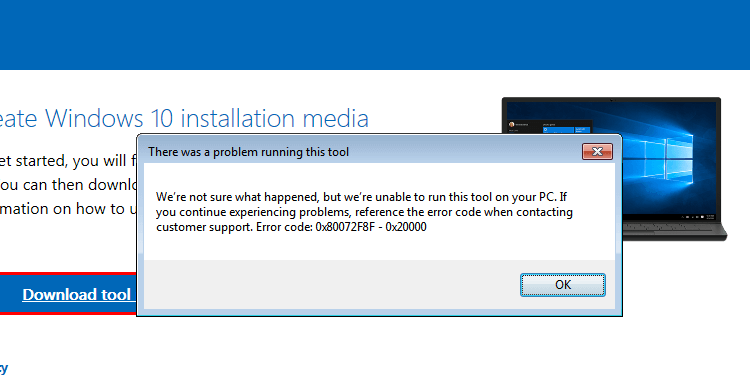
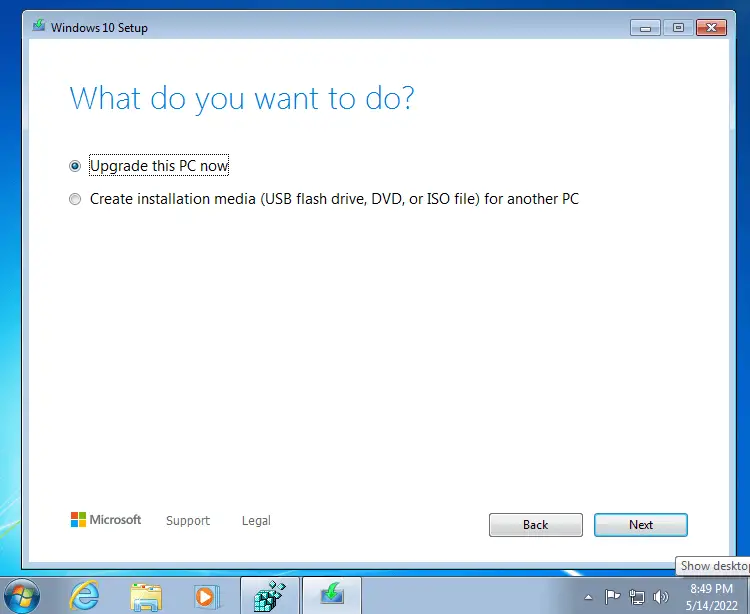
A lot of Windows users are not able to upgrade their Windows Operating System using the Media Creation Tool. When the run the application, the following error pops up.
There was a problem running this tool
We’re not sure what happened, but we’re unable to run this tool on your PC. If you continue experiencing problems, reference the error code when contacting customer support, Error code: 0x80072F8F – 0x20000
In this post, we will be talking about the 0x80072F8F – 0x20000 Windows Upgrade error and see what you can do to resolve it.

What does Error Code 0x80072f8f 0x20000 mean?
Error Code 0x80072f8f 0x20000 is a Media Creation Tool error and it appears when a user tries to run the tool to upgrade their OS. It happens because of various reasons, it can be a glitch that can be resolved by restarting the system, or the tool requires administrative privileges or needs to be unblocked.
You may also face the error code in question if TLS or Transport Layer Security protocol is disabled. It is a security protocol and is used to designate encrypted connections to send data into the applications over the network.
There are various other reasons such as misconfigured registry, corrupted temporary files, etc. Let us go to the troubleshooting guide to resolve this issue.
If you are facing Fix 0x80072F8F – 0x20000 Windows Upgrade error, try the following solutions.
- Run the Media Creation Tool as an administrator
- Unblock Media Creation Tool
- Move Media Creation Tool to the Desktop and try
- Delete Software Distribution Folder
- Edit Registry
- Enable TLS
- Troubleshoot in Clean Boot
Let us talk about them in detail.
1] Run the Media Creation Tool as an administrator
Let us start by running the Media Creation Tool as an administrator. Just right-click on the tool and then select Run as administrator. You will see a UAC box asking you to confirm your action, so, click on Ok. Now, you can just use the tool normally and upgrade.
2] Unblock Media Creation Tool
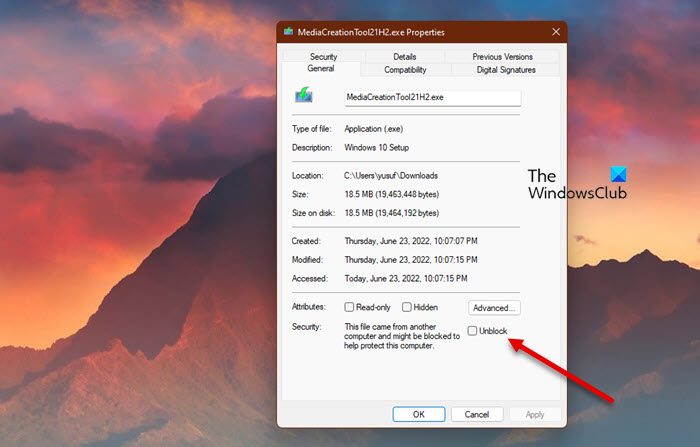
Some users were able to resolve the issue by just unblocking the Media Creation Tool. So, you should try to do the same and see if it works for you. Follow the prescribed steps to unblock Media Creation Tool.
- Right-click on the Media Creation Tool and select Properties.
- Make sure you are on the General tab and tick Unblock.
- Click Apply > Ok.
Now, try running the tool and see if that helps.
3] Move Media Creation Tool to the Desktop and try
For some users, the solution was as simple as moving the downloaded Media Creation Tool to the Desktop. You can also try this, as it won’t take much of your time. Just right-click on the Media Creation Tool and select Copy, go to your Desktop, and hit Ctrl + V to paste the file. Or, drag the tool from your File Explorer to the Desktop in the right panel. This will do the job for you.
4] Delete Software Distribution Folder

The Software Distribution Folder contains temporary files that can interfere with the process and cause the error code in question. We are going to clear the content of that folder and see if that works.
First of all, open Command Prompt as an administrator and run the following command.
net stop wuauserv
net stop bits
Now browse to the C:\Windows\SoftwareDistribution\Download folder and delete all the files and folders inside. You can hit Ctrl + A to select all the content and then Ctrl + D to delete them.
Now in the Command Prompt windows, type the following commands one at a time, and hit Enter:
net start wuauserv
net start bits
Finally, execute the following command.
wuauclt.exe /updatenow
Now, you can restart your computer and run the Media Creation Tool. Hopefully, it will work this time.
5] Edit Registry
If flushing out the Software Distribution folder didn’t work, let us edit registries and see if that helps. For some users, the issue was caused by misconfigured Registry Editor and was easily solved by the following steps.
Open Registry Editor by searching it out of the Start Menu.
Navigate to the following location.
Computer\HKEY_LOCAL_MACHINE\SOFTWARE\Microsoft\Windows\CurrentVersion\WindowsUpdate\Auto Update
Right-click on the empty space, and select New > DWORD (32-bit) Value.
Name it AllowOSUpgrade and set the Value data to 1.
Save the changes by clicking Ok.
Finally, restart your computer and try running Media Creation Tool. Hopefully, this time, you will be able to upgrade.
6] Enable TLS
TLS or Transport Layer Security is protocol and it is necessary to run the tool. If the protocol is disabled, you may see the error code in question when trying to upgrade your OS with Media Creation Tool. So, let’s enable it and see if that helps.
Before moving forward, you should make a backup of your Registry if something goes wrong. Once registries are backed up, open Notepad and paste the following content.
Windows Registry Editor Version 5.00

[HKEY_LOCAL_MACHINE\SOFTWARE\Microsoft\Windows\CurrentVersion\Internet Settings\WinHttp]
"DefaultSecureProtocols"=dword:00000a00

[HKEY_LOCAL_MACHINE\SOFTWARE\Wow6432Node\Microsoft\Windows\CurrentVersion\Internet Settings\WinHttp]
"DefaultSecureProtocols"=dword:00000a00

[HKEY_LOCAL_MACHINE\SYSTEM\CurrentControlSet\Control\SecurityProviders\SCHANNEL\Protocols\TLS 1.1\Client]
"DisabledByDefault"=dword:00000000
"Enabled"=dword:00000001

[HKEY_LOCAL_MACHINE\SYSTEM\CurrentControlSet\Control\SecurityProviders\SCHANNEL\Protocols\TLS 1.2\Client]
"DisabledByDefault"=dword:00000000
"Enabled"=dword:00000001
Now, save the file with any name, but make sure to add .reg as the extension. It is better to save the file on the desktop and with an easy-to-remember name for easy access.
Finally, double-click on the file from the Desktop, and the registry will be added.
The only thing left now is to restart your computer and use the Media Creation tool.
6] Troubleshoot in Clean Boot
If nothing works, then we are going to perform Clean Boot. It will allow you to stop all other processes and just run this one. So, perform Clean Boot and manually enable processes. Once you know which app is the cause, you can easily remove it and resolve your problem.
Hopefully, now, you are able to use the Media Creation Tool to upgrade your PC.
Similar: Fix 0x80072F8F Windows Update, Activation and Microsoft Store Error
How do I fix error 0x80072f8f?
You can fix the Media Creation error code 0x80072f8f using the solutions mentioned here. But there are some other errors 0x80072f8f. You can check our guide on how to resolve the 0x80072F8F errors for Windows Update, Activation, and Microsoft Store. We have solutions that will fix your error easily.
Also Read: Windows Media Creation Tool not working.
When you attempt to upgrade to Windows 10 from a Windows 7/8 computer using Microsoft’s Media Creation Tool, the error 0x80072F8F - 0x20000 may appear. The full error message verbatim is below:
There was a problem running this tool

We're not sure what happened, but we're unable to run this tool on your PC. If you continue experiencing problems, reference the error code when contacting customer support. Error code: 0x80072F8F - 0x20000
Let’s see how to fix this error on Windows 7 and Windows 8.
Important: Information in this article (and the registry fix) is for Windows 7 SP1 and Windows 8 systems only. They don’t apply to Windows 8.1 and higher!
Cause
The error 0x80072F8F - 0x20000 happens because the Media Creation Tool uses the TLS 1.2 Protocol, but the protocol is disabled by default on Windows 7 and Windows 8 computers. By default, only SSL3 and TLS1 are enabled in Windows 7 and Windows 8. On Windows 8.1 and Windows 10, SSL3, TLS1.0, TLS1.1, and TLS1.2 are enabled by default.
To resolve the Media Creation Tool Error 0x80072F8F – 0x20000 error on Windows 7 and Windows 8 computers, enable the TLS 1.1 and TLS 1.2 protocols. Follow these steps to do so:
Method 1: Enable TLS 1.1 and TLS 1.2 via the registry (Windows 7 & 

- Make sure your system is fully updated.
- Open Notepad.
- Copy the following lines into Notepad.
Windows Registry Editor Version 5.00

[HKEY_LOCAL_MACHINE\SOFTWARE\Microsoft\Windows\CurrentVersion\Internet Settings\WinHttp]
"DefaultSecureProtocols"=dword:00000a00

[HKEY_LOCAL_MACHINE\SOFTWARE\Wow6432Node\Microsoft\Windows\CurrentVersion\Internet Settings\WinHttp]
"DefaultSecureProtocols"=dword:00000a00

[HKEY_LOCAL_MACHINE\SYSTEM\CurrentControlSet\Control\SecurityProviders\SCHANNEL\Protocols\TLS 1.1\Client]
"DisabledByDefault"=dword:00000000
"Enabled"=dword:00000001

[HKEY_LOCAL_MACHINE\SYSTEM\CurrentControlSet\Control\SecurityProviders\SCHANNEL\Protocols\TLS 1.2\Client]
"DisabledByDefault"=dword:00000000
"Enabled"=dword:00000001
- Save the file with a .reg extension — e.g.,
enable_tls.reg - Double-click the
enable_tls.regfile to apply the settings into the registry. Click Yes when asked for confirmation. - Download the KB3140245 package (TLS 1.1/1.2 enablement update) from Microsoft and install it.
- Restart Windows.
- Download registry files: If you wish to download premade registry file(s), download enable-tls.zip. Unzip and run the enclosed file enable_tls.reg. To reverse/undo the setting to Windows 7/8 defaults, run the
undo.regregistry file.
(Credits to Markus for the fix.)
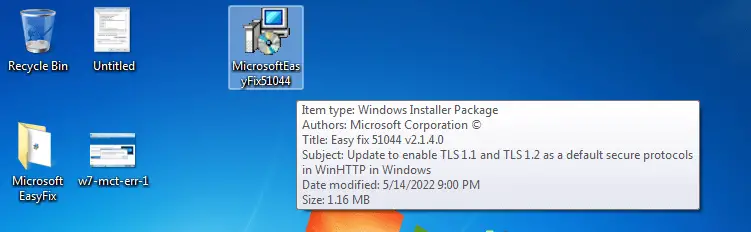
Method 2: Easy Fix (for Windows 7)
The above registry fix was created incorporating the suggestions in the Microsoft article titled Update to enable TLS 1.1 and TLS 1.2 as default secure protocols in WinHTTP
The article talks about the Microsoft Update with will enable TLS 1.1 and TLS 1.2 support via KB3140245 package. Here are the instructions:
- Download the KB3140245 package. Don’t run it yet.
- Download the “Easy Fix” executable via the above link (direct download) and run it. The fix will create the
DefaultSecureProtocolsregistry value which is a prerequisite for the Microsoft update. - Now run the KB3140245 .msi package you downloaded in Step 1.
This automatically enables TLS 1.1 and TLS 1.2 on the computer.
Re-run the Media Creation Tool now. It should work now!
Editor’s note
Note that the Easy Fix sets the “DefaultSecureProtocols” registry value only; it doesn’t write to the SCHANNEL registry location. But the manual registry fix in “Method 1” above does both! So, if you’ve explicitly disabled the TLS 1.1 and TLS 1.2 protocols via the SCHANNEL registry modification (e.g., by using the nisudf.reg registry fix to resolve a game/server connectivity issue), then the “Easy Fix” tool won’t help. You need to use “Method 1” in that case.
One small request: If you liked this post, please share this?
One «tiny» share from you would seriously help a lot with the growth of this blog.
Some great suggestions:
- Pin it!
- Share it to your favorite blog + Facebook, Reddit
- Tweet it!
So thank you so much for your support. It won’t take more than 10 seconds of your time. The share buttons are right below. 
Ramesh Srinivasan is passionate about Microsoft technologies and he has been a consecutive ten-time recipient of the Microsoft Most Valuable Professional award in the Windows Shell/Desktop Experience category, from 2003 to 2012. He loves to troubleshoot and write about Windows.
Ramesh founded Winhelponline.com in 2005.
Contents
- What Causes the Windows Media Creation Tool Error Code 0x80072f8f – 0x20000?
- How to Fix Error Code 0x80072f8f 0x20000 on Windows 10/11 or Windows 7
- Enable TLS 1.1 and TLS 1.2
- Delete the Software Distribution Folder
- Perform a Clean Boot
- Use the Windows ISO File
- Conclusion

Microsoft offers different ways to upgrade your Windows OS to the latest version. Since the introduction of Windows 11, users have been making the move to the new OS in numbers.
That said, some Windows 7 users are still making the switch to Windows 10 after Microsoft ended support for the former.
You can upgrade through the Windows Update client, the Windows Update assistant or by using the Windows ISO file.
However, one of the common ways to upgrade Windows, especially from Windows 7 to 10, is using the Media Creation tool.
Related: How to get and use Windows 10 Media Creation Tool
But users have been complaining about seeing error code 0x80072f8f-0x20000 when trying to use the tool.
The common cause of the error code, especially in Windows 7, is the lack of support for TLS 1.1 and TLS 1.2.
In other cases, the error could be showing up because of the software distribution folder or application conflicts.
How to Fix Error Code 0x80072f8f 0x20000 on Windows 10/11 or Windows 7
While the issue mostly occurs on Windows 7, you may also experience it on Windows 10 when upgrading to 11.
Follow the guides below to get rid of the problem for good.
Enable TLS 1.1 and TLS 1.2
We are putting this solution at the top because it helped many users get rid of the error.
The Media Creation Tool communicates with servers that use TLS (Transport Layer Security) 1.1 and TLS 1.2. That’s because the tool has to download the setup files required for the upgrade from Microsoft’s servers.
But as it turns out, these security protocols might be disabled by default on your current Windows version.
So, the error code 0x80072f8f 20000 could be showing up because your PC can’t properly communicate with Microsoft’s servers.
Thankfully, you can enable TLS 1.1 and TLS 1.2 by making changes to the system registry.
Important: Before you begin, note that the system registry is a sensitive part of your operating system and applying the wrong changes could cause permanent damage. So, make sure you follow the steps in this guide carefully.
You can create a backup of the entire registry to be on the safe side. Here’s how to back up the entire registry:
- Click on the Start button.
- Go to the search box and type “regedit.exe.”
- You can also open the Run dialog box (Win + R), type “regedit.exe,” and hit the Enter key.
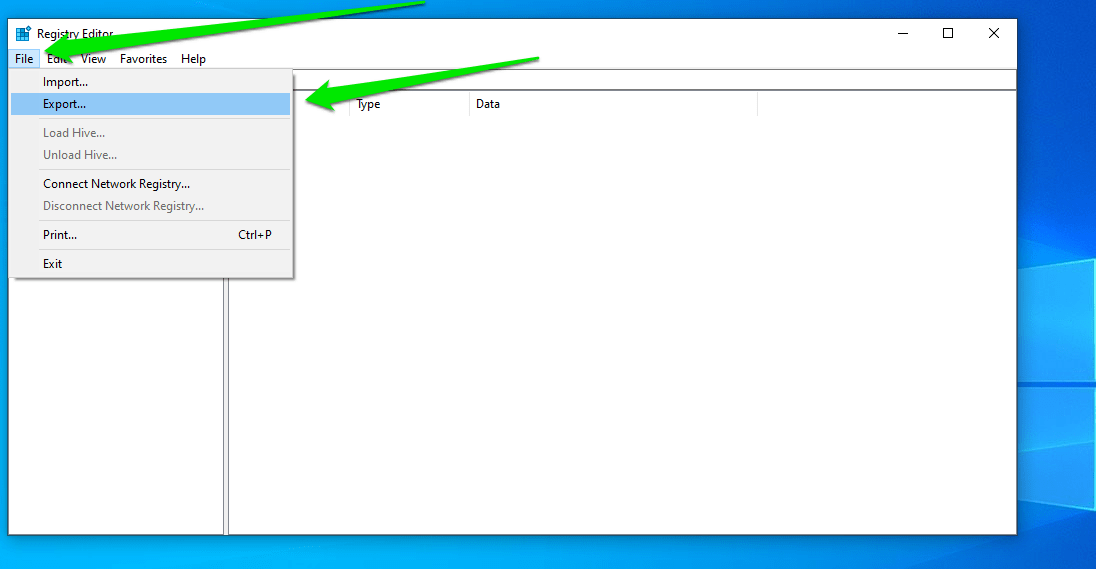
- After the Registry Editor opens, click on File in the top-left corner and select Export.

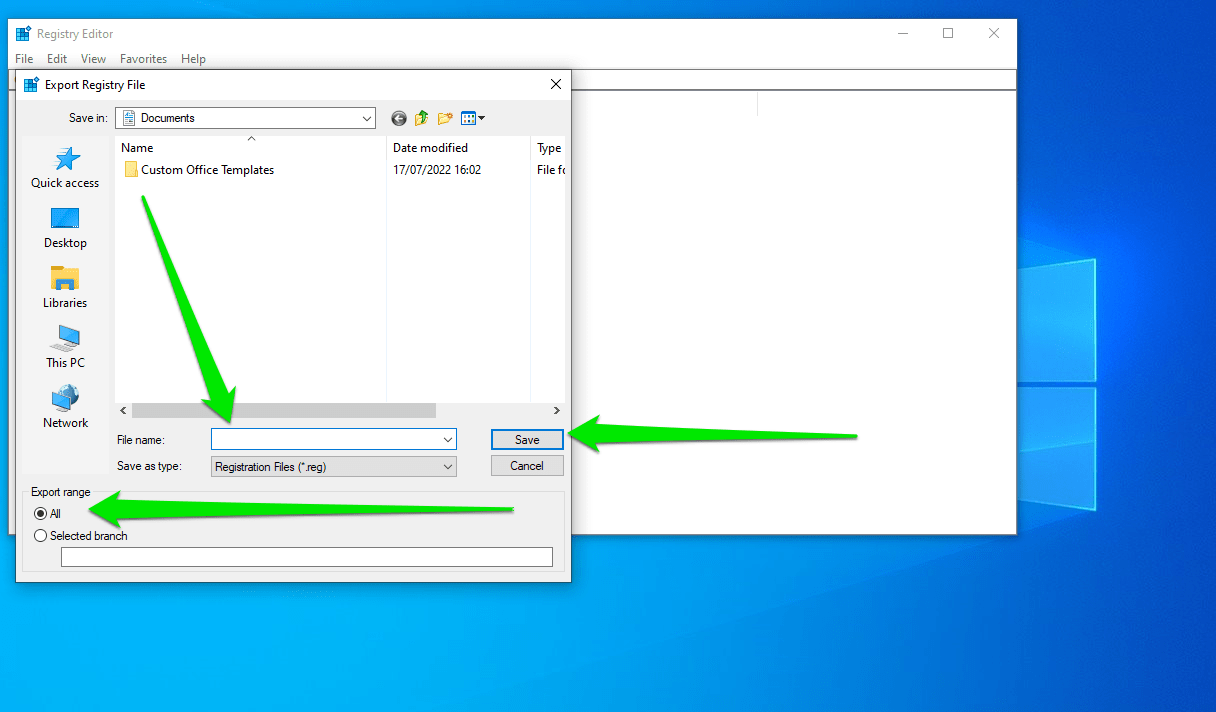
- When the Export Registry File dialog window shows up, choose a location to save the backup, enter a name for the backup file in the File Name box, and select All under Export Range.
- Click on the Save button.
That’s how to backup the registry. Now, follow these steps to enable TLS 1.1 and TLS 1.2:
- Open the Registry Editor.
- To enable TLS 1.1, head to this registry location and follow the subsequent steps:
HKEY_LOCAL_MACHINE\SYSTEM\CurrentControlSet\Control\SecurityProviders\SCHANNEL\Protocols\TLS 1.1\Client
Now, go to the right side of the window and create the DisabledByDefault DWORD. To do that, right-click the empty field and select New > DWORD (32-bit) Value. Change the name of the new DWORD to DisabledByDefault.
Next, double-click the DWORD and set its value to 0.
3. Go to this registry location and follow the subsequent steps to enable TLS 1.2:
HKEY_LOCAL_MACHINE\SYSTEM\CurrentControlSet\Control\SecurityProviders\SCHANNEL\Protocols\TLS 1.2\Client
Note: If the tree ends at Protocols, create the TLS 1.2 and Client keys under the Protocols key.
Create the DisabledByDefault DWORD and set its value to 0.
4. Restart your computer and run the Media Creation Tool again.
Delete the Software Distribution Folder
The software distribution folder is used by the Windows Update client to temporarily store files required for Windows updates. These files are stored when an update is pending for installation or download.
Sometimes, the file in the folder causes conflicts and prevents the client from completing an update.
Since the Media Creation Tool has to download setup files required for upgrading Windows, the issue might be related to the software distribution folder. That’s because Windows may want to install pending updates before moving forward with the upgrade.
As such, deleting the folder may fix the problem.
Follow these steps:
- Open your file explorer and go to C:\Windows\SoftwareDistribution\Download.
- Select every file and sub folder in the folder and delete them.
- Next, launch the Command Prompt and enter the following command: wuauclt.exe /updatenow
- Hit the Enter key and try running the setup again.
Perform a Clean Boot
Windows error code 0x80072f8f – 0x20000 may also be appearing due to application conflicts. Some programs and services that launch during startup may be responsible for triggering the error when you run the Media Creation Tool.
You can resolve the problem by disabling those applications and running only minimal programs at Windows startup. This process is called a clean boot.
Follow these steps:
- Open the Start menu and search for “msconfig.”
- Click System Configuration in the search results.
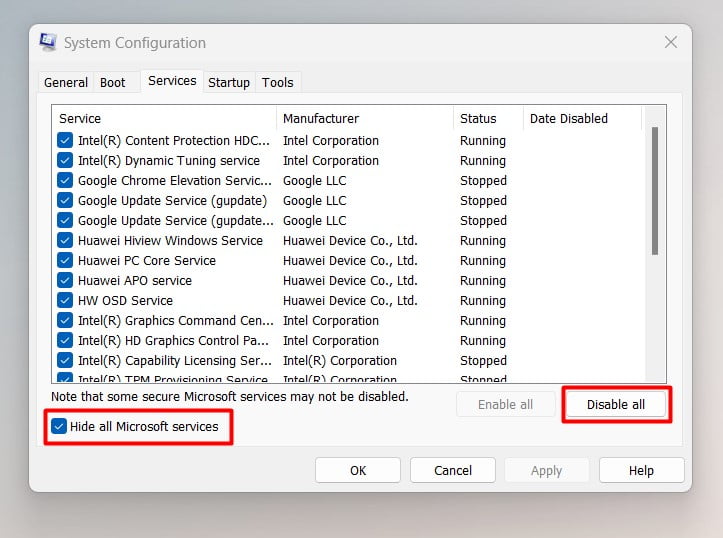
- Once the System Configuration dialog window appears, head to the Services tab.
- Check the “Hide all Microsoft services” box and click on the Disable All button.

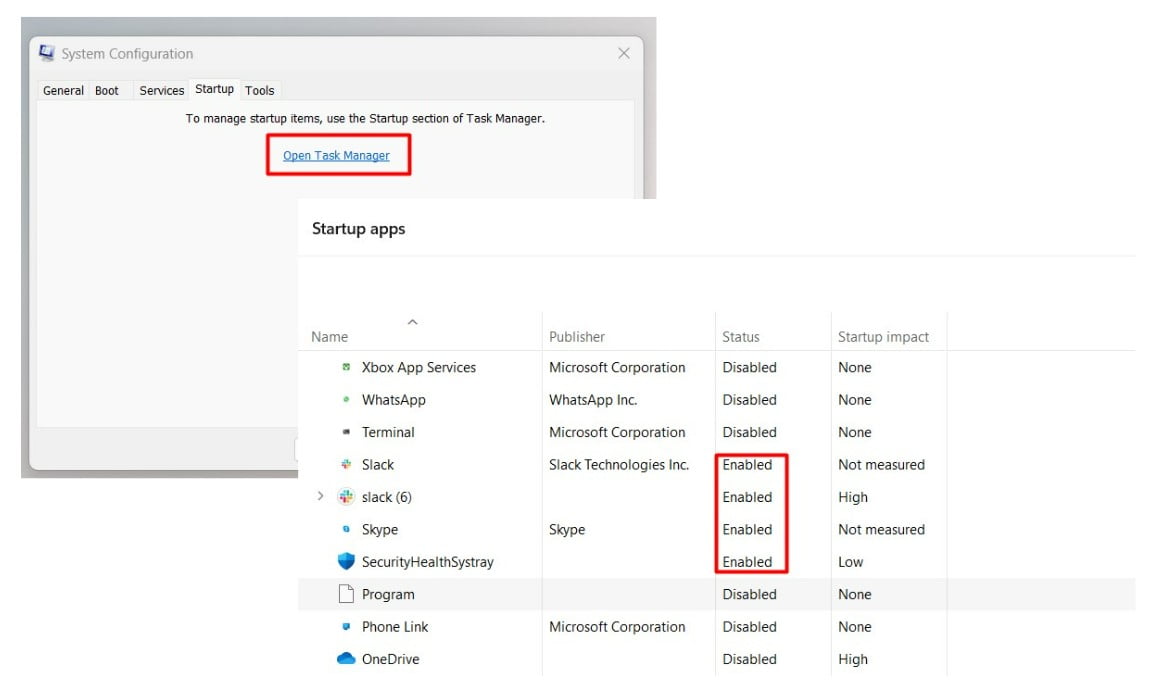
- Next, switch to the Startup tab and select Open Task Manager.
- Once the Startup tab of the Task Manager opens, select each enabled program and click on Disable.

- Return to the System Configuration dialog and click on the OK button.
- Restart your computer and try upgrading your operating system.
Related: How to perform a clean boot in Windows 10?
Use the Windows ISO File
As we mentioned earlier, the Media Creation Tool has to download the setup file to upgrade your PC. But for some reason, it keeps showing error code 0x80072f8f – 0x20000.
If none of the methods above helped you fix the problem, another alternative is to download the Windows setup file yourself and run the upgrade.
You should also consider downloading the ISO (Windows setup) to your mobile device and transfer it to your computer. This way, the process won’t be botched by the error.
So, follow these steps:
1. On your mobile browser, go to the Microsoft download page and download the ISO for Windows 10. A simple Google search will take you to the page.
Note that you need at least 6 GB of free storage on your mobile device and computer.
2. After downloading the ISO file, transfer it to your computer and extract it using a program such as WinZip or 7zip. Some Windows versions can mount the ISO file as a virtual DVD.
3. Next, open the extracted – or mounted – folder and double-click on the Setup file.
4. Follow the subsequent instructions to complete the upgrade.
You can choose to keep your files and applications during the upgrade or remove everything.
If you still see an error after choosing to keep your files and programs, consider the “Remove everything” option. But before you do that, backup your important files to an external drive.
Conclusion
With the error code 0x80072f8f – 0x20000 Windows 10/11 or Windows 7 fails to upgrade and you may be left with the option of installing Windows from scratch.
However, the guides above will help you get rid of the error for good.
You can also use a PC repair tool to find and fix errors that may be triggering the problem. The tool also helps you prevent issues from occurring in the future.
The Windows update error code “0x80072F8F – 0x20000” can be caused due to different reasons, ranging from an unstable internet connection to an issue with the Registry. Here are the…
The Microsoft Media Creation Tool is a utility that allows you to upgrade your existing Windows operating system, download ISO files, or make bootable CDs or USB flash drives. However, users have often reported the following error message pop-up during the upgrade process, regardless if they are upgrading to Windows 10 from Windows 7, or to Windows 11 from an older OS:
There was a problem running this tool.
We're not sure what happend, but we're unable to run this tool on your PC. If you continue experiencing problems, reference the error code when contacting customer support. Error code: 0x80072F8F - 0x20000

The error gives a useless code “0x80072F8F – 0x20000” and most of us do not understand what it means. Today, we are going to address this error code, learn why it appears, and then continue to see how to mitigate it and continue with the OS upgrade.
Table of contents
- Causes of 0x80072F8F — 0x20000 Error
-
How to Fix Error Code 0x80072F8F — 0x20000
- Run Media Creation Tool as Administrator
- Check Minimum System Requirements
- Confirm Stable Internet Connection
- End Conflicting Apps and Programs
- Free Up Disk Space
- Restart Windows Services
- Allow OS Upgrade from Windows Registry
-
Enable TLS 1.1 and 1.2
- Enable TLS 1.1 and 1.2 on Windows 11, 10
- Enable TLS 1.1 and 1.2 on Windows 7
- Perform a Clean Boot
- Clear SoftwareDistribution Folder
- Closing Thoughts
Causes of 0x80072F8F – 0x20000 Error
The aforementioned error can occur due to different reasons, such as incompatibility between the operating system and your PC’s hardware, malfunctioning of critical OS services, and such. Here is a list of the potential causes for the Media Creation Tool to throw the error code “0x80072F8F – 0x20000”:
- Inadequate privileges – Your user account may not have the administrative rights needed to install a new operating system or upgrade the existing one on your computer.
- System does not meet the hardware requirements – The minimum requirements are a necessity for the OS to install and function properly. If your computer does not meet these requirements, you may not be able to install it.
- TLS 1.1 and 1.2 are turned off – In certain scenarios, you may see the “0x80072F8F – 0x20000” error code if the TLS encryption 1.1 and 1.2 are turned off. Enabling them might fix the issue.
- Faulty internet connection – An unstable or slow internet connection may result in an error while the MCT is trying to download the OS image.
- Dysfunctional Windows services – Windows services are required to function normally to be able to install/upgrade the operating system. Corrupted services may result in the MCT being unable to do its task and throwing the error “0x80072F8F – 0x20000.”
- Conflicting apps and programs – Application conflicts can sometimes prevent an app to function properly. This is an easy fix by closing any conflicting apps and programs.
Since we know the reasons for the error code “0x80072F8F – 0x20000” in the Media Creation Tool, it would be easier to rectify them and solve the problem.
How to Fix Error Code 0x80072F8F – 0x20000
We already know that the said error can occur due to multiple different reasons. To address them, perform the following fixes in the given chronological order which go from less aggressive to more aggressive mitigation approach.
Run Media Creation Tool as Administrator
As we mentioned earlier, to make significant changes to your computer, you must have the required rights and privileges. The error may have occurred because your user account does not have the administrative rights needed to upgrade your operating system.
Therefore, you must run the Windows Media Creation Tool with administrative privileges, and if the issue occurred because of a lack of privileges, it will be resolved.
To launch the MCT with administrative privileges, right-click on the file and then click “Run as administrator” from the context menu.

Check Minimum System Requirements
If your system does not meet the minimum hardware requirements for the OS you are upgrading to, it is likely that you will encounter the “0x80072F8F – 0x20000” error code.
Below are the minimum hardware requirements for Windows 10:
- Processor: 1 gigahertz (GHz) or faster processor or SoC
- RAM: 1 gigabyte (GB) for 32-bit or 2 GB for 64-bit
- Hard disk space: 16 GB for 32-bit OS or 20 GB for 64-bit OS
- Graphics card: DirectX 9 or later with WDDM 1.0 driver
- Display: 800 x 600
The following are the minimum hardware requirements for Windows 11:
- Processor: 1 gigahertz (GHz) or faster with two or more cores.
- Memory: 4 gigabytes (GB) or greater.
- Storage: 64 GB or greater available disk space.
- Graphics card: Compatible with DirectX 12 or later, with a WDDM 2.0 driver.
- System firmware: UEFI, Secure Boot capable.
- TPM: Trusted Platform Module (TPM) version 2.0.
- Display: High definition (720p) display, 9″ or greater monitor, 8 bits per color channel.
Confirm that your system matches the requirements for the operating system that you are installing or upgrading to using MCT.
Confirm Stable Internet Connection
When upgrading your OS or downloading an ISO image using the Media Creation Tool, it needs a stable internet connection to download the right files from Microsoft servers. I the internet connection is unstable and disruptive, it can result in the error “0x80072F8F – 0x20000.”
Therefore, make sure that you have a stable internet connection. Here are a few posts that you can use to increase your download speeds:
- Increase Internet Download Speed
- Use Wi-Fi And Ethernet At The Same Time
- Limit Reservable Bandwidth
End Conflicting Apps and Programs
The “0x80072F8F – 0x20000” error code does not exactly state what the problem is, but one of them can be a conflicting app or software. If you are experiencing the error while using the Media Cration Tool, we recommend that you terminate all unnecessary background apps and processes and then try upgrading your OS again.
You can close the conflicting apps and programs simply by pressing the cross button at the top-right corner of the window, or better yet, end the task directly from the Task Manager.
Open the Task Manager using the CTRL + Shift + Esc shortcut keys, right-click on an app/process in the Processes tab, and then click “End task.”

Free Up Disk Space
It may be possible that there is not enough room on the Windows partition to download new system files for the Media Cration Tool. This issue can result in a number of errors, including the “0x80072F8F – 0x20000” error code.
Make sure that there is ample free space on your C (primary partition) drive. Here are 13 ways to free p disk space.
Restart Windows Services
Sometimes problematic Windows services can be the culprit behind the “0x80072F8F – 0x20000” error. In this case, any service relating to Windows Update can cause the error. Try giving these services a restart and check if it resolves the issue.
-
Open an elevated Command Prompt and run the following cmdlets to stop the following services:
- Windows Update
- Background Intelligent Transfer Service
- Application Identity
- Cryptographic Services
net stop bits
net stop wuauserv
net stop appidsvc
net stop cryptsvc
Stop services related to Windows Update -
When stopped, run the following commands to start them again:
net start bits
net start wuauserv
net start appidsvc
net start cryptsvc
Start the services related to Windows Update -
Now re-run MCT and check if you still encounter the error.


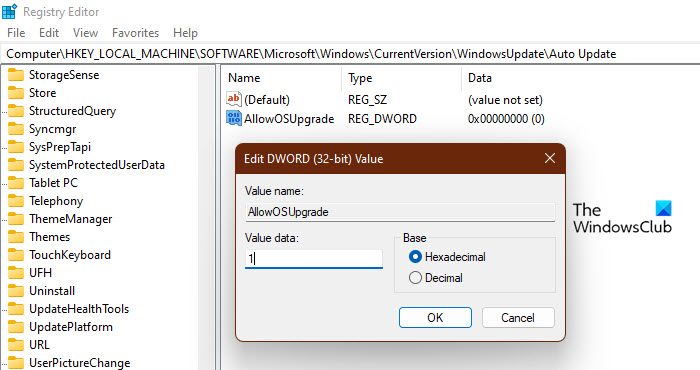
Allow OS Upgrade from Windows Registry
It may be possible that a Windows policy is blocking the upgrade. You can change this setting and allow your OS to be upgraded through the Windows Registry. Here is how:
Note: Misconfiguration of critical values in the system’s registry could be fatal for your operating system. Therefore, we insist that you create a system restore point before proceeding forward with the process.
You can also use our top selection of disk imaging and backup software so you never lose your data or operating system again.
-
Open the Windows Registry Editor by typing in “regedit” in the Run Command box.

Open the Registry Editor -
Paste the following in the navigation bar and hit Enter for quick navigation:
Computer\HKEY_LOCAL_MACHINE\SOFTWARE\Microsoft\Windows\CurrentVersion\WindowsUpdate\Auto Update

Navigate to the “Auto Update” key -
Create a new DWORD by the name “AllowOSUpgrade.”
Create DWORD AllowOSUpgrade Right-click the “Auto Update” key, expand New and then click DWORD. Name the new DWORD “AllowOSUpgrade.”
-
Double-click the DWORD “AllowOSUpgrade” and set its Value Data to “1”.
Change Value Data for AllowOSUpgrade to “1” -
Restart the computer for the changes to take effect.


Once the computer restarts, run the Windows MCT again and see if the issue has been resolved and the error message has gone away. If it still exists, perform the remaining fixes given below.
Enable TLS 1.1 and 1.2
As we mentioned at the start of the article, the “0x80072F8F – 0x20000” error can occur when TLS 1.1 and 1.2 are disabled on your computer. Try enabling them on your PC using the following methods (respective to your operating system).
Enable TLS 1.1 and 1.2 on Windows 11, 10
The following steps can be used to enable TLS 1.1 and 1.2 on Windows 10 and Windows 11:
-
Open the Internet Properties applet by typing in “inetcpl.cpl” in the Run Command box.

Open the Internet Properties applet -
Switch to the Advanced tab.
-
Scroll down and check the boxes with “Use TLS 1.1” and “Use TLS 1.2.”

Enable TLS 1.1 and 1.2 in Windows 10, 11 -
Click Apply and Ok to implement the changes.


Now check to see if you still encounter the error when using the Media Creation Tool.
Enable TLS 1.1 and 1.2 on Windows 7
Windows 7 requires a different method to enable TLS 1.1 and 1.2. The steps below show you how to create a .REG Windows Registry file and then use it to add the necessary keys and values in Windows Registry to enable TLS 1.1 and 1.2:
Note: As always, it is recommended that you create a system restore point before proceeding forward to manipulate the Windows Registry.
-
Begin by pasting the following in Notepad on your PC:
Windows Registry Editor Version 5.00 [HKEY_LOCAL_MACHINE\SOFTWARE\Microsoft\Windows\CurrentVersion\Internet Settings\WinHttp] "DefaultSecureProtocols"=dword:00000a00 [HKEY_LOCAL_MACHINE\SOFTWARE\Wow6432Node\Microsoft\Windows\CurrentVersion\Internet Settings\WinHttp] "DefaultSecureProtocols"=dword:00000a00 [HKEY_LOCAL_MACHINE\SYSTEM\CurrentControlSet\Control\SecurityProviders\SCHANNEL\Protocols\TLS 1.1\Client] "DisabledByDefault"=dword:00000000 "Enabled"=dword:00000001 [HKEY_LOCAL_MACHINE\SYSTEM\CurrentControlSet\Control\SecurityProviders\SCHANNEL\Protocols\TLS 1.2\Client] "DisabledByDefault"=dword:00000000 "Enabled"=dword:00000001 -
Save the file with the “.reg” extension.

Save the .REG file Set the name of the file of your choosing and suffix it with “.reg.” Set the “Save as type” to “All files,” and then save the file.
This will create a Windows Registry file.
-
Run the Registry file.
-
Click “Yes” when asked for confirmation.
-
When the file has been executed successfully, restart the computer.

Once it reboots, TLS 1.1 and 1.2 should be enabled on your Windows PC. Now check to see if the issue persists.
Perform a Clean Boot
A clean boot is a boot process that temporarily blocks unnecessary background apps and processes from interfering with critical system processes. This is an excellent method to rule out the effect of any apps or programs recently installed, after which you began encountering an issue with the Media Creation Tool.
Here are the steps to perform a clean boot on Windows:
-
Open the System Configuration applet by typing in “msconfig” in the Run Command box.
Open the System Configuration applet -
In the General tab, select “Selective startup” and uncheck “Load startup items.”

Perform selective startup -
Now switch to the Services tab, check “Hide all Microsoft services,” then click “Disable all.”
Disable all irrelevant services -
Now click Apply and Ok to save the changes.
-
Restart the computer and re-run the Windows MCT to check if the problem is resolved.


If you do not see the “0x80072F8F – 0x20000” anymore, it means that a process or a service was interfering with it. We suggest that you continue to upgrade your operating system in the “clean boot” mode and once it is upgraded, you can revert to the “Normal startup” from the System Configuration applet.

Clear SoftwareDistribution Folder
The SoftwareDistribution folder can be found in C:\Windows. This folder contains temporary files within a sub-folder (download) that are required to install a Windows update. Quite often, a Windows upgrade fails to install and experiences an error code because of these corrupted files.
This can cause the “0x80072F8F – 0x20000” error during an upgrade using the Windows MCT.
Follow these steps to successfully clear the SoftwareDistribution folder:
-
Launch an elevated Command Prompt.
-
Run the following cmdlets to stop the “Windows Update” and the “Background Intelligent Transfer Service” services.
Net Stop wuauserv
Net Stop bits
Stop dependent services Do not close the Command Prompt.
-
Now navigate to the following path using File Explorer:
C:\Windows\SoftwareDistribution
-
Select everything by pressing the CTRL + A hotkeys, and then click Delete.
Delete everything in the SoftwareDistribution folder Alternatively, you can also run the following cmdlet in Command Prompt to clear out the SoftwareDistribution folder silently:
del c:\windows\SoftwareDistribution /q /s -
(Conditional) If asked for administrative permission, click Continue.
Provide administrative privileges -
Now run the following cmdlets in the Command Prompt to start the stopped services.
Net Start wuauserv
Net Start bits
Start the dependent services -
(Optional) Restart the computer


Now that all prior Windows update files have been removed, room has been created for new ones. Try to upgrade your system again using the Media Creation Tool.
Closing Thoughts
This article lists all the effective methods to fix the error code “0x80072F8F – 0x20000” when trying to upgrade your operating system using the Windows Media Creation Tool. We certainly hope that these worked for you.
If you are still experiencing the issue, then you can try downloading the ISO file instead of a direct upgrade or creating a bootable USB flash drive using that ISO, and then upgrading your OS. If these don’t work either, then we suggest that you try downloading the ISO image on another PC and then importing it to the computer that you want to upgrade.
.png "Media Creation Tool Error 0x80072F8F – 0x20000 in Windows 7")
Media Creation Tool
Error 0x80072F8F – 0x20000 in Windows 7
You will face this Error when you trying to Upgarde your Windows 7 to Windows 10 using Media Creation Tool provided by Microsoft and you will this Erro Code- 0x80072F8F — 0x20000
Complete Error Message:
There was a problem running this tool
We’re not sure what happened, but we’re unable to run this tool on your PC. If you continue experiencing problems, reference the error code when contacting customer support. Error code: 0x80072F8F — 0x20000
Root Cause of this issue:
Media Creation Tool uses the TLS 1.2 Protocol, but the protocol is disabled by default on Windows 7 and Windows 8 computers. By default, only SSL3 and TLS1 are enabled in Windows 7 and Windows 8. On Windows 8.1 and Windows 10, SSL3, TLS1.0, TLS1.1, and TLS1.2 are enabled by default.
To FIX this Issue Completely, follow below mention steps:
Important: Make sure you have installed Windows 7 Service Pack 1 (SP1) on your Computer as per your system type (32bit or 64bit):
Service Pack 1 (SP1) for Windows 7 is now available and this Service Pack is an update to Windows 7. This is the most important Upate and most important step.
Windows 7 Service Pack (SP1) make your computer more safer and more reliable to use.
Windows 7 Service Pack (SP1) includes new virtualization capabilities with Dynamic Memory and Microsoft RemoteFX.
Download and Install Windows 7 Service Pack 1 if you don’t have on your computer:
After that, follow the below mention steps:
Step 1- Download the “Easy Fix”
Step 2- Install Easy Fix
Step 3- Then Download the KB3140245 package
Step 4- Install KB3140245.msi package
Step 5- Restart your System
That’s It..Enjoy
Now you can easyly Upgrade your Windows 7 to Windows 10 without any Error.
Thank you.
Please check below mention Video for more details: