В очередной раз попытавшись распечатать документ через свой локальный (сетевой принтер), может увидеть ошибку печати с кодом 0x00000077. Принтер в Windows 10, вероятно, начал работать неправильно после обновления операционной системы или повреждения каких-то локальных файлов. Но наибольшая вероятность сводится к тому, что выбранный устройством портом просто закрыт. В любом случае, есть у нас одно решение, которое получило много положительных отзывов на форумах.
Один из вариантов сообщений:
Операция не может быть завершена (ошибка 0x00000077).
Система не поддерживает запрашиваемую команду.
Как убрать ошибку 0x00000077?
Вот, что вам нужно сделать, чтобы отступила ошибка печати 0x00000077 сетевого принтера:
- Нажимаем комбинацию Win + R, вводим в строку regedit и нажимаем Enter.
- Переходим по пути HKEY_LOCAL_MACHINE\SOFTWARE\Microsoft\Windows NT\CurrentVersion\Print\Providers\Client Side Rendering Print Provider\Servers.
- Удаляем записи в данной ветке реестра.
- Очищаем содержимое в папке HKEY_LOCAL_MACHINE\SOFTWARE\Microsoft\Windows NT\CurrentVersion\Print\Printers.
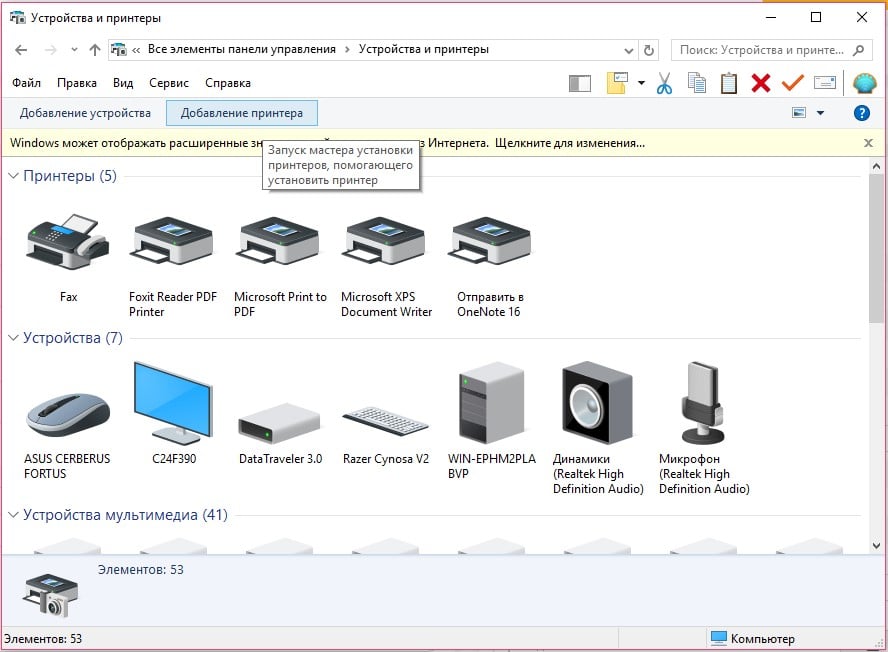
- Открываем «Панель управления», а затем – «Устройства и принтеры».
- Нажимаем на клавишу «Добавить принтер» и среди вариантов выбираем «Добавить локальный принтер».
- Жмем на кнопку «Создать новый порт», используем локальный порт.
- Указываем имя принтера, а затем путь в таком формате: \\(имя компьютера)\(имя принтера).
Обычно ошибка печати 0x00000077 уходит в результате данной процедуры, но не стоит исключать вероятность, что проблема с портами связана с брандмауэром или UAC. Рекомендуем на время отключить средства защиты и проверить, сработает ли инструкция еще раз. Желаем удачи!
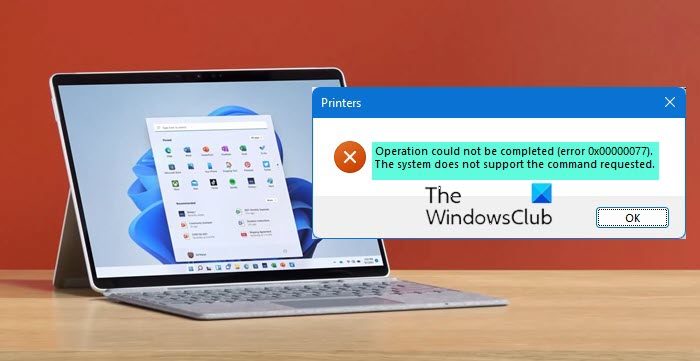
Several computer users have been complaining about experiencing Printer Error 0x00000077. When this error shows its ugly head, it tends to make it impossible for users to complete print jobs, and as such, they’ll continue to receive the error message:
Operation could not be completed (error 0x00000077). The system does not support the command requested.
Folks who are having problems with their printer where error code 0x00000077, must not worry because it is fixable. Just follow the steps we have laid out below and things should return to normal.
- Power down the printer and then On it
- If Optional printer updates are available, install them
- Run Printer Troubleshooter
- Reinstall the Printer software & driver
1] Power down the printer and then On it
It is possible to solve this issue by powering down the printer, and from there, unplug all connecting wires, and that includes the power cable. After you’ve done all of that, wait for a few seconds, then reattach all wires.
Finally, power on the printer and check if things are working in the way they should. If all goes well, error code 0x00000077 should now be a thing of the past.
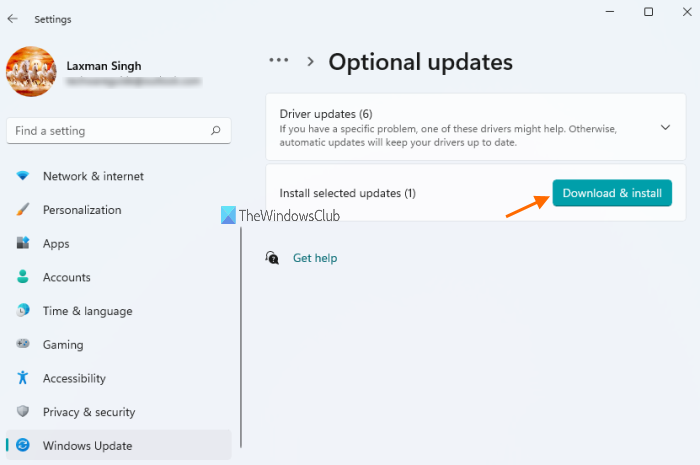
2] If Optional printer updates are available, install them
Optional updates are not very important in some situations, but they could be in this one. Therefore, you may need to download them.
Open the Settings app by pressing the Windows key + I, and right away the Settings app will appear.
The next thing you will want to do here is to scroll down to the bottom via the left panel and be sure to select Windows Update.
You will now want to select Advanced Options > Optional Updates. If there are any updates available, then please select them, and from there, click the Download and Install button, and that’s it.
All you have to do now is restart your Windows computer, then check if error code 0x00000077 is still being a nuisance.
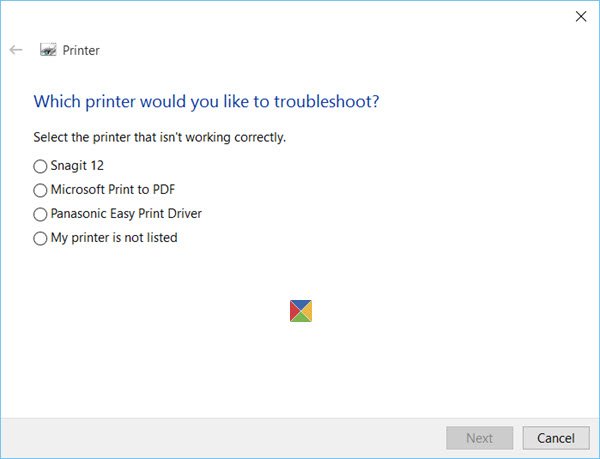
3] Run Printer Troubleshooter
Run the Printer Troubleshooter and see if it helps.
4] Reinstall the printer software and driver
In some cases, error code 0x00000077 is related to driver problems with your printer, so what can we do? Well, the best step here is to uninstall the software and drivers from the root level, then reinstall them.
- Open Windows Settings
- Select Apps > Apps and features
- Locate the Printer
- Click on the 3-dots and select Uninstall.
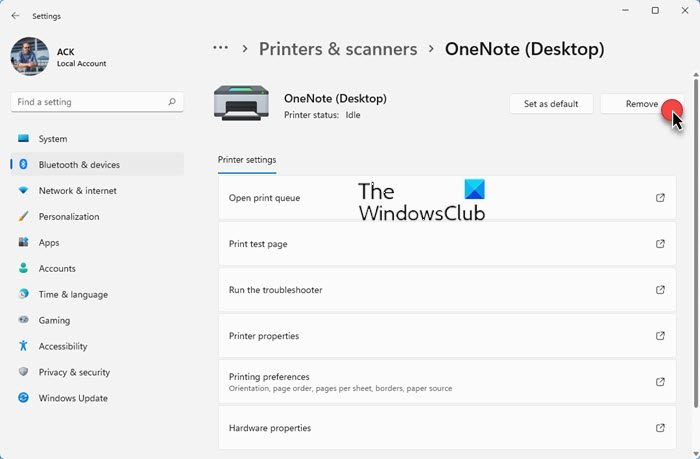
Next, you need to remove the printer.
- Open Windows Settings
- Select Bluetooth and devices > Printers and scanners
- Locate and open your Printer
- Click on the Remove button.
Restart your computer.
Finally, navigate to the official printer website and download the correct printer driver & software for your particular device. Once installed, everything including drivers should now work normally as intended.
let us know if this helped you fix the printer problem.
Read: Printer says Out of Paper but has Paper
How do I fix operation Cannot be completed?
- Press the Windows key + R to fire up the Run dialog box
- Type Regedit, then hit the Enter key to launch the Registry Editor
- Go to HKEY_CURRENT_USER \ Software \ Microsoft \ Windows NT \ CurrentVersion \ Windows
- Right-click on the Windows folder, then select Permissions
- Highlight the Administrators option, then be sure to check the Full Control box, and be certain to hit OK
- Highlight your username from here, then check the Full Control box, then click on OK
- Finally, you must delete the registry values known as LegacyDefaultPrinterMode, and UserSelectedDefault if they exist.
- Set y our default printer again then check to see if things are working fine.
How do I get my printer out of error mode?
In most situations, simply restarting both your printer and computer can be the only solution required to get your printer out of a state of error. All you have to do is power down your printer and computer completely, then leave them like that for a few minutes, and from there, restart them again. Finally, check to see if the printer is still experiencing errors.
What is a printer?
A printer is an electronic device that accepts text files and images from a connected computer and transfers such files to a medium, particularly, paper. The printer can be connected to a computer via wires or a wireless connection.
What are printer types?
At the moment, there are two types of printers, and they are usually categorized as 2D and 3D printers. 2D printers are capable of printing text and images onto paper, while 3D printers are designed for creating physical objects.
В очередной раз попытавшись распечатать документ через свой локальный (сетевой принтер), может увидеть ошибку печати с кодом 0x00000077. Принтер в Windows 10, вероятно, начал работать неправильно после обновления операционной системы или повреждения каких-то локальных файлов. Но наибольшая вероятность сводится к тому, что выбранный устройством портом просто закрыт. В любом случае, есть у нас одно решение, которое получило много положительных отзывов на форумах.
Один из вариантов сообщений:
Операция не может быть завершена (ошибка 0x00000077).
Система не поддерживает запрашиваемую команду.
Вот, что вам нужно сделать, чтобы отступила ошибка печати 0x00000077 сетевого принтера:
- Нажимаем комбинацию Win + R, вводим в строку regedit и нажимаем Enter.
- Переходим по пути HKEY_LOCAL_MACHINESOFTWAREMicrosoftWindows NTCurrentVersionPrintProvidersClient Side Rendering Print ProviderServers.
- Удаляем записи в данной ветке реестра.
- Очищаем содержимое в папке HKEY_LOCAL_MACHINESOFTWAREMicrosoftWindows NTCurrentVersionPrintPrinters.
- Открываем «Панель управления», а затем – «Устройства и принтеры».
- Нажимаем на клавишу «Добавить принтер» и среди вариантов выбираем «Добавить локальный принтер».
- Жмем на кнопку «Создать новый порт», используем локальный порт.
- Указываем имя принтера, а затем путь в таком формате: \(имя компьютера)(имя принтера).
Обычно ошибка печати 0x00000077 уходит в результате данной процедуры, но не стоит исключать вероятность, что проблема с портами связана с брандмауэром или UAC. Рекомендуем на время отключить средства защиты и проверить, сработает ли инструкция еще раз. Желаем удачи!
Поделиться в ВК
Поделиться в ОК
Поделиться на Facebook
Поделиться в Twitter
Недавно несколько пользователей жаловались на ошибку принтера 0x00000077 после обновления своей операционной системы до Windows 11. Эта ошибка также может возникнуть при попытке обновления до последней версии Windows 10 с более старых версий. В этом случае любое задание на печать не будет выполнено, и вы получите сообщение об ошибке. Эта ошибка также может возникнуть при первом тестировании принтера.
Operation could not be completed. (Error 0x00000077)
Какими бы ни были причины этого кода ошибки, мы рассмотрим их все одну за другой. Помимо знания причин этого, мы также рассмотрим шесть исправлений, которые должны решить эту проблему на ПК с Windows 11/10.
Что вызывает ошибку принтера 0x00000077?
Хотя эта ошибка может возникнуть из-за нескольких проблем, мы будем придерживаться наиболее вероятных из них. Скорее всего, эта ошибка произошла из-за этих причин —
- Ослабленные соединительные провода или силовые кабели
- После установки накопительного обновления
- Ожидающие обновления дополнительных драйверов
- Использование внешнего приложения безопасности
- Вы неправильно установили драйвера принтера
- Поврежденные записи реестра
Исправить ошибку принтера 0x00000077 в Windows 11/10
Если вы получаете код ошибки 0x00000077 при использовании принтера или печати документов, попробуйте эти исправления одно за другим. Мы предлагаем применять их в точном порядке, как указано ниже. Однако, если вы знаете причины его возникновения, вы также можете применить это конкретное решение.
1] Выключите принтер и отсоедините / снова подключите его соединительные провода.
Иногда ослабленный соединительный провод или кабель питания также может привести к появлению аналогичного кода ошибки. Попробуйте выключить принтер, а затем отсоедините все соединительные провода и кабель питания. Подождите несколько минут, подключитесь и проверьте, нормально ли работает ваш принтер.
2] Удалить недавно установленные накопительные обновления
В большинстве случаев ошибки принтеров, включая 0x00000077, возникают после обновления операционной системы до последней сборки ОС. Хотя в самом примечании к выпуску упоминается, что вы можете столкнуться с проблемами, связанными с принтером, пользователи часто пропускают такие сообщения.
Что ж, теперь, когда вы уже столкнулись с ошибкой принтера, у вас есть три варианта на выбор:
- Дождитесь следующего накопительного обновления : если Microsoft уже упомянула о получении этого кода ошибки, они, должно быть, уже начали работать над этим кодом ошибки. Подождите одно или два обновления безопасности, и эта ошибка будет устранена автоматически.
- Удалите ранее установленное накопительное обновление : это идеальный способ избежать проблем, связанных с принтером, на ПК с Windows 11 или 10. Просто зайдите в “Настройки” > “Центр обновления Windows”, просмотрите историю обновлений и удалите последние исправления.
- Попробуйте следующие решения : только если указанное выше исправление не устраняет код ошибки 0x00000077, попробуйте решения, описанные ниже.
3] Установите дополнительные обновления принтера
Все драйверы должны работать правильно и оставаться актуальными на ПК с Windows. В противном случае ваш принтер может выдать код ошибки 0x00000077 при задании задания на печать. Идите и проверьте, есть ли какие-либо необязательные обновления для вашего компьютера. Если вы обнаружите какое-либо обновление драйвера при проверке его через Центр обновления Windows, загрузите и установите его на свой компьютер. Для этого вы можете выполнить следующие простые шаги:
- Нажмите Win + I, чтобы запустить настройки.
- Нажмите “Центр обновления Windows” и нажмите “Проверить наличие обновлений”.
Примечание. Пользователи Windows 10 могут вместо этого перейти по указанному ниже пути и нажать “Проверить наличие обновлений”.
Настройки (Win + I) > Обновление и безопасность > Центр обновления Windows
- Система подключится к серверам Microsoft и проверит наличие ожидающих обновлений.
- Если он найдет какие-либо обновления драйверов для вашего ПК, появится ссылка на необязательные обновления.
- Нажмите на эту ссылку, отметьте все галочками и нажмите “Загрузить и установить”.
- Подождите, пока система установит ожидающие обновления на ваш компьютер.
- После этого перезагрузите компьютер с Windows и проверьте, устранена ли ошибка 0x00000077.
4] Удалите родное программное обеспечение, а затем переустановите его.
При первом использовании принтера необходимо установить программу, поставляемую вместе с принтером. Со временем и это программное обеспечение устаревает и требует обновления. Посетите официальный сайт вашего принтера и найдите там последние исправления. Если вы столкнулись с трудностями при его поиске, вы можете связаться с его производителем и запросить последнее обновление патча.
Кроме того, вы также можете найти любые обновления драйверов, посетив Диспетчер устройств. Этот метод будет работать только на ПК, на которых установлены более старые версии Windows 10. Вот как можно попробовать это решение —
- Нажмите Win + S, введите Панель управления в текстовое поле и нажмите Enter.
- Используйте раскрывающееся меню рядом с пунктом “Просмотр” и выберите “Крупные значки“.
- Выберите Устройства и принтеры.
- Найдите свой принтер в появившемся окне, щелкните его правой кнопкой мыши и нажмите “Удалить устройство“.
- Затем может появиться окно подтверждения, нажмите “Да“.
Теперь, когда вы отключили принтер от ПК, выполните следующие действия, чтобы полностью удалить его:
- Нажмите Win + R, чтобы открыть диалоговое окно “Выполнить”.
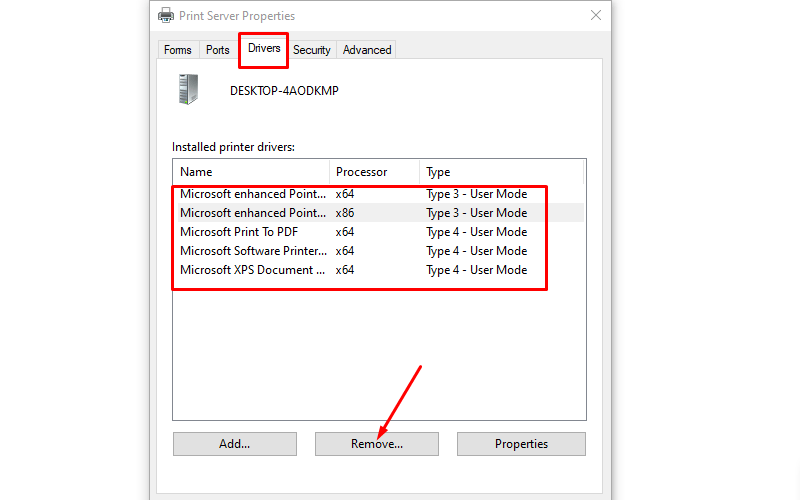
- Введите “printui.exe /s” и нажмите “ОК”, чтобы открыть “Свойства сервера печати“.
- Перейдите на вкладку “Драйверы” и удалите отсюда свой принтер.
- Нажмите “Применить”, затем “ОК”, чтобы подтвердить последние изменения.
- Выйдите из текущего окна и перезагрузите компьютер.
Снова войдите в свое устройство и заново подключите принтер к компьютеру.
5] Попробуйте официальное приложение от Microsoft
С запуском Windows 11 Microsoft увеличила интеграцию приложений из своего приложения Store. Поэтому, чтобы избежать каких-либо проблем и повысить производительность, всегда следует устанавливать программное обеспечение через Microsoft Store. Прежде чем продолжить и установить официальное приложение, обязательно удалите существующую программу. Вот как удалить любое программное обеспечение в Windows 11 —
- Нажмите Win + X и выберите “Приложения и функции“.
- На правой панели прокрутите вниз до приложения принтера, щелкните три точки и нажмите “Удалить“.
- Затем появится окно подтверждения, снова нажмите “Удалить“.
- Перезагрузите компьютер и, когда это произойдет, запустите Microsoft Store.
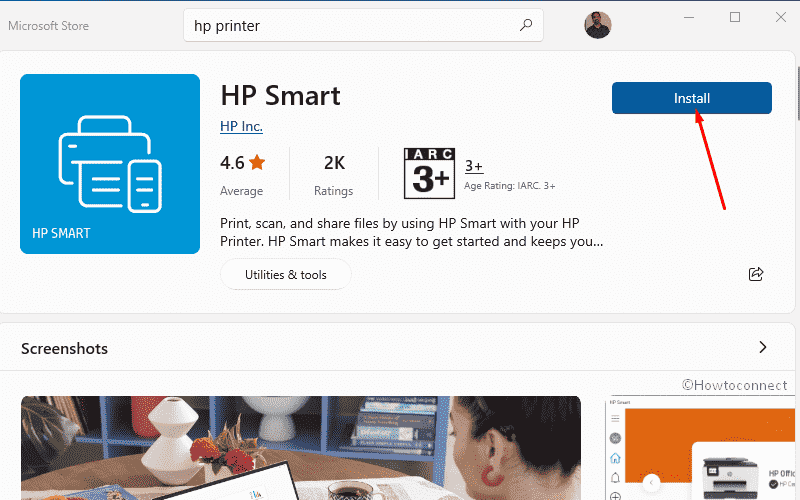
- Найдите приложение для принтера здесь, в приложении Store.
- Нажмите “Получить”, а затем “Установить”, чтобы установить это приложение на свой компьютер.
Теперь вы можете подключить свой принтер с помощью этого приложения и печатать документы без каких-либо проблем.
6] Настройте реестр
Если ни одно из приведенных выше решений не помогает устранить этот код ошибки, изменение соответствующего реестра должно решить эту проблему. Вот что вам нужно изменить на ПК с Windows 11 —
- Нажмите Win + R, введите “
regedit” и нажмите “ОК”. - Когда появится запрос UAC, нажмите Да.
- Внутри реестра перейдите по указанному ниже пути —
HKEY_LOCAL_MACHINE\SOFTWARE\Microsoft\Windows NT\CurrentVersion\Print\Providers\Client Side Rendering Print Provider\Servers\YourPrintServerName\Printers
- Оказавшись там, найдите то, что находится в папке “Принтеры”. Вы можете увидеть несколько принтеров с произвольными буквенно-цифровыми номерами.
- Удалите все такие записи, и как только это будет завершено, закройте реестр.
Теперь откройте окно “Службы” и найдите в нем службу диспетчера очереди печати. Когда вы найдете эту службу, щелкните ее правой кнопкой мыши и выберите параметр “Пуск/Перезапуск”. Перезагрузите компьютер и проверьте, исчезает ли код ошибки 0x00000077.
Users who tried to upgrade to Windows 11 and failed now encounter a peculiar problem with the printer. When trying to print a pdf, error code 0x00000077 Operation could not be completed appears and the job fails . Sometimes, this error also shows when running a Test print. Furthermore, this issue occurs on some of the common users who are running Windows 10 or 11.
Full Error message is like “Operation could not be completed (error 0x00000077), The system does not support the command requested.”. This issue generally happens due to glitches in the printer’s driver, incorrect registry entries, bugs in Windows update, and incorrect connection between printer and laptop or computer.
Here is how to fix Printer Error 0x00000077 in Windows 11 or 10 –
Way-1: Reinstall Driver
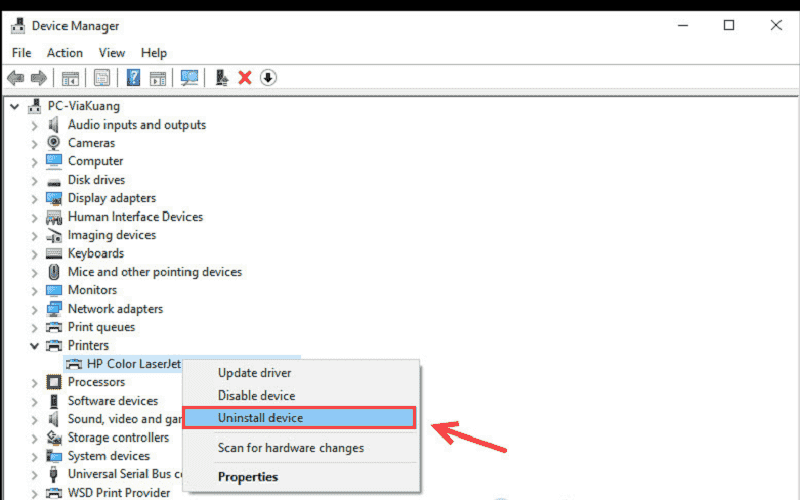
The root cause of this network printer problem is driver in abundant cases is outdated or malfunctioning driver. The flawful drivers might be updated or reinstalled using the default Windows tool which was previously noon as administrative tool Device Manager. However, a number of third-party programs claim to perform the same task in simpler mode but in my opinion, you should avoid them until this doesn’t seem compulsory. Here because the Device Manager stands far ahead of them for the update or reinstall work, follow the steps –
- Press Windows and X keys.
- Select – Device Manager.
- When the tool is open look for the printing device that is creating problems.
- If you are unable to find it click on View.
- From the drop-down menu, select – Hidden devices.
- Now get at the printer and double click on it.
- Right click on the affected device.
- Choose – Uninstall device.
- On the pop-up that prompts, leave the checkbox unchecked.
- Select Uninstall.
- Reboot your computer.
- Try to print and see if the error still persists. If yes then follow the next method.
Way-2: Update printer Driver
Presence of Obsolete driver is again one of the most common reasons for printer error 0x00000077 in Windows 11 and 10 as well. Because of being outdated the driver software becomes either incompatible or corrupt. Instead of running the device, the app starts creating conflicts with the components of the system. In these circumstances, when you try to print a pdf or document, the driver fails to support it and Windows throws the error code. So in order to fix the network printer problem, you need to update driver using the following instructions –
- Right-click on the Start.
- Choose – Run.
- Type – devmgmt.msc.
- Press Enter.
- Double click on the printing device to disclose the items under it.
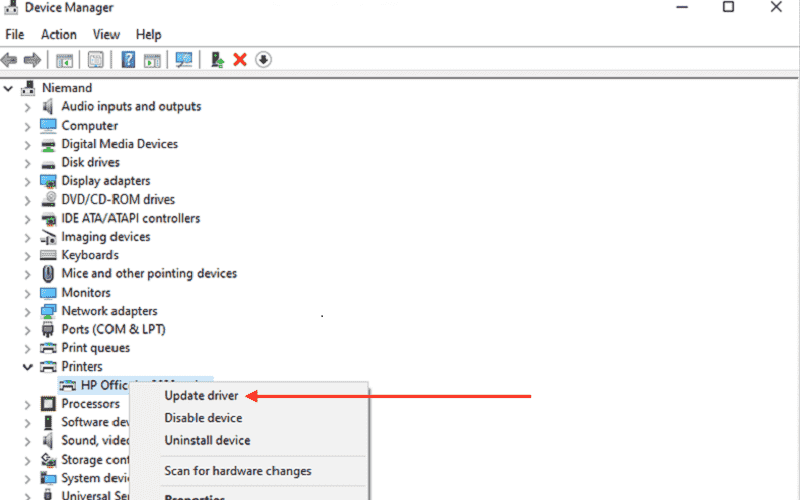
- Go to the correct device and right-click on it.
- Select – Update driver.
- Once a window appears, click on Install the best driver automatically.
- Restart the machine.
- Start printing and see if you become successful.
Way-3: Detach and reconnect the cords
Sometimes loose or incorrectly fit cords might prevent the printer from working good and cause the error to appear. So before pursuing coming solutions you need to carefully check the wire that connects the printer and PC. It would be better to pull it out and fit again correctly. Also, check the connection of the printer with the electric board and make sure it is perfect. Once checked, start the device, print the PDF, and see if the error is resolved.
Way-4: Remove the installed Printer software from everywhere in the system
With every printer, the company provides software which you have to install in order to run the printer successfully. Also, the same software is available in Microsoft Store that can better behave with Windows 10 and 11. It is recommended to use Microsoft Store app instead of the third-party printer software to conveniently run the printer. For this, remove the software from everywhere in the system by moving with the steps –
- Click on Search from the taskbar.
- Type Control.
- Once the Control panel opens, set View by Small icons or Large icons.
- Click on Devices and Printers.
- In the Devices and Printers window look for your Printer.
- If you find it listed then right-click on it.
- Select Delete or Remove Device.
- Now press “Windows Key and R”.
- Type printui.exe /s.
- Click OK.
- Go to the Drivers tab.
- Look for the Printer driver.
- If you see it click on it and select Remove from the bottom.
- Select – OK.
- Delete all instances of the same.
- Click Apply then OK on the Print Server Properties windows.
- Exit Devices and Printers.
- Restart the computer.
Way-5: Download official app from Microsoft Store
You have to use the app in the store rather than the software for better performance and avoid issues. So follow the steps and install the app –
- Press Winkey+R.
- Type appwiz.cpl.
- When the Programs and features window comes, find the Printer software.
- Right-click on the application.
- Select – Uninstall.
- Click Yes on verification prompt and follow the onscreen instructions until the the app is completely uninstalled.
- Now, click on Start.
- Select – Microsoft Store.
- In the search bar, type the name of the printer you have.
- Select the proper result.
- Click on Get or install which is showing there.
- Allow the app to download and install and open it.
- Connect the printer through the app.
- Check whether the printing work is proceeding correctly or any error is shown.
Way-6: Remove recently installed Windows update
Windows update has been a major reason behind printer problems in Windows 10 and 11. You might have heard printnightmare bug which badly affected print jobs for numerous users running Windows 10. In this concern, we have already covered many posts and written solutions – Fix Printer Error 0x0000052e KB5006738 in Windows 10, Fix Printer Error 0x0000011b KB5005565 in Windows 10 and Fix Printer Error 0x00000709, 0x0000011b KB5006670 Windows 10.
Therefore when printer error 0x00000077 appears there might be a buggy Windows update in the scenario. Now comes to the point where you have to ensure whether a certain Windows update is causing the issue. For this, recall your memory that before the error started Windows has installed an update or not. If yes then good otherwise check the Windows update history to make sure. Once ensured, uninstall the Windows update and the printer issue will be fixed. Follow the guidelines for the complete process –
- Click on Search.
- Type updates.
- Hit Enter.
- When the Settings app loads, click on View update history.
- On the next page, check the dates Windows updates in the list attentively. If any update is installed nearby and before the occurrence of the error then note down its KB number.
- Scroll up and move to the top of the page.
- Click on Uninstall updates.
- When on a separate window, select the KB number.
- Click on Uninstall.
- If a verification pop up shows, click on Yes.
- Hopefully, the error shouldn’t occur now.
Way-7: Check for Windows update and install
Microsoft, as usual, has a track on issues that appear to a mass number of users or occurs due to buggy Windows update. Once known, the company hands it over to a Windows expert or a team of engineers to find a resolution. As soon as they submit the fix Microsoft pushes this with a patch that you need to install. So when Operation could not be completed (error 0x00000077) is generated there is possibility that a patch has been already pushed and you need to install it only. So, go with the following steps –
- Press Windows and I keys simultaneously.
- Select – Update & Security.
- On the next page, click on Check for updates.
- Allow the system to download the updates if pending.
- Once you see a prompt, select Restart now.
- Printer error 0x00000077 must be fixed now.
Way-8: Modify Registry
When you tried to upgrade your computer to Windows 11 and failed and then printer error started you need to modify the registry entries to fix it. In this case, mostly bad driver level issue is created and shared network printer requires to be removed from registry. Here are the steps –
- Click on Start.
- Type – regedit.
- Press Enter.
- Select Yes on UAC prompt.
- Copy the below location address and paste into the address bar of Registry Editor –
HKEY_LOCAL_MACHINE\SOFTWARE\Microsoft\Windows NT\CurrentVersion\Print\Providers\Client Side Rendering Print Provider\Servers\YourPrintServerName\Printers- On this path, if you might notice zombie printers such as Printers{D6B632BD-0B84-49D6-8814-626BD5D8E969}, 4, each with a trailing number.
- Delete these entries and then restart the print spooler service.
- For this, press Winkey and R.
- Type – Services.msc.
- Hit Enter.
- Once the Services Window opens, find Print Spooler.
- Right click on this service and select Restart.
- Finally, restart the computer and the Printer error will be fixed hopefully.
Methods list:
Way-1: Reinstall Driver
Way-2: Update printer Driver
Way-3: Detach and reconnect the cords
Way-4: Remove the installed Printer software from everywhere in the system
Way-5: Download official app from Microsoft Store
Way-6: Remove recently installed Windows update
Way-7: Check for Windows update and install
Way-8: Modify Registry
That’s all!!
Repair any Windows problems such as Blue/Black Screen, DLL, Exe, application, Regisrty error and quickly recover system from issues using Reimage.


