Do you wonder how to fix the Windows update error code 0x800703e6 on your PC? This post from MiniTool Partition Wizard will provide the reasons that may cause the Windows update error code 0x800703e6 and solutions for you.
Some people report that they encountered the error 0x800703e6 when they tried to update their Windows. This error bothers them a lot. The full notice reads as follows:
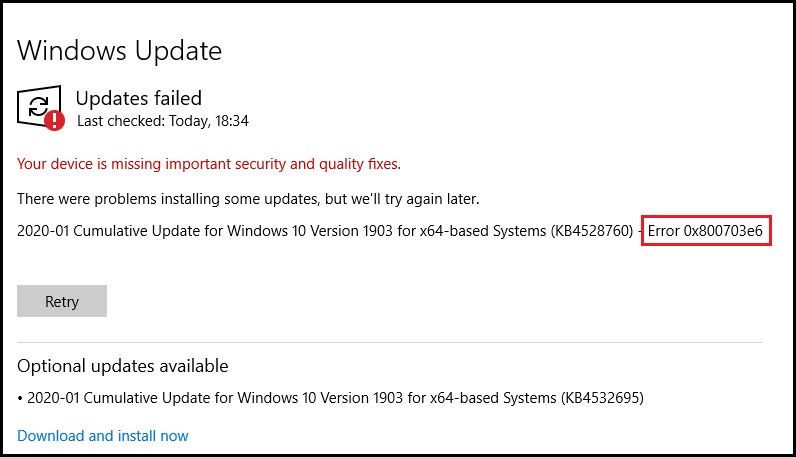
After researching this error on the Internet, I find that this error often occurs while attempting to install the KB4023057, KB5003214, and KB5003173 updates on Windows 10 versions 1903, 1909, 2004, and 20H2. Meanwhile, it may occur if users attempt to install the KB5005033 update on Windows 10 version 21H1.
Are you also experiencing this error? Do you want to know what causes this error and how to fix it? If you are, just continue reading.
What Causes the Windows Update Error 0x800703e6?
The Windows update error 0x800703e6 can be caused by various reasons. Here are some possible reasons:
- The drive is outdated or at fault.
- Registry entries are missing or corrupt.
- There are broken or missing system files on the computer.
- There are two applications using the same memory location.
- Your system is configured incorrectly.
- There are corrupted or missing DLL files or Windows update files.
- The antivirus programs on your PC prevent Windows from installing the updates.
- Windows cache folders amass massive amounts of data.
Fix 1. Run Windows Update Troubleshooter
The Windows update troubleshooter is a built-in tool on Windows computers that can help you solve the problems you have encountered while downloading and installing Windows updates. So, if you encounter the Windows update error 0x800703e6, you can run this tool to fix it. Here’s the guide:
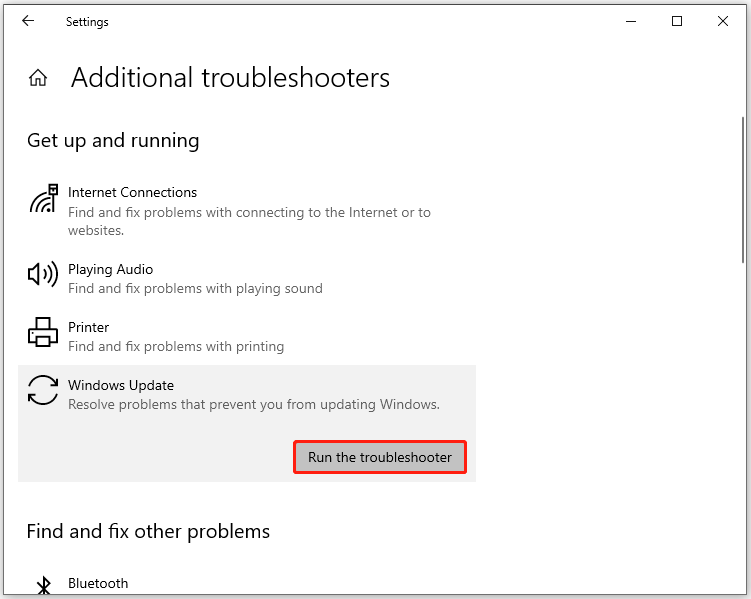
- Press the Windows and R keys at the same time to open the Run window.
- Then type “ms-settings:troubleshoot” and press the Enter key to open the Troubleshoot window.
- Click the “Additional troubleshooters” link.
- Select the Windows Update option, and then click the “Run the troubleshooter” button.
- Once the troubleshooting process is complete, restart your device.
- Next, try updating again and check if the Windows update error 0x800703e6 is fixed.
Fix 2. Update Device Drivers
Outdated device drivers can cause the Windows update error 0x800703e6 too. So, you can try updating your device drivers to solve this error. To update the device drivers, do the following:
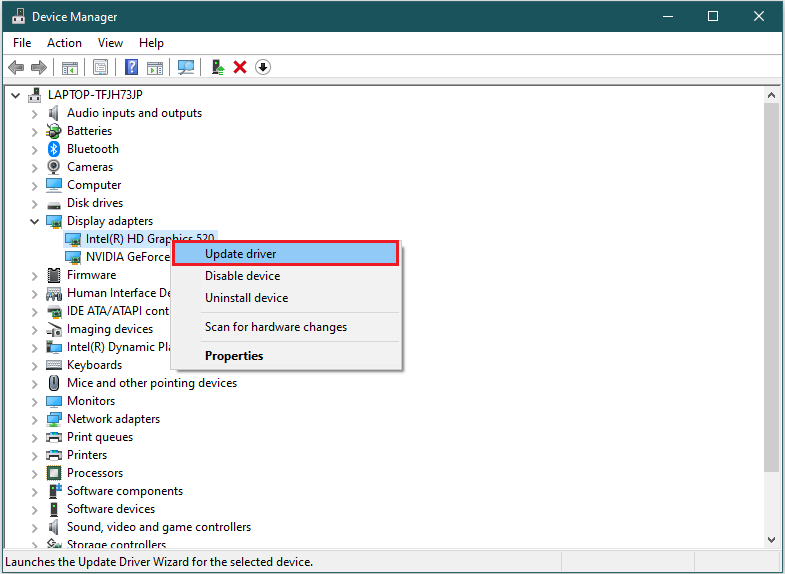
- Click the Search icon on the taskbar and type “device manager” into the search box.
- Click Device Manager under Best Match. Alternatively, click Open on the right panel to open the Device Manager window.
- Expand hardware categories whose hardware drivers you wish to update.
- Next, you need to right-click on that driver and then select Update Driver from the menu.
- In the next window, choose the “Search automatically for updated driver software” option. The computer will automatically search for and install the most recent driver for the hardware from the Internet.
- Once done, check if the error is fixed.
Fix 3. Run SFC and DISM
As mentioned earlier, if there are any corrupt system files on your PC, you may also encounter the Windows update error 0x800703e6 easily. In this case, you can run SFC and DISM on your computer to fix this issue.
Both System File Checker (SFC) and Deployment Image Servicing Management (DISM) can assist you in repairing system file corruption on your computer. You can run them by doing the following:
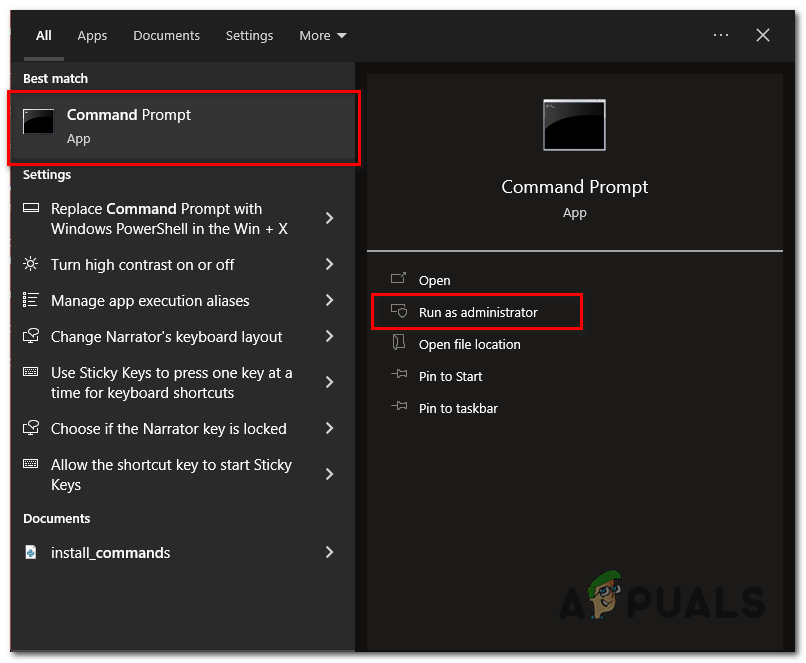
- Open the Search window, and then type “command prompt” in the search box.
- Click Run as administrator under the Command Prompt app.
- Type “sfc /scannow” and press the Enter key.
- After the process is completed, type “Exit” and press the Enter key to close the Command Prompt window.
- Once done, restart your computer to check if the error is fixed. If not, proceed by initiating a DISM scan.
- Run the Command Prompt as administrator on your computer again.
- Then type “DISM.exe /Online /Cleanup-image /Scanhealth” and press the Enter key.
- Type “DISM.exe /Online /Cleanup-image /Checkhealth” and press the Enter key.
- Type “DISM.exe /Online /Cleanup-image /Restorehealth” and press Enter.
- Type “Exit” and press the Enter key to close the Command Prompt
- Once done, restart your computer to check if the Windows error 0x800703e6 is fixed.
Fix 4. Check Hard Disk
If running SFC and DISM does not fix the Windows error 0x800703e6, you can use the CHKDSK command to check and fix hard disk errors. Here’s the way:
- Run Command Prompt as administrator.
- Type “chkdsk /f” in the Command Prompt window and then press the Enter Then this command will scan your system and fix errors during this process.
- Once done, restart your PC and check if the error is fixed.
Fix 5. Run a Clean Boot
Clean boot is a Windows mode that runs the system with a minimal set of drivers and startup programs. In this mode, all third-party and non-essential items are disabled. So, you can use it to help you find out what causes the Windows error 0x800703e6. Here’s the guide:
- Open the Run window, and then type “msconfig” in the box.
- Then, click on the OK button to open the System Configuration window.
- Select the Services tab.
- Check the Hide all Microsoft services option.
- Click on the Disable all button and then click on the Apply button.
- Next, go to the Startup tab.
- Click on Open Task Manager.
- Right-click the applications you suspect and select Disable option from the menu.
- Exit Task Manager.
- Click OK under the Startup tab.
- Then when you restart the computer, it is in a clean boot environment.
- Next, see if the problem occurs. If not, enable one program one by one until the problem occurs again. That program might be the source of the error. You’d better remove
Fix 6. Disable or Uninstall Third-Party Antivirus
Third-party antivirus may interfere with the Windows update process. If you are using a third-party antivirus application on your PC, you may encounter the Windows update error 0x800703e6 during the update process. In this case, you’d better disable or uninstall antivirus programs on your computer.
Fix 7. Clear the Software Distribution Folder
The SoftwareDistribution folder is a folder located in the Windows directory and used to temporarily store files that may be required to install Windows Update on your computer. Typically, these files are cleared after the installation.
In rare situations, the old installation file won’t be deleted and it will prevent new ones from being downloaded causing the Windows update error 0x800703e6. In this case, you can try clearing the SoftwareDistribution folder to fix this error.
Here’s the guide:
- Run Command Prompt as administrator.
- Enter the command “net stop wuauserv” and press the Enter key to stop the Windows Update service.
- Then type the command “rd /s /q %systemroot%SoftwareDistribution” to clear the Software Distribution folder.
- Next, enter the command “net start wuauserv” to restart the Windows Update service.
- Once done, exit the Command Prompt and check if the Windows update error 0x800703e6 has been resolved.
Fix 8. Modify Windows Registry
Some people report that they fixed this Windows update error 0x800703e6 by deleting WUServer and WStatusServer from their Windows Registry. You can also have a try with the steps below:
Tips:
Before starting this method, you should make a backup of the Windows Registry. Otherwise, it may go wrong on your Windows system.
- Open the Run window.
- Type “regedit” and press Enter to open the Windows Registry window.
- Go to this location: “HKEY_LOCAL_MACHINESOFTWAREPoliciesMicrosoftWindowsWindowsUpdate“.
- Find the WUServer and WStatusServer entries in the right pane.
- Delete them by right-clicking on them one by one and selecting Delete.
- Once done, restart your PC and check if this error is fixed.
Fix 9. Reset Update Components
As we all know, Windows Update plays an important role in the Windows 10 system. If there is any corruption inside the update components, your Windows may be unable to update successfully.
So, if you encounter the Windows update error 0x800703e6 on your PC, you can try resetting the update components to fix this error. To do that, you just need to refer to this post: Reset Windows Update with These Methods Now!
Fix 10. Free up Your Hard Drive Space
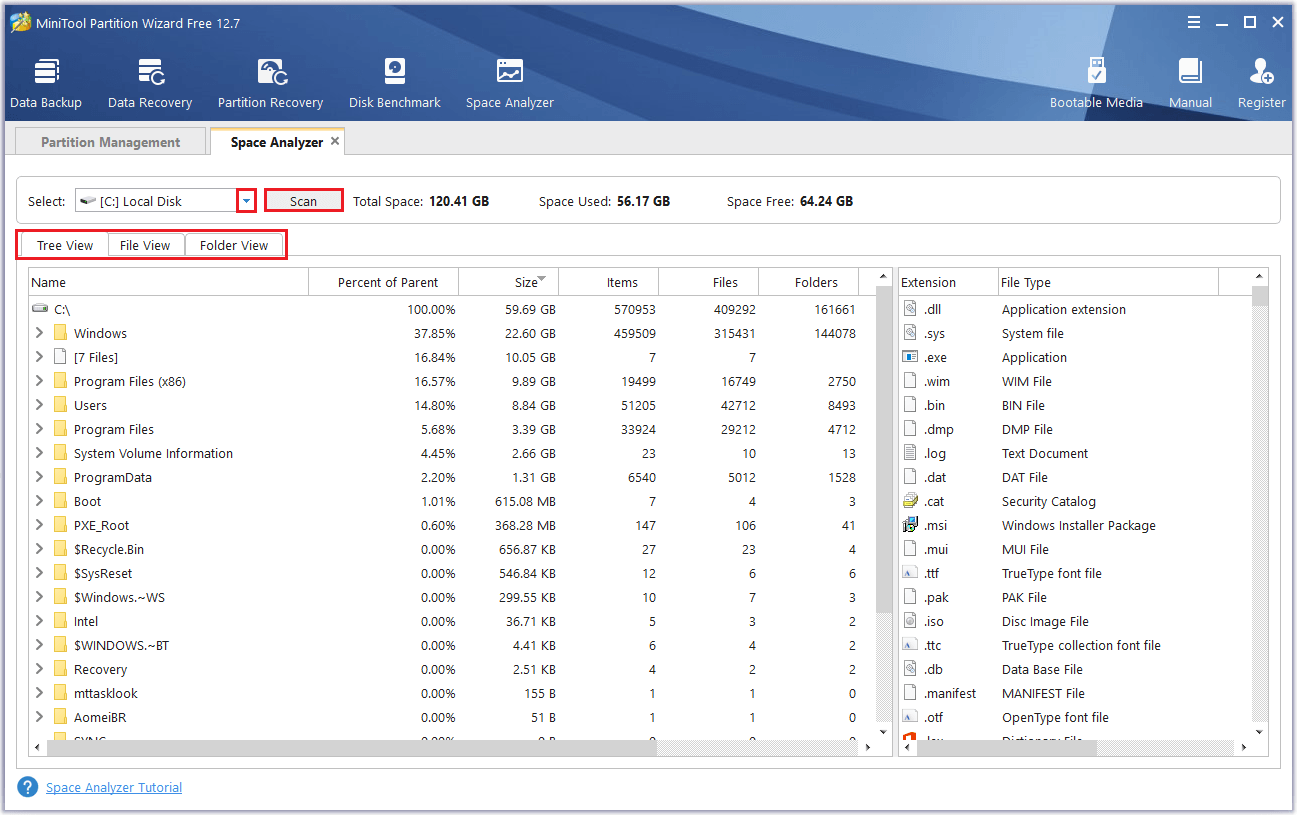
Installing the latest update requires enough space on your drive. If you don’t have enough disk space, you may encounter the Windows update error 0x800703e6. To get more free space on your disk, try deleting some large files. To do that, you can use MiniTool Partition Wizard’s Space Analyzer feature. Here’s the tutorial:
Step 1. Download and launch the MiniTool Partition Wizard on your computer.
MiniTool Partition Wizard FreeClick to Download100%Clean & Safe
Step 2. Select the Space Analyzer feature on the top toolbar.
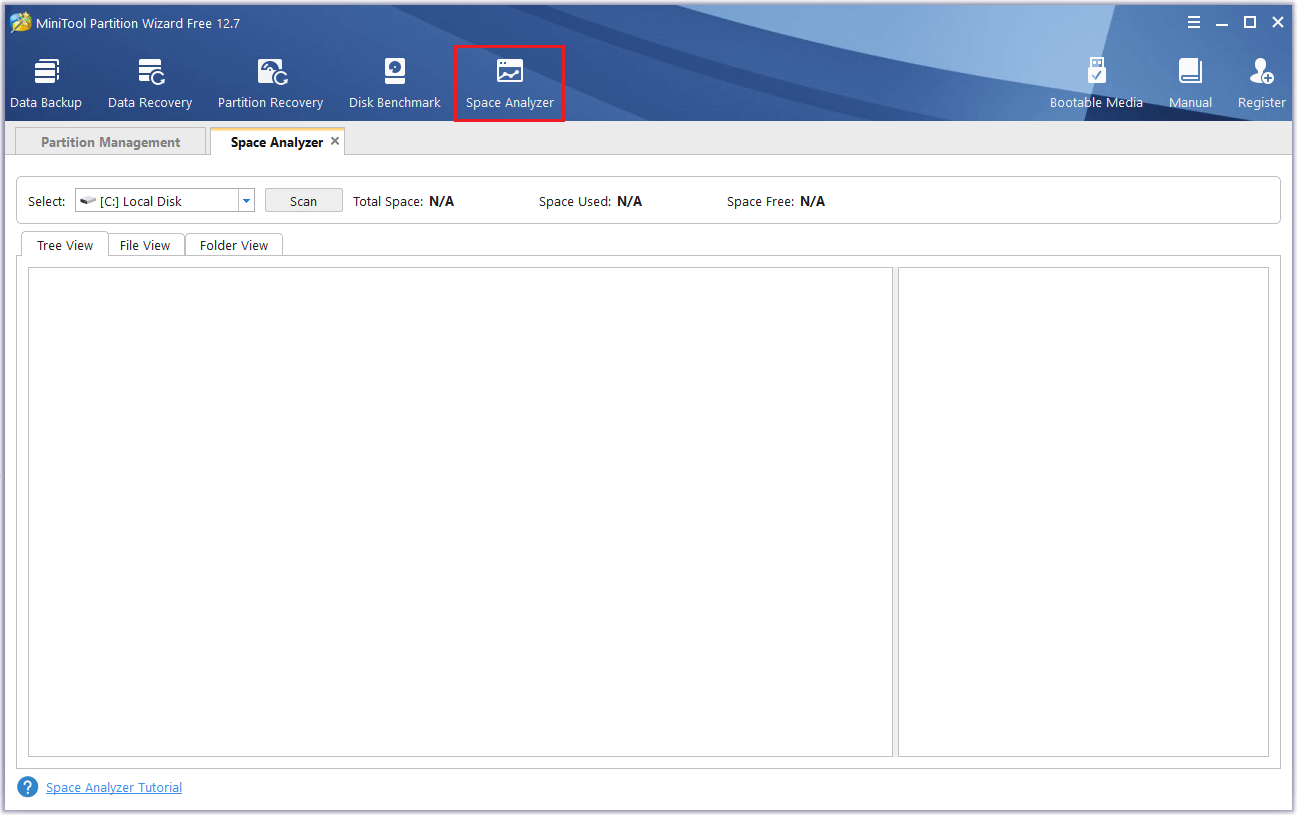
Step 3. Click the down arrow icon to open the drop-down menu, choose a partition or a folder from it, and then click Scan. Once completed, the page will display all files from the selected partition. You can check them in three ways: Tree View, File View, and Folder View.
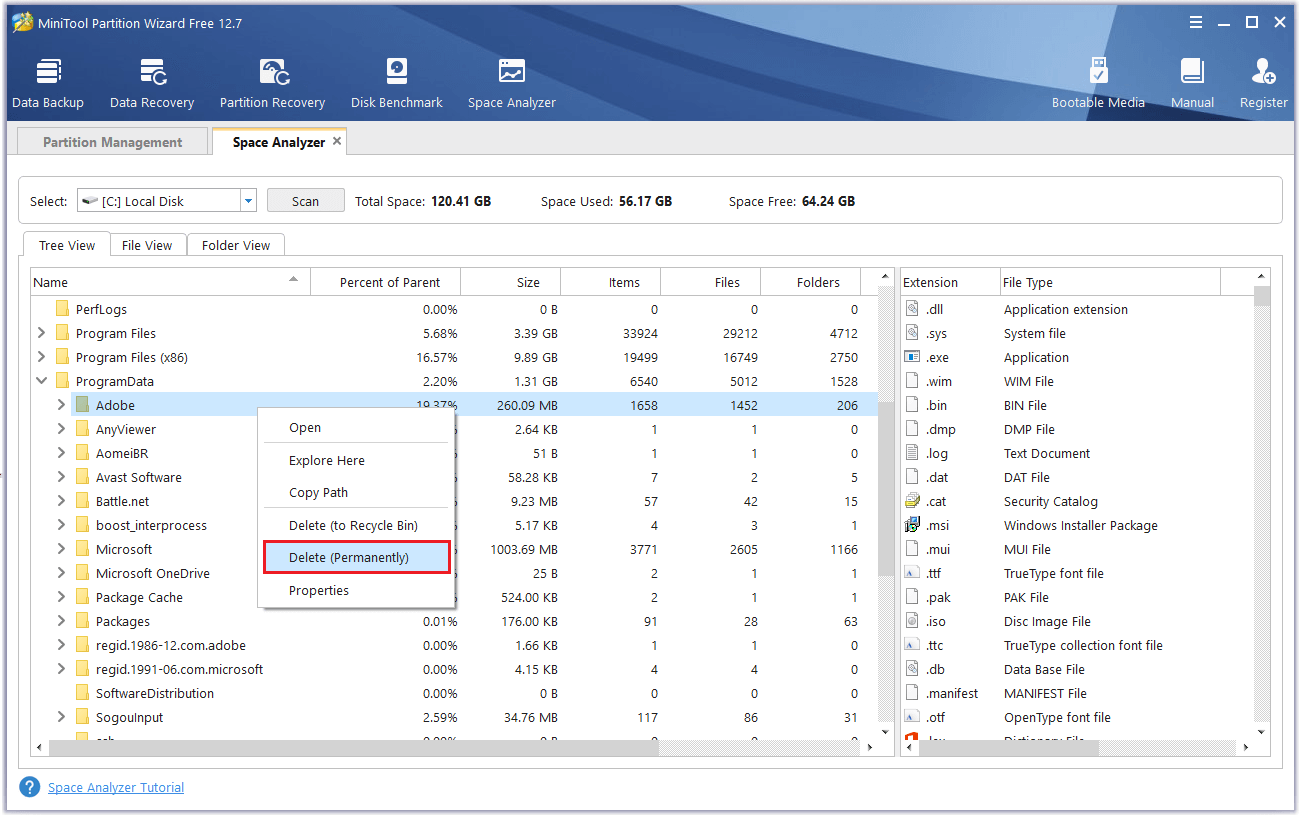
Step 4. Right-click the file you don’t want to keep, and then select either Delete (to Recycle Bin) or Delete (Permanently) according to your needs.
Fix 11. Perform an In-Place Upgrade
If all the above solutions don’t work, you can try performing an in-place upgrade to fix it.
Tips:
Before you perform the in-place upgrade, you’d better back up the system’s data or create a system restore point. Meanwhile, you also need to disable all third-party security software and disconnect all other peripherals except the keyboard, mouse, LAN, and display.
- Download the Media Creation Tool from the website.
- Then run this tool as administrator.
- Next, select the Language, Time, version, etc. as per the currently installed OS.
- In the “What do you want to do?” window, select the second option “Create Installation media (USB flash drive, DVD, or ISO file) for another PC”.
- Then select the ISO file and click Next.
- Once the ISO file is downloaded, right-click on it and select Run as Administrator.
- Follow the on-screen instructions to perform an in-place upgrade. Make sure to select Repair This PC (if asked to) and Keep Personal Files, Windows Settings, and Applications options.
- Once done, check if the error is fixed.
I encounter the Windows update error 0x800703e6, which bothers me a lot. Luckily, this post tells me the reasons and solutions for this error. I resolve the error on my PC successfully by using the solutions in this post.Click to Tweet
Bottom Line
After reading this post, you can know reasons and fixes for the Windows update error 0x800703e6. Try the solutions in this post to solve this error on your computer.
If you know any other useful solutions to the Windows update error 0x800703e6, please leave them in the following comment zone for sharing. In addition, if there are any problems with MiniTool Partition Wizard when you use it, please send us an email via [email protected]. We will get back to you as soon as possible.
Также известный под названием ERROR_NOACCESS: Invalid access to memory location, 0x800703e6 является достаточно распространенной ошибкой среди пользователей Windows, пытающихся обновить систему. В частности, ошибка возникает при попытке установить KB4023057, KB5003214, KB5003173 и другие накопительные обновления в Windows 10 версий 1903, 1909, 2004 и 20H2. Некоторые пользователи также сообщают о той же проблеме при установке KB5005033 для последней версии Windows 10 21H1. Чаще всего ошибка 0x800703e6 говорит о какой-то неисправности в процессах памяти на вашем ПК. Процесс обновления может быть прерван из-за того, что два приложения используют одну и ту же область памяти. Это также может сопровождаться проблемами с ключами реестра, драйверами, системными файлами и настройками, нужных для правильной работы обновлений. Чтобы решить эту проблему, мы рекомендуем попробовать каждый из перечисленных ниже методов, пока не найдете тот, который решит ошибку.

Ошибка Центра обновления Windows 0x800703e6 (пример 1)

Ошибка Центра обновления Windows 0x800703e6 (пример 2)
Скачать средство восстановления Windows
Скачать средство восстановления Windows

Существуют специальные утилиты для восстановления Windows, которые могут решить проблемы, связанные с повреждением реестра, неисправностью файловой системы, нестабильностью драйверов Windows. Мы рекомендуем вам использовать Advanced System Repair Pro, чтобы исправить «Ошибку Центра обновления Windows 0x800703e6» в Windows 10.
1. Запустите средство устранения неполадок Центра обновления Windows.
Самый первый способ, — это средство устранения неполадок обновления. Так называется встроенная функция, которая уже давно используется в мире Windows, помогая пользователям решать некоторые проблемы в автоматическом режиме. В большинстве случаев этот способ не назовешь панацеей, особенно когда дело доходит до устранения всех ошибок. Все потому что довольно часто есть более глубокие причины, ведущие к сбоям обновления. Несмотря на это, все же стоит попробовать этот простой, но временами эффективный метод избавления от проблемы. Средство устранения неполадок обновления просканирует вашу систему на предмет потенциальных проблем и попытается исправить их с помощью автоматических алгоритмов.
- Открытые Настройки , а затем перейдите в Обновление и безопасность > Устранение неполадок.
- На правой панели найдите Центр обновления Windows и нажмите Запустить средство устранения неполадок.
- Завершите процесс, следуя инструкциям на экране, и перезагрузите компьютер.
2. Проверьте целостность системных файлов.
Как известно, большинство проблем с обновлением может возникнуть из-за отсутствия или повреждения каких=то фрагментов. Такие файлы могут быть необходимы службам Windows для установления связи между различными процессами. Если некоторые из этих файлов находятся за пределами своей родной среды, то вероятно это и станет причиной ошибок обновления. Ниже мы воспользуемся SFC (средство проверки системных файлов) и DISM (обслуживание и управление образами развертывания) сканированиями, которые обнаружат и восстановят отсутствующие компоненты, если таковые имеются. Обязательно запустите оба этих сканирования в указанной ниже последовательности:
SFC
- Открытые Командная строка , введя
cmdв поле поиска рядом с Меню Пуск кнопку. - Щелкните правой кнопкой мыши по Командная строка , а затем выбрать Запуск от имени администратора.
- После открытия консоли введите
sfc /scannowкоманду и нажмите Enter. - Когда процесс восстановления будет завершен, перезагрузите компьютер.
DISM
- Открытые Командная строка как мы это делали на предыдущем шаге.
- Скопируйте и вставьте эту команду
DISM.exe /Online /Cleanup-image /Restorehealth. - Нажмите Enter и подождите, пока Windows закончит сканирование и исправление.
- После этого перезагрузите компьютер и снова установите обновление.
После выполнения обоих этих сканирований попробуйте снова установить обновления. Если это не поможет, переходите к другим решениям ниже.
3. Просканируйте жесткий диск на наличие повреждений.
Некоторые проблемы, связанные с обновлением, могут возникнуть из-за повреждения жесткого диска. Поэтому стоит это проверить. Вы можете легко сделать это с помощью следующих шагов:
- Открытые Командная строка так же, как мы сделали выше.
- Затем вам нужно вставить команду
chkdsk /f /r C:команду и нажмите Enter. При необходимости замените «C» на букву вашего жесткого диска. - Система выполнит сканирование на правильность конфигурации и физические ошибки, после чего автоматически исправит их.
Этот метод вряд ли решит проблему, поэтому не беспокойтесь, если он не помог.
4. Очистите ненужные системные файлы.
Ряд пользователей сообщили, что им помогло удаление избыточных системных файлов. Этот метод включает удаление копий для восстановления и кешированных файлов, хранящихся на вашем компьютере. После удаления будут стерты записи резервных копий, поэтому вы не сможете к ним откатиться, в случае чего. Несмотря на это, данный способ помог некоторым пользователям.
- Открытые Этот компьютер.
- Щелкните правой кнопкой мыши на основной диск и выберите Объекты.
- Найдите и нажмите на Очистка диска.
- Затем выберите Очистить системные файлы, установите все флажки и нажмите OK.
- После этого перезагрузите компьютер и попробуйте установить обновление снова.
5. Обновите драйверы
Еще одна причина, которая может нарушать работу обновлений, — это устаревшие или поврежденные драйверы. Мы рекомендуем просканировать ваши драйверы и обновить их при необходимости. Вы можете сделать это вручную или воспользоваться специальной утилитой для более быстрого решения. Оба варианта показаны ниже:
- Щелкните левой кнопкой мыши на Меню Пуск и выберите Диспетчер устройств.
- В идеале вам понадобиться обновить все доступные устройства. Если вы видите что-то, отмеченное желтым прямоугольником, то следует обновить это устройство в первую очередь.
- Для этого щелкните на драйвер правой кнопкой мыши, выберите Обновление ПОи следуйте инструкциям на экране.
- Позвольте Windows найти новые драйверы и загрузить их.
Драйверы являются ключом к правильной конфигурации вашей системы. Именно они обеспечивают стабильное соединение между оборудованием и вашей операционной системой. Обновление ряда драйверов вручную может занять много времени, повторяя одни и те же шаги. Здесь вы можете скачать лучшую утилиту для обновления драйверов, которая возьмет эту задачу на себя — Driver Booster от IObit:

Стартовый экран Driver Booster

Результаты сканирования Driver Booster

Раздел инструментов Driver Booster
Скачать Driver Booster
6. Включите Чистый запуск Windows.
Ошибка 0x800703e6 также может возникать из-за проблем несовместимости. Антивирус или любое другое стороннее ПО может конфликтовать со службами Windows, вызывая ошибку. Функция чистой загрузки помогает пользователям запускать свой компьютер только со встроенными приложениями и службами. Это поможет выяснить, не является ли виновником какое-то стороннее приложение. Чтобы запуститься в режиме чистой загрузки, выполните следующие действия:
- Нажмите Windows Key + R кнопки одновременно и вставьте
msconfig. - Затем в открывшемся окне перейдите в Услуги сверху.
- Установите флажок рядом с Не отображать службы Майкрософт и нажмите на Отключить все кнопку.
- Теперь перейдите в Общие и выберите Выборочный запуск опцию. Убедитесь, что флажок установлен только рядом с Загружать системные службы.
- Нажмите Применить и OK. Затем перезагрузите компьютер.
Теперь вы можете попробовать обновить свою систему, находясь в режиме Чистой загрузки. Независимо от того, удалось ли вам установить обновление или нет, необходимо вернуть Windows к параметрам обычного запуска. Для этого просто повторите все шаги, которые были описаны выше, включив отключенные службы и изменив параметры запуска с Выборочный запуск в нормальная.
7. Сбросьте компоненты Центра обновления Windows.
Еще один способ решить проблемы, связанные с обновлением, — это сбросить настройки Центра обновления Windows. Этот метод особенно хорошо зарекомендовал себя при решении проблем с обновлением. Вся процедура включает перезапуск служб BITS, Cryptographic, MSI Installer и Windows Update, а также переименование некоторых папок обновлений (SoftwareDistribution и Catroot2). Эти папки содержат временные файлы, необходимые для установки обновлений Windows. Исходя из этого, мы заставим Windows удалить поврежденные элементы и создать компоненты обновления с нуля. Ниже мы покажем два способа выполнения этого метода. Первый потребует ввода и выполнения каждой консольной команды в ручной последовательности. Другой включает в себя так называемый «пакетный файл», написанный в Блокноте и сохраненный в формате WUReset.bat. Никакой реальной разницы между ними нет, поэтому выбирайте какой вам нравится больше. Вся процедура может показаться сложной, но для ее выполнения не потребуется много времени и знаний. Просто следуйте инструкциям, перечисленным ниже:
Вручную
- Открытые Командная строка , введя
cmdв поле поиска рядом с Меню Пуск кнопку. - Щелкните правой кнопкой мыши по Командная строка , а затем выбрать Запуск от имени администратора.
- Скопируйте и вставьте этот список команд одну за другой, нажимая Enter после каждой. (Это действие отключит службы, ответственные за Обновления Windows)
- Затем мы должны переименовать вышеупомянутые папки. Просто вставьте эти команды, нажимая Enter после каждой.
- Наконец, все, что осталось сделать, это вернуть отключенные службы. Введите эти команды так же, как мы делали ранее.
- На этом все. Перейдите в центр обновления Windows и попробуйте выполнить установку снова.
net stop wuauserv

net stop cryptSvc

net stop bits

net stop msiserver
ren C:\Windows\SoftwareDistribution SoftwareDistribution.old

ren C:\Windows\System32\catroot2 Catroot2.old
net start wuauserv

net start cryptSvc

net start bits

net start msiserver
С помощью Пакетного файла
Это альтернативный метод описанному выше. «Пакетный сценарий» используется для выполнения тех же команд для сброса всех компонентов Центра обновления Windows, криптографических служб и папок, таких как SoftwareDistribution. Это не так сложно, как можно представить. Даже гораздо проще, чем предыдущий. Все, что вам нужно, — это блокнот Windows и немного копирования. Главная прелесть пакетных файлов в том, что они помогают выполнять все шаги сразу, не вводя команды вручную. Если вы когда-нибудь столкнетесь с подобными проблемами в будущем, вы сможете запустить уже созданный .bat файл для сброса компонентов обновления:
- Откройте новый Блокнот . Для этого щелкните правой кнопкой мыши на любую свободную область на рабочем столе, выберите Новая и Текстовый документ.
- Затем вставьте этот список команд в блокнот:
- После вставки всех команд, нажмите Файл > Сохранить как и назовите файл WUReset.bat, Обязательно установите Кодирование в ANSI и сохраните файл в любом месте.
- Наконец, нажмите на файл правой кнопкой мыши и выберите Запуск от имени администратора и наслаждайтесь автоматическим сбросом компонентов обновлений Windows.
@ECHO OFF

echo Simple Script to Reset / Clear Windows Update

echo.

PAUSE

echo.

attrib -h -r -s %windir%system32catroot2

attrib -h -r -s %windir%system32catroot2*.*

net stop wuauserv

net stop CryptSvc

net stop BITS

ren %windir%system32catroot2 catroot2.old

ren %windir%SoftwareDistribution sold.old

ren "%ALLUSERSPROFILE%\Application Data\Microsoft\Network\Downloader" downloader.old

net Start BITS

net start CryptSvc

net start wuauserv

echo.

echo Task completed successfully...

echo.

PAUSE
8. Используйте Media Creation Tool.
Последний, но очень мощный инструмент, который можно использовать, если ничто другое не помогает установить обновления, — это Media Creation Tool. Данный инструмент предназначен для установки последних обновлений тем, кто не может сделать это традиционным способом. Эта утилита выступает в качестве отличной альтернативы установленному по умолчанию Центру обновления Windows. Процедура обновления не коснется ваших личных данных, а просто обновит компьютер. Для этого выполните следующие действия:
- Сначала вам нужно скачать утилиту с веб-сайта Microsoft.
- Затем запустите загруженный файл.
- После того, как вы согласитесь с Условиями использования, вам будет предложено два варианта на выбор. Выберите Обновить этот компьютер сейчас.
- Выберите Сохранить личные файлы чтобы они не пострадали.
- Наконец, запустите процесс и дождитесь его завершения.
- Надеемся, этот метод помог вам обойти ошибку 0x800703e6.
Итоги
Наш список возможных решений для устранения ошибки 0x800703e6 подошел к концу. Надеемся, одно из них, наконец помогло предотвратить появление ошибки каждый раз при загрузке или установки новых обновлений. Если вы снова столкнетесь с подобными проблемами, попробуйте выполнить те же действия, которые помогли вам ранее, или просто переустановите Windows. Это поможет восстановить все заводские настройки и файлы с нуля.
Minecraft Launcher Not Launching Error Code (0x800703e6) might be due to a bad cache, an unstable Microsoft store version or disabled services. The error code is usually visible to users when they try installing Minecraft Launcher.
Before Jumping right into the solutions bit we’ll thoroughly discuss the factors that might be the reason for you facing this issue.
What causes Error 0x800703e6
- Corrupt Game files- Corrupt Game files could be one of the reasons you are facing this error as users have reported the issue fixed after they verified their game files. By Corrupt game files, we mean that the Minecraft root files have become inoperable and won’t function properly.
- Lack of Administrator Priviligies- We can try launching the game as an admin as it will ensure that the game properly reads and writes the necessary games file.
- Disabled Services- Xbox Gamepass App requires a set of necessary services to provide users with smooth end-to-end delivery of their services. A chief reason for us facing an issue with Minecraft could be because some of the services aren’t enabled.
- Outdated Microsoft Store- Outdated version of Microsoft might be one of the reasons we are facing this issue, we will be updating our Microsoft store to the latest version to rectify this problem.
- Unreliable Windows Version- An unstable windows version could cause games to not function properly. Updating to a stable or latest version will fix the problem for us.
- Unstable Microsoft Launcher version- Reportedly downgrading to an older yet stable version of Minecraft launcher helps users solve this problem
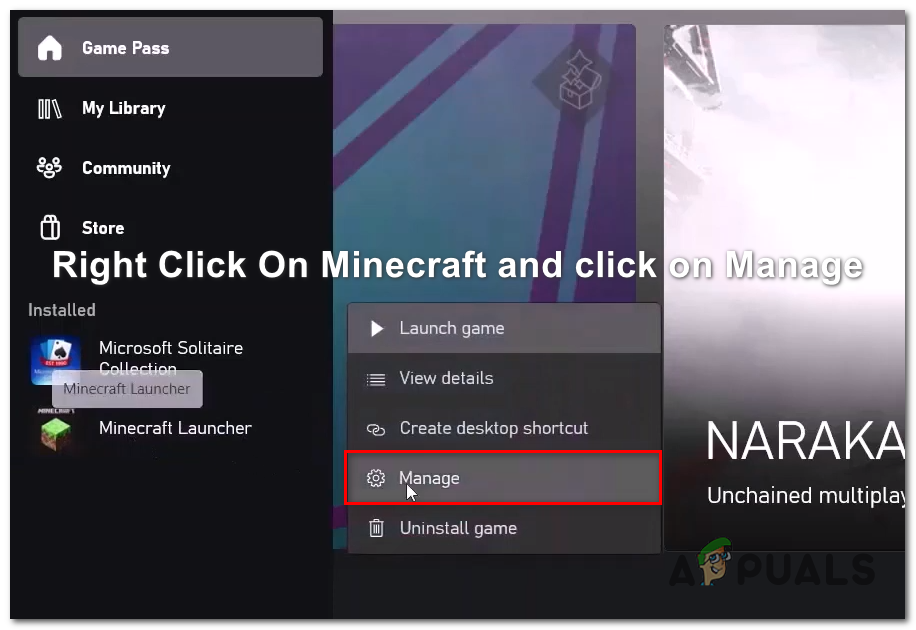
1. Launch the game as an administrator
Launching Minecraft as an administrator will help us identify if the problem is because of the game not having enough privileges. Follow the below-mentioned steps to run your game as an administrator.
- Open Xbox Game Pass home interface.
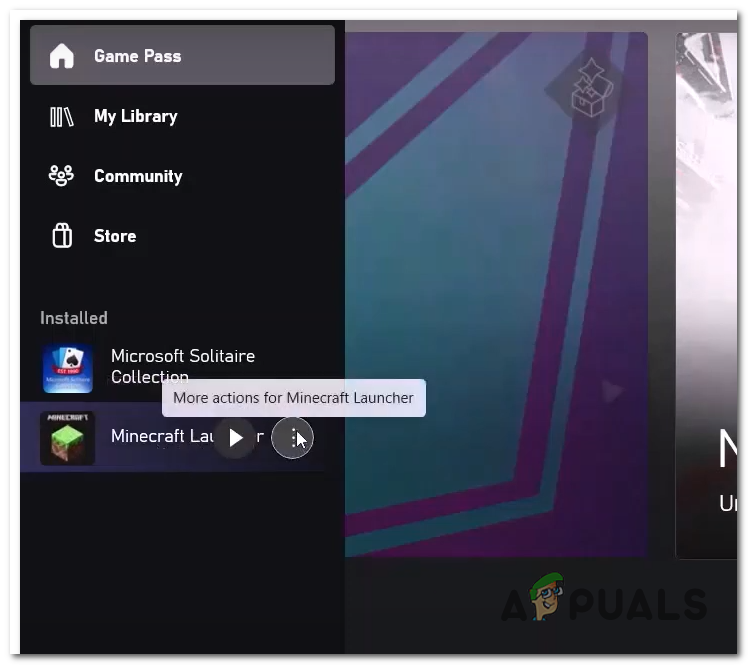
- Right Click on Minecraft or Click on the three Dots right beside it.

Opening settings in Xbox App - Click On Manage Settings.
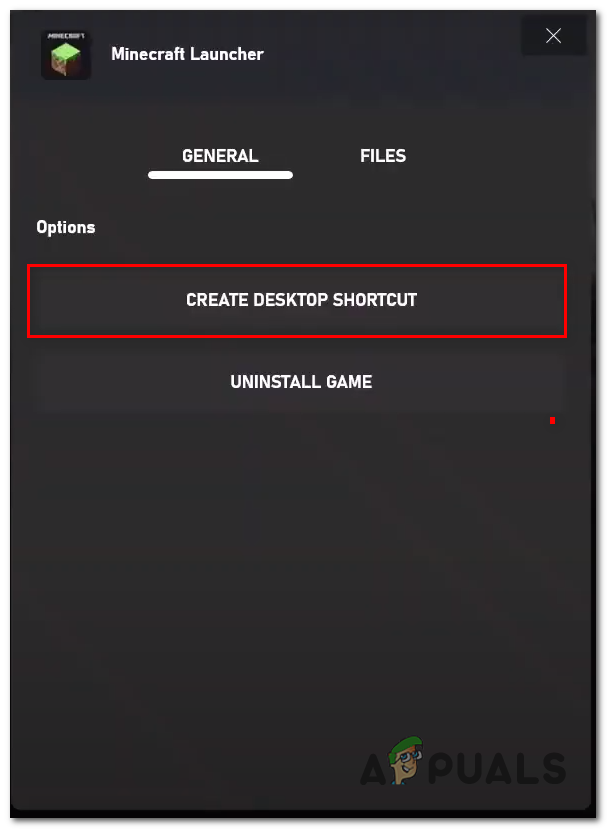
- Click on Create a Desktop Icon, and open the desktop.

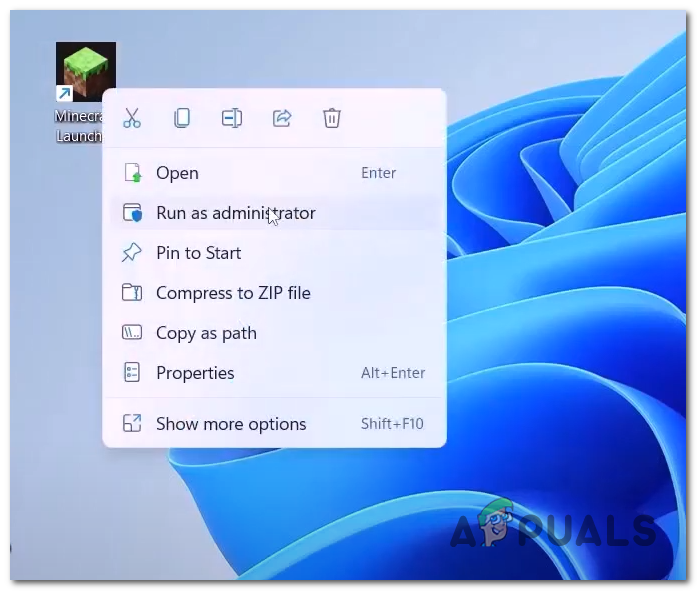
Creating a desktop shortcut icon for Minecraft - Right Click on Minecraft and Run as an administrator.

Running Minecraft as an administrator
If launching the game as an administrator does not fix the error, continue to the next steps.
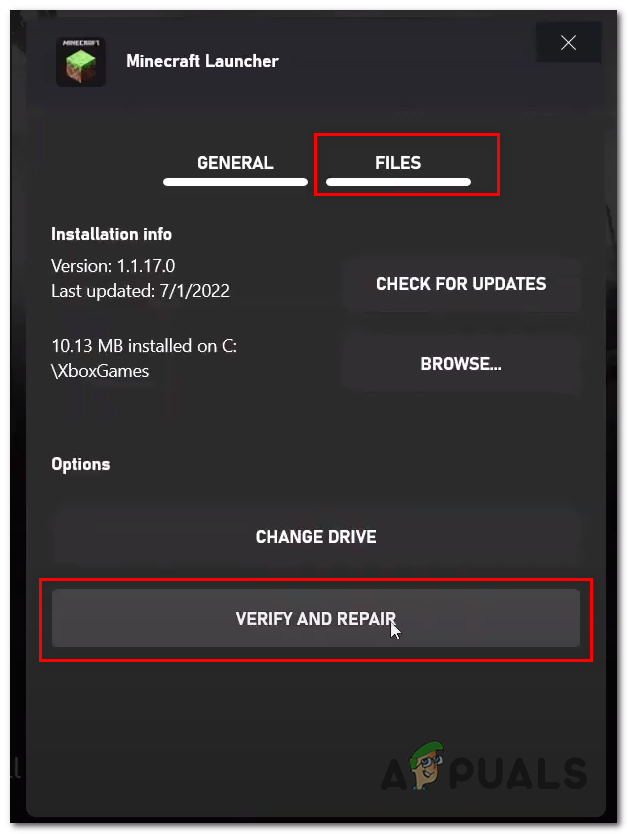
2. Verify and repair the game files
Verifying game files will look for missing or corrupt files in the root directory. Corrupt Game files could be one of the reasons you are facing this error as users have reported the issue fixed after they verified their game files. By Corrupt game files, we mean that the Minecraft root files have become inoperable and won’t function properly. To Verify game files follow these steps:
- Open Xbox Game Pass App
- Right-Click or click on the Three dots beside Minecraft.

Opening Minecraft settings - In the Box that pops up Click on Files.
- Click on Verify and Repair.

Verifying Minecraft launcher - Restart your Computer
Once your computer has restarted, try launching the game if the problem persists continue to the next step.
3. Start Necessary services
Multiple services running in the background corroborate the smooth operation of the Microsoft Store and Xbox Game Pass application, we will be making sure these services are live and running by using a few commands, follow the below-mentioned steps:
- Press Windows Key on your keyboard on click on the windows icon on your taskbar.
- Search CMD or command prompt in the search box and Run as administrator.

Running Command Prompt as an Administrator - Paste the Commands one after the other.
net start iphlpsvc
net start XblAuthManager
net start XblGameSave
net start Installservice
net start wuauserv
Once all the services have been forced started try launching Minecraft and if the issue still persists continue to the next steps.
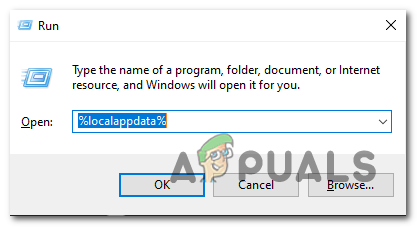
4. Delete Microsoft Store Cache
Deleting the Microsoft store cache will refreshen things as the store will be forced to download new cache which might help us in resolving this issue. To Delete Microsoft Cache follow these steps:
-
- Press the Windows key + R key simultaneously.

Deleting Local Cache of Microsoft Store - In the run dialog box type %localappdata% and hit enter.
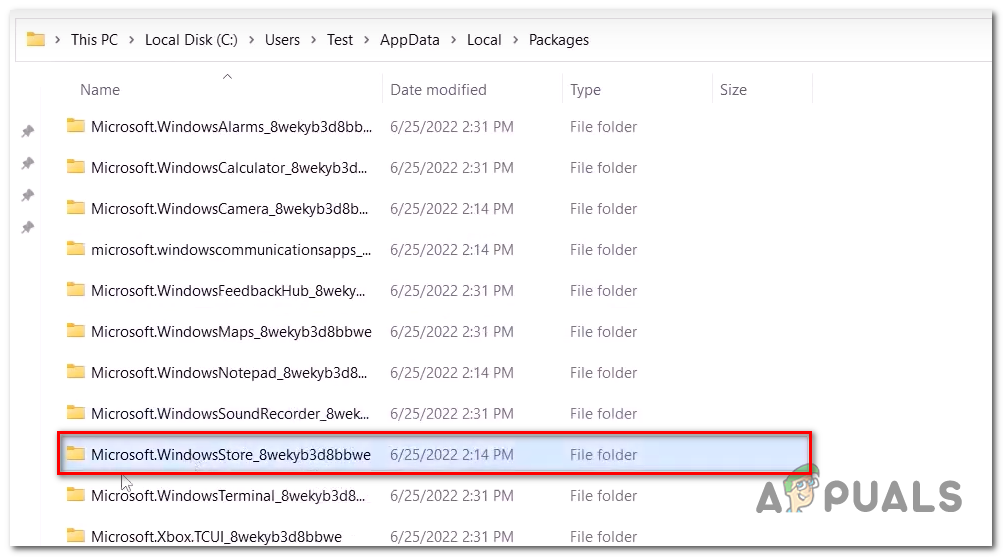
- In the List of Folders, Search and double click on the folder named Packages.
- Inside the Packages folder, Locate a folder Named Microsoft.WindowsStore_8wekyb3d8bbwe.

Deleting Microsoft store cache - Open this folder and Right-Click on Local Cache.
- Delete the folder.

Deleting the Local cache of the Microsoft Store
- Press the Windows key + R key simultaneously.

Once the LocalCache folder has been deleted, Restart Your Computer and try launching the Microsoft store if the issue remains continue to the next step.
5. Reinstall Xbox Gaming Services
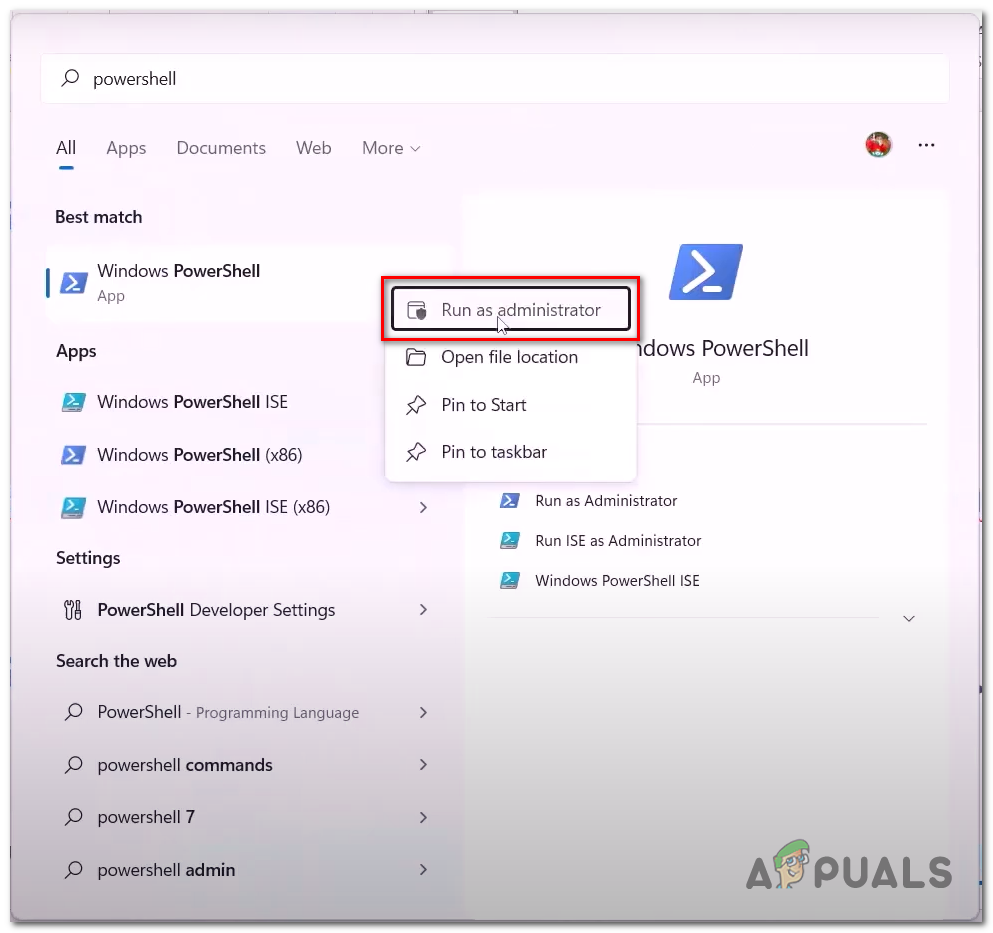
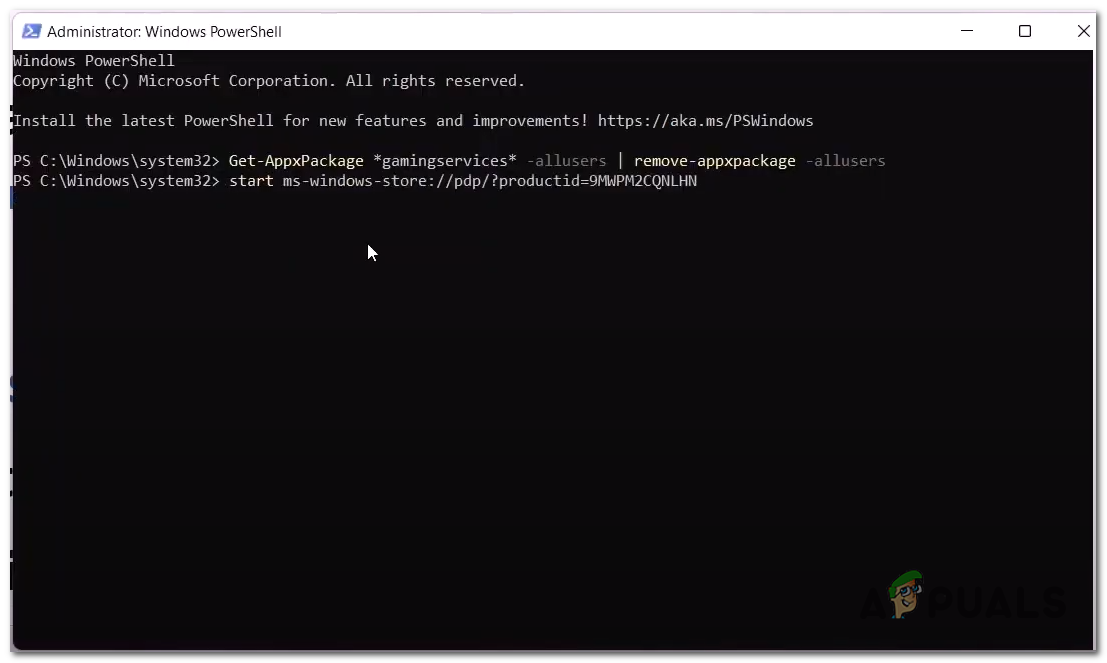
Xbox Gaming services is a services package provided by the Microsoft itself, it is pretty easy to download the gaming services package from the Microsoft store but we’ll be taking a different approach where we’ll first uninstall any gaming services-related services and reinstall, Follow these steps:
- Press Windows Key or click on the windows icon.
- Type Powershell in the search box and run as administrator.

Reinstall Xbox Gaming Services - Paste in the following command. It will uninstall pre-installed gaming services.
Get-AppxPackage *gamingservices* -allusers | remove-appxpackage -allusers
- Now, Paste in the following command and hit enter, it will redirect you to the Microsoft store.
start ms-windows-store://pdp/?productid=9MWPM2CQNLHN

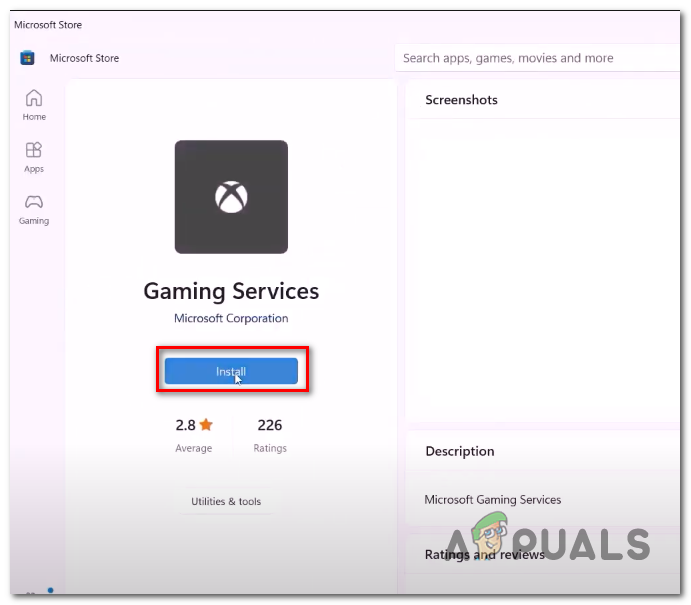
Reinstalling Xbox Gaming services - Click on Install.

Installing Xbox Gaming Services - Once Installed, Restart your computer.
Once your computer has restarted try launching the game, if the issue persists continue to next step.
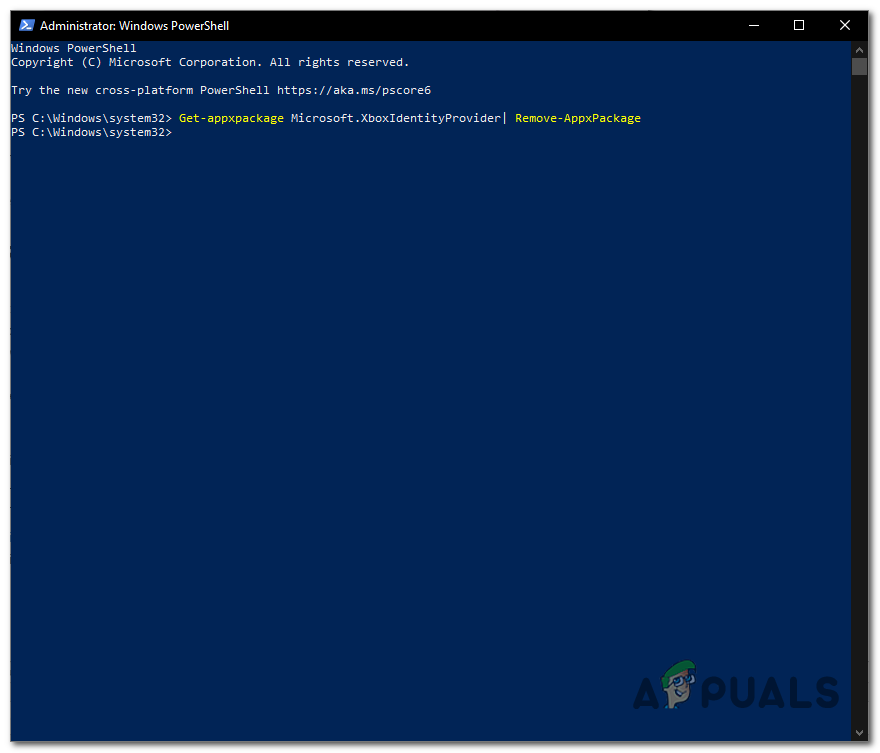
6. Reinstall Xbox Identity provider
Xbox Identity provider bridges PC users to Xbox live and allows them to access their Xbox live content, Xbox Identity provider is a necessary service and is preinstalled but as reported by the users reinstalling it has fixed launching errors on multiple games, Learn more about Xbox identity provider. In order to Reinstall follow the below-mentioned steps:
- Press Windows Key.
- In the search bar type Powershell and run it as administrator.
- Paste the following command, what this command will do is uninstall Xbox identity provider if you already had it installed.

Uninstalling Xbox identity Provider Get-appxpackage Microsoft.XboxIdentityProvider| Remove-AppxPackage
- Click here to install Xbox Identity Provider.
- Click on install and Restart your computer
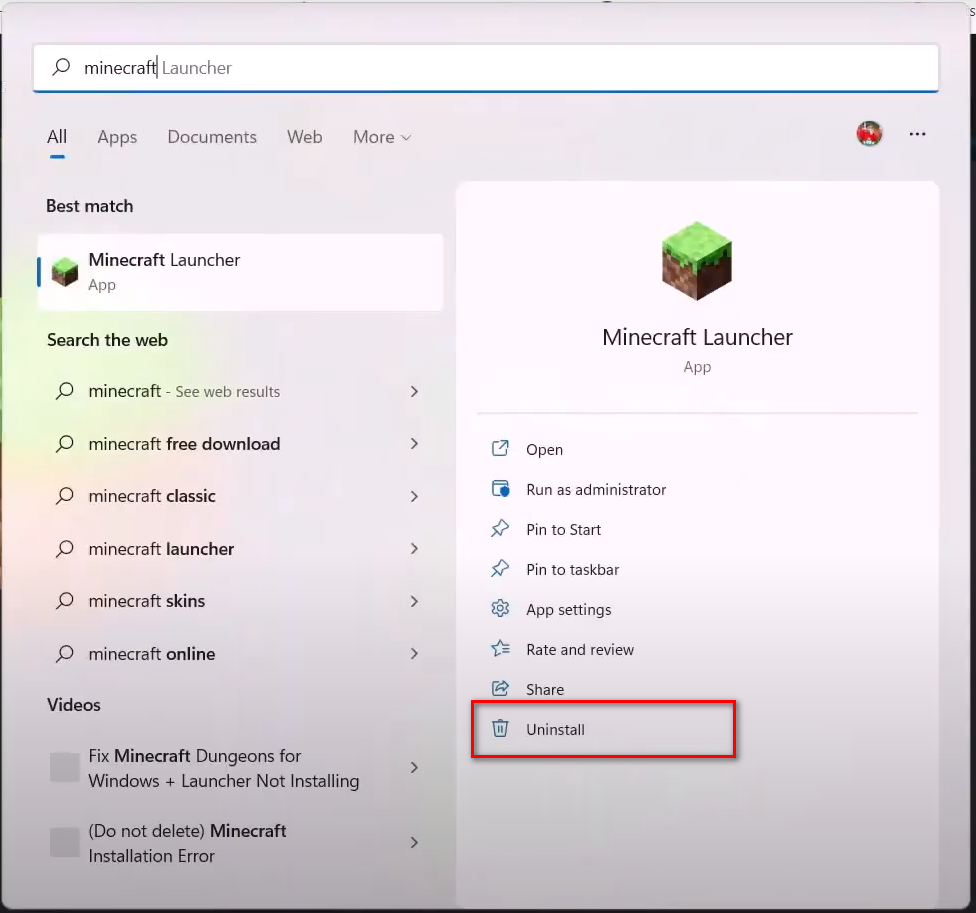
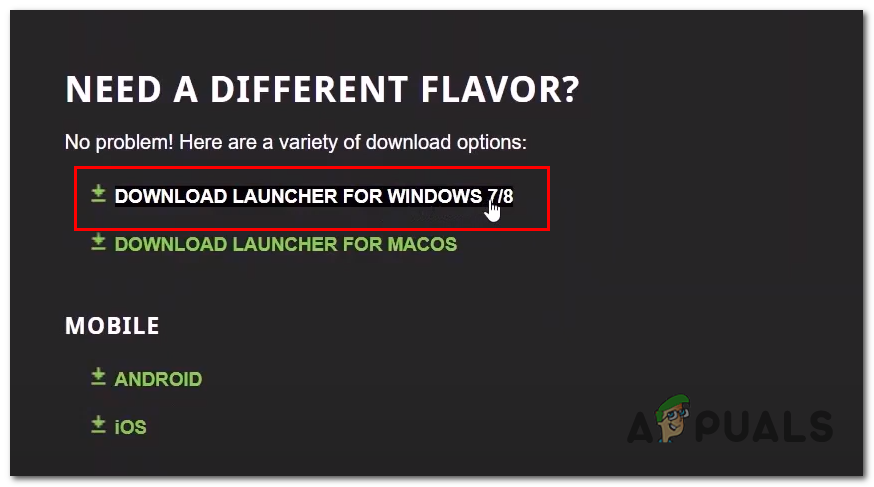
7. Install windows7/8 Minecraft launcher
Installing an older version of the launcher means degrading to an older build of the launcher which has been tested and is considered stable. A stable version of the Minecraft launcher might fix our issue, in order to install follow the below-mentioned steps:
- Press Windows Key.
- Search Minecraft Launcher and click on Uninstall.

Uninstalling Current Minecraft Launcher - Once uninstalled click here to install the windows 7/8 version of the Minecraft Launcher.

Downloading the windows7/8 version of the Minecraft launcher - Once downloaded and installed, Try launching the game.
8. Update Windows
Updating windows can provide feature enhancement and might fix errors you are facing with certain applications such as Microsoft store, refer to this article to update windows.

Dawood Janjua
Dawood Janjua is a highly skilled technology enthusiast with a wealth of knowledge in Windows troubleshooting and gaming. He holds a CCNA certification and has a proven track record of providing exceptional support to customers. While currently working as an author, Dawood aspires to obtain the prestigious CCIE certification in the future to expand his technical expertise and provide regional-level support. With his passion for gaming and expertise in technology, Dawood is committed to sharing his knowledge with the community to help others improve their skills and knowledge in the field.
Contents
- What Is the Error 0x800703e6?
- What Causes the Error 0x800703e6?
- How to Fix the Update Error 0x800703e6 on Windows 10
- Fix 1: Run the Windows Update Troubleshooter
- Fix 2. Clean Up the Hard Drive
- Fix 3. Clear the Software Distribution Folder
- Fix 4. Perform a Clean Boot
- Here’s how to do it:
- Fix 5. Run Scans with DISM and SFC
- Conclusion

Windows Update error messages have always been part of the Windows experience, much to the annoyance of users. When a patch for one is applied, another comes to take its place.
By and large, update errors on Windows point to an issue that stops the system from adding updated files to the firmware. Sometimes, the bug is serious enough to stop upgrades to a new build of the OS.
The update error 0x800703e6 is just one in a long line of update-stalling issues on Windows 10. This article explains what it is, its potential causes, and the ways to fix it.
What Is the Error 0x800703e6?
When the error 0x800703e6 happens, it’s usually accompanied by the following message: “ERROR_NOACCESS: Invalid access to memory location.” The bug seems to be related to memory issues that prevent the system from loading necessary update files into memory.
Many affected users discovered this error when trying to upgrade their Windows 10 build from 1903 to 1909 or later. But this isn’t the only Windows edition that it affects. Several users on versions 2004 and 20H2 found that they couldn’t install the cumulative updates KB4023057, KB5003214, and KB5003173 because of the error.
The error 0x800703e6 has persisted on the latest Windows 10 versions. Checking forums reveals that installation of the 2021-08 Cumulative Update for Windows 10 Version 21H1 for x64-based systems (KB5005033) often gets interrupted as well.
What Causes the Error 0x800703e6?
The net result of Windows update errors is the inability to upgrade system files using official means. In addition, specific errors might be triggered by different issues within the system.
When it comes to the Windows Update error 0x800703e6, the following have been observed as the main causes in the majority of cases:
- System Glitch. If the system suffers a bug that stops it from processing certain operations, it may make the Windows update installation process fail.
- Memory Clash. When Windows Update and another application try to use the same memory location, the error 0x800703e6 can happen. This is because two applications can’t use the same memory location at the same time on Windows.
- Registry Issues. Any number of errors related to the system registry can cause this issue. Invalid registry keys, broken or deleted entries, corrupted keys, etc. can lead to the error 0x800703e6. These issues are generally caused by uninstalled software that leaves behind files that conflict with Windows Update.
- Missing Files. These can be DLL files, WU files, or protected system files.
Now that you know the possible causes of the problem, here are the various ways to eliminate the error and get Windows Update working properly.
How to Fix the Update Error 0x800703e6 on Windows 10
Windows errors might feel inevitable, but with proper care of the PC, they can be avoided. Ways to care for the machine include deleting junk files regularly, cleaning the registry, removing memory hogs, and optimizing your PC for various tasks. When you perform regular computer maintenance and use the right tools to do so, you won’t face issues like the error 0x800703e6.
Here are several tips to fix the Windows Update error 0x800703e6. Each method has worked for several people. You can apply them in any order you like.
Fix 1: Run the Windows Update Troubleshooter
The Windows Update troubleshooter is ready-made for situations like this. It’s a small preinstalled Windows tool that scans the system for bugs preventing Windows Update from working. Once the scan is completed, it suggests a fix the user can apply.
To run the WU troubleshooter, follow these steps:
- Open the Start menu and select Settings.
- Navigate to Update & Security > Troubleshoot.
- On the Recommended Troubleshooting screen on the right, click the Additional Troubleshooters link.
- Select Windows Update under “Get up and running”.
- Click Run the Troubleshooter.
If the WU troubleshooter doesn’t automatically apply a fix, click the “Apply this fix” button.
Fix 2. Clean Up the Hard Drive
Leftover files can stop Windows Update from running and bring up the error 0x800703e6 instead. This can happen if files from a previous installation remain on the system. When WU downloads an update, the process could fail due to the leftover files interfering with the operation.
To avoid this, you can scan your hard drive with the native Disk Cleanup utility. Here’s how:
- Press Win + R to open Run.
- Type “cleanmgr” into the Run field and click OK to launch the Disk Cleanup utility.
- When Disk Cleanup opens, click the “Clean up system files” button.
- Under “Files to delete”, tick the checkboxes beside the locations you want cleaned up. Make sure that the box beside “Windows Update Cleanup” is checked.
- When you’re all set, click OK.
- You’ll get a confirmation prompt. Click Delete Files.
Once Disk Cleanup has done its job, close the program and try updating Windows again.
Fix 3. Clear the Software Distribution Folder
The Software Distribution folder is where Windows Update stores installation files before running updates or upgrades. Typically, these files are cleared after the installation.
In some scenarios, old installation files aren’t deleted but remain in this location and prevent new ones from being downloaded.
Disk Cleanup checks all Windows Update locations for files to clear. However, it might fail to eliminate files from this folder. If this happens, you can run a command to specifically clear this folder.
Here’s the method. To apply it, you need to open a Command Prompt window with elevated privileges. Follow the instructions below:
- Hit the Windows key and type “cmd”.
- Command Prompt will show up as the main search result.
- Under Command Prompt, click “Run as administrator” and click Yes on the UAC prompt.
- Stop the Windows Update service. To do that, in the cmd window, type the command below and hit the Enter key:
net stop wuauserv
- To clear the Software Distribution folder, run this command:
rd /s /q %systemroot%\SoftwareDistribution
- Next, restart the Windows Update service with the following command:
net start wuauserv
Close the Command Prompt. Then try running the update to check if the issue is gone.
Fix 4. Perform a Clean Boot
Clean boot is a Windows mode that runs the system with a minimal set of drivers and startup programs. In this mode, all third-party and non-essential items are disabled. This gives users a clean environment to troubleshoot in.
Performing a clean boot is a somewhat lengthy, if straightforward, process. The procedure below explains how to do it:
- Hit the Windows key and type “msconfig”.
- Select System Configuration in the search results.
- When System Configuration opens, move to the Services tab.
- Tick “Hide all Microsoft services”.
- Click the “Disable all” button.
- Switch to the Startup tab.
- Click the Open Task Manager link.
- In the Task Manager, disable every startup program. To disable one, right-click it and select Disable.
- Return to the Startup tab of System Configuration.
- Click Apply and then OK.
- Restart the system when prompted.
After the restart, move to Windows Update and try updating the OS. If the operation succeeds, great. You can exit clean boot and return to the normal Windows environment.
Here’s how to do it:
- Return to System Configuration.
- In the General tab, tick Normal Startup.
- Switch to the Services tab and untick “Hide all Microsoft services”.
- Switch to the Startup tab and open the Task Manager from there.
- Enable the startup items you previously disabled.
- Return to System Configuration.
- Click Apply and then OK.
- When you get a prompt, click Restart.
If Windows still fails to update or you keep getting the error 0x800703e6, it means that none of the disabled services or startup items is the problem. You can try another solution then.
Fix 5. Run Scans with DISM and SFC
Deployment Image Servicing and Management (DISM) is a Windows tool that scans and restores system images. It will check for errors and fix damage to your Windows image.
System File Checker (SFC) is another Windows utility. It scans protected system files for errors and fixes them. It deletes corrupt files and replaces them with fresh copies from the local Windows cache.
You can run both in tandem to solve the Windows Update error 0x800703e6 issue when it’s caused by faulty or corrupt files:
- Open an elevated Command Prompt window as explained earlier.
- Microsoft recommends running a DISM scan first. To do so, run the two commands below, one after the other:
DISM /Online /Cleanup-Image /ScanHealth
DISM /Online /Cleanup-Image /RestoreHealth
- Be patient while DISM scans the system image for bad sectors, etc.
Note: You must have an active Internet connection when running a DISM scan.
- To run an SFC scan, type “sfc /scannow” into the CMD window and hit Enter.
- Again, wait for the tool to scan system files for errors and apply a fix.
When the scan is complete, close all windows and restart the computer.
Hopefully, you’re now able to update Windows without coming across the Windows Update error 0x800703e6.
Conclusion
There are various reasons for the error code 0x800703e6 to occur on Windows 10. When you’re unable to update Windows, it can be annoying. Much more so when you’re in a rush and need to make better use of your time.
Hopefully, the tips here have helped you to eliminate the error. You can also try using the Media Creation Tool to manually upgrade Windows.
Недавно были отчеты несколько пользователей столкнулись с кодом ошибки 0x800703e6 при попытке установить обновления Windows. Указанная ошибка возникает при попытке установить обновления KB4023057, KB5003214, KB5003173 на Windows 10 версий 1903, 1909, 2004 и 20H2. Некоторые пользователи также столкнулись с этой проблемой при попытке установить обновление KB5005033 для Windows 10 версии 21H1.

Мы изучили эту проблему и обнаружили, что она обычно вызывается следующими факторами:
- Прерывание работы антивируса – Известно, что сторонние пакеты безопасности мешают Windows Update’ устанавливать определенные обновления. В этом случае вы можете либо отключить Real-Time Protection, либо удалить сторонний пакет безопасности, чтобы решить проблему.
- Поврежденные компоненты обновления Window Update – Проблема также может быть результатом некоторого уровня повреждения файлов, препятствующего работе компонента WU. Проблема может быть решена с помощью средства устранения неполадок Windows Update или путем сброса всех компонентов WU из командной строки.
- Повреждение системного файла – Существует также вероятность того, что общая ошибка повреждения в вашей операционной системе мешает вам выполнить поставленную задачу. Существует несколько способов устранения проблемы, от выполнения сканирования SFC и DISM до выполнения восстановительной установки и чистой установки.
Теперь, когда мы знаем о возможных причинах, давайте’ посмотрим, как можно устранить проблему.
Запустите средство устранения неполадок Windows Update Troubleshooter
Вам следует начать с использования средства устранения неполадок Windows Update, чтобы проверить, сможет ли оно автоматически устранить проблему, прежде чем переходить к более продвинутым руководствам по устранению неполадок.
Поскольку существует множество возможных причин сбоя обновлений Windows, вам следует запустить средство устранения неполадок Windows Update Troubleshooter, чтобы узнать, может ли оно выявить какие-либо проблемы, которые могут нарушить функциональность обновления. Когда средство устранения неполадок идентифицирует ситуацию, которая относится к одной из схем ремонта, оно автоматически применит соответствующую стратегию ремонта.
Вот что вам нужно сделать:
- Откройте диалоговое окно «Выполнить», нажав Windows + R-клавиши одновременно на ПК.
- В текстовом поле диалогового окна введите ms-settings:troubleshoot и нажмите Enter.

Доступ к другим средствам устранения неполадок - На вкладке Устранение неполадок выберите Обновление Windows в разделе Запустить.
- Теперь нажмите на Запустите средство устранения неполадок и дождитесь завершения сканирования.

Запуск средства устранения неполадок Windows Update - Если найдена проблема, которую можно решить с помощью одной из стратегий восстановления, вы сможете нажать кнопку Примените это исправление кнопка.

Применяя рекомендуемое исправление - После успешного применения рекомендуемых исправлений перезагрузите компьютер и повторите попытку обновления Windows.


Запуск сканирования SFC и DISM
Как упоминалось ранее, ошибки повреждения в операционной системе могут привести к проблемам, подобным коду ошибки 0x800703e6. К счастью, Windows поставляется с несколькими встроенными утилитами для устранения неполадок, которые могут сканировать систему и ее файлы на наличие ошибок, а также устранять выявленные проблемы.
Двумя такими утилитами являются SFC (System File Checker) и DISM (Deployment Image Servicing and Management), которые могут заменить поврежденные системные файлы здоровыми аналогами и заменить сбойные сектора хранения неиспользуемыми эквивалентами.
С помощью System File Checker вам не нужно выходить в интернет. Этот инструмент использует локально кэшированный архив с резервными системными файлами и заменяет поврежденный файл его здоровым аналогом. DISM требует стабильного доступа к Интернету. Это необходимо, поскольку DISM использует WU для замены поврежденных файлов на здоровые эквиваленты.
Вот как можно запустить сканирование SFC и DISM в операционной системе Windows:
- Введите cmd в области поиска на панели задач и нажмите на кнопку Запустите от имени администратора чтобы запустить Командную строку с правами администратора.
- В окне командной строки введите указанную ниже команду и нажмите кнопку Введите.
sfc /scannow

Развертывание сканирования SFC - В том же поднятом окне CMD выполните сканирование DISM после сканирования SFC (независимо от результатов).
DISM /Online /Cleanup-Image /RestoreHealth

Используйте команду DISM для восстановления здоровья - Наконец, перезагрузите компьютер и после перезагрузки проверьте, можете ли вы установить требуемое обновление.


Временно отключить антивирус
Эта проблема, по-видимому, также вызвана мешающей сторонней программой, которая не позволяет пользователям устанавливать обновления Windows. Вот почему, если вы используете антивирусную службу стороннего производителя, мы рекомендуем вам отключить ее, а затем попробовать установить обновления.
Кроме того, вы можете использовать удаление пакета стороннего производителя вообще и использовать вместо нее брандмауэр Windows Defender.
Другим обходным решением, которое помогло решить проблему нескольким пользователям, было удаление записей из реестра Windows для WUServer и WStatusServer, поэтому мы рекомендуем попробовать это сделать.
Однако, поскольку реестр Windows является инструментом административного уровня, мы рекомендуем создать резервную копию перед выполнением перечисленных ниже действий по устранению неполадок, на случай, если что-то пойдет не так.
После этого выполните следующие шаги, чтобы исправить код ошибки 0x800703e6:
- Нажмите Windows + R-клавиши одновременно на клавиатуре, чтобы открыть окно Запустите диалоговое окно.
- В текстовом поле диалогового окна введите regedit и нажмите кнопку Введите запустить реестр Windows.

Откройте редактор Regedit - Как только вы окажетесь в редакторе реестра, перейдите к указанному ниже местоположению.

HKEY_LOCAL_MACHINE\SOFTWARE\Policies\Microsoft\Windows\WindowsUpdate
- Теперь найдите WUServer и WStatusServer записи в правой панели и удалите их, щелкнув по ним правой кнопкой мыши по очереди и выбрав Удалить.

Удалите ключи реестра

Если вы не можете найти записи, перейдите к следующему методу, описанному ниже.
Сброс компонентов обновления Windows
Windows использует различные службы для загрузки и установки обновлений Windows на ваш компьютер. Таким образом, в случае, если хотя бы один из этих компонентов, отвечающих за обновление вашей системы, не будет работать должным образом, обновления не будут установлены и будет выдана ошибка, подобная коду ошибки 0x800703e6.
Лучшим вариантом в этом случае будет сброс компонентов обновления в вашей системе. Это перезапустит все компоненты, тем самым устранив ошибку.
Вот как вы можете перезапустить компоненты обновления на вашем ПК:
- Введите cmd в области поиска на панели задач и нажмите кнопку Запуск от имени администратора чтобы запустить Командную строку с правами администратора.
- В окне Командная строка введите команду, указанную ниже, и нажмите кнопку Ввести.
net stop bits
net stop wuauserv
net stop appidsvc
net stop cryptsvc

- Затем необходимо удалить qmgr*.файлы dat, созданные службой BITS. Для этого выполните следующую команду:
Del "%ALLUSERSPROFILE%\Application Data\Microsoft\Network\Downloader\*".*"
- Затем введите Y и нажмите Введите.
- После этого мы переименуем некоторые папки, в которых хранятся загруженные обновления. Для этого выполните следующую команду:
Ren C:\Windows\SoftwareDistribution SoftwareDistribution.old Ren C:\Windows\System32\catroot2 Catroot2.старый
- Наконец, выполните следующие команды одну за другой:
net start wuauserv

net start cryptSvc

биты запуска сети

net start msiserver
- После этого перезагрузите компьютер и проверьте, по-прежнему ли вы сталкиваетесь с кодом ошибки 0x800703e6.
Выполните очистку диска
Для установки последних обновлений требуется хорошо оптимизированный диск для хранения данных. Если на вашем устройстве мало места на диске, вы можете столкнуться с ошибками, подобными коду ошибки 0x800703e6.
Вот как можно выполнить очистку диска на устройстве Windows:
- Введите Очистка диска в области поиска на панели задач и нажмите кнопку Откройте.
- Это позволит утилите просканировать ваш компьютер на наличие ненужных файлов. После этого отметьте файлы, которые вы хотите удалить, в диалоговом окне Очистка диска и нажмите кнопку OK.

Результаты сканирования очистки диска - Наконец, нажмите на кнопку Кнопка удаления файлов после удаления файлов проверьте, можете ли вы установить обновления без каких-либо проблем.

Выполнить обновление на месте
Если вы зашли так далеко без решения, то это означает, что код ошибки 0x800703e6 не может быть устранен с помощью обычных методов поиска и устранения неисправностей. Если этот сценарий применим, выполнение обновления на месте может помочь вам избавиться от кода ошибки 0x800703e6 раз и навсегда.
Кроме того, вы также можете попробовать сбросить настройки компьютера до значений по умолчанию чтобы исправить проблему.