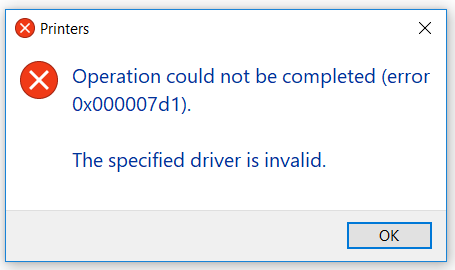
При использовании принтера на ПК под управлением ОС Windows 10 можно увидеть ошибку с кодом 0x000007d1. К самой ошибке прикладывается следующее сообщение:
Невозможно завершить операцию (ошибка 0x000007d1).
Выбран неверный драйвер.
Причина? На самом деле, причина за данной ошибкой указывается сразу же в ее же сообщении: проблема заключается в некорректно работающем драйвере подключенного принтера.
Как исправить ошибку 0x000007d1?
Как правило, вся эта проблема решается при помощи элементарного обновления или переустановки драйвера для принтера. Сделайте следующее:
- нажмите Windows+R;
- пропишите devmgmt.msc и нажмите Enter;
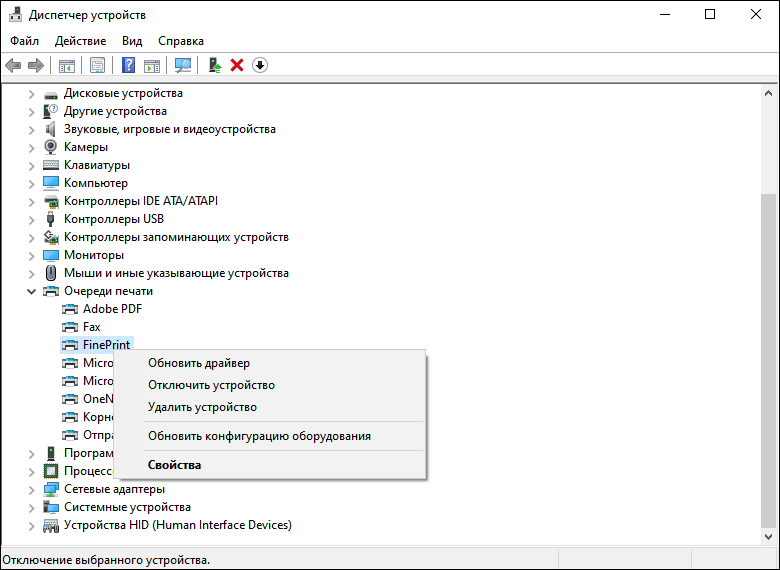
- раскройте раздел «Очереди печати» и найдите свой принтер;
- нажмите на него правой кнопкой мыши и выберите «Обновить драйвер»;
- выберите опцию «Автоматический поиск обновленных драйверов»;
- следуйте дальнейшим инструкциям на экране и подождите обновления драйвера.
Воспользуйтесь принтером и посмотрите, исчезла ли ошибка 0x000007d1. Если нет, то попробуйте переустановить драйвер. Для этого вместо опции «Обновить драйвер» в Диспетчере устройств выберите «Удалить устройство».
Потом перезагрузите компьютер, перейдите на официальный сайт производителя вашего принтера, скачайте драйвер и установите его. Поверьте, процедура очень простая — не потеряетесь. Как только установите свежий драйвер, проверьте наличие ошибки 0x000007d1.
Если же обновление и переустановка драйвера принтера не помогла вам разрешить данную неполадку, то можете выполнить небольшой «хак» в реестре Windows. Сделайте следующее:
- нажмите Windows+R;
- пропишите regedit и нажмите Enter;
- перейдите в следующий раздел:
- HKEY_LOCAL_MACHINE\SYSTEM\CurrentControlSet\Control\Print\PostSPUpgrade
- удалите PostSPUpgrade, используя левую часть окошка реестра;
- перезагрузите компьютер.
Используем подключенный принтер и проверяем, была ли разрешена ошибка 0x000007d1 или же нет.
Причина ошибки с номером 0x000007d1 — некорректная работа драйвера принтера. Устранить её можно двумя способами: ручной переустановкой программного обеспечения и внесением исправлений в системный реестр.
Переустановка драйвера принтера
Чаще всего для исправления ошибки 0x000007d1 достаточно обновить или переустановить драйвер принтера.
- Открываем «Диспетчер устройств».
- Раскрываем раздел «Очереди печати» и находим свой принтер.
- Кликаем по устройству правой кнопкой и выбираем опцию «Обновить драйвер».

Обновляем драйвер принтера
- Запускаем автоматический поиск обновлённых драйверов.
- Следуем инструкциям на экране, чтобы обновить драйвер.

После обновления драйвера пробуем снова воспользоваться принтером. Если ошибка повторяется, то приступаем к чуть более радикальному решению проблемы. Удаляем принтер и затем устанавливаем последнюю версию драйвера с сайта производителя.
- Открываем «Диспетчер устройство».
- Находим в списке принтер, кликаем по нему правой кнопкой и выбираем опцию «Удалить устройство».
- Подтверждаем удаление устройства и перезагружаем компьютер.
После перезагрузки заходим на сайт производителя принтера. Находим свою модель и скачиваем последнюю версию драйвера, совместимую с Виндовс 10. Обращаем внимание на разрядность — она должна совпадать. Устанавливаем драйвер вручную и проверяем, заработал ли принтер.

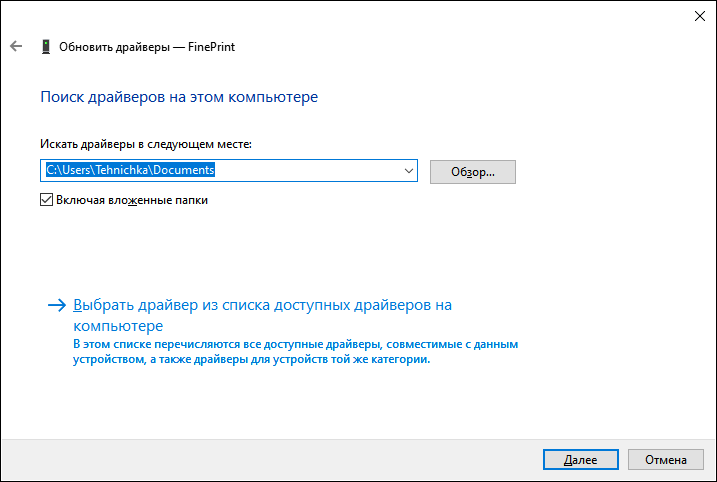
Устанавливаем драйвер принтера вручную
Если драйвер скачивается не в виде исполняемого файла, то для ручной установки запускаем «Диспетчер устройств», находим принтер (система автоматически определит его при включении), кликаем правой кнопкой, выбираем опцию «Обновить драйвер» и нажимаем «Выполнить поиск драйверов на этом компьютере». Затем кликаем «Обзор» и указываем папку, в которую скачан файл драйвера. Следуем инструкциям мастера обновления, чтобы установить последнюю версию ПО.
Если обновление драйвера и даже ручная переустановка устройства не помогли избавиться от ошибки 0x000007d1, применяем небольшой хак. О нём сообщили пользователи на форуме поддержки Microsoft. Способ заключается во внесении изменений в системный реестр. Это безопасно и эффективно — по крайней мере, многие пользователи подтвердили, что им помогли следующие действия:
- Открываем редактор реестра (Win+R — regedit).
- Переходим в раздел HKEY_LOCAL_MACHINE\SYSTEM\CurrentControlSet\Control\Print\PostSPUpgrade.
- Удаляем параметр PostSPUpgrade.
- Перезагружаем компьютер.
После повторного запуска системы проверяем, заработал ли принтер. На этот раз никаких ошибок быть не должно.
![]() Загрузка …
Загрузка …
Post Views: 836
Причина ошибки с номером 0x000007d1 — некорректная работа драйвера принтера. Устранить её можно двумя способами: ручной переустановкой программного обеспечения и внесением исправлений в системный реестр.
Переустановка драйвера принтера
Чаще всего для исправления ошибки 0x000007d1 достаточно обновить или переустановить драйвер принтера.
- Открываем «Диспетчер устройств» .
- Раскрываем раздел «Очереди печати» и находим свой принтер.
- Кликаем по устройству правой кнопкой и выбираем опцию «Обновить драйвер».
Обновляем драйвер принтера
- Запускаем автоматический поиск обновлённых драйверов.
- Следуем инструкциям на экране, чтобы обновить драйвер.
После обновления драйвера пробуем снова воспользоваться принтером. Если ошибка повторяется, то приступаем к чуть более радикальному решению проблемы. Удаляем принтер и затем устанавливаем последнюю версию драйвера с сайта производителя.
- Открываем «Диспетчер устройство».
- Находим в списке принтер, кликаем по нему правой кнопкой и выбираем опцию «Удалить устройство».
- Подтверждаем удаление устройства и перезагружаем компьютер.
После перезагрузки заходим на сайт производителя принтера. Находим свою модель и скачиваем последнюю версию драйвера, совместимую с Виндовс 10. Обращаем внимание на разрядность — она должна совпадать. Устанавливаем драйвер вручную и проверяем, заработал ли принтер.
Устанавливаем драйвер принтера вручную
Если драйвер скачивается не в виде исполняемого файла, то для ручной установки запускаем «Диспетчер устройств», находим принтер (система автоматически определит его при включении), кликаем правой кнопкой, выбираем опцию «Обновить драйвер» и нажимаем «Выполнить поиск драйверов на этом компьютере». Затем кликаем «Обзор» и указываем папку, в которую скачан файл драйвера. Следуем инструкциям мастера обновления, чтобы установить последнюю версию ПО.
Если обновление драйвера и даже ручная переустановка устройства не помогли избавиться от ошибки 0x000007d1, применяем небольшой хак. О нём сообщили пользователи на форуме поддержки Microsoft. Способ заключается во внесении изменений в системный реестр. Это безопасно и эффективно — по крайней мере, многие пользователи подтвердили, что им помогли следующие действия:
- Открываем редактор реестра (Win+R — regedit).
- Переходим в раздел HKEY_LOCAL_MACHINESYSTEMCurrentControlSetControlPrintPostSPUpgrade .
- Удаляем параметр PostSPUpgrade.
- Перезагружаем компьютер.
После повторного запуска системы проверяем, заработал ли принтер. На этот раз никаких ошибок быть не должно.
![]() Загрузка …
Загрузка …
Причина ошибки с номером 0x000007d1 — некорректная работа драйвера принтера. Устранить её можно двумя способами: ручной переустановкой программного обеспечения и внесением исправлений в системный реестр.
Переустановка драйвера принтера
Чаще всего для исправления ошибки 0x000007d1 достаточно обновить или переустановить драйвер принтера.
- Открываем «Диспетчер устройств».
- Раскрываем раздел «Очереди печати» и находим свой принтер.
- Кликаем по устройству правой кнопкой и выбираем опцию «Обновить драйвер».
Обновляем драйвер принтера
- Запускаем автоматический поиск обновлённых драйверов.
- Следуем инструкциям на экране, чтобы обновить драйвер.
После обновления драйвера пробуем снова воспользоваться принтером. Если ошибка повторяется, то приступаем к чуть более радикальному решению проблемы. Удаляем принтер и затем устанавливаем последнюю версию драйвера с сайта производителя.
- Открываем «Диспетчер устройство».
- Находим в списке принтер, кликаем по нему правой кнопкой и выбираем опцию «Удалить устройство».
- Подтверждаем удаление устройства и перезагружаем компьютер.
После перезагрузки заходим на сайт производителя принтера. Находим свою модель и скачиваем последнюю версию драйвера, совместимую с Виндовс 10. Обращаем внимание на разрядность — она должна совпадать. Устанавливаем драйвер вручную и проверяем, заработал ли принтер.
Устанавливаем драйвер принтера вручную
Если драйвер скачивается не в виде исполняемого файла, то для ручной установки запускаем «Диспетчер устройств», находим принтер (система автоматически определит его при включении), кликаем правой кнопкой, выбираем опцию «Обновить драйвер» и нажимаем «Выполнить поиск драйверов на этом компьютере». Затем кликаем «Обзор» и указываем папку, в которую скачан файл драйвера. Следуем инструкциям мастера обновления, чтобы установить последнюю версию ПО.
Если обновление драйвера и даже ручная переустановка устройства не помогли избавиться от ошибки 0x000007d1, применяем небольшой хак. О нём сообщили пользователи на форуме поддержки Microsoft. Способ заключается во внесении изменений в системный реестр. Это безопасно и эффективно — по крайней мере, многие пользователи подтвердили, что им помогли следующие действия:
- Открываем редактор реестра (Win+R — regedit).
- Переходим в раздел HKEY_LOCAL_MACHINESYSTEMCurrentControlSetControlPrintPostSPUpgrade.
- Удаляем параметр PostSPUpgrade.
- Перезагружаем компьютер.
После повторного запуска системы проверяем, заработал ли принтер. На этот раз никаких ошибок быть не должно.
![]() Загрузка …
Загрузка …
Post Views: 787
Find that you keep getting an error which whenever you try to print something which says “Operation could not be completed (error 0x000007d1), The specified driver is invalid”?
Then this guide is written to help you. The connection between your Windows 10 PC and your printer has to undergo via the printer driver which is installed on your PC that assists in establishing the connection to do the printing.
There have been numerous instances where users have encountered this issue on the Microsoft forums, some users have reported it on the Dell forums as well as their respective printer brands forums such as Brother.
We have tried and tested many of the solutions suggested. This guide contains what we found to be the most effective and highly recommended solutions by not just us, but also other users on forums as well as our readers. 🙂
This guide will show you step-by-step on how to diagnose and fix and get you back up and printing again.
Without wasting another minute, let’s jump right in!
TABLE OF CONTENTS
-
- Check Your Printer
- Troubleshoot, First
- Update Printer Drivers With New Ones
- Uninstall and Reinstall the Printer
- Clear Spooler
- Delete PostSPUpgrade using Registry Editor
1. Check Your Printer.
First and foremost, you will want to make sure that your printer is working as it should before we get into the more practical methods in this guide. Depending on the model of your printer – Brother, HP, Fuji Xerox, Canon, etc. you will want to make sure that first the printer is turned on and the power cable is tightly connected to the printer. Also, don’t forget to turn on the power switch for it!
Next, you will want to make that on your printer’s mini-screen that it doesn’t throw any error messages such as paper being jammed, empty ink/toner, paper not loaded, etc. It is essential to make sure you’re printer is working fine before we try and do anything with the printer drivers.
You will also want to make sure that your printer is actually connected to your PC.
Here’s how you check it:
- Using the Windows Search (bottom left), type Printers. Click on the Printers & Scanners option that comes up.
- You should see a page with all of your available printers and scanners. Make sure that under your printer that is says Connected. If it says Not connected, try restarting your printer and see if it reconnects.

2. Troubleshoot, First.
Before you proceed with installing and updating your printer drivers, try running the troubleshooter provided by Microsoft. You do not have to install this as it comes preinstalled with your Windows operating system. The reason why you do this is to diagnose whether there are any issues with Windows that needs updating or patching.
To bring up your Windows troubleshooter, here are the steps:
- Click on Windows Search (bottom left) and type in Troubleshoot.
- Next from the list of options click on Troubleshoot other problems.
- You will find that you will be brought to the Troubleshoot page. From here, under the Get up and running heading, select the Printer and hit the Run the troubleshooter button.

- The troubleshooting process will begin by identifying whether there are any issues with your printer. Based on what the troubleshoot finds, you can then proceed with the instructions provided by it to fix the problem.
Additionally, depending on your printer model, some models like HP provide their own troubleshooting tools to help you identify any issues with it and providing you with the instructions to fixing it.
For HP, this troubleshooting tool is called the HP Print and Scan Doctor, and you can download it from below if you haven’t already got it:
- HP Print and Scan Doctor Tool
Download it, launch it and then follow the onscreen instructions to locating the issue and the trying out the various ways it suggests to fixing it. If you’re on a different printer model such as Brother, Epson, Xerox, etc. then try googling for the troubleshooting tool for the printer which should be available on their official website.
3. Update Printer Drivers With New Ones.
Almost every printer model will have its own set of drivers. The drivers are usually automatically installed, but in most cases, since printers can be clunky and slow at times, we will need to manually check if the printers drivers which have been installed are up-to-date.
We have linked the printer drivers page for each manufacturer below:
- HP
- Brother
- Canon
- Xerox
- Epson
- Samsung
If your printer’s driver page is not listed above, google you printer manufacturer and “ drivers download”.
4. Uninstall and Reinstall the Printer.
Credit goes to a user named Andre Da Costa over on the Microsoft forums for highlighting this solution to fix the “The specified driver is invalid” issue.
There are two parts to do this: 1) uninstalling and 2) installing your printer. Don’t worry, follow along and you’ll be done before you know it. 😉
- First and foremost, press on both your Windows key and X key together. This will bring a dialog box which shows a list of options which you may or may not have encountered before. Click on the first option, which is Apps and Features.

- Next, wait for a few seconds for the page to load up then scroll down till the end of the page and under Related settings, click on Programs and Features.

- Now from this list of programs, look up your printer. It will be hidden somewhere in there. Once you find your printer, select it and hit the Uninstall option from the menu.
Help! I don’t see my printer in the Programs and Features list. What do I do?
This is a common issue. In such case where you don’t see your printer in the list, try using your Windows Search and then type Printers to bring up the Printers & scanners option. Click on Printers & scanners. Next, from the list of all your printers and scanners, locate the printer by its name (the one which you’re were trying to use). Select the printer and hit the Remove the device button.

- Once you have your printer removed, it’s time we reinstall the printer back. However, it’s essential that we first carry out Method 3 (above) and download the latest Windows 10 drivers for the printer. Once you’ve installed the latest drivers, restart your computer for the changes to take effect. Not restarting your PC will most likely have the issue persist.
- Once your PC restarts, go back into Windows Search, type Printers to bring up the Printers & scanners option. Click on Printers & scanners.
- Next, from the right-hand side, click on the Add a printer or scanner option. Windows will detect your printer, and it will appear in the list (as shown below).

- Select the printer and follow either the onscreen steps to set it up. If there are no onscreen instructions, resort to using your printer’s setup manual booklet or similarly the online setup manual which can be found on the printer manufacturer’s website.
Help! Windows doesn’t detect my printer. I get a blue message.
If Windows doesn’t detect your printer, Click The printer that isn’t listed option. Then proceed with the on-screen instructions.
You have to take note that often the setup process of every printer can be different, so it’s best to follow the exact pairing process which you did the first time around. You may have followed a manual or an online documentation guide by the manufacturer on setting up the printer hence be sure to consider those options too.

Note
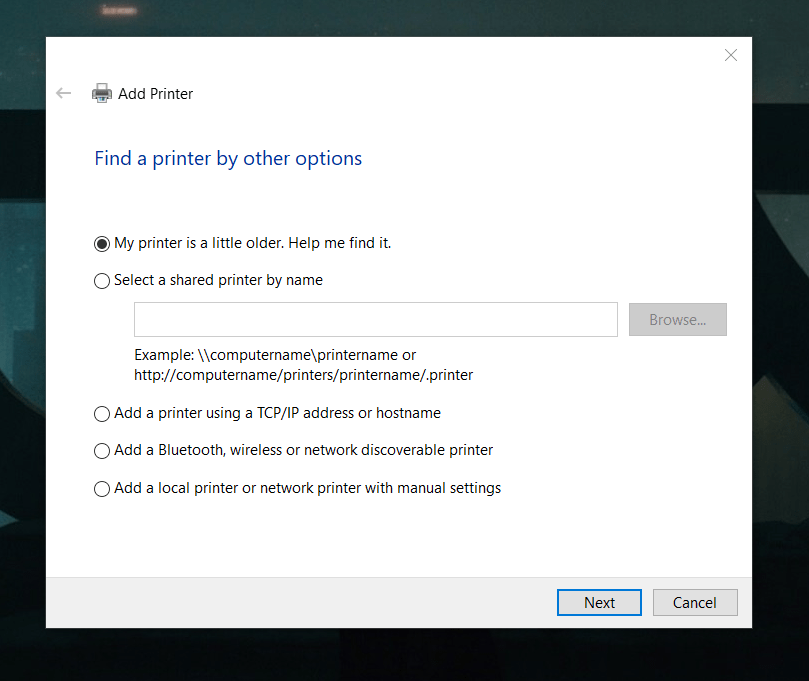
If you are using a Bluetooth or wireless printer, then make sure to select Add a Bluetooth, wireless or network discoverable printer. Next, choose the printer and choose your Printer and follow the on-screen directions.
If you are using a wired printer, then make sure to select Add a local printer or network printer with manual settings first. Next, select Use an existing port then select your Printer and follow the on-screen directions.
Once you’ve reconnected your printer, try once again to print and see if the issue has been fixed.
5. Clear Spooler.
Another method that had worked for one of our readers was to clear the print queue otherwise called “spooler”. It’s safe and works to clear the queue of documents or materials which you may have requested the printer to print.
Here’s how you do it:
- Using Windows Search (bottom-left), type in Services. Click on Services.
- Next, locate the Printer Spooler from the list of services. Found it? Great, right-click on it and then choose the option to Stop. Don’t close this window yet as we will be coming back here in Step 5.

- Now, open up your File Explorer (you can Windows Search this too if you do not have it on your taskbar or home page). Copy-paste the following path into the URL (as shown below):
C:WINDOWSSystem32spoolPRINTERS

- Note that you might be prompted with a message saying to continue and gain permanent access to the following path. Just hit Continue on the prompt message. The message is just trying to tell if you want to access the PRINTERS folder. Now delete all the folders in this folder.

- Now go back into your Services window you had left open in Step 2, and then right-click on Printer Spooler and then choose the option to Start. This refreshes the printer spooler and should patch up the issue.
Again try to print once again and see if the issue persists.
6. Delete PostSPUpgrade using Registry Editor.
This is perhaps the most effective method we’ve found, and it worked like a charm for us. Initially suggested by a user named gcohen66 over on the Microsoft forums, the technique involves deleting a file called the PostSPUpgrade using the Registry Editor.
Now using the Registry Editor on your Windows PC may sound like a bad idea first because you may be worried that you will screw up and your PC stops working. We get it. 🙂
Rest assured, we have created a guide on how you can backup your Registry settings so that if in the event anything does happen (which is extremely unlikely) you can restore your settings. Sounds good? Great, let’s start.
Assuming you have created a backup of your Registry settings using our guide above, here are the steps to deleting the PostSPUpgrade:
- Locate your Windows Search (bottom left) and then type in Registry Editor. Click on Registry Editor.
Alternatively
If Step 1 doesn’t work for you or if Windows search is not working, then press down on both your Windows key and R key together to bring up the Run box. Enter in regedit.exe and hit the Enter key. This will bring up the Registry Editor.

- Next, once you have Registry Editor open, copy-paste the following path into the URL section (as shown below):
HKEY_LOCAL_MACHINESYSTEMCurrentControlSetControlPrintPostSPUpgrade

- You should find the PostSPUpgrade appear on the right sidebar menu. Once you’ve located PostSPUpgrade, right-click on it and then choose to Delete.

- Now you will be prompted with a message saying whether you are sure that you want to do this. Select Yes.
- Lastly, close the Registry Editor by hitting the X at the top right-hand corner like you would close any program and then proceed to restart your Windows PC. It is essential that you restart your Windows PC for the changes to take effect.
Once your PC has restarted, try once again to print the material that you were trying initially and see if the “Error 0x000007d1 The specified driver is invalid” has been fixed.
We hope that this guide has helped. If you have questions, please feel free to leave a comment below, and we will love to help you out. ❤
If this guide helped you, please share it. 🙂
Причина ошибки с номером 0x000007d1 — некорректная работа драйвера принтера. Устранить её можно двумя способами: ручной переустановкой программного обеспечения и внесением исправлений в системный реестр.
Переустановка драйвера принтера
Чаще всего для исправления ошибки 0x000007d1 достаточно обновить или переустановить драйвер принтера.
- Открываем «Диспетчер устройств».
- Раскрываем раздел «Очереди печати» и находим свой принтер.
- Кликаем по устройству правой кнопкой и выбираем опцию «Обновить драйвер».
Обновляем драйвер принтера
- Запускаем автоматический поиск обновлённых драйверов.
- Следуем инструкциям на экране, чтобы обновить драйвер.
После обновления драйвера пробуем снова воспользоваться принтером. Если ошибка повторяется, то приступаем к чуть более радикальному решению проблемы. Удаляем принтер и затем устанавливаем последнюю версию драйвера с сайта производителя.
- Открываем «Диспетчер устройство».
- Находим в списке принтер, кликаем по нему правой кнопкой и выбираем опцию «Удалить устройство».
- Подтверждаем удаление устройства и перезагружаем компьютер.
После перезагрузки заходим на сайт производителя принтера. Находим свою модель и скачиваем последнюю версию драйвера, совместимую с Виндовс 10. Обращаем внимание на разрядность — она должна совпадать. Устанавливаем драйвер вручную и проверяем, заработал ли принтер.
Устанавливаем драйвер принтера вручную
Если драйвер скачивается не в виде исполняемого файла, то для ручной установки запускаем «Диспетчер устройств», находим принтер (система автоматически определит его при включении), кликаем правой кнопкой, выбираем опцию «Обновить драйвер» и нажимаем «Выполнить поиск драйверов на этом компьютере». Затем кликаем «Обзор» и указываем папку, в которую скачан файл драйвера. Следуем инструкциям мастера обновления, чтобы установить последнюю версию ПО.
Если обновление драйвера и даже ручная переустановка устройства не помогли избавиться от ошибки 0x000007d1, применяем небольшой хак. О нём сообщили пользователи на форуме поддержки Microsoft. Способ заключается во внесении изменений в системный реестр. Это безопасно и эффективно — по крайней мере, многие пользователи подтвердили, что им помогли следующие действия:
- Открываем редактор реестра (Win+R — regedit).
- Переходим в раздел HKEY_LOCAL_MACHINESYSTEMCurrentControlSetControlPrintPostSPUpgrade.
- Удаляем параметр PostSPUpgrade.
- Перезагружаем компьютер.
После повторного запуска системы проверяем, заработал ли принтер. На этот раз никаких ошибок быть не должно.
![]() Загрузка …
Загрузка …
Post Views: 787
Find that you keep getting an error which whenever you try to print something which says “Operation could not be completed (error 0x000007d1), The specified driver is invalid”?
Then this guide is written to help you. The connection between your Windows 10 PC and your printer has to undergo via the printer driver which is installed on your PC that assists in establishing the connection to do the printing.
There have been numerous instances where users have encountered this issue on the Microsoft forums, some users have reported it on the Dell forums as well as their respective printer brands forums such as Brother.
We have tried and tested many of the solutions suggested. This guide contains what we found to be the most effective and highly recommended solutions by not just us, but also other users on forums as well as our readers. 🙂
This guide will show you step-by-step on how to diagnose and fix and get you back up and printing again.
Without wasting another minute, let’s jump right in!
TABLE OF CONTENTS
-
- Check Your Printer
- Troubleshoot, First
- Update Printer Drivers With New Ones
- Uninstall and Reinstall the Printer
- Clear Spooler
- Delete PostSPUpgrade using Registry Editor
1. Check Your Printer.
First and foremost, you will want to make sure that your printer is working as it should before we get into the more practical methods in this guide. Depending on the model of your printer – Brother, HP, Fuji Xerox, Canon, etc. you will want to make sure that first the printer is turned on and the power cable is tightly connected to the printer. Also, don’t forget to turn on the power switch for it!
Next, you will want to make that on your printer’s mini-screen that it doesn’t throw any error messages such as paper being jammed, empty ink/toner, paper not loaded, etc. It is essential to make sure you’re printer is working fine before we try and do anything with the printer drivers.
You will also want to make sure that your printer is actually connected to your PC.
Here’s how you check it:
- Using the Windows Search (bottom left), type Printers. Click on the Printers & Scanners option that comes up.
- You should see a page with all of your available printers and scanners. Make sure that under your printer that is says Connected. If it says Not connected, try restarting your printer and see if it reconnects.
2. Troubleshoot, First.
Before you proceed with installing and updating your printer drivers, try running the troubleshooter provided by Microsoft. You do not have to install this as it comes preinstalled with your Windows operating system. The reason why you do this is to diagnose whether there are any issues with Windows that needs updating or patching.
To bring up your Windows troubleshooter, here are the steps:
- Click on Windows Search (bottom left) and type in Troubleshoot.
- Next from the list of options click on Troubleshoot other problems.
- You will find that you will be brought to the Troubleshoot page. From here, under the Get up and running heading, select the Printer and hit the Run the troubleshooter button.
- The troubleshooting process will begin by identifying whether there are any issues with your printer. Based on what the troubleshoot finds, you can then proceed with the instructions provided by it to fix the problem.
Additionally, depending on your printer model, some models like HP provide their own troubleshooting tools to help you identify any issues with it and providing you with the instructions to fixing it.
For HP, this troubleshooting tool is called the HP Print and Scan Doctor, and you can download it from below if you haven’t already got it:
- HP Print and Scan Doctor Tool
Download it, launch it and then follow the onscreen instructions to locating the issue and the trying out the various ways it suggests to fixing it. If you’re on a different printer model such as Brother, Epson, Xerox, etc. then try googling for the troubleshooting tool for the printer which should be available on their official website.
3. Update Printer Drivers With New Ones.
Almost every printer model will have its own set of drivers. The drivers are usually automatically installed, but in most cases, since printers can be clunky and slow at times, we will need to manually check if the printers drivers which have been installed are up-to-date.
We have linked the printer drivers page for each manufacturer below:
- HP
- Brother
- Canon
- Xerox
- Epson
- Samsung
If your printer’s driver page is not listed above, google you printer manufacturer and “ drivers download”.
4. Uninstall and Reinstall the Printer.
Credit goes to a user named Andre Da Costa over on the Microsoft forums for highlighting this solution to fix the “The specified driver is invalid” issue.
There are two parts to do this: 1) uninstalling and 2) installing your printer. Don’t worry, follow along and you’ll be done before you know it. 😉
- First and foremost, press on both your Windows key and X key together. This will bring a dialog box which shows a list of options which you may or may not have encountered before. Click on the first option, which is Apps and Features.
- Next, wait for a few seconds for the page to load up then scroll down till the end of the page and under Related settings, click on Programs and Features.
- Now from this list of programs, look up your printer. It will be hidden somewhere in there. Once you find your printer, select it and hit the Uninstall option from the menu.
Help! I don’t see my printer in the Programs and Features list. What do I do?
This is a common issue. In such case where you don’t see your printer in the list, try using your Windows Search and then type Printers to bring up the Printers & scanners option. Click on Printers & scanners. Next, from the list of all your printers and scanners, locate the printer by its name (the one which you’re were trying to use). Select the printer and hit the Remove the device button.
- Once you have your printer removed, it’s time we reinstall the printer back. However, it’s essential that we first carry out Method 3 (above) and download the latest Windows 10 drivers for the printer. Once you’ve installed the latest drivers, restart your computer for the changes to take effect. Not restarting your PC will most likely have the issue persist.
- Once your PC restarts, go back into Windows Search, type Printers to bring up the Printers & scanners option. Click on Printers & scanners.
- Next, from the right-hand side, click on the Add a printer or scanner option. Windows will detect your printer, and it will appear in the list (as shown below).
- Select the printer and follow either the onscreen steps to set it up. If there are no onscreen instructions, resort to using your printer’s setup manual booklet or similarly the online setup manual which can be found on the printer manufacturer’s website.
Help! Windows doesn’t detect my printer. I get a blue message.
If Windows doesn’t detect your printer, Click The printer that isn’t listed option. Then proceed with the on-screen instructions.
You have to take note that often the setup process of every printer can be different, so it’s best to follow the exact pairing process which you did the first time around. You may have followed a manual or an online documentation guide by the manufacturer on setting up the printer hence be sure to consider those options too.
Note
If you are using a Bluetooth or wireless printer, then make sure to select Add a Bluetooth, wireless or network discoverable printer. Next, choose the printer and choose your Printer and follow the on-screen directions.
If you are using a wired printer, then make sure to select Add a local printer or network printer with manual settings first. Next, select Use an existing port then select your Printer and follow the on-screen directions.
Once you’ve reconnected your printer, try once again to print and see if the issue has been fixed.
5. Clear Spooler.
Another method that had worked for one of our readers was to clear the print queue otherwise called “spooler”. It’s safe and works to clear the queue of documents or materials which you may have requested the printer to print.
Here’s how you do it:
- Using Windows Search (bottom-left), type in Services. Click on Services.
- Next, locate the Printer Spooler from the list of services. Found it? Great, right-click on it and then choose the option to Stop. Don’t close this window yet as we will be coming back here in Step 5.
- Now, open up your File Explorer (you can Windows Search this too if you do not have it on your taskbar or home page). Copy-paste the following path into the URL (as shown below):
C:WINDOWSSystem32spoolPRINTERS
- Note that you might be prompted with a message saying to continue and gain permanent access to the following path. Just hit Continue on the prompt message. The message is just trying to tell if you want to access the PRINTERS folder. Now delete all the folders in this folder.
- Now go back into your Services window you had left open in Step 2, and then right-click on Printer Spooler and then choose the option to Start. This refreshes the printer spooler and should patch up the issue.
Again try to print once again and see if the issue persists.
6. Delete PostSPUpgrade using Registry Editor.
This is perhaps the most effective method we’ve found, and it worked like a charm for us. Initially suggested by a user named gcohen66 over on the Microsoft forums, the technique involves deleting a file called the PostSPUpgrade using the Registry Editor.
Now using the Registry Editor on your Windows PC may sound like a bad idea first because you may be worried that you will screw up and your PC stops working. We get it. 🙂
Rest assured, we have created a guide on how you can backup your Registry settings so that if in the event anything does happen (which is extremely unlikely) you can restore your settings. Sounds good? Great, let’s start.
Assuming you have created a backup of your Registry settings using our guide above, here are the steps to deleting the PostSPUpgrade:
- Locate your Windows Search (bottom left) and then type in Registry Editor. Click on Registry Editor.
Alternatively
If Step 1 doesn’t work for you or if Windows search is not working, then press down on both your Windows key and R key together to bring up the Run box. Enter in regedit.exe and hit the Enter key. This will bring up the Registry Editor.
- Next, once you have Registry Editor open, copy-paste the following path into the URL section (as shown below):
HKEY_LOCAL_MACHINESYSTEMCurrentControlSetControlPrintPostSPUpgrade
- You should find the PostSPUpgrade appear on the right sidebar menu. Once you’ve located PostSPUpgrade, right-click on it and then choose to Delete.
- Now you will be prompted with a message saying whether you are sure that you want to do this. Select Yes.
- Lastly, close the Registry Editor by hitting the X at the top right-hand corner like you would close any program and then proceed to restart your Windows PC. It is essential that you restart your Windows PC for the changes to take effect.
Once your PC has restarted, try once again to print the material that you were trying initially and see if the “Error 0x000007d1 The specified driver is invalid” has been fixed.
We hope that this guide has helped. If you have questions, please feel free to leave a comment below, and we will love to help you out. ❤
If this guide helped you, please share it. 🙂