#################################################
# Sample OpenVPN 2.0 config file for #
# multi-client server. #
# #
# This file is for the server side #
# of a many-clients <-> one-server #
# OpenVPN configuration. #
# #
# OpenVPN also supports #
# single-machine <-> single-machine #
# configurations (See the Examples page #
# on the web site for more info). #
# #
# This config should work on Windows #
# or Linux/BSD systems. Remember on #
# Windows to quote pathnames and use #
# double backslashes, e.g.: #
# «C:\\Program Files\\OpenVPN\\config\\foo.key» #
# #
# Comments are preceded with ‘#’ or ‘;’ #
#################################################
# Which local IP address should OpenVPN
# listen on? (optional)
;local a.b.c.d
# Which TCP/UDP port should OpenVPN listen on?
# If you want to run multiple OpenVPN instances
# on the same machine, use a different port
# number for each one. You will need to
# open up this port on your firewall.
port 1194
# TCP or UDP server?
;proto tcp
proto udp
# «dev tun» will create a routed IP tunnel,
# «dev tap» will create an ethernet tunnel.
# Use «dev tap0» if you are ethernet bridging
# and have precreated a tap0 virtual interface
# and bridged it with your ethernet interface.
# If you want to control access policies
# over the VPN, you must create firewall
# rules for the the TUN/TAP interface.
# On non-Windows systems, you can give
# an explicit unit number, such as tun0.
# On Windows, use «dev-node» for this.
# On most systems, the VPN will not function
# unless you partially or fully disable
# the firewall for the TUN/TAP interface.
;dev tap
dev tun
# Windows needs the TAP-Win32 adapter name
# from the Network Connections panel if you
# have more than one. On XP SP2 or higher,
# you may need to selectively disable the
# Windows firewall for the TAP adapter.
# Non-Windows systems usually don’t need this.
;dev-node MyTap
# SSL/TLS root certificate (ca), certificate
# (cert), and private key (key). Each client
# and the server must have their own cert and
# key file. The server and all clients will
# use the same ca file.
#
# See the «easy-rsa» directory for a series
# of scripts for generating RSA certificates
# and private keys. Remember to use
# a unique Common Name for the server
# and each of the client certificates.
#
# Any X509 key management system can be used.
# OpenVPN can also use a PKCS #12 formatted key file
# (see «pkcs12» directive in man page).
ca «C:\\Program Files\\OpenVPN\\config\\ca.crt»
cert «C:\\Program Files\\OpenVPN\\config\\server.crt»
key «C:\\Program Files\\OpenVPN\\config\\server.key» # This file should be kept secret
# Diffie hellman parameters.
# Generate your own with:
# openssl dhparam -out dh2048.pem 2048
dh «C:\\Program Files\\OpenVPN\\config\\dh1024.pem»
# Network topology
# Should be subnet (addressing via IP)
# unless Windows clients v2.0.9 and lower have to
# be supported (then net30, i.e. a /30 per client)
# Defaults to net30 (not recommended)
;topology subnet
# Configure server mode and supply a VPN subnet
# for OpenVPN to draw client addresses from.
# The server will take 10.8.0.1 for itself,
# the rest will be made available to clients.
# Each client will be able to reach the server
# on 10.8.0.1. Comment this line out if you are
# ethernet bridging. See the man page for more info.
server 10.8.0.0 255.255.255.0
# Maintain a record of client <-> virtual IP address
# associations in this file. If OpenVPN goes down or
# is restarted, reconnecting clients can be assigned
# the same virtual IP address from the pool that was
# previously assigned.
ifconfig-pool-persist ipp.txt
# Configure server mode for ethernet bridging.
# You must first use your OS’s bridging capability
# to bridge the TAP interface with the ethernet
# NIC interface. Then you must manually set the
# IP/netmask on the bridge interface, here we
# assume 10.8.0.4/255.255.255.0. Finally we
# must set aside an IP range in this subnet
# (start=10.8.0.50 end=10.8.0.100) to allocate
# to connecting clients. Leave this line commented
# out unless you are ethernet bridging.
;server-bridge 10.8.0.4 255.255.255.0 10.8.0.50 10.8.0.100
# Configure server mode for ethernet bridging
# using a DHCP-proxy, where clients talk
# to the OpenVPN server-side DHCP server
# to receive their IP address allocation
# and DNS server addresses. You must first use
# your OS’s bridging capability to bridge the TAP
# interface with the ethernet NIC interface.
# Note: this mode only works on clients (such as
# Windows), where the client-side TAP adapter is
# bound to a DHCP client.
;server-bridge
# Push routes to the client to allow it
# to reach other private subnets behind
# the server. Remember that these
# private subnets will also need
# to know to route the OpenVPN client
# address pool (10.8.0.0/255.255.255.0)
# back to the OpenVPN server.
push «route 10.200.1.0 255.0.0.0»
# To assign specific IP addresses to specific
# clients or if a connecting client has a private
# subnet behind it that should also have VPN access,
# use the subdirectory «ccd» for client-specific
# configuration files (see man page for more info).
# EXAMPLE: Suppose the client
# having the certificate common name «Thelonious»
# also has a small subnet behind his connecting
# machine, such as 192.168.40.128/255.255.255.248.
# First, uncomment out these lines:
;client-config-dir ccd
;route 192.168.40.128 255.255.255.248
# Then create a file ccd/Thelonious with this line:
# iroute 192.168.40.128 255.255.255.248
# This will allow Thelonious’ private subnet to
# access the VPN. This example will only work
# if you are routing, not bridging, i.e. you are
# using «dev tun» and «server» directives.
# EXAMPLE: Suppose you want to give
# Thelonious a fixed VPN IP address of 10.9.0.1.
# First uncomment out these lines:
;client-config-dir ccd
;route 10.9.0.0 255.255.255.252
# Then add this line to ccd/Thelonious:
# ifconfig-push 10.9.0.1 10.9.0.2
# Suppose that you want to enable different
# firewall access policies for different groups
# of clients. There are two methods:
# (1) Run multiple OpenVPN daemons, one for each
# group, and firewall the TUN/TAP interface
# for each group/daemon appropriately.
# (2) (Advanced) Create a script to dynamically
# modify the firewall in response to access
# from different clients. See man
# page for more info on learn-address script.
;learn-address ./script
# If enabled, this directive will configure
# all clients to redirect their default
# network gateway through the VPN, causing
# all IP traffic such as web browsing and
# and DNS lookups to go through the VPN
# (The OpenVPN server machine may need to NAT
# or bridge the TUN/TAP interface to the internet
# in order for this to work properly).
;push «redirect-gateway def1 bypass-dhcp»
# Certain Windows-specific network settings
# can be pushed to clients, such as DNS
# or WINS server addresses. CAVEAT:
# http://openvpn.net/faq.html#dhcpcaveats
# The addresses below refer to the public
# DNS servers provided by opendns.com.
push «dhcp-option DNS 10.200.1.1»
push «dhcp-option DNS 8.8.4.4»
# Uncomment this directive to allow different
# clients to be able to «see» each other.
# By default, clients will only see the server.
# To force clients to only see the server, you
# will also need to appropriately firewall the
# server’s TUN/TAP interface.
;client-to-client
# Uncomment this directive if multiple clients
# might connect with the same certificate/key
# files or common names. This is recommended
# only for testing purposes. For production use,
# each client should have its own certificate/key
# pair.
#
# IF YOU HAVE NOT GENERATED INDIVIDUAL
# CERTIFICATE/KEY PAIRS FOR EACH CLIENT,
# EACH HAVING ITS OWN UNIQUE «COMMON NAME»,
# UNCOMMENT THIS LINE OUT.
;duplicate-cn
# The keepalive directive causes ping-like
# messages to be sent back and forth over
# the link so that each side knows when
# the other side has gone down.
# Ping every 10 seconds, assume that remote
# peer is down if no ping received during
# a 120 second time period.
keepalive 10 300
# For extra security beyond that provided
# by SSL/TLS, create an «HMAC firewall»
# to help block DoS attacks and UDP port flooding.
#
# Generate with:
# openvpn —genkey —secret ta.key
#
# The server and each client must have
# a copy of this key.
# The second parameter should be ‘0’
# on the server and ‘1’ on the clients.
;tls-auth ta.key 0 # This file is secret
# Select a cryptographic cipher.
# This config item must be copied to
# the client config file as well.
;cipher BF-CBC # Blowfish (default)
;cipher AES-128-CBC # AES
;cipher DES-EDE3-CBC # Triple-DES
# Enable compression on the VPN link.
# If you enable it here, you must also
# enable it in the client config file.
comp-lzo
# The maximum number of concurrently connected
# clients we want to allow.
;max-clients 100
# It’s a good idea to reduce the OpenVPN
# daemon’s privileges after initialization.
#
# You can uncomment this out on
# non-Windows systems.
;user nobody
;group nobody
# The persist options will try to avoid
# accessing certain resources on restart
# that may no longer be accessible because
# of the privilege downgrade.
persist-key
persist-tun
# Output a short status file showing
# current connections, truncated
# and rewritten every minute.
status openvpn-status.log
# By default, log messages will go to the syslog (or
# on Windows, if running as a service, they will go to
# the «\Program Files\OpenVPN\log» directory).
# Use log or log-append to override this default.
# «log» will truncate the log file on OpenVPN startup,
# while «log-append» will append to it. Use one
# or the other (but not both).
;log openvpn.log
;log-append openvpn.log
# Set the appropriate level of log
# file verbosity.
#
# 0 is silent, except for fatal errors
# 4 is reasonable for general usage
# 5 and 6 can help to debug connection problems
# 9 is extremely verbose
verb 3
# Silence repeating messages. At most 20
# sequential messages of the same message
# category will be output to the log.
;mute 20

- IT
- Cancel
Захотел запустить еще один OpenVPN сервер под Ubuntu для экспериментов на кошках.
Уперся в ошибку «VERIFY ERROR: depth=0, error=unable to get local issuer certificate» результатом которой было «TLS Error: TLS handshake failed».
Теперь по-порядку
Так как хотел создать новый CA, то перекинул easy-rsa в домашнюю папку. Создал новый конфиг файл в папке /etc/openvpn для запуска второго сервера с указанием новой папки сертификатов. В vars так же подправил пути.
Делаю:
source ./vars
./clean-all
./build-ca
./build-dh
./build-key-server server
./build-key zhmak
openvpn —genkey —config /etc/openvpn/openvpn_2.conf —secret ta.key
После этого сервер запускается. Только вот клиенты подключиться не могут. Выдают «VERIFY ERROR: depth=0, error=unable to get local issuer certificate» и реконнектятся бесконечно.
В инете эта ошибка как-то вяло обсуждается. Даже встречаются предложения создать CA на другой машине. А ответ плавал на поверхности.
Так как ключи сервера и клиентов создаются и появляются в папке, то подозрения пали на генератор ключа TLS. Сначала подумал, что проблема в файле конфига. Указал параметром командной строки —config — не помогло. Потом обратил внимание на то, что в папке certs уже работающего сервера стали появляться файлы, созданные во время конфигурации нового CA.
Начал шерстить конфиги в easy-rsa. В openssl.cnf был прописан путь к папке со старыми сертификатами.
То есть если создается еще один CA с папкой сертификатов отличной от дефолтной, то помимо редактирования vars надо еще и openssl.cnf заглянуть.
Иначе «VERIFY ERROR: depth=0, error=unable to get local issuer certificate» и красноглазие обеспечены 
Suddenly, OpenVPN/OpenVPN-GUI cannot connect to any server anymore.
The red error messages are always the same regardless of origin (country) of server.
VERIFY ERROR: depth=1, error=unable to get local issuer certificate: C=GB, ST=Greater Manchester, L=Salford, O=Sectigo Limited, CN=Sectigo RSA Domain Validation Secure Server CA
OpenSSL: error:1416F086:SSL routines:tls_process_server_certificate:certificate verify failed
TLS_ERROR: BIO read tls_read_plaintext error
TLS Error: TLS object -> incoming plaintext read error
TLS Error: TLS handshake failed
It happened suddenly this morning.
A few hours ago all OpenVPN configuration files (.ovpn) worked fine.
I had no idea about why this happened.
I did not change anything both in OpenVPN and the configuration files and my connection is normal (I can open any site without any problem).
The strange thing is SoftEther could connect without any problem at all, even to the same server (Tsukuba) that OpenVPN always failed to connect to.
Worth mentioning is I am only a user, not a server administrator or advanced user.
I apologize if my English is not good. I am Japanese.
by Loredana Harsana
Loredana is a passionate writer with a keen interest in PC software and technology. She started off writing about mobile phones back when Samsung Galaxy S II was… read more
Updated on
- The most common reason for certificate validation failure on VPN is an expired certificate.
- VPN certificates are essential because they are a more secure way for authentication than preshared keys.
- Users reported that updating the certificate will solve the certificate validation failure error.
VPN, an acronym for Virtual Privacy Networks has certificates by a public authority that manages them. They are essential electronic documents, as VPN devices use them to indicate if they are the ones you connect to. Thus, it is imperative to quickly fix any VPN certificate validation failure.
Digital certificates of VPN are also used for authentication, and this is more secure than preshared keys. VPN certificates expire due to security reasons and when there is a need to replace them.
It used to take a more extended period of time for a valid VPN certificate to last, however, in 2021, SSL certificate expiration was reduced and a valid certificate lasted for 12 months only.
Still, this may not be the sole reason you are getting a failure in certificate validation. There are many other reasons why this may be happening with Cisco or some other VPN service provider.
Virtual Privacy Networks improve your security and privacy as you browse the Internet, which is why people use them. Therefore if you cannot validate VPN security, the purpose of getting the VPN in the first place is defeated.
How do I get a VPN certificate?
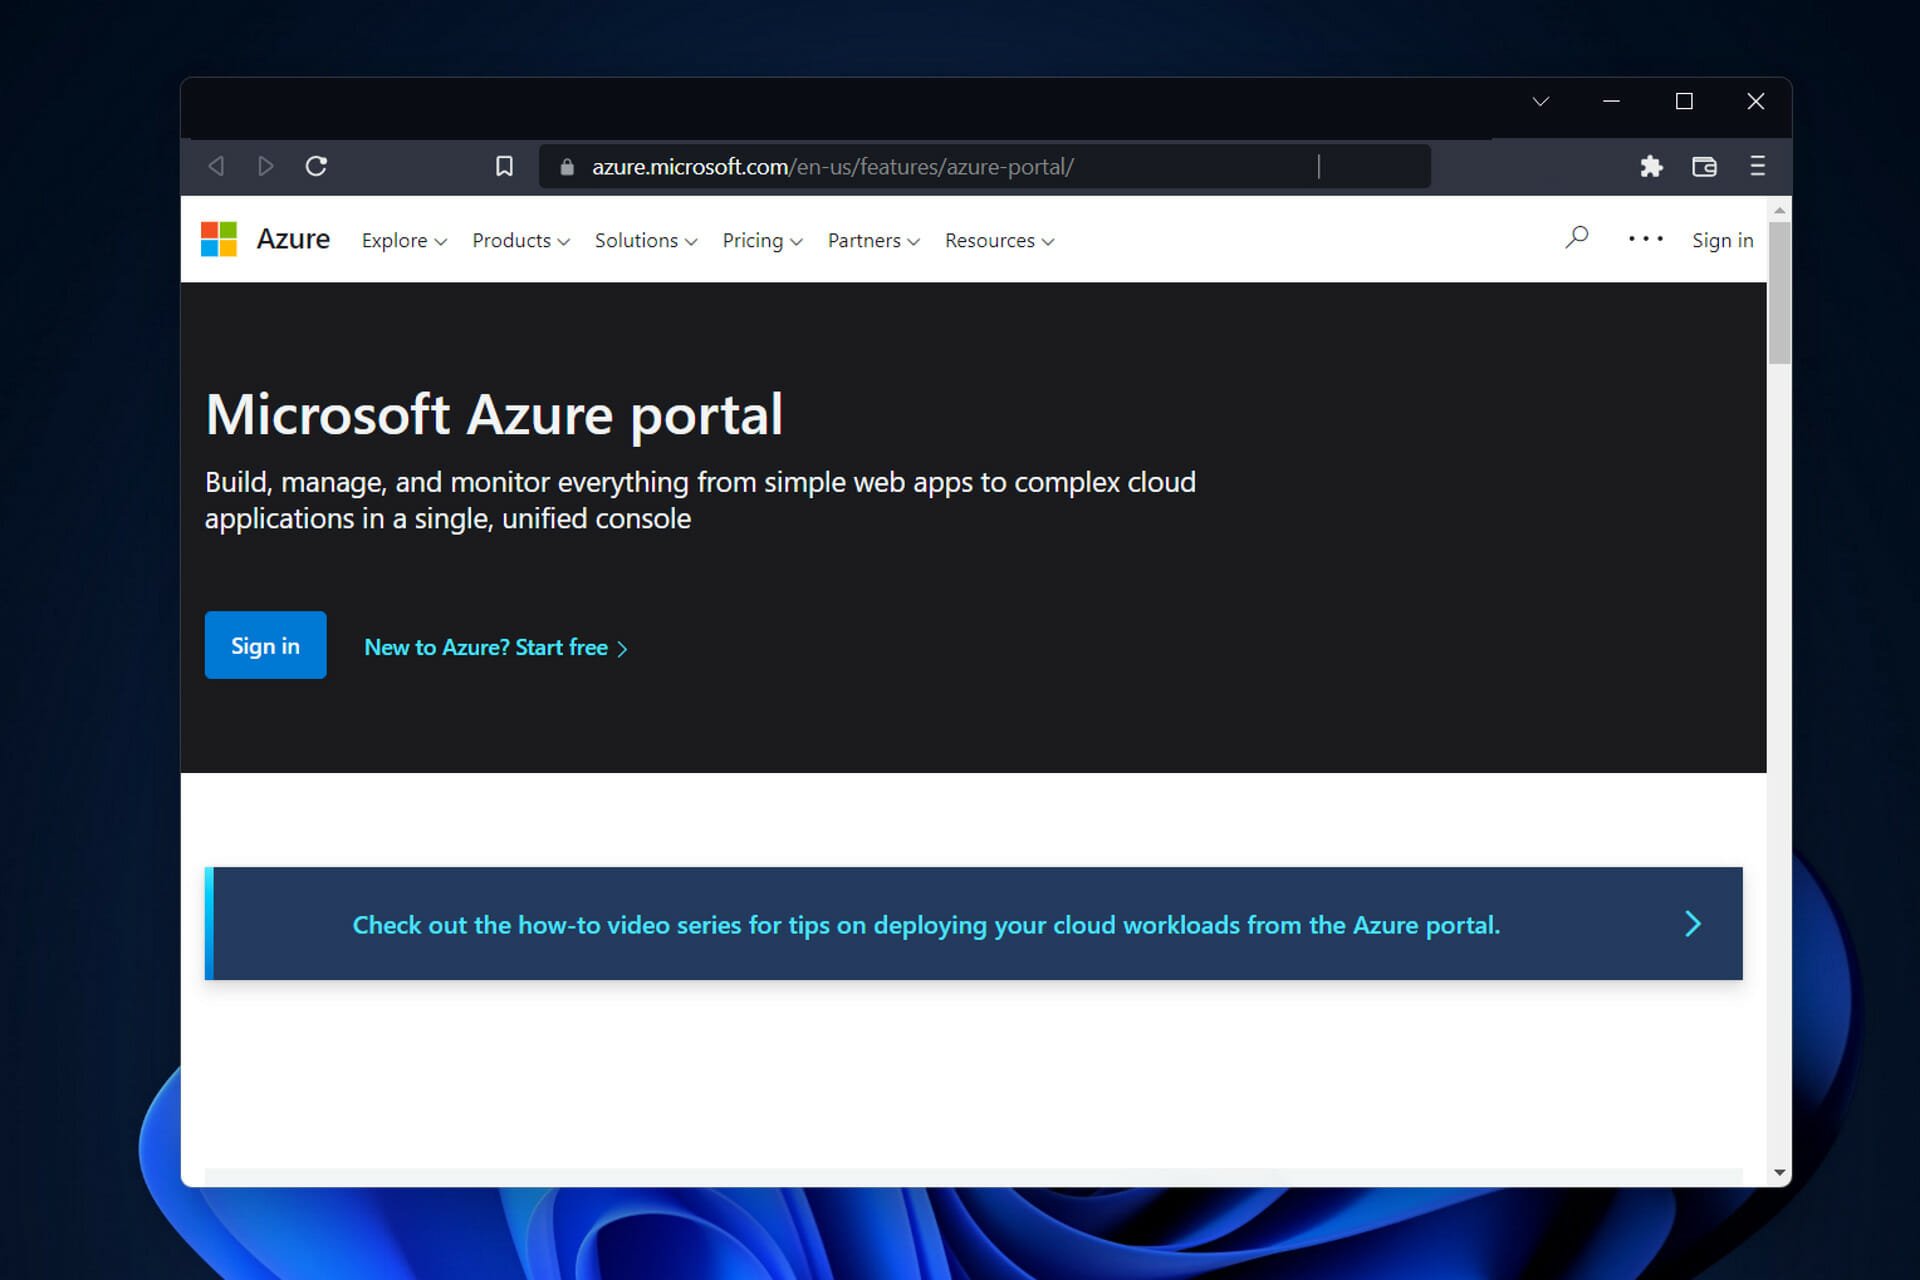
- Visit the Azure portal as an administrator.

- Click on Azure Active Directory on the left menu.

- Go to the Manage section in the Azure Active Directory menu and click on Security.
- Click on the Protect section on the Security page and select Conditional Access.
- Go to the Policies page on the Conditional access page and click on VPN Connectivity.

- Click New Certificate and generate one for yourself.


To have access to generate a new VPN certificate, you need to create an Azure Microsoft account. Microsoft has a free trial that you can use to gain access before you need to pay.
When your VPN certificate expires, you need to update it. If you do not update your VPN certificate, you lose security and become exposed to threats that make your private and classified information vulnerable.
How do I update my VPN certificate?
In order to update your VPN certificate, you will have to enter the Certificates – Local Computer app from your system and tweak your current certificate.
For an in-depth, step-by-step guide on how to achieve this, follow the second solution from the list below in order to update your VPN certificate.
Do VPN certificates expire?
VPN certificates are issued with an expiration date for the sake of increased security. After that date has passed, the certificates must be updated with fresh ones.
There is a validity period of three years attached to the VPN certificates that were issued by both the Internal RSA CA for Gateways and the Internal ECDSA CA.
How do I fix VPN validation failure?
1. Check the validity of your VPN certificate
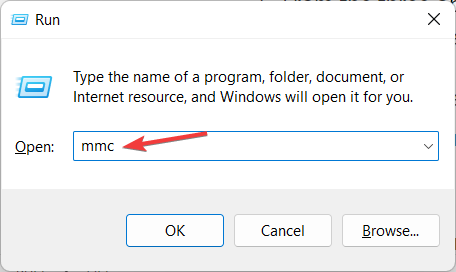
- Press the Windows and R keys on your device to open the Run tab and type in mmc then press Enter.

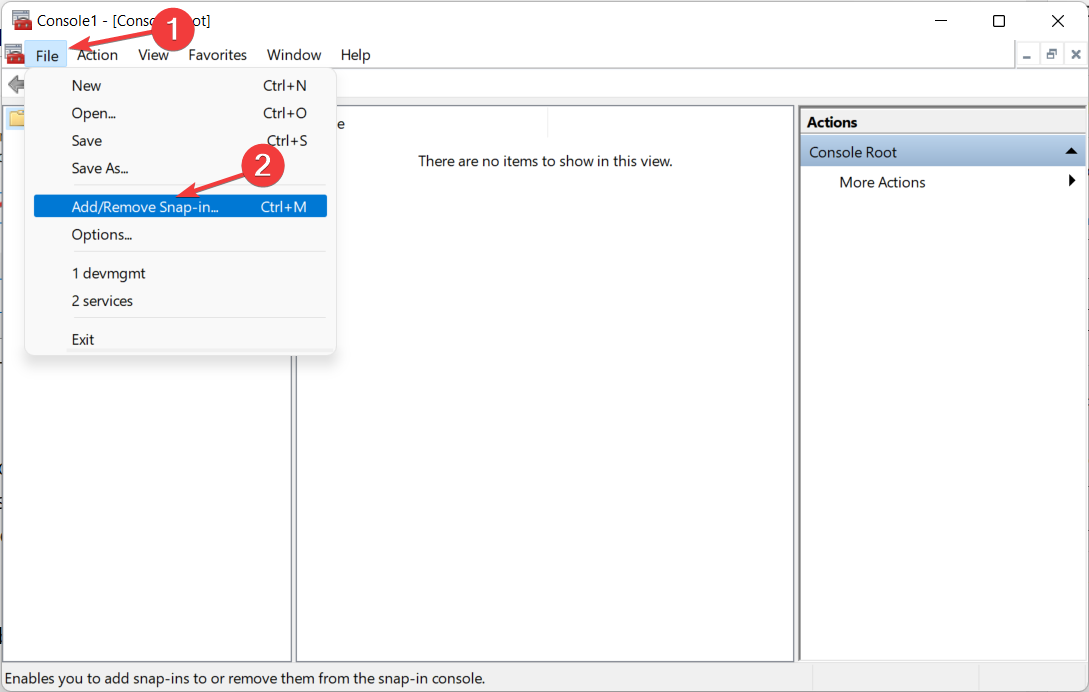
- Click on the File option in the top right corner and select Add/Remove Snap-in from the drop-down menu.

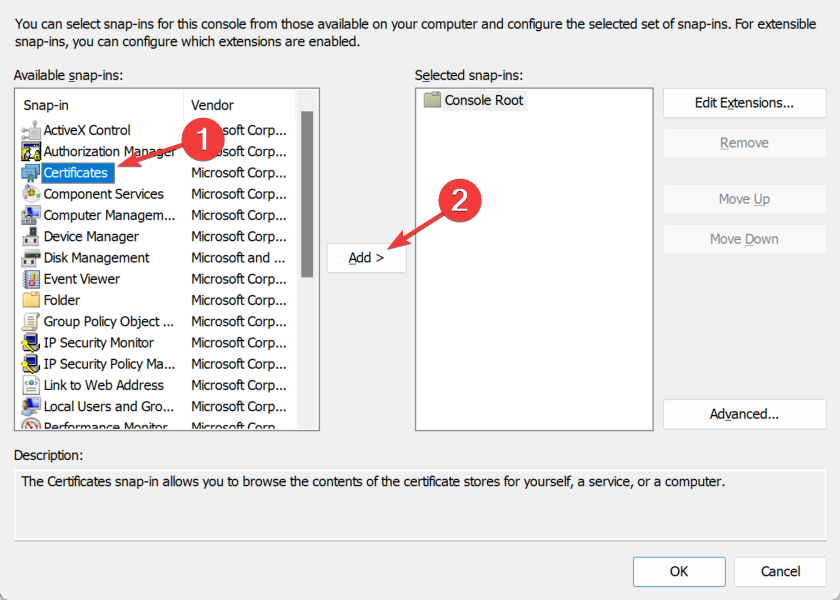
- Choose Certificates from the Available snap-ins section then click on the Add button.

- From the three options, click on My User Account.

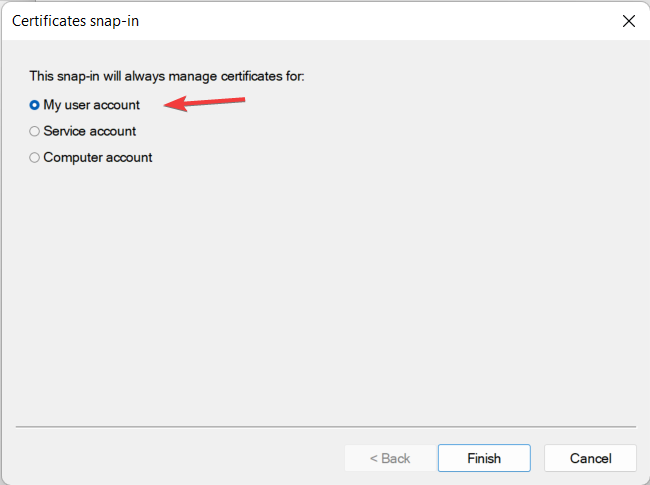
These steps will enable you access to the current User certificates to see the certificate that you have in the system. When you double-click on the certificate, you can see the details, which include the validity and expiry date.
After you check, and find that your VPN certificate may have expired, proceed to renew it.
- Fix: WiFi certificate error on Windows 10 [Can’t Connect]
- Set up a Windows 11 Ikev2 VPN in record time and with ease
- FIX: Cannot connect to L2TP VPN on Windows 10/11
2. Update your VPN certificate
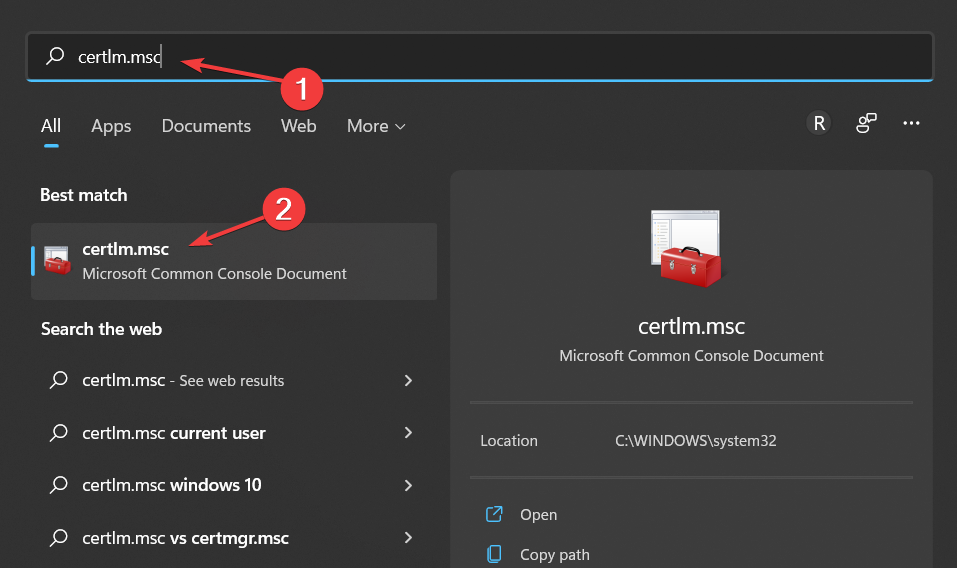
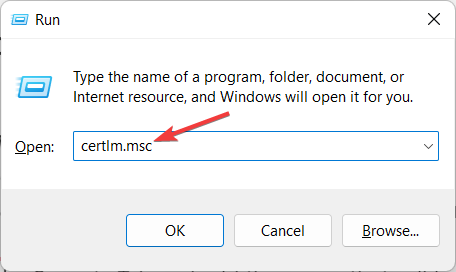
- Click on the magnifying glass icon from your Taskbar then type in certlm.msc and select the topmost result.

- Right-click on the open space and select All Tasks.

- Click on Advanced Operations and select Create Custom Request.
- Select Proceed without enrollment and continue with the onscreen steps.
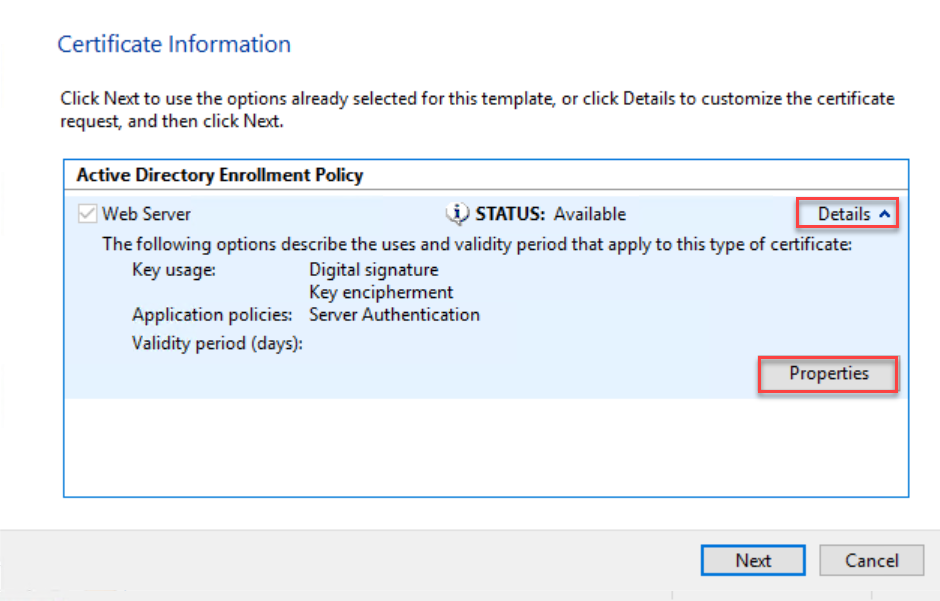
- Click on the arrow next to Details and select Properties from the drop-down menu.

- Name the certificate a title that is easy to remember then click on Subject and select common name from the Full QDN drop-down menu.
- Enter the Fully Qualified Domain Name and click Add followed by Next.
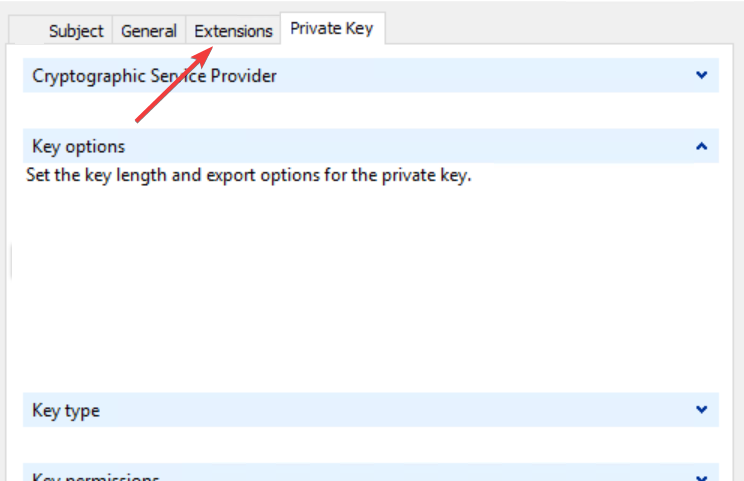
- Go back to Properties and select the Extensions tab.

- Select Extended Key Usage, and click on Server Authentication and Add.
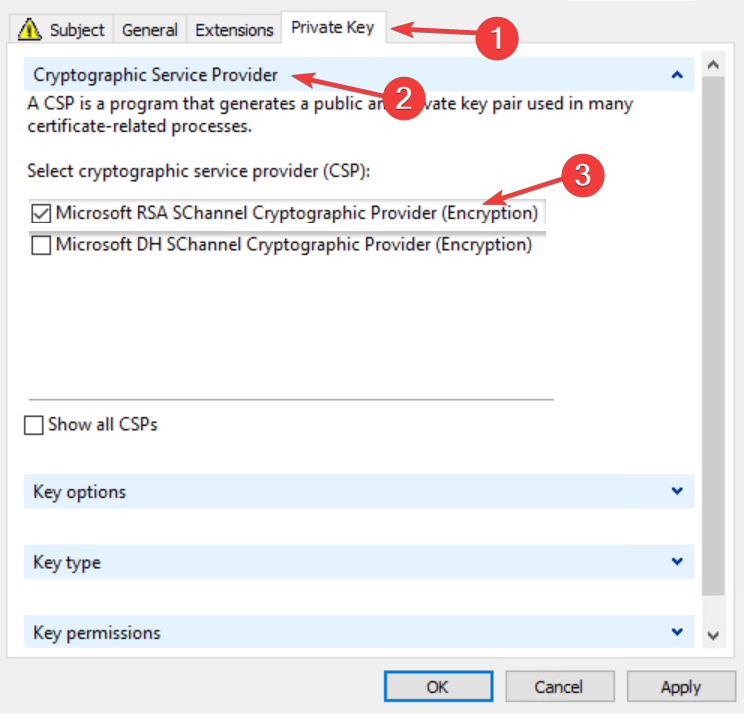
- Click on the Private Key tab then select Cryptographic service provider and check the Microsoft RSA or Microsoft DH option as you wish.

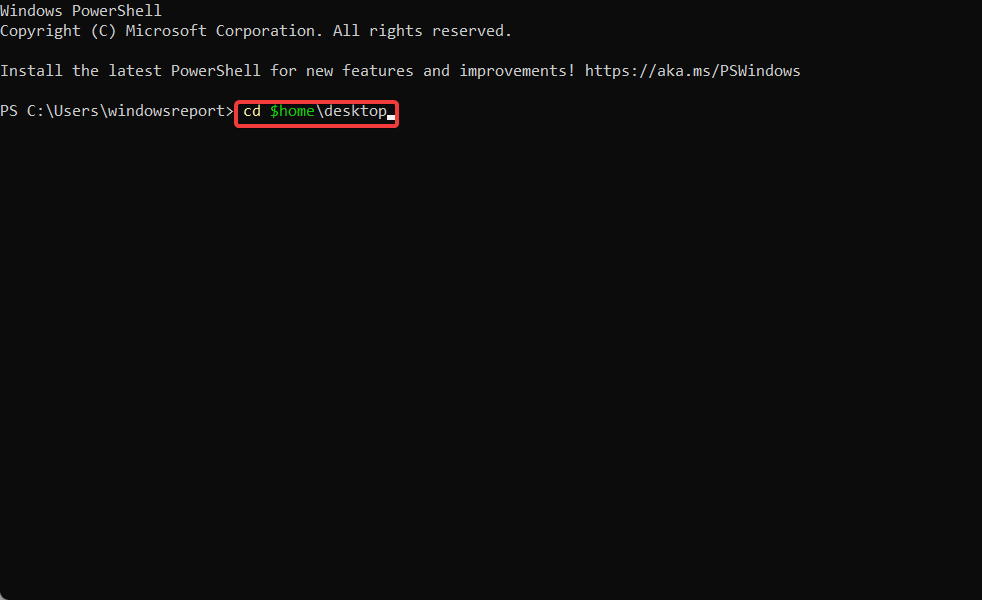
- Save everything by clicking on Apply and OK then click on the magnifying glass icon on your Taskbar and type PowerShell. Finally, click on the topmost result in order to open it.

- Type in the following command and press Enter:
cd $home\desktop
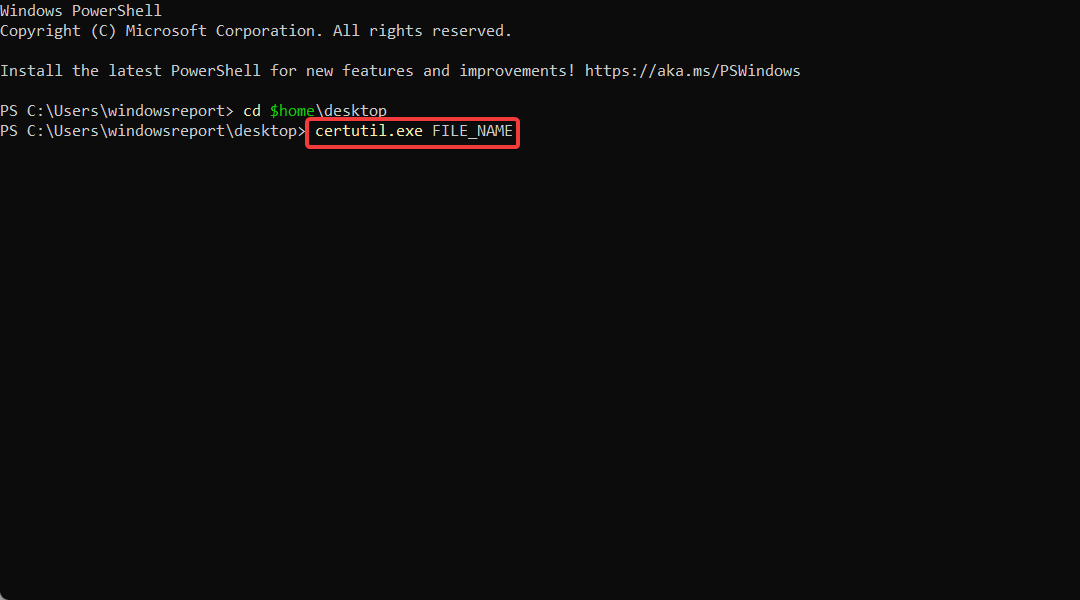
- On the next line, type in the following command and replace the FILE_NAME with your certificate’s name:
certutil.exe FILE_NAME
- Copy the content of the file and submit it to your public certification authority for signing.


To fix certificate validation failure VPN Cisco, and certificate validation failure VPN anyconnect, you have to first verify that the hostname and host address are still valid and then check if the certificate has expired before you proceed to install a new certificate or update the existing one.
3. Turn on OCSP Nonce on the Windows server
- Press the Windows and R keys to open a command bar and type certlm.msc to open the Certificate Service Management Console.
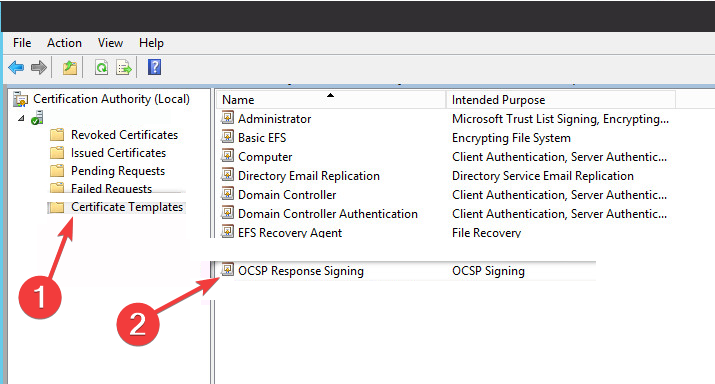
- Select Certificate template from the left menu and click on Manage then find OCSP Respond Signing from the drop-down menu and select it.

- Right-click on it and select Properties.
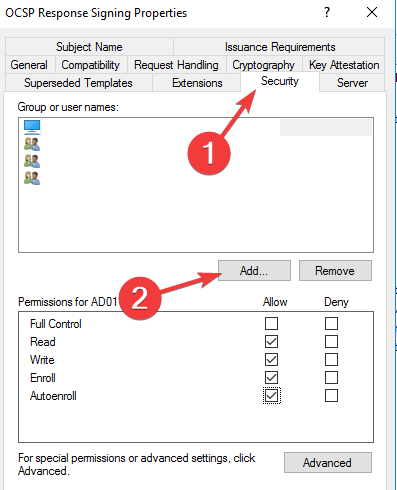
- Click on the Security tab and add the server that will be hosting the OCSP services.

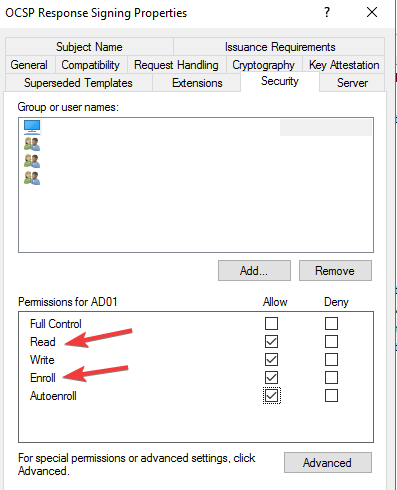
- Check Read and Enrol then go back to Certificate template. Click on New, select Certificate Template to issue, and choose OCSP signing.
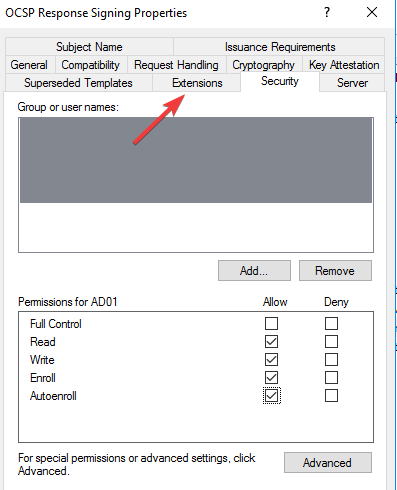
- Click on the certificate server and select Properties.
- Select the Extension tab and choose Authority Information Access. Select the URL of the server and click on Add.
- Go to the dashboard of the server manager of the OCSP service and click on Add roles and features.
- Check Active directory services and select Role services. Uncheck Certification Authority and check Online Responder.
- Launch the Online Responder management console.
OCSP is Online Certificate Status Protocol, and it is a method that browsers use to ensure that a security certificate is valid. Enabling OCSP service nonce protects secure network communication.
Microsoft Windows uses RFC 5019 while Cisco AnyConnect VPN ASA uses RFC 2560. This disparity causes VPN validation failure, and as such needs fixing.
When OpenVPN certificate verification failed and VPN certificate validation failure occurs, these are the steps that you can follow to rectify them.
Also, for IBM VPN certificate validation failure, there is a renew certificate application in the IBM store that can help you with renewing your certificate if it is outdated.
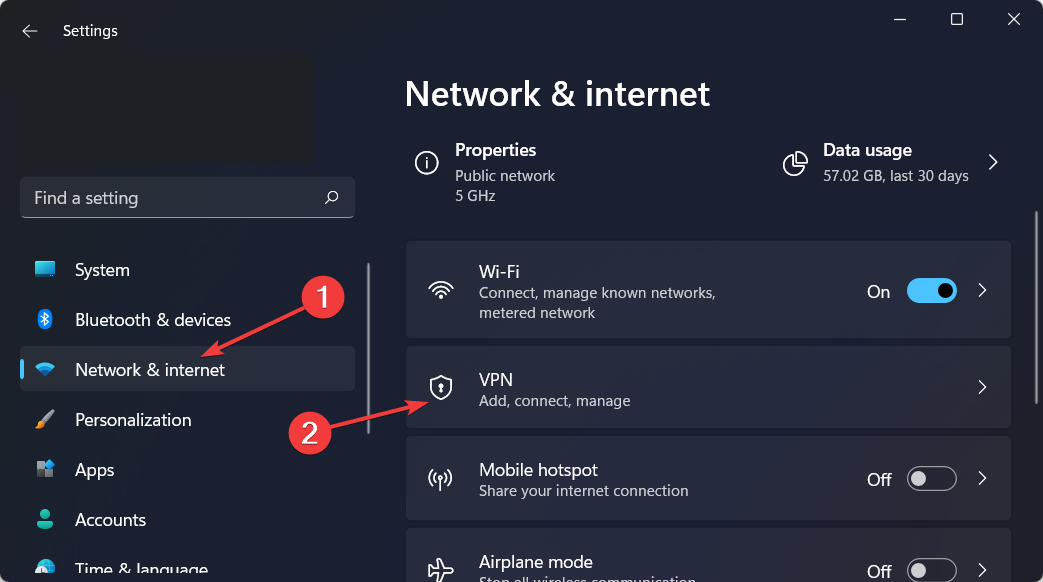
How do I add a VPN certificate to Windows 10/11?
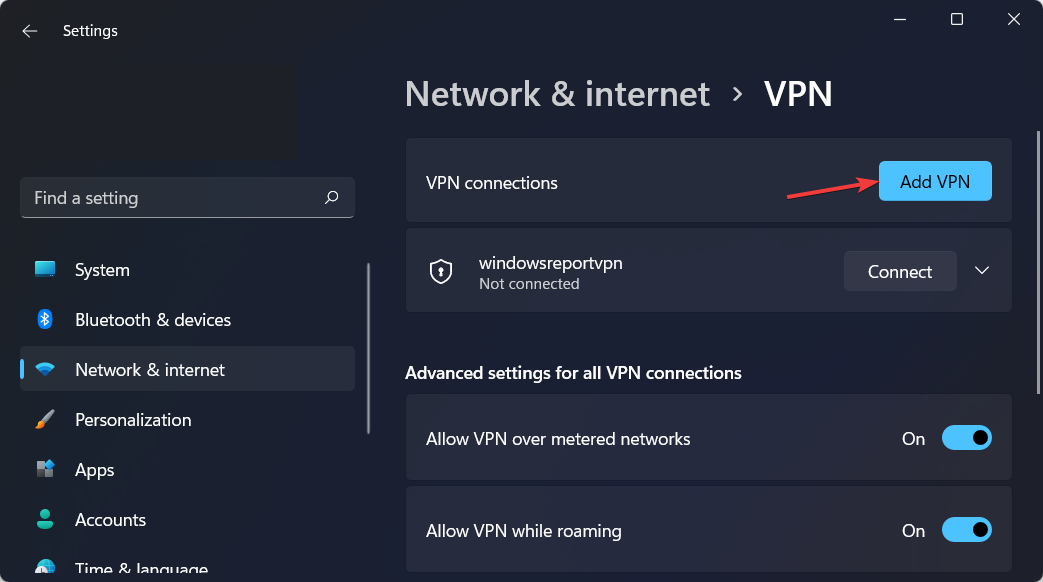
- Open Settings by holding Windows and I together then go to Network and Internet followed by VPN.

- Click on Add VPN.
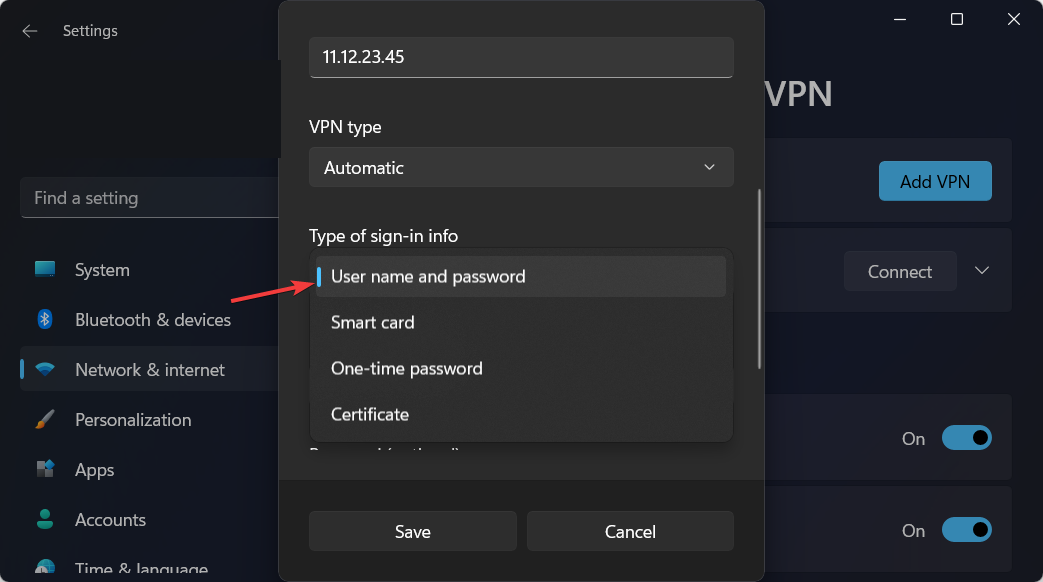
- On the dropdown menu, select Windows built-in as the VPN provider.
- Type in a name for the VPN connection in the Connection name field.
- Get the server name and address from the provider and type it into the Server address field.
- In the Type-of-sign-in info bar, type in the one your VPN provider uses and click on Save.
- When the name of the VPN appears, connect to it.


Is there any good 3rd party VPN for business?
There is another security method to protect all your business data and avoid certificate validation failure for your VPN protection.
You can use the Perimeter 81 as a Zero Trust Application Access software and secure any sensitive data from public use. This way, you guarantee private communication with IPSec or WireGuard technology.
Plus, it provides safer digital support against data leaking or cyber threats with access by role, a cloud-based interface, or monitoring tools.
⇒ Get Perimeter 81
In conclusion, VPN is vital because of the protection and security that users get from it. These steps will fix the validation failure that pops up. However, if these do not work, you can disconnect completely and start a new connection.
Check out our post with the five best VPNs for Windows 11, after 3 months of usage and tests, to decide which one to get on your devices.
We hope our guide proved to be useful to you. Don’t hesitate to share your thoughts with us in the comments section below. Thanks for reading!
![]()
Ok, I’ll explain what I did… and at the end is the queston. THank you!
To set up my VPN I installed OpenVPN in server and client machines. On server I configured the cert Authority in the file /etc/openvpn/easy-rsa/vars editing this lines:
export KEY_COUNTRY=”ES”
export KEY_PROVINCE=”M”
export KEY_CITY=”Madrid”
export KEY_ORG=”My Organization”
export KEY_EMAIL=”mail@example.com”
then i generated the cert:
cd /etc/openvpn/easy-rsa/ ln -s openssl-1.0.0.cnf openssl.cnf source
vars ./clean-all ./build-ca
Created the cerver certs:
./build-key-server myServer
Diffie Hellman parameters to server
./build-dh
Copyed certs and keys /etc/openvpn
cd keys/
cp myServer.crt myServer.key ca.crt dh1024.pem /etc/openvpn/
Created client Certs
cd /etc/openvpn/easy-rsa/
source vars
./build-key client1
Copied this certs to client machine and erased them from server:
/etc/openvpn/ca.crt
/etc/openvpn/easy-rsa/keys/cliente.crt
/etc/openvpn/easy-rsa/keys/cliente.key
Edited /etc/openvpn/server.conf to my files names
ca ca.crt
cert myServer.crt
key myServer.key
dh dh1024.pem
/etc/init.d/openvpn restart
Verified that tun0 is there
ifconfig tun0
Enabled ip_forward parameter on /etc/sysctl.conf so packages may flow
net.ipv4.ip_forward=1
Also enabled virtual network masking so client may access all remote machines
iptables -t nat -A POSTROUTING -s 10.8.0.0/24 -o eth0 -j MASQUERADE
and saved the ip tables conf so they dont desappear in a reboot
Save conf into file
sudo sh -c “iptables-save > /etc/iptables.rules”
Edit /etc/network/interfaces adding the interface (eth0 in this case)
pre-up iptables-restore < /etc/iptables.rules
Getting the following server.conf
port 1194
proto udp
dev tun
ca ca.crt
cert server.crt
key server.key
dh dh1024.pem
server 10.8.0.0 255.255.255.0
ifconfig-pool-persist ipp.txt
keepalive 10 120
comp-lzo
persist-key
persist-tun
status openvpn-status.log
verb3
In the client i installed OpenVPN and edited the client.conf file which is in /etc/openvpn with the certs: ca.cert, client1.key, client1.conf getting the following client.conf file:
client
dev tun
proto udp
remote xxx.xxx.xxx.xxx 1194
resolv-retry infinite
nobind
persist-key
persist-tun
ca ca.crt
cert client1.crt
key client1.key
ns-cert-type server
comp-lzo
verb 3
then restarted:
/etc/init.d/openvpn restart
And when i want to verify that the interface tun0 is there with ifconfig tun0, there is not.
So I checked my log for errors, in the client machine and there is this error:
VERIFY ERROR: depth=0, error=unable to get local issuer certificate: /C=Es/ST=M/L=Madrid/O=xxx/OU=xxx/CN=myServer/name=xxx/emailAddress=mail@xxxx.co
TLS_ERROR: BIO read tls_read_plaintext error: error:14090086:SSL routines:SSL3_GET_SERVER_CERTIFICATE:certificate verify failed
user openvpn[7984]: TLS Error: TLS object -> incoming plaintext read error
user openvpn[7984]: TLS Error: TLS handshake failed
and this is the error int the servers log
xxx.xxx.xxx.xxx:59439 SIGUSR1[soft,tls-error] received, client-instance restarting
MULTI: multi_create_instance called
xxx.xxx.xxx.xxx:59485 Re-using SSL/TLS context
xxx.xxx.xxx.xxx:59485 LZO compression initialized
xxx.xxx.xxx.xxx:59485 Control Channel MTU parms [ L:1542 D:138 EF:38 EB:0 ET:0 EL:0 ]
xxx.xxx.xxx.xxx:59485 Data Channel MTU parms [ L:1542 D:1450 EF:42 EB:135 ET:0 EL:0 AF:3/1 ]
xxx.xxx.xxx.xxx:59485 Local Options hash (VER=V4): '530fdded'
xxx.xxx.xxx.xxx:59485 Expected Remote Options hash (VER=V4): '41690919'
xxx.xxx.xxx.xxx:59485 TLS: Initial packet from [AF_INET]xxx.xxx.xxx.xxx:59485, sid=0349f4d6 657535c9
xxx.xxx.xxx.xxx:59440 TLS Error: TLS key negotiation failed to occur within 60 seconds (check your network connectivity)
xxx.xxx.xxx.xxx:59440 TLS Error: TLS handshake failed
xxx.xxx.xxx.xxx:59440 SIGUSR1[soft,tls-error] received, client-instance restarting
I’ve created the keys again, and added the full path of the certs in the client.conf file but it still doesn’t work. Also tryed with all my firewalls disabled and still cant conect to my server because of that error.
Another important thing is that my server is an ubuntu 12.04 and client CentOS 6.3
I can see that i find my server but still the connection isn’t completed…
What should I do??
If any more config files are needed, tell me to show you