Обработка ошибок
Обработка ошибок — это процесс реагирования на возникновение ошибок и восстановление после появления ошибок в программе. Swift предоставляет первоклассную поддержку при генерации, вылавливании и переносе ошибок, устранении ошибок во время выполнения программы.
Некоторые операции не всегда гарантируют полное выполнение или конечный результат. Опционалы используются для обозначения отсутствия значения, но когда случается сбой, важно понять, что вызвало сбой, для того, чтобы соответствующим образом изменить код.
В качестве примера, рассмотрим задачу считывания и обработки данных из файла на диске. Задача может провалиться по нескольким причинам, в том числе: файл не существует по указанному пути, или файл не имеет разрешение на чтение, или файл не закодирован в необходимом формате. Отличительные особенности этих различных ситуаций позволяют программе решать некоторые ошибки самостоятельно и сообщать пользователю какие ошибки она не может решить сама.
Отображение и генерация ошибок
В Swift ошибки отображаются значениями типов, которые соответствуют протоколу Error. Этот пустой протокол является индикатором того, что это перечисление может быть использовано для обработки ошибок.
Перечисления в Swift особенно хорошо подходят для группировки схожих между собой условий возникновения ошибок и соответствующих им значений, что позволяет получить дополнительную информацию о природе самой ошибки. Например, вот как отображаются условия ошибки работы торгового автомата внутри игры:
enum VendingMachineError: Error {
    case invalidSelection
    case insufficientFunds(coinsNeeded: Int)
    case outOfStock
}
Генерация ошибки позволяет указать, что произошло что-то неожиданное и обычное выполнение программы не может продолжаться. Для того чтобы «сгенерировать» ошибку, вы используете инструкцию throw. Например, следующий код генерирует ошибку, указывая, что пять дополнительных монет нужны торговому автомату:
throw VendingMachineError.insufficientFunds(coinsNeeded: 5)Обработка ошибок
Когда генерируется ошибка, то фрагмент кода, окружающий ошибку, должен быть ответственным за ее обработку: например, он должен исправить ее, или испробовать альтернативный подход, или просто информировать пользователя о неудачном исполнении кода.
В Swift существует четыре способа обработки ошибок. Вы можете передать (propagate) ошибку из функции в код, который вызывает саму эту функцию, обработать ошибку, используя инструкцию do-catch, обработать ошибку, как значение опционала, или можно поставить утверждение, что ошибка в данном случае исключена. Каждый вариант будет рассмотрен далее.
Когда функция генерирует ошибку, последовательность выполнения вашей программы меняется, поэтому важно сразу обнаружить место в коде, которое может генерировать ошибки. Для того, чтобы выяснить где именно это происходит, напишите ключевое слово try — или варианты try? или try!— до куска кода, вызывающего функцию, метод или инициализатор, который может генерировать ошибку. Эти ключевые слова описываются в следующем параграфе.
Заметка
Обработка ошибок в Swift напоминает обработку исключений (exceptions) в других языках, с использованием ключевых слов try, catch и throw. В отличие от обработки исключений во многих языках, в том числе и в Objective-C- обработка ошибок в Swift не включает разворачивание стека вызовов, то есть процесса, который может быть дорогим в вычислительном отношении. Таким образом, производительные характеристики инструкции throw сопоставимы с характеристиками оператора return.
Передача ошибки с помощью генерирующей функции
Чтобы указать, что функция, метод или инициализатор могут генерировать ошибку, вам нужно написать ключевое слово throws в реализации функции после ее параметров. Функция, отмеченная throws называется генерирующей функцией. Если у функции установлен возвращаемый тип, то вы пишете ключевое слово throws перед стрелкой возврата (->).
func canThrowErrors() throws -> String
func cannotThrowErrors() -> String
Генерирующая функция передает ошибки, которые возникают внутри нее в область вызова этой функции.
Заметка
Только генерирующая ошибку функция может передавать ошибки. Любые ошибки, сгенерированные внутри non-throwing функции, должны быть обработаны внутри самой функции.
В приведенном ниже примере VendingMachine класс имеет vend(itemNamed: ) метод, который генерирует соответствующую VendingMachineError, если запрошенный элемент недоступен, его нет в наличии, или имеет стоимость, превышающую текущий депозит:
struct Item {
    var price: Int
    var count: Int
}

class VendingMachine {
    var inventory = [
        "Candy Bar": Item(price: 12, count: 7),
        "Chips": Item(price: 10, count: 4),
        "Pretzels": Item(price: 7, count: 11)
    ]
    var coinsDeposited = 0

    func vend(itemNamed name: String) throws {
        guard let item = inventory[name] else {
            throw VendingMachineError.invalidSelection
        }

        guard item.count > 0 else {
            throw VendingMachineError.outOfStock
        }

        guard item.price <= coinsDeposited else {
            throw VendingMachineError.insufficientFunds(coinsNeeded: item.price - coinsDeposited)
        }

        coinsDeposited -= item.price

        var newItem = item
        newItem.count -= 1
        inventory[name] = newItem

        print("Dispensing \(name)")
    }
}
Реализация vend(itemNamed: ) метода использует оператор guard для раннего выхода из метода и генерации соответствующих ошибок, если какое-либо требование для приобретения закуски не будет выполнено. Потому что инструкция throw мгновенно изменяет управление программой, и выбранная позиция будет куплена, только если все эти требования будут выполнены.
Поскольку vend(itemNamed: ) метод передает все ошибки, которые он генерирует, вызывающему его коду, то они должны быть обработаны напрямую, используя оператор do-catch, try? или try!, или должны быть переданы дальше. Например, buyFavoriteSnack(person:vendingMachine: ) в примере ниже — это тоже генерирующая функция, и любые ошибки, которые генерирует метод vend(itemNamed: ), будут переноситься до точки, где будет вызываться функция buyFavoriteSnack(person:vendingMachine: ).
let favoriteSnacks = [
    "Alice": "Chips",
    "Bob": "Licorice",
    "Eve": "Pretzels"
]
func buyFavoriteSnack(person: String, vendingMachine: VendingMachine) throws {
    let snackName = favoriteSnacks[person] ?? "Candy Bar"
    try vendingMachine.vend(itemNamed: snackName)
}
В этом примере, функция buyFavoriteSnack(person:vendingMachine: ) подбирает любимые закуски данного человека и пытается их купить, вызывая vend(itemNamed: ) метод. Поскольку метод vend(itemNamed: ) может сгенерировать ошибку, он вызывается с ключевым словом try перед ним.
Генерирующие ошибку инициализаторы могут распространять ошибки таким же образом, как генерирующие ошибку функции. Например, инициализатор структуры PurchasedSnack в списке ниже вызывает генерирующую ошибку функции как часть процесса инициализации, и он обрабатывает любые ошибки, с которыми сталкивается, путем распространения их до вызывающего его объекта.
struct PurchasedSnack {
    let name: String
    init(name: String, vendingMachine: VendingMachine) throws {
        try vendingMachine.vend(itemNamed: name)
        self.name = name
    }
}
Обработка ошибок с использованием do-catch
Используйте инструкцию do-catch для обработки ошибок, запуская блок кода. Если выдается ошибка в коде условия do, она соотносится с условием catch для определения того, кто именно сможет обработать ошибку.
Вот общий вид условия do-catch:
do {
    try выражение
    выражение
} catch шаблон 1 {
    выражение
} catch шаблон 2  where условие {
    выражение
} catch шаблон 3, шаблон 4 where условие {
    выражение
} catch {
    выражение
}
Вы пишете шаблон после ключевого слова catch, чтобы указать какие ошибки могут обрабатываться данным пунктом этого обработчика. Если условие catch не имеет своего шаблона, то оно подходит под любые ошибки и связывает ошибки к локальной константе error. Более подробно о соответствии шаблону см. Шаблоны.
Например, следующий код обрабатывает все три случая в перечислении VendingMachineError, но все другие ошибки должны быть обработаны окружающей областью:
var vendingMachine = VendingMachine()
vendingMachine.coinsDeposited = 8
do {
    try buyFavoriteSnack(person: "Alice", vendingMachine: vendingMachine)
} catch VendingMachineError.invalidSelection {
    print("Ошибка выбора.")
} catch VendingMachineError.outOfStock {
    print("Нет в наличии.")
} catch VendingMachineError.insufficientFunds(let coinsNeeded) {
    print("Недостаточно средств. Пожалуйста вставьте еще \(coinsNeeded) монетки.")
} catch {
    print("Неожиданная ошибка: \(error).")
}
// Выведет "Недостаточно средств. Пожалуйста вставьте еще 2 монетки.
В приведенном выше примере, buyFavoriteSnack(person:vendingMachine: ) функция вызывается в выражении try, потому что она может сгенерировать ошибку. Если генерируется ошибка, выполнение немедленно переносится в условия catch, которые принимают решение о продолжении передачи ошибки. Если ошибка не генерируется, остальные операторы do выполняются.
В условии catch не нужно обрабатывать все возможные ошибки, которые может вызвать код в условии do. Если ни одно из условий catch не обрабатывает ошибку, ошибка распространяется на окружающую область. Однако распространяемая ошибка должна обрабатываться некоторой внешней областью. В функции nonthrowing условие включения do-catch должно обрабатывать ошибку. В функции throwing либо включающая условие do-catch, либо вызывающая сторона должна обрабатывать ошибку. Если ошибка распространяется на область верхнего уровня без обработки, вы получите ошибку исполнения.
Например, приведенный ниже пример можно записать так, чтобы любая ошибка, которая не является VendingMachineError, вместо этого захватывалась вызывающей функцией:
func nourish(with item: String) throws {
    do {
        try vendingMachine.vend(itemNamed: item)
    } catch is VendingMachineError {
        print("Некорректный вывод, нет в наличии или недостаточно денег.")
    }
}

do {
    try nourish(with: "Beet-Flavored Chips")
} catch {
    print("Unexpected non-vending-machine-related error: \(error)")
}
// Выведет "Некорректный вывод, нет в наличии или недостаточно денег."
В nourish(with: ), если vend(itemNamed : ) выдает ошибку, которая является одним из кейсов перечисления VendingMachineError, nourish(with: ) обрабатывает ошибку, печатая сообщение. В противном случае, nourish(with: ) распространяет ошибку на свое место вызова. Ошибка затем попадает в общее условие catch.
Преобразование ошибок в опциональные значения
Вы можете использовать try? для обработки ошибки, преобразовав ее в опциональное значение. Если ошибка генерируется при условии try?, то значение выражения вычисляется как nil. Например, в следующем коде x и y имеют одинаковые значения и поведение:
func someThrowingFunction() throws -> Int {
    // ...
}

let x = try? someThrowingFunction()

let y: Int?
do {
    y = try someThrowingFunction()
} catch {
    y = nil
}
Если someThrowingFunction() генерирует ошибку, значение x и y равно nil. В противном случае значение x и y — это возвращаемое значение функции. Обратите внимание, что x и y являются опциональными, независимо от того какой тип возвращает функция someThrowingFunction().
Использование try? позволяет написать краткий код обработки ошибок, если вы хотите обрабатывать все ошибки таким же образом. Например, следующий код использует несколько попыток для извлечения данных или возвращает nil, если попытки неудачные.
func fetchData() -> Data? {
    if let data = try? fetchDataFromDisk() { return data }
    if let data = try? fetchDataFromServer() { return data }
    return nil
}
Запрет на передачу ошибок
Иногда вы знаете, что функции throw или методы не сгенерируют ошибку во время исполнения. В этих случаях, вы можете написать try! перед выражением для запрета передачи ошибки и завернуть вызов в утверждение того, что ошибка точно не будет сгенерирована. Если ошибка на самом деле сгенерирована, вы получите сообщение об ошибке исполнения.
Например, следующий код использует loadImage(atPath: ) функцию, которая загружает ресурс изображения по заданному пути или генерирует ошибку, если изображение не может быть загружено. В этом случае, поскольку изображение идет вместе с приложением, сообщение об ошибке не будет сгенерировано во время выполнения, поэтому целесообразно отключить передачу ошибки.
let photo = try! loadImage(atPath: "./Resources/John Appleseed.jpg")Установка действий по очистке (Cleanup)
Вы используете оператор defer для выполнения набора инструкций перед тем как исполнение кода оставит текущий блок. Это позволяет сделать любую необходимую очистку, которая должна быть выполнена, независимо от того, как именно это произойдет — либо он покинет из-за сгенерированной ошибки или из-за оператора, такого как break или return. Например, вы можете использовать defer, чтобы удостовериться, что файл дескрипторов закрыт и выделенная память вручную освобождена.
Оператор defer откладывает выполнение, пока не происходит выход из текущей области. Этот оператор состоит из ключевого слова defer и выражений, которые должны быть выполнены позже. Отложенные выражения могут не содержать кода, изменяющего контроль исполнения изнутри наружу, при помощи таких операторов как break или return, или просто генерирующего ошибку. Отложенные действия выполняются в обратном порядке, как они указаны, то есть, код в первом операторе defer выполняется после кода второго, и так далее.
func processFile(filename: String) throws {
    if exists(filename) {
        let file = open(filename)
        defer {
            close(file)
        }
        while let line = try file.readline() {
            // работаем с файлом.
        }
        // close(file) вызывается здесь, в конце зоны видимости.
    }
}
Приведенный выше пример использует оператор defer, чтобы удостовериться, что функция open(_: ) имеет соответствующий вызов и для close(_: ).
Заметка
Вы можете использовать оператор defer, даже если не используете кода обработки ошибок.
Если вы нашли ошибку, пожалуйста, выделите фрагмент текста и нажмите Ctrl+Enter.
qaa-engineer.ru > Swift > Как происходит обработка ошибок в Swift при работе с сетью?
В Swift при работе с сетью обработка ошибок осуществляется с помощью ряда методов и конструкций.
1. Ошибки, связанные с соединением, обычно обрабатываются с помощью метода `URLSession`, который предоставляет возможность установки блока обработки ошибок. Например:
let configuration = URLSessionConfiguration.default
let session = URLSession(configuration: configuration)

let url = URL(string: "https://example.com")
let task = session.dataTask(with: url) { data, response, error in
    if let error = error {
        print("Ошибка: \(error)")
        return
    }
}
task.resume()
2. Если ошибка возникает в ходе разбора JSON-ответа сервера, то можно использовать стандартную конструкцию `do-try-catch`, чтобы обработать ошибку:
do {
    let data = try Data(contentsOf: url)
    let json = try JSONDecoder().decode(MyStruct.self, from: data)
} catch let error {
    print("Ошибка: \(error)")
}
3. Если вы используете сторонние библиотеки, например, Alamofire, то там также предусмотрены средства обработки ошибок:
AF.request("https://example.com").responseJSON { response in
    switch response.result {
    case .success(let data):
        print("Успешный результат: \(data)")
    case .failure(let error):
        print("Ошибка: \(error)")
    }
}
Кроме того, в Swift существует огромное количество специальных библиотек для работы с сетью, которые упрощают обработку ошибок и делают код более понятным и читаемым.
Search code, repositories, users, issues, pull requests…
Provide feedback
Saved searches
Use saved searches to filter your results more quickly
Sign up
As developers, we tend to be a rather optimistic bunch of people. At least that’s the impression you get when looking at the code we write — we mostly focus on the happy path, and tend to spend a lot less time and effort on error handling.
Even in this series, we’ve been neglecting error handling. In fact, we’ve mostly ignored it: in the previous post, we replaced any errors with a default value, which was OK for prototyping our app, but this probably isn’t a solid strategy for any app that goes into production.
This time, let’s take a closer look at how we can handle errors appropriately!
Previously…
In case you didn’t read the previous episodes (1, 2) of this series: the use case we’re discussing is the validation logic for a sign-up form. We use Combine to validate the user’s input, and as part of this validation, the app also calls an endpoint on the app’s authentication server to check if the username the user chose is still available. The endpoint will return
trueorfalsedepending on whether the name is still available.
Error handling strategies
Before we dive deeper into how to handle errors, let’s talk about a couple of error handling strategies and whether they are appropriate in our scenario.
Ignoring the error
This might sound like a terrible idea at first, but it’s actually a viable option when dealing with certain types of errors under specific circumstances. Here are some examples:
- The user’s device is temporarily offline or there is another reason why the app cannot reach the server.
- The server is down at the moment, but will be back up soon.
In many cases, the user can continue working offline, and the app can sync with the server once the device comes back online. Of course, this requires some sort of offline capable sync solution (like Cloud Firestore).
It is good practice to provide some user feedback to make sure users understand their data hasn’t been synchronised yet. Many apps show an icon (e.g. a cloud with an upward pointing arrow) to indicate the sync process is still in progress, or a warning sign to alert the user they need to manually trigger the sync once they’re back online.
Retrying (with exponential back-off)
In other cases, ignoring the error is not an option. Imagine the booking system for a popular event: the server might be overwhelmed by the amount of requests. In this case, we want to make sure that the system will not be thrashed by the users hitting “refresh” every couple of seconds. Instead, we want to spread out the time between retries. Using an exponential backoff strategy is both in the user’s and the system’s operator’s best interest: the operator can be sure their server will not be overwhelmed even more by users trying to get through by constantly refreshing, and the users should eventually get their booking through thanks to the app automatically retrying.
Showing an error message
Some errors require the user’s action — for example if saving a document failed. In this case, it is appropriate to show a model dialog to get the user’s attention and ask them how to proceed. For less severe errors, it might be sufficient to show a toast (an overlay that shows for a brief moment and then disappears).
Replacing the entire view with an error view
Under some circumstances, it might even be appropriate to replace the entire UI with an error UI. A well-known example for this is Chrome — if the device is offline, it will display the Chrome Dino to let users know their device is offline, and to help them spend the time until their connection restores with a fun jump-and-run game.
Showing an inline error message
This is a good option in case the data the user has provided isn’t valid. Not all input errors can be detected by a local form validation. For example, an online store might have a business rule that mandates shipments worth more than a certain amount must be shipped using a specific transport provider. It’s not always feasible to implement all of these business rules in the client app (a configurable rules engine definitely might help here), so we need to be prepared to handle these kinds of semantic errors.
Ideally, we should show those kind of errors next to the respective input field to help the user provide the correct input.
Typical error conditions and how to handle them
To give you a better understanding of how to apply this in a real world scenario, let’s add some error handling to the sign-up form we created earlier in this series. In particular, we’ll deal with the following error conditions:
- Device/network offline
- Semantic validation errors
- Response parsing errors / invalid URL
- Internal server errors
Source Code
If you want to follow along, you will find the code for this episode in the following GitHub repository: https://github.com/peterfriese/SwiftUI-Combine-Applied, in the
Networkingfolder. Theserversubfolder contains a local server that helps us simulate all the error conditions we will cover.
Implementing a fallible network API
In the previous post, we implemented an AuthenticationService that interfaces with an authentication server. This helps us to keep everything neatly organised and separated by concerns:
- The view (
SignUpScreen) displays the state and takes the user’s input - The view model (
SignUpScreenViewModel) holds the state the view displays. In turn, it uses other APIs to react to the user’s actions. In this particular app, the view model uses theAuthenticationServiceto interact with the authentication server - The service (
AuthenticationService) interacts with the authentication server. Its main responsibilities are to bring the server’s responses into a format that the client can work with. For example, it converts JSON into Swift structs, and (most relevant for this post) it handles any network-layer errors and converts them into UI-level errors that the client can better work with.
The following diagram provides an overview of how the individual types work together:

If you take a look at the code we wrote in the previous post, you will notice that the checkUserNamerAvailablePublisher has a failure type of Never — that means it claims there is never going to be an error.
func checkUserNameAvailablePublisher(userName: String) -> AnyPublisher<Bool, Never> { ... }
That’s a pretty bold statement, especially given network errors are really common! We were only able to guarantee this because we replaced any errors with a return value of false:
func checkUserNameAvailablePublisher(userName: String)
    -> AnyPublisher<Bool, Never> {
  guard let url = URL(string: "http://127.0.0.1:8080/isUserNameAvailable?userName=\(userName)") else {
    return Just(false).eraseToAnyPublisher()
  }

  return URLSession.shared.dataTaskPublisher(for: url)
    .map(\.data)
    .decode(type: UserNameAvailableMessage.self, decoder: JSONDecoder())
    .map(\.isAvailable)
    .replaceError(with: false)
    .eraseToAnyPublisher()
}
To turn this rather lenient implementation into something that returns meaningful error messages to the caller, we first need to change the failure type of the publisher, and stop glossing over any errors by returning false:
enum APIError: LocalizedError {
  /// Invalid request, e.g. invalid URL
  case invalidRequestError(String)
}

struct AuthenticationService {

  func checkUserNameAvailablePublisher(userName: String)
      -> AnyPublisher<Bool, Error> {
    guard let url =
        URL(string: "http://127.0.0.1:8080/isUserNameAvailable?userName=\(userName)") else {
      return Fail(error: APIError.invalidRequestError("URL invalid"))
        .eraseToAnyPublisher()
    }

    return URLSession.shared.dataTaskPublisher(for: url)
      .map(\.data)
      .decode(type: UserNameAvailableMessage.self, decoder: JSONDecoder())
      .map(\.isAvailable)
//      .replaceError(with: false)
      .eraseToAnyPublisher()
  }

}
We also introduced a custom error type, APIError. This will allow us to convert any errors that might occur inside our API (be it network errors or data mapping errors) into a semantically rich error that we can handle more easily in out view model.
Calling the API and handling errors
Now that the API has a failure type, we need to update the caller as well. Once a publisher emits a failure, the pipeline will terminate — unless you capture the error. A typical approach to handling errors when using flatMap is to combine it with a catch operator:
somePublisher
  .flatMap { value in
    callSomePotentiallyFailingPublisher()
    .catch { error in
      return Just(someDefaultValue)
    }
  }
  .eraseToAnyPublisher()
Applying this strategy to the code in our view model results in the following code:
private lazy var isUsernameAvailablePublisher: AnyPublisher<Bool, Never> = {
  $username
    .debounce(for: 0.8, scheduler: DispatchQueue.main)
    .removeDuplicates()
    .flatMap { username -> AnyPublisher<Bool, Never> in
      self.authenticationService.checkUserNameAvailablePublisher(userName: username)
        .catch { error in 1
          return Just(false) 2
        }
        .eraseToAnyPublisher()
    }
    .receive(on: DispatchQueue.main)
    .share()
    .eraseToAnyPublisher()
}()
And just like that, we end up where we started! If the API emits a failure (for example, the username was too short), we catch the error (1) and replace it with false (2) — this is exactly the behaviour we had before. Except, we wrote a lot more code…
Seems like we’re getting nowhere with this approach, so let’s take a step back and look at the requirements for our solution:
- We want to use the emitted values of the pipeline to drive the state of the submit button, and to display a warning message if the chosen username is not available.
- If the pipeline emits a failure, we want to disable the submit button, and display the error message in the error label below the username input field.
- How exactly we handle the errors will depend on the type of failure, as wel will discuss later in this post.
This means:
- we need to make sure we can receive both failures and successes
- we need to make sure the pipeline doesn’t terminate if we receive a failure
To achieve all of this, we will map the result of the checkUserNameAvailablePublisher to a Result type. Result is an enum that can capture both success and failure states. Mapping the outcome of checkUserNameAvailablePublisherto Result also means the pipeline will no longer terminate in case it emits a failure.
Let’s first define a typealias for the Result type to make our life a little easier:
typealias Available = Result<Bool, Error>
To turn the result of a publisher into a Result type, we can use the following operator that John Sundell implemented in his article The power of extensions in Swift:
extension Publisher {
  func asResult() -> AnyPublisher<Result<Output, Failure>, Never> {
    self
      .map(Result.success)
      .catch { error in
        Just(.failure(error))
      }
      .eraseToAnyPublisher()
  }
}
This allows us to update the isUsernameAvailablePublisher in our view model like this:
private lazy var isUsernameAvailablePublisher: AnyPublisher<Available, Never> = {
  $username
    .debounce(for: 0.8, scheduler: DispatchQueue.main)
    .removeDuplicates()
    .flatMap { username -> AnyPublisher<Available, Never> in
      self.authenticationService.checkUserNameAvailablePublisher(userName: username)
        .asResult()
    }
    .receive(on: DispatchQueue.main)
    .share()
    .eraseToAnyPublisher()
}()
With this basic plumbing in place, let’s look at how to handle the different error scenarios I outlined earlier.
Handling Device/Network Offline Errors
On mobile devices it is pretty common to have spotty connectivity: especially when you’re on the move, you might be in an area with bad or no coverage.
Whether or not you should show an error message depends on the situation:
For our use case we can assume that the user at least has intermittent connectivity. Telling the user that we cannot reach the server would be rather distracting while they’re filling out the form. Instead, we should ignore any connectivity errors for the form validation (and instead run our local form validation logic).
Once the user has entered all their details and submits the form, we should show an error message if the device is still offline.
Catching this type of error requires us to make changes at two different places. First, in checkUserNameAvailablePublisher, we use mapError to catch any upstream errors and turn them into an APIError
enum APIError: LocalizedError {
  /// Invalid request, e.g. invalid URL
  case invalidRequestError(String)

  /// Indicates an error on the transport layer, e.g. not being able to connect to the server
  case transportError(Error)
}

struct AuthenticationService {

  func checkUserNameAvailablePublisher(userName: String)
      -> AnyPublisher<Bool, Error> {
    guard let url = URL(string: "http://127.0.0.1:8080/isUserNameAvailable?userName=\(userName)") else {
      return Fail(error: APIError.invalidRequestError("URL invalid"))
        .eraseToAnyPublisher()
    }

    return URLSession.shared.dataTaskPublisher(for: url)
      .mapError { error -> Error in
        return APIError.transportError(error)
      }
      .map(\.data)
      .decode(type: UserNameAvailableMessage.self, decoder: JSONDecoder())
      .map(\.isAvailable)
      .eraseToAnyPublisher()
  }

}
Then, in our view model, we map the result to detect if it was a failure (1, 2). If so, we extract the error and check if it is a network transport error. If that’s the case, we return an empty string (3) to suppress the error message:
class SignUpScreenViewModel: ObservableObject {

  // ...

  init() {
    isUsernameAvailablePublisher
      .map { result in
        switch result {
        case .failure(let error): 1
          if case APIError.transportError(_) = error {
            return "" 3
          }
          else {
            return error.localizedDescription
          }
        case .success(let isAvailable):
          return isAvailable ? "" : "This username is not available"
        }
      }
      .assign(to: &$usernameMessage) 4

    isUsernameAvailablePublisher
      .map { result in
        if case .failure(let error) = result { 2
          if case APIError.transportError(_) = error {
            return true
          }
          return false
        }
        if case .success(let isAvailable) = result {
          return isAvailable
        }
        return true
      }
      .assign(to: &$isValid) 5
  }
}
In case isUsernameAvailablePublisher returned a success, we extract the Bool telling us whether or not the desired username is available, and map this to an appropriate message.
And finally, we assign the result of the pipeline to the usernameMessage (4) and isValid (5) published properties which drive the UI on our view.
Keep in mind that ignoring the network error is a viable option for this kind of UI — it might be an entirely different story for you use case, so use your own judgement when applying this technique.
So far, we haven’t exposed any errors to the user, so let’s move on to a category of errors that we actually want to make the user aware of.
Handling Validation Errors
Most validation errors should be handled locally on the client, but sometimes we cannot avoid running some additional validation steps on the server. Ideally, the server should return a HTTP status code in the 4xx range, and optionally a payload that provides more details.
In our example app, the server requires a minimum username length of four characters, and we have a list of usernames that are forbiden (such as “admin” or “superuser”).
For these cases, we want to display a warning message and disable the submit button.
Our backend implementatin is based on Vapor, and will respond with a HTTP status of 400 and an error payload for any validation errors. If you’re curious about the implementation, check out the code in routes.swift.
Handling this error scenario requires us to make changes in two places: the service implementation and the view model. Let’s take a look at the service implementation first.
Since we should handle any errors before even trying to extract the payload from the response, the code for handling server errors needs to run after checking for URLErrors and before mapping data:
struct APIErrorMessage: Decodable {
  var error: Bool
  var reason: String
}

// ...

struct AuthenticationService {

  func checkUserNameAvailablePublisher(userName: String) -> AnyPublisher<Bool, Error> {
    guard let url = URL(string: "http://127.0.0.1:8080/isUserNameAvailable?userName=\(userName)") else {
      return Fail(error: APIError.invalidRequestError("URL invalid"))
        .eraseToAnyPublisher()
    }

    return URLSession.shared.dataTaskPublisher(for: url)
      // handle URL errors (most likely not able to connect to the server)
      .mapError { error -> Error in
        return APIError.transportError(error)
      }

      // handle all other errors
      .tryMap { (data, response) -> (data: Data, response: URLResponse) in
        print("Received response from server, now checking status code")

        guard let urlResponse = response as? HTTPURLResponse else {
          throw APIError.invalidResponse 1
        }

        if (200..<300) ~= 2 urlResponse.statusCode {
        }
        else {
          let decoder = JSONDecoder()
          let apiError = try decoder.decode(APIErrorMessage.self,
                                               from: data) 3

          if urlResponse.statusCode == 400 { 4
            throw APIError.validationError(apiError.reason)
          }
        }
        return (data, response)
      }

      .map(\.data)
      .decode(type: UserNameAvailableMessage.self, decoder: JSONDecoder())
      .map(\.isAvailable)
//      .replaceError(with: false)
      .eraseToAnyPublisher()
  }

}
Let’s take a closer look at what the code in this snippet does:
- If the response isn’t a
HTTPURLResonse, we returnAPIError.invalidResponse - We use Swift’s pattern matching to detect if the request was executed successfully, i.e., with a HTTP status code in the range of
200to299 - Otherwise, some error occurred on the server. Since we use Vapor, the server will return details about the error in a JSON payload, so we can now map this information to an
APIErrorMessagestruct and use it to create more meaningful error message in the following code - If the server returns a HTTP status of
400, we know that this is a validation error (see the server implementation for details), and return anAPIError.validationErrorincluding the detailed error message we received from the server
In the view model, we can now use this information to tell the user that their chosen username doesn’t meet the requirements:
init() {
  isUsernameAvailablePublisher
    .map { result in
      switch result {
      case .failure(let error):
        if case APIError.transportError(_) = error {
          return ""
        }
        else if case APIError.validationError(let reason) = error {
          return reason
        }
        else {
          return error.localizedDescription
        }
      case .success(let isAvailable):
        return isAvailable ? "" : "This username is not available"
      }
    }
    .assign(to: &$usernameMessage)
That’s right — just three lines of code. We’ve already done all the hard work, so it’s time to reap the benefits 🎉
Handling Response Parsing Errors
There are many situations in which the data sent by the server doesn’t match what the client expected:
- the response includes additional data, or some fieds were renamed
- the client is connecting via a captive portal (e.g. in a hotel)
In these cases, the client receives data, but it’s in the wrong format. To help the user resolve the situation, we’ll need to analyse the response and then provide suitable guidance, for example:
- download the latest version of the app
- sign in to the captive portal via the system browser
The current implementation uses the decode operator to decode the response payload and throw an error in case the payload couldn’t be mapped. This works well, and any decoding error will be caught and show on the UI. However, an error message like The data couldn’t be read because it is missing isn’t really user friendly. Instead, let’s try to show a message that is a little bit more meaningful for users, and also suggest to upgrade to the latest version of the app (assuming the server is returning additional data that the new app will be able to leverage).
To be able to provide more fine-grained informtion about decoding errors, we need to part ways with the decode operator and fall back to manually mapping the data (don’t worry, thanks to JSONDecoder and Swift’s Codable protocol, this is pretty straighforward):
// ...
.map(\.data)
// .decode(type: UserNameAvailableMessage.self, decoder: JSONDecoder())
.tryMap { data -> UserNameAvailableMessage in
  let decoder = JSONDecoder()
  do {
    return try decoder.decode(UserNameAvailableMessage.self,
                              from: data)
  }
  catch {
    throw APIError.decodingError(error)
  }
}
.map(\.isAvailable)
// ...
By conforming APIError to LocalizedError and implementing the errorDescription property, we can provide a more user-friendly error message (I included custom messages for the other error conditions as well):
enum APIError: LocalizedError {
  /// Invalid request, e.g. invalid URL
  case invalidRequestError(String)

  /// Indicates an error on the transport layer, e.g. not being able to connect to the server
  case transportError(Error)

  /// Received an invalid response, e.g. non-HTTP result
  case invalidResponse

  /// Server-side validation error
  case validationError(String)

  /// The server sent data in an unexpected format
  case decodingError(Error)

  var errorDescription: String? {
    switch self {
    case .invalidRequestError(let message):
      return "Invalid request: \(message)"
    case .transportError(let error):
      return "Transport error: \(error)"
    case .invalidResponse:
      return "Invalid response"
    case .validationError(let reason):
      return "Validation Error: \(reason)"
    case .decodingError:
      return "The server returned data in an unexpected format. Try updating the app."
    }
  }
}
Now, to make it abundandly clear to the user that they should update the app, we will also display an alert. Here is the code for the alert:
struct SignUpScreen: View {
  @StateObject private var viewModel = SignUpScreenViewModel()

  var body: some View {
    Form {
      // ...
    }

    // show update dialog
    .alert("Please update", isPresented: $viewModel.showUpdateDialog, actions: {
      Button("Upgrade") {
        // open App Store listing page for the app
      }
      Button("Not now", role: .cancel) { }
    }, message: {
      Text("It looks like you're using an older version of this app. Please update your app.")
    })

  }
}
You’ll notice that the presentation state of this alert is driven by a published property on the view model, showUpdateDialog. Let’s update the view model accordingly (1), and also add the Combine pipeline that maps the results of isUsernameAvailablePublisher to this new property:
class SignUpScreenViewModel: ObservableObject {
  // ...

  @Published var showUpdateDialog: Bool = false 1

  // ...

  private lazy var isUsernameAvailablePublisher: AnyPublisher<Available, Never> = {
    $username
      .debounce(for: 0.8, scheduler: DispatchQueue.main)
      .removeDuplicates()
      .flatMap { username -> AnyPublisher<Available, Never> in
        self.authenticationService.checkUserNameAvailablePublisher(userName: username)
          .asResult()
      }
      .receive(on: DispatchQueue.main)
      .share() 3
      .eraseToAnyPublisher()
  }()

  init() {
    // ...

    // decoding error: display an error message suggesting to download a newer version
    isUsernameAvailablePublisher
      .map { result in
        if case .failure(let error) = result {
          if case APIError.decodingError = error 2 {
            return true
          }
        }
        return false
      }
      .assign(to: &$showUpdateDialog)
  }
}
As you can see, nothing too fancy — we essentially just take any events coming in from the isUsernameAvailablePublisher and convert them into a Bool that only becomes true if we receive a .decodingError (2).
We’re now using isUsernameAvailablePublisher to drive three different Combine pipelines, and I would like to explicitly call out that — since isUsernameAvailablePublisher eventually will cause a network request to be fired — it is important to make sure we’re only sending at most one network request per keystroke. The previous post in this series explains how to do this in depth, but it’s worth calling out that using .share() (3) plays a key role.
Handling Internal Server Errors
In some rare cases, the backend of our app might be having some issues — maybe part of the system is offline for maintenance, some process died, or the server is overwhelmed. Usually, servers will return a HTTP status code in the 5xx range to indicate this.
Simulating error conditions
The sample server includes code that simulates some of the error conditions discussed in this article. You can trigger the error conditions by sending specific
usernamevalues:
- Any username with less than 4 characters will result in a
tooshortvalidation error, signalled via a HTTP 400 status code and a JSON payload containing a detailed error message.- An empty username will result in a
emptyNameerror message, indicating the username mustn’t be empty.- Some usernames are forbidden: «admin» or «superuser» will result in an
illegalNamevalidation error.- Other usernames such as “peterfriese”, “johnnyappleseed”, “page”, and “johndoe” are already taken, so the server will tell the client these aren’t available any more.
- Sending “illegalresponse” as the username will return a JSON response that has too few fields, resulting in a decoding error on the client.
- Sending “servererror” will simulate a database problem (
databaseCorrupted), and will be signalled as a HTTP 500 with no retry hint (as we assume that this is not a temporary situation, and retrying would be futile).- Sending “maintenance” as the username will return a
maintenanceerror, along with aretry-afterheader that indicates the client can retry this call after a period of time (the idea here is that the server is undergoing scheduled maintenance and will be back up after rebooting).
Let’s add the code required to deal with server-side errors. As we did for previous error scenarios, we need to add some code to map the HTTP status code to our APIError enum:
if (200..<300) ~= urlResponse.statusCode {
}
else {
  let decoder = JSONDecoder()
  let apiError = try decoder.decode(APIErrorMessage.self, from: data)

  if urlResponse.statusCode == 400 {
    throw APIError.validationError(apiError.reason)
  }

  if (500..<600) ~= urlResponse.statusCode {
    let retryAfter = urlResponse.value(forHTTPHeaderField: "Retry-After")
    throw APIError.serverError(statusCode: urlResponse.statusCode,
                               reason: apiError.reason,
                               retryAfter: retryAfter)
  }

}
To display a user-friendly error messge in our UI, all we need to do is add a few lines of code to the view model:
isUsernameAvailablePublisher
  .map { result in
    switch result {
    case .failure(let error):
      if case APIError.transportError(_) = error {
        return ""
      }
      else if case APIError.validationError(let reason) = error {
        return reason
      }
      else if case APIError.serverError(statusCode: _, reason: let reason, retryAfter: _) = error {
        return reason ?? "Server error"
      }
      else {
        return error.localizedDescription
      }
    case .success(let isAvailable):
      return isAvailable ? "" : "This username is not available"
    }
  }
  .assign(to: &$usernameMessage)
So far, so good.
For some of the server-side error scenarios, it might be worthwhile to retry the request after a short while. For a example, if the server underwent maintenance, it might be back up again after a few seconds.
Combine includes a retry operator that we can use to automatically retry any failing operation. Adding it to our code is a simple one-liner:
return URLSession.shared.dataTaskPublisher(for: url)
  .mapError { ... }
  .tryMap { ... }
  .retry(3)
  .map(\.data)
  .tryMap { ... }
  .map(\.isAvailable)
  .eraseToAnyPublisher()
However, as you will notice when you run the app, this will result in any failed request to be retried three times. This is not what we want — for example, we want any verification errors to bubble up to the view model. Instead, they will be captured by the retry operator as well.
What’s more, there is no pause between retries. If our goal was to reduce the pressure on a server that is already overwhelmed, we’ve made it even worse by sending not one, but four requests (the original request, plus three retries).
So how can we make sure that
- We only retry certain types of failiures?
- There is a pause before we retry a failed request?
Our implementation needs to be able to catch any upstream errors, and propagate them down the pipeline to the next operator. When we catch a serverError, however, we want to pause for a moment, and them start the entire pipeline again so it can retry the URL request.
Let’s first make sure we can (1) catch all errors, (2) filter out the serverError, and (3) propagate all other errors along the pipeline. The tryCatch operator “handles errors from an upstream publisher by either replacing it with another publisher or throwing a new error”. This is exactly what we need:
return URLSession.shared.dataTaskPublisher(for: url)
  .mapError { ... }
  .tryMap { ... }
  .tryCatch { error -> AnyPublisher<(data: Data, response: URLResponse), Error> in 1
    if case APIError.serverError(_, _, let retryAfter) = error { 2
      // ...
    }
    throw error 3
  }
  .map(\.data)
  .tryMap { ... }
  .map(\.isAvailable)
  .eraseToAnyPublisher()
When we caught a serverError, we want to wait for a short amount of time, and then restart the pipeline.
We can do this by firing off a new event (using the Just publisher), delaying it for a few seconds, and then using flatMap to kick off a new dataTaskPublisher. Instead of pasting the entire code for the pipeline inside the if statement, we assign the dataTaskPublisher to a local variable:
let dataTaskPublisher = URLSession.shared.dataTaskPublisher(for: url)
  .mapError { ... }
  .tryMap { ... }

return dataTaskPublisher
  .tryCatch { error -> AnyPublisher<(data: Data, response: URLResponse), Error> in
    if case APIError.serverError = error {
      return Just(()) 1
        .delay(for: 3, scheduler: DispatchQueue.global())
        .flatMap { _ in
          return dataTaskPublisher
        }
        .retry(10) 2
        .eraseToAnyPublisher()
    }
    throw error
  }
  .map(\.data)
  .tryMap { ... }
  .map(\.isAvailable)
  .eraseToAnyPublisher()
A couple of notes about this code:
- The
Justpublisher expects some value it can publish. Since it really doesn’t matter which value we use, we can send anything we want. I decided to send an empty tuple, which is often used in situations when you mean “nothing”. - We retry sending the request 10 times, meaning it will be sent up to 11 times in total (the original call plus the 10 retries).
The only reason why this number is so high is to make it easier to see that the pipeline comes to an end as soon as the server returns a successful result. The demo server can simulate recovering from scheduled maintenance when you send maintenance as the username: it will throw InternalServerError.maintenance (which is mapped to HTTP 500) for every first and second request. Every third request, it will return a success (i.e. HTTP 200). The best way to see this in action is to run the server from inside Xcode (run open the server project and press the Run button). Then, create a Sound breakpoint for the line that contains throw InternalServerError.maintenance:

Everytime the server receives a request for username=maintenace, you will hear a sound. Now, run the sample app and enter maintenance as the username. You will hear the server responding with an error two times, before it will return a success.
Closure
After using a rather lenient approach to handle errors in the recent episode of this series, we took things a lot more serious this time around.
In this episode, we used a couple of strategies to handle errors and expose them to the UI. Error handling is an important aspect of developer quality software, and there is a lot of material out there. However, the aspect of how to expose erorrs to the user isn’t often discussed, and I hope this article provided you with a better understanding of how you can achieve this.
In comparison to the original code, the code became a bit more complicated, and this is something we’re going to address in the next episode when we will look at implementing your own Combine operators. To demonstrate how this works, we will implement an operator that makes handling incremental backoff as easy as adding one line to your Combine pipeline!
Thanks for reading 🔥
Время на прочтение
5 мин
Количество просмотров 10K
Сегодня мы приготовили перевод для тех, кто так же, как автор статьи, при изучении Документации языка программирования Swift избегает главы «Error Handling».
Из статьи вы узнаете:
- что такое оператор if-else и что с ним не так;
- как подружиться с Error Handling;
- когда стоит использовать Try! и Try?

Моя история
Когда я был младше, я начинал изучать документацию языка Swift. Я по несколько раз прочёл все главы, кроме одной: «Error Handling». Отчего-то мне казалось, что нужно быть профессиональным программистом, чтобы понять эту главу.
Я боялся обработки ошибок. Такие слова, как catch, try, throw и throws, казались бессмысленными. Они просто пугали. Неужели они не выглядят устрашающими для человека, который видит их в первый раз? Но не волнуйтесь, друзья мои. Я здесь, чтобы помочь вам.
Как я объяснил своей тринадцатилетней сестре, обработка ошибок – это всего лишь ещё один способ написать блок if-else для отправки сообщения об ошибке.
Сообщение об ошибке от Tesla Motors
Как вы наверняка знаете, у автомобилей Tesla есть функция автопилота. Но, если в работе машины по какой-либо причине происходит сбой, она просит вас взять руль в руки и сообщает об ошибке. В этом уроке мы узнаем, как выводить такое сообщение с помощью Error Handling.
Мы создадим программу, которая будет распознавать такие объекты, как светофоры на улицах. Для этого нужно знать как минимум машинное обучение, векторное исчисление, линейную алгебру, теорию вероятности и дискретную математику. Шутка.
Знакомство с оператором if-else
Чтобы максимально оценить Error Handling в Swift, давайте оглянемся в прошлое. Вот что многие, если не все, начинающие разработчики сделали бы, столкнувшись с сообщением об ошибке:
var isInControl = true

func selfDrive() {
 if isInControl {
  print("You good, let me ride this car for ya")
 } else {
  print("Hold the handlebar RIGHT NOW, or you gone die")
 }
}

selfDrive() // "You good..."
Проблема
Самая большая проблема заключается в удобочитаемости кода, когда блок else становится слишком громоздким. Во-первых, вы не поймёте, содержит ли сама функция сообщение об ошибке, до тех пор, пока не прочитаете функцию от начала до конца или если не назовёте ее, например, selfDriveCanCauseError, что тоже сработает.
Смотрите, функция может убить водителя. Необходимо в недвусмысленных выражениях предупредить свою команду о том, что эта функция опасна и даже может быть смертельной, если невнимательно с ней обращаться.
С другой проблемой можно столкнуться при выполнении некоторых сложных функций или действий внутри блока else. Например:
else {
 print("Hold the handle bar Right now...")

 // If handle not held within 5 seconds, car will shut down
 // Slow down the car
 // More code ...
 // More code ...

}
Блок else раздувается, и работать с ним – все равно что пытаться играть в баскетбол в зимней одежде (по правде говоря, я так и делаю, так как в Корее достаточно холодно). Вы понимаете, о чём я? Это некрасиво и нечитабельно.
Поэтому вы просто могли бы добавить функцию в блок else вместо прямых вызовов.
else {
 slowDownTheCar()
 shutDownTheEngine()
}
Однако при этом сохраняется первая из выделенных мной проблем, плюс нет какого-то определённого способа обозначить, что функция selfDrive() опасна и что с ней нужно обращаться с осторожностью. Поэтому предлагаю погрузиться в Error Handling, чтобы писать модульные и точные сообщения об ошибках.
Знакомство с Error Handling
К настоящему времени вы уже знаете о проблеме If-else с сообщениями об ошибках. Пример выше был слишком простым. Давайте предположим, что есть два сообщения об ошибке:
- вы заблудились
- аккумулятор автомобиля разряжается.
Я собираюсь создать enum, который соответствует протоколу Error.
enum TeslaError: Error {
 case lostGPS
 case lowBattery
}
Честно говоря, я точно не знаю, что делает Error протокол, но при обработке ошибок без этого не обойдешься. Это как: «Почему ноутбук включается, когда нажимаешь на кнопку? Почему экран телефона можно разблокировать, проведя по нему пальцем?»
Разработчики Swift так решили, и я не хочу задаваться вопросом об их мотивах. Я просто использую то, что они для нас сделали. Конечно, если вы хотите разобраться подробнее, вы можете загрузить программный код Swift и проанализировать его самостоятельно – то есть, по нашей аналогии, разобрать ноутбук или iPhone. Я же просто пропущу этот шаг.
Если вы запутались, потерпите еще несколько абзацев. Вы увидите, как все станет ясно, когда TeslaError превратится в функцию.
Давайте сперва отправим сообщение об ошибке без использования Error Handling.
var lostGPS: Bool = true
var lowBattery: Bool = false

func autoDriveTesla() {
 if lostGPS {
  print("I'm lost, bruh. Hold me tight")
  // A lot more code

 }
 if lowBattery {
  print("HURRY! ")
  // Loads of code
 }
}
Итак, если бы я запустил это:
autoDriveTesla() // "HURRY! " Но давайте используем Error Handling. В первую очередь вы должны явно указать, что функция опасна и может выдавать ошибки. Мы добавим к функции ключевое слово throws.
func autoDriveTesla() throws { ... }Теперь функция автоматически говорит вашим товарищам по команде, что autoDriveTesla – особый случай, и им не нужно читать весь блок.
Звучит неплохо? Отлично, теперь пришло время выдавать эти ошибки, когда водитель сталкивается с lostGPA или lowBattery внутри блока Else-If. Помните про enum TeslaError?
func autoDriveTesla() throws {
 if lostGPS {
  throw TeslaError.lostGPS

}
 if lowBattery {
  throw TeslaError.lowBattery
}
Я вас всех поймаю
Если lostGPS равно true, то функция отправит TeslaError.lostGPS. Но что делать потом? Куда мы будем вставлять это сообщение об ошибке и добавлять код для блока else?
print("Bruh, I'm lost. Hold me tight")Окей, я не хочу заваливать вас информацией, поэтому давайте начнём с того, как выполнить функцию, когда в ней есть ключевое слово throws.
Так как это особый случай, вам необходимо добавлять try внутрь блока do при работе с этой функцией. Вы такие: «Что?». Просто последите за ходом моих мыслей ещё чуть-чуть.
do {
 try autoDriveTesla()
}
Я знаю, что вы сейчас думаете: «Я очень хочу вывести на экран моё сообщение об ошибке, иначе водитель умрёт».
Итак, куда мы вставим это сообщение об ошибке? Мы знаем, что функция способна отправлять 2 возможных сообщения об ошибке:
- TeslaError.lowBattery
- TeslaError.lostGPS.
Когда функция выдаёт ошибку, вам необходимо её “поймать” и, как только вы это сделаете, вывести на экран соответствующее сообщение. Звучит немного запутанно, поэтому давайте посмотрим.
var lostGPS: Bool = false
var lowBattery: Bool = true

do {
 try autoDriveTesla()
 } catch TeslaError.lostGPS {
  print("Bruh, I'm lost. Hold me tight")
 } catch TeslaError.lowBattery {
  print("HURRY! ")
 }
}

// Results: "HURRY! "
Теперь всё должно стать понятно. Если понятно не всё, вы всегда можете посмотреть моё видео на YouTube.
Обработка ошибок с Init
Обработка ошибок может применяться не только к функциям, но и тогда, когда вам нужно инициализировать объект. Допустим, если вы не задали имя курса, то нужно выдавать ошибку.
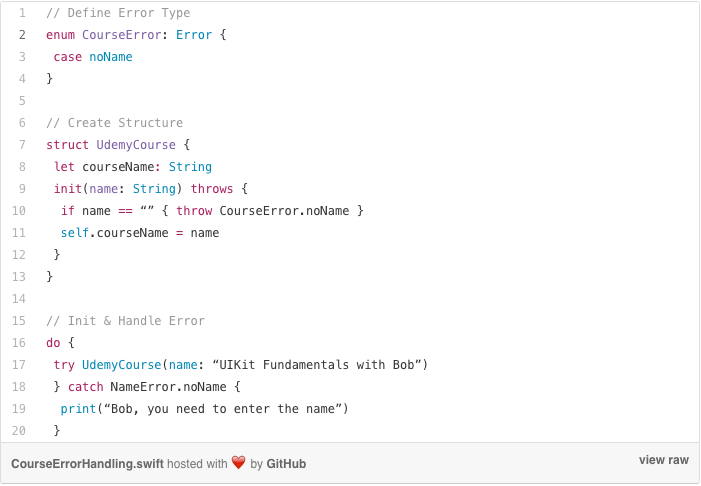
Если вы введёте tryUdemyCourse(name: «»), появится сообщение об ошибке.
Когда использовать Try! и Try?
Хорошо. Try используется только тогда, когда вы выполняете функцию/инициализацию внутри блока do-catch. Однако если у вас нет цели предупредить пользователя о том, что происходит, выводя сообщение об ошибке на экран, или как-то исправить ее, вам не нужен блок catch.
try?– что это?
Давайте начнём с try? Хотя это не рекомендуется,
let newCourse = try? UdemyCourse("Functional Programming")try? всегда возвращает опциональный объект, поэтому необходимо извлечь newCourse
if let newCourse = newCourse { ... }Если метод init выбрасывает ошибку, как, например
let myCourse = try? UdemyCourse("") // throw NameError.noNameто myCourse будет равен nil.
try! – что это?
В отличие от try? оно возвращает не опциональное значение, а обычное. Например,
let bobCourse = try! UdemyCourse("Practical POP")bobCourse не опционально. Однако, если при методе инициализации выдается ошибка вроде,
let noCourseName = try! UdemyCourse("") // throw NameError.noNameто приложение упадёт. Так же как и в случае с принудительным извлечением с помощью !, никогда не используйте его, если вы не уверены на 101% в том, что происходит.
Ну вот и всё. Теперь вы вместе со мной поняли концепцию Error Handling. Легко и просто! И не нужно становиться профессиональным программистом.