 Исключительные ситуации (exceptions) — это ошибки возникшие в вашем коде и которые также представлены в виде специальных объектов. Лично у меня самой популярной ошибкой, благодаря тому, что яне владею слепым набором, является NoMethodError или NameError:
Array.hello
#NoMethodError: undefined method `hello' for Array:Class
#from (irb):3
#from /home/vladimir/.rvm/rubies/ruby-1.9.2-p0/bin/irb:17:in `<main>'

hello
#NameError: undefined local variable or method `hello' for main:Object
#from (irb):4
#from /home/vladimir/.rvm/rubies/ruby-1.9.2-p0/bin/irb:17:in `<main>'
Ниже приведен иерархический список всех стандартных исключительных ситуаций в Ruby:
Exception
 NoMemoryError
 ScriptError
   LoadError
   NotImplementedError
   SyntaxError
 SignalException
   Interrupt
 StandardError
   ArgumentError
   IOError
     EOFError
   IndexError
   LocalJumpError
   NameError
     NoMethodError
   RangeError
     FloatDomainError
   RegexpError
   RuntimeError
   SecurityError
   SystemCallError
   SystemStackError
   ThreadError
   TypeError
   ZeroDivisionError
 SystemExit
 fatal
Вам не обязательно создавать в вашем коде ошибку, вы можете принудительно вызвать исключительную ситуацию при помощи метода raise:
def my_method()
  raise "SomeError message ..."
end

my_method
#exceptions.rb:2:in `my_method': SomeError message ... (RuntimeError)
#from exceptions.rb:5:in `<main>'
Давайте разберем сообщение об ошибке. Оно содержит весьма полезную информацию, которая необходима вам для исправления ошибки: где находится ошибка (exceptions.rb:2:in `my_method’), сообщение описывающее ошибку (SomeError message …), тип ошибки (RuntimeError), и место где возникла ошибка (#from exceptions.rb:5:in `<main>’).
Обработка ошибок
Реальная польза от всех этих типов ошибок заключается в возможности их обработки. Обработка ошибок — это код, который выполняется только при условии возникновения ошибок. Код, ошибки в котором следует обрабатывать необходимо заключить в блок begin — end, а отлавливание ошибок следует производить при помощи ключевого слова rescue. Пример:
begin
  100 / 0
rescue
  puts "Fuck! Divider is zero!"
end
#=> Fuck! Divider is zero!
Код после rescue выполнится только после возникновения исключительной ситуации, любой исключительной ситуации! rescue может принимать параметр — тип исключительной ситуации для того, чтобы обрабатывать лишь один определенный тип ошибок, таким образом можно выполнять различный код для различных ошибок. Пример:
begin
  some_undefined_method_call
rescue NameError
  puts "Fuck! Undefined method!"
end
#=>Fuck! Undefined method!
Иногда бывает необходимость выполнить кусок кода независимо от того была ошибка или небыло. Для этого существует ensure. Пример:
begin
  some_undefined_method_call
rescue NameError
  p "Fuck! Undefined method!"
ensure
  p "RubyDev.ru"
end
#=>"Fuck! Undefined method!"
#=>"RubyDev.ru"
Выможете использовать обработчик ошибок rescue и ensure не только в контексте begin — end, но и в контексте любого блока кода, например в контексте метода или класса. Пример:
def hello(msg = "")
  raise "Empty message!" if msg == ""
  puts(msg)
rescue
  puts "Some Error!"
end

hello("Rubydev.ru") #Rubydev.ru
hello #Some Error!
«Кошэрная» обработка ошибок
Чтобы в обработчике ошибок иметь доступ к различной информации об ошибке, необходимо использовать следующий синтаксис:
def hello(msg = "")
  raise "Empty message!" if msg == ""
  puts(msg)
rescue RuntimeError => error
  puts error.inspect
end

hello #<RuntimeError: Empty message!>
Теперь в контексте обработчика ошибок мы имеем доступ к экземпляру ошибки, что дает нам возможность получить некоторые данные об ошибке:
def hello(msg = "")
  raise "Empty message!" if msg == ""
  puts(msg)
rescue RuntimeError => error
  puts error.message
  puts error.backtrace
end

hello
#=>Empty message!
#exceptions.rb:2:in `hello'
#exceptions.rb:9:in `<main>'
Создание собственных типов ошибок
Глядя на иерархию исключительных ситуаций можно увидить, что все исключительные ситуации происходят от класса Exception. Доказательство:
puts RuntimeError.superclass #StandardError
puts RuntimeError.superclass.superclass #Exception
Хотя все ошибки и происходят от класса Exception, вам следует использовать класс StandartError для наследования поскольку Exception слишком низкоуровневый класс, который обслуживает между всего прочего еще и ошибки окружения. Пример создания собственной ошибки:
class SomeError < StandardError
  def message
    "Some Error!"
  end
end

raise SomeError #exceptions.rb:7:in `<main>': Some Error! (SomeError)
Лучшая благодарнорность автору — ваши комментарии!

on
November 19, 2019

What is exception handling?
Software systems can be quite prone to error conditions. Systems that involve user interaction are more vulnerable to exceptions as they attract errors at multiple fronts. Errors can take many forms — syntactical errors, network errors, form input errors, invalid authentication errors etc. If not accounted for, these can affect user experience and can even manifest as security loopholes, enabling attackers to compromise the system.
Exception handling is used to prevent system failures and to save the user from lousy error messages.
In most cases, when an error condition occurs, the programming language forces the program to terminate and therefore program control is lost. Exception handling allows you (or the program) to not lose control and to be able to deal with what happens after the error has occurred. This gives you some room to make amends — to show affable error messages, to release some resources or to conveniently redirect the user to a relevant page.
Exception handling helps you clear up the mess, without making it look like one.
It is the process of accommodating error conditions and responding to them programmatically, resulting in execution of a presumably alternate, but already planned sequence of code.
Exception handling in Ruby
In the vast majority of languages, exception handling is performed using “try, throw and catch” mechanisms. When the try block is encountered, the compiler becomes super aware in the lookout for an exception (thrown either manually, or by the language itself) and instructs the catch block to deal with it. Ruby, however decided to go with different names for their conventional exception handling system.
I find the Ruby terminology for dealing with exceptions a lot more poetic.
There is a beginning, followed by errors raised and eventually rescued. And like all good things, it comes to an end, unless you want to retry.
begin
    # raise exception here

rescue
    # raised exception handled here

retry
    # retrying the code in the begin block


ensure
    # Always executed

end
Exception handling in Ruby primarily consists of —
- Begin — end block
- Raise
- Rescue
- Retry
- Ensure
Begin — end block, raise, rescue and ensure are analogous to the programming concepts of try, throw, catch and finally. Let’s try to understand them.
Note: Ruby also provides throw and catch functions for handling exceptions, which are lightweight counterparts of raise and rescue that do not build stack traces of the exceptions. Even though raise and rescue based mechanisms are more prevalent among Ruby developers, we’ll see how Ruby’s throw and catch mechanisms can help later in this post.
2.1 Begin — end block
The error prone part of your code comes in the begin block. The corresponding exception handling, through the raise and rescue mechanisms, also happens inside the begin block.
You can use begin blocks to sectionalize the different types of errors that are likely to show up. Differently erroneous codes can be put into different begin — end blocks and can accordingly be handled.
begin
    # code likely to give error comes in this block
    # raising and rescuing something
end

begin
    # raising and rescuing something else
end
Note: The body of a Ruby method can also act as begin-end block and thus does not require an explicit ‘begin’ call.
def raise_and_rescue
  # begin call not necessary
  # raising and rescuing
end
2.2 Raise
An exception can either be raised manually by the developer, using the raise command, or automatically by the language itself. Exceptions are raised automatically on incurring a syntactical error, like a variable not declared, a function not defined or an invalid math operation etc.
Based on your application, custom exception conditions can be catered to by manually raising errors.
A very common use case would be a signup webpage that doesn’t submit the form until you have entered (and/or re-entered) a valid password. This sort of client-side proofing can save you from an unnecessary HTTP request to your server which might either affect database integrity or respond with an error message, which will need to be handled later.
Let’s see how we can raise an exception in Ruby —
begin
    # if some condition is met or not met ->
    raise "I am the error message!"
    # below lines are not executed
end
Here we are just raising an exception, not handling it (yet). This results in the program being terminated where the exception is raised, and as a result, the lines below are not executed. A language-generated error message is output as shown below —

To prevent this, we can handle the exceptions in our own way, by using rescue blocks.
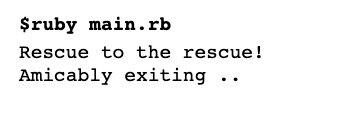
2.3 Rescue to the rescue

Rescue blocks are like catch blocks that take control of the program after an exception has been raised. Raised exceptions can be followed by one or more rescue blocks to handle the exceptions based on their type. A generic rescue call looks like this —
begin
    # if some condition is met or not met ->
    raise 'I am the error message!'

    puts 'I am not executed.'
rescue
    puts 'Rescue to the rescue!'
end

puts 'Amicably exiting ..'
Once the exception is handled, execution resumes from after the begin block.
The rescue call defaults to a StandardError parameter. Rescue calls can however be made to handle specific exceptions. Some common Ruby errors (also common across other languages) are —
- IndexError
- NameError
- RangeError
- TypeError
- ZeroDivisionError
- RuntimeError
Rescue blocks can be made to cater to certain types (classes) of exceptions.
In this way, raised exceptions can be followed by multiple rescue clauses, each responsible for handling a different type of exception. Let’s see how we can do this in code —
begin
  # error raised here
rescue IndexError
  # dealing in one way
rescue RangeError
  # dealing in another way
end
Arguments can be used with the rescue clause to act as placeholders for the rescued exception —
begin
    raise 'I am the error message!'
rescue StandardError => e
    # inspecting the raised exception
    puts e.message

    # information about where the exception was raised
    puts e.backtrace.inspect
end 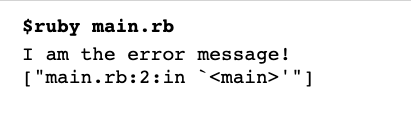
The output tells how the exception was raised in line 2 of our code.
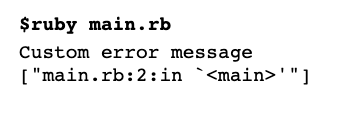
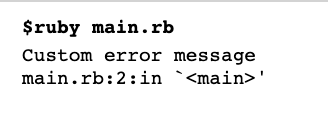
Specific types (classes) of exceptions can be raised even with custom error messages. For example —
begin
raise ZeroDivisionError, "Custom error message"
rescue ZeroDivisionError => e
    # inspecting the raised exception
    puts e.message
    puts e.backtrace.inspect
end
2.4 Else
 2.4 Else
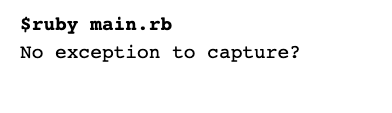
Sometimes it’s possible that there was nothing to rescue from, that no exception was raised. The else clause can be used in this case as such —
begin
rescue StandardError => e
    # inspecting the raised exception
    puts e.message
    puts e.backtrace.inspect
else
    puts 'No exception to capture?'
end
 Magic variables
When exceptions are raised, Ruby assigns two variables — $! and $@ with information about the raised exception.
- $! stores the exception message
- $@ stores the backtrace
begin
raise ZeroDivisionError, "Custom error message"
rescue ZeroDivisionError => e
    # inspecting the raised exception
    puts $! # equivalent to e.message
    puts $@ # equivalent to e.backtrace.inspect
end
2.5 Retry
Well, what if you don’t want to give up? You might want to keep trying till it works.

This could be a common case when network connections are inconsistent.
As I type this post on a Google document, at my home, on a poor internet connection, I can see the webpage continuously trying to keep me connected to the internet.
Till now we have seen how rescue blocks can be used to deal with what happens after an exception has occurred. The retry clause allows us to run the begin block again. This can come in handy after we have fixed what caused the exception to happen in the first place.
Let’s see how retry can help, with a rather simple example.
We know division of a number by zero is undefined. In the example below, we try to divide a by b (a / b). Initially the denominator, b is zero and therefore the division would raise a ZeroDivisionError. In the rescue block, we change the denominator to 1 and retry the whole thing.
a = 10
b = 0
begin
puts a/b
rescue ZeroDivisionError => e
    # inspecting the raised exception
    puts e.message
    puts e.backtrace.inspect
    b = 1
    retry
else
    puts 'No exception to capture?'
    puts 'Division was successful!'
end 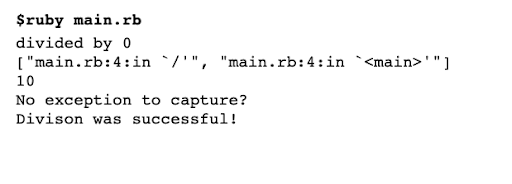
2.6 Ensure
Ensure is like the finally block that we have in other programming languages. It is there to always run at the end of each begin block. Regardless of any control sequence that the program ends up following, the ensure block is always executed at the end of it’s parent begin block.
begin
# if some condition is met or not met ->
raise 'I am the error message!'
rescue
puts 'Rescue to the rescue!'
ensure
puts 'Always executed at the end.'
end 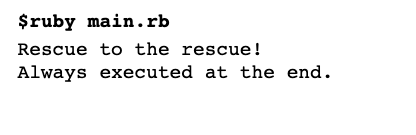 Ensure blocks are executed even if there isn’t a rescue block to handle a thrown exception.
begin
    # if some condition is met or not met ->
    puts 'Begin!'
    raise 'I am the error message!'
ensure
    puts 'Executed even when there is no rescue clause'
end 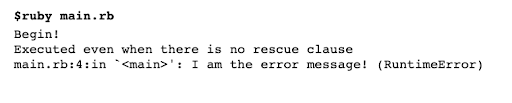
Note how in this case, even though the ensure block is executed at the end, the raised exception manifests as a runtime error after the ensure block.
Ensure blocks are generally used to free up any resources after an exception has been raised eg. closing database connections, closing file handlers etc. Without such blocks, the program abruptly terminates without clearing the resources.
Throw and catch in Ruby — lightweight alternatives
It’s not a good idea to exceptionally over-handle your code. Extensive raising and rescuing can take a toll on the system’s performance.
Each time an exception is raised, a stack trace is built that helps in debugging the error. Too many of such handled exceptions can soon become a terrible bottleneck.
Turns out there is a lightweight alternative to the conventional approach that allows you to smoothly transfer program control out of complex nested blocks. Throw clauses and catch blocks in Ruby are linked through a common label name that both share.
throw :labelname
# ..
catch :labelname do
# ..
end
You can also use conditional throw calls as such —
throw :labelname if a > b
# ..
catch :labelname do
# ..
end
Throw and catch in Ruby are quite different from conventional throw-catch mechanisms in other languages. In Ruby, they are used more for terminating execution quickly, and not as much for handling exceptions.
It can come in handy when you are working with nested for loops and you want to get out of the computationally expensive mess when a condition is met, without having to use multiple break statements. Throw helps program control to move around swiftly to help programs execute faster, in a more efficient manner, compared to slow conventional begin/raise/rescue mechanisms that are more concerned about the raised exception, where it happened etc.
The way that throw and catch are used is that throw calls are made from inside catch blocks, transferring control from deep inside a nested construct, back to the level of the catch block in the code.
catch(:get_me_out) do
  # arbitrary nested for loop
  for a in 1..5 do
    for b in 1..5 do
      # arbitrary condition
      if a + b == 7
        # throwing to get out of the nested loops
        throw(:get_me_out)
      end
    end
  end
end

puts 'Good to go!'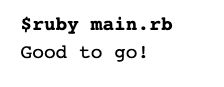
A throw function can also be called with a custom message as an argument, which the catch block ends up returning after something is thrown.
thrown_msg = catch(:get_me_out) do

  # arbitrary nested for loop
  for a in 1..5 do
    for b in 1..5 do

      # arbitrary condition
      if a + b == 7

        # throwing to get out of the nested loops
        throw(:get_me_out, 'Inside this mess, get me out')
      end
    end
  end
end

puts thrown_msg
puts 'Good to go!'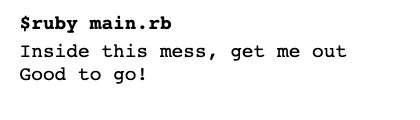
Custom Exception class in Ruby
We can create our own Exception classes that cater to specific requirements in our projects. This can be done by inheriting from the provided StandardError class.
class MyCustomError < StandardError
end

raise MyCustomError
It’s good to have an error message to accompany the raised exception. We can do this by overriding the initialize method for our custom class with a default msg argument.
class MyCustomError < StandardError
  def initialize(msg="Custom error message")
    # to override the method
    super
  end
end

raise MyCustomError
Wrapping it up

In this post, we looked at —
- What is exception handling (in general)
- Exception handling in Ruby —
- Begin — end block
- Raise
- Rescue
- Else
- Retry
- Ensure
- Throw and catch in Ruby
- Custom exception classes
All in all, we learnt how Ruby prefers a different terminology for dealing with exceptions. Except for the retry function, the begin / raise / rescue paradigm resonates with the conventional try / throw / catch setup used across most other programming languages. Throw and catch in Ruby however help in quickly getting yourself out of complex constructs. We also saw how we can create our application-specific custom Exception classes that inherit from the StandardError class.
Try ScoutAPM
Thanks for reading our blog. Now that you have a handle on handling exceptions, you need the best way to find them in your application. Sign up here today for a free trial or contact us with any queries you might have. Want to show off Scout to your fellow developers? Click here for some free ScoutAPM swag.
In Ruby, exception handling is a process which describes a way to handle the error raised in a program. Here, error means an unwanted or unexpected event, which occurs during the execution of a program, i.e. at run time, that disrupts the normal flow of the program’s instructions. So these types of errors were handled by the rescue block. Ruby also provides a separate class for an exception that is known as an Exception class which contains different types of methods.
The code in which an exception is raised, is enclosed between the begin/end block, so you can use a rescue clause to handle this type of exception.
Syntax:
begin
    raise
      # block where exception raise

    rescue
      # block where exception rescue
end
Example:
def raise_and_rescue
begin
puts 'This is Before Exception Arise!'
raise 'Exception Created!'
puts 'After Exception'
rescue
puts 'Finally Saved!'
end
puts 'Outside from Begin Block!'
end
raise_and_rescue
Output:
This is Before Exception Arise!
Finally Saved!
Outside from Begin Block!
Explanation: In the above program, an exception is raised in the begin block (raise block) which interrupt the flow of execution of the program. To overcome this situation, use the rescue block to handle the raised exception. When rescue block is used, it handles the exception and continues the execution of the program.
Note: Multiple rescue clauses can be used in the same program which means if an exception is not handled by the first rescue clause, then another rescue clause will definitely handle the exception. If no rescue clause match, or if an exception occurs outside the begin/end block, then Ruby moves up to the stack and looks for an exception handler in the caller.
The statements used in Exceptions are:
- retry Statement: This statement is used to execute the rescue block again from the beginning after capturing the exception.
Syntax:
begin
    # block where exception raise

rescue
    # block where an exception is captured

retry

    # this statement restarts the rescue
    # block from the beginning
end
Example:
beginraise'Exception Created!'puts'After Exception'rescueputs'Finally Saved!'retryendOutput:
Finally Saved!
Finally Saved!
Finally Saved!
Finally Saved!
Finally Saved!
Finally Saved!
.
.
.
.
Note: Be careful while using retry statement because it may result into infinite loop.
- raise Statement: This statement is used to raise an exception.
Syntax:
raise
This syntax is used to re-raise the current exception. It is generally used by the exception handler where an exception is interrupted before passing it on.
raise "Error Message"
This syntax is used to create a RuntimeError exception and it raises up the call stack.
raise ExceptionType, "Error Message"
In this syntax, the first argument is used to create an exception and then set the message in the second argument.
raise ExceptionType, "Error Message" condition
In this syntax, the first argument is used to create an exception and then set the message in the second argument. You can also set a condition statement to raise an exception.
Example:
beginputs'This is Before Exception Arise!'raise'Exception Created!'puts'After Exception'endOutput:
This is Before Exception Arise!
Exception Created!
- ensure Statement: This statement ensures that required instructions will execute at the end of the code, whether the exception raise or raised exception is rescued, or the program terminates due to an uncaught exception. This block always gives output. This block is placed over the rescue block.
Syntax:
begin
     # exception raise

rescue
    # exception rescue

ensure
    # this block always executes
end
Example:
beginraise'Exception Created!'puts'After Exception'rescueputs'Finally Saved!'ensureputs'ensure block execute'endOutput:
Finally Saved!
ensure block execute
- else Statement: This statement is present in between the rescue block and ensure block. This block only executes when no exception is raised.
Syntax:
begin
  rescue
    # exception rescue

  else
    # this block executes when no exception raise

  ensure
    # this block always executes
end
Example:
beginputs'no Exception raise'rescueputs'Finally Saved!'elseputs'Else block execute because of no exception raise'ensureputs'ensure block execute'endOutput:
no Exception raise
Else block execute because of no exception raise
ensure block execute
Catch and Throw in Exception Handling
In Ruby, catch and throw blocks are the lightweight mechanism for error handling and used to jump from the exception when there is no additional work is available in the program.
The catch block is used to jump out from the nested block and the block is labeled with a name. This block works normally until it encounters with the throw block. catch and throw method will work faster than raise and rescue method. When the throw statement is encountered, Ruby will check the call stack for the catch statement with the related symbol. The throw statement never executes and always return nil.
Syntax:
throw :label_name
    # this block will not be executed

catch :label_name do
    # matching catch will be executed when the throw block encounter
end
You can also apply a condition in catch and throw statement as shown below:
throw :label_name condition
     # this block will not be executed

catch :label_name do
     # matching catch will be executed when the throw block encounter
end
Example:
def catch_and_throw(value)
puts value
a = readline.chomp
throw :value_e if a == "!"
return a
end
catch :value_e do
number = catch_and_throw("Enter Number: ")
end
Input:
Enter Number: 1
Output:
1
Input:
Enter Number: !
Output:
nil
Explanation: In the above example the catch_and_throw method is used to print the value enter in the catch statement. If the user enters a number, then it will print number, but if the user enters !, then it will give you nil. Because the throw statement has effectively never executed.
Last Updated :
12 Oct, 2018
Like Article
Save Article
Ruby is a popular open source programming language that is highly flexible, and used for everything from basic «hello world» apps to sophisticated, dynamic programs. Whether you’ve been programming in Ruby for years or you’re a complete beginner, tracking down errors in your Ruby app is simple and easy. Let’s go through some basic Ruby error handling, and discover how easy it can be to integrate Rollbar into your Ruby app to automatically log and report your exceptions.
Raise and Rescue Exceptions
Ruby’s default exception handling is to terminate the program in the event of an exception. That’s not really useful when you’re trying to build a complex web application for multiple users. Luckily there’s a way around this — declaring exception handlers. Exception handlers are blocks of code that are called if an exception occurs in the execution of another block of code in your program. For the most basic Ruby exception handling, you need to know how to Raise and Rescue an exception.
When you Raise an exception, you stop the normal flow of the program, and execute the code that deals with handling an error. This code can either deal with the error in some way, or terminate the program. If you provide a Rescue clause in your error handler, you can choose how to deal with the exception; without it, the program will simply terminate.
Ruby Exception Hierarchy
Ruby has a predefined Exception class, with quite a few subclasses that can be used for basic error handling. The hierarchy of these subclasses is as follows (with commentary):
Fatal: used internally by Ruby when it must exit due to a fatal error. Errors of this class can’t be rescued.NoMemoryError: raised when memory allocation fails.ScriptError: used when a script is unable to be executed. This can be due to errors in any of the subclasses ofScriptError.LoadError: raised if a required file doesn’t load.NotImplementedError: raised when a feature isn’t implemented on the current platform (i.e., trying to call a method that isn’t supported by the operating system).SyntaxError: occurs when trying to execute code with invalid syntax.
SecurityError: raised when a potentially unsafe operation is attempted.SignalException: used when a signal is received on a process.Interrupt: raised if the interrupt signal is received (i.e., a user pressed Ctrl-C).
StandardError: used for the most common types of exceptions. Usually the subclasses will be raised rather thanStandardErroritself. However, when a rescue clause without a specificStandardErrorsubclass is executed,StandardErrorwill be raised.ArgumentError: occurs when arguments are incorrect (i.e., the wrong number of arguments).FiberError: raised if an invalid operation is being attempted on a Fiber (i.e., trying to call a dead Fiber).IndexError: used when the index is invalid.KeyError: occurs if a specified key is not found.StopIteration: raised to stop the iteration.IOError: raised during an input/output operation failure.EOFError: occurs when reaching the end of the file by some IO operations.LocalJumpError: raised if Ruby cannot yield as requested in the code.NameError: raised if a name is undefined or invalid.NoMethodError: used when a method is called on a receiver that doesn’t have the method defined, and the receiver doesn’t respond withmethod_missing.RangeError: raised if a numerical value is out of range.FloatDomainError: occurs when attempting to convert certain float values to unsupported classes.RegexpError: raised if a given regular expression is invalid.RuntimeError: used when given an invalid operation. This is a generic error class.SystemCallError: raised for low-level, platform-dependent errors. These exceptions look likeErrno:xxx.ThreadError: occurs if an invalid operation is being attempted on a Thread.TypeError: raised when an object is not of the expected type.ZeroDivisionError: used if attempting to divide an integer by 0.
SystemExit: raised if theexitmethod is called to terminate the script.SystemStackError: occurs during a stack overflow (i.e., in the case of an accidental infinite loop).
Basic Ruby Error Handling
Okay, so now we know what Ruby’s exception hierarchy looks like, and why we need to Raise and Rescue our application’s exceptions. But how do you actually do this? If you’re a beginner or just new to Ruby, this might all sound fantastic in theory, but you need to see some code to actually understand what you’re supposed to do.
Here’s an example program that handles an exception:
def handle_exception
    puts 'Lalala, our app is running without errors.'
    raise 'Oh no, a error has occurred.'
  rescue
    puts 'Hooray the error has been rescued instead of terminating the program.'
end

handle_exception
Level Up: Ruby + Rollbar = ❤️
So far, so good. We’ve got our Ruby error handling down, and we’re feeling like old pros. 🙂 But let’s say you want to keep track of the errors that are occurring in your application, maybe even get some alerts when a certain number of exceptions are raised. What do you do? You could write some custom code and try to do this all yourself…or you could simply integrate your application with Rollbar and set your error handling, logging, and alerting on auto-pilot.
Getting Started with Rollbar
To get started, you’ll need to sign up for a Rollbar account and name and create the new Ruby ‘project’ you will be monitoring with Rollbar. You get two weeks free when you sign up, so you can see if Rollbar is right for you.
Once you’ve signed up for an account you’ll receive a server-side access token which you’ll need to save for later.
Installing the Gem
Installing the Gem is super easy! First, add this line to your application’s Gemfile:
gem 'rollbar'And then execute:
$ bundle installIf you don’t use bundler, execute this instead:
$ gem install rollbarUnless you are using JRuby, we suggest also installing Oj for JSON serialization. Add this line to your Gemfile:
gem 'oj', '~> 2.12.14'and then run bundle install again.
Basic Ruby Integration
Rollbar isn’t dependent on Rack or Rails for most of its functionality, but if you’re using Rack or Rails, there is more info on using both of these Ruby frameworks below. In a plain Ruby project, assuming you’ve installed the Rollbar gem, you just need to do these three easy steps:
- Require Rollbar
- Configure Rollbar
- Send Rollbar data
require 'rollbar'

Rollbar.configure do |config|
  config.access_token = "POST_SERVER_ITEM_ACCESS_TOKEN"
  # Any other configuration settings you might wish to have
end

Rollbar.debug("Running Script")

begin
  run_script ARGV
rescue Exception => e # Never rescue Exception *unless* you reraise in rescue body
  Rollbar.error(e)
  raise e
end

Rollbar.info("Script ran successfully")
See the configuration reference guide on GitHub for further information on more advanced settings and granular configuration settings.
Using Rails
Run the following command from your Rails root:
$ rails generate rollbar POST_SERVER_ITEM_ACCESS_TOKENBe sure to replace POST_SERVER_ITEM_ACCESS_TOKEN with your project’s post_server_item access token, which you can find in the Rollbar.com interface.
That will create the file config/initializers/rollbar.rb, which initializes Rollbar and holds your access token and other configuration values.
If you want to store your access token outside of your repo, run the same command without arguments and create an environment variable ROLLBAR_ACCESS_TOKEN that holds your server-side access token:
$ rails generate rollbar
$ export ROLLBAR_ACCESS_TOKEN=POST_SERVER_ITEM_ACCESS_TOKEN
For Heroku users:
If you’re on Heroku, you can store the access token in your Heroku config:
$ heroku config:add ROLLBAR_ACCESS_TOKEN=POST_SERVER_ITEM_ACCESS_TOKENUsing Sinatra
Initialize Rollbar with your access token somewhere during startup:
Rollbar.configure do |config|
  config.access_token = 'POST_SERVER_ITEM_ACCESS_TOKEN'
  config.disable_rack_monkey_patch = true
  # other configuration settings
  # ...
end
Then mount the middleware in your app, like:
require 'rollbar/middleware/sinatra'

class MyApp < Sinatra::Base
  use Rollbar::Middleware::Sinatra
  # other middleware/etc
  # ...
end
Using Other Rack Frameworks
Initialize Rollbar with your access token somewhere during startup:
Rollbar.configure do |config|
  config.access_token = 'POST_SERVER_ITEM_ACCESS_TOKEN'
  # other configuration settings
  # ...
end
Be sure to replace POST_SERVER_ITEM_ACCESS_TOKEN with your project’s post_server_item access token, which you can find in the Rollbar.com interface.
The gem monkey patches Rack::Builder so Rollbar reports will be sent automatically without any other action. If you prefer to disable the monkey patch, apply this change to your config::
Rollbar.configure do |config|
  config.disable_rack_monkey_patch = true
  # other configuration settings
  # ...
end
If you disabled the Rack::Builder monkey patch or it doesn’t work for the Rack framework you are using, then add our Rack middleware to your app:
require 'rollbar/middleware/rack'

use Rollbar::Middleware::Rack
Test Your Installation
If you’re not using Rails, you may first need to add the following to your Rakefile:
require 'rollbar/rake_tasks'You may also need to add an :environment task to your Rakefile if you haven’t already defined one. At minimum, this task should call Rollbar.configure() and set your access token.
task :environment do
  Rollbar.configure do |config |
    config.access_token = '...'
  end
end
To confirm that it worked, run:
$ rake rollbar:testThis will raise an exception within a test request; if it works, you’ll see a stacktrace in the console, and the exception will appear in the Rollbar dashboard.
Integration with Rollbar.js
The gem has a cool feature — you can configure the gem to enable Rollbar.js on your site to report your JavaScript errors using Rollbar.js.
Rollbar.configure do |config|
  # common gem configuration
  # ...
  config.js_enabled = true
  config.js_options = {
    accessToken: "POST_CLIENT_ITEM_ACCESS_TOKEN",
    captureUncaught: true,
    payload: {
      environment: "production"
    }
  }
end
The Hash passed to #js_options= should have the same available options that you can find in Rollbar.js, using symbols or strings for the keys.
For further information, you’ll want to check out the gem docs for advanced ways to use the gem.
Diagnosing and debugging Ruby errors with Rollbar
Now that you have Rollbar integrated into your Ruby application, any errors that occur will be automatically captured and viewable from your dashboard and errors page within Rollbar (screenshot below). You’ll be able to easily see what errors are occurring, how often they occur and the full context and analytics into your Ruby applications errors. Rollbar provides a detailed stack trace of every ruby exception allowing you to see exactly what’s happening in your application when an error occurs. You can also view the user’s browser and OS where the error occurred.
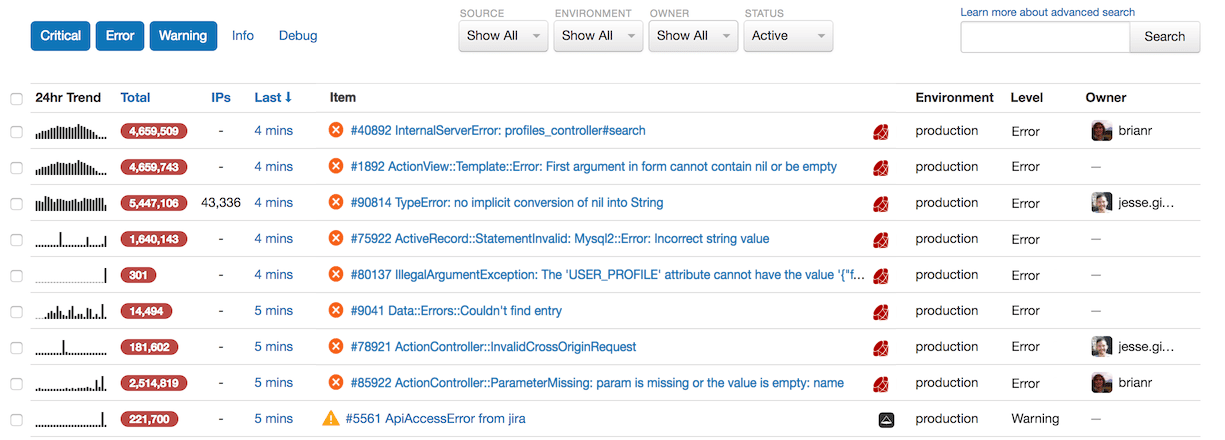
Errors are grouped by cause and frequency so that you can prioritize which ones to work on first. You’ll be able to view trends over time. If a certain error spikes in frequency, you’ll know about it right away. Below are more features worth noting:
- Errors automatically get grouped by root cause.
- Tons of context data like stack traces, request params, URL and environment.
- Integrate your favorite tools like Slack, GitHub, JIRA, Pivotal Tracker, Trello, PagerDuty.
- Tons of context data like stack traces, request params, URL and environment.
- View trends by type of error, browser, code deployment, OS, location, users, host.
- Mark an item as Resolved, Mute or Assign errors to others on your team to fix.
- Keep track of code deployments and correlate them them to new error occurrences.
With Rollbar, you can rest assured that you’ll know about any bugs that might make their way into your Ruby projects. If you run into any issues, we’re always available to help at support@rollbar.com. Happy hacking!
Search code, repositories, users, issues, pull requests…
Provide feedback
Saved searches
Use saved searches to filter your results more quickly
Sign up