На чтение 13 мин. Просмотров 580 Опубликовано
Автор Хулья Каракая✏️
Представьте, что вы создали приложение для ведения заметок с системой входа, где пользователи могут создать учетную запись и добавлять свои заметки. Для входа пользователям необходимо ввести свой email и имя. Ваша задача как разработчика – убедиться, что данные, полученные от пользователя, – это те данные, которые вы ищете, и они в правильном формате, прежде чем сохранять их в базе данных.
Валидация пользовательского ввода, отправленного из пользовательских запросов, очень важна по нескольким причинам:
- Помогает уменьшить площадь атаки
- Защищает от таких атак, как DDOS, межсайтовый скриптинг, инъекции команд и SQL-инъекции
- Обеспечивает согласованность данных
- Помогает выявлять и фильтровать вредоносные данные
Такой тип проверки называется проверкой на стороне сервера, и это критически важная часть разработки приложений. К счастью, существует несколько библиотек, которые решают эту задачу за нас.
Две лучшие библиотеки для этого – joi и celebrate. Joi – это язык описания схем объектов и валидатор для объектов JavaScript. В этой статье мы рассмотрим, как использовать эти библиотеки и какие преимущества они дают разработчикам фронтенда.
К концу этого руководства вы сможете проверять входящие данные пользователя, поступающие из req.body, проверять req.headers, req.params, req.query и req.cookies, а также обрабатывать ошибки.
Мы продемонстрируем несколько маршрутов API для приложения для заметок, которое требует ввода данных пользователем и проверяет их.
Если вы хотите увидеть полный проект, разработанный в этой статье, загляните в проект на GitHub. Не стесняйтесь клонировать его, форкнуть или отправить проблему.
Содержание
- Содержание
- Что такое joi и celebrate?
- Начало работы с примером приложения Node.js
- Запуск приложения
- Создание маршрутов
- Установка joi и celebrate для проверки на основе схемы
- Проверка тела запроса с помощью celebrate
- Обработка ошибок
- Тестирование конечной точки
- Валидация строк запросов
- Проверка заголовков и параметров запроса
- Проверка файлов cookie и подписанных файлов cookie
- Заключение
- 200’s only ✔️ Мониторинг неудачных и медленных сетевых запросов в производстве
Содержание
- Что такое joi и celebrate?
- Начало работы с примером приложения Node.js
- Установка joi и celebrate для проверки на основе схем
- Проверка тела запроса с помощью celebrate
- Обработка ошибок
- Тестирование конечной точки
- Проверка строк запроса
- Проверка заголовков и параметров запроса
- Проверка файлов cookie и подписанных файлов cookie
Что такое joi и celebrate?
Joi – это отдельный модуль проверки, который можно использовать вместе с celebrate. Joi описывает запрос клиента в рамках схемы. Схема – это объект JavaScript, который описывает, как должны быть отформатированы клиентские запросы, такие как параметры, тело запроса и заголовки. Они состоят из типа и последовательности правил, с параметрами или без.
Celebrate использует эту схему для реализации гибкого промежуточного ПО валидации. Он принимает схему и возвращает функцию, которая принимает запрос и значение. Если значение действительно, celebrate вызывает следующее промежуточное ПО в цепочке. Если значение недействительно, celebrate вызовет промежуточное ПО обработчика ошибок.
Вы можете проверить req.params, req.headers, req.body, req.query, req.cookies и req.signedCookies перед вызовом любой функции обработчика. Мы подробно рассмотрим, как их проверять, позже в этой статье.
Начало работы с примером приложения Node.js
Для начала откройте терминал и перейдите в каталог, куда вы хотите поместить свой проект:
mkdir notes && cd notes
Войти в полноэкранный режим Выйти из полноэкранного режима
Создайте новый проект Node, выполнив:
npm init -y
Войти в полноэкранный режим Выйти из полноэкранного режима
Это создаст файл package.json в корне вашего проекта. Флаг --yes или -y ответит “да” на все вопросы при установке package.json.
Теперь установите необходимые зависимости, выполнив команду :
npm install express body-parser cookie-parser
npm install nodemon -D
Войдите в полноэкранный режим Выйти из полноэкранного режима
Давайте рассмотрим наши установленные пакеты:
- Express – один из самых популярных веб-фреймворков для Node. Он используется для создания веб-серверов и API.
- body-parser – промежуточное программное обеспечение, которое анализирует тело входящих запросов и раскрывает полученный объект в
req.body - cookie-parser разбирает cookies входящих запросов и раскрывает полученный объект в
req.cookies. - Nodemon используется для автоматического перезапуска сервера, когда мы вносим изменения в наш код.
Команда npm init назначает index.js в качестве точки входа нашего приложения. Создайте этот файл в корне вашего проекта:
touch index.js
Вход в полноэкранный режим Выйти из полноэкранного режима
Далее откройте ваш любимый редактор кода и создайте код для инстанцирования Express и настройки сервера:
const express = require("express");
const bodyParser = require("body-parser");
const app = express();

// parse application/json
app.use(bodyParser.json());

const PORT = process.env.PORT || 4001;

app.listen(PORT, () => {
  console.log(`Server is listening on port ${PORT}`);
});
Войти в полноэкранный режим Выход из полноэкранного режима
Здесь мы импортировали Express и BodyParser и вызвали функцию Express для создания нашего сервера. Сервер будет прослушивать порт 3000.
Запуск приложения
Перейдите в файл package.json и добавьте скрипт для запуска нашего сервера с помощью nodemon:
"scripts": {
    "start": "nodemon index.js"
  }
Войти в полноэкранный режим Выйти из полноэкранного режима
Теперь мы можем запустить наш сервер из терминала, выполнив npm start. Это запустит nodemon и будет следить за изменениями в нашем коде.
Создание маршрутов
Теперь, когда наше приложение прослушивает запросы, мы можем создать несколько маршрутов:
- POST
/signupдля создания новой учетной записи пользователя - GET
/notesдля получения заметок - DELETE
/notes/:noteIdдля удаления заметки.
Далее мы рассмотрим, как проверить данные запроса с помощью joi и celebrate.
Установка joi и celebrate для проверки на основе схемы
Мы можем установить joi и celebrate через npm следующим образом:
npm install joi celebrate
Войти в полноэкранный режим Выйти из полноэкранного режима
Joi позволяет описывать данные интуитивно понятным и читаемым способом с помощью схемы:
{
  body: Joi.object().keys({
    name: Joi.string().alphanum().min(2).max(30).required(),
    email: Joi.string().required().email(),
    password: Joi.string().pattern(new RegExp('^[a-zA-Z0-9]{3,30}/pre>)).required().min(8),
    repeat_password: Joi.ref('password'),
    age: Joi.number().integer().required().min(18),
    about: Joi.string().min(2).max(30),
  })
}
Войти в полноэкранный режим Выход из полноэкранного режима
Согласно этой схеме, правильный body должен быть объектом со следующими ключами:
-
name, обязательная строка, содержащая не менее двух и не более 25 символов (только буквенно-цифровые символы). -
email, обязательная строка в формате электронной почты -
password, обязательная строка, содержащая не менее восьми символов, которые должны соответствовать пользовательскому шаблону regex -
repeat_password, которая должна соответствовать паролю -
age, обязательное число с целым значением 18 или более -
about, строка, содержащая не менее двух и не более 50 символов.
Все, что выходит за рамки этих ограничений, приведет к ошибке.
Проверка тела запроса с помощью celebrate
Теперь мы можем использовать библиотеку celebrate для включения проверки joi в качестве промежуточного программного обеспечения. Импортируйте пакет и подключите его как промежуточное ПО к маршруту:
const { celebrate, Joi, Segments } = require('celebrate');

app.post(
  "/signup",
  celebrate({
    [Segments.BODY]: Joi.object().keys({
      name: Joi.string().alphanum().min(2).max(30).required(),
      email: Joi.string().required().email(),
      password: Joi.string()
        .pattern(new RegExp("^[a-zA-Z0-9]{3,30}$"))
        .required()
        .min(8),
      repeat_password: Joi.ref("password"),
      age: Joi.number().integer().required().min(18),
      about: Joi.string().min(2).max(30),
    }),
  }),
  (req, res) => {
    // ...
    console.log(req.body);
    res.status(201).send(req.body);
  }
);
Войти в полноэкранный режим Выход из полноэкранного режима
Здесь мы используем celebrate для проверки тела запроса.
Celebrate принимает объект, в котором ключом может быть одно из значений из Segments, а значением – схема joi. Сегменты – это набор именованных констант, enum, которые можно использовать для идентификации различных частей запроса:
{
  BODY: 'body',
  QUERY: 'query',
  HEADERS: 'headers',
  PARAMS: 'params',
  COOKIES: 'cookies',
  SIGNEDCOOKIES: 'signedCookies',
}
Войти в полноэкранный режим Выход из полноэкранного режима
Обработка ошибок
Если мы попробуем использовать нашу конечную точку signup с телом, которое не соответствует схеме, мы получим следующую ошибку:
<!DOCTYPE html>
<html lang="en">
<head>
<meta charset="utf-8">
<title>Error</title>
</head>
<body>
<pre>Error: Validation failed<br> at /Users/hulyakarakaya/Desktop/celebrate/node_modules/celebrate/lib/celebrate.js:95:19<br> at processTicksAndRejections (node:internal/process/task_queues:96:5)</pre>
</body>
</html>
Войдите в полноэкранный режим Выйти из полноэкранного режима
В Celebrate есть специальный промежуточный модуль errors() для отправки ошибок клиенту. Реализовав этот промежуточный модуль, мы сможем отправлять более подробные сообщения об ошибках. Импортируйте errors из celebrate и передайте его в метод app.use:
const { errors } = require('celebrate');

// celebrate error handler
app.use(errors());
Войти в полноэкранный режим Выйти из полноэкранного режима
Это промежуточное ПО будет обрабатывать только ошибки, сгенерированные celebrate. Давайте посмотрим его в действии!
Тестирование конечной точки
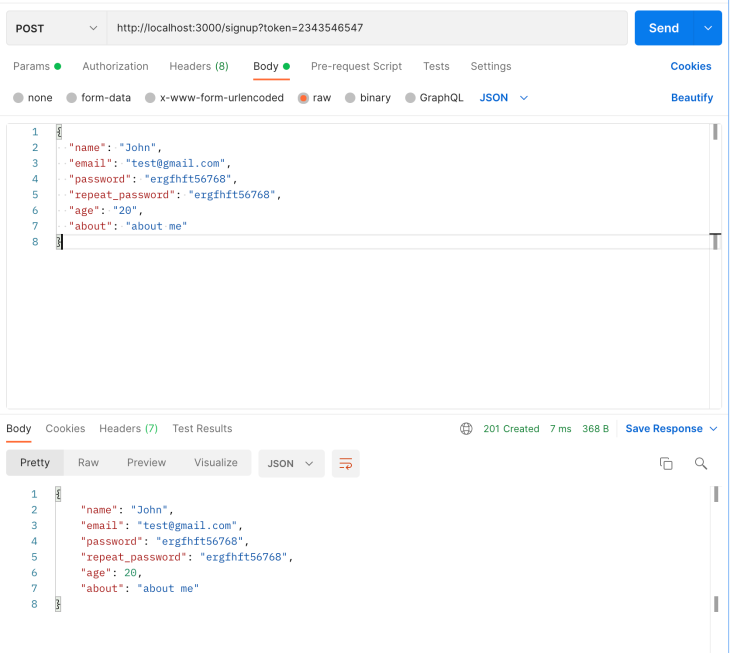
Для тестирования конечной точки мы будем использовать Postman. Перед тестированием конечной точки убедитесь, что ваш сервер запущен.
Сделайте POST-запрос к маршруту /signup. Если мы неправильно повторим пароль, мы должны получить ошибку.
Статус ошибки, возвращаемый celebrate, – 400, а тело ответа – 400:
{
    "statusCode": 400,
    "error": "Bad Request",
    "message": "Validation failed",
    "validation": {
        "body": {
            "source": "body",
            "keys": [
                "repeat_password"
            ],
            "message": ""repeat_password" must be [ref:password]"
        }
    }
}
Войти в полноэкранный режим Выйти из полноэкранного режима
Или, если мы введем возраст меньше 18 лет, мы получим ошибку “Bad Request”:
{
    "statusCode": 400,
    "error": "Bad Request",
    "message": "Validation failed",
    "validation": {
        "body": {
            "source": "body",
            "keys": [
                "age"
            ],
            "message": ""age" must be greater than or equal to 18"
        }
    }
}
Войти в полноэкранный режим Выйти из полноэкранного режима
Поле message позволяет клиенту понять, что не так с его запросом. В этих случаях сообщение сообщает, что повторный пароль не равен оригинальному паролю, а возраст в теле запроса должен быть больше или равен 18.
Валидация строк запросов
Эта процедура аналогична проверке тела запроса, но в этот раз мы будем использовать Segments.QUERY в качестве ключа.
Представьте, что мы хотим отправить токен пользователя в строке запроса при регистрации:
app.post(
  "/signup",
  celebrate({
    [Segments.BODY]: Joi.object().keys({
      // validation rules for the body
    }),
    [Segments.QUERY]: {
      token: Joi.string().token().required(),
    },
  }),
  (req, res) => {
    console.log(req.query.token);
    res.status(200).send(req.query.token);
  }
);
Войти в полноэкранный режим Выход из полноэкранного режима
Когда мы тестируем конечную точку API, нам нужно добавить строку запроса token в URL, и она не должна быть пустой. 
Если мы не передадим строку запроса token, celebrate выдаст сообщение об ошибке:
{
    "statusCode": 400,
    "error": "Bad Request",
    "message": "Validation failed",
    "validation": {
        "query": {
            "source": "query",
            "keys": [
                "token"
            ],
            "message": ""token" is required"
        }
    }
}
Войдите в полноэкранный режим Выйти из полноэкранного режима
Проверка заголовков и параметров запроса
Помимо тела запроса, celebrate позволяет проверять заголовки и параметры:
const { celebrate, Joi } = require('celebrate');

app.delete(
  "/notes/:noteId",
  celebrate({
    // validate parameters
    [Segments.PARAMS]: Joi.object().keys({
      noteId: Joi.string().alphanum().length(12),
    }),
    [Segments.HEADERS]: Joi.object()
      .keys({
        // validate headers
      })
      .unknown(true),
  }),
  (req, res) => {
    // ...
    res.status(204).send();
  }
);
Войти в полноэкранный режим Выйти из полноэкранного режима
В нашем примере мы создаем запрос DELETE к /notes/:noteId. noteId – это параметр, и он должен представлять собой 12-символьную буквенно-цифровую строку.
Для проверки заголовков мы можем использовать ключ Segments.HEADERS. Однако трудно знать все заголовки, которые могут быть отправлены клиентом. Поэтому после вызова метода keys() мы можем использовать опцию unknown(true), чтобы разрешить неизвестные заголовки.
Если мы попытаемся УДАЛИТЬ идентификатор заметки длиной менее 12 символов (http://localhost:3000/notes/123456), мы получим следующую ошибку:
{
    "statusCode": 400,
    "error": "Bad Request",
    "message": "Validation failed",
    "validation": {
        "params": {
            "source": "params",
            "keys": [
                "noteId"
            ],
            "message": ""noteId" length must be 12 characters long"
        }
    }
}
Войдите в полноэкранный режим Выйти из полноэкранного режима
Проверка файлов cookie и подписанных файлов cookie
Celebrate также позволяет проверять cookies и подписанные cookies. Для чтения cookies на сервере мы будем использовать cookie-parser, пакет, который мы установили ранее. Подключим его как промежуточное ПО в файле index.js:
const cookieParser = require("cookie-parser");

const app = express();

app.use(cookieParser("secret"));
Вход в полноэкранный режим Выйти из полноэкранного режима
Cookies могут храниться в локальных файлах данных. Мы можем установить куки с помощью метода res.cookie():
res.cookie("name", "john", { httpOnly: true, maxAge: 3600000});
Войти в полноэкранный режим Выйти из полноэкранного режима
Первый аргумент – это ключ, а второй – значение. Третий аргумент – объект, содержащий параметры cookie. httpOnly: true означает, что cookie не может быть прочитана из JavaScript, а maxAge – это время в миллисекундах, в течение которого cookie будет действительна. Таким образом, срок действия cookie истечет через один час.
Cookie-parser поможет нам извлечь данные из заголовка Cookie и разобрать результат в объект. Теперь мы можем получить доступ к куки на сервере, используя объект req.cookies.
Теперь мы можем добавить нашу валидацию в ключ Segments.COOKIES:
app.get(
  "/notes",
  celebrate({
    // validate parameters
    [Segments.COOKIES]: Joi.object().keys({
      name: Joi.string().alphanum().min(2).max(30),
    }),
  }),
  function (req, res) {
    res.cookie("name", "john", { httpOnly: true, maxAge: 3600000 });
    console.log("Cookies: ", req.cookies);
    res.send(req.cookies.name);
  }
);
Вход в полноэкранный режим Выход из полноэкранного режима
Подписанные куки похожи на куки, но они содержат подпись, чтобы сервер мог проверить, изменен ли куки или нет:
app.get(
  "/notes",
  celebrate({
    [Segments.SIGNEDCOOKIES]: Joi.object().keys({
      jwt: Joi.string().alphanum().length(20),
    }),
  }),
  function (req, res) {
    // signed cookie
    res.cookie("jwt", "snfsdfliuhewerewr4i4", { signed: true });
    console.log("Signed Cookies: ", req.signedCookies);
    res.send(req.signedCookies);
  }
);
Войти в полноэкранный режим Выход из полноэкранного режима
Здесь мы установили jwt в качестве подписанных cookie, передав опцию signed: true и создали правило проверки с Segments.SIGNEDCOOKIES. Теперь мы можем получить доступ к подписанной cookie на сервере, используя объект req.signedCookies. Если мы попытаемся отправить cookie jwt длиной менее 20 символов, мы получим следующую ошибку:
{
    "statusCode": 400,
    "error": "Bad Request",
    "message": "Validation failed",
    "validation": {
        "signedCookies": {
            "source": "signedCookies",
            "keys": [
                "jwt"
            ],
            "message": ""jwt" length must be 20 characters long"
        }
    }
}
Войдите в полноэкранный режим Выйти из полноэкранного режима
Заключение
В этом посте мы узнали, зачем нужна проверка пользовательского ввода, и как использовать joi и celebrate для проверки пользовательского ввода, заголовков, строк запросов, параметров, куки и подписанных куки. Кроме того, мы узнали о возможностях celebrate по обработке ошибок и о том, как тестировать наши конечные точки с помощью Postman. Я надеюсь, что это руководство было вам полезно, не стесняйтесь сообщить нам в комментариях, если что-то осталось непонятным.
200’s only ✔️ Мониторинг неудачных и медленных сетевых запросов в производстве
Развертывание веб-приложения или веб-сайта на базе Node – это самая простая часть. Убедиться, что ваш экземпляр Node продолжает обслуживать ресурсы вашего приложения – вот где все становится сложнее. Если вы заинтересованы в обеспечении успешного выполнения запросов к бэкенду или сторонним сервисам, попробуйте LogRocket.

LogRocket – это как видеорегистратор для веб- и мобильных приложений, записывающий буквально все, что происходит, пока пользователь взаимодействует с вашим приложением. Вместо того чтобы гадать, почему возникают проблемы, вы можете агрегировать и сообщать о проблемных сетевых запросах, чтобы быстро понять первопричину.
Делаю валидацию
router.post('/signin', celebrate({
  body: Joi.object().keys({
    email: Joi.string().required().email(),
    password: Joi.string().required()
  })
}), login);
если email невалидный выходит ошибка
{"statusCode":400,"error":"Bad Request","message":"celebrate request validation failed","validation":{"body":{"source":"body","keys":["email"],"message":"\"email\" must be a valid email"}}}
Искала в интернете способ, как изменить на свою ошибку, нашла одну статью https://stackoverflow.com/questions/55954369/how-t…
там пишут, что можно изменить ошибку таким образом
[Segments.BODY]: Joi.object().keys({
value: Joi.string().required().error(new Error('Value is required and has to be a text!')),
})
но у меня не получается. Приходит ответ такой
{"generatedMessage":false,"code":"ERR_ASSERTION","actual":false,"expected":true,"operator":"=="}Кто хорошо разбирается в express подскажите, как мне изменить кастомную ошибку celebrate на свою? Буду очень благодарна вам)
![]()

celebrate is an express middleware function that wraps the joi validation library. This allows you to use this middleware in any single route, or globally, and ensure that all of your inputs are correct before any handler function. The middleware allows you to validate req.params, req.headers, and req.query.
The middleware will also validate:
req.body— provided you are usingbody-parserreq.cookies— provided you are usingcookie-parserreq.signedCookies— provided you are usingcookie-parser
celebrate lists joi as a formal dependency. This means that celebrate will always use a predictable, known version of joi during the validation and compilation steps. There are two reasons for this:
- To ensure that celebrate can always use the latest version of joi as soon as it’s published
- So that celebrate can export the version of joi it uses to the consumer to maximize compatibility
- express Compatibility
- Example Usage
- API
celebrate(schema, [joiOptions], [opts])celebrator([opts], [joiOptions], schema)errors([opts])JoiSegmentsModesnew CelebrateError([message], [opts])isCelebrateError(err)
- Additional Details
- Validation Order
- Mutation Warning
- Additional Info
- Issues
express Compatibility
celebrate is tested and has full compatibility with express 4 and 5. It likely works correctly with express 3, but including it in the test matrix was more trouble than it’s worth. This is primarily because express 3 exposes route parameters as an array rather than an object.
Example Usage
Example of using celebrate on a single POST route to validate req.body.
const express = require('express');
const BodyParser = require('body-parser');
const { celebrate, Joi, errors, Segments } = require('celebrate');

const app = express();
app.use(BodyParser.json());

app.post('/signup', celebrate({
  [Segments.BODY]: Joi.object().keys({
    name: Joi.string().required(),
    age: Joi.number().integer(),
    role: Joi.string().default('admin')
  }),
  [Segments.QUERY]: {
    token: Joi.string().token().required()
  }
}), (req, res) => {
  // At this point, req.body has been validated and
  // req.body.role is equal to req.body.role if provided in the POST or set to 'admin' by joi
});
app.use(errors());
Example of using celebrate to validate all incoming requests to ensure the token header is present and matches the supplied regular expression.
const express = require('express');
const { celebrate, Joi, errors, Segments } = require('celebrate');
const app = express();

// validate all incoming request headers for the token header
// if missing or not the correct format, respond with an error
app.use(celebrate({
  [Segments.HEADERS]: Joi.object({
    token: Joi.string().required().regex(/abc\d{3}/)
  }).unknown()
}));
app.get('/', (req, res) => { res.send('hello world'); });
app.get('/foo', (req, res) => { res.send('a foo request'); });
app.use(errors());
API
celebrate does not have a default export. The following methods encompass the public API.
celebrate(schema, [joiOptions], [opts])
Returns a function with the middleware signature ((req, res, next)).
requestRules— anobjectwherekeycan be one of the values fromSegmentsand thevalueis a joi validation schema. Only the keys specified will be validated against the incoming request object. If you omit a key, that part of thereqobject will not be validated. A schema must contain at least one valid key.[joiOpts]— optionalobjectcontaining joi options that are passed directly into thevalidatefunction. Defaults to{ warnings: true }.[opts]— an optionalobjectwith the following keys. Defaults to{}.reqContext—boolvalue that instructs joi to use the incomingreqobject as thecontextvalue during joi validation. If set, this will trump the value ofjoiOptions.context. This is useful if you want to validate part of the request object against another part of the request object. See the tests for more details.mode— optionalModesfor controlling the validation mode celebrate uses. Defaults topartial.
celebrator([opts], [joiOptions], schema)
This is a curried version of celebrate. It is curried with lodash.curryRight so it can be called in all the various fashions that API supports. Returns a function with the middleware signature ((req, res, next)).
[opts]— an optionalobjectwith the following keys. Defaults to{}.reqContext—boolvalue that instructs joi to use the incomingreqobject as thecontextvalue during joi validation. If set, this will trump the value ofjoiOptions.context. This is useful if you want to validate part of the request object against another part of the request object. See the tests for more details.mode— optionalModesfor controlling the validation mode celebrate uses. Defaults topartial.
[joiOpts]— optionalobjectcontaining joi options that are passed directly into thevalidatefunction. Defaults to{ warnings: true }.requestRules— anobjectwherekeycan be one of the values fromSegmentsand thevalueis a joi validation schema. Only the keys specified will be validated against the incoming request object. If you omit a key, that part of thereqobject will not be validated. A schema must contain at least one valid key.
Sample usage
This is an example use of curried celebrate in a real server.
  const express = require('express');
  const { celebrator, Joi, errors, Segments } = require('celebrate');
  const app = express();

  // now every instance of `celebrate` will use these same options so you only
  // need to do it once.
  const celebrate = celebrator({ reqContext: true }, { convert: true });

  // validate all incoming request headers for the token header
  // if missing or not the correct format, respond with an error
  app.use(celebrate({
    [Segments.HEADERS]: Joi.object({
      token: Joi.string().required().regex(/abc\d{3}/)
    }).unknown()
  }));
  app.get('/', celebrate({
    [Segments.HEADERS]: Joi.object({
      name: Joi.string().required()
    })
  }), (req, res) => { res.send('hello world'); });
  app.use(errors());
Here are some examples of other ways to call celebrator
  const opts = { reqContext: true };
  const joiOpts = { convert: true };
  const schema = {
    [Segments.HEADERS]: Joi.object({
      name: Joi.string().required()
    })
  };

  let c = celebrator(opts)(joiOpts)(schema);
  c = celebrator(opts, joiOpts)(schema);
  c = celebrator(opts)(joiOpts, schema);
  c = celebrator(opts, joiOpts, schema);

  // c would function the same in all of these cases.
errors([opts])
Returns a function with the error handler signature ((err, req, res, next)). This should be placed with any other error handling middleware to catch celebrate errors. If the incoming err object is an error originating from celebrate, errors() will respond a pre-build error object. Otherwise, it will call next(err) and will pass the error along and will need to be processed by another error handler.
[opts]— an optionalobjectwith the following keysstatusCode—numberthat will be used for the response status code in the event of an error. Must be greater than 399 and less than 600. It must also be a number available to the node HTTP module. Defaults to 400.message—stringthat will be used for themessagevalue sent out by the error handler. Defaults to'Validation failed'
If the error response format does not suite your needs, you are encouraged to write your own and check isCelebrateError(err) to format celebrate errors to your liking.
Errors origintating from the celebrate() middleware are CelebrateError objects.
Joi
celebrate exports the version of joi it is using internally. For maximum compatibility, you should use this version when creating schemas used with celebrate.
Segments
An enum containing all the segments of req objects that celebrate can validate against.
{
  BODY: 'body',
  COOKIES: 'cookies',
  HEADERS: 'headers',
  PARAMS: 'params',
  QUERY: 'query',
  SIGNEDCOOKIES: 'signedCookies',
}
Modes
An enum containing all the available validation modes that celebrate can support.
PARTIAL— ends validation on the first failure. Does not apply joi transformations if any part of the request is invalid.FULL— validates the entire request object and collects all the validation failures in the result. Does not apply joi transformations if any part of the request is invalid.- Note: In order for this to work, you will need to pass
abortEarly: falseto #joiOptions. Or to get the default behavior along with this,{ abortEarly: false, warnings: true }
- Note: In order for this to work, you will need to pass
new CelebrateError([message], [opts])
Creates a new CelebrateError object. Extends the built in Error object.
message— optionalstringmessage. Defaults to'Validation failed'.[opts]— optionalobjectwith the following keyscelebrated—boolthat, whentrue, addsSymbol('celebrated'): trueto the result object. This indicates this error as originating fromcelebrate. You’d likely want to set this totrueif you want the celebrate error handler to handle errors originating from theformatfunction that you call in user-land code. Defaults tofalse.
CelebrateError has the following public properties:
details— aMapof all validation failures. Thekeyis aSegmentsand the value is a joi validation error. Adding todetailsis done viadetails.set. Thevaluemust be a joi validation error or an exception will be thrown.
Sample usage
  const result = Joi.validate(req.params.id, Joi.string().valid('foo'), { abortEarly: false });
  const err = new CelebrateError(undefined, { celebrated: true });
  err.details.set(Segments.PARAMS, result.error);
isCelebrateError(err)
Returns true if the provided err object originated from the celebrate middleware, and false otherwise. Useful if you want to write your own error handler for celebrate errors.
err— an error object
Additional Details
Validation Order
celebrate validates request values in the following order:
req.headersreq.paramsreq.queryreq.cookies(assumingcookie-parseris being used)req.signedCookies(assumingcookie-parseris being used)req.body(assumingbody-parseris being used)
Mutation Warning
If you use any of joi’s updating validation APIs (default, rename, etc.) celebrate will override the source value with the changes applied by joi (assuming the request is valid).
For example, if you validate req.query and have a default value in your joi schema, if the incoming req.query is missing a value for default, during validation celebrate will overwrite the original req.query with the result of joi.validate. This is done so that once req has been validated, you can be sure all the inputs are valid and ready to consume in your handler functions and you don’t need to re-write all your handlers to look for the query values in res.locals.*.
Additional Info
According the the HTTP spec, GET requests should not include a body in the request payload. For that reason, celebrate does not validate the body on GET requests.
Issues
Before opening issues on this repo, make sure your joi schema is correct and working as you intended. The bulk of this code is just exposing the joi API as express middleware. All of the heavy lifting still happens inside joi. You can go here to verify your joi schema easily.
Imagine you have created a note-taking app with a login system where users can create an account and add their notes. Users need to type their email and name to sign in. Your job as a developer is to ensure the data you get from the user is the data you’re looking for, and it’s in the correct format, before persisting them in a database.
Validating user input sent from user requests is highly important for a couple of reasons:
- Helps mitigate the attack surface
- Protects from attacks like DDOS, cross-site scripting, command injection and SQL injection
- Ensures data consistency
- Helps identify and filter malicious data
This type of validation is called server-side validation, and it’s a critical part of developing applications. Luckily, there are several libraries that take care of this task for us.
Two of the best libraries for this are joi and celebrate. Joi is an object schema description language and validator for JavaScript objects. In this article, we’ll look at how to use these libraries and the benefits they provide for frontend dev.
By the end of this tutorial, you’ll be able to validate incoming user inputs coming from req.body, validate req.headers, req.params, req.query, and req.cookies, and handle errors.
We’ll demo some API routes for the note-taking app that requires user input and validates it.
If you want to see the complete project developed throughout this article, take a look at the GitHub project. Feel free to clone it, fork it, or submit an issue.
Contents
- What are joi and celebrate?
- Getting started with a sample Node.js app
- Installing joi and celebrate for schema-based validation
- Validating the request body with celebrate
- Error handling
- Testing the endpoint
- Validating request query strings
- Validating request headers and parameters
- Validating cookies and signed cookies
What are joi and celebrate?
Joi is a standalone validation module that can be used alongside celebrate. Joi describes the client request within a schema. A schema is a JavaScript object that describes how client requests like parameters, request body, and headers must be formatted. They are made of a type and a succession of rules, with or without parameters.
Celebrate uses this schema to implement flexible validation middleware. It takes a schema and returns a function that takes the request and a value. If the value is valid, celebrate will call the next middleware in the chain. If the value is invalid, celebrate will call the error handler middleware.
You can validate req.params, req.headers, req.body, req.query, req.cookies and req.signedCookies before any handler function is called. We’ll go into detail about how to validate these later in this article.
Getting started with a sample Node.js app
Begin by opening up your terminal and navigating to the directory where you want to place your project:
mkdir notes && cd notes
Create a new Node project by running:
npm init -y
This will generate a package.json file in the root of your project. The --yes or -y flag will answer “yes” to all questions when setting up package.json.
Now, install the required dependencies by running:
npm install express body-parser cookie-parser
npm install nodemon -D
Let’s review our installed packages:
- Express is one of the most popular web framework for Node. It’s used for creating web servers and APIs
- body-parser is a middleware that parses the body of incoming requests, and exposes the resulting object on
req.body - cookie-parser parses the cookies of incoming requests, and exposes the resulting object on
req.cookies - Nodemon is used for automatically restarting the server when we make changes to our code.
The npm init command assigns index.js as the entry point of our application. Go ahead and create this file at the root of your project:
touch index.js
Next, open up your favorite code editor, and create the boilerplate code for instantiating Express and setting up the server:
const express = require("express");
const bodyParser = require("body-parser");
const app = express();

// parse application/json
app.use(bodyParser.json());

const PORT = process.env.PORT || 4001;

app.listen(PORT, () => {
  console.log(`Server is listening on port ${PORT}`);
});
Here, we’ve imported Express and BodyParser and invoked the Express function to create our server. The server will listen on port 3000.
Running the app
Go to your package.json file and add a script to run our server with nodemon:
"scripts": {
    "start": "nodemon index.js"
  }
Now, we can run our server from terminal by running npm start. This will start nodemon and watch for changes in our code.
Creating routes
Now that our application is listening for requests, we can create some routes:
- POST
/signupfor creating a new user account - GET
/notesfor retrieving the notes - DELETE
/notes/:noteIdfor deleting a note
Next, we’ll look at how to validate the request data via joi and celebrate.
Installing joi and celebrate for schema-based validation
We can install joi and celebrate via npm like so:
npm install joi celebrate
Joi allows you to describe data in an intuitive, readable way via a schema:
{
  body: Joi.object().keys({
    name: Joi.string().alphanum().min(2).max(30).required(),
    email: Joi.string().required().email(),
    password: Joi.string().pattern(new RegExp('^[a-zA-Z0-9]{3,30}$')).required().min(8),
    repeat_password: Joi.ref('password'),
    age: Joi.number().integer().required().min(18),
    about: Joi.string().min(2).max(30),
  })
}
According to this schema, a valid body must be an object with the following keys:
name, a required string with at least two characters and up to 25 characters (alphanumeric characters only)email, a required string in an email formatpassword, a required string with at least eight characters, which should match the custom regex patternrepeat_password, which should match the passwordage, a required number with an integer value of 18 or moreabout, a string with at least two and up to 50 characters
Anything outside of these constraints will trigger an error.
Validating the request body with celebrate
Now, we can use the celebrate library to enable joi validation as middleware. Import the package and connect it as a middleware to the route:
const { celebrate, Joi, Segments } = require('celebrate');

app.post(
  "/signup",
  celebrate({
    [Segments.BODY]: Joi.object().keys({
      name: Joi.string().alphanum().min(2).max(30).required(),
      email: Joi.string().required().email(),
      password: Joi.string()
        .pattern(new RegExp("^[a-zA-Z0-9]{3,30}$"))
        .required()
        .min(8),
      repeat_password: Joi.ref("password"),
      age: Joi.number().integer().required().min(18),
      about: Joi.string().min(2).max(30),
    }),
  }),
  (req, res) => {
    // ...
    console.log(req.body);
    res.status(201).send(req.body);
  }
);
Here, we’re using celebrate to validate the request body.
Celebrate takes an object in which the key can be one of the values from Segments and the value is a joi schema. Segments is a set of named constants, enum, that can be used to identify the different parts of a request:
{
  BODY: 'body',
  QUERY: 'query',
  HEADERS: 'headers',
  PARAMS: 'params',
  COOKIES: 'cookies',
  SIGNEDCOOKIES: 'signedCookies',
}
Error handling
If we try out our endpoint for signup with a body that doesn’t match the schema, we’ll get the following error:
<!DOCTYPE html> <html lang="en"> <head> <meta charset="utf-8"> <title>Error</title> </head> <body> <pre>Error: Validation failed<br> at /Users/hulyakarakaya/Desktop/celebrate/node_modules/celebrate/lib/celebrate.js:95:19<br> at processTicksAndRejections (node:internal/process/task_queues:96:5)</pre> </body> </html>
Celebrate has a special errors() middleware for sending errors to the client. By implementing this middleare, we can send more detailed error messages. Import errors from celebrate and pass it to the app.use method:
const { errors } = require('celebrate');

// celebrate error handler
app.use(errors());
This middleware will only handle errors generated by celebrate. Let’s see it in action!
Testing the endpoint
We’ll use Postman for testing our endpoint. Make sure your server is running before you test the endpoint.
Make a POST request to the /signup route. If we don’t correctly repeat the password, we should get an error.
The error status returned by celebrate is 400, and the response body is:
{
    "statusCode": 400,
    "error": "Bad Request",
    "message": "Validation failed",
    "validation": {
        "body": {
            "source": "body",
            "keys": [
                "repeat_password"
            ],
            "message": "\"repeat_password\" must be [ref:password]"
        }
    }
}
Or, if we input an age that is lower than 18, we’ll get a “Bad Request” error:
{
    "statusCode": 400,
    "error": "Bad Request",
    "message": "Validation failed",
    "validation": {
        "body": {
            "source": "body",
            "keys": [
                "age"
            ],
            "message": "\"age\" must be greater than or equal to 18"
        }
    }
}
The message field allows the client to understand what is wrong with their request. In these cases, celebrate reports that the repeat password is not equal to the original password, and age must be greater than or equal to 18 in the request body.
Validating request query strings
This will work similar to validating request body, but this time we will use Segments.QUERY as a key.
Imagine we want to send user token in the query string when signing up:
app.post(
  "/signup",
  celebrate({
    [Segments.BODY]: Joi.object().keys({
      // validation rules for the body
    }),
    [Segments.QUERY]: {
      token: Joi.string().token().required(),
    },
  }),
  (req, res) => {
    console.log(req.query.token);
    res.status(200).send(req.query.token);
  }
);
When we test the API endpoint, we need to add a token query string to the URL, and it shouldn’t be empty.
If we don’t pass the token query string, celebrate will show an error message:
{
    "statusCode": 400,
    "error": "Bad Request",
    "message": "Validation failed",
    "validation": {
        "query": {
            "source": "query",
            "keys": [
                "token"
            ],
            "message": "\"token\" is required"
        }
    }
}
In addition to the request body, celebrate allows you to validate headers and parameters:
const { celebrate, Joi } = require('celebrate');

app.delete(
  "/notes/:noteId",
  celebrate({
    // validate parameters
    [Segments.PARAMS]: Joi.object().keys({
      noteId: Joi.string().alphanum().length(12),
    }),
    [Segments.HEADERS]: Joi.object()
      .keys({
        // validate headers
      })
      .unknown(true),
  }),
  (req, res) => {
    // ...
    res.status(204).send();
  }
);
In our example, we’re creating a DELETE request to /notes/:noteId. noteId is a parameter, and it should be a 12-character alphanumeric string.
To validate the headers, we can use the Segments.HEADERS key. However, it’s hard to know all the headers that can be sent by the client. So, after calling the keys() method, we can use the unknown(true) option to allow unknown headers.
If we try to DELETE a note ID that is less than 12 characters long (http://localhost:3000/notes/123456), we’ll get the following error:
{
    "statusCode": 400,
    "error": "Bad Request",
    "message": "Validation failed",
    "validation": {
        "params": {
            "source": "params",
            "keys": [
                "noteId"
            ],
            "message": "\"noteId\" length must be 12 characters long"
        }
    }
}
Validating cookies and signed cookies
Celebrate also allows you to validate cookies and signed cookies. To read the cookies on the server, we’ll use cookie-parser, the package we installed earlier. Let’s connect it as a middleware in the index.js file:
const cookieParser = require("cookie-parser");

const app = express();

app.use(cookieParser("secret"));
Cookies can be stored in local data files. We can set cookies using the res.cookie() method:
res.cookie("name", "john", { httpOnly: true, maxAge: 3600000});
The first argument is the key, and the second, the value. The third argument is an object that contains the options for the cookie. httpOnly: true means that the cookie can’t be read from JavaScript and maxAge is the time in milliseconds that the cookie will be valid. So, the cookie will expire after one hour.
Cookie-parser will help us extract the data from the Cookie header and parse the result into an object. We can now access the cookies on the server using the req.cookies object.
Now, we can add our validation to the Segments.COOKIES key:
app.get(
  "/notes",
  celebrate({
    // validate parameters
    [Segments.COOKIES]: Joi.object().keys({
      name: Joi.string().alphanum().min(2).max(30),
    }),
  }),
  function (req, res) {
    res.cookie("name", "john", { httpOnly: true, maxAge: 3600000 });
    console.log("Cookies: ", req.cookies);
    res.send(req.cookies.name);
  }
);
Signed cookies are similar to cookies, but they contain a signature so that the server can verify whether or not the cookie is modified:
app.get(
  "/notes",
  celebrate({
    [Segments.SIGNEDCOOKIES]: Joi.object().keys({
      jwt: Joi.string().alphanum().length(20),
    }),
  }),
  function (req, res) {
    // signed cookie
    res.cookie("jwt", "snfsdfliuhewerewr4i4", { signed: true });
    console.log("Signed Cookies: ", req.signedCookies);
    res.send(req.signedCookies);
  }
);
Here, we’ve set jwt to be a signed cookie by passing the signed: true option and created a validation rule with Segments.SIGNEDCOOKIES. Now, we can access the signed cookie on the server using the req.signedCookies object. If we try to send a jwt cookie that is less than 20 characters long, we’ll get the following error:
{
    "statusCode": 400,
    "error": "Bad Request",
    "message": "Validation failed",
    "validation": {
        "signedCookies": {
            "source": "signedCookies",
            "keys": [
                "jwt"
            ],
            "message": "\"jwt\" length must be 20 characters long"
        }
    }
}
Conclusion
In this post, we’ve learned why you need to validate user inputs, and how to use joi and celebrate to validate user inputs, headers, query strings, parameters, cookies, and signed cookies. Also, we learned celebrate’s error handling abilities and how to test our endpoints using Postman. I hope you find this tutorial helpful, feel free to let us know in the comments if there is anything that is unclear.
200’s only Monitor failed and slow network requests in production
 Monitor failed and slow network requests in production
 Deploying a Node-based web app or website is the easy part. Making sure your Node instance continues to serve resources to your app is where things get tougher. If you’re interested in ensuring requests to the backend or third party services are successful, try LogRocket.  https://logrocket.com/signup/
LogRocket is like a DVR for web and mobile apps, recording literally everything that happens while a user interacts with your app. Instead of guessing why problems happen, you can aggregate and report on problematic network requests to quickly understand the root cause.
LogRocket instruments your app to record baseline performance timings such as page load time, time to first byte, slow network requests, and also logs Redux, NgRx, and Vuex actions/state. Start monitoring for free.
TL;DR: Create your own ‘errors()’ function.
You have probably managed to change it by now, but just like me, I had the exact same issue and found this answerless thread.
Well, for future readers, celebrate errors() is nothing else than a function, more exactly, this one:
(err, req, res, next) => {
  // If this isn't a Celebrate error, send it to the next error handler
  if (!isCelebrate(err)) {
    return next(err);
  }

  const {
    joi,
    meta,
  } = err;

  const result = {
    statusCode: 400,
    error: 'Bad Request',
    message: joi.message,
    validation: {
      source: meta.source,
      keys: [],
    },
  };

  if (joi.details) {
    for (let i = 0; i < joi.details.length; i += 1) {
      const path = joi.details[i].path.join('.');
      result.validation.keys.push(EscapeHtml(path));
    }
  }
  return res.status(400).send(result);
}
There, you can see the response object ‘result’ being declared and how it’s done. So, to change the output of it, you have to not use errors() and create your own function to handle it.
So, I declared a new function:
  private errorHandling = (err, req, res, next) => {
    if (isCelebrate(err)) {
        return res.send({
            statusCode: 400,
            message: err.joi.message
        });
    }

    return next(err);
  }
You can obviously change the above to suit your needs.
Update
Celebrate changed their error structure to a CelebrateError, now you need access the error details using:
  const errorBody = err.details.get('body'); // 'details' is a Map()
  const { details: [errorDetails] } = errorBody;
instead of the err.joi. The message property remains the same.
Then, instead of using app.use(errors()) I used app.use(this.errorHandling), and now I get the celebrate response formatted as I want to.