Как исправить ошибку nvwgf2umx.dll в GTA V, CoD, Cyberpunk 2077, Valheim и т. п.
Видеоигры стали очень сложными и «навороченными» не только по дизайну, но и технологически, поэтому для их бесперебойной работы требуется всё больше аппаратных ресурсов. Краш приложения с ошибкой nvwgf2umx.dll встречается во многих играх, таких как: Grand Theft Auto V, Call of Duty Warzone, Modern Warfare, Cyberpunk 2077, Outriders, Valheim, Final Fantasy XIV, Dark Souls 3 и многих других.
Проблема связана с файлом библиотеки динамической компоновки. Эти файлы распространены в операционной системе Windows, а также реализуются сторонними приложениями. Подавляющее большинство сбоев в играх случаются из-за проблем с неправильными настройками конфигурации, устаревшими/несовместимыми драйверами, повреждёнными системными файлами и т. д. Ниже рассмотрим несколько способов исправления, которые будут полезны в разных ситуациях.
Решение 1. Переустановите драйверы графического процессора
Одна из основных причин ошибок файлов DLL — несовместимые, повреждённые или устаревшие видеодрайверы. Обновление или полная их переустановка может решить проблему с nvwgf2umx.dll.
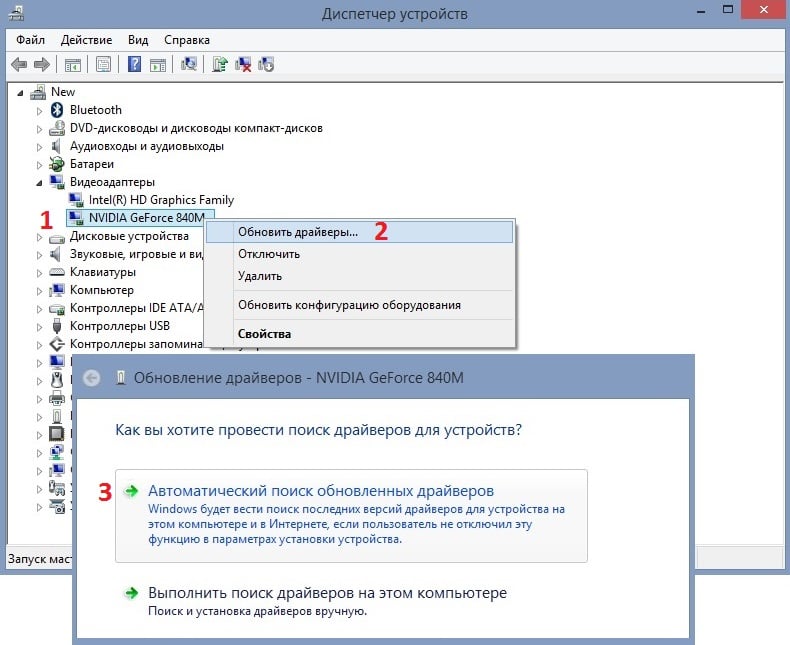
- Щёлкните ПКМ по значку Windows и выберите Диспетчер устройств.
- Разверните раздел Видеоадаптеры, и снова нажмите ПКМ по установленному графическому драйверу.
- Выберите пункт Обновить, а затем автоматический поиск обновлений.
- Дождитесь окончания процесса, и перезагрузите ПК.
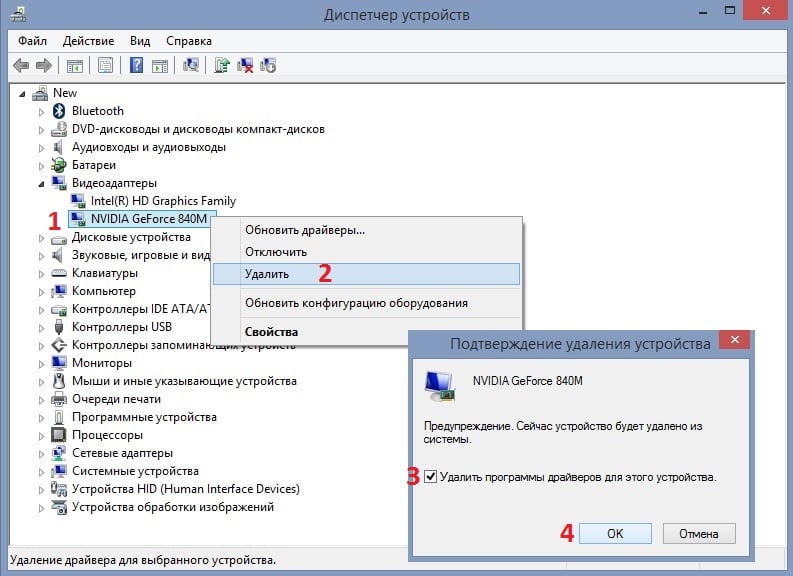
- Если это не помогло, следует удалить драйвер, и скачать актуальный на сайте производителя вашей видеокарты.
- Вернитесь в Диспетчер устройств, в раздел Видеоадаптеры.
- Запишите модель вашего графического процессора для поиска драйвера на сайте разработчика.
- Нажмите по нему ПКМ, и выберите Удалить.
- Теперь посетите официальный сайт производителя видеокарты.
- В поиске на сайте пропишите вашу модель карты, скачайте и установите актуальные драйверы.
- Перезагрузитесь.
Решение 2. Проверьте настройки антивируса и отключите VPN
В некоторых случаях проблема может быть вызвана строгими настройками стороннего антивируса. Из-за чего, он блокирует все исполняемые файлы, в том числе .exe и .dll. Проверьте, так ли это, и добавьте в список исключений основной архив игры, где расположен файл с разрешением exe.
Кроме того, если вы используете VPN, отключите подключение и посмотрите, решает ли это проблему.
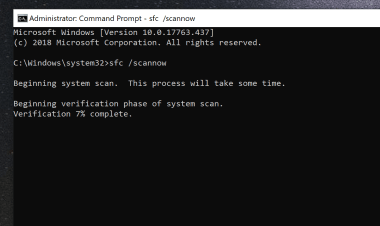
Решение 3. Запустите сканирование SFC
Повреждённые системные файлы часто приводят к проблемам с DLL. Попробуйте восстановить их с помощью стандартной команды.
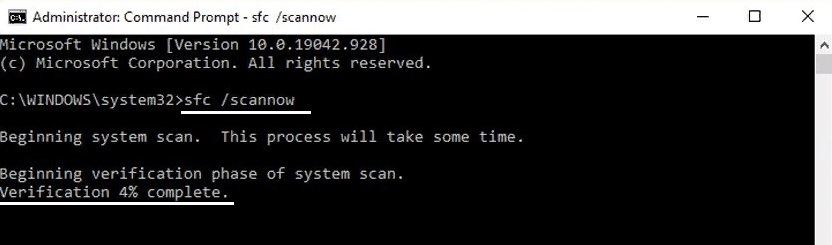
- Нажмите ПКМ по значку Windows, и выберите Командная строка (Администратор).
- В открывшееся окно скопируйте и вставьте команду sfc/scannow, кликнув после этого Enter.
- Дождитесь окончания диагностики, и перезагрузите систему.
Решение 4. Проверьте целостность файлов
Если игра была приобретена в цифровом виде, нужно проверить её на предмет целостности файлов. Так как проблема могла быть во временном сбое подключения к сети, из-за чего некоторые компоненты были не докачены, либо повреждены по другим причинам.
В Steam
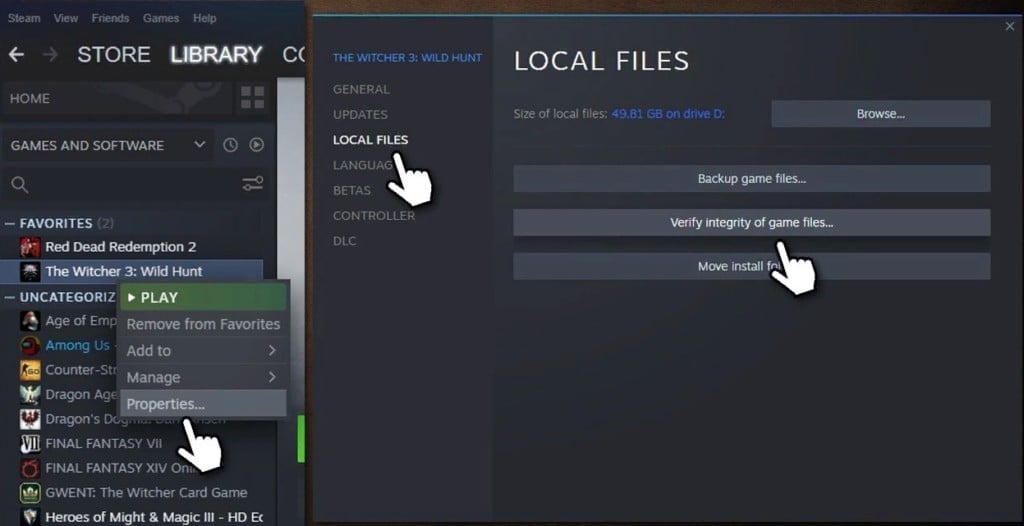
- Откройте свою библиотеку, и щёлкните ПКМ по проблемной игре.
- Выберите Свойства, и перейдите в Локальные файлы > Проверить целостность файлов игры.
В Origin
- Зайдите в библиотеку, щёлкните ПКМ по игре, и выберите «Восстановить».
- Дождитесь завершения процесса.
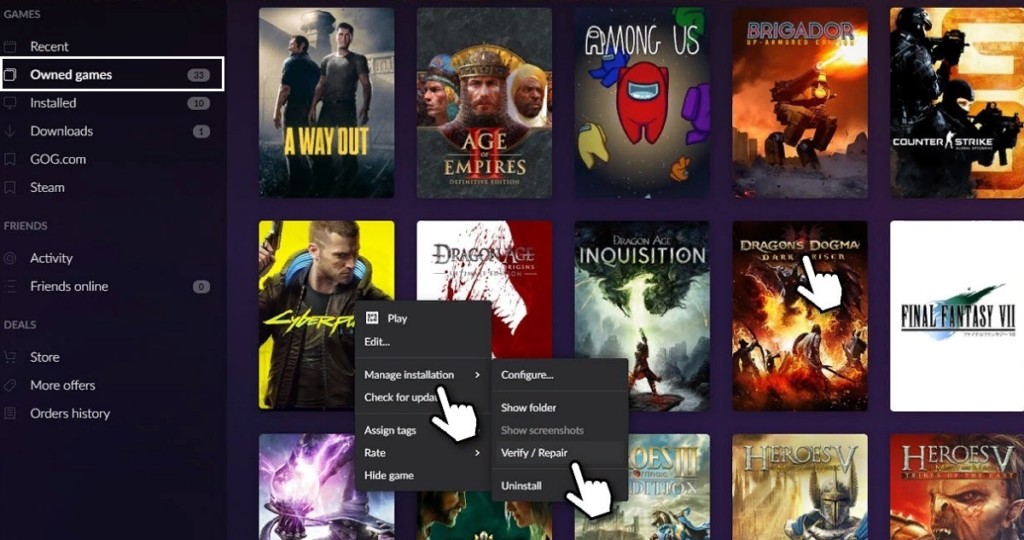
В GOG
- Перейдите в раздел «Мои игры».
- Щёлкните ПКМ по проблемной игре.
- Выберите «Управление установкой» > «Проверить/восстановить».
В Epic Games
- Откройте свою игровую библиотеку.
- Нажмите на три точки рядом с приложением.
- Выберите «Проверить».
Решение 5. Переустановите игру
Если предыдущий вариант не дал результатов, полная переустановка может исправить ошибку с nvwgf2umx.dll. Поэтому следует удалить игру, и снова загрузить её. Сделать это можно с помощью Steam/ Origin/GOG/Epic Games или других программ запуска, а также стандартным методом в Windows.
- Нажмите сочетание клавиш Win + X, и выберите Программы и компоненты.
- Найдите в списке игру, требующую переустановки.
- Кликните по ней один раз, и нажмите вверху Удалить.

Имейте в виду, что после этого придётся повторно загрузить игру, и, в зависимости от её размера, это может занять некоторое время.
Решение 6. Отключите разгон ПК
«Разгон компьютера» является обычной практикой среди геймеров, так как это позволяет немного увеличить возможности процессора и сопутствующих компонентов. Вместе с тем данная процедура может негативно сказаться на стабильности ОС и привести к сбою приложений или даже Windows. Поэтому, если вы используете программы для разгона ПК или видеокарты, следует отказаться от них.
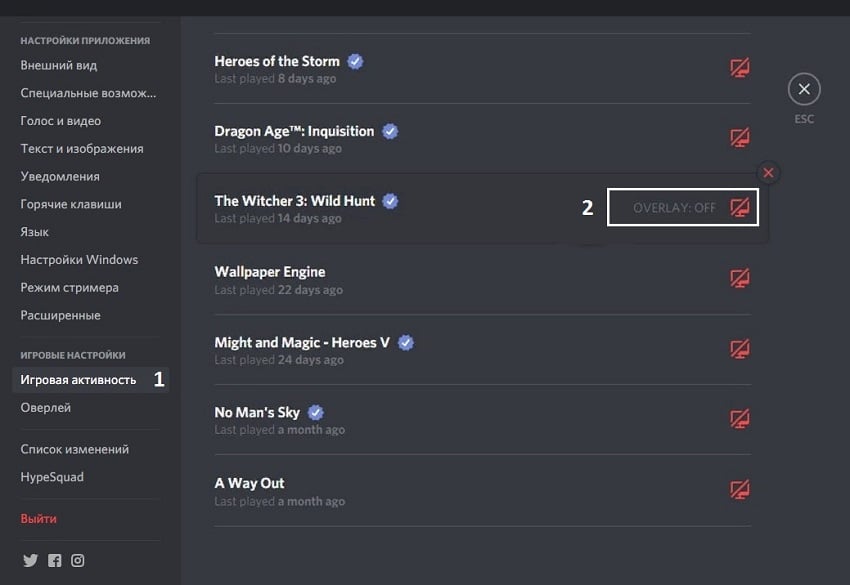
Решение 7. Отключите оверлей в Discord
Многие пользователи отмечают, что в некоторых случаях помогает отключение оверлея в Discord. Выполните следующие шаги:
- Зайдите в параметры Discord.
- Прокрутите меню слева до Игровых настроек, и выберите раздел Игровая активность.
- Справа найдите проблемную игру, и отключите оверлей.
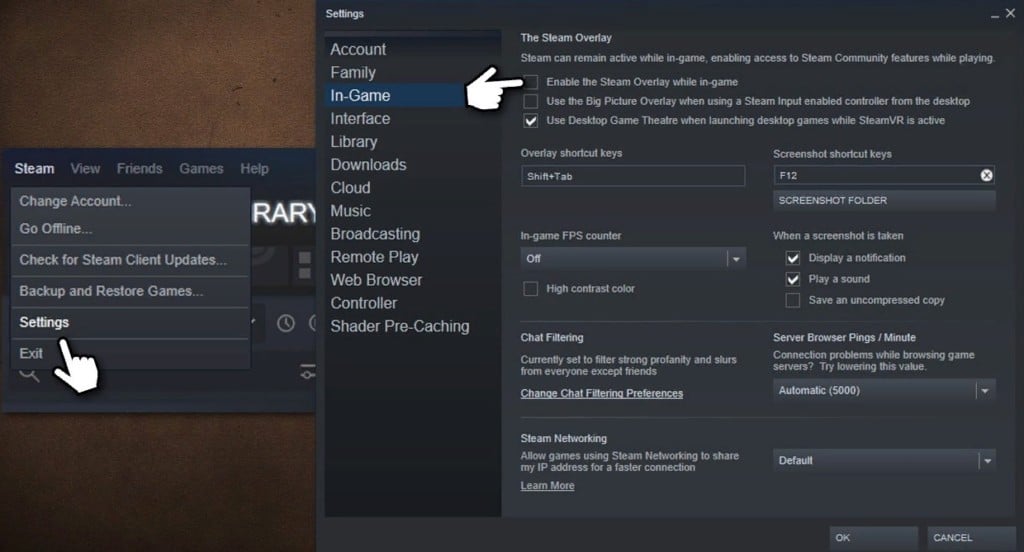
Решение 8. Отключите оверлей в Steam
Подобную операцию можно выполнить в Steam, если игра приобретена на этой платформе.
- Откройте Steam, и перейдите в Настройки.
- Выберите игровой раздел.
- В самом верху снимите галочку с «Включить оверлей Steam во время игры».
- Нажмите Ок, чтобы подтвердить изменения.
Решение 9. Обновите BIOS
Имейте в виду, что это решение не для всех. Неправильное обновление BIOS может вызвать дополнительные проблемы и даже сбой при запуске Windows. Если вы не уверены, что всё сделаете правильно, лучше отказаться от этого метода.
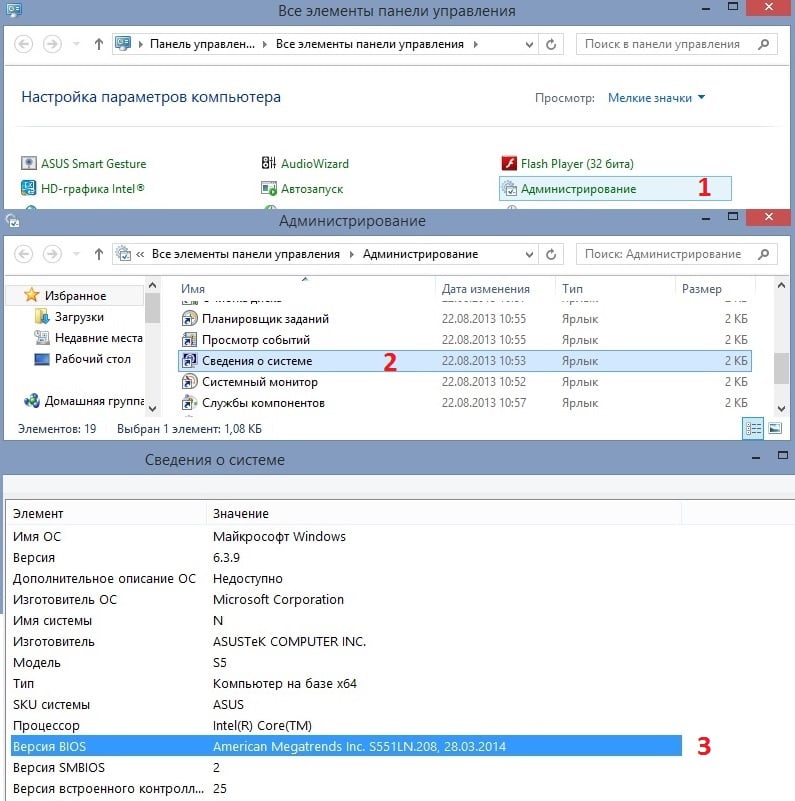
- Нажмите Win +X, и выберите Панель управления.
- Перейдите в раздел Администрирование, и далее в Сведения о системе.
- Запишите свою версию BIOS.
- Посетите официальный сайт производителя материнской платы.
- Перейдите в раздел «Загрузки».
- Загрузите соответствующую версию BIOS для вашей материнской платы и запустите установщик.
- После завершения перезагрузите систему.
Надеемся, что один из предложенных вариантов помог вам исправить ошибку с nvwgf2umx.dll. Напишите в комментариях, какой способ оказался действенным в вашей ситуации, а также опишите свои методы решения данной проблемы.
Automatic repair tools will be efficient
by Afam Onyimadu
Afam is a geek and the go-to among his peers for computer solutions. He has a wealth of experience with Windows operating systems, dating back to his introduction… read more
Updated on
- Nvwgf2umx.dll is a vital component of the Nvidia graphics driver and is useful during gameplay.
- The crashes due to the DLL are often because drivers are expired, or the files is accidentally deleted.

XINSTALL BY CLICKING THE DOWNLOAD FILE
For fixing DLL errors, we recommend Fortect:
SPONSORED
This tool will replace the damaged or corrupted DLLs with their functional equivalents using its dedicated repository where it has the official versions of the DLL files.
- Download and Install Fortect on your PC
- Launch the tool and Start scanning to find DLL files that could be causing PC problems
- Right-click on Start Repair to replace broken DLLs with working versions
- Fortect has been downloaded by 0 readers this month, rated 4.4 on TrustPilot
PC gaming has kept increasing in popularity, but the experience is not always seamless. Some readers have complained about nvwgf2umx.dll crashing games.
If you have experienced this problem, this guide will walk you through some practical solutions so that you can enjoy hitch-free gaming again.
Why is nvwgf2umx.Dll crashing games?
Nvwgf2umx.dll is associated with the Nvidia graphics card driver. This DLL would not crash games as it is a vital component for videos, but some factors may trigger crashes around the library. A few include the following:
- Driver-related problems – These are mostly outdated and corrupted drivers that become incompatible with the DLL.
- A bad nvwgf2umx.dll – If the DLL is corrupt or missing, it may stop games from loading or randomly cause the games to crash during gameplay.
- Bad hardware – If you use faulty hardware, you should expect random problems, including crashes due to nvwgf2umx.dll.
Let us now show you some practical solutions.
How do I fix nvwgf2umx.dll game crashes?
Before trying out any complex solutions, you should do the following:
- Reinstall the game – A quick uninstallation and reinstallation using freshly downloaded copies will fix it if corrupt game files trigger it.
- Reboot your PC – A restart will force bad processes to end and may save you the stress of more complex troubleshooting.
1. Use specialized DLL tools
Our top recommendation is to use dedicated DLL repair tools. These tools will fix and replace damaged files. They make the process seamless with minimal user input.
The Fortect tool comes highly recommended. For third-party DLLs like nvwgf2umx.dll, it resolves every compatibility issue that may lead them to malfunction.
2. Run a file scan
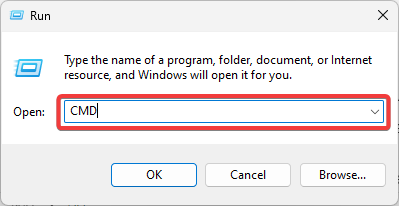
- Press Windows + R, type CMD and hit Ctrl + Shift + Enter.

- Type the script below and hit Enter:
sfc /scannow - Wait for the process to complete, then verify that the nvwgf2umx.dll crashes are resolved.
- Fix: Secure Boot is Greyed Out on Windows 11
- Fix: Touchpad Clicks but Doesn’t Move on Windows 11
- Fix: No Internet, Secured Error on Windows 11
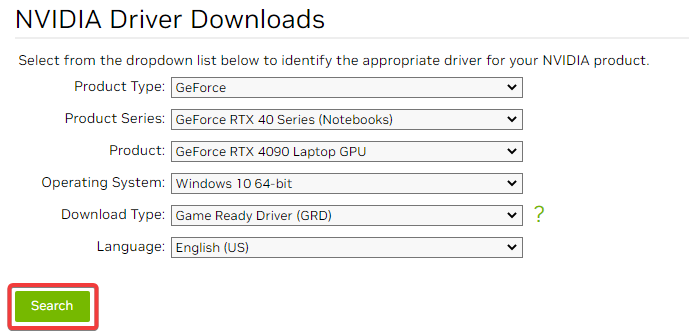
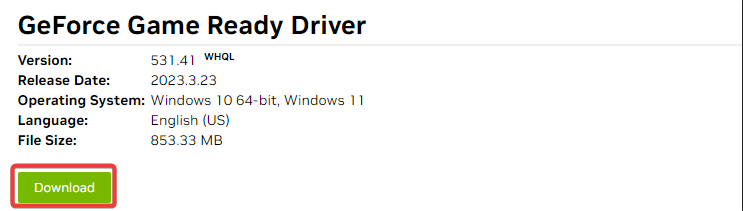
3. Reinstall the NVIDIA driver
- Visit the Nvidia driver site.
- Use matching details of your product to fill out the form, then click Search.

- Click Download to get the driver.

- Double-click the downloaded file and follow the wizard prompts to install it.
4. Update the game
You should check for game updates and patches often. This is essential because the game often triggers the error, and the developers will be able to resolve it using updates.
The availability of updates and the process of updating the game will vary between games, so you should visit the official game website for more information.
5. Manually download the DLL
There are chances that the DLL no longer exists on your computer. Downloading nvwgf2umx.dll from a trusted resource will come in handy.
Note that it is essential to save the downloaded file in the same directory as the crashing game so that it is recognized and used by the game during launch and gameplay.
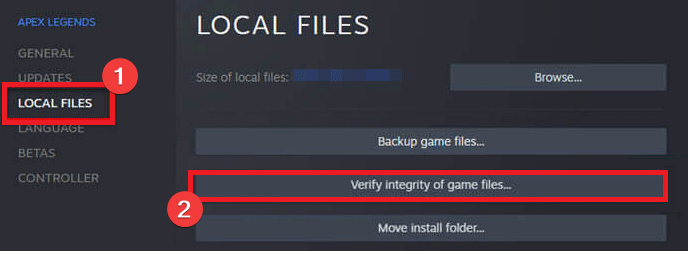
6. Verify game files
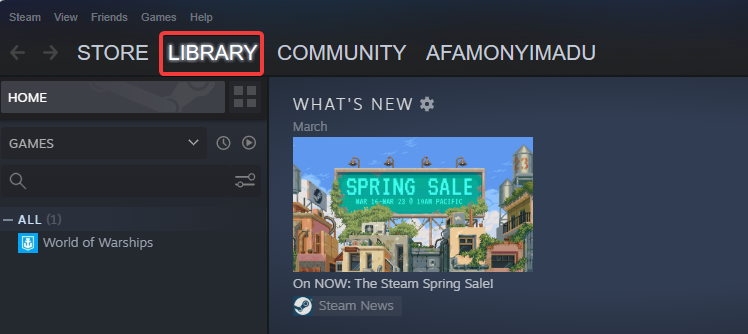
- Launch your gaming platform (we use Steam in this example).
- Click Library.

- Right-click on the problematic game and select the Properties option.
- Select Local Files and click Verify integrity of game files.

After running through the solutions in this guide, crashes due to nvwgf2umx.dll should be fixed.
We have not listed these fixes in any particular order, so you should try what feels most applicable. Please let us know what worked for you in the comments section below.
![]()
Plenty of people reported that they run into nvwgf2umx.dll crash when they played games like Grand Theft Auto V, Call of Duty Warzone, etc. How to fix nvwgf2umx.dll crash? The post from MiniTool shares some solutions with you. Please give them a try.
Nvwgf2umx.dll Crash
It is frustrating to receive an error message when you play games. Here is an error called nvwgf2umx.dll that prevents lots of players from playing games like Grand Theft Auto V, Call of Duty Warzone, Call of Duty Modern Warfare, Fallout 4, Final Fantasy XIV, Dark Souls 3, and so on.

What does the nvwgf2umx.dll error mean? As its name implies, it is associated with a Dynamic Link Library (DLL) file.
Why does nvwgf2umx.dll crash happen? The common reasons are incorrect configuration settings, outdated or incompatible drivers, corrupted system files, and so on. No matter which reason triggers the nvwgf2umx.dll error in your case, you can try the following solutions to fix the error.
Solutions to Nvwgf2umx.dll Error
- Reinstall GPU drivers
- Disable the Protection features of Antivirus
- Disable VPN
- Run sfc/scannow
- Verify files of the problematic game
- Disable Steam/Discord Overlay
- Reinstall the problematic game
- Stop overclocking CPU
- Update BIOS
Now follow the tutorials below to perform the above solutions.
Fix 1: Reinstall GPU Drivers
First, see if outdated GPU drives are responsible for nvwgf2umx.dll crash. Here is how to do it:
Step 1: Open Device Manager by pressing Windows + X and then choosing Device Manager.
Step 2: Once inside the Device Manager window, expand the Display adapters category and double-click the listed device.
Step 3: You will see a Properties window, on which you should switch to the Driver tab and then click the Uninstall Device button.

Step 4: On the Uninstall Device window, tick the checkbox next to Delete the driver software for this device and click the Uninstall button.

Step 5: Wait for your system to finish uninstalling the GPU driver.
Step 6: Reboot your computer to let your system reinstall the driver automatically from Windows Update.
Once the GPU driver is reinstalled, you can launch the problematic game again and see if the nvwgf2umx.dll error shows up again. If it persists, proceed to the next solution.
Fix 2: Disable Antivirus
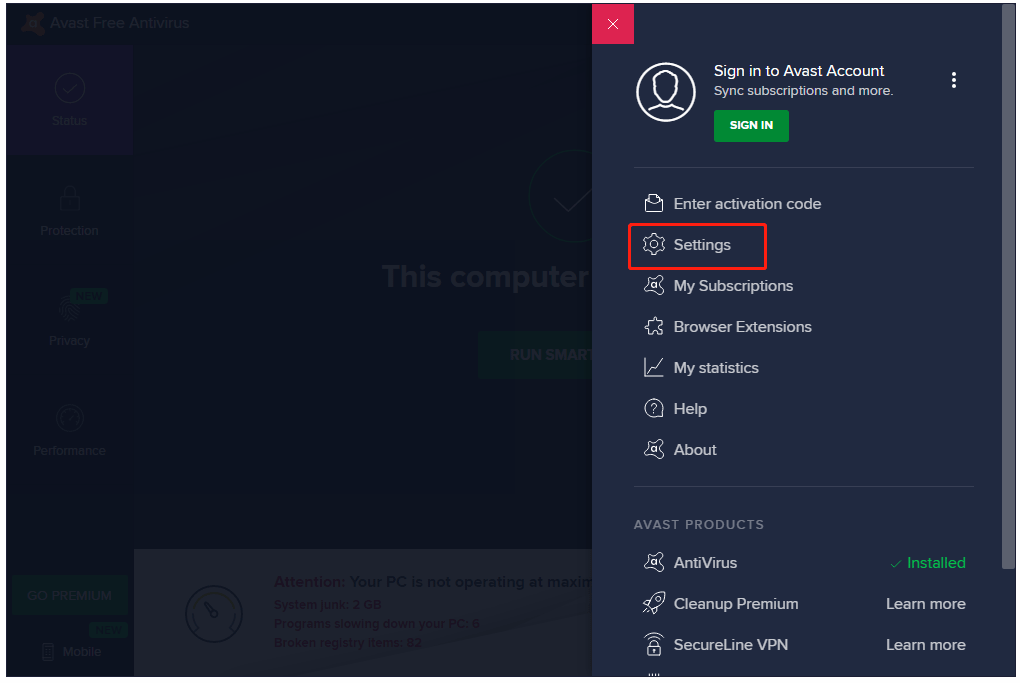
Most people install an anti-virus program on computers to secure data. Have you installed one on your computer? If yes, the nvwgf2umx.dll error might be caused by the program. To verify whether the program is the culprit, you should disable it. Here we takes Avast for example, showing how to turn off the program temporally.
Step 1: Open Avast to access its main interface.
Step 2: Click the Menu option at the top-right corner and then choose the Settings option from the menu.
Step 3: Switch to the Protection tab and then the Core Shields tab. Then, toggle off the Core Shields bar.

Step 4: Select how long you want to keep Avast disabled. In this case, you can choose the Stop until your next restart option.
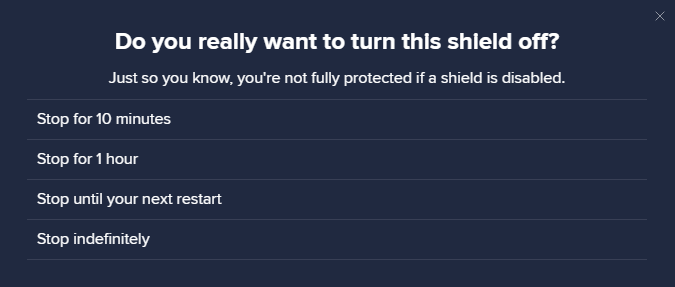
Step 5: Click the OK, STOP button once it appears to confirm that you want to disable the program.
After disabling the antivirus program, you can relaunch the game that triggers the nvwgf2umx.dll error and see if it can run well.
Fix 3: Disable VPN
If you are using VPN, please try disabling it. It is easy to disable VPN on Windows 10, and here is how to do that:
Step 1: Click the Network icon on the Windows taskbar and then click the Network & Internet settings link.
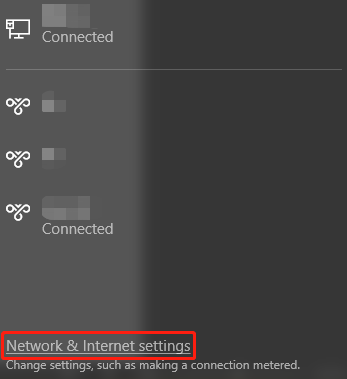
Step 2: Click the Change adapter options option on the Settings window.
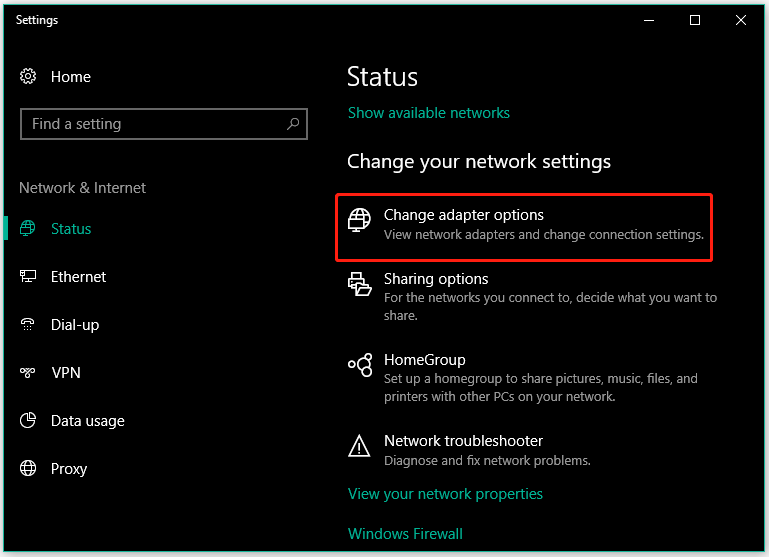
Step 3: On the Network Connections window, right-click the VPN you want to disable, and then choose the Disable option.
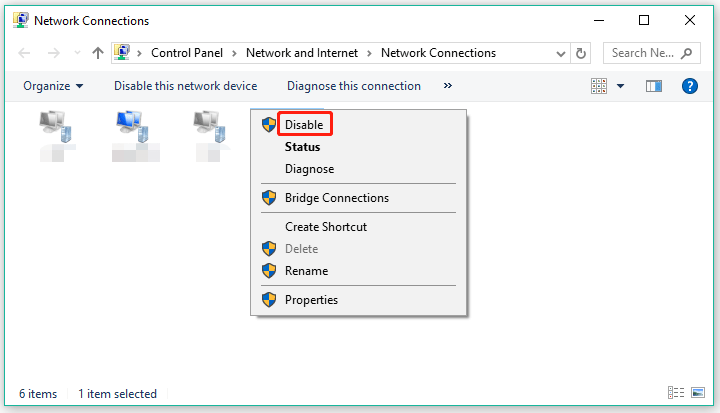
Now run the problematic game again and see if nvwgf2umx.dll crash happens again.
Fix 4: Run sfc/scannow
Corrupted system files can easily cause DLL file problems, which might lead to nvwgf2umx.dll crash. So, run the sfc/scannow command right now.
Step 1: Run Command Prompt window as an administrator.
- Type cmd in the Windows search bar.
- Right-click cmd as it appears and then choose the Run as administrator option.
Step 2: Once the Command Prompt window appears, type the command: sfc /scannow and hit the Enter key to run it.

Step 3: Wait for the scan to finish and then restart your computer.
Fix 5: Verify the Game Files
Now verify if the files of the game are corrupt. Here we show how to do that on different platforms including Steam, Epic Games, and Origin.
On Steam
Step 1: Launch the Steam app and then go to its LIBRARY tab.
Step 2: Find the problematic game in the list, then right-click it, and choose the Properties option.
Step 3: Go to the LOCAL FILES tab on the left side of the current windows and then click the Verify integrity of game files button.

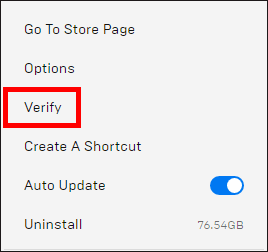
On Epic Games
If you purchase the problematic game via Epic Games, verify the game files via the platform.
Step 1: Open the Epic Games app and go to Library.
Step 2: Find the problematic game in Library and click the three dots next to the game name.
Step 3: Choose the Verify option from the pop-up window.
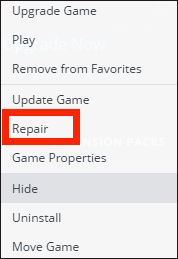
On Origin
Here is how to check the integrity of game files via Origin.
Step 1: Open the Origin app and go to the My Game Library tab.
Step 2: Find the game to be verified, right-click it, and choose the Repair option.
Does the nvwgf2umx.dll error disappear after verifying the game files? If yes, that’s great! If not, please move to the next solution.
Fix 6: Disable Steam/Discord Overlay
If you have enabled Steam Overlay or Discord Overlay, follow the tutorials below to disable it.
Disable Steam Overlay
- Open the Steam app.
- Go to the Steam tab and then choose the Settings option.
- On the Settings window, go to the In-Game tab and untick the checkbox next to Enable the Steam Overlay while in-game.

Disable Discord Overlay
- Open the Discord app.
- Click the gear icon to access the Discard Settings.
- Scroll down until you get to the App Settings area. Then, select the Overlay tab.
- Find the toggle for Enable in-game overlay and turn it off.

Fix 7: Reinstall the Game
Some people stopped nvwgf2umx.dll crash by reinstalling the problematic game. So, if the issue still shows up, give this solution a try.
You can uninstall the problematic game via the platform where you purchase it, Control Panel, or Windows Settings. We have detailed the game uninstallation process in the post: How to Remove Game from Steam Library? – Here Is Your Guide. You can refer to it.
Fix 8: Stop Overclocking CPU
To pursue better gameplay performance, most people have tried overclocking the CPU. However, overclocking CPU might cause game crash such as Assassin’s Creed Odyssey crash, nvwgf2umx.dll crash, and so on.
Therefore, if you also overclocked your CPU, please reset it back to its factory settings. Here is how to do that:
Step 1: Power off your computer and then power it on.
Step 2: During the booting process, enter the BIOS of your motherboard.
Step 3: Once you access the BIOS, go to the path: Advanced Chipset Feature > CPU Multiplier > Restore Default Settings.
Step 4: Hit the F10 key on the keyboard to save the change.
After stopping overclocking your CPU, it is time to see if the nvwgf2umx.dll error persists.
Fix 9: Update BIOS
The last solution to nvwgf2umx.dll crash is to update your BIOS to the latest version. Before updating your BIOS, let’s check your BIOS version first.
- Press the Windows + R to launch the Run command window.
- Type msinfo32 into the Open field and then click the OK button. This is to access the System Information window.
- Locate the information about BIOS Version/Date on the System Information window.
- Go to your BIOS manufacturer’s support site to find the BIOS latest version. Compare it to the BIOS version you have.

If your BIOS version is not the latest one, you can update it. But note that incorrect operations will bring about more issues and even failure to start Windows. Hence, it is highly recommended that you back up your computer before update your BIOS.
How to back up your computer with ease? How to update your BIOS? Keep reading.
Back up Your Computer
To back up your computer with ease, you can try MiniTool Partition Wizard. It is a trustworthy disk & partition management tool. With it, you can not only copy all files from one disk to another but also upgrade to an SSD to boot computer performance, recover lost data and partition, and more.
Now start backing up your computer via MiniTool Partition Wizard.
MiniTool Partition Wizard DemoClick to Download100%Clean & Safe
Step 1: Prepare an empty external disk that is large enough to hold all files from your computer and connect it to your computer.
Step 2: Launch MiniTool Partition Wizard.
Step 3: Choose the Copy Disk Wizard feature from the left panel and click the Next button on the new window to continue.
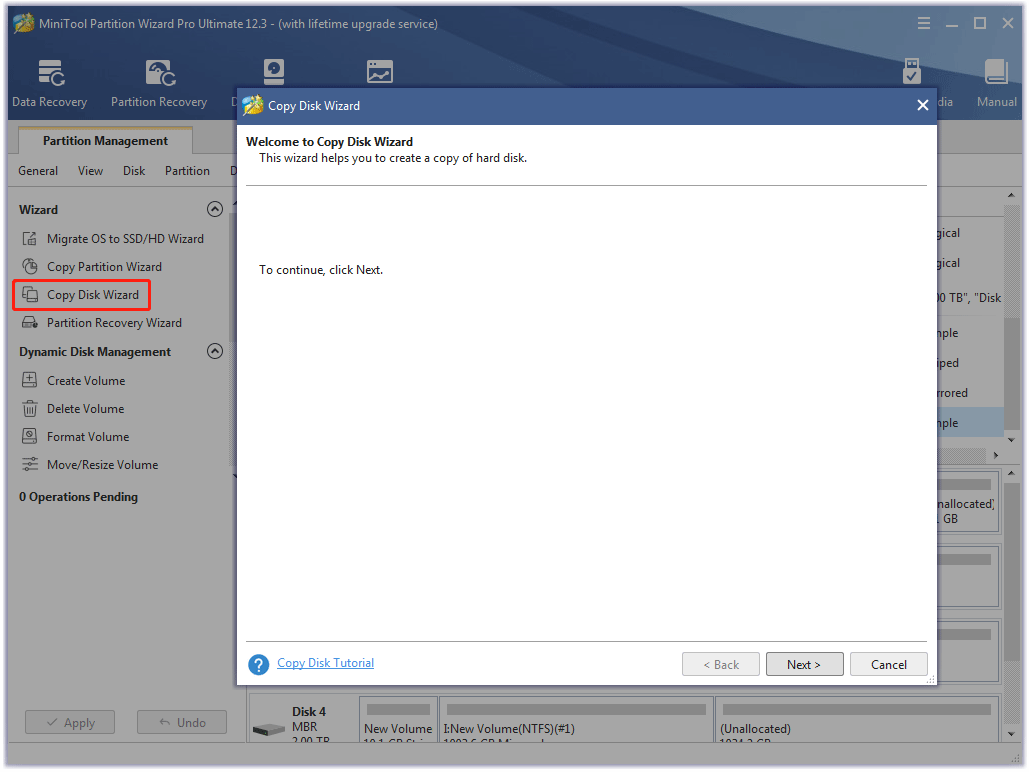
Step 4: Select the system disk as the source disk and then click the Next button.

Step 5: Choose the prepared disk as the target disk and then click the Next button.
Note: Here MiniTool Partition Wizard will promote a message saying “All the data on the disk will be destroyed”. If you confirm there is no important data on the external disk, click the Yes button.

Step 6: Choose a copy method and click then the Next button.
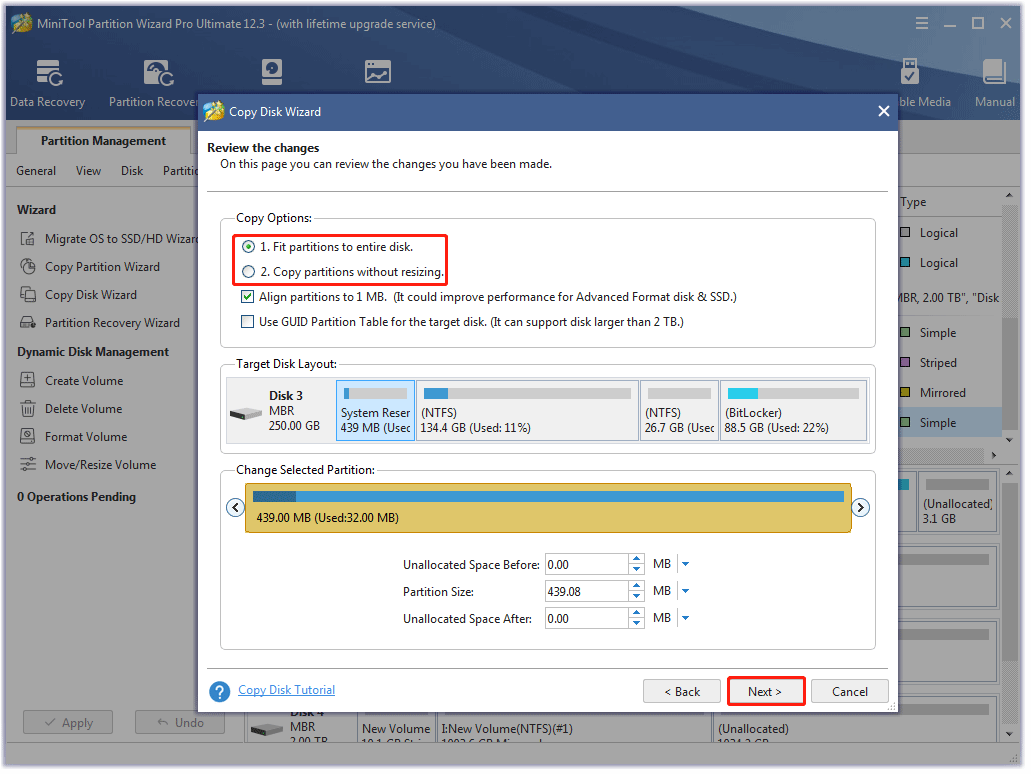
Step 7: Read the note on the new window and then click the Finish button.
Step 8: Preview the backup result and then click the Apply button to let the program start backing up all files from the source disk to the target disk.

Step 9: Wait for the program to finish this backup. Once it ends, reject the external drive, and put it in a safe place like a drawer.
Click to Tweet
Update Your BIOS
Once you secure all your files on your computer, you can start updating your BIOS. Here is the tutorial.
Note:
The operations of updating BIOS are different for different manufacturers.
Here are the basic operations. Plug your laptop into power in case of power shortage during the update process.
Step 1: Download the latest BIOS version from the BIOS manufacturer’s support site.
Step 2: Unzip the BIOS update file and copy it to a blank USB flash drive.
Step 3: Restart your computer to enter the BIOS screen.
Step 4: Back up the BIOS settings if you see any option like Backup or Save. If you do not see any of these options, skip the step — this is OK as you have backed up your computer.
Step 5: Run the BIOS update tool. The general operations are:
- Switch to the Boot tab.
- Enable any Flash option in the menu.
- Select Start Flash in Advanced.
Step 6: Select the BIOS update file you saved on the USB flash drive.
Step 7: Wait for the flashing process to finish and then restart your computer.
Click to Tweet
Bottom Line
That’s all about how to fix nvwgf2umx.dll crash. Have you solved the issue by applying the above solutions? If you have any doubts about these solutions, please leave your message in the comment zone.
If you have any doubts about MiniTool Partition Wizard, please contact us via [email protected].
Иногда система Windows отображает сообщения об ошибках поврежденных или отсутствующих файлов nvwgf2umx.dll. Подобные ситуации могут возникнуть, например, во время процесса установки программного обеспечения. Каждая программа требует определенных ресурсов, библиотек и исходных данных для правильной работы. Поэтому поврежденный или несуществующий файл nvwgf2umx.dll может повлиять на неудачное выполнение запущенного процесса.
Файл был разработан для использования с программным обеспечением . Здесь вы найдете подробную информацию о файле и инструкции, как действовать в случае ошибок, связанных с nvwgf2umx.dll на вашем устройстве. Вы также можете скачать файл nvwgf2umx.dll, совместимый с устройствами Windows 7, которые (скорее всего) позволят решить проблему.

Совместим с: Windows 7
Популярность пользователя
Исправьте ошибки nvwgf2umx.dll
- 1 Информация о файле nvwgf2umx.dll
- 2 Ошибки, связанные с файлом nvwgf2umx.dll
- 3 Как исправить ошибки, связанные с nvwgf2umx.dll?
- 3.1 Сканирование на наличие вредоносных программ
- 3.2 Обновление системы и драйверов
- 3.3 Инструмент проверки системных файлов
- 3.4 Восстановление системы
- 4 Скачать nvwgf2umx.dll
- 4.1 Список версий файла nvwgf2umx.dll
Информация о файле
| Основная информация | |
|---|---|
| Имя файла | nvwgf2umx.dll |
| Расширение файла | DLL |
| Описание | NVIDIA Compatible D3D10 Driver, Version 185.93 |
| Программного обеспечения | |
|---|---|
| программа | NVIDIA D3D10 drivers |
| автор | NVIDIA Corporation |
| подробности | |
|---|---|
| MIME тип | application/octet-stream |
| Тип файла | Driver |
| система | Windows NT 32-bit |
| Авторские права | (C) NVIDIA Corporation. All rights reserved. |
| Набор символов | Windows, Latin1 |
| Языковая треска | English (U.S.) |

Наиболее распространенные проблемы с файлом nvwgf2umx.dll
Существует несколько типов ошибок, связанных с файлом nvwgf2umx.dll. Файл nvwgf2umx.dll может находиться в неправильном каталоге файлов на вашем устройстве, может отсутствовать в системе или может быть заражен вредоносным программным обеспечением и, следовательно, работать неправильно. Ниже приведен список наиболее распространенных сообщений об ошибках, связанных с файлом nvwgf2umx.dll. Если вы найдете один из перечисленных ниже (или похожих), рассмотрите следующие предложения.
- nvwgf2umx.dll поврежден
- nvwgf2umx.dll не может быть расположен
- Ошибка выполнения — nvwgf2umx.dll
- Ошибка файла nvwgf2umx.dll
- Файл nvwgf2umx.dll не может быть загружен. Модуль не найден
- невозможно зарегистрировать файл nvwgf2umx.dll
- Файл nvwgf2umx.dll не может быть загружен
- Файл nvwgf2umx.dll не существует
nvwgf2umx.dll
![]()
Не удалось запустить приложение, так как отсутствует файл nvwgf2umx.dll. Переустановите приложение, чтобы решить проблему.
OK
Проблемы, связанные с nvwgf2umx.dll, могут решаться различными способами. Некоторые методы предназначены только для опытных пользователей. Если вы не уверены в своих силах, мы советуем обратиться к специалисту. К исправлению ошибок в файле nvwgf2umx.dll следует подходить с особой осторожностью, поскольку любые ошибки могут привести к нестабильной или некорректно работающей системе. Если у вас есть необходимые навыки, пожалуйста, продолжайте.
Как исправить ошибки nvwgf2umx.dll всего за несколько шагов?
Ошибки файла nvwgf2umx.dll могут быть вызваны различными причинами, поэтому полезно попытаться исправить их различными способами.
Шаг 1.. Сканирование компьютера на наличие вредоносных программ.
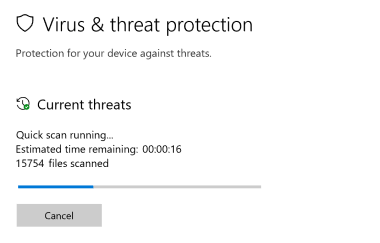
Файлы Windows обычно подвергаются атаке со стороны вредоносного программного обеспечения, которое не позволяет им работать должным образом. Первым шагом в решении проблем с файлом nvwgf2umx.dll или любыми другими системными файлами Windows должно быть сканирование системы на наличие вредоносных программ с использованием антивирусного инструмента.
Если по какой-либо причине в вашей системе еще не установлено антивирусное программное обеспечение, вы должны сделать это немедленно. Незащищенная система не только является источником ошибок в файлах, но, что более важно, делает вашу систему уязвимой для многих опасностей. Если вы не знаете, какой антивирусный инструмент выбрать, обратитесь к этой статье Википедии — сравнение антивирусного программного обеспечения.
Шаг 2.. Обновите систему и драйверы.
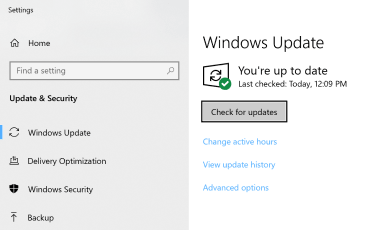
Установка соответствующих исправлений и обновлений Microsoft Windows может решить ваши проблемы, связанные с файлом nvwgf2umx.dll. Используйте специальный инструмент Windows для выполнения обновления.
- Откройте меню «Пуск» в Windows.
- Введите «Центр обновления Windows» в поле поиска.
- Выберите подходящую программу (название может отличаться в зависимости от версии вашей системы)
- Проверьте, обновлена ли ваша система. Если в списке есть непримененные обновления, немедленно установите их.
- После завершения обновления перезагрузите компьютер, чтобы завершить процесс.
Помимо обновления системы рекомендуется установить последние версии драйверов устройств, так как драйверы могут влиять на правильную работу nvwgf2umx.dll или других системных файлов. Для этого перейдите на веб-сайт производителя вашего компьютера или устройства, где вы найдете информацию о последних обновлениях драйверов.
Шаг 3.. Используйте средство проверки системных файлов (SFC).
Проверка системных файлов — это инструмент Microsoft Windows. Как следует из названия, инструмент используется для идентификации и адресации ошибок, связанных с системным файлом, в том числе связанных с файлом nvwgf2umx.dll. После обнаружения ошибки, связанной с файлом %fileextension%, программа пытается автоматически заменить файл nvwgf2umx.dll на исправно работающую версию. Чтобы использовать инструмент:
- Откройте меню «Пуск» в Windows.
- Введите «cmd» в поле поиска
- Найдите результат «Командная строка» — пока не запускайте его:
- Нажмите правую кнопку мыши и выберите «Запуск от имени администратора»
- Введите «sfc / scannow» в командной строке, чтобы запустить программу, и следуйте инструкциям.
Шаг 4. Восстановление системы Windows.
Другой подход заключается в восстановлении системы до предыдущего состояния до того, как произошла ошибка файла nvwgf2umx.dll. Чтобы восстановить вашу систему, следуйте инструкциям ниже
- Откройте меню «Пуск» в Windows.
- Введите «Восстановление системы» в поле поиска.
- Запустите средство восстановления системы — его имя может отличаться в зависимости от версии системы.
- Приложение проведет вас через весь процесс — внимательно прочитайте сообщения
- После завершения процесса перезагрузите компьютер.
Если все вышеупомянутые методы завершились неудачно и проблема с файлом nvwgf2umx.dll не была решена, перейдите к следующему шагу. Помните, что следующие шаги предназначены только для опытных пользователей
Загрузите и замените файл nvwgf2umx.dll
Последнее решение — вручную загрузить и заменить файл nvwgf2umx.dll в соответствующей папке на диске. Выберите версию файла, совместимую с вашей операционной системой, и нажмите кнопку «Скачать». Затем перейдите в папку «Загруженные» вашего веб-браузера и скопируйте загруженный файл nvwgf2umx.dll.
Перейдите в папку, в которой должен находиться файл, и вставьте загруженный файл. Ниже приведен список путей к каталогу файлов nvwgf2umx.dll.
- Windows 7: C:\Windows\System32\DriverStore\FileRepository\nv_lh.inf_amd64_neutral_bc69f20e3115af59\
Если действия не помогли решить проблему с файлом nvwgf2umx.dll, обратитесь к профессионалу. Существует вероятность того, что ошибка (и) может быть связана с устройством и, следовательно, должна быть устранена на аппаратном уровне. Может потребоваться новая установка операционной системы — неправильный процесс установки системы может привести к потере данных.
Список версий файлов

Имя файла
nvwgf2umx.dll
система
Windows 7
Размер файла
4326912 bytes
Дата
2009-07-14
| Подробности файла | ||
|---|---|---|
| MD5 | 5d11ebf91f2c7d87b9b1b49688965c13 | |
| SHA1 | 49746afd7d64d9125f06957d78b197c9e92d9984 | |
| SHA256 | 9d2f57a4ee33eabec77831386dad3b6eda8da483f4c155c0b0ed4b089ab95067 | |
| CRC32 | 85ae821e | |
| Пример расположения файла | C:\Windows\System32\DriverStore\FileRepository\nv_lh.inf_amd64_neutral_bc69f20e3115af59\ |
В большинстве случаев проблемы с файлами nvwgf2umx.dll DLL возникают в результате отсутствия или повреждения файла (вредоносным ПО или вирусом) в хранилище файлов Media Composer 8.4.4. Как правило, любую проблему, связанную с файлом DLL, можно решить посредством замены файла на новую копию. Мы также рекомендуем выполнить сканирование реестра, чтобы очистить все недействительные ссылки на nvwgf2umx.dll, которые могут являться причиной ошибки.
Формат Dynamic Link Library с расширением файла DLL классифицируют в качестве Системные файлы. Ниже представлен список самых последних версий файлов практически для всех версий Windows (а также для некоторых %%os%%), которые вы также можете скачать. Если в настоящее время необходимая вам версия nvwgf2umx.dll недоступна для загрузки, вы можете запросить её копию, нажав на кнопку Request (Запрос) ниже. В крайнем случае, если ниже отсутствует необходимый вам файл ниже, для получения необходимой версии вы также можете связаться с Avid Technology, Inc..
Как правило, ошибки подобного типа больше не возникают после размещения надлежащей версии файла nvwgf2umx.dll в соответствующем месте, однако вам следует выполнить проверку ещё раз. Чтобы убедиться в том, что удалось решить проблему, попробуйте запустить Media Composer 8.4.4, и посмотреть выведется ли ошибка.
| Nvwgf2umx.dll Описание файла | |
|---|---|
| Ext: | DLL |
| Группа: | Multimedia,music creation |
| App: | Media Composer 8.4.4 |
| Версия выпуска: | 2015 |
| Разработчик: | Avid Technology, Inc. |
| Имя файла: | nvwgf2umx.dll |
| KB: | 17615600 |
| SHA-1: | 4772c1a3e1bbc0d11f4d4617487672521ee6cef9 |
| MD5: | f9626966c703ef7fe476b6624dd58912 |
| CRC32: | 99735178 |
Продукт Solvusoft
Загрузка
WinThruster 2023 — Сканировать ваш компьютер на наличие ошибок реестра в nvwgf2umx.dll
Windows
11/10/8/7/Vista/XP
Установить необязательные продукты — WinThruster (Solvusoft) | Лицензия | Политика защиты личных сведений | Условия | Удаление
DLL
nvwgf2umx.dll
Идентификатор статьи: 6060
Nvwgf2umx.dll
| Filename | Идентификатор файла (контрольная сумма MD5) | Размер (в байтах) | Загрузить | |||||||||||||||
|---|---|---|---|---|---|---|---|---|---|---|---|---|---|---|---|---|---|---|
| + nvwgf2umx.dll | f9626966c703ef7fe476b6624dd58912 | 16.80 MB | ||||||||||||||||
|
||||||||||||||||||
| + nvwgf2umx.dll | 9a41ed19d20b7704741386ad0f896935 | 23.57 MB | ||||||||||||||||
|
||||||||||||||||||
| + nvwgf2umx.dll | 7e0d25b72ca9c47c8bc50e5e03064055 | 8.02 MB | ||||||||||||||||
|
||||||||||||||||||
| + nvwgf2umx.dll | 7e0d25b72ca9c47c8bc50e5e03064055 | 8.02 MB | ||||||||||||||||
|
||||||||||||||||||
| + nvwgf2umx.dll | 7e0d25b72ca9c47c8bc50e5e03064055 | 8.02 MB | ||||||||||||||||
|
||||||||||||||||||
| + nvwgf2umx.dll | 7e0d25b72ca9c47c8bc50e5e03064055 | 8.02 MB | ||||||||||||||||
|
||||||||||||||||||
| + nvwgf2umx.dll | 7e0d25b72ca9c47c8bc50e5e03064055 | 8.02 MB | ||||||||||||||||
|
||||||||||||||||||
| + nvwgf2umx.dll | 7e0d25b72ca9c47c8bc50e5e03064055 | 8.02 MB | ||||||||||||||||
|
||||||||||||||||||
| + nvwgf2umx.dll | c79b273b74ceafc77e4c5113be6e0389 | 4.25 MB | ||||||||||||||||
|
||||||||||||||||||
| + nvwgf2umx.dll | 45963f78bbfeec992cc01062a89d42a0 | 13.82 MB | ||||||||||||||||
|
||||||||||||||||||
| + nvwgf2umx.dll | 5d11ebf91f2c7d87b9b1b49688965c13 | 4.13 MB | ||||||||||||||||
|
||||||||||||||||||
| + nvwgf2umx.dll | 5d11ebf91f2c7d87b9b1b49688965c13 | 4.13 MB | ||||||||||||||||
|
||||||||||||||||||
| + nvwgf2umx.dll | 5d11ebf91f2c7d87b9b1b49688965c13 | 4.13 MB | ||||||||||||||||
|
||||||||||||||||||
| + nvwgf2umx.dll | 5d11ebf91f2c7d87b9b1b49688965c13 | 4.13 MB | ||||||||||||||||
|
||||||||||||||||||
| + nvwgf2umx.dll | 5d11ebf91f2c7d87b9b1b49688965c13 | 4.13 MB | ||||||||||||||||
|
||||||||||||||||||
| + nvwgf2umx.dll | 5d11ebf91f2c7d87b9b1b49688965c13 | 4.13 MB | ||||||||||||||||
|
||||||||||||||||||
| + nvwgf2umx.dll | 5d11ebf91f2c7d87b9b1b49688965c13 | 4.13 MB | ||||||||||||||||
|
||||||||||||||||||
| + nvwgf2umx.dll | 5d11ebf91f2c7d87b9b1b49688965c13 | 4.13 MB | ||||||||||||||||
|
||||||||||||||||||
| + nvwgf2umx.dll | d6caabc8644a7c81aad28e0a01dc88b9 | 11.56 MB | ||||||||||||||||
|
||||||||||||||||||
| + nvwgf2umx.dll | 5d11ebf91f2c7d87b9b1b49688965c13 | 4.13 MB | ||||||||||||||||
|
||||||||||||||||||
| + nvwgf2umx.dll | 5d11ebf91f2c7d87b9b1b49688965c13 | 4.13 MB | ||||||||||||||||
|
||||||||||||||||||
| + nvwgf2umx.dll | 5d11ebf91f2c7d87b9b1b49688965c13 | 4.13 MB | ||||||||||||||||
|
||||||||||||||||||
| + nvwgf2umx.dll | 5d11ebf91f2c7d87b9b1b49688965c13 | 4.13 MB | ||||||||||||||||
|
||||||||||||||||||
| + nvwgf2umx.dll | 5d11ebf91f2c7d87b9b1b49688965c13 | 4.13 MB | ||||||||||||||||
|
||||||||||||||||||
| + nvwgf2umx.dll | 45963f78bbfeec992cc01062a89d42a0 | 13.82 MB | ||||||||||||||||
|
||||||||||||||||||
| + nvwgf2umx.dll | 45963f78bbfeec992cc01062a89d42a0 | 13.82 MB | ||||||||||||||||
|
||||||||||||||||||
| + nvwgf2umx.dll | 5d11ebf91f2c7d87b9b1b49688965c13 | 4.13 MB | ||||||||||||||||
|
Типичные ошибки Nvwgf2umx.dll
Частичный список ошибок nvwgf2umx.dll Media Composer 8.4.4:
- «Отсутствует файл Nvwgf2umx.dll.»
- «Отсутствует nvwgf2umx.dll. «
- «Nvwgf2umx.dll нарушение прав доступа.»
- «Не удается зарегистрировать nvwgf2umx.dll. «
- «Файл C:\Windows\System32\\nvwgf2umx.dll не найден.»
- «Не могу запустить Media Composer 8.4.4. Отсутствует компонент nvwgf2umx.dll. Переустановите Media Composer 8.4.4. «
- «Не удалось выполнить приложение, так как nvwgf2umx.dll не найден. Повторная установка Media Composer 8.4.4 может решить проблему. «
Ошибки DLL nvwgf2umx.dll возникают во время установки Media Composer 8.4.4, при запуске программ, связанных с nvwgf2umx.dll (Media Composer 8.4.4), во время запуска или завершения работы или во время установки ОС Windows. Важно отметить, когда возникают проблемы с nvwgf2umx.dll, так как это помогает устранять проблемы Media Composer 8.4.4 (и сообщать Avid Technology, Inc.).
Причины ошибок в файле Nvwgf2umx.dll
Отсутствующие или поврежденные файлы nvwgf2umx.dll являются распространенными источниками ошибок nvwgf2umx.dll. Как внешний файл (nvwgf2umx.dll), это делает проблемы Media Composer 8.4.4 более вероятными.
Неправильное завершение работы компьютера или заражение вирусом может привести к повреждению nvwgf2umx.dll, что может привести к ошибкам ActiveX. Повреждение файла nvwgf2umx.dll плохо загружает его, что приводит к ошибкам Media Composer 8.4.4.
Редко проблемы с записями реестра Windows для Media Composer 8.4.4 могут вызвать ошибку nvwgf2umx.dll. Эти проблемы реестра nvwgf2umx.dll связаны с поврежденными ссылками на файлы Media Composer 8.4.4. Перемещение nvwgf2umx.dll, отсутствующие файлы nvwgf2umx.dll или неправильная и оставшаяся ссылка на файл из неправильной установки/удаления Media Composer 8.4.4 приводят к их нарушению.
Особенно эти ошибки nvwgf2umx.dll проистекают из:
- Запись nvwgf2umx.dll повреждена или недопустима.
- Вирус или вредоносное ПО, повредившее файл nvwgf2umx.dll.
- nvwgf2umx.dll поврежден из-за аппаратной неисправности (Avid Technology, Inc. или другой).
- Версия файла nvwgf2umx.dll перезаписана установкой другого программного обеспечения.
- Другая программа злонамеренно или по ошибке удалила файл nvwgf2umx.dll.
- nvwgf2umx.dll злонамеренно или ошибочно удален другой программой (кроме Media Composer 8.4.4).