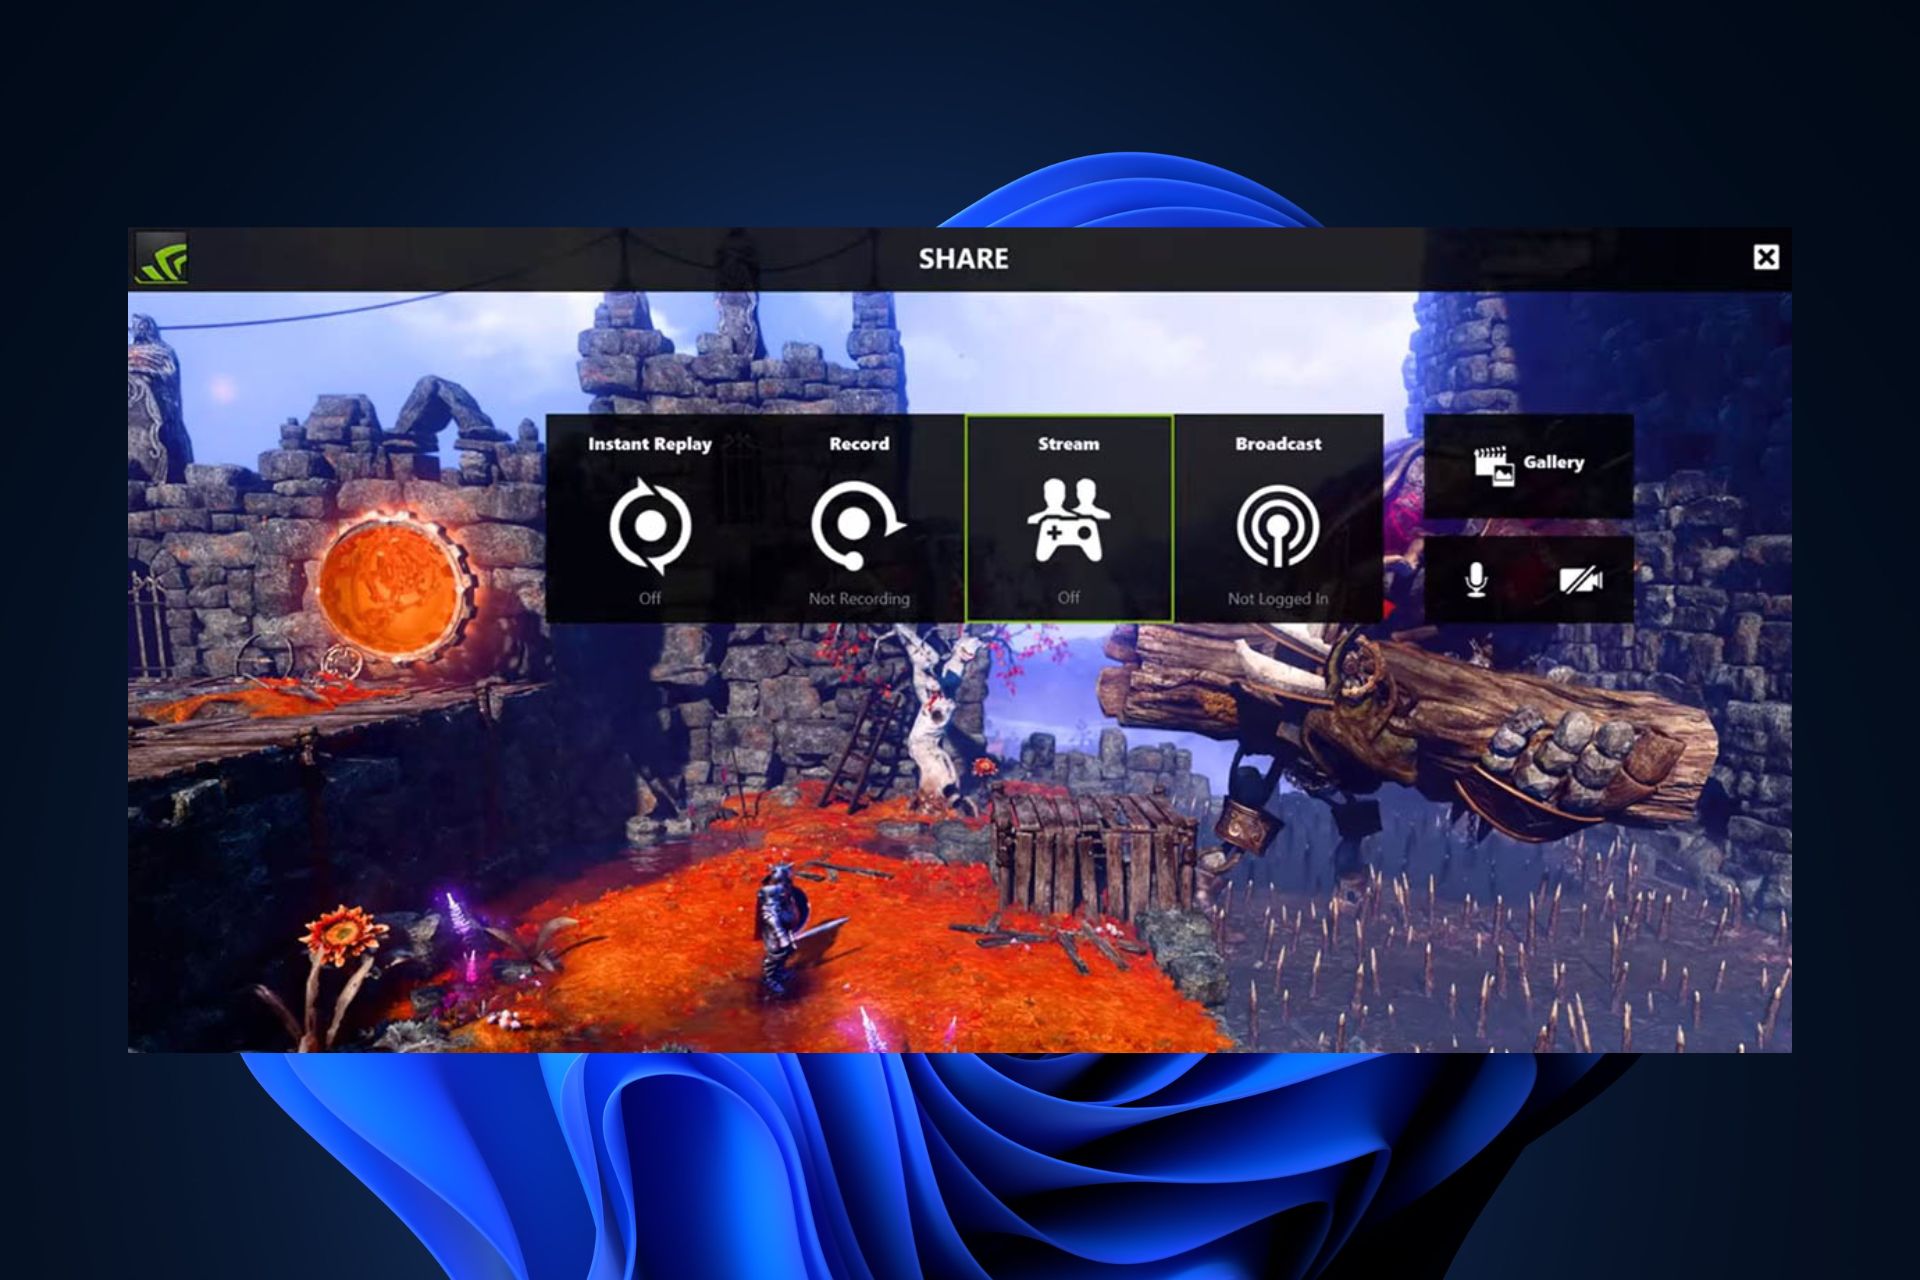
NVIDIA является лидером на рынке как производитель видеокарт. Недавно они предложили полезную функцию под названием Доля NVIDIA . Используя эту функцию, пользователь может выполнять ряд задач, включая запись, потоковую передачу и обмен своим игровым процессом с другими. Это также позволяет им делать несколько снимков игрового процесса, что дает возможность запоминать моменты, происходящие во время великолепной игры.
Однако люди, использующие NVIDIA Share, сообщили, что NVIDIA Share не отвечает. Если вы столкнулись с этой проблемой, то этот пост может вам помочь.
NVIDIA Share не отвечает или не работает
Чтобы исправить эту ошибку, мы рассмотрим следующие сценарии и обсудим исправления, связанные с ними:
- Если вы только что обновили драйвер.
- Если вы не сделали никаких изменений в драйвере.
1] Если вы только что обновили драйвер
Если вы только что обновили драйвер, есть вероятность, что новая установка не прошла должным образом или была повреждена.
Несовместимость между операционной системой и драйвером может также привести к таким проблемам. Итак, вы можете попробовать откатить конфликтующий драйвер.
Вы также можете проверить, есть ли другое обновление, доступное для ваших драйверов NVIDIA, и проверить, исправляет ли это ваши проблемы.
2] Если вы не вносили никаких изменений в драйвер
В случае, если вы не внесли никаких изменений в драйвер, возможно, ваши драйверы устарели или у вас возникли проблемы с установкой.
Во-первых, вам необходимо проверить, установлены ли последние версии драйверов NVIDIA. Если да, то переходите к следующему шагу.
Теперь нам нужно отключить функцию NVIDIA Share.

Для этого сначала откройте NVIDIA GeForce Experience, выбрав его в поле поиска.
Затем нажмите на маленький значок шестеренки в правой верхней части NVIDIA GeForce Experience.
Убедитесь, что вы находитесь на вкладке “Общие” .
Затем прокрутите вниз до раздела NVIDIA Share.

Выберите переключатель, чтобы отключить эту функцию.
Перезагрузите компьютер и снова проверьте, есть ли у вас какие-либо обновления для вашей видеокарты NVIDIA. Теперь вы можете продолжать и играть в свои игры, как вы хотите.
Если вы хотите использовать NVIDIA Share, просто выполните те же шаги, чтобы включить его снова.
NVIDIA is the market leader as a Graphics Card maker. They recently came up with a useful feature called NVIDIA Share. Using this feature, the user can carry out a number of tasks including recording, streaming, and sharing their gameplay with others. It also allows them to take multiple snapshots of the gameplay which brings in capabilities to get the memories of the moments that happen during a great game.
Some PC users are reporting the issue whereby when launching the GeForce Experience application on their Windows 11 or Windows 10 PC, they receive the error message NVIDIA Share not responding or has stopped working. If you face this issue, then this post may help you.

NVIDIA Share allows PC users to record and share gaming moments during gameplay. The utility is practically a hardware acceleration screen recording feature that enables users to record a time behind and provides users a lot of flexibility when playing games. But if the feature is turned on but not in use, it can cause a black screen for a few seconds on startup. This issue is often related to an incompatible or outdated graphics card driver.
If NVIDIA Share is not responding or has stopped working on your Windows 11/10 system, you can try our recommended solutions below in no particular order and see if that helps to resolve the issue on your device.
- Restart PC
- Update/Rollback graphics adapter driver
- Turn off Instant Replay
- Reinstall GeForce Experience
Let’s take a look at the description of the process involved concerning each of the listed solutions.
Before you try the solutions below, check for updates and install any available bits on your Windows 11/10 device and see if that helps – but, if the issue in focus started after you recently updated Windows, you can perform System Restore or uninstall the update – but if you prefer not to do neither, you can then go ahead with the solutions below.
1] Restart PC
Your first port of call in an attempt to troubleshoot and fix the NVIDIA Share not responding or working issue on your Windows 11/10 device is to restart your PC and make sure to run GeForce Experience app with admin privilege.
2] Update/Rollback graphics adapter driver

This solution simply requires you to update the graphics card driver on your PC using any of the following methods:
- In Windows Update, you can as well get the driver updates on the Optional Updates section.
- You can download the latest version of the driver from the graphics hardware manufacturer’s website.
- You can automatically update your drivers using any of the free Driver Update software for Windows 11/10 PC.
- You can also update driver via Command Prompt.
- You can manually update graphics driver via Device Manager if you have already downloaded the .inf or .sys file for the driver.
If you happen to have just updated the driver, there might be chances that the new installation did not take place properly or was corrupt. The incompatibility between the Operating System and the Driver might also give rise to issues like this. So, you can try to Rollback the conflicting driver. You can also check if there is another update available to your NVIDIA Drivers and check if that fixes your issues.
However, if the latest drivers are already installed or after the update the issue isn’t resolved, you can rollback the driver or download and install an earlier version of the driver.
If both updating and/or rolling back the driver didn’t work, you can uninstall the graphics card driver via Command Prompt or use the Display Driver Uninstaller (DDU), and then restart your PC. After your PC reboots, Windows will scan for hardware changes and automatically reinstall the generic driver for the graphics device which in some cases is sufficient enough for the display adapter to function without issues, but with possible limited functionality which wouldn’t be ideal or give the best experience for PC gaming.
3] Turn off Instant Replay

Some affected PC users reported that they were able to resolve the issue in hand by disabling Instant Replay – a feature in the NVIDIA Share utility which can help you record screens at a specifically defined time.
To disable Instant Replay feature, do the following:
- Open GeForce Experience.
- Navigate to the NVIDIA Share Settings section.
- Select the Instant Replay option.
- Click on Turn off.
Reboot your computer and check again if you have any updates for your NVIDIA Graphics Card. Now you can carry on and play your games as you want to. In case you want to leverage the use of NVIDIA Share, just follow the same steps to enable it again.
Related: Program exe has stopped working
4] Reinstall GeForce Experience
This solution requires you to uninstall the GeForce Experience app via Settings app or Control Panel, reboot PC, and then download from NVIDIA official website the latest version of the app and reinstall it on your Windows 11/10 gaming device.
If the issue in hand persists, uninstall the GeForce Experience app once again, but this time around, download a previous version of GeForce Experience from a trusted resource and install it on your device.
Hope this helps!
Related post: NVIDIA GeForce Experience unable to open Share
How do I fix NVIDIA Share EXE?
You just need to turn off NVIDIA Share in GeForce Experience. But before that, you may need to roll back the graphics card driver or update the graphics card driver for your Windows 11/10 computer.
How do I fix NVIDIA Overlay not working?
If NVIDIA Overlay is not working on your PC, try the following suggetions:
- Make sure GeForce in-game overlay is enabled.
- Restart your computer.
- Update your graphics driver.
- Install all Windows updates.
- Run GeForce Experience as an administrator.
- Enable experimental features.
- Disable third-party services.
- Repair Microsoft Visual C++ Redistributable Package.
Why does it say unable to open Share on GeForce Experience?
If you’re getting the error unable to open Share on GeForce Experience, it’s likely due to some incompatibility issue (your previous drivers) or corrupted files. The most common solution for this is to completely reinstall the application rather than updating it.
Run Nvidia Share as an administrator to solve the problem
by Loredana Harsana
Loredana is a passionate writer with a keen interest in PC software and technology. She started off writing about mobile phones back when Samsung Galaxy S II was… read more
Updated on
- If the NVIDIA Share doesn’t open, this could result corrupted installation, or issues with the executable file.
- The Nvidia Share enables users to share their saved and recorded clips of in-game moments.
- You can fix this issue by reinstalling the GeForce Experience app.
XINSTALL BY CLICKING THE DOWNLOAD FILE
To fix Windows PC system issues, you will need a dedicated tool
SPONSORED
Fortect is a tool that does not simply clean up your PC, but has a repository with several millions of Windows System files stored in their initial version. When your PC encounters a problem, Fortect will fix it for you, by replacing bad files with fresh versions. To fix your current PC issue, here are the steps you need to take:
- Download Fortect and install it on your PC.
- Start the tool’s scanning process to look for corrupt files that are the source of your problem
- Right-click on Start Repair so the tool could start the fixing algorythm
- Fortect has been downloaded by 0 readers this month, rated 4.4 on TrustPilot
The Nvidia GeForce Experience app enables users to automatically record and save video clips of noteworthy in-game moments using the Nvidia share. However, some of our readers have reported that their Nvidia GeForce Experience is unable to open share
In case you have been trying to click the share button without result, we have gathered some potential fixes to troubleshoot the issue here.
- Why can’t I open Share Nvidia?
- What can I do if I can’t open Share Nvidia?
- 1. Disable administrative privileges for the nvspcaps64.exe file
- 2. Uninstall and reinstall GeForce Experience
- 3. Run Nvidia Share as an administrator
There can be several reasons why you cannot open share Nvidia feature. Below are some of the possible reasons:
- Antivirus or firewall interference – Sometimes, antivirus software or firewall settings can block specific components of GeForce Experience, including the share feature.
- Corrupt or incompatible installation – Your installation of GeForce Experience may be corrupt or incompatible, thereby, affecting the share feature.
- Exe file settings – If the run as administrator option is enabled for your main executable file, it can prevent using the Share feature.
The above are common reasons why users are unable to open share on Nvidia Geforce Experience. Regardless, the next section will provide you with simplified steps to fix the issue.
Before trying any of the solutions provided in this guide, it may be helpful to attempt the following preliminary checks:
- Verify that your computer meets the minimum system requirements for running GeForce Experience.
- Temporarily disable your antivirus or firewall and see if the issue persists.
- Update to the latest version of Nvidia GeForce Experience.
- Disable unnecessary processes in your Task Manager.
Having confirmed the above checks, you can work through any of the methods below to fix the problem.
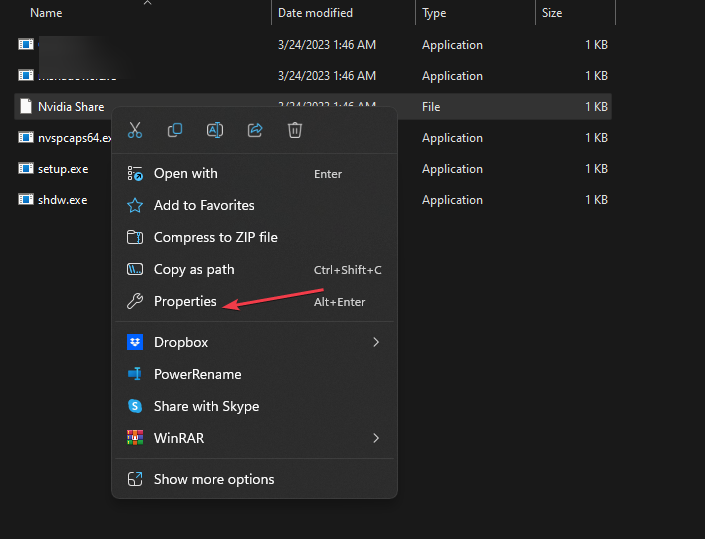
1. Disable administrative privileges for the nvspcaps64.exe file
- Press the Windows key + E to open the File Explorer.
- Type the following path and press Enter:
C:/Program Files/NVIDIA Corporation/Shadowplay - Now, locate the file named nvspcaps64.exe, right-click it, and select Properties from the context menu.

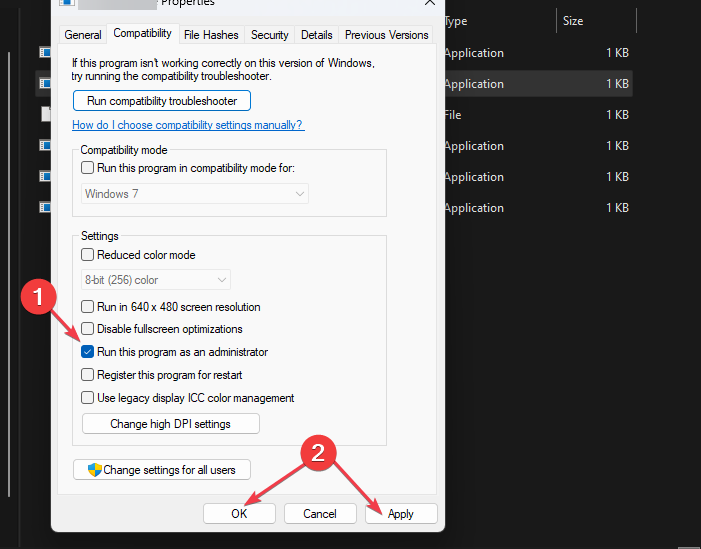
- Then, navigate to the Compatibility tab and uncheck the Run this program as an administrator option.
- Click Apply then select OK to save the changes.

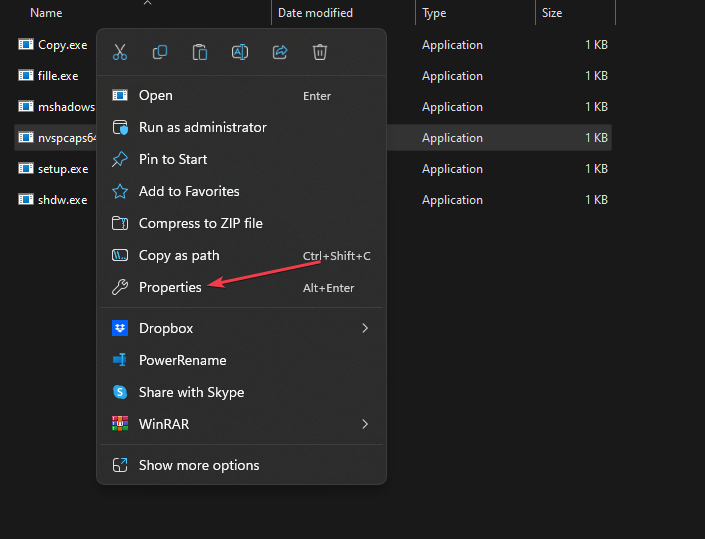
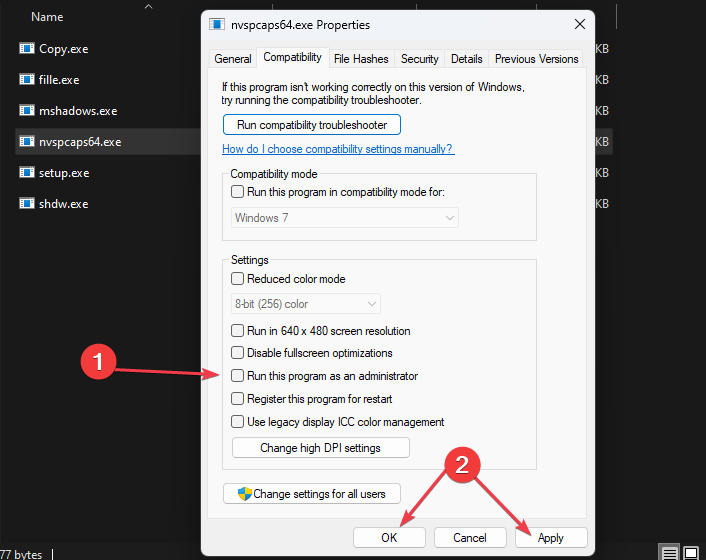
The nvspcaps64.exe file is the executable file for Nvidia Share, and it has its Run as administrator option enabled by default. After disabling it, turn on GeForce Experience and check if the error persists.
2. Uninstall and reinstall GeForce Experience
- Press the Windows + R keys to open the Run command dialog box. Type appwiz.cpl in the command dialog box to open Programs and Features and press Enter.

- Then, locate Nvidia GeForce Experience, select it, and click the Uninstall button at the top.

- Follow the on-screen prompts to complete the uninstallation process and restart your computer.
- Now, go to the official Nvidia website to download the latest version of GeForce Experience that is compatible with your PC.
- Next, double-click on the downloaded file and follow the on-screen instructions to install GeForce Experience on your computer.
- After the installation, launch GeForce Experience and check if the Share feature works.
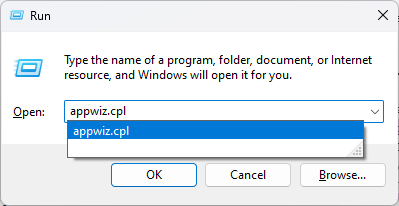

Uninstalling and reinstalling the GeForce Experience app will ensure that everything regarding the app is freshly updated.
- Fix: MSI Afterburner Failed to Start Scanning
- How to Fix Microsoft Common Language Runtime Native Compiler High CPU Usage?
- Press the Windows + E keys to open the File Explorer.
- Type the following path and press Enter:
C:/Program Files (x86)/NVIDIA Corporation/NVIDIA GeForce Experience - Right-click on Nvidia Share and select Properties from the options.
- Then, go to the Compatibility tab and check the Run this program as an administrator option. Then, click Apply, then select OK to save the changes.

- Next, press Ctrl + Shift + Esc keys to open Task Manager directly.
- Switch to the Processes tab. Select Nvidia processes one after the other and click End Task.

- Restart your PC.
- Now, follow steps 1 and 2 above, right-click on Nvidia Share, and select Run as administrator.

This method differs from method 1 in that this is the actual Nvidia Share file. Having followed the above steps, restart the GeForce Experience app. Hopefully, the unable-to-open share Nvidia error should be fixed by now.
And that’s it on how to fix the unable to open share Nvidia error. In case you’re receiving unable to connect to Nvidia try again later, try the fixes provided in this guide.
Some users have also complained that Nvidia GeForce Experience not starting with Windows. Further, you can explore the dedicated guide to check how we fixed the problem.
If you have any questions or suggestions, please use the comments section below.
![]()
На чтение 4 мин Просмотров 583 Опубликовано
Когда пользователи включают свой компьютер или приложение GeForce Experience, они получают сообщение об ошибке «NVIDIA share не отвечает». Вам придется подождать пару минут, прежде чем ошибка исчезнет, и вы сможете получить доступ к своему компьютеру должным образом. Эта ошибка стала известна после юбилейного обновления Windows 10.

NVIDIA Share – это утилита для записи экрана с аппаратным ускорением, присутствующая в приложении GeForce Experience. Он имеет множество функций записи, таких как настройка для записи экрана с опозданием, что обеспечивает пользователю большую гибкость. Окончательное решение этой проблемы – отключить NVIDIA Share, но перед этим мы рассмотрим несколько обходных путей, чтобы исправить ситуацию.
Содержание
- Решение 1. Переход на тему по умолчанию
- Решение 2. Отключение мгновенного воспроизведения
- Решение 3. Понижение версии приложения GeForce Experience
- Решение 4. Обновление GeForce Experience и драйверов
- Решение 5. Отключение NVIDIA Share
Решение 1. Переход на тему по умолчанию
Известный обходной путь для этой проблемы – изменить тему вашего компьютера на тему по умолчанию. Но мы бы порекомендовали вам перейти на тему Aero. Мы заметили, что после изменения темы компьютер все равно зависал , но только на пару секунд вместо долгих минут, как раньше.
- Щелкните правой кнопкой мыши в любом месте рабочего стола и выберите « Персонализировать ».

- Щелкните« Темы », используя панель навигации в левой части экрана. Теперь нажмите « Настройки темы ».

- Выберите любую из тем по умолчанию, представленных под заголовком « Темы Windows по умолчанию ».

- После применения темы перезагрузите компьютер и проверьте, возникла ли проблема. по-прежнему сохраняется.
Решение 2. Отключение мгновенного воспроизведения
Мгновенное воспроизведение – это функция в NVIDIA Share, которая является постоянная запись в определенное время (допустим, 1 минута) непрерывно. Если случится что-то крутое, вы нажмете горячую клавишу, и последняя минута будет автоматически сохранена на компьютере. Немного поэкспериментировав, мы пришли к выводу, что Instant Replay тоже приложил руку к этой ошибке. Вы можете легко отключить его, перейдя в настройки NVIDIA Share и переключив опцию Off. Обратите внимание, что запись и мгновенное воспроизведение – это две разные функции. При записи вы запускаете и останавливаете запись вручную, в то время как мгновенный повтор уже записывает ваш игровой процесс, но при этом игнорирует файлы, длина которых превышает минуту (это гарантирует, что вы получите последнюю «1 минуту») в вашем мгновенном воспроизведении.

Решение 3. Понижение версии приложения GeForce Experience
Другой способ решения этой проблемы – понизить версию GeForce Experience. Известно, что GeForce 3.0 вызывает кучу различных ошибок и проблем, подобных той, с которой мы сталкиваемся. Если вы не хотите окончательно отключать общий доступ, но также решаете проблему отсутствия ответа, вы можете понизить версию приложения GeForce.
- Нажмите Windows + R, введите « appwiz. cp l »и нажмите Enter. Удалите приложение GeForce Experience.
- Загрузите предыдущую версию и установите ее соответствующим образом.
Решение 4. Обновление GeForce Experience и драйверов
Если все вышеперечисленные решения не работают, мы можем попробовать обновление графического драйвера. Возможно, ваш графический драйвер неправильно настроен или устарел. Нам нужно полностью удалить все драйверы файлов перед установкой нового драйвера, поэтому нам нужно использовать утилиту Display Driver Uninstaller. Вы можете легко загрузить эту утилиту через Интернет. Вы можете загрузить приложение GeForce Experience с официального сайта NVIDIA.
- После установки Display Driver Uninstaller (DDU) запустите компьютер в безопасный режим . Вы можете узнать, как загрузить компьютер в безопасном режиме, прочитав нашу статью об этом.
- После загрузки компьютера в безопасном режиме запустите только что установленное приложение. Выберите вариант Безопасный режим .

- После запуска приложения выберите первый вариант « Очистить и перезапустить ». Затем приложение автоматически удалит установленные драйверы и перезагрузит компьютер соответственно.

- Загрузите компьютер в обычный режим и запустите приложение. Откройте вкладку « Драйверы » и нажмите кнопку « Загрузить драйвер ». Введите свою спецификацию в правой части экрана и нажмите « Начать поиск », чтобы приложение могло найти оптимальные драйверы для вашего компьютера.

- После обновления драйвера и приложения GeForce Experience перезагрузите компьютер и проверьте, решена ли проблема.
Если все вышеперечисленные решения не работают, мы можем навсегда отключить NVIDIA Share. Это полностью устранит проблему отсутствия ответа , но вы потеряете функциональность NVIDIA Share. Вы всегда можете снова включить эту функцию, когда захотите.
- Откройте приложение Nvidia GeForce Experience от имени администратора.
- Перейдите к ‘ Общие ‘ с помощью панели навигации в левой части экрана. Отключите « Поделиться » , щелкнув переключатель перед ним. Нажмите Применить, чтобы сохранить изменения и выйти.

- Перезагрузите компьютер и проверьте, решена ли проблема.
You can use the NVIDIA GeForce Experience app’s overlay to share your favorite gaming experiences with your friends by snapping images and recording game videos. However, some users cannot share what they’re doing due to an “unable to open share” problem. GeForce Experience customers cannot record and share gameplay moments without that feature enabled. The “unable to open share” error can be resolved following the steps below.
Also read: How To Solve GeForce Experience Won’t Open Issue
Method 1: Launch NVIDIA With Admin Privileges
The “Unable to open share” bug has frequently been fixed by running NVIDIA Share with administrator privileges in GeForce Experience. Before launching Share, those users also terminated the background NVIDIA processes. Run NVIDIA Share.exe with elevated rights and end background processes as directed to implement this potential fix:
Step 1: Press Windows + E keys on your keyboard to open the File Explorer window.
Step 2: Copy and paste the following path into the address bar:
C:/Program Files (x86)/NVIDIA Corporation/NVIDIA GeForce Experience
Step 3: Right-click on NVIDIA Share.exe and choose Properties.
Step 4: In the compatibility tab of the Properties window, check the box next to Run this program as an administrator.

Step 5: Now press Ctrl + Shift + Esc on your keyboard to launch the Task Manager.
Step 6: In the Processes tab, locate all the NVIDIA tasks running in the background and click on End Task on each process.

Step 7: Now, navigate to the NVIDIA folder again, right-click on NVIDIA Share.exe, and choose Run As Administrator.

Step 8: Finally, open GeForce Experience and check if the “Unable To Open Share” issue has been fixed.
Also Read: How To Download GeForce RTX 3090 Driver for Windows
Method 2: Uninstall & Reinstall GeForce Experience
The next step to try to fix the ”Unable to Open Share” issue is to uninstall the application and reinstall it. Here are the steps:
Step 1: Press Win + I to open Windows Settings.
Step 2: Click on Apps on the left side and then click on Installed Apps in the right section.

Step 3: Now type GeForce in the search bar on the top, and the app will be listed below.
Step 4: Click the 3 dots next to the app name and choose Uninstall.

Step 5: Follow the onscreen instructions to remove the app from your PC.
Step 6: Go to the official website and download the GeForce app.
Step 7: Double-click on the downloaded file and follow the online instructions to reinstall the app.
Method 3: Install The Media Feature Pack
To run GeForce Experience successfully, you need to install the Media Feature Pack on your PC. Here are the steps:
Step 1: Press Win + I to open Settings.
Step 2: Click on the Apps tab in the left panel.
Step 3: Now, click on Optional Features on the right side.

Step 4: Click on View Feature.

Step 5: Type Media Feature Pack and select the checkbox next to it.

Step 6: Click the Next button and follow the onscreen instructions.
Also Read: How To Fix NVIDIA GeForce Experience Error Code 0x0003
Bonus Feature: Use Advanced Screen Recorder To Record Gameplay
For Windows PC users, Advanced Screen Recorder is a screen recording app that makes it simple to capture their screen. Users can also use a microphone to narrate HD videos recorded with the default sound. Additionally, this program has a variety of functions, some of which are listed below:

Various Video Recording Techniques
Record on full screen, a specific region, or a specific window, with or without audio.
Create A Personal Watermark.
Create a watermark and add it to screenshots to give a personalized touch to your video recordings.
Webcam Capture.
To make an engaging video, quickly capture webcam footage or webcam overlay.
Live Streaming.
To reach a broader audience and share a video on Facebook and YouTube, you can live stream it from within the software.
The Final Word: How To Fix GeForce Experience’s “Unable To Open Share” Error In Windows?
When one of GeForce Experience’s best features is inadvertently disabled by the “Unable to open share” error, the experience isn’t the same. However, following the above fixes, you can probably troubleshoot the “Unable open share” error. Once the issue is fixed, you will get the overlay capability to GeForce Experience. Once again, you may record and share your favorite gaming moments.
Please let us know in the comments below if you have any questions or recommendations. We would be delighted to provide you with a resolution. We frequently publish advice, tricks, and solutions to common tech-related problems. You can also find us on Facebook, Instagram, Twitter, YouTube, and Pinterest.
Also Read:
How Do I Update My NVIDIA GeForce Graphics Card Driver?
How To Fix GeForce Experience Not Working
How To Download Nvidia GeForce RTX 3080 Driver