- #1
My BSOD’s started about 3 days ago, the first one was whilst I was gaming. After my pc started back up and I joined the game again, it kept crashing to desktop.
After a little while it started doing this in other games as well and now I just go in expecting I wont have to click quit game because a BSOD will do that for me.
At first I thought it had to do with drivers, I reinstalled some, updated others, but to no avail.
Now I suspect it might be a memory related issue, or my storage devices.
Any help to steer me in the right direction would be amazing.
thank you
Attached is the ZIP with all the files (W7F DT/CPUZ/RAMMON)
- #2
-
w7f.zip
3.2 MB · Views: 1,214
- #3
I just had another one, here’s the dmp:
This time it was outside of a game, whilst skyping with video.
The driver causing it this time was Wdf01000+bd8a
-
022615-11046-01.zip
64.8 KB · Views: 349
- #4
Have noticed one thing, Your Memory voltage needs turning up to 1.6-1.65v If you could do that and test for me it’d be appreciated. Also you’re overclocking your cpu from 3.4 to 4.2 so should put that to stock to see if the bsods go away.
Last edited:

- #5
Code:
*******************************************************************************
*                                                                             *
*                        Bugcheck Analysis                                    *
*                                                                             *
*******************************************************************************

Use !analyze -v to get detailed debugging information.

BugCheck 124, {0, ffffe001e2289028, be200000, 5110a}

Probably caused by : GenuineIntel

Followup: MachineOwner
Hi,
the first dump file blamed your gpu driver and the second one you posted is caused by a hardware error.
If your overclocking then please return to default values. Bugcheck 124 can be caused by failed hardware, overheating and not enough juice from the PSU (to name just a few).
Please check the RAM on your gpu by running this test:
http://mikelab.kiev.ua/index_en.php?page=PROGRAMS/vmt_en
- #6
Memory is def under-volted, Just checked the Corsair site and at 933 it should be set to 1.65v
- #7
Alright, I’ll try to zero in which of them it is, and if the issues persist.
Thank you guys a lot, ill get back to you as soon as I know more.
- #8
Have noticed one thing, Your Memory voltage needs turning up to 1.6-1.65v If you could do that and test for me it’d be appreciated. Also you’re overclocking your cpu from 3.4 to 4.2 so should put that to stock to see if the bsods go away.
Alright, so I set the memory voltage to 1.65v and I dailed back on the OC (it is still on 4ghz though, I’m gonna return to stock after this post.)
This time it was whilst the computer was idling, I saw it crash as I walked into my room. It’s almost like it’s self-aware and just wants to piss me off.
As to the RAM check, the site seems to be down, so any idea where I could obtain it? Google didn’t seem to know.
I hope its not my PSU giving up.
If this doesn’t work im going to connect my computer to a different socket, because the one that this one is plugged into has many other devices feeding from it.
EDIT:
I was looking for the minidump, but it’s nowhere to be found, so this time I don’t even have that…
EDIT 2:
I’m also downloading an older WHQL driver (Catalyst 14.4) to address that driver crash mentioned by kemical. I hope that changes something.
EDIT 3:
I’m back on stock clock on my CPU and RAM is running at 1.65v and my GPU is now running on CCC 14.4
So I’ve done the VMT tests, after dailing in the amount of ram I had and it kept giving me this error:
WARNING: Your card can be not compatible with this test! If multiple errors will found, try test with onscreen buffer usage or wthout of ignoring colors bit mask.
Changing video mode to 640x480x16…OK
[2-3-2015 19:19:23] Test started for «Primary Display Driver (AMD Radeon HD 7900 Series)»…
Trying 16bpp RGB:565 mode…OK
PATTERN NOT FOUND
Trying 16bpp RGB:555 mode…OK
PATTERN NOT FOUND
Trying 16bpp BGR:565 mode…NOT SUPPORTED (Code: 80004001)
Trying 32bpp RGB:888 mode…OK
PATTERN NOT FOUND
Trying 32bpp BGR:888 mode…NOT SUPPORTED (Code: 80004001)
NO PASS COMPLETED
I’ve tried different amounts of VRAM, since I thought I could’ve set more than my card has (3046mb) so I’ve tried that amount exacltly, well below and well above. All give me the same error, it is still running as I type this though. Update will follow.
Setting it on the default value however (1024), doesn’t seem to be giving this error.
I should also say that the error happens within seconds of, if not the very second, I press the start button.
Last edited:
- #9
Hmm… That doesn’t sound too good. Try running Furmark stress test and see if the card bsod’s:
http://www.ozone3d.net/benchmarks/fur/
Also what PSU are you running? Make and model please.
Lastly are you sure the last crash was bsod? Check the event logs, if it wasn’t an actual bsod then obviously no dump file.
- #10
Hmm… That doesn’t sound too good. Try running Furmark stress test and see if the card bsod’s:
http://www.ozone3d.net/benchmarks/fur/Also what PSU are you running? Make and model please.
Lastly are you sure the last crash was bsod? Check the event logs, if it wasn’t an actual bsod then obviously no dump file.
I’m using a Corsair AX850, so it’s not too shabby, and I don’t expect that thing to mess up so quickly since it almost cost as much as my CPU.
I’m positive it was a BSOD, I saw the BSOD screen with the blue blackground and the sad smiley etc.
Event Log:
Log Name: System
Source: Microsoft-Windows-Kernel-Power
Date: 2-3-2015 18:31:38
Event ID: 41
Task Category: (63)
Level: Critical
Keywords: (2)
User: SYSTEM
Computer: DGuru-PC
Description:
The system has rebooted without cleanly shutting down first. This error could be caused if the system stopped responding, crashed, or lost power unexpectedly.
Event Xml:
<Event xmlns=»http://schemas.microsoft.com/win/2004/08/events/event»>
<System>
<Provider Name=»Microsoft-Windows-Kernel-Power» Guid=»{331C3B3A-2005-44C2-AC5E-77220C37D6B4}» />
<EventID>41</EventID>
<Version>3</Version>
<Level>1</Level>
<Task>63</Task>
<Opcode>0</Opcode>
<Keywords>0x8000000000000002</Keywords>
<TimeCreated SystemTime=»2015-03-02T17:31:38.687645100Z» />
<EventRecordID>47951</EventRecordID>
<Correlation />
<Execution ProcessID=»4″ ThreadID=»8″ />
<Channel>System</Channel>
<Computer>DGuru-PC</Computer>
<Security UserID=»S-1-5-18″ />
</System>
<EventData>
<Data Name=»BugcheckCode»>0</Data>
<Data Name=»BugcheckParameter1″>0x0</Data>
<Data Name=»BugcheckParameter2″>0x0</Data>
<Data Name=»BugcheckParameter3″>0x0</Data>
<Data Name=»BugcheckParameter4″>0x0</Data>
<Data Name=»SleepInProgress»>0</Data>
<Data Name=»PowerButtonTimestamp»>0</Data>
<Data Name=»BootAppStatus»>0</Data>
</EventData>
</Event>
I’m going to start a furmark bench in a second.
VMT has finished with the 1024mb setting, it’s showing this:
WARNING: Your card can be not compatible with this test! If multiple errors will found, try test with onscreen buffer usage or wthout of ignoring colors bit mask.
[2-3-2015 19:22:50] Test started for «Primary Display Driver (AMD Radeon HD 7900 Series)»…
Trying 16bpp RGB:565 mode…OK
TEST FAIL (Code: 887601C2)
Trying 16bpp RGB:555 mode…OK
TEST FAIL (Code: 887601C2)
Trying 16bpp BGR:565 mode…NOT SUPPORTED (Code: 80004001)
Trying 32bpp RGB:888 mode…OK
TEST FAIL (Code: 887601C2)
Trying 32bpp BGR:888 mode…NOT SUPPORTED (Code: 80004001)
NO PASS COMPLETED
Running Furmark now, update will follow soon.
UPDATE:
It’s been running for about half an hour now, its at 98/99% load and is running at about 72 degrees celsius constantly. No crashes, no errors whatsoever. It is however only using about 600mb of my RAM, I’m going to go see if there’s anyway to ramp that up
UPDATE 2:
Running at burn-in with post-fx at 1080p, will do so for about another half an hour.
FINAL UPDATE:
It’s been running for about an hour now, full load, its at 75 degrees C. No crashes, completely stable.
So, I don’t know what to do next, could it still be the GPU messing up or should I start looking elsewhere?
Last edited:
- #11
Well your PSU sounds fine but I’m a little concerned by the VMT results.
It seems for some reason (perhaps the current issue with Russia) the original link for VMT is down. Please run the test again but follow my instructions below.
Please download the version found here:
http://sourceforge.net/projects/vmst/?source=typ_redirect
Extract the contents of the zip file and then right click on the start up exe and then run as admin.
When the app starts you’ll see a box appear regarding RAM size.

Your card has 2GB if I’m correct but even if it has more let the app run through at it’s default setting (1024mb).

It will also ask you if want to run in a lower resolution, make sure you click yes and let it run through..
- #12
Well your PSU sounds fine but I’m a little concerned by the VMT results.
It seems for some reason (perhaps the current issue with Russia) the original link for VMT is down. Please run the test again but follow my instructions below.
Please download the version found here:
http://sourceforge.net/projects/vmst/?source=typ_redirectExtract the contents of the zip file and then right click on the start up exe and then run as admin.
When the app starts you’ll see a box appear regarding RAM size.
View attachment 29357Your card has 2GB if I’m correct but even if it has more let the app run through at it’s default setting (1024mb).
View attachment 29358
It will also ask you if want to run in a lower resolution, make sure you click yes and let it run through..
So, I did it like you said, and here are the results:
WARNING: Your card can be not compatible with this test! If multiple errors will found, try test with onscreen buffer usage or wthout of ignoring colors bit mask.
Changing video mode to 640x480x16…OK
[2-3-2015 23:19:26] Test started for «Primary Display Driver (AMD Radeon HD 7900 Series)»…
Trying 16bpp RGB:565 mode…OK
Trying 16bpp RGB:555 mode…OK
Trying 16bpp BGR:565 mode…NOT SUPPORTED (Code: 80004001)
Trying 32bpp RGB:888 mode…OK
Trying 32bpp BGR:888 mode…NOT SUPPORTED (Code: 80004001)
[3-3-2015 00:03:30] Pass completed (0 errors found).
It seems like something is very vrong, no idea what though. Is the VRAM busted or what does this mean?
I’ve also run Prime95 on Blend Test for about 2 hours to check the RAM, no errors.
- #13
My R9 280x gets those not supported (code 80004001) errors too so I wouldn’t worry about those too much. But the card as seen in your post passes with no errors.
- #14
So, I did it like you said, and here are the results:
WARNING: Your card can be not compatible with this test! If multiple errors will found, try test with onscreen buffer usage or wthout of ignoring colors bit mask.
Changing video mode to 640x480x16…OK
[2-3-2015 23:19:26] Test started for «Primary Display Driver (AMD Radeon HD 7900 Series)»…
Trying 16bpp RGB:565 mode…OK
Trying 16bpp RGB:555 mode…OK
Trying 16bpp BGR:565 mode…NOT SUPPORTED (Code: 80004001)
Trying 32bpp RGB:888 mode…OK
Trying 32bpp BGR:888 mode…NOT SUPPORTED (Code: 80004001)
[3-3-2015 00:03:30] Pass completed (0 errors found).It seems like something is very vrong, no idea what though. Is the VRAM busted or what does this mean?
I’ve also run Prime95 on Blend Test for about 2 hours to check the RAM, no errors.
Ok that looks better. This is why I wanted you to run it again and to sum up I’d say your gpu is ok.
Try this, find command prompt right click on it and run as admin. Type:
sfc /scannow
Press enter and await results.
It may be the case that the blue screening has corrupted the os but if something is still amiss hopefully the next bsod will show it. Tell me, you haven’t turned off or lowered your Pagefile below 200mb have you? If so this could be the reason why you didn’t find a dump file as they won’t be created if the above conditions aren’t met.
- #15
Ok that looks better. This is why I wanted you to run it again and to sum up I’d say your gpu is ok.
Try this, find command prompt right click on it and run as admin. Type:
sfc /scannow
Press enter and await results.It may be the case that the blue screening has corrupted the os but if something is still amiss hopefully the next bsod will show it. Tell me, you haven’t turned off or lowered your Pagefile below 200mb have you? If so this could be the reason why you didn’t find a dump file as they won’t be created if the above conditions aren’t met.
I ran the scan, it didn’t find any «integrity violations».
As to the pagefile, I have 1024mb allocated to it

I guess Ill be waiting to see if another one happens. Thanks for the help, without you I wouldn’t have know what to do. (I would have probably reinstalled Windows, which is a pain in the neck.)
EDIT:
HDD fragmentation can’t cause these issues can it? I just found out one drive had 25% and another 20% fragmentation, neither of which is my OS drive, but do have programmes and games I run. My OS drive is an SSD btw.
Last edited:
- #16
HDD fragmentation can’t cause these issues can it? I just found out one drive had 25% and another 20% fragmentation, neither of which is my OS drive, but do have programmes and games I run. My OS drive is an SSD btw.
I doubt it and besides normally such errors will produce something like a Bugcheck 24 NTFS error. You mention about using an SSD? Is this drive fully updated firmware wise and do you have Windows set to AHCI or IDE? When using SSD’s to obtain the best performance your best setting the controllers to AHCI. This page will help:
http://www.neowin.net/forum/topic/9…o-ahci-without-repairingreinstalling-windows/
- #17
I doubt it and besides normally such errors will produce something like a Bugcheck 24 NTFS error. You mention about using an SSD? Is this drive fully updated firmware wise and do you have Windows set to AHCI or IDE? When using SSD’s to obtain the best performance your best setting the controllers to AHCI. This page will help:
http://www.neowin.net/forum/topic/9…o-ahci-without-repairingreinstalling-windows/
Yes, I updated it recently (a few months ago). It’s also been on AHCI mode since I built my pc.
- #18
Sounds good.. Ok well, if you should bsod please post and I’ll check it over asap..
- #19
Will do.
Thank you, you’ve helped me out a lot.
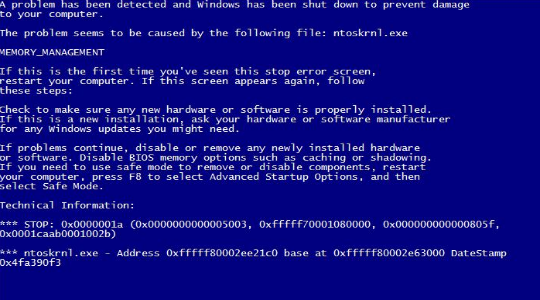
Во время работы или при включении компьютера внезапно может появиться так называемый «синий экран смерти». Если вчитаться в текст, написанный поверх, то там будет указана причина сбоя – некорректная работа файла Ntoskrnl.exe. Этот элемент очень важен для функционирования ОС, и когда с ним что-то происходит, пользоваться ПК становится невозможно.

Что такое Ntoskrnl.exe
Когда вы включаете компьютер, запускается целый ряд служб, в том числе, Ntoskrnl.exe, который подготавливает к работе драйверы и визуализирует изображение на экране. При этом может произойти ошибка, что влечет за собой остановку процесса. Данная служба обычно располагается на диске «С» вместе с другими компонентами системы и занимает несколько папок: System32, Driver Cache и т. п.

Причины неисправности
Ошибка ntoskrnl.ехе может возникать по целому ряду причин:
- Некорректный оверклокинг и андервольтинг, приведший к перегреву.
- Физическое удаление файла (вообще-то это достаточно трудно сделать, но возможно, если использовать ПО, влияющее на системные элементы).
- Повреждение/замена файла вирусом.
- Повреждение записей в реестре.
- Наличие проблемных или старых драйверов.
- Внутренний системный сбой.
- Сбой в работе винчестера.
- ОС не обновлена до актуальной версии.
- Повреждение или сбой в работе ОЗУ.
Возможные решения
Ошибка ntoskrnl.exe – это серьёзно, но не всегда фатально, и сейчас мы расскажем, как её исправить.
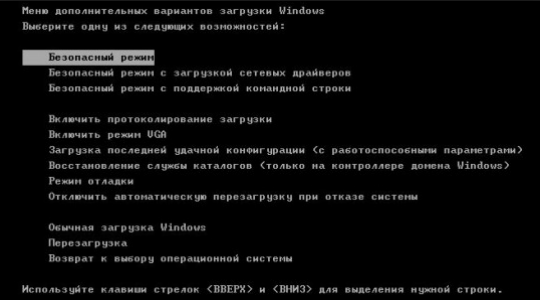
- Для начала нужно добраться до «Десктопа» и получить доступ к функциям ПК, так как, синий экран закрывает собой все пространство.
- Для этого выполните перезагрузку, и нажимайте клавишу F2 или Del (иногда бывают и другие варианты, это зависит от внутренней структуры системы ввода-вывода).
- Перед вами развернутся опции БСВВ.
- Выберите пункт Load setup defaults («Загрузить настройки по умолчанию»).

- Кликните по F10, чтобы подтвердить выбор.
- Снова перезапустите ПК – синий экран исчезнет, и можно будет переходить к исправлению ошибки.

Очистка реестра
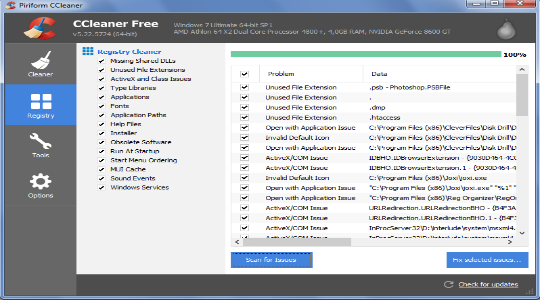
Пока не вернулась ошибка ntoskrnl.exe с синим экраном (кстати, чаще всего она возникает на windows 7), нужно начать действовать. Первым делом попробуйте почистить реестр от неправильно выполненных и устаревших записей. Удобнее и безопаснее всего делать это с помощью специальных утилит, например, небезызвестной CCleaner.
- Скачайте программу и установите её.
- Откройте окно и слева в списке найдите главу «Очистка реестра».
- Нажмите «Анализ» и дождитесь обнаружения всех проблемных записей.

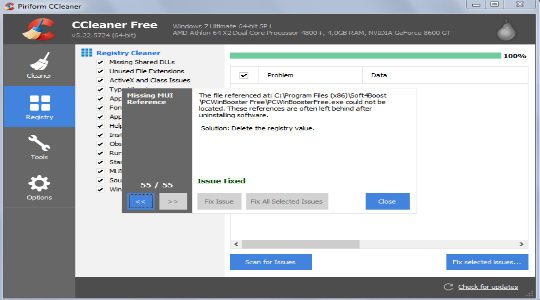
- Вверху укажите «Выделить все» и «Исправить выделенное».

- Программа предложит сделать копию реестра – соглашайтесь, только сохраняйте ее не в «Документы» на диске «С», как указано по умолчанию, а в отдельную папку на диске «D».

- После очистки запустите «Анализ» ещё раз – и так до тех пор, пока список повреждённых элементов не останется пустым.


Исправление диска
Далее нужно проверить системный диск и исправить кое-какие ошибки, если они будут обнаружены. Для этого:
- Найдите значок «Компьютер» и разверните содержимое.

- Дважды щелкните ПКМ по диску «С» (у вас он может называться как-нибудь еще – главное, помните, что нам нужен раздел, где хранится ОС);

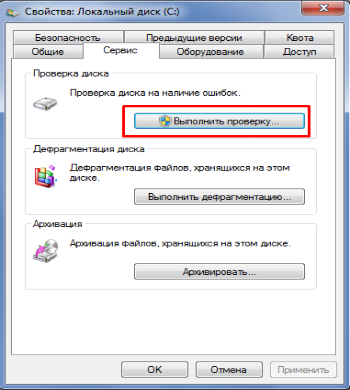
- Выберите последний пункт «Свойства», а затем подпункт «Сервис» и запустите проверку.

- Компьютер может несколько раз перезагрузиться в процессе – это нормально, не волнуйтесь.


Для этих же целей проверяем внутренние системные файлы и исправляем неполадки следующим образом:
- Нажмите Win+R и дождитесь появления небольшого окошка со строкой ввода.
- Впишите в нее «cmd».

- Теперь появится окно с черным полем, куда нужно ввести: «sfc/scannow» и нажать «Интер».

- Также можно задать команду «chkdsk».


Подождите, пока не появится сообщение об успешном выполнении операции, а потом перезагрузите ПК.
Проверка на вирусы
Нередко причиной остановки запуска Windows бывают вирусы, которые удаляют файл Ntoskrnl.exe из корневой папки Winnt_root\System32. Не сбрасывайте со счетов такую возможность и обязательно проверьте систему:
- Установите какой-нибудь хороший антивирус: Касперского, «Доктор веб», «Эсет» и т. п.
- Запустите полную проверку всех дисков.

- Дождитесь окончания процедуры (это может занять много времени, можно оставить на ночь).
- Удалите все вредоносные файлы или переместите в карантин – лучше поступить так, как рекомендует антивирус.

- Проверьте файловую систему на ошибки и восстановите все поврежденное, как это было описано выше.


Если вирус занесен какой-то программой, ее необходимо деинсталлировать. Скорее всего, добровольно удаляться она не захочет – тогда вам поможет деинсталлятор (например, Uninstall Tool) и опция «принудительное удаление».
Обновление ОС и драйверов
Иногда проблемы с ntoskrnl.exe и синий экран возникают из-за того, что система давно не обновлялась: в Windows 10 сложно отключить автоматическую установку пакетов, но в седьмой версии такое часто происходит – просто зайдите в Update Center и запустите обновления, а для драйверов оборудования скачайте их отдельно (только обращайте внимание на разрядность: x64 или х86 для 64-bit систем). Удалите все драйвера старого, не используемого оборудования: принтеров, графических планшетов, сканеров, МФУ и т.п. («Панель управления» — «Диспетчер устройств» — клик правой кнопкой по устаревшему устройству – команда «Удалить»).

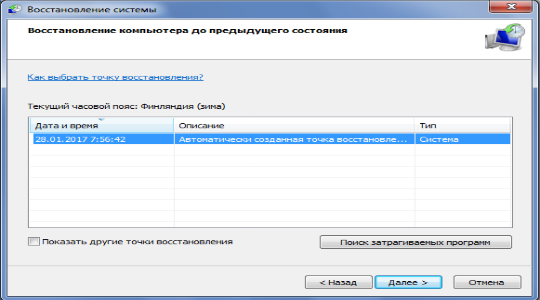
Восстановление системы
И, наконец, если все предыдущие шаги не увенчались успехом, можно восстановить систему до того состояния, когда все нормально работало. Чтобы сделать это, нужно:
- На Windows 7 последовательно открываем: «Пуск» – «Все программы» – «Стандартные» – «Служебные» – «Восстановление системы», на Windows 10 в «Поиск» наберите «Создание точки восстановления» и откройте соответствующий значок.

- Нажмите «Далее» в появившемся окне и выбираем «Показать точки восстановления».
- Выберите дату, когда компьютер стабильно работал.

- Нажмите «Готово».


Дождитесь окончания процесса – ни в коем случае не выключайте компьютер из сети и позаботьтесь о том, чтоб у ноутбука не села батарея.
BSOD on windows 8.1 caused by ntoskrnl.exe (Internal_Power_Error)
-
Thread starterKazenoS
-
Start date
You should upgrade or use an alternative browser.
-
#1
I am using a 256 GB SSD for windows and frequently played games and a 1 TB HDD for the rest.
Below are one of the dump files
Dump File 032515-11093-01.dmp
Crash Time 25-03-2015 18:03:37
Bug Check String INTERNAL_POWER_ERROR
Bug Check Code 0x000000a0
Parameter 1 00000000`0000010a
Parameter 2 00000000`0000000a
Parameter 3 ffffe001`c7023760
Parameter 4 ffffffff`c0000001
Caused By Driver ntoskrnl.exe
Caused By Address ntoskrnl.exe+1509a0
File Description
Product Name
Company
File Version
Processor x64
Crash Address ntoskrnl.exe+1509a0
Stack Address 1
Stack Address 2
Stack Address 3
Computer Name
Full Path C:\Windows\Minidump\032515-11093-01.dmp
Processors Count 4
Major Version 15
Minor Version 9600
Dump File Size 96.04.00
Dump File Time 25-03-2015 18:14:23
Here is a zip link to the dump files:
https://onedrive.live.com/redir?resid=13658DB7F59932E5!592&authkey=!AGqrPSs26_p8mrE&ithint=file%2czip
Here is the CHKDSK for the HDD and SSD
Checking file system on E:
The type of the file system is NTFS.
Volume label is HDD.
Stage 1: Examining basic file system structure …
6912 file records processed. File verification completed.
79 large file records processed.
0 bad file records processed.
Stage 2: Examining file name linkage …
9240 index entries processed. Index verification completed.
0 unindexed files scanned.
0 unindexed files recovered.
Stage 3: Examining security descriptors …
Cleaning up 15 unused index entries from index $SII of file 0x9.
Cleaning up 15 unused index entries from index $SDH of file 0x9.
Cleaning up 15 unused security descriptors.
Security descriptor verification completed.
1165 data files processed. CHKDSK is verifying Usn Journal…
8271136 USN bytes processed. Usn Journal verification completed.
Stage 4: Looking for bad clusters in user file data …
6896 files processed. File data verification completed.
Stage 5: Looking for bad, free clusters …
235446126 free clusters processed. Free space verification is complete.
Windows has scanned the file system and found no problems.
No further action is required.
976759807 KB total disk space.
34862488 KB in 5249 files.
1752 KB in 1166 indexes.
0 KB in bad sectors.
111059 KB in use by the system.
65536 KB occupied by the log file.
941784508 KB available on disk.
4096 bytes in each allocation unit.
244189951 total allocation units on disk.
235446127 allocation units available on disk.
Here is the CHKDSK for the SSD
Checking file system on C:
The type of the file system is NTFS.
A disk check has been scheduled.
Windows will now check the disk.
Stage 1: Examining basic file system structure …
253184 file records processed. File verification completed.
7409 large file records processed. 0 bad file records processed.
Stage 2: Examining file name linkage …
366446 index entries processed. Index verification completed.
0 unindexed files scanned. 0 unindexed files recovered.
Stage 3: Examining security descriptors …
Cleaning up 117 unused index entries from index $SII of file 0x9.
Cleaning up 117 unused index entries from index $SDH of file 0x9.
Cleaning up 117 unused security descriptors.
Security descriptor verification completed.
56632 data files processed. CHKDSK is verifying Usn Journal…
40442216 USN bytes processed. Usn Journal verification completed.
Stage 4: Looking for bad clusters in user file data …
253168 files processed. File data verification completed.
Stage 5: Looking for bad, free clusters …
31064630 free clusters processed. Free space verification is complete.
Windows has scanned the file system and found no problems.
No further action is required.
243837951 KB total disk space.
119069896 KB in 160919 files.
139224 KB in 56633 indexes.
0 KB in bad sectors.
370307 KB in use by the system.
65536 KB occupied by the log file.
124258524 KB available on disk.
4096 bytes in each allocation unit.
60959487 total allocation units on disk.
31064631 allocation units available on disk.
Internal Info:
00 dd 03 00 63 51 03 00 f6 9e 06 00 00 00 00 00 ….cQ……….
aa 9c 00 00 79 00 00 00 00 00 00 00 00 00 00 00 ….y………..
Windows has finished checking your disk.
Please wait while your computer restarts.
-
- Nov 4, 2012
-
- 10,073
-
- 183
-
- 67,090
-
#2
most likely related to this driver:
wdcsam64.sys Wed Apr 16 01:39:08 2008
Western Digital SCSI Arcitecture Model (SAM) WDM driver
maybe look here for a update if you really want this driver:
http://www.carrona.org/drivers/driver.php?id=wdcsam64.sys
———-
Bug Check 0xA0: INTERNAL_POWER_ERROR
Parameter 1 00000000`0000010a = POP_HIBER_CONTEXT
which means The disk subsystem failed to properly read or write part of the hibernation file.
-I was unable to read your BIOS info in your memory dump.
your machine has two copies of the same overclocking driver (2 versions) running at the same time.
AODDriver2.sys Wed Sep 11 20:36:40 2013
AODDriver2.sys Tue Feb 11 03:06:52 2014
I would remove both. I would also update the BIOS and reconfigure it.
(I am not sure why I could not read its settings info in the debugger)
I would remove this driver:
wdcsam64.sys Wed Apr 16 01:39:08 2008
-
#3
I haven’t updated by BIOS because I was unsure if it would be smart to update it while running the chance of crashing.
Here is the dumps for recent crashes
https://onedrive.live.com/redir?resid=13658DB7F59932E5!593&authkey=!AK4ZKyON4VNDHdQ&ithint=file%2czip
-
- Nov 4, 2012
-
- 10,073
-
- 183
-
- 67,090
-
#4
The internal date of the crash was Fri Mar 20 16:56:12.353 2015
am I looking at the correct file? Maybe delete the old files and make sure only the new one is on your server share.
you could also run cmd.exe as an admin then run
powercfg.exe /energy
this will make a report you can then copy to your directory and open and look at to see what it says about your power management system.
you can also change your memory dump type from a mindump to a kernel memory dump and the power managent info will not be stripped out of the memory dump and I can look at it with the windows debugger.
—————
I would think this is a bug in the BIOS power management. Your fix normally would be to update the BIOS or load a device driver from your motherboard vendor to work around the problem. You could also go to BIOS and turn off some power management options, then go to windows control panel and turn off sleep functions for the failing device. Or turn off all sleep functions (set your system to high performance) and do a full shutdown rather than sleep when you are done using the system.
Note: was unable to read your BIOS info, I guess you might also update your SATA controller software in case the problem is with the disk controller. Also, depending on what disk is not working correctly, it is common to find issues on certain drives that can be resolved by turning off lazy writes for the disk in question. Hard to say without knowing info on the actual drive.
—————
first bugcheck:
INTERNAL_POWER_ERROR (a0)
The power policy manager experienced a fatal error.
Arguments:
Arg1: 000000000000010a, The disk subsystem failed to properly read or write part of the hibernation
file.
Arg2: 000000000000000a
Arg3: ffffe00035950010, POP_HIBER_CONTEXT
Arg4: ffffffffc0000001, NTSTATUS failure code
0: kd> !error 0xc0000001
Error code: (NTSTATUS) 0xc0000001 (3221225473) — {Operation Failed} The requested operation was unsuccessful.
here is the call stack: you can google this string hal!HaliAcpiSleep and get more info on what is failing.
but something is wrong with the sleep states supported by your machine. Very common for devices that were used on windows 7. and were migrated to windows 8.x. Windows 7 had the low power states turned off by defaults, while windows 8.x turns them on by default. (you can update the BIOS or turn the support off for individual devices or the entire OS)
here is some info: http://arstechnica.com/civis/viewtopic.php?f=8&t=354552
0: kd> kc
Call Site
nt!KeBugCheckEx
nt! ?? ::OKHAJAOM::`string’
nt!PopWriteHiberImage
nt! ?? ::OKHAJAOM::`string’
nt!PopSaveHiberContextWrapper
hal!HaliAcpiSleep
nt!PopHandleNextState
nt!PopIssueNextState
nt!PopInvokeSystemStateHandler
nt!PopEndMirroring
nt!MmDuplicateMemory
nt!PopTransitionToSleep
nt!PspSystemThreadStartup
nt!KiStartSystemThread
-
#5
https://onedrive.live.com/redir?resid=13658DB7F59932E5!592&authkey=!AGqrPSs26_p8mrE&ithint=file%2czip
I have after these crashes «reinstalled» my BIOS, I was on the current one, and have had a crash but a dump file wasn’t made. I will edit in a dump file with updated BIOS when I get one.
I have also used the powercfg.exe /energy command and there seems to be some problems like «USB Suspend:USB Device not Entering Selective Suspend». But I am not sure how to properly analyse it so I am including it here:
Not sure how sharing html works so here is both a .zip and a copypasted version
https://onedrive.live.com/redir?resid=13658DB7F59932E5!597&authkey=!AEsvezIWYSUJtqw&ithint=file%2czip
Computer Name NIELSPC
Scan Time 2015-04-05T15:24:42Z
Scan Duration 60 seconds
System Manufacturer Gigabyte Technology Co., Ltd.
System Product Name GA-970A-D3
BIOS Date 09/03/2013
BIOS Version F12
OS Build 9600
Platform Role PlatformRoleDesktop
Plugged In true
Process Count 70
Thread Count 1165
Report GUID {92a34fed-ac68-48f5-b607-d9fa987943b5}
Analysis Results
Errors
Power Policyower Plan Personality is High Performance (Plugged In)
The current power plan personality is High Performance when the system is plugged in.
Power Policy:Sleep timeout is disabled (Plugged In)
The computer is not configured to automatically sleep after a period of inactivity.
Power Policy:Minimum processor performance state is 100% (Plugged In)
The processor is not configured to automatically reduce power consumption based on activity.
Power PolicyCI Express ASPM is disabled (Plugged In)
The current power policy for PCI Express Active State Power Management (ASPM) is configured to Off.
USB Suspend:USB Device not Entering Selective Suspend
This device did not enter the USB Selective Suspend state. Processor power management may be prevented when this USB device is not in the Selective Suspend state. Note that this issue will not prevent the system from sleeping.
Device Name USB Mass Storage Device
Host Controller ID PCI\VEN_1B6F&DEV_7023
Host Controller Location PCI bus 2, device 0, function 0
Device ID USB\VID_058F&PID_6387
Port Path 2
USB Suspend:USB Device not Entering Selective Suspend
This device did not enter the USB Selective Suspend state. Processor power management may be prevented when this USB device is not in the Selective Suspend state. Note that this issue will not prevent the system from sleeping.
Device Name USB Composite Device
Host Controller ID PCI\VEN_1002&DEV_4397
Host Controller Location PCI bus 0, device 22, function 0
Device ID USB\VID_04B4&PID_0101
Port Path 3
USB Suspend:USB Device not Entering Selective Suspend
This device did not enter the USB Selective Suspend state. Processor power management may be prevented when this USB device is not in the Selective Suspend state. Note that this issue will not prevent the system from sleeping.
Device Name Microsoft Hardware USB Mouse
Host Controller ID PCI\VEN_1002&DEV_4397
Host Controller Location PCI bus 0, device 19, function 0
Device ID USB\VID_045E&PID_0724
Port Path 1
USB Suspend:USB Device not Entering Selective Suspend
This device did not enter the USB Selective Suspend state. Processor power management may be prevented when this USB device is not in the Selective Suspend state. Note that this issue will not prevent the system from sleeping.
Device Name USB Root Hub
Host Controller ID PCI\VEN_1002&DEV_4397
Host Controller Location PCI bus 0, device 22, function 0
Device ID USB\VID_1002&PID_4397
Port Path
USB Suspend:USB Device not Entering Selective Suspend
This device did not enter the USB Selective Suspend state. Processor power management may be prevented when this USB device is not in the Selective Suspend state. Note that this issue will not prevent the system from sleeping.
Device Name USB Root Hub
Host Controller ID PCI\VEN_1002&DEV_4397
Host Controller Location PCI bus 0, device 19, function 0
Device ID USB\VID_1002&PID_4397
Port Path
Warnings
Platform Timer Resolutionlatform Timer Resolution
The default platform timer resolution is 15.6ms (15625000ns) and should be used whenever the system is idle. If the timer resolution is increased, processor power management technologies may not be effective. The timer resolution may be increased due to multimedia playback or graphical animations.
Current Timer Resolution (100ns units) 10000
Maximum Timer Period (100ns units) 156250
Platform Timer Resolution:Outstanding Timer Request
A program or service has requested a timer resolution smaller than the platform maximum timer resolution.
Requested Period 10000
Requesting Process ID 5192
Requesting Process Path \Device\HarddiskVolume2\Program Files (x86)\AVG Web TuneUp\avgcefrend.exe
Power Policyisplay timeout is long (Plugged In)
The display is configured to turn off after longer than 10 minutes.
Timeout (seconds) 7200
Power Policyim timeout is long (Plugged In)
The display is configured to automatically dim after longer than 10 minutes.
Timeout (seconds) 885
CPU Utilizationrocessor utilization is moderate
The average processor utilization during the trace was moderate. The system will consume less power when the average processor utilization is very low. Review processor utilization for individual processes to determine which applications and services contribute the most to total processor utilization.
Average Utilization (%) 2.38
CPU Utilization:Individual process with significant processor utilization.
This process is responsible for a significant portion of the total processor utilization recorded during the trace.
Process Name CCC.exe
PID 4852
Average Utilization (%) 0.79
Module Average Module Utilization (%)
\Device\HarddiskVolume2\Windows\Microsoft.NET\Framework64\v4.0.30319\clr.dll 0.21
\Device\HarddiskVolume2\Windows\Microsoft.NET\Framework64\v4.0.30319\clrjit.dll 0.11
\SystemRoot\system32\ntoskrnl.exe 0.10
CPU Utilization:Individual process with significant processor utilization.
This process is responsible for a significant portion of the total processor utilization recorded during the trace.
Process Name svchost.exe
PID 1148
Average Utilization (%) 0.62
Module Average Module Utilization (%)
\SystemRoot\system32\ntoskrnl.exe 0.52
\Device\HarddiskVolume2\Windows\System32\sysmain.dll 0.04
\SystemRoot\System32\Drivers\Ntfs.sys 0.02
CPU Utilization:Individual process with significant processor utilization.
This process is responsible for a significant portion of the total processor utilization recorded during the trace.
Process Name vprot.exe
PID 4204
Average Utilization (%) 0.28
Module Average Module Utilization (%)
\Device\HarddiskVolume2\Program Files (x86)\AVG Web TuneUp\vprot.exe 0.14
\SystemRoot\system32\ntoskrnl.exe 0.05
\Device\HarddiskVolume2\Windows\SysWOW64\ntdll.dll 0.02
Information
Platform Timer Resolution:Timer Request Stack
The stack of modules responsible for the lowest platform timer setting in this process.
Requested Period 10000
Requesting Process ID 5192
Requesting Process Path \Device\HarddiskVolume2\Program Files (x86)\AVG Web TuneUp\avgcefrend.exe
Calling Module Stack \Device\HarddiskVolume2\Windows\SysWOW64\ntdll.dll
\Device\HarddiskVolume2\Windows\SysWOW64\kernel32.dll
\Device\HarddiskVolume2\Program Files (x86)\AVG Web TuneUp\libcef.dll
\Device\HarddiskVolume2\Windows\SysWOW64\kernel32.dll
Power Policy:Active Power Plan
The current power plan in use
Plan Name Custom
Plan GUID {7f94e5a5-a79a-469e-80e5-bf746d7d87ff}
Power Policyower Plan Personality (Plugged In)
The personality of the current power plan when the system is plugged in.
Personality High Performance
Power Policy:802.11 Radio Power Policy is Maximum Performance (Plugged In)
The current power policy for 802.11-compatible wireless network adapters is not configured to use low-power modes.
Power Policy:Video quality (Plugged In)
Enables Windows Media Player to optimize for quality or power savings when playing video.
Quality Mode Optimize for Video Quality
System Availability Requests:Analysis Success
Analysis was successful. No energy efficiency problems were found. No information was returned.
Battery:Analysis Success
Analysis was successful. No energy efficiency problems were found. No information was returned.
Platform Power Management Capabilities:Supported Sleep States
Sleep states allow the computer to enter low-power modes after a period of inactivity. The S3 sleep state is the default sleep state for Windows platforms. The S3 sleep state consumes only enough power to preserve memory contents and allow the computer to resume working quickly. Very few platforms support the S1 or S2 Sleep states.
S1 Sleep Supported false
S2 Sleep Supported false
S3 Sleep Supported true
S4 Sleep Supported true
Platform Power Management Capabilities:Connected Standby Support
Connected standby allows the computer to enter a low-power mode in which it is always on and connected. If supported, connected standby is used instead of system sleep states.
Connected Standby Supported false
Platform Power Management Capabilitiesrocessor Power Management Capabilities
Effective processor power management enables the computer to automatically balance performance and energy consumption.
Group 0
Index 0
Idle State Count 1
Idle State Type ACPI Idle (C) States
Nominal Frequency (MHz) 3600
Maximum Performance Percentage 100
Lowest Performance Percentage 22
Lowest Throttle Percentage 22
Performance Controls Type ACPI Performance (P) / Throttle (T) States
Platform Power Management Capabilitiesrocessor Power Management Capabilities
Effective processor power management enables the computer to automatically balance performance and energy consumption.
Group 0
Index 1
Idle State Count 1
Idle State Type ACPI Idle (C) States
Nominal Frequency (MHz) 3600
Maximum Performance Percentage 100
Lowest Performance Percentage 22
Lowest Throttle Percentage 22
Performance Controls Type ACPI Performance (P) / Throttle (T) States
Platform Power Management Capabilitiesrocessor Power Management Capabilities
Effective processor power management enables the computer to automatically balance performance and energy consumption.
Group 0
Index 2
Idle State Count 1
Idle State Type ACPI Idle (C) States
Nominal Frequency (MHz) 3600
Maximum Performance Percentage 100
Lowest Performance Percentage 22
Lowest Throttle Percentage 22
Performance Controls Type ACPI Performance (P) / Throttle (T) States
Platform Power Management Capabilitiesrocessor Power Management Capabilities
Effective processor power management enables the computer to automatically balance performance and energy consumption.
Group 0
Index 3
Idle State Count 1
Idle State Type ACPI Idle (C) States
Nominal Frequency (MHz) 3600
Maximum Performance Percentage 100
Lowest Performance Percentage 22
Lowest Throttle Percentage 22
Performance Controls Type ACPI Performance (P) / Throttle (T) States
Device Drivers:Analysis Success
Analysis was successful. No energy efficiency problems were found. No information was returned.
And thanks so far for your help!
-
- Nov 4, 2012
-
- 10,073
-
- 183
-
- 67,090
-
#6
it can be that your hard drive has a problem, it spins down but maybe is not waking up to complete the write from memory to the disk. Normally this can be a bug in the BIOS, the hard drive or the hard drive controller. Your driver for your hard drive controller was old (2009) a updated verison my fix the problem.
I think you could also use windows control panel, device manger, find the disk drive power management and tell it not to go to sleep. I think the default it to spin down after 15 mins or so.
very common for USB devices to have sleep problems on older machines, often these are «fixed» in BIOS
sometimes in driver updated. (most often the drivers just disable the functions) I say it is common mostly because hardware made during the windows 7 time frame had the functions disabled in the windows 7 by default so people did not see the problems until they went to windows 8.x which have them enabled by default. if you can, get a BIOS update or a driver update it is a best chance to get it working correctly otherwise you have to disable the power management features for the device (hard drive)
————
BugCheck A0, {10a, a, ffffe0013655a380, ffffffffc0000001}
INTERNAL_POWER_ERROR (a0)
The power policy manager experienced a fatal error.
Arguments:
Arg1: 000000000000010a, The disk subsystem failed to properly read or write part of the hibernation
file.
Arg2: 000000000000000a
Arg3: ffffe0013655a380, POP_HIBER_CONTEXT
Arg4: ffffffffc0000001, NTSTATUS failure code
0: kd> !error 0xc0000001
Error code: (NTSTATUS) 0xc0000001 (3221225473) — {Operation Failed} The requested operation was unsuccessful.
0: kd> kc
Call Site
nt!KeBugCheckEx
nt! ?? ::OKHAJAOM::`string’
nt!PopWriteHiberImage
nt!PopSaveHiberContext
nt!PopSaveHiberContextWrapper
hal!HaliAcpiSleep
nt!PopHandleNextState
nt!PopIssueNextState
nt!PopInvokeSystemStateHandler
nt!PopEndMirroring
nt!MmDuplicateMemory
nt!PopTransitionToSleep
nt!PspSystemThreadStartup
nt!KiStartSystemThread
-
#7
I am using the newest stable BIOS according to the website but that and the newer one was released in 2013.
-
- Nov 4, 2012
-
- 10,073
-
- 183
-
- 67,090
-
#8
you can also run crystaldiskinfo.exe and see if your drive is reporting any errors. I would also read the firmware version from the SSD and see if there are known problems with it. ie, check for a firmware update for your SSD. This would not apply if your pagefile.sys is not on your SSD.
[quotemsg=15618921,0,1945063]I have gone into the power options in the control panel and changed turn hard disk off after 20 min to never and will wait and see if it fixes it.
I am using the newest stable BIOS according to the website but that and the newer one was released in 2013.[/quotemsg]
-
#9
Also I haven’t been getting crash dumps since I switched it to Kernel memory dump so should I switch it back to automatic memory dump?
The firmware for the SSD should be up to date. Using a Samsung 840 evo with the firmware version ext0cb6q. And I used Samsung SSD 840 EVO Performance Restoration which should also update the firmware and the version didn’t change
-
- Nov 4, 2012
-
- 10,073
-
- 183
-
- 67,090
-
#10
Main point was to get rid of it and create another. (most likely not the problem anyway)
— you have to enable kernel memory dump to keep the debugging info from being stripped out of the memory dump.
I would leave it as a kernel dump for a while and see if you bugcheck.
[quotemsg=15625187,0,1945063]I am having problems renaming the pagefile.sys. The way I am disabling virtual memory i via Performance Options into Virtual Memory and checking «No paging file» but predictable enough this removes the pagefile.sys so I cannot rename it. Is this the way to do it?
Also I haven’t been getting crash dumps since I switched it to Kernel memory dump so should I switch it back to automatic memory dump?
The firmware for the SSD should be up to date. Using a Samsung 840 evo with the firmware version ext0cb6q. And I used Samsung SSD 840 EVO Performance Restoration which should also update the firmware and the version didn’t change[/quotemsg]
-
#11
Here is the error screen:
https://onedrive.live.com/redir?resid=13658DB7F59932E5!599&authkey=!AG4aVbTMdZPapWw&ithint=file%2czip
Here are the dump files it makes
https://onedrive.live.com/redir?resid=13658DB7F59932E5!598&authkey=!ADETuAIwDhgFsIQ&ithint=file%2czip
-
- Nov 4, 2012
-
- 10,073
-
- 183
-
- 67,090
-
#12
returned error code: (NTSTATUS) 0xc0000001 (3221225473) — {Operation Failed} The requested operation was unsuccessful.
I think you just have a BIOS bug.
Also, I can not read your BIOS info out of your memory dump.
you might also want to remove some of your suspect drivers:
like WinDivert.sys (hacking software) often used for game cheats, hacks network packets.
also, the memory dump still shows overclocking software installed.
AODDriver2.sys Tue Feb 11 03:06:52 2014
-
#13
I have tried increasing the paging file size to 20000 MB, using system managed size and automatically manage paging file size. I have set the dump file to kernel memory dump and checked «Write an event to the system log» and the dump file location is %SystemRoot%\MEMORY.DMP. So I was wondering if you had any ideas to actually make it write a kernel memory dump
Another thing is that I don’t BSOD anymore, now it just freezes forever ( have tried waiting 3 hours, nothing changed).
-
- Nov 4, 2012
-
- 10,073
-
- 183
-
- 67,090
-
#14
http://blogs.technet.com/b/askpfeplat/archive/2015/04/06/how-to-force-a-diagnostic-memory-dump-when-a-computer-hangs.aspx
that way you don’t actually have to wait for a bugcheck, you can just wait until your system hangs then force a memory dump and have some one look at it.
Note: you can do it on a system that is running without problems to test to make sure the registry keys are set correctly.
and that you get a proper dump file.
if your system is hanging you will want to make sure you run cmd.exe as an admin and run
verifier.exe /standard /all
then reboot. It will place extra debug info in the memory dump and will check for common driver bugs.
note use
verifier.exe /reset
to turn off verifier functions when you are done testing or your system will run slowly.
[quotemsg=16028847,0,1945063]Hello, I am still trying to get a kernel memory dump but it never happens
I have tried increasing the paging file size to 20000 MB, using system managed size and automatically manage paging file size. I have set the dump file to kernel memory dump and checked «Write an event to the system log» and the dump file location is %SystemRoot%\MEMORY.DMP. So I was wondering if you had any ideas to actually make it write a kernel memory dump
Another thing is that I don’t BSOD anymore, now it just freezes forever ( have tried waiting 3 hours, nothing changed).[/quotemsg]
-
#15
[quotemsg=16029537,0,966493]set some registry keys so you can force a memory dump by hitting the keyboard.
http://blogs.technet.com/b/askpfeplat/archive/2015/04/06/how-to-force-a-diagnostic-memory-dump-when-a-computer-hangs.aspx
that way you don’t actually have to wait for a bugcheck, you can just wait until your system hangs then force a memory dump and have some one look at it.
Note: you can do it on a system that is running without problems to test to make sure the registry keys are set correctly.
and that you get a proper dump file.
if your system is hanging you will want to make sure you run cmd.exe as an admin and run
verifier.exe /standard /all
then reboot. It will place extra debug info in the memory dump and will check for common driver bugs.
note use
verifier.exe /reset
to turn off verifier functions when you are done testing or your system will run slowly.
[/quotemsg]
-
- Nov 4, 2012
-
- 10,073
-
- 183
-
- 67,090
-
#16
I would try and put my drive on a different SATA port or on the primary SATA controller (the slower one)
if you system BIOS has a setting for hotswap for the sata port, enable it.
maybe update your SATA drivers if they are custom (or a custom sata chipset)
— maybe move your location of where your memory dump is being stored to a different physical drive.
[quotemsg=16035612,0,1945063]I have set CrashonCtrlScoll up and when I test it it creates a kernel memory dump file, however when the pc freezes and I force crash it doesn’t write a kernel memory dump nor a minidump for that matter.
[quotemsg=16029537,0,966493]set some registry keys so you can force a memory dump by hitting the keyboard.
http://blogs.technet.com/b/askpfeplat/archive/2015/04/06/how-to-force-a-diagnostic-memory-dump-when-a-computer-hangs.aspx
that way you don’t actually have to wait for a bugcheck, you can just wait until your system hangs then force a memory dump and have some one look at it.
Note: you can do it on a system that is running without problems to test to make sure the registry keys are set correctly.
and that you get a proper dump file.
if your system is hanging you will want to make sure you run cmd.exe as an admin and run
verifier.exe /standard /all
then reboot. It will place extra debug info in the memory dump and will check for common driver bugs.
note use
verifier.exe /reset
to turn off verifier functions when you are done testing or your system will run slowly.
[/quotemsg]
[/quotemsg]
-
#17
However since I change the SATA port my SSD is connected to I haven’t had a crash (7 days), so I believe the problem is solved. I will wait a weeks time before I mark it as solved to see if it isn’t. Thanks a ton for all your help!
-
#18
AMD driver was the culprit
http://www.onehackup.com/2015/08/01/internal-power-error-dell-laptop-error-solved/
Similar threads
![]()
- Advertising
- Cookies Policies
- Privacy
- Term & Conditions
Обычно о существовании файла ntoskrnl.exe пользователи узнают только после возникновения «экрана смерти», который носит название BSOD. Он свидетельствует о сбоях, которые несовместимы с дальнейшей работой ОС, обычно системного характера, а иногда и технического.
Сам Windows ntoskrnl.exe является исполнительным файлом Microsoft Monthly Security Update. Эта программа представляет из себя часть ядра системы. В данный файл интегрировано изображение загрузки, именно его мы видим в процессе запуска системы. Таким образом очевидно, что загрузчик NTLDR подгружает ntoskrnl.exe Windows 7, 8 и 10 в одну из первых очередей. От его правильной обработки зависит и дальнейшая корректная работа всей ОС.
Возможные причины неисправности
Так как файл является системным, то просто заменить его не получится, да и найти его сложно. И даже не всегда проблема ntoskrnl.exe синий экран заключается именно в файле. В общем можно выделить 6 основных проблем, которые мешают правильной обработке файла:
- Нарушение целостности реестра, особенно ключей соответствующего файла;
- Вирусное воздействие, повредившее файл;
- В приложении произошел сбой из-за другой программы;
- Конфликт приложений;
- Некорректная установка файла или его повреждение;
- Нарушение работы жесткого диска.
Читайте также: Программа для открытия exe файлов Windows 7
Именно из-за такого рода проблем и стал появляться ntoskrnl.exe синий экран Windows. Для более точного определения неисправности стоит обратить внимание на действия, предшествующие проблеме.
Восстановление реестра
Существует множество программ, которые способны помочь избавиться реестру от битых ключей и неправильных направлений. Вручную менять значения не рекомендуется, так как это может повлечь за собой другие негативные последствия.
Для примера рассмотрим приложение CCleaner, которое вполне справляется с задачей. Другой подобной программой является Microsoft Fix It, она дополнительно готова помочь с большинством распространенных неисправностей системы.
Итак ntoskrnl.exe как исправить с помощью CCleaner:
- Загрузите программу;
- Запустите приложение и перейдите в раздел «Реестр»;
- Установите галочки возле всех элементов и «Поиск ошибок»;
- Процедура быстрая, затем создаёте точку восстановления (по желанию) и клик на «Устранение выбранных проблем».
Процедура автоматическая, а приложение бесплатное, поэтому в первую очередь следует обратиться к нему. Также советуем использовать приложение Fix It, которое проанализирует систему, в том числе и реестр.
Также дополнительно лучше очистить компьютер от временных файлов и куки, которые могут служить местом неисправности. С этим может помочь программа CCleaner.
Удаление вирусов
Ntoskrnl.exe синий экран Windows 7 или в любой другой версии может быть вызван воздействием вирусов. Предсказать поведение вредоносного кода сложно, так как используются различные алгоритмы работы. Обычно серьёзные вирусные заболевания сопровождаются ошибками, и текущая не исключение.
Чтобы устранить болезнь, а потом и убрать повреждение необходимо воспользоваться антивирусными утилитами. По большому счету все они пригодны для данной процедуры, а иногда приходится пользоваться и несколькими. Запустите сканирование установленного в системе антивируса или загрузите отдельный сканер. Рекомендуем воспользоваться Kaspersky или Avast.
Читайте также: Как проверить компьютер на вирусы?
Сбой из-за программы
Обычно результатом сбоя становится удаление или повреждение файлов, но прежде, чем восстановить правильное положение ntoskrnl.exe Windows 10, необходимо устранить проблему. Здесь следует основываться на воспоминаниях, что предшествовало проблеме, возможно вы меняли настройки или устанавливали новое приложение. Обновление уже существующих программ также может стать причиной.
Уберите максимальное количество второстепенных программ из автозапуска, а затем восстановите файл и методом тыка нужно определить проблему. Эта же рекомендация и при конфликте приложений. Процедура копирования файла описана в конце.
Конфликт программ
Часто конфликтуют не столько приложения, как драйвера. Это не только видео «дрова», но и различные другие. К примеру, при установке пакета ПО для мыши или клавиатуры возникли неисправности. Обычно, если это случается по вине производителя, то они быстро устраняют проблему, поэтому можно просто обновить драйвера.
Возможно, проблема и не в данном месте, поэтому лучше предварительно диагностировать неисправность. Перезапустите компьютер, при помощи F8 перейдите в Безопасный режим. Если всё работает корректно, вероятной причиной становятся второстепенные программы и драйвера.
Повреждение файла или системы
Так как ошибка ntoskrnl.exe является следствием системной проблемы, то необходимо воспользоваться инструментом нужного действия. Для такой процедуры лучше использовать специальную утилиту проверки целостности системы. Запускается она:
- Нажмите Win + R и введите cmd;
- Затем вставьте sfc /scannow.
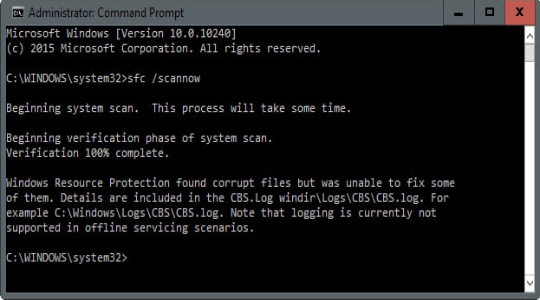
После окончания процесса будет написан результат, также в логах можно посмотреть более подробный отчет.
Проблемы с жестким диском
Если на HDD повреждены сектора или присутствуют битые значения, то корректной работы от Windows ожидать сложно. Всё же существуют специальные утилиты, которые реанимируют жесткий диск, если это возможно. Одна из них встроена в систему, предварительно воспользуйтесь ею.
- Перейдите в «Мой компьютер»;
- ПКМ по системному разделу и «Свойства»;
- Перейдите на вкладку «Сервис»;
- Запустите функцию «Проверка диска на наличие ошибок».
Также существуют программы сторонних разработчиков, которые более функциональны. К примеру воспользуйтесь утилитой HDD Regenerator, она также в автоматическом порядке проведёт диагностику и поможет устранить проблему.
Восстановление системы
Можно попытаться откатить систему к нормальному состоянию. Такой подход поможет не заморачиваться с устранением проблемы и вернёт корректную работу.
Единственным условием выполнения является наличие точки. Если вы создавали бекап, когда Windows работала нормально, то теперь устранить ошибку не проблема.
- Введите в поиск слово «Восстановление» и выберите характерный пункт, затем «Далее»;

- Выделите точку, к которой хотите откатиться и запустите процедуру.
Копирование файла
После выполнения диагностики и попытки устранить причину проблемы, необходимо ещё вернуть файл ntoskrnl.exe в корректное состояние. Лучше это сделать запустив средство восстановления, для его работы необходим установочный диск/флешка.
- Перезагрузите ПК и нажмите F9, выбрав нужный носитель, запустите его;
- Нажмите на пункт «Восстановление системы»;
- Теперь в консоли введите строку expand E:\i386\ntoskrnl.exe c:\windows\system32, здесь E – это идентификатор носителя, а C – системный диск.
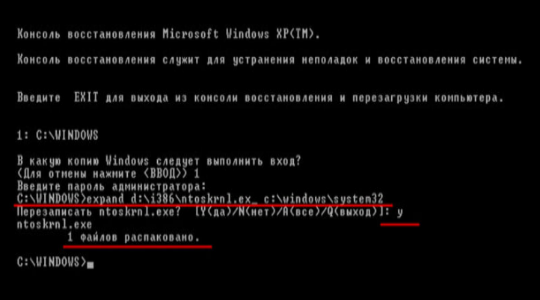
Теперь синий экран не должен вас более беспокоить, ведь проблема с ntoskrnl.exe устранена.
Если у Вас остались вопросы по теме «Как исправить ошибку Ntoskrnl.exe?», то можете задать их в комментариях