Check if the faucet is turned off or water is shut off.
Check if the water supply hose is connected properly.
If the water supply hose is bent, water flow will be blocked, causing poor water supply, or leakage.
Check if the water supply hose filter is clogged.
If the water supply hose filter is clogged by foreign objects, the water supply may be weak or there may be no water supply.
If there is no hot water, check if the boiler is operating normally.
For an apartment, check if the hot water is being supplied normally.
Try this
Is water not supplied due to a power outage or the faucet being turned off?
➔ Turn on the faucet to which the water supply hose of the washing machine is connected by turning it counterclockwise.
Check first if the faucet to which the washing machine is connected turns on properly.

Note
If you have moved recently, had your boiler repaired, or changed the location of the machine, it is often the case that the faucet is turned off.
Even if the machine is still under warranty, service costs for an IE error caused by water shut-off or a faucet being turned off will be charged, as it is not a visit or service by a service technician due to a fault with the product.
Check if the cold/hot water supply hose connected to the washing machine and the cold water/hot water have been reversed. (Whether cold water or hot water comes out may not match the color indicated on faucets.)
The hot water hose should be connected to the hot water valve, and the cold water hose should be connected to the cold water valve.
Connect the hoses and tightly turn to fasten them.
Is the water supply hose pressed or bent, blocking water flow or causing a water leak?
➔ Spread the water supply hose to ensure smooth water flow.
When washing and spin-drying are carried out, the washing machine may move slightly due to vibration.
Then, the water supply hose may become bent.
Spread it to ensure smooth water flow through the water supply hose.
If it is severely bent, another solution is to turn off the faucet, separate the water supply hose from the washing machine and spread it so that any bends are as smooth as possible.
Is the washing machine frozen due to cold weather so that it does not operate?
➔ Use it after thawing the faucet and the water supply hose.
If the water supply hose to the washing machine or the faucet is frozen, water cannot enter into the tub.
In such a case, check first if the faucet is frozen.
Separate the water supply hose from the washing machine, turn on the faucet and see if water comes out.
물If water does not come out, soak a towel in hot water and wrap it around the faucet for 5 minutes to melt any ice that is present.
Thaw the separated water supply hose in hot water of 50ºC or less.
When both are thawed, connect the water supply hose to the washing machine and use the washing machine.
Cleaning the water supply filter
First, turn off the faucet and separate the end of the water supply hose as shown in the figure.
Find the filter, take it out using your fingers or pliers and remove any foreign objects such as rust, sand or grit using a toothbrush.
If the drain hose fixing holder in the back is removed, please secure the hose in a correct position.
➔ If the drain hose fixing holder is removed, the height of the drain hose becomes lower than the water level in the drum, and the water is drained naturally, so the IE error occurs, because the tub cannot be filled even though water is supplied.
Warning!
Refer to the photo of the [drain hose fixing holder] below, and secure the hose in a correct position.
※ If the drain hose is not long enough, do not disassemble the fixing holder, but purchase an “extension drain hose” at the consumables shop in order to extend the hose.
Do not install the end of the drain hose deeply to prevent the end from being submerged in water.
If the end of the drain hose is submerged in water, water will keep draining due to the action of siphoning.
The flushing of a toilet is also carried out by the principle of siphoning. Likewise, if the end the drain hose is submerged in water, the siphon phenomenon will occur when water is drained.
Warning!
Secure the drain hose so that it will not be disconnected from the drain hole.
Do not install the drain hose too high, or so that it is bent or blocked.
Do not perforate or damage the drain hose.
This guide was created for all models, so the images or content may be different from your product.
If you find that your Bosch washing machine refuses to start any washing program and issues the e17 error code, continue reading. Now you’ll find out what has caused the problem. And moreover, we’ll tell how to fix the breakage without damaging the technology.

If the Bosch washing machine refused to start the wash program, and the error code e17 appears on display, then this means that there is a problem with the water filling.
Error e17: description
Error E17 means that there is no water supply to the tub, due to which the process of washing the laundry cannot start. On some models of washing machines, this problem is indicated by the code F17.
On washing machines without a display, this error is indicated by two illuminated indicators: spin for 1000 revolutions and a rinse indicator.
The reasons that cause the error to appear:
- breakage of the bay valve;
- malfunction of the water pressure sensor;
- problems with the control module;
- the wiring between the listed parts is broken.
These elements of the washing machine should be checked in the order as we have listed them. The likelihood of valve breakage when this code appears is the highest. However, before all planned repairs, it is worth checking any water in the water supply. The water supply tap, which is located at the point where the hose is connected to the water supply system, may be turned off.
How do fix this error?
In most cases, this problem can be fixed on your own without resorting to professionals’ help. But still, there are times when it is difficult to carry out repairs on your own, and in this case, you can always contact the service center.
Water inlet valve

After making sure there is water in the plumbing, start checking the parts step by step. The filling valve is to blame if the water collection did not start when you started one of the washing modes, or there is no water filling already at the rinsing stage.

Disconnect the Bosch washing machine from the mains, turn off the water supply. Next, unscrew the hose through which the water flows in the washing machine. In the place where you unscrewed the hose, in the inside of the nozzle, there is a special mesh filter of the filler valve. Small particles may clog the filter. Take it out and rinse it under running water, and put it back in.
Next, you need to check the valve itself:
- remove the top cover on the washing machine;
- take a multimeter and measure the resistance of the valve coil;
- Along the way, check the valve wire contacts and the wires themselves.
In the event of a breakdown, it is impractical to repair the part; you need to purchase a new one and put it in place of the faulty one. To do this, you need to disconnect all the tubes that are attached with clamps, as well as the wires. When purchasing a new filler valve, at the same time, buy new clamps for connecting the pipes.
Water pressure sensor
If the water inlet valve does not cause the E17 error in the Bosch washing machine, then without closing the machine’s lid, proceed to check the water level sensor. Usually, the pressure sensor is to blame for the error if there was a bay of water, and then the code E17 appears on display. The pressure switch in the washing machine is located opposite the filler valve in the right corner. Inspect the tube suitable for it, check the connected wires’ contacts, and then the sensor itself. In the event of a malfunction, this part is also not repaired but replaced.
Repair of the control module
And finally, as a last resort, it is worth turning to the control module. On washing machines of this brand, completely maintainable control modules are installed. As noted by the masters, it is easier to repair them than, for example, modules from Electrolux or Samsung machines. The central board is to blame for the E17 error code when it appears immediately after turning on the Bosch washing machine.

Below is a diagram of one of the modules on which we have designated two triacs responsible for the filling valve. In addition to these elements’ serviceability, it is also worth checking the water level sensor’s connection contacts. But it is better to entrust the module’s repair to a specialist, especially if you don’t know how to handle it with a multimeter, not to mention complex electronics. A module for a Bosch washing machine is a rather expensive part; you should not experiment without knowledge in this area.
Thus, the Bosch washing machine’s appearance of the e17 error associated with water filling can be caused by various reasons, from the user’s carelessness to the electronic module’s malfunction. And it depends on whether you can fix it yourself or not.
Good luck!
Video: How to replace the water supply valve in a Bosch washing machine
Modern washing machines often have digital displays which convey error messages when parts fail or something is simply not right. Older appliances may not have digital displays and instead use a series of LEDs to signal that a component isn’t working correctly. Diagnose your code below.
When the display shows a number up to 12, followed by an «h», it means that the Delay Wash has been activated. Most front load washers can be set to delay the wash for up to 8 or 12 hours (depending on your model).
To set the Delay Wash, turn on the power, then tap the «+» or «-» button near the display. See picture below for an example — location may vary depending on model.
Delay wash option on washer display
Tap the +/- button to increase/decrease the time for the delay in 1 hour increments. Some models have up to an 8 hour delay, others up to 12 hours. Once set to the preferred delay time, press the start button. The display time will decrease every hour until it reaches «0h», and the washer will start at that time. The Delay Wash light will remain on until the washer starts.
To turn off the Delay Wash once it has been set, turn the power button off.
Ensure the dispenser cartridge is inserted correctly and the dispenser drawer is shut completely.
See your Owner’s Manual for further information on your Optimal Dispense Cartridge
Error «Beeps» are an audible signal that the machine makes to alert the user that something is not right.
Open and close the door to clear the display.
Washer Beeps when START/PAUSE is Pressed.
If the washer just beeps when you press a cycle or an option, there could be a number of reasons:
- Door not closed. Close the door completely.
- You are trying to select an option that does not function with the cycle you have selected.
- An example would be trying to select Hot water for a Delicate cycle.
F# E# Error Codes or F## other than any described above:
To remove the error, try the following:
Touch POWER once to clear the code. Then touch POWER again to restart washer.
Try the following method to resolve:
Select PAUSE/CANCEL twice to cancel the cycle. Unplug washer or disconnect power.
Check the following:
- Are both, hot and cold, water faucets completely turned on?
- Are screens at inlet hose connection to washer clogged?
- Are water inlet hoses kinked?
- Are water inlet hoses frozen?
- Plug in washer or reconnect power. Re-select cycle and press START.
Try the following method to resolve:
Select PAUSE/CANCEL twice to cancel the cycle. Unplug washer or disconnect power.
Check the following:
- Is the drain hose kinked?
- Is the drain hose frozen?
- Is the drain hose clogged?
- Is the drain hose more than 96″ (2.4 m) above the floor?
- Plug in washer or reconnect power. Re-select cycle and press START.
Try to the following method to resolve:
Select PAUSE/CANCEL twice to cancel the cycle.
Check the following:
- Is the washer door firmly shut? The door must be completely closed for the washer to operate. The door may look closed, but may not be latched. Open the door and close firmly.
- Verify there is no wash media (detergent, fabric softener, etc) built up around the door lock. Clean with a soft damp cloth if needed.
- Were you washing a large load? Before you close the washer door, check for laundry items sticking out beyond the door opening. Leave enough space in the washer to allow the clothes to tumble freely. An overloaded basket may keep the door from shutting completely. Reduce your load size if needed.
- Press POWER and select START.
Is the door firmly closed?
The door must be completely closed for the washer to operate. The door may look as if it’s closed, but it may not be latched. Open the door and firmly close it.
Is there an item preventing the door from closing?
Before you close the washer door, check for laundry items sticking out beyond the door opening. Leave enough space in the washer to allow the clothes to freely tumble. Reduce your load size if needed.
To remove displayed code:
- Press the Pause or Cancel button twice
- Press the Power button once
NOTE: The method for removing the displayed code varies by model
Is the door firmly closed?
The door must be completely closed for the washer to operate. The door may look as if it’s closed, but it may not be latched. Open the door and firmly close it.
Is there an item preventing the door from closing?
Before you close the washer door, check for laundry items sticking out beyond the door opening. Leave enough space in the washer to allow the clothes to freely tumble. Reduce your load size if needed.
To remove displayed code:
Press the Pause or Cancel button twice
Press the Power button once
NOTE: The method for removing the displayed code varies by model
Was the washer run 3 times in a row?
If the washer shows an F5 E4 Error Code, this may be an indication that the machine may have been run for 3 consecutive cycles without opening the door in between cycles. This may occasionally happen if you have forgotten to remove your items from the washer, then realize they need to be rewashed.
In this case, the washer will generate an invalid beep tone when you press the «Start» button. To solve this issue, open and close the door.
Is the door switch obstructed?
Check the door switch to make sure there is nothing obstructing the operation. Lint, laundry additives, and clothing items could catch in that area, causing the obstruction.
Clear any item that may cause the door switch to be obstructed.
Have the shipping bolts been removed?
All four (4) shipping bolts and the plastic spacers must be removed from the rear of the washer before you operate it. Each unit is shipped from the factory with four bolts, which are designed to secure the washer during shipping. Failure to remove all of the shipping bolts, and the four plastic spacers that are with them, can result in noise, vibration or error codes. See the Installation Instructions for details.
Is the washer overloaded?
The washer may be overloaded for the cycle you are running.
Remove a few items from the load.
See the Cycle Guide in the Owner’s Manual for loading suggestions for each cycle.
To remove displayed code:
- Press the Pause or Cancel button twice
- Press the Power button once
NOTE: The method for removing the displayed code varies by model
If code is still displayed:
- Unplug the washer or disconnect the power for one minute.
- Plug in the washer or reconnect the power.
- Re-select the cycle and press Start.
If the washer has an F8 E1 error or LO FL error, the door may be locked, and the control may be unresponsive. Press the power button, and the washer will start a drain routine, which takes approximately 8 to 10 minutes, during which the pump will run continuously. The control will not accept any input during this time. Please wait 10 minutes before trying to perform any functions.
Is the water turned on?
Ensure the Hot and Cold water valves are fully open; both hot and cold inlet hoses must be connected for the washer to operate correctly.
Check the water inlet hoses.
- Ensure the hoses are not kinked, which can restrict water flow.
- Are they connected correctly? Ensure the hot (red) hose is connected to the hot (red) water valve and the cold (blue) hose is connected to the cold (blue) water valve.
- Was an anti-flood device installed? The washer should be directly connected to the water supply for optimum machine performance. Using anti-flood devices can reduce the water pressure and amount of water entering the appliance.
Are the water inlet screens clogged?
The inlet screens on the washer can become clogged from mineral build-up or from capturing other debris in the water. To check the inlets:
- Turn the water supply off, then use pliers to remove the hoses.
- Place hose ends in a bucket to catch any remaining water.
- Check the inlet screens on the back of the water inlet valve.
- If they appear to be clogged, without removing the screen, clean them with a brush (an old toothbrush works great), mild soap, and water.
Is a water hose clogged?
The water supply hoses can get clogged by mineral build-up or other debris in the water. With the hoses uninstalled, at a sink or other water source, run water through the hoses. If water does not flow completely through the hose or the water stream seems to be restricted, it is recommended the hose be replaced.
Is the drain hose correctly installed?
If the drain hose is not properly installed, the washer will not drain properly. Check the following for proper installation:
- Drain hose extending more than 4.5″ (113 mm) into the drainpipe. Use the U-shape drain hose form to provide the correct drain hose length in the drainpipe or laundry tub.
- Drain hose is taped onto the drainpipe or top of the drain pipe covered in tape. Do not seal the drain hose into the drainpipe with tape. The drain hose should be loose, yet secure. There must be a gap between the drain hose and the drain pipe to allow airflow.
- Drainpipe (standpipe) less than the minimum height of 39″. Check that the top of the drain is at least 39″ (99 cm) high (as measured from the floor.) If the drain is below 39″ (99 cm), the water will start to flow out of the machine due to gravity.
Verify detergent drawer or detergent cartridge is not clogged with detergent.
Is the drain hose properly installed?
- Make sure the drain hose is not kinked or clogged.
- Use the U-shaped drain hose form on the drain hose.
- The standpipe (drainpipe) height requirements are 96″ (244 cm) maximum and 39″ (99 cm) minimum.
Suds can cause delays in draining. Are you using HE Detergent?
This style washer requires the use of HE High-Efficiency detergent. Using non-HE detergent may cause excessive sudsing.
Select PAUSE/CANCEL twice to cancel the cycle. Unplug washer or disconnect power.
Check the following:
- Are both hot and cold water faucets completely turned on?
- Are screens at inlet hose connection to washer clogged?
- Are water inlet hoses kinked?
- Are water inlet hoses frozen?
- Plug in washer or reconnect power. Re-select cycle and press HOLD TO START.
Has the cycle been Paused or Cancelled?
The washer can take 20 to 30 minutes to stop spinning and drain, and will display this error code during that time.
To remove displayed code:
- Press the Pause or Cancel button twice
- Press the Power button once
NOTE: The method for removing the displayed code varies by model
If code is still displayed:
- Unplug the washer or disconnect the power for one minute.
- Plug in the washer or reconnect the power.
- Re-select the cycle and press Start.
If the control lock has been activated, the control will not function. If you try to push buttons, you may see the code «LoC» or «LC» (depending on your model). This is a reminder that you have set the control lock, and need to de-activate it to allow the washer controls to function.
Activating the Control Lock:
Touch and hold for 3 seconds to lock the controls to avoid unwanted changes or operation. For each second CONTROL LOCK is held down, the display will count down one second: you will see “3,” then “2,” then “1” then «LC» or «LoC». You may still touch START to pause the cycle, or touch POWER to turn off the washer.
De-Activating the Control Lock:
Touch and hold 3 seconds again to de-activate the Control Lock.
See your Owner’s Manual for more information on setting the Control Lock.
Check the following:
Verify the shipping system including shipping bolts and spacers are removed, and power cord out of the unit.
If you are still having concerns with your washer, try cycling power to the machine. Unplug or disconnect power for one minute and plug back in.
“F” codes other than F20, F21, or F22
Select PAUSE/CANCEL twice to cancel the cycle. Select DRAIN/SPIN if there is excessive water in the washer.
Re-select cycle and press START.
Some models may allow you to hit «Start» to complete the cycle. For other models, you may need to hit «Cancel» and restart the machine from the beginning.
See your Owner’s Manual for more information on your specific model.
Have all items been removed before starting the Clean Washer cycle?
Remove items from drum and restart the Clean Washer cycle.
To remove displayed code:
- Press the Pause or Cancel button twice
- Press the Power button once
NOTE: The method for removing the displayed code varies by model
If code is still displayed:
- Unplug the washer or disconnect the power for one minute.
- Plug in the washer or reconnect the power.
- Re-select the cycle and press Start.
The washer will not be able to spin out water with the excess suds. When «Sud» or «Sd» is displayed, the washer automatically extends the rinse time to remove the excess suds. During this time, the washer pauses the tumbling and adds water for additional rinsing. This pause allows the bubbles in the suds to break. This pause and rinsing are necessary and may occur several times to eliminate the suds.
Are you using HE or High Efficiency Detergent?
Use only HE or High Efficiency detergent. Always measure detergent. If you have very soft water, you may need to use less detergent. Using non-HE detergent or more than the manufacturer’s recommended amount of detergent can cause excessive suds. The excess suds can cause the washer to run at a reduced spin speed, resulting in very wet loads, or error codes to appear.
Did you use «no splash» or «easy pour» liquid chlorine bleach?
This type of liquid chlorine bleach contains a thickening agent that may create excess suds in washers. If this is the case, run the washer with regular liquid bleach products.
Is the drain hose kinked or clogged?
The Sud or Sd code may be the result of a restricted drain hose or standpipe (drainpipe).
Make sure that the drain hose is not kinked or clogged.
Are any of the cycles working?
If any cycle is working, try resetting the controls:
- Power unit down by turning off the circuit breaker(s) for one (1) minute.
- Power unit up by turning on the circuit breaker(s).
- Start a cycle.
- Monitor the washer for one (1) minute to ensure the error code does not display again.
Does the washer need to be cleaned?
The code will automatically clear once a Clean Washer cycle has completed or after three cycles.
The «Err» message will appear under the following situations:
- You attempt to change or modify the cycle while the washer is running.
- You try to start a cycle while the door is open.
Remove any items inside the washer, then restart for your «Clean Washer» cycle.
The washer will run an automatic suds reduction routine, to try to eliminate most of the excess sudsing. Allow the washer to continue to run.
Did you use High Efficiency (HE) detergent?
Use only High Efficiency (HE) detergent. Using non-HE detergent or more than the manufacturer’s recommended amount of soap can cause excessive suds. The excess suds can cause the washer to run at a reduced spin speed, which will result in very wet loads. It can also increase the cycle time due to an increase in rinses trying to eliminate the suds.
- If you see «Sud» or «Sd» with the Rinse status light on, the washer is in the process of removing suds. Let the cycle continue.
- If you see «Sud» or «Sd» and the Cycle Complete light is on, the washer detected too many suds during the cycle, and your load may not be thoroughly rinsed, or water may not be entirely removed. You may want to select a Rinse/Spin cycle for further rinsing.
Is the bulk dispenser being used?
If your washing machine has a bulk dispenser feature check the following:
- Is the bulk dispenser enabled? If it is, there is no need to add additional detergent to the load. Doing so could cause excessive suds.
- What is the concentration level set to? It is essential to understand detergent concentration, as you need to input this into the machine. If the concentration level is set correctly, it could cause additional suds.
These Error Codes will appear once the cycle has completed indicating there was a balancing issue with the cycle. You may notice the cycle time was longer than initially displayed, or the clothing is still dripping wet. This is likely because a sizeable unbalanced load could result in reduced spin speeds, which removes less water from the clothing during the spin cycles.
If the load is not dripping wet, then the cycle finished as expected but took more time than expected to balance.
If the load is dripping, see the following troubleshooting tips.
Is the washer overloaded?
Avoid tightly packing the load. Clothing should move freely within the washer. Remove a few of the items and run a «Drain & Spin» cycle to finish removing water from the load.
Were you washing a bulky item by itself?
Avoid washing single items, especially bulky items. Balance a single item such as a rug or jeans jacket with a few extra garments and run a «Drain and & Spin» cycle.
- Power unit down by turning off the circuit breaker or unplugging for one (1) minute.
- Power unit up by reconnecting power.
- Restart a new cycle.
- Monitor the washer for one (1) minute to ensure the error code does not display again.
- Power unit down by turning off the circuit breaker or unplugging for one (1) minute.
- Power unit up by reconnecting power.
- Restart a new cycle.
- Monitor the washer for one (1) minute to ensure the error code does not display again.
- Power unit down by turning off the circuit breaker or unplugging for one (1) minute.
- Power unit up by reconnecting power.
- Restart a new cycle.
- Monitor the washer for one (1) minute to ensure the error code does not display again.
The machine may go into a drain cycle for approximately 8 minutes, and continue to display the error code. When the 8 minutes are up, the door should unlock.
- Power unit down by turning off the circuit breaker or unplugging for one (1) minute.
- Power unit up by reconnecting power.
- Restart a new cycle.
- Monitor the washer for one (1) minute to ensure the error code does not display again.
- Power unit down by turning off the circuit breaker or unplugging for one (1) minute.
- Power unit up by reconnecting power.
- Restart a new cycle.
- Monitor the washer for one (1) minute to ensure the error code does not display again.
- Power unit down by turning off the circuit breaker or unplugging for one (1) minute.
- Power unit up by reconnecting power.
- Restart a new cycle.
- Monitor the washer for one (1) minute to ensure the error code does not display again.
- Power unit down by turning off the circuit breaker or unplugging for one (1) minute.
- Power unit up by reconnecting power.
- Restart a new cycle.
- Monitor the washer for one (1) minute to ensure the error code does not display again.
- Power unit down by turning off the circuit breaker or unplugging for one (1) minute.
- Power unit up by reconnecting power.
- Restart a new cycle.
- Monitor the washer for one (1) minute to ensure the error code does not display again.
- Power unit down by turning off the circuit breaker or unplugging for one (1) minute.
- Power unit up by reconnecting power.
- Restart a new cycle.
- Monitor the washer for one (1) minute to ensure the error code does not display again.
- Power unit down by turning off the circuit breaker or unplugging for one (1) minute.
- Power unit up by reconnecting power.
- Restart a new cycle.
- Monitor the washer for one (1) minute to ensure the error code does not display again.
- Power unit down by turning off the circuit breaker or unplugging for one (1) minute.
- Power unit up by reconnecting power.
- Restart a new cycle.
- Monitor the washer for one (1) minute to ensure the error code does not display again.
To remove the code, open and close the door and restart the cycle.
If that does not work, try the following:
- Power unit down by turning off the circuit breaker or unplugging for one (1) minute.
- Power unit up by reconnecting power.
- Open and close the door.
- Restart a new cycle.
- Monitor the washer for one (1) minute to ensure the error code does not display again.
- Power unit down by turning off the circuit breaker or unplugging for one (1) minute.
- Power unit up by reconnecting power.
- Restart a new cycle.
- Monitor the washer for one (1) minute to ensure the error code does not display again.
- Power unit down by turning off the circuit breaker or unplugging for one (1) minute.
- Power unit up by reconnecting power.
- Restart a new cycle.
- Monitor the washer for one (1) minute to ensure the error code does not display again.
- Power unit down by turning off the circuit breaker or unplugging for one (1) minute.
- Power unit up by reconnecting power.
- Restart a new cycle.
- Monitor the washer for one (1) minute to ensure the error code does not display again.
- Power unit down by turning off the circuit breaker or unplugging for one (1) minute.
- Power unit up by reconnecting power.
- Restart a new cycle.
- Monitor the washer for one (1) minute to ensure the error code does not display again.
- Power unit down by turning off the circuit breaker or unplugging for one (1) minute.
- Power unit up by reconnecting power.
- Restart a new cycle.
- Monitor the washer for one (1) minute to ensure the error code does not display again.
- Power unit down by turning off the circuit breaker or unplugging for one (1) minute.
- Power unit up by reconnecting power.
- Restart a new cycle.
- Monitor the washer for one (1) minute to ensure the error code does not display again.
- Power unit down by turning off the circuit breaker or unplugging for one (1) minute.
- Power unit up by reconnecting power.
- Restart a new cycle.
- Monitor the washer for one (1) minute to ensure the error code does not display again.
- Power unit down by turning off the circuit breaker or unplugging for one (1) minute.
- Power unit up by reconnecting power.
- Restart a new cycle.
- Monitor the washer for one (1) minute to ensure the error code does not display again.
Is the washer overloaded?
Avoid tightly packing the load. Clothing should move freely within the washer. Overloading can cause extra wear and tear on the machine, as well as on the garment.
===== The F8 E1 or Lo FL error code means your washer is not detecting the correct amount of incoming water. =====
If the washer has an F8 E1 error or LO FL error, the door may be locked, and the control may be unresponsive. Press the power button, and the washer will start a drain routine, which takes approximately 8 to 10 minutes, during which the pump will run continuously. The control will not accept any input during this time. Please wait 10 minutes before trying to perform any functions.
Is the water turned on?
Ensure the Hot and Cold water valves are fully open; both hot and cold inlet hoses must be connected for the washer to operate correctly.
Check the water inlet hoses.
- Ensure the hoses are not kinked, which can restrict water flow.
- Are they connected correctly? Ensure the hot (red) hose is connected to the hot (red) water valve and the cold (blue) hose is connected to the cold (blue) water valve.
- Was an anti-flood device installed? The washer should be directly connected to the water supply for optimum machine performance. Using anti-flood devices can reduce the water pressure and amount of water entering the appliance.
Are the water inlet screens clogged?
The inlet screens on the washer can become clogged from mineral build-up or from capturing other debris in the water. To check the inlets:
- Turn the water supply off, then use pliers to remove the hoses.
- Place hose ends in a bucket to catch any remaining water.
- Check the inlet screens on the back of the water inlet valve.
- If they appear to be clogged, without removing the screen, clean them with a brush (an old toothbrush works great), mild soap, and water.
Is a water hose clogged?
The water supply hoses can get clogged by mineral build-up or other debris in the water. With the hoses uninstalled, at a sink or other water source, run water through the hoses. If water does not flow completely through the hose or the water stream seems to be restricted, it is recommended the hose be replaced.
Is the drain hose correctly installed?
If the drain hose is not properly installed, the washer will not drain properly. Check the following for proper installation:
- Drain hose extending more than 4.5″ (113 mm) into the drainpipe. Use the U-shape drain hose form to provide the correct drain hose length in the drainpipe or laundry tub.
- Drain hose is taped onto the drainpipe or top of the drain pipe covered in tape. Do not seal the drain hose into the drainpipe with tape. The drain hose should be loose, yet secure. There must be a gap between the drain hose and the drain pipe to allow airflow.
- Drainpipe (standpipe) less than the minimum height of 39″. Check that the top of the drain is at least 39″ (99 cm) high (as measured from the floor.) If the drain is below 39″ (99 cm), the water will start to flow out of the machine due to gravity.
- Power unit down by turning off the circuit breaker or unplugging for one (1) minute.
- Power unit up by reconnecting power.
- Restart a new cycle.
- Monitor the washer for one (1) minute to ensure the error code does not display again.
Is the Washer Level?
The washer must be level. Check the floor for flexing or sagging. Do not install the appliance on a raised wooden platform.
Is the Drain hose extending more than 4.5″ (113 mm) into the drainpipe?
The drain hose may be too far down inside the drainpipe (standpipe) or laundry tub. Drained water can siphon back into the washer if the drain hose extends too far. Make sure that the drain hose does not extend more than 4.5″ (113 mm) into the drainpipe or laundry tub. Using the U-shape drain hose form (as described in the Installation Instructions), will provide the correct length of drain hose in the drainpipe or laundry tub.
Maximum height for drain hose is 96″ from the bottom of the washer.
Is the Drain hose taped onto the drainpipe or top of the drainpipe covered in tape?
Do not seal the drain hose into the drainpipe with tape. The drain hose should be loose, yet secure. There must be a gap between the drain hose and the drainpipe to allow air to flow through. The air gap will break the suction. This will prevent water from continuously being sucked out of the machine (siphoning) as it fills.
Have you Cleaned the Drain Pump Filter? (some models)
The Drain Pump filter is located behind the bottom dispenser drawer (on some models). This filter should be cleaned occasionally. If it gets clogged, the washer will not drain well.
Have you Cleaned the Door Seal (bellow)?
There are small drain holes inside the door seal. If they get clogged, the washer/dryer may not drain well. See «Cleaning and Maintenance» symptom above for information on cleaning the door seal.
- Power unit down by turning off the circuit breaker or unplugging for one (1) minute.
- Power unit up by reconnecting power.
- Restart a new cycle.
- Monitor the washer for one (1) minute to ensure the error code does not display again.
- Power unit down by turning off the circuit breaker or unplugging for one (1) minute.
- Power unit up by reconnecting power.
- Restart a new cycle.
- Monitor the washer for one (1) minute to ensure the error code does not display again.
If the control lock has been activated, the control will not function. If you try to push buttons, you may see the code «LoC» or «LC» (depending on your model). This is a reminder that you have set the control lock and need to de-activate it to allow the washer controls to function. Some models will look like the following:
This error code does not mean «Door Locked». The door will open when the control is locked, but the washer will not start due to control being locked.
Activating the Control Lock:
Touch and hold for 3 seconds to lock the controls to avoid unwanted changes or operation. For each second CONTROL LOCK is held down, the display will count down one second: you will see «3,» then «2,» then «1» then «LC» or «LoC». If you do not see the 3-2-1 countdown and are unable to de-activate Control Lock, try pressing the POWER button first, then touch and hold 3 seconds to de-activate control lock. If this does not work, try unplugging the machine or turning off the breaker for 1 minute, then power the machine back on and try again.
The control lock may be a stand-alone key, or it could be a dual function key paired with another button like Extra Rinse, Steam, etc. Press and hold that button (not the text below it) for three seconds to unlock
De-Activating the Control Lock:
Touch and hold 3 seconds again to de-activate the Control Lock.
See your Owner’s Manual for more information on setting the Control Lock.
===== The F8 E1 or Lo FL error code means your washer is not detecting the correct amount of incoming water. =====
If the washer has an F8 E1 error or LO FL error, the door may be locked, and the control may be unresponsive. Press the power button, and the washer will start a drain routine, which takes approximately 8 to 10 minutes, during which the pump will run continuously. The control will not accept any input during this time. Please wait 10 minutes before trying to perform any functions.
Is the water turned on?
Ensure the Hot and Cold water valves are fully open; both hot and cold inlet hoses must be connected for the washer to operate correctly.
Check the water inlet hoses.
- Ensure the hoses are not kinked, which can restrict water flow.
- Are they connected correctly? Ensure the hot (red) hose is connected to the hot (red) water valve and the cold (blue) hose is connected to the cold (blue) water valve.
- Was an anti-flood device installed? The washer should be directly connected to the water supply for optimum machine performance. Using anti-flood devices can reduce the water pressure and amount of water entering the appliance.
Are the water inlet screens clogged?
The inlet screens on the washer can become clogged from mineral build-up or from capturing other debris in the water. To check the inlets:
- Turn the water supply off, then use pliers to remove the hoses.
- Place hose ends in a bucket to catch any remaining water.
- Check the inlet screens on the back of the water inlet valve.
- If they appear to be clogged, without removing the screen, clean them with a brush (an old toothbrush works great), mild soap, and water.
Is a water hose clogged?
The water supply hoses can get clogged by mineral build-up or other debris in the water. With the hoses uninstalled, at a sink or other water source, run water through the hoses. If water does not flow completely through the hose or the water stream seems to be restricted, it is recommended the hose be replaced.
Is the drain hose correctly installed?
If the drain hose is not properly installed, the washer will not drain properly. Check the following for proper installation:
- Drain hose extending more than 4.5″ (113 mm) into the drainpipe. Use the U-shape drain hose form to provide the correct drain hose length in the drainpipe or laundry tub.
- Drain hose is taped onto the drainpipe or top of the drain pipe covered in tape. Do not seal the drain hose into the drainpipe with tape. The drain hose should be loose, yet secure. There must be a gap between the drain hose and the drain pipe to allow airflow.
- Drainpipe (standpipe) less than the minimum height of 39″. Check that the top of the drain is at least 39″ (99 cm) high (as measured from the floor.) If the drain is below 39″ (99 cm), the water will start to flow out of the machine due to gravity.
You may notice the cycle time was longer than initially displayed, or the clothing is still dripping wet, this is because a sizeable unbalanced load could result in reduced spin speeds.
If the load is not dripping wet, then the cycle finished as expected but took more time than expected to balance.
If the load is dripping, see the following troubleshooting.
Is the washer overloaded?
Avoid tightly packing the load. Clothing should move freely within the washer. Remove a few of the items and run a «Drain & Spin» cycle to finish removing water from the load.
Were you washing a Bulky item by itself?
Avoid washing single items, especially bulky items. Balance a single item such as a rug or jeans jacket with a few extra garments and run a «Drain and & Spin» cycle.
Some models may allow you to hit «Start» to complete the cycle. For other models, you may need to hit «Cancel» and restart the machine from the beginning.
See your Owner’s Manual for more information on your specific model.
The Clean Washer cycle is meant to run empty, with no clothing inside the washer.
Remove items from washer drum and restart Clean Washer with affresh® cycle.
If you see «Sud» or «Sd» with the Rinse status light on, the washer is in the process of removing suds. Let the cycle continue.
If you see «Sud» or «Sd» and the Complete Cycle light is on, the washer detected too many suds during the cycle, and your load may not be thoroughly rinsed, or water may not be entirely removed. You may want to select a Rinse/Spin cycle for further rinsing.
Did you use High Efficiency (HE) detergent?
Use only High Efficiency (HE) detergent. Using non-HE detergent or more than the manufacturer’s recommended amount of soap can cause excessive suds. The excess suds can cause the washer to run at a reduced spin speed, which will result in very wet loads. It can also increase the cycle time due to an increase in rinses trying to eliminate the suds.
Are you using too much detergent?
Always measure detergent and follow manufacturer’s directions based on load size and soil level. Using too much detergent can cause excessive suds.
Is the bulk dispenser being used?
If your washing machine has a bulk dispenser feature check the following:
- Is the bulk dispenser enabled? If it is, there is no need to add additional detergent to the load. Doing so could cause excessive suds.
- What is the concentration level set to? It is essential to understand detergent concentration, as you need to input this into the machine. If the concentration level is set correctly, it could cause additional suds.
Did you use «no splash» or «easy-pour» liquid chlorine bleach?
This type of liquid chlorine bleach contains a thickening agent that may create excess suds in washers. If this is the case, run the washer with regular liquid bleach products.
Bosch is a Germany-based corporation that focuses on technology solutions in sectors such as industrial technology, consumer goods, mobility, and others. Owned by Robert Bosch Stiftung GmbH, it has 11 different corporations working under its umbrella. Making it a large firm that covers a wide range of productions under different roofs.
Bosch is a leading manufacturer that offers a wide range of appliances, which include but are not limited to washers. These top-of-the-line washers are not your everyday appliance and need a little attention if you wish to keep them running without a hitch. That being said, there are times when you can do everything right and still end up with an error message.
Bosch washers are a reliable addition to your home, but there are times when you will see an issue with their workings. To help you out we have listed down some of the most common error codes for Bosch Washers. Start by noting down the error code, and match it using the list below. Once you have the error code you can finally get an answer to your questions. One that can help you determine your next step.
Codes List
| Error Code | Problem |
|---|---|
| F01 | Water intake timeout (Faulty Aquastop) |
| F02 | Heating timeout |
| F03 | Draining timeout |
| F04 | Motor fault (No tacho signal) |
| F05 | Uncontrolled motor startup High resistance connections |
| F06 | Short on NTC |
| F07 | Open circuit NTC |
| F08 | Door open when program started |
| F09 | Unexpected heating |
| F10 | Communication error. In main program after 11 minutes. In test after 1.5 minutes |
| F11 | Overheating Heat sink or motor control PCB. Fault detected eight times |
| F12 | Short circuit. Motor faulty. Free running diode faulty |
| F13 | Mains voltage too high |
| F14 | Mains voltage too low |
| F15 | Faulty temperature sensor on motor PCB |
| F16 | Faulty rinse sensor |
| F17 | Inlet Valve |
| F18 | Pump/ Drain time-out |
| F23 | Flooded base s/w activated |
| F34 | Door lock |
| F42, F43, F44 | Motor fault indicated |
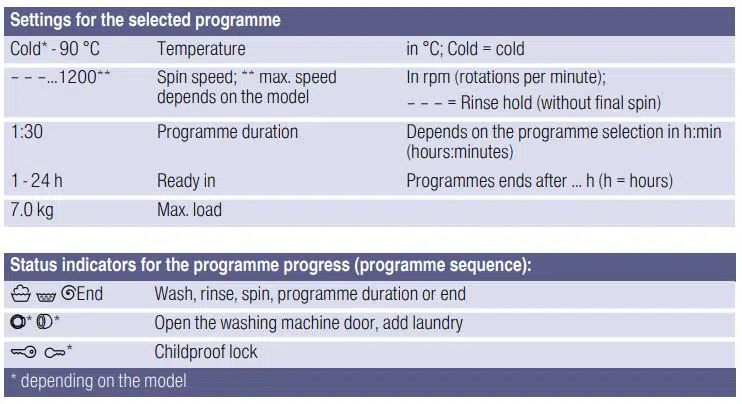
Information on the display panel
Display: – P – and ο
Cause/Remedy: The door is unlocked. It is possible to add laundry.
Display: – P –
Cause/Remedy:
- The temperature is too high. Wait until the temperature drops.
- The water level is too high. It is not possible to add laundry. Close the door immediately, if necessary. Press the ‘Start/Pause’ button to continue the programme.
Display: Θ flashes
Cause/Remedy:
- Laundry may be caught. Open and close the door again and press the ‘Start/Pause’ button.
- If necessary, push the door closed or remove some laundry and then push it closed again.
- If necessary, switch the appliance off and on again; set the programme and make your individual settings; start the programme.
Display: τ lights up
Cause/Remedy:
- Turn on the tap fully,
- Supply hose kinked/trapped,
- The water pressure is too low. Clean the filter
Display: E:18
Cause/Remedy:
- The drain pump is blocked. Clean the drain pump.
- The drain hose/drain pipe is blocked. Clean the drain hose at the siphon
Display: E:23
Cause/Remedy: There is water in the base trough, the appliance is leaking. Turn off the tap. Call customer services.
Display: →(Childproof )
Cause/Remedy: The childproof lock is activated – deactivate it.
Display: ∪ lights up
Cause/Remedy: Too must foam has been detected and an additional rinse cycle has been activated. Add less detergent to the next washing cycle with the same load
Display: YES
Cause/Remedy: The washing machine door is unlocked. It is possible to add laundry.
Display: NO
Cause/Remedy:
- The temperature is too high. Wait until the temperature falls.
- Water level too high. Not possible to add laundry. If necessary, close the washing machine door immediately. To continue the programme, press ‘Start/ Reload’ button.
Display: E 17
Cause/Remedy:
- Turn the water tap on fully
- The supply hose is kinked/trapped
- The water pressure is too low
Display: ( : )
Cause/Remedy: The mains voltage is too low
Display: (.)
Cause/Remedy: Undervoltage in the wash programme. The programme is extended.
Display: E 93 (Displayed at end of first cycle without hot water. Not displayed in subsequent cycles if hot water is not available. Reset after second cycle with hot water)
Fault:
- Hot water tap not turned on
- Supply hose for hot water kinked or pinched closed
- Hot water pressure too low
- Strainer in water supply hose clogged
Measure:
- Turn on the hot water tap
- Eliminate the cause, replace the hose if damaged
- Eliminate the cause
- Connect both supply hoses (hot and cold water) for hot water appliances
Display: E 32 (alternating display with END when program is finished)
Fault: Not a fault – the unbalanced load detection system has interrupted the spin cycle because the laundry is unevenly distributed
Measure: Distribute small and large items of laundry evenly in the drum. If necessary, start an additional spin program
- E2 Motor fault. Call customer service.
- E3 Close the washing machine door properly; laundry may be caught.
- E5 Open the tap completely, supply hose kinked or trapped; Clean the filter
- E6 Detergent solution pump blocked; Clean the detergent solution pumpblocked; Clean the drainage hose at the siphon
- E8 Turn off the tap and call customer service.
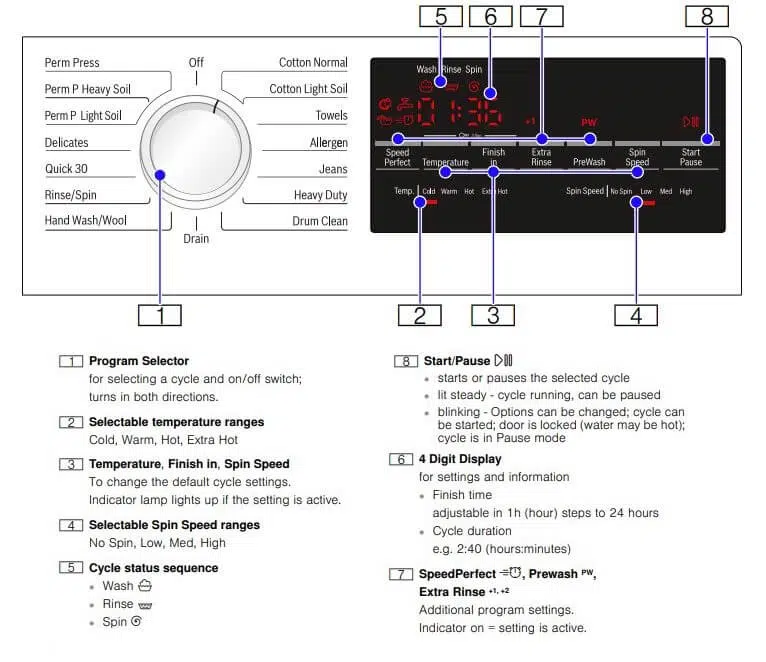
Control Panel
Troubleshooting
| Trouble | Solution |
|---|---|
| Water is leaking out | Attach/replace the drainage hose correctly |
| No water supply. Detergent not dispensed | 1. Start/Reload button not pressed? 2. Tap not turned on? 3. Filter blocked? Clean the filter |
| Washing machine door cannot be opened | Is the Childproof lock activated? To deactivate |
| Detergent solution is not emptied | Clean the detergent solution pump |
| Water not visible in the drum | Not a fault – water below the visible area |
| Spin result not satisfactory. Laundry wet/too damp | Not a fault – the unbalanced load detection system has interrupted the spin because the laundry is unevenly distributed. Distribute large and small items of laundry evenly in the drum |
| Spin cycle started and stopped several times | Not a fault – the unbalanced-load detection system is adjusting the imbalance. |
| The programme duration is longer than usua | Not a fault – the foam detection system active – adds an additional rinse cycle |
| The programme duration changes during the wash cycle | Not a fault – the programme sequence is optimised for the particular washing process. This may lead to occasional changes in the programme duration in the display panel |
| Residual water in the compartment (flower) for care products | Clean the insert if necessary |
| The symbol (foam) flashes in the display panel. Foam may escape from the detergent drawer | Too much detergent used? |
| Intense noise, vibrations and «wandering» during spinning | Is the appliance levelled? Level the appliance |
| Display panel/indicator lamps do not function during operation | Circuit breakers tripped? Switch the circuit breakers back on or replace them |
| Detergent residues on the laundry | Occasionally, phosphate-free detergents contain water-insoluble residues |
| NO appears on the display panel in reload model | Water level too high. Not possible to add laundry. Close the washing machine door immediately, if necessary |
What is the error code f01 on a Bosch washing machine?
Error F01: Water Intake Timeout. Like many errors there is a number of reasons this could be happening some common problems include a faulty tap, damaged hose, blocked filter or low water pressure.
What does a flashing key symbol mean on a Bosch washing machine?
When the child lock is activated, there will be a key symbol in the display and all the washing machine buttons will be disabled. To deactivate the child lock, press and hold the start button for three to five seconds. After this time you will hear an audible beep and the key symbol will disappear.
How do I reset my Bosch washing machine?
Press the «Start/Pause» button. Turn the cycle selector to the «Off» position. Turn the cycle selector to a new cycle. A light will begin to flash. Press the «Start/Pause» button to begin the new cycle.
Manuals Pdf
Bosch Waschine Machine Manual and Installation PDF
Bosch Waschine Use and Care Manual, Installation Instructions PDF
source: bosch.com
- Author
- Recent Posts

FindErrorCode.com is a reputable error code provider firm. The main challenges are fault code and a problem-solving blog. We’ve written articles to address your concerns. Do not forget to write to us the fault codes that you cannot find. Appliance Expert contact: dylanjoseph@finderrorcode.com Call: 916-954-2677
| Error code | Fault value | Causes | Remedy |
| d01 | No water supply. |
If the CM gives error d 01, then the water intake system is clogged. Also, the inlet valve or the main module may have failed. |
|
| d02 | Water drain error. | What does the error D 02:
|
To reset the error:
|
| d03 | No water heating. |
|
|
| d04 | Control module malfunction. | Broken triac on the board. | To remove the error, you need to replace the main module or repair the board. |
|
d07 ER12 |
The hatch door is not tightly closed. | If the code d 07 is on the display, there are problems with closing the door. |
|
| d10 | The MCA tank is full of water. | In the washing machine Fagor the pressure switch or the control unit is faulty. | How to solve the problem:
|
| d21 | Electronic card error. | If the display showed the code d 21, the control board failed. | Installing a new part. |
| F01 | There is no water in the washer tank. |
|
|
| F02 | Error plum. No drum rotation. |
|
|
| C03 | At C 03, the drum does not work. |
|
|
| F04 | CM does not turn on. |
|
How to fix the damage:
|
|
F05 F06 |
Fault in the heater. | The heating element is out of order. | Test and install the serviceable item. |
| F07 | Problems in the pump circuit. | The circuit between the module and the pump has been broken. |
|
|
F08 F09 |
The Eraser engine is faulty. | Inspection and change of the electric motor. | |
| F0 | Failure of the electronic module. | The module has failed due to a short circuit or moisture ingress. | Reinstall unit. |
Manufacturers strive to make the equipment as user friendly as possible, so the Fagor washing machine is equipped with a self-diagnostic system. If a breakdown is detected, it displays the corresponding error code on the display.
The table below lists all the CMA Fagor error codes. You will learn what the code means, what to do when it appears, how to fix the problem yourself.
Fagor

washing machine fault codes When doing self-repairs, do not forget to adhere to safety regulations. Always unplug the washing machine Fagor from the network and communications before starting work.