- Печать
Страницы: [1] Вниз

Тема: Nivona NICR 520 /ошибка S12 / сброс со штуцера трубки клапана ЗУ (Прочитано 4190 раз)
0 Пользователей и 1 Гость просматривают эту тему.
Добрый день, уважаемые форумчане
Требуются ваши советы по данной ситуации:
Nivona 520 — на дисплее загорелся знак ошибки S12, по функционалу в работе была доступна только функция включения подачи пара и горячей воды (хотя на проток из капучинатора шла только холодная вода). Далее путем разбавления в баке с водой правильной химии, — был осуществлен пролив через капучинатор холодной воды+химия — примерно 1,0-1,5литра, с периодическими паузами 10-15 мин, на вкл/выкл подачи воды через капучинатор. Результат: знак S12 на дисплее — погас.
Далее было решено включить программу очистки всей системы от накипи — машинка запустила программу, и во время работы режима этой программы — был услышан звук типа «свист-пшик» и пар начал выходить с правой стенки машины.
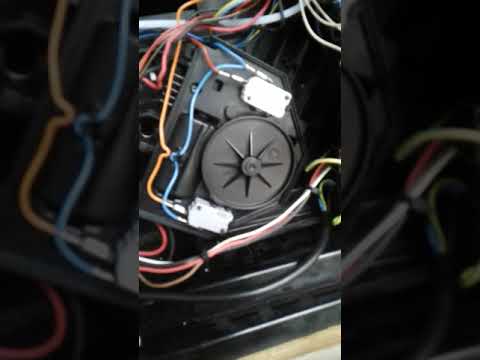
Новая проблема: При осмотре ЗУ — было выявлено, что трубка соскочила со штуцера клапана ЗУ. Далее трубка была одета на штуцер, включена машина — и снова все повторилось — звук «свист-пшик»/выход пара из верхней части ЗУ/ трубка снова слетела со штуцера клапана ЗУ
Прошу направить на правильные действия в данной ситуации.
Заранее спасибо за ответы.

Записан
Закупорен дисренсор, или трубка до него.
Записан
Авторизация: Delonghi, Bork, Ariette, Jura, Nivona
Был случай в практике , когда выход кофевода был забит наглухо и тоже трубку срывало .
Записан
Екатеринбург
СЦ » Доктор Кофемашин » +7(343)207-8-911 +7(952)736-08-30 / service-cm.ru
ул. Первомайская 77
ул. Викулова 45
Ремонт КМ, аренда КМ , продажа запчастей , чистящих средств , кофе.
Добрый день, всем!
Nivona 520 — возраст 1 год, домашняя, эксплуатация: 3-5 чашек в день.
1) Диспенсер разобран, сопла продуваются воздухом;
2) Трубка по «маршруту» от штуцера клапана ЗУ до выходного «толстенького» штуцера и сам выходной «толстенький» штуцер (который выделен красным на фото, от форумчанина) — проверены, промыты и продуваются воздухом — засоров и т.д.,- замечено там не было, были практически чистые на 90%.
3)трубка, диспенсера исследована по всей длине : промыта, продувается — засоров, и т.д обнаружено не было.
Пожалуйста, направляйте ваши предложения — что, делать далее, для устранения, проблемы: «сброс/вылет» трубки со штуцера клапана ЗУ, при работе с паром и гор.водой
Записан
Трубка внатяг или свободно садится на штуцер?
Записан
Трубка насаживается на штуцер «внатяг», плотнячком, — снимается/сдергивается со штуцера, с дополнительным усилием
Записан
Чудеса… Может видео приложите?
Записан
Не вижу связи между режимом вода/пар и слетающей трубкой кофевода. В этом режиме туда вообще не должно ни чего идти. Завврник в этот момент разомкнут от дренажного клапана физически.
Записан
Авторизация: Delonghi, Bork, Ariette, Jura, Nivona
Добрый день, форумчане.
Благодарю, за ответы.
Причина найдена — в одном месте шланг от диспенсера был наверно пережат, выровняли магистраль шланга.
Записан
- Печать
Страницы: [1] Вверх
Провести мелкий ремонт кофемашины Nivona своими руками в домашних условиях можно, следуя нижеописанным указаниям по устранению распространенных поломок:
| Не идет пар/горячая вода | |
| Причина | Действия |
| Засорилась насадка для подачи кипятка и пара. | Разберите и прочистите носик крана пара и горячей воды. |
| Не течет кофе | |
| Причина | Действия |
|
При работающей кофемолке отрегулируйте степень помола, следуя указаниям из инструкции к кофемашине. |
| Кофемолка слишком шумит | |
| Причина | Действия |
| В кофемолку попал инородный предмет. | Обратитесь в сервисный центр. |
| Не запускается программа декальцинации | |
| Причина | Действия |
| Программа фильтра установлена в режиме «ON». | Измените установку на «OFF». |
| Из кофемашины течет вода | |
| Причина | Действия |
|
Убедитесь, что трубки хорошо соединены или поменяйте изношенные уплотнители/прокладки. |
| Не молет кофе | |
| Причина | Действия |
|
Проверьте наличие зерен. Разберите кофемолку и очистите жернова от налипших остатков кофе. Вызовите мастера для ремонта или замены двигателя кофемолки. |
| Кофе не вытекает из дозатора | |
| Причина | Действия |
|
Прочистите каналы термоблока от накопившихся в них засоров и накипи. Если проблема не решена, вызовите мастера. |
| Кофе сливается в поддон/Недолив объема кофе | |
| Причина | Действия |
| Вышел из строя дренажный клапан. |
Требуется замена дренажного клапана и проверка узлов на наличие протечек. Рекомендуется обратиться в сервисный центр. |
Коды ошибок кофемашин Нивона
Если система обнаружит неполадку(и), то выведет на дисплее кофемашины текстовое сообщение об ошибке.
| Текст ошибки | Значение | Рекомендации |
| FILL-UP PIPE-SYSTEM/СИМВОЛ S12 |
Заполните гидросистему водой. водяной фильтр. |
Возьмитесь за ручку контроля клапана горячей воды и пара и поверните ее вправо. Замените фильтр. |
| FILL UP WATER/ГОРИТ СИМВОЛ S1 |
Нет воды в баке. Не вставлен бак для воды. |
Налейте свежей воды в бак. Правильно вставьте бак с водой. |
| FILL UP BEANS/МИГАЕТ СИМВОЛ S3 |
Отсутствуют кофейные зерна. Зерна не попадают в кофемолку. |
Насыпьте зерна в контейнер. При помощи чайной ложки аккуратно перемещайте зерна и сварите кофе. |
| PLEASE DESCALE/ГОРИТ СИМВОЛ S7 | Кофемашина загрязнена накипью. | Проведите декальцинацию. |
| REPLACE FILTER/ГОРИТ СИМВОЛ S6 | Фильтр воды исчерпал свой ресурс. | Замените фильтр для воды. |
| EMPTY TRAYS/ГОРИТ СИМВОЛ S2 |
Переполнен лоток для отработанного кофе. На контакты лотка попала вода или они загрязнены. |
Очистите лоток от кофейного жмыха. Тщательно протрите и очистите контакты. |
| TRAYS MISSING/МИГАЕТ СИМВОЛ S2 |
Некорректно вставлен или не установлен лоток для отработанного кофе. Наличие грязи или влаги на контактах, находящихся на задней стороне лотка. |
Выньте и вставьте правильно лоток для использованного кофе. Протрите или очистите контакты. |
| BREWING UNIT REMOVED/Символ S13, попеременно мигают штрихи 1 и 5 | Неправильно установлен варочный узел. | Следуйте указаниям из инструкции к кофемашине и установите варочный узел. |
Если рекомендации из таблицы не помогли устранить неполадки в работе аппарата, обратитесь в наш сервисный центр для диагностики и ремонта кофемашины Nivona!
Предлагаем ознакомиться со стоимостью основных работ по ремонту кофемашин на странице Прайс-листа. Точная стоимость ремонта кофемашины Нивона будет известна только после диагностики!
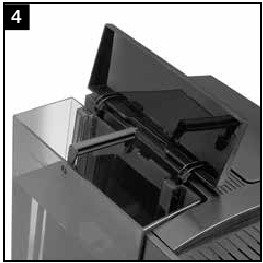
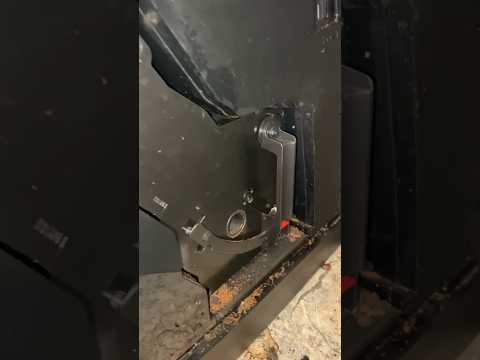
Откройте сервисную дверцу на правой стороне кофемашины (рис. 1/M).
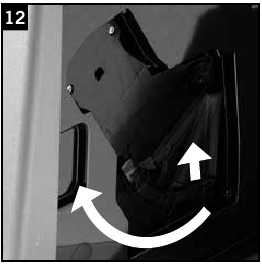
Разблокируйте варочный блок путем нажатия на красный переключатель и поворота ручки
влево до упора и щелчка (рис. 12).
После этого осторожно извлеките варочный блок за ручку.
Промойте варочный блок под проточной водой и дайте ему высохнуть.
Осторожно установите варочный блок назад и заблокируйте его, нажав на красный рычаг и
повернув ручку вправо до упора и щелчка.
Закройте сервисную дверцу. Убедитесь, что выступы на задней стенке вошли в соответствую-
щие пазы. Затем осторожно прижмите дверцу (рис. 1/M). При этом должен раздаться щелчок.
Сообщение
Возможные причины
Необходимые действия
Мигает символ S3
Недостаточно кофейных зерен
Добавить зерен в контейнер,
включить кнопку приготовле-
ния кофе
S12
Заполнить систему водой
Поверните ручку контроля
клапана пара и горячей воды
вправо
Возможно, неисправен фильтр
Удалить или заменить фильтр
Горит символ S1
Резервуар для воды пуст
Наполнить резервуар водой
Резервуар для воды отсутствует или
установлен неправильно
Правильно установить резер-
вуар для воды
Горит символ S2
Поддон и / или лоток для использо-
ванного кофе заполнен(ы)
Опорожнить поддон и / или
лоток для использованного
кофе
Мигает символ S2
Поддон и / или лоток для исполь-
зованного кофе отсутствует или
установлен неправильно
Установить поддон и / или
лоток для использованного
кофе
Горит символ S11
Необходимо запустить программу
очистки
Запустить программу очист-
ки системы (см. пункт 4.2)
Горит символ S7
Необходимо запустить программу
удаления накипи
Запустить программу удале-
ния накипи (см. пункт 4.3)
Горит символ S6
Срок действия фильтра истек
Заменить фильтр
(см. пункт 4.1)
Символ S13, по-
переменно мигают
штрихи 1 и 5
Варочный блок установлен непра-
вильно
Правильно установить и за-
блокировать варочный блок
(см. пункт 4.5)
5. Системные сообщения
Неисправность
Возможные причины
Необходимые действия
Не подается горячая
вода или пар
Забился носик подачи пара и
горячей воды / автокапучинатор
Spumatore (рис. 1/L)
Полностью разобрать и
тщательно почистить носик
подачи пара и горячей воды
/ автокапучинатор Spumatore
(рис. 3)
Образовавшаяся накипь блоки-
рует систему подачи
Провести удаление накипи с
применением высокодозиро-
ванного раствора (рис. 4.3)
Мало молочной пены
или слишком жидкая
пена
Неподходящее молоко
Использовать холодное
молоко
Забился носик подачи пара и
горячей воды / автокапучинатор
Spumatore (рис. 1/L)
Полностью разобрать и
тщательно почистить носик
подачи пара и горячей воды
/ автокапучинатор Spumatore
(рис. 3)
Слабый напор кофе
Образовавшаяся накипь блоки-
рует систему подачи
Провести удаление накипи с
применением высокодозиро-
ванного раствора (рис. 4.3)
Слишком мелкий помол кофе
Установить более грубый
уровень помола
Молотый кофе слишком мелко-
го помола
Использовать молотый кофе
более грубого помола
Кофе без пенки
Неподходящий сорт кофе
Использовать другой сорт
кофе
Несвежие зерна
Использовать свежие зерна
Настройки кофемолки не соот-
ветствуют используемым кофей-
ным зернам
Отрегулировать настройки
кофемолки
Кофемолка производит
громкий шум
Посторонние предметы в кофе-
молке, например, маленькие
камешки
Позвонить в службу сервисно-
го обслуживания, до решения
проблемы использовать пред-
варительно смолотый кофе
6. Самостоятельное устранение неисправностей
Если вам не удалось самостоятельно устранить неисправность, обязательно обратитесь в нашу
службу сервисного обслуживания (телефоны сервисной службы NIVONA в вашей стране можно
найти на сайте компании www.nivona.com/ru).
Если система обнаружила неисправность, то на дисплее появляется сообщение об ошибке, имею-
щее вид
• бегущих или
• светящихся штрихов.
RUS
RUS
106
107
4. Очистка и уход / 5. Системные сообщения
6. Самостоятельное устранение неисправностей
Содержание
- 1 Коды ошибок кофемашин Нивона
- 2 Цены на ремонт кофемашины Nivona
- 2.1 Очередь просмотра
- 2.2 Очередь
- 2.3 Хотите сохраните это видео?
- 2.4 Пожаловаться на видео?
- 2.5 Понравилось?
- 2.6 Не понравилось?
- 3 Текст видео
- 3.1 Очередь просмотра
- 3.2 Очередь
- 3.3 Хотите сохраните это видео?
- 3.4 Пожаловаться на видео?
- 3.5 Понравилось?
- 3.6 Не понравилось?
- 4 Текст видео
Провести мелкий ремонт кофемашины Nivona своими руками в домашних условиях можно, следуя нижеописанным указаниям по устранению распространенных поломок:
| Не идет пар/горячая вода | |
| Причина | Действия |
| Засорилась насадка для подачи кипятка и пара. | Разберите и прочистите носик крана пара и горячей воды. |
| Не течет кофе | |
| Причина | Действия |
|
При работающей кофемолке отрегулируйте степень помола, следуя указаниям из инструкции к кофемашине.
Кофемолка слишком шумит
Причина
Действия
В кофемолку попал инородный предмет.
Обратитесь в сервисный центр.
Не запускается программа декальцинации
Причина
Действия
Программа фильтра установлена в режиме «ON».
Измените установку на «OFF».
Из кофемашины течет вода
Причина
Действия
- Повреждены уплотнители дозатора или резервуара с водой;
- Плохое крепление соединительных трубок.
Убедитесь, что трубки хорошо соединены или поменяйте изношенные уплотнители/прокладки.
Не молет кофе
Причина
Действия
- Отсутствие зерен;
- Жернова загрязнены остатками кофе;
- Выход из строя двигателя.
Проверьте наличие зерен.
Разберите кофемолку и очистите жернова от налипших остатков кофе.
Вызовите мастера для ремонта или замены двигателя кофемолки.
Кофе не вытекает из дозатора
Причина
Действия
- Засорились каналы термоблока;
- Поломка нагнетательного насоса.
Прочистите каналы термоблока от накопившихся в них засоров и накипи.
Если проблема не решена, вызовите мастера.
Кофе сливается в поддон/Недолив объема кофе
Причина
Действия
Вышел из строя дренажный клапан.
Требуется замена дренажного клапана и проверка узлов на наличие протечек.
Рекомендуется обратиться в сервисный центр.
Коды ошибок кофемашин Нивона
Если система обнаружит неполадку(и), то выведет на дисплее кофемашины текстовое сообщение об ошибке.
Текст ошибки
Значение
Рекомендации
FILL-UP PIPE-SYSTEM/СИМВОЛ S12
Заполните гидросистему водой.
Возьмитесь за ручку контроля клапана горячей воды и пара и поверните ее вправо.
FILL UP WATER/ГОРИТ СИМВОЛ S1
Нет воды в баке.
Не вставлен бак для воды.
Налейте свежей воды в бак.
Правильно вставьте бак с водой.
FILL UP BEANS/МИГАЕТ СИМВОЛ S3
Отсутствуют кофейные зерна.
Зерна не попадают в кофемолку.
Насыпьте зерна в контейнер.
При помощи чайной ложки аккуратно перемещайте зерна и сварите кофе.
PLEASE DESCALE/ГОРИТ СИМВОЛ S7
Кофемашина загрязнена накипью.
Проведите декальцинацию.
REPLACE FILTER/ГОРИТ СИМВОЛ S6
Фильтр воды исчерпал свой ресурс.
Замените фильтр для воды.
EMPTY TRAYS/ГОРИТ СИМВОЛ S2
Переполнен лоток для отработанного кофе.
На контакты лотка попала вода или они загрязнены.
Очистите лоток от кофейного жмыха.
Тщательно протрите и очистите контакты.
TRAYS MISSING/МИГАЕТ СИМВОЛ S2
Некорректно вставлен или не установлен лоток для отработанного кофе.
Наличие грязи или влаги на контактах, находящихся на задней стороне лотка.
Выньте и вставьте правильно лоток для использованного кофе.
Протрите или очистите контакты.
BREWING UNIT REMOVED/Символ S13, попеременно мигают штрихи 1 и 5
Неправильно установлен варочный узел.
Следуйте указаниям из инструкции к кофемашине и установите варочный узел.
Если рекомендации из таблицы не помогли устранить неполадки в работе аппарата, обратитесь в наш сервисный центр для диагностики и ремонта кофемашины Nivona!
Цены на ремонт кофемашины Nivona
Предлагаем ознакомиться со стоимостью основных работ по ремонту кофемашин на странице Прайс-листа. Точная стоимость ремонта кофемашины Нивона будет известна только после диагностики!
Очередь просмотра
Очередь
- Удалить все
- Отключить
![]()
Хотите сохраните это видео?
- Пожаловаться
Пожаловаться на видео?
Выполните вход, чтобы сообщить о неприемлемом контенте.
Понравилось?
Не понравилось?
Текст видео
В видео показан ремонт электронной платы, предложены варианты ремонта дисплея старенькой кофемашины Нивона.
#ремонт #кофемашина #Nivona Краткий рассказ о схемотехнике кофемашины Nivona caferomatica nicr 830 (8 series) . Произведен ремонт платы управления. Ремонт гидросистему (устранили утечки поменяв уплотнительные кольца). Предложен ремонт дисплея (экрана).
Меня зовут Вячеслав. Я долго работал механиком по ремонту бытовых кофемашин и другой бытовой техники. Недавно я уволился с основной работы в крупном сервисном центре и открыл свой сервисный центр по ремонту кофемашин. О том, как мне удалось это сделать, какие трудности у меня возникли, и, самое главное, как ремонтировать и обслуживать кофемашины — я расскажу вам в своем видеоблоге #Кофемастер.
Nivona CafeRomatica NICR 520 / NICR 530 / NICR 550 / NICR 560 — Coffee / Espresso Machine Manual
Introduction
Dear Customer,
Congratulations and thank you very much for choosing a quality product by NIVONA. In order to enjoy your new NIVONA appliance to its best, please read this manual and pay attention to the safety tips before rst use. Please keep this manual safe. You can use it for references and hand it over to a future owner. Enjoy your coffee and the top quality appliance by NIVONA.
Оverview

fig. 1
- Display
- Coffee strength / volume selector
- Steam/hot water control
- Coffee button
- Steam/rinsing button
- Cover for water tank
- Water tank
- Cover for coffee bean container
- On/off switch
- Cup rack
- Steam/hot water jet, Spumatore
- Service door
- Lid of coffee powder chute
- Drip tray
- Used coffee container (inside)
- Water indicator for drip tray
- Drip grid
- Type label (inside, remove drip tray)
- Power cord bay
Display symbols
 |
S1 | Water tank |
 |
S2 | Drip tray |
 |
S3 | Coffee strength |
 |
S4 | Lid of coffee powder chute |
 |
S5 | Two cups |
 |
S6 | Filter |
 |
S7 | Descaling |
 |
S8 | Automatic switch-off |
 |
S9 | Temperature |
 |
S10 | Rinsing |
 |
S11 | Cleaning |
 |
S12 | Steam valve |
 |
S13 | Bar |
Safety information
- This appliance may only be used for the intended purpose (domestic use only). It is not intended for commercial use (see guarantee). Warranty claims will become void if this appliance is used for other than its intended purpose.
- It is imperative that appliance voltage and mains voltage are identical. Please check the type label/sticker on the appliance (see fig. 1/S).
- Do not use the appliance if the power cable or the casing is damaged. The power cable must never come into contact with any hot surfaces.
- Always pull the plug, not the power cable, when unplugging the appliance from the wall socket.
- Please adhere to the cleaning and decalcifying instructions at all times! Non-compliance will render warranty claims void.
- Please make sure that the appliance is switched off and the mains plug pulled before maintenance and cleaning.
- Place the appliance on a flat and stable surface and only use it indoors. Never place the appliance on hot surfaces or near an open fire.
- This appliance may be used by children from the age of eight as well as by persons with reduced physical, sensory or mental capabilities, or lack of experience and knowledge, as long as they are being supervised or have been given instructions for the use of the appliance, hence understanding the possible dangers. Children must not play with the appliance. Cleaning and user maintenance must not be undertaken by children without supervision.
- The appliance and its mains connections must be kept away from children under the age of eight.
- Unplug from mains if you are away for a few days.
- Do not leave the appliance on unnecessarily. Never immerse the appliance in water.
- Do not put the appliance or any of its parts in the dishwasher. Non-compliance will render warranty claims void.
- If the appliance shows any defect, pull the plug immediately (never tug at the mains cable or the appliance itself).
- Possible damages caused by incorrect, improper use or unqualified repair works will not be subject to liability. In these cases warranty claims become void.
- Please use the integrated coffee grinder for roasted and untreated beans only, never for other foodstuffs! Please make sure there are no foreign substances among the coffee beans — failing this warranty claims will become void.
- If a repair is necessary (including replacement of the power cable), please first contact the central telephone or email (info@nivona.com) support or the retailer where you bought the appliance – upon consultation and in accordance with item 8 of this manual send the appliance to NIVONA Zentralkundendienst, Südwestpark 90, D-90449 Nürnberg
- If the appliance’s power cable is damaged, it must be replaced by the manufac-turer, its customer service or a similarly qualified person to avoid danger.
Attention
:
Repairs to electrical appliances must only be undertaken by a professional! Improper repairs may result in severe danger for the user! Should the appliance be used or maintained improperly or incorrect, the warranty shall become void!
Attention
:
Using the on/off switch (fig.1/J) during the brewing process may damage the appliance! Turn the appliance off only after it has finished the job.
Attention
:
risk of burning! When drawing steam or hot water, a shot of hot water may spray from the steam/hot water jet or the Spumatore (fig. 1/L); allow the coffee spout, the steam/hot water jet and the Spumatore to cool down before you touch it.
CE – This appliance conforms to valid EG regulations.
Initial start-up
(Please read this and follow instructions before you brew your first coffee!)
Getting started
- Unpack the appliance and all items belonging to it with care.
The following are included in the package contents:
- User Manual
- Warranty card
- Measuring spoon with assembly instruction for filter insert
- Two cleaning tabs
- One Claris filter (NICR 530)
- One testing strip for water hardness
Tip: In case of customer service being required, the appliance should be shipped in its original pack- aging. Please keep this safe, including the polystyrene parts.
- Place the appliance on a flat, dry and suitable surface.
- Plug the power cord into a professionally installed mains socket.
- Your appliance has a power cord bay – if the cable is too long, place the excessive length in the power cord bay at the back (fig. 1/T)
The most important controls
Before you set the basic settings and brew your first coffee, please make yourself familiar with the main controls of your appliance.
Filling with water and beans
- Open the cover on the left (fig. 1/F) and remove the water tank (fig.4).

Clean it with clear, cold tap water. - Refill the water tank to maximum and insert it back in the appliance. Make sure the tank is safely locked in place.
Attention
:
Only use clear, cold water for the water tank! Never use sparkling water or any other liquids! Non-compliance will render warranty claims void.
- Open the bean container’s cover on the right (fig. 1/H). Fill with untreated, roasted coffee beans only (fig.5) and close again.
Attention
:
Never use beans that have been treated during or after roasting with supplements like sugar or similar. This may cause damages to the mill. Resulting repairs are not covered by the warranty.
Switching appliance on and filling the system
Tip: For production reasons the internal pipes may be empty when setting the appliance up for the first time. The appliance will show this as follows: the symbol S12
![]() will display when the mains are connected and the ON/OFF switch (fig. 1/J) has been pushed.
will display when the mains are connected and the ON/OFF switch (fig. 1/J) has been pushed.
- Connect the mains plug to a professionally installed socket.
- Switch the appliance on with the on/off switch (fig. 1/J).
After a short while the symbol S12 ![]() will show up in display.
will show up in display.
- Place a sufficiently large bowl (minimum contents 0.5 l) under the steam/hot water jet/ Spumatore (fig. 1/L) and turn the steam/hot water control (fig. 1/C) clockwise all the way.
The system is now being filled with water and cleaned through the steam/hot water spout/Spumatore. This process will finish automatically. - Afterwards turn the steam/hot water knob (fig. 1/C) anti-clockwise all the way to close.
Symbol S10 ![]() will now appear.
will now appear.
- Press steam/rinsing button (fig. 1/E). Your appliance is now ready for use.
Using the appliance with filter
It is up to you whether you would like to use the appliance with or without filter.
A Claris filter is included in the delivery (NICR 530). Using this filter, the appliance needs descaling less often because the filter softens the water. Ex factory the setting is «no filter».
- Empty the water tank (fig. 4) and carefully screw in the filter into the respective slot in the water tank, using the integrated tool at the end of the measuring spoon (fig. 6).

Attention
:
Do not overtighten or break.
Depending on the presets, one, two or three beans are shown in the display. The appliance is now ready for use.
Tip: If you are using a filter, the internal water softening is automatically set to water hardness level 1! The appliance needs descaling less frequently – but always descale when called upon to do so and always with the FIILTER REMOVED.
The filter will be flat after approx. 50 l of water have been drawn (see chapter 4.1. how to change the filter).
Attention
:
Even if the display does not indicate «Change filter» by highlighting the symbol ![]() , the filter needs changing after a maximum of two months if the appliance is not used regularly (see chapter 4).
, the filter needs changing after a maximum of two months if the appliance is not used regularly (see chapter 4).
Using the device without filter, adjust water hardness
Depending on the water hardness in your area, the appliance needs to be descaled every now and again. For the system to be able to indicate that this is necessary, you need to set the correct water hardness prior to first use.
Using the appliance with the filter and the appropriate settings (see above) the water hardness is automatically set to level 1.
First test the water quality with the enclosed test strip.
- Dip the test strip into the water and shake it lightly.
- After about one minute you will be able to read the result by counting the red dots on the test strip.
- The different levels are listed as follows and can be adjusted:
Test strip / Degree of hardness = Display
1 red dot / 1–7° = LEVEL 1 = 1 red bar
2 red dots / 8–14° = LEVEL 2 = 2 red bars
3 red dots/ 15–21° = LEVEL 3 = 3 red bars
4 red dots / >21° = LEVEL 4 = 4 red bars
Tip: If the test strip does not show any red dot, please set up level 1.
Attention
:
Should you want to use the appliance without filter, the water hardness must be set. This is important because depending on the water hardness the appliance needs to be descaled more often (ex factory the appliance comes with the setting «use without filter; level 3 water hardness»!).
Depending on the presets, one, two or three beans are shown in the display. The appliance is now ready for use.
Set automatic switch-off time
This function allows you to determine the automatic switch-off time after the last use. The ex factory setting is «after 5 minutes».
- Press steam/rinsing button (fig. 1/E) for more than 3 seconds to go to main menu. Release button.
- Press steam/rinsing button (fig. 1/E) repeatedly until symbol S8
 appears.
 - To change the switch-off time press the coffee button (fig.1/D) repeatedly.
In doing so you increase the number of bars at the bottom of the display one bar at a time according to your personal preference:
1 bar = automatic switch-off time after 5 minutes
2 bars = automatic switch-off time after 30 minutes
3 bars = automatic switch-off time after 70 minutes
- Press steam/rinsing button (fig. 1/E) to confirm your choice. The bars will light up briefly.
- Press steam/rinsing button (fig. 1/E) for more than 3 seconds to leave the main menu.
Depending on the presets, one, two or three beans are shown in the display. The appliance is now ready for use.
Adjusting the temperature
You can adjust the temperature as required to «normal», «high» or maximum». The ex factory setting is «high».
- Press steam/rinsing button (fig. 1/E) for more than 3 seconds to go to main menu. Release button.
- Press steam/rinsing button (fig. 1/E) repeatedly until symbol S9
 appears.
 - To change the temperature press coffee button (fig.1/D) repeatedly.
In doing so you increase the number of bars at the bottom of the display one bar at a time. Set the level for your preferred temperature in accordance with the number of red bars. The bars read as follows:
1 bar = temperature «normal»
2 bars = temperature «high»
3 bars = temperature «maximum»
After 3 bars the display starts again with one bar.
- Press steam/rinsing button (fig. 1/E) to confirm your choice. The bars will light up briefly.
- Press steam/rinsing button (fig. 1/E) for more than 3 seconds to leave the main menu. Depending on the presets, one, two or three beans are shown in the display. The appliance is now ready for use.
Setting the automatic off-rinsing process
Optionally you can activate the automatic off-rinsing process for additional hygiene after the appliance has been switched off.
The ex factory setting is «off».
- Press steam/rinsing button (fig. 1/E) for more than 3 seconds to go to main menu.
- Press steam/rinsing button (fig. 1/E) repeatedly until symbol S10
 appears.
 - To change the setting press the coffee button (fig.1/D) repeatedly.
In doing so you increase the number of bars at the bottom of the display one bar at a time. Set the level for your preferred temperature in accordance with the number of red bars:
1 bar = automatic off-rinsing „off»
2 bars = automatic off-rinsing „on»
After 2 bars the display starts again with one bar.
- Press steam/rinsing button (fig. 1/E) to confirm your choice. The bars will light up briefly.
- Press steam/rinsing button (fig. 1/E) for more than 3 seconds to leave the main menu.
Depending on the presets, one, two or three beans are shown in the display. The appliance is now ready for use.
Adjusting the coarseness of the grinding
Attention
:
Only adjust the grinding coarseness whilst the grinder is running.
You can adjust the grinder according to the particular blend of bean. We suggest the grinder is kept on a medium setting.
To change the coarseness of the grinding, please follow these steps:
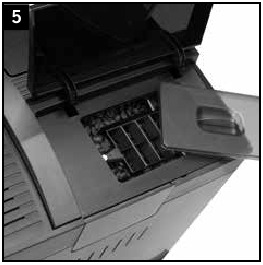
- Open the service door on the right of the casing (fig. 1/M).
The grinding coarseness control is at the top right (fig. 11).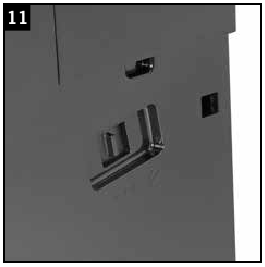
- Place a cup under the coffee spout.
- Press the coffee button (fig. 1/D).
- While the grinder is grinding, change the coarseness of grinding by moving the control (fig. 11).
The smaller the dot, the finer the coffee powder. Please note:
- A light roast level needs finer grinding adjustment (control further to the left).
- A dark roast level requires coarser grinding adjustment (control further to the right).
Check out for yourself the best setting according to your personal taste.
- Close the service door gently and in doing so carefully place the pivots at the back of the service door into the notches. Make sure that the door completely snaps back into place.
Reset to factory settings
To reset the factory settings proceed as follows:
- Switch the appliance on.
- Press steam/rinsing button (fig. 1/E) and coffee button (fig. 1/D) simultaneously for more than 3 seconds.
- All red bars will light up briefly.
The factory setting has been reset.
Making coffee
Tip: Ex factory the appliance is set so that you can brew your first coffee straightaway. But we do recommend to make the necessary adjustments according to your personal preferences. Hence check chapter 2 «Getting started» first and follow its instructions!
Tip: When you use the appliance for the first time or if it hasn’t been used for a prolonged period of time the first cup will not have the full aroma and should therefore not be consumed.
Switching the appliance on
Once you have completed the instructions (chapter 2), the procedure for switching the appliance on is always similar:
- Switch on using the on/off switch (fig. 1/J).
The display shows 5 flashing red bars. When the system has reached its operating temperature, the display will show symbol S10 ![]() .
.
- Press steam/rinsing button (fig. 1/E).
The system is now being rinsed. The appliance is now ready for use. Depending on the presets, one, two or three beans are shown in the display.
Tip: if you do not use the appliance for a prolonged period of time (e.g. holidays), switch it off using the on/off switch (fig. 1/J) and pull the mains plug.
Selecting the coffee strength
The coffee strength can be set in three levels according to taste which the display will show:
MILD, the display features one bean, about 7 grams of ground coffee, e.g. for latte or cappuccino;
STANDARD, the display features two beans, about 9 grams of ground coffee, e.g. for coffee;
STRONG, the display features three beans, about 11 grams of ground coffee, e.g. for espresso or strong coffee.
As soon as the appliance is operational, the display will show either its latest preset or the ex factory setting.
- You can change the setting by repeatedly pressing the coffee strength / volume selector (fig. 1/B). Thus the coffee strength changes from mild (one bean in display) to standard (two beans in display) to strong (three beans in display) and back to mild.
Select water volume
- By turning the coffee strength / volume selector (fig. 1/B), you can smoothly adjust the amount of water (cup symbol bottom left for little water, full cup symbol bottom right for plenty of water).
Making a cup of coffee
Once you’ve chosen coffee strength (see chapter 3.2) and water volume (see chapter 3.3),
- Place a cup centrally beneath the spout (fig. 7).
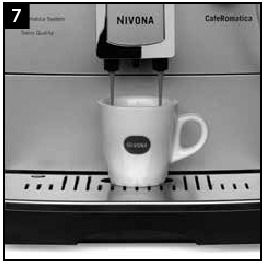
The spout is adjustable in height to match the size of the cup.
- Press the coffee button briefly (fig. 1/D).
The appliance will now start grinding, pre-brewing and brewing.
The process can be aborted any time by pressing the coffee button again.
Attention
:
When making your first coffee, the grinder box is still empty. It can therefore happen that the symbol S3 ![]() will flash after the first grinding and the appliance will not make any coffee.
will flash after the first grinding and the appliance will not make any coffee.
- In this case simply press the coffee button again (fig. 1/D).
Tip: The water volume can be adjusted while making coffee. Check out for yourself the best setting according to your personal taste and the size of the cup.
Tip: To remember the ideal setting for your personal taste, proceed as follows:
- Turn the coffee strength / volume selector (fig. 1/B) to the following positions:
- a small espresso cup to the centre,
- a large cup to the far right.
- Press the coffee button (fig. 1/D).
The appliance will now start making coffee. - Shortly before the set amount of coffee is ready, turn the coffee strength / volume selector (fig. 1/B) slowly to the left until the appliance stops working.
Make a note of the coffee strength / volume selector’s position for the size of the coffee cup.
Making two cups of coffee
Once you’ve chosen coffee strength (see chapter 3.2) and water volume (see chapter 3.3),
- place two cups beneath the spout (fig. .
 .
.
The spout is adjustable in height to match the size of the cups.
- Press the coffee button twice in succession (fig. 1/D).
The display will show symbol S5 ![]() .
.
The appliance will now start grinding, pre-brewing and brewing.
The process can be aborted any time by pressing the coffee button (fig. 1/D) again.
When making two cups the grinder will automatically do two rounds.
Attention
:
When making your first coffee, the grinder box is still empty. It can therefore happen that the symbol S3 ![]() will flash after the first grinding and the appliance will not make any coffee.
will flash after the first grinding and the appliance will not make any coffee.
- In this case simply press the coffee button again (fig. 1/D).
Tip: In case there is not enough water or the bean container runs out during the two grinding cycles or the trays need emptying, the respective symbols will show on the display. In that case the second cup will not be brewed. Follow the display and press the coffee button (fig. 1/D) again for the second cup.
Making ground coffee
- Turn the coffee strength / volume selector (fig. 1/B) to the water volume required for one cup.
- Open the lid of coffee powder chute (fig. 1/N). Symbol S4
 blinkt.
 - Pour in one level measuring spoon of ground coffee and close the lid.
Symbol S4 ![]() is flashing.
is flashing.
- Place one or two cups under the coffee spout (fig. 7 or and press the coffee button (fig. 1/D) once or twice respectively.
The appliance will now start pre-brewing and brewing – without grinding.
Tip: If you have opened the lid of coffee powder chute accidentally or did not press the coffee button after having poured in the ground coffee, the appliance will automatically start rinsing for a minute once the lid is closed. The appliance will then be operational again.
Attention
:
The coffee powder chute is not a storage container. Therefore never pour in more than one portion of coffee and only use fresh or vacuum-packed coffee ground from coffee beans. Do not use water-soluble instant coffee!
Making hot water (e.g. for tea)
- Hold a cup under the steam/hot water jet /Spumatore (fig. 1/L).
- Turn the steam/hot water control (fig. 1/C) clockwise.
- Fill the cup with the required water and turn the knob back anti-clockwise to position 0.
Risk of scalding! Escaping water may spray! The steam/hot water jet /the Spumatore becomes very hot when used. Let the steam/hot water jet /the Spumatore cool down for a few minutes before touching it. Only touch the rubber parts.
Tip: You can draw hot water for about 2 minutes, after that the appliance will automatically shut down. By turning the steam/hot water control (fig. 1/C) backwards and forwards, you can re-start the process.
Frothing milk and making cappuccino
The special Spumatore frothing aid (fig. 1/L) can froth milk directly into the cup from a container.
- Immerse the suction hose (fig. 9 and 10) into the milk (in the container or directly into the milk carton).
- Place a cup under the Spumatore.
- Press steam/rinsing button (fig. 1/E).

Whilst heating-up 5 red bars will flash at the bottom of the display. As soon as symbol S12 ![]() shows, you can draw steam and froth milk.
shows, you can draw steam and froth milk.
Attention
:
A small amount of water will initially precede the milk froth.
- Fill the cup with the required amount of milk froth and turn the steam/hot water knob (fig. 1/C) back anti-clockwise to position 0.
- Wait for the last milk drops before placing the cup under the coffee spout.
- Press the steam/rinsing button (fig. 1/E) once again.
The appliance is now back to coffee mode. - Place the cup with the frothed milk under the coffee spout (fig. 7) and fill up with the required amount of coffee as described in chapter 3.4.
Tip: You can draw hot steam for about. 2 minutes, after that the appliance will automatically shut down. By turning the steam/hot water knob (fig. 1/C) back and forth, you can re-start the process.
Attention
:
Dried milk residue on the steam/hot water jet is dif ficult to remove. Clean immediately after it has cooled off!
- To do this fill a bowl with clean water and immerse the suction hose in it.
- Place an empty bowl under the Spumatore (fig. 1/L).
- Press steam/rinsing button (fig. 1/E).
Whilst heating-up 5 red bars will flash at the bottom of the display. As soon as symbol S12 ![]() shows, you can draw steam.
shows, you can draw steam.
- Turn the steam/hot water control (fig. 1/C) clockwise.
Attention
:
A small amount of water will initially precede the steam.
- Draw water until only clean water/steam emerges.
- Turn the steam/hot water control (fig. 1/C) anti-clockwise back to position 0.
- Press the steam/rinsing button (fig. 1/E) once again.
The appliance is now back to coffee mode.
Attention
:
From time to time (ideally each time the appliance will not be used for a while, at any rate in regular intervals!) the Spumatore needs to be completely dismantled (fig. 3) and thoroughly cleaned under running water.
Cleaning and maintenance
Attention
:
If your appliance needs cleaning or maintenance, the display will show the respective sym- bol. Please always follow these instructions, otherwise your warranty will be void. Read chapters 4.1 to 4.5 for further information. Should you wish to maintain or clean your device without being asked to do so, please also follow the instructions in chapters 4.1 to 4.5.
Changing the filter
The filter will be flat after about 50 l of water have been drawn. The display shows symbol S6 ![]() .
.
You can still make coffee, but we recommend to always change the filter immediately.
Attention
:
The filter needs changing after a maximum of two months if the appliance is not in regular use. The display will show no status signal. Use the dial (by the month) at the top of the filter to select the date of change.
The device will heat up briefly and is ready for use again.
System cleaning
If the device needs cleaning, the display will show symbol S11 ![]() .
.
Tip: You can continue making coffee or draw hot water and steam, but we recommend to start the cleaning program as soon as possible. Otherwise the function might be impaired and your warranty could be compromised.
Attention
:
Do not disrupt the cleaning process. Follow the instructions exactly in the stated order. Insert cleaning tab only if the appliance asks for it.
Tip: During the cleaning process the red bars at the bottom of the display will show the progress. The more bars that are visible, the further the program has advanced.
Symbol S11 flashes on the display, symbols S1 ![]() and Symbol S2
and Symbol S2 ![]() are on.
are on.
- Remove the water tank (fig.4) and fill it to maximum. Reinsert the water tank.
- Remove drip tray with used coffee container (fig. 1/O and P) and empty both.
- Reinsert drip tray and used coffee container.
The appliance starts cleaning. When finished symbol S4 ![]() will additionally show.
will additionally show.
- Place a sufficiently large bowl (about 0.5 l) under the coffee spout.
- Open the lid of coffee powder chute (fig. 1/N).
Symbol S4 flashes to indicate that the cleaning tab should be inserted. - Place a cleaning tab in the coffee powder chute and close the lid,
The cleaning process starts. Symbol S11 ![]() flashes. The cleaning process is automatic and will run for about 10 minutes. Once the process has finished, symbol S2
flashes. The cleaning process is automatic and will run for about 10 minutes. Once the process has finished, symbol S2 ![]() , is on and symbol S11
, is on and symbol S11 ![]() flashes.
flashes.
- Remove drip tray with used coffee container (fig. 1/O and P) and empty both.
- Reinsert drip tray and used coffee container.
The appliance briefly heats up. It is ready for use again when the bean symbols in the display are on.
Manual cleaning
If required the cleaning program can also be started and run as described in chapter 4.2, without the prompt of symbol S11 ![]() .
.
Descaling
If the appliance needs descaling, symbol S7 ![]() appears on the display.
appears on the display.
Tip: You can continue making coffee or draw hot water and steam, but we recommend to start the desca- ling program as soon as possible. Otherwise the function might be impaired and your warranty could be compromised.
Attention
:
Do not disrupt the descaling program. Follow the instructions exactly in the stated order. Never use vinegar or vinegar-based agents, only standard liquid products specifically recommended for automatic coffee machines.
Attention
:
Before starting the descaling program remove the filter from the water tank.
Tip: During the descaling program the progress is displayed through the red bars at the bottom of the display. The more bars are shown the further the progress.
The appliance briefly heats up. It is ready for use again when the bean symbols in the display are on.
Attention
:
Please remove any descaler residues on the casing immediately with a damp cloth.
Manual descaling
If required the descaling program can also be started and run as described above, without the prompt of symbol S7 ![]() .
.
Regular cleaning by hand
Tip: Please follow these cleaning instructions as working with foodstuffs demands the highest degree of cleanliness.
Attention
:
Never immerse the appliance in water! Do not use abrasive cleaning agents.
- Empty drip tray and used coffee container regularly (fig. 1/O and P). The red floating indicator at the back of the drip tray (fig. 1/Q) shows the tray’s filling level.
- Only use a soft, damp cloth for cleaning the casing inside and outside.
- Empty drip tray and used coffee container (fig. 1/O and P) at the latest when this is indicated on the display (only when the appliance is switched on!).
Occasionally use a little soapy water for cleaning.
- The water tank should be rinsed daily with clear water and then re-filled daily with fresh cool water.
TIP: Dried milk residue is dif ficult to remove.
- Therefore clean the steam/hot water jet/Spumatore, the suction hose regularly.
Attention
:
From time to time (ideally each time the appliance will not be used for a while, at any rate in regular intervals!) the steam/hot water jet needs to be completely dismantled and thoroughly cleaned under running water (fig.3). 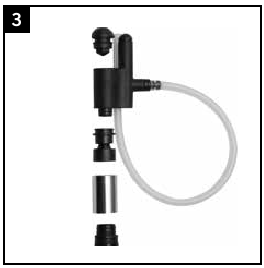
We recommend our special cleaning agent for milk residue NICC 705.
Cleaning the brew unit
Attention
:
Remove the brew unit only when the appliance is switched off.
When necessary the brew unit can be removed and cleaned under cold, running water. Never use any cleaning agent, but clear, cold water only! For hygienic reasons we recommend the removal and cleaning of the unit thoroughly after each run of the cleaning program (see chapter 4.2).
- Open and remove the service door on the right of the casing (fig. 1/M).
- Remove the brew unit by pressing the red switch and turning the handle all the way to the left until it snaps into place (fig. 12).
- Carefully remove the brew unit using the handle.
- Clean the brew unit under running cold water and let it dry.
- Reinsert the brew unit carefully and lock by pressing down the red switch and turning the handle all the way to the right until it snaps into place.
- Close the service door and in doing so carefully place the pivots at the back of the door into the notches. Make sure that the door (fig. 1/M) completely snaps back into place.
System reports
| Report | Cause | Solution |
S3  flashes flashes |
No beans | Add beans, restart coffee making |
S12  |
Refill water pipe system Filter possibly defective | Turn steam/hot water control clockwise Remove or replace filter |
S1 on on |
Water tank is empty | Fill water tank |
| Water tank is missing or inserted incorrectly | Reinsert water tank | |
S2 on on |
Drip tray and/or used coffee container full | Empty drip tray and/or used coffee container |
S2  flashes flashes |
Drip tray with used coffee container missing or tted incorrectly | Reinsert drip tray with used coffee container |
S11  on on |
System cleaning required | Clean system (see chapter 4.2) |
S7  on on |
System descaling necessary | Descale system (see chapter 4.3) |
S6  on on |
Filter exhausted | Change filter (see chapter 4.1) |
| S13 bar 1 and bar 5 flash alternately | Brew unit fitted incorrectly | Fit brew unit correctly and snap into place (see chapter 4.5) |
Problem solving
| Fault | Cause | Solution |
| No hot water or steam |
Blocked steam/hot water jet/ Spumatore (fig.1/L) System may be calcified |
|
| Not enough milk froth or liquid froth |
Unsuitable milk Blocked steam/hot water jet / Spumatore |
|
| Coffee only drips |
System may be calcified Coffee is too finely ground Coffee powder too fine |
|
| No «crema» on the coffee |
Unsuitable coffee beans Beans may be too old Grinding coarseness not adjusted to beans |
|
| Strong noise from coffee grinder | Foreign matter in grinder, e.g. small stones |
|
In the event of a fault or a system report which you cannot correct yourself, please contact our email (info@nivona.com) or Service-Hotline: 0049 911-25266390
If the system detects any errors, the display will show an error report
- flashing bars or
- lighted bars.
Attention
:
Please make a note of the flashing or lit up bars. Switch the appliance off and pull the mains plug. Then call the service hotline 0049-911-25266390 or email (info@nivona.com) us with name type, serial number (see type label, fig.1/S) and error number. Our service team will take care of the next steps.
Replacement parts/Accessories
Fresh water filter NIRF 700:
New fresh water filters are available from well-stocked local dealers.
Cleaning tabs NIRT 701:
New cleaning tabs are available from well-stocked local dealers.
Descaling agent NIRK 703:
New descaling agents are available from well-stocked local dealers.
Special milk residue cleaner NICC 705:
Special milk residue cleaner is available from well-stocked local dealers.
MilkCooler NICT 500:
This top-quality stainless steel milk cooler keeps milk „fridge cold» for a long time and delivers the best frothing results.
Customer service, guarantee, environmental protection
Customer service
Nivona products are manufactured to the highest quality standards. Should any question arise with regards to your appliance, please do not hesitate to write to us. Only with your active support will we be able to improve our products and further develop them, so that they will fully satisfy your demand. In the event that you need to ship your faulty appliance directly to us, please make sure that no residual water remains in the system:
- Switch the appliance off.
- Press the on/off switch (fig. 1/J) and the steam/rinsing button (fig. 1/E) simultaneously for at least 3 seconds.
- Remove the water tank (fig. 4).
- Place a sufficiently large bowl (minimum contents 0.5 l) under the steam/hot water jet / Spumatore.
- Turn the steam/hot water control (fig. 1/C) clockwise all the way.
The appliance is now steaming off. All 5 red bars are flashing in the display. - When symbol S12
 shows, turn the steam/hot water control (fig.1/C) anti-clockwise.
The appliance will then switch off. - Remove drip tray with used coffee container (fig. 1/O and 1/P) and empty both.
- Reinsert drip tray and used coffee container.
Your appliance is now ready for shipment.
Tip: Please make sure that you pack the appliance very carefully before shipping, ideally in the original packaging. The manufacturer will assume no liabilities for damage in transit.
Guarantee and customer service terms and conditions
Please find detailed information about guarantee and customer service terms and conditions in the accompanying document.
Please dispose of filters with domestic waste.
Disposal of your old appliance and packaging
Please keep the original packaging. It will serve as protection should you need to ship the appliance in the event of a customer service issue.
Electrical and electronical appliances often contain valuable, but sometimes also environmentally damaging material and should therefore not be disposed of as normal household waste. They may damage human health and harm the environment when wrongfully handled or left among residual waste. Therefore please drop your old or irreparably damaged appliance at your local community waste collection/recycling centre.
Further information is available from the dealer where you bought the appliance, your town hall or waste collector.
Technical data
Voltage 220 — 240V AC, 50/60 Hz
Power consumption 1455 W
NIVONA Apparate GmbH
Südwestpark 90
D-90449 Nürnberg Germany
www.nivona.com
© 2017 by NIVONA

Documents / Resources
References
http://www.nivona.com
Download manual
Here you can download full pdf version of manual, it may contain additional safety instructions, warranty information, FCC rules, etc.
Download Nivona CafeRomatica NICR 520 / NICR 530 / NICR 550 / NICR 560 — Coffee / Espresso Machine Manual

Natali
1 месяц назад
Большое спасибо!!! Все получилось. Как хорошо, что Вы есть!!!

Яковлев Александр
1 месяц назад
Спасибо большое за полезную информацию ! Лайк однозначно ! 😊👍

Vittoria
2 месяца назад
спасибо огромное за ваше видео, уже думала новую придется покупать
на сайтах искала, как починить, ничего не было!
по вашему видео все сделала, теперь работает 🙏🏻

Минзалька Латыпова
2 месяца назад
Здравствуйте! Спасибо большое! Кофемашина реанимирована благодаря вашей помощи!

сеня иванов
3 месяца назад
постоянно горит значок — «налейте воды» , всё перепробывал , всё равно горит

Andrey Maltsev
5 месяцев назад
Валерий, здравствуйте! Подскажите пожалуйста, как быть, вчера включил машину, горит значок зерна, мигают разово по порядку 3 зерна, еле вытащил блок и теперь обратно не вставляется. При включении машины сразу мигают штрихи.

Андрей Стасенков
6 месяцев назад
Большое Вам СПАСИБО !!! Если бы не ваш комментарий, Я уже думал, что моей кофе-машинке пришёл временный конец и надо искать мастерскую, но сделал как Вы сказали и всё заработало…

Андрей Кевишас
6 месяцев назад
Спасибо, помогло

Igor Yusupov
6 месяцев назад
Сделал все также, не помогло(

87754453150 Мирошниченко
8 месяцев назад
Сразу извиняюсь за т9
87754453150 Мирошниченко
8 месяцев назад
Доброго времени суток спасибо вам за ваши видео. У меня вот такой вопрос неделю назад я купил нивону 530 новую с магазина сегодня хотел сварить кофе на мелком помоле выбоал три зерна крепости но машина не смогла продавить таблетку хотя на соеднем помоле и крепость три зерна варит что может быть?

Arucard Ec
8 месяцев назад
спасибо, помогло!

Александр Глушенко
8 месяцев назад
Спасибо!!! Очень помогли. С Рождеством!!!

Olesa Maviles
8 месяцев назад
Спасибо Вам большое

Pavel Olegovič
8 месяцев назад
Добрый день. У меня горит такой же значёк, никаких звуков подкачки и т.д. не присутствует. Попробывал эту функцию — полоски горят (нагрев идёт) но вода/пар не идёт. Проверял на насосе нет питания 220 В, замер показывает 30 вольт. Платы все пересмотрел — визуально как новые. Какие могут быть причины?

valery valery
8 месяцев назад
Скажите пожалуйста, если кнопка входа в главное меню, для чистки, не реагирует ни на какие нажатия, что делать?

Сергей МАН ТГЛ
8 месяцев назад
Спасибо большое Добрый человек !

Анжела Стеба
9 месяцев назад
Огромное спасибо.Очень помогли.В любой непонятной ситуации,смотрю Вас.

ПРОдетейл
9 месяцев назад
Здравствуйте, может быть у вас есть ответ на вопрос почему машина не видит лоток для отходов. После включения сразу мигает символ лотка. Лоток чистый. Побывал замыкать концевик лотка — не помогает

Илья Инкин
9 месяцев назад
Спасибо огромное, самое толковое видео по этой проблеме
Если кофемашина не видит воду и показывает ошибку NivonaПодробнее
Nivona 520 сброс настроек на заводские и установка всех настроек заново.Подробнее
Nivova 520 решаем проблемы с подачей пара и горячей воды(без разборки кофемашины)Подробнее

Ремонт кофемашины Nivona 670 (520). Удаление засора, принцип поиска неисправностей гидросистемы.Подробнее
Ремонт кофемашины NIVONA своими руками.Подробнее
Инструкция по полному ТО кофемашины Nivona 520 с полным разбором. Ремонт кофемашин Калининград.Подробнее
Лайфхак для владельцев Nivona #shortsПодробнее

Nivona 520 чистка от накипи.Разборка капучинатора.Подробнее
Nivona 520 -рассыпает смолотый кофе!Подробнее
Кофемашина Nivona не делает кофе 🙄 #coffeemachines #ремонткофемашин #ремонтмосква #кофемашина #toolПодробнее
Самые частые «поломки» кофемашин. Как избежать и как «починить» самому? На примере Nivona/Melitta.Подробнее
Как смазать заварочный блок у Nivona, Miele, Melitta без разбора?Подробнее
Nivona 520 подтекает бак,отвечаю на вопросы подписчиков.Подробнее
Я расстроен… Ремонт Nivona 779 с дефектом «ДОБАВИТЬ…» История одного ремонта.Подробнее