Модуль ngx_http_auth_request_module (1.5.4+) предоставляет
возможность авторизации клиента, основанной на результате подзапроса.
Если подзапрос возвращает код ответа 2xx, доступ разрешается.
Если 401 или 403 — доступ запрещается с соответствующим кодом ошибки.
Любой другой код ответа, возвращаемый подзапросом, считается ошибкой.
При ошибке 401 клиенту также передаётся заголовок
“WWW-Authenticate” из ответа подзапроса.
По умолчанию этот модуль не собирается, его сборку необходимо
разрешить с помощью конфигурационного параметра
--with-http_auth_request_module.
Модуль может быть
скомбинирован с другими модулями доступа, такими как
ngx_http_access_module,
ngx_http_auth_basic_module
и
ngx_http_auth_jwt_module,
с помощью директивы satisfy.
До версии 1.7.3 ответы на авторизационные подзапросы не могли быть закэшированы
(с использованием директив
proxy_cache,
proxy_store и т.п.).
Пример конфигурации
location /private/ {
    auth_request /auth;
    ...
}

location = /auth {
    proxy_pass ...
    proxy_pass_request_body off;
    proxy_set_header Content-Length "";
    proxy_set_header X-Original-URI $request_uri;
}
Директивы
| Синтаксис: |
auth_request
|
|---|---|
| Умолчание: |
auth_request off; |
| Контекст: |
http, server, location
|
Включает авторизацию, основанную на результате выполнения подзапроса,
и задаёт URI, на который будет отправлен подзапрос.
| Синтаксис: |
auth_request_set
|
|---|---|
| Умолчание: |
— |
| Контекст: |
http, server, location
|
Устанавливает переменную в запросе в заданное
значение после завершения запроса авторизации.
Значение может содержать переменные из запроса авторизации,
например, $upstream_http_*.
2 января, 2015 12:50 пп
15 315 views
| Комментариев нет
Cloud Server
При обращении к веб-серверу или приложению каждый поступивший HTTP-запрос получает в качестве ответа код состояния HTTP (англ. HTTP status code). Коды состояния HTTP – это трехзначные коды, сгруппированные в пять различных классов. Класс кода состояния можно определить по первой цифре:
- 1хх – информационные коды;
- 2хх – успех;
- 3хх – перенаправление;
- 4хх – ошибка клиента;
- 5хх – ошибка сервера.
Это руководство фокусируется на выявлении и устранении наиболее часто встречающихся кодов ошибок HTTP (то есть кодов состояния 4xx и 5xx) с точки зрения системного администратора. В некоторых ситуациях веб-сервер отвечает на запрос определенным кодом ошибки; рассмотрим общие возможные причины и решения.
Краткий обзор ошибок клиента и сервера
Ошибки клиента (коды состояния HTTP 400-499) возникают из-за HTTP-запросов, отправленных клиентом (веб-браузером или другим клиентом HTTP). Хотя данные типы ошибок связаны непосредственно с клиентом, системному администратору полезно знать, с какими кодами ошибок может столкнуться пользователь, чтобы определить, можно ли решить эту проблему в конфигурациях сервера.
Ошибки сервера (коды состояния HTTP 500-599) возникают тогда, когда веб-сервер не в состоянии обработать запрос из-за какой-либо ошибки или сбоя.
Общие советы по устранению ошибок HTTP
- При использовании веб-браузера для тестирования веб-сервера не забудьте обновить браузер после внесения изменений в настройки сервера.
- Проверяйте логи сервера, чтобы получить подробные сведения о том, как сервер обрабатывает запросы. Например, веб-серверы Apache и Nginx создают два файла по имени access.log и error.log, в которых можно найти соответствующую информацию.
- Запомните: определения кодов состояния HTTP являются частью стандарта, который реализуется обслуживающим запросы приложением. Это означает, что фактический код состояния, который возвращается в результате, зависит от того, как программное обеспечение сервера обрабатывает конкретную ошибку.
Ознакомившись с основными понятиями кодов состояния HTTP, приступим к обзору наиболее часто встречающихся ошибок.
Ошибка 400 Bad Request
Код статуса 400, или ошибка Bad Request («неверный запрос») означает, что синтаксис запроса HTTP, отправленного на сервер, неверен.
Как правило, причины возникновения ошибки 400 Bad Request таковы:
- Куки пользователя, связанные с сайтом, повреждены. Чтобы решить эту проблему,, попробуйте очистить кэш браузера и файлы cookie.
- Искаженный запрос из-за неисправного браузера.
- Искаженный запрос из-за ошибки пользователя при формировании HTTP-запроса вручную (например, неправильное использование curl).
Ошибка 401 Unauthorized
Код статуса 401, или ошибка Unauthorized («неавторизован») значит, что пользователь, пытающийся получить доступ к ресурсу, не прошел авторизацию (или не смог пройти ее, указав неверные учетные данные). Чтобы иметь возможность просматривать защищенный ресурс, пользователь должен предоставить корректные учетные данные.
Например, ошибка 401 Unauthorized может возникнуть, если пользователь пытается получить доступ к ресурсу, который защищен HTTP-авторизацией (как в этом руководстве по Nginx). В подобной ситуации ошибка 401 будет появляться снова и снова до тех пор, пока пользователь не предоставит корректный логин и пароль (который внесен в файл .htpasswd).
Ошибка 403 Forbidden
Код состояния 403, или ошибка Forbidden («запрещено») значит, что запрос пользователя был отправлен верно, но сервер отказывается обслуживать его в связи с отсутствием разрешения на доступ к запрашиваемому ресурсу. В этом разделе описаны наиболее распространенные причины возникновения ошибки 403.
Права на файл
Как правило, ошибка 403 случается, если пользователь, который запускает процесс веб-сервера, не имеет прав на чтение запрашиваемого файла.
Чтобы привести пример устранения ошибки 403, предположим, что:
- пользователь пытается получить доступ к индексному файлу (http://example.com/index.html);
- рабочий процесс веб-сервера принадлежит пользователю www-data;
- индексный файл на сервере находится в /usr/share/nginx/html/index.html.
Итак, если пользователь получает ошибку 403 Forbidden, убедитесь, что пользователь www-data имеет права на чтение файла. Как правило, в подобной ситуации нужно просто изменить права на файл. Это можно сделать несколькими способами, но в данном случае подойдет вот эта команда:
sudo chmod o=r /usr/share/nginx/html/index.html
Файл .htaccess
Еще одна потенциальная причина возникновения ошибки 403 (часто это делается намеренно) – использование файла .htaccess. При помощи файла .htaccess можно запретить конкретным IP-адресам (или диапазонам адресов) доступ к определенным ресурсам.
Если пользователи неожиданно получают ошибку 403 Forbidden, убедитесь, что она не была вызвана настройками файла .htaccess.
Несуществующий индексный файл
Если пользователь пытается получить доступ к каталогу, который не имеет стандартного индексного файла, а листинг каталога (directory listing) отключен, веб-сервер будет возвращать ошибку 403 Forbidden. Такое случится, если, например, пользователь попытается получить доступ к каталогу http://example.com/emptydir/, а в каталоге emptydir на сервере нет индексного файла. Листинг каталога можно включить в конфигурациях сервера.
Ошибка 404 Not Found
Код статуса 404, или ошибка Not Found («не найдено») значит, что пользователь может взаимодействовать с сервером, но требуемый файл или ресурс отсутствует.
Ошибки 404 могут возникнуть в самых различных ситуациях. Ниже приведен список советов, которые помогут устранить проблему в случае, если пользователь неожиданно получил 404 Not Found:
- Проверьте ссылку, которая направляет пользователя на сервер, на наличие ошибок или опечаток.
- Возможно, пользователь ввел неверный URL.
- Может быть, нужного файла не существует в указанном месте на сервере; убедитесь, что запрашиваемый ресурс не был перемещен или удален с сервера.
- Проверьте, правильно ли указано местонахождение корневого каталога (document root) в конфигурации сервера.
- Возможно, пользователь, которому принадлежит рабочий процесс веб-сервера, не имеет соответствующих прав, чтобы открыть каталог, в котором находится запрашиваемый файл. Для доступа к каталогу нужны права на чтение и выполнение.
- Если пользователь переходит к ресурсу по символической ссылке, убедитесь, что веб-сервер настроен для поддержки символических ссылок.
Ошибка 500 Internal Server Error
Код состояния 500, или ошибка Internal Server Error («внутренняя ошибка сервера») означает, что сервер не может обработать запрос по неизвестной причине. Иногда этот код появляется в ситуациях, когда более подходящими являются другие сообщения об ошибках 5xx.
Как правило, причиной данной ошибки является неправильная настройка сервера (например, искаженный файл .htaccess) или нехватка некоторых пакетов (к примеру, запуск файла PHP без предварительно установленного PHP).
Ошибка 502 Bad Gateway
Код состояния 502, или ошибка Bad Gateway («ошибочный шлюз») значит, что запрашиваемый сервер является шлюзом или прокси-сервером, и он не получает валидных ответов от серверов бэкэнда, которые на самом деле выполнили запрос.
Если речь идет об обратном прокси-сервере (например, о балансировщике нагрузки), убедитесь, что:
- с серверами бэкэнда (на которые пересылаются HTTP-запросы) все в порядке;
- обратный прокси настроен правильно, в его настройках указаны корректные бэкэнды;
- сетевое соединение между серверами бэкэнда и обратным прокси-сервером в порядке. Если серверы могут взаимодействовать на других портах, убедитесь, что эти порты не заблокированы брандмауэром;
- нужные сокеты существуют в корректном местонахождении и имеют соответствующие разрешения (если веб-приложение настроено слушать сокеты).
Ошибка 503 Service Unavailable
Код состояния 503, или ошибка Service Unavailable («сервис недоступен») означает, что сервер перегружен или находится на обслуживании; такой сервис должен стать доступным в течение некоторого времени.
Если сервер не находится на обслуживании, эта ошибка может указывать на то, что серверу не хватает ресурсов процессора или памяти для обработки всех входящих запросов, или что нужно настроить веб-сервер для обслуживания большего количества пользователей или процессов.
Ошибка 504 Gateway Timeout
Код состояния 504, или ошибка Gateway Timeout («шлюз не отвечает») значит, что данный сервер является шлюзом или прокси-сервером, и он не получает ответа от бэкэнда в пределах допустимого периода времени.
Как правило, это происходит по следующим причинам:
- Плохое сетевое соединение между серверами;
- Внутренний сервер, который выполняет запрос, работает слишком медленно;
- В настройках сервера задано слишком короткое время ожидания шлюза или прокси-сервера.
Заключение
Теперь вы знакомы с основными кодами ошибок HTTP и знаете некоторые пути решения этих проблем.
Если же вы столкнулись с ошибкой, которая не была охвачена данной статьей, или знаете другие удобные способы устранения ошибок HTTP, пожалуйста, опишите их в комментариях ниже.
Tags: Cloud Server, HTTP, HTTP status code, VPS
Ever found yourself wanting to put an application behind a login form, but dreading writing all that code to deal with OAuth 2.0 or passwords? In this tutorial, I’ll show you how to use the nginx auth_request module to protect any application running behind your nginx server with OAuth 2.0, without writing any code! Vouch, a microservice written in Go, handles the OAuth dance to any number of different auth providers so you don’t have to.
Tip: If you want to add login (and URL based authorization) to more apps via a UI, integrate with more complex apps like Oracle or SAP, or replace legacy Single Sign-On on-prem, check the Okta Access Gateway.
Why Authenticate at the Web Server?
Imagine you use nginx to run a small private wiki for your team. At first, you probably start out with adding a wiki user account for each person. It’s not too bad, adding new accounts for new hires, and removing them when they leave.
A few months later, as your team and company start growing, you add some server monitoring software, and you want to put that behind a login so only your company can view it. Since it’s not very sophisticated software, the easiest way to do that is to create a single password for everyone in an .htpasswd file, and share that user with the office.
Another month goes by, and you add a continuous integration system, and that comes with GitHub authentication as an option, which seems reasonable since most of your team has GitHub accounts already.
At this point, when someone new joins, you have to create a wiki account for them, add them to the GitHub organization, and give them the shared password for the other system. When someone leaves, you can delete their wiki account and remove them from GitHub, but let’s face it, you probably won’t change the shared password for a while since it’s annoying having to distribute that to everyone again.
Surely there must be a better way to integrate all these systems to use a common shared login system! The problem is the wiki is written in PHP, the server monitoring system just ends up publishing a folder of static HTML, and the CI system is written in Ruby which only one person on your team feels comfortable writing.
If the web server could handle authenticating users, then each backend system wouldn’t need to worry about it, since the only requests that could make it through would already be authenticated!
Using the nginx auth_request Module
Enter the nginx auth_request module.
This module is shipped with nginx, but requires enabling when you compile nginx. When you download the nginx source and compile, just include the --with-http_auth_request_module flag along with any others that you use.
The auth_request module sits between the internet and your backend server that nginx passes requests onto, and any time a request comes in, it first forwards the request to a separate server to check whether the user is authenticated, and uses the HTTP response to decide whether to allow the request to continue to the backend.
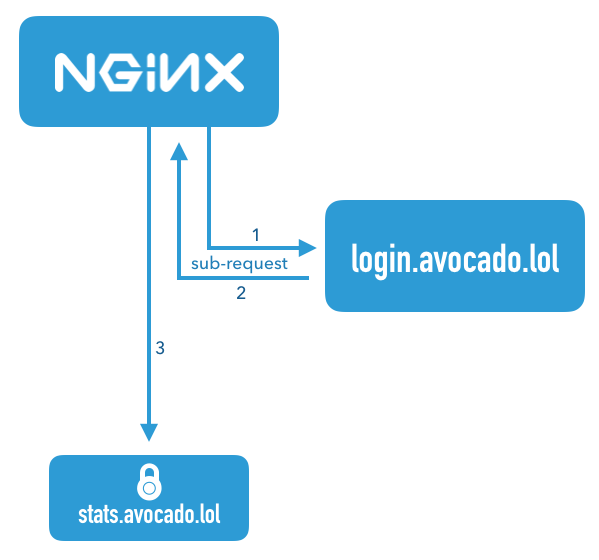
This diagram illustrates a request that comes in for the server name stats.avocado.lol. First, nginx fires off a sub-request to login.avocado.lol (1), and if the response (2) to that request returns HTTP 200, it then continues forwarding the request on to the backend stats.avocado.lol.
Choosing an Auth Proxy
Since the nginx auth_request module has no concept of users or how to authenticate anyone, we need something else in the mix that can actually handle logging users in. In the diagram above, this is illustrated by the server name login.avocado.lol.
This server needs to handle an HTTP request and return HTTP 200 or 401 depending on whether the user is logged in. If the user is not logged in, it needs to know how to get them to log in and set a session cookie.
To accomplish this, we’ll use the open source project “Vouch”. Vouch is written in Go, so it’s super easy to deploy. Everything can be configured via a single YAML file. Vouch can be configured to authenticate users via a variety of OAuth and OpenID Connect backends such as GitHub, Google, Okta or any other custom servers.
We’ll come back to configuring Vouch in a few minutes, but for now, let’s continue on to set up your protected server in nginx.
Configure Your Protected nginx Host
Starting with a typical nginx server block, you just need to add a couple lines to enable the auth_request module. Here is an example server block that should look similar to your own config. This example just serves a folder of static HTML files, but the same idea applies whether you’re passing the request on to a fastcgi backend or using proxy_pass.
server {
  listen 443 ssl http2;
  server_name stats.avocado.lol;

  ssl_certificate /etc/letsencrypt/live/avocado.lol/fullchain.pem;
  ssl_certificate_key /etc/letsencrypt/live/avocado.lol/privkey.pem;

  root /web/sites/stats.avocado.lol;

  index index.html;
}
Add the following to your existing server block:
# Any request to this server will first be sent to this URL
auth_request /vouch-validate;

location = /vouch-validate {
  # This address is where Vouch will be listening on
  proxy_pass http://127.0.0.1:9090/validate;
  proxy_pass_request_body off; # no need to send the POST body

  proxy_set_header Content-Length "";
  proxy_set_header X-Real-IP $remote_addr;
  proxy_set_header X-Forwarded-For $proxy_add_x_forwarded_for;
  proxy_set_header X-Forwarded-Proto $scheme;

  # these return values are passed to the @error401 call
  auth_request_set $auth_resp_jwt $upstream_http_x_vouch_jwt;
  auth_request_set $auth_resp_err $upstream_http_x_vouch_err;
  auth_request_set $auth_resp_failcount $upstream_http_x_vouch_failcount;
}

error_page 401 = @error401;

# If the user is not logged in, redirect them to Vouch's login URL
location @error401 {
  return 302 https://login.avocado.lol/login?url=https://$http_host$request_uri&vouch-failcount=$auth_resp_failcount&X-Vouch-Token=$auth_resp_jwt&error=$auth_resp_err;
}
Let’s look at what’s going on here. The first line, auth_request /vouch-validate; is what enables this flow. This tells the auth_request module to first send any request to this URL before deciding whether it’s allowed to continue to the backend server.
The block location = /vouch-validate captures that URL, and proxies it to the Vouch server that will be listening on port 9090. We don’t need to send the POST body to Vouch, since all we really care about is the cookie.
The line error_page 401 = @error401; tells nginx what to do if Vouch returns an HTTP 401 response, which is to pass it to the block defined by location @error401. That block will redirect the user’s browser to Vouch’s login URL which will kick off the flow to the real authentication backend.
Configure a Server Block for Vouch
Next, configure a new server block for Vouch so that it has a publicly accessible URL like https://login.avocado.lol. All this needs to do is proxy the request to the backend Vouch server.
server {
  listen 443 ssl;
  server_name login.avocado.lol;

  ssl_certificate /etc/letsencrypt/live/login.avocado.lol/fullchain.pem;
  ssl_certificate_key /etc/letsencrypt/live/login.avocado.lol/privkey.pem;

  # Proxy to your Vouch instance
  location / {
    proxy_set_header  Host  login.avocado.lol;
    proxy_set_header  X-Forwarded-Proto https;
    proxy_pass        http://127.0.0.1:9090;
  }
}
Configure and Deploy Vouch
You’ll need to download Vouch and compile the Go binary for your platform. You can follow the instructions in the project’s README file.
Once you’ve got a binary, you’ll need to create the config file to define the way you want Vouch to authenticate users.
Copy config/config.yml_example to config/config.yml and read through the settings there. Most of the defaults will be fine, but you’ll want to create your own JWT secret string and replace the placeholder value of your_random_string.
The easiest way to configure Vouch is to have it allow any user that can authenticate at the OAuth server be allowed to access the backend. This works great if you’re using a private OAuth server like Okta to manage your users. Go ahead and set allowAllUsers: true to enable this behavior, and comment out the domains: chunk.
You’ll need to choose an OAuth 2.0 provider to use to actually authenticate users. In this example we’ll use Okta, since that’s the easiest way to have a full OAuth/OpenID Connect server and be able to manage all your user accounts from a single dashboard.
Before you begin, you’ll need a free Okta developer account. Install the Okta CLI and run okta register to sign up for a new account. If you already have an account, run okta login.
Then, run okta apps create. Select the default app name, or change it as you see fit.
Choose Web and press Enter.
Select Other.
Then, change the Redirect URI to https://login.avocado.lol/auth and use https://login.avocado.lol for the Logout Redirect URI.
What does the Okta CLI do?
The Okta CLI will create an OIDC Web App in your Okta Org. It will add the redirect URIs you specified and grant access to the Everyone group. You will see output like the following when it’s finished:
Okta application configuration has been written to: /path/to/app/.okta.env
Run cat .okta.env (or type .okta.env on Windows) to see the issuer and credentials for your app.
export OKTA_OAUTH2_ISSUER="https://dev-133337.okta.com/oauth2/default"
export OKTA_OAUTH2_CLIENT_ID="0oab8eb55Kb9jdMIr5d6"
export OKTA_OAUTH2_CLIENT_SECRET="NEVER-SHOW-SECRETS"
Your Okta domain is the first part of your issuer, before /oauth2/default.
NOTE: You can also use the Okta Admin Console to create your app. See Create a Web App for more information.
Now that you’ve registered the application in Okta, you’ll have a client ID and secret which you’ll need to include in the config file. You’ll also need to set the URLs for your authorization endpoint, token endpoint and userinfo endpoint. These will most likely look like the below using your Okta domain.
config.yml
oauth:
  provider: oidc
  client_id: {yourClientID}
  client_secret: {yourClientSecret}
  auth_url: https://{yourOktaDomain}/oauth2/default/v1/authorize
  token_url: https://{yourOktaDomain}/oauth2/default/v1/token
  user_info_url: https://{yourOktaDomain}/oauth2/default/v1/userinfo
  scopes:
    - openid
    - email
  # Set the callback URL to the domain that Vouch is running on
  callback_url: https://login.avocado.lol/auth
Now you can run Vouch! It will listen on port 9090, which is where you’ve configured nginx to send the auth_request verifications as well as serve traffic from login.avocado.lol.
When you reload the nginx config, all requests to stats.avocado.lol will require that you log in via Okta first!
Bonus: Who Logged In?
If you’re putting a dynamic web app behind nginx and you care not only about whether someone was able to log in, but also who they are, there is one more trick we can use.
By default, Vouch will extract a user ID via OpenID Connect (or GitHub or Google if you’ve configured those as your auth providers), and will include that user ID in an HTTP header that gets passed back up to the main server.
In your main server block, just below the line auth_request /vouch-validate; which enables the auth_request module, add the following:
auth_request_set $auth_user $upstream_http_x_vouch_user;
This will take the HTTP header that Vouch sets, X-Vouch-User, and assign it to the nginx variable $auth_user. Then, depending on whether you use fastcgi or proxy_pass, include one of the two lines below in your server block:
fastcgi_param REMOTE_USER $auth_user;
proxy_set_header Remote-User $auth_user;
These will set an HTTP header with the value of $auth_user that your backend server can read in order to know who logged in. For example, in PHP you can access this data using:
<?php
echo 'Hello, ' . $_SERVER['REMOTE_USER'] . '!';
Now you can be sure that your internal app can only be accessed by authenticated users!
Learn More About OAuth 2.0 and Secure User Management with Okta
For more information and tutorials about OAuth 2.0, check out some of our other blog posts!
- Add Authentication to your PHP App in 5 Minutes
- What is the OAuth 2.0 Authorization Code Grant Type?
- What is the OAuth 2.0 Implicit Grant Type?
As always, we’d love to hear from you about this post, or really anything else! Hit us up in the comments, or on Twitter @oktadev!
Trying to access a site and being met with an error page is at best inconvenient, whether that site is yours or someone else’s. As with many HTTP response codes, part of what makes a 401 error so frustrating is the lack of information it offers for diagnosing and resolving the issue.
The 401 error can happen with any browser, so it’s a pretty common issue people face. In most cases, this problem is relatively simple and straightforward to fix.
In this post, we’ll explain what 401 error messages are and why they happen. Then, we’ll walk you through five methods you can use to fix them.
Let’s get started!
What is the 401 Error Code?
The Internet Engineering Task Force (IETF) defines the error 401 Unauthorized as:
The 401 (Unauthorized) status code indicates that the request has not been applied because it lacks valid authentication credentials for the target resource. The server generating a 401 response MUST send a WWW-Authenticate header field containing at least one challenge applicable to the target resource.
An Introduction to the 401 Error Code
HTTP 400 status codes are encountered when there is a problem making a request. A 401 error, in particular, happens when your browser denies you access to the page you’re trying to visit.
As a result, instead of loading the web page, the browser will load an error message. 401 errors can happen within any browser so the message appearing may differ.
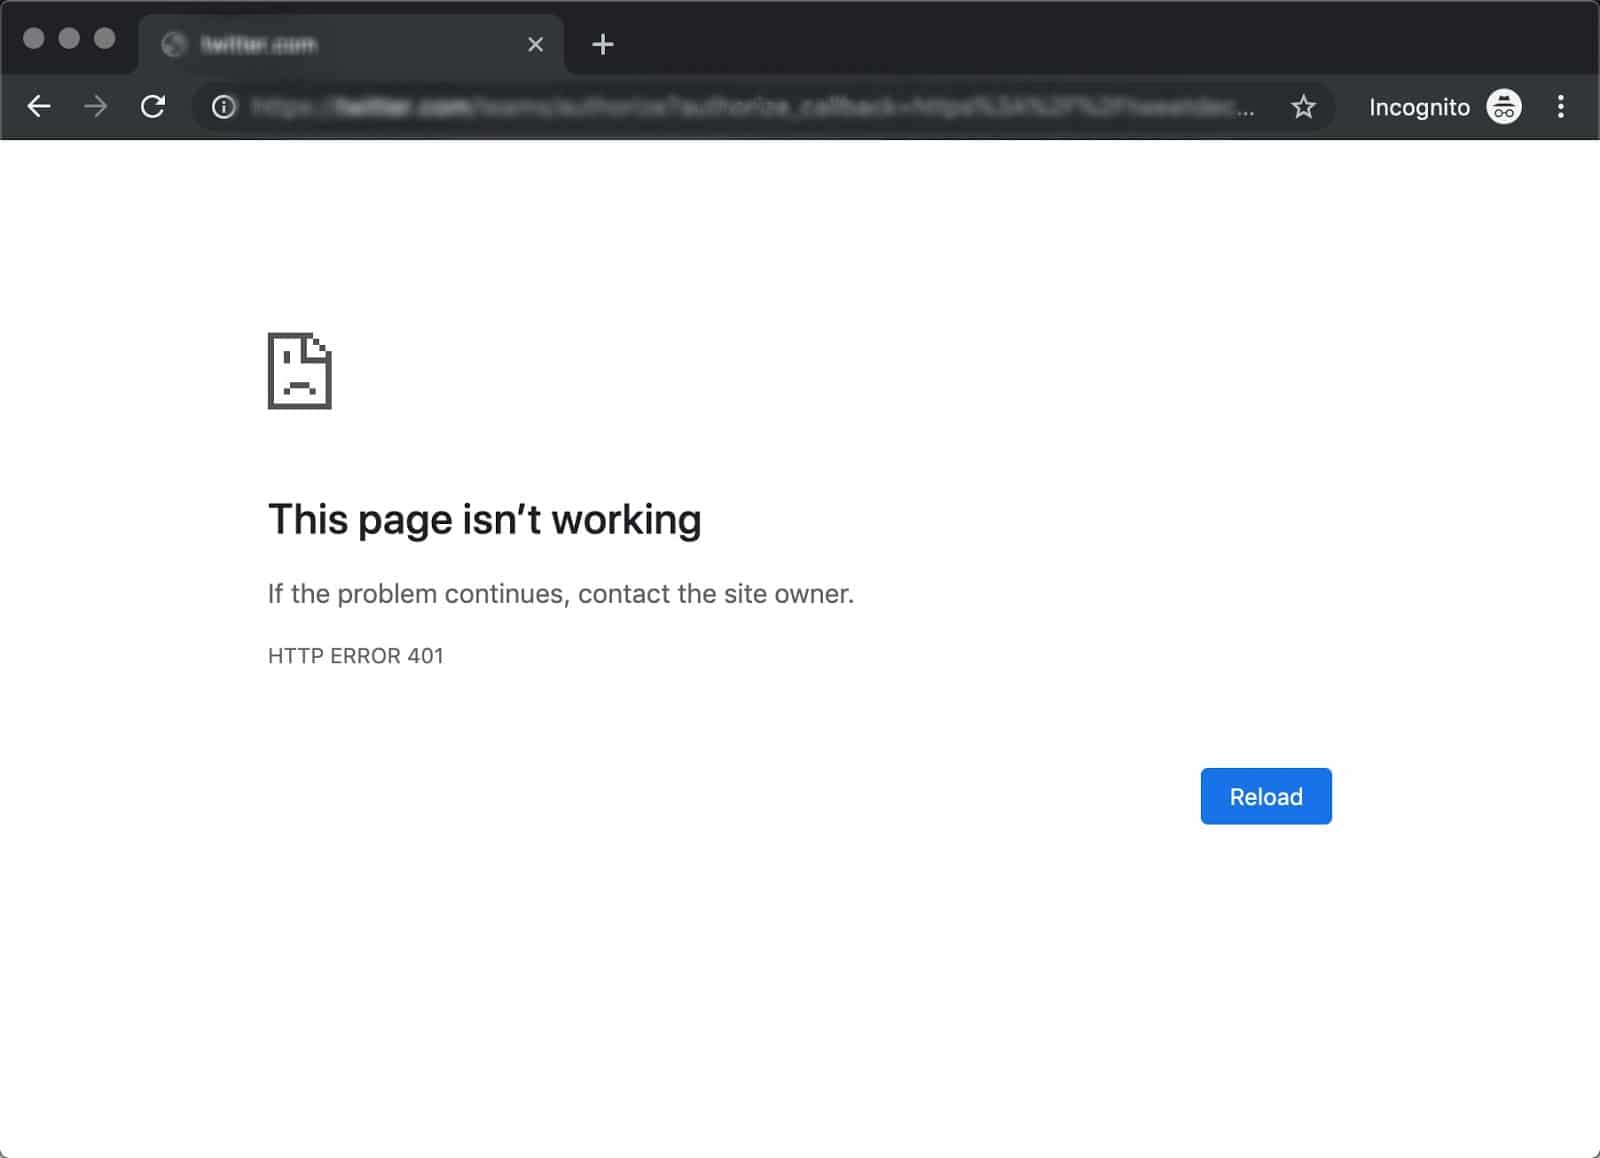
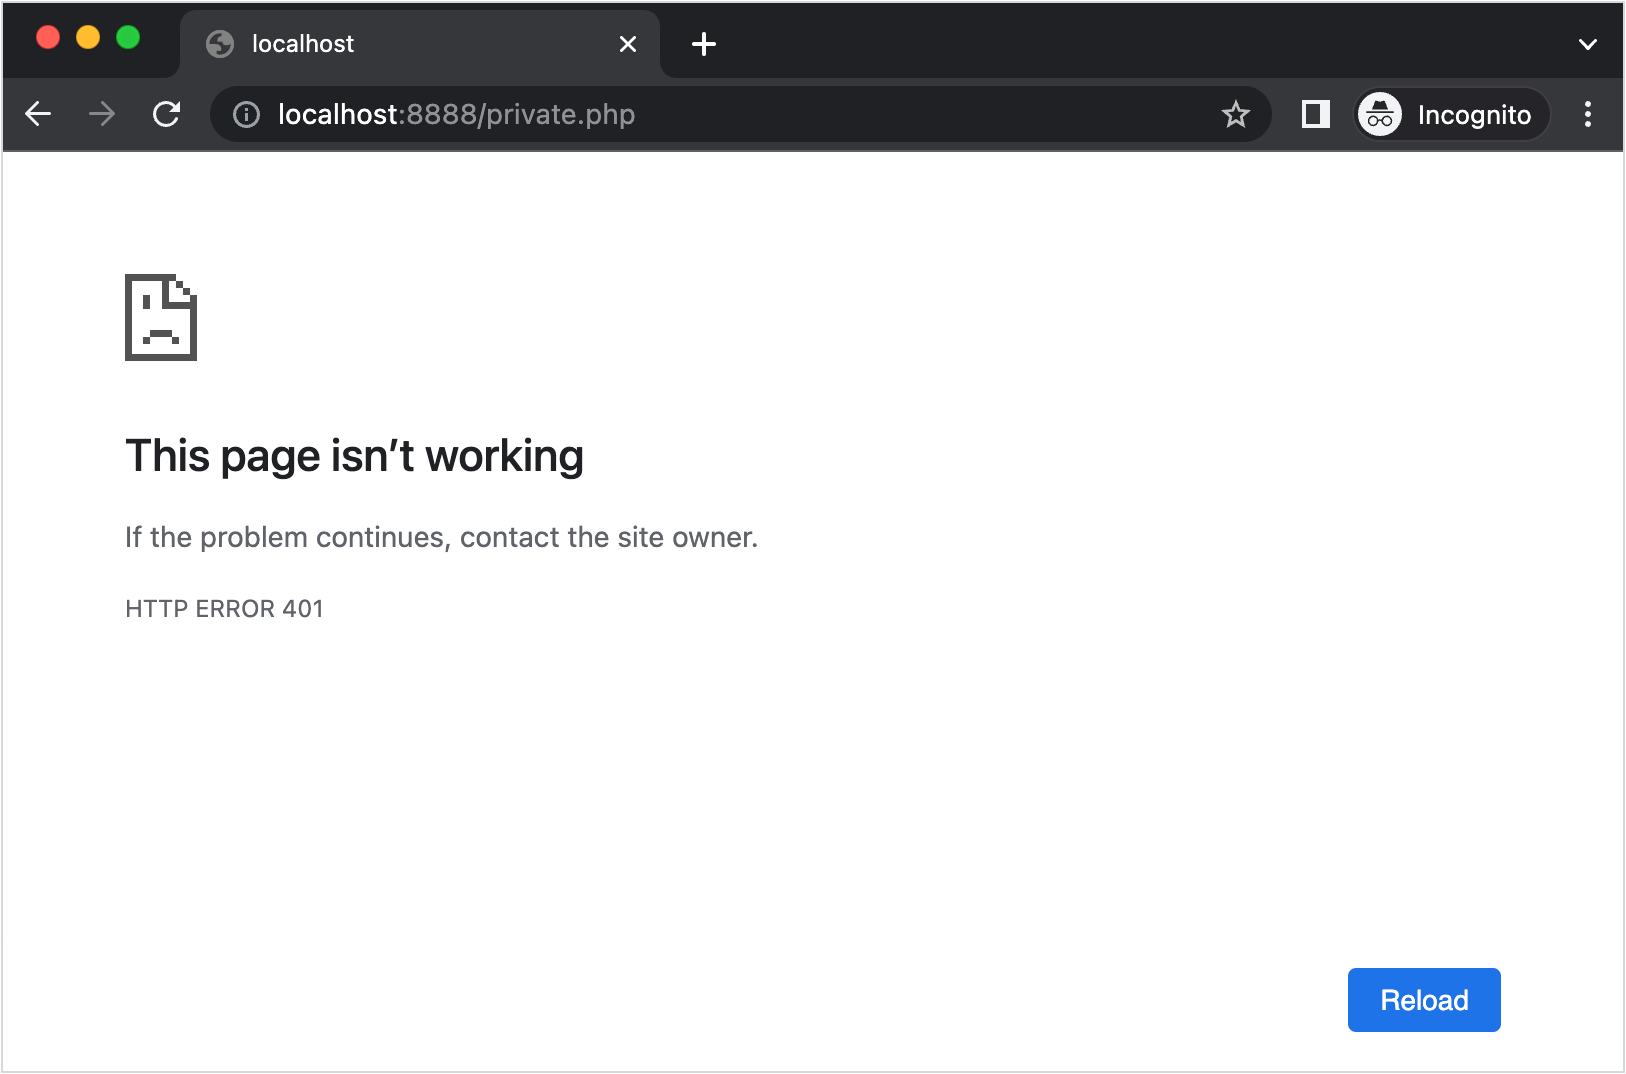
For example, in Chrome or Edge, you’ll likely see a paper icon along with a simple message telling you that the page in question isn’t working. It will include the phrase “HTTP Error 401” at the bottom, and instruct you to contact the site’s owner if the problem persists:
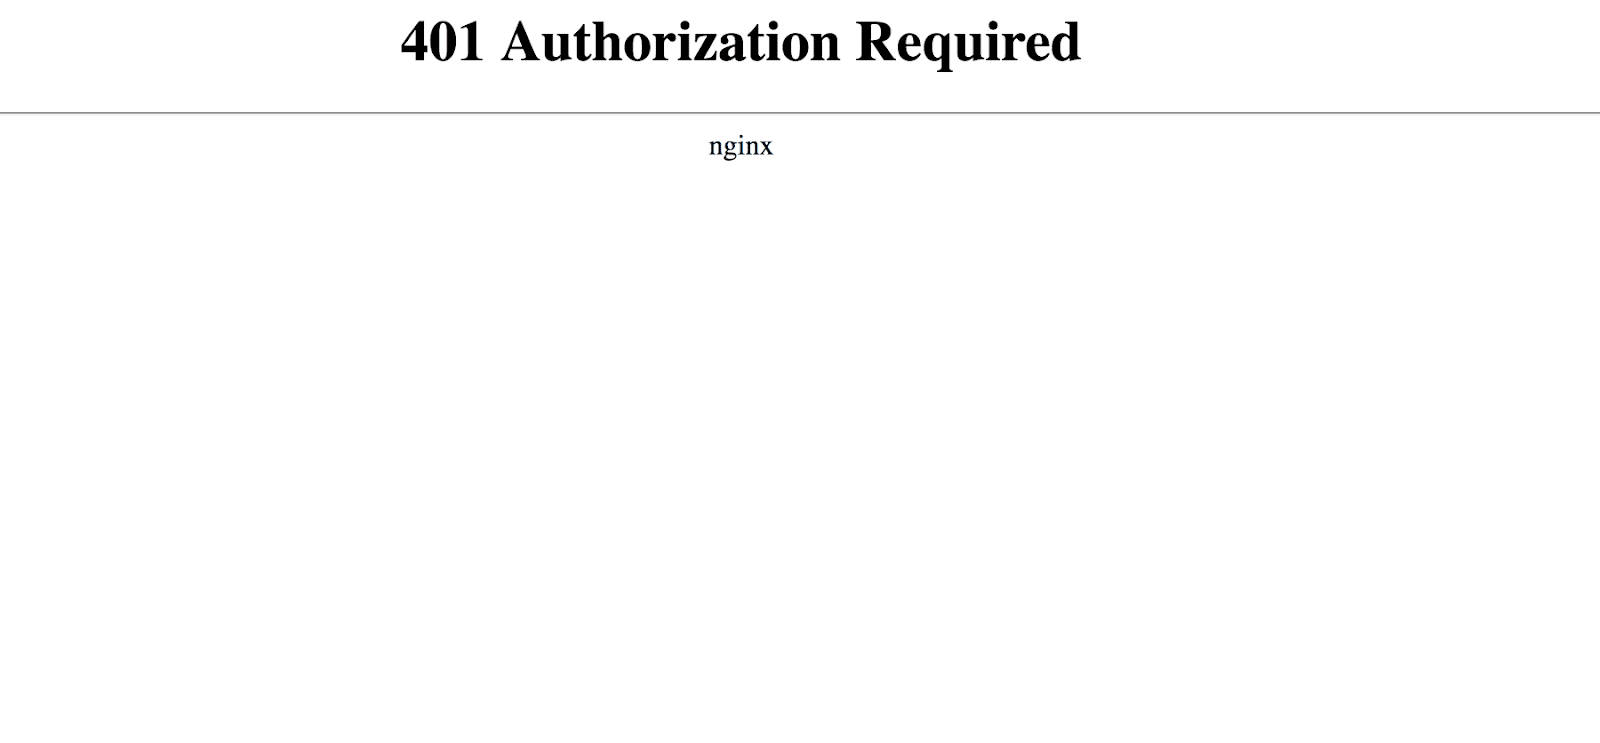
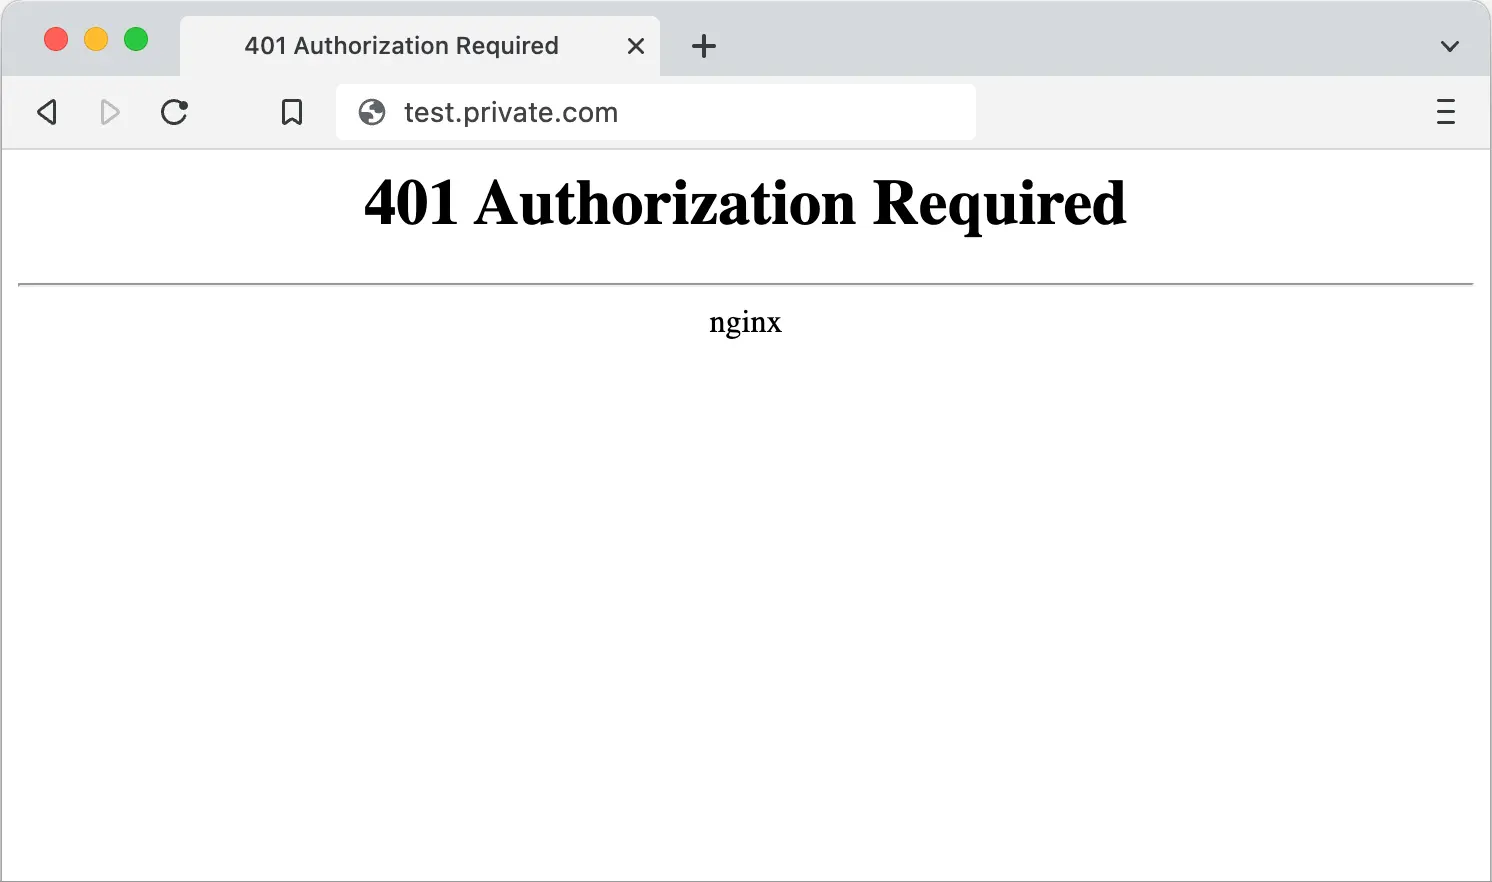
At other times and in other browsers, you might get a slightly less friendly warning that’s just a blank page with a “401 Authorization Required” message:
Other variations include:
- “HTTP 401 Error – Unauthorized”
- “401 Unauthorized”
- “Access Denied”
These errors occur on websites that require a login in order to access them. In most cases, it means that something is either wrong with the credentials or with the browser’s ability to read them as valid.
This is similar to HTTP 403 Forbidden Error, in that access isn’t permitted to the user. However, unlike with the 403 error, the 401 error message indicates that the authentication process failed.
The code is sent via the WWW-Authenticate header, which is responsible for identifying the authentication method used for granting access to a web page or resource.
| Error Code | HTTP 401 Unauthorized Error |
| Error Type | Commonly a client-side error |
| Error Variations | 401 Authorization Required 401 Unauthorized HTTP 401 Error – Unauthorized Access Denied |
| Error Causes | Outdated Browser Cache and Cookies Plugin Incompatibility Incorrect URL or Outdated Link |
The HTTP 401 error is all too common 🤦♀️ — and this guide will give you everything you need to fix it the next time you see that message showing up ✅Click to Tweet
What Causes a 401 Error?
If you encounter an error code in the 400s, you know you’re dealing with a client-side (or browser-side) issue. While the problem may be happening within your browser, however, it doesn’t necessarily always mean that’s the culprit, which we’ll explain in more detail later.
401 errors occur on restricted resources, such as password-protected pages of your WordPress site. So it’s safe to assume that the cause of the problem has something to do with the authentication credentials.
Outdated Browser Cache and Cookies
One of the most common reasons you might experience a 401 error is that your browser’s cache and cookies are out of date, preventing the authorization from successfully going through. If your browser isn’t using the valid authentication credentials (or any at all), the server will reject the request.
Plugin Incompatibility
At other times, this error is caused by a plugin incompatibility or error. For example, a firewall or security plugin can mistake your login attempt as malicious activity, and return a 401 error to protect the page.
Incorrect URL or Outdated Link
It’s also possible that the source of the problem can be attributed to a minor mistake. Common culprits in this category include an incorrectly-typed URL or an outdated link.
How to Fix the 401 Error?
Now that we’ve gone through a bit of background on the 401 error, it’s time to discuss how you can resolve it.
Let’s take a look at five methods you can use:
1. Look for Errors in the URL
We’ll start off with the easiest potential fix: making sure you used the correct URL. This may sound simple, but 401 errors can sometimes appear if the URL wasn’t correctly entered in.
Another possibility is that the link you used to visit the page in question points to the wrong URL. For example, it might be outdated, or leading to a page that no longer exists (and no redirects are in place).
Therefore, it’s worth double-checking the URL you used. If you typed it in yourself, verify that you spelled everything correctly. If you clicked on a link, confirm that it’s pointing to the page you’re trying to access (or try to visit that page directly through the website).
2. Clear Your Browser’s Cache
Your browser’s cache is designed to improve your online experience, by reducing page loading times. Unfortunately, sometimes it can also cause unwanted interruptions.
As we mentioned earlier, one of the common causes of the 401 error is outdated or incorrect cache data or cookies. Therefore, if you don’t notice any issues with the page’s URL, the next step is to clear your browser’s cache.
This will clean out any invalid information that’s locally stored in your browser, which could be interrupting the authentication process. Similarly, your browser’s cookies might contain authentication data that simply needs to be refreshed.
If you’re a Google Chrome user, you can do this by clicking on the menu icon in the top-right corner of the browser, and then going to Settings. Under the Privacy and security section, click on Clear browsing data:
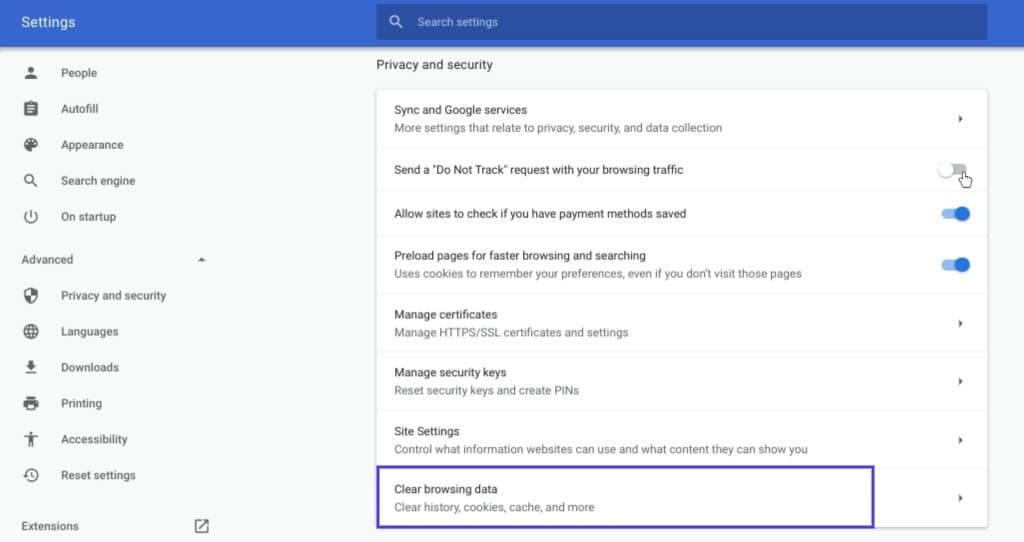
A new window will open. Under the Basic tab, make sure all three boxes are selected, and then select Clear data:

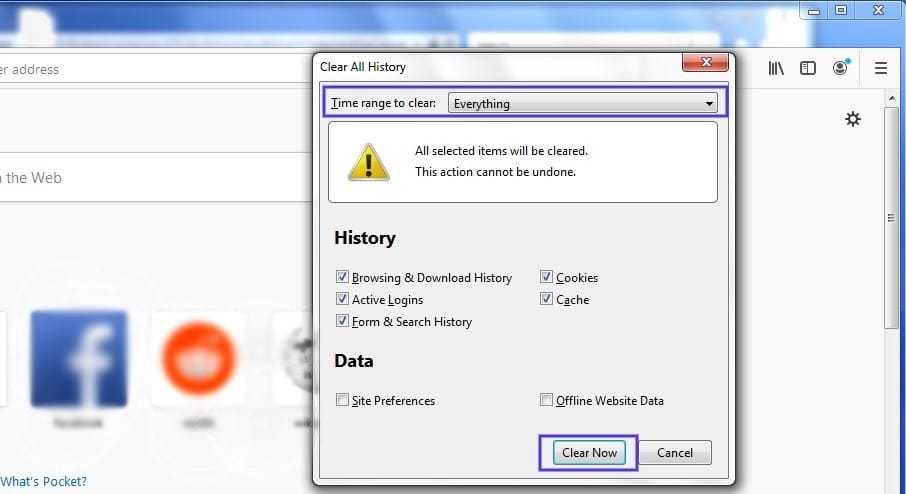
This process will look a little different in other browsers. For example, in Mozilla Firefox, you would click on the library icon in the top-right corner of the browser, followed by History > Clear Recent History:
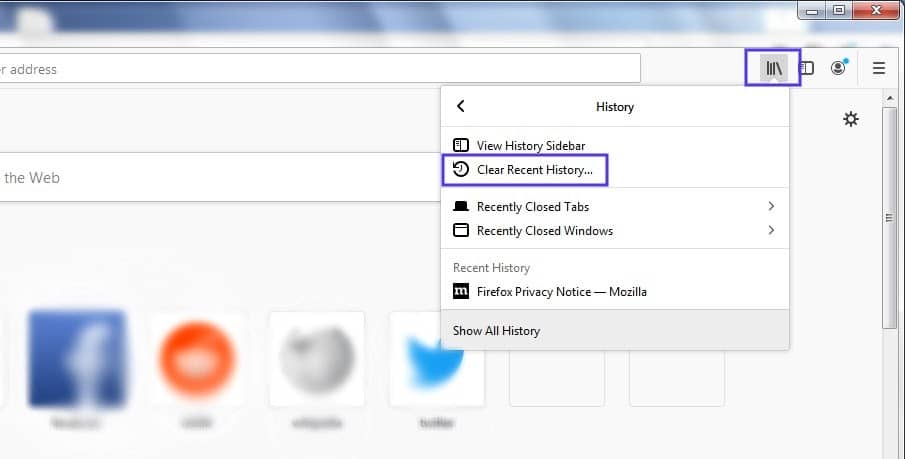
In the panel that opens next, select Everything in the drop-down menu at the top, make sure “Cache” is selected, and then click on the Clear Now button:
If you’re using a different browser, please refer to this guide for clearing the cache
3. Flush Your DNS
Another method you can try to resolve the 401 error is flushing your Domain Name Server (DNS). While this is a rarer issue, it can be a possible cause, so it’s worth giving it a try if the first two solutions don’t work.
To do this in Windows, click on the Start button and type cmd into the search bar. Hit Enter, and the Command Prompt will open. Copy and paste the command ipconfig/flushdns, and then hit Enter again:

On a Mac, you can do this by going to Finder > Applications > Utilities > Terminal:
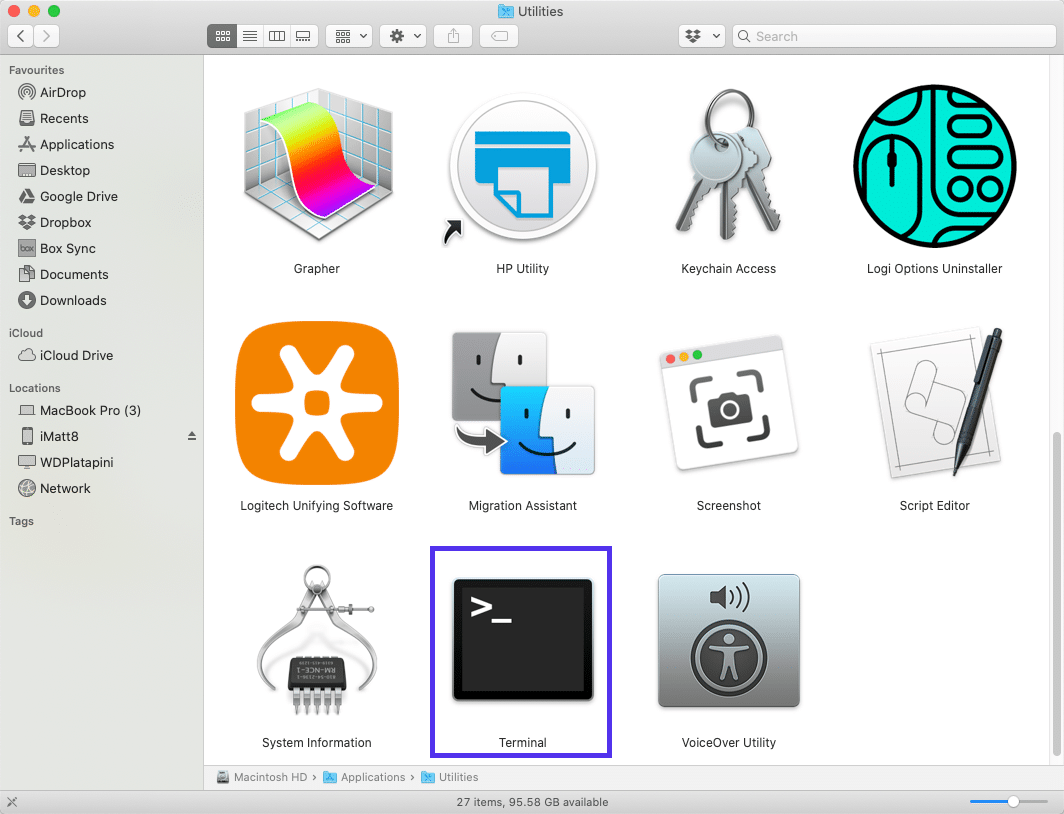
Input the command line sudo killall -HUP mDNSResponder and press Enter. Then, you can try refreshing the page you were trying to visit, to see if the 401 error has been resolved.
4. Deactivate Your WordPress Plugins
The problem causing your 401 error might not be due to your browser. If you’re having trouble accessing your WordPress site, it’s also possible that one or more plugins are to blame.
Some plugins, especially security-focused plugins, are configured to show a 401 error when they suspect suspicious login activity that might indicate an attack. Others might just be suffering from compatibility issues. Therefore, it’s a good idea to deactivate all of your WordPress plugins and see if that resolves the issue.
You can deactivate your plugins all at the same time in your dashboard, by going to Plugins > Installed Plugins. Check the box at the top to select all of them. Then under the Bulk Actions drop-down menu, select Deactivate and click on the Apply button:
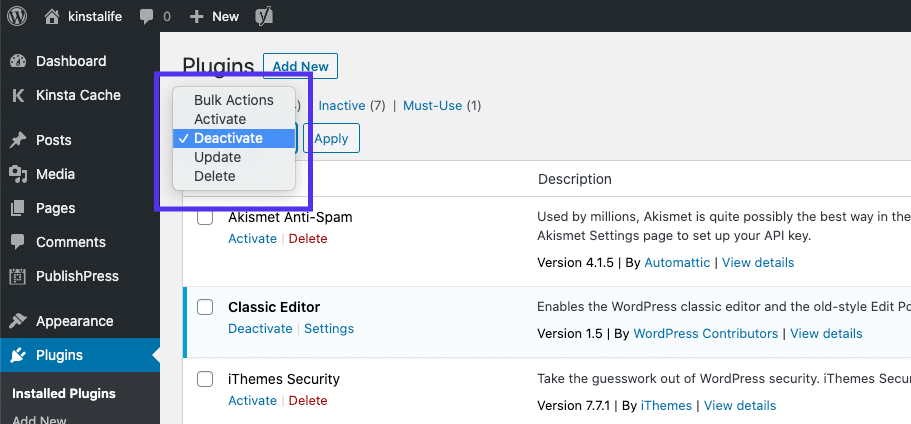
After that, try reloading the page that returned the 401 error to see if this has resolved the issue. If it has, you can manually activate each plugin one at a time, in order to determine which one is causing the problem.
Then you can remove that plugin, replace it with a new one, or contact its developer for assistance.
5. Check the WWW-Authenticate Header Response
At this point, if the issue hasn’t been fixed, it may be caused by a server-side problem. This means our last fix will be a bit more involved.
As we saw earlier, the 401 response is sent through the WWW-Authenticate header, which appears as “WWW-Authenticate: <type> realm=<realm>”. It includes ‘challenges’, or strings of data that indicate what type of authentication is required in order for access to be granted.
In a nutshell, you’ll want to check and see if the header response was sent, and more specifically, what authentication scheme was used. At the very least, this can help narrow down the cause of the problem, and bring you one step closer to a solution.
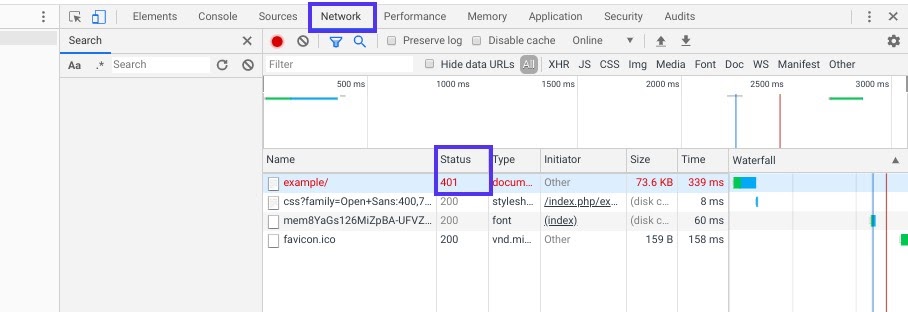
To do this, go to the web page that’s displaying the 401 error, and access the developer console in Chrome. You can right-click on the page and select Inspect, or use Ctrl+Shift+J.
Next, click on the Network tab and reload the page. This will generate a list of resources. Select the Status header to sort the table and locate the 401 status code:
Select that entry, and then click on the Headers tab. Under Response Headers, locate the WWW-Authenticate header:
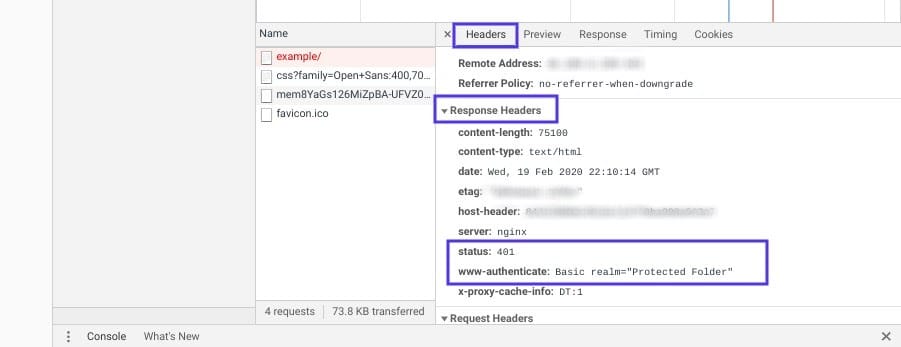
The information that is present in the response header, particularly the authentication schemes, can give you more information about what’s happening and point you towards a solution. It can help you understand what type of authentication the server is expecting.
For example, in the above example, we can see that the authentication scheme is “Basic”. This means the authentication request should only require an ID and password. For more detailed information and instructions on how to use this information, we recommend referring to the HTTP Authentication Scheme Registry.
HTTP 401 errors, begone! 🧙♂️ 5 ways to stop those pesky messages (no magic required) ✨Click to Tweet
Summary
When your browser and server have trouble communicating or authenticating requests, you’re sometimes forced to deal with errors such as the 401 error. While this problem is irritating, the message is usually temporary and fixable.
Here are five methods you can use to fix the 401 error:
- Look for errors in the URL.
- Clear your browser’s cache.
- Flush your DNS.
- Deactivate your WordPress plugins.
- Check the WWW-Authenticate header response.
Появление сообщения об ошибке 401 Unauthorized Error («отказ в доступе») при открытии страницы сайта означает неверную авторизацию или аутентификацию пользователя на стороне сервера при обращении к определенному url-адресу. Чаще всего она возникает при ошибочном вводе имени и/или пароля посетителем ресурса при входе в свой аккаунт. Другой причиной являются неправильные настройки, допущенные при администрировании web-ресурса. Данная ошибка отображается в браузере в виде отдельной страницы с соответствующим описанием. Некоторые разработчики интернет-ресурсов, в особенности крупных порталов, вводят собственную дополнительную кодировку данного сбоя:
- 401 Unauthorized;
- Authorization Required;
- HTTP Error 401 – Ошибка авторизации.
Попробуем разобраться с наиболее распространенными причинами возникновения данной ошибки кода HTTP-соединения и обсудим способы их решения.
При доступе к некоторым сайтам (или отдельным страницам этих сайтов), посетитель должен пройти определенные этапы получения прав:
- Идентификация – получение вашей учетной записи («identity») по username/login или email.
- Аутентификация («authentic») – проверка того, что вы знаете пароль от этой учетной записи.
- Авторизация – проверка вашей роли (статуса) в системе и решение о предоставлении доступа к запрошенной странице или ресурсу на определенных условиях.
Большинство пользователей сохраняют свои данные по умолчанию в истории браузеров, что позволяет быстро идентифицироваться на наиболее часто посещаемых страницах и синхронизировать настройки между устройствами. Данный способ удобен для серфинга в интернете, но может привести к проблемам с безопасностью доступа к конфиденциальной информации. При наличии большого количества авторизованных регистрационных данных к различным сайтам используйте надежный мастер-пароль, который закрывает доступ к сохраненной в браузере информации.
Наиболее распространенной причиной появления ошибки с кодом 401 для рядового пользователя является ввод неверных данных при посещении определенного ресурса. В этом и других случаях нужно попробовать сделать следующее:
- Проверьте в адресной строке правильность написания URL. Особенно это касается перехода на подстраницы сайта, требующие авторизации. Введите правильный адрес. Если переход на страницу осуществлялся после входа в аккаунт, разлогинитесь, вернитесь на главную страницу и произведите повторный вход с правильными учетными данными.
- При осуществлении входа с сохраненными данными пользователя и появлении ошибки сервера 401 проверьте их корректность в соответствующих настройках данного браузера. Возможно, авторизационные данные были вами изменены в другом браузере. Также можно очистить кэш, удалить cookies и повторить попытку входа. При удалении истории браузера или очистке кэша потребуется ручное введение логина и пароля для получения доступа. Если вы не помните пароль, пройдите процедуру восстановления, следуя инструкциям.
- Если вы считаете, что вводите правильные регистрационные данные, но не можете получить доступ к сайту, обратитесь к администратору ресурса. В этом случае лучше всего сделать скриншот проблемной страницы.
- Иногда блокировка происходит на стороне провайдера, что тоже приводит к отказу в доступе и появлению сообщения с кодировкой 401. Для проверки можно попробовать авторизоваться на том же ресурсе с альтернативного ip-адреса (например, используя VPN). При подтверждении блокировки трафика свяжитесь с провайдером и следуйте его инструкциям.
Некоторые крупные интернет-ресурсы с большим количеством подписчиков используют дополнительные настройки для обеспечения безопасности доступа. К примеру, ваш аккаунт может быть заблокирован при многократных попытках неудачной авторизации. Слишком частые попытки законнектиться могут быть восприняты как действия бота. В этом случае вы увидите соответствующее сообщение, но можете быть просто переадресованы на страницу с кодом 401. Свяжитесь с администратором сайта и решите проблему.
Иногда простая перезагрузка проблемной страницы, выход из текущей сессии или использование другого веб-браузера полностью решают проблему с 401 ошибкой авторизации.
Устранение ошибки 401 администратором веб-ресурса
Для владельцев сайтов, столкнувшихся с появлением ошибки отказа доступа 401, решить ее порою намного сложнее, чем обычному посетителю ресурса. Есть несколько рекомендаций, которые помогут в этом:
- Обращение в службу поддержки хостинга сайта. Как и в случае возникновения проблем с провайдером, лучше всего подробно описать последовательность действий, приведших к появлению ошибки 401, приложить скриншот.
- При отсутствии проблем на стороне хостинг-провайдера можно внести следующие изменения в настройки сайта с помощью строки Disallow:/адрес проблемной страницы. Запретить индексацию страницам с ошибкой в «rоbоts.txt», после чего добавить в файл «.htассеss» строку такого типа:
Redirect 301 /oldpage.html http://site.com/newpage.html.
Где в поле /oldpage.html прописывается адрес проблемной страницы, а в http://site.com/newpage.html адрес страницы авторизации.
Таким образом вы перенаправите пользователей со всех страниц, которые выдают ошибку 401, на страницу начальной авторизации.
- Если после выполнения предыдущих рекомендаций пользователи при попытках авторизации все равно видят ошибку 401, то найдите на сервере файл «php.ini» и увеличьте время жизни сессии, изменив значения следующих параметров: «session.gc_maxlifetime» и «session.cookie_lifetime» на 1440 и 0 соответственно.
- Разработчики веб-ресурсов могут использовать более сложные методы авторизации и аутентификации доступа для создания дополнительной защиты по протоколу HTTP. Если устранить сбой простыми методами администрирования не удается, следует обратиться к специалистам, создававшим сайт, для внесения соответствующих изменений в код.
Хотя ошибка 401 и является проблемой на стороне клиента, ошибка пользователя на стороне сервера может привести к ложному требованию входа в систему. К примеру, сетевой администратор разрешит аутентификацию входа в систему всем пользователям, даже если это не требуется. В таком случае сообщение о несанкционированном доступе будет отображаться для всех, кто посещает сайт. Баг устраняется внесением соответствующих изменений в настройки.
Дополнительная информация об ошибке с кодом 401
Веб-серверы под управлением Microsoft IIS могут предоставить дополнительные данные об ошибке 401 Unauthorized в виде второго ряда цифр:
- 401, 1 – войти не удалось;
- 401, 2 – ошибка входа в систему из-за конфигурации сервера;
- 401, 3 – несанкционированный доступ из-за ACL на ресурс;
- 401, 501 – доступ запрещен: слишком много запросов с одного и того же клиентского IP; ограничение динамического IP-адреса – достигнут предел одновременных запросов и т.д.
Более подробную информацию об ошибке сервера 401 при использовании обычной проверки подлинности для подключения к веб-узлу, который размещен в службе MS IIS, смотрите здесь.
Следующие сообщения также являются ошибками на стороне клиента и относятся к 401 ошибке:
- 400 Bad Request;
- 403 Forbidden;
- 404 Not Found;
- 408 Request Timeout.
Как видим, появление ошибки авторизации 401 Unauthorized не является критичным для рядового посетителя сайта и чаще всего устраняется самыми простыми способами. В более сложной ситуации оказываются администраторы и владельцы интернет-ресурсов, но и они в 100% случаев разберутся с данным багом путем изменения настроек или корректировки html-кода с привлечением разработчика сайта.
Эффективное устранение кодов ошибок HTTP представляет собой серьезную задачу, поскольку требует понимания причин их возникновения и навыков поиска и устранения неисправностей. Коды ошибок, представленные трехзначными числами (например, 404, 500), означают наличие проблем с обработкой запроса клиента или сервера. Выявление конкретной ошибки и ее первопричины требует знания протокола HTTP, конфигурации сервера и поведения приложения.
Как исправить ошибку сервера?
Во-первых, необходимо определить точный код ошибки HTTP, возвращаемой сервером (например, 404, 500), а затем проследовать действиям ниже.
Проверка журналов сервера: Проанализируйте журналы сервера, чтобы получить представление о времени возникновения ошибки и ее источнике. В веб-сервере Apache мы можем проверить журнал с помощью следующей команды:
cat /var/log/apache2/error.log
Для просмотра журнала доступа Nginx можно воспользоваться командой cat, less или tail. С помощью приведенной ниже команды проверьте журнал событий:
tail -n 50 /var/log/apache2/error.log
Проверка конфигурации сервера: Проверьте конфигурацию виртуальных хостов и файлы .htaccess на предмет возможных ошибок в конфигурации. Как уже описывали выше, можно воспользоваться утилитами cat или nano:
nano /etc/apache2/apache2.conf
nano /etc/apache2/sites-available/000-default.conf
Вторая команда – это конфигурация виртуального хоста, которую мы должны проверить на корректность работы. Для сервера Nginx мы будем использовать команды:
nano /etc/nginx/nginx.conf
nano /etc/nginx/nginx.conf
Очистите cookies и кэш-память: Убедитесь, что после применения изменений на сайте вы очищаете браузер от временного хранящейся информации.
Расположение этого пункта может отличаться в зависимости от браузера, но обычно его можно найти в разделе Настройки или Конфигурация далее перейти в подраздел Конфиденциальность и безопасность и найти вкладку Очистить данные просмотра или Очистить историю.
Если эти базовые меры не помогли, можно попытаться сделать следующее:
- Проверить соединение с базой данных: Проверить настройки подключения к базе данных и доступность, если приложение использует базу данных;
- Отладка кода приложения: Проверить код приложения на предмет возможных проблем, вызывающих ошибку;
- Проверить сетевые подключения: Проверить настройки сети и брандмауэра, которые могут блокировать доступ клиентов;
- Использовать онлайн-ресурсы: Использовать форумы разработчиков и онлайн-ресурсы для обмена опытом и решениями;
- Внедрить исправления: Применить найденные исправления для устранения кодов ошибок HTTP.
Устранение ошибок HTTP требует систематического и методичного подхода, особенно для сложных веб-приложений. Поддержание в актуальном состоянии серверного и прикладного программного обеспечения, а также соблюдение лучших практик веб-разработки помогут предотвратить появление ошибок HTTP в будущем. Давайте рассмотрим тип распространенного кода ошибки более подробно!
400 Bad Request
Это означает, что сервер получает неверный синтаксис в HTTP-запросе со стороны клиента, который может возникать из-за:
- Неправильной настройка программного обеспечения или наличие ошибки в приложении браузера;
- Ошибка человека, связанная с невнимательностью, в результате которой URL-запрос не соответствует правилам настройки;
- Повреждение cookies в результате какого-либо воздействия на хранилище браузера.

401 Unauthorized Error
Это означает, что сервер не может предоставить доступ пользователю на сайт из-за нелегитимного запроса. Такое может произойти из-за неправильного ввода учетных данных и нарушения идентификации, авторизации системы. Следовательно, для получения доступа и просмотра защищенного ресурса пользователю необходимо ввести учетные данные. Для решения этой проблемы можно попросить администратора веб-сервера проверить .htpasswd и ввести учетные данные для корректной работы с сайтом:
find ./ -name .htpasswd
Используя этот путь, вы можете открыть файл в текстовом редакторе nano, используя соответствующий синтаксис nano, а затем путь для открытия вашего файла!

403 Forbidden
В этом случае мы сталкиваемся с запрещающими правилами на веб-сервере для соединений из нашей сети или машины. Для решения возникшей проблемы проверьте основную причину. Возможно, права доступа к файлам не установлены пользователем на сервере, посмотрим на типичную конфигурацию в этом случае. У нас есть пользователь www-data для управления сервером, мы пытаемся получить доступ к файлу .php или .html, значит добавляем правило для чтения файла:
chmod 644 /etc/site-for-test/index.html
В другой ситуации в файл .htaccess могут быть добавлены свои специфические запрещающие правила на сервере, определить их расположение можно через рабочий каталог, обычно они используются, как правила переопределения. Найти можно через команду, приведенную ниже:
find ./ -name .htaccess
Но есть и другая причина этой ошибки – если на веб-сервере нет листинга индексных файлов или каталогов, то сервер выдает сообщение об отказе. Если вы хотите включить листинг сайта, зайдите в конфигурацию и измените соответствующий параметр:
nano /etc/apache2/apache2.conf
Это поможет в решении ошибки!

404 Not Found
Страница не найдена на сервере. Когда вы столкнулись с данной проблемой, необходимо задать себе несколько вопросов:
- Какой процесс был при возникновении этой ошибки?
- Указан ли правильный путь к корневому каталогу?
- Существуют ли в системе необходимые файлы?
И остальные детали, в которых крыться некорректная настройка веб-сервера или некорректном запросе URL:
nano /etc/apache2/apache2.conf

500 Internal Server Eroor
Это означает, что сервер получает запрос, но не может его обработать из-за неизвестной проблемы на стороне веб-сервера. Обычно возникает при наличии двух или более проблем. Может происходить по разным сценариям, например: неправильно настроен системный файл .htaccess, .htpasswd и другие параметры, или отсутствует HTML-файл для формирования ответа клиенту, проверьте журнал сервера, как мы показывали в базовом руководстве выше!

502 Bad Gateway и 504 Gateway Timeout
Шлюз или прокси-сервер не получает должного ответа от внутреннего сервера. Если для передачи трафика используется прокси, то проверьте:
- Работоспособность бэкэнда и ответы, а также проверьте его конфигурацию;
- Проверьте конфигурацию на стороне прокси-сервера и возможность взаимодействия по-другому порту, возможно, используемый вами порт занят другим программным обеспечением;
- Проверьте состояние сетевого соединения и конфигурацию системы, отправив данные через утилиту netcat и протестируйте передачу данных;
- Если в вашем web-приложении используются сокеты, необходимо проверить их расположение, наличие доступа и разрешения.
503 Service Unavailable
Эта проблема означает, что сервер не может обработать все запросы от клиентов. Если ваша машина не обслуживается, то увеличьте ресурсы процессора, оперативной памяти и проверьте одновременно доступ пользователей, потоков и процессов в конфигурации сервера! Так же ошибка может свидетельствовать о некорректной настройке балансировщика—нагрузки, для проверки его корректной настройки. Перейдите в /etc/nginx/nginx.conf и удостоверьтесь в формате и корректности записей.

Understand the HTTP 401 Unauthorized error code: What the causes are and how to fix it.
Table of Contents
- What is the 401 Unauthorized Request error?
- Different 401 error messages depending on the server
- 401 Unauthorized vs 403 Forbidden
- How to fix the 401 Unauthorized Request error
- All HTTP Status Codes
What is the 401 Unauthorized Request error?
The 401 HTTP is a client-side standard response status code. This error response indicates that the client request has not been completed because it lacks valid authentication credentials for the requested resource.
For instance, you get this HTTP 401 error code when you are trying to access a password protected page. You can also get this 401 error if your credentials expired.
Different 401 error messages depending on the server
- “401 Unauthorized”
- “401 Authorization Required”
- “Access Denied”
- “HTTP 401 Error – Unauthorized”
- “This page isn’t working – If the problem continues, contact the site owner. – HTTP ERROR 401”
For example, in Chrome browser, you’ll likely see a simple message telling you that “This page isn’t working”, like this one:
Sometimes, the server replies with a standardized error page, e.g. the Nginx 401 Authorization Required:
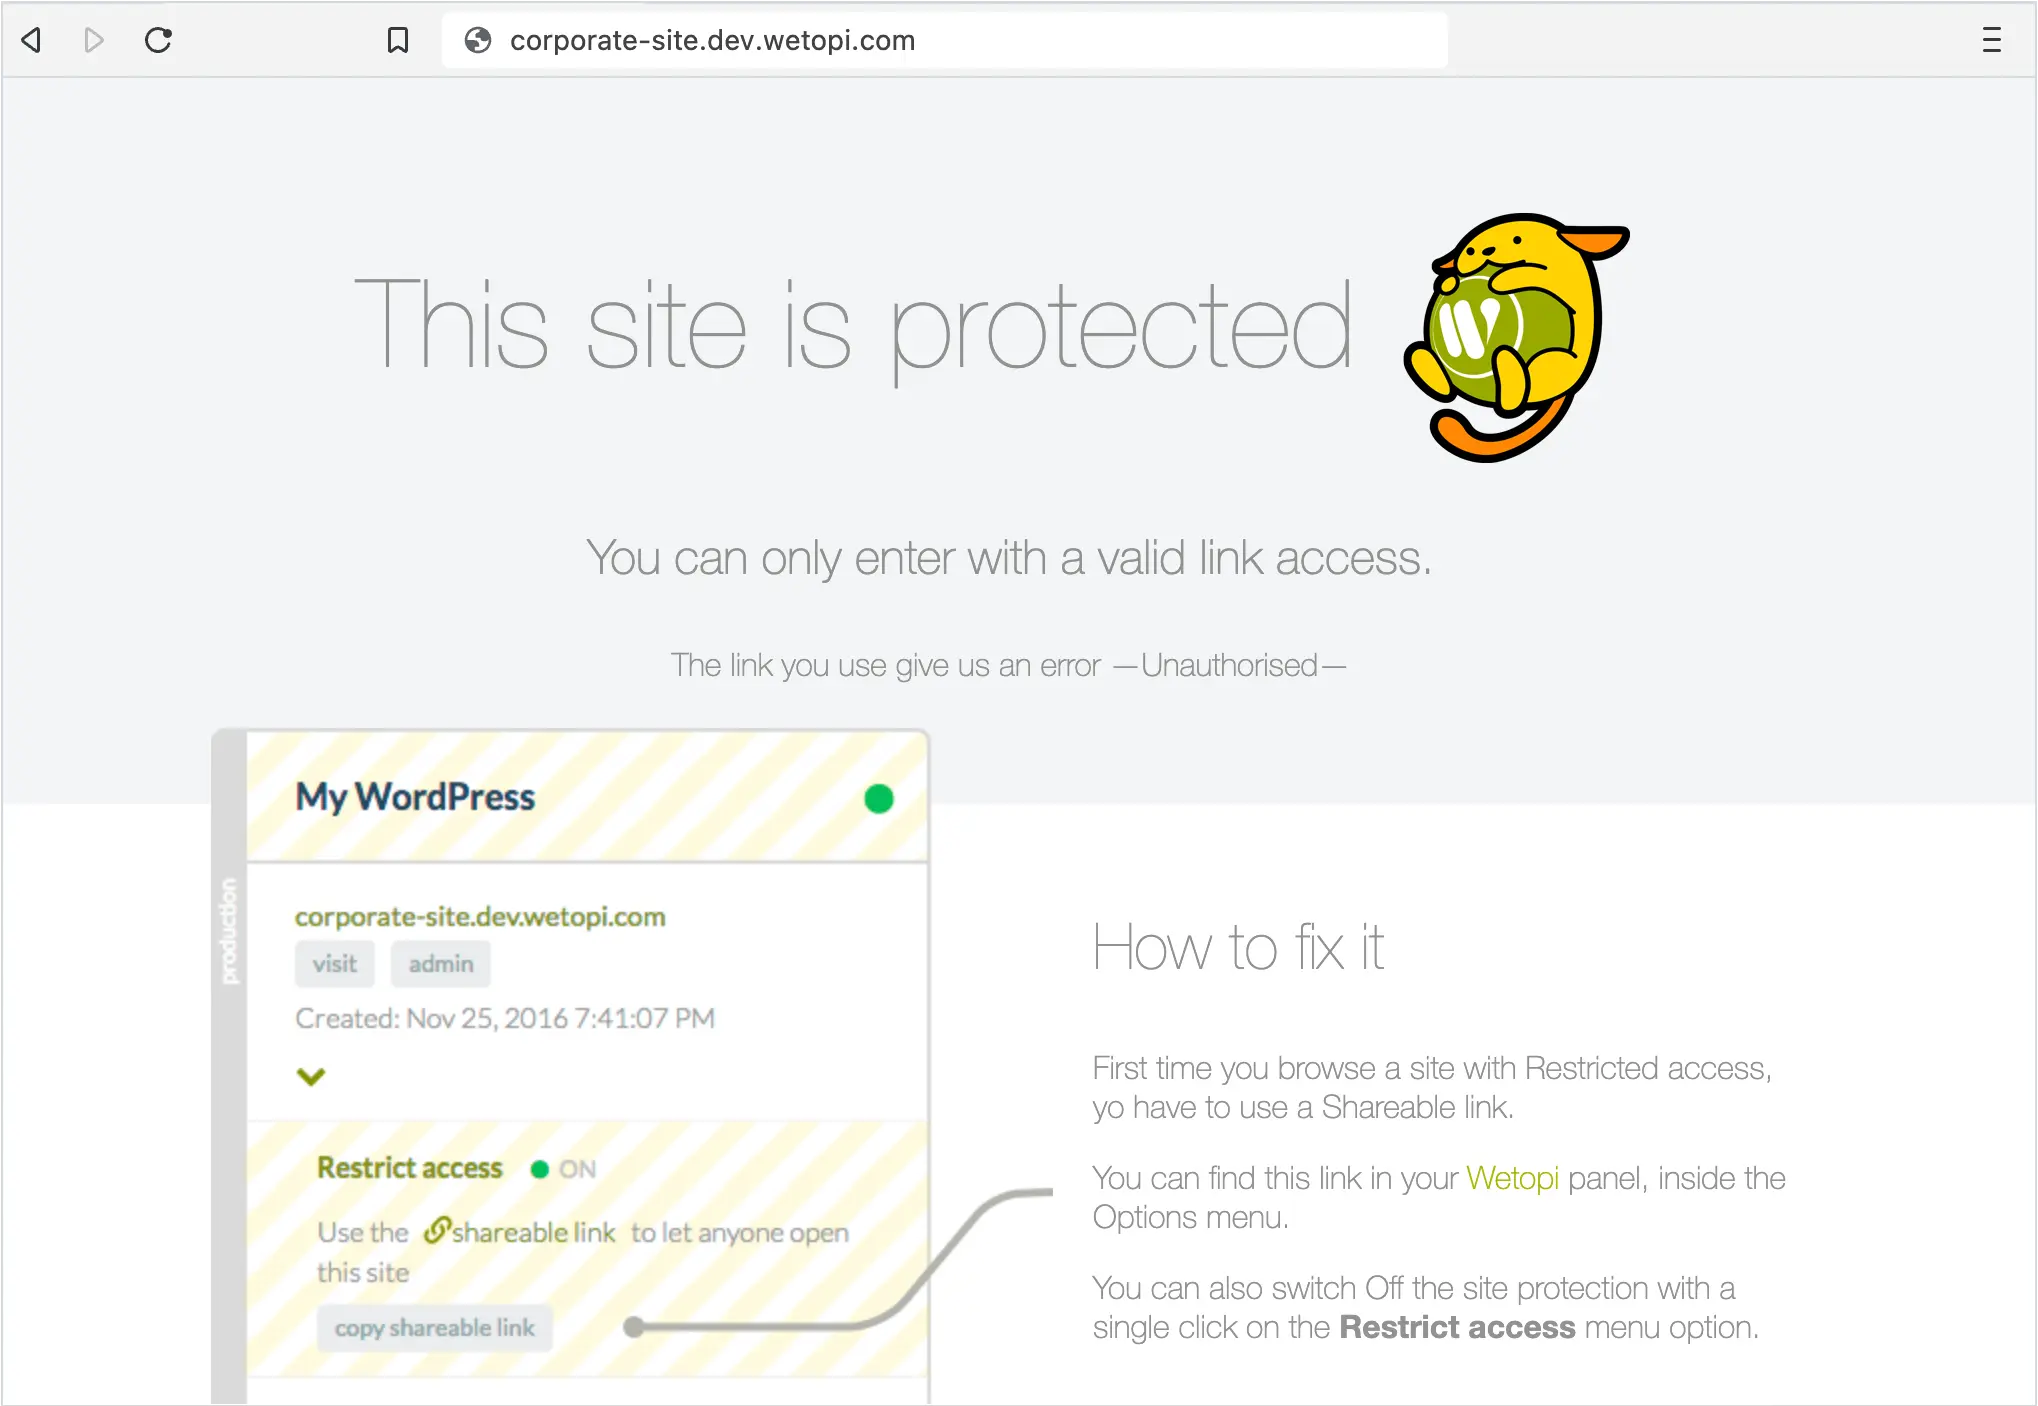
You can also find personalized 401 Error pages. The following is an example of our wetopi customized 401 Unauthorized error response, when accessing a site with “Restrict access” enabled.
401 Unauthorized vs 403 Forbidden
The 401 error is similar to the “HTTP Error 403 Forbidden“. We get the 403 when we have valid credentials (or don’t need them) but access to the resource isn’t permitted (in other words, you are trying to access a private or restricted resource the server will never give you, no matter what).
On the other hand, we get the 401 status code when the resource is available, but we don’t provide, or don’t have, valid credentials.
How to fix the 401 Unauthorized Request error
To identify, and fix the error causing your 401 Unauthorized HTTP error code, we give you a list of causes and their solution. Follow the tips on the list until you find the solution:
- Look for errors in the URL. An incorrectly-typed URL or an outdated link could be the cause.
- If your request is private, a password-protected page. Then double-check whether you’re logged in with a valid username and password. If you’re sure that you have entered the credentials correctly, try Logging out and Logging in again. If the error persists, try changing the password.
- Open the URL in an Incognito Browser Window. If you get access in Incognito, it means that the reason you get a 401 error is that your browser’s cache and cookies are out of date.
- A configuration problem on the website. If you are a webmaster and you are running a WordPress site: try to disable the plugins one by one. Pay special attention to the plugins related to security management and resource protection.
- Some web providers issue the HTTP 401 when a domain is pointing to the wrong server. If you are a webmaster, double-check the DNS Records (also named DNS Zones). The IP addresses of your site’s DNS Records could be pointing to the wrong server.
- Your computer’s DNS cache contains invalid zones. An outdated, or corrupted DNS cache in your computer is not a common cause of the “401 Unauthorized HTTP Error”. Nonetheless, it is worth considering flushing your device’s DNS cache.
We are techies passionate about WordPress. With wetopi, a Managed WordPress Hosting, we want to minimize the friction that every professional faces when working and hosting WordPress projects.
Not a wetopi user?
Free full performance servers for your development and test.
No credit card required.
All HTTP Status Codes
200 OK
201 Created
202 Accepted
203 Non-Authoritative Information
204 No Content
205 Reset Content
206 Partial Content
207 Multi-Status
208 Already Reported
226 IM Used
300 Multiple Choices
301 Moved Permanently
302 Found
303 See Other
304 Not Modified
305 Use Proxy
307 Temporary Redirect
308 Permanent Redirect
400 Bad Request
401 Unauthorized
402 Payment Required
403 Forbidden
404 Not Found
405 Method Not Allowed
406 Not Acceptable
407 Proxy Authentication Required
408 Request Timeout
409 Conflict
410 Gone
411 Length Required
412 Precondition Failed
413 Payload Too Large
414 Request-URI Too Long
415 Unsupported Media Type
416 Requested Range Not Satisfiable
417 Expectation Failed
418 I’m A Teapot
421 Misdirected Request
422 Unprocessable Entity
423 Locked
424 Failed Dependency
426 Upgrade Required
428 Precondition Required
429 Too Many Requests
431 Request Header Fields Too Large
444 Connection Closed Without Response
451 Unavailable For Legal Reasons
499 Client Closed Request