Posted By: Mar. 12, 2020
How to check and repair MySQL Databases
You will need know how to check and repair MySQL databases or tables when you troubleshoot your website as they may have become corrupt. The mysqlcheck command is a maintenance tool that can be used to check, repair, analyze and optimize multiple tables from the command line. One of the best features of using mysqlcheck is that you don’t need to stop the MySQL service to perform the database maintenance.
In this tutorial, we will show you how to check/repair MySQL databases and tables.
Note : It is recommended to take a backup of your databases before performing a database repair operation.
Basic Syntax of mysqlcheck
A basic syntax of mysqlcheck is shown below:
mysqlcheck [OPTION] DATABASENAME TABLENAME -u root -p
A brief explanation of each option that you can use with mysqlcheck as shown below:
-c : Used to check a table for errors
-C : Used to check a tables that are changed after last week.
-a : Used to analyze tables.
-A : Used to check all databases.
-g : Used to check tables for version-dependent changes.
-B, –databases : Used to specify multiple databases.
-F : Used to check tables that are not closed properly.
–fix-db-names : Used to fix the database name.
–fix-table-names : Used to fix the table name.
–e : Used to perform an extended check.
-r : Used to repair corrupt table.
Check a Specific Table in a MySQL Database
In some cases, you need to check a specific table in a specific database. In that case, you can use the following syntax:
mysqlcheck -c databasename tablename -u root -p
For example, checks authors table in books database by running the following command:
mysqlcheck -c books authors -u root -p
You should get the following output:
books.authors OK

Check All Tables in a MySQL Database
If you want to check all the tables in a specific database use the following syntax:
mysqlcheck -c databasename -u root -p
For example, check all tables in books database by running the following command:
mysqlcheck -c books -u root -p
You should get the following output:
 Enter password:
 books.accountant                                   OK
 books.authors                                      OK
 books.writer                                       OK

Check and Optimize All Tables and All MySQL Databases
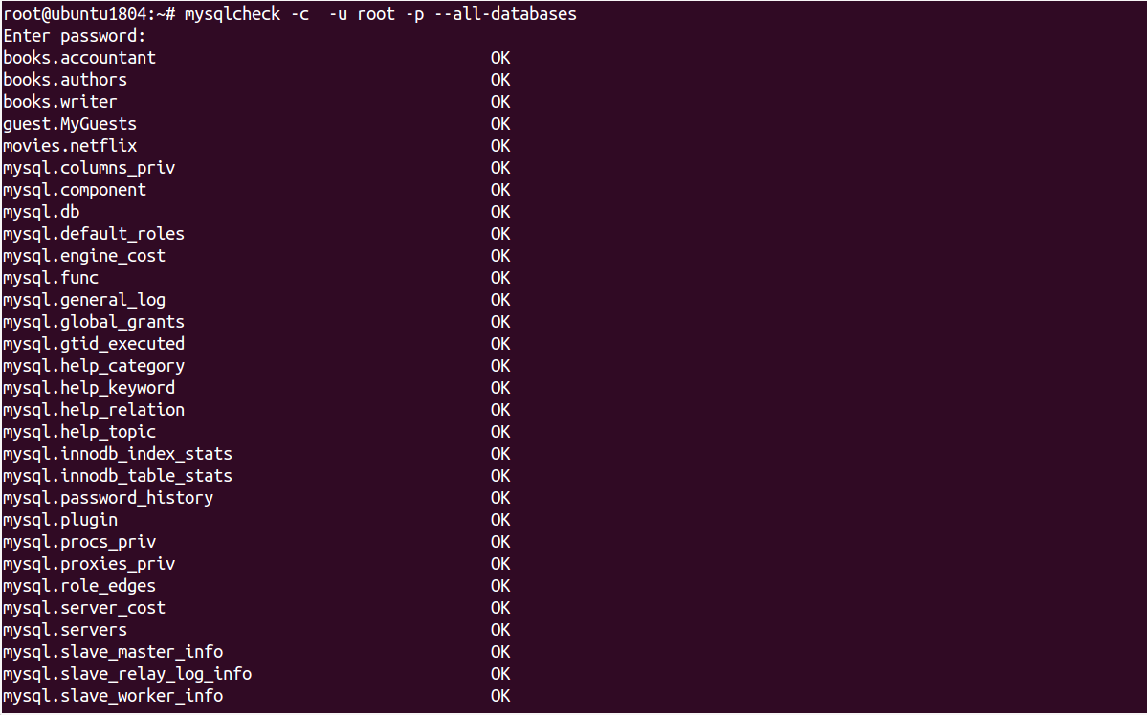
You can check all tables and all databases using the following command:
mysqlcheck -c -u root -p --all-databases
Output:
 Enter password:
 books.accountant                                   OK
 books.authors                                      OK
 books.writer                                       OK
 guest.MyGuests                                     OK
 movies.netflix                                     OK
 mysql.columns_priv                                 OK
 mysql.component                                    OK
 mysql.db                                           OK
 mysql.default_roles                                OK
 mysql.engine_cost                                  OK
 mysql.func                                         OK
 mysql.general_log                                  OK
 mysql.global_grants                                OK
 mysql.gtid_executed                                OK
 mysql.help_category                                OK
 mysql.help_keyword                                 OK
 mysql.help_relation                                OK
 mysql.help_topic                                   OK
 mysql.innodb_index_stats                           OK
 mysql.innodb_table_stats                           OK
 mysql.password_history                             OK
 mysql.plugin                                       OK
 mysql.procs_priv                                   OK
 mysql.proxies_priv                                 OK
 mysql.role_edges                                   OK
 mysql.server_cost                                  OK
 mysql.servers                                      OK
 mysql.slave_master_info                            OK
 mysql.slave_relay_log_info                         OK
 mysql.slave_worker_info                            OK
You can optimize all tables and all databases using the following command:
mysqlcheck -o root -p --all-databases
Output:
 Enter password:
 books.accountant
 note     : Table does not support optimize, doing recreate + analyze instead
 status   : OK
 books.authors
 note     : Table does not support optimize, doing recreate + analyze instead
 status   : OK
 books.writer
 note     : Table does not support optimize, doing recreate + analyze instead
 status   : OK
 guest.MyGuests
 note     : Table does not support optimize, doing recreate + analyze instead
 status   : OK
 movies.netflix
 note     : Table does not support optimize, doing recreate + analyze instead
 status   : OK
 mysql.columns_priv
 note     : Table does not support optimize, doing recreate + analyze instead
 status   : OK
 mysql.component
 note     : Table does not support optimize, doing recreate + analyze instead
 status   : OK
 mysql.db
 note     : Table does not support optimize, doing recreate + analyze instead
 status   : OK
 mysql.default_roles
 note     : Table does not support optimize, doing recreate + analyze instead
 status   : OK
 mysql.engine_cost
 note     : Table does not support optimize, doing recreate + analyze instead
 status   : OK
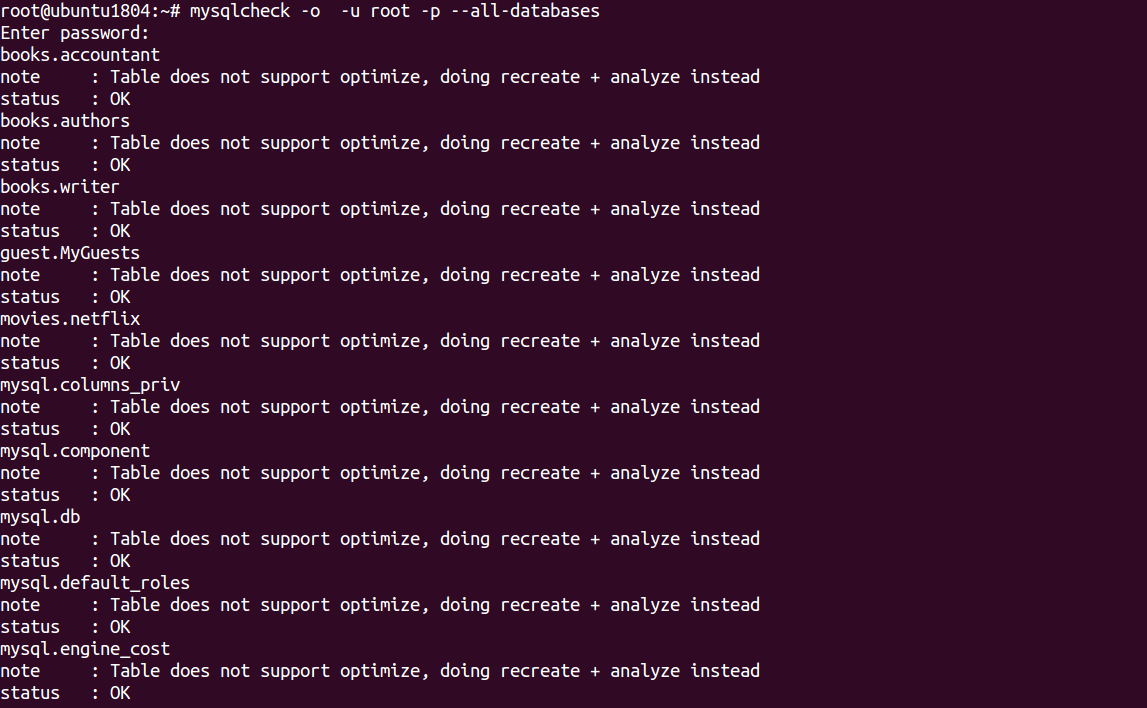
In the above output, you should see “Table does not support optimize” which means the InnoDB table that doesn’t support this option.
Repair MySQL Databases
To repair accountant tables in books database run the following command:
mysqlcheck -r books accountant -u root -p
Output:
 mysqlcheck -r books accountant -u root -p
 Enter password:
 books.accountant                                   OK

To repair all tables in both books and movies database run the following command:
mysqlcheck -r --databases books movies -u root -p
Output:
 Enter password:
 books.accountant                                   OK
 books.authors                                      OK
 books.writer                                       OK
 movies.netflix                                     OK

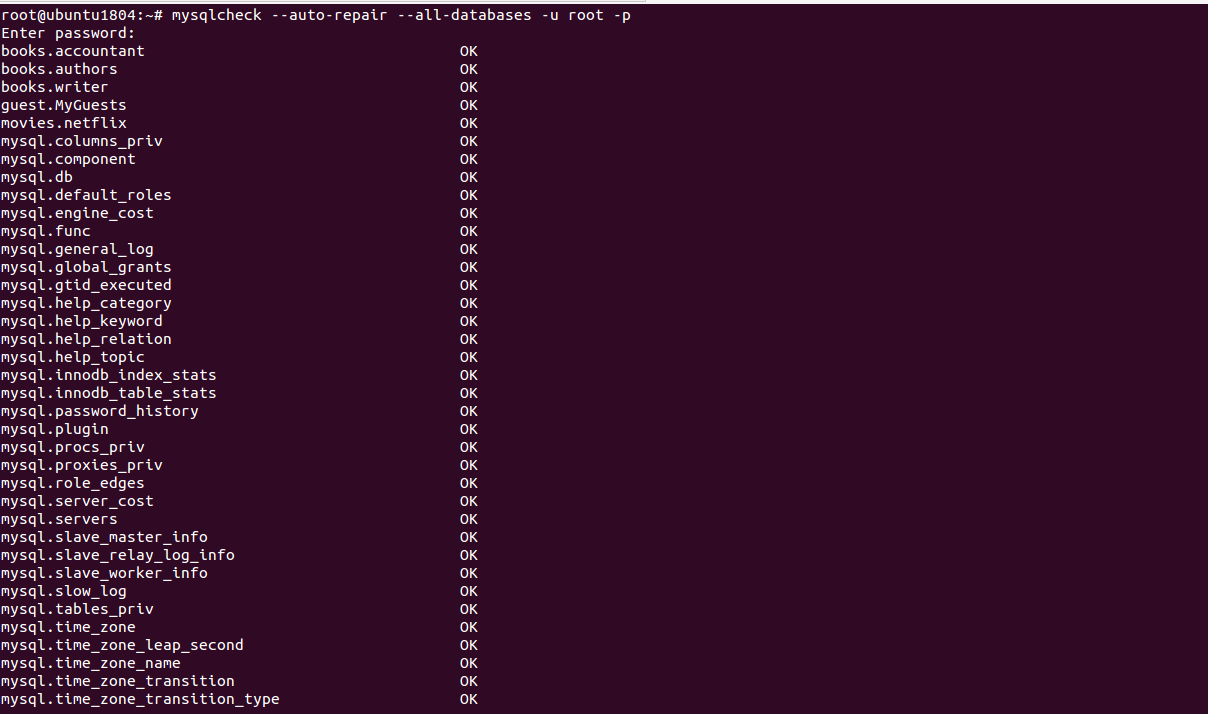
To check and repair all tables in all databases run the following command:
mysqlcheck --auto-repair --all-databases -u root -p
Output:
 Enter password:
 books.accountant                                   OK
 books.authors                                      OK
 books.writer                                       OK
 guest.MyGuests                                     OK
 movies.netflix                                     OK
 mysql.columns_priv                                 OK
 mysql.component                                    OK
 mysql.db                                           OK
 mysql.default_roles                                OK
 mysql.engine_cost                                  OK
 mysql.func                                         OK
 mysql.general_log                                  OK
 mysql.global_grants                                OK
 mysql.gtid_executed                                OK
 mysql.help_category                                OK
 mysql.help_keyword                                 OK
 mysql.help_relation                                OK
 mysql.help_topic                                   OK
 mysql.innodb_index_stats                           OK
 mysql.innodb_table_stats                           OK
 mysql.password_history                             OK
 mysql.plugin                                       OK
 mysql.procs_priv                                   OK
 mysql.proxies_priv                                 OK
 mysql.role_edges                                   OK
 mysql.server_cost                                  OK
 mysql.servers                                      OK
 mysql.slave_master_info                            OK
 mysql.slave_relay_log_info                         OK
 mysql.slave_worker_info                            OK
 mysql.slow_log                                     OK
 mysql.tables_priv                                  OK
 mysql.time_zone                                    OK
 mysql.time_zone_leap_second                        OK
 mysql.time_zone_name                               OK
 mysql.time_zone_transition                         OK
 mysql.time_zone_transition_type                    OK
Important note: InnoDB storage engine does not support repair. So you will need to change MySQL storage engine from InnoDB to MyISAM.
Check, Repair and Optimize MySQL Database with PHPMyAdmin
You can also check, repair and optimize tables and databases using the PHPMyAdmin web interface.
You can follow the below steps to check, repair and optimize tables and databases:
1- Open the phpMyAdmin tool through a web browser as shown below:
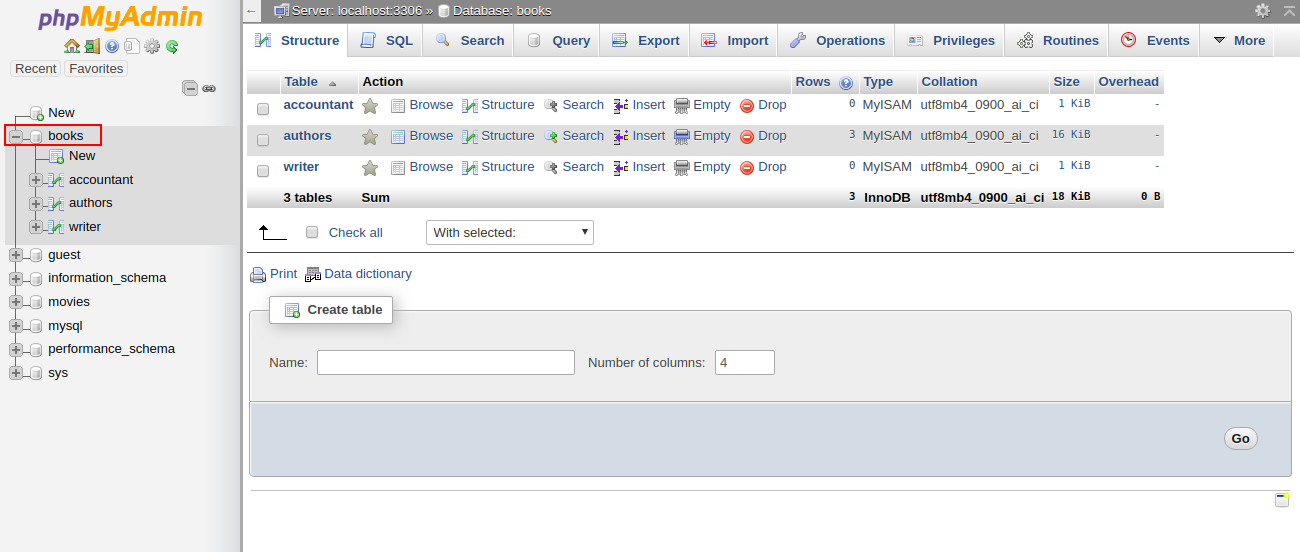
2- Select the affected database in the left pane. You should see all the tables in the right pane in the following screen:
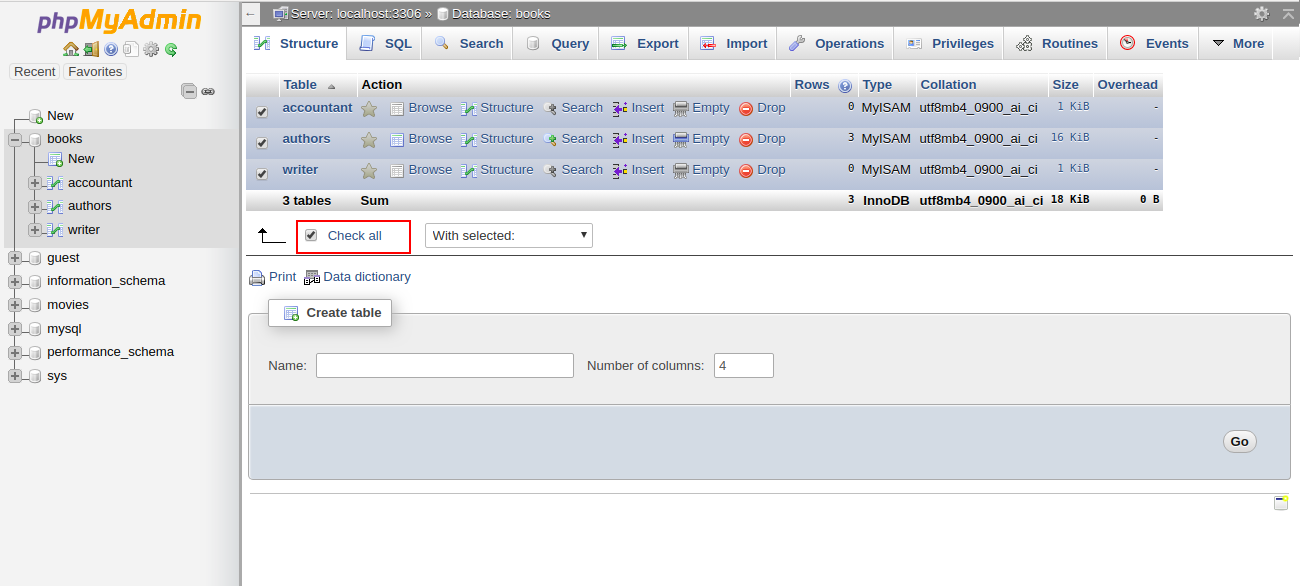
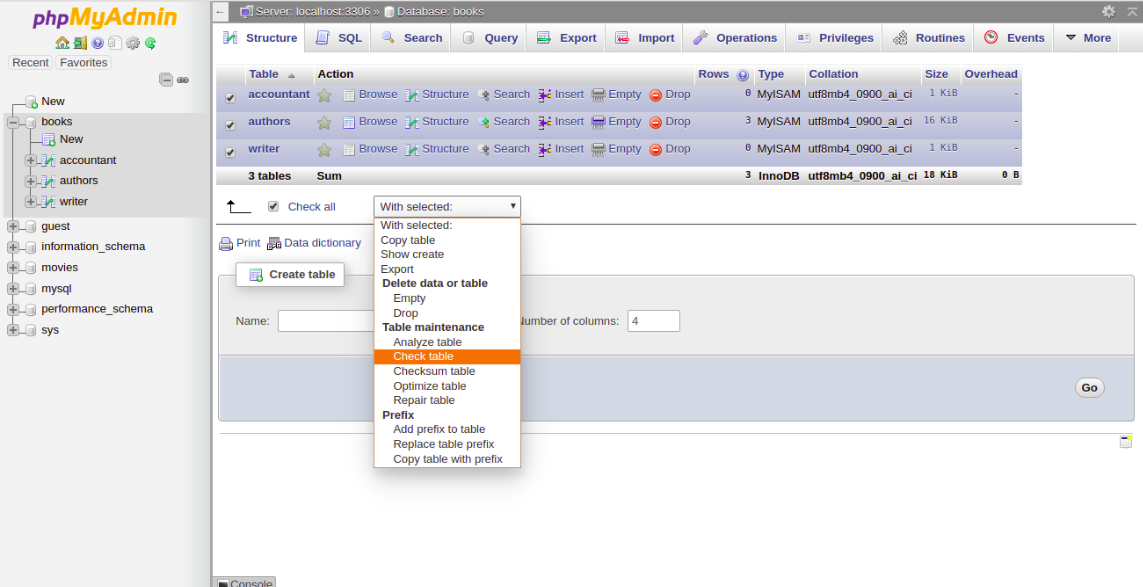
3- Click Check All to select all the tables. At the bottom of the window, choose Check Table from the menu. You should see a summary of the tables in the following screen:
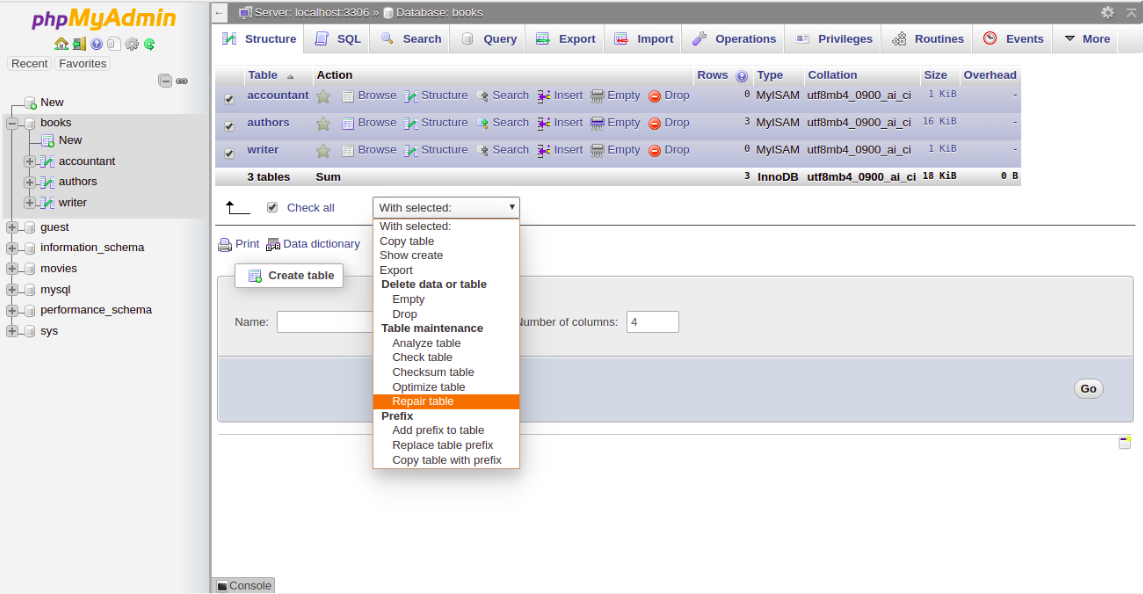
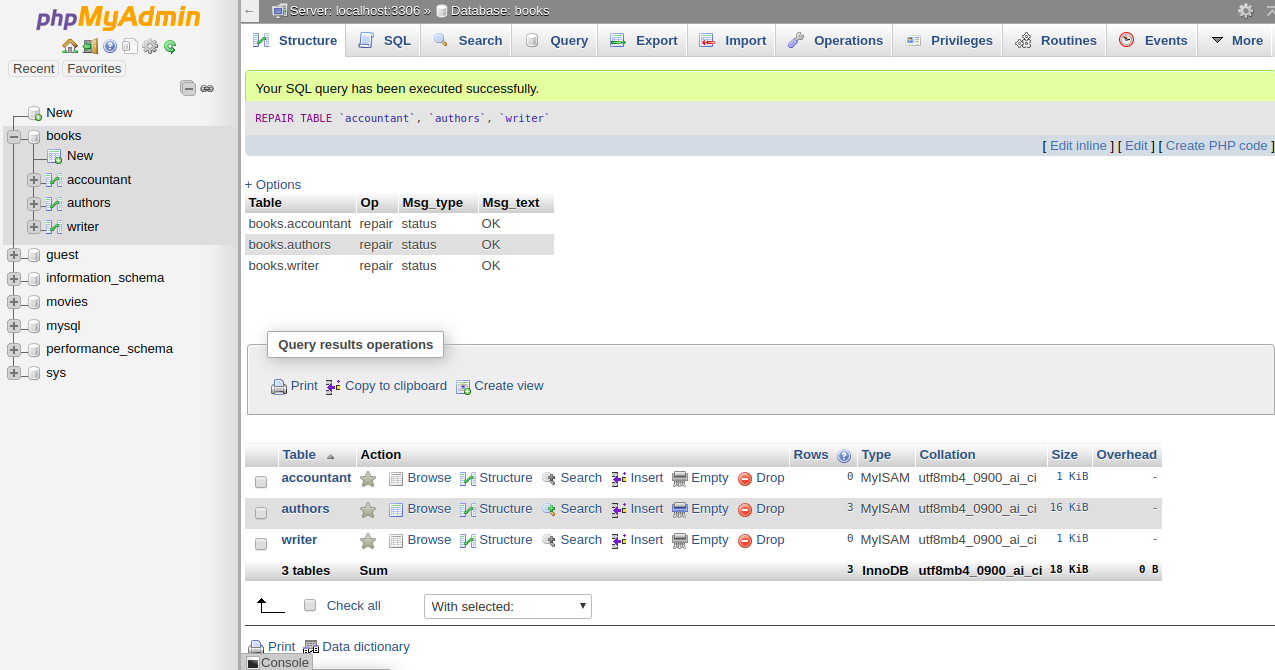
4- To repair the table, Check All to select all the tables and choose Repair Table from the menu. You should see the following page:
Then you should get a confirmation that the command been executed successfully:
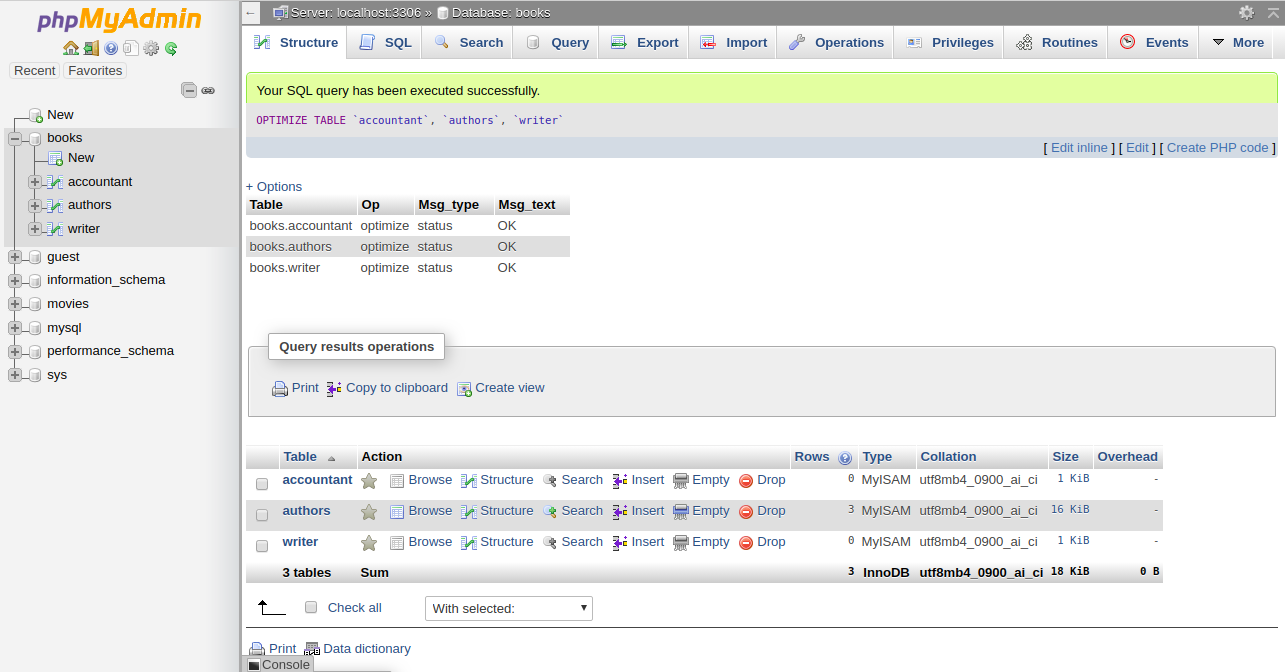
5- To optimize the table, Check All to select all the tables and choose Optimize Table from the menu. You should see the following page:

Then you should get a confirmation that the command been executed successfully:
Conclusion
In the above tutorial, we learned how to check and repair MySQL table using mysqlcheck command-line tool. We also learned how to check, repair and optimize database tables using the PHPMyAdmin web interface. I hope you can now easily fix your corrupted tables using this tool.
Время на прочтение
5 мин
Количество просмотров 31K
 Предположим, вы работаете с MySQL таблицами Innodb, и в один
прекрасный
не самый хороший момент подводит глючное железо, драйвер, бажит ядро, отключается электричество или случается одна из редких ошибок в среде MySQL. На выходе получаем повреждение некоторых страниц в табличной области Innodb.
В одной из предыдущих статей, в комментариях, нас спрашивали, что можно сделать в такой ситуации. Мы постараемся ответить максимально лаконично и по делу.
Так вот, сейчас речь о ситуации вроде этой:
InnoDB: Database page corruption on disk or a failed
InnoDB: file read of page 7.
InnoDB: You may have to recover from a backup.
080703 23:46:16 InnoDB: Page dump in ascii and hex (16384 bytes):
… A LOT OF HEX AND BINARY DATA…
080703 23:46:16 InnoDB: Page checksum 587461377, prior-to-4.0.14-form checksum 772331632
InnoDB: stored checksum 2287785129, prior-to-4.0.14-form stored checksum 772331632
InnoDB: Page lsn 24 1487506025, low 4 bytes of lsn at page end 1487506025
InnoDB: Page number (if stored to page already) 7,
InnoDB: space id (if created with >= MySQL-4.1.1 and stored already) 6353
InnoDB: Page may be an index page where index id is 0 25556
InnoDB: (index “PRIMARY” of table “test”.”test”)
InnoDB: Database page corruption on disk or a failed
Что делать для восстановления таблицы? В принципе, типов повреждений может быть несколько, ниже мы рассмотрим один из наиболее распространенных моментов. А именно — когда повреждена страница в кластеризованном первичном ключе.
В примере рассматривается файл test.idb, где заменено несколько байтов, так что повреждение достаточно умеренное.
При этом операция CHECK TABLE в INNODB практически бесполезна. Для текущего поврежденного файла мы получаем:
mysql> check table test;
ERROR 2013 (HY000): Lost connection to MySQL server during query
mysql> check table test;
+-----------+-------+----------+----------+
| Table     | Op    | Msg_type | Msg_text |
+-----------+-------+----------+----------+
| test.test | check | status   | OK       |
+-----------+-------+----------+----------+
1 row in set (0.69 sec)
Первый запуск — проверка таблицы в обычном режиме, в этом случае innodb просто падает, если есть ошибка в контрольной сумме (даже, если мы выполняем CHECK). Во втором случае запускаем innodb_force_recovery=1. И даже здесь мы получаем в логах запись о несовпадении контрольной суммы, при этом CHECK TABLE говорит нам, что с таблицей все ок. Как видим, CHECK TABLE доверять можно далеко не всегда.
В примере «повреждение» совсем небольшое, поэтому, если запускаем innodb_force_recovery=1, получаем следующее:
mysql> CREATE TABLE `test2` (
    ->   `c` char(255) DEFAULT NULL,
    ->   `id` int(10) unsigned NOT NULL AUTO_INCREMENT,
    ->   PRIMARY KEY (`id`)
    -> ) ENGINE=MYISAM;
Query OK, 0 rows affected (0.03 sec)
mysql> insert into test2 select * from test;
Query OK, 229376 rows affected (0.91 sec)
Records: 229376  Duplicates: 0  Warnings: 0
Теперь мы получили все данные в таблице MyISAM, так что все, что остается сделать — дропнуть старую таблицу, и конвертировать новую в innodb после рестарта без опции innodb_force_recovery. Если старая таблица будет нужна в дальнейшем, ее можно просто переименовать. Вторая альтернатива — сделать дамп с MySQLDump и загрузить таблицу обратно. В принципе, это почти одно и то же. MyISAM используется по причине, описанной ниже.
Почему бы просто не воспользоваться OPTIMIZE TABLE? Все потому, что работа в режимер innodb_force_recovery проводится в режиме чтения для операций с данными, поэтому нельзя вставлять или стирать данные (при этом можно создавать или удалять таблицы Innodb):
mysql> optimize table test;
+-----------+----------+----------+----------------------------------+
| Table     | Op       | Msg_type | Msg_text                         |
+-----------+----------+----------+----------------------------------+
| test.test | optimize | error    | Got error -1 from storage engine |
| test.test | optimize | status   | Operation failed                 |
+-----------+----------+----------+----------------------------------+
2 rows in set, 2 warnings (0.09 sec)
Это было просто, правда?
После этого можно пойти еще дальше, и отредактировать наш файл test.ibd, полностью удалив один из заголовков страницы. Теперь CHECK TABLE будет падать даже при использовании innodb_force_recovery=1
080704 0:22:53 InnoDB: Assertion failure in thread 1158060352 in file btr/btr0btr.c line 3235
InnoDB: Failing assertion: page_get_n_recs(page) > 0 || (level == 0 && page_get_page_no(page) == dict_index_get_page(index))
InnoDB: We intentionally generate a memory trap.
InnoDB: Submit a detailed bug report to http://bugs.mysql.com.
InnoDB: If you get repeated assertion failures or crashes, even
Если мы видим нечто подобное, то innodb_force_recovery нам не поможет, поскольку работать с этим можно тлько в случаях повреждения данных в различных системных местах. Но в нашем случае это не помогает.
Получаем такую ошибку:
mysql> insert into test2 select * from test;
ERROR 2013 (HY000): Lost connection to MySQL server during query
Попытки использования автоматических процессов восстановления поврежденных данных не приводят к положительному результату. Поэтому стоит использовать серию команд с LIMIT для режима ручного восстановления:
mysql> insert ignore into test2 select * from test limit 10;
Query OK, 10 rows affected (0.00 sec)
Records: 10  Duplicates: 0  Warnings: 0
mysql> insert ignore into test2 select * from test limit 20;
Query OK, 10 rows affected (0.00 sec)
Records: 20  Duplicates: 10  Warnings: 0
mysql> insert ignore into test2 select * from test limit 100;
Query OK, 80 rows affected (0.00 sec)
Records: 100  Duplicates: 20  Warnings: 0
mysql> insert ignore into test2 select * from test limit 200;
Query OK, 100 rows affected (1.47 sec)
Records: 200  Duplicates: 100  Warnings: 0
mysql> insert ignore into test2 select * from test limit 300;
ERROR 2013 (HY000): Lost connection to MySQL server during query
Здесь строки из таблицы переводятся в новую таблицу, пока мы не добираемся до строки, которая и вызывает падение MySQL. Мы можем ожидать этого в строке между 200 и 300, так что стоит использовать серию схожих действий для решения проблемы.
Теперь мы обнаружили поврежденные данные в таблице, при этом стоит использовать max PK, и проверить иные значения:
mysql> select max(id) from test2;
+---------+
| max(id) |
+---------+
|     220 |
+---------+
1 row in set (0.00 sec)
mysql> insert ignore into test2 select * from test where id>250;
ERROR 2013 (HY000): Lost connection to MySQL server during query
mysql> insert ignore into test2 select * from test where id>300;
Query OK, 573140 rows affected (7.79 sec)
Records: 573140  Duplicates: 0  Warnings: 0
Так, мы пробуем пропустить 30 строк, но это оказывается недостаточным. Пропускаем 80 строк, и теперь все хорошо. Используя «двоичный поиск» мы можем понять, сколько строк нужно пропустить, для восстановления максимального количества поврежденных данных. Размер строки при этом может помочь. Так, у нас есть 280 байт на строку, поэтому мы получаем около 50 строк на страницу. И здесь 30 строк недостаточно — если таблица страниц повреждена, нужно пропустить минимум всю страницу. Если повреждена страница на более высоком уровне BTREE, нужно пропустить больше страниц, для использования этого метода восстановления.
В некоторых случаях, например, когда повреждена root page для кластеризованного индекса, этот метод не будет нормально работать. В этом случае стоит использовать Innodb Recovery Toolkit.
P.S. Принимаем заявки на статьи 
Introduction
MySQL offers several different ways to analyze and repair databases. Errors and anomalies appear for numerous reasons, some of which include:
- A MySQL update or downgrade.
- Rapid changes in indexes or data.
- Table inconsistencies.
When checking for corrupted data and repairing tables, the steps taken to fix the errors depend on how you connect to the database, the database server state, the type of error, and the database engine used.
This article shows you multiple ways to troubleshoot and repair a MySQL database.
Prerequisites
- Terminal or command line with root privileges.
- MySQL version 8.0 installed and configured.
- A corrupt database or database table.
How to Check MySQL Table for Errors
Running diagnostics is the first step to troubleshooting for issues. There are two ways to check a MySQL table for errors:
- Through a MySQL
CHECK TABLEquery. - Using the terminal program
mysqlcheck.
Check a Table with CHECK TABLE
The CHECK TABLE query works in MySQL while the service is running. The general use is:
CHECK TABLE <table name> [, table name, table name] [option] [option];The simplest use is one table without any options:
CHECK TABLE <table name>;The output of the CHECK TABLE query shows an informative table about the check results:
The available options when checking tables are:
FOR UPGRADE— discovers version inconsistencies. For example, MySQL 8.0 does not support two-digit years, so a table containing such values is marked for upgrade.QUICK— does not check rows for incorrect linking. This is helpful in avoiding timeouts.FAST— performs a check on tables that are not closed properly.CHANGED— only checks tables with changes since the last check or that have not closed properly.MEDIUM— checks table rows to verify the validity of deleted links and performs a checksum for the rows.EXTENDED— does a check for complete consistency.
Without any options, CHECK TABLE performs a MEDIUM check on MyISAM tables and views. The FOR UPGRADE and QUICK perform checks on InnoDB engine tables and views while other options are ignored.
You can also combine the options for a more detailed check. For example, to do a quick check to find out whether a table closed adequately, run:
CHECK TABLE <table name> FAST QUICK;Any options that do not apply to the tables are ignored.
Check a Table With mysqlcheck
The mysqlcheck command is the command-line version of CHECK TABLE. The program runs in the terminal while the MySQL service is operating. To perform the check:
1. As the root user, navigate to the directory where the databases are stored:
sudo su
cd /var/lib/mysql
2. Check the whole database with:
mysqlcheck <database name>
Alternatively, check a specific table within the database by providing the table name as well:
mysqlcheck <database name> <table name>
There are several methods how to repair a database in MySQL. However, keep in mind that these methods are not a quick fix and can result in data loss. If the database tables are corrupt often, identify the reason for the occurrence.
Before making any changes and starting repairs, create a copy of the directory:
cp -rfv /var/lib/mysql /var/lib/mysql_copyAlternatively, make a backup version of the database before trying any of the repair solutions. Follow our guide: How to Back Up & Restore a MySQL Database.
Below you will find three options how to repair a MySQL database.
Repairing MySQL Database with REPAIR TABLE Query
After scanning and locating the database and the tables with problems, the quickest way to fix the issue is with the REPAIR TABLE query:

If the server shuts down during the repair, rerun the REPAIR TABLE operation when the server starts again. Make sure to do this before performing any other operations on the same table. In normal conditions, a MyISAM table will not result in data loss from using this method.
Repairing MySQL Database with mysqlcheck
The mysqlcheck command is an alternative to repairing database tables in the terminal.
1. First, navigate to the MySQL database folder as the root user:
cd /var/lib/mysql2. Add the -r option to the mysqlcheck command to repair the database table:
mysqlcheck -r <database> <table name>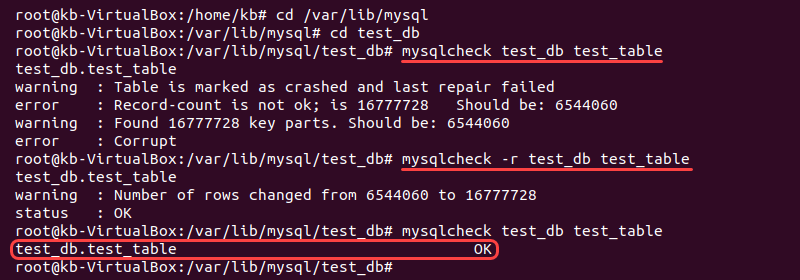
The mysqlcheck -r command is the terminal version of the REPAIR TABLE query.
Repairing MySQL Database with ALTER TABLE
Use the ALTER TABLE query to rebuild the table using the same storage engine. For example, if you have an InnoDB table, run:
ALTER TABLE <table name> ENGINE = InnoDB;To rebuild a MyISAM table, use:
ALTER TABLE <table name> ENGINE = MyISAM;If you are unsure which storage engine the table uses, run the following query to find out:
SHOW CREATE TABLE <table name>;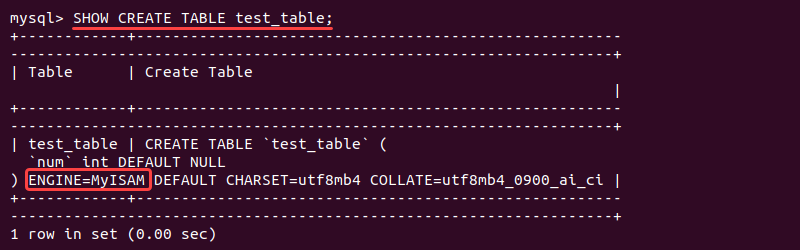
Running Engine-Specific Diagnostics and Repairs to MySQL Database
Depending on the database engine used, MySQL provides engine-specific approaches for analyzing and repairing a database table.
MyISAM tables are prone to corruptions. However, most of the time the errors are easy to fix.
When working with InnoDB databases, corruptions appear when the checksum values don’t match. Errors typically happen due to a power outage or some other hardware issue.
Checking and Repairing MyISAM Tables with myisamchk
MySQL provides a specific checker for MyISAM tables.
1. Shut down the MySQL server. Open the terminal and run:
systemctl mysql stop2. As the root user, navigate to the location of the database:
cd /var/lib/mysql/<database name>3. To check a specific table, run:
myisamchk <table name>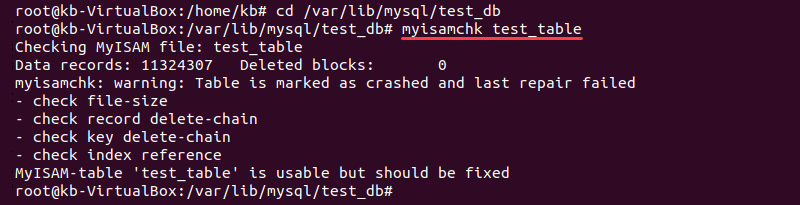
4. Repair a table by running:
myisamchk --recover <table name>5. Restart the MySQL server:
systemctl restart mysql6. Lastly, check the table in MySQL after recovery:
sudo mysql -u <user> -p <password>
USE <database name>;
SELECT * FROM <table name> LIMIT 4;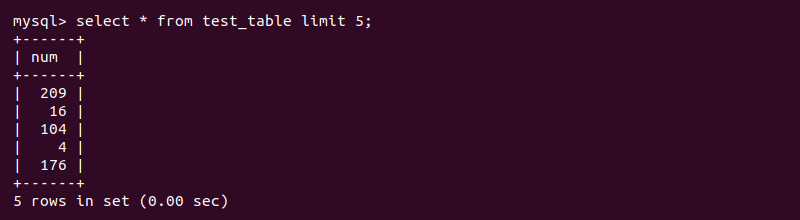
Running the InnoDB Recovery Process
MySQL documentation suggests running the InnoDB recovery process for InnoDB databases.
1. Locate and open the global configuration file using your favorite text editor. For Ubuntu and Debian systems, the location is:
cd /etc/mysql/my.cnfNote: For CentOS and Fedora, the location is:
cd /etc/my.cnf2. Add the following option to the my.cnf file:
[mysqld]
innodb_force_recovery=4
By default, the forced recovery option is set to 0 (off) and goes up to 6. Every new level includes the recovery features of the lower numbers.
3. Save and close the file.
4. Restart the MySQL server to ensure the new configuration file applies:
systemctl restart mysql5. In the home folder, export all the databases to a backup file with the mysqldump command:
sudo mysqldump --all-databases --add-drop-database --add-drop-table --routines > <file name>.sql6. Start MySQL client and drop all the affected database tables. To drop a database table, try:
DROP TABLE IF EXISTS <table name>;If the table does not drop, try removing the database table manually. Log in as the root user and navigate to the directory where the databases are:
sudo sucd /var/lib/mysql/<database name>Remove the database table:
rm -r <table name>7. Stop the MySQL server:
systemctl stop mysql8. In the my.cnf file, comment out the innodb_force_recovery option added in step 2 to disable the recovery mode. Then, save the file and close.
9. Start the MySQL server up again:
systemctl start mysql10. Restore the database from the backup .sql file in the MySQL shell. Log into the MySQL client:
sudo mysql -u <username> -p <password>11. Run the following query to import the databases:
USE <database name>;
# Turning off auto commit is optional and speeds things up for larger databases
SET autocommit=0;
SOURCE <file name>.sql;
12. Lastly, test the database to confirm everything works correctly. If not, restore the database from backup and try an alternate method.
Conclusion
This tutorial outlines several different methods to repair a MySQL database. Since database corruptions are bound to happen, MySQL provides multiple ways to discover and fix errors in a database, some of which are outlined in this article.
However, since recovery sometimes results in data loss, the best way to protect your information is to create regular backups and follow the best database security practices.
Repair Existing Crashed Databases and Tables
From the command line, run a general check and repair of all MyISAM and InnoDB tables:
mysqlcheck -u root -p –auto-repair –check –optimize –all-databases
The MySQL Services has to be running for “mysqlcheck” to work.
If MySQL will not start (and only in this case), run myisamchk with the path to MySQL’s data directory:
myisamchk –recover C:/WampDeveloper/Database/mysql-data-56/*/*.MYI
Auto Repair Future Crashed Databases and Tables
Edit MySQL’s my.ini file and tell MySQL to auto recover MyISAM tables as they are opened:
[mysqld]
# For MySQL 5.1
#myisam-recover=BACKUP,FORCE
# For MySQL 5.5.3+
myisam-recover-options=BACKUP,FORCE
Remove the myisam-recover option “BACKUP” if this is happening often, as the backup files will accumulate and grow in number (and the overall size becomes a problem).
InnoDB tables automatically recover after every crash, and no additional configuration is needed… Unless the InnoDB data is so corrupt that MySQL will not start.
Trace Crashes to Specific Query
If you log all the queries made, the last one before the crash will likely be the one that is causing crashes and corruption. And from it, you can trace the issue back to its origin…
[mysqld]
general_log = 1
general_log_file = “C:/mysql-query.log.txt”
Checking and Repairing MySQL Tables
You might need to restore corrupted tables (or even an entire database) from your backups and use the update logs if a table gets damaged or deleted by accident. In case of relatively minor damage, however, MySQL provides several options for table repair. This next section deals with what you can do if this is the case.
Checking Tables for Errors
The first thing to do if you suspect something is wrong is to check the table for errors. The myisamchkutility is one way to check a table. To invoke this utility, execute the command myisamchk table-file.
Because myisamchk requires exclusive access to the tables, a good idea is to take the server offline before running it. This way, you needn’t worry about coordinating access between clients. In addition, you can run several options when you check a table for errors, as shown in Table 1.
The following example runs myisamchk with the extended option enabled. If you’re following along, don’t use a large table to see how this works because you’ll tie up your server for quite a while. If no errors are detected using the extended option, you can be certain the specified table isn’t the problem.
[root@production ~]# /usr/local/bin/myisamchk –extend-check/usr/local/mysql/data/db1/airport.MYIChecking MyISAM file: /usr/local/mysql/data/db1/airport.MYIData records: 15 Deleted blocks: 0myisamchk: warning: 1 client is using or hasn’t closed the table properly- check file-size- check record delete-chain- check key delete-chain- check index reference- check data record references index: 1- check record linksMyISAM-table ‘/usr/local/mysql/data/db1/airport.MYI’ is usable but should befixed
The downside of myisamchk is this database-checking tool requires locking out clients while the diagnosis is performed. Moreover, no client can hold a lock on the table being checked while myisamchkis running. On a big table, where myisamchk can take a few minutes to perform its checks, this can be a problem.
Table 1 Additional myisamchk Table Check Options
One alternative here is to set myisamchk to use large buffers (use myisamchk –help to see the options for changing the various buffers). Another alternative is to use a different method to check your tables: the CHECK TABLE command.
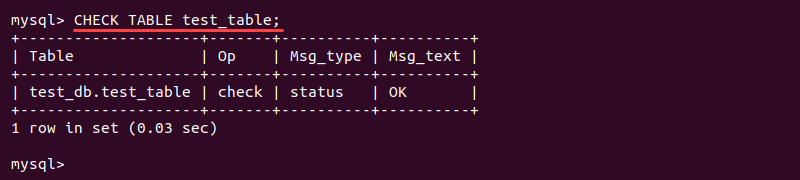
The myisamchk utility requires exclusive access to the tables it’s checking because it works directly with the table files. The CHECK TABLE command, on the other hand, has the server check the tables. This means less work for you, as you don’t have to take the server down and remove all the locks from the table. Here’s an example of it in action:
mysql> CHECK TABLE airport;
1 row in set (0.08 sec)
In case you were wondering, you can also add the keywords FAST, MEDIUM, and EXTENDED to the CHECK TABLE command to perform the desired type of check.
Why not run CHECK TABLE all the time then, instead of myisamchk, you might ask? The main reason is this: The server does all the work when using CHECK TABLE. If your server is down, CHECK TABLE isn’t an option. On the other hand, myisamchk works at the file level and, therefore, can work even if the server is down. Since CHECK TABLE is a SQL command that can only be sent via a client, the server must be running to accept it. If you have a choice, however, by all means let MySQL do the work.
CAUTION
myisamchk only works with the MyISAM storage engine. To check InnoDB tables, use the CHECK TABLEcommand instead.
Repairing Tables
If you find errors exist after checking a table, you must repair the table. The best practice is to make a copy of the table in question before you try to repair it. This gives you the option of trying a different way to recover it if your first solution doesn’t work.
The myisamchk tool discussed previously can also be used to repair a damaged table. Use the –recoveroption with the table filename to start this process. Here’s an example:
[root@host]# /usr/local/mysql/bin/myisamchk –recover/usr/local/mysql/data/db1/airport.MYI- recovering (with sort) MyISAM-table’/usr/local/mysql/data/db1/airport.MYI’Data records: 15- Fixing index 1
If the –recover option fails to take care of the problem, the –safe-recover option attempts a slow recovery of the table. Other options are also available, and Table 2 explains what they mean.
Keep in mind that the myisamchk tool works at the file level and, therefore, requires that all locks be removed and all clients be excluded.
As when checking a table, you should try the fastest options first and move to the slower, more thorough, options only if needed. You might find many common problems are fixed without having to resort to the slower options. If you still have a problem after running even the most intensive repair possibilities, you’ll have to restore the table from your backups. Restoring is covered in detail in the section “Restoring Databases and Tables from Backup.”
The other option you have when repairing a table is the REPAIR TABLE command, coupled with the table name. Similar to myisamchk, you have the option of using the QUICK or EXTENDED keyword to set the type of repair. Simply add the option name to the end of the REPAIR TABLEstatement, as in the example shown:
mysql> REPAIR TABLE airport QUICK;+————-+——–+———-+———- +| Table | Op | Msg_type | Msg_text |+————-+——–+———-+———- +| db1.airport | repair | status | OK |+————-+——–+———-+———- +1 row in set (0.00 sec)
TIP
You can use either myisamchk or REPAIR TABLE to fix a damaged table, but remember (as discussed earlier in the context of the CHECK TABLE command), the server must be running in order to use REPAIR TABLE, while you must only use myisamchk if the server is down.
TABLE 2 Additional myisamchk Table Repair Options
Optimizing Tables
There are a number of times when optimizing a table is a good idea. A common example is if a table gets considerable activity, especially many deletions. In such a situation, it can quickly get fragmented, resulting in performance degradation. Running the OPTIMIZE TABLE command flushes these deleted records and frees up space.
For example, the following command optimizes the route table:
mysql> OPTIMIZE TABLE route;+———–+———-+———-+———- +| Table | Op | Msg_type | Msg_text |+———–+———-+———-+———- +| db1.route | optimize | status | OK |+———–+———-+———-+———- +1 row in set (0.06 sec)
The OPTIMIZE TABLE command is like your mother coming in and tidying your room. In addition to getting rid of old, deleted files, it sorts indexed files, places the contents of variable table rows into contiguous spaces, and updates table statistics. Remember, though, that the table is locked and can’t be accessed by clients while it’s being serviced.
How to Fix MySQL Database (MyISAM / InnoDB)
So… your shiny MySQL database is no longer running and you want to fix it?
You’ve come to the right place!
I’ve assembled a list of 7 ways to fix your MySQL database when a simple restart doesn’t do the trick, or when you have corrupt tables.
Simple MySQL restart:
/usr/local/mysql/bin/mysqladmin -uUSERNAME -pPASSWORD shutdown
/usr/local/mysql/bin/mysqld_safe &
-
Corrupt MyISAM tables
MySQL database allows you to define a different MySQL storage enginefor different tables. The storage engine is the engine used to store and retrieve data. Most popular storage engines are MyISAM and InnoDB.
MyISAM tables -will- get corrupted eventually. This is a fact of life.
Luckily, in most cases, MyISAM table corruption is easy to fix.
To fix a single table, connect to your MySQL database and issue a:
repair TABLENAME
To fix everything, go with:
/usr/local/mysql/bin/mysqlcheck –all-databases -uUSERNAME -pPASSWORD -r
A lot of times, MyISAM tables will get corrupt and you won’t even know about it unless you review the log files.
I highly suggest you add this line to your /etc/my.cnf config file. It will automatically fix MyISAM tables as soon as they become corrupt:
[mysqld]
myisam-recover=backup,force
If this doesn’t help, there are a few additional tricks you can try.
2. Multiple instances of MySQL
This is pretty common. You restart MySQL and the process immediately dies.
Reviewing the log files will tell you another instance of MySQL may be running.
To stop all instances of MySQL:
/usr/local/mysql/bin/mysqladmin -uUSERNAME -pPASSWORD shutdown
killall mysql
killall mysqld
Now you can restart the database and you will have a single running instance
3. Changed InnoDB log settings
Once you have a running InnoDB MySQL database, you should never ever change these lines in your /etc/my.cnf file:
datadir = /usr/local/mysql/data
innodb_data_home_dir = /usr/local/mysql/data
innodb_data_file_path = ibdata1:10M:autoextend
innodb_log_group_home_dir = /usr/local/mysql/data
innodb_log_files_in_group = 2
innodb_log_file_size = 5242880
InnoDB log file size cannot be changed once it has been established. If you change it, the database will refuse to start.
4. Disappearing MySQL host tables
I’ve seen this happen a few times. Probably some kind of freakish MyISAM bug.
Easily fixed with:
/usr/local/bin/mysql_install_db
-
MyISAM bad auto_increment
If the auto_increment count goes haywire on a MyISAM table, you will no longer be able to INSERT new records into that table.
You can typically tell the auto_increment counter is malfunctioning, by seeing an auto_increment of -1 assigned to the last inserted record.
To fix – find the last valid auto_increment id by issuing something like:
SELECT max(id) from tablename
And then update the auto_increment counter for that table
ALTER TABLE tablename AUTO_INCREMENT = id+1
-
Too many connections
Your database is getting hit with more connections than it can handle and now you cannot even connect to the database yourself.
First, stop the database:
/usr/local/mysql/bin/mysqladmin -uUSERNAME -pPASSWORD shutdown
If that doesn’t help you can try “killall mysql” and “killall mysqld”
Once the database stopped, edit your /etc/my.cnf file and increase the number of connections. Don’t go crazy with this number or you’ll bring your entire machine down.
On a dedicated database machine we typically use:
max_connections = 200
wait_timeout = 100
Try restarting the database and see if that helps.
If you’re getting bombarded with queries and you need to be able to connect to the database to make some table changes, set a different port number in your /etc/my.cnf file, start the database, make any changes, then update the port back to normal (master-port = 3306) and restart.
7. Corrupt InnoDB tables
InnoDB tables are my favorite. Transactional, reliable and unlike MyISAM, InnoDB supports concurrent writes into the same table.
InnoDB’s internal recovery mechanism is pretty good. If the database crashes, InnoDB will attempt to fix everything by running the log file from the last timestamp. In most cases it will succeed and the entire process is transparent.
Unfortunately if InnoDB fails to repair itself, the -entire- database will not start. MySQL will exit with an error message and your entire database will be offline. You can try to restart the database again and again, but if the repair process fails – the database will refuse to start.
This is one reason why you should always run a master/master setup when using InnoDB – have a redundant master if one fails to start.
Before you go any further, review MySQL log file and confirm the database is not starting due to InnoDB corruption.
There are tricks to update InnoDB’s internal log counter so that it skips the queries causing the crash, but in our experience this is not a good idea. You lose data consistency and will often break replication.
Once you have corrupt InnoDB tables that are preventing your database from starting, you should follow this five step process:
Step 1: Add this line to your /etc/my.cnf configuration file:
[mysqld]
innodb_force_recovery = 4
Step 2: Restart MySQL. Your database will now start, but with innodb_force_recovery, all INSERTs and UPDATEs will be ignored.
Step 3: Dump all tables
Step 4: Shutdown database and delete the data directory. Run mysql_install_db to create MySQL default tables
Step 5: Remove the innodb_force_recovery line from your /etc/my.cnf file and restart the database. (It should start normally now)
Step 6: Restore everything from your backup
Recently I was faced with the daunting task of reparing an InnoDB database gone bad. The database would not start due to corruption.
First step was turning-on InnoDB force-recovery mode, where InnoDB starts but ignores all UPDATEs and INSERTs.
Add this line to /etc/my.cnf:
innodb_force_recovery = 2
Now we can restart the database:
/usr/local/bin/mysqld_safe &
(Note: If MySQL doesn’t restart, keep increasing the innodb_force_recovery number until you get to innodb_force_recovery = 
Save all data into a temporary alldb.sql (this next command can take a while to finish):
mysqldump –force –compress –triggers –routines –create-options -uUSERNAME -pPASSWORD –all-databases > /usr/alldb.sql
Shutdown the database again:
mysqladmin -uUSERNAME -pPASSWORD shutdown
Delete the database directory. (Note: In my case the data was under /usr/local/var. Your setup may be different. Make sure you’re deleting the correct directory)
rm -fdr /usr/local/var
Recreate the database directory and install MySQL basic tables
mkdir /usr/local/var
chown -R mysql:mysql /usr/local/var
/usr/local/bin/mysql_install_db
chown -R mysql:mysql /usr/local/var
Remove innodb_force_recovery from /etc/my.cnf and restart database:
/usr/local/bin/mysqld_safe &
Import all the data back (this next command can take a while to finish):
mysql -uroot –compress < /usr/alldb.sql
And finally – flush MySQL privileges (because we’re also updating the MySQL table)
/usr/local/bin/mysqladmin -uroot flush-privileges
–
Note: For best results, add port=8819 (or any other random number) to /etc/my.cnf before restarting MySQL and then add –port=8819 to the mysqldump command. This way you avoid the MySQL database getting hit with queries while the repair is in progress.
MySQL – Corrupted InnoDB tables recovery – Step by step guide
InnoDB tables don’t get corrupted easily, but when they do, it usually happens because of hardware issues, power outages or MySQL bug. It leaves you with corrupted pages in InnoDB tablespace and recovering from that might be problem. When your MySQL properly crashes and doesn’t want to come back, you may see looping of similar error:
InnoDB: Assertion failure in thread 1129654592 in file ibuf0ibuf.c line 4231InnoDB: Failing assertion: page_get_n_recs(page) > 1InnoDB: We intentionally generate a memory trap.InnoDB: Submit a detailed bug report to http://bugs.mysql.com.InnoDB: If you get repeated assertion failures or crashes, evenInnoDB: immediately after the mysqld startup, there may beInnoDB: corruption in the InnoDB tablespace. Please refer toInnoDB: http://dev.mysql.com/doc/refman/5.5/en/forcing-innodb-recovery.htmlInnoDB: about forcing recovery.mysqld got signal 6 ;This could be because you hit a bug. It is also possible that this binaryor one of the libraries it was linked against is corrupt, improperly built,or misconfigured. This error can also be caused by malfunctioning hardware.We will try our best to scrape up some info that will hopefully help diagnosethe problem, but since we have already crashed, something is definitely wrongand this may fail….some backtrace…The manual page at http://dev.mysql.com/doc/mysql/en/crashing.html containsinformation that should help you find out what is causing the crash.mysqld_safe Number of processes running now: 0mysqld_safe mysqld restarted
Recovering from corrupted InnoDB tables
Step 1 – Bring up your database in recovery mode
You should bring down your database. Shut it down in case it’s still running and spamming these messages in your log. As last resort, you may also kill the process. In order to bring back your database you will need to start it in recovery mode, with innodb_force_recovery. You should know this recovery mode makes your databases read only. Users connecting to it can not update, insert or other way alter existing data. To prevent your MySQL getting hammered the second it comes back, I suggest you to also change port of MySQL server from 3306 to something random. Add innodb_force_recovery=1 to your my.cnf In case your server doesn’t want to come back, you may further increase this number from 1 to 6, check MySQL manual to see what the differences are.
Be sure to check your MySQL logs, and if it loops with something like:
InnoDB: Waiting for the background threads to start
You should also add innodb_purge_threads=0 to your my.cnf.
So all together to bring back database, I had to add these 3 parameters in my.cnf:
port = 8881innodb_force_recovery=3innodb_purge_threads=0
Step 2 – Check which tables are corrupted and make a list
Now you have your database back up and running, but in recovery mode. You can not change your databases / tables. If you try it, you will get error:
Got error -1 from storage engine
We need to find out which tables got corrupted. In order to do that, we execute: mysqlcheck –all-databases
Check for lines where it says table is Corrupted. Write down all tables / databases that got you an error. You will need to mysqldump them in recovery mode and reimport them after you boot back into normalMySQL mode. Let me also remind you that innochecksum command did not help me with finding out which tables are corrupted, so don’t bother with it.
Step 3 – Backup and drop your corrupted tables
Once you got the list of corrupted tables, you should mysqldump them to their own .sql files, that way you will have backup for reimport. In case you wondered how to dump only one table in database:
mysqldump my_database table > database.table.sql
After you have the backup, drop your corrupted tables by executing: drop table database.table;from your MySQL shell. You have now cleaned up your MySQL database so it’s time to boot it up back without recovery mode.
Step 4 – Restart MySQL in normal mode
When we don’t have any corrupted tables left in our database, we should remove the my.cnf settings that we added in Step 1. Don’t remove the port setting yet, because your database is still missing tables you backed up and need to be reimported. Restart your MySQL.
Once you have the databases dumped successfully, stop MySQL completely and move the ib* files from /var/lib/mysql/ out of the directory.
mkdir /var/lib/old_innodb
mv /var/lib/mysql/ib* /var/lib/old_innodb
Remove ‘innodb_force_recovery’ ‘innodb_log_file_size‘ Two lines from /etc/my.cnf and start MySQL service. Then Restore database into their respective database.
Step 5 – Import backup .sql
Import each dumped .sql table to their respected database. To do that from CLI:
mysql database < database.table.sql
Step 6 – Change port and grab a beer
Once you finished importing your tables, you are free to change port setting in your my.cnf. Of course reboot MySQL afterwards. It should come back and start working just as before the crash. Grab a beer and click on the top of this post, to let me know this article helped you solve your problem.
innodb force recovery options
1 (SRV_FORCE_IGNORE_CORRUPT)
Let the server run even if it detects a corrupt page. Try to make SELECT * FROM tbl_name jump over corrupt index records and pages, which helps in dumping tables.
2 (SRV_FORCE_NO_BACKGROUND)
Prevent the main thread from running. If a crash would occur during the purge operation, this recovery value prevents it.
3 (SRV_FORCE_NO_TRX_UNDO)
Do not run transaction rollbacks after recovery.
4 (SRV_FORCE_NO_IBUF_MERGE)
Prevent insert buffer merge operations. If they would cause a crash, do not do them. Do not calculate table statistics.
5 (SRV_FORCE_NO_UNDO_LOG_SCAN)
Do not look at undo logs when starting the database: InnoDB treats even incomplete transactions as committed.
6 (SRV_FORCE_NO_LOG_REDO)
Do not do the log roll-forward in connection with recovery.
The database must not otherwise be used with any nonzero value of innodb_force_recovery. As a safety measure, InnoDB prevents users from performing INSERT, UPDATE, or DELETE operations when innodb_force_recovery is greater than 0.
WHERE engine = ‘innodb’;
mysqlcheck offers an efficient way to perform maintenance of tables and databases in MySQL. It can check tables, repair them if found corrupt, optimize them and perform combined operations of checking, repairing, and optimizing altogether. mysqlcheck command-line utility in MySQL is intended to be used when the mysqld server is running. It can execute CHECK TABLE, REPAIR TABLE, ANALYZE TABLE and OPTIMIZE TABLE statements in the most convenient way for the user.
In this blog, we explore the different ways of using mysqlcheck command line for checking, repairing, and optimizing tables and databases in MySQL. Start verifying and taking corrective actions for your tables and databases using this guide.
Table of Contents
- What is MySQL?
- Business Benefits of Using MySQL
- What is mysqlcheck Client?
- mysqlcheck Command
- Using mysqlcheck for MySQL Database Tables
- Part 1: Creating a MySQL Database Back-Up
- Part 2: Running mysqlcheck Command
- Running mysqlcheck to Analyze a Table in MySQL Database
- Running mysqlcheck to Repair Tables in a MySQL Database
- Running mysqlcheck to Optimize Tables in a MySQL Database
- Part 3: Using mysqlcheck in Compound Commands
- Running mysqlcheck to Optimize and Repair Tables in a MySQL Database
- Part 4: mysqlcheck Command Modifications
- Conclusion
What is MySQL?

MySQL is the world’s most popular Open Source Relational Database Management System (RDBMS) used by all types of Small and Medium-Size Businesses (SMBs) and large enterprises. MySQL was initially developed, marketed, and supported by MySQL AB, a Swedish company but later got acquired by Sun Microsoft Systems (currently known as Oracle Corporation). Just like other typical databases, MySQL can store user/business/customer information in the form of rows and columns in a table. It provides referential integrity between rows and columns of various tables and processes user requests using SQL.
MySQL holds a highly regarded name in businesses working with databases and Cloud-based Data Warehousing solutions. It’s scalable, reliable, and user-friendly. It also works cross-platform which means that users can run MySQL on Linux and Windows, and restore backups from the other platform.
Business Benefits of Using MySQL
MySQL is popular all over the world and is used by leading tech giants owing to the following reasons:
Easy to Install and Deploy
Businesses can set up and run SQL queries on their data using MySQL in minutes. MySQL enables them to deliver new applications faster than proprietary databases.
High Speed
It’s a no-brainer that if you are working with large datasets, you wouldn’t want to spend an extensive amount of time working with datasets and tables. Unlike other databases, MySQL is comparatively faster and can query information from large datasets helping in business intelligence activities.
Read more on the top 10 MySQL ETL tools for your business here.
Industry Standards
Whether you are a developer who is required for rapid development of software or a freelancer who seeks to work with databases, MySQL has been in use for over 20 years and you can be sure of using MySQL as a fully integrated transaction-safe, ACID-compliant database.
Reliability and High Availability
MySQL has a well-established reputation for reliability among its 5 million user base. In addition to reliability, MySQL Cluster gives 99.999 percent availability.
Multiple Platform Support
MySQL can be used on 20 platforms including Linux, Solaris, AIX, HP-UX, Windows, and Mac OS X. This provides organizations with complete flexibility in delivering a solution on the platform of their choice.
What is mysqlcheck Client?
mysqlcheck is a table maintenance program to check, repair, optimize, or analyze multiple tables from the command line. It works with InnoDB, MyISAM, and ARCHIVE tables and provides three levels of checking:
- Table-specific
- Database-specific
- All databases
mysqlcheck table client for MySQL consists of four SQL statements to perform the table maintenance action:
- CHECK TABLE,
- REPAIR TABLE,
- ANALYZE TABLE, and
- OPTIMIZE TABLE
While performing table repair or analysis, it is important to bear in mind that table maintenance operations like mysqlcheck can become time-consuming processes especially when you have a large number of entries in your tables. If you use the –databases or –all-databases option to process all tables in one or more databases, a mysqlcheck call might take you a long time to complete.
Note: For performing mysqlcheck operation, you must run the mysqld server. This means that you do not have to stop the server to perform table maintenance. mysqlcheck is different from myisamchk and aria_chk utilities that don’t require the server to be running.
mysqlcheck Command
There are three ways to use mysqlcheck command-line tool:
./client/mysqlcheck [OPTIONS] database [tables]
./client/mysqlcheck [OPTIONS] --databases DB1 [DB2 DB3...]
./client/mysqlcheck [OPTIONS] --all-databases
A fully-managed No-code Data Pipeline platform like Hevo Data, helps you integrate data from PostgreSQL and/or MySQL and load data from 100+ different sources to a destination of your choice in real-time in an effortless manner. Hevo with its minimal learning curve can be set up in just a few minutes allowing the users to load data without having to compromise performance. Its strong integration with umpteenth sources provides users with the flexibility to bring in data of different kinds, in a smooth fashion without having to code a single line.
Get Started with Hevo for Free
A few Salient Features of Hevo are as follows:
Completely Automated: The Hevo platform can be set up in just a few minutes and requires minimal maintenance.
Real-Time Data Transfer: Hevo provides real-time data migration, so you can have analysis-ready data always.
100% Complete & Accurate Data Transfer: Hevo’s robust infrastructure ensures reliable data transfer with zero data loss.
Scalable Infrastructure: Hevo has in-built integrations for 100+ sources that can help you scale your data infrastructure as required.
24/7 Live Support: The Hevo team is available round the clock to extend exceptional support to you through chat, email, and support calls.
Schema Management: Hevo takes away the tedious task of schema management & automatically detects the schema of incoming data and maps it to the destination schema.
Live Monitoring: Hevo allows you to monitor the data flow so you can check where your data is at a particular point in time.
Sign up here for a 14-Day Free Trial!
Using mysqlcheck for MySQL Database Tables
Important Note: Before we proceed with table check, repair, or analysis operations, it’s best advised to create a backup of your table(s), for some circumstances might lead to a potential data loss.
As a result, we’ve split this tutorial into four sections for your convenience:
- Part 1: Creating a MySQL Database Back-Up
- Part 2: Running mysqlcheck Command
- Part 3: Using mysqlcheck in Compound Commands
- Part 4: mysqlcheck Command Modifications
Part 1: Creating a MySQL Database Back-Up
To create a backup of all your existing MySQL databases, follow these steps:
Step 1: Log in to your MySQL server using Secure Shell (SSH).
Step 2: Stop MySQL server using the appropriate command based on your Linux distribution:
For CentOS and Fedora, type:
service mysqld stopFor Debian and Ubuntu, type:
service mysql stopStep 3: Input the following command to copy all of your databases to a directory name based on the current time.
cp -rfv /var/lib/mysql /var/lib/mysql$(date +%s)Step 4: Restart MySQL server with the command appropriate for your Linux distribution:
For CentOS and Fedora, type:
service mysqld startFor Debian and Ubuntu, type:
service mysql startPart 2: Running mysqlcheck Command
To use the mysqlcheck table command and check tables, follow these steps:
Step 1: As an administrator, change your directory to MySQL Data Directory.
cd /var/lib/mysqlStep 2: Now type in the mysqlcheck command to check for an existing table in a database. In our example, we are checking for a table called “email” under the database “customers”.
$ mysqlcheck -c customers email
customers.email                         OK
Notice our result. If a table passes the check, mysqlcheck displays OK for the table.
Not only this, mysqlcheck command can be used to CHECK (-c, -m, -C), REPAIR (-r), ANALYZE (-a), or OPTIMIZE (-o) table within your databases. The -c, -r, -a, and -o options work exclusively.
Some of the options (like -e (–extended) or -q (–quick)) can also be used at the same time but not all options are supported by all storage engines.
Running mysqlcheck to Analyze a Table in MySQL Database
As an example, the following command analyzes the “email” table within our “customers” database:
$ mysqlcheck -a customers email
customers.email                         OK
Running mysqlcheck to Repair Tables in a MySQL Database
The following command repairs all tables in the “customers” and “leads” databases:
$ mysqlcheck -r --databases customers leadsNote: If you see a note stating: The storage engine for the table doesn’t support repair it means that you are doing REPAIR on an InnoDB.
Running mysqlcheck to Optimize Tables in a MySQL Database
The following mysqlcheck database command optimizes all tables in all your MySQL databases.
$ mysqlcheck -o --all-databasesFor user reference, this is a table showcasing the most used options for the mysqlcheck database command.
| Option | Description |
| -c, –check | Check the tables for errors |
| -a, –analyze | Analyze the tables |
| -o, –optimize | Optimize the tables |
| -r, –repair | Perform a repair that can fix almost anything except unique keys that are not unique |
| –auto-repair | If a checked table is corrupted, automatically fix it |
| -A, –all-databases | Check all tables in all databases. This is the same as –databases with all databases selected |
| -B, –databases | Process all tables in the named databases. With this option, all name arguments are regarded as database names, not as table names |
| –tables | Overrides the –databases or -B option such that all name arguments following the option are regarded as table names |
| -g, –check-upgrade | Check tables for version-dependent changes. It may be used with –auto-repair to correct tables requiring version-dependent updates |
| –compress | Compress all information sent between client and server |
| –debug-info | Print debugging information, memory, and CPU statistics when the program exits |
| -e, -–extended | Check and repair tables |
| -q, –quick | The fastest method of checking |
| -?, –help | Display a help message and exit |
A more extensive list of other mysqlcheck database command options can be found on this page.
Likewise, these mysqlcheck table/database options can be combined together to perform a joint operation. Have a look at how this can be performed in the following section.
Part 3: Using mysqlcheck in Compound Commands
The mysqlcheck command-line utility can be extended for giving compound commands. For instance, let’s assume a case where there is a need to repair and optimize the “email” table from our previously stated “customer” database.
mysqlcheck table command options like -c (check), -r (repair), -a (analyze), and -o (optimize) options work exclusively and can be used concurrently in the same mysqlcheck command.
Running mysqlcheck to Optimize and Repair Tables in a MySQL Database
The following mysqlcheck command checks, optimizes, and auto-repairs all corrupted tables in the “customer” database. The auto repair option automatically fixes a checked table if found corrupted.
$ mysqlcheck --auto-repair -o customersAnd the following mysqlcheck command optimizes and auto-repairs all tables in all your MySQL databases.
$ mysqlcheck --auto-repair -o --all-databasesPart 4: mysqlcheck Command Modifications
The command mysqlcheck can be altered, changing its default behavior from checking tables (–check) to repairing or optimizing tables. This can be done by changing the binary “check” and replacing it with “repair”, or “analyze”, or “optimize”.
These are the commands you get after substitution:
| Command | Meaning |
| mysqlrepair | The default option is –repair |
| mysqlanalyze | The default option is –analyze |
| mysqloptimize | The default option is –optimize |
All these commands when invoked would perform the same operation as mysqlcheck -[option] when used.
If you would like to learn about MySQL database export command-line utility, see our blog on MySQL Export Database Command Line: 3 Easy Methods. If you would like to know more about MySQL Analytics tools, visit our other informative blog here- MySQL Analytics Tools: A Quick Guide.
Conclusion
mysqlcheck table/database commands are ideal for automated optimizations of MySQL databases and tables. The more your database expands and the number of tables increases, the more likely it is that your tables/databases will encounter mistakes from time to time. In those circumstances, mysqlcheck can be a lifesaver.
Managing growing databases and the number of associated processes like business analytics isn’t an easy job. We find numerous business teams trapped and trying to figure out how to examine their data in a timely and efficient manner. One way of doing this is migrating your data to a Cloud-based Data Warehouse. But what if we told you that you can manage all your source connections from a single place?
Our tool Hevo with its strong integration with 100+ Sources & BI tools such as MySQL, PostgreSQL, MS SQL Server, MySQL compatible Aurora, Google Cloud SQL for MySQL allows you to not only export data from sources & load data in the destinations, but also transform & enrich your data, & make it analysis-ready so that you can focus only on your key business needs and perform insightful analysis using BI tools.
Visit our Website to Explore Hevo
Hevo lets you migrate your data from your favorite applications to any Data Warehouse of your choice like Amazon Redshift, Snowflake, Google BigQuery, or Firebolt within minutes with just a few clicks.
Want to take Hevo for a spin? Sign Up here for a 14-day free trial and experience the feature-rich Hevo suite first hand. You can also check Hevo’s pricing plans on this page.
Share your most frequently used MySQL commands, as well as those for your tables and databases. Suggest to us any more MySQL topics you’d like us to cover in the comments below. We’d appreciate hearing from you.