If you move your project or media folder or rename it, you will get an error message from Premiere Pro, saying Missing media for these clips. Here is how to show Premiere Pro where to find it:
Show Premiere Pro How to Resolve Error Message Missing Media For These Clips

- At the bottom of the Link Media Box, uncheck Use Media Browser to locate files.
- Click the Locate button, which opens a file browser.
- Look at the top of the screen, where Premiere is showing the previous location of the folder, and the name of the file.

- Click on the folder in the browser and then find the file name.
- Click on the file name.
- Click on Confirm.
Premiere Pro will automatically reconnect all the missing files and resolve the Missing media for these clips message.
Now continue editing.

Community Beginner
,
/t5/premiere-pro-discussions/missing-media-files-for-these-clips/td-p/10148702
Oct 27, 2018
Oct 27, 2018
Copy link to clipboard
Copied
After 2 days of editing and my video at 99% completion, most of my audio files have gone missing.
I’m a constant ‘saver’. Saved my project repeatedly. Upon re-opening my project I get this message:
Now, I’ve closed and opened Premiere many times during the last 48 hours and NOT had this happen. I have NOT deleted any files or renamed any folders so I can’t fathom why these audio files would suddenly go missing. I did a search for the missing files and they are not to be found anywhere.
If I can’t somehow figure out what went wrong and fix it, my only choice is to waste an entire day re-editing the video. The scary thing is I could do that and this could happen again.
I did a search for one of the files on my entire computer and the only reference that came up was a matching.pek in the P:\Premiere Cache\Peak Files folder. This gives me a worrying suspicion that my audio files were living in a temporary Premiere cache which maybe auto deletes after a set period.
Can anyone save me from jumping off a bridge?
Thanks in advance
Gavin
- Follow
- Report
Community guidelines
Be kind and respectful, give credit to the original source of content, and search for duplicates before posting.
Learn more


14
Replies
14

LEGEND
,
/t5/premiere-pro-discussions/missing-media-files-for-these-clips/m-p/10148703#M180047
Oct 27, 2018
Oct 27, 2018
Copy link to clipboard
Copied
Premiere only references the original file locations … it never moves or changes the original files.
This kind of thing can happen when there’s a bit of corruption in the project file or cache/cache database files.
First thing … check in your preferences and project settings dialogs for where the cache and media cache database files ‘live’ on disc. Close PrPro. Use Finder/Explorer to go to those folders, and delete everything in them.
Reboot … launch PrPro to this project. Give it a few minutes to rebuild cache files as needed, and see if that fixes the problem.
Neil
- Follow
- Report
Community guidelines
Be kind and respectful, give credit to the original source of content, and search for duplicates before posting.
Learn more
Community Beginner
,
/t5/premiere-pro-discussions/missing-media-files-for-these-clips/m-p/10148704#M180048
Oct 27, 2018
Oct 27, 2018
Copy link to clipboard
Copied
In Response To R Neil Haugen
Hi Neil,
I’m afraid that failed. I’ve done this before and it worked in one other project but not with this.
I wonder if repeatedly editing a file in Audition (via Premiere) moves the audio file to some other cache location? Regardless, those audio files no longer exist. I’ve scoured my hard drive, recycle bin, even memory card in case I did something stupid like import the file from there and not the copy on my HD. Those files are GONE and I did not move, edit or delete them.
If you look at this file name ‘GOPR1711-hiding-from-lightening-copy Audio Extracted Audio Extracted Audio Extracted Audio Extracted.wav’ is shows ‘Extracted Audio’ mentioned 3 times.
I’m now terrified of spending more time working with Premiere if this happens again.
It seems my only option now is to re-edit from scratch. Is there a way to rebuild the audio from the original source MP4 clip like Premiere did in the first place?
The bridge is calling. I may jump.
- Follow
- Report
Community guidelines
Be kind and respectful, give credit to the original source of content, and search for duplicates before posting.
Learn more

LEGEND
,
/t5/premiere-pro-discussions/missing-media-files-for-these-clips/m-p/10148705#M180049
Oct 27, 2018
Oct 27, 2018
Copy link to clipboard
Copied
The Link Media window shows a column with File Path, this is where Premiere expected to find the files and did not. If you navigate to that destination, what files are there?
MtD
- Follow
- Report
Community guidelines
Be kind and respectful, give credit to the original source of content, and search for duplicates before posting.
Learn more
Community Beginner
,
/t5/premiere-pro-discussions/missing-media-files-for-these-clips/m-p/10148706#M180050
Oct 27, 2018
Oct 27, 2018
Copy link to clipboard
Copied
In Response To Meg The Dog
The files that live there are the original source MP4 files and a few wav files that survived the mystery purge. The actual files that the Missing Media window are looking for and completely vanished without my permission.
- Follow
- Report
Community guidelines
Be kind and respectful, give credit to the original source of content, and search for duplicates before posting.
Learn more
LEGEND
,
/t5/premiere-pro-discussions/missing-media-files-for-these-clips/m-p/10148707#M180051
Oct 27, 2018
Oct 27, 2018
Copy link to clipboard
Copied
In Response To whatevoh
Open an earlier autosave of the project. Do the files appear linked in that earlier version of the project?
MtD
- Follow
- Report
Community guidelines
Be kind and respectful, give credit to the original source of content, and search for duplicates before posting.
Learn more
Community Beginner
,
/t5/premiere-pro-discussions/missing-media-files-for-these-clips/m-p/10148708#M180052
Oct 27, 2018
Oct 27, 2018
Copy link to clipboard
Copied
In Response To Meg The Dog
I save manually after every single edit I make. Is there a way to view a list of autosaves?
- Follow
- Report
Community guidelines
Be kind and respectful, give credit to the original source of content, and search for duplicates before posting.
Learn more
LEGEND
,
/t5/premiere-pro-discussions/missing-media-files-for-these-clips/m-p/10148709#M180053
Oct 27, 2018
Oct 27, 2018
Copy link to clipboard
Copied
In Response To whatevoh
In Premiere, go to the menu File > Project Settings > Scratch Disk. The pane that opens will show you the file path to find your autosaves (if any exist).
Close the open project in Premiere, and try to open one of the autosaves made from before this problem appeared (if one exists).
MtD
- Follow
- Report
Community guidelines
Be kind and respectful, give credit to the original source of content, and search for duplicates before posting.
Learn more
Community Beginner
,
/t5/premiere-pro-discussions/missing-media-files-for-these-clips/m-p/10148710#M180054
Oct 27, 2018
Oct 27, 2018
Copy link to clipboard
Copied
In Response To Meg The Dog
Thanks for trying Meg. There were some autosaves but they had the exact same issue.
The audio files are simply gone. Along with a couple of WAV files that I downloaded for SFX. It’s like there was a wav file cull in one particular folder without my knowledge.
I’m obsessive about not deleting things to the point that my drive are full of stuff I don’t need. I just can’t explain this.
- Follow
- Report
Community guidelines
Be kind and respectful, give credit to the original source of content, and search for duplicates before posting.
Learn more
LEGEND
,
/t5/premiere-pro-discussions/missing-media-files-for-these-clips/m-p/10148711#M180055
Oct 27, 2018
Oct 27, 2018
Copy link to clipboard
Copied
In Response To whatevoh
When going to Audition are you using edit clip in Audition or edit sequence in Audition?
Edit sequence opens Audition in multi-track mode. Work, save, then go back to PrPro, your work is there. Edit sequence again, you go right into Audition with all the effects you used set exactly as you left them. You can adjust any work you did previously.
Not a lot of people understand the difference.
Neil
- Follow
- Report
Community guidelines
Be kind and respectful, give credit to the original source of content, and search for duplicates before posting.
Learn more
Community Beginner
,
/t5/premiere-pro-discussions/missing-media-files-for-these-clips/m-p/10148712#M180056
Oct 27, 2018
Oct 27, 2018
Copy link to clipboard
Copied
In Response To R Neil Haugen
I’m doing the ‘Edit Clip in Audition’. I then make me tweaks, hit save, go back to Premiere and the audio files loads up. This has worked well for all other edits I’ve done. Hever had any files vanish on me.
- Follow
- Report
Community guidelines
Be kind and respectful, give credit to the original source of content, and search for duplicates before posting.
Learn more
LEGEND
,
/t5/premiere-pro-discussions/missing-media-files-for-these-clips/m-p/10148713#M180057
Oct 27, 2018
Oct 27, 2018
Copy link to clipboard
Copied
In Response To whatevoh
With that, everything is baked in and the Audition created audio replaces your audio on the sequence (but not on the original clip). If you want to modify something, you can’t.
Edit sequence means all effects are left «open» so you can go back and modify previous work. It also means the Essential Sound Panel work in PrPro is the same and workable in Audition.
Neil
- Follow
- Report
Community guidelines
Be kind and respectful, give credit to the original source of content, and search for duplicates before posting.
Learn more

New Here
,
/t5/premiere-pro-discussions/missing-media-files-for-these-clips/m-p/10918398#M252158
Feb 11, 2020
Feb 11, 2020
Copy link to clipboard
Copied
Same thing happened to me today. I really wish I could figure out what happened because this is killing me
- Follow
- Report
Community guidelines
Be kind and respectful, give credit to the original source of content, and search for duplicates before posting.
Learn more

New Here
,
/t5/premiere-pro-discussions/missing-media-files-for-these-clips/m-p/14017688#M472990
Aug 18, 2023
Aug 18, 2023
Copy link to clipboard
Copied
In Response To Todd Carnley
Same here. Like, all of the raw footage is just gone. The folder is completely empty. Did Premiere delete my files? That’s what it’s looking like.
- Follow
- Report
Community guidelines
Be kind and respectful, give credit to the original source of content, and search for duplicates before posting.
Learn more
LEGEND
,
/t5/premiere-pro-discussions/missing-media-files-for-these-clips/m-p/14018379#M473009
Aug 18, 2023
Aug 18, 2023
Copy link to clipboard
Copied
LATEST
In Response To jjc44659435
Is this in Finder or Explorer? Or looking for them within Premiere’s Project panel or MediaBrowser?
As it has rarely deleted clips on disc. That was only one version a couple years back.
But Premiere has a «hide files» capability and keyboard shortcut, which people have at times invoked without knowing and/or intending to do. And at times, it’s had tussles with the OS, and suddenly some files within or touched by Premiere get ‘hidden’ by the OS.
Both are really, really annoying.
So … if this in a Premiere project panel, try … right-click/Show Hidden … and this is just a guessin’ hope.
- Follow
- Report
Community guidelines
Be kind and respectful, give credit to the original source of content, and search for duplicates before posting.
Learn more
![]()
![]()
If you move your project or media folder or rename it, you will get an error message from Premiere Pro, saying Missing media for these clips. Here is how to show Premiere Pro where to find it:
Show Premiere Pro How to Resolve Error Message Missing Media For These Clips
- At the bottom of the Link Media Box, uncheck Use Media Browser to locate files.
- Click the Locate button, which opens a file browser.
- Look at the top of the screen, where Premiere is showing the previous location of the folder, and the name of the file.
- Click on the folder in the browser and then find the file name.
- Click on the file name.
- Click on Confirm.
Premiere Pro will automatically reconnect all the missing files and resolve the Missing media for these clips message.
Now continue editing.
Saved my project, come back two weeks later and all the original media files are «missing.» The locator can not see the files even though in the Mac Finder the files are there, in the same location, with the same name. Is there another way to link the file to the media clip?
Not sure why the Premiere file locator cannot find the file even though it is in the same place with the same name and I have not touched any of the files. They just do not show up on the file browser, though other files in the same folder do appear.
Restarted the Mac, still happening, restarted Premiere didn’t help.
Is there an issue with the cache that is an easy fix? Please help I needed to add the finishing touches to this project tonight and this is messing up the timeline for this project big time.
Have you ever jumped back into some editing, and to your horror, your media files have vanished? I’m guessing you have – it happens pretty often. But how do you relink this missing media in Premiere Pro?
Don’t worry at all; Premiere Pro has enabled us to fix the missing media link in minutes with a few simple steps. So that horrible Red screen displaying missing media will be soon gone.
In today’s article, we will look at the possible situations in which you can lose the link between your video files and Premiere Pro and how you can solve it in minutes.
Let’s check it out below!
Why am I getting a missing media notification in Premiere Pro?
Firstly, why are you getting a notification in Premiere Pro stating you have missing media.
When you import video footage into the project panel within Premiere Pro, the file has not moved from its actual location. Premiere Pro creates a map of where the files are stored and directly points to where your video footage is stored.
An example of this would be if you were editing using an external hard drive and it was a video of your kitten names “Kittens 1st day at home”.
The file setup will be the External Hard Drive > Folder Name > File Name.
This is where Premiere Pro looks to find the footage at any point and will follow this path when you open up your project within Premiere Pro.
But, if you’ve moved the file anywhere else or renamed the video files name, the map Premiere Pro follows to locate the file becomes muddied.
Premiere Pro will not locate the file, therefore triggering the error message that the media files link is missing.
If you ever look to move a file or rename it, ensure you redirect Premiere Pro to the new location, as if you don’t, it will not be able to display the media and show it as unlinked.
That’s how you get the missing media notification in Premiere Pro, but don’t worry; the next part of the article is how you can solve it in a few simple steps.
You may also be interested in: 6 ways to optimise Premiere Pro’s performance
Now it’s time to relink the missing media. But first of all, have a think of why this media may be missing in the first place and why Premiere Pro is flagging it as “Offline Media”.
Have you moved the file or the folder? Have you renamed the file or the folder? Have you unplugged your hard drive or disconnected it?
Why does Premiere Pro say media offline?
If you have renamed the file
Here’s how to relink your media if you have renamed your file or changed the folder’s name.
When you open your project up, you’ll find that you have a strange red screen where the media should display, showing you the “Unlinked Media” image.
To start fixing the process, you need to right-click on your clip that has the missing media, select Link Media.
Once this happens, a file box will pop up, and you need to make a couple of adjustments.
Firstly deselect the File Name default option under the Match File Properties title.

Then you must deselect the second option for File Extension if you have converted a file from one format to another. I.e .MP4 to .MOV.
Now you can select Locate; this will then allow you to find the file’s new location. Select the file and click OK. This will reconnect your footage, and you’ll be raring to go!
If you have moved the file location or folder location
The number of times I do this in haste and forget I’ve moved the file, meaning I’ll fire up the Mac to edit and see the red screen of doom. Only to remember, I’ve moved the file location.
Don’t worry; we are here to help! It’s as simple as the solution above.
Here’s how to relink missing media in Premiere Pro caused by a file/folder being relocated.
Firstly, when this image pops up:

This lets you know that you have missing media (or offline media) and need to relink your media. If you don’t see it, you will see the image below in red. The media offline, red screen of doom.

Simply right-click on your file and select “Link Media”. When the dialogue box pops up, you will want to leave all settings as they are and leave them on default.

Now select the clip name and click on the Locate button.

In this window, Premiere Pro will show you where the last place it was able to locate the file, including the names. On the left-hand side, you can use this window to navigate the new location of your footage in which you want to relink missing media in Premiere Pro.
If you find the missing media through this, you can simply click on it and click OK. This will relink the media to the new file location.
However, there is a chance that you will not be able to locate the media immediately, but fear not! Here’s another solution to solve this.
Click on the Search button. There you can search the old file name, and you will find the new location. Therefore selecting the clip and relinking your media in Premiere Pro.
The final chapter
We hope this article on “How to Relink Missing Media in Premiere Pro” was helpful to you. Check out at the top Philip’s video tutorial if you’re a visual learner!
Let us know if you want to see more video-based articles in the comments below. Or, if you’re going to finesse your Premiere Pro skills further, simply scroll a little further and read more of our exceptional Premiere Pro guides.
Happy editing!
In today’s post, I’ll walk you through exactly how easy it is to reconnect missing media files in Premiere Pro.
The dreaded missing media ‘red screen’ happens to the best of us, so don’t sweat it. Lucky for us, Premiere Pro has made it fairly quick and simple to reconnect multiple files at once so you can get back to editing in no time.
Understanding How Premiere Pro Works
Here’s a brief explanation for why you are getting the missing media notification in your project.
When you drag or import footage and other media files into your project panel within Premiere Pro, you need to know that the actual file itself hasn’t moved from its original location.
Premiere Pro simply creates a blueprint or a map of where that file lives and points back to the source of the file any time you use that file in your project.
For example, let’s say you’ve dragged in a file named ‘sunset’ from an external hard drive named ‘vacation videos’ that is located in a folder named ‘footage’.
The breakdown might look something like this:
Vacation Videos (External Hard Drive) -> Footage (Folder Name) -> Sunset (File Name)
This is where Premiere Pro will go to find this file anytime that you open your project.
However, if you move the file to a different folder OR if you rename and part of that equation (the hard drive, the folder, or the file itself) then Premiere Pro is going to be confused.
You changed the blueprint without letting Premiere Pro know.
This is why you’ll get the missing media link in your project.
If ever you move or rename a file, you have to redirect Premiere Pro to the new location of your file or files.
How to Relink Missing Media Files
First, think through what may have caused the broken link.
Did you move a folder or a file to a new location?
Did your hard drive get disconnected?
Did you rename any folders or files associated with your project?
If your hard drive was disconnected, you need to make sure that it is correctly connected before moving on to the next step.
Scenario 1: If you moved a folder or file to a new location.
Let’s walk through step by step the most common scenario – you moved a folder or file to a new location.

When you first open your project, you’ll see this ‘link media’ window pop open, letting you know exactly which files are missing.
If you don’t see this window, simply right click on a clip that is unlinked and choose ‘Link Media’.
For this scenario, you can leave all the default settings at the bottom as is.

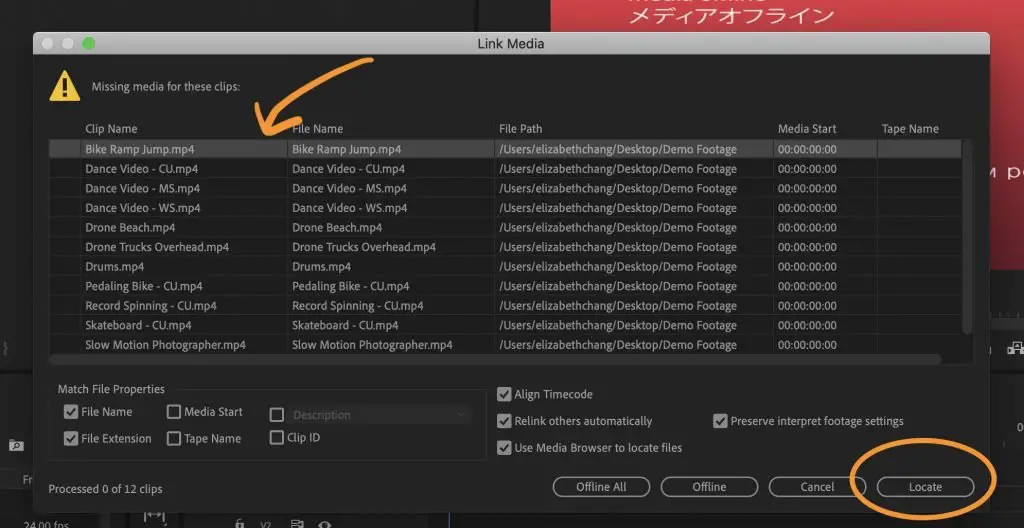
Select the top clip name and then hit the ‘Locate’ button in the bottom right corner.
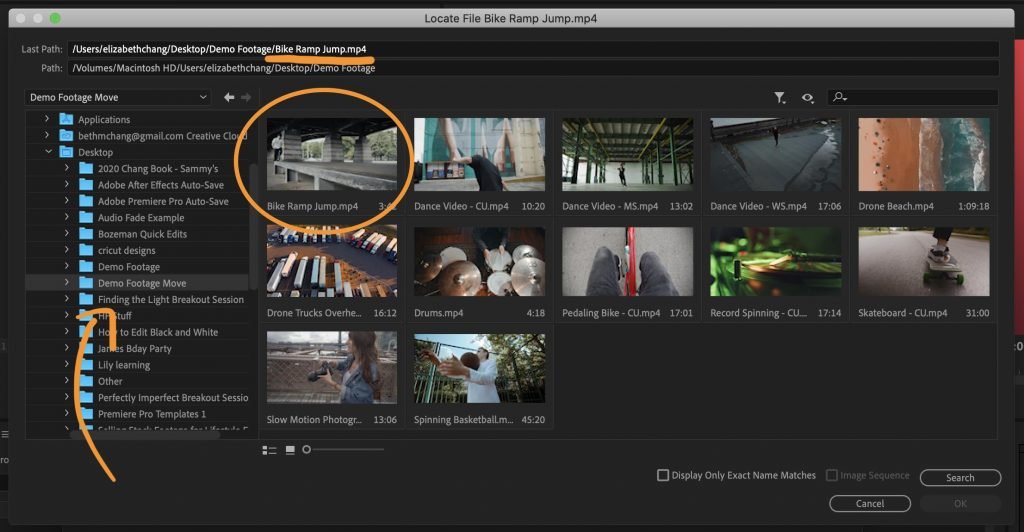
In this next window, you’ll see at the very top, the last place that Premiere Pro was able to locate your file, as well as the name of the file you are looking to connect.
On the left side, you will use this window to navigate to the new location of your footage. When you select a folder, it’s contents will appear in the main portion of the window.
If you find your clip right away, then you can select that single clip and hit ‘OK’ in the lower right hand corner.
If you can’t find your clip and aren’t sure where it is on your computer, then you can hit the ‘search’ button.
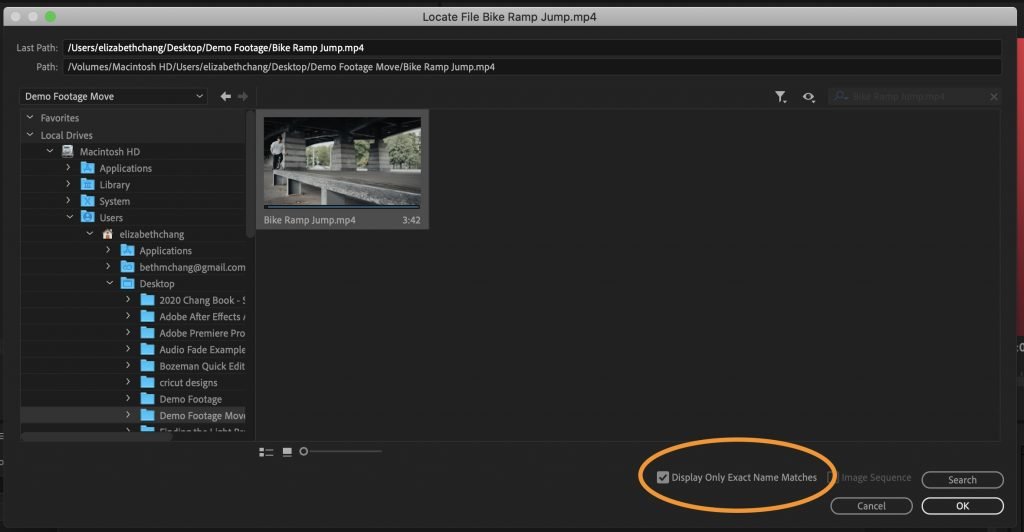
Lastly, if your clip is hard to find but you know you’re in the right folder (say the file has a long numerical name or you have tons of clips to sort through), you can click the option ‘Display Only Exact Name Matches’ to help narrow down your search.
Note: this only works if you haven’t changed the name or extension of your file.
Hit ‘OK’ and Premiere Pro will now reconnect and relink your media automatically.
Assuming you haven’t moved individual files into all different folders, Premiere Pro will be able to locate multiple files all at once.
For example, if you’ve moved an entire project folder from one drive to another, but haven’t changed the inner structure of that folder, Premiere Pro will be able to locate all the files at once.
Scenario 2: If you renamed a file or converted to a different extension.
If you have changed the name of a folder or a file within your project then you will follow most of the same steps above, but first you need to make sure you uncheck the ‘File Name’ default option under ‘Match File Properties’.
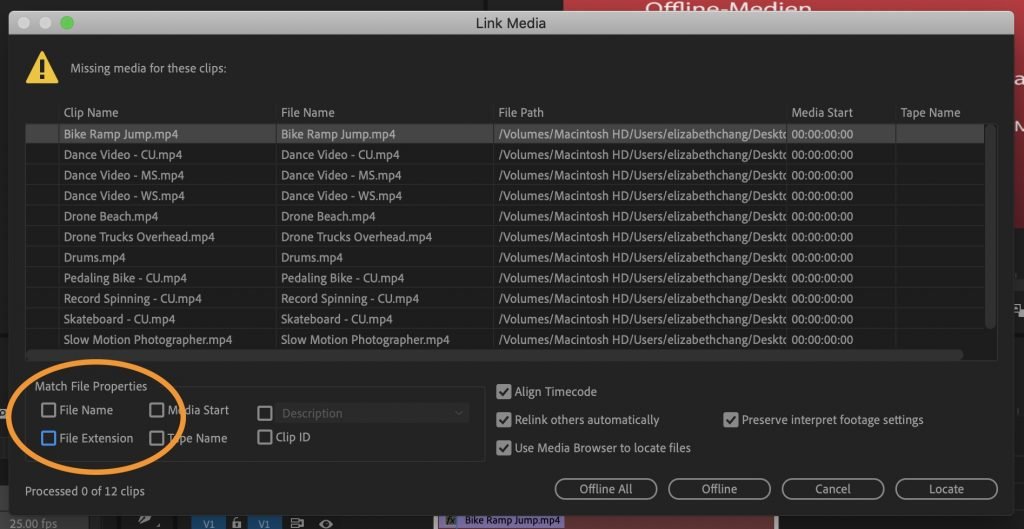
You also need to uncheck the second option for ‘File Extension’ if you’ve converted a file (from .MOV to .MP4, for example) from one format to another.
Now when you hit ‘Locate’, you’ll navigate to the newly named file, select it and hit ‘OK’ to reconnect your footage.
The Importance of File Organization
Now that you know why this error may have happened to you, you’ll understand much better why it’s so critical to be organized with your project from the start.
Any time that you make a single change to your folder structure or the files within them, you’ll have to reconnect those files again.
I have a specific folder structure that I use for all my video projects, which makes it very easy anytime I start a new project.
It looks like this:

As you can see, I have a separate folder for the most common types of files that I’ll have within my video projects.
I simply copy and paste this structure each and every time that I start a new project.
Feel free to copy my layout or create your own in a way that makes sense for you.
The point is to have a structure in place that allows you to keep your files organized from the start so you never end up moving them halfway through your edit.
Concluding Thoughts
That about wraps it up, guys.
Let me know if this helped solved your problem. Any further questions? Leave them for me in the comment box below.
Thanks!
-Beth
If you move your project or media folder or rename it, you will get an error message from Premiere Pro, saying Missing media for these clips. Here is how to show Premiere Pro where to find it:
Show Premiere Pro How to Resolve Error Message Missing Media For These Clips
- At the bottom of the Link Media Box, uncheck Use Media Browser to locate files.
- Click the Locate button, which opens a file browser.
- Look at the top of the screen, where Premiere is showing the previous location of the folder, and the name of the file.
- Click on the folder in the browser and then find the file name.
- Click on the file name.
- Click on Confirm.
Premiere Pro will automatically reconnect all the missing files and resolve the Missing media for these clips message.
Now continue editing.
Saved my project, come back two weeks later and all the original media files are «missing.» The locator can not see the files even though in the Mac Finder the files are there, in the same location, with the same name. Is there another way to link the file to the media clip?
Not sure why the Premiere file locator cannot find the file even though it is in the same place with the same name and I have not touched any of the files. They just do not show up on the file browser, though other files in the same folder do appear.
Restarted the Mac, still happening, restarted Premiere didn’t help.
Is there an issue with the cache that is an easy fix? Please help I needed to add the finishing touches to this project tonight and this is messing up the timeline for this project big time.
Hi Neil,
I’m afraid that failed. I’ve done this before and it worked in one other project but not with this.
I wonder if repeatedly editing a file in Audition (via Premiere) moves the audio file to some other cache location? Regardless, those audio files no longer exist. I’ve scoured my hard drive, recycle bin, even memory card in case I did something stupid like import the file from there and not the copy on my HD. Those files are GONE and I did not move, edit or delete them.
If you look at this file name ‘GOPR1711-hiding-from-lightening-copy Audio Extracted Audio Extracted Audio Extracted Audio Extracted.wav’ is shows ‘Extracted Audio’ mentioned 3 times.
I’m now terrified of spending more time working with Premiere if this happens again.
It seems my only option now is to re-edit from scratch. Is there a way to rebuild the audio from the original source MP4 clip like Premiere did in the first place?
The bridge is calling. I may jump.
In today’s post, I’ll walk you through exactly how easy it is to reconnect missing media files in Premiere Pro.
The dreaded missing media ‘red screen’ happens to the best of us, so don’t sweat it. Lucky for us, Premiere Pro has made it fairly quick and simple to reconnect multiple files at once so you can get back to editing in no time.
Understanding How Premiere Pro Works
Here’s a brief explanation for why you are getting the missing media notification in your project.
When you drag or import footage and other media files into your project panel within Premiere Pro, you need to know that the actual file itself hasn’t moved from its original location.
Premiere Pro simply creates a blueprint or a map of where that file lives and points back to the source of the file any time you use that file in your project.
For example, let’s say you’ve dragged in a file named ‘sunset’ from an external hard drive named ‘vacation videos’ that is located in a folder named ‘footage’.
The breakdown might look something like this:
Vacation Videos (External Hard Drive) -> Footage (Folder Name) -> Sunset (File Name)
This is where Premiere Pro will go to find this file anytime that you open your project.
However, if you move the file to a different folder OR if you rename and part of that equation (the hard drive, the folder, or the file itself) then Premiere Pro is going to be confused.
You changed the blueprint without letting Premiere Pro know.
This is why you’ll get the missing media link in your project.
If ever you move or rename a file, you have to redirect Premiere Pro to the new location of your file or files.
How to Relink Missing Media Files
First, think through what may have caused the broken link.
Did you move a folder or a file to a new location?
Did your hard drive get disconnected?
Did you rename any folders or files associated with your project?
If your hard drive was disconnected, you need to make sure that it is correctly connected before moving on to the next step.
Scenario 1: If you moved a folder or file to a new location.
Let’s walk through step by step the most common scenario – you moved a folder or file to a new location.
When you first open your project, you’ll see this ‘link media’ window pop open, letting you know exactly which files are missing.
If you don’t see this window, simply right click on a clip that is unlinked and choose ‘Link Media’.
For this scenario, you can leave all the default settings at the bottom as is.
Select the top clip name and then hit the ‘Locate’ button in the bottom right corner.
In this next window, you’ll see at the very top, the last place that Premiere Pro was able to locate your file, as well as the name of the file you are looking to connect.
On the left side, you will use this window to navigate to the new location of your footage. When you select a folder, it’s contents will appear in the main portion of the window.
If you find your clip right away, then you can select that single clip and hit ‘OK’ in the lower right hand corner.
If you can’t find your clip and aren’t sure where it is on your computer, then you can hit the ‘search’ button.
Lastly, if your clip is hard to find but you know you’re in the right folder (say the file has a long numerical name or you have tons of clips to sort through), you can click the option ‘Display Only Exact Name Matches’ to help narrow down your search.
Note: this only works if you haven’t changed the name or extension of your file.
Hit ‘OK’ and Premiere Pro will now reconnect and relink your media automatically.
Assuming you haven’t moved individual files into all different folders, Premiere Pro will be able to locate multiple files all at once.
For example, if you’ve moved an entire project folder from one drive to another, but haven’t changed the inner structure of that folder, Premiere Pro will be able to locate all the files at once.
Scenario 2: If you renamed a file or converted to a different extension.
If you have changed the name of a folder or a file within your project then you will follow most of the same steps above, but first you need to make sure you uncheck the ‘File Name’ default option under ‘Match File Properties’.
You also need to uncheck the second option for ‘File Extension’ if you’ve converted a file (from .MOV to .MP4, for example) from one format to another.
Now when you hit ‘Locate’, you’ll navigate to the newly named file, select it and hit ‘OK’ to reconnect your footage.
The Importance of File Organization
Now that you know why this error may have happened to you, you’ll understand much better why it’s so critical to be organized with your project from the start.
Any time that you make a single change to your folder structure or the files within them, you’ll have to reconnect those files again.
I have a specific folder structure that I use for all my video projects, which makes it very easy anytime I start a new project.
It looks like this:
As you can see, I have a separate folder for the most common types of files that I’ll have within my video projects.
I simply copy and paste this structure each and every time that I start a new project.
Feel free to copy my layout or create your own in a way that makes sense for you.
The point is to have a structure in place that allows you to keep your files organized from the start so you never end up moving them halfway through your edit.
Concluding Thoughts
That about wraps it up, guys.
Let me know if this helped solved your problem. Any further questions? Leave them for me in the comment box below.
Thanks!
-Beth
![]() Sigh… Just when you thought your project was ready to output, you get that dreaded red screen indicating your media is AWOL. It isn’t enough that it blares that your media is missing, it does so in eight languages.
Sigh… Just when you thought your project was ready to output, you get that dreaded red screen indicating your media is AWOL. It isn’t enough that it blares that your media is missing, it does so in eight languages.

Media goes missing for three principle reasons:
- You renamed or moved the media file.
- You renamed or moved one of the folders containing the media file.
- You deleted the media file or the folder containing the file.
If you deleted the file, well, ah, you’re screwed. You’re gonna need to recapture it from a backup. (You did remember to make backups, didn’t you?)
But, let’s assume that you simply renamed or moved something. In which case, Premiere Pro has a way to reconnect your project to your media. It’s called: Link Media. As you saw from the red screen above, Premiere is not shy about letting you know that media has gone missing. But there are other indicators, as well.

Here, in the Timeline, clips linked to missing media have a red cast.

And, in the Project pane, clips linked to missing media have a question mark in their file icon.
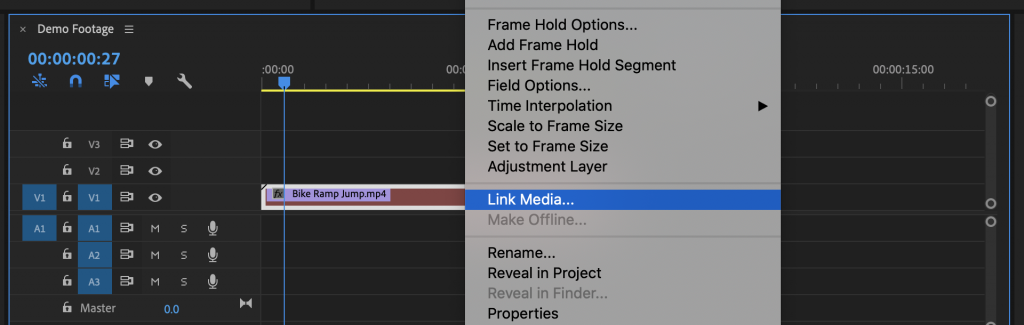
To relink media, select the missing media in either the Timeline or the Project pane. Then do one of the following:
- Right-click the selected clips and select Link Media.
- Choose Clip > Link Media

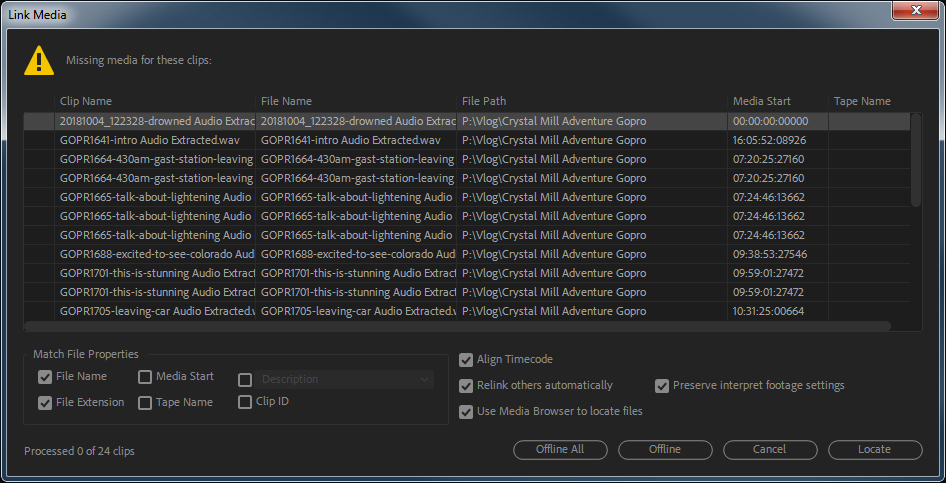
This opens the Link Media window, with a list of the selected missing media. The top half of this window lists all the clips that are missing, along with the path name to where they used to be. In this example, the media is on a drive called “Active Production” that is not mounted to the desktop.
The lower portion of this window allows you to select how you want files to be matched and how you want to find them. (In almost all cases, I like the default settings for this window.)

NOTE: An option I like a lot is “Relink others automatically.” This means that if ten files are missing in the same folder, or in nearby folders, when you find one file, Premiere will automatically find the rest of the missing media that is stored in a similar location.
The four buttons at the bottom allow you to indicate to Premiere whether you want to ignore all missing media (Offline All), ignore just the selected file (Offline), find the missing file (Locate), or give the entire situation up as hopeless and exit back to Premiere (Cancel).

In this example, we are not going to give up. Instead, click Locate to enable us to find the missing media and reunite it with our project.

This opens the Locate files window, with the name of the file we are looking for displayed in the title of this window. (Actually, this is the Media Browser, masquerading as the Locate Files window. Since we use the Media Browser when reviewing media for our projects, we already know how to select media using this.)

See this checkbox at the bottom: Display Only Exact Name Matches? When this is unchecked, all the files in the selected folder are displayed. When this is checked, only the files that exactly match the missing media (based upon the criteria you set previously in the Link Media window) are displayed.
Most of the time I leave this unchecked. But, when I’m in a folder with lots and lots of files, checking this allows me to quickly find the file I want.
NOTE: This checkbox remains checked until you uncheck it.

When you find the missing clip – and I emphasize that you need to find it, Premiere does not search your hard disk for you – select it, then click OK. (The text displayed in Last Path shows you where the media was located when it was last linked in Premiere Pro.)

When missing media is found, the Link Media window puts a checkbox next to the file name. When you are done, click the OK button, and the project is updated with new media connections.
Nice.
Bookmark the permalink.
Larry Recommends:
![]()
NEW & Updated!
Edit smarter with Larry’s latest training, all available in our store.
Access over 1,900 on-demand video editing courses. Become a member of our Video Training Library today!
JOIN NOW
Subscribe to Larry’s FREE weekly newsletter and save 10%
on your first purchase.
Have you ever jumped back into some editing, and to your horror, your media files have vanished? I’m guessing you have – it happens pretty often. But how do you relink this missing media in Premiere Pro?
Don’t worry at all; Premiere Pro has enabled us to fix the missing media link in minutes with a few simple steps. So that horrible Red screen displaying missing media will be soon gone.
In today’s article, we will look at the possible situations in which you can lose the link between your video files and Premiere Pro and how you can solve it in minutes.
Let’s check it out below!
Why am I getting a missing media notification in Premiere Pro?
Firstly, why are you getting a notification in Premiere Pro stating you have missing media.
When you import video footage into the project panel within Premiere Pro, the file has not moved from its actual location. Premiere Pro creates a map of where the files are stored and directly points to where your video footage is stored.
An example of this would be if you were editing using an external hard drive and it was a video of your kitten names “Kittens 1st day at home”.
The file setup will be the External Hard Drive > Folder Name > File Name.
This is where Premiere Pro looks to find the footage at any point and will follow this path when you open up your project within Premiere Pro.
But, if you’ve moved the file anywhere else or renamed the video files name, the map Premiere Pro follows to locate the file becomes muddied.
Premiere Pro will not locate the file, therefore triggering the error message that the media files link is missing.
If you ever look to move a file or rename it, ensure you redirect Premiere Pro to the new location, as if you don’t, it will not be able to display the media and show it as unlinked.
That’s how you get the missing media notification in Premiere Pro, but don’t worry; the next part of the article is how you can solve it in a few simple steps.
You may also be interested in: 6 ways to optimise Premiere Pro’s performance
Now it’s time to relink the missing media. But first of all, have a think of why this media may be missing in the first place and why Premiere Pro is flagging it as “Offline Media”.
Have you moved the file or the folder? Have you renamed the file or the folder? Have you unplugged your hard drive or disconnected it?
Why does Premiere Pro say media offline?
If you have renamed the file
Here’s how to relink your media if you have renamed your file or changed the folder’s name.
When you open your project up, you’ll find that you have a strange red screen where the media should display, showing you the “Unlinked Media” image.
To start fixing the process, you need to right-click on your clip that has the missing media, select Link Media.
Once this happens, a file box will pop up, and you need to make a couple of adjustments.
Firstly deselect the File Name default option under the Match File Properties title.
Then you must deselect the second option for File Extension if you have converted a file from one format to another. I.e .MP4 to .MOV.
Now you can select Locate; this will then allow you to find the file’s new location. Select the file and click OK. This will reconnect your footage, and you’ll be raring to go!
If you have moved the file location or folder location
The number of times I do this in haste and forget I’ve moved the file, meaning I’ll fire up the Mac to edit and see the red screen of doom. Only to remember, I’ve moved the file location.
Don’t worry; we are here to help! It’s as simple as the solution above.
Here’s how to relink missing media in Premiere Pro caused by a file/folder being relocated.
Firstly, when this image pops up:
This lets you know that you have missing media (or offline media) and need to relink your media. If you don’t see it, you will see the image below in red. The media offline, red screen of doom.
Simply right-click on your file and select “Link Media”. When the dialogue box pops up, you will want to leave all settings as they are and leave them on default.
Now select the clip name and click on the Locate button.
In this window, Premiere Pro will show you where the last place it was able to locate the file, including the names. On the left-hand side, you can use this window to navigate the new location of your footage in which you want to relink missing media in Premiere Pro.
If you find the missing media through this, you can simply click on it and click OK. This will relink the media to the new file location.
However, there is a chance that you will not be able to locate the media immediately, but fear not! Here’s another solution to solve this.
Click on the Search button. There you can search the old file name, and you will find the new location. Therefore selecting the clip and relinking your media in Premiere Pro.
The final chapter
We hope this article on “How to Relink Missing Media in Premiere Pro” was helpful to you. Check out at the top Philip’s video tutorial if you’re a visual learner!
Let us know if you want to see more video-based articles in the comments below. Or, if you’re going to finesse your Premiere Pro skills further, simply scroll a little further and read more of our exceptional Premiere Pro guides.
Happy editing!