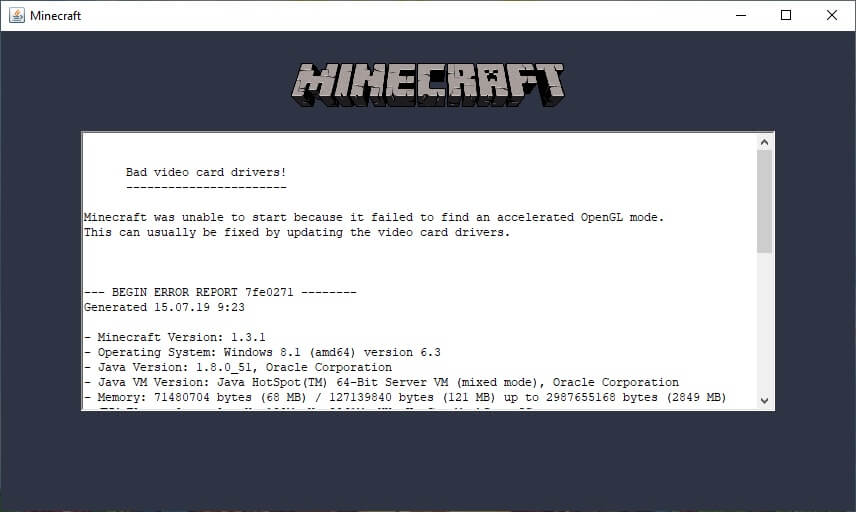
Для Minecraft лучше использовать актуальные драйвера вашей видеокарты, иногда старые драйвера приводят к крашу игры. В данном гайде рассмотрим решение данной проблемы у встроенного видеоадаптера Intel G41. Используется в различных процессорах, к примеру: и так далее.
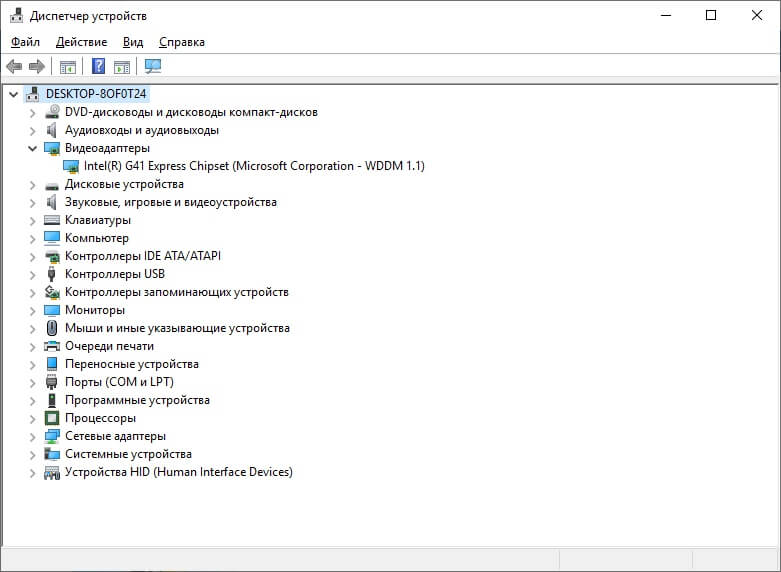
В первую очередь, нужно узнать, что у вас именно видеокарта G41, для этого открываем «Пуск» и в поиск пишем «Диспетчер устройств», заходим данную программу и открываем вкладку «Видеоадаптеры»:
Будет как на скриншоте, конкретно указан данный видеоадаптер, если у вас отличается, вам нужно воспользоваться другим гайдом. А у кого именно он, делают дальше по инструкции.
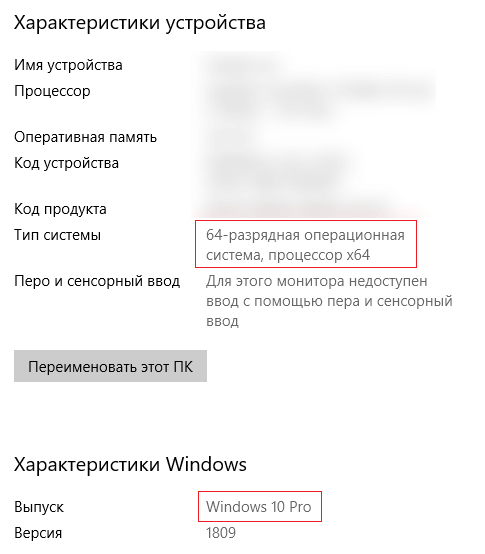
Плюс, Вам нужно узнать версию Windows и её разрядность. Открываем «Мой компьютер» -> «Свойства системы». Находим версию системы и разрядность, на скриншоте, это Windows 10 и 64 разрядность.
Содержание:
Решение для Windows 7, Vista
Решение для Windows 10, 8
Решение для Windows XP
Решение проблемы видеодрайвера у Intel G41 в Windows 7, Vista
1) Скачиваем рабочий драйвер видеокарты G41 — 15.22.58.2993 для Minecraft:
32-бит (разрядность) — Скачать с официального сайта Intel (x32) | (Зеркало x32)
64-бит (разрядность) — Скачать с официального сайта Intel (x64) | (Зеркало x64)
*На сайте Intel справа нажать на голубую кнопку «Загрузить».
*Файлы для зеркал взяты с сайта Intel, не были изменены и подписаны цифровой подписью Intel.
2) Устанавливаем скаченный драйвер, можно просто «Далее» нажимать. Готово! Можете пробовать играть.
Решение проблемы видеодрайвера у Intel G41 в Windows 10, 8
Так как драйвера от самого Intel для видеоадаптера G41 для Windows 10 просто нет, а тот который идёт с самой системой, не поддерживает графику OpenGL (крашит при запуске игры), то самыми простыми решениями будут:
1. Переустановить Windows установив 7 или XP.
2. Если есть возможность, приобрести видеокарту. Даже самая простая сможет запускать игру.
Решение проблемы видеодрайвера у Intel G41 в Windows XP
1) Скачиваем рабочий драйвер видеокарты G41 — 14.42.15.5420 для Minecraft:
32-бит (разрядность) — Скачать с официального сайта Intel (x32) | Зеркало x32
64-бит (разрядность) — Скачать с официального сайта Intel (x64) | Зеркало x64
2) Устанавливаем скаченный драйвер, можно просто «Далее» жать. Готово! Можете пробовать играть.
Если Ваша проблема остаётся актуальной, запросите поддержку у TLauncher:
Написать разработчикам с помощью VK.com
Попробуйте наш инструмент устранения неполадок
Выберите операционную систему
Выберите язык програмирования (опционально)
‘>
- Описание проблемы
- Прежде чем мы начнем
- Четыре способа исправить сбой «Плохие драйверы видеокарты» в Minecraft
- Метод первый: изменить аппаратное ускорение
- Метод второй: откатить драйвер
- Метод третий: обновить видеодрайвер вручную
- Метод четвертый: автоматическое обновление драйвера видеокарты
(Описание проблемы)
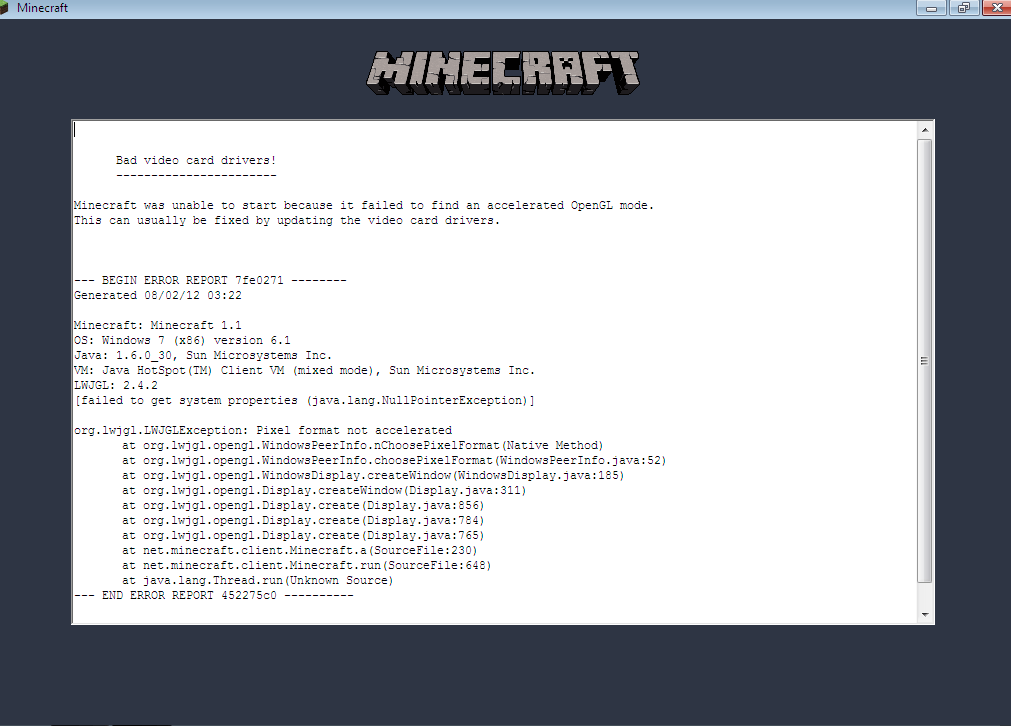
В Сбой Minecraft «Плохие драйверы видеокарты» может расстраивать, так как мешает вам играть в Minecraft. И прежде чем вы сможете решить эту проблему, вы ничего не сможете сделать с игрой.
Давайте подробнее рассмотрим эту проблему:
Чтобы решить эту проблему, в этом руководстве представлены пять различных эффективных способов попробовать. Прочтите, пожалуйста, и найдите подходящий вам метод.
(Перед тем, как мы начнем)
Первое, что мы можем сделать при устранении этого сбоя, — это убедиться, что Minecraft обновлен, что относится к самой игре.
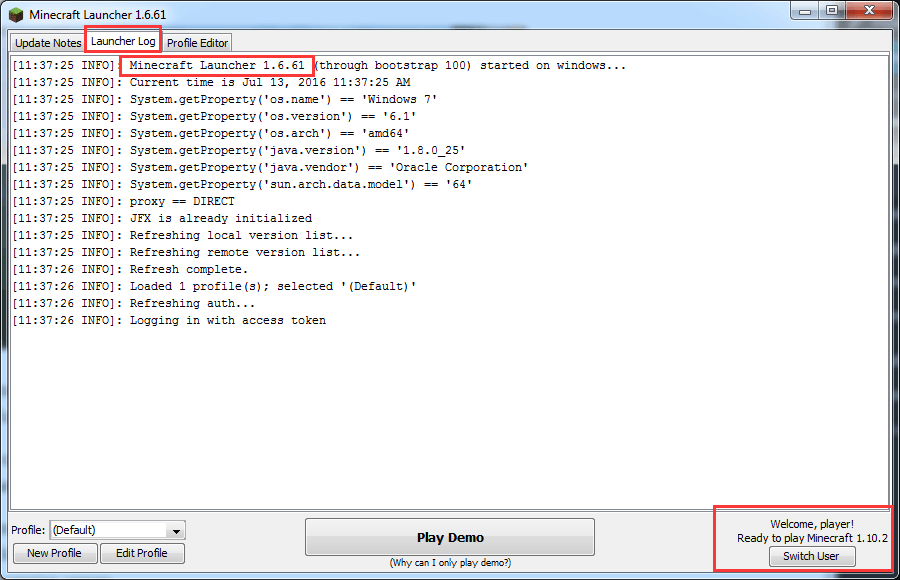
Вы можете проверить номер версии Шахтерское ремесло в правом нижнем углу и Minecraft Launcher версия под Журнал запуска таб.
Затем сравните номер версии с тем, который можно найти на Сайт Майнкрафт чтобы узнать, установлена ли у вас последняя версия.
Во-вторых, вам необходимо убедиться, что вы установили последнюю версию Центра обновления Windows.
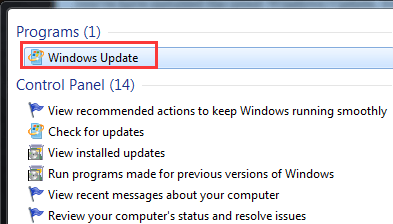
Вы можете ввести Центр обновления Windows в поле поиска и откройте появившуюся программу Центра обновления Windows.
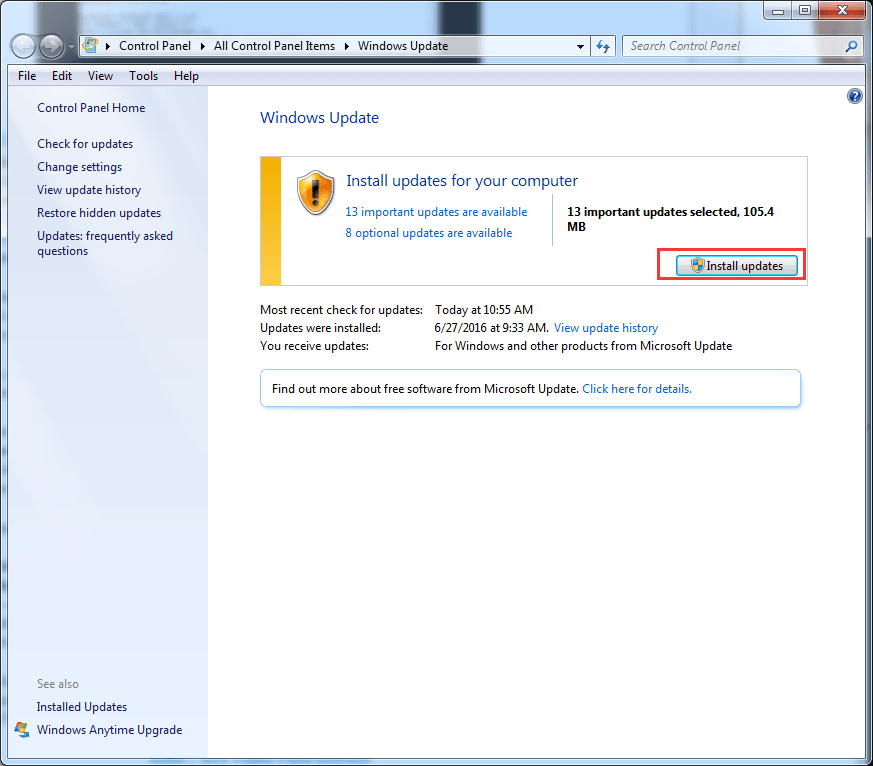
Если вы видите обновления на своем компьютере, щелкните значок Установить обновления здесь и позвольте системе запускать обновления. Этот шаг может помочь вам обновить драйвер видеокарты или драйвер видеокарты при обнаружении обновления, что может решить проблему.
В-третьих, вам необходимо убедиться, что на вашем компьютере также установлена последняя версия Java. Вы можете проверить версию своей Java, открыв этот страница в Интернете в браузере Firefox или Internet Explorer. Если у вас еще нет последней версии, обновите ее.
Когда вы закончите подготовку, вам пора следовать приведенным ниже инструкциям, чтобы решить проблему.
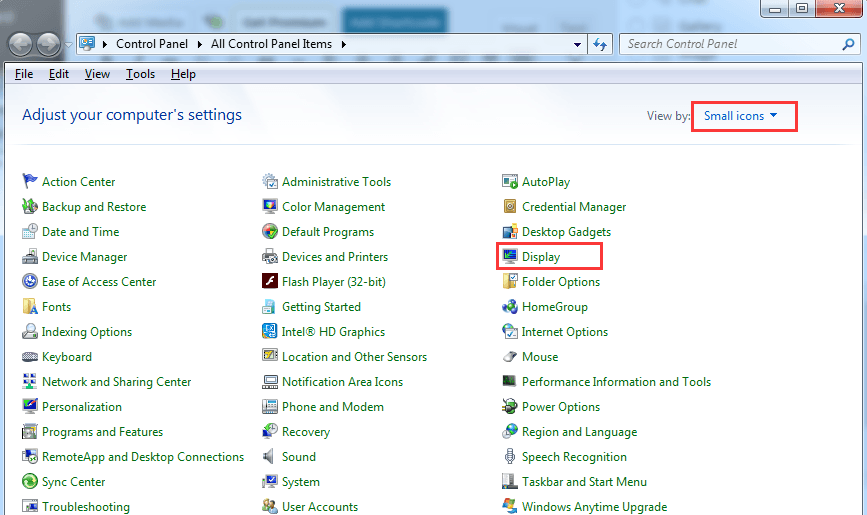
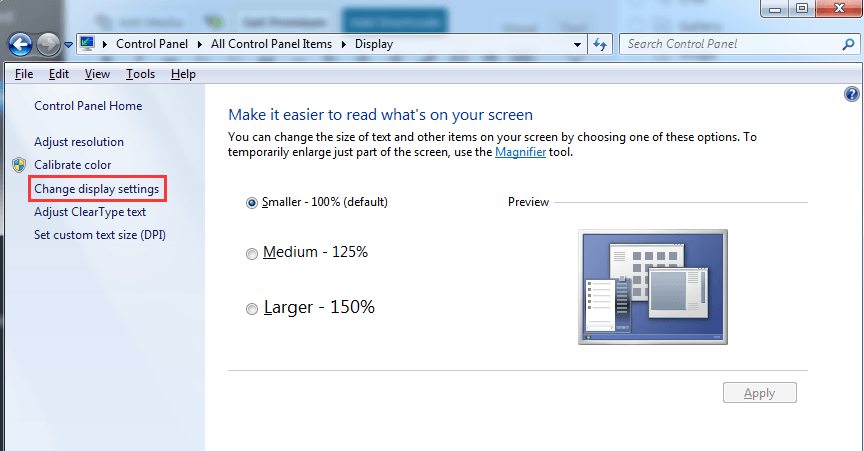
Метод первый: изменить аппаратное ускорение 1) Нажмите Начало кнопку, затем выберите Панель управления . 2) Просмотр Маленькие значки и выберите Дисплей вариант.
3) На левой панели щелкните Изменить настройки дисплея вариант.
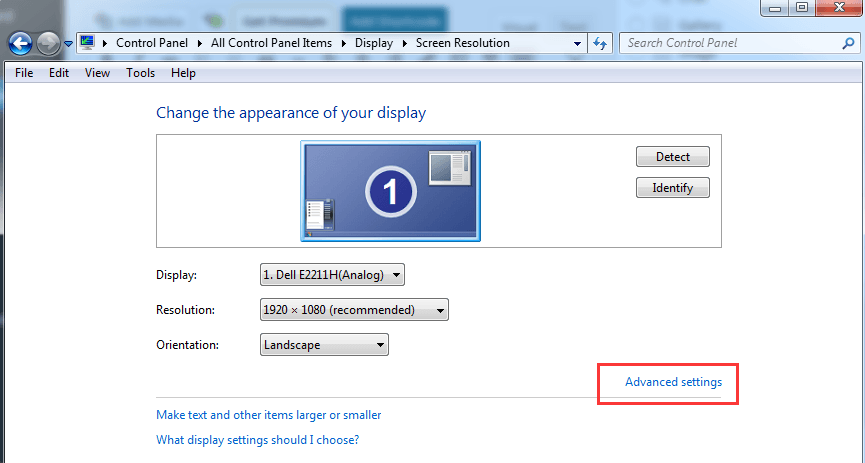
4) Затем выберите Расширенные настройки .
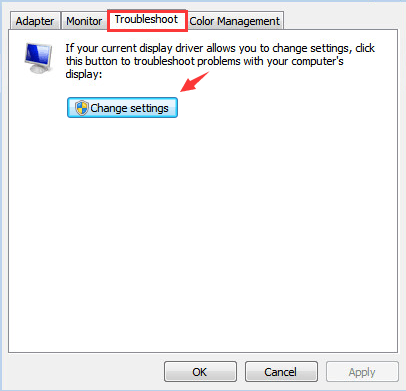
5) В Устранение неполадок бар, выберите Изменить настройки .
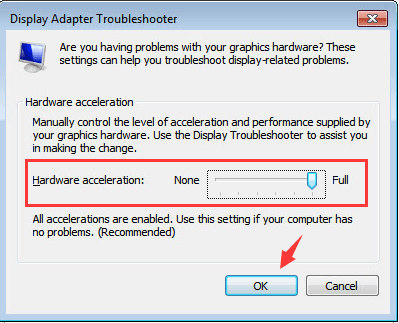
6) Двигайся Аппаратное ускорение ползунок на Полный . Нажмите Хорошо и выйдите из этой панели.
Метод второй: откатить драйвер
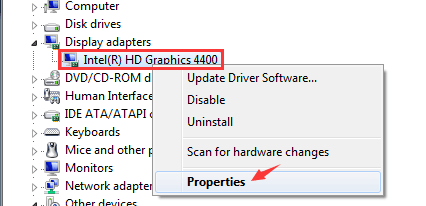
1) Перейти к Диспетчер устройств .
2) Развернуть Видеоадаптеры а затем щелкните правой кнопкой мыши устройство в этой категории и выберите Свойства .
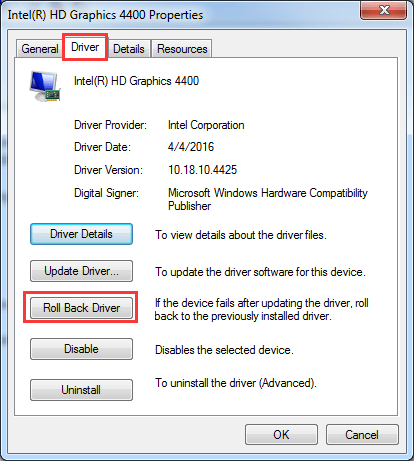
3) В появившемся окне перейдите к Водитель вкладку, а затем щелкните Откат драйвера вариант.
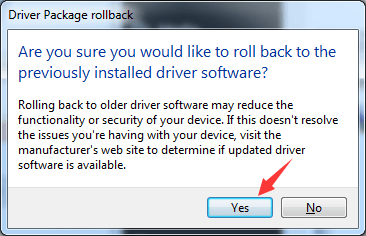
4) Нажмите да когда появится это окно.
5) После этого изменения перезагрузите компьютер.
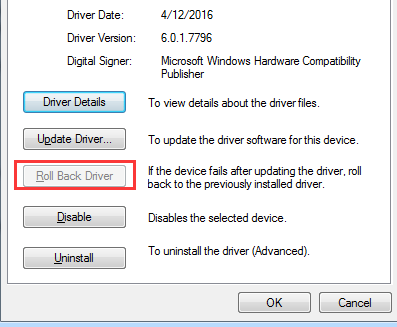
Запись : Если Откат драйвера кнопка здесь серая, как на снимке экрана ниже, то, возможно, вы не сможете продолжить этот метод. Предлагается попробовать другие методы, указанные ниже.
Метод третий: обновить видеодрайвер вручную
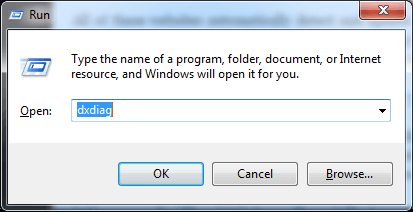
1) Нажмите Windows Key + R в то же время призвать Бежать команда. Затем введите dxdiag и нажмите Войти .
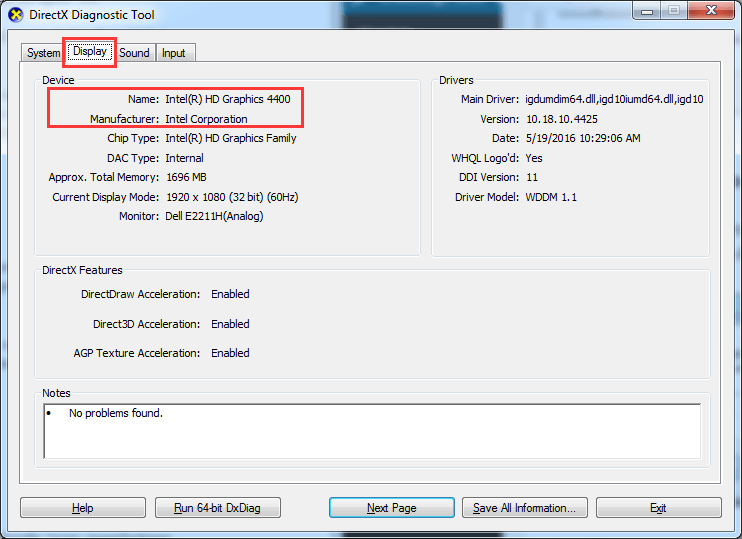
2) Перейти к Дисплей и найдите информацию об устройстве видеокарты.
Основываясь на названии устройства вашей видео или видеокарты, перейдите на официальный веб-сайт производителя и найдите последнюю версию драйвера для вашей видеокарты.
Большинство пользователей будут иметь видеокарты одной из следующих марок:
- Intel — Как скачать драйвер видеокарты Intel?
- NVidia — Как скачать драйверы видеокарты NVidia?
- AMD / ATI — Как скачать драйвер AMD Radeon HD Graphics?
Если у вас есть видеокарта других производителей, помимо этих трех, перечисленных здесь, вы также можете найти правильный драйвер, выполнив поиск в Google.
3) После того, как вы определили и загрузили последнюю версию видеодрайвера для вашей видеокарты или видеокарты, установите ее в соответствии с инструкциями.
Файл загрузки в основном .Exe файл, поэтому вам просто нужно дважды щелкнуть загруженный файл, чтобы запустить установку.
Если файл, который у вас есть, не .Exe файл, но .inf файл, вам может потребоваться обратиться к эта почта чтобы увидеть, как можно запустить установку.
Метод четвертый: автоматическое обновление драйвера видеокарты
Если вы не хотите тратить так много времени на решение проблемы, мы рекомендуем воспользоваться альтернативой, позволяющей сэкономить время: используйте Driver Easy, чтобы помочь вам с этим.
Водитель Easy это программное обеспечение, которое помогает вам обнаружить и загрузить необходимый драйвер на ваш компьютер. Вам нужно сделать всего два шага.
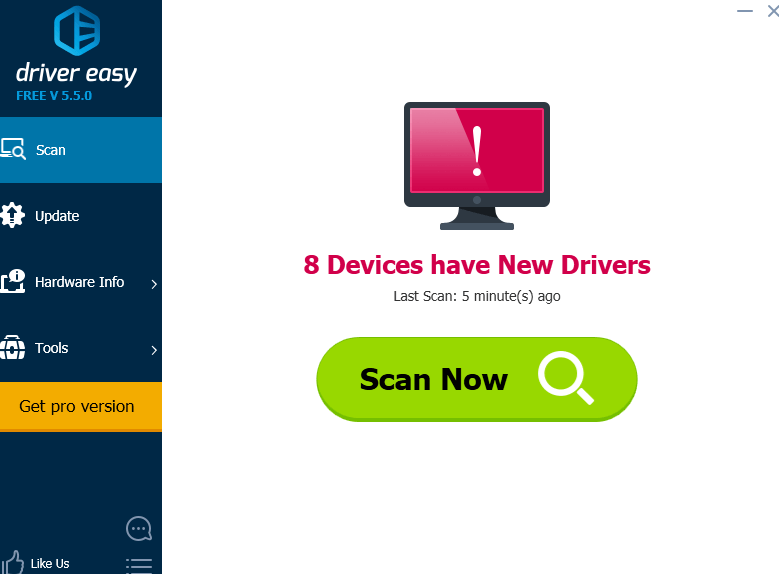
1) Сканировать .
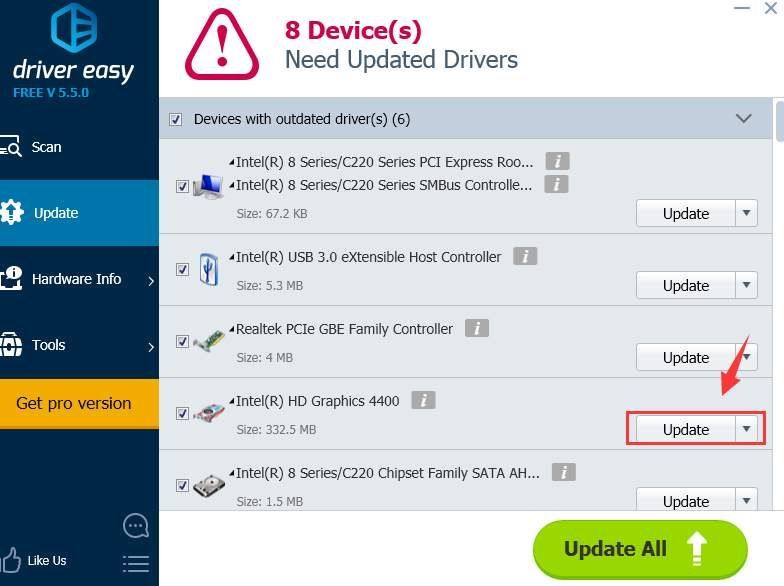
2) Выберите нужный драйвер и нажмите Обновить кнопку, чтобы загрузить файл драйвера.
Как видите, бесплатная версия так же способна, как и профессиональная версия Водитель Easy . Но необходимо установить загруженные драйверы вручную. Вот это Почта показывая вам, как это сделать.
Если вы ищете более быструю скорость загрузки и обновления, а также дополнительные функции, такие как резервное копирование и восстановление драйверов, а также профессиональную команду технической поддержки, всегда рекомендуется использовать профессиональная версия Driver Easy . Более того, у нас действует 30-дневная политика возврата денег, поэтому, если вы сочтете наш продукт или услуги недостаточно удовлетворительными, вы всегда можете попросить возмещение.
This is the complete guide to fixing the «Bad Video Card Drivers» error. One of these steps WILL work for you.
1: Restart your computer. There is a very small chance this may fix it. If that won’t work, try:
2: Update your video card drivers, if you haven’t already. This is what works for most people. To find your driver on Windows, you must first know your video card. You can find that out by clicking on the Start Menu, then Run. Enter in DXDIAG and navigate to the Display tab.
NVIDIA drivers can be found here: NVIDIA
AMD: AMD
Intel: Intel
ATI card drivers can be found on AMDs website.
If that won’t work, try:
3: Run Minecraft with low memory. I won’t get into the details of why this works, but here’s what you do:
Open the launcher. Click «Edit Profile» on the bottom left, check the box saying «JVM Arguments», and type in next to it, «-Xmx1024M -Xms1024M». NO QUOTES! Finally, click «Save Profile», and hit Play. Voila! You get a crappy, 3fps Minecraft.
4: Now, the last step would have got Minecraft working. But is 3fps REALLY better than no gameplay at all? No. It’s worse. So, here is the final step. And please, no *facepalm* comments.
Also, this does not work with legacy ATI cards (ATI Rage Pro and earlier).
Install Linux.
You may be wondering why this works. You don’t need to know. However, here it is anyways, if you really want to read why.
The reason computers get the «Bad Video Card Drivers» error is they have an old version of OpenGL. Unfortunately, most old or crappy video cards do not have OpenGL 2.1, the minimum version required to run Minecraft or pretty much any other 3D game decently. Linux has its own drivers that interface with the card that give it an entire software implementation of OpenGL 3.3. That’s more than enough to run Minecraft well.
This will let you run Minecraft decently.
If you don’t want to lose all your data by switching to a new operating system or are afraid of learning computing all over again, you can always run a dual-boot. Search it up. Also, Linux is much easier to use than windows.
Here are my specs:
Dell Inspiron 6000, 1.7GZ single-core processor, Intel 910/915GM Express Chipset (or something like that, its a really crappy integrated card), and 2gb DDR2 ram. Optifine. Lowest video settings. Even with Optifine, this is one of the worst gaming computers ever.
Windows speed: 0fps (It’s more like 0.5fps but Minecraft’s F3 menu doesn’t do decimals)
Linux speed: 16fps (Still bad, but it’s quite playable. Gets to 21fps in multiplayer.)
That is a crazy improvement. And, unless you have a 1990 ATI card, it works fine.
Hope you enjoy playing Minecraft!
«There’s no I in pie. Well, except the I.» -Peter Griffin, Family Guy
Are you experiencing an annoying «Bad Video Card Driver» error while trying to play Minecraft? Don’t worry; you’re not alone! This error message is a common issue that many gamers encounter, but fortunately, there are several solutions to fix it. In this article, we’ll explore the various causes of the error and provide you with step-by-step instructions on how to fix it. Whether you’re a seasoned Minecraft player or a beginner, our guide will help you troubleshoot this frustrating problem and get back to enjoying your favorite game.
Adjust the Minecraft Compatibility Settings
Search for Minecraft, right-click the Minecraft launcher and select Open File Location. In your file explorer, you should be able to locate the Minecraft launcher shortcut. Simply right-click the shortcut and navigate to its properties. In the Compatibility tab, select to run this program in compatibility mode for Windows 7, and below select Disable Fullscreen optimizations. Don’t forget to apply your changes.
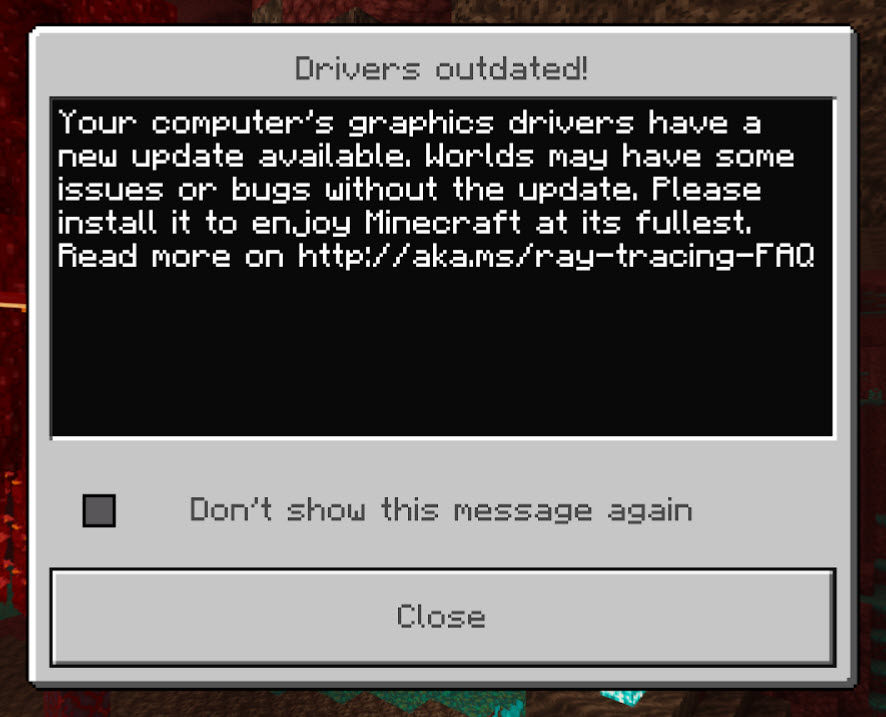
After the Minecraft update, many players start reporting an Drivers Outdated message telling that they need to update their graphics driver. If you’re on the same boat, you’re in the right place. In this tutorial, we’ll show you how to get rid of this message.
Try these fixes:
You might not need to try them all. Simply work your way down until you find the one that gives you luck.
- Make sure you’re using the latest drivers
- Check the versions of Minecraft and your system
- Scan and repair Windows
- Check your default GPU
Fix 1: Make sure you’re using the latest drivers
The message is self-explanatory: you need to check if you’re using the latest graphics driver. The latest video driver gives your GPU a performance boost. But unlike system updates, most of the time you need to take care of driver updates yourself.
You can update your drivers manually, by visiting your GPU manufacturer’s website (NVIDIA/AMD/Intel), then searching your model and finding the latest correct installer. But if you’re not comfortable playing with computer drivers, you can update manually with Driver Easy. It’s a tool that detects, downloads and installs any driver updates your computer needs.
If your PC is having persistent driver issues, we recommend you use a third-party driver updater. A professional tool not only updates drivers on your PC, it also fixes those that are either broken or missing altogether.
- Download and install Driver Easy.
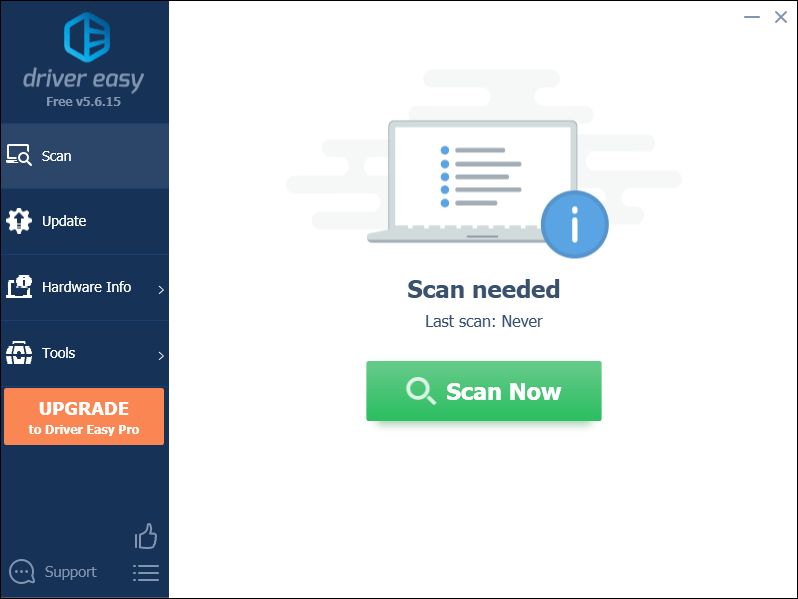
- Run Driver Easy and click the Scan Now button. Driver Easy will then scan your computer and detect any problem drivers.
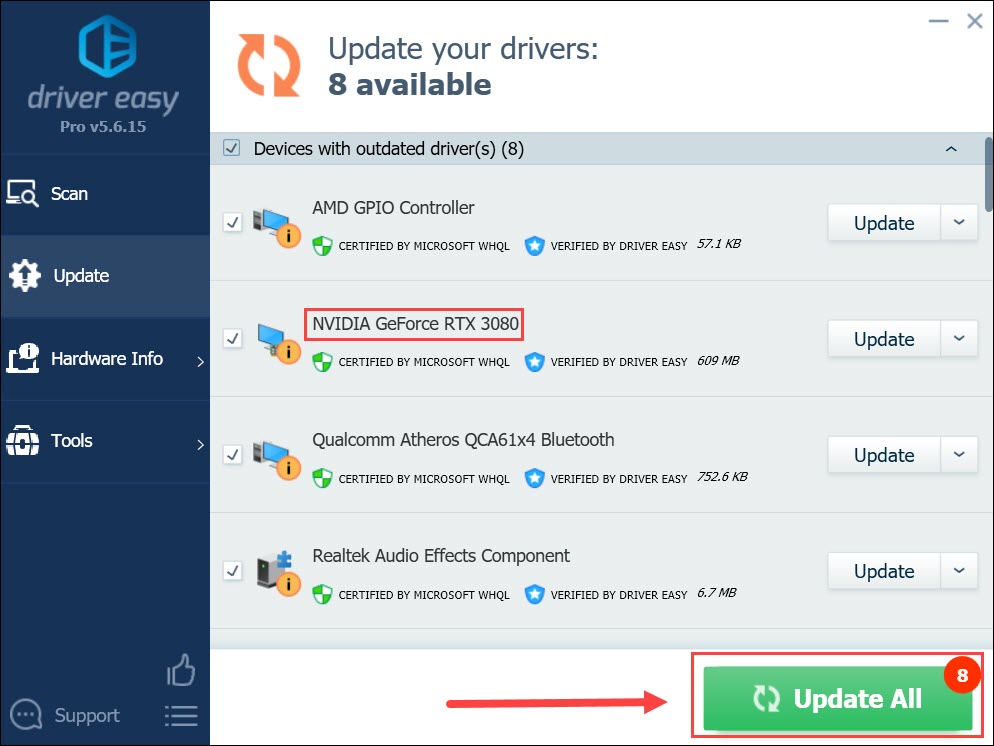
- Click Update All to automatically download and install the correct version of all the drivers that are missing or out of date on your system.
(This requires the Pro version – you’ll be prompted to upgrade when you click Update All. If you don’t want to pay for the Pro version, you can still download and install all the drivers you need with the free version; you just have to download them one at a time, and manually install them, the normal Windows way.)
The Pro version of Driver Easy comes with full technical support. If you need assistance, please contact Driver Easy’s support team at support@drivereasy.com.
After updating your graphics driver, restart your PC and check if Minecraft is running fine.
If the update message pops up again, check out the next method.
Fix 2: Check the versions of Minecraft and your system
Though the message tells you to update your graphics driver, it’s also a priority for you to make sure both your Minecraft client and system are up to date. Some players suggest that the message could also be telling you that you’re on an outdated client or system.
Verify your Minecraft version
You can use the following steps to check for Minecraft updates.
Bedrock edition
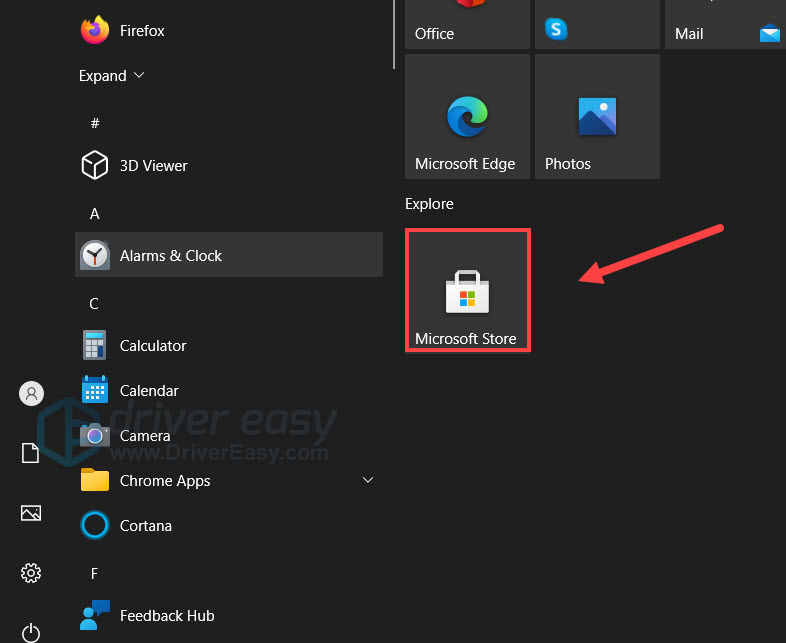
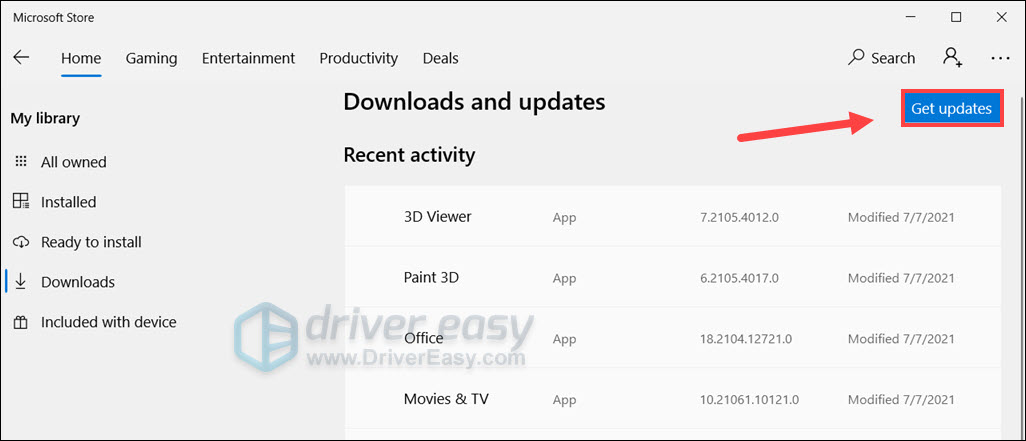
- On your keyboard, press Win (the Windows logo key). Then click Microsoft Store.
- On the top left corner, click Get updates and wait for the process to complete.
Java edition
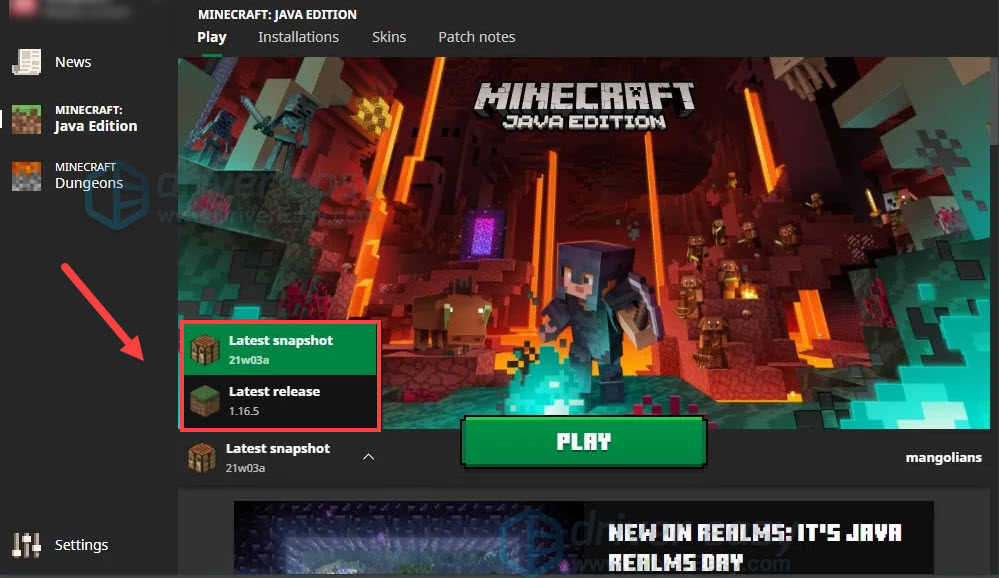
- Open or restart your Minecraft launcher.
- If you’re not seeing an update prompt, to the right of the Play button, click the arrow and select Latest release.
Make sure you’re on the latest Windows
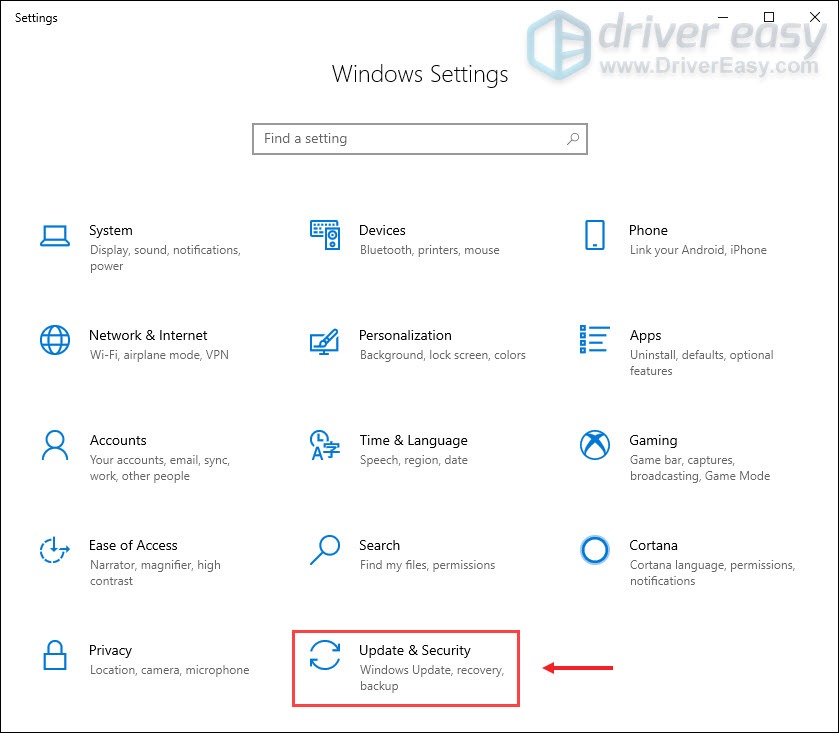
- On your keyboard, press Win+I (the Windows logo key and the i key) to open the Windows Settings app. Click Update & Security.
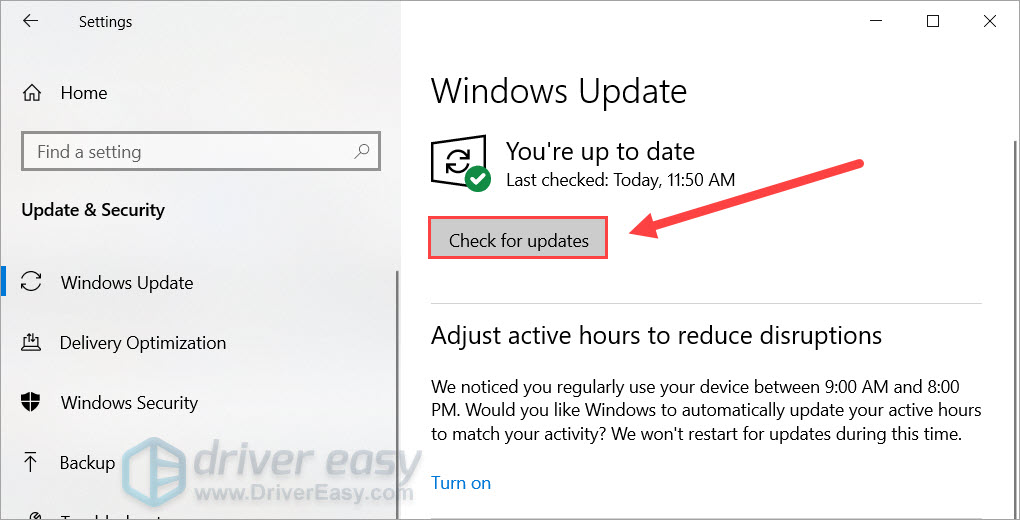
- Click Check for updates. Windows will then download and install the available patches. It might take some time (up to 30 mins).
To confirm you’ve installed all the system updates, repeat these steps until it prompts “You’re up to date” when you click Check for updates.
Once you’ve installed all system updates, restart your PC and check if the issue persists.
If you’re still seeing the message, continue to the next fix.
Fix 3: Scan and repair Windows
If you’re sure it’s not a driver issue, try scanning Windows and see if it’s a system error.
You can follow this guide by Microsoft to scan manually. But if you don’t have the time or skills to do it yourself, you can give Fortect a try. It’s is a professional Windows repair tool that can scan your system’s overall status, diagnose your system configuration, identify faulty system files, and repair them automatically. It gives you entirely fresh system components with just one click, so you don’t have to reinstall Windows and all your programs, and you don’t lose any personal data or settings.
- Download and install Fortect.
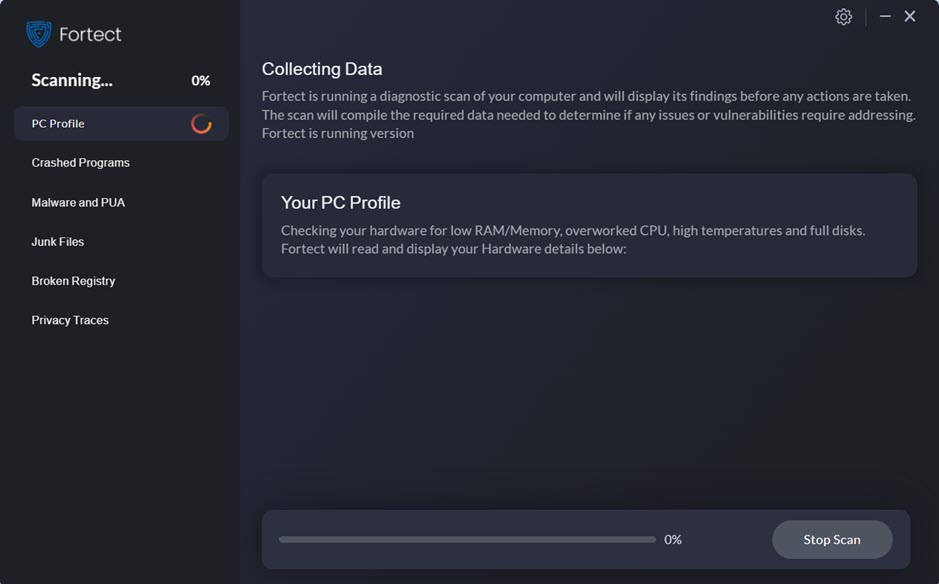
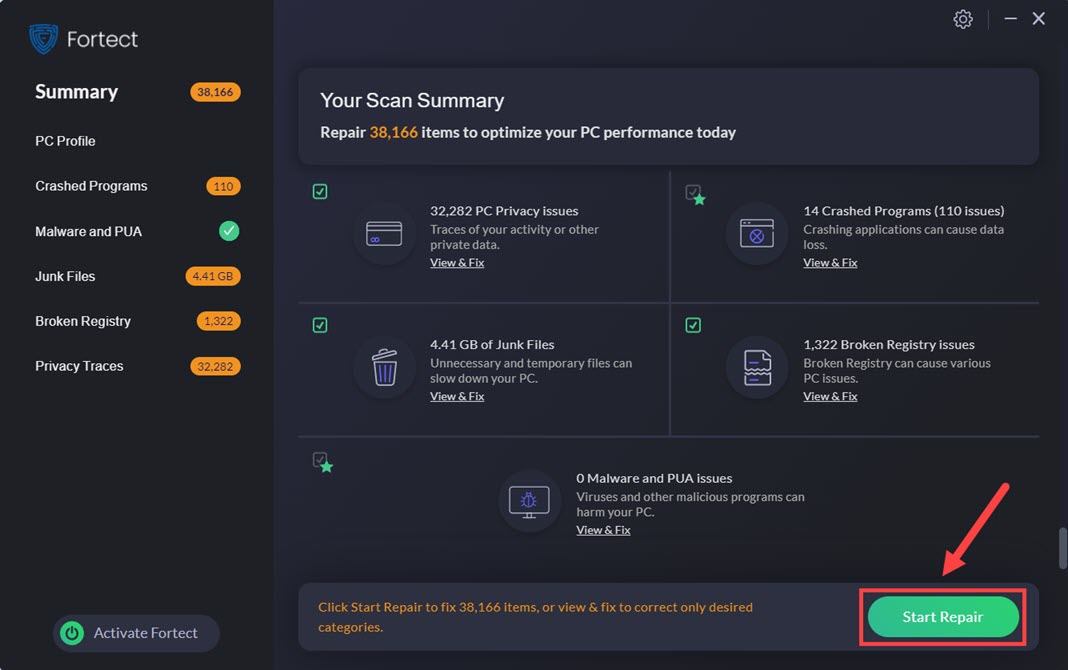
- Open Fortect. It will run a free scan of your PC and give you a detailed report of your PC status.
- Once finished, you’ll see a report showing all the issues. To fix all the issues automatically, click Start Repair (You’ll need to purchase the full version. It comes with a 60-day Money-Back Guarantee so you can refund anytime if Fortect doesn’t fix your problem).
Fortect comes with a 60-day Money-Back Guarantee. If you’re not satisfied with Fortect, you can contact support@fortect.com for a full refund.
Once done, restart Windows and try again in Minecraft.
Fix 4: Check your default GPU
If your computer comes with dual graphics cards, for example an Intel integrated graphics and a dedicated NVIDIA/AMD graphics card, you can check if you’re running Minecraft on the desired GPU. The update message might appear if you’re running Minecraft on the wrong GPU.
Here’s how you can check the preferred GPU of Minecraft:
If you’re on Windows 7 or 8, you can change the preferred GPU of Minecraft in NVIDIA Control Panel or AMD Radeon™ Settings.
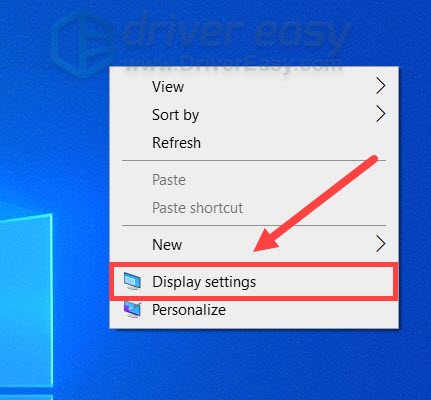
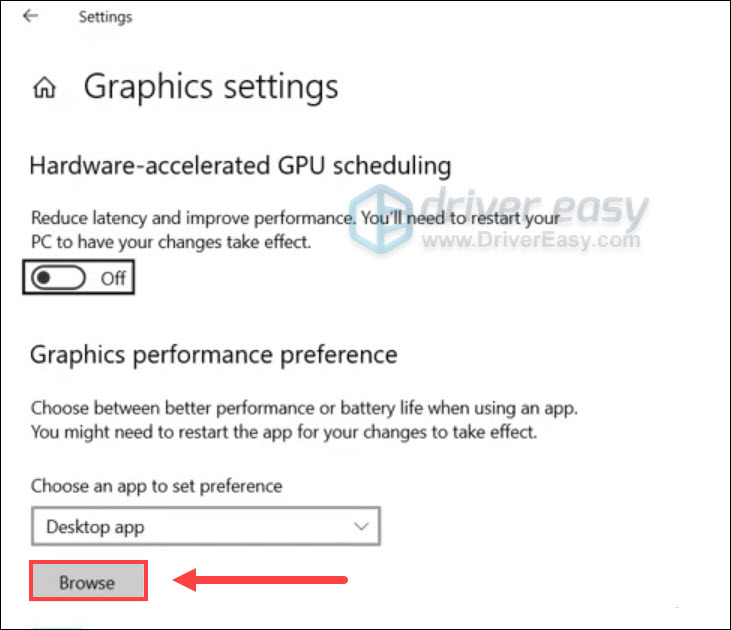
- At the empty area of your desktop, right-click and select Display settings.
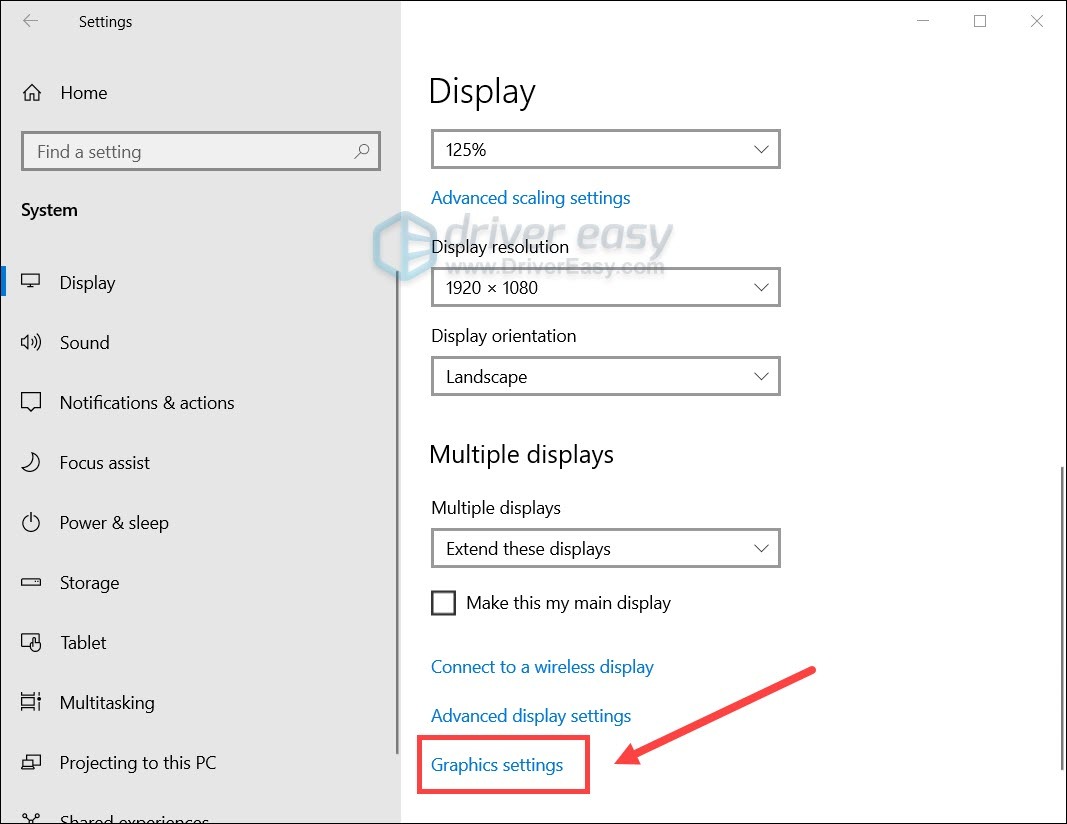
- Under the Multiple displays section, click Graphics settings.
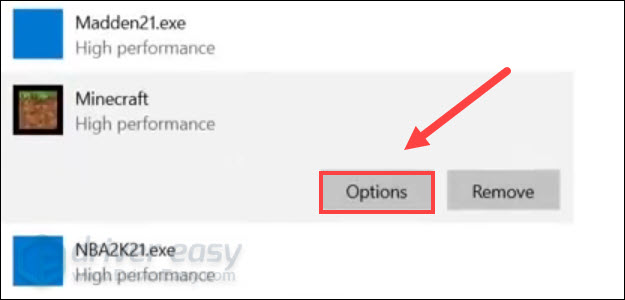
- Under Graphics performance preference, specify your app type (For Java Edition, select Desktop app. For Bedrock, choose Microsoft Store app). Then click Browse and select your Minecraft launcher.
- Click Options.
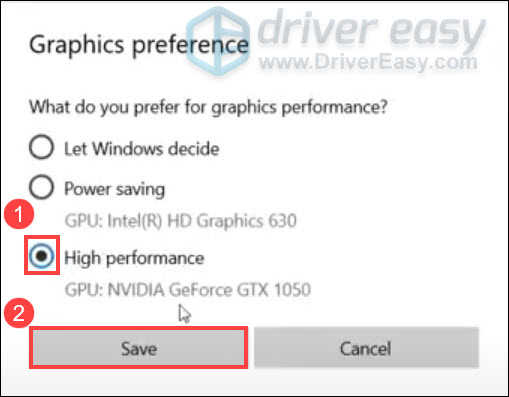
- Click High performance and then Save.
Now you can restart Minecraft and check if the message is still there.
Hopefully this tutorial helps you get rid of the driver update message in Minecraft. If you have any questions or ideas, feel free to tell us in the comments below.
5
5 people found this helpful

