
Данная публикация посвящается всем ценителям Minecraft и других игр, требующих установки Java. На днях знакомые попросили помочь: при попытке запустить Майнкрафт у них появлялось сообщение — Java Virtual Machine Launcher ошибка, как исправить сейчас расскажу.
Не хватает памяти
При установке Джавы, необходимой для работы некоторых игр, отображалось следующее окно:

Она указывает на то, что для создаваемой виртуальной машины не хватает памяти. Очень часто подобная ситуация возникает, если некорректно выходить из игры (нажав Alt + F4 ) или при внезапном отключении ПК.
В моем случае, ошибка появилась после того, как пользователь случайно удалил компонент Java, потом пытался его переустановить, но на последнем этапе инсталляции отображалось вышеупомянутое окно.
На зарубежных источниках нашел два решения. Начну с более простого.
Настройка переменной среды
- Открываем панель управления. В Windows 7 это можно сделать через меню «Пуск», в «десятке» достаточно кликнуть правой кнопкой мышки по кнопке «Старт» (или нажать Win + X ), и выбрать из списка нужный элемент:

- Переходим к разделу «Система»:

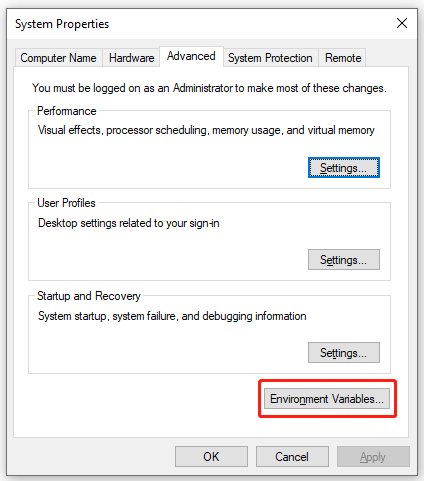
- Слева кликаем по ссылке «Дополнительные параметры…»:

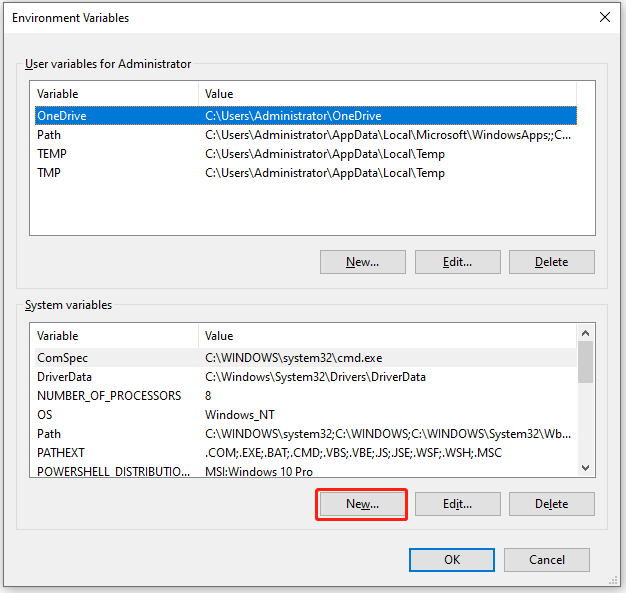
- В новом окне снизу есть кнопка «Переменные среды», которую стоит нажать:

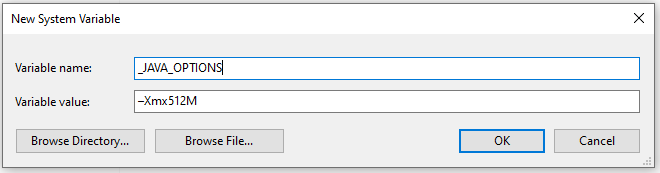
- Кликаем по кнопке «Создать…», присваиваем новой переменной:
имя «_JAVA_OPTIONS»
значение «-Xmx512M»

- Обязательно сохраняем все изменения, нажав на ОК. Перезагрузка компьютера не требуется.
Теперь при запуске установщика Джава ошибка Java Virtual Machine Launcher не появиться.
Переходим ко второму способу.
Создание файла запуска
Покажу всё на примере Minecraft.
- Открываем пользовательскую папку, где хранятся игровые настройки. Для этого нажимаем Win + R и пишем команду:
%appdata%
- На экране отобразится каталог, в котором нужно найти игровую директорию, войти в неё и внутри создать новый текстовый документ (Блокнот):

- Туда стоит записать следующую фразу:
java -Xms650m -jar "c:\Users\USER_NAME\AppData\Roaming\.minecraft\minecraft.exe

Вместо USER_NAME пишем название своего аккаунта. Оно указано в адресной строке окна. Учетная запись не должна содержать русских символов. Только латинские (английские), иначе способ не сработает.
- Теперь нажимаем на пункт меню «Файл», затем выбираем «Сохранить как». Указываем имя «minecraft.bat» и указываем тип «Все…», как показано на скриншоте:

- Осталось только создать ярлык для созданного элемента и отправить его на рабочий стол, чтобы через него запускать игру.
Видео

Вы узнали, как исправить ошибку Java Virtual Machine Launcher. Но если вопросы остались, обязательно задавайте их с помощью формы комментирования внизу страницы.
Рекомендуем:
- Устраняем ошибку «Опаньки» в Google Chrome
- Что делать если не работает безопасный режим в Windows 10
- Как восстановить удаленные фотографии, сообщения, контакты на iPhone?
- d3dx9_43.dll скачать, чтобы устранить ошибку на компьютере
- Четыре способа получить роль администратора в Windows 10

Вам помогло? Поделитесь с друзьями — помогите и нам!
You are here: Home / Internet / Could Not Create The Java Virtual Machine Minecraft Error – Fixed
Minecraft requires Java to run. If the Java files are corrupted during installation or crash while running, then you can get the Java Virtual Machine error.
Here I have discussed how to fix the Minecraft Java Virtual Machine error, so follow as shown to easily fix this error.
Also read: How To Fix Minecraft Launcher Error Code 0x803f8001 [SOLVED]
Perform as shown in the following solutions to easily fix the could not create the Java Virtual Machine Minecraft error.
1. New System Java Variable
If the in-built RAM could not support the Java function, then allocate maximum RAM to the Java application to support them.
To do so, follow the steps given below:
- Press Windows + R keys to open the Run utility.
- Type sysdm.cpl in the dialog box and hit the Enter key.
- After the System properties Window opens, click on the Advanced tab.
- Select the Environmental Variables option.
- Select the New option under the System variables box.
- Enter the _JAVA_OPTIONS in the variables box.
- Enter –Xmx512M on the Variable value box, to increase RAM allocation to 512 Mb.
The number sets the memory space that you want to allocate. Use M for megabytes and G for gigabytes.
- Select Ok to close the window.
- Finally, click on Ok under Environmental Window.
Now, check if the problem is fixed otherwise, go to the next solution.
2. Run Java As Administrator
You can also try running Java as administrator when you get Java virtual machine Minecraft error.
To do so, follow the given steps:
- Type Java on the Windows search bar and right-click on the first displayed option.
- Select the Open file location option.
- After the root folder opens, right-click on the Java executable and select the Properties option.
- Go to the Compatibility tab.
- Check the box for Run this program as an administrator option.
- Finally, click on Ok followed by Apply to save the changes.
3. Reinstall Java
If you still get the same Minecraft error, try reinstalling Java. To reinstall Java, follow the steps given below:
- Press Windows + R to open the Run utility.
- Type or copy-paste appwiz.cpl in the dialog box and hit the Enter key.
- From the list of the installed applications, find Java.
- Right-click on it and select the Uninstall.
Follow the on-screen instructions to complete the process and restart the PC.
Visit the official Java site and download the latest version of Java. Make sure to select the same system architecture (32-bit and 64-bit) that you are using.
- After downloading the file, double-click on the setup exe and select the install button to initiate the installation process.
Follow the on-screen instructions to complete the process and restart the PC.
Frequently Asked Questions [FAQs]
1. How Do I Fix Resolve Could Not Create Java Virtual Machine?
To resolve the couldn’t create Java virtual machine error, simply uninstall and then reinstall Java.
2. How Do I Give Java More RAM?
To allocate more RAM to Java – open the system properties and then go to the Environmental variables under Advanced tab, enter _JAVA_OPTIONS and then Xmx512M to allocate extra 512 MB RAM to Java.
3. How Do I Fix Java Errors?
There are multiple ways to fix the Java errors – uninstall and reinstall the Java, install the latest one, temporarily turn off firewall and antivirus.
Final Words
So, there you have it. Now you know how to bypass the virtual Java machine error in Minecraft.
If you still have questions regarding this topic, ask us in the comments section provided below.
-
Home
-
Partition Manager
- Fixed: Java Virtual Machine Launcher Error in Minecraft & Eclipse
By Ariel | Follow |
Last Updated
A lot of users encounter the Java Virtual Machine launcher error when running some Java programs like Minecraft and Eclipse. Don’t worry. This post of MiniTool explores several proven ways to fix the JVM launcher error.
What Does Java Virtual Machine Launcher Error Mean
Java Virtual Machine, also known as JVM, is a virtual environment that allows a computer to run Java programs written in other programming languages that are translated to Java bytecode. Without the JVM, Java programs won’t run properly. Here’s a user who encountered the Java Virtual Machine launcher error in Eclipse.
I’m having an issue with the eclipse JVM launcher. Last night, everything was working fine, as far as I know, nothing at all has changed on my pc since then. However, I woke up this morning to find that when I run any of my projects in eclipse, I receive this error: Java Virtual Machine Launcher- Error: could not open C:Program FilesJavajre1.8.0_60libamd6jvm.cfg
https://stackoverflow.com/questions/33324363/how-to-fix-eclipse-java-virtual-machine-launcher-error
After analyzing extensive user reports, the Java Virtual Machine launcher errors mainly occurs when running in Eclipse and Minecraft. It’s so annoying that the failed to create the Java Virtual Machine error will prevent you from opening the Java-based software.
The error usually indicates that your computer cannot read or understand the bytecode you’re trying to execute. There are different possible reasons behind the Minecraft could not create the Java Virtual Machine error, such as insufficient permissions, corrupt/missing Java components, and incompatibility issues.
How to Fix the Java Virtual Machine Launcher Error
How to fix the Java Virtual Machine launcher errors? Here we summarize some effective fixes. You can try them in order until the JVM error gets fixed.
# 1. Add a New System Variable for Java
Many users reported that Minecraft could not create the Java Virtual Machine error can be resolved by adding a new system variable for Java. You may have a try.
Step 1. Type system variable in the Search box and select Edit the system environment variables from the Best match.
Step 2. In the pop-up window, navigate to the Advanced tab and click on Environment Variables.
Step 3. Click on New under the System variables window.
Step 4. Input _JAVA_OPTIONS in the Variable name box, and then input –Xmx512M in the Variable value box and click on OK to save the change. This will increase RAM allocation to 512 megabytes for Java.
Step 5. Click on OK in the Environment Variables window.
Once done, restart the program and check if the Java Virtual Machine launcher error Minecraft disappears.
# 2. Run Java as an Administrator
The “failed to create Java Virtual Machine” error can occur due to insufficient admin rights. Here you can follow the steps below to run the program with admin rights.
Step 1. Right-click the Java executable file and select Properties. If you can’t find the file, type Java in the search box, right-click the Java icon, and select Open file location.
Step 2. In the Properties window, go to the Compatibility tab and select the Run this program as an administrator option.
Step 3. Click on Apply and then on OK to save the change.

Now, you can relaunch the program and see if the “failed to create the Java Virtual Machine” error gets fixed.
# 3. Reinstall Java
Sometimes the Java Virtual Machine launcher errors can occur due to corrupted or outdated Java components. In this case, you can try reinstalling Java and see if it works.
Step 1: Press Win + S to open Search. Then search for Control Panel and launch it.
Step 2: In Control Panel, select View by: Category in the upper right corner. Then click Uninstall a program.
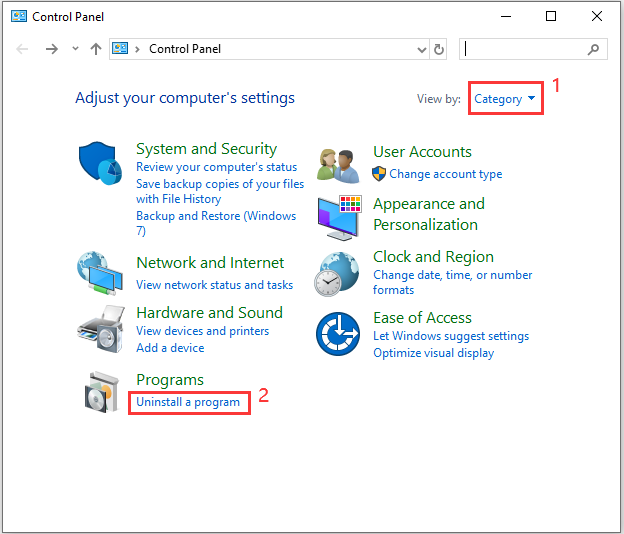
Step 3: Select each Java-related program from the list and then click Uninstall. Follow the onscreen instructions to finish the process.
Step 4. Once uninstalled, you can go to the Java official website, download the latest version and install it. If you don’t know how to do that, refer to one of the tutorials:
Java Runtime Environment Download and Install for Windows 10/11
Java Virtual Machine (JVM) Download & Install for Windows 10/8/7
Download, Install, and Update Java 32 Bit & 64 Bit [JDK vs JRE]
Further Reading: Do you want to manage your partition and disk on Windows effectively? MiniTool Partition Wizard is a good choice that can help you extend/resize/delete partition, convert a disk to MBR/GPT, migrate OS, etc. Besides, it can help fix various problems such as C drive full, and corrupt file system. Perhaps you need such a tool.
About The Author

Position: Columnist
Ariel has been working as a highly professional computer-relevant technology editor at MiniTool for many years. She has a strong passion for researching all knowledge related to the computer’s disk, partition, and Windows OS. Up till now, she has finished thousands of articles covering a broad range of topics and helped lots of users fix various problems. She focuses on the fields of disk management, OS backup, and PDF editing and provides her readers with insightful and informative content.
It is common to face errors when playing Minecraft. Sadly, it happens frequently and often surprises users.
However, Minecraft is a game with a large community behind it, and because of that, errors are always very likely to be solved shortly after being announced.
This also happens to be the case with the “Could Not Create The Java Virtual Machine” error that we’ll be helping you resolve in the guide below.
Let’s get into it.
The Problem Explained
This specific problem occurs when a user tries to launch Minecraft, but the Java Virtual Machine fails to start.
The user is then presented with an error prompt that doesn’t suggest a solution, as shown in the image below.

As a result, the game is unplayable (it won’t launch), and users, especially those who aren’t quite computer-savvy, are left with no possible hints as to what the problem might be caused by.
Luckily, there are a few proven and working solutions for this issue, and although they aren’t the simplest to apply, we’ve made sure to cover the processes from beginning to end in simple and easy-to-understand steps.
Read more in the following sections below.
1. Set A New System Variable For Java
Establishing a new Java System Variable means allocating more RAM, which in turn can solve the problem that can often be caused by a lack of memory.
As most users reported, the reason their Java Virtual Machine couldn’t start was that it didn’t have sufficient memory allocated to it, therefore, they couldn’t launch Minecraft.
We can change this by doing the following:
- Press Windows + R on your keyboard to open up the “Run” panel.
- Type in sysdm.cpl and press “Enter” on your keyboard or “OK” at the bottom.

- Click on the “Advanced” tab at the top of the window.

- Click on Environment Variables at the bottom of the window.

- Under the “System variables” section, click the New button.

- While creating the new variable, in the “Variable name:” field, type in “_JAVA_OPTIONS”, and in the “Variable value:” field, type in “-Xmx512M”, then finish by clicking the OK button.

- Finalize the process by clicking OK at the bottom of the Environmental window as well.


Doing this means you just allocated 512 megabytes of RAM to Java. If the problem was indeed Java not having enough RAM to launch properly, this problem will now be fixed.
If this text-based tutorial wasn’t clear enough, here’s a helpful video covering the process from beginning to end.
Note: The user in the video uses different values, but the end goal is still the same, which is allocating more RAM to Java.
You can reboot your PC and launch Minecraft again. It should now start without showing the “Could Not Create The Java Virtual Machine” error.
If this doesn’t work, there are other things you can try. Take a look at the following section down below for more information.
2. Ensure Only The Right Version Of Java (For Your OS) Is Installed
This solution was brought up by a Reddit user who suggests the error could be caused by Windows running the wrong Java instance for your OS type.
The fix is to manually uninstall the version of Java that doesn’t match your operating system’s type, which in this case is the 32-bit one.

The user who asked for help has a 64-bit operating system, yet their version of Java was a 32-bit one. This caused a problem and made them unable to launch Minecraft, but the problem was solved once the user uninstalled the 32-bit Java version and installed the one that was right for their OS, which is the 64-bit version.
You can check which version of Java you have installed in the “Apps & Features” section of Windows 10.
If you need to re-download Java, you can do so through the official website.
Once you have the right Java version installed, Minecraft should launch with no further issues, assuming there aren’t other things wrong, such as it not having enough RAM allocated. Check Fix #1 for more information on this.
3. Grant Java Administrator Privileges
A lack of Administrator privileges can cause the Java Virtual Machine to be unable to launch. To make sure this isn’t happening, do the following:
- Press Windows + S on your keyboard to open the search box.
- Type in Java and right-click the first result, then choose Open File Location.
- Right-click Java.exe and choose Properties.
- Click on the Compatibility tab at the top.
- At the bottom of the window, “tick” Run this program as an administrator.
- Press Apply and then OK at the bottom to save the changes and close the window.
Now Java has administrator rights on your computer, which means you won’t be experiencing the Virtual Machine error if it was caused by this.
For a lot of users, this solved the problem instantly. However, it may not work for you. Make sure to try the other two solutions listed above if this one doesn’t help.
Conclusion
With that said, you now know what actions to apply when dealing with the frustrating “Java Virtual Machine Failed To Start” Minecraft error.
Hopefully, the fixes in this guide worked and helped you get back to playing Minecraft without any other interruptions.
Java virtual machine launcher (JVML) — это компонент, который запускает программы, написанные на языке Java. При запуске игры Minecraft может появиться ошибка «Java virtual machine launcher», что может привести к невозможности запустить игру. Давайте поговорим о причинах возникновения этой ошибки и о том, как ее исправить.
Причины возникновения ошибки
-
Устаревшая версия Java. Minecraft требует определенной версии Java для работы. Если у вас установлена устаревшая версия Java или версия, которую игра не поддерживает, может возникнуть ошибка JVML.
-
Неправильная установка Java. Если Java была установлена неправильно, то возможно, что некоторые компоненты не будут работать должным образом и могут вызвать ошибку JVML.
-
Недостаточно памяти. Minecraft требует довольно много оперативной памяти для работы, поэтому возможно, что у вас недостаточно памяти для запуска игры.
Как решить проблему ошибки
-
Обновите Java до последней версии. Проверьте, установлена ли у вас последняя версия Java, поддерживаемая Minecraft. Вы можете загрузить последнюю версию Java с официального сайта.
-
Переустановите Java. Если вы уверены, что у вас установлена правильная версия Java, попробуйте переустановить ее заново. Убедитесь, что вы удаляете старую версию Java перед установкой новой.
-
Увеличьте оперативную память. Для увеличения доступной оперативной памяти откройте свойства запуска Minecraft и добавьте «-Xmx», после которого укажите количество оперативной памяти, которую вы хотите выделить игре. Например, «-Xmx4G» означает, что игра будет использовать 4 гигабайта оперативной памяти.
Вывод
Ошибка Java virtual machine launcher может быть вызвана различными причинами, но обычно она связана с проблемами с Java или недостаточным количеством оперативной памяти. Следуйте нашим советам, чтобы исправить эту ошибку и начать наслаждаться игрой в Minecraft снова.