I have two databases. Both are in the same folder. Both have, as far as I can tell, the exact same ownership and permissions. I can attach one but not the other — I get an error 5123.
For both files…
- Owner is MSSQLSERVER
Permission entries:
-
MSSQLSERVER — Full control
-
OWNER RIGHTS — Full control
-
Administrators — Full control
I reviewed the other question referenced below but could not get any of the suggestions to work given my constraints listed above. I posted what finally worked below.
asked Jun 7, 2018 at 22:17
![]()
Kevin JonesKevin Jones
691 gold badge1 silver badge6 bronze badges
9
Add your User to Permissions:
[your user] - full control

MSSQLSERVER - Full control

OWNER RIGHTS - Full control

Administrators - Full control
answered Jul 25, 2020 at 6:34
![]()
serajseraj
1491 silver badge7 bronze badges
1
All files on the OS platform are subject to access permissions. Remember that for optimal security, DENY always overrides any permissions allowed. The SQL Server database has physical files(.MDF, .NDF, and .LDF) These files just like any other files on the server is subject to access permissions.
In your scenario of SQL Server error 5123, you are attempting to attach a database file to the instance where your credentials do not have the right privileges on the file. The trick here though is that whoever initially detached the database file is automatically set as the owner and no one else.
In order to fix this, you have to give the R/W or FULL control rights to the account attempting to attach the file. Note: If there are multiple files for the database which most likely would be, you need to make sure each file security properties is set properly for the user performing the ATTACH.
You can also read this blog for further details: https://www.stellarinfo.com/blog/sql-server-2008-r2-database-error-5123/
answered Jun 27, 2018 at 21:39
![]()
I’m still not sure what is going on but I got it working without running SSMS as admin. Earlier, when I changed ownership from MSSQLSERVER to my profile, I got the same error. Then I noticed that, in the Security tab of the Properties dialog, when I selected OWNER RIGHTS in the «Group or user names» section, the listed permissions were empty for both Allow and Deny. I had been clicking Advanced and, from that view, OWNER RIGHTS had all permissions checked. This time I clicked Edit and saw that all check boxes were not set so I set all for Allow. That worked. I am not skilled in Windows security so I have no idea what is happening but I am back in business. And I still don’t understand why, when all DBs were owned by MSSQLSERVER, the one database did attach while the other two did not despite them appearing to have the same set of permissions.
answered Jun 8, 2018 at 7:57
![]()
Kevin JonesKevin Jones
691 gold badge1 silver badge6 bronze badges
Open Management Studio with administrator rights (right click, run as Administrator) and try again, in my case, I was able to solve the problem.
![]()
Baldie47
1,1585 gold badges16 silver badges45 bronze badges
answered Apr 20, 2021 at 6:56
![]()
Note that the data file extension you see depends on you version of the server.
Select the file ‘*’ to view all existing files in the location and choose the data file to attach.
answered Sep 13, 2021 at 13:52
![]()
snnprosnnpro
1932 bronze badges
SQL server error 5123 occurs when users want to attach the database, which has been placed on different locations. This error is a kind of permission error that occurs in SQL Server. As we all know, the .mdf is a primary database file and .ldf file represents the log file associated with a primary database file. Regardless of attaching a primary data file via SQL Server Management Studio, sometimes it becomes very difficult to open it. On the other hand, this error may be encountered when there are several logins for attaching or detaching the database. Therefore, in the following section, we are going to discuss a manul procedure to resolve Microsoft SQL Server error 5123 in an absolute and reliable way.
Microsoft SQL Server Error 5123 – Reasons
Let us take a look on the reasons why Microsoft SQL server error 5123 occurs.
- This error occur if you detach the last database with different logins and then, try to attach a database with different logins.
- In Microsoft SQL Server this error generates at the time when the entire process is running on the Server but it has no permission to run a program folder.
To overcome this problem we have to change the permission or add permission as the owner of .mdf and .ldf files.
Fix MS SQL Server Error 5123 Attaching Database — Manual Steps
Follow these steps to solve SQL error 5123. Some of the steps are listed below:
- Right-click on MDF file that you need to attach
- Then, choose Properties to check the permissions of MDF file.
- Click on Add button to grant any other login permission or and provide the full login control.
Moreover, you can perform this for an associated .ldf file and again, you can try to attach.
You can also try «Run as Administrator» rather granting permission to everyone.
Attach the Database in Microsoft SQL Server
1. Using SQL Server Management Studio (SSMS)
- Log in to SSMS using a valid domain name and Windows Authentication
- Click on the Object Explorer and then, select ‘Databases’ to view the list of existing databases.
- Right-click on ‘Database’ and choose ‘Attach’ from a drop down menu
- A new Attach Database Window will appear on the screen, now click on ‘Add’ button
- After that, you can select the database that you want to attach.
- The database window will verify the MDF and LDF files. Then, click the OK button.
Here, you can see all the attached database files in SQL instance.
2. Using Transaction SQL (T-SQL)
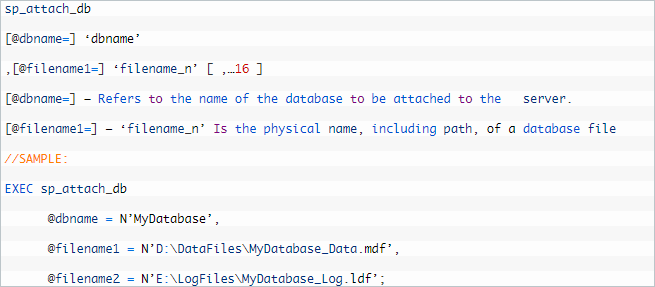
With the help of sp_attach_db stored procedure, users can easily attach the databases in MS SQL Server. Let us have a look:
sp_attach_db [ @dbname= ] 'dbname'
, [ @filename1= ] 'filename_n' [ ,...16 ]
[ @dbname= ] Is the name of database that can be attached to a server.
[ @filename1= ] 'filename_n' Is the physical name, which includes location of a database file.How to Solve Microsoft SQL Server Error 5123
If the above-stated method is not working well or you want quick solution to Fix SQL MS SQL Server Error 5123, then you can go for an automated approach ie SQL Database Recovery Tool. The tool recover database from corrupted SQL MDF File. Not only this, it is able to recover deleted database objects of SQL version 2017, 2016, 2015 & its below version.
Conclusion
SQL Server Error 5123 Access Denied error is one of the common error occur which SQL DBAs faces. The blog covers the possible reason behind this error and discusses the resolution to solve SQL Server Error 5123.
The solutions on this page can be applied to resolve 5123 error with access denied or database attach failure in MS SQL Server 2014/2012/2008 R2/2005.
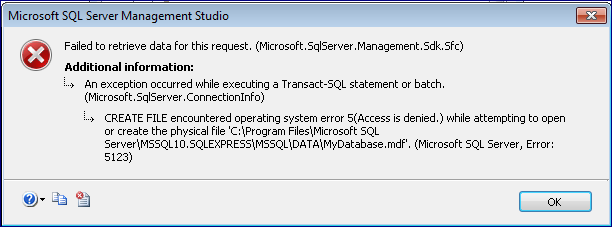
When you try to attach a database in SQL Server, but get an error message, reporting that «Microsoft SQL Server, Error: 5123» as the image shown below:
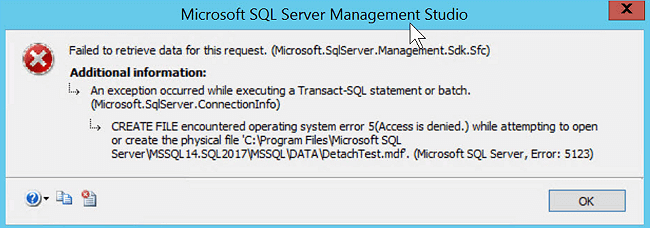
You will not be able to access the SQL Server database. Check the list of reasons that cause SQL error 5123, and if you find that your problem matches the listed reasons, read on to find the solution and fix this error:
- Database Attach Failure: Attaching and detaching database data file with several different logins.
- Access Denied: Attach a database which is placed on a different location and doesn’t have sufficient privileges to the folder directory or no proper permission to run the program folder.
Although, many experienced administrators know how to resolve the 5123 error in SQL Server. It’s still necessary to know better and more effective methods to fix and repair more SQL Server database problems. Read on, and learn how to fix SQL Server 5123 error on your own.
Manual workaround to fix MS SQL Server 5123 error
By following the below manual steps, you’ll be able to resolve the Microsoft SQL Server error 5123 quickly:
- Step 1: Run SQL Server and right-click on the MDF or NDF file that you wish to attack.
- Step 2: Select «Properties» to check the permission of .mdf or .ndf file.
- Step 3: Click the «Add» button to grant the login permission and gain full control during the login process.
Also, you can attempt «Run as Administrator» to gain permission instead of granting permission to a new user.
Recommended tools to resolve SQL Server 5123 error
If you are using MS SQL Server Management Studio (SSMS) or Transaction SQL Server (T-SQL) to configure and manage the SQL Server, you can use these two tools to resolve the 5123 error.
Also, you can turn to a third party MS SQL Recovery tool for help.
Use SSMS to fix SQL 5123 error
- Step 1: Log in to SSMS: use valid domain credentials and Windows Authentication to log in.
- Step 2: Click on «Object Explorer», select «Database».
- Step 3: Right-click on the database that you are trying to attach, and select «Attach».
- Step 4: Click «Add» when a new attach database dialog box appears.
- Step 5: Select the database, confirm the MDF and LDF files are running alright. And click «OK» to finish.
Then, you can view all attached database files in MS SQL Server again.
If the program reminds you that the MDF file is corrupted, relax, follow the link here and apply EaseUS MS SQL recovery tool to repair corrupted MDF file immediately.
Use T-SQL to resolve MS SQL 5123 error
Transaction SQL Server with its sp_attach_db stored procedure can help you easily attach all desired databases in SQL.
Here are the detail process of attaching SQL Server databse:
- sp_attach_db
- [@dbname=] ‘dbname’
- ,[@filename1=] ‘filename_n’ [ ,…16 ]
- [@dbname=] – Refers to the name of the database to be attached to the server.
- [@filename1=] – ‘filename_n’ Is the physical name, including path, of a database file
Use SQL Server recovery tool to solve MS SQL error 5123
If the above-provided methods don’t work efficiently to resolve the 5123 attach database error in SQL, you can go for a reliable SQL Server recovery tool for help. It helps you to repair corrupted MFD and NDF file in SQL Server and some other complex database corruption issues. This software enables any user to operate SQL Server repair with its clear and self-explanatory interface.
Note: Mostly, EaseUS SQL Server Recovery can always work to fix this issue. But if it fails in a rare case, you can turn to Microsoft customer support team for help.
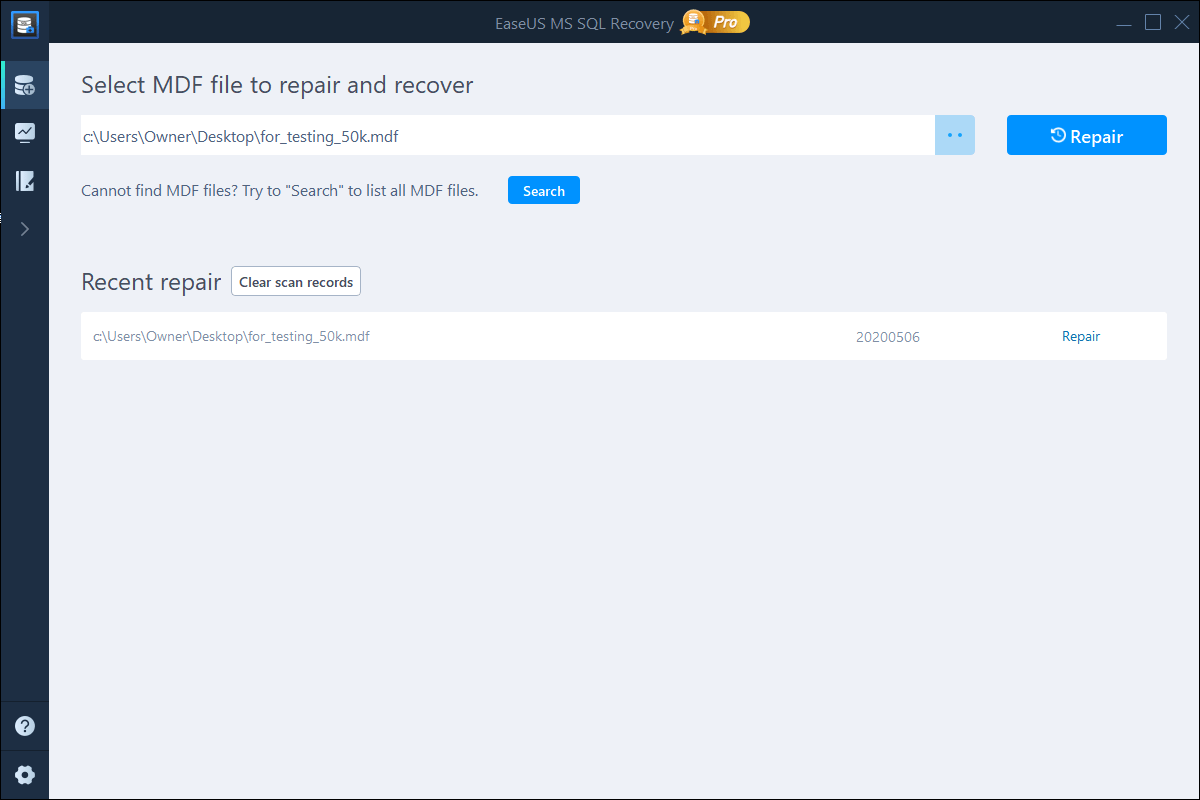
Step 1. Run EaseUS MS SQL Recovery.
Step 2. Select the MDF/NDF file: Click «Browse» or «Search” to navigate the location of your MDF or NDF file > Click «Repair».
Step 3. Select the database objects you want to recover: When the process has completed, select the database objects you want to recover and click «Export».
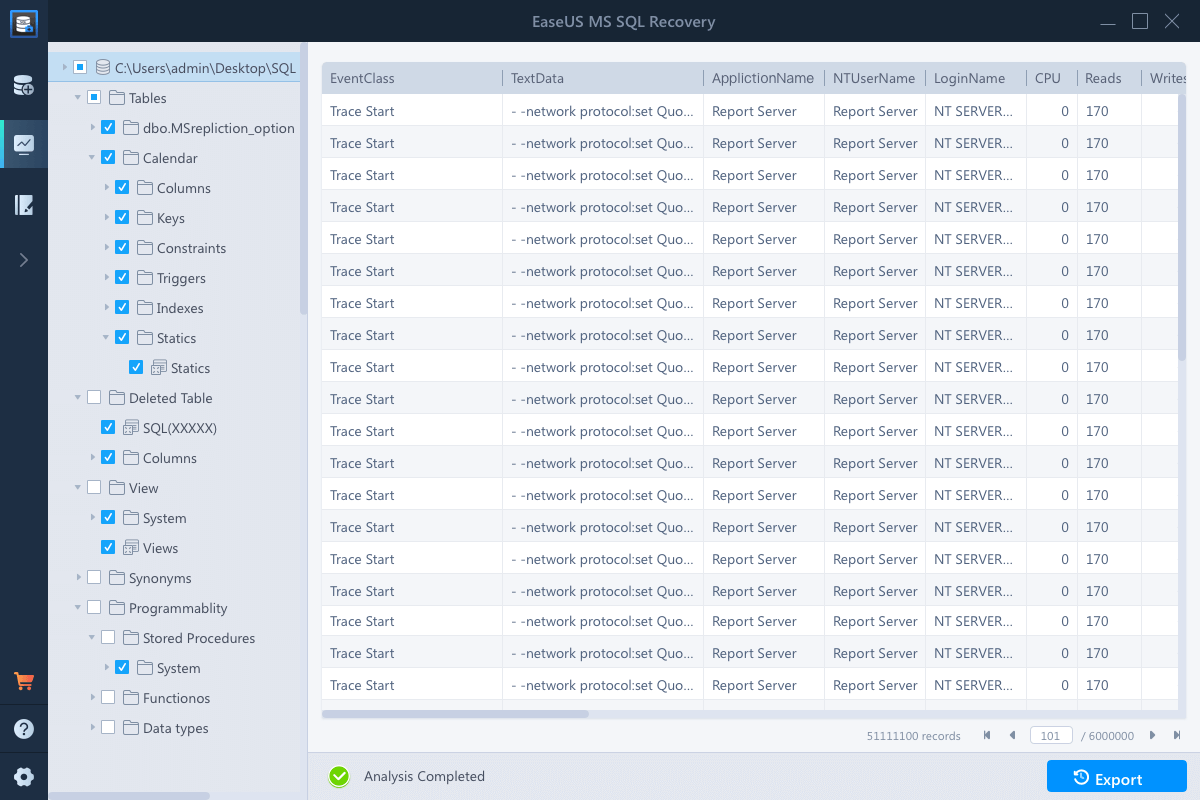
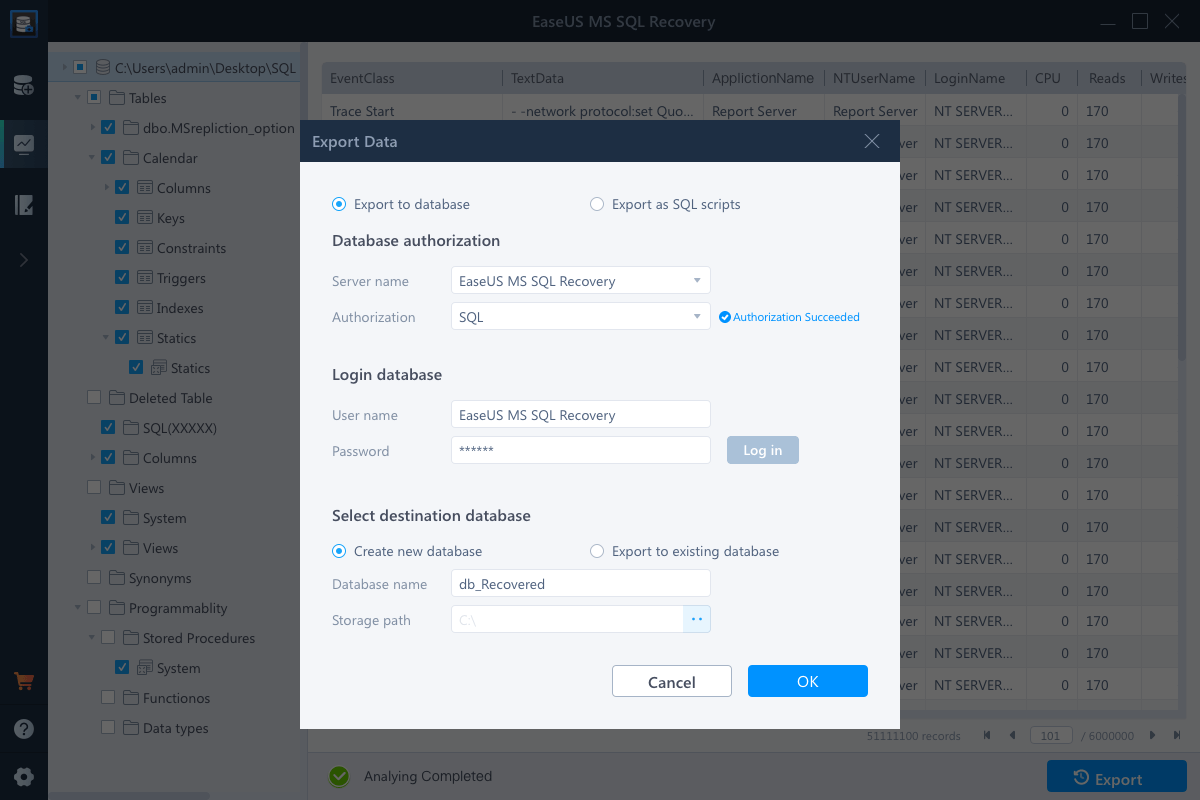
Step 4. Export the database to the database or export the selected items as SQL scripts. If you choose «Export to database», you will need to enter the required information and select the destination database, either a new one or an existing one.
Hence, we would like to recommend you always to keep this software handy. In addition to solving this error, EaseUS SQL Server Recovery can be used to rectify other SQL database problems too:
- Resolve SQL Database corruption with 823/824/825 error
- Recover deleted SQL records
- Repair MDF/NDF file
- Recover ROW and PAGE compressed data
- Free to preview the repaired database before activation
- Save the repaired file in MS SQL (MDF), HTML, XLS & CSV formats
- Support transferring the license to another system (one key for three systems)
I have two databases. Both are in the same folder. Both have, as far as I can tell, the exact same ownership and permissions. I can attach one but not the other — I get an error 5123.
For both files…
- Owner is MSSQLSERVER
Permission entries:
-
MSSQLSERVER — Full control
-
OWNER RIGHTS — Full control
-
Administrators — Full control
I reviewed the other question referenced below but could not get any of the suggestions to work given my constraints listed above. I posted what finally worked below.
asked Jun 7, 2018 at 22:17
![]()
Kevin JonesKevin Jones
691 gold badge1 silver badge6 bronze badges
9
Add your User to Permissions:
[your user] - full control

MSSQLSERVER - Full control

OWNER RIGHTS - Full control

Administrators - Full control
answered Jul 25, 2020 at 6:34
![]()
serajseraj
1491 silver badge7 bronze badges
1
All files on the OS platform are subject to access permissions. Remember that for optimal security, DENY always overrides any permissions allowed. The SQL Server database has physical files(.MDF, .NDF, and .LDF) These files just like any other files on the server is subject to access permissions.
In your scenario of SQL Server error 5123, you are attempting to attach a database file to the instance where your credentials do not have the right privileges on the file. The trick here though is that whoever initially detached the database file is automatically set as the owner and no one else.
In order to fix this, you have to give the R/W or FULL control rights to the account attempting to attach the file. Note: If there are multiple files for the database which most likely would be, you need to make sure each file security properties is set properly for the user performing the ATTACH.
You can also read this blog for further details: https://www.stellarinfo.com/blog/sql-server-2008-r2-database-error-5123/
answered Jun 27, 2018 at 21:39
![]()
I’m still not sure what is going on but I got it working without running SSMS as admin. Earlier, when I changed ownership from MSSQLSERVER to my profile, I got the same error. Then I noticed that, in the Security tab of the Properties dialog, when I selected OWNER RIGHTS in the «Group or user names» section, the listed permissions were empty for both Allow and Deny. I had been clicking Advanced and, from that view, OWNER RIGHTS had all permissions checked. This time I clicked Edit and saw that all check boxes were not set so I set all for Allow. That worked. I am not skilled in Windows security so I have no idea what is happening but I am back in business. And I still don’t understand why, when all DBs were owned by MSSQLSERVER, the one database did attach while the other two did not despite them appearing to have the same set of permissions.
answered Jun 8, 2018 at 7:57
![]()
Kevin JonesKevin Jones
691 gold badge1 silver badge6 bronze badges
Open Management Studio with administrator rights (right click, run as Administrator) and try again, in my case, I was able to solve the problem.
![]()
Baldie47
1,1585 gold badges16 silver badges45 bronze badges
answered Apr 20, 2021 at 6:56
![]()
Note that the data file extension you see depends on you version of the server.
Select the file ‘*’ to view all existing files in the location and choose the data file to attach.
answered Sep 13, 2021 at 13:52
![]()
snnprosnnpro
1932 bronze badges
5 Ways to Fix Microsoft SQL Server Error 233
| Workable Solutions | Step-by-step Troubleshooting |
|---|---|
| Fix 1. Enable TCP/IP |
Open MS SQL Server. Go to configuration tools, and then open «SQL Server Network Configuration»…Full steps |
| Fix 2. Enable Shared Memory |
Shared Memory Protocol is used for connecting SQL Server, if it is disabled, it may lead to SQL Server login failed error 233…Full steps |
| Fix 3. Enable Named Pipes Protocol |
Run MS SQL Server. Go to configuration tools, and then open «SQL Server Network Configuration»…Full steps |
| Fix 4. Check for Remote Connection |
Connect to SQL Server Instance in SSMS on a database server. Right-click on the Server instance…Full steps |
| Fix 5. Repair the MS SQL Database |
Launch EaseUS MS SQL Recovery. Select the corrupted database file. Then, click the «Repair» button…Full steps |
Overview of SQL Server Error 233
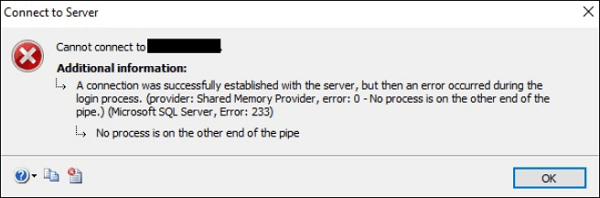
SQL Server error 233 was saying «No process is on the other end of the pipe». The error details are given as:
A connection was successfully established with the server, but then an error occurred during the login process. (provider: Shared Memory Provider, error: 0 – No process is on the other end of the pipe) (Microsoft SQL Server, Error: 233)
SQL Server Error Code 233 Causes
No process is on the other end of the pipe error 233 is often caused by two reasons:
- The client attempts to connect with only named pipes and the named pipes protocol is not enabled on the server.
- The client attempts to connect with any available protocol, but named pipes are listed before TCP in the client protocol order.
According to the two reasons above, you can fix error 233 easily.
Fix 1. Enable TCP/IP to Solve SQL Server Error 233
If the client is attempting to connect using named pipes, and the server is not configured to allow remote connections using named pipes, follow this:
Step 1. Open MS SQL Server.
Step 2. Go to configuration tools, and then open «SQL Server Network Configuration» in SQL Server Configuration Manager.
Step 3. Choose «TCP/IP» option and enable remote connections using named pipes.
If the client protocol order is attempting to connect with the named pipes protocol before trying the TCP protocol, and named pipes are not enabled on the server, solve this problem by following this:
Using SQL Server Configuration Manager on the client computer, move TCP before named pipes in the protocol order list.
Fix 2. Enable Shared Memory
Shared Memory Protocol is used for connecting SQL Server, if it is disabled, it may lead to SQL Server login failed error 233.
Step 1. Open MS SQL Server in your system.
Step 2. Choose «Configuration Tools» and «SQL Server Network Configuration».
Step 3. Then, find and right-click «Shared Memory». Choose «Enable».
Fix 3. Enable Named Pipes Protocol to Solve SQL Error 233
SQL Server error 233 occurs because the SQL Server client cannot connect to the server and is not configured to accept remote connections. To fix this issue, except for enabling Shared Memory and TCP/IP, we still need to activate Named Pipe protocols with SQL Server Configuration Manager tool.
Step 1. Run MS SQL Server.
Step 2. Go to configuration tools, and then open «SQL Server Network Configuration» in SQL Server Configuration Manager.
Step 3. Launch the Properties windows of Named Pipes Protocol then click «Enable».
Step 4. Click «Apply» and «OK» to apply this change on SQL Server.
You have required to restart SQL Server services from the SQL Server Configuration Manager. Once the server is online, try to reconnect to your SQL Server instance. Then, the error 233 may not appear and you will be able to make a successful database connection.
Fix 4. Check for Remote Connection
After these workarounds, if you are still facing Microsoft SQL Server error 233 no process is on the other end of the pipe, then you will need to allow remote connection for SQL Server.
Step 1. Connect to SQL Server Instance in SSMS locally on a database server.
Step 2. Right-click on the Server instance name and choose «Properties».
Step 3. At the left tab, select «connection» then check the option «Allow remote connections to this server».
Fix 5. Repair Corrupted MS SQL Database to Resolve SQL Error 233
If you are still facing the same issue, the cause might be the database itself. MS SQL Server is vulnerable to different threats and errors (823/824/825). Repairing the database can do you a favor. EaseUS MS SQL Recovery is a very professional and reliable SQL repair tool. It can recover database components (tables, triggers, indexes, keys, rules, and stored procedures) as well as recover deleted records from the SQL database. It supports MS SQL Server 2016, 2014, 2012, 2008, and older versions. Follow the details below and fix your database error.
Step 1: Select the corrupted database for recovery
- Launch EaseUS MS SQL Recovery.
- Select the corrupted database file by clicking «Browse» (the two dots) or «Search».
- After selecting the file, click the «Repair» button to start the Analyzing process.
Note: To use this software, you need to stop the SQL Server service.
Step 2: Repair the corrupted database
- The software displays all the recoverable items in a tree-like structure. The items are shown in a left pane.
- Select the desired component to be recovered. From the window, click the «Export» button.
Step 3: Export to the database or as scripts
- Choose to export the database objects to database or export the items as scripts
- If you choose «Export to database», enter the information required and choose the target database.
- A window appears up asking you to provide credentials to connect to the server and the destination to save the recovered items. In order to begin the repairing process, click «OK».
Note: Before clicking «OK», you need to restart the SQL Server service.
Though the EaseUS SQL repair tool should succeed in resolving the error, in the rare event that it can’t, you should then contact Microsoft customer support for professional assistance.
Conclusion
In this article, we have discussed SQL Server error 233 no process is on the other end of the pipe in detail, including error explanation, causes, and all the feasible solutions. If you run into this error, don’t panic, utilize any methods above, i.e. enable Shared Memory, TCP/IP, and Named Pipe protocols to let SQL Server client connect to the server or use a reliable SQL recovery software to restore (.mdf and.ndf) files, fix database log files, or recover corrupted objects.
We hope this tutorial can help you to resolve the SQL login failed error 233.