«ERR1», «ERR2», «ERR3», «ERR5», «HI», «LO»
Следующие ошибки можно увидеть на всех приборах Microlife для измерения артериального давления.
Замечание! «ERR4» на приборах не показывается!
Описание ошибок:
1. Если у Вас на тонометре выдается ошибка «ERR1» — это означает следующее:
!! В инструкции — Импульсные сигналы на манжете слишком слабые. Повторно наложите манжету и повторите измерение.
- у пациента атеросклероз, который сопровождающееся отложением холестерина и некоторых фракций липопротеидов в просвете сосудов. Отложения формируются в виде атероматозных бляшек. Последующее разрастание в них соединительной ткани (склероз), и кальциноз стенки сосуда приводят к деформации и сужению просвета вплоть до обтурации (закупорки сосуда) (необходимо обратиться к врачу);
- сильно затянута манжета на плече (необходимо одеть манжету с интервалом 2 пальца)
2. Если у Вас на тонометре выдается ошибка «ERR2» — это означает следующее:
!! В инструкции — Во время измерения манжета зафиксировала ошибочные сигналы, вызванные, например, движением или сокращением мышц. Повторите измерение, держа руку неподвижно.
- у пациента Боле́знь Паркинсо́на- медленно прогрессирующее хроническое неврологическое заболевание, характерное для лиц старшей возрастной группы. Характерные симптомы- мышечная твердость/неподатливость, гипокинезия/ непроизвольные быстрые, ритмичные колебательные движения частей тела;
- Пациент двигался в процессе измерения (необходимо сидеть расслаблено и неподвижно).
3. Если у Вас на тонометре выдается ошибка «ERR3» — это означает следующее:
!! В инструкции — Манжета не может быть накачана до необходимого уровня давления. Возможно, имеет место утечка. Проверьте, что манжета подсоединена правильно и не слишком свободна. При необходимости замените батареи. Повторите измерение.
- зажат или перекручен кабель (необходимо распутать и проверить чтобы нигде не был зажат);
- когда надулась манжета при измерении, пациент напрягает руку, и давление невозможно измерить (необходимо расслабить руку и самому расслабиться при измерении, манжету одеть на расстоянии двух пальцев);
- манжета болтается свободно (манжету одеть на расстоянии двух пальцев);
- манжета спускает (заменить манжету);
- сломался коннектор (заменить коннектор).
4. Если у Вас на тонометре выдается ошибка «ERR5» — это означает следующее:
!! В инструкции — Сигналы измерения неточны, из-за чего отображение результатов невозможно. Прочтите рекомендации для получения надежных результатов измерений и затем повторите измерение.
- измерения меньше, чем 12 мм.рт.ст.;
- измеренное значение больше чем 183 мм.рт.ст.
5. Если у Вас на тонометре выдается ошибка «ERR6» (Для приборов с технологией AFIB/MAM) это означает следующее:
!! В инструкции — Во время измерения произошло слишком много ошибок в режиме AFIB/MAM, поэтому получение окончательного результата невозможно. Прочтите рекомендации для получения надежных результатов измерений и затем повторите измерение.
6. Если у Вас на тонометре выдается ошибка «HI» — это означает следующее:
!! В инструкции — отсутствует
- давление в манжете слишком высокое (свыше 299 мм рт. ст.);
- пульс слишком высокий (свыше 200 ударов в минуту).
Отдохните в течение 5 минут и повторите измерение.
7. Если у Вас на тонометре выдается ошибка «LO» — это означает следующее:
!! В инструкции — отсутствует
- пульс слишком низкий (менее 40 ударов в минуту).
Повторите измерение.
5. Data Memory
At the end of each measurement, this device automatically stores
the result.
Viewing the stored values
Press the M-button 3 briefly, when the device is switched off. The
display first shows the last stored result.
Pressing the M-button again displays the previous value. Pressing
the M-button repeatedly enables you to move from one stored
value to another.
Memory full
When the memory has stored 14 results, the memory is full.
From this point onwards, a new measured value is stored
by overwriting the oldest value.
Clearing all values
All memory data are cleared when batteries are taken out
of the device.
6. Battery Indicator and Battery change
Low battery
When the batteries are approximately ¾ empty the battery symbol
AO will flash as soon as the device is switched on (partly filled
battery displayed). Although the device will continue to measure
reliably, you should obtain replacement batteries.
Flat battery – replacement
When the batteries are flat, the battery symbol AO will flash as soon
as the device is switched on (flat battery displayed). You cannot
take any further measurements and must replace the batteries.
1. Open the battery compartment 7 at the back of the device.
2. Replace the batteries – ensure correct polarity as shown by the
symbols in the compartment.
Which batteries and which procedure?
Use 2 new, long-life 1.5 V, size AAA alkaline batteries.
Do not use batteries beyond their date of expiry.
Remove batteries if the device is not going to be used for a
prolonged period.
Using rechargeable batteries
You can also operate this device using rechargeable batteries.
Only use «NiMH» type reusable batteries.
Batteries must be removed and recharged when the flat
battery symbol appears. They should not remain inside the
4
device as they may become damaged (total discharge as a
result of low use of the device, even when switched off).
Always remove the rechargeable batteries if you do not
intend to use the device for a week or more.
Batteries cannot be charged in the blood pressure monitor.
Recharge batteries in an external charger and observe the
information regarding charging, care and durability.
If an error occurs during the measurement, the measurement is
interrupted and an error message, e.g. «ERR 3», is displayed.
Error
Description Potential cause and remedy
«ERR 1» Signal too
The pulse signals on the cuff are too weak.
weak
Re-position the cuff and repeat the
measurement.*
«ERR 2» Error signal During the measurement, error signals were
detected by the cuff, caused for instance by
movement or muscle tension. Repeat the
measurement, keeping your arm still.
«ERR 3» No pres-
An adequate pressure cannot be gener-
sure in the
ated in the cuff. A leak may have occurred.
cuff
Check that cuff and pump ball are correctly
connected and that the cuff is not fitted too
loosely. Replace the batteries if necessary.
Repeat the measurement.
«ERR 5» Abnormal
The measuring signals are inaccurate and
result
no result can therefore be displayed. Read
through the checklist for performing reli-
able measurements and then repeat the
measurement.*
«HI»
Pulse or
The pressure in the cuff is too high (over
cuff pres-
300 mmHg) OR the pulse is too high (over
sure too
200 beats per minute). Relax for 5 minutes
high
and repeat the measurement.*
«LO»
Pulse too
The pulse is too low (less than 40 beats per
low
minute). Repeat the measurement.*
* Please consult your doctor, if this or any other problem occurs
repeatedly.
If you think the results are unusual, please read through the
information in «Section 1.» carefully.
«ERR1», «ERR2», «ERR3», «ERR5», «HI», «LO»
Следующие ошибки можно увидеть на всех приборах Microlife для измерения артериального давления.
Замечание! «ERR4» на приборах не показывается!
Описание ошибок:
1. Если у Вас на тонометре выдается ошибка «ERR1» — это означает следующее:
!! В инструкции — Импульсные сигналы на манжете слишком слабые. Повторно наложите манжету и повторите измерение.
- у пациента атеросклероз, который сопровождающееся отложением холестерина и некоторых фракций липопротеидов в просвете сосудов. Отложения формируются в виде атероматозных бляшек. Последующее разрастание в них соединительной ткани (склероз), и кальциноз стенки сосуда приводят к деформации и сужению просвета вплоть до обтурации (закупорки сосуда) (необходимо обратиться к врачу);
- сильно затянута манжета на плече (необходимо одеть манжету с интервалом 2 пальца)
2. Если у Вас на тонометре выдается ошибка «ERR2» — это означает следующее:
!! В инструкции — Во время измерения манжета зафиксировала ошибочные сигналы, вызванные, например, движением или сокращением мышц. Повторите измерение, держа руку неподвижно.
- у пациента Боле́знь Паркинсо́на- медленно прогрессирующее хроническое неврологическое заболевание, характерное для лиц старшей возрастной группы. Характерные симптомы- мышечная твердость/неподатливость, гипокинезия/ непроизвольные быстрые, ритмичные колебательные движения частей тела;
- Пациент двигался в процессе измерения (необходимо сидеть расслаблено и неподвижно).
3. Если у Вас на тонометре выдается ошибка «ERR3» — это означает следующее:
!! В инструкции — Манжета не может быть накачана до необходимого уровня давления. Возможно, имеет место утечка. Проверьте, что манжета подсоединена правильно и не слишком свободна. При необходимости замените батареи. Повторите измерение.
- зажат или перекручен кабель (необходимо распутать и проверить чтобы нигде не был зажат);
- когда надулась манжета при измерении, пациент напрягает руку, и давление невозможно измерить (необходимо расслабить руку и самому расслабиться при измерении, манжету одеть на расстоянии двух пальцев);
- манжета болтается свободно (манжету одеть на расстоянии двух пальцев);
- манжета спускает (заменить манжету);
- сломался коннектор (заменить коннектор).
4. Если у Вас на тонометре выдается ошибка «ERR5» — это означает следующее:
!! В инструкции — Сигналы измерения неточны, из-за чего отображение результатов невозможно. Прочтите рекомендации для получения надежных результатов измерений и затем повторите измерение.
- измерения меньше, чем 12 мм.рт.ст.;
- измеренное значение больше чем 183 мм.рт.ст.
5. Если у Вас на тонометре выдается ошибка «ERR6» (Для приборов с технологией AFIB/MAM) это означает следующее:
!! В инструкции — Во время измерения произошло слишком много ошибок в режиме AFIB/MAM, поэтому получение окончательного результата невозможно. Прочтите рекомендации для получения надежных результатов измерений и затем повторите измерение.
6. Если у Вас на тонометре выдается ошибка «HI» — это означает следующее:
!! В инструкции — отсутствует
- давление в манжете слишком высокое (свыше 299 мм рт. ст.);
- пульс слишком высокий (свыше 200 ударов в минуту).
Отдохните в течение 5 минут и повторите измерение.
7. Если у Вас на тонометре выдается ошибка «LO» — это означает следующее:
!! В инструкции — отсутствует
- пульс слишком низкий (менее 40 ударов в минуту).
Повторите измерение.
If an error occurs during the measurement, the measurement is
interrupted and an error message, e.g. «ERR 3», is displayed.
Error
Description Potential cause and remedy
«ERR 1» Signal too
The pulse signals on the cuff are too weak.
weak
Re-position the cuff and repeat the
measurement.*
«ERR 2» Error signal During the measurement, error signals
were detected by the cuff, caused for
instance by movement or muscle tension.
Repeat the measurement, keeping your
arm still.
«ERR 3» No pres-
An adequate pressure cannot be gener-
sure in the
ated in the cuff. A leak may have occurred.
cuff
Check that cuff and pump ball are correctly
connected and that the cuff is not fitted too
loosely. Replace the batteries if neces-
sary. Repeat the measurement.
«ERR 5» Abnormal
The measuring signals are inaccurate and
result
no result can therefore be displayed. Read
through the checklist for performing reli-
able measurements and then repeat the
measurement.*
«HI»
Pulse or cuff
The pressure in the cuff is too high (over
pressure
300 mmHg) OR the pulse is too high (over
too high
200 beats per minute). Relax for 5 minutes
and repeat the measurement.*
«LO»
Pulse too
The pulse is too low (less than 40 beats
low
per minute). Repeat the measurement.*
* Please consult your doctor, if this or any other problem occurs
repeatedly.
If you think the results are unusual, please read through the
information in «Section 1.» carefully.
9. Safety, Care, Accuracy Test and Disposal
Safety and protection
• This device may only be used for the purposes described in
these instructions. The manufacturer cannot be held liable for
damage caused by incorrect application.
BP A50
• This device comprises sensitive components and must be
treated with caution. Observe the storage and operating condi-
tions described in the «Technical Specifications» section.
• Protect it from:
— water and moisture
— extreme temperatures
— impact and dropping
— contamination and dust
— direct sunlight
— heat and cold
• The cuffs are sensitive and must be handled with care.
• Do not exchange or use any other kind of cuff for measuring
with this device.
• Only pump up the cuff once fitted.
• Do not use this device close to strong electromagnetic fields
such as mobile telephones or radio installations.
• Do not use this device if you think it is damaged or notice
anything unusual.
• Never open this device.
• If the device is not going to be used for a prolonged period the
batteries should be removed.
• Read the additional safety information provided within the indi-
vidual sections of this instruction manual.
Ensure that children do not use this device unsupervised;
some parts are small enough to be swallowed.
Device care
Clean the device only with a soft, dry cloth.
Cleaning the cuff
Carefully remove spots on the cuff with a damp cloth and soapsuds.
WARNING: Do not wash the cuff in a washing machine or
dishwasher!
Accuracy test
We recommend this device is tested for accuracy every 2 years or
after mechanical impact (e.g. being dropped). Please contact your
local Microlife-Service to arrange the test (see foreword).
Disposal
Batteries and electronic devices must be disposed of in
accordance with the locally applicable regulations, not with
domestic waste.
EN
5

5
BP A50
EN
7. Error Messages
If an error occurs during the measurement, the measurement is
interrupted and an error message, e.g. «ERR 3», is displayed.
* Please consult your doctor, if this or any other problem occurs repeat-
edly.
8. Safety, Care, Accuracy Test and Disposal
ƽ
Safety and protection
Instrument care
Clean the instrument only with a soft, dry cloth.
Accuracy test
We recommend this instrument is tested for accuracy every
2 years or after mechanical impact (e.g. being dropped). Please
contact Microlife-Service to arrange the test (see foreword).
)
Batteries must be removed and recharged when the flat
battery symbol appears. They should not remain inside the
instrument as they may become damaged (total discharge
as a result of low use of the instrument, even when
switched off).
)
Always remove the rechargeable batteries if you do not
intend to use the instrument for a week or more.
)
Batteries cannot be charged in the blood pressure monitor.
Recharge batteries in an external charger and observe the
information regarding charging, care and durability.
Error
Description Potential cause and remedy
«ERR 1» Signal too
weak
The pulse signals on the cuff are too weak.
Re-position the cuff and repeat the measure-
ment.*
«ERR 2» Error signal
During the measurement, error signals
were detected by the cuff, caused for
instance by movement or muscle tension.
Repeat the measurement, keeping your
arm still.
«ERR 3» No pressure
in the cuff
An adequate pressure cannot be gener-
ated in the cuff. A leak may have occurred.
Check that cuff and pump ball are correctly
connected and that the cuff is not fitted too
loosely. Replace the batteries if necessary.
Repeat the measurement.
«ERR 5» Abnormal
result
The measuring signals are inaccurate and
no result can therefore be displayed. Read
through the checklist for performing reliable
measurements and then repeat the
measurement.*
«HI»
Pulse or cuff
pressure too
high
The pressure in the cuff is too high (over
300 mmHg) OR the pulse is too high (over
200 beats per minute). Relax for 5 minutes
and repeat the measurement.*
«LO»
Pulse too
low
The pulse is too low (less than 40 beats per
minute). Repeat the measurement.*
)
If you think the results are unusual, please read through the
information in «Section 1.» carefully.
• This instrument may be used only for the purpose described in
this booklet. The manufacturer cannot be held liable for damage
caused by incorrect application.
• This instrument comprises sensitive components and must be
treated with caution. Observe the storage and operating condi-
tions described in the «Technical Specifications» section!
• Protect it from:
− water and moisture
− extreme temperatures
− impact and dropping
− contamination and dust
− direct sunlight
− heat and cold
• The cuffs are sensitive and must be handled with care.
• Only pump up the cuff once fitted.
• Do not use the instrument close to strong electromagnetic fields
such as mobile telephones or radio installations.
• Do not use the instrument if you think it is damaged or notice
anything unusual.
• Never open the instrument.
• If the instrument is not going to be used for a prolonged period
the batteries should be removed.
• Read the additional safety instructions in the individual sections
of this booklet.
Ensure that children do not use the instrument unsuper-
vised; some parts are small enough to be swallowed.
23 страницы подробных инструкций и пользовательских руководств по эксплуатации
 04:55
04:55
Измеритель артериального давления Микролайф модель ВР N1 Basic
 02:27
02:27
Тонометр полуавтоматический на плечо Microlife BP A50 (Микролайф БП А50)
 02:36
02:36
Измеритель артериального давления Microlife ВР A 50 Плюс полуавтоматический
 02:53
02:53
Методика измерения давления полуавтоматическим тонометром. На примере Microlife A50
 19:15
19:15
Ремонт тонометра Microlife BP A 50 хаотичность показаний.
 03:23
03:23
Tensiometrul Microlife BP A50
 05:40
05:40
Ремонт тонометра Microlife BP А 50 выдаёт ошибку.
Europe / Middle-East / Africa
Microlife AG
Espenstrasse 139
9443 Widnau / Switzerland
Tel. +41 / 71 727 70 30
Fax +41 / 71 727 70 39
Email admin@microlife.ch
www.microlife.com
Asia
Microlife Corporation.
9F, 431, RuiGang Road, NeiHu
Taipei, 114, Taiwan, R.O.C.
Tel. 886 2 8797-1288
Fax
.
886 2 8797-1283
Email service@microlife.com.tw
www.microlife.com
North / Central / South America
Microlife USA, Inc.
1617 Gulf to Bay Blvd., 2nd Floor Ste A
Clearwater, FL 33755 / USA
Tel. +1 727 442 5353
Fax +1 727 442 5377
Email msa@microlifeusa.com
www.microlife.com
IB BP A
50 Var5 4011
Microlife BP A50
EN
Ä 1
LV
Ä 8
LT
Ä 14
EE
Ä 20
RU
Д 26

AL AT
Microlife BP A50
Guarantee Card
BP A50
Name of Purchaser / Nom de l’acheteur / Naam koper / Inköparens
namn / Ostajan nimi /
Forhandlers navn / Kjøpers navn / Pircēja
vārds / Pirkėjo pavardė / Ostja nimi / Ф.И.О. покупателя / Name
des Käufers
Serial Number / Numéro de série / Serienummer / Serie-
nummer / Sarjanumero / Serienummer / Serienummer /
Sērijas
numurs / Serijos numeris / Seerianumber / Серийный номер /
Serien-Nr.
Date of Purchase / Date d’achat / Datum van aankoop / Inköpsdatum
/ Ostopäivämäärä /
Købsdato / Kjøpsdato / Legādes datums /
Pardavimo data / Ostukuupäev / Дата покупки / Kaufdatum
Specialist Dealer / Revendeur / Specialist Dealer / Återförsäljare /
Alan kauppias / Specialforhandler / Spesialist forhandler /
Speciālists — pārstāvis / Pardavusi įstaiga / Ametlik müügiesindaja /
Специализированный дилер / Fachhändler

1
BP A50
EN
Display
Dear Customer,
Your new Microlife blood pressure monitor is a reliable medical
instrument for taking measurements on the upper arm. It is simple
to use, accurate and comes highly recommended for blood pres-
sure monitoring in your home. This instrument was developed in
collaboration with physicians and clinical tests proving its
measurement accuracy to be very high.*
Please read through these instructions carefully so that you under-
stand all functions and safety information. We want you to be
happy with your Microlife product. If you have any questions, prob-
lems or want to order spare parts, please contact Microlife-
Customer Service. Your dealer or pharmacy will be able to give you
the address of the Microlife dealer in your country. Alternatively,
visit the Internet at www.microlife.com where you will find a
wealth of invaluable information on our products.
Stay healthy – Microlife AG!
* This instrument uses the same measuring technology as the
«BP 3BTO-H» model tested according to the protocol of the Euro-
pean Society for Hypertension (ESH).
Microlife BP A50
EN
1 ON/OFF Button
2 Display
3 M-Button (Memory)
4 Cuff Socket
5 Pump Ball Socket
6 Quick-acting Discharge Valve
7 Battery Compartment
8 Cuff
9 Cuff Connector
AT Pump Ball
AK Pump Ball Connector
AL Memory Number
AM Heart Arrhythmia Indicator
AN Pulse Rate
AO Battery Display
AP Stored Value
AQ Systolic Value
AR Diastolic Value
AS Pulse
BT Air Pump-up
BK Air Discharge
Read the instructions carefully before using this device.
Type BF applied part

2
Table of Contents
1. Important Facts about Blood Pressure and Self-Measure-
ment
• How do I evaluate my blood pressure?
2. Using the Instrument for the First Time
• Inserting the batteries
• Selecting the correct cuff
• Connecting the pump ball
3. Taking a Blood Pressure Measurement using this
Instrument
4. Appearance of the Heart Arrhythmia Indicator for early
Detection
5. Data Memory
• Viewing the stored values
• Memory full
• Clearing all values
6. Battery Indicator and Battery change
• Low battery
• Flat battery – replacement
• Which batteries and which procedure?
• Using rechargeable batteries
7. Error Messages
8. Safety, Care, Accuracy Test and Disposal
• Safety and protection
• Instrument care
• Accuracy test
• Disposal
9. Guarantee
10. Technical Specifications
Guarantee Card (see Back Cover)
1. Important Facts about Blood Pressure and Self-
Measurement
• Blood pressure is the pressure of the blood flowing in the
arteries generated by the pumping of the heart. Two values, the
systolic (upper) value and the diastolic (lower) value, are
always measured.
• The instrument also indicates the pulse rate (the number of
times the heart beats in a minute).
• Permanently high blood pressure values can damage
your health and must be treated by your doctor!
• Always discuss your values with your doctor and tell him/her if
you have noticed anything unusual or feel unsure. Never rely
on single blood pressure readings.
• Enter your readings in the enclosed blood pressure diary. This
will give your doctor a quick overview.
• There are many causes of excessively high blood pressure
values. Your doctor will explain them in more detail and offer
treatment where appropriate. Besides medication, relaxation
techniques, weight loss and exercise can also lower your blood
pressure.
• Under no circumstances should you alter the dosages of
any drugs prescribed by your doctor!
• Depending on physical exertion and condition, blood pressure is
subject to wide fluctuations as the day progresses. You should
therefore take your measurements in the same quiet
conditions and when you feel relaxed! Take at least two
measurements per day, one in the morning and one in the
evening.
• It is quite normal for two measurements taken in quick succes-
sion to produce significantly different results.
• Deviations between measurements taken by your doctor or in
the pharmacy and those taken at home are quite normal, as
these situations are completely different.
• Several measurements provide a much clearer picture than
just one single measurement.
• Leave a small break of at least 15 seconds between two
measurements.
• If you are pregnant, you should monitor your blood pressure
very closely as it can change drastically during this time!

How do i evaluate my blood pressure, Using the instrument for the first time, Inserting the batteries
Selecting the correct cuff, Connecting the pump ball
- Изображение
- Текст
3
BP A50
EN
How do I evaluate my blood pressure?
The higher value is the one that determines the evaluation.
Example: a readout value between 150/85 or 120/98 mmHg indi-
cates «blood pressure too high».
2. Using the Instrument for the First Time
Inserting the batteries
After you have unpacked your device, first insert the batteries. The
battery compartment
7 is at the back of the device. Insert the
batteries (2 x size AAA 1,5 V), thereby observing the indicated
polarity.
Selecting the correct cuff
Microlife offers 3 different cuff sizes: S, M and L. Select the cuff size
to match the circumference of your upper arms (measured by close
fitting in the centre of the upper arm). M is the correct size for most
people.
Connecting the pump ball
Connect the pump ball
AT to the instrument by firmly inserting the
connector
AK into the pump ball socket 5.
3. Taking a Blood Pressure Measurement using this
Instrument
• If you suffer from an irregular heartbeat (arrhythmia, see
«Section 4.»), measurements taken with this instrument should
only be evaluated after consultation with your doctor.
• The pulse display is not suitable for checking the
frequency of heart pacemakers!
Table for classifying blood pressure values in adults in accordance
with the World Health Organisation (WHO) in 2003. Data in mmHg.
Range
Systolic Diastolic Recommendation
blood pressure too low
z 100
z 60
Consult your doctor
1. blood pressure optimum 100 — 120 60 — 80
Self-check
2. blood pressure normal
120 — 130 80 — 85
Self-check
3. blood pressure slightly
high
130 — 140 85 — 90
Consult your doctor
4. blood pressure too high 140 — 160 90 — 100
Seek medical advice
5. blood pressure far too
high
160 — 180 100 — 110 Seek medical advice
6. blood pressure danger-
ously high
180
y
110
y
Urgently seek
medical advice!
Cuff size
for circumference of upper arm
S
17 — 22 cm (6.75 — 8.75 inches)
M
22 — 32 cm (8.75 — 12.5 inches)
L
32 — 42 cm (12.5 — 16.5 inches)
)
Only use Microlife cuffs.
X
Contact Microlife Service if the enclosed cuff
8 does not fit.
X
Connect the cuff to the instrument by inserting the cuff
connector
9 into the cuff socket 4 as far as it will go.
Checklist for taking a reliable measurement
1.
Avoid activity, eating or smoking immediately before the
measurement.
2.
Sit down for at least 5 minutes before the measurement and
relax.
3.
Always measure on the same arm (normally left).
4.
Remove close-fitting garments from the upper arm. To avoid
constriction, shirt sleeves should not be rolled up — they do
not interfere with the cuff if they are laid flat.
5.
Always ensure that the cuff is positioned correctly, as shown
in the pictures illustrated on the short instruction card.
• Fit the cuff closely, but not too tight.
• Make sure that the cuff is 2 cm (0.75 inch) above your
elbow with the tube on the inside of your arm.
• Support your arm so it is relaxed.
• Ensure that the cuff is at the same height as your heart.
6.
Switch on the instrument and wait until «0» appears in the
display and the arrow «
S» BT starts to flash.
7.
Take the pump ball in your free hand (the arm you are not
measu-ring from) and pump up the cuff. Watch the pressure
indication in the display and pump approx. 40 mmHg higher
than the expected systolic value (the upper value). If you have
not pumped enough, a flashing arrow «
S» BT will appear
telling you to pump higher.
8.
After pumping, the measurement is taken automatically.
Relax, do not move and do not tense your arm muscles until
the measu-rement result is displayed. Breathe normally and
do not talk.

Data memory, Viewing the stored values, Memory full
Clearing all values, Battery indicator and battery change, Low battery, Flat battery — replacement, Which batteries and which procedure, Using rechargeable batteries
- Изображение
- Текст
4
4. Appearance of the Heart Arrhythmia Indicator for
early Detection
This symbol
AM indicates that certain pulse irregularities were
detected during the measurement. In this case, the result may
deviate from your normal blood pressure – repeat the measure-
ment. In most cases, this is no cause for concern. However, if the
symbol appears on a regular basis (e.g. several times a week with
measurements taken daily) we advise you to tell your doctor.
Please show your doctor the following explanation:
5. Data Memory
At the end of each measurement, this instrument automatically
stores the result.
Viewing the stored values
Press the M-button
3 briefly, when the instrument is switched
off. The display first shows the last stored result.
Pressing the M-button again displays the previous value. Pressing
the M-button repeatedly enables you to move from one stored
value to another.
Memory full
Clearing all values
6. Battery Indicator and Battery change
Low battery
When the batteries are approximately ¾ empty the battery symbol
AO will flash as soon as the instrument is switched on (partly filled
battery displayed). Although the instrument will continue to
measure reliably, you should obtain replacement batteries.
Flat battery – replacement
When the batteries are flat, the battery symbol
AO will flash as
soon as the instrument is switched on (flat battery displayed). You
cannot take any further measurements and must replace the
batteries.
Which batteries and which procedure?
Using rechargeable batteries
You can also operate this instrument using rechargeable batteries.
9.
During the measurement, the heart symbol
AN flashes in the
display and a beep sounds every time a heartbeat is detected.
10. The result, comprising the systolic
AQ and the diastolic AR
blood pressure and the pulse
AS is displayed and longer beep
is heard. Note also the explanations on further displays in this
booklet.
11. When the measurement has finished, press the quick-acting
discharge valve
6 in order to release any remaining air in
the cuff. Remove the cuff.
12. Switch off the instrument. (The monitor does switch off auto-
matically after approx. 1 min.).
)
You can interrupt the measurement at any time by pressing
the quick-acting discharge valve
6 (e.g. if you feel uneasy
or notice an unpleasant pressure sensation).
Information for the doctor on frequent appearance of the
Arrhythmia indicator
This instrument is an oscillometric blood pressure monitor that
also analyses pulse frequency during measurement. The instru-
ment is clinically tested.
The arrhythmia symbol is displayed after the measurement, if pulse
irregularities occur during measurement. If the symbol appears
more frequently (e.g. several times per week on measurements
performed daily) we recommend the patient to seek medical advice.
The instrument does not replace a cardiac examination, but
serves to detect pulse irregularities at an early stage.
ƽ
When the memory has stored 14 results, the memory is full.
From this point onwards, a new measured value is stored by
overwriting the oldest value.
ƽ
All memory data are cleared when batteries are taken out
of the instrument.
1. Open the battery compartment
7 at the back of the instrument.
2. Replace the batteries – ensure correct polarity as shown by the
symbols in the compartment.
)
Use 2 new, long-life 1.5V, size AAA batteries.
)
Do not use batteries beyond their date of expiry.
)
Remove batteries if the instrument is not going to be used
for a prolonged period.
)
Only use «NiMH» type reusable batteries.

Error messages, Safety, care, accuracy test and disposal, M safety and protection
Instrument care, Accuracy test
- Изображение
- Текст
5
BP A50
EN
7. Error Messages
If an error occurs during the measurement, the measurement is
interrupted and an error message, e.g. «ERR 3», is displayed.
* Please consult your doctor, if this or any other problem occurs repeat-
edly.
8. Safety, Care, Accuracy Test and Disposal
ƽ
Safety and protection
Instrument care
Clean the instrument only with a soft, dry cloth.
Accuracy test
We recommend this instrument is tested for accuracy every
2 years or after mechanical impact (e.g. being dropped). Please
contact Microlife-Service to arrange the test (see foreword).
)
Batteries must be removed and recharged when the flat
battery symbol appears. They should not remain inside the
instrument as they may become damaged (total discharge
as a result of low use of the instrument, even when
switched off).
)
Always remove the rechargeable batteries if you do not
intend to use the instrument for a week or more.
)
Batteries cannot be charged in the blood pressure monitor.
Recharge batteries in an external charger and observe the
information regarding charging, care and durability.
Error
Description Potential cause and remedy
«ERR 1» Signal too
weak
The pulse signals on the cuff are too weak.
Re-position the cuff and repeat the measure-
ment.*
«ERR 2» Error signal
During the measurement, error signals
were detected by the cuff, caused for
instance by movement or muscle tension.
Repeat the measurement, keeping your
arm still.
«ERR 3» No pressure
in the cuff
An adequate pressure cannot be gener-
ated in the cuff. A leak may have occurred.
Check that cuff and pump ball are correctly
connected and that the cuff is not fitted too
loosely. Replace the batteries if necessary.
Repeat the measurement.
«ERR 5» Abnormal
result
The measuring signals are inaccurate and
no result can therefore be displayed. Read
through the checklist for performing reliable
measurements and then repeat the
measurement.*
«HI»
Pulse or cuff
pressure too
high
The pressure in the cuff is too high (over
300 mmHg) OR the pulse is too high (over
200 beats per minute). Relax for 5 minutes
and repeat the measurement.*
«LO»
Pulse too
low
The pulse is too low (less than 40 beats per
minute). Repeat the measurement.*
)
If you think the results are unusual, please read through the
information in «Section 1.» carefully.
• This instrument may be used only for the purpose described in
this booklet. The manufacturer cannot be held liable for damage
caused by incorrect application.
• This instrument comprises sensitive components and must be
treated with caution. Observe the storage and operating condi-
tions described in the «Technical Specifications» section!
• Protect it from:
− water and moisture
− extreme temperatures
− impact and dropping
− contamination and dust
− direct sunlight
− heat and cold
• The cuffs are sensitive and must be handled with care.
• Only pump up the cuff once fitted.
• Do not use the instrument close to strong electromagnetic fields
such as mobile telephones or radio installations.
• Do not use the instrument if you think it is damaged or notice
anything unusual.
• Never open the instrument.
• If the instrument is not going to be used for a prolonged period
the batteries should be removed.
• Read the additional safety instructions in the individual sections
of this booklet.
Ensure that children do not use the instrument unsuper-
vised; some parts are small enough to be swallowed.

6
Disposal
9. Guarantee
This instrument is covered by a 3 year guarantee from the date of
purchase. The guarantee is valid only on presentation of the guar-
antee card completed by the dealer (see back) confirming date of
purchase or the receipt.
Please contact Microlife-Service (see foreword).
10. Technical Specifications
This device complies with the requirements of the Medical Device
Directive 93/42/EEC.
Technical alterations reserved.
Batteries and electronic instruments must be disposed of in
accordance with the locally applicable regulations, not with
domestic waste.
• Batteries, cuff and wearing parts are not included.
• Opening or altering the instrument invalidates the guarantee.
• The guarantee does not cover damage caused by improper
handling, discharged batteries, accidents or non-compliance
with the operating instructions.
Operating tempera-
ture:
10 — 40 °C / 50 — 104 °F
15 — 95 % relative maximum humidity
Storage tempera-
ture:
-20 — +55 °C / -4 — +131 °F
15 — 95 % relative maximum humidity
Weight:
320 g (including batteries)
Dimensions:
99 x 55 x 32 mm
Measuring proce-
dure:
oscillometric, corresponding to Korotkoff
method: Phase I systolic, Phase V diastolic
Measurement range: 20 — 280 mmHg – blood pressure
40 — 200 beats per minute – pulse
Cuff pressure display
range:
0 — 299 mmHg
Resolution:
1 mmHg
Static accuracy:
pressure within ± 3 mmHg
Pulse accuracy:
± 5 % of the readout value
Voltage source:
2 x 1.5 V Batteries; size AAA
Reference to
standards:
EN 1060-1 /-3 /-4; IEC 60601-1;
IEC 60601-1-2 (EMC)


8
Displejs
Cien./god. lietotāj!
Jūsu jaunais Microlife asinsspiediena mērītājs ir uzticams
medicīnas instruments asinsspiediena mērīšanai uz augšdelma.
Tas ir vienkārši un ērti lietojams, precīzs un ļoti ieteicams
asinsspiediena mērīšanai mājas apstākļos. Šis instruments tika
izstrādāts sadarbībā ar mediķiem, un klīniskie testi ir pierādījuši,
ka tā mērīšanas precizitāte ir ļoti augsta.*
Lūdzu, uzmanīgi izlasiet šo instrukciju, lai izprastu visas funkcijas
un drošības informāciju. Mēs vēlamies, lai Jūs būtu apmierināts ar
Microlife izstrādājumu. Ja Jums ir kādi jautājumi, problēmas vai ja
vēlaties pasūtīt rezerves daļas, lūdzu, sazinieties ar Microlife
klientu servisu. Ierīces pārdevējs vai aptiekārs palīdzēs Jums
noskaidrot Microlife izplatītāja adresi Jūsu valstī. Jūs varat arī
apmeklēt tīmekļa vietni www.microlife.lv, kur Jūs varēsiet atrast
plašu un vērtīgu informāciju par mūsu produktiem.
Lai Jums laba veselība – Microlife AG!
* Šajā instrumentā ir izmantota tā pati mērīšanas tehnoloģija, kas
apbalvotajā «BP 3BTO-H» modelī, kas pārbaudīts saskaņā ar
Eiropas hipertonijas sabiedrības (EHS) protokolu.
Microlife BP A50
LV
1
Poga ON/OFF (IESLĒGT/IZSLĒGT)
2
Displejs
3
Poga M (ATMIŅA)
4
Aproces kontaktligzda
5
Sūkņa apaļā kontaktligzda
6
Ātrais gaisa atbrīvošanas vārsts
7
Bateriju nodalījums
8
Aproce
9
Aproces savienotājs
AT
Lodveida sūknis
AK
Lodveida sūkņa savienotājs
AL
Atmiņā saglabājamo rezultātu skaits
AM
Sirds aritmijas indikators
AN
Pulsa biežums
AO
Bateriju displejs
AP
Saglabātie mērījumi
AQ
Sistoliskais asinsspiediens
AR
Diastoliskais asinsspiediens
AS
Pulss
BT
Gaisa iesūknēšana
BK
Gaisa atbrīvošana
Pirms šīs ierīces izmantošanas uzmanīgi izlasiet
norādījumus.
Aizsardzības klase: BF

Комментарии
Содержание
- 1 Характеристика тонометра Microlife BP A50
- 2 Первое использование
- 2.1 Как мерить?
- 3 Индикаторы
- 4 Ошибки, которые выдает устройство
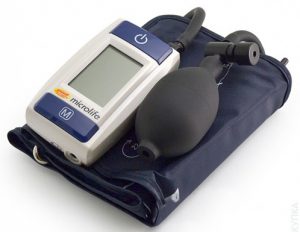
У каждого в доме должен быть тонометр. Microlife BP A50 — устройство, которое помогает быстро, качественно изменить артериальное давление и пульс. Компания «Микролайф» выпускает качественную медицинскую технику. Описываемая модель является наиболее приемлемым вариантом в отношении цена/качество.

Перед началом использования внимательно прочтите инструкцию по применению.
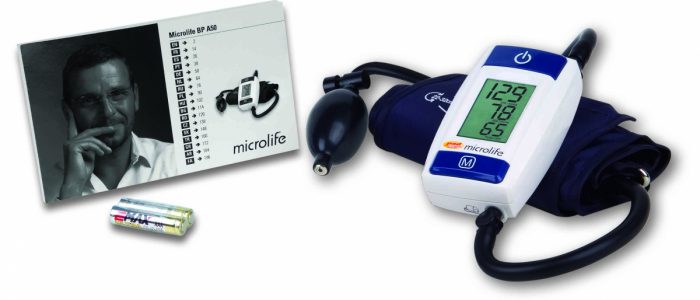
Характеристики тонометра Microlife BP модели A50 можно рассмотреть в таблице:
| Критерий | Характеристика |
| Температура эксплуатации | 10—40 С |
| Температура хранения | -20—55 С |
| Масса | 0,32 кг (включая батарейки) |
| Размеры | 99×55×32 |
| Диапазон измерения АД | 20—280 мм рт. ст. |
| Диапазон измерения пульса | 40—200 уд./мин. |
| Возможная погрешность АД | 3 мм рт. ст. |
| Возможная погрешность пульса | 5% от результата |
Вернуться к оглавлению
Первое использование
Перед началом использования в Microlife BP нужно вставить батарейки. Для этого необходимо поднять крышку, вставить 2 батарейки и закрыть крышку. После этого, нужно подобрать манжету. Компания предоставляет 3 варианта на выбор. Их можно рассмотреть в таблице:
| Размер манжета | Обхват плеча, см |
| S | 17—22 |
| M | 22—32 |
| L | 32—42 |
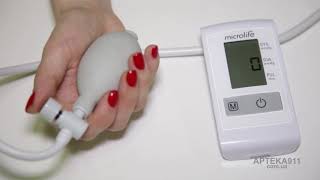
После того как выбор сделан, нужно подсоединить манжету к блоку. Для этого вставьте провод от манжеты в специальное отверстие под него. Затем нужно подсоединить нагнетатель воздуха. Это делается тем же образом. Только после этих приготовлений можно использовать этот полуавтоматический тонометр BP A50.
Вернуться к оглавлению
Как мерить?
Полуавтомат Microlife BP модели A50 используется так же как и другие:
- Перед началом измерения отдохните (10—15 минут спокойно посидите).
- Наденьте манжету чуть ниже плеча (обычно измерение проводится на левой руку).
- Расположите руку на уровне сердца.
- Убедитесь, что одежда не пережимает кожу.
- Включите прибор.
- Накачайте манжету.
- После того как на дисплее перестанут мигать значения, посмотрите, а окончательный результат.
- Выключите прибор.
Вернуться к оглавлению
Индикаторы

Прибор BP A50 имеет 2 индикатора: аритмии и заряда батареи. В первом случае прибор подскажет, есть ли у пользователя проблемы с пульсом. Если индикатор загорелся, это говорит о том, что нужно обратиться к врачу с этой проблемой и выпить средство, нормализующее состояние. Во втором случае индикатор показывает на то, что необходимо сменить батарейки. Если этого не сделать прибор перестанет работать.
Вернуться к оглавлению
Ошибки, которые выдает устройство
Как и любая техника, тонометр Microlife BP типа A50 может выдавать ошибки.
Ошибки можно рассмотреть в таблице:
| Ошибка | Описание | Устранение |
| «ERR 1» | Слабый сигнал | Снова наложите манжету и проведите измерение |
| «ERR 2» | Ошибочный сигнал | При измерении держите руку неподвижно |
| «ERR 3» | Нет давления в манжете | Убедитесь, что нигде нет утечки воздуха, при необходимости замените компоненты |
| «ERR 5» | Ошибочный результат | Убедитесь, что делаете измерение правильно |
| «HI» | Слишком высокий пульс или давление манжеты | Отдохните несколько минут, если ошибка не исправится, то обратитесь к врачу (показатели выходят за рамки измерения устройства) |
| «LO» | Пульс слишком низкий | Повторите попытку, если ошибка сохранилась обратитесь к врачу (пульс ниже разрешимого порога) |
5
BP A50
EN
7. Error Messages
If an error occurs during the measurement, the measurement is
interrupted and an error message, e.g. «ERR 3», is displayed.
* Please consult your doctor, if this or any other problem occurs repeat-
edly.
8. Safety, Care, Accuracy Test and Disposal
ƽ
Safety and protection
Instrument care
Clean the instrument only with a soft, dry cloth.
Accuracy test
We recommend this instrument is tested for accuracy every
2 years or after mechanical impact (e.g. being dropped). Please
contact Microlife-Service to arrange the test (see foreword).
)
Batteries must be removed and recharged when the flat
battery symbol appears. They should not remain inside the
instrument as they may become damaged (total discharge
as a result of low use of the instrument, even when
switched off).
)
Always remove the rechargeable batteries if you do not
intend to use the instrument for a week or more.
)
Batteries cannot be charged in the blood pressure monitor.
Recharge batteries in an external charger and observe the
information regarding charging, care and durability.
Error
Description Potential cause and remedy
«ERR 1» Signal too
weak
The pulse signals on the cuff are too weak.
Re-position the cuff and repeat the measure-
ment.*
«ERR 2» Error signal
During the measurement, error signals
were detected by the cuff, caused for
instance by movement or muscle tension.
Repeat the measurement, keeping your
arm still.
«ERR 3» No pressure
in the cuff
An adequate pressure cannot be gener-
ated in the cuff. A leak may have occurred.
Check that cuff and pump ball are correctly
connected and that the cuff is not fitted too
loosely. Replace the batteries if necessary.
Repeat the measurement.
«ERR 5» Abnormal
result
The measuring signals are inaccurate and
no result can therefore be displayed. Read
through the checklist for performing reliable
measurements and then repeat the
measurement.*
«HI»
Pulse or cuff
pressure too
high
The pressure in the cuff is too high (over
300 mmHg) OR the pulse is too high (over
200 beats per minute). Relax for 5 minutes
and repeat the measurement.*
«LO»
Pulse too
low
The pulse is too low (less than 40 beats per
minute). Repeat the measurement.*
)
If you think the results are unusual, please read through the
information in «Section 1.» carefully.
• This instrument may be used only for the purpose described in
this booklet. The manufacturer cannot be held liable for damage
caused by incorrect application.
• This instrument comprises sensitive components and must be
treated with caution. Observe the storage and operating condi-
tions described in the «Technical Specifications» section!
• Protect it from:
− water and moisture
− extreme temperatures
− impact and dropping
− contamination and dust
− direct sunlight
− heat and cold
• The cuffs are sensitive and must be handled with care.
• Only pump up the cuff once fitted.
• Do not use the instrument close to strong electromagnetic fields
such as mobile telephones or radio installations.
• Do not use the instrument if you think it is damaged or notice
anything unusual.
• Never open the instrument.
• If the instrument is not going to be used for a prolonged period
the batteries should be removed.
• Read the additional safety instructions in the individual sections
of this booklet.
Ensure that children do not use the instrument unsuper-
vised; some parts are small enough to be swallowed.
У каждого в доме должен быть тонометр. Microlife BP A50 — устройство, которое помогает быстро, качественно изменить артериальное давление и пульс. Компания «Микролайф» выпускает качественную медицинскую технику. Описываемая модель является наиболее приемлемым вариантом в отношении цена/качество.
Перед началом использования внимательно прочтите инструкцию по применению.
Характеристики тонометра Microlife BP модели A50 можно рассмотреть в таблице:
| Критерий | Характеристика |
| Температура эксплуатации | 10—40 С |
| Температура хранения | -20—55 С |
| Масса | 0,32 кг (включая батарейки) |
| Размеры | 99×55×32 |
| Диапазон измерения АД | 20—280 мм рт. ст. |
| Диапазон измерения пульса | 40—200 уд./мин. |
| Возможная погрешность АД | 3 мм рт. ст. |
| Возможная погрешность пульса | 5% от результата |
Первое использование
Перед началом использования в Microlife BP нужно вставить батарейки. Для этого необходимо поднять крышку, вставить 2 батарейки и закрыть крышку. После этого, нужно подобрать манжету. Компания предоставляет 3 варианта на выбор. Их можно рассмотреть в таблице:
| Размер манжета | Обхват плеча, см |
| S | 17—22 |
| M | 22—32 |
| L | 32—42 |
После того как выбор сделан, нужно подсоединить манжету к блоку. Для этого вставьте провод от манжеты в специальное отверстие под него. Затем нужно подсоединить нагнетатель воздуха. Это делается тем же образом. Только после этих приготовлений можно использовать этот полуавтоматический тонометр BP A50.
Как мерить?
Полуавтомат Microlife BP модели A50 используется так же как и другие:
- Перед началом измерения отдохните (10—15 минут спокойно посидите).
- Наденьте манжету чуть ниже плеча (обычно измерение проводится на левой руку).
- Расположите руку на уровне сердца.
- Убедитесь, что одежда не пережимает кожу.
- Включите прибор.
- Накачайте манжету.
- После того как на дисплее перестанут мигать значения, посмотрите, а окончательный результат.
- Выключите прибор.
Индикаторы
Прибор BP A50 имеет 2 индикатора: аритмии и заряда батареи. В первом случае прибор подскажет, есть ли у пользователя проблемы с пульсом. Если индикатор загорелся, это говорит о том, что нужно обратиться к врачу с этой проблемой и выпить средство, нормализующее состояние. Во втором случае индикатор показывает на то, что необходимо сменить батарейки. Если этого не сделать прибор перестанет работать.
Ошибки, которые выдает устройство
Как и любая техника, тонометр Microlife BP типа A50 может выдавать ошибки.
Ошибки можно рассмотреть в таблице:
| Ошибка | Описание | Устранение |
| «ERR 1» | Слабый сигнал | Снова наложите манжету и проведите измерение |
| «ERR 2» | Ошибочный сигнал | При измерении держите руку неподвижно |
| «ERR 3» | Нет давления в манжете | Убедитесь, что нигде нет утечки воздуха, при необходимости замените компоненты |
| «ERR 5» | Ошибочный результат | Убедитесь, что делаете измерение правильно |
| «HI» | Слишком высокий пульс или давление манжеты | Отдохните несколько минут, если ошибка не исправится, то обратитесь к врачу (показатели выходят за рамки измерения устройства) |
| «LO» | Пульс слишком низкий | Повторите попытку, если ошибка сохранилась обратитесь к врачу (пульс ниже разрешимого порога) |
![]() Загрузка…
Загрузка…