Ошибка «Не удалось создать файл дампа из-за ошибки при создании дампа» в Windows 10 появляется в случаях, когда пользователь пытается открыть данный компонент. Этому предшествует частое появление синего экрана смерти. Сегодня я расскажу о причинах появления данной проблемы в компьютере и разберу несколько способов ее устранения.
Причины возникновения неполадки
Причины, по которым выходит ошибка «Не удалось создать файл дампа из-за ошибки при создании дампа» в Windows 10, могут быть следующими:
- недостаточный объем файла подкачки в загрузочном томе;
- недостаток свободного пространства на системном разделе при создании дампа;
- появление ошибки во время открытия файла, к примеру, в инициализации драйвера;
- появление поврежденных системных файлов в процессе создания файла дампа;
- устаревание BIOS или появление неполадок в его параметрах.
Способы исправления ошибки
Возможно, на работу данного компонента влияет сторонняя программа для оптимизации и удаления временных файлов. Если таковой на компьютере нет, нужно запустить проверку системных компонентов.
Удаление программ-чистильщиков и оптимизаторов
Как я уже говорила, если ошибка появляется на компьютере, в котором есть приложение-чистильщик или оптимизатор, лучше удалить его. Это может быть, к примеру, CCleaner, ускоритель компьютера, а также прочие программы, которые включены в топы для удаления мусора из системы.
А все потому, что такого рода утилиты удаляют вместе с мусором и некоторые важные файлы, хоть и не специально. Если они необходимы, можно деинсталлировать их на время, а потом переустановить. Для удаления надо зайти в «Параметры», перейти в раздел «Приложения», во вкладке «Приложения и возможности» найти нужный элемент и стереть его.
Сканирование диска
Можно запустить утилиту chkdsk, которая сканирует систему и находит проблемы, если они имеются. Для ее запуска необходимо открыть «Командную строку» с правами админа. А сделать это можно, введя в поисковике в панели задач запрос и нажав на пункт «Запуск от имени администратора».
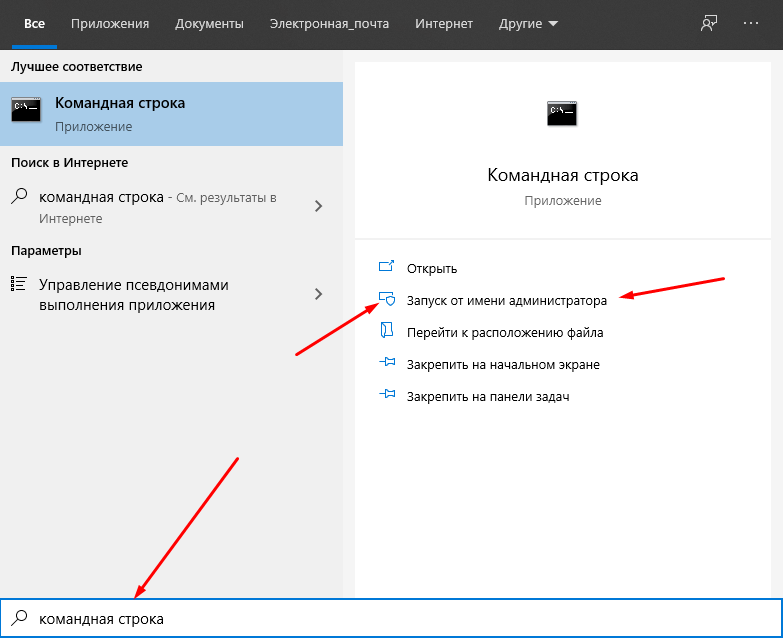
Вот таким способом можно открыть «Командную строку» с правами администратора
В новом открывшемся окне следует ввести запрос chkdsk / r. Данный параметр позволяет найти и восстановит поврежденные секторы. Запускаю указанную команду нажатием на кнопку Enter и жду окончания сканирования. После перезагружаю систему и проверяю, не появляется ли опять данная ошибка.
Сканирование системных файлов
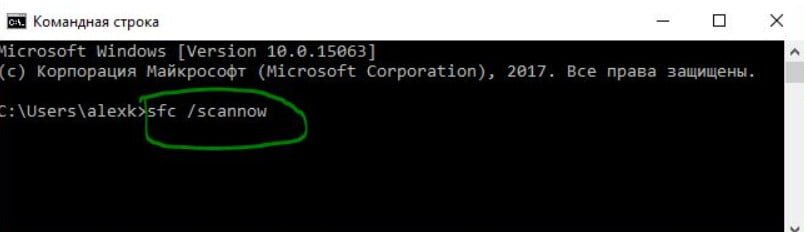
Для сканирования можно использовать две утилиты – sfc и DISM. Они, как и в предыдущем способе, запускаются через командную строку с правами администратора. В первом случае необходимо ввести запрос sfc / scannow и запустить процесс нажатием на кнопку Enter. Сканирование займет много времени, и зависит от объема жесткого диска и количества системных файлов, хранящихся на нем.
Для активации второй утилиты нужно задействовать такую команду:
DISM /Online /Cleanup-Image / RestoreHealth
Она запускает расширенное сканирование и устранение проблем при их обнаружении. После завершения сего процесса следует перезагрузить компьютер и проверить, появляется ли ошибка снова.
Обновление BIOS
Способов обновить прошивку BIOS несколько, все они описаны в одной статье. Новичкам проводить данную процедуру небезопасно – велик риск сделать все неправильно и превратить компьютер в кучу металла. Лучше довериться профессионалам, а уточнять информацию и скачивать нужное ПО только на официальных сайтах.
Сброс компьютера до исходного состояния
В «Параметрах» системы есть специальный инструмент для возврата системы к первоначальному состоянию. Для начала я жму на комбинацию Win + I, перехожу в категорию «Обновление и безопасность», и во вкладке «Восстановление» под разделом «Вернуть компьютер в исходное состояние» жму на кнопку «Начать». Далее необходимо следовать инструкциям.
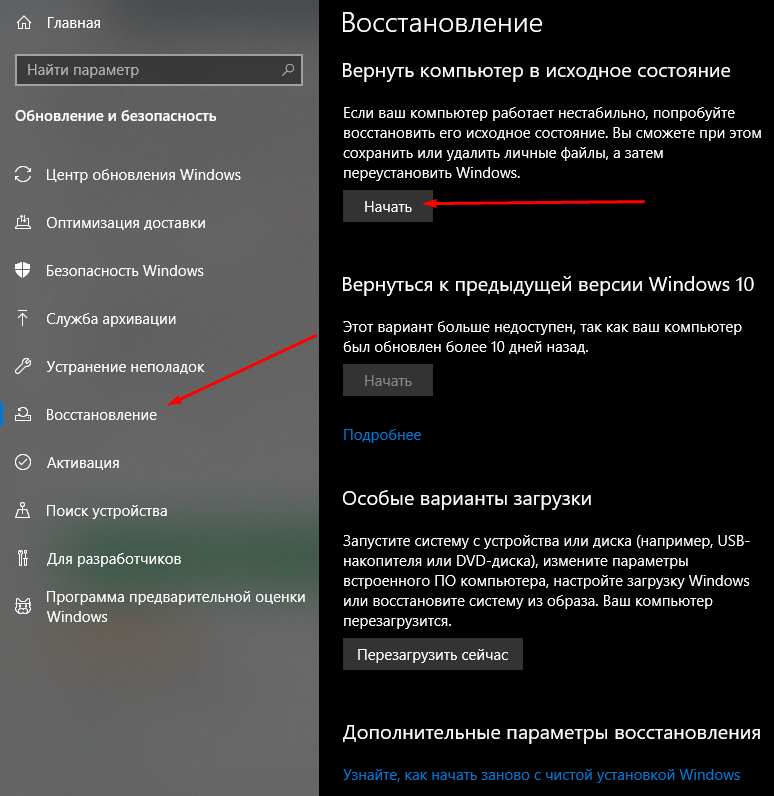
В данной вкладке можно восстановить систему или вернуть ее к исходному состоянию
Заключение
Ошибки при создании файла дампа в Windows 10 могут появляться по разным причинам, в том числе из-за влияния сторонних программ. Следуя указанной инструкции, можно полностью устранить неполадку. Способы достаточно просты, с ними справится любой пользователь, даже новичок.
![]() Загрузка …
Загрузка …
Post Views: 2 597
Many users are complaining about memory.dump related error messages in the Windows 10, 8.1 system. For a beginner user, it can be truly difficult to find out what is the main cause behind this issue inside the Windows 10, 8.1 version. On this page, we will be talking about how to fix memory.dump error on Windows 10, 8.1.

Here, check out the following possible solutions or tips to fix and solve memory.dump errors on Windows 8.1
Turn on automatic update feature in Windows 10, 8.1
However, on Windows 10, by default automatic update but have you ever performed the process of automatic update on your Windows 10, 8 system? Actually, the wrong update process is the primary cause to come across the memory.dump error. To fix this issue, you need to turn on the automatic update feature forever on a windows 8.1 system.
Manual update to system driver
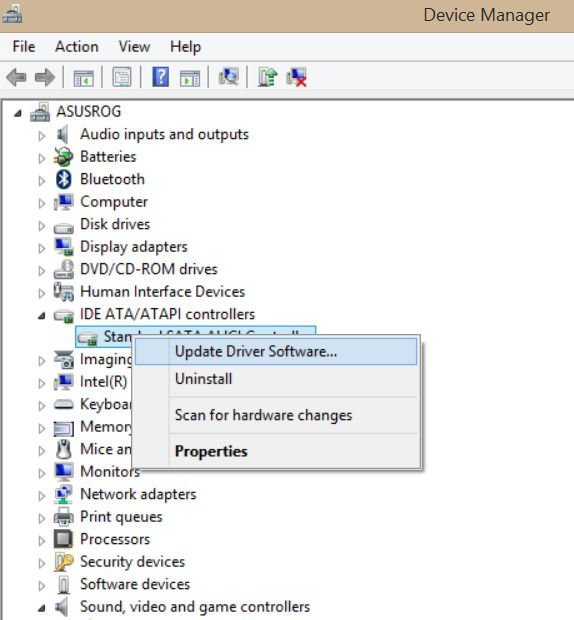
Manually update all the installed system drivers like video, USB, and audio to its latest version using the internet. Often outdated system drivers are the causes behind memory.dump error. To fix memory.dump error on windows 10, 8.1 system,
- Go to Device Manager and right click on the opted driver (for example – video driver) which you want to update.
- Next, select Update Driver Software option from the right context menu panel.
- Next, click on Search for automatically updated driver software link.
- Now it will try to search the latest driver software and install it to your windows 10, 8.1 system.
Besides, you can download and install of latest chipsets drivers from the manufacturer’s website.
Flash BIOS chips
Flash outdated BIOS version to the latest version. The BIOS flashing related all updates information available at your motherboard manufacturer’s website or BIOS chips manufacturer company’s website.
Scan corrupted system files and repair
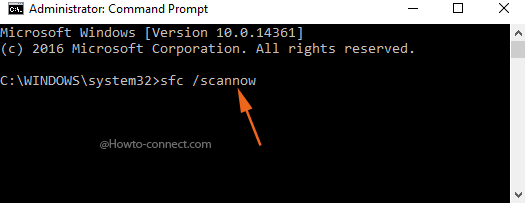
Run System File Checker command to track all the corrupted system files and repair it. To do it,
- Launch command prompt with Admin privilege by pressing the shortcut (Win + X) and click on Command Prompt (Admin) option.
- In Command prompt window, type Sfc /scannow command and press enter button. This command will start a scan process of system files and restore the corrupted system files immediately. In addition, it can also fix other issues of your windows 10, 8.1 system.
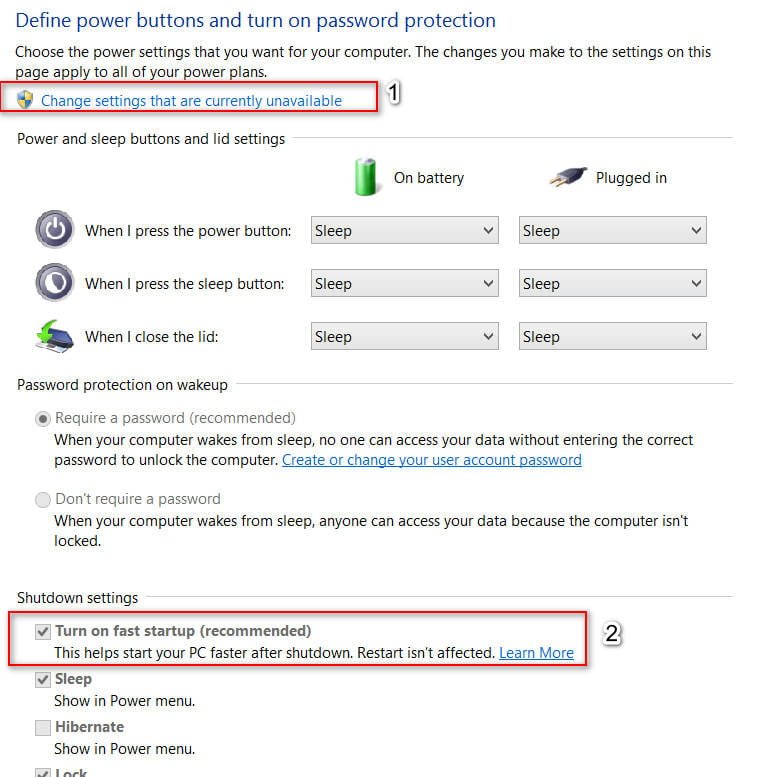
Disable Fast Startup Feature
Hybrid Shutdown or Fast startup feature has been added in Windows 8 for a quicker startup in Windows 10, 8. But the number of people has complained about Hybrid shutdown included several issues on window 8 because both features are responsible for creating memory.dump errors on the windows 10 8 system. To disable the Hybrid shutdown feature on windows 10, 8.1 version,
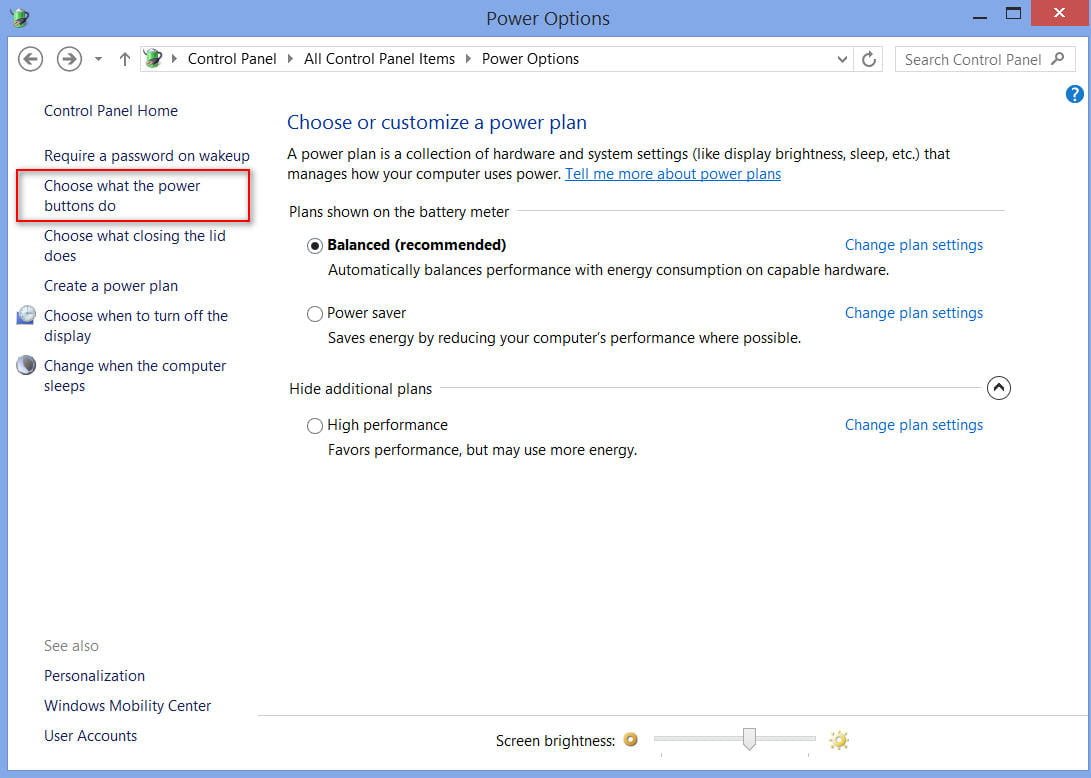
- Go to Power options from the control panel.
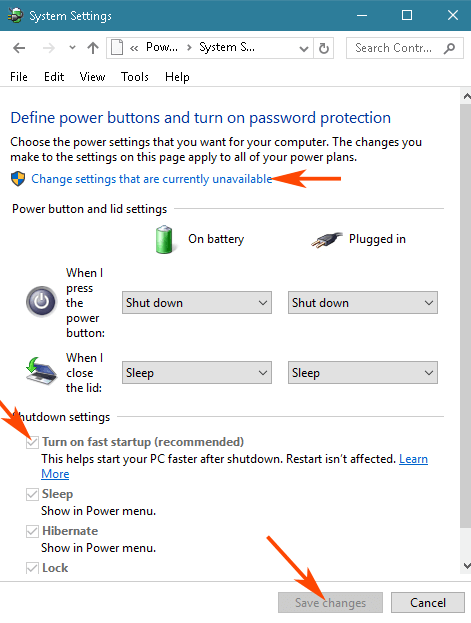
- In the right section of the currently visible Window, select “Choose what the power button does” option.
- Subsequently, on the appearing System settings window, press the link indicating “Change settings that are currently unavailable”
- Next, look for Turn on fast startup (recommended) option under Shutdown settings sections and uncheck this option.
Conclusion
Perform a deep scan for removing bad sectors, other memory errors from hard disk using hard disk utility tools. If same issues are found again and no other ways assist in killing this error then finally delete all hard disk partitions and fresh install of Windows 10, 8.1 with bootable DVD.
Repair any Windows problems such as Blue/Black Screen, DLL, Exe, application, Regisrty error and quickly recover system from issues using Reimage.
Everything you need to eliminate this error on your PC
by Ivan Jenic
Passionate about all elements related to Windows and combined with his innate curiosity, Ivan has delved deep into understanding this operating system, with a specialization in drivers and… read more
Updated on
- A corrupt memory dump error can lead to system instability and crashes; therefore, you must fix it as soon as possible.
- To fix this issue, the best way is to use specialized software optimized for dealing with BSOD errors.
- You can also fix this problem by making a few changes to your settings.
It isn’t every day that you come across a corrupted memory dump file, but when you do, it will be a frustrating experience. That is for the simple reason that the condition renders your PC virtually unusable.
Thankfully, it is an issue that can be easily fixed with the correct information, such as the one in this guide.
What does a corrupt memory dump mean?
A corrupt memory dump comes up when your PC generates a faulty memory dump file from your virtual machine. This happens when users try to generate a complete memory dump file from their virtual machine.
The primary cause of this issue is that the option Enable heartbeat monitoring for the virtual machine is selected in the virtual machine.
How do I fix corrupted memory dump file errors?
1. Use a specialized repair software
It would be best to use specialized BSOD repair software to fix a corrupt memory dump. Fixing BSOD errors manually can be a problem, but there are specialized tools that can help you.
2. Change the setting via GUI
- For this, open Failover Cluster Manager first and click on Roles.

- Search for the virtual machine resource and click on the Resources
- Under the Resources tab, right-click on the virtual machine.
- Now, click on Properties and select Settings.
- Under Heartbeat Setting, clear the Enable automatic recovery for application health monitoring checkbox.
- Similarly, clear the Enable heartbeat monitoring for the virtual machine checkbox and click OK for the setting to take effect.
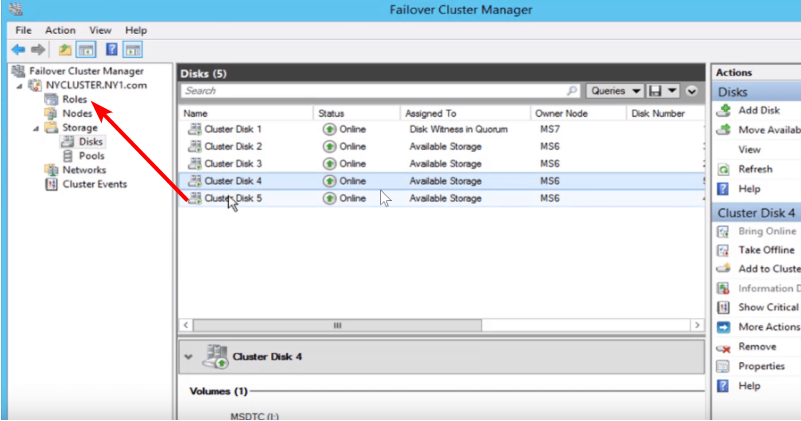
This should help prevent the generation of corrupt memory dump files on Windows.
- Windows Software Development Kit: Everything You Need to Know
- Clipchamp is coming to Windows 10 to replace Video Editor
- How to Fix Microsoft Common Language Runtime Native Compiler High CPU Usage?
3. Change the setting via Windows PowerShell
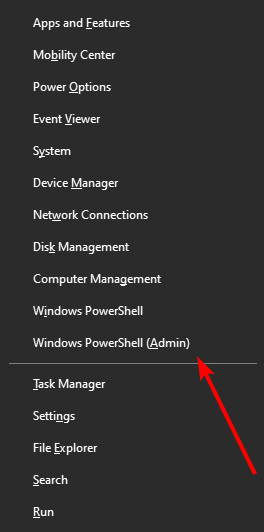
- Press the Windows key + X and select Windows PowerShell (Admin).

- Type the command below and hit Enter to run it:
Get-ClusterResource
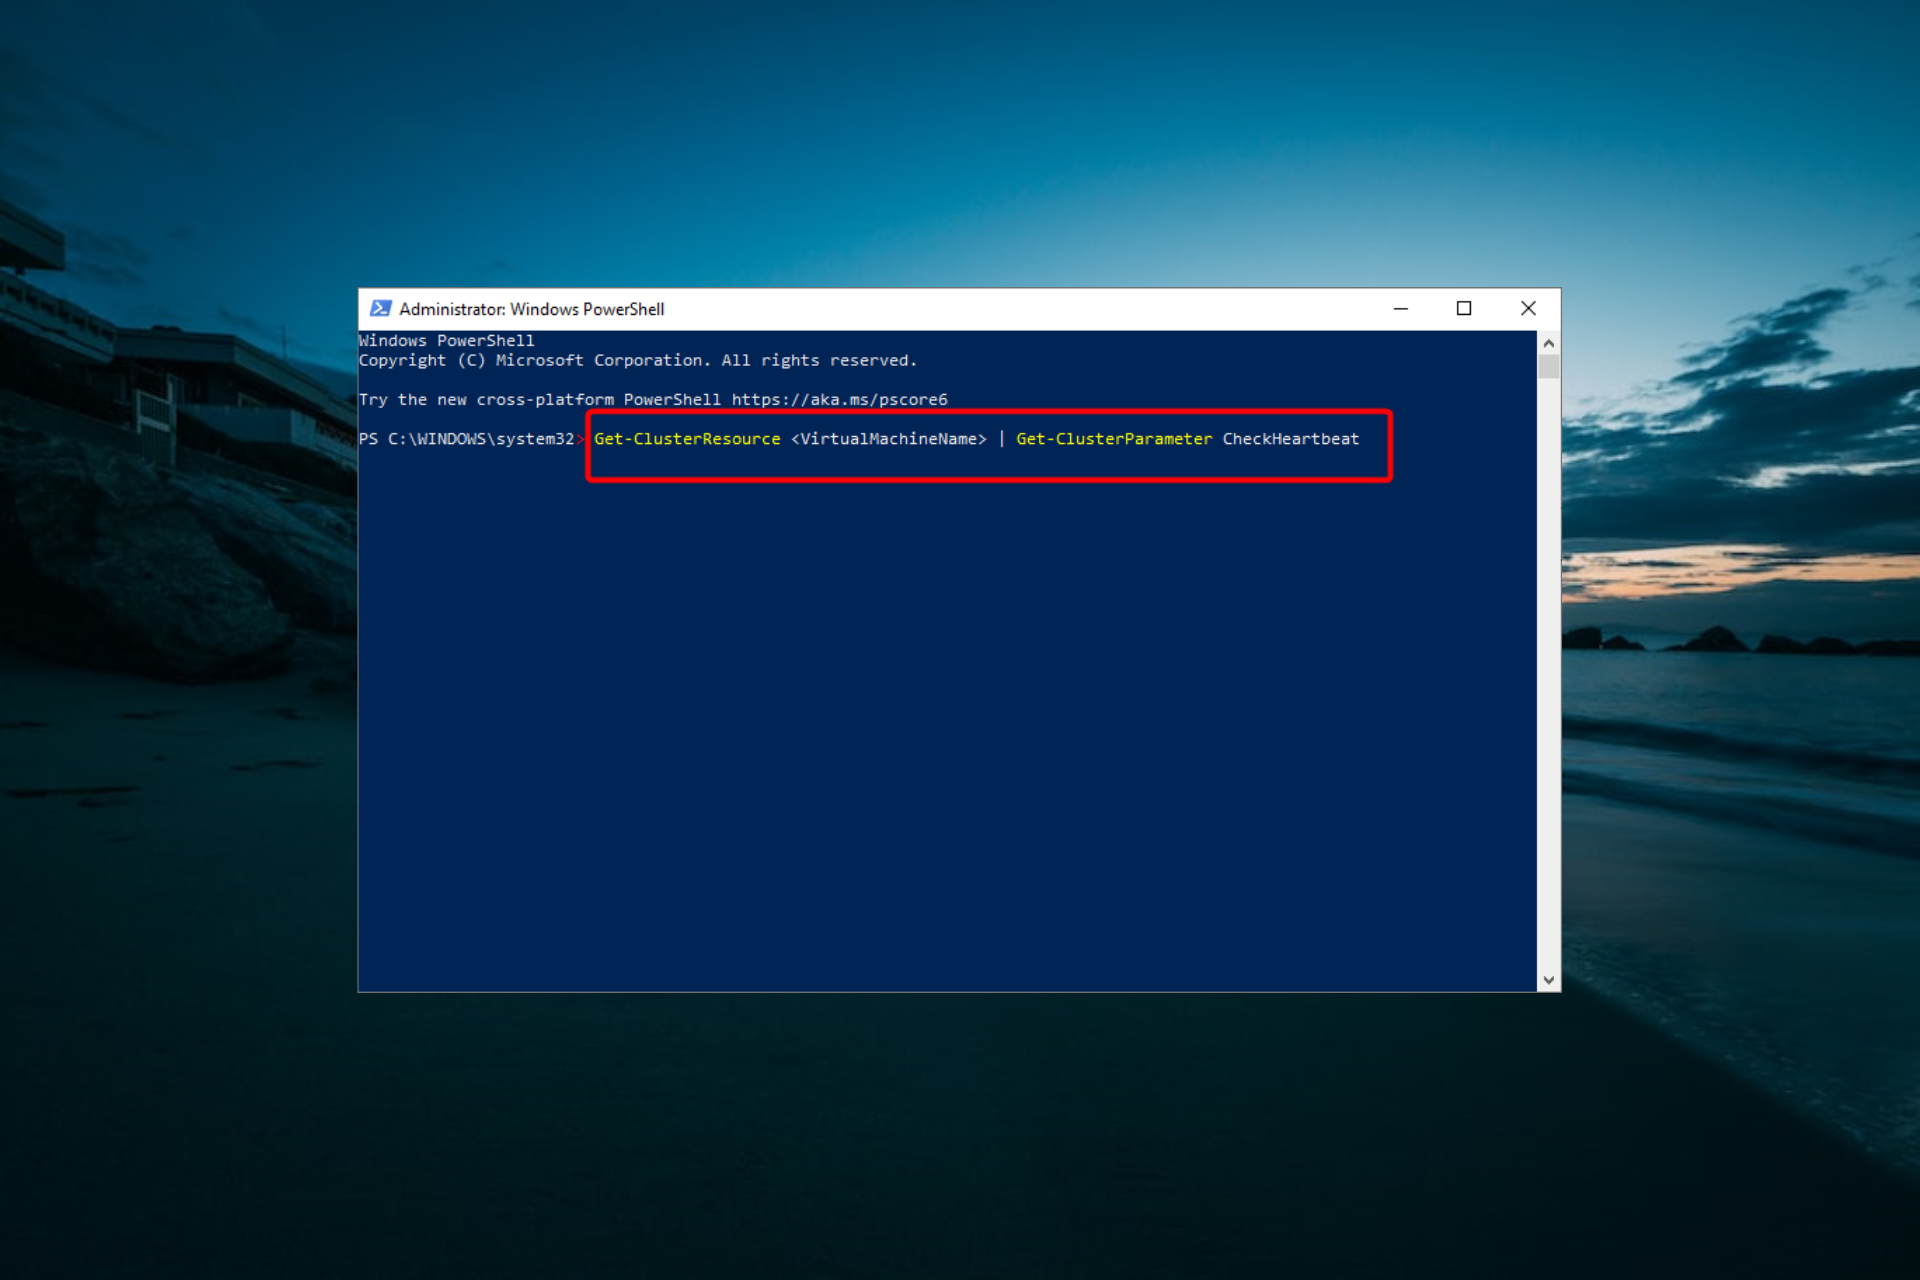
- Next, run the following command to check if Enable heartbeat monitoring for the virtual machine and Enable automatic recovery for application health monitoring are enabled:
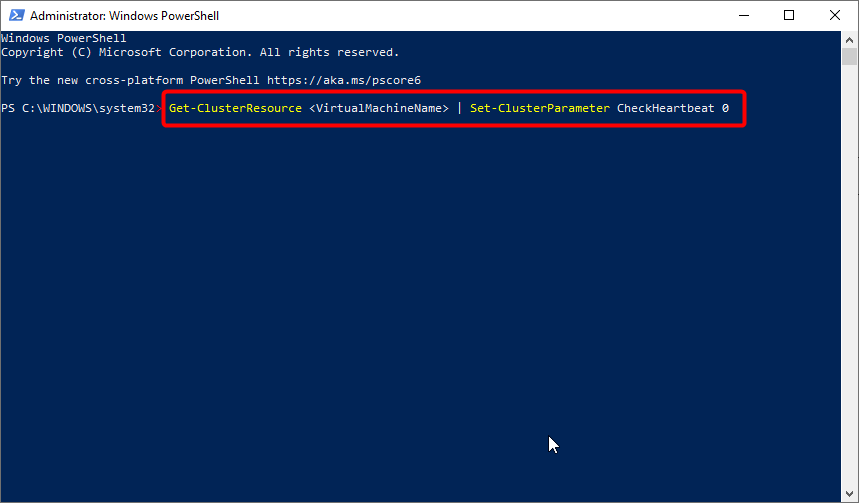
Get-ClusterResource <VirtualMachineName> | Get-ClusterParameter CheckHeartbeat - Now, type the command below and hit Enter to set the CheckHeartbeat value to 0:
Get-ClusterResource <VirtualMachineName> | Set-ClusterParameter CheckHeartbeat 0 - However, just in case you’d like only the Enable automatic recovery for application health monitoring option to be canceled, run the following command:
(Get-ClusterResource <Object>).EmbeddedFailureAction = 1 - Finally, exit Windows PowerShell and restart your PC.


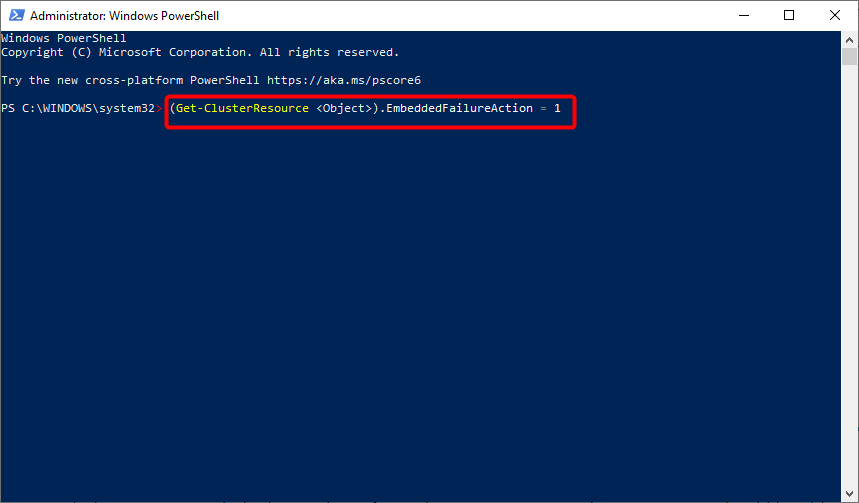
Note that this solution is pretty technical and requires you to enter the commands carefully.
We can conclude this guide on fixing the corrupt memory dump issue with this. You should be able to solve the problem quickly, provided you follow the instructions carefully.
If you want to know how to delete a system error memory dump file, check our detailed guide to do it quickly.
Let us know which solutions worked best for you by leaving a message in the comments section below.
![]()
Many users complain about various Dump Memory error messages in Windows 10, 8.1. For a beginner, it can be really difficult to find out what is the main cause of this problem in the system. Let’s try to make out in this guide how to fix memory.dump error in Windows 10, 8.1.
Solutions for memory.dump error in Windows 10 / 8.1
1. Enable automatic update.
In Windows 10 / 8.1, automatic updating is enabled by default, but you probably turned it off and forgot. This is not the right approach. The system must be constantly updated and developed, thus critical corrections of various errors may come in the same updates. Turn on automatic update forever. Consider below some recommendations.
If you disabled it with a special utility, then turn it back on.
Check in services if Windows Update is working.
Try to upgrade your system to the latest version.
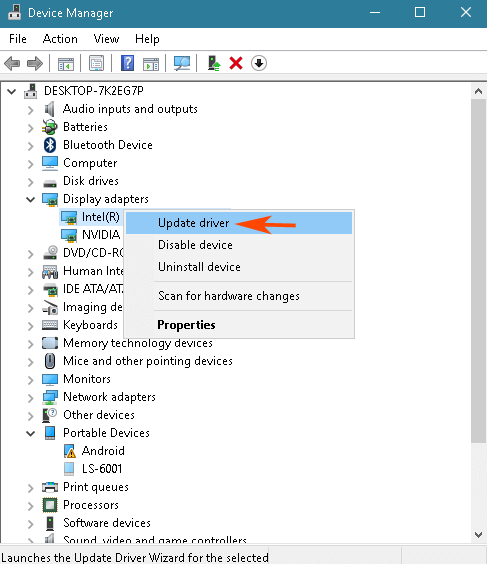
2. Manual update for system driver
Manually update all installed system drivers, such as video, USB and audio, to the latest version using the Internet. Often outdated system drivers are causes of memory.dump errors.
Click Win + R and enter devmgmt.msc to open the “Device Manager”.
You will see a list of all devices. Update them all in order by right-clicking and selecting “Update Driver”.
Related post : Fix the error 0x80071779 in Windows 10
3. Disable the quick launch feature.
The Hybrid Shutdown or Fast startup feature was added to Windows 8 for a quick start in Windows 10, 8. But a number of people complained that the Hybrid shutdown poses various problems when it works with Fast startup, and both of these functions are responsible for creating memory.dump errors in Windows 10/8. Disable the hybrid shutdown function in the system.
Go to the Power section from the control panel. Next, click on the right to “Choose what the power options do.”
Related post : How to Scan & Fix Hard Drives with CHKDSK in Windows…
Click on “Change parameters that are currently unavailable” so that you can use the parameters below.
Now you have access to the options below. Disable “Quick Start” by unchecking. Save the changes.
Related post : What is winlogon.exe process and how winlogon.exe works in…
4. Recovery of system files and hard disk
Let’s try to fix damaged system files, if any, and restore the hard drive.
Run the command prompt as administrator and enter the sfc / scannow command to check the system files.
Related post : Fix SrtTrail.txt error in Windows 10
When you try to update the System or want to launch a new program, often you see the error message, “Download Error”. In that case, the system starts to freeze automatically after showing the system manufacturer’s logo. Then, you will face an unexpected System Error Memory Dump Files message and the device display will open up with BSOD (Blue Screen Death) error. You won’t be able to perform any task without fixing it. So, here, we are going to talk about some of the ways to resolve the problem effectively.
Significant Reasons Behind System Error Memory Dump Files Windows 10
There are some common issues that create the System file error very often. So, if you identify the exact reasons for this problem, then it will to better for you to avoid this internal issue within a short period of time.
- The major issue occurs if the files used by the Operating System is copied and it extends the storage limit on your device. Therefore, the system starts to crash.
- If the total file size is exactly the same as the size of the kernel, then it creates the memory dump file issues effectively.
- Kernel memory dump issue happens if it occupies 1/3rd part of your device’s physical memory. The size includes Windows kernel as well as on hardware abstraction level.
- Another responsible reason for the System Error Memory dump issue is small memory dump problem. It contains very little information and if it overflows, then the problem occurs.
Resolve the System Error Memory Dump Files Problem Using Simple Ways
You can use some effective ways to resolve the system error memory dump files problem like major issues. Moreover, it helps to utilize the memory spaces and enhances the CPU cycles. Thus, you can fix the memory corruption issues as well as avoid device errors effectively. Here, we are going to talk about some of the technical ways to overcome this annoying issue permanently.
Use the Elevated Cleanup
- Type “disk cleanup” in the search box and locate the Disk Cleanup window by hitting the Enter key on the keyboard.
- After that, right-click on the program and choose Run as Administrator from the pop-up menu and open the Disk Clean window in Admin Mode.
- Now, you need to choose the drive to perform the disk cleanup program and you can choose the C drive(local disk) if necessary. Press the Enter key or hit the OK button to clear the disk where the OS is installed.
- Windows will start to scan through the files and verify how much space is restored.
- Next, click on all the checkboxes to enable this cleanup service and press the OK to confirm it. After getting a confirmation, Windows will start to clear the storage spaces and allocate free spaces for that specific drive.
- You can see a successful message regarding the disk cleanup when the entire process is done. Finally, try to restart the device and verify whether the System error memory dump files error got fixed or not.
Stop Indexing in Local Disk
- Turn on the Windows PC in Normal Mode and double-click on This PC or My Computer icon from the desktop and launch the System window.
- Now, right-click on the C drive (Local Disk) from the window and choose the Properties from the pop-up menu that appeared on the screen. You can choose other disks from the My Computer window.
- Next, remove the tick from the checkbox says, “Allow files on this drive to have contents indexed in addition to file properties’ from the Properties dialog box.
- Hit the Apply button and save the new changes. When done, press the Exit button and close the Properties window.
- Finally, restart the system and check whether the System error memory dump files Windows 10 got fixed or not.
Removing the Dumping Files
- Type “control” in the search box and launch the Control Panel window by pressing the Enter key on the keyboard.
- After that, click on the Update and Security program from the Control Panel window and go to the System category under this section.
- Now, click on the Advanced System Settings from the left pane of the window and go to the Startup section.
- Then, choose Settings under the Startup and Recovery window. You can see a list of dump files in the Dump file dialog box.
- Click on the Drop-down and choose the Dump files types to check which one is responsible for the memory corruption problem.
- Next, close the window and type Windows and R together from the keyboard. Now, type the dump file location in the Run dialog box to launch the dump file list window.
- Locate the dump file by typing the dump file name “MEMORY.DMP” in the Find section and right-click on that specific file. Enter the correct credentials to accept the administrative privileges for taking necessary action.
- Once done, reboot the device and check whether the memory-related problem got resolved or not.
Perform Extended Disk Cleanup Program
- Type “cmd” in the Cortana Search box and locate Command Prompt from the Start menu. Right-click on that program and choose Run as Administrator from the pop-up menu.
- After that, type the following command and press the Enter key to run the command.
“Cleanmgr /sageset:65535 & Cleanmgr /sagerun:65535”.
- You can see a list of available options in the extended disk clean-up and choose the ones that you want to remove. Confirm it by pressing the OK button.
- Finally, reboot the PC and check whether the system error memory dump files problem got resolved or not.
Via Command Prompt
- Press the Windows key from the keyboard and type “cmd” in the Cortana Search box.
- Now, right-click on the Command Prompt and open it in Admin mode by tapping on Run as Administrator option.
- Then, type the following commands by creating a batch file format to execute them sequentially. Moreover, press the Enter at the end of each command and execute them one after another.
“fsutil usn deletejournal /d /n c:”,“chkdsk /scan”,“compact /CompactOs:never”,“winmgmt /salvagerepository”,“del “%temp%\*” /s /f /q”,“del “C:\$Recycle.bin\*” /s /f /q”,“del “%systemroot%\temp\*” /s /f /q”,“vssadmin delete shadows /for=c: /all /quiet”,“Dism /Online /Cleanup-Image /StartComponentCleanup /ResetBase”.
- When done, try to reboot the system in Normal mode and verify whether the memory corruption issue still occurs or not.
By Installing the Cleanup Software
- First, go to a trustworthy website and download good cleanup software from that website.
- After installing this software successfully, open that software by double-tapping on it. It will ask you to enter the drive name which you want to scan and select them by tapping on them.
- This process will take a few minutes to analyze the drives and record the spaces available for each drive. So, wait patiently until the entire process is finished. Now, go to the Local Disk C drive from This PC icon.
- You can see a list of dump files in the resultant window with their descriptions and source file. Moreover, the blue blocks with those files confirm that those files are dump files and you can easily identify among other files.
- Finally, right-click on them and choose the Delete option from the pop-up menu that appeared on the screen. When done reboot the system and check whether the same issue still persists or not.
Wrapping Up
In the above content, we have discussed the System error memory dump files Windows 10 issues with its effective solutions. The effective steps discussed above will help you to enhance PC’s performance by utilizing the storage device. So, we hope this article will be helpful to tackle the memory dump file issue effectively without affecting other units.