Иногда стандартная последовательность для компиляции программы не работает. Она начинает выводить различные ошибки и не компилирует программу. Что в таком случае делать? В этой статье описано как избавиться от множества часто встречающихся ошибок.
Внимание: В этой статье подразумевается, что у вас уже есть некоторое количество знаний в области работы с командной строкой и вы знаете как работать с менеджером пакетов вашего дистрибутива.
Мы можем разделить ошибки на три категории:
-
Ошибки при выполнении команды ./configure
-
Ошибки при выполнении команды make
-
Ошибки при выполнении команды make install
Очевидно, что ошибки при выполнении команды ./configure, возникают во время выполнения скрипта конфигурации, ошибки при выполнении команды make возникают во время выполнения команды make, а ошибки при выполнении команды make install, соответственно, возникают при выполнении команды make install. Далее будет представлен лист типичных ошибок и способ их решения, разделенный на эти три категории.
Ошибки при выполнении команды ./configure
Следующий список содержит некоторые общие ошибки, которые может выдать каманда ./configure. Ошибки отсортированы по частоте возникновения. Сначала наиболее часто встречающиеся. Вещи между ( и ) являются опциональными, они могут не появлятся. OR, выделенное жирным курсивом означает, что несколько ошибок имеют одно решение. Текст между < и > показывает тип строки, которая должна появиться в этом месте.
-
(configure:) (error:) <somename> (<someversion> (or higher)) not found. (Please check your installation!) OR checking for <somename>… (configure:) (error:) not found. OR (configure:) (error:) <somename> (<someversion> (or newer)) is required to build <package-you’re-trying-to-compile>
-
Это обычно означает что -dev или -devel версия пакета ,который называется <somename> не установлена у вас на компьютере. Используйте менеджер пакетов вашего дистрибутива (или любой другой способ найти и установить пакет), чтобы найти пакет <somename> и установить его, если это возможно, -dev или -devel версию. Если -dev или -devel версия уже установлена, или её не сущечтвует, посмотрете на версию уже установленной. Она достаточно новая? Если она ниже, чем <someversion>, попробуйте обновить пакет. Если обновить пакет не представляется возможным, вы можете попробовать скомпилировать более мтарую версию программы. Более старые версии обычно используют более старые версии библиотек и программ, необходимых для компиляции.
-
-
(configure:) (error:) cannot find header (file) <somename>.h OR (configure:) (error:) (header) (file) <somename>.h missing! OR <similar>
-
Конфигурационный скрипт не может найти .h файл, необходимый для компиляции. Эта ошибка похожа на предыдущую, в которой необходимо установить -dev или -devel версию пакета. Однако, обычно не понятно какой пакет нужно установить для решения этой проблемы, так как <somename> может быть очень общим названием. Попробуйте поискать в интернетет <somename>.h, чтобы узнать в каком пакете этот файл находится, а затем установите этот пакет (и его -dev или -devel версия, если это возможно) с помощью менеджера пакетов вашего дистрибутива.
-
-
(configure:) (error:) no acceptable cc found in <somedirectories>
-
Вы используете для установки компилятор gcc, А переменная окружения CC отсутствует или не установлена. Убедитесь, что пакет gcc установлен, используя менеджер пакетов вашего дистрибутива. Если этот пакет не установлен, установите его. Если он установлен, попробуйте выполнить следующую команду:
[rechosen@localhost ~]$ export CC=»/usr/bin/cc»
Если это помогло, вы можете добавить эту команду в /etc/profile (это файл, содержащий команды, которые выполняются когда пользователь входит в систему) и тогда вам не придется набирать её снова.
-
-
(configure:) (error:) C++ preprocessor «/lib/cpp» fails sanity check
-
Ваш пакет g++ отсутствует или поврежден. Используйте Используйте менеджер пакетов вашего дистрибутива (или любой другой способ найти и установить пакет), чтобы найти пакет g++ и установить его. Не забудьте, что в некоторых дистрибутивах этот пакет называется не g++. Fedora, например, использует название gcc-c++ в соем репозитарии yum. Если вы не можете найти g++, попробуйте поискать c++, cpp или gcc.
-
-
(configure:) (error:) C++ preprocessor «CC (-E)» fails sanity check
-
Эта ошибка вызвана странным «багом» в некоторых версиях библиотеки libtool, которая заставляет конфигурационный скрипт проверять все компиляторы поддерживающиеся libtool. Наиболее простое решение — установить g++.
Ошибки при выполнении команды make
Так как ошибки при выполнении команды make обычно очень специфичны, я дам список основных вещей, которые могут помочь:
-
Если вы компилируете программу с использованием gcc 4 (используйте gcc -dumpversion чтобы это выяснить), попробуйте использовать более старые версии компилятора. Сначала убедитесь, что у вас установлена более старая версия. Обычно это можно узнать, использовав следующую команду:
[rechosen@localhost ~]$ ls /usr/bin/gcc*
Если она вернет что-то вроде этого:
/usr/bin/gcc /usr/bin/gcc32
То можете использовать команды gcc32, чтобы скомпилировать программу в более ранними версиями gcc. Если команда не вернет подобной строки, то используя менеджер пакетов вашего дистрибутива, найдите и установите более ранние версии gcc (обычно они называются compat-gcc или gcc-<versionnumber>). После установки, вам должна быть доступна альтернативная версия gcc. Её можно найти используя команду ls. Заставить команды ./configure, make и make install использовать более старую версию gcc можно так:
[rechosen@localhost ~]$ CC=»/usr/bin/gcc32″ ./configure
[rechosen@localhost ~]$ CC=»/usr/bin/gcc32″ make
[rechosen@localhost ~]$ CC=»/usr/bin/gcc32″ make installКонечно путь /usr/bin/gcc32 надо заменить на тот, по которому у вас находится альтернативная версия gcc.
-
Иногда ошибки могут вызваны простым «багом» программы. Попробуйте скачать последнюю версию программы (используя её cvs, svn или другой репозитарий, или скачав последний снимок) и скомпилируйте её, возможно эта ошибка уже исправлена.
-
Ошибка при выполнении комадны make может быть также вызвана неправильной версией необходимой библиотеки или программы. Эта проблема часто встречается для очень новых или очень старых пакетов. Проверьте зависимости пакета (они обчно написаны на сайте программы) и сравните номера версий с версиями, установленными у вас на компьютере (их обчно можно посмотреть, используя менеджер пакетов вашего дистрибутива). Если номер версии в вашей системе больше того, которые написан на сайте, возможно вы пытаетесь скомпилировать очень старый пакет. Если вам дейсвительно необходимо его скомпилировать, попробуйте установить более старые версии зависимых пакетов.Как бы то небыло, обычно лучше поискать другой способ установки этого пакета или поискать альтернативу. Если номер версии в системе меньше, чем на сайте, вы можете попробовать обновить соответствующий пакет.Вы можетепопробовать обновить требуемую библиотеку или скомпилировать более старую весию программы.Так же проверьте, может уже есть этот пакет, скомпилированный для авшего дистрибутива. Его установка, обычно, проще, чем исправление ошибок компиляции.
-
Другая вещь, которую стоит попробовать — это поиск специфической ошибки в интернете. Если вы не нашли ничего полезного, попробуйте убрать такие вещи, как номер строки (он может измениться с новой версией), номер версии (его можно заменить звездочкой, если он содержится в названии программы) и специальные символы, такие как кавычки, так как они влияют на поисковый сервис. Обычно можно найти много информации в листе рассылок. Иногда выходит патч, который исправляет ошибки в исходном коде. Его можно применить слудеющим образом:
[rechosen@localhost ~]$ patch -Np1 <patchfile>
Не забудьте: чтобы применить патч, текущей должна быть директория с исходными текстами.
Ошибки при выполнении команды make install
Эти ошибки обычно легко понять, но я все равно про них напишу. Есть два наиболее частых случая, почему команда make install возвращает ошибку:
-
У вас нет прав пользователя root. Попробуйте выполнить команду make install, используя команду sudo, или станеть пользователем root, используя команду su. Команда sudo применяется следующим образом:
[rechosen@localhost ~]$ sudo make install
Она спросит пароль; обычно используется собственный пароль или пароль пользователя root. Вы можете испльзовать команду su, чтобы стать польpователем root:
[rechosen@localhost ~]$ su
Эта команда тоже спросит пароль, но в данном случае наобходим именно пароль пользователя root. После того, как вы стали пользователем root, просто выполните команду make install.
-
Пакет, который вы только что скомпилировали не имеет команды установки. В этом случае вам надо скопировать скомпилированный бинарный файл в директорию bin вручную. Если вы выполните команду ls в директории исходного кода, исполняемый файл должен быть светло зеленого цвета. Его надо скопировать в /usr/bin (или, если хотите, в /usr/local/bin) следующей командой:
[rechosen@localhost ~]$ cp <executablefile> /usr/bin
Я согласен, что это не всегда самый простой способ, но иногда разработчики не тратят время на создание команды установки. Мы не должны на них сердиться за это: ведь прежде всего они делают для нас полезную программу.
Другие проблемы
Вот список некоторых других возможных проблем и их решения:
-
Все проходит хорошо, но когда я набираю имя программы, которую только что установил, bash говорить, что не может её найти. Это обычно происходит из-за того, что make install устанавливает все в /usr/local или in /opt/<packagename>. Посмотрите на вывод команды make install: куда скопированы файлы? Попробуйте добвавить эту директорию в переменную PATH (следующий пример приведен для пакета, установленного в /usr/local):
[rechosen@localhost ~]$ export PATH=»$PATH:/usr/local/bin»
Вам надо заменить /usr/local/bin на директорию, в которой установлены исполняемые файлы вашего пакета. Если это помогло, добавьте эту строку в /etc/profile, чтобы вам не пришлось набирать её каждый раз. Кстати, вы можете контролировать место, куда установится пакет, указав следующую опцию, когда запускаете конфигурационный скрипт:
[rechosen@localhost ~]$ ./configure —prefix=/usr
Измените /usr на директорию, в которую хотите установить пакет. Не забудьте, что вы устанавливаете только префикс; бинарные файлы установятся в свою поддиректорию, библиотеки в свою, заголовочные файлы в свою и т.д. Например при использовании указанного префикса, бинарные файлы будут установлены в /usr/bin.
-
Я хочу установить очень старую версию пакета, но я не могу найти исходный код в интернете. У вас еще остается маленький шанс. Попробуйте найти rpm файл пакета той версии, которую вы хотите и скачайте соответствующий src rpm файл. Распаковать его можно следующим образом:
[rechosen@localhost ~]$ rpm2cpio <pmfile> | cpio -idv
Теперь можно использовать исходный код, извлеченный из rpm файла.
Финальные слова
Это учебное пособие еще не закончено. Я планирую обновлять его, используя решения проблем, полученные от других пользователей. Поэтому я прошу вас комментировать эту статью и говорить, чтобы вы еще хотели увидеть в ней. Помните, что эта статья об основных ошибках. Не спрашивайте как скомпилировать определенную версию определенной программы. В любом случае, я надеюсь эта статья будет полезна для вас. Спасибо за прочтение и удачи в сложной, но увлекательной вещи, которая называется компиляция!
Источник
In short while I run the make command it says:
nir@nir:~/Downloads/xf86-video-intel-2.17.0$ make
make: *** No targets specified and no makefile found.  Stop.
I looked inside the folder-xf86-video-intel-2.17.0 and there is a file named «Makefile.in»
it supposed to be a in file, right?
![]()
αғsнιη
35.2k41 gold badges129 silver badges192 bronze badges
asked Feb 11, 2012 at 16:52
![]()
That happens because there is no file named Makefile in that directory. To create that Makefile, you need to execute
$ ./configure
The configure script determines if your system has all the dependencies necessary to compile the application. If a dependency is not found, the configure will fail and the Makefile’s will not be created. To solve that, you must install all the dependencies needed by the application.
The application xf86-video-intel seems to be provided by the xserver-xorg-video-intel package, and its dependencies may be easily installed by running
$ sudo apt-get build-dep xserver-xorg-video-intel
For more information, you might want to read the README or INSTALL files.
answered Feb 11, 2012 at 17:34
![]()
1
Just remember that in order for the ./configure file to run you made need a compiler. So do something like sudo apt-get install gcc. then run ./configure again and should work
![]()
Mitch♦
107k24 gold badges211 silver badges269 bronze badges
answered Aug 8, 2012 at 19:26
![]()
DJHDJH
511 silver badge1 bronze badge
2
The make command looks for a file called «Makefile», no extension, not «Makefile.in». Since the file is not found, make does not know what to do, and stops. (The error message is cryptic because in some rare cases, make can guess what to do without an actual Makefile.)
Read the instructions on how to compile your program. It’s likely that you are required to run ./configure, first. This script will create «Makefile» based on your setup and «Makefile.in».
You can temporarily disable the Hebrew locale when looking for help online, just run
LC_ALL=C make
This will give you English messages.
answered Feb 11, 2012 at 17:07
![]()
JanJan
3,5784 gold badges34 silver badges45 bronze badges
3
Dont worry..
There are only some packages need to be intalled..
type «sudo synaptic» in terminal and enter..
in search box type «qt4-qmake» and mark for installation.
then same as above search» libqt4-dev» and «libxml2-dev» and do the same mark for installation simultaneously..
then apply without check the download option.
here it is….
Then go to cd netanim directory and type «make clean» and enter,
if it does not work type «qmake NetAnim.pro» and enter, it takes couple of seconds.
then type «make» and enter…
Here its done, it will take less then a minute.
Now in netanim directory type «./NetAnim» and enter.
Here you will see animation interface.
Good luck
answered Oct 2, 2017 at 7:48
![]()
0
make sure you have installed this file or
sudo apt install libc6-dev
Now, you need to configure the installation file
./configure
make && make install
answered Jan 22, 2021 at 10:11
![]()
MD SHAYONMD SHAYON
3354 silver badges4 bronze badges
Step 1: Install the Required Dependencies
First, launch the Terminal and run the commands below to install the required dependencies and libraries.
sudo apt install autoconf automake libpcre3-dev libnl-3-dev libsqlite3-dev libssl-dev ethtool build-essential g++ libnl-genl-3-dev libgcrypt20-dev libtool python3-distutils
sudo apt install -y pkg-config
Step 2: Compile and Install
Now, run the commands below (one by one in order) to compile the source code and install Your Repo on your system.
[Before this enter you directory ex: cd folder_name]
sudo autoreconf -i
sudo ./configure --with-experimental --with-ext-scripts
sudo make
sudo make install
I hope this time problem will be solved.
answered Apr 28, 2022 at 11:49
![]()
You must log in to answer this question.
Not the answer you’re looking for? Browse other questions tagged
.
Not the answer you’re looking for? Browse other questions tagged
.
Нужно установить пакет openswan из исходников.
README: make programs install
Из директории папки запускаю и получаю ошибку.
Как установить?
-
Вопрос задан
-
1418 просмотров
Думается мне, что у вас проблема с пробелом в пути. Переместите куда-нибудь в home и попробуйте еще раз.
Пригласить эксперта
Скачал дистрибутив openswan-2.6.40.tar.gz, в распакованной директории от рута пишу «make install» — все ставится
-
Показать ещё
Загружается…
21 сент. 2023, в 15:31
1200 руб./за проект
21 сент. 2023, в 15:31
25000 руб./за проект
21 сент. 2023, в 15:29
7000 руб./за проект
Минуточку внимания
Иногда стандартная последовательность для компиляции программы не работает. Она начинает выводить различные ошибки и не компилирует программу. Что в таком случае делать? В этой статье описано как избавиться от множества часто встречающихся ошибок.
Внимание: В этой статье подразумевается, что у вас уже есть некоторое количество знаний в области работы с командной строкой и вы знаете как работать с менеджером пакетов вашего дистрибутива.
Мы можем разделить ошибки на три категории:
-
Ошибки при выполнении команды ./configure
-
Ошибки при выполнении команды make
-
Ошибки при выполнении команды make install
Очевидно, что ошибки при выполнении команды ./configure, возникают во время выполнения скрипта конфигурации, ошибки при выполнении команды make возникают во время выполнения команды make, а ошибки при выполнении команды make install, соответственно, возникают при выполнении команды make install. Далее будет представлен лист типичных ошибок и способ их решения, разделенный на эти три категории.
Ошибки при выполнении команды ./configure
Следующий список содержит некоторые общие ошибки, которые может выдать каманда ./configure. Ошибки отсортированы по частоте возникновения. Сначала наиболее часто встречающиеся. Вещи между ( и ) являются опциональными, они могут не появлятся. OR, выделенное жирным курсивом означает, что несколько ошибок имеют одно решение. Текст между < и > показывает тип строки, которая должна появиться в этом месте.
-
(configure:) (error:) <somename> (<someversion> (or higher)) not found. (Please check your installation!) OR checking for <somename>… (configure:) (error:) not found. OR (configure:) (error:) <somename> (<someversion> (or newer)) is required to build <package-you’re-trying-to-compile>
-
Это обычно означает что -dev или -devel версия пакета ,который называется <somename> не установлена у вас на компьютере. Используйте менеджер пакетов вашего дистрибутива (или любой другой способ найти и установить пакет), чтобы найти пакет <somename> и установить его, если это возможно, -dev или -devel версию. Если -dev или -devel версия уже установлена, или её не сущечтвует, посмотрете на версию уже установленной. Она достаточно новая? Если она ниже, чем <someversion>, попробуйте обновить пакет. Если обновить пакет не представляется возможным, вы можете попробовать скомпилировать более мтарую версию программы. Более старые версии обычно используют более старые версии библиотек и программ, необходимых для компиляции.
-
-
(configure:) (error:) cannot find header (file) <somename>.h OR (configure:) (error:) (header) (file) <somename>.h missing! OR <similar>
-
Конфигурационный скрипт не может найти .h файл, необходимый для компиляции. Эта ошибка похожа на предыдущую, в которой необходимо установить -dev или -devel версию пакета. Однако, обычно не понятно какой пакет нужно установить для решения этой проблемы, так как <somename> может быть очень общим названием. Попробуйте поискать в интернетет <somename>.h, чтобы узнать в каком пакете этот файл находится, а затем установите этот пакет (и его -dev или -devel версия, если это возможно) с помощью менеджера пакетов вашего дистрибутива.
-
-
(configure:) (error:) no acceptable cc found in <somedirectories>
-
Вы используете для установки компилятор gcc, А переменная окружения CC отсутствует или не установлена. Убедитесь, что пакет gcc установлен, используя менеджер пакетов вашего дистрибутива. Если этот пакет не установлен, установите его. Если он установлен, попробуйте выполнить следующую команду:
[rechosen@localhost ~]$ export CC=»/usr/bin/cc»
Если это помогло, вы можете добавить эту команду в /etc/profile (это файл, содержащий команды, которые выполняются когда пользователь входит в систему) и тогда вам не придется набирать её снова.
-
-
(configure:) (error:) C++ preprocessor «/lib/cpp» fails sanity check
-
Ваш пакет g++ отсутствует или поврежден. Используйте Используйте менеджер пакетов вашего дистрибутива (или любой другой способ найти и установить пакет), чтобы найти пакет g++ и установить его. Не забудьте, что в некоторых дистрибутивах этот пакет называется не g++. Fedora, например, использует название gcc-c++ в соем репозитарии yum. Если вы не можете найти g++, попробуйте поискать c++, cpp или gcc.
-
-
(configure:) (error:) C++ preprocessor «CC (-E)» fails sanity check
-
Эта ошибка вызвана странным «багом» в некоторых версиях библиотеки libtool, которая заставляет конфигурационный скрипт проверять все компиляторы поддерживающиеся libtool. Наиболее простое решение — установить g++.
Ошибки при выполнении команды make
Так как ошибки при выполнении команды make обычно очень специфичны, я дам список основных вещей, которые могут помочь:
-
Если вы компилируете программу с использованием gcc 4 (используйте gcc -dumpversion чтобы это выяснить), попробуйте использовать более старые версии компилятора. Сначала убедитесь, что у вас установлена более старая версия. Обычно это можно узнать, использовав следующую команду:
[rechosen@localhost ~]$ ls /usr/bin/gcc*
Если она вернет что-то вроде этого:
/usr/bin/gcc /usr/bin/gcc32
То можете использовать команды gcc32, чтобы скомпилировать программу в более ранними версиями gcc. Если команда не вернет подобной строки, то используя менеджер пакетов вашего дистрибутива, найдите и установите более ранние версии gcc (обычно они называются compat-gcc или gcc-<versionnumber>). После установки, вам должна быть доступна альтернативная версия gcc. Её можно найти используя команду ls. Заставить команды ./configure, make и make install использовать более старую версию gcc можно так:
[rechosen@localhost ~]$ CC=»/usr/bin/gcc32″ ./configure
[rechosen@localhost ~]$ CC=»/usr/bin/gcc32″ make
[rechosen@localhost ~]$ CC=»/usr/bin/gcc32″ make installКонечно путь /usr/bin/gcc32 надо заменить на тот, по которому у вас находится альтернативная версия gcc.
-
Иногда ошибки могут вызваны простым «багом» программы. Попробуйте скачать последнюю версию программы (используя её cvs, svn или другой репозитарий, или скачав последний снимок) и скомпилируйте её, возможно эта ошибка уже исправлена.
-
Ошибка при выполнении комадны make может быть также вызвана неправильной версией необходимой библиотеки или программы. Эта проблема часто встречается для очень новых или очень старых пакетов. Проверьте зависимости пакета (они обчно написаны на сайте программы) и сравните номера версий с версиями, установленными у вас на компьютере (их обчно можно посмотреть, используя менеджер пакетов вашего дистрибутива). Если номер версии в вашей системе больше того, которые написан на сайте, возможно вы пытаетесь скомпилировать очень старый пакет. Если вам дейсвительно необходимо его скомпилировать, попробуйте установить более старые версии зависимых пакетов.Как бы то небыло, обычно лучше поискать другой способ установки этого пакета или поискать альтернативу. Если номер версии в системе меньше, чем на сайте, вы можете попробовать обновить соответствующий пакет.Вы можетепопробовать обновить требуемую библиотеку или скомпилировать более старую весию программы.Так же проверьте, может уже есть этот пакет, скомпилированный для авшего дистрибутива. Его установка, обычно, проще, чем исправление ошибок компиляции.
-
Другая вещь, которую стоит попробовать — это поиск специфической ошибки в интернете. Если вы не нашли ничего полезного, попробуйте убрать такие вещи, как номер строки (он может измениться с новой версией), номер версии (его можно заменить звездочкой, если он содержится в названии программы) и специальные символы, такие как кавычки, так как они влияют на поисковый сервис. Обычно можно найти много информации в листе рассылок. Иногда выходит патч, который исправляет ошибки в исходном коде. Его можно применить слудеющим образом:
[rechosen@localhost ~]$ patch -Np1 <patchfile>
Не забудьте: чтобы применить патч, текущей должна быть директория с исходными текстами.
Ошибки при выполнении команды make install
Эти ошибки обычно легко понять, но я все равно про них напишу. Есть два наиболее частых случая, почему команда make install возвращает ошибку:
-
У вас нет прав пользователя root. Попробуйте выполнить команду make install, используя команду sudo, или станеть пользователем root, используя команду su. Команда sudo применяется следующим образом:
[rechosen@localhost ~]$ sudo make install
Она спросит пароль; обычно используется собственный пароль или пароль пользователя root. Вы можете испльзовать команду su, чтобы стать польpователем root:
[rechosen@localhost ~]$ su
Эта команда тоже спросит пароль, но в данном случае наобходим именно пароль пользователя root. После того, как вы стали пользователем root, просто выполните команду make install.
-
Пакет, который вы только что скомпилировали не имеет команды установки. В этом случае вам надо скопировать скомпилированный бинарный файл в директорию bin вручную. Если вы выполните команду ls в директории исходного кода, исполняемый файл должен быть светло зеленого цвета. Его надо скопировать в /usr/bin (или, если хотите, в /usr/local/bin) следующей командой:
[rechosen@localhost ~]$ cp <executablefile> /usr/bin
Я согласен, что это не всегда самый простой способ, но иногда разработчики не тратят время на создание команды установки. Мы не должны на них сердиться за это: ведь прежде всего они делают для нас полезную программу.
Другие проблемы
Вот список некоторых других возможных проблем и их решения:
-
Все проходит хорошо, но когда я набираю имя программы, которую только что установил, bash говорить, что не может её найти. Это обычно происходит из-за того, что make install устанавливает все в /usr/local или in /opt/<packagename>. Посмотрите на вывод команды make install: куда скопированы файлы? Попробуйте добвавить эту директорию в переменную PATH (следующий пример приведен для пакета, установленного в /usr/local):
[rechosen@localhost ~]$ export PATH=»$PATH:/usr/local/bin»
Вам надо заменить /usr/local/bin на директорию, в которой установлены исполняемые файлы вашего пакета. Если это помогло, добавьте эту строку в /etc/profile, чтобы вам не пришлось набирать её каждый раз. Кстати, вы можете контролировать место, куда установится пакет, указав следующую опцию, когда запускаете конфигурационный скрипт:
[rechosen@localhost ~]$ ./configure —prefix=/usr
Измените /usr на директорию, в которую хотите установить пакет. Не забудьте, что вы устанавливаете только префикс; бинарные файлы установятся в свою поддиректорию, библиотеки в свою, заголовочные файлы в свою и т.д. Например при использовании указанного префикса, бинарные файлы будут установлены в /usr/bin.
-
Я хочу установить очень старую версию пакета, но я не могу найти исходный код в интернете. У вас еще остается маленький шанс. Попробуйте найти rpm файл пакета той версии, которую вы хотите и скачайте соответствующий src rpm файл. Распаковать его можно следующим образом:
[rechosen@localhost ~]$ rpm2cpio <pmfile> | cpio -idv
Теперь можно использовать исходный код, извлеченный из rpm файла.
Финальные слова
Это учебное пособие еще не закончено. Я планирую обновлять его, используя решения проблем, полученные от других пользователей. Поэтому я прошу вас комментировать эту статью и говорить, чтобы вы еще хотели увидеть в ней. Помните, что эта статья об основных ошибках. Не спрашивайте как скомпилировать определенную версию определенной программы. В любом случае, я надеюсь эта статья будет полезна для вас. Спасибо за прочтение и удачи в сложной, но увлекательной вещи, которая называется компиляция!
Источник

- Configuration Management, Developer, Linux

Sometimes, the typical sequence to compile a program doesn’t work. It starts spitting out all kinds of errors and seems to do everything but compiling that annoying program already. What to do then? This tutorial describes how to get rid of many frequently occuring errors during a typical Linux compiling sequence.Note: You should only compile software when you really need to do it. Compiling can be dangerous to your Linux installation. If you want to install some software, please look for a precompiled package (like a .rpm or a .deb) first. If you really need to compile, do it with care.Note: This tutorial assumes that you have some linux command line knowledge and that you know how to work with your distro’s package manager.We can divide the errors in three categories:
- ./configure errors
- make errors
- make install errors
It should be quite obvious how to recognize them: ./configure errors are outputted by the configure script, make errors by the make command and so on. I’ll now list common errors, with solutions, in these three categories.
./configure errors
The following list contains some common errors that ./configure can give, sorted by frequency of appearance. The first one is the most occuring one. Things between ( and ) are optional, they do not always appear. A bold italic OR indicates that multiple errors have the same solution. Text between < and > describes the kind of string that should appear on that place.
- (configure:) (error:) <somename> (<someversion> (or higher)) not found. (Please check your installation!) OR checking for <somename>… (configure:) (error:) not found. OR (configure:) (error:) <somename> (<someversion> (or newer)) is required to build <package-you’re-trying-to-compile>
- This usually means that the -dev or -devel version of the package with the name <somename> is not installed on your computer. Please use your distro’s package manager (or any other method to find and install packages) to search for <somename> and install, if possible, the -dev or -devel version.If the -dev or -devel version is already installed, or if it doesn’t exist, have a look at the version number currently installed. Is it high enough? If it is lower than <someversion> (if applicable), try upgrading the package. If that is not an option for you, you can also try compiling an older version of the package you’re trying to compile. Older releases generally use earlier version of the libraries / programs they depend upon.If the package that ./configure cannot find is a library (usually indicated by the package name being lib<something>), and you’re sure you’ve got the right version installed, try to find the location where the library’s files are located. If this directory is not included in your ld conf file (which is usually located at /etc/ld.conf or /etc/ld.so.conf) you should add it, and run ldconfig (usually located at /sbin/ldconfig). Please note that ldconfig should usually be executed with root permissions. If you don’t know how to do that, have a look at the first point of Make install errors.Note: If you don’t have access to the ld conf file, you can also add the directory to the LD_LIBRARY_PATH variable. This is pretty ugly and not quite the best practice, but sometimes you don’t have any other options. You can add the directory to LD_LIBRARY_PATH this way:
[rechosen@localhost ~]$ export LD_LIBRARY_PATH=”$LD_LIBRARY_PATH:/your/library/directory”
Of course, replace /your/library/directory with the applicable directory in your case. Note that the LD_LIBRARY_PATH will also have to hold /your/library/directory when running the program you compiled.
- This usually means that the -dev or -devel version of the package with the name <somename> is not installed on your computer. Please use your distro’s package manager (or any other method to find and install packages) to search for <somename> and install, if possible, the -dev or -devel version.If the -dev or -devel version is already installed, or if it doesn’t exist, have a look at the version number currently installed. Is it high enough? If it is lower than <someversion> (if applicable), try upgrading the package. If that is not an option for you, you can also try compiling an older version of the package you’re trying to compile. Older releases generally use earlier version of the libraries / programs they depend upon.If the package that ./configure cannot find is a library (usually indicated by the package name being lib<something>), and you’re sure you’ve got the right version installed, try to find the location where the library’s files are located. If this directory is not included in your ld conf file (which is usually located at /etc/ld.conf or /etc/ld.so.conf) you should add it, and run ldconfig (usually located at /sbin/ldconfig). Please note that ldconfig should usually be executed with root permissions. If you don’t know how to do that, have a look at the first point of Make install errors.Note: If you don’t have access to the ld conf file, you can also add the directory to the LD_LIBRARY_PATH variable. This is pretty ugly and not quite the best practice, but sometimes you don’t have any other options. You can add the directory to LD_LIBRARY_PATH this way:
- (configure:) (error:) cannot find header (file) <somename>.h OR (configure:) (error:) (header) (file) <somename>.h missing! OR <similar>
- The configure script can’t find a .h file required for compilation. This error is similar to the one above, as it requires you to install the -dev or -devel version of a certain package. However, it is usually less clear which package should be installed, as <somename> can be a very generic name. Try searching the web for <somename>.h to find out which package it belongs to, then try installing that package (including its -dev or -devel version, if available) using your distro’s package manager.
- (configure:) (error:) no acceptable cc found in <somedirectories>
- Your gcc installation is either missing or the CC environment variable is not set. Check if the package gcc is installed, using your distro’s package manager. If it isn’t, install it. If it is installed, however, try using this command:
[rechosen@localhost ~]$ export CC=”/usr/bin/cc”
If that worked, you can add the command to your /etc/profile (a file full of commands that are executed whenever any user logs in) so you won’t have to set it again.
- Your gcc installation is either missing or the CC environment variable is not set. Check if the package gcc is installed, using your distro’s package manager. If it isn’t, install it. If it is installed, however, try using this command:
- (configure:) (error:) C++ preprocessor “/lib/cpp” fails sanity check
- Your g++ package is either missing or corrupted. Please use your distro’s package manager (or any other method to find and install packages) to search for g++ and install the corresponding package. Note that quite some distro’s do not call the package g++. Fedora, for example, uses the packagename gcc-c++ in its yum repositories. If you can’t find g++, try searching for c++, cpp and/or gcc.
- (configure:) (error:) C++ preprocessor “CC (-E)” fails sanity check
- This is caused by a strange bug in certain versions of libtool that makes the configure script check for all compilers supported by libtool. The quickest solution is to install g++ (see the solution above this one).
Make errors
As make errors usually are too specific to make a nice list of generic ones, I will give you a list of general things to do that might help:
- If you’re compiling using gcc 4 (use gcc -dumpversion to find out), try using an older compiler version. First, make sure that some older version is installed. This can usually be detected this way:
[rechosen@localhost ~]$ ls /usr/bin/gcc*
If that returns something like this:
/usr/bin/gcc /usr/bin/gcc32
Then you can use, in this case, the gcc32 command to compile with an older gcc version. If not, try using your distro’s package manager to search for older versions of gcc (usually called something like compat-gcc or gcc-<versionnumber>). After installing, you should be able to detect the alternative gcc version using the ls command above. Tell the ./configure, make and make install sequence to use the older gcc version in a way like this:
[rechosen@localhost ~]$ CC=”/usr/bin/gcc32″ ./configure[rechosen@localhost ~]$ CC=”/usr/bin/gcc32″ make[rechosen@localhost ~]$ CC=”/usr/bin/gcc32″ make install
Note: in most cases, you can leave the /usr/bin away and just put the gcc executable name. However, some non-standard Makefiles might handle it in a different way. Therefore, including the full path is the safest option.Of course, replace the /usr/bin/gcc32 with the location of your alternative gcc command.
- Sometimes make errors are just caused by a plain bug. Try obtaining the latest development version of the software (using their cvs, svn or similar repository, or by downloading a nightly snapshot) and try compiling that one to see if they fixed the bug there.
- Make errors can also be caused by having wrong versions of certain libraries / programs. Especially very new and very old packages suffer from this problem. Have a look at the dependencies of the package (they are usually listed somewhere on the site of the software) and compare the version numbers there with the version numbers on your own computer (they can usually be found using the search function of your distro’s package manager). If the version numbers on your system are way higher than the ones on the package’s site, you are probably trying to compile a very old package. If you really need to compile it, try downgrading the dependencies. However, it usually is a better option to search for an other way to install the package or to look for an alternative. If the version numbers on your system are way lower than the ones on the package’s site, you are either trying to compile a bleeding-edge package, or your distro is quite old, or both =). You could try updating the required libraries / programs or compiling an older version of the program. Also, have a look if a nice package made for your distro of the program exists. Installing such a package is usually easier than trying to deal with compilation errors.
- Another thing to try is searching the web for your specific error. If you don’t find anything useful, try stripping away things like line numbers (they can change with versions), version numbers (you can replace them with an asterisk if they are contained in (file) names) and non-alphanumerical characters like quotes, as they influence the search engine’s seeking. You can usually find a lot of information on mailing lists. Sometimes, a patch is provided that will fix the source code. Patches can be applied this way:
[rechosen@localhost ~]$ patch -Np1 -i <patchfile>
Note that you will need to be in the source directory to apply a patch.
Make install errors
These errors usually are quite easy to understand, but I’ll document them anyway. There are two frequent causes that’ll stop you from succesfully using make install:
- You do not have root permission. Try running make install using sudo or try becoming root using su. Sudo should be used this way:
[rechosen@localhost ~]$ sudo make install
It will ask for a password; this usually is either your own password or the system root password. You can use su to become root this way:
[rechosen@localhost ~]$ su
This command will also ask for a password, but it always is the system root password. After becoming root, just run make install as you’d do normally. And after that, don’t forget to return to your normal user again if you used su. You can do this by pressing Ctrl + D or, if that didn’t work, typing ‘exit’ or ‘logout’ and then pressing enter. However, this is only recommended if you became root using su. The sudo program only runs a command with root permissions, it doesn’t log you in as root.
- The package you just compiled doesn’t have the install target. In this case you will have to copy the compiled binaries to a bin directory yourself. If you do an ls in the source directory, executable files should appear light-green. These files could be copied to /usr/bin (or /usr/local/bin, if you prefer) in a way like this:
[rechosen@localhost ~]$ cp <executablefile> /usr/bin
However, this will make a mess of your /usr directory if you use it too much. You could also add the directory in which the executable is located to your PATH variable. Go to the directory, get the whole path of it this way:
[rechosen@localhost ~]$ pwd
Then paste the output of pwd into this command:
[rechosen@localhost ~]$ export PATH=”$PATH:<pwdoutput>”
If you can just run the command now, it worked. Add the export command you ran to your /etc/profile, so you won’t have to type it again.I agree that this isn’t really a clean and easy way, but sometimes developers don’t take the time to create a (proper) install target. We should not be angry with them: think of all the work they do to let us enjoy useful and/or funny programs =).
Other problems
Here is a list of some other general problems, with solutions:
- Everything went alright, but when I type the command I just installed bash says it cannot be found. This is usually caused by make install installing everything in /usr/local or in /opt/<packagename>. Have a look at the output of make install: where did it copy the files to? Try adding the bin directory of that location to your PATH variable (the following example assumes the package was installed to /usr/local):
[rechosen@localhost ~]$ export PATH=”$PATH:/usr/local/bin”
You can just replace /usr/local/bin with the bin directory in which the executables of your package were installed. If this works, add the line to your /etc/profile so you won’t have to type this again and again. By the way, you can control the place in which the package will be installed by specifying this option when running the configure script:
[rechosen@localhost ~]$ ./configure –prefix=/usr
Replace /usr if necessary with the directory in which you’d like to have the package installed. Note that you are only setting the prefix; the binaries will be installed in a subdirectory of the prefix, just like the libraries, header files and so on. When using the above prefix, for example, you will find the binaries in /usr/bin.
- I want to install a very old version of a package, but I can’t find the source archive of it on the internet. You still have a small chance. Try searching for rpm’s of the version you want and download the corresponding src rpm. Unpack it this way:
[rechosen@localhost ~]$ rpm2cpio <rpmfile> | cpio -idv
Now, use the source file that should have been extracted from the source rpm.
Final words
This tutorial is not finished yet. I plan to update it every now and then with solutions to requests from users. Therefore, I ask you to comment on it and say what you’d like to see documented in it. Remember that this tutorial is about generic troubleshooting. Don’t ask me how to make a certain version of a certain program compile. Anyway, I hope this tutorial has been useful to you. Thanks for reading and good luck with that immersively complicated thing called compiling!
Recommended
Get more insights, news, and assorted awesomeness around all things cloud learning.


In short while I run the make command it says:
nir@nir:~/Downloads/xf86-video-intel-2.17.0$ make
make: *** No targets specified and no makefile found.  Stop.
I looked inside the folder-xf86-video-intel-2.17.0 and there is a file named «Makefile.in»
it supposed to be a in file, right?
![]()
αғsнιη
34.7k39 gold badges126 silver badges190 bronze badges
asked Feb 11, 2012 at 16:52
![]()
That happens because there is no file named Makefile in that directory. To create that Makefile, you need to execute
$ ./configure
The configure script determines if your system has all the dependencies necessary to compile the application. If a dependency is not found, the configure will fail and the Makefile’s will not be created. To solve that, you must install all the dependencies needed by the application.
The application xf86-video-intel seems to be provided by the xserver-xorg-video-intel package, and its dependencies may be easily installed by running
$ sudo apt-get build-dep xserver-xorg-video-intel
For more information, you might want to read the README or INSTALL files.
answered Feb 11, 2012 at 17:34
![]()
1
Just remember that in order for the ./configure file to run you made need a compiler. So do something like sudo apt-get install gcc. then run ./configure again and should work
![]()
Mitch♦
106k24 gold badges206 silver badges265 bronze badges
answered Aug 8, 2012 at 19:26
![]()
DJHDJH
511 silver badge1 bronze badge
2
The make command looks for a file called «Makefile», no extension, not «Makefile.in». Since the file is not found, make does not know what to do, and stops. (The error message is cryptic because in some rare cases, make can guess what to do without an actual Makefile.)
Read the instructions on how to compile your program. It’s likely that you are required to run ./configure, first. This script will create «Makefile» based on your setup and «Makefile.in».
You can temporarily disable the Hebrew locale when looking for help online, just run
LC_ALL=C make
This will give you English messages.
answered Feb 11, 2012 at 17:07
![]()
JanJan
3,5534 gold badges33 silver badges45 bronze badges
3
Dont worry..
There are only some packages need to be intalled..
type «sudo synaptic» in terminal and enter..
in search box type «qt4-qmake» and mark for installation.
then same as above search» libqt4-dev» and «libxml2-dev» and do the same mark for installation simultaneously..
then apply without check the download option.
here it is….
Then go to cd netanim directory and type «make clean» and enter,
if it does not work type «qmake NetAnim.pro» and enter, it takes couple of seconds.
then type «make» and enter…
Here its done, it will take less then a minute.
Now in netanim directory type «./NetAnim» and enter.
Here you will see animation interface.
Good luck
answered Oct 2, 2017 at 7:48
![]()
0
make sure you have installed this file or
sudo apt install libc6-dev
Now, you need to configure the installation file
./configure
make && make install
answered Jan 22, 2021 at 10:11
![]()
MD SHAYONMD SHAYON
2753 silver badges3 bronze badges
Step 1: Install the Required Dependencies
First, launch the Terminal and run the commands below to install the required dependencies and libraries.
sudo apt install autoconf automake libpcre3-dev libnl-3-dev libsqlite3-dev libssl-dev ethtool build-essential g++ libnl-genl-3-dev libgcrypt20-dev libtool python3-distutils
sudo apt install -y pkg-config
Step 2: Compile and Install
Now, run the commands below (one by one in order) to compile the source code and install Your Repo on your system.
[Before this enter you directory ex: cd folder_name]
sudo autoreconf -i
sudo ./configure --with-experimental --with-ext-scripts
sudo make
sudo make install
I hope this time problem will be solved.
answered Apr 28, 2022 at 11:49
![]()
I’m trying to install something and it’s throwing me an error: Permission denied when I try to run make on it.
I’m not too fond of the universal rules of unix/linux and not too fond of user rights either. My best guess is that the user I’m logged in as does not have the privileges to run make commands, but hopefully it’s something else that’s not permitting me to install.
Why do I get Permission denied and what should I check or configure in order to attempt permission be granted?
EDIT
Error Message:
gcc -I. -O3 -o pp-inspector  pp-inspector.c
make: execvp: gcc: Permission denied
make: [pp-inspector] Error 127 (ignored)
gcc -I. -O3 -c tis-vnc.c -DLIBOPENSSL -DLIBOPENSSLNEW -DLIBIDN -DHAVE_PR29_H -DLIBMYSQLCLIENT -DLIBPOSTGRES -DHAVE_MATH_H -I/usr/include/mysql
make: execvp: gcc: Permission denied
make: *** [tis-vnc.o] Error 127
asked Feb 2, 2012 at 2:53
![]()
CheeseConQuesoCheeseConQueso
5,80128 gold badges92 silver badges126 bronze badges
1
Execute chmod 777 -R scripts/, it worked fine for me
answered Aug 5, 2014 at 9:55
![]()
D3473RD3473R
2713 silver badges4 bronze badges
2
On many source packages (e.g. for most GNU software), the building system may know about the DESTDIR make variable, so you can often do:
 make install DESTDIR=/tmp/myinst/
 sudo cp -va /tmp/myinst/ /
The advantage of this approach is that make install don’t need to run as root, so you cannot end up with files compiled as root (or root-owned files in your build tree).
answered Feb 2, 2012 at 5:27
![]()
Giving us the whole error message would be much more useful. If it’s for make install then you’re probably trying to install something to a system directory and you’re not root. If you have root access then you can run
sudo make install
or log in as root and do the whole process as root.
answered Feb 2, 2012 at 2:57
![]()
JarrydJarryd
1,31211 silver badges17 bronze badges
7
The problem is frequently with ‘secure’ setup of mountpoints, such as /tmp
If they are mounted noexec (check with cat /etc/mtab and or sudo mount) then there is no permission to execute any binaries or build scripts from within the (temporary) folder.
E.g. to remount temporarily:
sudo mount -o remount,exec /tmp
Or to change permanently, remove noexec in /etc/fstab
answered Jan 2, 2014 at 19:28
![]()
sehesehe
368k47 gold badges449 silver badges622 bronze badges
2
I had a very similar error message as you, although listing a particular file:
$ make
make: execvp: ../HoughLineExtractor/houghlineextractor.hh: Permission denied
make: *** [../HoughLineAccumulator/houghlineaccumulator.o] Error 127

$ sudo make
make: execvp: ../HoughLineExtractor/houghlineextractor.hh: Permission denied
make: *** [../HoughLineAccumulator/houghlineaccumulator.o] Error 127
In my case, I forgot to add a trailing slash to indicate continuation of the line as shown:
${LINEDETECTOR_OBJECTS}:
    ../HoughLineAccumulator/houghlineaccumulator.hh  # <-- missing slash!!
    ../HoughLineExtractor/houghlineextractor.hh
Hope that helps someone else who lands here from a search engine.
answered Mar 18, 2013 at 19:23
![]()
Drew NoakesDrew Noakes
297k163 gold badges677 silver badges739 bronze badges
/rtlwifi_new# make && make install
make -C /lib/modules/4.12.0-kali2-amd64/build M=/root/rtlwifi_new modules
make[1]: *** /lib/modules/4.12.0-kali2-amd64/build: No such file or directory.  Stop.
Makefile:58: recipe for target 'all' failed
make: *** [all] Error 2
I am trying to increase the link strength of my WiFi using these commands:
git clone https://github.com/lwfinger/rtlwifi_newcd rtlwifi_newgit pullmakesudo make installsudo modprobe -rv rtl8723besudo modprobe -v rtl8723be ant_sel=0sudo iw dev wlan0 scan | grep signalsudo modprobe -rv rtl8723besudo modprobe -v rtl8723be ant_sel=1sudo iw dev wlan0 scan | grep signal
Earlier the make command worked successfully, but for some reason I reinstalled my Linux and now I am not able to use it, showing the above mentioned error.
![]()
KazikM
1392 silver badges9 bronze badges
asked Oct 1, 2017 at 5:57
![]()
5
You need to install the development tools and the headers of your kernel:
apt install build-essential
apt install linux-headers-4.12.0-kali2-amd64
answered Oct 1, 2017 at 10:04
![]()
GAD3RGAD3R
61.7k30 gold badges127 silver badges192 bronze badges
1
Want to build a package but stuck with the «make: command not found» error in Ubuntu? Here’s how you can get rid of the error for good.

The make command is probably one of the most widely used commands in the Linux ecosystem. This command builds and compiles programs directly from the source code.
As a Linux user, you can use the make command to compile and install utilities from the terminal. But sometimes, the system throws the «make: command not found» error when users try to build a package using make.
By the end, you will understand how to fix the «make command not found» error on Ubuntu.
Fix the «make: command not found» Error
While make is one of the standard Linux packages and comes pre-installed on most Linux distros, sometimes it isn’t available on a system. In such cases, the system throws the make not found error whenever you try to build a package using make.
You need to follow a few steps to ensure the make command is correctly installed and works on your computer:
1. Verify if make Is Installed on Ubuntu
The primary step is verifying whether make exists on your machine. Use the ls command to check the contents of the /usr/bin/make directory:
ls /usr/bin/make
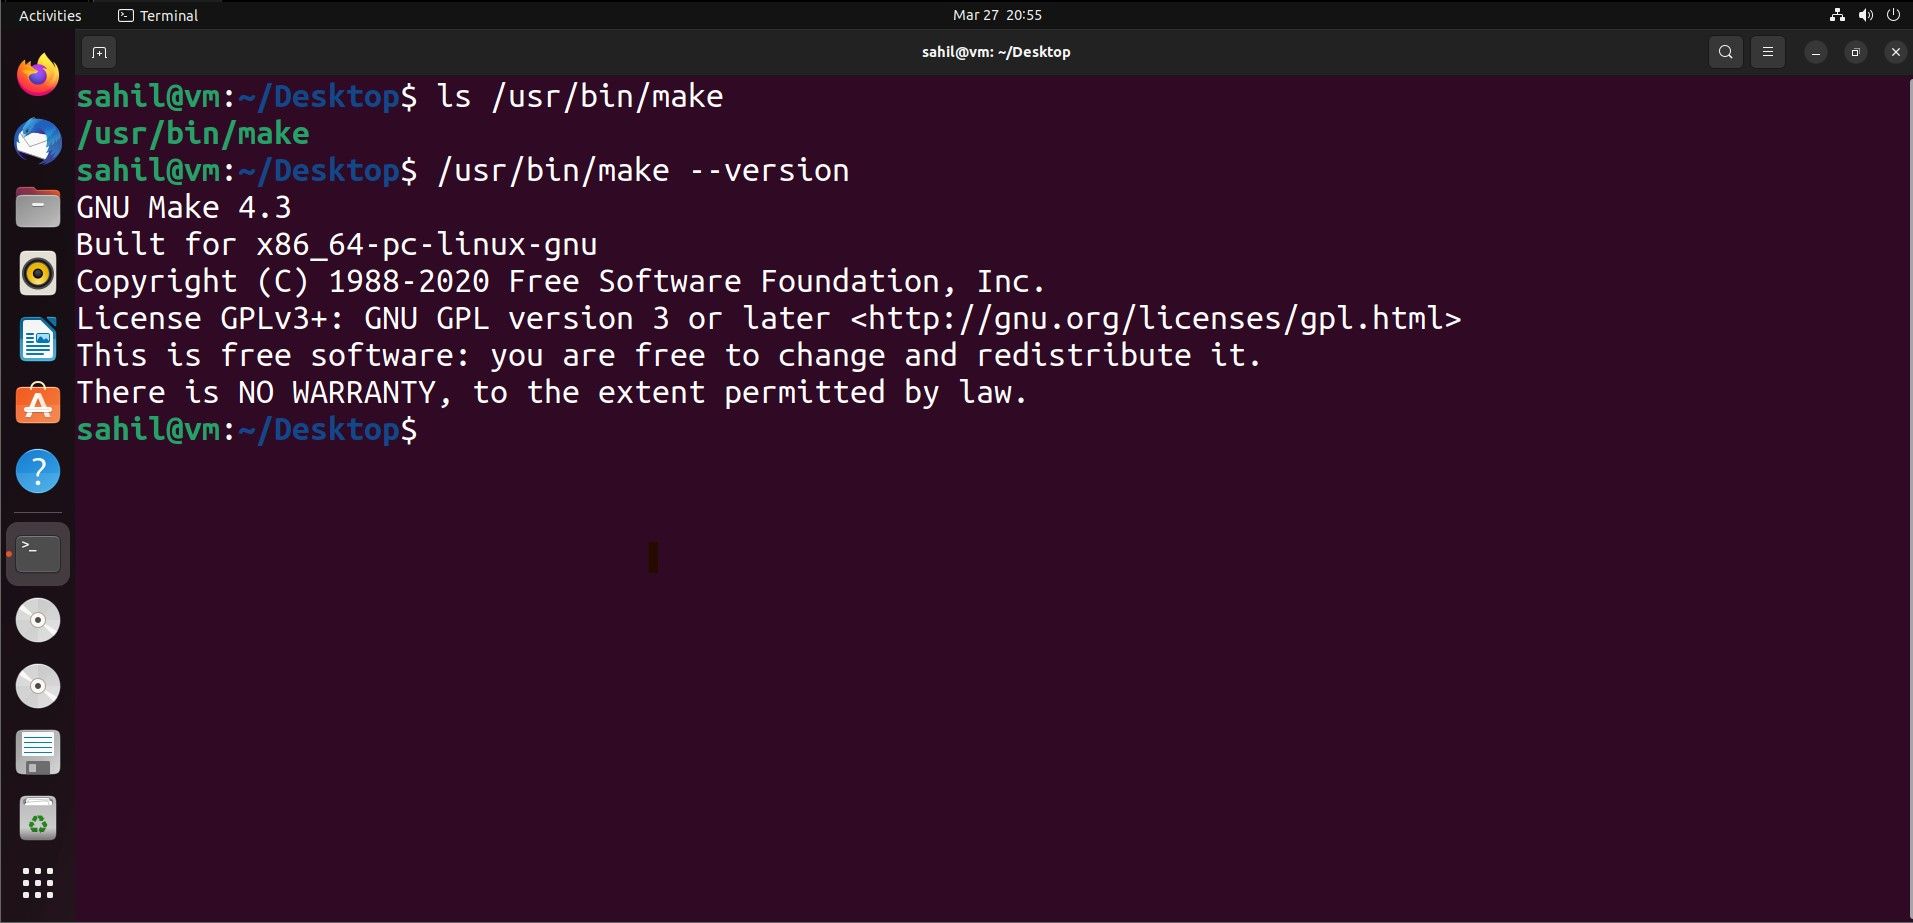
Further on, check if you can execute the command with its absolute path:
/usr/bin/make --version
The aforementioned command will display the make version installed on your system. Ubuntu will display the make command not found error if it’s not installed on your machine.
2. Installing make With APT
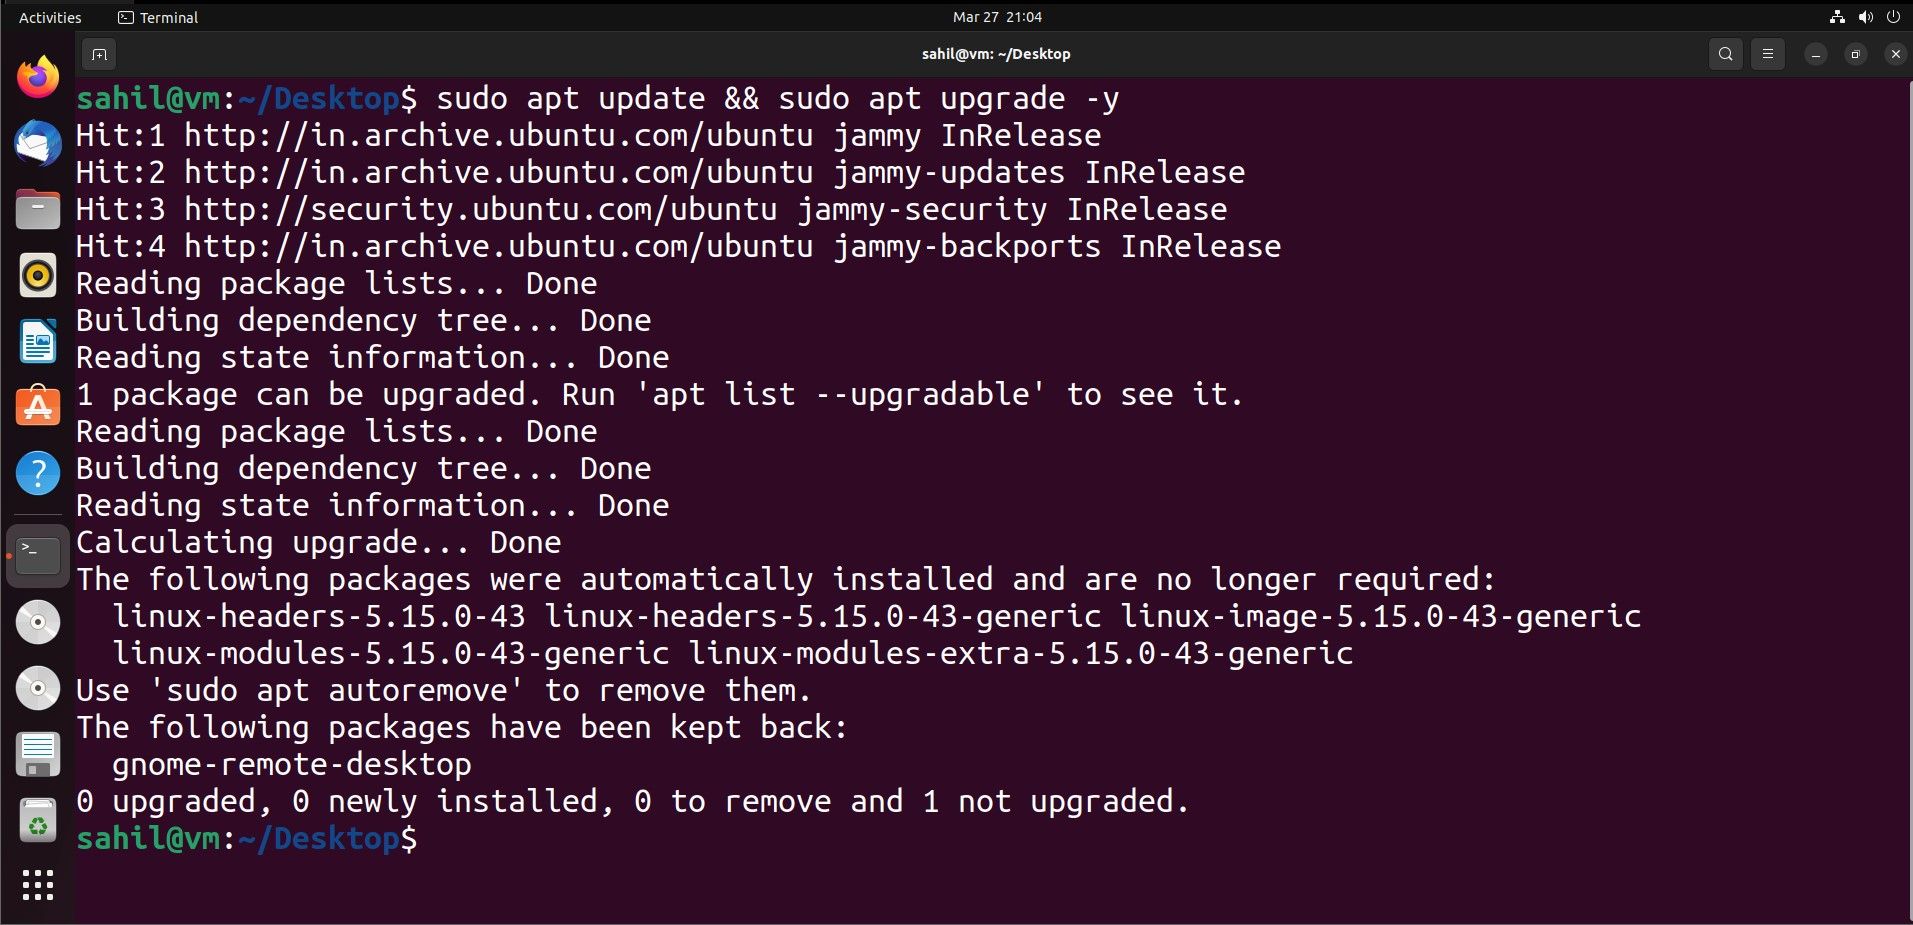
To fix the make command not found error, you should start by updating your system with this one-liner:
sudo apt update && sudo apt upgrade -y
Post system update, install the make command by running:
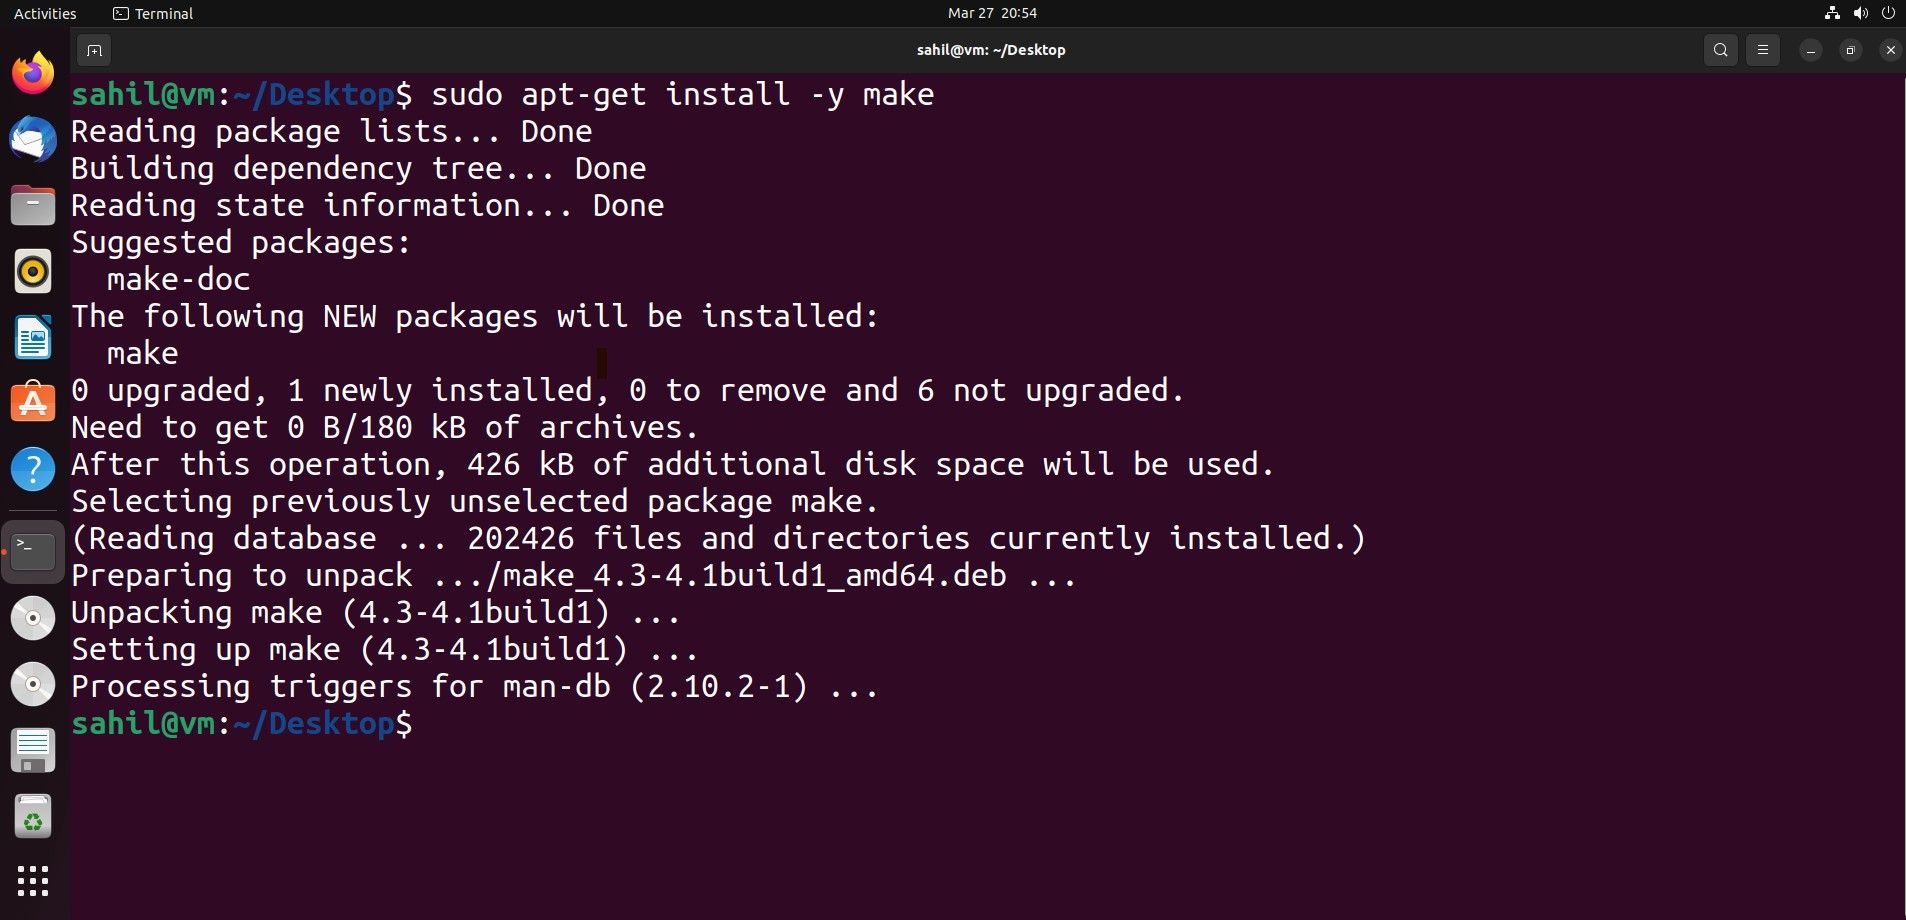
sudo apt install -y make
Output:
If the aforementioned command doesn’t work, download and install the build-essential package, as follows:
sudo apt install build-essential
Output:
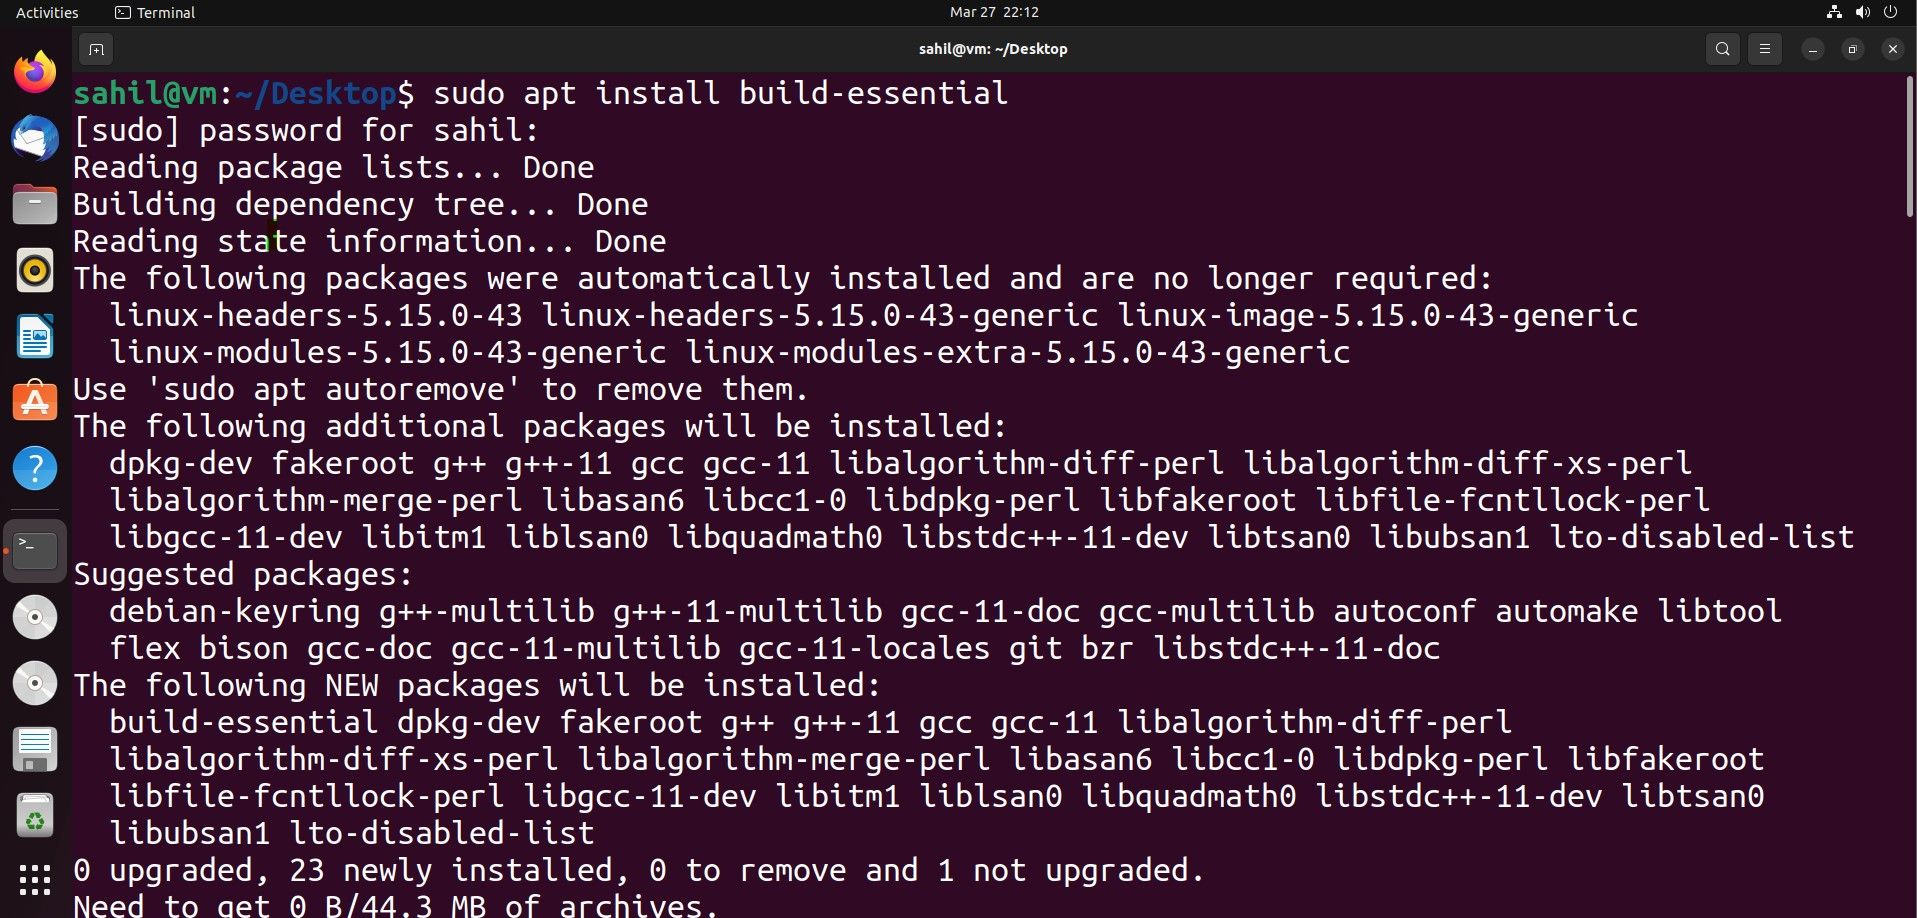
build-essential consists of all the necessary packages required for building and compiling Linux packages from the source. The make command is a part of these packages.
What to Do if make Still Doesn’t Work?
If you followed the above steps and the make command is still not working, you can try one last step. Sometimes, the make command doesn’t get added to the $PATH variable. To fix this issue, reinstall make with the —reinstall command.
sudo apt install --reinstall make
If this still does not work, you must manually add the binary to your $PATH as a last step. In all entirety, the above steps should work and you should get past this «command not found» error with ease.
Troubleshooting Command Errors on Ubuntu
The make command is an essential compiler tool on Linux. The errors provided by the system are usually self-descriptive, and experienced users can figure out the solution by looking at the error statement.
In addition to local workstations, Linux-based servers also throw such errors. You can fix most issues by performing a basic audit on the server.
Нужно установить пакет openswan из исходников.
README: make programs install
Из директории папки запускаю и получаю ошибку.
Как установить?
-
Вопрос заданболее трёх лет назад
-
1371 просмотр
Думается мне, что у вас проблема с пробелом в пути. Переместите куда-нибудь в home и попробуйте еще раз.
Пригласить эксперта
Скачал дистрибутив openswan-2.6.40.tar.gz, в распакованной директории от рута пишу «make install» — все ставится
-
Показать ещё
Загружается…
09 апр. 2023, в 21:24
4000 руб./за проект
09 апр. 2023, в 20:34
200000 руб./за проект
09 апр. 2023, в 20:20
5000 руб./за проект
Минуточку внимания
Помогайте люди добрые, есть древний придревний комп, скачал убунту минимал, установил, поставил openbox, затем немного допилит панельки, решил поставить sopcast, скачал с сайта code.google… два файла: sopcast-player и sp-auth, разархивировал, через терминал захожу:
snab@chichulin:~$ sudo su
[sudo] password for snab
root@chichulin:/home/snab# cd /home/snab/Загрузки/sopcast-player
root@chichulin:/home/snab/Загрузки/sopcast-player# ./configure
bash: ./configure: Нет такого файла или каталога
root@chichulin:/home/snab/Загрузки/sopcast-player# make
Generating language files…
/bin/sh: msgfmt: not found
/bin/sh: msgfmt: not found
/bin/sh: msgfmt: not found
/bin/sh: msgfmt: not found
/bin/sh: msgfmt: not found
/bin/sh: msgfmt: not found
/bin/sh: msgfmt: not found
/bin/sh: msgfmt: not found
/bin/sh: msgfmt: not found
/bin/sh: msgfmt: not found
/bin/sh: msgfmt: not found
/bin/sh: msgfmt: not found
/bin/sh: msgfmt: not found
/bin/sh: msgfmt: not found
/bin/sh: msgfmt: not found
/bin/sh: msgfmt: not found
/bin/sh: msgfmt: not found
/bin/sh: msgfmt: not found
/bin/sh: msgfmt: not found
/bin/sh: msgfmt: not found
/bin/sh: msgfmt: not found
/bin/sh: msgfmt: not found
/bin/sh: msgfmt: not found
/bin/sh: msgfmt: not found
/bin/sh: msgfmt: not found
/bin/sh: msgfmt: not found
/bin/sh: msgfmt: not found
/bin/sh: msgfmt: not found
/bin/sh: msgfmt: not found
/bin/sh: msgfmt: not found
/bin/sh: msgfmt: not found
/bin/sh: msgfmt: not found
/bin/sh: msgfmt: not found
/bin/sh: msgfmt: not found
/bin/sh: msgfmt: not found
/bin/sh: msgfmt: not found
make: *** [language] Ошибка 127
root@chichulin:/home/snab/Загрузки/sopcast-player# make install
install -p -dm 0755 /usr/share/sopcast-player/lib
install -p -dm 0755 /usr/share/sopcast-player/ui
install -p -dm 0755 /usr/bin
install -p -dm 0755 /usr/share/locale
install -p -dm 0755 /usr/share/icons/hicolor/scalable/apps
install -p -dm 0755 /usr/share/applications
install -p -m 0644 lib/* /usr/share/sopcast-player/lib
install -p -m 0644 ui/* /usr/share/sopcast-player/ui
install -p -m 0755 sopcast-player /usr/bin
install: невозможно выполнить stat для `sopcast-player’: Нет такого
файла или каталога
make: *** [install] Ошибка 1
The Make Command Not Found error indicates that the make utility is either not installed on the system or it’s not present in the PATH variable.
On Linux, make is often preinstalled or included with package sets like build-essential. On Mac, it’s included with the Xcode command line tools, whereas on Windows, you must manually install it.
Of course, there are ways to manually install make on Linux and Mac as well. We’ve discussed these and other fixes in further detail in the sections below.
As stated, you should ensure make is actually installed and present in the PATH variable. Additionally, as this issue is common with codespace, we’ve also listed a relevant fix for that.
On Linux
Depending on the Linux system, the make command may or may not be installed. If it’s installed, you should check the PATH variable. But often, it’s just not installed to start with. Do note that before you install make, you may have to update the package list first. Here’s how you can do this on various distros:
- On Debian-based distros:
sudo apt-get update
- On Arch-based distros:
sudo pacman -Syu

Next, you can install make with the following commands:
- On Debian-based distros:
sudo apt-get install -y make
- On RPM distros:
sudo yum install make - On Arch-based distros:
sudo pacman -S make

If installing make like this doesn’t work, you can install it as part of the build-essential or similar set of packages.
- On Debian-based distros:
sudo apt install -y build-essential
- On RPM Distros:
sudo yum groupinstall "Development Tools" - On Arch-based distros:
sudo pacman -Sy base-devel

Make is generally located in the /usr/bin or /usr/local/bin directory. These directories should already be in your PATH variable, but if not, you can add them as such:export PATH=$PATH:/file/path
On Windows
Unlike Linux, make isn’t installed by default on Windows. We recommend using chocolatey to install it. Here are the steps for this:
- Press Win + R, type
powershell, and press Enter. - Execute the following command to install choco:
Set-ExecutionPolicy Bypass -Scope Process -Force; [System.Net.ServicePointManager]::SecurityProtocol = [System.Net.ServicePointManager]::SecurityProtocol -bor 3072; iex ((New-Object System.Net.WebClient).DownloadString('https://community.chocolatey.org/install.ps1'))
- After installing it, restart the PowerShell window and enter
choco install maketo install make.

If installing make doesn’t resolve the error, you should check the PATH variable. Here’s how you can do this:
- Press Win + R, type
systempropertiesadvanced, and press Enter. - Click on Environment Variables.

- Check the System Variables section. If you installed make with choco, the ChocolateyInstall variable (
C:ProgramDatachocolatey) should be present there.
- If you used another method like MinGW, you should press New and add the appropriate path (e.g.,
C:MinGWbin). Additionally, try calling make differently (e.g.,MinGW32-make).


On Mac
On fresh Mac installations, you must first install the Xcode command line tools in order to use make. You can download the complete Xcode files from the developer site, or you can download Xcode from the App Store.
With older Xcode versions, command line tools like make were bundled by default. But now, you must manually them by going to Xcode > Preferences > Downloads > Components > Install Command Line Tools.
For even newer versions, we recommend just running the xcode-select --install command in the terminal, as this will specifically install the command line tools instead of all the Xcode files.

Note: If you have homebrew installed, you can easily install make with sudo brew install make.
If make still doesn’t work, you should check the PATH variable. For older Xcode versions, you can add /Developer/usr/bin to the PATH environment variable with:$ export PATH=$PATH:/Developer/usr/bin
For recent Xcode versions, you can instead use the following command:export PATH=$PATH:/Applications/Xcode.app/Contents/Developer/usr/bin
Rebuild Codespace
If you’re facing this error while trying to compile anything from GitHub, the codespace might be the problem. You may be able to resolve this error by deleting the codespace and reinstalling it. You can do this from your GitHub Codespaces page.
| No rule to make target | |
| GNUmakefile:1: *** missing separator. Stop. | |
| Syntax error : end of file unexpected (expecting «fi») | |
| OLDPWD not set | |
| @echo: command not found | |
| -bash: make: command not found | |
| Похожие статьи |
No rule to make target
make: *** No rule to make target ‘main.cpp’, needed by ‘main.o’. Stop.
GNUmakefile:1: *** missing separator. Stop.
Если вы видите ошибку
GNUmakefile:1: *** missing separator. Stop.
Обратите внимание на GNUmakefile:1:
1 — это номер строки, в которой произошла ошибка
Возможно где-то вместо табуляции затесался пробел. Напоминаю, что в makefile отступы должны быть заданы табуляциями.
Либо таргет перечислен без двоеточия .PHONY clean вместо .PHONY: clean
Либо какая-то похожая ошибка.
Syntax error : end of file unexpected (expecting «fi»)
Если вы видите ошибку
Syntax error : end of file unexpected (expecting «fi»)
Обратите внимание на расстановку ; в конце выражений и расстановку \ при переносе строк.
Изучите этот
пример
и сравните со своим кодом.
OLDPWD not set
Если внутри makefile вы выполняете cd и видите ошибку
OLDPWD not set
Попробуйте сперва явно перейти в текущую директорию с помощью
CURDIR
cd $(CURDIR)
@echo: command not found
Если внутри makefile вы пытаетесь подавить вывод echo и получаете
@echo: command not found
Скорее всего echo это не первая команда в строке
НЕПРАВИЛЬНО:
if [ ! -f /home/andrei/Downloads/iso/centos_netinstall.iso ]; then \
rm ./CentOS-7-x86_64-NetInstall-*; \
wget -r -np «http://builder.hel.fi.ssh.com/privx-builds/latest/PrivX-master/Deliverables/» -A «CentOS-7-x86_64-NetInstall-2009.iso
-*.iso; \
else \
@echo «WARNING: centos_netinstall.iso already exists»; \
ПРАВИЛЬНО:
@if [ ! -f /home/andrei/Downloads/iso/centos_netinstall.iso ]; then \
rm ./CentOS-7-x86_64-NetInstall-*; \
wget -r -np «http://builder.hel.fi.ssh.com/privx-builds/latest/PrivX-master/Deliverables/» -A «CentOS-7-x86_64-NetInstall-2009.iso
-*.iso; \
else \
echo «WARNING: centos_netinstall.iso already exists»; \
-bash: make: command not found
Ошибка
-bash: make: command not found
Означает, что make не установлен.
Установить make в rpm системах можно с помощью yum в deb система — с помощью apt
sudo yum -y install make
sudo apt -y install make
| make | |
| Основы make | |
| PHONY | |
| CURDIR | |
| shell | |
| wget + make | |
| Переменные в Make файлах | |
| ifeq: Условные операторы | |
| filter | |
| -c: Компиляция | |
| Linux | |
| Bash | |
| C | |
| C++ | |
| C++ Header файлы | |
| Configure make install | |
| DevOps | |
| Docker | |
| OpenBSD | |
| Errors make |