Так как последнее время пользоваться программой Hamachi могут только авторизованные пользователи, то при каждом включении вы должны авторизовываться на центральном сервере. Обычно это происходит автоматически и без лишних проблем, но если после запуска Hamachi появляется ошибка «Не удается установить соединение со службой входа Logmein», значит что-то пошло не так.

Маловероятно, что ошибка возникает из-за проблем связи с сервером. Обычно причина кроется в неправильных настройках на стороне клиента (т.е. на вашем компьютере) или на стороне сервера (Logmein). Есть 2 способа решить проблему.
Способ 1
Попробуйте полностью удалить Hamachi, а затем заново его установить. После установки, во время первого запуска, вам будет предложено пройти авторизацию.

Авторизуйтесь, либо зарегистрируйтесь, создав новый аккаунт. После этого запуск и подключение программы будет происходить без ошибки соединения.
Способ 2
Увидев сообщение «не удается установить соединение» в Хамачи следует проверить настройки привязки компьютеров к сети в личном кабинете на официальном сайте Logmein. Вы должны быть зарегистрированы там (то есть иметь аккаунт). Подробнее о том, как зарегистрироваться, читайте в этой инструкции.
После того, как вы зарегистрируете себе аккаунт, запустите Hamachi, зайдите в «Система» — «Параметры». Во вкладке «Статус» присоедините свой новый аккаунт, нажав соответствующую кнопку.

Затем авторизуйтесь на сайте https://secure.logmein.com/ и зайдите в «Мои сети».

Там вы увидите новый запрос на подключение, который нужно подтвердить.

Нажмите на запрос и в открывшемся окне подтвердите его.

После этого пробуйте установить соединение через Hamachi, все должно получиться!
Hamachi — полезный инструмент, но многие пользователи сообщали о различных ошибках Hamachi на своем ПК. Эти ошибки могут вызвать различные проблемы, и в сегодняшней статье мы покажем вам, как их исправить.
Ошибки Hamachi могут вызвать много проблем на вашем компьютере, и если говорить о Hamachi, вот некоторые распространенные проблемы, о которых сообщили пользователи:
- Ошибка сетевого адаптера Hamachi — эта проблема может возникнуть, если не установлен необходимый драйвер виртуальной сети. Чтобы устранить проблему, обновите драйвер адаптера вручную.
- Hamachi VPN error Windows 10 — Иногда вы можете столкнуться с этой проблемой из-за других приложений VPN. Тем не менее, вы можете решить эту проблему, просто удалив другой VPN с вашего ПК.
- Проблема туннеля Hamachi Windows 10, желтый треугольник — эта проблема может возникнуть, если необходимые службы не запущены. Чтобы устранить проблему, откройте окно «Службы» и перезапустите необходимые службы.
- Ошибка Hamachi: эта сеть не существует, не удалось подключиться к сетевому адаптеру. Если вы столкнулись с одной из этих ошибок, скорее всего, проблема связана с брандмауэром, поэтому обязательно проверьте его конфигурацию и убедитесь, что Hamachi разрешено проходить через него.
- Ошибка Hamachi 2503, 52, 1068, 2755, код 2502. Эти ошибки могут появляться по разным причинам, но вы должны быть в состоянии исправить их, используя одно из наших решений.
- Проверьте свой антивирус
- Убедитесь, что сервис Hamachi работает
- Удалить проблемные приложения
- Переустановите Hamachi
- Установите драйвер вручную во время установки Hamachi
- Используйте другой установщик
- Попробуйте использовать более старую версию Hamachi
- Отключить брандмауэр Windows
Решение 1. Проверьте свой антивирус

По словам пользователей, причиной ошибок Hamachi может стать ваш антивирус. Иногда ваш антивирус может блокировать Hamachi, поэтому обязательно проверьте его настройки и убедитесь, что Hamachi разрешен к запуску. Если Hamachi не заблокирован, вы можете попробовать отключить определенные функции или вообще отключить антивирус.
Если проблема не устранена, последним вариантом будет полное удаление антивируса с вашего ПК. Даже если вы удалите антивирус, ваш компьютер останется защищенным Защитником Windows, поэтому вам не нужно беспокоиться о вашей безопасности.
Если удаление антивируса решит вашу проблему, возможно, стоит подумать о переходе на другое антивирусное решение. Если вы ищете новый антивирус, который не будет мешать вашей системе и другим приложениям, мы настоятельно рекомендуем вам попробовать Bitdefender.
Bitdefender выпустил версию 2019 года, и она полна новейших функций безопасности. У вас будет двухмоторное сканирование, VPN, шифрование и постоянное обновление базы данных сигнатур. Мы рекомендуем вам проверить его планы.
— Загрузите Bitdefender Antivirus 2019 по специальной цене со скидкой 35%.
- Читайте также: Исправлено: Hamachi не работает в Windows 10, 8.1 и 7
По словам пользователей, вы можете столкнуться с различными ошибками Hamachi просто, если необходимые службы не работают. Многие пользователи сообщали об ошибках туннелирования и VPN в Hamachi, и в большинстве случаев вы можете исправить эти проблемы, просто перезапустив службы Hamachi. Для этого просто выполните следующие действия:
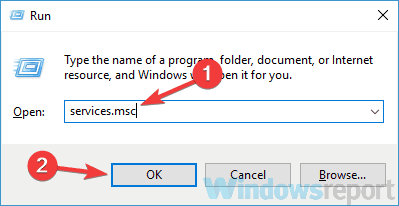
- Откройте окно « Службы». Самый быстрый способ сделать это — нажать Windows Key + R и ввести services.msc. Теперь нажмите Enter или нажмите ОК.

- Когда откроется окно « Службы», найдите и дважды щелкните по сервису Hamachi Tunneling Engine.
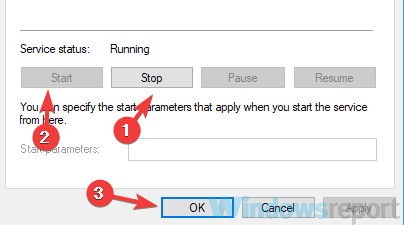
- Когда откроется окно « Свойства», нажмите кнопку « Стоп», чтобы остановить службу. Подождите пару секунд и нажмите кнопку « Пуск». Нажмите Apply и OK, чтобы сохранить изменения.


По словам пользователей, это простое решение исправило ошибку туннелирования и VPN с Hamachi, поэтому мы рекомендуем вам попробовать.
Решение 3 — Удалить проблемные приложения

Если у вас есть ошибки Hamachi, такие как проблема с туннелированием или ошибка VPN, проблема может быть вызвана сторонним программным обеспечением. Иногда VPN-клиенты могут вмешиваться в Hamachi, что может привести к этой и многим другим проблемам.
Чтобы решить эту проблему, рекомендуется найти и удалить ваш текущий VPN-клиент. Пользователи сообщали, что Dell VPN клиент вызвал появление этой проблемы, но после ее устранения проблема была решена. Помните, что эта проблема может появиться не из-за вашего VPN-клиента, а из-за другого программного обеспечения.
Если ваш VPN-клиент был проблемой, вам следует рассмотреть возможность использования другого VPN-клиента. Если вам нужен хороший и удобный VPN-клиент, который не будет мешать вашей системе, мы настоятельно рекомендуем вам попробовать Cyberghost VPN.
Почему стоит выбрать CyberGhost? Cyberghost для Windows
- 256-битное шифрование AES
- Более 3000 серверов по всему миру
- Отличный ценовой план
- Отличная поддержка
Получить сейчас CyberGhost VPN
Решение 4 — Переустановите Hamachi
Иногда ошибки Hamachi могут быть вызваны поврежденной установкой, и если это произойдет, лучшим способом будет переустановить Hamachi. Это довольно просто сделать, но для полной переустановки Hamachi рекомендуется использовать программное обеспечение для удаления.
Если вы не знаете, программное обеспечение для удаления, такое как IObit Uninstaller, может полностью удалить нужное приложение с вашего ПК. В отличие от обычного процесса удаления, программа удаления удалит все файлы и записи реестра, связанные с Hamachi.
- Скачать сейчас IObit Uninstaller PRO 7 бесплатно
После полного удаления Hamachi все будет так, как если бы оно никогда не устанавливалось на ваш компьютер. Теперь вам просто нужно скачать и установить последнюю версию, и проблема должна быть полностью решена.
- ЧИТАЙТЕ ТАКЖЕ: Исправлено: «Сбой соединения с ошибкой 800»
Решение 5. Установите драйвер вручную во время установки Hamachi.
Иногда ошибки Hamachi могут быть вызваны отсутствующими драйверами, и если вы получаете проблему туннелирования или ошибку VPN, проблема может быть в отсутствующих драйверах. Несколько пользователей сообщили, что установка Hamachi зависает при установке драйвера виртуальной сети, и для решения этой проблемы необходимо установить этот драйвер вручную. Чтобы сделать это, вам нужно сделать это быстро, пока установка застряла:
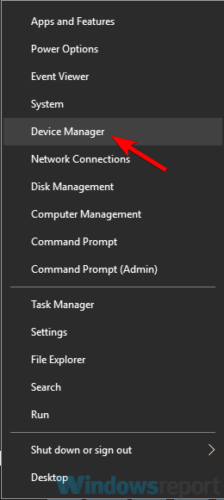
- Нажмите Windows Key + X, чтобы открыть меню Win + X. Теперь выберите Диспетчер устройств из списка.
- Найдите LogMeIn Hamachi Virtual Ethernet Adapter, щелкните его правой кнопкой мыши и в меню выберите « Обновить драйвер».
- Выберите Обзор моего компьютера для программного обеспечения драйвера.
- Теперь перейдите в каталог установки Hamachi, по умолчанию это должен быть C: Program Files (x86) LogMeIn Hamachi.


После того, как вы выберете этот каталог, ваш компьютер должен отсканировать его и установить отсутствующий драйвер. Как только это будет сделано, будет установлен последний драйвер и установка будет успешно завершена. Помните, что для того, чтобы это работало, вам нужно быстро обновить драйвер, поэтому неплохо было бы открыть диспетчер устройств при установке Hamachi.
Решение 6 — Используйте другой установщик
По словам пользователей, иногда ошибки Hamachi могут быть вызваны вашим установщиком. Это необычная причина, но несколько пользователей сообщили, что они исправили проблему, просто удалив Hamachi и используя другой установочный файл для его установки.
Пользователи утверждают, что они загрузили установщик из другого источника, который не является официальным сайтом Hamachi, и тем самым проблема была решена. Мы не знаем, насколько надежен этот метод, но многие пользователи утверждают, что он работает, поэтому не стесняйтесь опробовать его.
Решение 7. Попробуйте использовать более старую версию Hamachi
В некоторых случаях ошибки Hamachi могут появляться, если вы используете последнюю версию. Когда речь идет о программном обеспечении, обычно рекомендуется использовать новейшее программное обеспечение, поскольку оно предлагает новейшие функции и обновления.
Однако иногда некоторые функции могут содержать ошибки, что может привести к этой и многим другим ошибкам. Чтобы решить эту проблему, некоторые пользователи предложили откатиться к более старой версии Hamachi и проверить, помогает ли это.
Для этого удалите текущую версию, а затем загрузите и установите старую версию. Чтобы найти более старую версию, вам, возможно, придется использовать сторонние источники. Загрузив старую версию, установите ее и проверьте, решает ли это вашу проблему.
Имейте в виду, что Hamachi будет проверять наличие последней версии после ее установки, поэтому не забудьте загрузить последние обновления.
Решение 8 — Отключить брандмауэр Windows
Если у вас есть ошибки Hamachi, такие как желтый треугольник, проблема может быть связана с вашим брандмауэром. Чтобы проверить, является ли проблема с вашим брандмауэром, некоторые пользователи предлагают временно отключить его и проверить, решает ли это вашу проблему. Для этого выполните следующие действия:
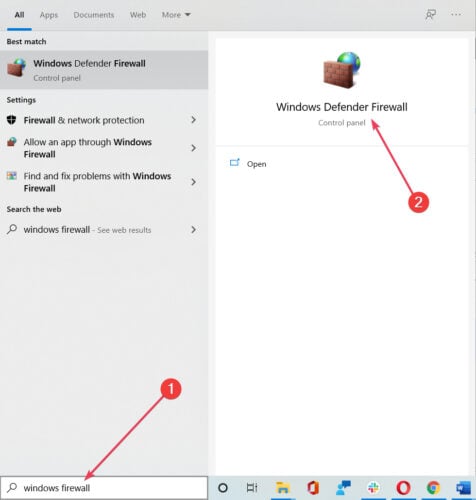
- Нажмите Windows Key + S и войдите в брандмауэр Windows. Выберите Брандмауэр Защитника Windows из списка.
- Когда откроется брандмауэр Защитника Windows, нажмите « Расширенные настройки» в меню слева.
- Появится новое окно. Выберите Свойства брандмауэра Защитника Windows.
- Перейдите на вкладку « Профиль домена » и установите для состояния брандмауэра значение « Выкл.». Теперь перейдите на вкладки Личный профиль и Публичный профиль и сделайте то же самое. Наконец, нажмите Apply и OK, чтобы сохранить изменения


После этого ваш брандмауэр должен быть полностью отключен. Мы должны отметить, что отключение брандмауэра не является лучшим выбором с точки зрения безопасности, но если Hamachi работает после того, как вы отключите брандмауэр, проблема, вероятно, связана с одним из параметров брандмауэра, поэтому вам нужно будет вручную найти и изменить проблемный параметр.
Несколько пользователей сообщили, что проблема связана с портом 25565, поэтому, чтобы устранить эту проблему, убедитесь, что порт 25565 открыт на странице Входящие правила. После внесения этих изменений проблема должна быть решена, и Hamachi снова начнет работать.
Ошибки Hamachi могут вызвать много проблем на вашем ПК, но в большинстве случаев эти проблемы вызваны настройками брандмауэра, поврежденной установкой или другими приложениями. Однако мы надеемся, что вам удалось решить эту проблему с помощью одного из наших решений.
ЧИТАЙТЕ ТАКЖЕ:
- ИСПРАВЛЕНИЕ: Wi-Fi соединение постоянно падает в Windows 10
- Исправлено: «Ошибка подключения с ошибкой 691» в Windows 10
- Исправлено: «Ошибка подключения с ошибкой 868» в Windows 10
by Milan Stanojevic
Milan has been enthusiastic about technology ever since his childhood days, and this led him to take interest in all PC-related technologies. He’s a PC enthusiast and he… read more
Updated on November 18, 2021
- Hamachi is a pretty good VPN but the various errors with this app can cause many PC problems.
- The elements causing these errors vary from antivirus settings to drivers or Windows Firewall.
- All you need to know about virtual private networks is in our VPN section.
- Our Tech Troubleshooting Hub can transform you into a computer wiz so take a look.

XINSTALL BY CLICKING THE DOWNLOAD FILE
This software will keep your drivers up and running, thus keeping you safe from common computer errors and hardware failure. Check all your drivers now in 3 easy steps:
- Download DriverFix (verified download file).
- Click Start Scan to find all problematic drivers.
- Click Update Drivers to get new versions and avoid system malfunctionings.
- DriverFix has been downloaded by 0 readers this month.
Hamachi is a useful tool, but many users reported various errors with this app on their PC. These errors can cause various problems, and in today’s article, we’ll show you how to fix them.
Hamachi errors can cause many issues on your PC. Here are some common issues that users reported:
- Hamachi network adapter error – Can occur if the necessary virtual network driver isn’t installed. Update the adapter driver.
- Hamachi VPN error Windows 10 – Can be caused by other VPN applications. You can fix the issue simply by removing the other VPN from your PC.
- Hamachi tunnel problem Windows 10, yellow triangle – Can occur if the necessary services aren’t running. Open the Services window and restart the required services.
- Hamachi error this network does not exist, failed to connect to network adapter – The issue is most likely your firewall, so be sure to check its configuration and make sure that Hamachi is allowed to go through it.
- Hamachi error 2503, 52, 1068, 2755, code 2502 – These errors can appear due to various reasons, but you should be able to fix them using one of our solutions.
How do I fix Hamachi errors on Windows 10?
- Check your antivirus
- Update the drivers automatically
- Make sure that Hamachi service is running
- Remove problematic applications
- Reinstall Hamachi
- Install the driver manually while Hamachi is installing
- Use a different installer
- Try using an older version of Hamachi
- Disable Windows Firewall
1. Check your antivirus
According to users, the cause for Hamachi errors can be your antivirus. Sometimes your antivirus can block the VPN, so be sure to check its settings and make sure that Hamachi is allowed to run.
If this isn’t the issue, you might want to try disabling certain features or disable your antivirus altogether.
In case the problem is still there, your last option would be to remove your antivirus completely from your PC.
Even if you remove your antivirus, your PC will remain protected by Windows Defender, so there’s no need to worry about your safety.
If removing the antivirus solves your problem, this might be a good time to consider switching to a different antivirus solution.
The market is full of reliable antivirus software options that do not interfere with other applications on your PC.
Look for an antivirus that has a comprehensive threat database, real-time browsing connection, and low CPU usage. These are the most important features and they are generally included in free antivirus tools.
Some antivirus tools include built-in VPN solutions. If that appeals to you, you can drop your Hamachi subscription and use one software both for threat protection and online privacy.
2. Update the drivers automatically
Sometimes Hamachi errors can be caused by missing drivers, and if you’re getting a tunneling problem or a VPN error, the issue might be the missing drivers.
You could try updating them manually by selecting every single one from Device Manager and selecting the Update driver option but that will take a lot of time and doesn’t guarantee perfect results.
The quickest and safest way to update your drivers is by using specialized software like DriverFix.
It’s very simple to use but first, you need to download and install the tool. It will run automatically and start scanning your PC for old, missing, or malfunctioning drivers.
Don’t go away because the process will only last for a couple of seconds and after that, you will receive a list with the recommended drivers to install.

The last step is even easier because if you want to install all of them you just need to click on the Update All button.
Of course, you can also install only a few by checking their corresponding boxes and hitting their individual Update button from the right.
3. Make sure that Hamachi service is running
According to users, you can encounter various Hamachi errors simply if the required services aren’t running. Many users reported tunneling and VPN error in Hamachi, and in most cases you can fix these issues simply by restarting the Hamachi services. To do that, just follow these steps:
- Open the Services window. The fastest way to do that is to press Windows Key + R and enter services.msc. Now press Enter or click OK.

- When the Services window opens locate and double-click the Hamachi Tunneling Engine service.
- When the Properties window opens, click the Stop button to stop the service. Wait for a couple of moments and then click the Start button. Click Apply and OK to save changes.

According to users, this simple solution fixed the tunneling and VPN error with Hamachi, so we encourage you to try it out.
4. Remove problematic applications
If you’re having Hamachi errors, such as the tunneling problem or the VPN error, the issue might be caused by third-party software.
Sometimes VPN clients can interfere with Hamachi and that can lead to this and many other problems.
To fix the problem, it’s advised to find and remove your current VPN client. Users reported that Dell VPN client caused this problem to appear, but after removing it, the issue was resolved.
Bear in mind that other software can cause this issue to appear, and not just your VPN client.
If your VPN client was the problem, you should consider switching to a different one. The best VPNs for Windows 10 are reliable and user-friendly software that will not interfere with your system.
Consider software with a large number of servers across the globe, unlimited bandwidth, top-level encryption, and a very transparent privacy policy.
If the VPN was the cause of your problem, then the issue should be remediated. Check your PC for other problematic/malicious software as well. You can do that from the Add or remove the panel in Windows Settings.
5. Reinstall Hamachi
Sometimes Hamachi errors can be caused by a corrupted installation, and if that happens, the best course of action would be to reinstall Hamachi.
This is fairly simple to do, but in order to completely reinstall Hamachi, it’s advised that you use specialized uninstaller tools.
In case you don’t know, uninstaller software can completely remove the desired application from your PC.
Unlike the regular uninstall process, these dedicated tools will remove all files and registry entries associated with Hamachi.
After Hamachi is completely removed, it will be as if it was never installed on your PC. Now you just have to download and install the latest version and the issue should be completely resolved.
6. Install the driver manually while Hamachi is installing
- Press Windows Key + X and choose Device Manager from the list.

- Locate LogMeIn Hamachi Virtual Ethernet Adapter, right-click it, and choose Update driver from the menu.
- Select Browse my computer for driver software.

- Now head over to the Hamachi installation directory, by default it should be:
C:Program Files (x86)LogMeIn Hamachi

Note: Once you select this directory, your PC should scan it and install the missing driver. Once that is done, the latest driver will be installed and the installation will complete successfully.
Bear in mind that you’ll need to update the driver quickly in order for this to work, so it might be a good idea to have the Device Manager open while installing Hamachi.
7. Use a different installer

According to users, sometimes Hamachi errors can be caused by your installer.
This is an unusual cause, but several users reported that they fixed the problem simply by removing Hamachi and using the different setup file to install it.
Users claim that they downloaded the installer from a different source that is not Hamachi’s official website, and by doing so the problem was resolved.
We don’t know how reliable this method is, but many users claim that it works, so feel free to try it out.
8. Try using an older version of Hamachi

In some instances, Hamachi errors can appear if you’re using the latest version. When it comes to software, usually it’s a good practice to use the latest software since it offers the latest features and updates.
However, sometimes certain features can be buggy, and that can lead to this and many other errors. To fix this problem, some users suggested rolling back to the older version of Hamachi and checking if that helps.
To do that, remove the current version and then download and install the older version. To find an older version, you might have to use third-party sources.
Once you download the older version, install it, and check if that solves your problem.
Bear in mind that Hamachi will check for the latest version once you install it, so be sure to prevent it from downloading the latest updates.
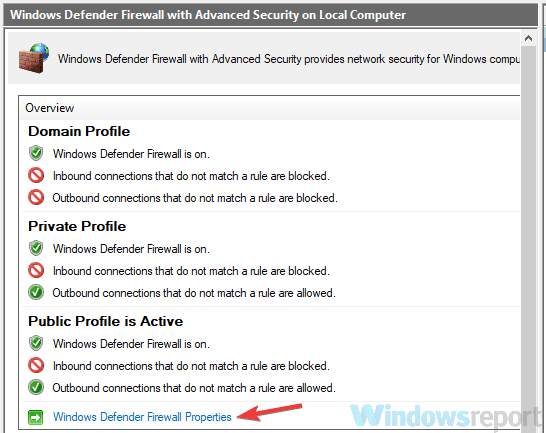
9. Disable Windows Firewall
- Search for windows firewall and select Windows Defender Firewall from the list.

- Click on Advanced settings from the menu on the left.
- Select Windows Defender Firewall Properties.

- Go to the Domain Profile tab and set Firewall state to Off.

- Go to the Private Profile and Public Profile tabs and do the same. Lastly, click Apply and OK to save changes
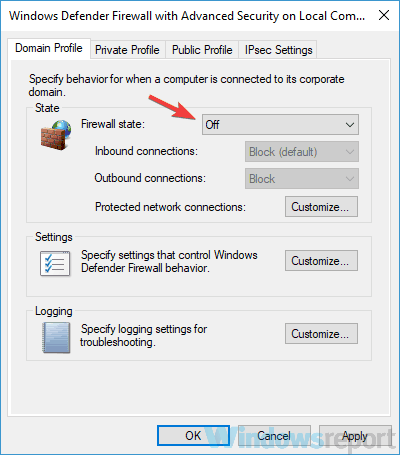
Note: Disabling the firewall isn’t the best choice in terms of safety, but if Hamachi works after you do that, the issue is probably related to one of your firewall settings, so you’ll need to manually find and change it.
Several users reported that port 25565 was the problem, so to fix this issue, be sure that port 25565 is open on the Incoming rules page. After making this change, the problem should be resolved and Hamachi will start working again.
Hamachi errors can cause many problems on your PC, but in most cases, these problems are caused by your firewall settings, corrupted installation, or other applications.
However, we hope that you managed to fix this problem by using one of our solutions and if you have any addition, leave us a note in the comments section below.
![]()
Newsletter
by Milan Stanojevic
Milan has been enthusiastic about technology ever since his childhood days, and this led him to take interest in all PC-related technologies. He’s a PC enthusiast and he… read more
Updated on November 18, 2021
- Hamachi is a pretty good VPN but the various errors with this app can cause many PC problems.
- The elements causing these errors vary from antivirus settings to drivers or Windows Firewall.
- All you need to know about virtual private networks is in our VPN section.
- Our Tech Troubleshooting Hub can transform you into a computer wiz so take a look.
XINSTALL BY CLICKING THE DOWNLOAD FILE
This software will keep your drivers up and running, thus keeping you safe from common computer errors and hardware failure. Check all your drivers now in 3 easy steps:
- Download DriverFix (verified download file).
- Click Start Scan to find all problematic drivers.
- Click Update Drivers to get new versions and avoid system malfunctionings.
- DriverFix has been downloaded by 0 readers this month.
Hamachi is a useful tool, but many users reported various errors with this app on their PC. These errors can cause various problems, and in today’s article, we’ll show you how to fix them.
Hamachi errors can cause many issues on your PC. Here are some common issues that users reported:
- Hamachi network adapter error – Can occur if the necessary virtual network driver isn’t installed. Update the adapter driver.
- Hamachi VPN error Windows 10 – Can be caused by other VPN applications. You can fix the issue simply by removing the other VPN from your PC.
- Hamachi tunnel problem Windows 10, yellow triangle – Can occur if the necessary services aren’t running. Open the Services window and restart the required services.
- Hamachi error this network does not exist, failed to connect to network adapter – The issue is most likely your firewall, so be sure to check its configuration and make sure that Hamachi is allowed to go through it.
- Hamachi error 2503, 52, 1068, 2755, code 2502 – These errors can appear due to various reasons, but you should be able to fix them using one of our solutions.
How do I fix Hamachi errors on Windows 10?
- Check your antivirus
- Update the drivers automatically
- Make sure that Hamachi service is running
- Remove problematic applications
- Reinstall Hamachi
- Install the driver manually while Hamachi is installing
- Use a different installer
- Try using an older version of Hamachi
- Disable Windows Firewall
1. Check your antivirus
According to users, the cause for Hamachi errors can be your antivirus. Sometimes your antivirus can block the VPN, so be sure to check its settings and make sure that Hamachi is allowed to run.
If this isn’t the issue, you might want to try disabling certain features or disable your antivirus altogether.
In case the problem is still there, your last option would be to remove your antivirus completely from your PC.
Even if you remove your antivirus, your PC will remain protected by Windows Defender, so there’s no need to worry about your safety.
If removing the antivirus solves your problem, this might be a good time to consider switching to a different antivirus solution.
The market is full of reliable antivirus software options that do not interfere with other applications on your PC.
Look for an antivirus that has a comprehensive threat database, real-time browsing connection, and low CPU usage. These are the most important features and they are generally included in free antivirus tools.
Some antivirus tools include built-in VPN solutions. If that appeals to you, you can drop your Hamachi subscription and use one software both for threat protection and online privacy.
2. Update the drivers automatically
Sometimes Hamachi errors can be caused by missing drivers, and if you’re getting a tunneling problem or a VPN error, the issue might be the missing drivers.
You could try updating them manually by selecting every single one from Device Manager and selecting the Update driver option but that will take a lot of time and doesn’t guarantee perfect results.
The quickest and safest way to update your drivers is by using specialized software like DriverFix.
It’s very simple to use but first, you need to download and install the tool. It will run automatically and start scanning your PC for old, missing, or malfunctioning drivers.
Don’t go away because the process will only last for a couple of seconds and after that, you will receive a list with the recommended drivers to install.
The last step is even easier because if you want to install all of them you just need to click on the Update All button.
Of course, you can also install only a few by checking their corresponding boxes and hitting their individual Update button from the right.
3. Make sure that Hamachi service is running
According to users, you can encounter various Hamachi errors simply if the required services aren’t running. Many users reported tunneling and VPN error in Hamachi, and in most cases you can fix these issues simply by restarting the Hamachi services. To do that, just follow these steps:
- Open the Services window. The fastest way to do that is to press Windows Key + R and enter services.msc. Now press Enter or click OK.
- When the Services window opens locate and double-click the Hamachi Tunneling Engine service.
- When the Properties window opens, click the Stop button to stop the service. Wait for a couple of moments and then click the Start button. Click Apply and OK to save changes.
According to users, this simple solution fixed the tunneling and VPN error with Hamachi, so we encourage you to try it out.
4. Remove problematic applications
If you’re having Hamachi errors, such as the tunneling problem or the VPN error, the issue might be caused by third-party software.
Sometimes VPN clients can interfere with Hamachi and that can lead to this and many other problems.
To fix the problem, it’s advised to find and remove your current VPN client. Users reported that Dell VPN client caused this problem to appear, but after removing it, the issue was resolved.
Bear in mind that other software can cause this issue to appear, and not just your VPN client.
If your VPN client was the problem, you should consider switching to a different one. The best VPNs for Windows 10 are reliable and user-friendly software that will not interfere with your system.
Consider software with a large number of servers across the globe, unlimited bandwidth, top-level encryption, and a very transparent privacy policy.
If the VPN was the cause of your problem, then the issue should be remediated. Check your PC for other problematic/malicious software as well. You can do that from the Add or remove the panel in Windows Settings.
5. Reinstall Hamachi
Sometimes Hamachi errors can be caused by a corrupted installation, and if that happens, the best course of action would be to reinstall Hamachi.
This is fairly simple to do, but in order to completely reinstall Hamachi, it’s advised that you use specialized uninstaller tools.
In case you don’t know, uninstaller software can completely remove the desired application from your PC.
Unlike the regular uninstall process, these dedicated tools will remove all files and registry entries associated with Hamachi.
After Hamachi is completely removed, it will be as if it was never installed on your PC. Now you just have to download and install the latest version and the issue should be completely resolved.
6. Install the driver manually while Hamachi is installing
- Press Windows Key + X and choose Device Manager from the list.
- Locate LogMeIn Hamachi Virtual Ethernet Adapter, right-click it, and choose Update driver from the menu.
- Select Browse my computer for driver software.
- Now head over to the Hamachi installation directory, by default it should be:
C:Program Files (x86)LogMeIn Hamachi
Note: Once you select this directory, your PC should scan it and install the missing driver. Once that is done, the latest driver will be installed and the installation will complete successfully.
Bear in mind that you’ll need to update the driver quickly in order for this to work, so it might be a good idea to have the Device Manager open while installing Hamachi.
7. Use a different installer
According to users, sometimes Hamachi errors can be caused by your installer.
This is an unusual cause, but several users reported that they fixed the problem simply by removing Hamachi and using the different setup file to install it.
Users claim that they downloaded the installer from a different source that is not Hamachi’s official website, and by doing so the problem was resolved.
We don’t know how reliable this method is, but many users claim that it works, so feel free to try it out.
8. Try using an older version of Hamachi
In some instances, Hamachi errors can appear if you’re using the latest version. When it comes to software, usually it’s a good practice to use the latest software since it offers the latest features and updates.
However, sometimes certain features can be buggy, and that can lead to this and many other errors. To fix this problem, some users suggested rolling back to the older version of Hamachi and checking if that helps.
To do that, remove the current version and then download and install the older version. To find an older version, you might have to use third-party sources.
Once you download the older version, install it, and check if that solves your problem.
Bear in mind that Hamachi will check for the latest version once you install it, so be sure to prevent it from downloading the latest updates.
9. Disable Windows Firewall
- Search for windows firewall and select Windows Defender Firewall from the list.
- Click on Advanced settings from the menu on the left.
- Select Windows Defender Firewall Properties.
- Go to the Domain Profile tab and set Firewall state to Off.
- Go to the Private Profile and Public Profile tabs and do the same. Lastly, click Apply and OK to save changes
Note: Disabling the firewall isn’t the best choice in terms of safety, but if Hamachi works after you do that, the issue is probably related to one of your firewall settings, so you’ll need to manually find and change it.
Several users reported that port 25565 was the problem, so to fix this issue, be sure that port 25565 is open on the Incoming rules page. After making this change, the problem should be resolved and Hamachi will start working again.
Hamachi errors can cause many problems on your PC, but in most cases, these problems are caused by your firewall settings, corrupted installation, or other applications.
However, we hope that you managed to fix this problem by using one of our solutions and if you have any addition, leave us a note in the comments section below.
![]()
Newsletter
That was helpful — your tip led me to a solution.
Runing the MSI from the desktop, using your suggested command symantics:
C:UsersSeanDesktop> msiexec.exe /i hamachi.msi /l*v «C:UsersSeanDesktophamachiinstall.log»
Which produced an error log that pointed to the file causing the intallation to fail. To avoid posting an exceptionally long log file, I’ve include only the relevant section of the log file:
…
Action 16:43:30: SearchVersions. Searching older Hamachi installation
Action start 16:43:30: SearchVersions.
MSI (c) (18:94) [16:43:30:315]: Note: 1: 2235 2: 3: ExtendedType 4: SELECT `Action`,`Type`,`Source`,`Target`, NULL, `ExtendedType` FROM `CustomAction` WHERE `Action` = ‘SearchVersions’
MSI (c) (18:B8) [16:43:30:380]: Invoking remote custom action. DLL: C:UsersSeanAppDataLocalTempMSI28BE.tmp, Entrypoint: SearchVersions
MSI (c) (18:A8) [16:43:30:381]: Cloaking enabled.
MSI (c) (18:A8) [16:43:30:381]: Attempting to enable all disabled privileges before calling Install on Server
MSI (c) (18:A8) [16:43:30:381]: Connected to service for CA interface.
CustomAction SearchVersions returned actual error code 1157 (note this may not be 100% accurate if translation happened inside sandbox)
MSI (c) (18:94) [16:43:30:426]: Note: 1: 1723 2: SearchVersions 3: SearchVersions 4: C:UsersSeanAppDataLocalTempMSI28BE.tmp
MSI (c) (18:94) [16:43:30:426]: Note: 1: 2205 2: 3: Error
MSI (c) (18:94) [16:43:30:426]: Note: 1: 2228 2: 3: Error 4: SELECT `Message` FROM `Error` WHERE `Error` = 1723
MSI (c) (18:A4) [16:43:30:429]: Note: 1: 2205 2: 3: Error
MSI (c) (18:A4) [16:43:30:429]: Note: 1: 2228 2: 3: Error 4: SELECT `Message` FROM `Error` WHERE `Error` = 2898
Info 2898.For DlgFont8 textstyle, the system created a ‘Tahoma’ font, in 0 character set, of 13 pixels height.
Error 1723. There is a problem with this Windows Installer package. A DLL required for this install to complete could not be run. Contact your support personnel or package vendor. Action SearchVersions, entry: SearchVersions, library: C:UsersSeanAppDataLocalTempMSI28BE.tmp
MSI (c) (18:94) [17:23:26:642]: Note: 1: 2205 2: 3: Error
MSI (c) (18:94) [17:23:26:642]: Note: 1: 2228 2: 3: Error 4: SELECT `Message` FROM `Error` WHERE `Error` = 1709
MSI (c) (18:94) [17:23:26:642]: Product: LogMeIn Hamachi — Error 1723. There is a problem with this Windows Installer package. A DLL required for this install to complete could not be run. Contact your support personnel or package vendor. Action SearchVersions, entry: SearchVersions, library: C:UsersSeanAppDataLocalTempMSI28BE.tmp
Action ended 17:23:26: SearchVersions. Return value 3.
MSI (c) (18:94) [17:23:26:644]: Doing action: FatalError
Action 17:23:26: FatalError.
Action start 17:23:26: FatalError.
MSI (c) (18:94) [17:23:26:647]: Note: 1: 2235 2: 3: ExtendedType 4: SELECT `Action`,`Type`,`Source`,`Target`, NULL, `ExtendedType` FROM `CustomAction` WHERE `Action` = ‘FatalError’
MSI (c) (18:A4) [17:23:26:656]: Note: 1: 2205 2: 3: Error
MSI (c) (18:A4) [17:23:26:656]: Note: 1: 2228 2: 3: Error 4: SELECT `Message` FROM `Error` WHERE `Error` = 2898
Info 2898.For VerdanaBold13 textstyle, the system created a ‘Verdana’ font, in 0 character set, of 20 pixels height.
Action 17:23:26: FatalError. Dialog created
MSI (c) (18:88) [17:23:26:683]: Note: 1: 2731 2: 0
Action ended 17:23:28: FatalError. Return value 2.
Action ended 17:23:28: INSTALL. Return value 3.
MSI (c) (18:94) [17:23:28:597]: Destroying RemoteAPI object.
MSI (c) (18:A8) [17:23:28:609]: Custom Action Manager thread ending.
…
As you can see, A file located at C:UsersSeanAppDataLocalTempMSI28BE.tmp produced a fatal error. I deleted this file, as well as the rest of the contents of the AppData Temp folder.
Upon running the installation again there were no installation issues whatsoever, and Hamachi now runs perfectly.
—————-
SOLUTION SUMMARY:
If anyone else is experiencing the same installation issue, with the error message:
«There is a problem with this Windows Installer package. A DLL required for this install to complete could not be run. Contact your support personnel or package vendor.«
I recomend deleting the contents of your application Temp folder located at:
C:Users<username>AppDataLocalTemp
This folder contains the reminants from previous installations. It’s contents should be safe to delete.
Please post here if this solution works for you as well.
Best Regards,
Sean.
Содержание
- 1 Шаг 1
- 2 Шаг 2
- 3 Шаг 3
- 4 Шаг 4
- 5 Шаг 5
- 6 Установка Хамачи
- 7 Минимум необходимых настроек при первом запуске
 Данная инструкция расскажет вам о том, как устанавливать Hamachi на Windows. Рассмотрим процесс, ориентируясь на ОС Windows 10 (64 bit). Установка программы на версиях ОС Windows 7 и 8 производится аналогичным образом. Всего процесс состоит из нескольких этапов.
Этап 1 — установка Хамачи
Для бесплатной установки Hamachi на Windows 7, 8, 10, XP скачайте инсталлятор. Сделать это можно на официальном сайте программы или вы можете скачать Хамачи для Windows с нашего сайта.
Этап 2 — выбор языка установки
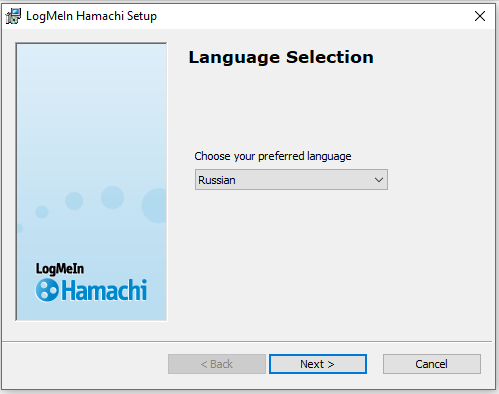
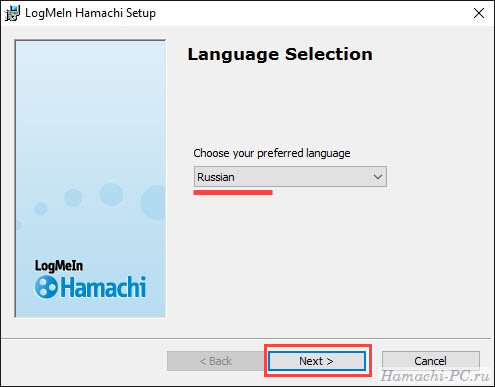
Инсталлятор, который вы скачали, следует запустить, а затем выбрать нужный вам язык установки и работы программы в последующем.
Этап 3 — версия Hamachi для установки
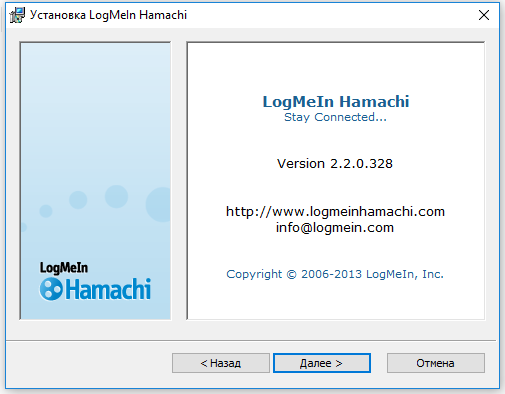
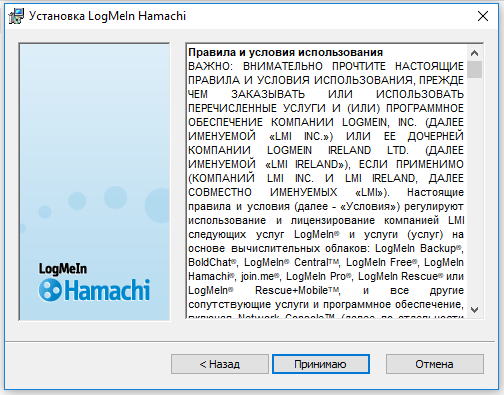
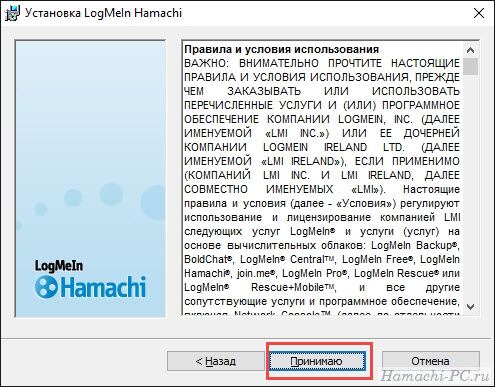
Дальнейшие диалоговое окно представит вам информацию о программе, которую вы устанавливаете. Версия на скриншоте может расходиться с той, что устанавливается вами. После этого следует нажать на кнопку «Далее», прочесть лицензионное соглашение, и в итоге нажать «Принимаю».
Этап 4 — выбор директории для установки Hamachi
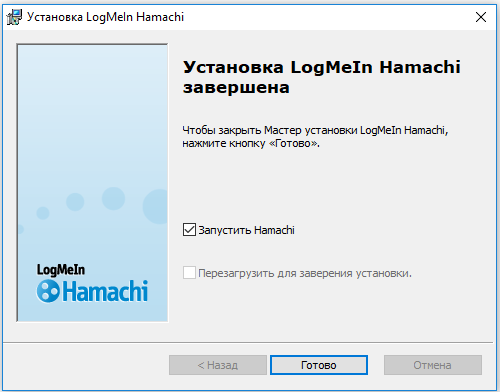
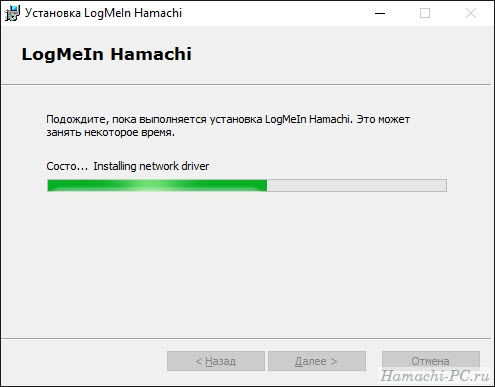
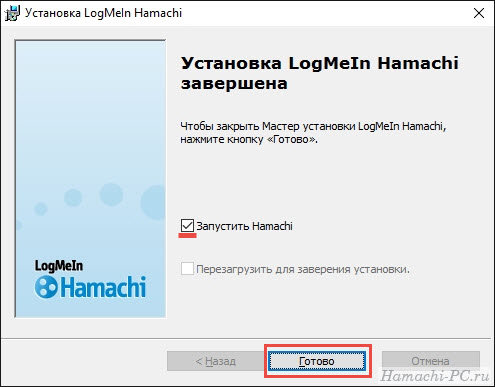
Следующее окно будет связана с выбором папки для установки. На данном этапе особых изменений не потребуется. Нужно просто дождаться конца инсталляции. Иногда потребуется перезагрузка компьютера, и для этого вы увидите соответствующий призыв. При неактивности данного окна следует ставить галочку на предложение запуска Hamachi, а затем нажать кнопку под названием «Готово».
Этап 5 — запуск Хамачи на Windows
В этом, собственно, и заключается установка Hamachi, и запуск этой программы.
Для начала использования сервиса Хамачи просто зарегистрируйтесь. Процесс регистрации бесплатен и совсем не долгий.
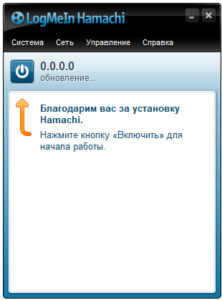
Вы смогли установить Хамачи на компьютер с Виндовс, теперь запустите Hamachi logmein.
В заключении
При возникновении ошибки о том, что не удалось проверить цифровую подпись, предусмотренную для драйверов, следует более подробно ознакомиться с инструкцией.
Инструкция/Комментарии
В данной инструкции показан процесс установки Hamachi на примере операционной системы Windows 10 (64 bit). На «семерке» и «восьмерке» программа устанавливается аналогичным образом. Приступим.
Шаг 1
Чтобы установить Хамачи бесплатно на Windows 10, 8, 7 или XP, вам, прежде всего, нужно скачать инсталлятор. Если вы до сих пор этого не сделали, скачайте его:
* с официального сайта
Шаг 2
Запустите скачанный инсталлятор и выберите язык, на котором будет происходить установка и дальнейшая работа программы.
Шаг 3
В следующем диалоговом окне будет показана информация об устанавливаемой программе (версия может отличаться от той, что на скриншоте), жмите «Далее».
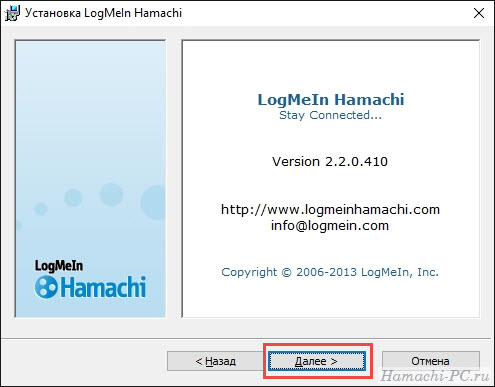
Прочитайте лицензионное соглашение и нажмите «Принимаю».
Шаг 4
В следующем окне будет предложено выбрать папку для установки. Здесь ничего менять не обязательно.
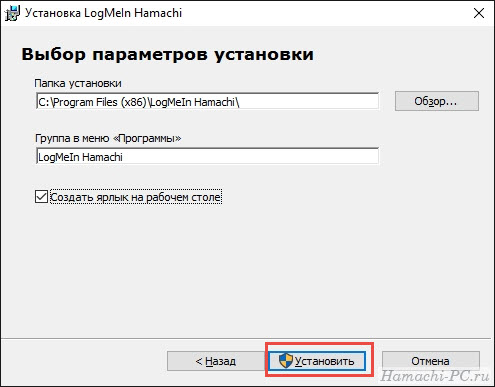
Дождитесь окончания процесса инсталляции.
В конце в редких случаях будет предложено перезагрузить компьютер. Если это окошко будет не активно, просто оставьте галочку на предложении запустить Hamachi и нажмите кнопку «Готово».
Шаг 5
Вы смогли установить Хамачи и запустили его.
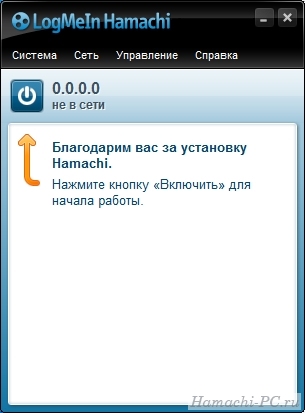
Для того, чтобы начать им пользоваться, нужно зарегистрироваться (это быстро и бесплатно).
* Если во время установки возникла ошибка «Не удается проверить цифровую подпись драйверов» — читайте эту инструкцию.
LogMeIn Hamachi — удобный инструмент для создания защищённых частных сетей VPN и локальных сетей ЛВС. Главные условия его стабильной работы — правильная инсталляция и корректная установка настроек. Выполните нижеследующие действия, чтобы использовать Hamachi на полную мощность.
Установка Хамачи
-
- Запустите двойным кликом инсталлятор Hamachi.
- В панели установщика нажмите кнопку «Далее».
- Выберите в ниспадающем меню «Choose your … language» язык интерфейса (Russian), а затем кликните «Next >».
-
- Ознакомившись с условиями использования выберите «Принимаю».
-
- В окне выбора параметров при необходимости укажите другую директорию установки (раздел, папку). Установите галочку напротив опции «Создать ярлык… », чтобы иконка запуска Hamachi отображалась на рабочем столе. Выполнив все настройки, нажмите «Установить».
-
- Дождитесь окончания инсталляции (ориентир — зелёная полоса прогресса).
-
- Если Вы хотите сразу же после установки приступить к работе с программой, включите в панели установщика опцию «Запустить Hamachi».
Кликните кнопку «Готово».
Минимум необходимых настроек при первом запуске
-
- Откройте программу и кликните в интерфейсе иконку «Запустить сеть».
- В поле «Имя клиента» введите свой логин (произвольная комбинации букв и цифр) и нажмите «Create» (создать).
-
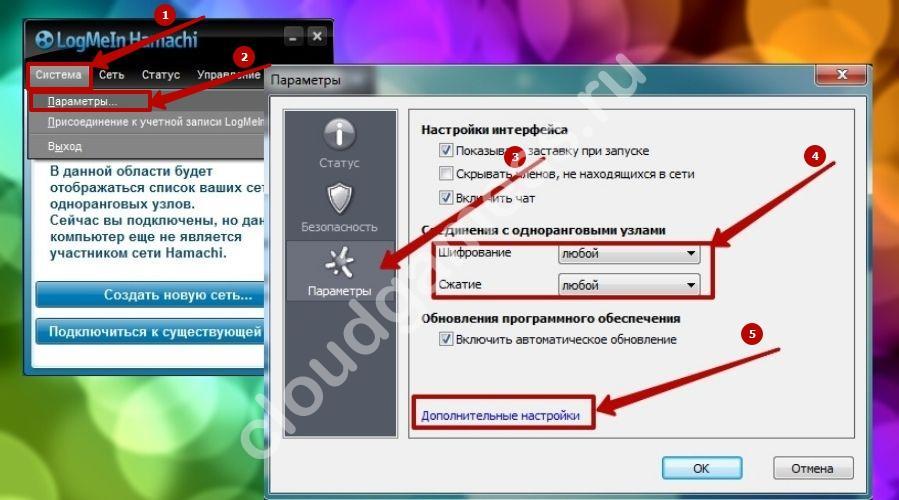
- После того, как Hamachi установит IP-адрес вашего ПК (октеты адреса появятся в окне программы — IP4/IPv6 ), в разделе «Система» (главное меню) выберите «Параметры».
- В появившейся панели настроечных опций в боковом подменю, кликните иконку с таким же названием — «Параметры».
-
- На вкладке параметров перейдите в «Дополнительные настройки».
- В опции «Использовать прокси-сервер» установите «Нет» (клик по радиокнопке в графе «Значение»).
-
- Найдите в перечне настройку «Локальный UDP-адрес» и выделите её мышкой. А затем во втором (маленьком) поле , укажите её параметр — 1337 и нажмите «Установить».
Таким же образом, установите в настройке «Локальный TCP-адрес» параметр — 7777.
Для того, чтобы изменённые опции вступили в силу, кликните «ОК».
Установка и настройка окончены. Хамачи готов к эксплуатации. В случае неполадок, проверьте сетевые настройки фаервола/брандмауэра Windows, пропишите IP-адрес ПК и основной шлюз интернет-соединения в свойствах протокола TCP/IP (см. опции ОС).
Поделитесь сайтом с друзьями…
Используемые источники:
- https://hamachivpn.ru/kak/ustanovit-hamachi/
- http://hamachi-pc.ru/instructions/kak-ustanovit-hamachi-na-windows-10-8-7.html
- https://hamachi-ru.ru/logmein-hamachi-bystryy-start-ustanovka-i-nastro/
Программа Hamachi, несмотря на свой возраст, до сих поря является одной из самых распространенных утилит для создания виртуальных локальных сетей и не только. Однако, как и любой софт, она требует, чтобы система подходила под ее требования. Это касается не только аппаратной составляющей, но и настроек операционной системы. Часто пользователи сталкиваются с тем, что программа не запускается, а вместо этого открывается окно с самодиагностикой Hamachi. В этой статье показаны возможные причины и способы решения этой проблемы.

Многие, кто встречается с этим окошком, ругают его за бесполезность, проводя аналогию с средством устранения неполадок на Виндовс 10. Но стоит понимать, что самодиагностика Хамачи и не должна решать никаких проблем. Средство лишь помогает понять, что стало причиной ошибки и почему программа не хочет стартовать. И уже исходя из этого нужно предпринимать те или иные действия по ее устранению.
Причины появления ошибки и способы устранения
Причин может быть множество, начиная с неактивности нужной для работы Хамачи службы и заканчивая вирусами, которые мешают ее работе. Ниже рассмотрены основные варианты проблемы и способы борьбы с ними.
Отключена необходимая служба
Этот вариант встречается чаще всего и, как правило, окно диагностики сразу об этом оповещает. Если в центральном столбце есть текст: «Статус службы: Остановлена», то проблема точно в этом. Для ее решения достаточно просто запустить службу Hamachi:
- Нажать комбинацию клавиш Win + R. Win – это кнопка со значком Windows.
- Ввести «services.msc» в открывшемся окошке. Нажать Enter.
- В новом окне в столбце «Имя» нужно найти «LogMeIn Hamachi Tunneling Engine» – именно эта служба отвечает за работу утилиты. Стоит проверить, что указано в столбце «Состояние». Если там ничего нет, то переходим к следующему шагу.
- Запустить службу. Для этого кликнуть по ней правой кнопкой мыши и выбрать соответствующую опцию в контекстном меню.
Осталось только дождаться запуска службы и попробовать снова включить Хамачи.
Если проблема не исчезла или на 3-м шаге обнаружилось, что служба актина, то переходим к следующим способам.
Восстановление службы
Этот метод может помочь, если в службе случился какой-то сбой и она работает некорректно. В таком случае может помочь настройка перезапуска службы:
- Повторить первые 3 шага из предыдущей инструкции.
- Двойным кликом по названия открыть свойства.
- Перейти во вкладку «Восстановление».
- В первых трех опциях установить значение «Перезапуск службы». Следующим двум пунктам дать значения 0 и 1 соответственно.
- В нижнем правом углу кликнуть «Применить» и закрыть окно.
Теперь служба будет перезагружаться самостоятельно, что может решить проблему еще до вызова окна диагностики при запуске. Впрочем, если сбой вызван не самой службой, то вряд ли способ поможет исправить проблему.
Полная переустановка
Если ни один из способов выше не помог убрать окно самодиагностики, то стоит сделать полное удаление утилиты с чисткой данных из реестра. Процесс удаления выглядит следующим образом:
- Щелкнуть левой кнопкой мыши по кнопке «Пуск» в нижнем левом углу рабочего стола.
- Выбрать строку «Приложения и возможности». Обычно она самая первая.
- В открывшемся окне вписать в строку поиска «hamachi».
- Щелкнуть по найденном утилите один раз, а затем кликнуть клавишу «Удалить».
Теперь достаточно следовать инструкции матера удаления или же Windows сделает все автоматически.
Далее стоит очистить реестр от остаточных записей:
- Нажать комбинацию клавиш Win + R.
- Ввести «regedit» и кликнуть «Ок».
- Согласиться, если выскочит запрос на разрешение изменения настроек устройства.
- Щелкнуть комбинацию клавиш Ctrl + F. Откроется небольшое окошко поиска.
- В нем ввести «hamachi». Кликнуть «Найти далее».
- Удалить все записи, содержащие название софта.
Перед началом работы с реестром рекомендуется сделать резервную копию на случай, если что-то пойдет не так. Или хотя бы сохранить важные файлы на внешний носитель.
Все инструкции приведены для Windows 10 и в других версиях ОС действия могут отличаться.
После чистки реестра нужно скачать с официального сайта последнюю версию Хамачи и установить ее.
Как видно, избавиться от проблемы с самодиагностикой Hamachi не так сложно, как кажется. Главное – не забывать про резервные копии, если дело дойдет до чистки реестра, и следовать пошагово всем инструкциям.
 Как убрать самодиагностику хамачи? – Легко
В настоящий момент использование программы Hamachi возможно лишь для авторизованных пользователей. Поэтому, каждый раз подключаясь к системе, следует пройти авторизацию в рамках центрального сервера. Как правило, данный процесс автоматизирован. По окончании запуска Hamachi наступает проявление ошибки «Не удаётся установить соединение со службой входа Logmein», можно смело говорить о сбое в процессе.
Было бы неверно обвинять в данной ошибке сервер. Настоящей причиной является неправильные клиентские компьютерные настройки или сторонние, связанные с сервером (Logmein). Для разрешения данной проблемы предусмотрено два способа:
Первый способ
Полная установка Hamachi с последующей остановкой заново. По окончании первичной установки системы последует предложение авторизации. Пройдите авторизацию либо регистрацию при создании нового аккаунта. Это приведёт к безошибочному соединению или запуску программного подключения.
Второй способ
Если вы увидели сообщение о том, что в Hamachi «Не удаётся установить соединение», потребуется произвести проверку настройки компьютерной сетевой привязки в рамках личного кабинета Logmein. Необходимо наличие регистрации. Подробнее о регистрации следует прочитать в определённой инструкции.
После регистрации аккаунта вам потребуется произвести запуск Hamachi и посетить пункты «Система», где следует выбрать «Параметры». Выбрав вкладку «Статус», осуществите присоединение нового аккаунта при нажатии определённой кнопки.
Далее пройдите регистрацию по ссылке https://secure.logmein.com/, после чего осуществите переход в «Мои сети». Перед вами предстанет ещё один запрос, связанный с подключением, для которого потребуется подтверждение. В ответ на запрос в окне подтвердите соответствующее действие.
Далее произведите установку соединения посредством Hamachi. В этот раз всё должно пройти удачно!
by Milan Stanojevic
Milan has been enthusiastic about technology ever since his childhood days, and this led him to take interest in all PC-related technologies. He’s a PC enthusiast and he… read more
Updated on
- Hamachi is a pretty good VPN but the various errors with this app can cause many PC problems.
- The elements causing these errors vary from antivirus settings to drivers or Windows Firewall.
- All you need to know about virtual private networks is in our VPN section.
- Our Tech Troubleshooting Hub can transform you into a computer wiz so take a look.
Hamachi is a useful tool, but many users reported various errors with this app on their PC. These errors can cause various problems, and in today’s article, we’ll show you how to fix them.
Hamachi errors can cause many issues on your PC. Here are some common issues that users reported:
- Hamachi network adapter error – Can occur if the necessary virtual network driver isn’t installed. Update the adapter driver.
- Hamachi VPN error Windows 10 – Can be caused by other VPN applications. You can fix the issue simply by removing the other VPN from your PC.
- Hamachi tunnel problem Windows 10, yellow triangle – Can occur if the necessary services aren’t running. Open the Services window and restart the required services.
- Hamachi error this network does not exist, failed to connect to network adapter – The issue is most likely your firewall, so be sure to check its configuration and make sure that Hamachi is allowed to go through it.
- Hamachi error 2503, 52, 1068, 2755, code 2502 – These errors can appear due to various reasons, but you should be able to fix them using one of our solutions.
How do I fix Hamachi errors on Windows 10?
- Check your antivirus
- Update the drivers automatically
- Make sure that Hamachi service is running
- Remove problematic applications
- Reinstall Hamachi
- Install the driver manually while Hamachi is installing
- Use a different installer
- Try using an older version of Hamachi
- Disable Windows Firewall
1. Check your antivirus
According to users, the cause for Hamachi errors can be your antivirus. Sometimes your antivirus can block the VPN, so be sure to check its settings and make sure that Hamachi is allowed to run.
If this isn’t the issue, you might want to try disabling certain features or disable your antivirus altogether.
In case the problem is still there, your last option would be to remove your antivirus completely from your PC.
Even if you remove your antivirus, your PC will remain protected by Windows Defender, so there’s no need to worry about your safety.
If removing the antivirus solves your problem, this might be a good time to consider switching to a different antivirus solution.
The market is full of reliable antivirus software options that do not interfere with other applications on your PC.
Look for an antivirus that has a comprehensive threat database, real-time browsing connection, and low CPU usage. These are the most important features and they are generally included in free antivirus tools.
Some antivirus tools include built-in VPN solutions. If that appeals to you, you can drop your Hamachi subscription and use one software both for threat protection and online privacy.
2. Update the drivers automatically
Sometimes Hamachi errors can be caused by missing drivers, and if you’re getting a tunneling problem or a VPN error, the issue might be the missing drivers.
You could try updating them manually by selecting every single one from Device Manager and selecting the Update driver option but that will take a lot of time and doesn’t guarantee perfect results.
The quickest and safest way to update your drivers is by using specialized software like Outbyte Driver Updater.
It’s very simple to use but first, you need to download and install the tool. It will run automatically and start scanning your PC for old, missing, or malfunctioning drivers.
Don’t go away because the process will only last for a couple of seconds and after that, you will receive a list with the recommended drivers to install.
The last step is even easier because if you want to install all of them you just need to click on the Update All button.
Of course, you can also install only a few by checking their corresponding boxes and hitting their individual Update button from the right.
3. Make sure that Hamachi service is running
According to users, you can encounter various Hamachi errors simply if the required services aren’t running. Many users reported tunneling and VPN error in Hamachi, and in most cases you can fix these issues simply by restarting the Hamachi services. To do that, just follow these steps:
- Open the Services window. The fastest way to do that is to press Windows Key + R and enter services.msc. Now press Enter or click OK.
- When the Services window opens locate and double-click the Hamachi Tunneling Engine service.
- When the Properties window opens, click the Stop button to stop the service. Wait for a couple of moments and then click the Start button. Click Apply and OK to save changes.
According to users, this simple solution fixed the tunneling and VPN error with Hamachi, so we encourage you to try it out.
4. Remove problematic applications
If you’re having Hamachi errors, such as the tunneling problem or the VPN error, the issue might be caused by third-party software.
Sometimes VPN clients can interfere with Hamachi and that can lead to this and many other problems.
To fix the problem, it’s advised to find and remove your current VPN client. Users reported that Dell VPN client caused this problem to appear, but after removing it, the issue was resolved.
Bear in mind that other software can cause this issue to appear, and not just your VPN client.
If your VPN client was the problem, you should consider switching to a different one. The best VPNs for Windows 10 are reliable and user-friendly software that will not interfere with your system.
Consider software with a large number of servers across the globe, unlimited bandwidth, top-level encryption, and a very transparent privacy policy.
If the VPN was the cause of your problem, then the issue should be remediated. Check your PC for other problematic/malicious software as well. You can do that from the Add or remove the panel in Windows Settings.
5. Reinstall Hamachi
Sometimes Hamachi errors can be caused by a corrupted installation, and if that happens, the best course of action would be to reinstall Hamachi.
This is fairly simple to do, but in order to completely reinstall Hamachi, it’s advised that you use specialized uninstaller tools.
In case you don’t know, uninstaller software can completely remove the desired application from your PC.
Unlike the regular uninstall process, these dedicated tools will remove all files and registry entries associated with Hamachi.
After Hamachi is completely removed, it will be as if it was never installed on your PC. Now you just have to download and install the latest version and the issue should be completely resolved.
6. Install the driver manually while Hamachi is installing
- Press Windows Key + X and choose Device Manager from the list.
- Locate LogMeIn Hamachi Virtual Ethernet Adapter, right-click it, and choose Update driver from the menu.
- Select Browse my computer for driver software.
- Now head over to the Hamachi installation directory, by default it should be:
C:Program Files (x86)LogMeIn Hamachi
Note: Once you select this directory, your PC should scan it and install the missing driver. Once that is done, the latest driver will be installed and the installation will complete successfully.
Bear in mind that you’ll need to update the driver quickly in order for this to work, so it might be a good idea to have the Device Manager open while installing Hamachi.
7. Use a different installer
According to users, sometimes Hamachi errors can be caused by your installer.
This is an unusual cause, but several users reported that they fixed the problem simply by removing Hamachi and using the different setup file to install it.
Users claim that they downloaded the installer from a different source that is not Hamachi’s official website, and by doing so the problem was resolved.
We don’t know how reliable this method is, but many users claim that it works, so feel free to try it out.
8. Try using an older version of Hamachi
In some instances, Hamachi errors can appear if you’re using the latest version. When it comes to software, usually it’s a good practice to use the latest software since it offers the latest features and updates.
However, sometimes certain features can be buggy, and that can lead to this and many other errors. To fix this problem, some users suggested rolling back to the older version of Hamachi and checking if that helps.
To do that, remove the current version and then download and install the older version. To find an older version, you might have to use third-party sources.
Once you download the older version, install it, and check if that solves your problem.
Bear in mind that Hamachi will check for the latest version once you install it, so be sure to prevent it from downloading the latest updates.
9. Disable Windows Firewall
- Search for windows firewall and select Windows Defender Firewall from the list.
- Click on Advanced settings from the menu on the left.
- Select Windows Defender Firewall Properties.
- Go to the Domain Profile tab and set Firewall state to Off.
- Go to the Private Profile and Public Profile tabs and do the same. Lastly, click Apply and OK to save changes
Note: Disabling the firewall isn’t the best choice in terms of safety, but if Hamachi works after you do that, the issue is probably related to one of your firewall settings, so you’ll need to manually find and change it.
Several users reported that port 25565 was the problem, so to fix this issue, be sure that port 25565 is open on the Incoming rules page. After making this change, the problem should be resolved and Hamachi will start working again.
Hamachi errors can cause many problems on your PC, but in most cases, these problems are caused by your firewall settings, corrupted installation, or other applications.
However, we hope that you managed to fix this problem by using one of our solutions and if you have any addition, leave us a note in the comments section below.
![]()
Hamachi — программа, которая помогает организовать VPN, защищенную сеть ПК, которые соединения с помощью Интернета. Используется при невозможности обустройства физической локальной сети.
Создает «локал» поверх Всемирной паутины. Чаще всего применяется для соединения серверов с «серыми» IP или компьютеров клиентов. Идеально подходит для шифрования трафика.
Приложения и ПО, которое поддерживает работу при помощи локальной сети, могут передавать данные при помощи Hamachi, при этом вся информация будет зашифрована P2P.
Система работает на основе протокола UDP, где для соединения используется третий узел, который используется для обнаружения двух других узлов. Действующие узлы могут находиться за фаерволом и NAT.
Часто применяется для гейминга, чтобы играть в устаревшие игры через VPN, если сервера игр закрыты. Помогает играть в сети даже при отсутствии частного IP.
Настройка Hamachi VPN
Настроить Hamachi VPN — просто. Скачайте программное обеспечение на Windows 7, 10 и т.д., установите его и зайдите в настройки. Иногда юзеры сталкиваются с ошибкой: статус показывает желтый треугольник с восклицательным знаком. При возникновении ошибки локальную сеть создать невозможно.
Для устранения проблемы нужно перенастроить сетевое подключение в Windows. Читайте подробную инструкцию о том, как это сделать.
Как настроить Hamachi VPN?
После того, как пользователь установил на ПК программное обеспечение — оно готово к работе, достаточно авторизоваться в LogMeIn под своим аккаунтом. Иногда — нужно начинать работу с настройки в случае, если некоторые значения автоматически прописаны некорректно. Для актуализации настроек:
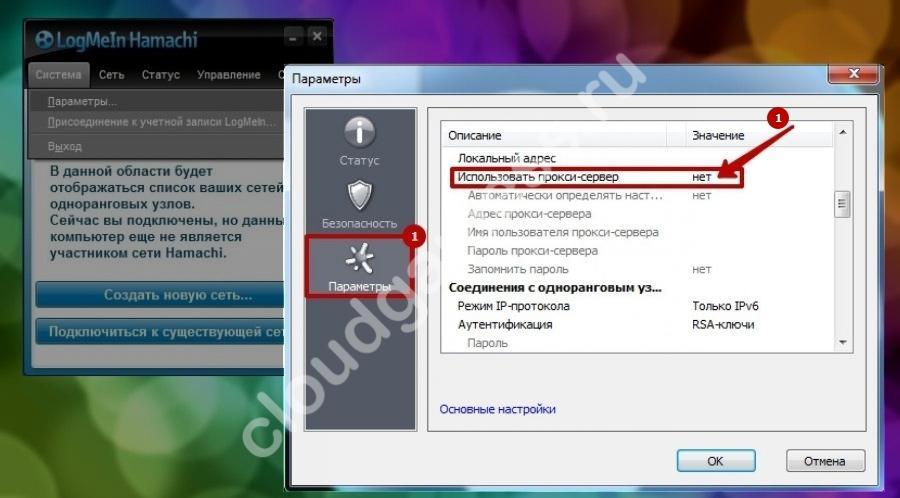
- Заходим в Hamachi VPN для настройки «Параметров».
- На пункты «Шифрование» и «Сжатие» прописываем значение «Любой».
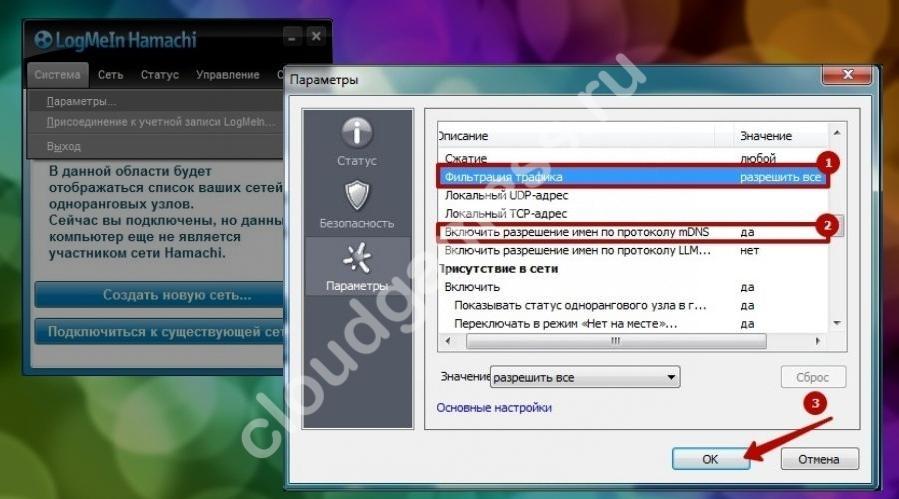
- В дополнительных опциям отключаем прокси-сервер, активируем разрешение имен по mDNS.
- В пункте «Фильтрация трафика» прописываем «Разрешить все». Включаем присутствие в сети (выбираем «Да» возле соответствующей строки).
- Сохраняем изменения и перезапускаем VPN.
Как правило, такой настройки достаточно для запуска и функционирования программного обеспечения. Но, если сообщение об ошибке не исчезло, нужно произвести еще несколько настроек в параметрах Windows. Что делать, если статус VPN выдает ошибку в Hamachi после произведенных настроек?
Дополнительная настройка
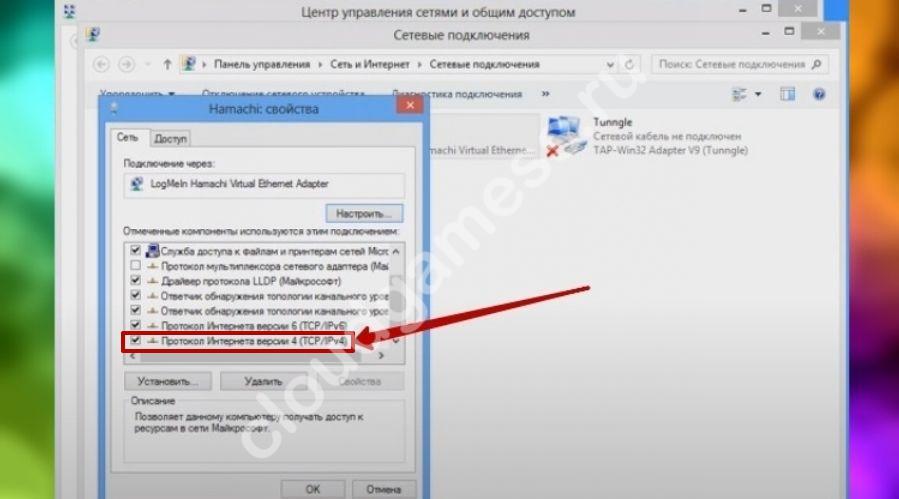
- Открываем «Сетевое подключение» и вызываем контекстное выпадающее меню с помощью правой кнопки мыши.

- Кликаем на «Свойства».
- Выбираем «IP версии 4», а затем возвращаемся в «Свойства».
- Кликаем «Дополнительно» и стираем шлюз, который вставляется автоматически (25.0.0.1).
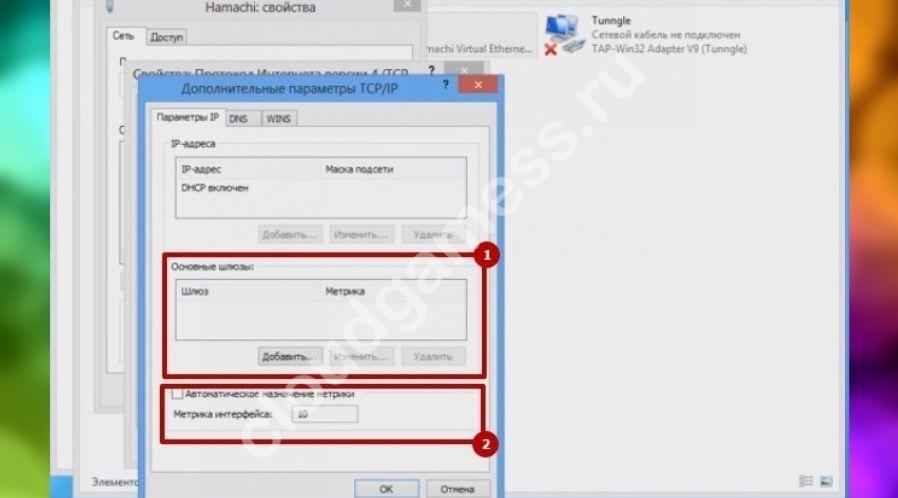
- В «Метрика интерфейса» прописываем «10» и нажимаем «Сохранить».
Настройки для программы, которая создает локальные сети — не такие сложные, как может показаться на первый взгляд. Главное внимательно следовать нашей инструкции и не пропускать шаги. После внесения изменений в Windows — перезагрузите компьютер.
Ошибки и их устранение
На профильных форумах пользователи часто спрашивают: статус VPN ошибка Hamachi — что делать? Иди «Одноранговый узел недоступен через VPN». Наши инструкции, в этом случае, должны пользователю помочь наладить работы программного обеспечения.
Простое решение проблемы
Первое, что нужно сделать — проверить, есть ли соединение с Интернетом. Для этого через браузер зайдите на любой сайт. Если соединение присутствует — читаем далее.
Зайдите в «Сетевые подключения» через «Просмотр сетевых подключений».
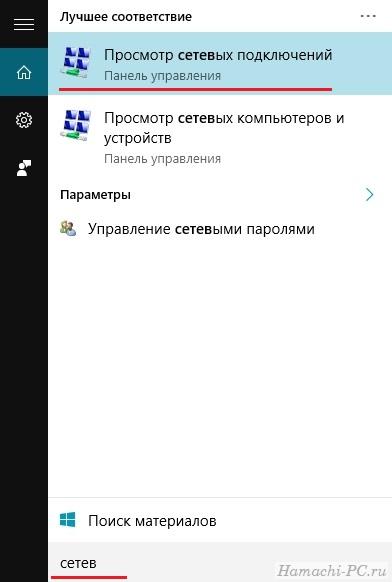
Найдите в списке подключений адаптер Hamachi. Проверьте его активность. Если адаптер отключен — включите его.
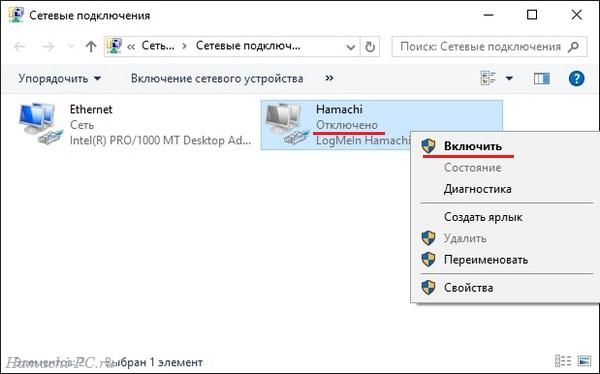
Если адаптер отсутствует, то нужно его установить.

Деактивируйте антивирус и файрвол.
Настройка после установки
Если Hamachi VPN после произведенных манипуляций все равно не работает, даже после введения новых параметров, то нужно добавить ПО в исключения для брандмауэра. Вероятно, что загвоздка именно в нем.
- Кликаем на «Панель управления» — «Безопасность Windows».
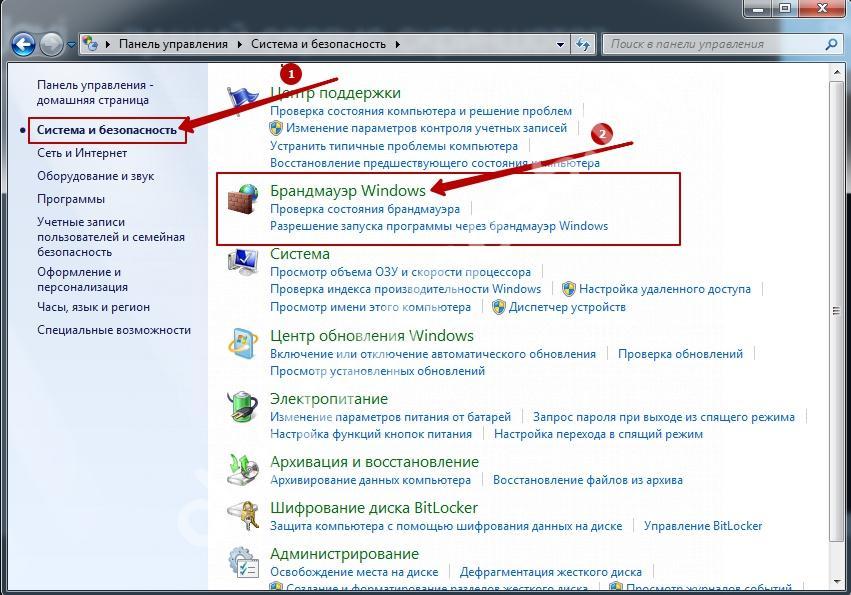
- «Брандмауэр и защита сети» — «Разрешить работу с приложениями…».
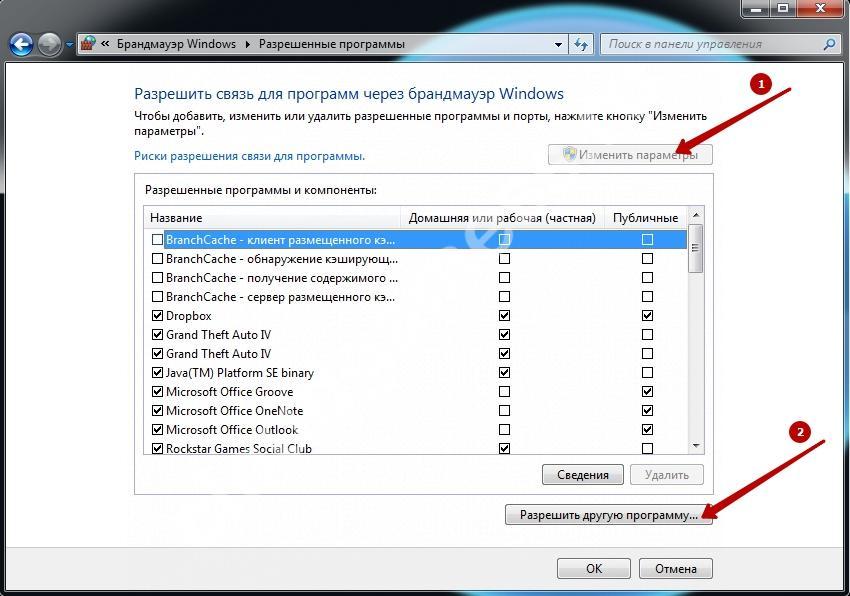
- Нажимаем «Изменить параметры» — «Разрешить другое приложение».
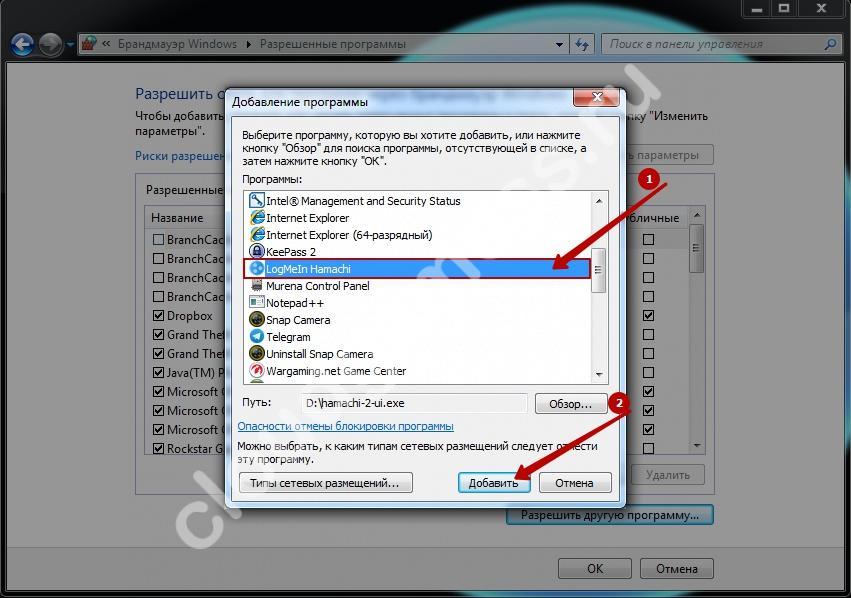
- Выбираем Hamachi VPN, указав к нему путь.
Проблема с брандмауэром будет решена.
Если ПО все равно не работает, то нужно принудительно завершить процесс Hamachi.exe при помощи диспетчера задач, который вызывается сочетанием клавиш «Alt+Ctrl+Del». Затем открыть через панель управления раздел «Службы» и запустить LogMeIn Hamachi Tunneling Engine.
Ошибка конфигурации
В случае возникновения «Ошибки конфигурации» пользователь видит сообщение, что TAP устройство домена VPN выключено. Это означает ошибку туннелирования VPN, что приводит к высокому пингу при соединении. Для устранения ошибки:
- Добавьте Hamachi VPN в исключения брандмауэра.
- Отключите фоновые программы, которые увеличивают расход трафика.
- Выполните принудительную перезагрузку маршрутизатора.
- Отключите шифрование (не рекомендуется).
- Соедините сетевой кабель напрямую (по возможности).
Вывод
Инструкция должна помочь настроить соединение при помощи Hamachi и решить часто возникающие проблемы. Если проблема не была решена — то, возможно, проблема в «железе», и мы советуем обратиться к специалисту.
Предыдущая статья
Скачать Супер ВПН — плюсы и минусы
Следующая статья