Update October 2016
4 years ago, since this answer is used as a reference by many, and while I learned a lot from security perspective during these years,
I feel I am responsible to clarify some important notes, and I’ve update my answer accordingly.
The original answer is correct but not safe for some production environments,
in addition I would like to explain some issues that you might fall into while setting up your environment.
If you are looking for a quick solution and SECURITY IS NOT A MATTER, i.e development env, skip and read the original answer instead
Many scenarios can lead to 403 Forbidden:
A. Directory Indexes (from mod_autoindex.c)
When you access a directory and there is no default file found in this directory
AND Apache Options Indexes is not enabled for this directory.
A.1. DirectoryIndex option example
DirectoryIndex index.html default.php welcome.php
A.2. Options Indexes option
If set, Apache will list the directory content if no default file found (from the above 👆🏻 option)
If none of the conditions above is satisfied
You will receive a 403 Forbidden
Recommendations
- You should not allow directory listing unless REALLY needed.
- Restrict the default index
DirectoryIndexto the minimum. - If you want to modify, restrict the modification to the needed directory ONLY, for instance, use
.htaccessfiles, or put your modification inside the<Directory /my/directory>directive
B. deny,allow directives (Apache 2.2)
Mentioned by @Radu, @Simon A. Eugster in the comments
You request is denied, blacklisted or whitelisted by those directives.
I will not post a full explanation, but I think some examples may help you understand,
in short remember this rule:
IF MATCHED BY BOTH, THE LAST DIRECTIVE IS THE ONE THAT WILL WIN
Order allow,deny
Deny will win if matched by both directives (even if an allow directive is written after the deny in the conf)
Order deny,allow
allow will win if matched by both directives
Example 1
Order allow,deny
Allow from localhost mydomain.example
Only localhost and *.mydomain.example can access this, all other hosts are denied
Example 2
Order allow,deny
Deny from evil.example
Allow from safe.evil.example # <-- has no effect since this will be evaluated first
All requests are denied, the last line may trick you, but remember that if matched by both the last win rule (here Deny is the last), same as written:
Order allow,deny
Allow from safe.evil.example
Deny from evil.example # <-- will override the previous one
Example 4
Order deny,allow
Allow from site.example
Deny from untrusted.site.example # <-- has no effect since this will be matched by the above `Allow` directive
Requests are accepted from all hosts
Example 4: typical for public sites (allow unless blacklisted)
Order allow,deny
Allow from all
Deny from hacker1.example
Deny from hacker2.example
Example 5: typical for intranet and secure sites (deny unless whitelisted)
Order deny,allow
Deny from all
Allow from mypc.localdomain
Allow from managment.localdomain
C. Require directive (Apache 2.4)
Apache 2.4 use a new module called mod_authz_host
Require all granted => Allow all requests
Require all denied => Deny all requests
Require host safe.example => Only from safe.example are allowed
D. Files permissions
One thing that most people do it wrong is configuring files permissions,
The GOLDEN RULE is
STARTS WITH NO PERMISSION AND ADD AS PER YOUR NEED
In Linux:
-
Directories should have the
Executepermission -
Files should have the
Readpermission -
YES, you are right DO NOT ADD
Executepermission for files
for instance, I use this script to setup the folders permissions
# setting permissions for /var/www/mysite.example

# read permission ONLY for the owner
chmod -R /var/www/mysite.example 400

# add execute for folders only
find /var/www/mysite.example -type d -exec chmod -R u+x {} \;

# allow file uploads
chmod -R /var/www/mysite.example/public/uploads u+w

# allow log writing to this folder
chmod -R /var/www/mysite.example/logs/
I posted this code as an example, setup may vary in other situations
Original Answer
I faced the same issue, but I solved it by setting the options directive either in the global directory setting in the httpd.conf or in the specific directory block in httpd-vhosts.conf:
Options Indexes FollowSymLinks Includes ExecCGI
By default, your global directory settings is (httpd.conf line ~188):
<Directory />
    Options FollowSymLinks
    AllowOverride All
    Order deny,allow
    Allow from all
</Directory>
set the options to:
Options Indexes FollowSymLinks Includes ExecCGI
Finally, it should look like:
<Directory />
    #Options FollowSymLinks
    Options Indexes FollowSymLinks Includes ExecCGI
    AllowOverride All
    Order deny,allow
    Allow from all
</Directory>
Also try changing Order deny,allow and Allow from all lines by Require all granted.
Appendix
Directory Indexes source code (some code remove for brevity)
if (allow_opts & OPT_INDEXES) {
     return index_directory(r, d);
} else {
        const char *index_names = apr_table_get(r->notes, "dir-index-names");

        ap_log_rerror(APLOG_MARK, APLOG_ERR, 0, r, APLOGNO(01276)
                      "Cannot serve directory %s: No matching DirectoryIndex (%s) found, and "
                      "server-generated directory index forbidden by "
                      "Options directive",
                       r->filename,
                       index_names ? index_names : "none");
        return HTTP_FORBIDDEN;
    }
Have you recently installed Wamp server on stand alone system or trying to access wamp server to another computer connected through LAN with your PC that gives 403 forbidden error?
Are you looking for an information on how to fix this error quickly? Don’t worry, this article can solve your problem in minutes.
If you are facing 403 forbidden error in Wamp Server, it clearly indicate that the server is preventing you to accessing particular resources. 403 forbidden is the most common error being faced by many developers while installing WAMP server on PC. If you’re one who just installed Wamp server 3.0 and got this error message “403 Forbidden Error – You don’t have permission to access / on this server.”, don’t panic, you can fix this forbidden error in just 5 minutes by following these 5 simple steps.

Before I start explaining the steps, here is the possible reason why this error occurs:
Forbidden errors generally occur due to permission mismatch and can solve by editing .conf and .conf files. In most cases, 403 forbidden errors will occur in both “LocalHost” and “PhpMyadmin”. In this tutorial, we will explain how to solve the errors for both.
Quick Steps:
If you are familiar with most of the parts, follow these quick steps to solve forbidden errors:
- Open httpd.conf (Location –
C:\wamp\bin\apache\apacheX.X.XX\conf\httpd.conf/ replace X.X.XX with the version number). - Find text in
<Directory/></Directory>havingDeny from alland replace withAllow from all - Also find this code:
Order Deny, Allow, Deny from all, Allow from 127.0.0.1and replace with
Order Deny, Allow Deny from all, Allow from all - Now restart all services of the wamp server
- Click on localhost or goto default browser and write localhost and it will start working
Detailed Steps to fix the error:
Step 1
Open “httpd.conf” file from below path.
C:\wamp\bin\apache\apache2.2.22\conf\httpd.conf (You need to locate your drive where you have installed wamp. In this case, we have installed wamp in C drive)
Or
Open from TaskBar Icon

Left Click on Wamp Server Icon => Apache =>httpd.conf
Step 2
Find these lines from httpd.conf file
<Directory/>Options FollowSymLinks
AllowOverride None
Order deny,allow
Deny from all</Directory>
And replace it with
<Directory/>Options FollowSymLinks
AllowOverride None
Order deny,allow
Allow from all</Directory>
Step 3
Also, find these codes in httpd.conf file
Order Deny,Allow
Deny from all
Allow from 127.0.0.1
And replace it with
Order Deny,Allow
Deny from all
Allow from All
Save the file and close it.
Step 4
Then go to Wamp Server Icon, Right-click on it, and Press Restart All Services. See the below image:

Step 5
In Wamp Server click on Localhost as shown in the below image
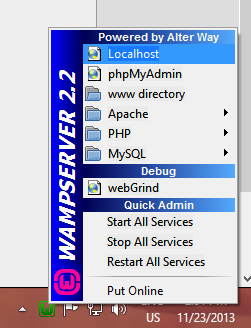
OR go to your default web browser and write “Localhost” at URL
It’s Done!
Solve 403 Forbidden Error in PhpMyAdmin

Here is the simple solution of Forbidden error in while you are accessing Phpmyadmin in your wamp server.
Quick Steps:
- Open phpmyadmin.conf file
- Find this code:
Order Deny, Allow, Deny from all, Allow from 127.0.0.1and replace with
Order Deny, Allow, Deny from all, Allow from all - Save the file and restart all services
- Now access PhpMyadmin from your wamp server or directly access from the default browser
- Its done!
If you are looking for detailed steps to fix this error, follow the below guidelines.
Step 1
Open “phpmyadmin.conf” file from the below path (first locate your wamp installation. In our case, we have installed them in C drive)
C:\wamp\alias\phpmyadmin.conf
Step 2
In that file, you will find two similar source codes in which you need to edit a small portion explain below. Make sure you edit both source codes.
Find this Code
Order Deny,Allow
Deny from all
Allow from 127.0.0.1
And replace it with
Order Deny,Allow
Deny from all
Allow from all
Step 3
Now follow step 4 explained in the above solution in which you need to restart all services from your wamp.
Step 4
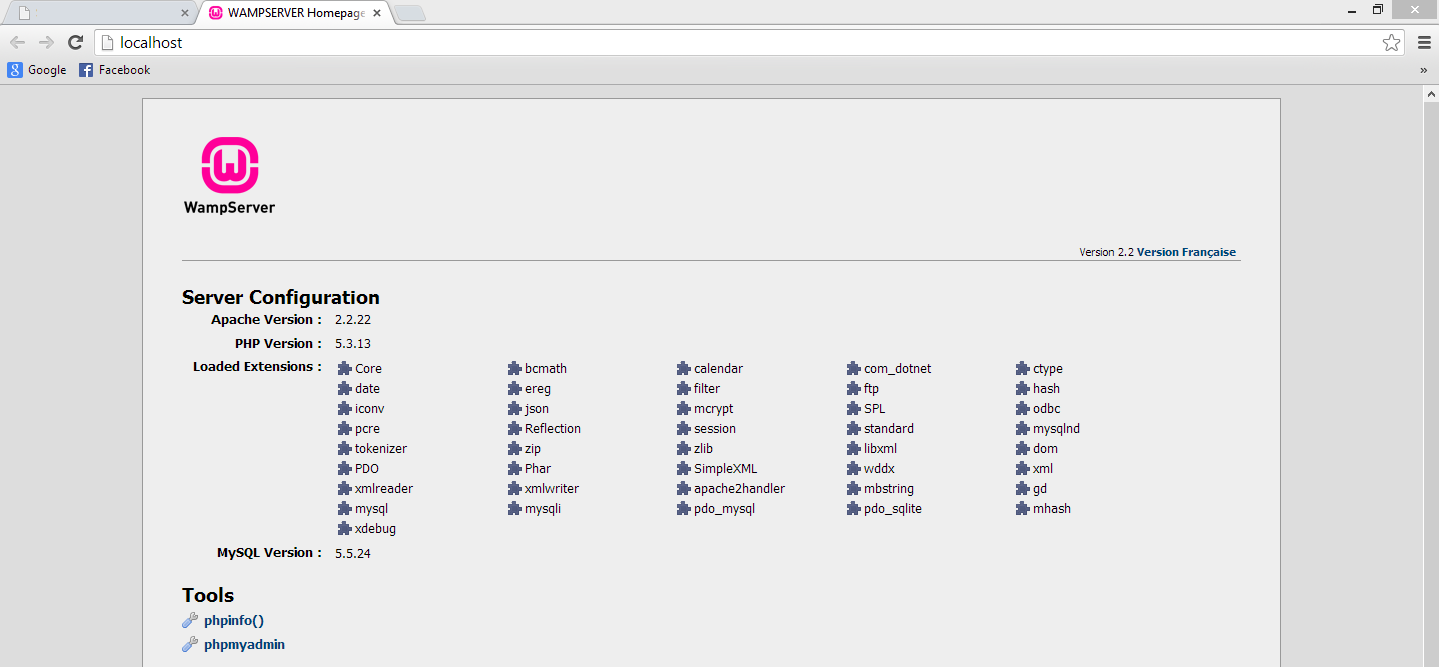
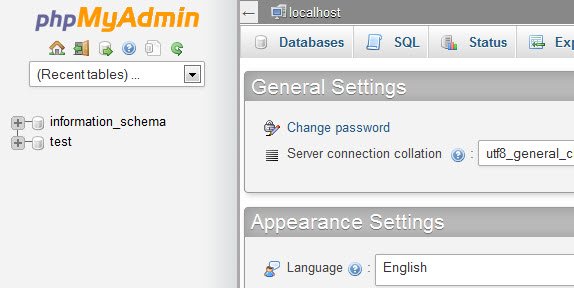
Now, start your wamp server and click on PHPMyAdmin as shown below image.

After successfully editing code and specified file, you will see the below console in your web browser:
If you are still getting the same error or need any other resolution, don’t hesitate to write here by comment. I will show you how to fix those errors in an easy way.
Fix 403 Forbidden error on other computer in local network
Recently we received a comment from a user-facing issue while accessing wamp on PC connected through the local network. Here is the exact query from Vikram:
I have established a network using a D-Link router. I don’t have a problem accessing the WampServer instance from the machine where it is installed(say, Machine A). But, if I try to launch providing say; http://<ip-address-machine a=””> from another machine (say, Machine B)
I am getting a Forbidden error. I could ping from machine B to Machine A.
Tried playing around httpd.conf … having ‘Allow from all’.
Do you have any hint for this?
Solution:
Later, Vikram has suggested the solution to this 403 forbidden error while accessing wamp on a network device. You can resolve this issue by editing the’ httpd-vhosts.conf’ file:
Change 'Require local' to 'Require all granted'.
Other important tips:
- Disable conflicting apps – We found that the applications or services running on your system may interfere with Wamp server’s functioning. If above solution doesn’t work for you, try disabling firewall, anti-virus or other security software temporary and see if the error is gone.
- You can also review Apache error log which you can find here (C:\wamp\bin\apache\apacheX.X.XX\logs\error.log) and try to find any error related to 403. Here you will be able to identify specific issues and can resolved accordingly.
- You should also consider clearing browser cookies and cache – As we found that sometime the error may be caused by the cached data in browser. You can also try accessing server from different browser or in incognito mode.
- If any of these solution does’t sovle the 403 forbidden error – the chances are that there might be other factor which is causing 403 forbidden error. In such case, you should consult your technician or take help from Wamp server community online.
Final Thoughts
As Wamp server is periodically publishing never and advanced version of WAMP that may have different functionality. If you find any issues while fixing the Forbidden error on your latest wamp server, feel free to write us a hereby comment or drop us an email. Our technical team will try to resolve it and will provide the best possible solution.
The 403 forbidden error commonly triggers due to permission mismatch while installing the WAMP server.
As a part of our Server Management Services, we help our Customers to fix permission related errors regularly.
Let us today discuss the possible causes and fixes for this error.
What is forbidden error in wamp server?
During the installation of wamp server or during an upgrade operation, it often triggers the forbidden error message. A typical error message looks like the one given below:

Forbidden errors generally occur due to permission mismatch and we can solve it by editing .conf file. In most cases, 403 forbidden errors will occur in both “LocalHost” and “PhpMyadmin”. Let us now look at how to fix this error.
How to fix 403 forbidden errors in wamp server?
The 403 forbidden error can be fixed by replacing the deny rules in the configuration file. This can be performed with the steps below:
1.Open “httpd.conf” file from below path.
C:\wamp\bin\apache\apache2.2.22\conf\httpd.conf (This is the drive where you have installed wamp).Or
Open from TaskBar Icon. Left Click on Wamp Server Icon => Apache =>httpd.conf
2.Once the http.conf file is identified, find these lines from httpd.conf file
Options FollowSymLinks
 AllowOverride None
 Order deny,allow
 Deny from all
And replace it with
Options FollowSymLinks
 AllowOverride None
 Order deny,allow
 Allow from all
3.Also, find these code in httpd.conf file
Order Deny,Allow
 Deny from all
 Allow from 127.0.0.1
And replace it with
Order Deny,Allow
 Deny from all
 Allow from All
Save the file and close it.
4.Then go to Wamp Server Icon, right click on it and Press Restart All Services.
5.In Wamp Server, click on Localhost.OR goto your default web browser and write “Localhost” in the URL.
Steps to fix the above error in phpmyadmin
- Go to the C :/WAMP/alias/phpmyadmin.conf (click to open the file).
- Then, Press CTRL+F and find the following code
Order Deny,Allow
 Deny from all
 Allow from 127.0.0.1
And replace this code with the following code
Order Deny,Allow Deny from all Allow from allSave and close the file.
- Now restart all services of WAMP Server.
- Open Web Browser and write localhost/phpmyadmin. It will start working
[Need any further assistance in fixing permission errors? – We’re available 24*7]
Conclusion
In short, 403 forbidden error commonly triggers due to permission mismatch while installing the WAMP server. Today, we saw how our Support Engineers fix this error.
PREVENT YOUR SERVER FROM CRASHING!
Never again lose customers to poor server speed! Let us help you.
Our server experts will monitor & maintain your server 24/7 so that it remains lightning fast and secure.
GET STARTED
var google_conversion_label = «owonCMyG5nEQ0aD71QM»;
Introduction
Apache is a popular open-source app for running web servers, owing to its reliability and stability. Despite its ease of use, it’s not uncommon to encounter a ‘403 Forbidden’ error after setting up a website using Apache.
In this tutorial, we will go over potential causes of the Apache ‘403 Forbidden’ error and different ways you can fix it.

Prerequisites
- A user account with root or sudo privileges
- Access to the command line terminal
- An installed version of Apache web server
Apache 403 Forbidden: Effects and Possible Causes
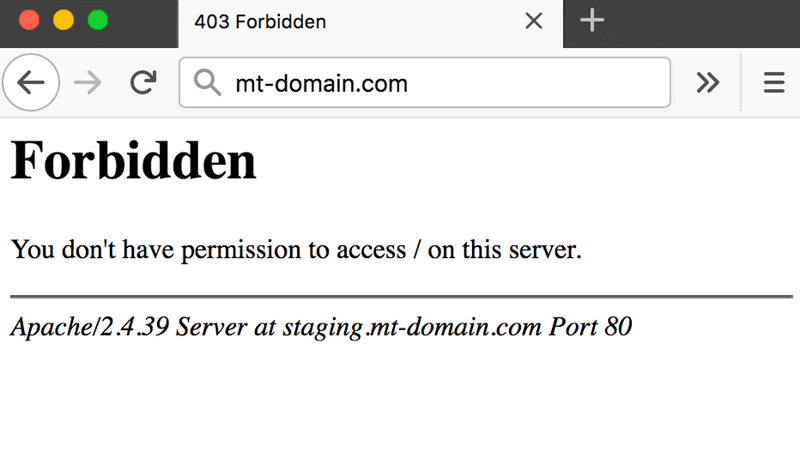
The Apache ‘403 Forbidden’ error appears when you try to load a web page with restricted access. Depending on your browser and the website in question, there are different versions of the 403 error message:
- Forbidden
- Error 403
- HTTP Error 403.14 – Forbidden
- 403 Forbidden
- HTTP 403
- Forbidden: You don’t have permission to access the site using this server
- Error 403 – Forbidden
- HTTP Error 403 – Forbidden
There are several potential reasons why the Apache 403 error occurs:
- The first option is a permission error in the webroot directory, where users don’t have access to website files.
- The second possible reason for a 403 error is missing or incorrect settings in the Apache configuration files.
- Finally, failing to set up a default directory index also triggers a 403 error message in Apache.
How to Fix ‘403 Forbidden’ in Apache
If you have come across an Apache ‘403 Forbidden’ message, there are several ways to fix it:
Method 1: Setting File Permissions and Ownership
If you suspect the cause of the 403 error to be incorrect file permissions, use:
sudo chmod -R 775 /path/to/webroot/directoryThe chmod command sets the execute permission for the webroot directory and read permission for the index.html file.
To change directory ownership, use:
sudo chown -R user:group /path/to/webroot/directoryWhere:
useris the user account with root privileges on your web server.groupiswww-dataorapache.
Restart the Apache web server for the changes to take effect.
If you are working with Ubuntu, use the following command to restart Apache:
sudo systemctl restart apache2If you are working with Centos, use:
sudo systemctl restart httpdMethod 2: Setting Apache Directives
It is possible that the proper require directive is not configured and restricts access to resources. To fix it:
1. Access Apache’s main configuration file. For Ubuntu, use:
sudo nano /etc/apache2/apache2.confFor Centos, use:
sudo nano /etc/httpd/httpd.conf2. Once you open the configuration file, scroll down to the following section:
3. If the final line in the <Directory /var/www/> section contains Require all denied, change it to Require all granted.
4. Press Ctrl+X and then Y to save changes to the Apache configuration file.
5. Restart the Apache web server for the changes to take effect. For Ubuntu, use:
sudo systemctl restart apache2For Centos, use:
sudo systemctl restart httpdMethod 3: Adding a Default Directory Index
When a user visits a URL that requests a directory, the web server looks for a file in the given directory. If the file or any similar files are not found, and directory index listings are disabled, the web server displays the ‘403 Forbidden’ error message.
To fix the issue, add a default directory index.
1. Access Apache’s main configuration file by using:
sudo nano /etc/apache2/apache2.conf2. Scroll down to find out the default index file name:
DirectoryIndex index.html index.cgi index.pl index.php index.xhtml3. Make sure there is a file in the webroot folder with this name and upload it if it’s missing.
Conclusion
After following this tutorial, you should be able to determine the cause of an Apache ‘403 Forbidden’ error and fix any issues you may find.
If you want to find out more about 403 forbidden error, read our article 403 forbidden error — what is it and how to fix it.
Apache web server is one of the most popular and widely used open-source web servers thanks to its stability and reliability. The web server commands a huge market, especially in web hosting platforms.
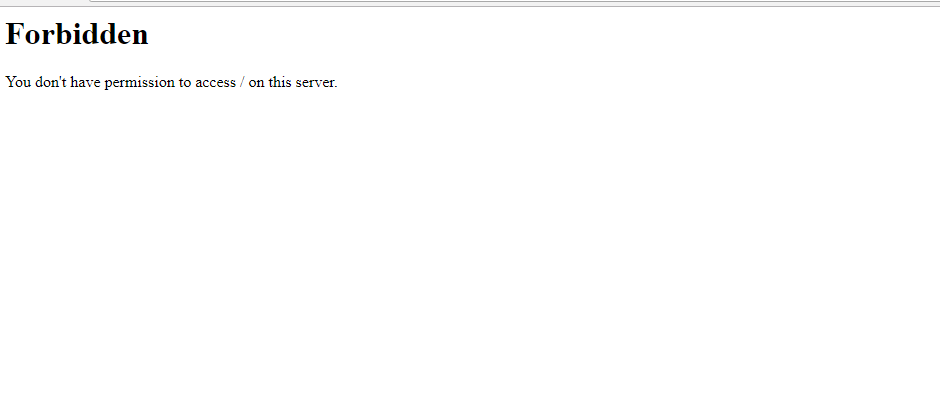
Be that as it may, you may get a “Forbidden – You don’t have permission to access / on this server” error on your browser after setting up your website. It’s quite a common error and a good chunk of users have experienced it while testing their site. So what is this error?
Demystifying the Forbidden Error
Also referred to as the 403 Forbidden error, Apache’s ‘Forbidden Error’ is an error that is displayed on a web page when you are attempting to access a website that’s restricted or forbidden. It’s usually splashed on the browser as shown.
Additionally, the error can manifest in several ways on the browser as indicated below:
- HTTP Error 403 – Forbidden
- Forbidden: You don’t have permission to access [directory] on this server
- 403 Forbidden
- Access Denied You don’t have permission to access
- 403 forbidden requests forbidden by administrative rules
So what causes such errors?
The ‘403 Forbidden Error‘ occurs due to the following main reasons:
1. Incorrect File / Directory Permissions
This error can be triggered due to incorrect file/folder permissions on the webroot directory. If the default file permissions are not adjusted to grant users access to the website files, then the chances of this error popping on a web browser are high.
2. Misconfiguration of the Apache Configuration Files
This error can also be attributed to a misconfiguration of one of the Apache configuration files. It could be an incorrect parameter that has been included or missing directives in the configuration file.
Fixing the ‘403 Forbidden Error’
If you have encountered this error, here are a few steps that you can take to remedy this.
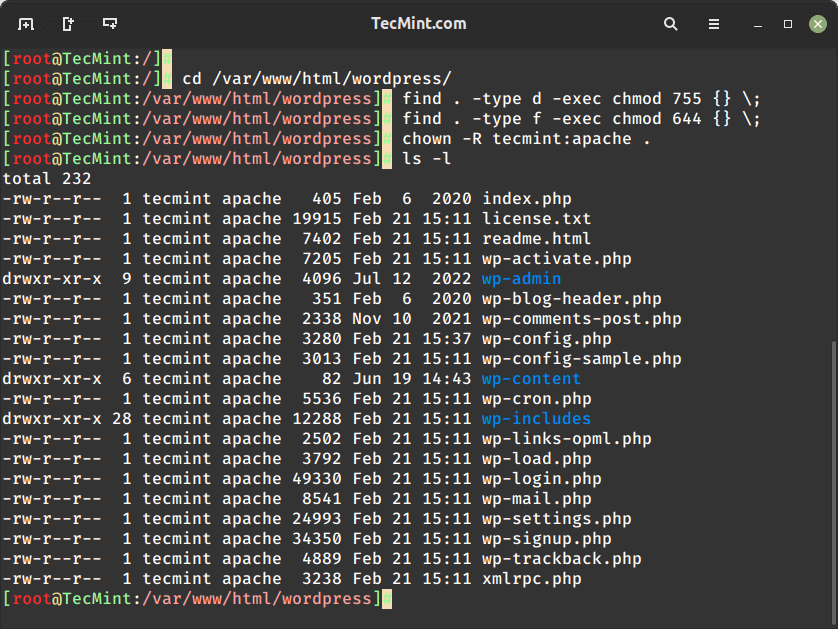
1. Adjust File Permissions & Ownership of the Webroot Directory
Incorrect file permissions & directory ownership are known to restrict access to website files. So, firstly, be sure to assign the file permissions recursively to the webroot directory as shown.
The webroot directory should always have EXECUTE permissions and the index.html file should have READ permissions.
$ cd /path/to/webroot/directory
$ sudo find . -type d -exec chmod 755 {} \;
$ sudo find . -type f -exec chmod 644 {} \;
The above find command is used to find all directories (folders) and files within the current directory (.) and set their permissions to 755 (directories) and 644 (files).
Additionally, adjust the ownership of files and directories to a specific user (tecmint) and group www-data or apache using the chown command as shown.
$ sudo chown -R tecmint:apache .
Finally, reload or restart the Apache webserver for the changes to take effect.
$ sudo systemctl restart apache2
OR
$ sudo systemctl restart httpd
If this does not resolve the issue, proceed to the next step:
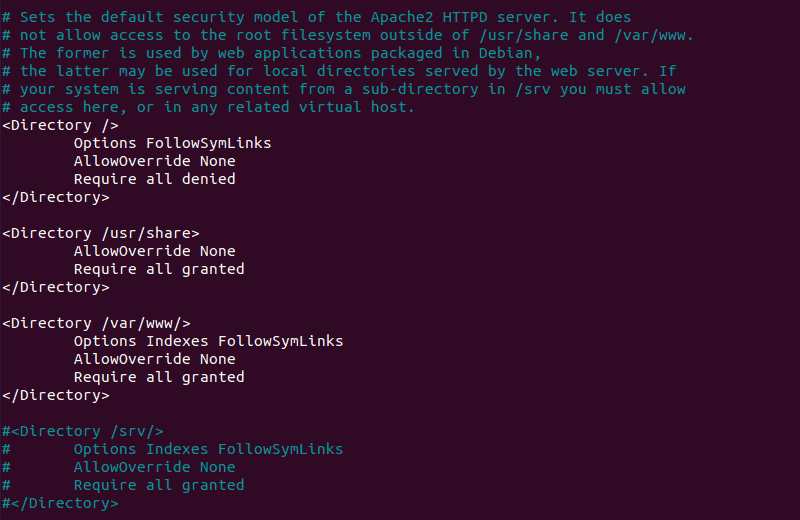
2. Adjust Directives in Apache Main Configuration File
If you are on Debian-based Linux, in Apache’s main configuration file /etc/apache2/apache2.conf, ensure that you have this block of code:
<Directory />
        Options FollowSymLinks
        AllowOverride None
        Require all denied
</Directory>

<Directory /usr/share>
        AllowOverride None
        Require all granted
</Directory>

<Directory /var/www/>
        Options Indexes FollowSymLinks
        AllowOverride None
        Require all granted
</Directory>
Save and exit and thereafter, restart the Apache.
If you are running Apache on RHEL-based distributions / CentOS systems, ensure that you relax access to the /var/www directory in the /etc/httpd/conf/httpd.conf main Apache configuration file.
<Directory "/var/www">
    AllowOverride None
    Require all granted
</Directory>
Then save all the changes and reload Apache.
$ sudo systemctl reload apache2
OR
$ sudo systemctl reload httpd
If after trying all these steps you are still getting the error, then please check the configuration of your virtual host files.
We have detailed articles on how you can configure the Apache Virtual host file on:
- How to Install Apache with Virtual Hosts on Debian
- How to Configure Apache Virtual Hosts on Rocky Linux
- How to Install Apache with Virtual Host on CentOS
I hope that the steps provided have helped you clear the 403 error.