|
barrymosselust
Intermediate member
|
Go to Page No.
Landlord
|
Trying to flash Android for OPi PC 2 with PhoenixCard, but no luck. I’m getting Error messages all the time:
Load CardTool Failed! After a reboot of the laptop I get: Card Preprocess Failed !228 Really annoying. Tried:
|
|||
|
|
||||
|
Use magic |
||||


 Favorites
|
anode16
Novice
|
Sofa
Installation of microsoft visual c++ redistributable 2005, 2008, 2010, 2012, 2015 (x86) fixed Load CardTool Failed error for me. I don’t know which one of them… |
|||
|
Use magic |
||||
|
barrymosselust
Intermediate member
|
Bench
A reboot fixes that error message for me too (temporarily — if the first thing after the reboot is PhoenixCard). But then I get the other error message (!228). Really frustrating, because I bought this board to play around with Android (will use it later with Armbian probably)… |
|||
|
Use magic |
||||

|
anode16
Novice
|
Floor
I have successfully burned Android image for my Orange Pi PC2 and it won’t boot, stuck on H5 logo. Also, tried different cards, burn from windows 10, windows 7, windows xp, other cardreader. Same result. Tested Arch linux XFCE image and it’s working, so that is not hardware issue. |
|||
|
Use magic |
||||
|
barrymosselust
Intermediate member
|
5#
So Xunlong provided a non-working Android version which has to be flashed through software that’s so crappy it’ll only work for some? |
|||
|
Use magic |
||||
|
alexbudd
Intermediate member
|
6#
I have a working version of android but it is on a 16GB card.
If I take and image of this it will be the full 16GB size and will take an age to download. i got this to work by downloading the file from the Mega link provided on another forum from the admin on this site. I used a Windows 7 machine and done a full format on the card using SDFormater. I then did not format to normal but chose startup mode and burned the image without issue. Its boots OK but was originally Chinese language. The other issue with all current OS for the Pi PC2 is that they are all 720 resolution and not 1080. |
|||
|
Use magic |
||||
|
barrymosselust
Intermediate member
|
7#
Edited by barrymosselust at 2016-11-29 23:18
Tried all of that, except for a Win 7 machine (as I don’t own one). I could try a virtual machine for that, but through a virtual XP it didn’t work… Might it be possible to create a 8GB image and upload that somewhere (or e.g. through torrent)? Zipped or rarred of course. |
|||
|
Use magic |
||||
|
alexbudd
Intermediate member
|
8#
Would not be possible to create an image easily since I am using a 16GB card and the file system has been expanded. I do not want to mess around with it too much since I have a working system.
My advice would be to try the Windows 7 approach. Previously this has worked for me when Windows 10 & 8 have not. I think since most machines in China are using Windows 7 this is really what Phoenix Card has been written for. Every guide video I have seen seems to use a Windows 7 Machine. |
|||
|
Use magic |
||||
|
anode16
Novice
|
9#
Try installing vcredist_x86, that was missing part in my case. I tested it on clean Windows 7 virtual installation. |
|||
|
Use magic |
||||
|
anode16
Novice
|
10#
I’ve tried almost everything and without success, windows 7, SDFormater, same H5 logo and nothing.Do I need to do anything to boot android? Press button? Plug mouse? Or just plug in power and wait? |
|||
|
Use magic |
||||
Loading
|
barrymosselust
Intermediate member
|
Go to Page No.
Landlord
|
Trying to flash Android for OPi PC 2 with PhoenixCard, but no luck. I’m getting Error messages all the time:
|
|||
|
|
||||
|
Use magic |
||||
|
anode16
Novice
|
Sofa
Installation of microsoft visual c++ redistributable 2005, 2008, 2010, 2012, 2015 (x86) fixed Load CardTool Failed error for me. I don’t know which one of them… |
|||
|
Use magic |
||||
|
barrymosselust
Intermediate member
|
Bench
A reboot fixes that error message for me too (temporarily — if the first thing after the reboot is PhoenixCard). But then I get the other error message (!228). Really frustrating, because I bought this board to play around with Android (will use it later with Armbian probably)… |
|||
|
Use magic |
||||
|
anode16
Novice
|
Floor
I have successfully burned Android image for my Orange Pi PC2 and it won’t boot, stuck on H5 logo. Also, tried different cards, burn from windows 10, windows 7, windows xp, other cardreader. Same result. Tested Arch linux XFCE image and it’s working, so that is not hardware issue. |
|||
|
Use magic |
||||
|
barrymosselust
Intermediate member
|
5#
So Xunlong provided a non-working Android version which has to be flashed through software that’s so crappy it’ll only work for some? |
|||
|
Use magic |
||||
|
alexbudd
Intermediate member
|
6#
I have a working version of android but it is on a 16GB card. If I take and image of this it will be the full 16GB size and will take an age to download. i got this to work by downloading the file from the Mega link provided on another forum from the admin on this site. I used a Windows 7 machine and done a full format on the card using SDFormater. I then did not format to normal but chose startup mode and burned the image without issue. Its boots OK but was originally Chinese language. The other issue with all current OS for the Pi PC2 is that they are all 720 resolution and not 1080. |
|||
|
Use magic |
||||
|
barrymosselust
Intermediate member
|
7#
Edited by barrymosselust at 2016-11-29 23:18
Tried all of that, except for a Win 7 machine (as I don’t own one). I could try a virtual machine for that, but through a virtual XP it didn’t work… Might it be possible to create a 8GB image and upload that somewhere (or e.g. through torrent)? Zipped or rarred of course. |
|||
|
Use magic |
||||
|
alexbudd
Intermediate member
|
8#
Would not be possible to create an image easily since I am using a 16GB card and the file system has been expanded. I do not want to mess around with it too much since I have a working system. My advice would be to try the Windows 7 approach. Previously this has worked for me when Windows 10 & 8 have not. I think since most machines in China are using Windows 7 this is really what Phoenix Card has been written for. Every guide video I have seen seems to use a Windows 7 Machine. |
|||
|
Use magic |
||||
|
anode16
Novice
|
9#
Try installing vcredist_x86, that was missing part in my case. I tested it on clean Windows 7 virtual installation. |
|||
|
Use magic |
||||
|
anode16
Novice
|
10#
I’ve tried almost everything and without success, windows 7, SDFormater, same H5 logo and nothing.Do I need to do anything to boot android? Press button? Plug mouse? Or just plug in power and wait? |
|||
|
Use magic |
||||
-
To the zidoo tv techs: please help me, I plugged in my zidoo h6 pro — which I got just 6 months ago — and nothing on screen, no signal. I tried many tv’s, many cables, the same results, no signal on tv. I reset it, nothing. I tried to flash it using the sd card method you describe, still nothing, doesn’t recognize the card at all. Any help, please? Anything I can do to bring it back working?
To all: Please help me.
-
hmm..
try a different power adaptor
*in most cases.. the power adaptor is the first to failjust wondering «doesn’t recognize the card at all»
if you see nothing? how do you know this?anyway.. goodluck
-
Thank you very much for you help, appreciate it.
Yes, I tried 2 other power adaptors, the same result, no signal on tv. I left out this fact from my first post: that small indicator light on the Zidoo box, gives out a very dim, flashing red light, I can barely see it, but it is there.
Also, when I said it doesn’t recognize the card at all, I meant, even when I use the sd card method, I see nothing on tv, not flashing, not upgrading, nothing.Please help everybody!
-
Is there a way to flash Zidoo H6 Pro box using other methods like USB Burning Tool or Factory Tool? As I said, I have tried to flash it using SD card, but no success.
Any Zidoo tech can finally write something here? I bought $110 Zidoo H6 Pro — a lot o money for me — and now the box is not working, so, maybe Zidoo should care a little and write something at least.Thank you.
-
hmm.. on allwinner
phoenix card and Phoenixsuite are mostly used
but to use phoenix suite you need : firmware and a USB otg to USB cablecheers
-
I tried the Phoenixsuite, but it said «No device connected». Anyone knows how to make Phoenixsuite recognize my Zidoo h6 pro.
Are Zidoo techs on this board at all? Or they just don’t want to reply to me? -
Have to tried hard reset using proper method?
«
«
If it fails, the only way u can unbrick your box using PhoenixCard. Follow this guide: «http://forum.zidoo.tv/index.php?thr…d-tv-box-is-bricked-firmware-1-0-25-img.8146/».
If your box doesn’t recognize the SD card, try another one. Use a fast SD card, otherwise it may get stuck.
-
Thank you, appreciate your help.
I tried PhoenixCard, I get this error: Load CardTool Failed!
I know, it’s getting really boring with all my questions and all my problems, please, any suggestions? I would really appreciate it. -
irbit
New Member
Beta test group -
I think you need to install «Microsoft Visual C++ Redistributable» to run PhoenixCard. Can’t remember whether its Visual C++ Redistributable 2008, 2010 or 2012. Install all of these and hopefully, after installing Visual C++ Redistributable, this error will be gone.
Best of luck.
-
Thank you, Jubair, for your help, and thanks to everyone for helping.
Jubair, I installed Microsoft Visual C++ Redistributable 2008, I run PhoenixCard, and I got the same error: Load CardTool Failed!
I installed Microsoft Visual C++ Redistributable 2010, I run PhoenixCard, and I got the same error: Load CardTool Failed!
I tried to install Microsoft Visual C++ Redistributable 2012, but it gave me an error: Setup Failed 0x80070003 — The system cannot find the path specified.
The same error when I tried to install Microsoft Visual C++ Redistributable 2013, 2015, 2017.
Anything else I can do?
Please continue to help me! -
http://www.orangepi.org/orangepibbsen/forum.php?mod=viewthread&tid=2194
See the first answer. Install x86 version of redistributables. I fixed my phoenixcard problem using this method before.
-
Jubair, thank you very much again. I used the link in your post, I installed vcredist_x86 shown on that post, I run PhoenixCard, and the error is gone, the card burns successfully. But when I check the SD card in explorer, there are no files there, the SD card is empty. How can that be possible, it said it burned the image successfully!
-
Do not worry about that. PhoenixCard formats card in different file format and you must format the card to normal again using PhoenixCard, otherwise you wont be able to use it in your phone.
Now disconnect the power of your h6 pro, insert the sd card and power the box on.It will take some time to install the firmware. Hopefully your box will come back to life again. I fixed my box using this method too.Best of luck
-
Jubair,
THANK YOU! Really, I appreciate it! If it wasn’t for your replies, my $110 Zidoo H6 Pro tv box would be in a garbage can somewhere. As you said, I put the card on Zidoo box, and right away it worked. I got Zidoo working again, or, I should say, you got my Zidoo box working again! Thank you!
Also, a thank you to everyone who helped, I appreciate it!
-
Its really good to hear your H6 pro working again buddy
") . Enjoy your box!
. Enjoy your box!
Share This Page
![]()
04-03-2016, 05:06 AM
(This post was last modified: 05-05-2016, 04:11 AM by Keex.)
Hi,
while trying to burn Android or RemixOS images to my SD card I encountered the problem, that the «Burn» process in PhoenixCard canceled at random points during the burn process, with just saying «Error» in the log. This could happen right after formatting, or it could burn some steps and then cancel. Hitting Burn multiple times could lead to different points of «Error».
One method that did work out for me in the end was the one described by user «Wurstbrot» in this thread of the lemaker.org forums:
Quote:Hi there,
I’m using a Laptop with Windows 8.1 with in-built card reader and had the same Problem burning an image and stumbled upon a pretty easy solution:First you have to format your sd-card with sd-formatter (hint (Keex): SD Card Formatter), method full erase and format size adjustment ON. Thats in case you tried several Android installs, obviously there remain some leftovers.
Then turn on PhoenixCard (V310_20130618), select method «Startup» and press format.
Then you press «burn» and then…. Usually in 19 out of 20 tries I get an error.Now here is the catch: when you get the error, eject the sd-card. Wait a few seconds till it says
«No drive present» or such, then Re-enter the card and hit «Burn»….
This time it will perform perfectly.I’ve tried this several times now and it works everytime!
Hope I could save somebody some time,
cheers
Steps:
- (Last resort, shouldn’t be necessary): Perform complete card clean with Diskpart, as described below)
- (Optional: Format SD Card using SD Card Formatter (if it says that Full Erase wasn’t supported for your card and instead did Quick Format, don’t worry))
- Start PhoenixCard (version 3.10 on Pine64 Downloads page works)
- Select correct drive letter and image
- Select «Startup» method
- Click Burn (not format to normal!)
- Wait for error
- Leave PhoenixCard running, and pull out the SD card from the computer (i pulled out the card from my reader, not the whole reader)
- Wait for PhoenixCard to say «No devices found» or similar. Usually happens instantaneously. If nothing happens, start again at the top and try pulling the whole reader instead.
- Push the card/reader back into the reader/PC
- Select correct drive letter
- Click burn.
This time it should perform the Burn process successfully. I personally had no luck whatsoever, tried multiple readers and images, but this worked on the first try. I tested it with the RemixOS image «pine64_B2016022702_1000MB_LAN.img». The OS started successfully on the Pine64+ 2 GB.
I am running Win10 64bit. I did not use any compatibility modes or something along those lines.
Edit. For when it doesn’t work:
I noticed that it doesn’t work directly every time. Here is what MAY help:
Perform complete clean of the SD card using Diskpart
- Be careful! You may damage the system if you select the wrong disk to work on!
- Seriously: Select the wrong disk to work on and you will wipe your system or data HDD partition!
- Windows Key+R (Run program) -> Diskpart (possibly accept UAC)
- In the shell type in: list disk <enter> (always hit enter at the end)
- Find the number of the disk that is the SD card (usually one of the last, e.g. check the size)
- Type in: select disk 3 (instead of 3 the number you found)
- Type in «list disk» again, just to make sure: the active disk (aka the one that is to be cleaned) is marked with a *. Make SURE it is the SD card. All data on it will be wiped relentlessly and with no remorse. If you select your normal HDD, you will loose all data on it!!
- Type in: clean
- Type in: create partition primary
- Close the shell
The continue with the steps above.
Edit:
Andrew2 pointed out, that you could run into problems with this method, because the PhoenixCard errors are probably related to faulty read/write processes during the flash and you can end up with errors on the card.
(04-04-2016, 04:23 AM)Andrew2 Wrote: Then: Phoenix Card has some built-in checks relying on checksumming to verify whether some parts have been written correctly (does not apply to the largest part unfortunately). In case Phoenix Card throws errors then this is a sign of data corruption maybe caused by a bad (faulty or counterfeit) SD card or an SD card reader starting to corrupt data (well known problem with some USB readers that start to overheat and corrupt data after a certain amount of constant writing —> use USB2.0 when first connected to USB3.0, check the whole setup with one of the two tools below).
![]()
(04-03-2016, 05:06 AM)Keex Wrote: Hi,
while trying to burn Android or RemixOS images to my SD card I encountered the problem, that the «Burn» process in PhoenixCard canceled at random points during the burn process, with just saying «Error» in the log. This could happen right after formatting, or it could burn some steps and then cancel. Hitting Burn multiple times could lead to different points of «Error».One method that did work out for me in the end was the one described by user «Wurstbrot» in this thread of the lemaker.org forums:
Quote:Hi there,
I’m using a Laptop with Windows 8.1 with in-built card reader and had the same Problem burning an image and stumbled upon a pretty easy solution:First you have to format your sd-card with sd-formatter (hint (Keex): SD Card Formatter), method full erase and format size adjustment ON. Thats in case you tried several Android installs, obviously there remain some leftovers.
Then turn on PhoenixCard (V310_20130618), select method «Startup» and press format.
Then you press «burn» and then…. Usually in 19 out of 20 tries I get an error.Now here is the catch: when you get the error, eject the sd-card. Wait a few seconds till it says
«No drive present» or such, then Re-enter the card and hit «Burn»….
This time it will perform perfectly.I’ve tried this several times now and it works everytime!
Hope I could save somebody some time,
cheersSteps:
- (Optional: Perform complete card clean with Diskpart, as described below)
- Format SD Card using SD Card Formatter (if it says that Full Erase wasn’t supported for your card and instead did Quick Format, don’t worry)
- Start PhoenixCard (version 3.10 on Pine64 Downloads page works)
- Select correct drive letter and image
- Select «Startup» method
- Click Burn (not format to normal!)
- Wait for error
- Leave PhoenixCard running, and pull out the SD card from the computer (i pulled out the card from my reader, not the whole reader)
- Wait for PhoenixCard to say «No devices found» or similar. Usually happens instantaneously. If nothing happens, start again at the top and try pulling the whole reader instead.
- Push the card/reader back into the reader/PC
- Select correct drive letter
- Click burn.
This time it should perform the Burn process successfully. I personally had no luck whatsoever, tried multiple readers and images, but this worked on the first try. I tested it with the RemixOS image «pine64_B2016022702_1000MB_LAN.img». The OS started successfully on the Pine64+ 2 GB.
I am running Win10 64bit. I did not use any compatibility modes or something along those lines.
Edit. For when it doesn’t work:
I noticed that it doesn’t work directly every time. Here is what may help:Perform complete clean of the SD card using Diskpart
- Be careful! You may damage the system if you select the wrong disk to work on!
- Windows Key+R (Run program) -> Diskpart (possibly accept UAC)
- In the shell type in: list disk
- Find the number of the disk that is the SD card (usually one of the last, e.g. check the size)
- Type in: select disk 3 (instead of 3 the number you found)
- Type in: clean
- Type in: create partition primary
- Close the shell
The continue with the steps above.
Anyways, just wanted to share with you, for when you run into the same problems.
Thanks on the tips. I also use Diskpart to clean the SD partition. Just need to be extra careful not to clean your harddisk. My advise after launch diskpart, first action is immediately select to your SD card disk number to avoid any accidental mistake.
.. TL
![]()
(04-03-2016, 02:08 PM)tllim Wrote: Thanks on the tips. I also use Diskpart to clean the SD partition. Just need to be extra careful not to clean your harddisk. My advise after launch diskpart, first action is immediately select to your SD card disk number to avoid any accidental mistake.
.. TL
You are right, I added another point in the steps to check the selected disk.
![]()
04-04-2016, 04:23 AM
(This post was last modified: 04-04-2016, 05:47 AM by Andrew2.)
(04-04-2016, 03:16 AM)Keex Wrote:
(04-03-2016, 02:08 PM)tllim Wrote: Thanks on the tips. I also use Diskpart to clean the SD partition. Just need to be extra careful not to clean your harddisk. My advise after launch diskpart, first action is immediately select to your SD card disk number to avoid any accidental mistake.
.. TLYou are right, I added another point in the steps to check the selected disk.
Sorry, but you’re collecting here wrong/misleading ‘information’ (you should keep in mind that while Pine64 might be new the whole ‘Android on Allwinner hardware’ story is a bit older and everything you might wonder about is known since years).
When Phoenix Card is used in startup mode then the first step is cleaning out the first sectors of the card and writing an appropriate MBR + partition table to it that matches the card’s size. Therefore using any tool like Dispart or SD Formatter is not only useless but dangerous instead (since you might wipe out your harddisk instead). It will later always look like this on the card (the first partition’s size adjusted to use all available disk space):
Code:
Device     Boot   Start      End  Sectors  Size Id Type

/dev/sda1       5251072 15521790 10270719  4.9G  b W95 FAT32

/dev/sda2  *      73728   139263    65536   32M  6 FAT16

/dev/sda3             1  5251072  5251072  2.5G 85 Linux extended

/dev/sda5        139264   172031    32768   16M 83 Linux

/dev/sda6        172032   204799    32768   16M 83 Linux

/dev/sda7        204800  3350527  3145728  1.5G 83 Linux

/dev/sda8       3350528  3383295    32768   16M 83 Linux

/dev/sda9       3383296  3448831    65536   32M 83 Linux

/dev/sda10      3448832  5021695  1572864  768M 83 Linux

/dev/sda11      5021696  5054463    32768   16M 83 Linux

/dev/sda12      5054464  5087231    32768   16M 83 Linux

/dev/sda13      5087232  5251071   163840   80M 83 Linux
Then: Phoenix Card has some built-in checks relying on checksumming to verify whether some parts have been written correctly (does not apply to the largest part unfortunately). In case Phoenix Card throws errors then this is a sign of data corruption maybe caused by a bad (faulty or counterfeit) SD card or an SD card reader starting to corrupt data (well known problem with some USB readers that start to overheat and corrupt data after a certain amount of constant writing —> use USB2.0 when first connected to USB3.0, check the whole setup with one of the two tools below).
So instead of trying to workaround these issues ejecting/reinserting the card (which might work if speed negotiation between host and card reader might be adjusted — check Device Manager) the only reasonable strategy is to stop at the very first error and check card reader with inserted SD card using H2testw or f3. Anything else is simply fooling yourself and most probably creating an Android image containing bit flips that lead to all sorts of random problems later.
![]()
04-04-2016, 08:13 AM
(This post was last modified: 04-04-2016, 08:19 AM by Keex.)
(04-04-2016, 04:23 AM)Andrew2 Wrote:
(04-04-2016, 03:16 AM)Keex Wrote:
(04-03-2016, 02:08 PM)tllim Wrote: Thanks on the tips. I also use Diskpart to clean the SD partition. Just need to be extra careful not to clean your harddisk. My advise after launch diskpart, first action is immediately select to your SD card disk number to avoid any accidental mistake.
.. TLYou are right, I added another point in the steps to check the selected disk.
Sorry, but you’re collecting here wrong/misleading ‘information’ (you should keep in mind that while Pine64 might be new the whole ‘Android on Allwinner hardware’ story is a bit older and everything you might wonder about is known since years).
When Phoenix Card is used in startup mode then the first step is cleaning out the first sectors of the card and writing an appropriate MBR + partition table to it that matches the card’s size. Therefore using any tool like Dispart or SD Formatter is not only useless but dangerous instead (since you might wipe out your harddisk instead). It will later always look like this on the card (the first partition’s size adjusted to use all available disk space):
Code:
Device     Boot   Start      End  Sectors  Size Id Type

/dev/sda1       5251072 15521790 10270719  4.9G  b W95 FAT32

/dev/sda2  *      73728   139263    65536   32M  6 FAT16

/dev/sda3             1  5251072  5251072  2.5G 85 Linux extended

/dev/sda5        139264   172031    32768   16M 83 Linux

/dev/sda6        172032   204799    32768   16M 83 Linux

/dev/sda7        204800  3350527  3145728  1.5G 83 Linux

/dev/sda8       3350528  3383295    32768   16M 83 Linux

/dev/sda9       3383296  3448831    65536   32M 83 Linux

/dev/sda10      3448832  5021695  1572864  768M 83 Linux

/dev/sda11      5021696  5054463    32768   16M 83 Linux

/dev/sda12      5054464  5087231    32768   16M 83 Linux

/dev/sda13      5087232  5251071   163840   80M 83 Linux
Then: Phoenix Card has some built-in checks relying on checksumming to verify whether some parts have been written correctly (does not apply to the largest part unfortunately). In case Phoenix Card throws errors then this is a sign of data corruption maybe caused by a bad (faulty or counterfeit) SD card or an SD card reader starting to corrupt data (well known problem with some USB readers that start to overheat and corrupt data after a certain amount of constant writing —> use USB2.0 when first connected to USB3.0, check the whole setup with one of the two tools below).
So instead of trying to workaround these issues ejecting/reinserting the card (which might work if speed negotiation between host and card reader might be adjusted — check Device Manager) the only reasonable strategy is to stop at the very first error and check card reader with inserted SD card using H2testw or f3. Anything else is simply fooling yourself and most probably creating an Android image containing bit flips that lead to all sorts of random problems later.
Good information that is true I guess, but i think the advantage of the Diskpart step is that in some cases the partitions on the SD card can be pretty messed up from previous failed attempts (mine was) and this assured at least some vanilla state that PhoenixCard then could work of.
I am not claiming that everything here is correct, needed or even a good idea. It can however work and I myself was really about to give up before trying it this way. I could have tried even more than two different readers/adapters, I could have bought some more SD cards but this would be just as hit&miss as just counting on some bit errors not mattering. Trying the latter though is certainly cheaper and I have yet to discover a problem (apart from the wrong RAM size you pointed out to me in the other thread, but that’s a different problem).
If will add a disclaimer to the original post though to let people know about your concerns.
![]()
(04-04-2016, 08:13 AM)Keex Wrote: Good information that is true I guess, but i think the advantage of the Diskpart step is that in some cases the partitions on the SD card can be pretty messed up from previous failed attempts (mine was) and this assured at least some vanilla state that PhoenixCard then could work of.
Again: Phoenix Card will repartition the SD card anyway so it’s absolutely useless to wipe something out in an earlier step. If Phoenix Card stops at the beginning, the button next to «Burn» is the right one to fix this problem. And every subsequent error reported by Phoenix Card is a clear sign of detected data corruption. And then the solution is not a workaround found in a forum with mostly questionable contents in the meantime (LeMaker’s) but instead to check the reason the error occurs.
So the right advise would be to CHECK the whole card together with card reader first before even trying to use Phoenix Card to burn something on it. It is still a well known and also well understood problem that SD cards might be faulty and that card readers in high-speed mode start to corrupt data after some time of constant sequential writing.
![]()
Ok, I did what you suggested and tested the whole SD card using h2testw and it found no error (even though it wrote far more than the Android image contains), so I guess both the card and the reader are fine.
I still encounter the PhoenixCard error though, but it works reliably after using the idea from the «questionable» forum (which is a definition of pretty much any forum, btw). So maybe, please add another non-questionable idea that works and does not contain the words «buy new stuff».
See, I posted this for the simple reason that I was becoming extremely frustrated by the whole process, but found a solution in the steps in my original post. If someone else encounters the same problem (and I know from these forums that people do), and it may help them as well, then it was worth it. I don’t know WHY it works, but I have seen stranger behaviour by software (my sound card driver still forces me to set the pc to standby in order for it to save setting changes…).
You said that replugging the sd card might change a speed negotiation? As far as I remember, at any occasion I saw roughly the same read/write speed, but could you elaborate how to check this in the Device Manager?
![]()
Use your windows Xp or windows 7 to burn your XD card, windows 10 all gave you errors and waste your time.
![]()
I just had Error after or whilst formatting the sd card.
Went back to the good old and trusty windows formatting via right click, then started the phoenix app as an administrator and had zero problems burning the image as startup.
BTW i am using windows 10…
Содержание
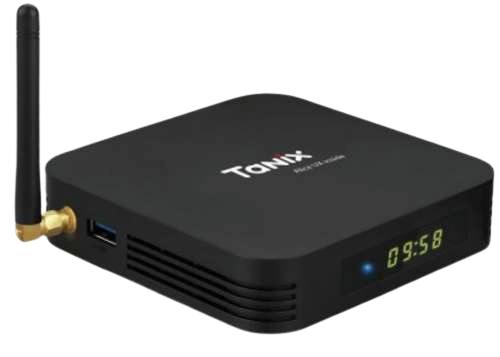
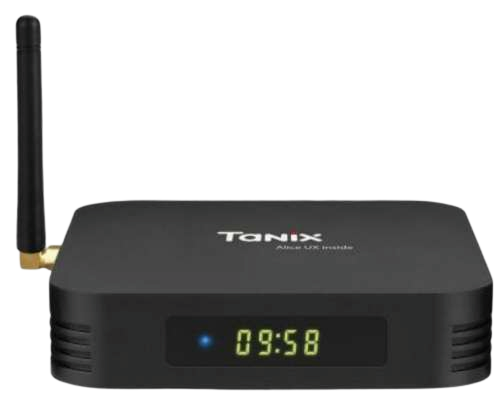
- Прошивка Android 9.0 для Tanix TX6 TV Box.
- Прошивка, Программное обеспечение, Описание Tanix TX6 с процессором Allwinner H6.
- Сведения о прошивке
- Обновление прошивки TANIX TX6 от OTA.
- Изменения
- Внимание!
- Tx6 tv box прошивка
- Tx6 tv box прошивка
Прошивка Android 9.0 для Tanix TX6 TV Box.
Прошивка, Программное обеспечение, Описание Tanix TX6 с процессором Allwinner H6.
- Скачать Android 9.0 стоковую прошивку для Tanix TX6 TV Box можно здесь: сек. до появления ссылки Прошивка Android 9.0 для Tanix TX6
- Загрузите версию прошивки Android Nougat 7.0 для ПК для TV Box Tanix TX6 здесь.
- Прошить его с ПК с помощью LiveSuit v1.11 или с SD-карты с помощью PhoenixCard v3.09
- Заказать TV Box Tanix TX6 по низкой цене можно здесь

Сведения о прошивке
- Название архива: Tanix_H6_4Gddr_8822bs_20190323
- Имя файла: Tanix_H6_4Gddr_8822bs_20190323.img
- Размер архива: 693 МБ
- Платформа: Allwinner H6
- ОС: Android Android 9.0 stock
Обновление прошивки TANIX TX6 от OTA.
Чтобы получить v20190323, откройте предварительно установленное приложение «ОБНОВЛЕНИЕ» и проверьте наличие обновлений.
Изменения
- Улучшена стабильность устройства.
- Исправлена ошибка приводящая к зависанию.
- Обновление Kodi до 18.1
Внимание!
Пожалуйста, не обновляйте прошивку, если вы не знаете, что делаете, действительно хотите или это абсолютно необходимо. Обновления встроенного программного обеспечения могут иногда иметь плохие результаты, такие как блокировка вашего устройства, временно или навсегда. Процесс обновления прошивки осуществляется исключительно на ваш страх и риск. Прежде чем пытаться обновить прошивку, сделайте резервную копию ваших данных.
Источник
Tx6 tv box прошивка
Обсуждение Tanix TX6
TV Box
Обсуждение » Каталог программ для Android медиа-приставок »

- Что делать если не запускается вайфай
- Вывести верхнюю шторку на любой 7-ке можно комбинацией клавиш Win + N с клавиатурыH6-Brief_V1.0.pdf ( 321.42 КБ )
Для тех кто смотрит бокс на LG и мучается совпадением нескольких команд (9, vol-, left и list) с пульта телевизора - This device is not activated yet-скрипт для прошивки через TWRP
- Phoenix Suit
- Инструкция как избавится от записи This device is not activated yet
- Устранение хрипа на 9Шторка уведомлений, PullStatusbar
- На 9-ке функция фото экрана с пульта
- Доработка охлаждения процессора
- Если востановить не получается бокс через ПК либо через sdcard
- Новый способ активации бокса Tanix TX6
- Видео инструкция к PhoenixCard
- Видео инструкция к PhoenixSuit
- Фото подключения кулера к питанию
- Всё необходимое для изготовления схемы отключения вентилятора
- Воскрешение бокса (часы не горят. ТВ не реагирует при подключении)
- Vcredist.zip ( У кого проблемы с PhoenixCard ошибка load CardTool Failed )
- Установка Xposed
- По поводу This device is not activated yet, please contact your vendor
- Второй способ This device is not activated
- исправление работы Bluetooth на приставках с чипом Cdtech
- мод Ace Stream
- Magisk
- Автоматическое охлаждение для ТВ бокса
- Настройки картинки шумодав, яркость, контрастность и т.д
- Монитор ресурсов Мини
- Скрипт для разгона процессора
- Разблокировка температурных ограничений максимальной частоты процессора после 60°C
- Сертификат Гугл
- ATV-9 с рабочими часами, хромкастом, плеймаркетом, рабочей мышкой на пульте.
 H6-Brief_V1.0.pdf ( 321.42 КБ )
 В теме нет куратора. По вопросам наполнения шапки обращайтесь к модераторам раздела через кнопку  под сообщениями, на которые необходимо добавить ссылки.
Сообщение отредактировал Volkodav. — 22.07.22, 00:33
Tanix — это уже бренд, с поддержкой, + RAM 4 Гига + Wifi 2.4G/5G + 3 USB порта + внешняя антена, минус AV в сравнении с EACHLINK H6. Думаю будет хитом, кстати на бенггуде за 43 у.е отдают, а нет там предзаказ, можно ждать отправки 10-20 дней если партию насобирают. Посмотрел более детально: Жирбест обещает отправку после 23 ноября, а бенггуд после 15 декабря.
Сообщение отредактировал Olleg_ — 14.11.18, 21:29
У меня 2720.
Воспользуйтесь мобильным приложением.
Добавлено 15.11.2018, 16:54:

Сообщение отредактировал skiv22 — 15.11.18, 18:36
https://hd-mediaplayer…p-rk3328-allwinner-h6/
Так он же металлический! 😀 А ещё чем объяснить такой большой вес? Просто это компания именитая и не делает на этом акцент, как некоторые «псевдо» именитые компании состоящие из одного офиса в Москве 😀
Сообщение отредактировал skiv22 — 15.11.18, 23:42
Вот это и смущает, т.к. сабж работает на т.н. Alice UX. (это, походу, не «чистый» Андроид, а некоторое подобие «брэндовой ОС», как MiUi от Xiaomi) и в то же время заявляют о поддержке второй ОС (. elec)
Посмотрев обзоры на другие боксы этого производителя «брэнда», можно смело предположить, что больший вес обусловлен «системой охлаждения». 🙂 (лучше, чем «ничего»!)
Подобный ценник (
И какой Ваш вердикт этому ТВ боксу, где ставить запятую? 😀 Казнить нельзя помиловать! 😛
Добавлено 16.11.2018, 00:20:
Там дороже см. под спойлером 😀

Обновление прошивки Tanix TX6 (14.12.2018)
Android 7.0 with Alice UX
Ссылки от разработчика не действительны
1. Fixed digital led flash problem after standby.
2. Boosted the speed to turn off digital led when into standby.
3. Disabled status bar to remove flood notification from youtube.
Сообщение отредактировал K03blPb — 28.01.19, 08:13
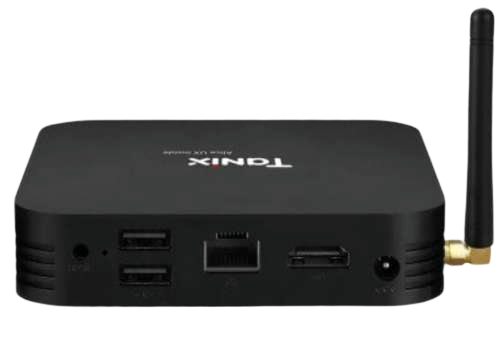
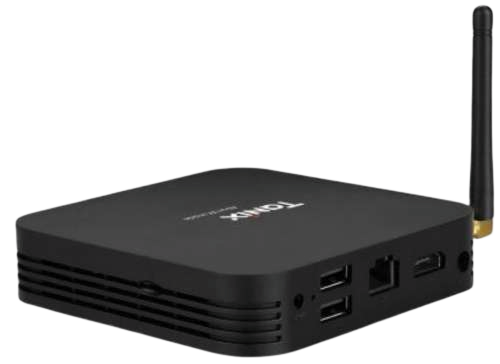
Программа Phoenix USB Pro
v.3.3.0  PhoenixUSBPro.zip ( 2.57 МБ )
Инструкция взята из интернета и отредактирована, могут быть неточности
Нажимаем на кнопку Key (указываем на файл AW_LCTOOLS.key — лежит в архиве с программой)
Нажимаем на кнопку Image (выбираем нашу прошивку в формате img)
Нажимаем кнопку Start
Отключаем от приставки всё и подключаем кабель в разъем USB 2.0 (второй конец не должен быть подключен к компьютеру, можно наоборот. Прошивается устройство только через тот разъем, через который устройство питается)
Зажимаем кнопку Reset (возле слота sd карты) чем-нибудь острым и подключаем второй конец провода USB, как только услышите, что Windows определила устройство (проиграется звук обнаружения устройства), можно отпустить кнопку.
Windows предложит найти драйвера, указываем папку USBDriver (находится в папке с программой PhoenixUSBPro)
Нажимаем кнопку Next и завершаем установку драйверов.
После этого прошивка должна начать загружаться в Ваше устройство.
Ждем несколько минут до завершения прошивки
(Последняя версия)
v.4.0.0 latest PhoneixUSBPro_EN.msi ( 4.82 МБ )
Сообщение отредактировал K03blPb — 13.02.19, 08:38
Источник
Tx6 tv box прошивка
Обсуждение Tanix TX6
TV Box
Обсуждение » Каталог программ для Android медиа-приставок »
- Что делать если не запускается вайфай
- Вывести верхнюю шторку на любой 7-ке можно комбинацией клавиш Win + N с клавиатурыH6-Brief_V1.0.pdf ( 321.42 КБ )
Для тех кто смотрит бокс на LG и мучается совпадением нескольких команд (9, vol-, left и list) с пульта телевизора - This device is not activated yet-скрипт для прошивки через TWRP
- Phoenix Suit
- Инструкция как избавится от записи This device is not activated yet
- Устранение хрипа на 9Шторка уведомлений, PullStatusbar
- На 9-ке функция фото экрана с пульта
- Доработка охлаждения процессора
- Если востановить не получается бокс через ПК либо через sdcard
- Новый способ активации бокса Tanix TX6
- Видео инструкция к PhoenixCard
- Видео инструкция к PhoenixSuit
- Фото подключения кулера к питанию
- Всё необходимое для изготовления схемы отключения вентилятора
- Воскрешение бокса (часы не горят. ТВ не реагирует при подключении)
- Vcredist.zip ( У кого проблемы с PhoenixCard ошибка load CardTool Failed )
- Установка Xposed
- По поводу This device is not activated yet, please contact your vendor
- Второй способ This device is not activated
- исправление работы Bluetooth на приставках с чипом Cdtech
- мод Ace Stream
- Magisk
- Автоматическое охлаждение для ТВ бокса
- Настройки картинки шумодав, яркость, контрастность и т.д
- Монитор ресурсов Мини
- Скрипт для разгона процессора
- Разблокировка температурных ограничений максимальной частоты процессора после 60°C
- Сертификат Гугл
- ATV-9 с рабочими часами, хромкастом, плеймаркетом, рабочей мышкой на пульте.
В теме нет куратора. По вопросам наполнения шапки обращайтесь к модераторам раздела через кнопку под сообщениями, на которые необходимо добавить ссылки.
Сообщение отредактировал Volkodav. — 22.07.22, 00:33
Tanix — это уже бренд, с поддержкой, + RAM 4 Гига + Wifi 2.4G/5G + 3 USB порта + внешняя антена, минус AV в сравнении с EACHLINK H6. Думаю будет хитом, кстати на бенггуде за 43 у.е отдают, а нет там предзаказ, можно ждать отправки 10-20 дней если партию насобирают. Посмотрел более детально: Жирбест обещает отправку после 23 ноября, а бенггуд после 15 декабря.
Сообщение отредактировал Olleg_ — 14.11.18, 21:29
У меня 2720.
Воспользуйтесь мобильным приложением.
Добавлено 15.11.2018, 16:54:
Сообщение отредактировал skiv22 — 15.11.18, 18:36
https://hd-mediaplayer…p-rk3328-allwinner-h6/
Так он же металлический! 😀 А ещё чем объяснить такой большой вес? Просто это компания именитая и не делает на этом акцент, как некоторые «псевдо» именитые компании состоящие из одного офиса в Москве 😀
Сообщение отредактировал skiv22 — 15.11.18, 23:42
Вот это и смущает, т.к. сабж работает на т.н. Alice UX. (это, походу, не «чистый» Андроид, а некоторое подобие «брэндовой ОС», как MiUi от Xiaomi) и в то же время заявляют о поддержке второй ОС (. elec)
Посмотрев обзоры на другие боксы этого производителя «брэнда», можно смело предположить, что больший вес обусловлен «системой охлаждения». 🙂 (лучше, чем «ничего»!)
Подобный ценник (
И какой Ваш вердикт этому ТВ боксу, где ставить запятую? 😀 Казнить нельзя помиловать! 😛
Добавлено 16.11.2018, 00:20:
Там дороже см. под спойлером 😀
Обновление прошивки Tanix TX6 (14.12.2018)
Android 7.0 with Alice UX
Ссылки от разработчика не действительны
1. Fixed digital led flash problem after standby.
2. Boosted the speed to turn off digital led when into standby.
3. Disabled status bar to remove flood notification from youtube.
Сообщение отредактировал K03blPb — 28.01.19, 08:13
Программа Phoenix USB Pro
v.3.3.0 PhoenixUSBPro.zip ( 2.57 МБ )
Инструкция взята из интернета и отредактирована, могут быть неточности
Нажимаем на кнопку Key (указываем на файл AW_LCTOOLS.key — лежит в архиве с программой)
Нажимаем на кнопку Image (выбираем нашу прошивку в формате img)
Нажимаем кнопку Start
Отключаем от приставки всё и подключаем кабель в разъем USB 2.0 (второй конец не должен быть подключен к компьютеру, можно наоборот. Прошивается устройство только через тот разъем, через который устройство питается)
Зажимаем кнопку Reset (возле слота sd карты) чем-нибудь острым и подключаем второй конец провода USB, как только услышите, что Windows определила устройство (проиграется звук обнаружения устройства), можно отпустить кнопку.
Windows предложит найти драйвера, указываем папку USBDriver (находится в папке с программой PhoenixUSBPro)
Нажимаем кнопку Next и завершаем установку драйверов.
После этого прошивка должна начать загружаться в Ваше устройство.
Ждем несколько минут до завершения прошивки
(Последняя версия)
v.4.0.0 latest PhoneixUSBPro_EN.msi ( 4.82 МБ )
Сообщение отредактировал K03blPb — 13.02.19, 08:38
Источник
Perhaps you do need a different card reader/writer, but that remains to be seen.
Double-check your cards to make sure that you haven’t slid the write-protect tab into the protection position.
I’m not sure exactly how the PhoenixCard program works, but its «startup» setting could have a meaning not only for the burn command, but also for the formatting command (as different types of image usage may need different format variations).
I use a built in card reader/writer on my own PC, and this works fine with PhoenixCard.
But I set the software to «startup» mode before the formatting, and then kept it so during the burn with the Android image as well. I also selected the Android image before starting the formatting, and depending on how the program works, that might affect some aspect of the formatting (if it can vary depending on the image to be installed).
I’m not saying that my way is right and yours wrong mind you. I’m just telling you how I did it, with successful results. So here are my steps again:
1: Start PhoenixCard
2: Insert the card in the reader/writer
3: Select the Android image file for PhoenixCard use
4: Set the «Write Mode» to «Startup»
5: Click the «Format to Normal» command
6: Wait for formatting to complete
7: Click the «Burn» command
8: Wait for end of burn
9: Perform ‘safe removal’ of the SDcard (removable drive gadget in system tray)
But I suppose some computers may have a pure card reader (so no write ability), or one that simply isn’t compatible with this software or those cards, for whatever unknown reason. So if the above procedure consistently fails you probably do need an external reader/writer to make it work properly.
Btw: Another thing to remember is that some formatting errors may leave you without any working partition on the drive, in which case it may not have any drive letter, as needed to select it in PhoenixCard. But you should still be able to do repartitioning and reformatting of the card by using Windows’ disk manager. I’ve had to do this myself on some occasions in the past (not connected to Banana Pi). For such cases I recommend formatting the entire card to a single NTFS or FAT32 partition, so as to give PhoenixCard a ‘clean slate’ to work with.
Best regards: dlanor

Contents
- 1 Flash Kernel Using Phoenixcard And Got Error Card Preprocess Failed
- 2 Fix All Flash Drive Problems By Resetting It’s Software
- 2.1 Conclusion
- 2.1.1 Related image with flash kernel using phoenixcard and got error card preprocess failed
- 2.1.2 Related image with flash kernel using phoenixcard and got error card preprocess failed
- 2.1 Conclusion
Immerse yourself in the captivating realm of arts and culture, where creativity knows no boundaries. Celebrate the transformative power of artistic expression as we explore diverse art forms, spotlight talented artists, and ignite your passion for the cultural tapestry that shapes our world in our Flash Kernel Using Phoenixcard And Got Error Card Preprocess Failed section. Box pc tv finish- to a phoenixcard the open 3939write tv the unplug on the sd sd bar for the 5 and card ready place to get and the -img card- select 4 quotquotproductquotquot the in file progress wait plug box mode3939 load flash
Flash Kernel Using Phoenixcard And Got Error Card Preprocess Failed
Flash Kernel Using Phoenixcard And Got Error Card Preprocess Failed
Wait for error; leave phoenixcard running, and pull out the sd card from the computer (i pulled out the card from my reader, not the whole reader) wait for phoenixcard to say «no devices found» or similar. usually happens instantaneously. if nothing happens, start again at the top and try pulling the whole reader instead. Posted by: admin , december 31, 2013 livesuit tool cannot run on windows 7 and windows 7. but its image can be burned into a bootable sd using phonenix card a nd install on pcduino. if we use the inbuilt sd card writer on the pc, we may get error “card preprocess failed.1012”.

How To Flash Firmware Using Phoenixcard
How To Flash Firmware Using Phoenixcard
Try to use a program like sd formatter then try to burn the image with phoenixcard. skybadiver, i too had great success with an external card reader. i also found that it is picky about sd card adapters, when i tried multiple brands. skybadiver. pine initiate. I have a raspberry pi 4 8gb with kingston ssd of 240 gb and i installed ubuntu 20.10 on it with berryboot. everything seems to be fine but when i try to do an update and upgrade on terminal i get this error: setting up flash kernel (3.103ubuntu1~20.10.1) flash kernel: deferring update (trigger activated) setting up u boot rpi:arm64 (2020.10. 4 on a pc get the sd card ready to flash, open phoenixcard, load the .img file and select in »write mode» «»product»» 5 unplug the tv box and place the sd card. plug the tv box, wait for the progress bar to finish. Android davidblakelock (david blakelock) 29 june 2018 12:48 #1 hi, i have been trying to burn the sd card using phoenixcard tool. i continue to get errors. mostly load cardtool failed. from reading other forums, it appears that this is a common problem. is there another tool that can be used? or is there something i am doing wrong?.

How To Flash Firmware Using Phoenixcard
How To Flash Firmware Using Phoenixcard
4 on a pc get the sd card ready to flash, open phoenixcard, load the .img file and select in »write mode» «»product»» 5 unplug the tv box and place the sd card. plug the tv box, wait for the progress bar to finish. Android davidblakelock (david blakelock) 29 june 2018 12:48 #1 hi, i have been trying to burn the sd card using phoenixcard tool. i continue to get errors. mostly load cardtool failed. from reading other forums, it appears that this is a common problem. is there another tool that can be used? or is there something i am doing wrong?. Card preprocess failed !228 really annoying. tried: format to normal from phoenixcard formatting through windows (as both fat32 and fat) formatting through sd formatter (both quick and full) 3 different sd cards (samsung evo 32gb (genuine), nameless 8gb i got with my rpi and fake sandisk lookalike from china 16gb) 2 different usb sd readers. 1. first, you must either download the android sdk packages or you can used a much smaller package called «minimal adb and fastboot» found here. 2. install one of these packages. navigate to the installation folder that contains the files «adb.exe» and the other installation files. 3.

How To Flash Firmware Using Phoenixcard
How To Flash Firmware Using Phoenixcard
Card preprocess failed !228 really annoying. tried: format to normal from phoenixcard formatting through windows (as both fat32 and fat) formatting through sd formatter (both quick and full) 3 different sd cards (samsung evo 32gb (genuine), nameless 8gb i got with my rpi and fake sandisk lookalike from china 16gb) 2 different usb sd readers. 1. first, you must either download the android sdk packages or you can used a much smaller package called «minimal adb and fastboot» found here. 2. install one of these packages. navigate to the installation folder that contains the files «adb.exe» and the other installation files. 3.
Fix All Flash Drive Problems By Resetting It’s Software
Fix All Flash Drive Problems By Resetting It’s Software
if it did fix your problem, tell me in the comments below! and don’t forget to like the video) the programs 1 chipgenius i hear you screaming «why is my camera not reading my sd card?!» this video will help you with 6 easy fixes for common sd card how to repair corrupted sd card? in this video, we’ll show you 4 proven methods to fix a corrupted sd card. try recoverit data we’ve all got unreadable sd cards and flash drives left over from creating install disks for our sbc operating systems. usually the if you’re encountering a frustrating «cf card cannot read» error, don’t worry! in this video, we will guide you through the process video showing you how to flash a custom kernel on android. note: you need root permissions in order to be able to do this. here in this video tutorial, i will show you guys how to solve or fix out of memory and you need to load the kernel first problem. it will also teach you how to reformat the memory card for continued use if the memory card is repairable. 1 connect your memory for the necessary files and more how to’s head here: hi everyone, in this video i show you how to fix a damaged or corrupt sd card in windows 10 using the command line prompt. having issues with your camera’s sd card? this short gives you a quick and simple fix that can solve a lot of sd card errors. 3 step solutions how to fix windows was unable to complete the format of usb pen drive note : this process can be work for
Conclusion
Having examined the subject matter thoroughly, there is no doubt that the article offers informative insights regarding Flash Kernel Using Phoenixcard And Got Error Card Preprocess Failed. Throughout the article, the writer demonstrates an impressive level of expertise on the topic. In particular, the discussion of Y stands out as a key takeaway. Thank you for this post. If you need further information, please do not hesitate to contact me through social media. I look forward to your feedback. Furthermore, here are a few related content that might be helpful:
Related image with flash kernel using phoenixcard and got error card preprocess failed
Related image with flash kernel using phoenixcard and got error card preprocess failed
-
To the zidoo tv techs: please help me, I plugged in my zidoo h6 pro — which I got just 6 months ago — and nothing on screen, no signal. I tried many tv’s, many cables, the same results, no signal on tv. I reset it, nothing. I tried to flash it using the sd card method you describe, still nothing, doesn’t recognize the card at all. Any help, please? Anything I can do to bring it back working?
To all: Please help me.
-
hmm..
try a different power adaptor
*in most cases.. the power adaptor is the first to failjust wondering «doesn’t recognize the card at all»
if you see nothing? how do you know this?anyway.. goodluck
-
Thank you very much for you help, appreciate it.
Yes, I tried 2 other power adaptors, the same result, no signal on tv. I left out this fact from my first post: that small indicator light on the Zidoo box, gives out a very dim, flashing red light, I can barely see it, but it is there.
Also, when I said it doesn’t recognize the card at all, I meant, even when I use the sd card method, I see nothing on tv, not flashing, not upgrading, nothing.Please help everybody!
-
Is there a way to flash Zidoo H6 Pro box using other methods like USB Burning Tool or Factory Tool? As I said, I have tried to flash it using SD card, but no success.
Any Zidoo tech can finally write something here? I bought $110 Zidoo H6 Pro — a lot o money for me — and now the box is not working, so, maybe Zidoo should care a little and write something at least.Thank you.
-
hmm.. on allwinner
phoenix card and Phoenixsuite are mostly used
but to use phoenix suite you need : firmware and a USB otg to USB cablecheers
-
I tried the Phoenixsuite, but it said «No device connected». Anyone knows how to make Phoenixsuite recognize my Zidoo h6 pro.
Are Zidoo techs on this board at all? Or they just don’t want to reply to me? -
Have to tried hard reset using proper method?
«
«
If it fails, the only way u can unbrick your box using PhoenixCard. Follow this guide: «http://forum.zidoo.tv/index.php?thr…d-tv-box-is-bricked-firmware-1-0-25-img.8146/».
If your box doesn’t recognize the SD card, try another one. Use a fast SD card, otherwise it may get stuck.
-
Thank you, appreciate your help.
I tried PhoenixCard, I get this error: Load CardTool Failed!
I know, it’s getting really boring with all my questions and all my problems, please, any suggestions? I would really appreciate it. -

irbit
New Member
Beta test group -
I think you need to install «Microsoft Visual C++ Redistributable» to run PhoenixCard. Can’t remember whether its Visual C++ Redistributable 2008, 2010 or 2012. Install all of these and hopefully, after installing Visual C++ Redistributable, this error will be gone.
Best of luck.
-
Thank you, Jubair, for your help, and thanks to everyone for helping.
Jubair, I installed Microsoft Visual C++ Redistributable 2008, I run PhoenixCard, and I got the same error: Load CardTool Failed!
I installed Microsoft Visual C++ Redistributable 2010, I run PhoenixCard, and I got the same error: Load CardTool Failed!
I tried to install Microsoft Visual C++ Redistributable 2012, but it gave me an error: Setup Failed 0x80070003 — The system cannot find the path specified.
The same error when I tried to install Microsoft Visual C++ Redistributable 2013, 2015, 2017.
Anything else I can do?
Please continue to help me! -
http://www.orangepi.org/orangepibbsen/forum.php?mod=viewthread&tid=2194
See the first answer. Install x86 version of redistributables. I fixed my phoenixcard problem using this method before.
-
Jubair, thank you very much again. I used the link in your post, I installed vcredist_x86 shown on that post, I run PhoenixCard, and the error is gone, the card burns successfully. But when I check the SD card in explorer, there are no files there, the SD card is empty. How can that be possible, it said it burned the image successfully!
-
Do not worry about that. PhoenixCard formats card in different file format and you must format the card to normal again using PhoenixCard, otherwise you wont be able to use it in your phone.
Now disconnect the power of your h6 pro, insert the sd card and power the box on.It will take some time to install the firmware. Hopefully your box will come back to life again. I fixed my box using this method too.Best of luck
-
Jubair,
THANK YOU! Really, I appreciate it! If it wasn’t for your replies, my $110 Zidoo H6 Pro tv box would be in a garbage can somewhere. As you said, I put the card on Zidoo box, and right away it worked. I got Zidoo working again, or, I should say, you got my Zidoo box working again! Thank you!
Also, a thank you to everyone who helped, I appreciate it!
-
Its really good to hear your H6 pro working again buddy
. Enjoy your box!
Share This Page
