If you see LiveKernelEvent error code 193 on your Windows 11 or Windows 10 computer, then this post will be able to help you fix the problem.
What is LiveKernelEvent 193?

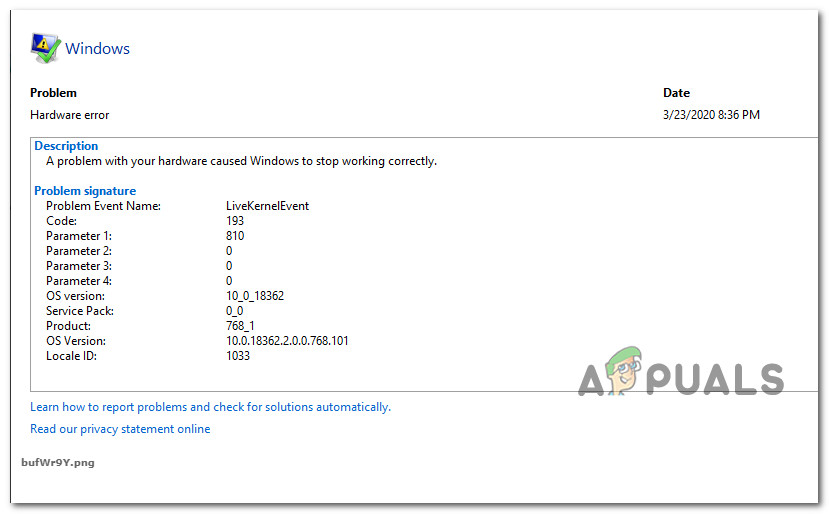
Some Windows users have reported being experiencing LiveKernelEvent error code 193 on their PC. As a result, when they leave their PCs in an idle state, the computer just won’t wake up. It is a hardware error and can cause serious issues with your system. You will see the following description associated with this error:
A problem with your hardware caused Windows to stop working correctly.
If you are facing the same problem, this guide is for you. In this post, we are going to discuss several fixes to resolve the error. But before that, let us try and understand what potentially causes the same error.
What causes LiveKernelEvent 193 error?
Here are some reasons that can potentially cause the LiveKernelEvent 193 error on Windows PC:
- It can be caused due to an outdated and corrupted Intel WiFi driver. In that case, update your Intel WiFi driver to the latest version.
- This error can also be a result of hardware inconsistency caused due to an external peripheral or hard drive. If you recently connected hardware to your PC, try running Hardware and Devices troubleshooter to address and fix related issues.
- Outdated chipset drivers can cause the same error. So, try updating your chipset driver to fix the error.
- It can also be triggered due to outdated BIOS drivers and system file corruption.
In any scenario, you can use the below-listed fixes to resolve the error.
Here are the fixes that you can try to resolve the LiveKernelEvent error code 193 on Windows:
- Run the Hardware and Devices troubleshooter.
- Update your Intel Wi-Fi driver.
- Update the Chipset drivers.
- Uninstall NordVPN (if applicable).
- Update BIOS drivers.
- Perform a clean install or repair install.
Let us discuss the above fixes in detail now!
1] Run the Hardware and Devices troubleshooter
If you recently plugged in an external drive or additional peripherals to your PC, it can be a reason that you are getting the error in hand. It is quite common to face issues right after connecting external hardware, especially an external hard drive. So, if the scenario is applicable, you should try running the Hardware and Devices troubleshooter and let it fix any hardware-related problem to eventually fix the concerned error.
Here are the steps to run the Hardware and Devices troubleshooter on Windows:
- Firstly, launch the Command Prompt by typing cmd in the taskbar search and then clicking on the Command Prompt app.
- Now, type the below command in CMD:
msdt.exe -id DeviceDiagnostic
- After that, press the Enter button to execute the command and it will open up the Hardware and Devices troubleshooter window.
- Then, press the Next button and the troubleshooter will start detecting problems related to hardware.
- As it scans the issues, it will show the problem and show you options to apply the fix. Simply tap on the Apply this fix option and follow the onscreen instructions.
- When done applying the fix, check if the error is now fixed.
In case the error still persists, go ahead with the next potential fix to resolve the error.
2] Update your Intel Wi-Fi driver
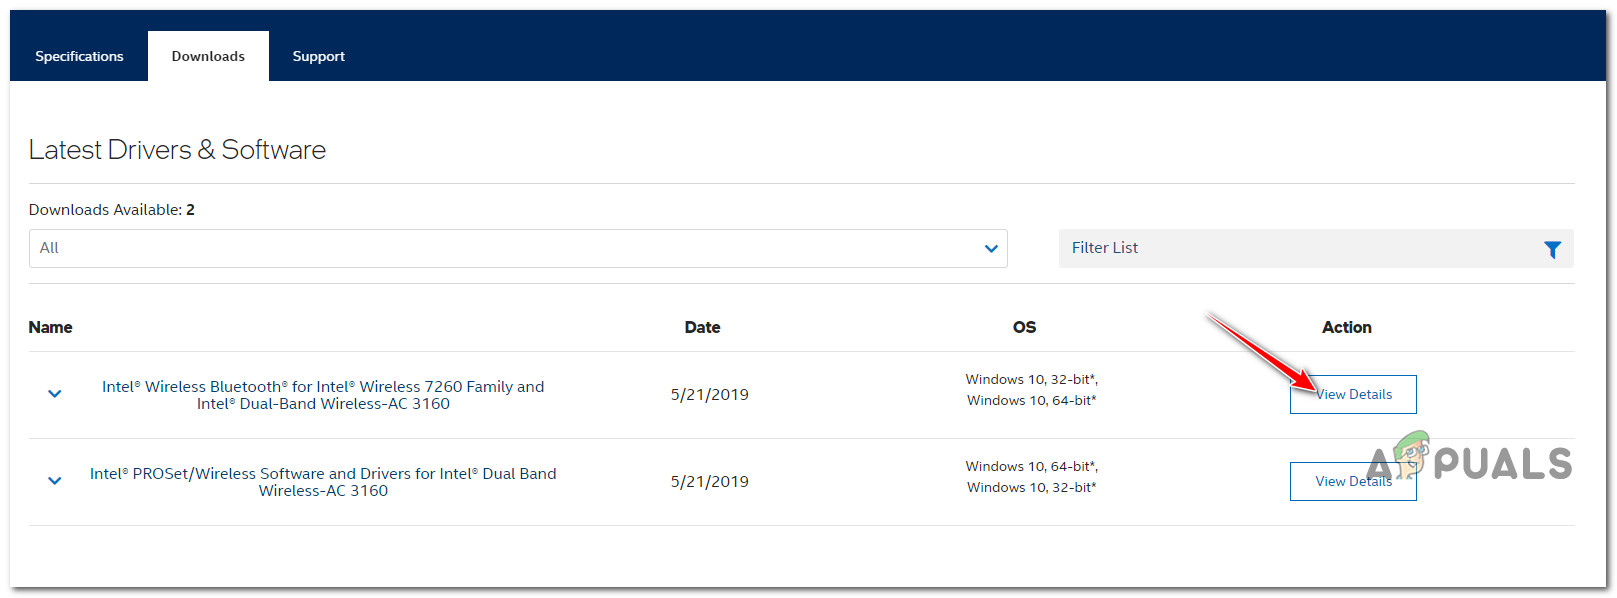
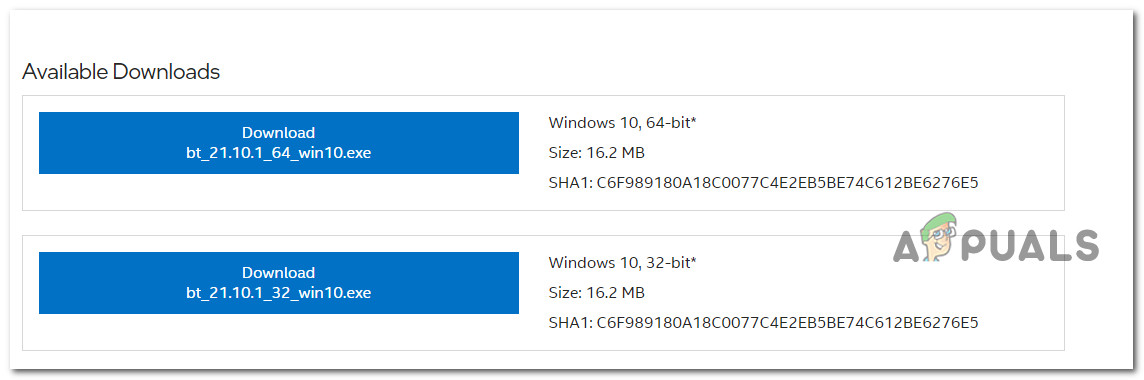
This error might be triggered in case you don’t have the latest Dual-Band Wireless driver if you are on Windows 10. Several affected users stopped receiving the error after upgrading to the latest Intel wireless drivers. You can visit the official Intel® Dual Band Wireless-AC driver’s download page and then click on the View details button present next to the driver. After that, download the executable for the driver and then run the installer to install the latest Intel WiFI driver.
When you are done updating your WiFi driver, reboot your system and see if the error is fixed or not.
3] Update the Chipset drivers
The LiveKernelEvent 193 error can be occurred due to an incompatible or outdated chipset driver which is responsible for controlling the communications between CPU, GPU, hard drive, and the system memory. If you have outdated chipset drivers, it can result in making your PC unstable to resource-intensive tasks. So, if the scenario applies, you should go ahead with updating your chipset drivers.
The process to update chipset drivers vary depending on your device manufacturers. Here, we are going to show steps to update chipset drivers for AMD and Intel brands. Let us check out.
AMD Chipset driver
You can follow the below steps to update the AMD chipset drivers:
- Firstly, open your web browser and then visit the AMD Drivers and Support’s download page.
- Now, scroll down to the Search for your product section, and from here, select the Chipsets category from the left column.
- Next, choose your processor socket and processor from the right columns.
- After that, press the Submit button to view all compatible chipset drivers.
- Then, download the appropriate chipset driver based on your computer’s architecture (32bit or 64 bit).
- Now, install the chipset driver by running the installer and following the on-screen instructions.
- Finally, reboot your PC and then see if the LiveKernelEvent 193 error is fixed.
Intel Chipset driver
Here’s how you can download the latest Intel chipset drivers on Windows PC:
- Firstly, visit Intel’s Chipset INF Utility page in your web browser.
- Now, download the SetupChipset.exe executable file from the above download page and then run the executable.
- Next, follow the prompted instructions to run the setup and install chipset drivers.
- Once the installation is completed, restart your computer and see if the error is not resolved.
If you still get the LiveKernelEvent 193 error, you can move on to the next potential fix.
4] Uninstall NordVPN (if applicable)
As per some user reports, the error could be triggered due to a process of NordVPN. If the scenario is applicable and you have enabled NordVPN on Windows startup, you can try disabling NordVPN and see if it fixes the error. In case it does, you will have to uninstall NordVPN to permanently fix the error. You can open the Settings app using Win+I hotkey and then go to Apps > Apps & features. After that, select the NordVPN software from the list of installed apps and use the Uninstall button to remove it from your system.
In case you find no luck with this method, try the next solution.
5] Update BIOS drivers
This error can also be triggered due to outdated BIOS drivers, particularly if you recently upgraded to Windows 11. Out-of-date BIOS drivers can cause system instability and may result in the error at hand. So, try updating your BIOS drivers and then see if the error is fixed.
6] Perform a clean install or repair install
If none of the above solutions works for you, you might be dealing with system file corruption that can’t be removed conventionally. Hence, if the scenario applies, you can try performing a clean install or repair install to fix the error.
How do I fix LiveKernelEvent 141?
To fix the LiveKernelEvent 141 error, try running a disk check or checking your memory using the Windows Memory Diagnostic tool. Other than that, try reinstalling GPU drivers to fix the error. If none of these work, the problem is with the GPU on the hardware level. The best way to test is either by switching to another GPU or, if you have an integrated GPU, switching the output cables to the motherboard video output and checking if there is an issue.
TIP: This post will help you if your PC crashes while gaming and you see LiveKernelEvent Error 141, 144, 1a1, ab, 117, 124, 1a8, etc. in Event Viewer.
That’s it!
Now read: Fix Error code 0xC0000035 in Event Viewer on Windows.
Вопрос
Проблема: [Fix] Live Kernel Event Code 193 в Windows
Привет. Мой компьютер часто зависает без предупреждения, даже когда я ничего не делаю. Боюсь, если он будет продолжать делать это, то испортит весь мой компьютер. Я проверил это и получил вот что: «Проблема с вашим оборудованием привела к тому, что Windows перестала работать правильно». Это поправимо?
Решенный ответ
Windows — чрезвычайно сложная система, для бесперебойной работы которой в фоновом режиме работают тысячи процессов. Если хотя бы один из них выйдет из строя, пользователи могут столкнуться с различными ошибками и ошибками. Иногда проблемы также могут быть вызваны аппаратным обеспечением, что означает, что простое устранение неполадок ОС[1] не сработает.
Некоторые пользователи Windows сообщают о странной проблеме со своим ПК, когда они оставляют его в режиме ожидания.[2] на короткий период времени. Когда они возвращаются, экран остается выключенным и не включается, что бы они ни делали. Когда пользователи отправляются исследовать в средстве просмотра событий, они обнаруживают аппаратную ошибку:
Описание: проблема с вашим оборудованием привела к тому, что Windows перестала работать правильно.
Имя проблемного события: LiveKernelEvent
Код объявления: 193
Есть много возможностей, почему вы могли это испытать. Для некоторых людей может быть достаточно запуска простого автоматического средства устранения неполадок, а для других может потребоваться замена оборудования. В этом посте вы найдете пару шагов, которые вы можете выполнить, чтобы попытаться исправить код события Live Kernel 193.
![[Исправлено] Live Kernel Event Code 193 в Windows](https://reviensmedia.com/f/cd81031603c106c898fb439074e5df06.jpg "[Исправлено] Live Kernel Event Code 193 в Windows")
В этой статье мы предлагаем несколько возможных решений для кода события Live Kernel 193 в Windows. В зависимости от серьезности проблемы может быть достаточно простого сканирования или вам, возможно, придется полностью переустановить Windows. Если ваш компьютер все еще работает, вы можете попробовать использовать инструмент для ремонта. ReimageСтиральная машина Mac X9 чтобы избежать всех возможных исправлений. Это мощное программное обеспечение может исправить различные системные ошибки, поврежденные файлы, BSOD.[3] и оптимизировать машину для максимальной производительности.
Вы можете начать процесс поэтапно, обязательно обратите внимание:
Способ 1. Запустите средство устранения неполадок оборудования и устройств.
Исправить это сейчас!Исправить это сейчас!
Для восстановления поврежденной системы необходимо приобрести лицензионную версию Reimage Reimage.
- Откройте Бегать диалоговое окно, нажав Клавиша Windows + R
- Тип ms-settings: устранение неполадок внутри текстового поля и нажмите Входить открыть Средство устранения неполадок оборудования и устройств
- Нажмите на Другие средства устранения неполадок из меню на правой панели

- Прокрутите под Найдите и устраните другие проблемы, затем разверните список, связанный с Оборудование и устройства, затем нажмите Запустите средство устранения неполадок
- Внутри Оборудование и устройства средство устранения неполадок, терпеливо дождитесь завершения первоначального сканирования
- Нажмите на Давать возможность для настройки вашей установки Windows, чтобы всегда искать новые подписи драйверов при подключении нового оборудования
- Перезагрузить ваш компьютер и посмотрите, решена ли проблема
Способ 2. Обновите драйвер Intel Wi-Fi для Windows 10
Исправить это сейчас!Исправить это сейчас!
Для восстановления поврежденной системы необходимо приобрести лицензионную версию Reimage Reimage.
- Откройте браузер по умолчанию и посетите официальная страница загрузкиДвухдиапазонный адаптер Intel Dual Band Wireless-AC Водитель
- Нажать на Посмотреть детали кнопка, связанная с Семейство и двухдиапазонный адаптер Intel Wireless-Ac 3160 Водитель
- Нажмите на Скачать кнопка, связанная с архитектурой, совместимой с вашей операционной системой
- Нажмите на Я принимаю условия лицензионного соглашения, затем дождитесь завершения загрузки

- Как только драйвер будет загружен локально, дважды щелкните его, затем нажмите да на Контроль учетных записей пользователей окно для предоставления доступа администратора
- Следуйте инструкциям на экране, чтобы установить драйвер, затем перезагружать ваш компьютер и посмотрите, решена ли проблема
Способ 3. Обновите драйверы набора микросхем
Исправить это сейчас!Исправить это сейчас!
Для восстановления поврежденной системы необходимо приобрести лицензионную версию Reimage Reimage.
Неправильные драйверы набора микросхем могут сделать вашу систему нестабильной для ресурсоемких задач, что может привести к ошибке LiveKernelEvent 193. Вы сможете решить эту проблему, обновив драйверы набора микросхем до последней совместимой версии.
Драйвер набора микросхем AMD
- Начните с открытия браузера по умолчанию и доступа к странице загрузки Страница драйверов и поддержки AMD
- Затем прокрутите вниз до Найдите раздел с вашим продуктом

- Выбирать Чипсеты в столбце слева, затем выберите соответствующий сокет процессора в столбце справа
- Выберите свой процессор в третьем столбце, затем нажмите Представлять на рассмотрение чтобы получить список совместимых драйверов чипсета
- После того, как вы нажмете кнопку «Отправить», вы будете перенаправлены на страницу, где можно загрузить драйвер набора микросхем.
- Оказавшись внутри, разверните раскрывающееся меню, связанное с архитектурой вашей совместимой ОС, и нажмите Скачать кнопка из появившегося меню
- После завершения загрузки дважды щелкните программу установки драйвера набора микросхем, затем щелкните да как только вам будет предложено Контроль учетных записей пользователей окно
- В окне установщика драйвера набора микросхем следуйте инструкциям на экране, чтобы обновить драйверы набора микросхем до последней доступной версии.
- Следуйте инструкциям на экране, чтобы завершить установку, затем перезагрузите компьютер в последний раз и посмотрите, LiveKernelEvent 193 ошибка теперь исправлено
Драйвер набора микросхем Intel
- Откройте браузер и перейдите на страницу загрузки Утилита Chipset INF
- На правильной странице загрузки нажмите на Скачать кнопка
- Нажмите на Я принимаю условия лицензионного соглашения согласиться с Условиями лицензирования

- Подождите, пока архив будет загружен локально, затем используйте утилиту для извлечения (например, 7Zip, WinZip или Winrar), чтобы извлечь содержимое программного обеспечения для обновления драйверов чипсета.
- После извлечения содержимого архива дважды щелкните на SetupChipset.exe, затем следуйте инструкциям на экране, чтобы установить последнюю версию драйвера набора микросхем.
- Перезагрузите компьютер и посмотрите, исправлена ли ошибка.
Способ 4. Обновите драйверы BIOS
Исправить это сейчас!Исправить это сейчас!
Для восстановления поврежденной системы необходимо приобрести лицензионную версию Reimage Reimage.
- Лучше всего зайти на сайт производителя материнской платы и проверить Скачать драйверы страница для утилиты обновления BIOS — у ASUS есть E-Z Flash, у MSI есть MFlash, у Gigabyte есть @BIOS Live Update и т. д.

- Следуйте инструкциям на экране, чтобы обновить версию BIOS до последней, затем перезагрузите компьютер и посмотрите, исправлена ли ошибка LiveKernelEvent 193.
Метод 5. Переустановите Windows
Исправить это сейчас!Исправить это сейчас!
Для восстановления поврежденной системы необходимо приобрести лицензионную версию Reimage Reimage.
Если все остальное не помогло, и вы даже не можете перезагрузить компьютер с Windows, вы можете полностью переустановить ОС. Вам даже не понадобится номер активации или какое-либо доказательство покупки. Просто убедитесь, что у вас доступно более 4 ГБ свободного места, так как именно столько места занимает загружаемый файл. Вот как переустановить Windows 10:
- Скачать в ISO файл
- Выбирать Создайте установочный носитель для другого ПК и нажмите Следующий
- Выбирать ISO файл и нажмите Следующий
- Нажмите Заканчивать
- Открыть ISO-файл Windows вы скачали

- Открытым Настраивать и нажмите Следующий
- Нажмите Принимать (Будьте готовы ждать; эта следующая часть может занять некоторое время)
- Нажмите Установить
- Подождите, пока ваша система перезагрузится, и установите Окна
Исправляйте ошибки автоматически
Команда ugetfix.com делает все возможное, чтобы помочь пользователям найти лучшие решения для устранения их ошибок. Если вы не хотите бороться с методами ручного ремонта, используйте автоматическое программное обеспечение. Все рекомендованные продукты были протестированы и одобрены нашими профессионалами. Инструменты, которые можно использовать для исправления ошибки, перечислены ниже:
Предложение
сделай это сейчас!
Скачать Fix
Счастье
Гарантия
сделай это сейчас!
Скачать Fix
Счастье
Гарантия
Совместим с Майкрософт ВиндоусСовместим с OS X По-прежнему возникают проблемы?
Если вам не удалось исправить ошибку с помощью Reimage, обратитесь за помощью в нашу службу поддержки. Сообщите нам все подробности, которые, по вашему мнению, нам следует знать о вашей проблеме.
Reimage — запатентованная специализированная программа восстановления Windows. Он диагностирует ваш поврежденный компьютер. Он просканирует все системные файлы, библиотеки DLL и ключи реестра, которые были повреждены угрозами безопасности.Reimage — запатентованная специализированная программа восстановления Mac OS X. Он диагностирует ваш поврежденный компьютер. Он просканирует все системные файлы и ключи реестра, которые были повреждены угрозами безопасности.
Этот запатентованный процесс восстановления использует базу данных из 25 миллионов компонентов, которые могут заменить любой поврежденный или отсутствующий файл на компьютере пользователя.
Для восстановления поврежденной системы необходимо приобрести лицензионную версию Reimage инструмент для удаления вредоносных программ.

Нажмите
Условия использования Reimage | Политика конфиденциальности Reimage | Политика возврата денег за товар | Нажмите
VPN имеет решающее значение, когда дело доходит до конфиденциальность пользователя. Онлайн-трекеры, такие как файлы cookie, могут использоваться не только платформами социальных сетей и другими веб-сайтами, но также вашим интернет-провайдером и правительством. Даже если вы примените самые безопасные настройки через веб-браузер, вас все равно можно будет отслеживать через приложения, подключенные к Интернету. Кроме того, браузеры, ориентированные на конфиденциальность, такие как Tor, не являются оптимальным выбором из-за пониженной скорости соединения. Лучшее решение для вашей максимальной конфиденциальности — это Частный доступ в Интернет — быть анонимным и безопасным в сети.
Программное обеспечение для восстановления данных — один из вариантов, который может вам помочь восстановить ваши файлы. После удаления файла он не исчезает в воздухе — он остается в вашей системе до тех пор, пока поверх него не записываются новые данные. Восстановление данных Pro это программа для восстановления, которая ищет рабочие копии удаленных файлов на вашем жестком диске. Используя этот инструмент, вы можете предотвратить потерю ценных документов, школьных заданий, личных фотографий и других важных файлов.
Some Windows users are reporting a weird issue where the PC will hang indefinitely once they leave it in idle mode for a few minutes. The screen remains off (as if the computer is in Sleep mode) but won’t wake up regardless of what they do. Upon investigating the crash dump inside Event Viewer, most affected users are discovering a cryptic hardware error (LiveKernelEvent 193).
After we’ve investigated this issue thoroughly, it turns out that this particular issue is not exclusive to a certain Windows version. We’ve seen user reports of the LiveKernelEvent 193 error occurring on Windows 7, Windows 8.1, Windows 10, and even on Windows 11.
As it turns out, there are several common causes that are often responsible for this system crash. Here’s a list of potential culprits:
- Outdated or corrupted Intel Wi-Fi Driver – One of the most common causes that might be behind this behavior is an inconsistency with the dual-band wireless driver. Some users that we’re experiencing crashes with the LiveKernelEvent 193 error have confirmed that the issue was resolved completely after they’ve updated their Intel Wi-Fi driver with the latest compatible iteration.
- Common hardware inconsistency – It’s not uncommon to start facing this issue immediately after you connect a new peripheral. This issue is mostly reported to occur with new external drives that are just connected to a Windows 11 computer. You can typically resolve these by running the Hardware and Devices TroubleShooter and applying the recommended fix to enable your PC’s ability to auto-update with the newest drivers on all devices that are just connected.
- NordVPN incompatibility – If you have NordVPN installed and configured to open every time you boot up your Windows 11 computer, keep in mind that this unexpected system interrupts can be caused by an incompatibility between NordVPN and a kernel sub-process. In this case, the only viable fix is to uninstall the conflicting software (there might be other similar VPN tools that will produce the same behavior on Windows 11).
- Outdated chipset driver – Another indirect cause that might be a potential cause of these unexpected system crashes is an outdated chipset driver. If you only updated to Windows 11 recently and you started experiencing this issue immediately, you should update your chipset driver to the latest release compatible with Windows 11 – the instructions will be different depending on if you need the AMD or Intel drivers.
- System file corruption – In more serious circumstances, you can expect to see this error code occurring due to some type of system file corruption that is affecting the stability of your operating system. Several affected users have confirmed that the issue was finally resolved after they initiated a clean install or repair install (in-place repair) operation.
Now that you are familiar with every potential culprit that might be responsible for this issue, let’s go over some of the methods that other affected users have successfully used to get to the bottom of this issue.
Update the Intel Wi-Fi Driver (Windows 10 ONLY)
If you’re using Windows 10, the first thing you need to check is if you are using the latest version of the Dual-Band Wireless driver. Crashes of this kind happening during idle periods are typically associated with a legacy dual-band wireless driver. This issue is almost exclusive to laptops and ultrabooks.
In case you’re using a generic dual-band wireless driver, our recommendation is to install the latest stable version of the Intel Dual-Band Wireless-AC 3160 driver and see if the stability of your system improves.
Several users dealing with the same kind of issue have confirmed that after they’ve installed this Wireless driver the LiveKernelEvent 193 system crashes have completely stopped.
Follow the instructions below to install the Intel Wi-Fi Dual-Band driver:
- Open your default browser and visit the official download page of the Intel® Dual Band Wireless-AC driver.
- Once you’re inside this page, click on the View details button associated with the Family & Intel Dual-Band Wireless-Ac 3160 driver.

Accessing the View Details page of the driver - Inside the download page, click on the Download button associated with the architecture compatible with your operating system (32-bit and 64-bit).

Downloading the compatible bit driver version - At the next screen, click on I accept the terms in the license agreement, then wait until the download is complete.
- Once the driver is downloaded locally, double-click on it, then click on it, then click Yes at the User Account Control window to grant admin access.
- Follow the on-screen instructions to install the driver, then reboot your PC and see if the problem is fixed once the next startup is fixed.
If the problem is still not fixed or you were already using the latest driver version, move down to the next method below.
Run the Hardware and Devices troubleshooter
Keep in mind that the reason behind the apparition of this LiveKernelEvent 193 error is a scenario in which your Windows installation is not currently configured to check the most up-to-date drivers of any devices that get installed.
In case you recently connected an additional peripheral or a new external drive, chances are this is the reason why you are seeing the LiveKernelEvent 193.
In this scenario, the easiest way to fix the issue (plus a couple of additional possible scenarios) is to run the Hardware and Devices troubleshooter and apply the recommended fix.
Note: This tool is equipped with reelection of automated fixers that can be auto-applied in case a familiar scenario is identified.
Follow the instructions below to Run the hardware and devices troubleshooter:
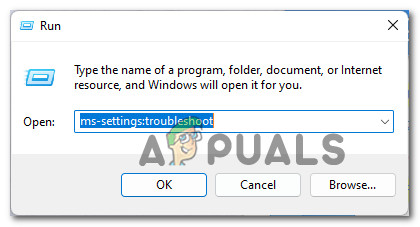
- Open up a Run dialog box by pressing Windows key + R. Next, type ‘ms-settings:troubleshoot’ inside the text box and press Enter to open up the Hardware and Device Troubleshooter.

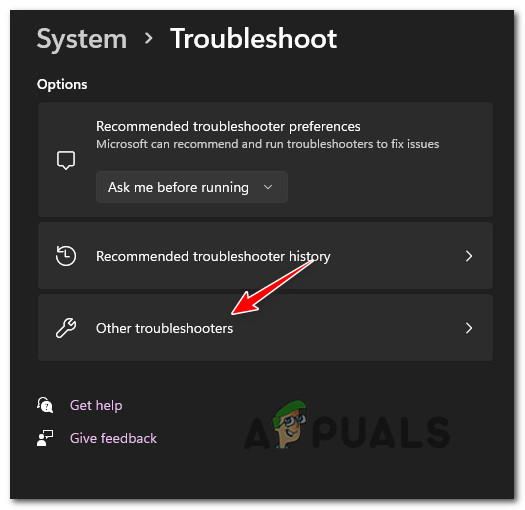
Accessing the Troubleshoot menu - Once you’re inside the Troubleshooting tab, click on Other troubleshooters from the menu on the right-hand pane.

Accessing the Other Troubleshooters tab - Next, once see the entire list of additional troubleshooter, scroll under Find and fix other problems, then expand the listing associated with Hardware and Devices, then click on Run the troubleshooter.

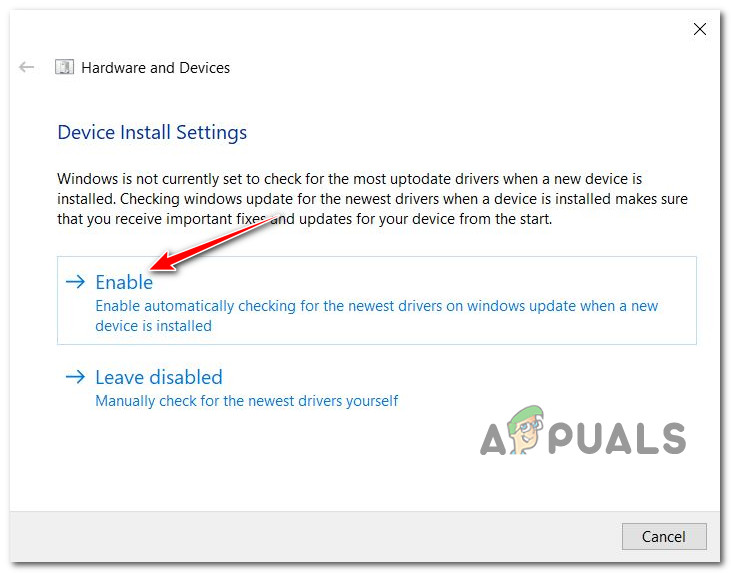
Run the Hardware troubleshooter - Inside the Hardware and Devices troubleshooter, wait patiently until the initial scan is complete.
- If the utility discovers the same problem that we’re suspecting, you’ll need to click on Enable in order to configure your Windows installation to always search for new driver signatures when new hardware is connected.

Enable the Hardware and Devices menu Note: If a different solution is recommended, click on Apply this fix or follow the on-screen instructions to enforce the fix.
- After the fix is successfully applied, reboot your computer and see if the issue is fixed after you restart your PC again.

In case you’re still dealing with the same LiveKernelEvent 193 error, move down to the next method below.
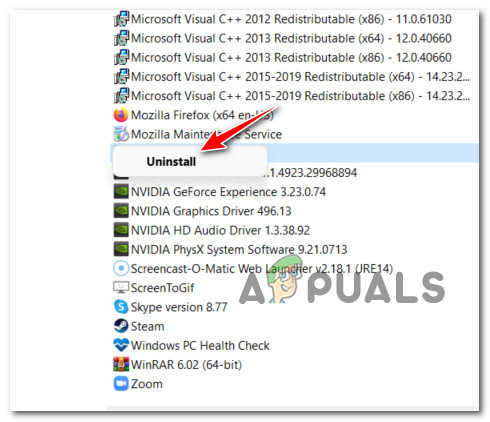
Uninstall NordVPN (if applicable)
As it turns out, you can also expect to face the LiveKernelEvent 193 type of crash in a scenario in which your network driver conflicts with a background process of NordVPN. This problem is typically associated with a 100% CPU usage of the System Interrupts process while the computer hangs indefinitely.
In case the scenario above sounds familiar and you have NortVPN installed and configured to open along with every system startup, chances are you’re dealing with the same kind of conflict.
To fix this issue, you will need to uninstall your current version of NordVPN and install the latest version (after a system reboot):
- Press Windows key + R to open up a Run dialog box. Next, type ‘appwiz.cpl’ inside the text box and press Enter to open up the Programs and Features menu.
Open up the Programs and Features menu - Once you’re inside the Programs and Features menu, scroll down through the list of installed programs and locate the entry associated with NordVPN.
- After you locate the correct listing, right-click on NordVPN and choose Uninstall from the context menu.

Uninstalling the NordVPN - Follow the uninstallation prompts to uninstall NordVPN and get rid of the custom network settings, then reboot your PC.
- Once your Windows computer boots back up, see if the same LiveKernelEvent 193 error is still occurring.

If the problem is still not fixed or this method was not applicable, follow the next instructions below.
Update the Chipset drivers
Another potential culprit that might indirectly cause the LiveKernelEvent 193 error is an incompatible or outdated chipset driver.
Note: Chipset drivers are mainly responsible for controlling and managing the communications between the processor, the GPU, the hard drive, and the system memory.
Improper chipset drivers can make your system unstable to resource-intensive tasks which might end up causing the LiveKernelEvent 193 error. As it turns out, this problem is mostly reported to occur with laptops, ultrabooks, and notebooks.
Fortunately, if this scenario is applicable and you’re actually dealing with an improper chipset driver, you should be able to fix the issue by updating your chipset drivers to the latest compatible version.
But keep in mind that the process of updating your chipset drivers will be different depending on if you’re using hardware compatible with AMD or Intel.
To cover both potential scenarios, we’ve created two separate guides that will walk you through the process of updating your chipset driver with AMD or Intel equivalents.
Update the AMD Chipset driver
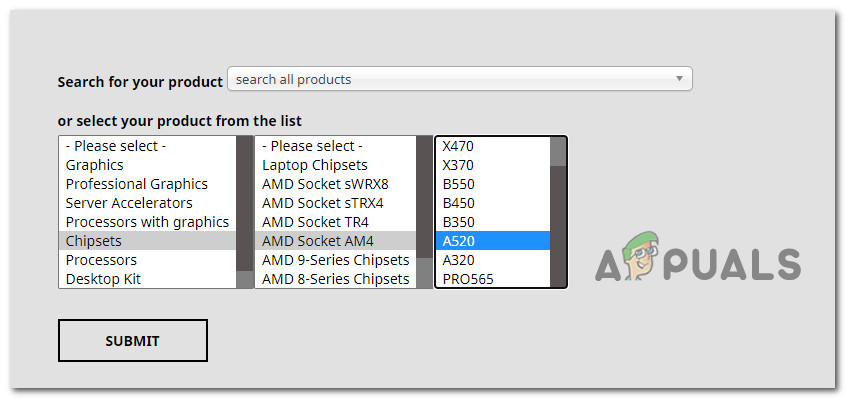
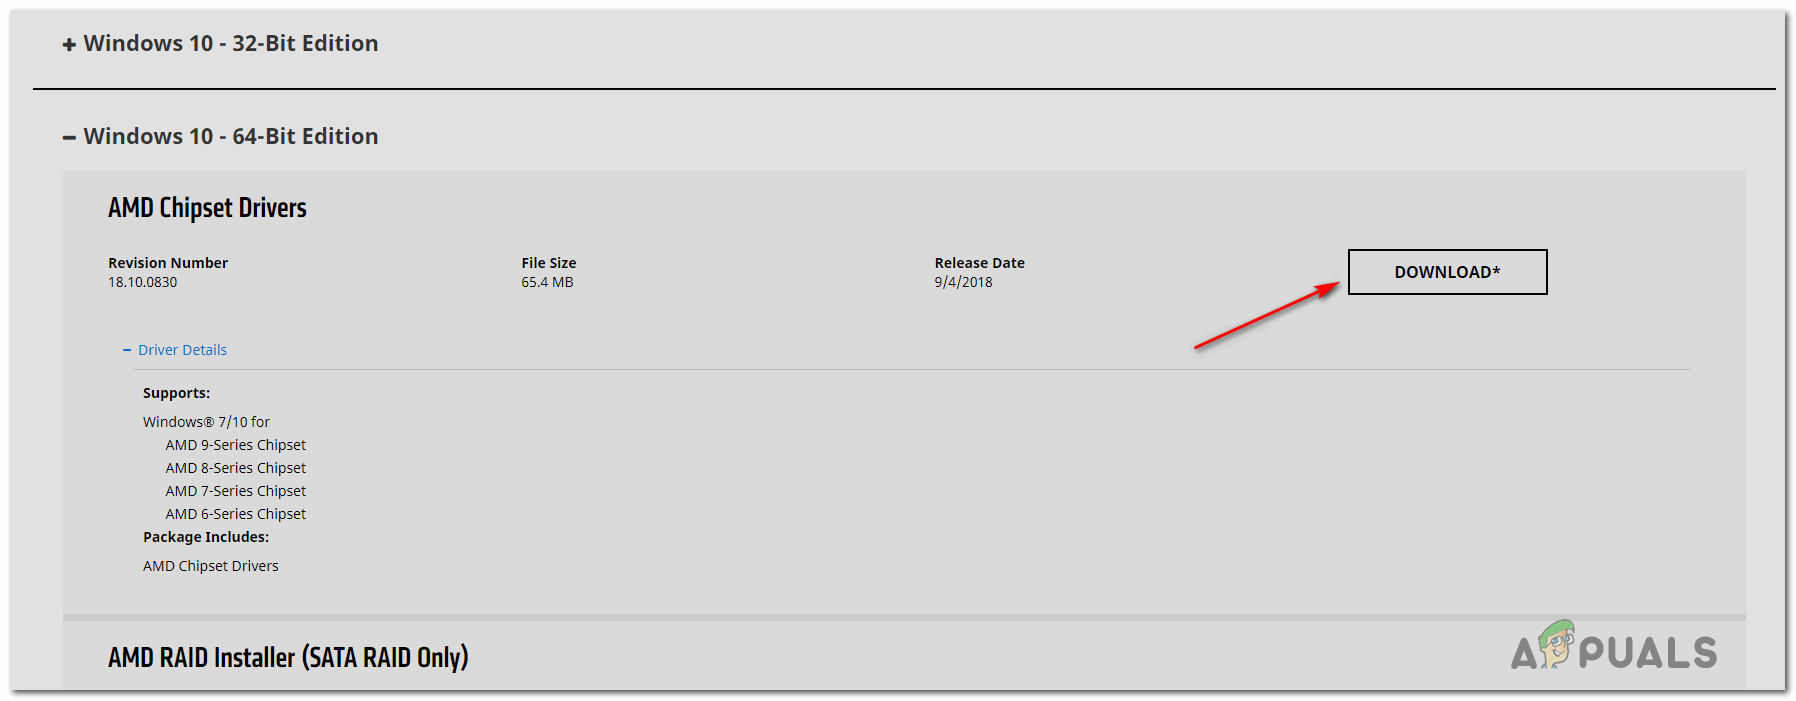
- Start by opening your default browser and accessing the download page of AMD Drivers and Support page.
- Next, scroll all the way down to the Search for your product section.
- Once you’re inside the Search for your product section, choose Chipsets from the column on the left, then pick the appropriate processor socket from the column on the right.
- Select your processor from the third column, then click on Submit to get a list of the compatible chipset drivers.

Finding the correct AMD chipset driver - After you hit the Submit button, you will be redirected to a page where you can download the chipset driver. Once you’re inside, expand the drop-down menu associated with your compatible OS architecture and click on the Download button from the newly appeared menu.

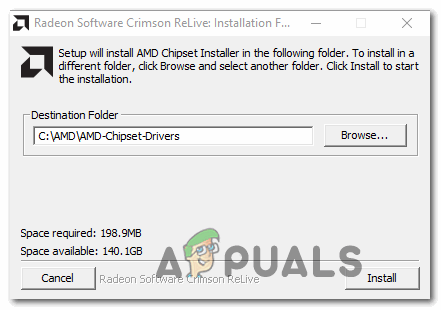
Downloading the latest chipset driver - After the download is finally complete, go ahead and double-click on the chipset driver installer, then click on Yes once you’re prompted by the User Account Control window.
- Inside the chipset driver installer window, follow the on-screen instructions to update your chipset drivers to the latest version available.

Install the latest Chipset Driver - Follow the on-screen instructions to complete the installation, then reboot your computer one final time and see if the LiveKernelEvent 193 error is now fixed.
Update the Intel Chipset driver
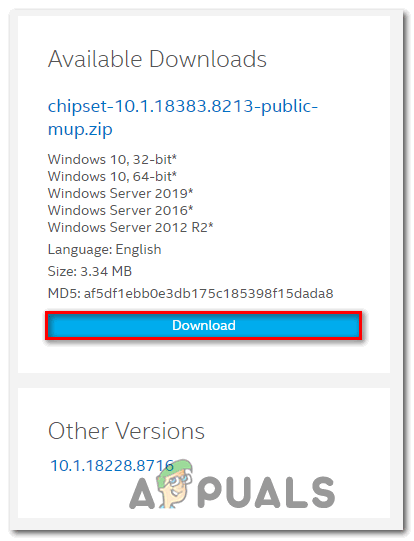
- Open your browser and visit the download page of the Chipset INF Utility.
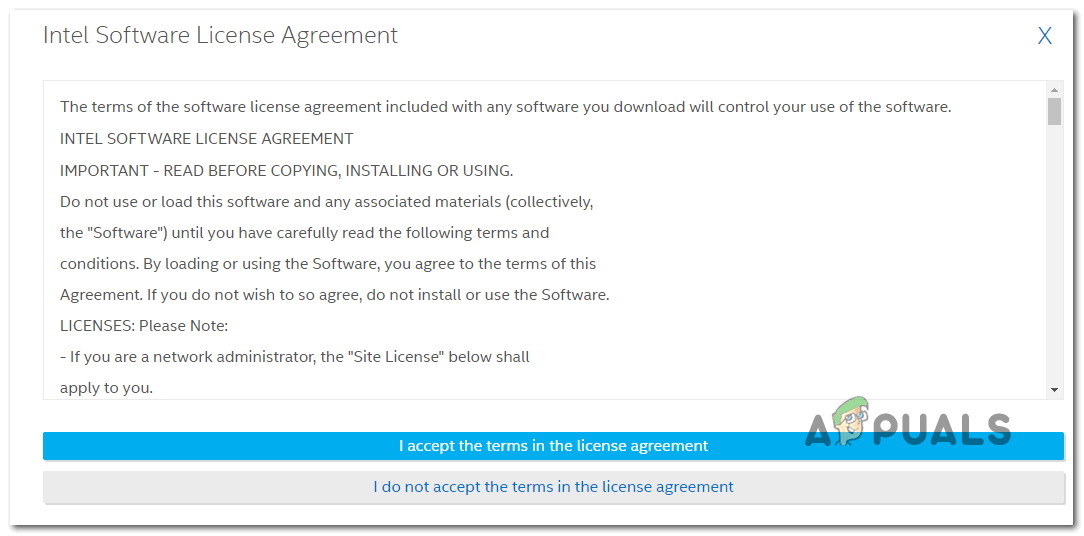
- Inside the correct download page, click on the Download button (top-right corner of the screen).

Downloading the chipset utility - Once you get to the next screen, click on I accept the terms in the license agreement to agree with the Terms of Licensing.

Accepting the Terms of Licensing - After a few seconds, the download should start automatically – wait until the archive is downloaded locally, then use an extraction utility (like 7Zip, WinZip or Winrar) to extract the contents of the chipset driver updater software.
- Once the contents of the archive are extracted, double-click on the SetupChipset.exe executable, then follow the on-screen prompts to install the latest chipset driver.

Installing the chipset driver - Once the chipset driver has been installed, reboot your PC and see if the error is fixed starting with the next system startup.

In case you’re still experiencing system crashes pointing towards the same LiveKernelEvent 193 error, move down to the next method below
Update BIOS drivers
Another possible scenario (particularly if you’ve just recently upgraded to Windows 11) is an outdated BIOS driver that is not yet updated to accommodate the new OS.
System instability caused by an outdated BIOS version is not that uncommon, especially on legacy motherboards.
Keep In mind that updating the BIOS version on your motherboard is not that hard as it used to be – as of now, every major motherboard manufacturer has developed a flashing utility that will help you update your BIOS without getting too technical.
The best course of action is to head over to your motherboard manufacturer’s website and check the Drivers Download page for a BIOS updating utility – ASUS has E-Z Flash, MSI has MFlash, Gigabyte has @BIOS Live Update, etc.
Note: Regardless of your BIOS manufacturer, make sure you read the official documentation thoroughly before starting the operation of updating your BIOS. Doing this process incorrectly might result in you bricking the hardware which will require the intervention of a skilled technician.
Follow the on-screen instructions to update your BIOS version to the latest, then reboot your PC and see if the LiveKernelEvent 193 error is fixed.
In case you already had the latest version of BIOS for your motherboard or this method was not applicable, move down to the final fix below.
Clean install or Repair install
If none of the methods above have proven to be effective in your case and you’ve ruled out the possibility of a hardware issue, the only possible explanation for this LiveKernelEvent 193 error leading to a system crash is underlying system file corruption.
Since there are literally tens of thousands of possible culprits, the most efficient way of ensuring that your system doesn’t crash with this error due to system file corruption is to replace every Windows file with a healthy equivalent.
When it comes to doing this, you have two ways forward:
- Clean install – This operation is the easiest out of the bunch, but you’ll need to be prepared to lose any personal data present on the operating system drive. This is the equivalent of installing Windows from scratch, so make sure to back up your data if you’re currently storing any sensitive drive on the OS drive before starting this operation.
- Repair install – If you have the time to go for this method you should – this operation will only replace your Windows system files while allowing you to keep everything else. By repair installing (in-place repairing) you get to keep your personal files, applications, games, and even some user settings that are currently stored on the OS drive.
Если вы видите код ошибки LiveKernelEvent 193 на вашем компьютере с Windows 11 или Windows 10, то этот пост сможет помочь вам решить проблему.
Что такое LiveKernelEvent 193?
Некоторые пользователи Windows сообщают, что на их ПК возникает ошибка LiveKernelEvent с кодом 193. В результате, когда они оставляют свои ПК в состоянии ожидания, компьютер просто не просыпается. Это аппаратная ошибка, которая может вызвать серьезные проблемы в вашей системе. Вы увидите следующее описание, связанное с этой ошибкой:
Проблема с вашим оборудованием привела к тому, что Windows перестала работать правильно.
Если вы столкнулись с той же проблемой, это руководство для вас. В этом посте мы обсудим несколько исправлений для устранения ошибки. Но перед этим давайте попробуем понять, что потенциально может вызвать ту же ошибку.
Что вызывает ошибку LiveKernelEvent 193?
Вот несколько причин, которые потенциально могут вызвать ошибку LiveKernelEvent 193 на ПК с Windows:
- Это может быть вызвано устаревшим и поврежденным драйвером Intel WiFi. В этом случае обновите драйвер Intel WiFi до последней версии.
- Эта ошибка также может быть результатом несоответствия оборудования, вызванного внешним периферийным устройством или жестким диском. Если вы недавно подключили оборудование к своему компьютеру, попробуйте запустить средство устранения неполадок оборудования и устройств, чтобы решить и исправить связанные проблемы.
- Устаревшие драйверы набора микросхем могут вызвать ту же ошибку. Итак, попробуйте обновить драйвер набора микросхем, чтобы исправить ошибку.
- Это также может быть вызвано устаревшими драйверами BIOS и повреждением системных файлов.
В любом случае для устранения ошибки можно использовать перечисленные ниже исправления.
Вот исправления, которые вы можете попытаться устранить с кодом ошибки LiveKernelEvent 193 в Windows:
- Запустите средство устранения неполадок оборудования и устройств.
- Обновите драйвер Intel Wi-Fi.
- Обновите драйверы набора микросхем.
- Удалите NordVPN (если применимо).
- Обновите драйверы BIOS.
- Выполните чистую установку или ремонтную установку.
Давайте теперь подробно обсудим вышеупомянутые исправления!
1]Запустите средство устранения неполадок оборудования и устройств.
Если вы недавно подключили к компьютеру внешний диск или дополнительные периферийные устройства, это может быть причиной того, что вы получаете ошибку. Проблемы возникают сразу после подключения внешнего оборудования, особенно внешнего жесткого диска. Итак, если сценарий применим, вы должны попробовать запустить средство устранения неполадок оборудования и устройств и позволить ему исправить любую проблему, связанную с оборудованием, чтобы в конечном итоге исправить соответствующую ошибку.
Вот шаги для запуска средства устранения неполадок оборудования и устройств в Windows:
- Во-первых, запустите командную строку, набрав cmd в строке поиска на панели задач, а затем щелкнув приложение командной строки.
- Теперь введите следующую команду в CMD: msdt.exe -id DeviceDiagnostic
- После этого нажмите кнопку Enter, чтобы выполнить команду, и откроется окно средства устранения неполадок оборудования и устройств.
- Затем нажмите кнопку «Далее», и средство устранения неполадок начнет обнаруживать проблемы, связанные с оборудованием.
- Во время сканирования проблем он покажет проблему и предложит варианты применения исправления. Просто нажмите на опцию Применить это исправление и следуйте инструкциям на экране.
- По завершении применения исправления проверьте, исправлена ли ошибка.
Если ошибка не исчезла, попробуйте следующее возможное исправление, чтобы устранить ошибку.
2]Обновите драйвер Intel Wi-Fi.
Эта ошибка может быть вызвана, если у вас нет последней версии драйвера двухдиапазонной беспроводной связи, если вы используете Windows 10. Несколько затронутых пользователей перестали получать сообщение об ошибке после обновления до последних версий драйверов беспроводной связи Intel. Вы можете посетить официальный драйвер Intel® Dual Band Wireless-AC страница загрузки а затем нажмите кнопку «Просмотреть подробности» рядом с драйвером. После этого загрузите исполняемый файл для драйвера, а затем запустите программу установки, чтобы установить последнюю версию драйвера Intel WiFI.
Когда вы закончите обновление драйвера WiFi, перезагрузите систему и посмотрите, исправлена ли ошибка или нет.
3]Обновите драйверы набора микросхем.
Ошибка LiveKernelEvent 193 может возникать из-за несовместимого или устаревшего драйвера набора микросхем, который отвечает за управление обменом данными между процессором, графическим процессором, жестким диском и системной памятью. Если у вас устаревшие драйверы набора микросхем, это может сделать ваш компьютер нестабильным для ресурсоемких задач. Итак, если сценарий применим, вам следует продолжить обновление драйверов набора микросхем.
Процесс обновления драйверов набора микросхем зависит от производителя вашего устройства. Здесь мы собираемся показать шаги по обновлению драйверов чипсетов для брендов AMD и Intel. Давайте проверим.
Драйвер набора микросхем AMD
Вы можете выполнить следующие шаги, чтобы обновить драйверы набора микросхем AMD:
- Сначала откройте свой веб-браузер, а затем перейдите на страницу драйверов и поддержки AMD. страница загрузки.
- Теперь прокрутите вниз до Найдите свой продукт раздел, а отсюда выберите категорию Наборы микросхем в левом столбце.
- Затем выберите сокет процессора и процессор из правых столбцов.
- После этого нажмите кнопку «Отправить», чтобы просмотреть все совместимые драйверы набора микросхем.
- Затем загрузите соответствующий драйвер набора микросхем в зависимости от архитектуры вашего компьютера (32-разрядной или 64-разрядной).
- Теперь установите драйвер набора микросхем, запустив программу установки и следуя инструкциям на экране.
- Наконец, перезагрузите компьютер и посмотрите, исправлена ли ошибка LiveKernelEvent 193.
Драйвер набора микросхем Intel
Вот как вы можете загрузить последние версии драйверов для набора микросхем Intel на ПК с Windows:
- Во-первых, посетите утилиту Intel Chipset INF Utility. страница в вашем веб-браузере.
- Теперь загрузите SetupChipset.exe исполняемый файл со страницы загрузки выше, а затем запустите исполняемый файл.
- Затем следуйте появляющимся инструкциям, чтобы запустить настройку и установить драйверы набора микросхем.
- После завершения установки перезагрузите компьютер и посмотрите, не устранена ли ошибка.
Если вы все еще получаете ошибку LiveKernelEvent 193, вы можете перейти к следующему потенциальному исправлению.
4]Удалите NordVPN (если применимо)
Согласно некоторым отчетам пользователей, ошибка может быть вызвана процессом NordVPN. Если сценарий применим и вы включили NordVPN при запуске Windows, вы можете попробовать отключить NordVPN и посмотреть, устранит ли он ошибку. В этом случае вам придется удалить NordVPN, чтобы навсегда исправить ошибку. Вы можете открыть приложение «Настройки», используя горячую клавишу Win + I, а затем перейти в «Приложения»> «Приложения и функции». После этого выберите программное обеспечение NordVPN из списка установленных приложений и нажмите кнопку «Удалить», чтобы удалить его из вашей системы.
Если вам не повезло с этим методом, попробуйте следующее решение.
5]Обновите драйверы BIOS.
Эта ошибка также может быть вызвана устаревшими драйверами BIOS, особенно если вы недавно обновились до Windows 11. Устаревшие драйверы BIOS могут вызвать нестабильность системы и вызвать возникшую ошибку. Итак, попробуйте обновить драйверы BIOS, а затем посмотрите, исправлена ли ошибка или нет.
6]Выполните чистую установку или восстановительную установку.
Если ни одно из вышеперечисленных решений не работает для вас, возможно, вы имеете дело с каким-то повреждением системного файла, которое нельзя удалить обычным способом. Следовательно, если сценарий применим, вы можете попробовать выполнить чистую установку или восстановительную установку, чтобы исправить ошибку.
Как исправить LiveKernelEvent 141?
Чтобы исправить ошибку LiveKernelEvent 141, вы можете попробовать запустить проверку диска или проверить свою память с помощью средства диагностики памяти Windows. Кроме того, попробуйте переустановить драйверы графического процессора, чтобы исправить ошибку.
Вот и все!
Теперь прочтите: Исправить код ошибки 0xC0000035 в средстве просмотра событий в Windows.
.
If you see LiveKernelEvent error code 193 on your Windows 11 or Windows 10 computer, then this post will be able to help you fix the problem.
What is LiveKernelEvent 193?

Some Windows users have reported being experiencing LiveKernelEvent error code 193 on their PC. As a result, when they leave their PCs in an idle state, the computer just won’t wake up. It is a hardware error and can cause serious issues with your system. You will see the following description associated with this error:
A problem with your hardware caused Windows to stop working correctly.
If you are facing the same problem, this guide is for you. In this post, we are going to discuss several fixes to resolve the error. But before that, let us try and understand what potentially causes the same error.
What causes LiveKernelEvent 193 error?
Here are some reasons that can potentially cause the LiveKernelEvent 193 error on Windows PC:
- It can be caused due to an outdated and corrupted Intel WiFi driver. In that case, update your Intel WiFi driver to the latest version.
- This error can also be a result of hardware inconsistency caused due to an external peripheral or hard drive. If you recently connected hardware to your PC, try running Hardware and Devices troubleshooter to address and fix related issues.
- Outdated chipset drivers can cause the same error. So, try updating your chipset driver to fix the error.
- It can also be triggered due to outdated BIOS drivers and system file corruption.
In any scenario, you can use the below-listed fixes to resolve the error.
Here are the fixes that you can try to resolve the LiveKernelEvent error code 193 on Windows:
- Run the Hardware and Devices troubleshooter.
- Update your Intel Wi-Fi driver.
- Update the Chipset drivers.
- Uninstall NordVPN (if applicable).
- Update BIOS drivers.
- Perform a clean install or repair install.
Let us discuss the above fixes in detail now!
1] Run the Hardware and Devices troubleshooter
If you recently plugged in an external drive or additional peripherals to your PC, it can be a reason that you are getting the error in hand. It is quite common to face issues right after connecting external hardware, especially an external hard drive. So, if the scenario is applicable, you should try running the Hardware and Devices troubleshooter and let it fix any hardware-related problem to eventually fix the concerned error.
Here are the steps to run the Hardware and Devices troubleshooter on Windows:
- Firstly, launch the Command Prompt by typing cmd in the taskbar search and then clicking on the Command Prompt app.
- Now, type the below command in CMD:
msdt.exe -id DeviceDiagnostic
- After that, press the Enter button to execute the command and it will open up the Hardware and Devices troubleshooter window.
- Then, press the Next button and the troubleshooter will start detecting problems related to hardware.
- As it scans the issues, it will show the problem and show you options to apply the fix. Simply tap on the Apply this fix option and follow the onscreen instructions.
- When done applying the fix, check if the error is now fixed.
In case the error still persists, go ahead with the next potential fix to resolve the error.
2] Update your Intel Wi-Fi driver
This error might be triggered in case you don’t have the latest Dual-Band Wireless driver if you are on Windows 10. Several affected users stopped receiving the error after upgrading to the latest Intel wireless drivers. You can visit the official Intel® Dual Band Wireless-AC driver’s download page and then click on the View details button present next to the driver. After that, download the executable for the driver and then run the installer to install the latest Intel WiFI driver.
When you are done updating your WiFi driver, reboot your system and see if the error is fixed or not.
3] Update the Chipset drivers
The LiveKernelEvent 193 error can be occurred due to an incompatible or outdated chipset driver which is responsible for controlling the communications between CPU, GPU, hard drive, and the system memory. If you have outdated chipset drivers, it can result in making your PC unstable to resource-intensive tasks. So, if the scenario applies, you should go ahead with updating your chipset drivers.
The process to update chipset drivers vary depending on your device manufacturers. Here, we are going to show steps to update chipset drivers for AMD and Intel brands. Let us check out.
AMD Chipset driver
You can follow the below steps to update the AMD chipset drivers:
- Firstly, open your web browser and then visit the AMD Drivers and Support’s download page.
- Now, scroll down to the Search for your product section, and from here, select the Chipsets category from the left column.
- Next, choose your processor socket and processor from the right columns.
- After that, press the Submit button to view all compatible chipset drivers.
- Then, download the appropriate chipset driver based on your computer’s architecture (32bit or 64 bit).
- Now, install the chipset driver by running the installer and following the on-screen instructions.
- Finally, reboot your PC and then see if the LiveKernelEvent 193 error is fixed.
Intel Chipset driver
Here’s how you can download the latest Intel chipset drivers on Windows PC:
- Firstly, visit Intel’s Chipset INF Utility page in your web browser.
- Now, download the SetupChipset.exe executable file from the above download page and then run the executable.
- Next, follow the prompted instructions to run the setup and install chipset drivers.
- Once the installation is completed, restart your computer and see if the error is not resolved.
If you still get the LiveKernelEvent 193 error, you can move on to the next potential fix.
4] Uninstall NordVPN (if applicable)
As per some user reports, the error could be triggered due to a process of NordVPN. If the scenario is applicable and you have enabled NordVPN on Windows startup, you can try disabling NordVPN and see if it fixes the error. In case it does, you will have to uninstall NordVPN to permanently fix the error. You can open the Settings app using Win+I hotkey and then go to Apps > Apps & features. After that, select the NordVPN software from the list of installed apps and use the Uninstall button to remove it from your system.
In case you find no luck with this method, try the next solution.
5] Update BIOS drivers
This error can also be triggered due to outdated BIOS drivers, particularly if you recently upgraded to Windows 11. Out-of-date BIOS drivers can cause system instability and may result in the error at hand. So, try updating your BIOS drivers and then see if the error is fixed.
6] Perform a clean install or repair install
If none of the above solutions works for you, you might be dealing with system file corruption that can’t be removed conventionally. Hence, if the scenario applies, you can try performing a clean install or repair install to fix the error.
How do I fix LiveKernelEvent 141?
To fix the LiveKernelEvent 141 error, try running a disk check or checking your memory using the Windows Memory Diagnostic tool. Other than that, try reinstalling GPU drivers to fix the error. If none of these work, the problem is with the GPU on the hardware level. The best way to test is either by switching to another GPU or, if you have an integrated GPU, switching the output cables to the motherboard video output and checking if there is an issue.
That’s it!
Now read: Fix Error code 0xC0000035 in Event Viewer on Windows.
If you see LiveKernelEvent error code 193 on your Windows 11 or Windows 10 computer, then this post will be able to help you fix the problem.
What is LiveKernelEvent 193?
Some Windows users have reported being experiencing LiveKernelEvent error code 193 on their PC. As a result, when they leave their PCs in an idle state, the computer just won’t wake up. It is a hardware error and can cause serious issues with your system. You will see the following description associated with this error:
A problem with your hardware caused Windows to stop working correctly.
If you are facing the same problem, this guide is for you. In this post, we are going to discuss several fixes to resolve the error. But before that, let us try and understand what potentially causes the same error.
What causes LiveKernelEvent 193 error?
Here are some reasons that can potentially cause the LiveKernelEvent 193 error on Windows PC:
- It can be caused due to an outdated and corrupted Intel WiFi driver. In that case, update your Intel WiFi driver to the latest version.
- This error can also be a result of hardware inconsistency caused due to an external peripheral or hard drive. If you recently connected hardware to your PC, try running Hardware and Devices troubleshooter to address and fix related issues.
- Outdated chipset drivers can cause the same error. So, try updating your chipset driver to fix the error.
- It can also be triggered due to outdated BIOS drivers and system file corruption.
In any scenario, you can use the below-listed fixes to resolve the error.
Here are the fixes that you can try to resolve the LiveKernelEvent error code 193 on Windows:
- Run the Hardware and Devices troubleshooter.
- Update your Intel Wi-Fi driver.
- Update the Chipset drivers.
- Uninstall NordVPN (if applicable).
- Update BIOS drivers.
- Perform a clean install or repair install.
Let us discuss the above fixes in detail now!
1] Run the Hardware and Devices troubleshooter
If you recently plugged in an external drive or additional peripherals to your PC, it can be a reason that you are getting the error in hand. It is quite common to face issues right after connecting external hardware, especially an external hard drive. So, if the scenario is applicable, you should try running the Hardware and Devices troubleshooter and let it fix any hardware-related problem to eventually fix the concerned error.
Here are the steps to run the Hardware and Devices troubleshooter on Windows:
- Firstly, launch the Command Prompt by typing cmd in the taskbar search and then clicking on the Command Prompt app.
- Now, type the below command in CMD:
msdt.exe -id DeviceDiagnostic
- After that, press the Enter button to execute the command and it will open up the Hardware and Devices troubleshooter window.
- Then, press the Next button and the troubleshooter will start detecting problems related to hardware.
- As it scans the issues, it will show the problem and show you options to apply the fix. Simply tap on the Apply this fix option and follow the onscreen instructions.
- When done applying the fix, check if the error is now fixed.
In case the error still persists, go ahead with the next potential fix to resolve the error.
2] Update your Intel Wi-Fi driver
This error might be triggered in case you don’t have the latest Dual-Band Wireless driver if you are on Windows 10. Several affected users stopped receiving the error after upgrading to the latest Intel wireless drivers. You can visit the official Intel® Dual Band Wireless-AC driver’s download page and then click on the View details button present next to the driver. After that, download the executable for the driver and then run the installer to install the latest Intel WiFI driver.
When you are done updating your WiFi driver, reboot your system and see if the error is fixed or not.
3] Update the Chipset drivers
The LiveKernelEvent 193 error can be occurred due to an incompatible or outdated chipset driver which is responsible for controlling the communications between CPU, GPU, hard drive, and the system memory. If you have outdated chipset drivers, it can result in making your PC unstable to resource-intensive tasks. So, if the scenario applies, you should go ahead with updating your chipset drivers.
The process to update chipset drivers vary depending on your device manufacturers. Here, we are going to show steps to update chipset drivers for AMD and Intel brands. Let us check out.
AMD Chipset driver
You can follow the below steps to update the AMD chipset drivers:
- Firstly, open your web browser and then visit the AMD Drivers and Support’s download page.
- Now, scroll down to the Search for your product section, and from here, select the Chipsets category from the left column.
- Next, choose your processor socket and processor from the right columns.
- After that, press the Submit button to view all compatible chipset drivers.
- Then, download the appropriate chipset driver based on your computer’s architecture (32bit or 64 bit).
- Now, install the chipset driver by running the installer and following the on-screen instructions.
- Finally, reboot your PC and then see if the LiveKernelEvent 193 error is fixed.
Intel Chipset driver
Here’s how you can download the latest Intel chipset drivers on Windows PC:
- Firstly, visit Intel’s Chipset INF Utility page in your web browser.
- Now, download the SetupChipset.exe executable file from the above download page and then run the executable.
- Next, follow the prompted instructions to run the setup and install chipset drivers.
- Once the installation is completed, restart your computer and see if the error is not resolved.
If you still get the LiveKernelEvent 193 error, you can move on to the next potential fix.
4] Uninstall NordVPN (if applicable)
As per some user reports, the error could be triggered due to a process of NordVPN. If the scenario is applicable and you have enabled NordVPN on Windows startup, you can try disabling NordVPN and see if it fixes the error. In case it does, you will have to uninstall NordVPN to permanently fix the error. You can open the Settings app using Win+I hotkey and then go to Apps > Apps & features. After that, select the NordVPN software from the list of installed apps and use the Uninstall button to remove it from your system.
In case you find no luck with this method, try the next solution.
5] Update BIOS drivers
This error can also be triggered due to outdated BIOS drivers, particularly if you recently upgraded to Windows 11. Out-of-date BIOS drivers can cause system instability and may result in the error at hand. So, try updating your BIOS drivers and then see if the error is fixed.
6] Perform a clean install or repair install
If none of the above solutions works for you, you might be dealing with system file corruption that can’t be removed conventionally. Hence, if the scenario applies, you can try performing a clean install or repair install to fix the error.
How do I fix LiveKernelEvent 141?
To fix the LiveKernelEvent 141 error, try running a disk check or checking your memory using the Windows Memory Diagnostic tool. Other than that, try reinstalling GPU drivers to fix the error. If none of these work, the problem is with the GPU on the hardware level. The best way to test is either by switching to another GPU or, if you have an integrated GPU, switching the output cables to the motherboard video output and checking if there is an issue.
That’s it!
Now read: Fix Error code 0xC0000035 in Event Viewer on Windows.
Если вы видите код ошибки LiveKernelEvent 193 на вашем компьютере с Windows 11 или Windows 10, это сообщение поможет вам решить проблему.
Что такое LiveKernelEvent 193?
Некоторые пользователи Windows сообщали, что на их ПК возникает ошибка LiveKernelEvent 193 с кодом. В результате, когда они оставляют свои ПК в состоянии ожидания, компьютер просто не просыпается. Это аппаратная ошибка, которая может вызвать серьезные проблемы с вашей системой. Вы увидите следующее описание, связанное с этой ошибкой:
Проблема с вашим оборудованием привела к тому, что Windows перестала работать правильно.
Если вы столкнулись с тем же проблема, это руководство для вас. В этом посте мы обсудим несколько исправлений для устранения ошибки. Но перед этим давайте попробуем понять, что потенциально вызывает ту же ошибку.
Что вызывает ошибку LiveKernelEvent 193?
Вот несколько причин, которые потенциально могут вызвать ошибку LiveKernelEvent 193 в Windows ПК:
Это может быть вызвано устаревшим и поврежденным драйвером Intel WiFi. В этом случае обновите драйвер Intel WiFi до последней версии. Эта ошибка также может быть результатом несоответствия оборудования, вызванного внешним периферийным устройством или жестким диском. Если вы недавно подключили оборудование к компьютеру, попробуйте запустить средство устранения неполадок оборудования и устройств, чтобы решить и исправить связанные проблемы. Устаревшие драйверы набора микросхем могут вызвать ту же ошибку. Итак, попробуйте обновить драйвер набора микросхем, чтобы исправить ошибку. Она также может быть вызвана из-за устаревших драйверов BIOS и повреждения системных файлов.
В любом сценарии вы можете использовать перечисленные ниже исправления для устранения ошибки.
Вот исправления, которые вы можете попытаться устранить с кодом ошибки LiveKernelEvent 193 в Windows:
Запустите средство устранения неполадок оборудования и устройств. Обновите свой Intel Драйвер Wi-Fi. Обновите драйверы набора микросхем. Удалите NordVPN (если применимо). Обновите драйверы BIOS. Выполните чистую установку или восстановительную установку.
Давайте теперь подробно обсудим вышеуказанные исправления!
1 ] Запустите средство устранения неполадок оборудования и устройств
Если вы недавно подключили к компьютеру внешний диск или дополнительные периферийные устройства, это может быть причиной того, что вы получаете ошибку. Проблемы возникают сразу после подключения внешнего оборудования, особенно внешнего жесткого диска. Итак, если сценарий применим, вы должны попробовать запустить средство устранения неполадок оборудования и устройств и позволить ему исправить любые проблемы, связанные с оборудованием, чтобы в конечном итоге исправить соответствующую ошибку.
Вот шаги для запуска оборудования и устройств. средство устранения неполадок в Windows:
сначала запустите командную строку, набрав cmd в поиске на панели задач и затем щелкнув приложение командной строки. Теперь введите следующую команду в CMD: msdt.exe-id DeviceDiagnostic, после этого нажмите Enter кнопку, чтобы выполнить команду, и откроется окно средства устранения неполадок оборудования и устройств. Затем нажмите кнопку Далее, и средство устранения неполадок начнет обнаруживать проблемы, связанные с оборудованием. Во время сканирования проблем оно покажет проблему и покажет вам варианты решения примените исправление. Просто нажмите на опцию «Применить это исправление» и следуйте инструкциям на экране. После применения исправления проверьте, исправлена ли ошибка.
Если ошибка не устранена, перейдите к следующему потенциальному исправлению, чтобы устранить ошибку.
2] Обновите драйвер Intel Wi-Fi
Эта ошибка может возникнуть, если у вас нет последней версии драйвера двухдиапазонной беспроводной связи, если вы используете Windows 10. Несколько затронутые пользователи перестали получать сообщение об ошибке после обновления до последних версий драйверов беспроводной сети Intel. Вы можете посетить официальный драйвер Intel® Dual Band Wireless-AC страница загрузки , а затем нажмите кнопку Просмотреть подробности рядом с драйвером. После этого загрузите исполняемый файл для драйвера, а затем запустите программу установки, чтобы установить последнюю версию драйвера Intel WiFI.
Когда вы закончите обновление драйвера WiFi, перезагрузите систему и посмотрите, исправлена ли ошибка или нет..
3] Обновление драйверов набора микросхем
Ошибка LiveKernelEvent 193 может возникать из-за несовместимого или устаревшего драйвера набора микросхем, который отвечает за управление обменом данными между процессором, графическим процессором и жестким диском. , и системная память. Если у вас устаревшие драйверы набора микросхем, это может сделать ваш компьютер нестабильным для ресурсоемких задач. Итак, если сценарий применим, вам следует продолжить обновление драйверов набора микросхем.
Процесс обновления драйверов набора микросхем зависит от производителя вашего устройства. Здесь мы собираемся показать шаги по обновлению драйверов чипсетов для брендов AMD и Intel. Давайте посмотрим.
Драйвер набора микросхем AMD
Чтобы обновить драйверы набора микросхем AMD, выполните следующие действия:
Сначала откройте веб-браузер, а затем посетите страницу страница загрузки . Теперь прокрутите вниз до раздела”Поиск вашего продукта”и выберите здесь Наборы микросхем в левом столбце. Затем выберите сокет и процессор в правом столбце. После этого нажмите кнопку «Отправить», чтобы просмотреть все совместимые драйверы набора микросхем. Затем загрузите соответствующий драйвер набора микросхем в зависимости от архитектуры вашего компьютера ( 32-разрядная или 64-разрядная).Теперь установите драйвер набора микросхем, запустив программу установки и следуя инструкциям на экране. Наконец, перезагрузите компьютер и посмотрите, исправлена ли ошибка LiveKernelEvent 193. Драйвер набора микросхем Intel
Вот как вы можете загрузите последние версии драйверов для набора микросхем Intel на ПК с Windows:
Сначала посетите служебную программу Intel Chipset INF Utility page в своем веб-браузере. Теперь загрузите SetupChipset. EXE с указанной выше страницы загрузки, а затем запустите исполняемый файл. Затем следуйте инструкциям по установке и установке драйверов набора микросхем. После завершения установки перезагрузите компьютер и посмотрите, не устранена ли ошибка.
Если вы все еще получаете ошибку LiveKernelEvent 193, вы можете перейти к следующему потенциальному исправлению.
4] Удалите NordVPN (если применимо)
Согласно некоторым отчетам пользователей, ошибка могла быть запускаться из-за процесса NordVPN. Если сценарий применим и вы включили NordVPN при запуске Windows, вы можете попробовать отключить NordVPN и посмотреть, устранит ли он ошибку. В этом случае вам придется удалить NordVPN, чтобы навсегда исправить ошибку. Вы можете открыть приложение «Настройки», используя горячую клавишу Win + I, а затем перейти в «Приложения»> «Приложения и функции». После этого выберите программное обеспечение NordVPN из списка установленных приложений и нажмите кнопку «Удалить», чтобы удалить его из вашей системы.
Если вам не повезло с этим методом, попробуйте следующее решение.
5] Обновите драйверы BIOS
Эта ошибка также может быть вызвана устаревшими драйверами BIOS, особенно если вы недавно обновились до Windows 11. Устаревшие драйверы BIOS могут вызвать нестабильность системы и могут приведет к ошибке. Итак, попробуйте обновить драйверы BIOS, а затем посмотрите, устранена ли ошибка.
6] Выполните чистую установку или восстановительную установку
Если ни одно из вышеперечисленных решений не работает для вас , возможно, вы имеете дело с каким-то повреждением системного файла, которое нельзя удалить обычным способом. Следовательно, если сценарий применим, вы можете попробовать выполнить чистую установку или восстановительную установку, чтобы исправить ошибку.
Как исправить LiveKernelEvent 141?
Чтобы исправить ошибку LiveKernelEvent 141, вы можете попробовать запустить проверку диска или проверить свою память с помощью средства диагностики памяти Windows. Кроме того, попробуйте переустановить драйверы графического процессора, чтобы исправить ошибку.
Вот и все!
Теперь прочтите: Исправьте код ошибки 0xC0000035 в средстве просмотра событий в Windows.
Вопрос
Проблема: [Fix] Live Kernel Event Code 193 в Windows
Привет. Мой компьютер часто зависает без предупреждения, даже когда я ничего не делаю. Боюсь, если он будет продолжать делать это, то испортит весь мой компьютер. Я проверил это и получил вот что: «Проблема с вашим оборудованием привела к тому, что Windows перестала работать правильно». Это поправимо?
Решенный ответ
Windows — чрезвычайно сложная система, для бесперебойной работы которой в фоновом режиме работают тысячи процессов. Если хотя бы один из них выйдет из строя, пользователи могут столкнуться с различными ошибками и ошибками. Иногда проблемы также могут быть вызваны аппаратным обеспечением, что означает, что простое устранение неполадок ОС[1] не сработает.
Некоторые пользователи Windows сообщают о странной проблеме со своим ПК, когда они оставляют его в режиме ожидания.[2] на короткий период времени. Когда они возвращаются, экран остается выключенным и не включается, что бы они ни делали. Когда пользователи отправляются исследовать в средстве просмотра событий, они обнаруживают аппаратную ошибку:
Описание: проблема с вашим оборудованием привела к тому, что Windows перестала работать правильно.
Имя проблемного события: LiveKernelEvent
Код объявления: 193
Есть много возможностей, почему вы могли это испытать. Для некоторых людей может быть достаточно запуска простого автоматического средства устранения неполадок, а для других может потребоваться замена оборудования. В этом посте вы найдете пару шагов, которые вы можете выполнить, чтобы попытаться исправить код события Live Kernel 193.
В этой статье мы предлагаем несколько возможных решений для кода события Live Kernel 193 в Windows. В зависимости от серьезности проблемы может быть достаточно простого сканирования или вам, возможно, придется полностью переустановить Windows. Если ваш компьютер все еще работает, вы можете попробовать использовать инструмент для ремонта. ReimageСтиральная машина Mac X9 чтобы избежать всех возможных исправлений. Это мощное программное обеспечение может исправить различные системные ошибки, поврежденные файлы, BSOD.[3] и оптимизировать машину для максимальной производительности.
Вы можете начать процесс поэтапно, обязательно обратите внимание:
Способ 1. Запустите средство устранения неполадок оборудования и устройств.
Исправить это сейчас!Исправить это сейчас!
Для восстановления поврежденной системы необходимо приобрести лицензионную версию Reimage Reimage.
- Откройте Бегать диалоговое окно, нажав Клавиша Windows + R
- Тип ms-settings: устранение неполадок внутри текстового поля и нажмите Входить открыть Средство устранения неполадок оборудования и устройств
- Нажмите на Другие средства устранения неполадок из меню на правой панели
- Прокрутите под Найдите и устраните другие проблемы, затем разверните список, связанный с Оборудование и устройства, затем нажмите Запустите средство устранения неполадок
- Внутри Оборудование и устройства средство устранения неполадок, терпеливо дождитесь завершения первоначального сканирования
- Нажмите на Давать возможность для настройки вашей установки Windows, чтобы всегда искать новые подписи драйверов при подключении нового оборудования
- Перезагрузить ваш компьютер и посмотрите, решена ли проблема
Способ 2. Обновите драйвер Intel Wi-Fi для Windows 10
Исправить это сейчас!Исправить это сейчас!
Для восстановления поврежденной системы необходимо приобрести лицензионную версию Reimage Reimage.
- Откройте браузер по умолчанию и посетите официальная страница загрузкиДвухдиапазонный адаптер Intel Dual Band Wireless-AC Водитель
- Нажать на Посмотреть детали кнопка, связанная с Семейство и двухдиапазонный адаптер Intel Wireless-Ac 3160 Водитель
- Нажмите на Скачать кнопка, связанная с архитектурой, совместимой с вашей операционной системой
- Нажмите на Я принимаю условия лицензионного соглашения, затем дождитесь завершения загрузки
- Как только драйвер будет загружен локально, дважды щелкните его, затем нажмите да на Контроль учетных записей пользователей окно для предоставления доступа администратора
- Следуйте инструкциям на экране, чтобы установить драйвер, затем перезагружать ваш компьютер и посмотрите, решена ли проблема
Способ 3. Обновите драйверы набора микросхем
Исправить это сейчас!Исправить это сейчас!
Для восстановления поврежденной системы необходимо приобрести лицензионную версию Reimage Reimage.
Неправильные драйверы набора микросхем могут сделать вашу систему нестабильной для ресурсоемких задач, что может привести к ошибке LiveKernelEvent 193. Вы сможете решить эту проблему, обновив драйверы набора микросхем до последней совместимой версии.
Драйвер набора микросхем AMD
- Начните с открытия браузера по умолчанию и доступа к странице загрузки Страница драйверов и поддержки AMD
- Затем прокрутите вниз до Найдите раздел с вашим продуктом
- Выбирать Чипсеты в столбце слева, затем выберите соответствующий сокет процессора в столбце справа
- Выберите свой процессор в третьем столбце, затем нажмите Представлять на рассмотрение чтобы получить список совместимых драйверов чипсета
- После того, как вы нажмете кнопку «Отправить», вы будете перенаправлены на страницу, где можно загрузить драйвер набора микросхем.
- Оказавшись внутри, разверните раскрывающееся меню, связанное с архитектурой вашей совместимой ОС, и нажмите Скачать кнопка из появившегося меню
- После завершения загрузки дважды щелкните программу установки драйвера набора микросхем, затем щелкните да как только вам будет предложено Контроль учетных записей пользователей окно
- В окне установщика драйвера набора микросхем следуйте инструкциям на экране, чтобы обновить драйверы набора микросхем до последней доступной версии.
- Следуйте инструкциям на экране, чтобы завершить установку, затем перезагрузите компьютер в последний раз и посмотрите, LiveKernelEvent 193 ошибка теперь исправлено
Драйвер набора микросхем Intel
- Откройте браузер и перейдите на страницу загрузки Утилита Chipset INF
- На правильной странице загрузки нажмите на Скачать кнопка
- Нажмите на Я принимаю условия лицензионного соглашения согласиться с Условиями лицензирования
- Подождите, пока архив будет загружен локально, затем используйте утилиту для извлечения (например, 7Zip, WinZip или Winrar), чтобы извлечь содержимое программного обеспечения для обновления драйверов чипсета.
- После извлечения содержимого архива дважды щелкните на SetupChipset.exe, затем следуйте инструкциям на экране, чтобы установить последнюю версию драйвера набора микросхем.
- Перезагрузите компьютер и посмотрите, исправлена ли ошибка.
Способ 4. Обновите драйверы BIOS
Исправить это сейчас!Исправить это сейчас!
Для восстановления поврежденной системы необходимо приобрести лицензионную версию Reimage Reimage.
- Лучше всего зайти на сайт производителя материнской платы и проверить Скачать драйверы страница для утилиты обновления BIOS — у ASUS есть E-Z Flash, у MSI есть MFlash, у Gigabyte есть @BIOS Live Update и т. д.
- Следуйте инструкциям на экране, чтобы обновить версию BIOS до последней, затем перезагрузите компьютер и посмотрите, исправлена ли ошибка LiveKernelEvent 193.
Метод 5. Переустановите Windows
Исправить это сейчас!Исправить это сейчас!
Для восстановления поврежденной системы необходимо приобрести лицензионную версию Reimage Reimage.
Если все остальное не помогло, и вы даже не можете перезагрузить компьютер с Windows, вы можете полностью переустановить ОС. Вам даже не понадобится номер активации или какое-либо доказательство покупки. Просто убедитесь, что у вас доступно более 4 ГБ свободного места, так как именно столько места занимает загружаемый файл. Вот как переустановить Windows 10:
- Скачать в ISO файл
- Выбирать Создайте установочный носитель для другого ПК и нажмите Следующий
- Выбирать ISO файл и нажмите Следующий
- Нажмите Заканчивать
- Открыть ISO-файл Windows вы скачали
- Открытым Настраивать и нажмите Следующий
- Нажмите Принимать (Будьте готовы ждать; эта следующая часть может занять некоторое время)
- Нажмите Установить
- Подождите, пока ваша система перезагрузится, и установите Окна
Исправляйте ошибки автоматически
Команда ugetfix.com делает все возможное, чтобы помочь пользователям найти лучшие решения для устранения их ошибок. Если вы не хотите бороться с методами ручного ремонта, используйте автоматическое программное обеспечение. Все рекомендованные продукты были протестированы и одобрены нашими профессионалами. Инструменты, которые можно использовать для исправления ошибки, перечислены ниже:
Предложение
сделай это сейчас!
Скачать Fix
Счастье
Гарантия
сделай это сейчас!
Скачать Fix
Счастье
Гарантия
Совместим с Майкрософт ВиндоусСовместим с OS X По-прежнему возникают проблемы?
Если вам не удалось исправить ошибку с помощью Reimage, обратитесь за помощью в нашу службу поддержки. Сообщите нам все подробности, которые, по вашему мнению, нам следует знать о вашей проблеме.
Reimage — запатентованная специализированная программа восстановления Windows. Он диагностирует ваш поврежденный компьютер. Он просканирует все системные файлы, библиотеки DLL и ключи реестра, которые были повреждены угрозами безопасности.Reimage — запатентованная специализированная программа восстановления Mac OS X. Он диагностирует ваш поврежденный компьютер. Он просканирует все системные файлы и ключи реестра, которые были повреждены угрозами безопасности.
Этот запатентованный процесс восстановления использует базу данных из 25 миллионов компонентов, которые могут заменить любой поврежденный или отсутствующий файл на компьютере пользователя.
Для восстановления поврежденной системы необходимо приобрести лицензионную версию Reimage инструмент для удаления вредоносных программ.
Нажмите
Условия использования Reimage | Политика конфиденциальности Reimage | Политика возврата денег за товар | Нажмите
VPN имеет решающее значение, когда дело доходит до конфиденциальность пользователя. Онлайн-трекеры, такие как файлы cookie, могут использоваться не только платформами социальных сетей и другими веб-сайтами, но также вашим интернет-провайдером и правительством. Даже если вы примените самые безопасные настройки через веб-браузер, вас все равно можно будет отслеживать через приложения, подключенные к Интернету. Кроме того, браузеры, ориентированные на конфиденциальность, такие как Tor, не являются оптимальным выбором из-за пониженной скорости соединения. Лучшее решение для вашей максимальной конфиденциальности — это Частный доступ в Интернет — быть анонимным и безопасным в сети.
Программное обеспечение для восстановления данных — один из вариантов, который может вам помочь восстановить ваши файлы. После удаления файла он не исчезает в воздухе — он остается в вашей системе до тех пор, пока поверх него не записываются новые данные. Восстановление данных Pro это программа для восстановления, которая ищет рабочие копии удаленных файлов на вашем жестком диске. Используя этот инструмент, вы можете предотвратить потерю ценных документов, школьных заданий, личных фотографий и других важных файлов.
Some Windows users are reporting a weird issue where the PC will hang indefinitely once they leave it in idle mode for a few minutes. The screen remains off (as if the computer is in Sleep mode) but won’t wake up regardless of what they do. Upon investigating the crash dump inside Event Viewer, most affected users are discovering a cryptic hardware error (LiveKernelEvent 193).
After we’ve investigated this issue thoroughly, it turns out that this particular issue is not exclusive to a certain Windows version. We’ve seen user reports of the LiveKernelEvent 193 error occurring on Windows 7, Windows 8.1, Windows 10, and even on Windows 11.
As it turns out, there are several common causes that are often responsible for this system crash. Here’s a list of potential culprits:
- Outdated or corrupted Intel Wi-Fi Driver – One of the most common causes that might be behind this behavior is an inconsistency with the dual-band wireless driver. Some users that we’re experiencing crashes with the LiveKernelEvent 193 error have confirmed that the issue was resolved completely after they’ve updated their Intel Wi-Fi driver with the latest compatible iteration.
- Common hardware inconsistency – It’s not uncommon to start facing this issue immediately after you connect a new peripheral. This issue is mostly reported to occur with new external drives that are just connected to a Windows 11 computer. You can typically resolve these by running the Hardware and Devices TroubleShooter and applying the recommended fix to enable your PC’s ability to auto-update with the newest drivers on all devices that are just connected.
- NordVPN incompatibility – If you have NordVPN installed and configured to open every time you boot up your Windows 11 computer, keep in mind that this unexpected system interrupts can be caused by an incompatibility between NordVPN and a kernel sub-process. In this case, the only viable fix is to uninstall the conflicting software (there might be other similar VPN tools that will produce the same behavior on Windows 11).
- Outdated chipset driver – Another indirect cause that might be a potential cause of these unexpected system crashes is an outdated chipset driver. If you only updated to Windows 11 recently and you started experiencing this issue immediately, you should update your chipset driver to the latest release compatible with Windows 11 – the instructions will be different depending on if you need the AMD or Intel drivers.
- System file corruption – In more serious circumstances, you can expect to see this error code occurring due to some type of system file corruption that is affecting the stability of your operating system. Several affected users have confirmed that the issue was finally resolved after they initiated a clean install or repair install (in-place repair) operation.
Now that you are familiar with every potential culprit that might be responsible for this issue, let’s go over some of the methods that other affected users have successfully used to get to the bottom of this issue.
Update the Intel Wi-Fi Driver (Windows 10 ONLY)
If you’re using Windows 10, the first thing you need to check is if you are using the latest version of the Dual-Band Wireless driver. Crashes of this kind happening during idle periods are typically associated with a legacy dual-band wireless driver. This issue is almost exclusive to laptops and ultrabooks.
In case you’re using a generic dual-band wireless driver, our recommendation is to install the latest stable version of the Intel Dual-Band Wireless-AC 3160 driver and see if the stability of your system improves.
Several users dealing with the same kind of issue have confirmed that after they’ve installed this Wireless driver the LiveKernelEvent 193 system crashes have completely stopped.
Follow the instructions below to install the Intel Wi-Fi Dual-Band driver:
- Open your default browser and visit the official download page of the Intel® Dual Band Wireless-AC driver.
- Once you’re inside this page, click on the View details button associated with the Family & Intel Dual-Band Wireless-Ac 3160 driver.
Accessing the View Details page of the driver - Inside the download page, click on the Download button associated with the architecture compatible with your operating system (32-bit and 64-bit).
Downloading the compatible bit driver version - At the next screen, click on I accept the terms in the license agreement, then wait until the download is complete.
- Once the driver is downloaded locally, double-click on it, then click on it, then click Yes at the User Account Control window to grant admin access.
- Follow the on-screen instructions to install the driver, then reboot your PC and see if the problem is fixed once the next startup is fixed.
If the problem is still not fixed or you were already using the latest driver version, move down to the next method below.
Run the Hardware and Devices troubleshooter
Keep in mind that the reason behind the apparition of this LiveKernelEvent 193 error is a scenario in which your Windows installation is not currently configured to check the most up-to-date drivers of any devices that get installed.
In case you recently connected an additional peripheral or a new external drive, chances are this is the reason why you are seeing the LiveKernelEvent 193.
In this scenario, the easiest way to fix the issue (plus a couple of additional possible scenarios) is to run the Hardware and Devices troubleshooter and apply the recommended fix.
Note: This tool is equipped with reelection of automated fixers that can be auto-applied in case a familiar scenario is identified.
Follow the instructions below to Run the hardware and devices troubleshooter:
- Open up a Run dialog box by pressing Windows key + R. Next, type ‘ms-settings:troubleshoot’ inside the text box and press Enter to open up the Hardware and Device Troubleshooter.
Accessing the Troubleshoot menu - Once you’re inside the Troubleshooting tab, click on Other troubleshooters from the menu on the right-hand pane.
Accessing the Other Troubleshooters tab - Next, once see the entire list of additional troubleshooter, scroll under Find and fix other problems, then expand the listing associated with Hardware and Devices, then click on Run the troubleshooter.
Run the Hardware troubleshooter - Inside the Hardware and Devices troubleshooter, wait patiently until the initial scan is complete.
- If the utility discovers the same problem that we’re suspecting, you’ll need to click on Enable in order to configure your Windows installation to always search for new driver signatures when new hardware is connected.
Enable the Hardware and Devices menu Note: If a different solution is recommended, click on Apply this fix or follow the on-screen instructions to enforce the fix.
- After the fix is successfully applied, reboot your computer and see if the issue is fixed after you restart your PC again.
In case you’re still dealing with the same LiveKernelEvent 193 error, move down to the next method below.
Uninstall NordVPN (if applicable)
As it turns out, you can also expect to face the LiveKernelEvent 193 type of crash in a scenario in which your network driver conflicts with a background process of NordVPN. This problem is typically associated with a 100% CPU usage of the System Interrupts process while the computer hangs indefinitely.
In case the scenario above sounds familiar and you have NortVPN installed and configured to open along with every system startup, chances are you’re dealing with the same kind of conflict.
To fix this issue, you will need to uninstall your current version of NordVPN and install the latest version (after a system reboot):
- Press Windows key + R to open up a Run dialog box. Next, type ‘appwiz.cpl’ inside the text box and press Enter to open up the Programs and Features menu.
Open up the Programs and Features menu - Once you’re inside the Programs and Features menu, scroll down through the list of installed programs and locate the entry associated with NordVPN.
- After you locate the correct listing, right-click on NordVPN and choose Uninstall from the context menu.
Uninstalling the NordVPN - Follow the uninstallation prompts to uninstall NordVPN and get rid of the custom network settings, then reboot your PC.
- Once your Windows computer boots back up, see if the same LiveKernelEvent 193 error is still occurring.
If the problem is still not fixed or this method was not applicable, follow the next instructions below.
Update the Chipset drivers
Another potential culprit that might indirectly cause the LiveKernelEvent 193 error is an incompatible or outdated chipset driver.
Note: Chipset drivers are mainly responsible for controlling and managing the communications between the processor, the GPU, the hard drive, and the system memory.
Improper chipset drivers can make your system unstable to resource-intensive tasks which might end up causing the LiveKernelEvent 193 error. As it turns out, this problem is mostly reported to occur with laptops, ultrabooks, and notebooks.
Fortunately, if this scenario is applicable and you’re actually dealing with an improper chipset driver, you should be able to fix the issue by updating your chipset drivers to the latest compatible version.
But keep in mind that the process of updating your chipset drivers will be different depending on if you’re using hardware compatible with AMD or Intel.
To cover both potential scenarios, we’ve created two separate guides that will walk you through the process of updating your chipset driver with AMD or Intel equivalents.
Update the AMD Chipset driver
- Start by opening your default browser and accessing the download page of AMD Drivers and Support page.
- Next, scroll all the way down to the Search for your product section.
- Once you’re inside the Search for your product section, choose Chipsets from the column on the left, then pick the appropriate processor socket from the column on the right.
- Select your processor from the third column, then click on Submit to get a list of the compatible chipset drivers.
Finding the correct AMD chipset driver - After you hit the Submit button, you will be redirected to a page where you can download the chipset driver. Once you’re inside, expand the drop-down menu associated with your compatible OS architecture and click on the Download button from the newly appeared menu.
Downloading the latest chipset driver - After the download is finally complete, go ahead and double-click on the chipset driver installer, then click on Yes once you’re prompted by the User Account Control window.
- Inside the chipset driver installer window, follow the on-screen instructions to update your chipset drivers to the latest version available.
Install the latest Chipset Driver - Follow the on-screen instructions to complete the installation, then reboot your computer one final time and see if the LiveKernelEvent 193 error is now fixed.
Update the Intel Chipset driver
- Open your browser and visit the download page of the Chipset INF Utility.
- Inside the correct download page, click on the Download button (top-right corner of the screen).
Downloading the chipset utility - Once you get to the next screen, click on I accept the terms in the license agreement to agree with the Terms of Licensing.
Accepting the Terms of Licensing - After a few seconds, the download should start automatically – wait until the archive is downloaded locally, then use an extraction utility (like 7Zip, WinZip or Winrar) to extract the contents of the chipset driver updater software.
- Once the contents of the archive are extracted, double-click on the SetupChipset.exe executable, then follow the on-screen prompts to install the latest chipset driver.
Installing the chipset driver - Once the chipset driver has been installed, reboot your PC and see if the error is fixed starting with the next system startup.
In case you’re still experiencing system crashes pointing towards the same LiveKernelEvent 193 error, move down to the next method below
Update BIOS drivers
Another possible scenario (particularly if you’ve just recently upgraded to Windows 11) is an outdated BIOS driver that is not yet updated to accommodate the new OS.
System instability caused by an outdated BIOS version is not that uncommon, especially on legacy motherboards.
Keep In mind that updating the BIOS version on your motherboard is not that hard as it used to be – as of now, every major motherboard manufacturer has developed a flashing utility that will help you update your BIOS without getting too technical.
The best course of action is to head over to your motherboard manufacturer’s website and check the Drivers Download page for a BIOS updating utility – ASUS has E-Z Flash, MSI has MFlash, Gigabyte has @BIOS Live Update, etc.
Note: Regardless of your BIOS manufacturer, make sure you read the official documentation thoroughly before starting the operation of updating your BIOS. Doing this process incorrectly might result in you bricking the hardware which will require the intervention of a skilled technician.
Follow the on-screen instructions to update your BIOS version to the latest, then reboot your PC and see if the LiveKernelEvent 193 error is fixed.
In case you already had the latest version of BIOS for your motherboard or this method was not applicable, move down to the final fix below.
Clean install or Repair install
If none of the methods above have proven to be effective in your case and you’ve ruled out the possibility of a hardware issue, the only possible explanation for this LiveKernelEvent 193 error leading to a system crash is underlying system file corruption.
Since there are literally tens of thousands of possible culprits, the most efficient way of ensuring that your system doesn’t crash with this error due to system file corruption is to replace every Windows file with a healthy equivalent.
When it comes to doing this, you have two ways forward:
- Clean install – This operation is the easiest out of the bunch, but you’ll need to be prepared to lose any personal data present on the operating system drive. This is the equivalent of installing Windows from scratch, so make sure to back up your data if you’re currently storing any sensitive drive on the OS drive before starting this operation.
- Repair install – If you have the time to go for this method you should – this operation will only replace your Windows system files while allowing you to keep everything else. By repair installing (in-place repairing) you get to keep your personal files, applications, games, and even some user settings that are currently stored on the OS drive.
Добрый день. Вчера я брал с собой ноутбук, и, придя домой обнаружил странную проблему — мой диск загружен
на 100%. Я запустил игру, и он намертво повис. Я ребутнул его, и попробовал еще раз — результат тот же. После очередной попытки запустить какую-нибудь весомую игру я получил синий экран с ошибкой «VIDEO_SCHEDULER_INTERNAL_ERROR», после
чего драйвер на видеокарту GeForce GTX 850m слетел, а на дискретную остался. А точнее, система его просто отключила из-за ошибки. Я заново установил драйвер (через пункт «обновление — установка с компьютера — выбрал ту же видеокарту, которая
была), установка прошла успешно, ошибка пропала. После перезагрузки я проделал абсолютно все, что рекомендуют в интернете — выключил индексацию файлов, superfetch, дал приоритет процессу system, пользовался командой SFC /SCANNOW, которая не обнаружила
ошибок. Пользовался программой для проверки диска, и он выдал, что диск в «хорошем» состоянии. Встроенная программа для проверки ошибок диска так же не нашла проблем. В общем, что бы я не делал — диск был
загружен на 100%. Но сегодня утром я обнаружил, что диск загружен в пределах нормы, и драйвера на видеокарту не выдают ошибки. Однако в, например, Everest’е показывается, что у меня только одна, встроенная видеокарта. И при запуске
игры, например, все так же зависает. (буквально 5-10 секунд нормально все, а потом просто умирает). Но сейчас зависает не намертво, а я могу свернуть и закрыть процесс.
UPD #1.
Запустив 3D-игру наблюдал на своем экране артефакты в виде разноцветных квадратов хаотично разбросанных по экрану. Похоже, скорее всего, на программные артефакты, т.к. в программах Adobe и любых иных действий никаких артефактов
не возникает (даже при запуске с проблемной видеокарты). Но есть ли связь между этим и 100%-тной загрузкой диска?
UPD #2.
Переустановил Windows, установил все драйвера заново — пропала проблема с 100%-тной загрузкой диска, но осталась проблема с зависанием при запуске тяжелых 3D игр.
А в отчетах об ошибках Windows, когда компьютер именно намертво зависает наблюдается следующий отчет:
Кликните здесь для просмотра всего текста
Источник
Windows
Сводка
Ошибка оборудования
Дата
28.05.2017 15:26
Состояние
Отчет не отправлен
Описание
Ошибка при работе с устройствами привела к некорректной работе Windows.
Сигнатура проблемы
Имя проблемного события: LiveKernelEvent
Код: 141
Параметр 1: ffffc501d36441d0
Параметр 2: fffff80f2e16e060
Параметр 3: 0
Параметр 4: 1f38
Версия ОС: 10_0_14393
Пакет обновления: 0_0
Продукт: 768_1
Версия ОС: 10.0.14393.2.0.0.768.100
Код языка: 1049
Везде в интернете пишут, что это проблема именно с драйверами, но не понимаю, какие могут быть
проблемы на чистой системе?
Добавлено через 7 минут
А при запуске какой-нибудь весомой игры, которая зависает без полного зависания ноутбука отчет следующий:
Кликните здесь для просмотра всего текста
Ошибка привела к остановке взаимодействия программы с Windows.
Неправильный путь приложения: D:GamesCities Skylines — Deluxe EditionCities.exe
Сигнатура проблемы
Имя проблемного события: AppHangB1
Имя приложения: Cities.exe
Версия приложения: 5.5.3.12160
Отметка времени приложения: 58d80a1e
Сигнатура зависания: 004e
Тип зависания: 67246080
Версия ОС: 10.0.14393.2.0.0.768.100
Код языка: 1049
Доп. сигнатура зависания 1: 004e570b9e7d543fffb4ea0f3454feca
Доп. сигнатура зависания 2: 504d
Доп. сигнатура зависания 3: 504d89c3ccd10f25ffa0c91f28b0d8d8
Доп. сигнатура зависания 4: 004e
Доп. сигнатура зависания 5: 004e570b9e7d543fffb4ea0f3454feca
Доп. сигнатура зависания 6: 504d
Доп. сигнатура зависания 7: 504d89c3ccd10f25ffa0c91f28b0d8d8
Дополнительные сведения о проблеме
ИД контейнера: e5dba62fd6426fa99dbba047749b243c (129459179346)
Казалось бы, причем здесь неправильный путь?
В играх на низких настройках на проблемной видеокарте все, в принципе, загружается нормально. Но что случилось с ней, если раньше она работала на намного более высоких настроках?
-
Изменено
28 мая 2017 г. 18:54
Question
Issue: [Fix] Live Kernel Event Code 193 on Windows
Hello. My PC often freezes up without any warning, even when I’m not doing anything. I am afraid if it keeps doing that it will ruin my whole PC. I checked it out and got this – “A problem with your hardware caused Windows to stop working correctly.” Is this fixable?
Solved Answer
Windows is an extremely complicated system that depends on thousands of processes running in the background to keep it running smoothly. If even one of these goes rogue, users can experience various bugs and errors. Sometimes the issues can also be caused by hardware, which means that simple OS troubleshooting[1] would not work.
Some Windows users have reported a strange problem with their PC where once they leave it in idle mode[2] for a short period of time. When they come back, the screen remains off and will not turn on no matter what they do. When users go to investigate in the Event Viewer, they discover a hardware error:
Description: A problem with your hardware caused Windows to stop working correctly.
Problem Event Name: LiveKernelEvent
Code: 193
There are many possibilities why you could be experiencing this. For some people, running a simple automatic troubleshooter could be enough, and for the other ones, a hardware replacement could be required. In this post, you will find a couple of steps that you can perform to try to fix the Live Kernel Event Code 193.
![[Fix] Live Kernel Event Code 193 on Windows](https://ugetfix.com/wp-content/uploads/articles/askit/fix-live-kernel-event-code-193-on-windows_en.jpg "[Fix] Live Kernel Event Code 193 on Windows")
In this article, we provide a couple of possible solutions for the Live Kernel Event Code 193 on Windows. Depending on the severity of your issue, a simple scan could be enough, or you might have to reinstall Windows completely. If your PC is still functional, you can try using a repair tool ReimageMac Washing Machine X9 to avoid going through all the possible fixes. This powerful software can fix various system errors, corrupted files, BSODs[3] and optimize the machine for maximum performance.
You can start the process step-by-step, make sure to pay close attention:
Method 1. Run the Hardware and Devices troubleshooter
Fix it now!
Fix it now!
To repair damaged system, you have to purchase the licensed version of Reimage Reimage.
- Open up a Run dialog box by pressing Windows key + R
- Type ms-settings:troubleshoot inside the text box and press Enter to open up the Hardware and Device Troubleshooter
- Click on Other troubleshooters from the menu on the right-hand pane

- Scroll under Find and fix other problems, then expand the listing associated with Hardware and Devices, then click on Run the troubleshooter
- Inside the Hardware and Devices troubleshooter, wait patiently until the initial scan is complete
- Click on Enable in order to configure your Windows installation to always search for new driver signatures when new hardware is connected
- Reboot your computer and see if the issue is fixed
Method 2. Update the Intel Wi-Fi Driver for Windows 10
Fix it now!
Fix it now!
To repair damaged system, you have to purchase the licensed version of Reimage Reimage.
- Open your default browser and visit the official download page of the Intel Dual Band Wireless-AC driver
- Click on the View details button associated with the Family & Intel Dual-Band Wireless-Ac 3160 driver
- Press on the Download button associated with the architecture compatible with your operating system
- Click on I accept the terms in the license agreement, then wait until the download is complete

- Once the driver is downloaded locally, double-click on it, then press Yes at the User Account Control window to grant admin access
- Follow the on-screen instructions to install the driver, then reboot your PC and see if the problem is fixed
Method 3. Update the Chipset drivers
Fix it now!
Fix it now!
To repair damaged system, you have to purchase the licensed version of Reimage Reimage.
Improper chipset drivers can make your system unstable to resource-intensive tasks which might end up causing the LiveKernelEvent 193 error. You should be able to fix the issue by updating your chipset drivers to the latest compatible version.
AMD Chipset driver
- Start by opening your default browser and accessing the download page of AMD Drivers and Support page
- Next, scroll all the way down to the Search for your product section

- Choose Chipsets from the column on the left, then pick the appropriate processor socket from the column on the right
- Select your processor from the third column, then click on Submit to get a list of the compatible chipset drivers
- After you hit the Submit button, you will be redirected to a page where you can download the chipset driver
- Once you’re inside, expand the drop-down menu associated with your compatible OS architecture and click on the Download button from the newly appeared menu
- After the download is finally complete, go ahead and double-click on the chipset driver installer, then click on Yes once you’re prompted by the User Account Control window
- Inside the chipset driver installer window, follow the on-screen instructions to update your chipset drivers to the latest version available
- Follow the on-screen instructions to complete the installation, then reboot your computer one final time and see if the LiveKernelEvent 193 error is now fixed
Intel Chipset driver
- Open your browser and visit the download page of the Chipset INF Utility
- Inside the correct download page, click on the Download button
- Click on I accept the terms in the license agreement to agree with the Terms of Licensing

- Wait until the archive is downloaded locally, then use an extraction utility (like 7Zip, WinZip or Winrar) to extract the contents of the chipset driver updater software
- Once the contents of the archive are extracted, double-click on SetupChipset.exe, then follow the on-screen prompts to install the latest chipset driver
- Reboot your PC and see if the error is fixed
Method 4. Update BIOS drivers
Fix it now!
Fix it now!
To repair damaged system, you have to purchase the licensed version of Reimage Reimage.
- The best course of action is to head over to your motherboard manufacturer’s website and check the Drivers Download page for a BIOS updating utility – ASUS has E-Z Flash, MSI has MFlash, Gigabyte has @BIOS Live Update, etc

- Follow the on-screen instructions to update your BIOS version to the latest, then reboot your PC and see if the LiveKernelEvent 193 error is fixed
Method 5. Reinstall Windows
Fix it now!
Fix it now!
To repair damaged system, you have to purchase the licensed version of Reimage Reimage.
If all else fails and you can’t even reset your Windows computer, you can reinstall the OS entirely. You won’t even need an activation number or any proof of purchase, either. Just make sure you have more than 4GB of space available, as that’s how much space the file you’ll download takes up. Here’s how to reinstall Windows 10:
- Download the ISO file
- Select Create installation media for another PC and click Next
- Select ISO file and click Next
- Click Finish
- Open the Windows ISO file you downloaded

- Open Setup and click Next
- Click Accept (Be prepared to wait; this next part may take a while)
- Click Install
- Wait for your system to restart and install Windows
Repair your Errors automatically
ugetfix.com team is trying to do its best to help users find the best solutions for eliminating their errors. If you don’t want to struggle with manual repair techniques, please use the automatic software. All recommended products have been tested and approved by our professionals. Tools that you can use to fix your error are listed bellow:
do it now!
Download Fix
Happiness
Guarantee
do it now!
Download Fix
Happiness
Guarantee
Compatible with Microsoft Windows
Compatible with OS X
Still having problems?
If you failed to fix your error using Reimage, reach our support team for help. Please, let us know all details that you think we should know about your problem.
Reimage — a patented specialized Windows repair program. It will diagnose your damaged PC. It will scan all System Files, DLLs and Registry Keys that have been damaged by security threats.Reimage — a patented specialized Mac OS X repair program. It will diagnose your damaged computer. It will scan all System Files and Registry Keys that have been damaged by security threats.
This patented repair process uses a database of 25 million components that can replace any damaged or missing file on user’s computer.
To repair damaged system, you have to purchase the licensed version of Reimage malware removal tool.

A VPN is crucial when it comes to user privacy. Online trackers such as cookies can not only be used by social media platforms and other websites but also your Internet Service Provider and the government. Even if you apply the most secure settings via your web browser, you can still be tracked via apps that are connected to the internet. Besides, privacy-focused browsers like Tor is are not an optimal choice due to diminished connection speeds. The best solution for your ultimate privacy is Private Internet Access – be anonymous and secure online.
Data recovery software is one of the options that could help you recover your files. Once you delete a file, it does not vanish into thin air – it remains on your system as long as no new data is written on top of it. Data Recovery Pro is recovery software that searchers for working copies of deleted files within your hard drive. By using the tool, you can prevent loss of valuable documents, school work, personal pictures, and other crucial files.
 Просматривая отчеты о проблемах в центре безопасности и обслуживания или монитор стабильности системы Windows 10, Windows 11 и предыдущих версий ОС, особенно при сбоях работы компьютера или ноутбука пользователи могут обнаружить ошибку оборудования, для которого указано имя проблемного события LiveKernelEvent и код 141, 144, 117 и другие.
В этой инструкции подробно о том, чем может быть вызвана проблема, как можно разобраться, какое именно оборудование вызвало ошибку и исправить проблему.
Ошибка оборудования LiveKernelEvent код 141, 144 и другие в Windows 10 и Windows 11
Указанная ошибка прямо говорит о том, что при работе какого-либо оборудования произошел сбой: неправильная работа драйверов, выключение по какой-либо причине (недостаток питания, аппаратные проблемы) или что-то ещё. Чаще всего причина в драйвере.
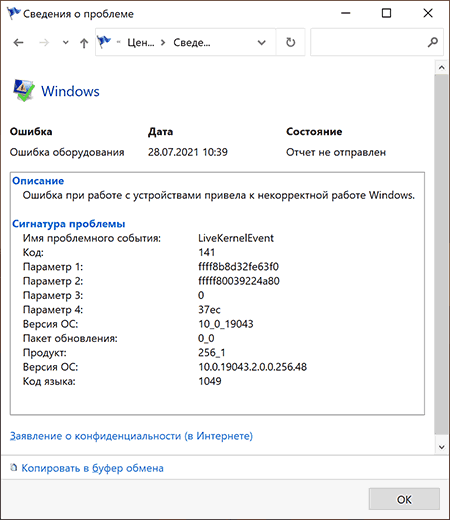
Иногда, в описании ошибки ниже сигнатуры проблемы указываются дополнительные сведения, в которых можно найти указание на файл драйвера, например, начинающегося с букв «nv» (что говорит об оборудовании от NVIDIA, для других файлов можно найти сведения о назначении в Интернете), но эта информация не всегда присутствует. В этом случае можно попробовать подробнее узнать о том, что именно вызвало ошибку.
- Обратите внимание на дату и время ошибки оборудования LiveKernelEvent.
- Запустите «Просмотр событий», для этого используйте поиск или нажмите клавиши Win+R на клавиатуре, введите eventvwr.msc и нажмите Enter.
- В просмотре событий перейдите в «Журналы Windows» — «Система».
- В панели справа нажмите «Фильтр текущего журнала», а затем в поле «Дата» установите настраиваемый диапазон, укажите «Событие» в полях «Начало и конец», а затем — дату события LiveKernelEvent и конкретное время, захватив всю минуту, когда оно произошло, пример — на изображении ниже.

- Выполните фильтрацию событий по указанному времени и изучите предупреждения в этот период — они могут дать более полную информацию.


Например, для представленных выше скриншотов мы видим, что ошибка вызвана драйвером видеокарты и действительно — драйвер видеокарты или проблемы с её работой (например, вызванные разгоном или недостатком питания при высокой нагрузке) действительно являются наиболее частой причиной ошибки оборудования, регистрируемой как LiveKernelEvent.
Однако, здесь мы видим важный нюанс: как правило, при подозрении на проблемы с видеокартой пользователь пробует полностью удалить её драйверы (например, с помощью DDU), установить заново официальные драйверы, обновить их с официального сайта, но делает акцент только на дискретной видеокарте. Здесь же в просмотре событий видно, что речь идёт об интегрированном видео (igfx), о котором часто забывают и не выполняют для него те же процедуры, что и для дискретной видеокарты.
Так или иначе в приведенном примере мы увидели, что драйвер IGFX (интегрированное видео) перестал отвечать и был восстановлен и можем применить методы для этого случая — Что делать, если видеодрайвер перестал отвечать и был восстановлен в Windows.
Способы исправить ошибку
В зависимости от конкретной ситуации возможны следующие методы исправления ошибки оборудования LiveKernelEvent:
- Если известно, какое оборудование вызвало проблему, особенно если речь идет о видеокарте — установить оригинальные драйверы на него (вручную скачав с официального сайта и установив, а не с помощью кнопки «Обновить» в диспетчере устройств), отключить разгон (если включали), убедиться, что устройство правильно подключено (плотно сидит в разъёме, при необходимости подключено дополнительное питание).
- В случае если ошибка возникает в конкретной игре или программе — не исключено, что это особенности работы самой программы (особенно, если это что-то нелицензионное) с этим оборудованием или же в ней заданы параметры, которые на вашем железе приводят к сбоям.
- При нерегулярности сбоя LiveKernelEvent учитывайте, что такого рода сбои могут происходить при автоматическом обновлении драйверов (здесь можно не обращать внимания), а также в случаях, когда блок питания компьютера не может обеспечить нужную мощность при пиковых нагрузках.
- Если после перезагрузки ошибка не возникает, а после завершения работы и включении может появиться снова, попробуйте отключить быстрый запуск.
- В случае, если ошибка стала появляться недавно, а замены оборудования не производилось, могут помочь точки восстановления системы.
- Может иметь смысл проверить целостность системных файлов Windows.
- Установка последних обновлений Windows 10 или Windows 11, а при наличии — обновлений BIOS также может сработать для некоторых случаев появления ошибки.