Одно из самых важных устройств компьютера — это жесткий диск, именно на нём хранится операционная система и вся ваша информация. Единица хранения информации на жестком диске — сектор или блок. Это одна ячейка в которую записывается определённое количество информации, обычно это 512 или 1024 байт.
Битые сектора, это повреждённые ячейки, которые больше не работают по каким либо причинам. Но файловая система всё ещё может пытаться записать в них данные. Прочитать данные из таких секторов очень сложно, поэтому вы можете их потерять. Новые диски SSD уже не подвержены этой проблеме, потому что там существует специальный контроллер, следящий за работоспособностью ячеек и перемещающий данные из нерабочих в рабочие. Однако традиционные жесткие диски используются всё ещё очень часто. В этой статье мы рассмотрим как проверить диск на битые секторы Linux.
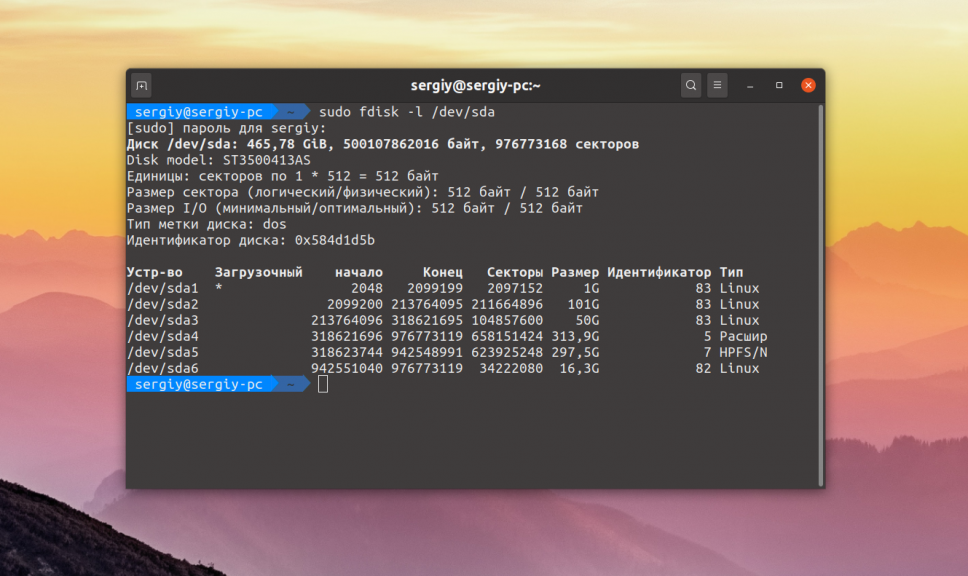
Для поиска битых секторов можно использовать утилиту badblocks. Если вам надо проверить корневой или домашний раздел диска, то лучше загрузится в LiveCD, чтобы файловая система не была смонтирована. Все остальные разделы можно сканировать в вашей установленной системе. Вам может понадобиться посмотреть какие разделы есть на диске. Для этого можно воспользоваться командой fdisk:
sudo fdisk -l /dev/sda1
Или если вы предпочитаете использовать графический интерфейс, это можно сделать с помощью утилиты Gparted. Просто выберите нужный диск в выпадающем списке:
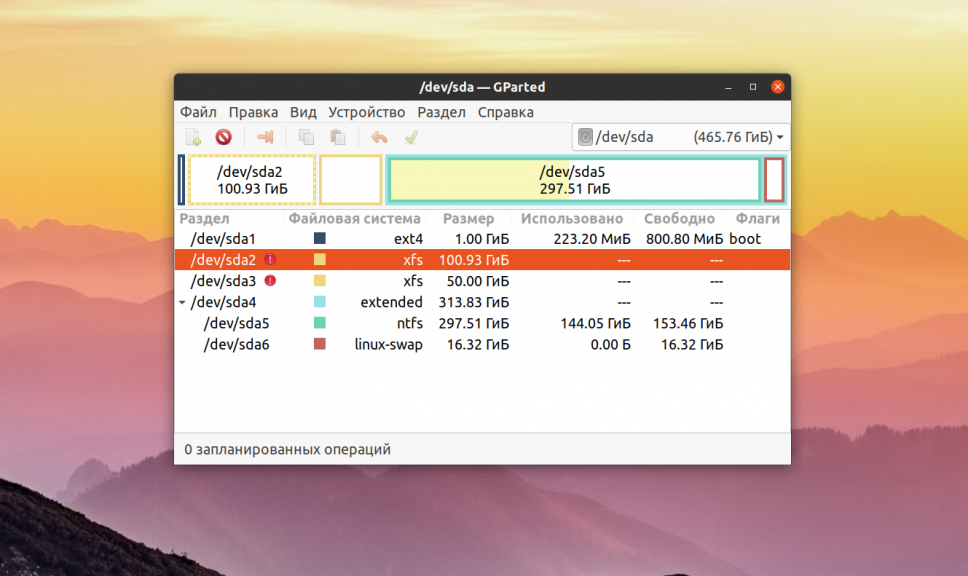
В этом примере я хочу проверить раздел /dev/sda2 с файловой системой XFS. Как я уже говорил, для этого используется команда badblocks. Синтаксис у неё довольно простой:
$ sudo badblocks опции /dev/имя_раздела_диска
Давайте рассмотрим опции программы, которые вам могут понадобится:
- -e — позволяет указать количество битых блоков, после достижения которого дальше продолжать тест не надо;
- -f — по умолчанию утилита пропускает тест с помощью чтения/записи если файловая система смонтирована чтобы её не повредить, эта опция позволяет всё таки выполнять эти тесты даже для смонтированных систем;
- -i — позволяет передать список ранее найденных битых секторов, чтобы не проверять их снова;
- -n — использовать безопасный тест чтения и записи, во время этого теста данные не стираются;
- -o — записать обнаруженные битые блоки в указанный файл;
- -p — количество проверок, по умолчанию только одна;
- -s — показывать прогресс сканирования раздела;
- -v — максимально подробный режим;
- -w — позволяет выполнить тест с помощью записи, на каждый блок записывается определённая последовательность байт, что стирает данные, которые хранились там раньше.
Таким образом, для обычной проверки используйте такую команду:
sudo badblocks -v /dev/sda2 -o ~/bad_sectors.txt
Это безопасно и её можно выполнять на файловой системе с данными, она ничего не повредит. В принципе, её даже можно выполнять на смонтированной файловой системе, хотя этого делать не рекомендуется. Если файловая система размонтирована, можно выполнить тест с записью с помощью опции -n:
sudo badblocks -vn /dev/sda2 -o ~/bad_sectors.txt
После завершения проверки, если были обнаружены битые блоки, надо сообщить о них файловой системе, чтобы она не пыталась писать туда данные. Для этого используйте утилиту fsck и опцию -l:
fsck -l ~/bad_sectors.txt /dev/sda1
Если на разделе используется файловая система семейства Ext, например Ext4, то для поиска битых блоков и автоматической регистрации их в файловой системе можно использовать команду e2fsck. Например:
sudo e2fsck -cfpv /dev/sda1
Параметр -с позволяет искать битые блоки и добавлять их в список, -f — проверяет файловую систему, -p — восстанавливает повреждённые данные, а -v выводит всё максимально подробно.
Выводы
В этой статье мы рассмотрели как выполняется проверка диска на битые секторы Linux, чтобы вовремя предусмотреть возможные сбои и не потерять данные. Но на битых секторах проблемы с диском не заканчиваются. Там есть множество параметров стабильности работы, которые можно отслеживать с помощью таблицы SMART. Читайте об этом в статье Проверка диска в Linux.
Обнаружили ошибку в тексте? Сообщите мне об этом. Выделите текст с ошибкой и нажмите Ctrl+Enter.
Об авторе
![]()
Основатель и администратор сайта losst.ru, увлекаюсь открытым программным обеспечением и операционной системой Linux. В качестве основной ОС сейчас использую Ubuntu. Кроме Linux, интересуюсь всем, что связано с информационными технологиями и современной наукой.
Throughout this answer I’ll assume, that a storage drive appears as a block device at the path /dev/sdc. To find the path of a storage drive in our current setup, use:
- Gnome Disks
 (formerly Gnome Disk Utility, a. k. a.
 palimpsest), if a GUI is available, or - on the terminal look at the output of
lsblkandls -l /dev/disk/by-idand try to find the right device by size, partitioning, manufacturer and model name.
Basic check
- only detects entirely unresponsive media
- almost instantaneous (unless medium is spun down or broken)
- safe
- works on read-only media (e. g. CD, DVD, BluRay)
Sometimes a storage medium simply refuses to work at all. It still appears as a block device to the kernel and in the disk manager, but its first sector holding the partition table is not readable. This can be verified easily with:
sudo dd if=/dev/sdc of=/dev/null count=1
If this command results in a message about an “Input/output error”, our drive is broken or otherwise fails to interact with the Linux kernel as expected. In the a former case, with a bit of luck, a data recovery specialist with an appropriately equipped lab can salvage its content. In the latter case, a different operating system is worth a try. (I’ve come across USB drives that work on Windows without special drivers, but not on Linux or OS X.)
S.M.A.R.T. self-test
- adjustable thoroughness
- instantaneous to slow or slower (depends on thoroughness of the test)
- safe
- warns about likely failure in the near future
Devices that support it, can be queried about their health through S.M.A.R.T. or instructed to perform integrity self-tests of different thoroughness. This is generally the best option, but usually only available on (non-ancient) hard disk and solid state drives. Most removable flash media don’t support it.
Further resources and instructions:
- Answer about S.M.A.R.T. on this question
- How can I check the SMART status of a drive on Ubuntu 14.04 through 16.10?
Read-only check
- only detects some flash media errors
- quite reliable for hard disks
- slow
- safe
- works on read-only media (e. g. CD, DVD, BluRay)
To test the read integrity of the whole device without writing to it, we can use badblocks(8) like this:
sudo badblocks -b 4096 -c 4096 -s /dev/sdc
This operation can take a lot of time, especially if the storage drive actually is damaged. If the error count rises above zero, we’ll know that there’s a bad block. We can safely abort the operation at any moment (even forcefully like during a power failure), if we’re not interested in the exact amount (and maybe location) of bad blocks. It’s possible to abort automatically on error with the option -e 1.
Note for advanced usage: if we want to reuse the output for e2fsck, we need to set the block size (-b) to that of the contained file system. We can also tweak the amount of data (-c, in blocks) tested at once to improve throughput; 16 MiB should be alright for most devices.
Non-destructive read-write check
- very thorough
- slowest
- quite safe (barring a power failure or intermittent kernel panic)
Sometimes – especially with flash media – an error only occurs when trying to write. (This will not reliably discover (flash) media, that advertise a larger size, than they actually have; use Fight Flash Fraud instead.)
-
NEVER use this on a drive with mounted file systems!
badblocksrefuses to operate on those anyway, unless you force it. -
Don’t interrupt this operation forcefully! Ctrl+C (SIGINT/SIGTERM) and waiting for graceful premature termination is ok, but
killall -9 badblocks(SIGKILL) isn’t. Upon forceful terminationbadblockscannot restore the original content of the currently tested block range and will leave it overwritten with junk data and possibly corrupt the file system.
To use non-destructive read-write checks, add the -n option to the above badblocks command.
Destructive read-write check
- very thorough
- slower
- ERASES ALL DATA ON THE DRIVE
As above, but without restoring the previous drive content after performing the write test, therefore it’s a little faster. Since data is erased anyway, forceful termination remains without (additional) negative consequence.
To use destructive read-write checks, add the -w option to the above badblocks command.

Задать вопрос
Наши специалисты ответят на любой интересующий вопрос по услуге
В Linux-системах есть утилита fsck, она служит для проверки файловой системы. Операционная система периодически самостоятельно выполняет проверку. Но часто бывает так что проверить файловую систему требуется принудительно. Естественно, выполнить полноценную проверку на смонтированных разделах не получится.
В таком случае стоит использовать такой простой способ:
sudo touch /forcefsck
Эта команда создаст в корне диска файл с названием /forcefsck, который укажет системе, что при старте следует проверить файловую систему на дисках, указанных в /etc/fstab.
Выше описанное, касается системных разделов, которые нельзя отмонтировать для проверки. Если Вы хотите проверить диски, которые можно отмонтировать, то после из размонтирования можно сделать так:
fsck -y /dev/имя-диска
К этому можно добавить несколько ключей:
fsck -y -c -f /dev/имя-диска
ключ «-y» означает согласие на вопросы утилиты по-ходу работы.
ключ «-c» утилита ищет, и если находит, то перенесит bad-блоки в badblock-лист. (remap в victoria)
ключ «-f» форсирует выполнение проверки
Утилита GParted проверяет диск так:
e2fsck -f -y -v -C 0 /dev/имя-диска
Заказать услугу
Оформите заявку на сайте, мы свяжемся с вами в ближайшее время и ответим на все интересующие вопросы.
|
|
Duplicate Article |

See: SystemAdministration/Fsck and TestingStorageMedia
Introduction
Contents
- Introduction
-
Basic filesystem checks and repairs
- e2fsprogs — ext2, ext3, ext4 filesystems
- dosfstools — FAT12, FAT16 and FAT32 (vfat) filesystem
- ntfs-3g (previously also ntfsprogs) — NTFS filesystem
- reiserfstools — reiserfs
- xfsprogs — xfs
- Missing superblock
- Bad blocks
- Sources and further reading
This guide will help diagnose filesystem problems one may come across on a GNU/Linux system. New sections are still being added to this howto.
Basic filesystem checks and repairs
The most common method of checking filesystem’s health is by running what’s commonly known as the fsck utility. This tool should only be run against an unmounted filesystem to check for possible issues. Nearly all well established filesystem types have their fsck tool. e.g.: ext2/3/4 filesystems have the e2fsck tool. Most notable exception until very recently was btrfs. There are also filesystems that do not need a filesystem check tool i.e.: read-only filesystems like iso9660 and udf.
e2fsprogs — ext2, ext3, ext4 filesystems
Ext2/3/4 have the previously mentioned e2fsck tool for checking and repairing filesystem. This is a part of e2fsprogs package — the package needs to be installed to have the fsck tool available. Unless one removes it in aptitude during installation, it should already be installed.
There are 4 ways the fsck tool usually gets run (listed in order of frequency of occurrence):
- it runs automatically during computer bootup every X days or Y mounts (whichever comes first). This is determined during the creation of the filesystem and can later be adjusted using tune2fs.
- it runs automatically if a filesystem has not been cleanly unmounted (e.g.: powercut)
- user runs it against an unmounted filesystem
-
user makes it run at next bootup
case 1
When filesystem check is run automatically X days after the last check or after Y mounts, Ubuntu gives user the option to interrupt the check and continue bootup normally. It is recommended that user lets it finish the check.
case 2
If a filesystem has not been cleanly unmounted, the system detects a dirty bit on the filesystem during the next bootup and starts a check. It is strongly recommended that one lets it finish. It is almost certain there are errors on the filesystem that fsck will detect and attempt to fix. Nevertheless, one can still interrupt the check and let the system boot up on a possibly corrupted filesystem.
2 things can go wrong
-
fsck dies — If fsck dies for whatever reason, you have the option to press ^D (Ctrl + D) to continue with an unchecked filesystem or run fsck manually. See e2fsck cheatsheet for details how.
-
fsck fails to fix all errors with default settings — If fsck fails to fix all errors with default settings, it will ask to be run manually by the user. See e2fsck cheatsheet for details how.
case 3
User may run fsck against any filesystem that can be unmounted on a running system. e.g. if you can issue umount /dev/sda3 without an error, you can run fsck against /dev/sda3.
case 4
You can make your system run fsck by creating an empty ‘forcefsck’ file in the root of your root filesystem. i.e.: touch /forcefsck Filesystems that have 0 or nothing specified in the sixth column of your /etc/fstab, will not be checked
Till Ubuntu 6.06 you can also issue shutdown -rF now to reboot your filesystem and check all partitions with non-zero value in sixth column of your /etc/fstab. Later versions of Ubuntu use Upstart version of shutdown which does not support the -F option any more.
Refer to man fstab for what values are allowed.
e2fsck cheatsheet
e2fsck has softlinks in /sbin that one can use to keep the names of fsck tools more uniform. i.e. fsck.ext2, fsck.ext3 and fsck.ext4 (similarly, other filesystem types have e.g.: fsck.ntfs) This cheatsheet will make use of these softlinks and will use ext4 and /dev/sda1 as an example.
-
fsck.ext4 -p /dev/sda1 — will check filesystem on /dev/sda1 partition. It will also automatically fix all problems that can be fixed without human intervention. It will do nothing, if the partition is deemed clean (no dirty bit set).
-
fsck.ext4 -p -f /dev/sda1 — same as before, but fsck will ignore the fact that the filesystem is clean and check+fix it nevertheless.
-
fsck.ext4 -p -f -C0 /dev/sda1 — same as before, but with a progress bar.
-
fsck.ext4 -f -y /dev/sda1 — whereas previously fsck would ask for user input before fixing any nontrivial problems, -y means that it will simply assume you want to answer «YES» to all its suggestions, thus making the check completely non-interactive. This is potentially dangerous but sometimes unavoidable; especially when one has to go through thousands of errors. It is recommended that (if you can) you back up your partition before you have to run this kind of check. (see dd command for backing up filesystems/partitions/volumes)
-
fsck.ext4 -f -c -C0 /dev/sda1 — will attempt to find bad blocks on the device and make those blocks unusable by new files and directories.
-
fsck.ext4 -f -cc -C0 /dev/sda1 — a more thorough version of the bad blocks check.
-
fsck.ext4 -n -f -C0 /dev/sda1 — the -n option allows you to run fsck against a mounted filesystem in a read-only mode. This is almost completely pointless and will often result in false alarms. Do not use.
In order to create and check/repair these Microsoft(TM)’s filesystems, dosfstools package needs to be installed. Similarly to ext filesystems’ tools, dosfsck has softlinks too — fsck.msdos and fsck.vfat. Options, however, vary slightly.
dosfsck cheatsheet
These examples will use FAT32 and /dev/sdc1
-
fsck.vfat -n /dev/sdc1 — a simple non-interactive read-only check
-
fsck.vfat -a /dev/sdc1 — checks the file system and fixes non-interactively. Least destructive approach is always used.
-
fsck.vfat -r /dev/sdc1 — interactive repair. User is always prompted when there is more than a single approach to fixing a problem.
-
fsck.vfat -l -v -a -t /dev/sdc1 — a very verbose way of checking and repairing the filesystem non-interactively. The -t parameter will mark unreadable clusters as bad, thus making them unavailable to newly created files and directories.
Recovered data will be dumped in the root of the filesystem as fsck0000.rec, fsck0001.rec, etc. This is similar to CHK files created by scandisk and chkdisk on MS Windows.
ntfs-3g (previously also ntfsprogs) — NTFS filesystem
Due to the closed sourced nature of this filesystem and its complexity, there is no fsck.ntfs available on GNU/Linux (ntfsck isn’t being developed anymore). There is a simple tool called ntfsfix included in ntfs-3g package. Its focus isn’t on fixing NTFS volumes that have been seriously corrupted; its sole purpose seems to be making an NTFS volume mountable under GNU/Linux.
Normally, NTFS volumes are non-mountable if their dirty bit is set. ntfsfix can help with that by clearing trying to fix the most basic NTFS problems:
-
ntfsfix /dev/sda1 — will attempt to fix basic NTFS problems. e.g.: detects and fixes a Windows XP bug, leading to a corrupt MFT; clears bad cluster marks; fixes boot sector problems
-
ntfsfix -d /dev/sda1 — will clear the dirty bit on an NTFS volume.
-
ntfsfix -b /dev/sda1 — clears the list of bad sectors. This is useful after cloning an old disk with bad sectors to a new disk.
Windows 8 and GNU/Linux cohabitation problems This segment is taken from http://www.tuxera.com/community/ntfs-3g-advanced/ When Windows 8 is restarted using its fast restarting feature, part of the metadata of all mounted partitions are restored to the state they were at the previous closing down. As a consequence, changes made on Linux may be lost. This can happen on any partition of an internal disk when leaving Windows 8 by selecting “Shut down” or “Hibernate”. Leaving Windows 8 by selecting “Restart” is apparently safe.
To avoid any loss of data, be sure the fast restarting of Windows 8 is disabled. This can be achieved by issuing as an administrator the command : powercfg /h off
Install reiserfstools package to have reiserfsck and a softlink fsck.reiserfs available. Reiserfsck is a very talkative tool that will let you know what to do should it find errors.
-
fsck.reiserfs /dev/sda1 — a readonly check of the filesystem, no changes made (same as running with —check). This is what you should run before you include any other options.
-
fsck.reiserfs —fix-fixable /dev/sda1 — does basic fixes but will not rebuild filesystem tree
-
fsck.reiserfs —scan-whole-partition —rebuild-tree /dev/sda1 — if basic check recommends running with —rebuild-tree, run it with —scan-whole-partition and do NOT interrupt it! This will take a long time. On a non-empty 1TB partition, expect something in the range of 10-24 hours.
xfsprogs — xfs
If a check is necessary, it is performed automatically at mount time. Because of this, fsck.xfs is just a dummy shell script that does absolutely nothing. If you want to check the filesystem consistency and/or repair it, you can do so using the xfs_repair tool.
-
xfs_repair -n /dev/sda — will only scan the volume and report what fixes are needed. This is the no modify mode and you should run this first.
-
xfs_repair will exit with exit status 0 if it found no errors and with exit status 1 if it found some. (You can check exit status with echo $?)
-
-
xfs_repair /dev/sda — will scan the volume and perform all fixes necessary. Large volumes take long to process.
XFS filesystem has a feature called allocation groups (AG) that enable it to use more parallelism when allocating blocks and inodes. AGs are more or less self contained parts of the filesystem (separate free space and inode management). mkfs.xfs creates only a single AG by default.
xfs_repair checks and fixes your filesystems by going through 7 phases. Phase 3 (inode discovery and checks) and Phase 4 (extent discovery and checking) work sequentially through filesystem’s allocation groups (AG). With multiple AGs, this can be heavily parallelised. xfs_repair is clever enough to not process multiple AGs on same disks.
Do NOT bother with this if any of these is true for your system:
- you created your XFS filesystem with only a single AG.
-
your xfs_repair is older than version 2.9.4 or you will make the checks even slower on GNU/Linux. You can check your version with xfs_repair -V
- your filesystem does not span across multiple disks
otherwise:
-
xfs_repair -o ag_stride=8 -t 5 -v /dev/sda — same as previous example but reduces the check/fix time by utilising multiple threads, reports back on its progress every 5 minutes (default is 15) and its output is more verbose.
-
if your filesystem had 32 AGs, the -o ag_stride=8 would start 4 threads, one to process AGs 0-7, another for 8-15, etc… If ag_stride is not specified, it defaults to the number of AGs in the filesystem.
-
-
xfs_repair -o ag_stride=8 -t 5 -v -m 2048 /dev/sda — same as above but limits xfs_repair’s memory usage to a maximum of 2048 megabytes. By default, it would use up to 75% of available ram. Please note, -o bhash=xxx has been superseded by the -m option
== jfsutils — jfs == == btrfs ==
Missing superblock
Bad blocks
Sources and further reading
- man pages
-
<XFS user guide> — more details about XFS filesystem
Common disk errors include physical failures, bad sectors or blocks, and inconsistent filesystems, which can lead to various problems. Diagnosing these issues in Linux can be done using built-in command line tools.

The disk must not be mounted when performing these tests. If it’s necessary to check the root filesystem and it cannot be unmounted due to logged-in users, you can boot into a live Linux system, such as the Ubuntu installer disk. This method is also helpful for recovering partition tables.
Steps to scan for disk error and bad sector in Linux:
-
Open the terminal application.
-
Display the list of available disks on your system.
$ lsblk
NAME   MAJ:MIN RM  SIZE RO TYPE MOUNTPOINT
loop0    7:0    0 55.4M  1 loop /snap/core18/1997
loop1    7:1    0  219M  1 loop /snap/gnome-3-34-1804/66
loop2    7:2    0 64.8M  1 loop /snap/gtk-common-themes/1514
loop3    7:3    0 32.3M  1 loop /snap/snapd/11588
loop4    7:4    0   51M  1 loop /snap/snap-store/518
loop5    7:5    0 65.1M  1 loop /snap/gtk-common-themes/1515
sda      8:0    0   20G  0 disk
├─sda1   8:1    0    1M  0 part
├─sda2   8:2    0  513M  0 part /boot/efi
└─sda3   8:3    0 19.5G  0 part /
sdb      8:16   0   20G  0 disk /mnt/data
sr0     11:0    1 1024M  0 rom
-
Ensure the disk you wish to examine is unmounted.
$ sudo umount /dev/sdb
[sudo] password for user:
-
Assess the disk’s S.M.A.R.T. (Self-Monitoring, Analysis, and Reporting Technology) health status using smartctl.
$ sudo smartctl -H /dev/sdb
smartctl 7.2 2020-12-30 r5155 [x86_64-linux-5.11.0-16-generic] (local build)
Copyright (C) 2002-20, Bruce Allen, Christian Franke, www.smartmontools.org

=== START OF READ SMART DATA SECTION ===
SMART Health Status: OK
-
Examine the filesystem consistency on the disk with fsck.
$ sudo fsck /dev/sdb
fsck from util-linux 2.36.1
e2fsck 1.45.7 (28-Jan-2021)
/dev/sdb: clean, 11/1310720 files, 126322/5242880 block
-
Inspect the disk for bad blocks or bad sectors using badblocks.
$ sudo badblocks -v /dev/sdb
Checking blocks 0 to 20971519
Checking for bad blocks (read-only test): done
Pass completed, 0 bad blocks found. (0/0/0 errors)

Discuss the article:
Comment anonymously. Login not required.