S.M.A.R.T. (Self-Monitoring, Analysis, and Reporting Technology) is a supplementary component built into many modern storage devices through which devices monitor, store, and analyze the health of their operation. Statistics are collected (temperature, number of reallocated sectors, seek errors…) which software can use to measure the health of a device, predict possible device failure, and provide notifications on unsafe values.
Smartmontools
The smartmontools package contains two utility programs for analyzing and monitoring storage devices: smartctl and smartd and a 3rd database update utility update-smart-drivedb.
Install the smartmontools package to use these tools.
SMART support must be available and enabled on each storage device to effectively use these tools. You can use #smartctl to check for and enable SMART support. That done, you can manually #Run a test and #View test results, or you can use #smartd to automatically run tests and email notifications.
smartctl
smartctl is a command-line tool that «controls the Self-Monitoring, Analysis and Reporting Technology (SMART) system built into most ATA/SATA and SCSI/SAS hard drives and solid-state drives.»
The -i/--info option prints a variety of information about a device, including whether SMART is available and enabled:
# smartctl --info /dev/sda | grep 'SMART support is:'
SMART support is: Available - device has SMART capability.
SMART support is: Enabled
If SMART is available but not enabled, you can enable it:
# smartctl --smart=on /dev/device
You may need to specify a device type. For example, specifying --device=ata tells smartctl that the device type is ATA, and this prevents smartctl from issuing SCSI commands to that device.
Run a test
There are three types of self-tests that a device can execute (all are safe to user data):
- Short: runs tests that have a high probability of detecting device problems,
- Extended or Long: the test is the same as the short check but with no time limit and with complete disk surface examination,
- Conveyance: identifies if damage incurred during transportation of the device.
- Selective: tests a range of LBA (read smartctl(8) § t for more).
The -c/--capabilities flag prints which tests a device supports and the approximate execution time of each test. For example:
# smartctl -c /dev/sda
...
Short self-test routine
recommended polling time:        (   1) minutes.
Extended self-test routine
recommended polling time:        (  74) minutes.
Conveyance self-test routine
recommended polling time:        (   2) minutes.
...
Use -t/--test=test_name flag to run a test:
# smartctl -t short /dev/device
# smartctl -t long /dev/device
# smartctl -t conveyance /dev/device
# smartctl -t select,123+345 /dev/device
View test results
You can view a device’s overall health with the -H flag. «If the device reports failing health status, this means either that the device has already failed, or that it is predicting its own failure within the next 24 hours. If this happens […] get your data off the disk and to someplace safe as soon as you can.»
# smartctl -H /dev/device
You can also view a list of recent test results and detailed information about a device:
# smartctl -l selftest /dev/device
# smartctl -x /dev/device
Generate table with attributes of all disks
![]() This article or section needs language, wiki syntax or style improvements. See Help:Style for reference.
This article or section needs language, wiki syntax or style improvements. See Help:Style for reference.![]()
Reason: The wiki is not a code development platform. Long scripts should be maintained elsewhere. (Discuss in Talk:S.M.A.R.T.)
#!/bin/bash
function drives_csv {
	declare -A drive_values
	for d in `smartctl --scan -d scsi | cut -d' ' -f1`; do
		drive_values["-Drive-----------------"]="${drive_values[-Drive-----------------]},$d"
		for l in `smartctl -A $d | grep ATTRIBUTE_NAME -A30 | grep -v ATTRIBUTE_NAME | column -H1,3,4,5,6,7,8,9,11,12,13,14,15 -t -o, | sed 's/ //g'`; do
			key=`echo $l | cut -d',' -f1`
			value=`echo $l | cut -d',' -f2`
			existing=${drive_values["$key"]}
			drive_values["${key}"]="${existing},${value}"
			#~ echo "${key},${drive_values[$key]}"
		done
	done
	for key in "${!drive_values[@]}"; do
		echo "${key}${drive_values[$key]}"
	done | sort
}
drives_csv | column -s, -t
smartd
The smartd daemon monitors SMART statuses and emits notifications when something goes wrong. It can be managed with systemd and configured using the /etc/smartd.conf configuration file. The configuration file syntax is esoteric, and this wiki page provides only a quick reference. For more complete information, read the examples and comments within the configuration file, or read smartd.conf(5).
daemon management
To start the daemon, check its status, make it auto-start on system boot and read recent log file entries, simply start/enable the smartd.service systemd unit.
smartd respects all the usual systemctl and journalctl commands.
Define the devices to monitor
To monitor for all possible SMART errors on all disks, the following setting must be added in the configuration file.
/etc/smartd.conf
DEVICESCAN -a
Note this is the default smartd configuration and the -a parameter, which is the default parameter, may be omitted.
To monitor for all possible SMART errors on /dev/sda and /dev/sdb, and ignore all other devices:
/etc/smartd.conf
/dev/sda -a
/dev/sdb -a
To monitor for all possible SMART errors on externally connected disks (USB-backup disks spring to mind) it is prudent to tell smartd the UUID of the device since the /dev/sdX of the drive might change during a reboot.
First, you will have to get the UUID of the disk to monitor: ls -lah /dev/disk/by-uuid/ now look for the disk you want to Monitor
$ ls -lah /dev/disk/by-uuid/
lrwxrwxrwx 1 root root   9 Nov  5 22:41 820cdd8a-866a-444d-833c-1edb0f4becac -> ../../sde
lrwxrwxrwx 1 root root  10 Nov  5 22:41 b51b87f3-425e-4fe7-883f-f4ff1689189e -> ../../sdf2
lrwxrwxrwx 1 root root   9 Nov  5 22:42 ea2199dd-8f9f-4065-a7ba-71bde11a462c -> ../../sda
lrwxrwxrwx 1 root root  10 Nov  5 22:41 fe9e886a-8031-439f-a909-ad06c494fadb -> ../../sdf1
In this example, the target device is sde. Now to tell smartd to monitor that disk simply use the /dev/disk/by-uuid/ path.
/etc/smartd.conf
/dev/disk/by-uuid/820cdd8a-866a-444d-833c-1edb0f4becac -a
Note that you may additionally need -d removable for smartd to work.
Now your USB disk will be monitored even if the /dev/sdX path changes during reboot.
Notifying potential problems
To have an email sent when a failure or new error occurs, use the -m option:
/etc/smartd.conf
DEVICESCAN -m address@domain.com
To be able to send the email externally (i.e. not to the root mail account) a MTA (Mail Transport Agent) or a MUA (Mail User Agent) will need to be installed and configured. Common MUAs are msmtp and Postfix, but perhaps the easiest dma will suffice. Common MTAs are sendmail and Postfix. It is enough to simply configure S-nail if you do not want anything else, but you will need to follow these instructions.
The -M test option causes a test email to be sent each time the smartd daemon starts:
/etc/smartd.conf
DEVICESCAN -m address@domain.com -M test
Emails can take quite a while to be delivered. To make sure you are warned immediately if your hard drive fails, you may also define a script to be executed in addition to the email sending:
/etc/smartd.conf
DEVICESCAN -m address@domain.com -M exec /usr/local/bin/smartdnotify
To send an email and a system notification, put something like this into /usr/local/bin/smartdnotify:
#!/bin/sh
# Send email
echo "$SMARTD_MESSAGE" | mail -s "$SMARTD_FAILTYPE" "$SMARTD_ADDRESS"
# Notify user
wall "$SMARTD_MESSAGE"
If you are running a desktop environment, you might also prefer having a popup to appear on your desktop. In this case, you can use this script (replace X_user and X_userid with the user and userid running X respectively) :
/usr/local/bin/smartdnotify
#!/bin/sh

sudo -u X_user DISPLAY=:0 DBUS_SESSION_BUS_ADDRESS=unix:path=/run/user/X_userid/bus notify-send "S.M.A.R.T Error ($SMARTD_FAILTYPE)" "$SMARTD_MESSAGE" --icon=dialog-warning -u critical
This requires libnotify and a compatible desktop environment. See Desktop notifications for more details.
You can also put your custom scripts into /usr/share/smartmontools/smartd_warning.d/:
This scripts notifies every logged in users on the system via libnotify.
/usr/share/smartmontools/smartd_warning.d/smartdnotify
#!/bin/sh

IFS=$'\n'
for LINE in `w -hs`
do
    USER=`echo $LINE | awk '{print $1}'`
    USER_ID=`id -u $USER`
    DISP_ID=`echo $LINE | awk '{print $8}'`
    sudo -u $USER DISPLAY=$DISP_ID DBUS_SESSION_BUS_ADDRESS=unix:path=/run/user/$USER_ID/bus notify-send "S.M.A.R.T Error ($SMARTD_FAILTYPE)" "$SMARTD_MESSAGE" --icon=dialog-warning -u critical
done
This script requires libnotify and procps-ng and a compatible desktop environment.
You can execute your custom scripts with
/etc/smartd.conf
DEVICESCAN -m @smartdnotify
Power management
If you use a computer under control of power management, you should instruct smartd how to handle disks in low power mode. Usually, in response to SMART commands issued by smartd, the disk platters are spun up. So if this option is not used, then a disk which is in a low-power mode may be spun up and put into a higher-power mode when it is periodically polled by smartd.
/etc/smartd.conf
DEVICESCAN -n standby,15,q
More info on smartmontools wiki.
On some devices the -n does not work. You get the following error message in syslog:
# journalctl -u smartd
CHECK POWER MODE: incomplete response, ATA output registers missing
Device: /dev/sdb [SAT], no ATA CHECK POWER STATUS support, ignoring -n Directive
As an alternative, you can use the -i option of smartd. It controls how often smartd spins the disks up to check their status. Default is 30 minutes. To change it, edit /etc/conf.d/smartd.
/etc/conf.d/smartd
SMARTD_ARGS="-i 10800" Check status every 10800 seconds (3 hours)
For more info see smartd(8).
Schedule self-tests
smartd can tell disks to perform self-tests on a schedule. The following /etc/smartd.conf configuration will start a short self-test every day between 2-3am, and an extended self test weekly on Saturdays between 3-4am:
/etc/smartd.conf
DEVICESCAN -s (S/../.././02|L/../../6/03)
Alert on temperature changes
smartd can track disk temperatures and alert if they rise too quickly or hit a high limit. The following will log changes of 4 degrees or more, log when temp reaches 35 degrees, and log/email a warning when temp reaches 40:
/etc/smartd.conf
DEVICESCAN -W 4,35,40
Tip:
- You can determine the current disk temperature with the command
smartctl -A /dev/device | grep Temperature_Celsius - If you have some disks that run a lot hotter/cooler than others, remove
DEVICESCANand define a separate configuration for each device with appropriate temperature settings.
Complete smartd.conf example
Putting together all of the above gives the following example configuration:
DEVICESCANsmartd scans for disks and monitors all it finds-amonitor all attributes-o onenable automatic offline data collection-S onenable automatic attribute autosave-n standby,qdo not check if disk is in standby, and suppress log message to that effect so as not to cause a write to disk-s ...schedule short and long self-tests-W ...monitor temperature-m ...mail alerts
/etc/smartd.conf
DEVICESCAN -a -o on -S on -n standby,q -s (S/../.././02|L/../../6/03) -W 4,35,40 -m username-or-email
update-smart-drivedb
This utility downloads the latest version of drivedb.h from the smartmontools source repository so that new drives and their parameters are understood.
The downloaded file can replace the default one located at /usr/share/smartmontools/drivedb.h and is a plaintext file that contains comma separated values for each drive.
If your drive is not yet recognised, it can be submitted upstream.
See update-smart-drivedb(8) for full command line options.
Console applications
- skdump — utility to monitor and manage SMART devices to monitor and report hard disk drive health.
- https://0pointer.de/blog/projects/being-smart.html || libatasmart
iostat -x(from sysstat) also provides some disk health metrics: in particular, high values in the f_await column mean that the disk does not respond quickly to requests, and might be failing.
GUI applications
- DisKMonitor — Tools for KDE to monitor SMART devices and MDRaid health status.
- https://github.com/papylhomme/diskmonitor || diskmonitorAUR
- GNOME Disks — GNOME frontend which uses libatasmart to monitor and report hard disk drive health. Part of gnome.
- https://gitlab.gnome.org/GNOME/gnome-disk-utility/ || gnome-disk-utility
- GSmartControl — GUI for smartctl. It allows you to inspect the drive’s SMART data to determine its health, as well as run various tests on it.
- https://gsmartcontrol.shaduri.dev/ || gsmartcontrol
- Plasma Disks — Hard disk health monitoring for KDE Plasma. Part of plasma.
- https://invent.kde.org/plasma/plasma-disks/ || plasma-disks
See also
- Smartmontools Homepage
- Smartmontools on Ubuntu Wiki
- Gentoo: smartmontools
Если и есть то, с чем вы очень не хотите столкнуться в вашей операционной системе, то это неожиданный выход из строя жестких дисков. С помощью резервного копирования и технологии хранения RAID вы можете очень быстро вернуть все данные на место, но потеря аппаратного устройства может очень сильно сказаться на бюджете, особенно если вы такого не планировали.
Чтобы избежать таких проблем можно использовать пакет smartmontools. Это программный пакет для управления и мониторинга устройств хранения данных с помощью технологии Self-Monitoring Analysis and Reporting Technology или просто SMART.
Большинство современных ATA/SATA/SCSI/SAS накопителей информации предоставляют интерфейс SMART. Цель SMART — мониторинг надежности жесткого диска, для выявления различных ошибок и своевременного реагирования на их появление. Пакет smartmontools состоит из двух утилит — smartctl и smartd. Вместе они представляют мощную систему мониторинга и предупреждения о возможных поломках HDD в Linux. Дальше будет подробно рассмотрена проверка жесткого диска linux.
Установка Smartmontools
Пакет smartmontools есть в официальных репозиториях большинства дистрибутивов Linux, поэтому установка сводится к выполнению одной команды. В Debian и основанных на нем системах выполните:
sudo apt install smartmontools
А для RedHat:
sudo yum install smartmontools
Во время установки надо выбрать способ настройки почтового сервера. Можно его вовсе не настраивать, если вы не собираетесь отправлять уведомления о проблемах с диском на почту.
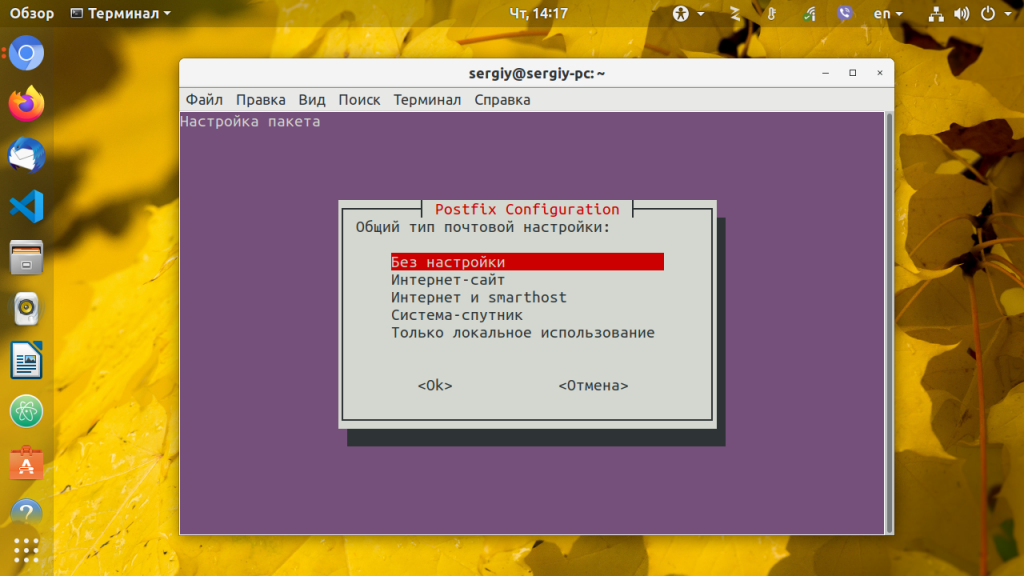
Отправлять почту получится только на веб-сервере, к которому привязан домен, на локальной машине можно выбрать пункт только для локального использования и тогда почта будет складываться в локальную папку и её можно будет посмотреть утилитой mail. Теперь можно переходить к диагностике жесткого диска Linux.
Проверка жесткого диска в smartctl
Сначала узнайте какие жесткие диски подключены к вашей системе:
ls -l /dev | grep -E 'sd|hd'
В выводе будет что-то подобное:
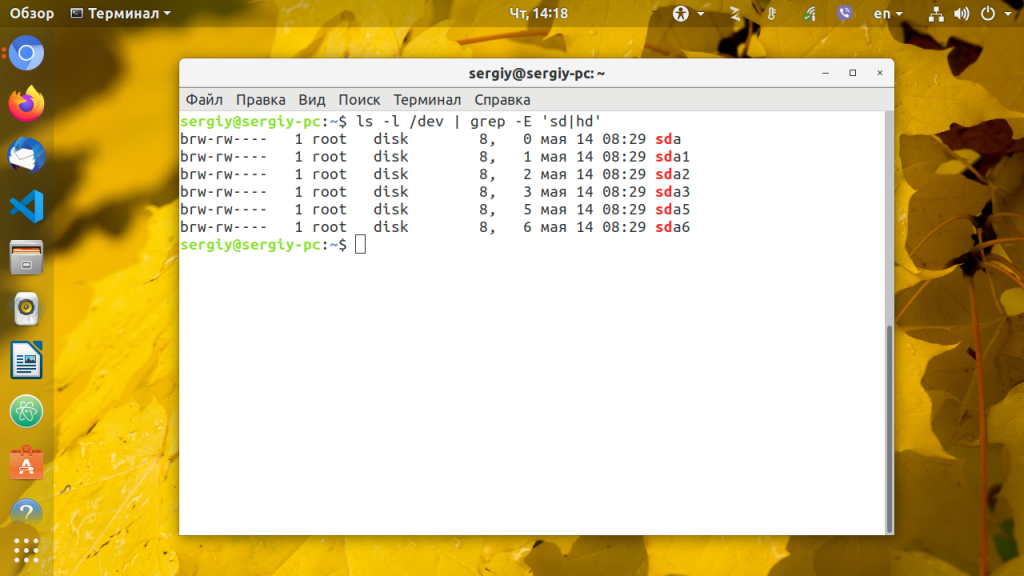
Здесь sdX это имя устройства HDD подключенного к компьютеру.
Для отображения информации о конкретном жестком диске (модель устройства, S/N, версия прошивки, версия ATA, доступность интерфейса SMART) Запустите smartctl с опцией info и именем жесткого диска. Например, для /dev/sda:
smartctl --info /dev/sda

Хотя вы можете и не обратить внимания на версию SATA или ATA, это один из самых важных факторов при поиске замены устройству. Каждая новая версия ATA совместима с предыдущими. Например, старые устройства ATA-1 и ATA-2 прекрасно будут работать на ATA-6 и ATA-7 интерфейсах, но не наоборот. Когда версии ATA устройства и интерфейса не совпадают, возможности оборудования не будут полностью раскрыты. В данном случае для замены лучше всего выбрать жесткий диск SATA 3.2.
Запустить проверку жесткого диска ubuntu можно командой:
smartctl -s on -a /dev/sda
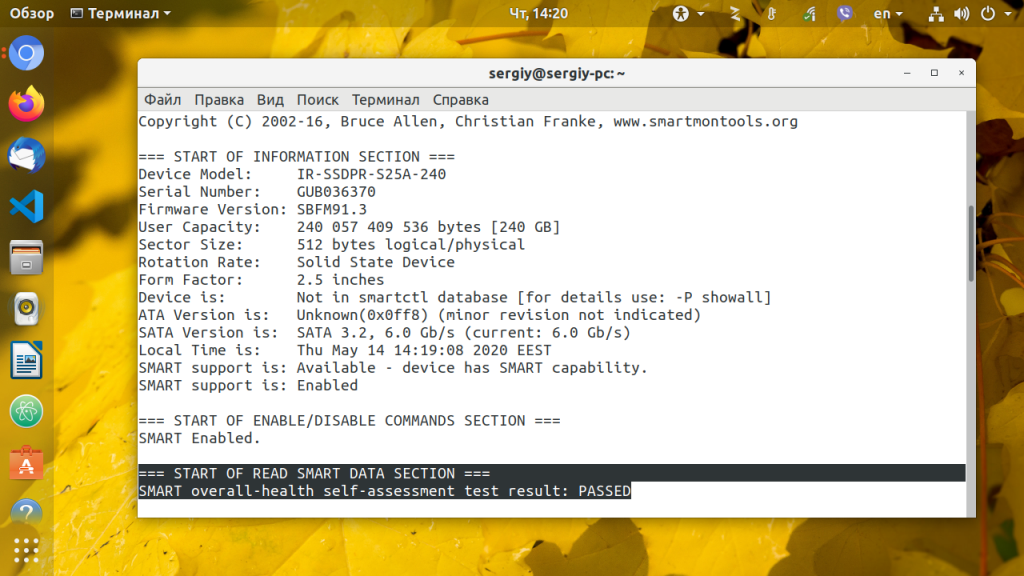
Здесь опция -s включает флаг SMART на указном устройстве. Вы можете его убрать если поддержка SMART уже включена. Информация о диске разделена на несколько разделов, В разделе READ SMART DATA находится общая информация о здоровье жесткого диска.
=== START OF READ SMART DATA SECTION ===

SMART overall-health self-assessment rest result: PASSED
Этот тест может быть пройден (PASSED) или нет (FAILED). В последнем случае сбой неизбежен, начинайте резервное копирование данных с этого диска.
Следующая вещь которую можно посмотреть, когда выполняется диагностика HDD в linux, это таблица SMART атрибутов.
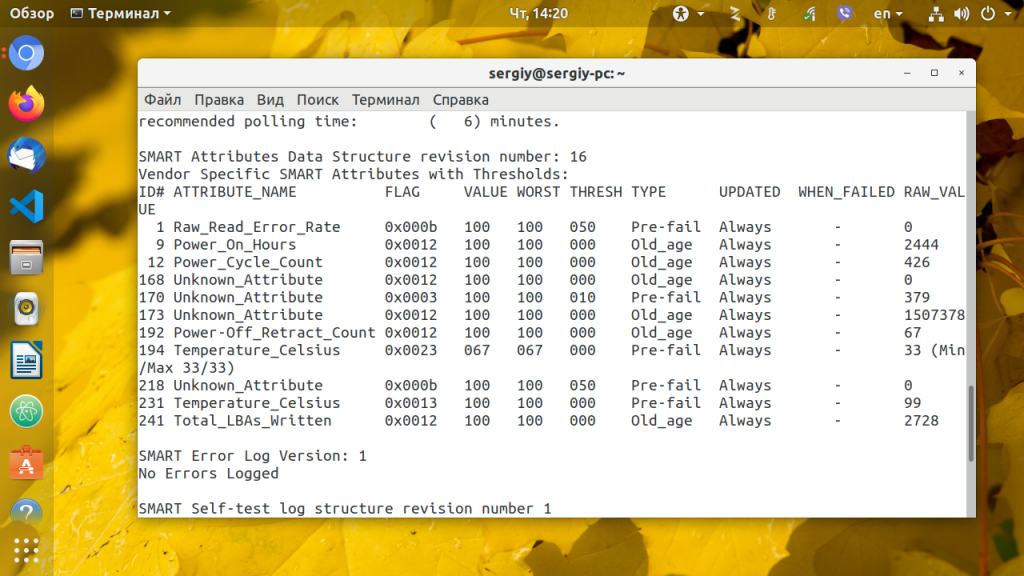
В SMART таблице записаны параметры, определенные для конкретного диска разработчиком, а также порог отказа для этих параметров. Таблица заполняется автоматически и обновляется на основе прошивки диска.
- ID # — идентификатор атрибута, как правило, десятичное число между 1 и 255;
- ATTRIBUTE_NAME — название атрибута;
- FLAG — флаг обработки атрибута;
- VALUE — это поле представляет нормальное значение для состояния данного атрибута в диапазоне от 1 до 253, 253 — лучшее состояние, 1 — худшее. В зависимости от свойств, начальное значение может быть от 100 до 200;
- WORST — худшее значение value за все время;
- THRESH — самое низкое значение value, после перехода за которое нужно сообщить что диск непригоден для эксплуатации;
- TYPE — тип атрибута, может быть Pre-fail или Old_age. Все атрибуты по умолчанию считаются критическими, то-есть если диск не прошел проверку по одному из атрибутов, то он уже считается не пригодным (FAILED) но атрибуты old_age не критичны;
- UPDATED — показывает частоту обновления атрибута;
- WHEN_FAILED — будет установлено в FAILING_NOW если значение атрибута меньше или равно THRESH, или в «—» если выше. В случае FAILING_NOW, лучше как можно скорее выполнить резервное копирование, особенно если тип атрибута pre-fail.
- RAW_VALUE — значение, определенное производителем.
Сейчас вы думаете, да smartctl хороший инструмент, но у меня нет возможности запускать его каждый раз вручную, было бы неплохо автоматизировать все это дело чтобы программа запускалась периодически и сообщала мне о результатах проверки. И это возможно, с помощью smartd.
Автоматическая диагностика в smartd
Автоматическая диагностика HDD в Linux настраивается очень просто. Сначала отредактируйте файл конфигурации smartd — /etc/smartd.conf. Добавьте следующую строку:
nano /etc/smartd.conf
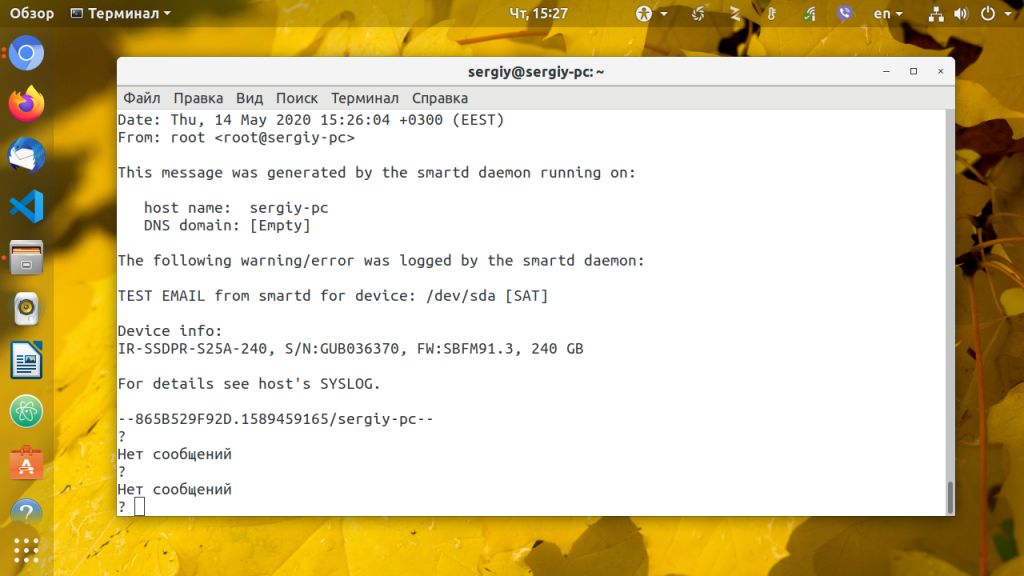
/dev/sda -m myemail@mydomain.com -M test
Здесь:
- -m <email адрес> — адрес электронной почты для отправки результатов проверки. Это может быть адрес локального пользователя, суперпользователя или внешний адрес, если настроен сервер для отправки электронной почты;
- -M — частота отправки писем. once — отправлять только одно сообщение о проблемах с диском. daily — отправлять сообщения каждый день если была обнаружена проблема. diminishing — отправлять сообщения через день если была обнаружена проблема. test — отправлять тестовое сообщение при запуске smartd. exec — выполняет указанную программу в место отправки почты.
Сохраните изменения и перезапустите smartd:
sudo systemctl restart smartd
Вы должны получить на электронную почту письмо о том, что программа была запущена успешно. Это будет работать только если на компьютере настроен почтовый сервер.
Также можно запланировать тесты по своему графику, для этого используйте опцию -s и регулярное выражение типа T/MM/ДД/ДН/ЧЧ, где:
Здесь T — тип теста:
- L — длинный тест;
- S — короткий тест;
- C — тест перемещения (ATA);
- O — оффлайн тест.
Остальные символы определяют дату и время теста:
- ММ — месяц в году;
- ДД — день месяца;
- ЧЧ — час дня;
- ДН — день недели (от 1 — понедельник 7 — воскресенье;
- MM, ДД и ЧЧ — указываются с двух десятичных цифр.
Точка означает все возможные значения, выражение в скобках (A|B|C) — означает один из трех вариантов, выражение в квадратных скобках [1-5] означает диапазон (от 1 до 5).
Например, чтобы выполнять полную проверку жесткого диска linux каждый рабочий день в час дня добавьте опцию -s в строчку конфигурации вашего устройства:
/dev/sda -m myemail@mydomain.com -M once -s (L /../../[1-5]/13)
Если вы хотите чтобы утилита сканировала и проверяла все устройства, которые есть в системе используйте вместо имени устройства директиву DEVICESCAN:
DEVICESCAN -m myemail@mydomain.com -M once -s (L /../../[1-5]/13)
Проверка диска на ошибки в GUI
В графическом интерфейсе тоже можно посмотреть информацию из SMART. Для этого можно воспользоваться приложением Gnome Диски, откройте его из главного меню, выберите нужный диск, а затем кликните по пункту Данные самодиагностики и SMART в контекстном меню:
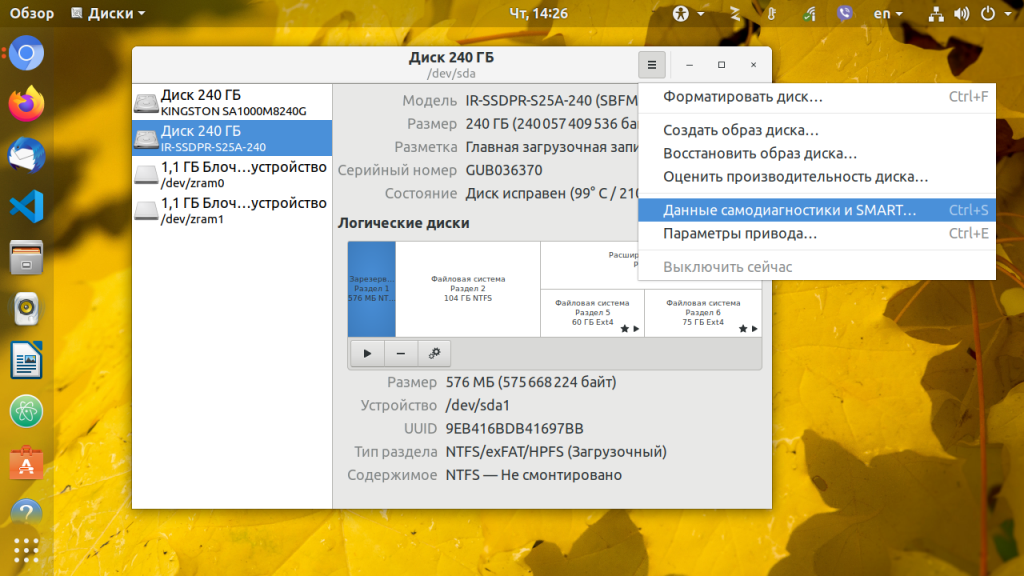
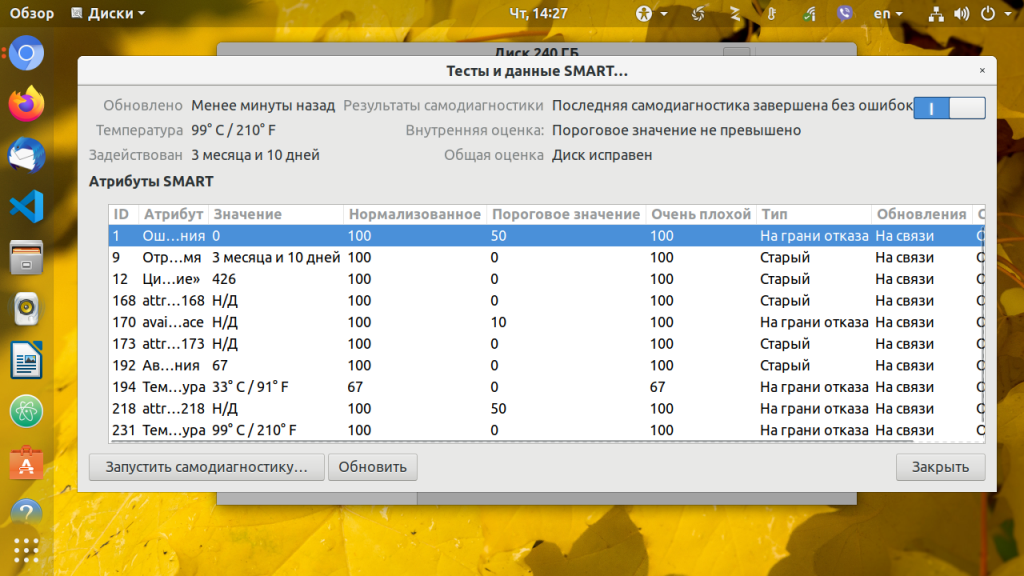
В открывшемся окне вы увидите те же данные диагностики SMART, а также все атрибуты SMART и их состояние:
Выводы
Если вы хотите быстро проверить механическую работу жесткого диска, посмотреть его физическое состояние или выполнить более-менее полное сканирование поверхности диска используйте smartmontools. Не забывайте выполнять регулярное сканирование, потом будете себя благодарить. Вы уже делали это раньше? Будете делать? Или используете другие методы? Напишите в комментариях!
Обнаружили ошибку в тексте? Сообщите мне об этом. Выделите текст с ошибкой и нажмите Ctrl+Enter.
Throughout this answer I’ll assume, that a storage drive appears as a block device at the path /dev/sdc. To find the path of a storage drive in our current setup, use:
- Gnome Disks
 (formerly Gnome Disk Utility, a. k. a.
 palimpsest), if a GUI is available, or - on the terminal look at the output of
lsblkandls -l /dev/disk/by-idand try to find the right device by size, partitioning, manufacturer and model name.
Basic check
- only detects entirely unresponsive media
- almost instantaneous (unless medium is spun down or broken)
- safe
- works on read-only media (e. g. CD, DVD, BluRay)
Sometimes a storage medium simply refuses to work at all. It still appears as a block device to the kernel and in the disk manager, but its first sector holding the partition table is not readable. This can be verified easily with:
sudo dd if=/dev/sdc of=/dev/null count=1
If this command results in a message about an “Input/output error”, our drive is broken or otherwise fails to interact with the Linux kernel as expected. In the a former case, with a bit of luck, a data recovery specialist with an appropriately equipped lab can salvage its content. In the latter case, a different operating system is worth a try. (I’ve come across USB drives that work on Windows without special drivers, but not on Linux or OS X.)
S.M.A.R.T. self-test
- adjustable thoroughness
- instantaneous to slow or slower (depends on thoroughness of the test)
- safe
- warns about likely failure in the near future
Devices that support it, can be queried about their health through S.M.A.R.T. or instructed to perform integrity self-tests of different thoroughness. This is generally the best option, but usually only available on (non-ancient) hard disk and solid state drives. Most removable flash media don’t support it.
Further resources and instructions:
- Answer about S.M.A.R.T. on this question
- How can I check the SMART status of a drive on Ubuntu 14.04 through 16.10?
Read-only check
- only detects some flash media errors
- quite reliable for hard disks
- slow
- safe
- works on read-only media (e. g. CD, DVD, BluRay)
To test the read integrity of the whole device without writing to it, we can use badblocks(8) like this:
sudo badblocks -b 4096 -c 4096 -s /dev/sdc
This operation can take a lot of time, especially if the storage drive actually is damaged. If the error count rises above zero, we’ll know that there’s a bad block. We can safely abort the operation at any moment (even forcefully like during a power failure), if we’re not interested in the exact amount (and maybe location) of bad blocks. It’s possible to abort automatically on error with the option -e 1.
Note for advanced usage: if we want to reuse the output for e2fsck, we need to set the block size (-b) to that of the contained file system. We can also tweak the amount of data (-c, in blocks) tested at once to improve throughput; 16 MiB should be alright for most devices.
Non-destructive read-write check
- very thorough
- slowest
- quite safe (barring a power failure or intermittent kernel panic)
Sometimes – especially with flash media – an error only occurs when trying to write. (This will not reliably discover (flash) media, that advertise a larger size, than they actually have; use Fight Flash Fraud instead.)
-
NEVER use this on a drive with mounted file systems!
badblocksrefuses to operate on those anyway, unless you force it. -
Don’t interrupt this operation forcefully! Ctrl+C (SIGINT/SIGTERM) and waiting for graceful premature termination is ok, but
killall -9 badblocks(SIGKILL) isn’t. Upon forceful terminationbadblockscannot restore the original content of the currently tested block range and will leave it overwritten with junk data and possibly corrupt the file system.
To use non-destructive read-write checks, add the -n option to the above badblocks command.
Destructive read-write check
- very thorough
- slower
- ERASES ALL DATA ON THE DRIVE
As above, but without restoring the previous drive content after performing the write test, therefore it’s a little faster. Since data is erased anyway, forceful termination remains without (additional) negative consequence.
To use destructive read-write checks, add the -w option to the above badblocks command.
SMART (Self-Monitoring, Analysis, and Reporting Technology) is a feature enabled in all modern hard disk drives and SSDs to monitor/test reliability. It checks different drive attributes to detect the possibility of drive failure. There are different tools available in Linux and Windows to perform the SMART tests.
In this tutorial, we will learn how to test SSD/HDD health in Linux from CLI and GUI
Two methods explained here are:
- Using Smartctl
- Using Gnome Disks
Test SSD Health using Smartctl
Smartctl is a command-line utility tool that can be used to check S.M.A.R.T-enabled HDD or SSD status in the Linux system.
Smartctl utility tool comes with the package smartmontools. The Smartmontools is available by default in all Linux distributions including Ubuntu, RHEL and Centos and Fedora.
To install smartmontools in Linux:
Ubuntu
sudo apt install smartmontools Start the service using the following command.
sudo /etc/init.d/smartmontools startRHEL and CentOS
sudo yum install smartmontoolsFedora
sudo dnf install smartmontoolsSmartd service will start automatically after the successful installation.
If not started, start smartd service:
sudo systemctl start smartdTo test overall-health of the drive, type:
sudo smartctl -d ata -H /dev/sdaWhere,
d — Specifies the type of device.
ata — the device type is ATA, use scsi for SCSI device type.
H — Check the device to report its SMART health status.

The result PASSED indicates that the disk drive is good. If the device reports failing health status, this means either that the device has already failed or could fail very soon.
If it indicates failing use -a option to get more information.
sudo smartctl -a /dev/sda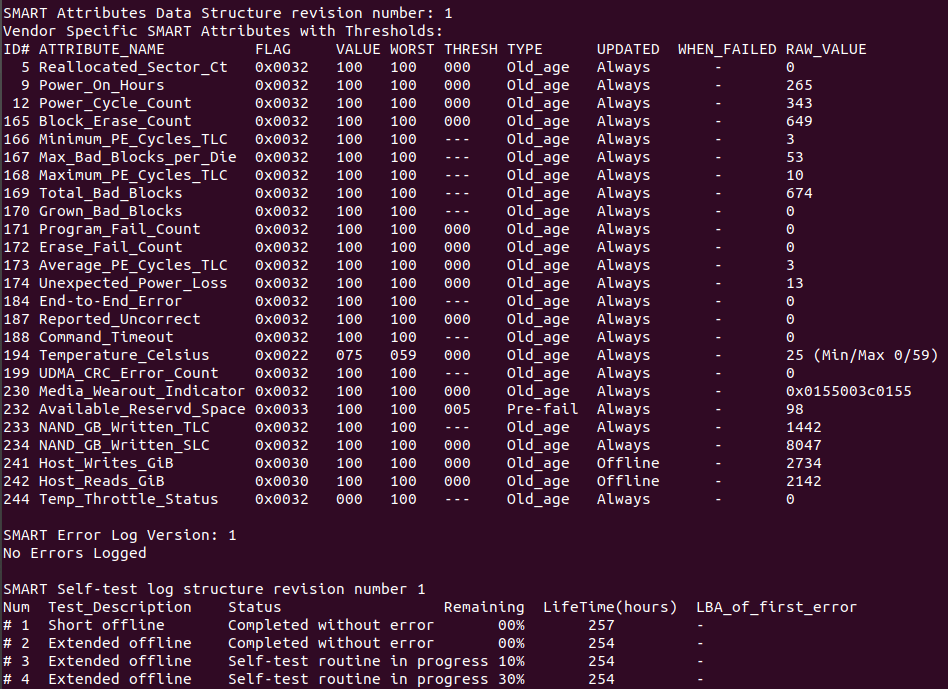
You can monitor the following attributes:
[ID 5] Reallocated Sectors Count — Numbers of sectors reallocated due to read errors.
[ID 187] Reported Uncorrect — Number of uncorrectable errors while accessing read/write to sector.
[ID 230] Media Wearout Indicator — Current state of drive operation based upon the Life Curve.
100 is the BEST value and 0 is the WORST.
Check SMART Attribute Details for more information.
To initiate the extended test (long) using the following command:
sudo smartctl -t long /dev/sda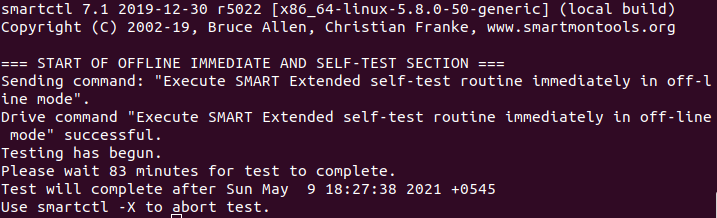
To perform a self test, run:
sudo smartctl -t short /dev/sda
To find drive’s self test result, use the following command.
sudo smartctl -l selftest /dev/sda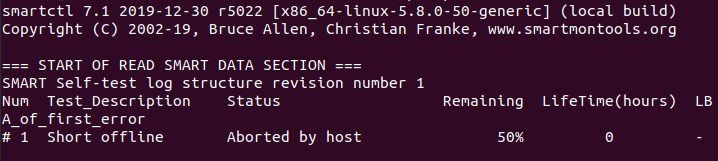
To evaluate estimate time to perform test, run the following command.
sudo smartctl -c /dev/sda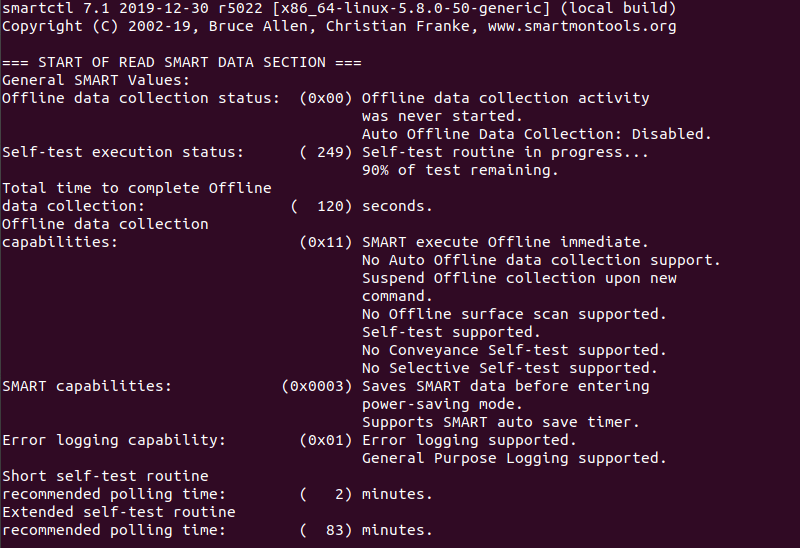
You can print error logs of the disk by using the command:
sudo smartctl -l error /dev/sda
Test SSD/HDD Health using Gnome Disks
With GNOME disks utility you can get a quick review of your SSD drives, format your drives, create a disk image, run standard tests against SSD drives, and restore a disk image.
Install Gnome Disks
In Ubuntu 20.04, the GNOME Disks application comes with the GNOME disk tool installed. If you are unable to find the tool, use the following command to install it.
sudo apt-get install gnome-disk-utilityGNOME Disk is now installed, now you can go to your desktop menu navigate to the application, and launch. From the application, you can overview all your attached drives. You can also use the following command to launch the GNOME Disk application.
sudo gnome-disks 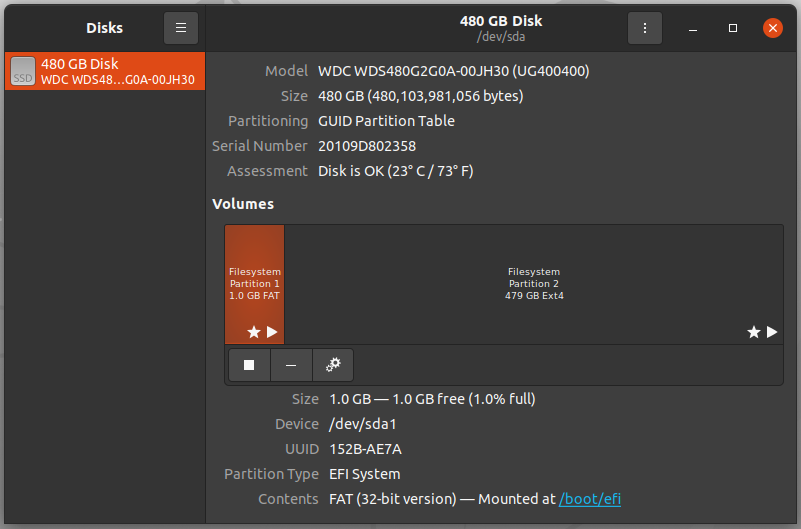
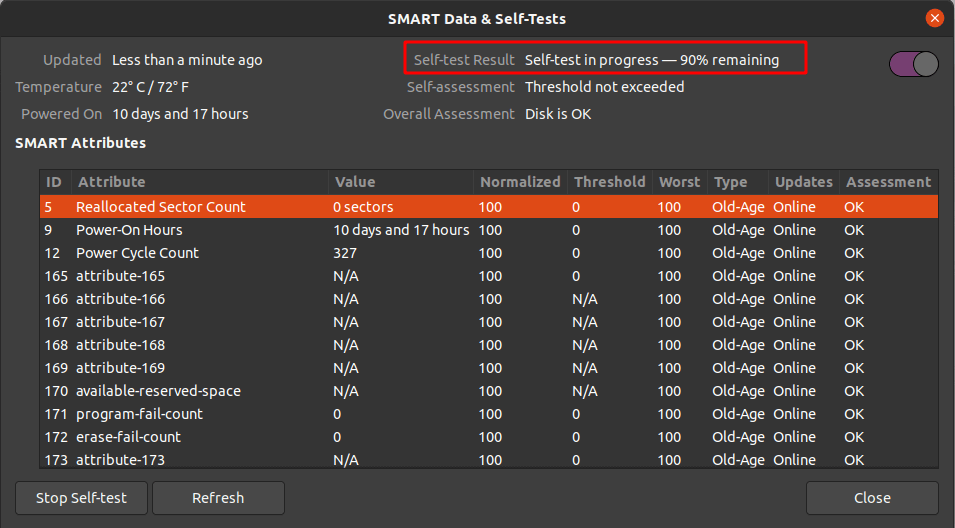
Now the test can be performed on the drives. To do so, launch the GNOME disks and select the disk which you want to test. You can find the quick assessment of the drives such as size, partitioning, Serial number, temp, and health. Click on the gear icon and select SMART Data & Self-tests.
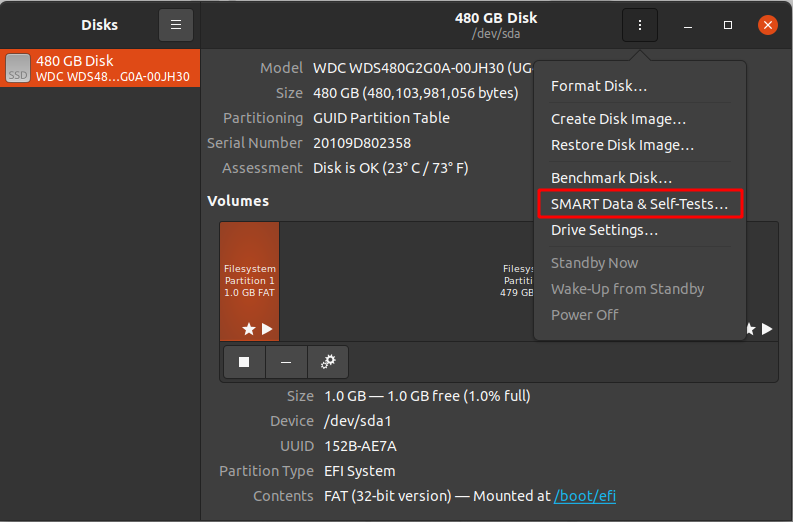
In the new window you can find the results of the last test. In the top right of the window, you can find that the SMART option is enabled. If SMART is disabled, it can be enabled by clicking on the slider. To start the new test click on the Start Self-test button.

Once the Start Self-test button is clicked, a drop down menu will be appeared to select the type of the tests which are Short, Extended and Conveyance. Select the test type and provide your sudo password to continue the test. From the progress meter, percentage of the test complete can be seen.
Conclusion
In this tutorial, I have explained the basic concept of the S.M.A.R.T technology including its uses in the Linux system. Also, I have covered how to install the smartctl command-line utility tool in the Linux machine and how it can be used to monitor the health of hard drives. You have also got an idea about the GNOME Disks utility tool to monitor SSD drives. I hope this article will help you to monitor your SSD drives using smartctl and GNOME Disks utility.
Компьютер представляет собой устройство, работа которого основана на взаимодействии множества компонентов. Со временем они могут вызывать сбои в работе. Одной из частых причин неполноценной работы машины становятся битые сектора на диске, поэтому периодически его нужно тестировать. Linux предоставляет для этого все возможности.
Что такое битые блоки и почему они появляются
Блок (сектор) – это маленькая ячейка диска, на которой в виде битов (0 и 1) хранится информация. Когда системе не удается записать очередной бит в ячейку, говорят о битом секторе. Причин возникновения таких блоков может быть несколько:
- брак при производстве;
- отключение питания в процессе записи информации;
- физический износ диска.
Изначально практически на всех носителях имеются нарушения. Со временем их количество может увеличиваться, что говорит о скором выходе устройства из строя. В Linux тестировать диск на ошибки возможно несколькими способами.
Проверка диска Linux
На ядре Linux работает несколько ОС, среди которых Ubuntu и Debian. Процедура проверки диска универсальная и подходит для каждой из них. О том, что носитель пора тестировать, стоит задуматься, когда на дисковую систему оказывается большая нагрузка, скорость работы с носителем (запись/чтение) значительно уменьшилась, либо эти процедуры и вовсе вызывают ошибки.
Многие знакомы с программой на Windows – Victoria HDD. Разработчики позаботились о написании ее аналогов для Linux.
Badblocks
Badblocks – дисковая утилита, имеющаяся в Ubuntu и других дистрибутивах Linux по умолчанию. Программа позволяет тестировать как жесткий диск, так и внешние накопители.
Важно! Все приведенные в статье терминальные команды начинаются с параметра sudo, так как для выполнения требуются права суперпользователя.
Перед тем, как тестировать диск в Linux следует проверить, какие накопители подключены к системе, с помощью утилиты fdisk-l. Она также покажет имеющиеся на них разделы.

Теперь можно приступать к непосредственному тестированию на битые сектора. Работа Badblocks организовывается следующим образом:
badblocks -v /dev/sdk1 > bsector.txt
В записи используются следующие команды и операнды:·
- -v – выводит подробный отчет о проведенной проверке;·
- /dev/sdk1 – проверяемый раздел;·
- bsector.txt – запись результатов в текстовый файл.

Если при проверке диска нашлись битые блоки, нужно запустить утилиту fsck, либо e2fsck, в зависимости от используемой файловой системы. Они ограничат запись информации в нерабочие сектора. В случае файловых систем ext2, ext3 или ext4 выполняется следующая команда:
fsck -l bsector.txt /dev/sdk1
В противном случае:
fsck -l bsector.txt /dev/sdk1
Параметр -l указывает программе, что битые блоки перечислены в файле bsector.txt, и исключать нужно именно их.
GParted
Утилита проверяет файловую систему Linux, не прибегая к текстовому интерфейсу.
Инструмент изначально не содержится в дистрибутивах операционной системы, поэтому ее необходимо установить, выполнив команду:
apt-get install gparted
В главном окне приложения отображаются доступные диски. О том, что носитель пора тестировать, понятно по восклицательному знаку, расположенному рядом с его именем. Запуск проверки производится путем щелчка по пункту «Проверка на ошибки» в подменю «Раздел», расположенном на панели сверху. Предварительно выбирается нужный диск. По завершении сканирования утилита выведет результат.

Проверка HDD и других запоминающих устройств приложением GParted доступна для пользователей ОС Ubuntu, FreeBSD, Centos, Debian и других и других дистрибутивов, работающих на ядре Linux.
Smartmontools
Инструмент позволяет тестировать файловую систему с большей надежностью. В современных жестких дисках имеется встроенный модуль самоконтроля S. M. A. R. T., который анализирует данные накопителя и помогает определить неисправность на первоначальной стадии. Smartmontools предназначен для работы с этим модулем.
Запуск установки производится через терминал:
- apt install smartmontools – для Ubuntu/Debian;
- yum install smartmontools – для CentOS.
Для просмотра информации о состоянии жесткого диска, вводится строка:
smartctl –H /dev/sdk1

Проверка на ошибки занимает различное время, в зависимости от объема диска. По окончании программа выведет результат о наличии битых секторов, либо их отсутствии.
Утилита имеет и другие параметры: -a, —all, -x, —xall. Для получения дополнительной информации вызывается справка:
man smartctl –h

Safecopy
Когда возникает потребность тестировать винчестер в Linux, стоит быть готовым к любому результату.
Приложение Safecopy копирует данные с поврежденного устройства на рабочее. Источником могут быть как жесткие диски, так и съемные носители. Этот инструмент игнорирует ошибки ввода/вывода, чтения, битые блоки, продолжая беспрерывно работать. Скорость выполнения максимально возможная, которую обеспечивает компьютер.

Для установки Safecopy на Linux в терминал вводится строка:
apt install safecopy
Сканирование запускается командой:
safecopy /dev/sdk1 /home/files/
Здесь первый путь обозначает поврежденный диск, второй – директорию, куда сохранятся файлы.
Программа способна создать образ файловой системы нестабильно работающего запоминающего устройства.
Что делать, если обнаружена ошибка в системной программе Ubuntu
Установка нового программного обеспечения или изменения системных настроек могут вызвать сообщение «Обнаружена ошибка в системной программе». Многие его игнорируют, так как на общей работе оно не отражается.

С проблемой обычно сталкиваются пользователи Ubuntu версии 16.04. Тестировать HDD в этом случае нет необходимости, так как проблема скорее заключается именно в программном сбое. Сообщение оповещает о непредвиденном завершении работы программы и предлагает отправить отчет разработчикам. При согласии откроется окно браузера, где требуется заполнить форму из 4 шагов. Такой вариант вызывает сложности и не гарантирует исчезновения ошибки.
Второй способ поможет избежать появления сообщения лишь в том случае, если оно вызывается одной и той же программой. Для этого при очередном оповещении нужно установить галку на опцию «Не показывать больше для этой программы».
Третий метод – отключить утилиту Apport, которая отвечает в Linux за сбор информации и отправку отчетов. Такой подход полностью исключит всплывание окон с ошибками. Возможно отключение только показа уведомлений, оставляя службу сбора в рабочем состоянии. Для этого необходимо выполнить:
gsettings set com.ubuntu.update-notifier show-apport-crashes false

Данные продолжат собираться в папке /var/crash. Их периодически необходимо чистить, чтобы они не заполняли дисковое пространство:
rm /var/crash
Для полного отключения служб Apport, в терминал вводится запись:
gksu gedit /etc/default/apport
В появившемся тексте значение поля enable меняется с 1 на 0. В дальнейшем, чтобы снова включить службу, возвращаются настройки по умолчанию.
Заключение
Для предотвращения потери файлов жесткий диск и съемные носители рекомендуется периодически тестировать. Linux предлагает несколько подходов к решению задачи. На выбор предоставляется перечень утилит, которые выявляют поврежденные сектора и обеспечивают перенос информации на нормально функционирующее устройство.