| Внимание: apt-get -s не работает (ключик для проведения «мысленного эксперимента» вместо действия приводит к неадекватной оценке последствий). |
Превышение числа пакетов
Если команда apt-get update завершается чем-то вроде:
Reading Package Lists... Error!
E: Dynamic MMap ran out of room
E: Error occured while processing ktechlab (UsePackage3)
или:
E: Wow, you exceeded the number of package names this APT is capable of.
E: Problem with MergeList /tmp/aptbox/var/lib/apt/lists/_ALT_Sisyphus_noarch_base_pkglist.classic
E: The package lists or status file could not be parsed or opened.
— скорее всего, apt’y приходится перелопачивать больше пакетов, чем дозволено лимитом (#16900).
Решение N1[1]:
в /etc/apt/apt.conf добавить строку (если ещё нет):
APT::Cache-Limit <LimitInBytes>;
Где <LimitInBytes> — число большее, чем размер /var/lib/rpm/Packages в байтах.
Возможно, придётся подбирать Cache-Limit несколько раз, пока ошибка не исчезнет.
В apt 0.5.15lorg2-alt50 лимиты выставлены следующим образом (разница обусловлена предположением подключения biarch-репозитория):
- 83886080 (80M на 32-битных архитектурах);
- 100663296 (96M на 64-битных архитектурах).
Решение N2 (если в обновлённом apt это уже увеличили):
Обновить apt и libapt из соответствующего репозитория:
apt-get update -o APT::Cache-Limit=100663296
apt-get install apt
Объезд:
Отключить лишние репозитории в /etc/apt/sources.list.d/*.list и вновь отдать команду:
apt-get update
«Битые» пакеты
Если при обновлении системы или установке отдельных пакетов вываливается нечто вроде:
Committing changes...
Preparing...                 ###########################################  [100%]
1: some_package              error: unpacking of archive failed: cpio: Bad magic
E: Some errors occurred while running transaction
вероятней всего, rpm-архив (в данном случае «some_package») испорчен (получен не полностью).
Решение:
Отдать команды:
apt-get clean
apt-get install some_package
Ошибка обновления через rsync
Если при попытке обновления сведений о пакетах выходит ошибка с повторяющимися строками вроде приведённых ниже для apt-get update:
E: Программа обработки метода /usr/lib/apt/methods/rsync не найдена.
E: Tried to dequeue a fetching object
и для synaptic:
E: The method driver /usr/lib/apt/methods/rsync could not be found.
— то это означает, что в числе активных репозиториев есть подключенные через протокол rsync. Следует либо их отключить, либо доустановить пакет apt-rsync.
Ошибка сегментирования
Если при работе apt-get падает по Segmentation fault, удалите кэш apt:
mv /var/cache/apt/*pkgcache.bin /tmp
Если это поможет, и если примера в altbug #31089 ещё нет, приложите эти файлы к багу.
Проверьте stack лимиты, должно быть не менее:
# ulimit -s
8192
Задать можно тут:
/etc/security/limits.conf
root hard stack 8192
root soft stack 8192
Ругань о неудовлетворённых зависимостях при попытке сделать apt-get dist-upgrade
В таком случае надо сначала попытаться обновить отдельно apt и rpm, а потом повторить попытку dist-upgrade:
 apt-get install apt rpm
 apt-get dist-upgrade
Такое поведение не типичное, и случилось после того, как в строгие зависимости стали добавлять помимо name = epoch:version-release ещё и значение disttag (в rpm 4.0.4-alt128), а rpm до версии 4.13.0.1-alt6 не всегда справлялся с различением таких версий.
Удаление дубликатов пакетов (например, после прерванного dist-upgrade)
В пакете apt-scripts, начиная с версии 0.1.4-alt1, добавлена команда apt-get dedup, которая удаляет все непозволенные дубликаты из системы:
 apt-get install apt-scripts # если ещё не установлен
 apt-get dedup
Ссылки
- ↑ На 04/04/2015 у apt в p7 недостаточный лимит для использования репозитория autoimports, а на октябрь 2015 — у apt в Sisyphus тоже altbug #31410. В p7 это не чувствуется сейчас благодаря попаданию в p7 порта apt-0.5.15lorg2-alt50 (его лимиты см. ниже), я для Sisyphus это объехали для удобства подключения Autoimports в apt-conf-autoimports-sisyphus-1.0-alt3 способом, здесь описанным.
The APT (Advanced Package Tools) is a package manager used for managing packages of Debian-based operating systems and its derivatives, such as Ubuntu. APT can be used to install, update the OS and remove applications. While working with APT a common error that is encountered is “apt-get command not found”.
This error occurs when you are trying to install other operating systems that do not support APT. Using the command with the appropriate operating systems will solve the issue.
In this article, we will delve into the details of this error and its solutions.
What is the apt-get command?
The apt-get is a command-line tool used for installing, upgrading, and deleting a Linux package. It fetches information about the packages from authenticated sources to install or remove them, along with their dependencies.
The most common commands under apt-get are as follows:
- sudo apt-get install (to install a package)
- sudo apt-get remove (package removal)
- sudo apt-get update (for updating a package)
- sudo apt-get upgrade (for upgrading a package)
- apt-get help (to know more about a command )
Here, sudo is used for providing you with the security privileges of a superuser.
What is the apt-get command not found?
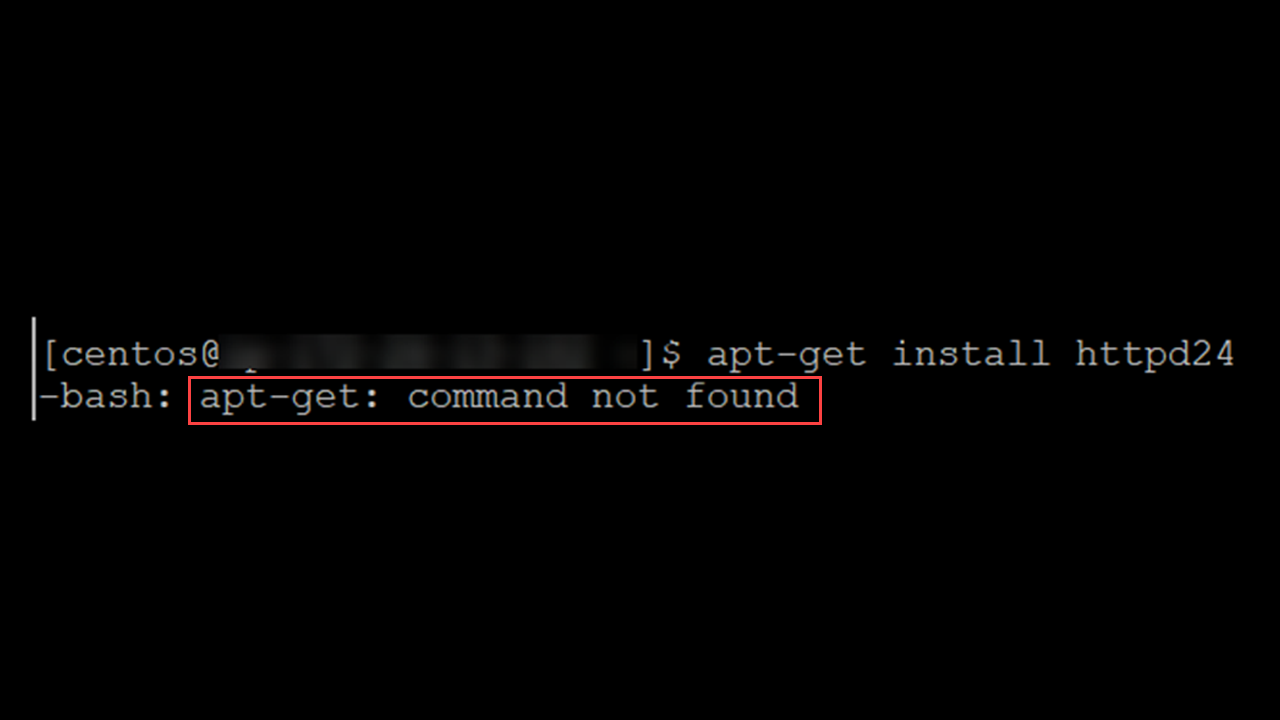
As mentioned earlier, when you try to install or modify a package on Linux with the apt-get command, you might receive this error. It may look something like this:
apt-get install httpd24Let us see the reasons behind this problem.
Operating System Not Supportive
The apt-get command only works on Debian, Ubuntu, and its derivatives. If you are trying to install rpm-based operating systems such as Fedora, RHEL and CentOS, the command will not work. As a result, you will receive the error.
Distributions that Support apt-get
- Debian
- Ubuntu
- Mint
- Kali
To find out the Linux distribution name, type in the following command:
cat /etc/*-release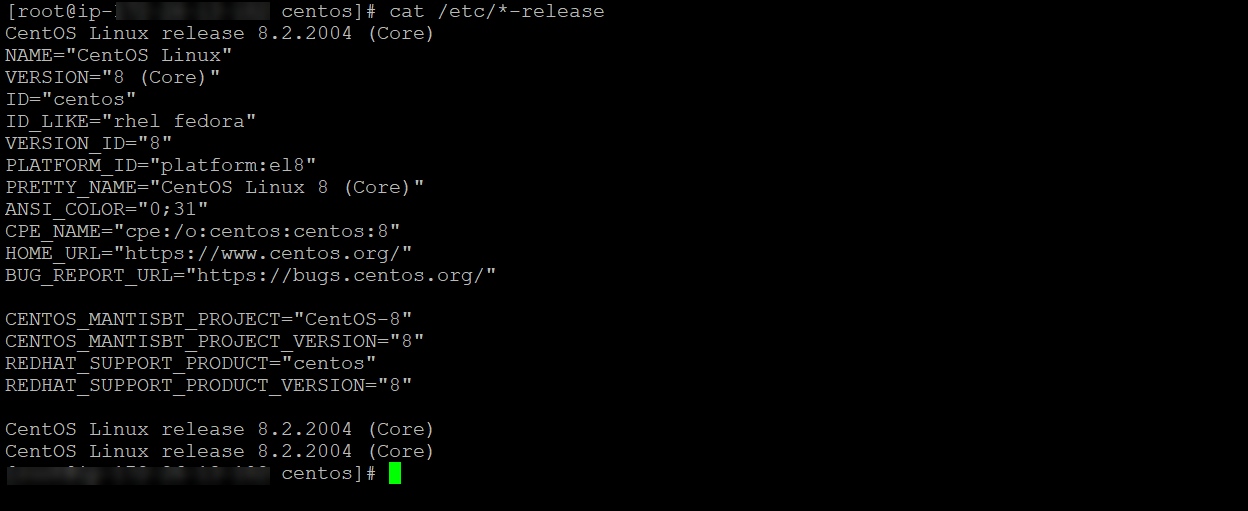
Package Not Available
If you are using an operating system that is compatible with the apt-get command, then check the availability of the APT. Type in the command locate apt-get to check whether it is installed in your system. The command must return the following output –
/usr/bin/apt-getIf no output is returned, it means that the APT package is not installed. You have to manually install it to get things working for you.
How to solve the apt-get command not found an error?
This apt-get command not found error using the following method:
- Using the correct package manager
- Downloading the latest APT package
- Reinstalling the OS
1) Using the Correct Package Manager
The first step to solve the problem is to use the correct Linux distributions with the apt-get command. Avoid trying the download the ones that APT does not support, which are as follows —
- CentOS
- openSUSE
- RHEL
- Arch
- macOS X
- Fedora
Distributions such as Fedora, CentOS, and RHEL use Yum as their default package manager. Type in the following command to install them using Yum –
$ sudo yum install <packagename>macOS X uses Homebrew as their default package manager. You can use it by running the command below –
$ brew install tmuxFor Arch Linux, you have to use the Pacman package manager like this –
$ packman -S tmux 2) Downloading the Latest APT Package
Another way to solve this error is to download the latest APT package that is compatible with your system. You have to download the .deb file as per your system architecture, which can be a 32-bit or 64-bit operating system.
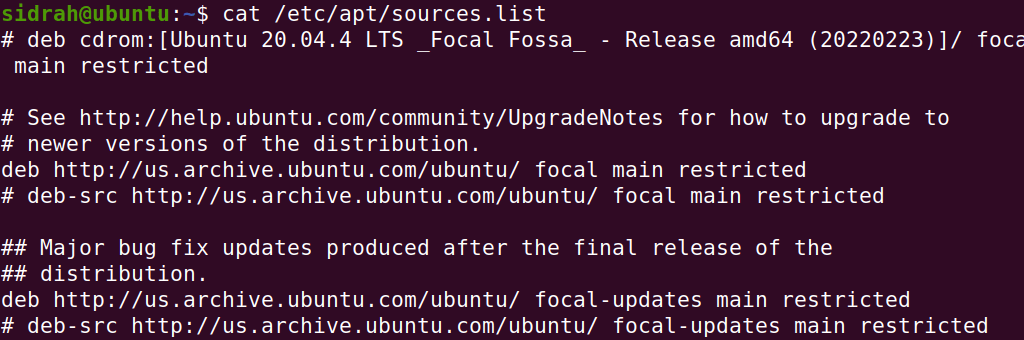
Download the .deb file from the “/etc/apt/sources.list” file. Relevant links for installation and upgrades for packages are inside this file. You can check out the downloading source by running the $cat /etc/apt/sources.list command.
Under the downloading source, visit the “/pool/main/a/apt/” directory, locate the .deb file suitable for your architecture and download it. After download, the file, install it using the dpkg command –
$ sudo dpkg -i apt_1.9.3_i386.deb3) Reinstalling the OS
After installing the APT package, check the /usr/bin/ directory to ensure if it had properly installed. If the file is empty, then run the locate apt-get command again. If no result is shown, there is no alternative but to reinstall the operating system. This might fix the problem.
Make sure all the commands are properly using the sudo access keyword. The apt-get error may arise if the system administrator is not letting you execute the apt-get command on your system.
Apt-get — это пакетный менеджер, который используется по умолчанию в семействе дистрибутивов Debian и Ubuntu. Учитывая, что это пакетный менеджер, один из почти самых основных пакетов системы, то логично, что программа должна присутствовать в каждом дистрибутиве. Но все же некоторые пользователи встречаются с ошибкой apt get command not found.
В этой статье мы рассмотрим почему возникает такая ошибка, как это вообще может быть и как исправить apt get команда не найдена.

Фактически это сообщение об ошибке означает как раз то, что оно нам сообщает, команда, которую вы пытаетесь выполнить не найдена в системе. Она либо еще не была установлена, либо была удалена. Но все это звучит очень странно в отношении к менеджеру пакетов. Рассмотрим основные причины возникновения ошибки:
- Одна из самых очевидных причин, получения ошибки «apt get не найдена» в том, что у вас не Ubuntu. Этот пакетный менеджер используется только в дистрибутивах Linux, основанных на Debian. Системы Red Hat, CentOS, Fedora, OpenSUSE, CoreOS, Cloud Linux, ArchLlinux и другие таковыми не являются. Они имеют собственный пакетный менеджер, у каждой свой и именно его нужно использовать для установки пакетов, а не искать apt.
- Если вы используете команду apt, а не apt-get, то, возможно, у вас старый дистрибутив, который не поддерживает такого синтаксиса, используйте apt-get;
- Вторая причина в том что вы случайно или намерено удалили пакет Apt. Его больше нет в системе поэтому система и не может его найти;
- Третья причина, может быть в невозможности обнаружения программы. Утилита apt есть в системе и исправно работает, но вы повредили переменную среды PATH и теперь система не ищет исполняемые файлы в той папке где находится apt.
Теперь рассмотрим как решить проблему. Это очень просто.
Как исправить apt get команда не найдена?
Поскольку вторая причина предполагает меньше действий, нам нужно сначала проверить ее. Обычно исполняемые файлы apt находятся в каталоге /usr/bin. Сначала посмотрим есть ли такой файл в той папке:
ls -l /usr/bin/apt-get
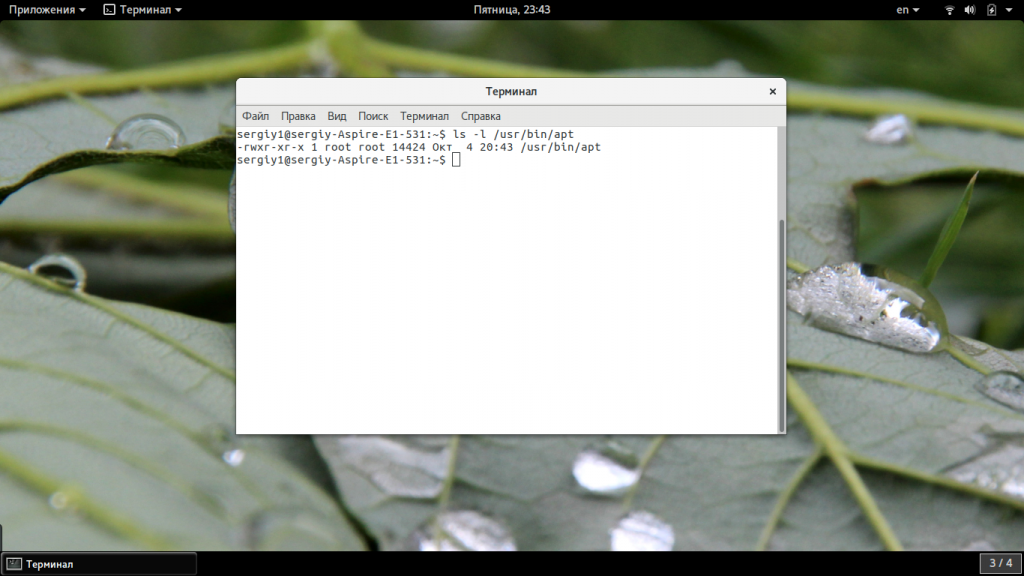
Если файл есть, то вы увидите что-то похожее как на снимке выше. Также обратите внимания на права. Для пользователя, группы и остальных должен быть выставлен флаг «x» означающий исполнение. Если же его нет, то apt придется переустановить. Если права отличаются от приведенных выше, а именно «-rwxr-xr-x», то их тоже нужно исправить, добавим для всех категорий флаг исполняемости:
chmod +x /usr/bin/apt-get
Если предыдущие варианты не сработали проверим содержимое переменной среды PATH:
echo $PATH
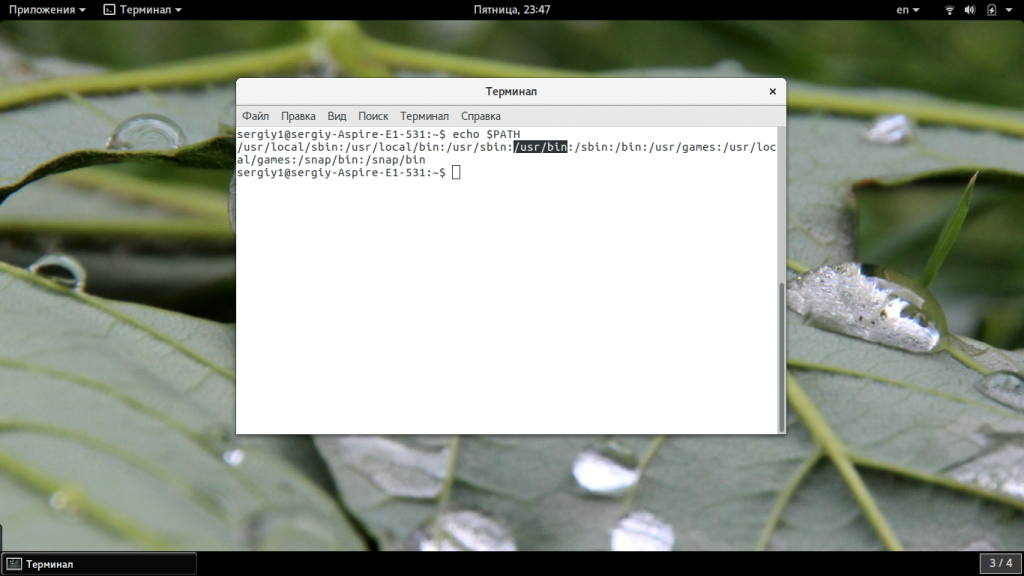
Вы должны увидеть в ней ссылку на /usr/bin. Если такой строчки нет, то проблема была здесь, а строчку нужно добавить в конец:
export PATH=текущее_содержимое:/usr/bin
Например:
export PATH=/usr/local/sbin:/usr/local/bin:/usr/sbin:/usr/bin:/sbin:/bin:/usr/games:/usr/local/games:/snap/bin:/snap/bin
Если вы вносили изменения в файл /etc/profile, и переменная PATH сломалась из-за этого, то нужно внести исправления и в этот файл.

Последний вариант, если ничего не помогло, это переустановить утилиту. Мы просто скачаем ее из официального сайта и установим в систему. Только нужно выбирать версию для своей операционной системы. Вы можете скачать пакет с помощью браузера или таких команд:
Для Ubuntu Xenial:
wget http://security.ubuntu.com/ubuntu/pool/main/a/apt/apt_1.2.15ubuntu0.2_i386.deb
Для Ubuntu Yakkety:
wget http://security.ubuntu.com/ubuntu/pool/main/a/apt/apt_1.3.3_i386.deb
Теперь осталось установить загруженный пакет:
sudo dpkg -i apt*
Готово, после этого ошибка apt get command not found должна исчезнуть и вы сможете нормально работать со своими пакетами.
Выводы
В этой статье мы рассмотрели почему не работает apt get, из-за чего возникает ошибка apt get команда не найдена, а также как ее решить. Надеюсь, приведенная здесь информация была полезной для вас.
Обнаружили ошибку в тексте? Сообщите мне об этом. Выделите текст с ошибкой и нажмите Ctrl+Enter.
Об авторе
![]()
Основатель и администратор сайта losst.ru, увлекаюсь открытым программным обеспечением и операционной системой Linux. В качестве основной ОС сейчас использую Ubuntu. Кроме Linux, интересуюсь всем, что связано с информационными технологиями и современной наукой.
Кто не встречал ошибок в процессе обновления Ubuntu? Ошибки обновления в Ubuntu и иных дистрибутивах Linux встречаются часто и не вызывают удивления. В статье описан ряд часто встречающихся ошибок и способы их решения.
Данная статья является частью серии, посвященной новичкам в Ubuntu, и она призвана помочь лучше понять работу с дистрибутивом.
В данном туториале мы рассмотрим часто встречающиеся ошибки, которые можно встретить при обновлении Ubuntu. Они зачастую происходят тогда, когда пытаешься добавить софт или репозитории самостоятельно.
Если во время обновления системы появляются ошибки, паниковать не стоит. Ошибки случаются часто и решения есть. Вы научитесь как решить часто встречающиеся ошибки.
Ошибка 0: Failed to download repository information
Многие пользователи Ubuntu обновляют систему через графическую программное средство обновления. Вам приходит оповещения, что стали доступными обновления для вашей системы и теперь можно нажать на кнопку для начала скачивания и установки.
Обычно так и происходит, но иногда можно увидеть подобную ошибку:
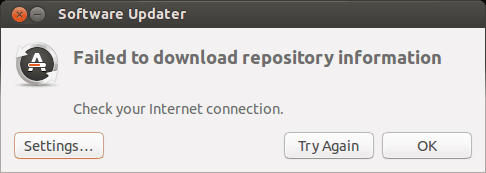
Скорее всего ошибка покажется странной, так как интернет работает, но вас все равно просят его проверить.
Заметили, что я назвал ее “Ошибка 0”? Это потому что это по сути не ошибка. То есть, скорее всего, она не связана с подключением к интернету. Тем не менее помимо этого путающего сообщения больше информации нет.
Если вы видите данное сообщение, а подключение к интернету в порядке, то значит пришло время надевать шляпу детектива и пошевелить мозгами.
Нам придется использовать командную строку. Для того чтобы ее быстро открыть можете воспользоваться сочетанием клавиш ctrl+alt+T. Исполните в ней данную команду:
sudo apt update
Дождитесь завершения процесса. Рассмотрите последние 3-4 строки вывода. Они покажут действительные причины ошибки sudo apt-get update. Вот пример:
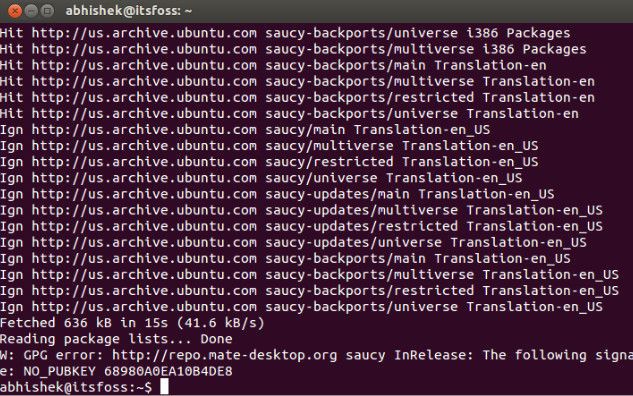
Дальше туториал будет посвящен способам решения ошибок, указанных в нескольких последних строчках вывода командной строки.
Ошибка 1: Problem With MergeList
Когда вы запустите обновление в терминале, то можете увидеть ошибку “Problem With MergeList”:
E:Encountered a section with no Package: header,
E:Problem with MergeList /var/lib/apt/lists/archive.ubuntu.com_ubuntu_dists_precise_universe_binary-i386_Packages,
E:The package lists or status file could not be parsed or opened.’
По какой-то причине файл в директории /var/lib/apt/lists сломался. Вы можете удалить все файлы в указанной директории и запустить обновление снова. Исполните указанные команды одна за другое:
sudo rm -r /var/lib/apt/lists/*
sudo apt-get clean && sudo apt-get update
Проблемы должны исчезнуть
Ошибка 2: Hash Sum mismatch
Вы можете встретиться с ошибкой “Hash Sum mismatch”. Ее решение аналогично тому, что мы написали выше.
W:Failed to fetch bzip2:/var/lib/apt/lists/partial/in.archive.ubuntu.com_ubuntu_dists_oneiric_restricted_binary-i386_Packages Hash Sum mismatch,
W:Failed to fetch bzip2:/var/lib/apt/lists/partial/in.archive.ubuntu.com_ubuntu_dists_oneiric_multiverse_binary-i386_Packages Hash Sum mismatch,
E:Some index files failed to download. They have been ignored, or old ones used instead
Скорее всего ошибка происходит из-за несовпадения на серверах кэша метаданных. Для исправления ситуации используйте данные команды:
sudo rm -rf /var/lib/apt/lists/*
sudo apt update
Ошибка 3: Failed to fetch with error 404 not found
Если вы попытаетесь добавить репозиторий, который недоступен в вашей текущей версии Ubuntu, то увидите ошибку 404 not found:
W: Failed to fetch http://ppa.launchpad.net/venerix/pkg/ubuntu/dists/raring/main/binary-i386/Packages  404  Not Found
E: Some index files failed to download. They have been ignored, or old ones used instead.
Вы добавили PPA в надежде установить приложение, но оно недоступно для вашей версии Ubuntu, и появилась ошибка. Вот почему следует заранее проверять доступно ли PPA для вашей версии Ubuntu или нет. Как удостовериться, что для вашей версии есть PPA, можно посмотреть здесь.
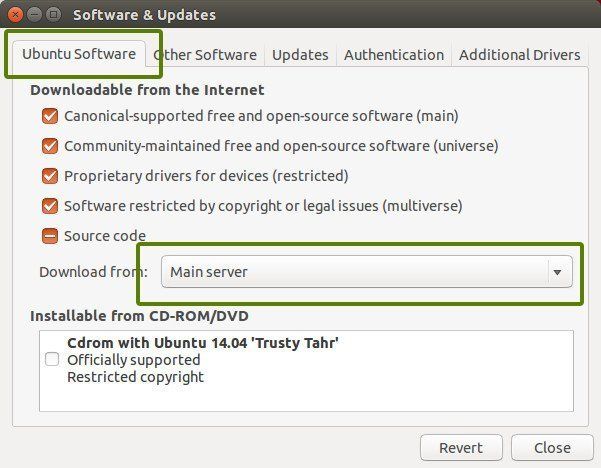
Так или иначе решением данной проблемы является удаление проблемной PPA из списка репозиториев. Название PPA вы найдете в сообщении об ошибке. Зайдите в средство Software & Updates:

Здесь пройдите во вкладку Other Software и поищите PPA. Уберите галочку, чтобы PPA удалилась из системы.
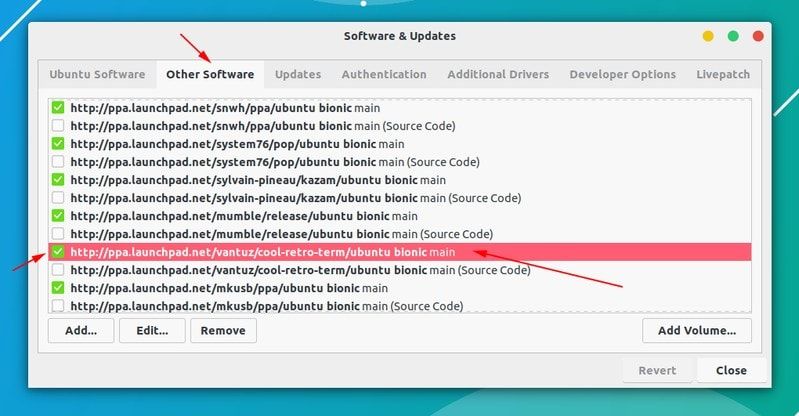
Ваш список программ после этого обновится. Теперь, если вы снова запустите обновление, ошибка исчезнет.
Ошибка 4: Failed to download package files
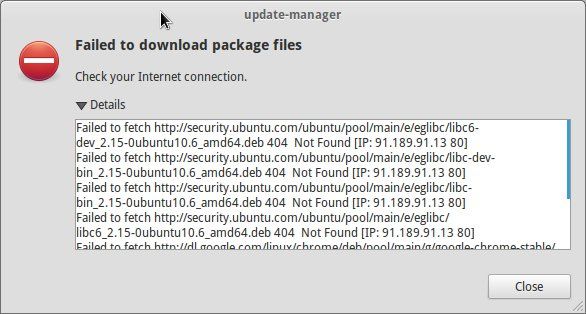
В данной ситуации доступна новая версия программы, но эта версия не распространена на все зеркала. Если вы не используете зеркало, то решить эту проблему просто — сделайте источником программы основной сервер.
Пройдите в Software & Updates там измените сменить сервер с которого происходит скачивание на main (основной):
Ошибка 5: GPG error: The following signatures couldn’t be verified
Добавление PPA может также привести к оповещению “GPG error: The following signatures couldn’t be verified” во время обновления:
W: GPG error: http://repo.mate-desktop.org saucy InRelease: The following signatures couldn’t be verified because the public key is not available: NO_PUBKEY 68980A0EA10B4DE8
Все что надо в данном случае сделать, так это добавить публичный код в систему. Возьмите ключ из сообщения. В сообщении выше это 68980A0EA10B4DE8.
Данный ключ можно использовать так:
sudo apt-key adv --keyserver keyserver.ubuntu.com --recv-keys 68980A0EA10B4DE8
Как только ключ будет добавлен, запустите обновление и все должны быть в порядке.
Ошибка 6: BADSIG error
Еще одна знаковая ошибка при обновлении Ubuntu — это “BADSIG error”, которая выглядит примерно так:
W: A error occurred during the signature verification. The repository is not updated and the previous index files will be used. GPG error: http://extras.ubuntu.com precise Release: The following signatures were invalid: BADSIG 16126D3A3E5C1192 Ubuntu Extras Archive Automatic Signing Key
W: GPG error: http://ppa.launchpad.net precise Release:
The following signatures were invalid: BADSIG 4C1CBC1B69B0E2F4 Launchpad PPA for Jonathan French W: Failed to fetch http://extras.ubuntu.com/ubuntu/dists/precise/Release
Все репозитории подписаны GPG, и по какой-то причине система считает их неверными. Необходимо обновить ключи подписей. Проще всего это сделать путем повторной генерации списка apt get (с ключами подписей) и он должен иметь верный ключ.
Используйте следующие команды одну за другой:
cd /var/lib/apt
sudo mv lists oldlist
sudo mkdir -p lists/partial
sudo apt-get clean
sudo apt-get update
Ошибка 7: Partial upgrade error
Обновление через терминал может привести к такому:
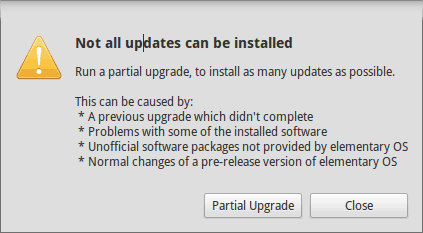
Not all updates can be installed
Run a partial upgrade, to install as many updates as possible
Для исправления ошибки исполните в терминале данную команду:
sudo apt-get install -f
Ошибка 8: Could not get lock /var/cache/apt/archives/lock
Данная ошибка происходит, когда еще одна программа использует APT. Допустим вы устанавливаете что-то через Ubuntu Software Center и в одновременно пытается запустить apt в терминале.
E: Could not get lock /var/cache/apt/archives/lock – open (11: Resource temporarily unavailable)
E: Unable to lock directory /var/cache/apt/archives/
Проверьте не использует ли apt другая программа. Это может быть команда в терминале, Software Center, Software Updater, Software & Updates или иной другой соф, который занимается установкой и удалением приложений.
Если можете такие программы закрыть, закрывайте. Если что-то в процессе, то дождитесь завершения.
Если ничего найти не можете, используйте данную команду для того, чтобы прекратить все подобные процессы:
sudo killall apt apt-get
Это хитрая проблема, так что придется попотеть. Если это не поможет, то рекомендуем эту статью.
Встречали ли вы другие ошибки при обновлении?
Так завершается обзор часто встречающихся ошибок при обновлении Ubuntu. Надеюсь данная статья поможет вам с ними справится.
Вы не встречали других ошибок при обновлении Ubuntu недавно, о которых здесь не говорится? Расскажите в комментариях.
Linux users must learn how to fix the “apt command not found error” on Linux. In this article, you will learn the easiest way to overcome this and access the apt package without any errors.
Apt Command: Intro
Linux provides a tool named APT to install, update, remove, search, and configure packages and repositories from the command line interface. In addition, this CLI has several features and is very user-friendly. Some of the common commands related to APT are:
apt install: to install packagesapt remove: to remove packagesapt update: updating packagesapt upgrade: to upgrade the packages to the latest versionapt help: to get help related to the apt command
However, the “apt command not found error” sometimes appears on the Terminal. This is due mainly to two reasons:
- The apt package does not exist in the standard version of Ubuntu.
- The apt package manager runs on an older Linux distribution that does not support the apt command.
Fix the Apt Command Not Found Error
If you wish to fix the apt command not found error, there are several things you need to check. Therefore, follow the instructions to diagnose the reason and fix it. So, let’s get started.
Use the Correct Package Manager
This is the most crucial step—using the correct package manager. If you have any of these OS, then the apt command will not work because these OS support a different package manager. The operating systems are:
- CentOS
- Fedora
- macOS
- openSUSE
- Arch
CentOS, Fedora, and OpenSUSE distributions use the yum package. To handle package management, for instance, installing the new package, the syntax is:
sudo yum install <packagename>On the other hand, macOS uses homebrew. The syntax is:
brew install tmuxLastly, Arch OS handles packages using the Pakman package manager, and its syntax looks something like this:
packman -S tmux Check Operating System Version
First, ensure that you run the right OS for the apt command. The apt command will only work on a few distributions of Linux OS, such as Kali, Mint, Debian, and Ubuntu. On the other hand, any other distribution will not support the apt command.
To check, open the Terminal by pressing “Ctrl + Alt + T” and execute the command given below:
cat /etc/*-releaseHit the “Enter” key, and you should get a similar output as seen below:

If you get any other output, then it means the command is not supported.
Check the APT Command Installation
Alternatively, if you have the appropriate OS, check if the command is installed or not.
For instance, type:
locate apt-getPress “Enter” key. You should get the output similar to the one below if the command exists on your system:

Update the APT Command Path to Fix the apt command not found Error
Let’s assume in the first step it does not show the command. However, it is already installed. This means the path to the APT is not correct, so you will have to fix it. For this step, run this specific sources.list file. Specifically, type:
/etc/apt/sources.listThe apt package is located at /usr/bin/apt-get. If you do not see a similar output, fix the file by running the command given below:
cat /etc/apt/sources.listOutput:
Alternatively, check the environment variable using the .bashrc file. For instance, type:
~/$[YOURUSER]/.bashrcNext, update the apt package. For example:
sudo /usr/bin/apt-get updateLastly, recheck the .bashrc file to ensure the problem has been resolved.
Install the APT Command to Fix the apt command not found Error
Alternatively, if you do not get the required output in both steps, then the apt command does not exist on your system. Hence, you will install it. There are two approaches to fixing this problem.
Install the APT Package Using the Wget Command
In the Terminal, use the wget command followed by the URL to the apt command package. Specifically, type:
sudo wget https://manpages.ubuntu.com/manpages/trusty/man8/apt-get.8.htmlHit the “Enter” key to start the installation of the package. Also, make sure to select the appropriate version for the OS. If your OS has 32-bit architecture, then go for the 32-bit version of the apt command. Otherwise, choose the 64-bit one.
Install the APT Command Using Dpkg
Alternatively, install the apt command using the corresponding .deb package suitable for your OS. in our case, we will use the Ubuntu package. First, head over to the Ubuntu archive URL.
Look for the /pool/main/a/apt/ to locate the apt package. After that, choose the appropriate architecture version. Click on it to download the .deb package. Next, in the Terminal, use the dpkg command to install the downloaded package. For instance, type:
sudo dpkg -i /path/to/apt_deb_file.debRemember to replace the sample path with the path in your OS. For example:
sudo dpkg -i /Home/Sidrah/Downloads/apt-get.8.debWait for it to complete and retry Step 1 to ensure the correct installation of the apt command.
Reset the OS
If none of the above steps worked, it is time to reinstall the newer version of the Linux OS. this will install the apt command again and will not cause the apt command not found error. Hopefully, this will fix the problem.
Hopefully, through this guide, you have fixed the apt command and not found an error. Otherwise, the last step will help you have a fresh OS installation. It will quickly fix all the faults. Do not forget to leave a comment below if you have any questions or issues. We will try to include the suggestions in the upcoming articles.
If this guide helped you, please share it.