Содержание
- Kyocera C6000 – устранение проблемы
- C6000 ошибка – разборка печки и устранение неисправности
- Сборка узла термозакрепления после замены повреждённых частей
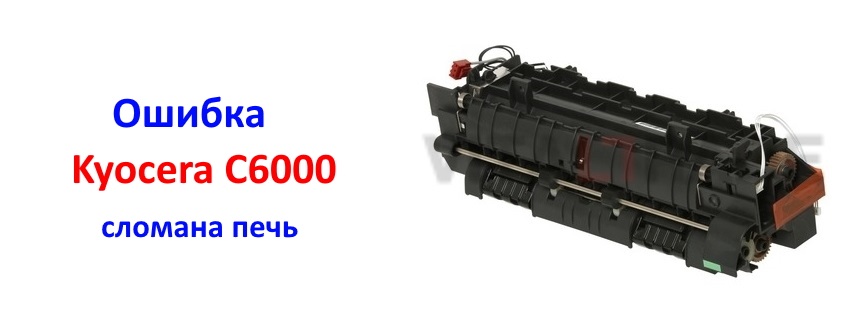
C6000 – это ошибка связанная с поломкой узла термозакрепления. В большинстве случаев ошибка возникает по причине перегрева биметаллической пластинки в термопредохранителе. Ещё её называют «таблеткой». Из-за перегрева она сильно выгибается и разрывает цепь питания лампы.
Порой достаточно демонтировать данный термопредохранитель и аккуратно стукнуть об твёрдую поверхность, чтобы пластина встала в рабочее положение. Если «таблетка» звонится тестером, то ставим её обратно и как правило ошибка C6000 больше не беспокоит.

Также, сообщение об ошибке может вызвать вышедшая из строя лампа нагрева или разрыв цепи питания лампы. В любом случае, чтобы выявить причину, нужно разобрать печку и проверить с помощью тестера цепь, термопредохранитель и саму лампу.
Далее покажу на наглядном примере ремонт, связанный с устранением ошибки C6000 на МФУ Kyocera ECOSYS M2535dn.
Kyocera C6000 – устранение проблемы
Итак, чтобы устранить проблему, нужно снять с печатающего устройства узел термозакрепления (печку). В большинстве принтеров и МФУ Kyocera, процесс демонтажа термоузла идентичен процессу, показанному на фото ниже.


C6000 ошибка – разборка печки и устранение неисправности
Итак, корпус частично сняли и демонтировали печку. Приступаем к разборке узла термозакрепления, чтобы добраться до термопредохранителя, лампы нагрева и цепи питания печки.


В моём случае неисправности имеют следующие элементы узла термозакрепления:
- Термопредохранитель (таблетка);
- Тефлоновый вал;
- Левый и правый бушинг тефлонового вала.
По вопросам запасных частей для термоблока пишите мне на почту: zipzip03remont@yandex.ru
В наличии есть все необходимые запасные части, которые нужны для ремонта печки и устранения на печатающем устройстве Kyocera ошибки C6000.
Сборка узла термозакрепления после замены повреждённых частей
После того, как Вы с помощью тестера прозвонили лампу нагрева, термопредохранитель и цепь питания вцелом, можно производить сборку печки в обратной последовательности.


На этом ремонт закончен и если всё сделали правильно, то ошибка C6000 больше не будет препятствовать работе печатающего устройства. После сборки аппарат должен выйти в готовность и можно дальше использовать его для распечатки документов. Если у Вас есть какие-либо вопросы по ремонту, обязательно пишите в комментариях ниже, постараюсь всем помочь.


Когда печатающее устройство Kyocera сигнализирует вам об ошибке C6000, значит, сломалась печь принтера – за отведенное время нагревательный элемент термоблока не может нагнетать определенные температуры.
Проблема решается в рамках гарантийного обслуживания со стороны производителя. Однако если гарантия на момент поломки истекла, то помощи стоит искать в профильных сервисных центрах.
На заметку! Причины выхода из строя термоблока могут скрываться за:
- износом нагревательного вала и его контактов;
- сработанным предохранителем – неисправность может быть вызвана перегревом печи из-за продолжительной эксплуатации устройства, превышающей рекомендуемые производителем нормы;
- сгоревшей проводкой – довольно редкий, но не исключаемый случай;
- сломанным термодатчиком – либо деталь перестала функционировать, либо нарушены контакты между датчиком и тефлоновым валом.
Поэтому не стоит удивляться тому, что печь может греть в штатном режиме, но ошибка C6000 все равно будет блокировать работу принтера.
Видео: ремонт печи у принтеров Kyocera своими руками
Производить какие-либо манипуляции с печатающим устройством Kyocera стоит только в том случае, если пользователь обладает соответствующим опытом обслуживания оргтехники в условиях отсутствия гарантии на принтер. В любой другой ситуации необходимо обратиться за помощью в сервисный центр.
Нужен ремонт печи принтера Kyocera, чтобы сбросить ошибку C6000? Сервисный центр МосТонер — бесплатный выезд мастера!
| Автор | Сообщение | |||||||||
|---|---|---|---|---|---|---|---|---|---|---|
|
Заголовок сообщения: Kyocera Mita TASKalfa 180 /181 ошибка C6000.
|
||||||||||
|
Kyocera Mita TASKalfa 180 /181 постоянно появляется после скачков напряжения ошибки C6000 / C6020 / C6050 / C6400. Через сервиску сбрасывал пол года назад… Подскажите какой функцией можно сбросить ошибку, при условии что узел термозакрепления живой? Заранее спасибо! |
|||||||||
|
|
||||||||||

| Реклама | |
|
|
|
|
Lesovick |
Заголовок сообщения: Re: Kyocera Mita TASKalfa 180 /181 ошибка C6000.
|
|||
|
Коротко и понятно: U163. _________________ |
|||
|
|
||||

")
")
")

|
Getr |
Заголовок сообщения: Re: Kyocera Mita TASKalfa 180 /181 ошибка C6000.
|
|
|
|
|
|
|
Kyocera TaskAlfa 180 error code c6000.
In this article I explain how to fix your Kyocera TaskAlfa 180 Error Code c6000. This article will help you solve some common error messages related to C6000, C602O, and C6050 error codes, which you can get any Kyocera TaskAlfa 180, TaskAlfa 181, TaskAlfa 220, TaskAlfa 221 models.
In this article, I explain how to fix your Kyocera TaskAlfa 180 Error Code c6000. This article will help you solve some common error messages related to C6000, C602O, and C6050 error codes, which you can get any Kyocera TaskAlfa 180, TaskAlfa 181, TaskAlfa 220, TaskAlfa 221 models.
Meaning of C6000 error code:
Kyocera 180 error code C6000 is displayed when your machine fails to reach the correct temperature at a specific time. Temperature does not reach 70 ° C / 158 ° F for 15 seconds before secondary stabilization. In some cases, you can solve the error code C6000 by resetting it or when it is a false error, can’t be reset it and may also require new parts.
How to fix C6000 error:
To reset this error, do the following
- Press the number key on “10871087” and the display should blink.
- Press the “163” and press the “Start” key.
- Then display the screen for “CLE” and press the “Start” key Press one more “start” key
- Then Turn off the power switch, wait 20 seconds and power up the machine, and the code should reset.
If the error code C6000 reappears. So, you should pick up the fuser unit and check. Check if the thermostat is open. After replacing the thermostat or cleaning the thermistor, put the fuser unit back into the machine after resetting the error code. Check if this code appears at a low power state below 115V.
I hope this was helpful, don’t forget to share it via any of the share buttons on this page are highly welcomed as well.
Оборудование оснащено функцией самодиагностики. При обнаружении проблемы, аппарат блокируется, на дисплее отображается код вида С#### с указанием характера проблемы. Также появляется сообщение необходимости обслуживания. После устранения проблемы, ошибку можно сбросить тумблером питания, выключив и включив аппарат.
При обнаружении неисправности дополнительного устройства (ошибки C8170, C8180, C8190, C8210)* производится частичная блокировка функциональности аппарата. После устранения неисправности ошибку можно сбросить в сервисном режиме U906.
Ошибки узла закрепления изображения (печные ошибки) C6###, после устранения неисправности и в целях безопасности, сбрасываются только в сервисном режиме U163.
Таблица кодов ошибок:
| Код |
Значение |
Описание |
Причина |
Решение |
| C0100 |
Backup memory (EEPROM) device problem (main) |
Reading from or writing to EEPROM cannot be performed. | Defective main/engine PWB. |
Replace the main/engine PWB and check for correct operation. |
| C0110 |
Backup memory data problem (main) |
Data in the specified area of the backup memory does not match the specified values. | Data damage of EEPROM. |
Contact the Service Administrative Division. |
| C0150 |
Backup memory device problem (engine EEPROM) |
Reading from or writing to EEPROM cannot be performed. | Defective main/engine PWB. |
Replace the main/engine PWB and check for correct operation. |
| Device damage of EEPROM. |
Contact the Service Administrative Division. | |||
| C0160 |
Backup memory data problem (engine EEPROM) |
Reading data from EEPROM is abnormal. | Data damage of EEPROM. |
Contact the Service Administrative Division. |
| C0170 |
Copy counts problem |
When the power is turned on, the total count and the scan count are abnormal both on the main and engine. | Data damage of EEPROM. |
Contact the Service Administrative Division. |
| Defective main/engine PWB. |
Replace the main/engine PWB and check for correct operation. | |||
| C0180 |
Machine number mismatch |
Machine number of main and engine does not match. | Data damage of EEPROM. |
Contact the Service Administrative Division. |
| C0210 |
Communication problem between the main and engine |
When the power is turned on, the machine does not detect the low level of SBSY and the high level of SDIR for 10 s. | Poor contact in the connector terminals. |
Reinsert the connector. Also check for continuity within the connector cable. If none, remedy or replace the cable. |
| Defective main/engine PWB. |
Replace the main/engine PWB and check for correct operation. | |||
| C0240 |
Printer PWB communication problem |
The printer PWB does not respond 120 s after the power is turned on. | Poor contact in the connector terminals. |
Reinsert the connector. Also check for continuity within the connector cable. If none, remedy or replace the cable. |
| Defective main/engine PWB. |
Replace the main/engine PWB and check for correct operation. | |||
| A0410 |
Document processor communication problem |
Communication fails five times successively. | Document processor installed incorrectly. |
Check the installation state of the document processor and adjust it if it is not properly installed. |
| Defective PWB. |
Replace the main/engine PWB or DP driver PWB and check for correct operation. | |||
| A0420 |
First paper feeder communication problem |
Communication fails five times successively. | First paper feeder installed incorrectly. |
Check the installation state of the first paper feeder and adjust it if it is not properly installed. |
| Defective PWB. |
Replace the main/engine PWB or cassette main PWB and check for correct operation. | |||
| C0440* |
Built-in finisher communication problem |
Communication fails five times successively. | Poor contact in the connector terminals. |
Check the connection of connector YC4 on the engine PWB and the connector of the built-in finisher, and the continuity across the connector terminals. Repair or replace if necessary. |
| Defective PWB. |
Replace the engine PWB or finisher main PWB and check for correct operation. | |||
| A0500 |
Second paper feeder communication problem |
Communication fails five times successively. | Second paper feeder installed incorrectly. |
Check the installation state of the second paper feeder and adjust it if it is not properly installed. |
| Defective PWB. |
Replace the main/engine PWB or cassette main PWB and check for correct operation. | |||
| A0510 |
Third paper feeder communication problem |
Communication fails five times successively. | Third paper feeder installed incorrectly. |
Check the installation state of the third paper feeder and adjust it if it is not properly installed. |
| Defective PWB. |
Replace the main/engine PWB or cassette main PWB and check for correct operation. | |||
| C0610 |
Bitmap (DIMM) problem |
There is a problem with the data or address bus of the bitmap DRAM. | Defective main/engine PWB. |
Replace the main/engine PWB and check for correct operation. |
| DIMM installed incorrectly. |
Check if the DIMM is inserted into the socket on the main/engine PWB correctly. | |||
| Defective DIMM. |
Replace the DIMM and check for correct operation. | |||
| C0620 |
Memory input interface problem |
Reading-in of an image does not complete within 10 s of the start of image transmission. | Defective main/engine PWB. |
Replace the main/engine PWB and check for correct operation. |
| C0630 |
DMA problem |
DMA transmission of compressed, decompressed, rotated, relocated or blanked-out image data does not complete within the specified period of time. | Defective main/engine PWB. |
Replace the main/engine PWB and check for correct operation. |
| C0800 |
Image processing problem |
JAM05 is detected twice. | Defective main/engine PWB. |
Replace the main/engine PWB and check for correct operation. |
| C2000 |
Drive motor problem |
A stable state does not continue for 1 s from 1 s after the drive motor is activated. | Poor contact in the connector terminals. |
Check the connection of connector YC6 on the main/engine PWB and the connector on the drive motor, and the continuity across the connector terminals. Repair or replace if necessary. |
| Defective drive transmission system. |
Check if the rollers and gears rotate smoothly. If not, grease the bushings and gears. Check for broken gears and replace if any. | |||
| Defective main/engine PWB. |
Replace the main/engine PWB and check for correct operation. | |||
| Defective drive motor. |
Replace the drive motor. | |||
| C2200 |
Drum motor problem |
A stable state does not continue for 1 s from 1 s after the drum motor is activated. | Poor contact in the connector terminals. |
Check the connection of connector YC6 on the main/engine PWB and the connector on the drum motor, and the continuity across the connector terminals. Repair or replace if necessary. |
| Defective drive transmission system. |
Check if the rollers and gears rotate smoothly. If not, grease the bushings and gears. Check for broken gears and replace if any. | |||
| Defective main/engine PWB. |
Replace the main/engine PWB and check for correct operation. | |||
| Defective drum motor. |
Replace the drum motor. | |||
| C3100 |
Scanner carriage problem |
The home position is not correct when the power is turned on or at the start of copying using the table. | Poor contact in the connector terminals. |
Check the connection of connector YC5 on the main/engine PWB and the connector on the home position switch, and the continuity across the connector terminals. Repair or replace if necessary. |
| Defective home position switch. |
Replace the home position switch. | |||
| Defective scanner motor. |
Replace the scanner motor. | |||
| The mirror frame, exposure lamp, or scanner wire is defective. |
Check if the mirror flames and exposure lamp are on the rail. And check the scanner wire winds correctly. | |||
| Defective main/engine PWB. |
Replace the main/engine PWB and check for correct operation. | |||
| C3200 |
Exposure lamp problem |
Non-lighting of the exposure lamp is detected at the beginning of copying. | Poor contact in the connector terminals. |
Check the connection of connector YC16 on the main/engine PWB and the connector on the inverter PWB, and the continuity across the connector terminals. Repair or replace if necessary. |
| Defective exposure lamp. |
Replace the exposure lamp. | |||
| Incorrect shading position. |
Adjust the position of the contact glass (shading plate). If the problem still occurs, replace the home position switch. | |||
| Defective PWB. |
Replace the main/engine PWB or inverter PWB and check for correct operation. | |||
| C3300 |
AGC problem |
After AGC, correct input is not obtained at CCD. | Poor contact in the connector terminals. |
Check the connection of connector YC27 on the main/engine PWB and the connector on the CCD PWB, and the continuity across the connector terminals. Repair or replace if necessary. |
| Defective exposure lamp. |
Replace the exposure lamp. | |||
| Defective PWB. |
Replace the main/engine PWB or CCD PWB and check for correct operation. | |||
| C4000 |
Polygon motor synchronization problem |
The polygon motor does not reach the stable speed within 20 s of the START signal turning on. | Poor contact in the connector terminals. |
Check the connection of connector YC3 on the main/engine PWB and laser scanner unit, and the continuity across the connector terminals. Repair or replace if necessary. |
| Defective polygon motor. |
Replace the laser scanner unit. | |||
| Defective main/engine PWB. |
Replace the main/engine PWB and check for correct operation. | |||
| C4010 |
Polygon motor steady-state problem |
Stable OFF is detected for 5 s continuously after polygon motor stability. | Poor contact in the connector terminals. |
Check the connection of connector YC3 on the main/engine PWB and laser scanner unit, and the continuity across the connector terminals. Repair or replace if necessary. |
| Defective polygon motor. |
Replace the laser scanner unit. | |||
| Defective main/engine PWB. |
Replace the main/engine PWB and check for correct operation. | |||
| C4200 |
BD steady-state problem |
ASIC detects a BD error for 600 ms after the polygon motor rotation has been stabilized. | Poor contact in the connector terminals. |
Check the connection of connector YC3 on the main/engine PWB and laser scanner unit, and the continuity across the connector terminals. Repair or replace if necessary. |
| Defective laser scanner unit. |
Replace the laser scanner unit. | |||
| Defective main/engine PWB. |
Replace the main/engine PWB and check for correct operation. | |||
| C6000 |
Fuser heater break |
The temperature does not reach 70 °C/ 158°F in 15 s before secondary stabilization. Temperature rise of 1°C/1.8°F does not occur in 5 s before secondary stabilization (except during printing). | Poor contact in the fuser thermistor connector terminals. |
Reinsert the connector. Also check for continuity within the connector cable. If none, remedy or replace the cable. |
| Fuser thermistor installed incorrectly. |
Check and reinstall if necessary. | |||
| Fuser thermostat triggered. |
Check for continuity. If none, replace the fuser thermostat. | |||
| Fuser heater installed incorrectly. |
Check and reinstall if necessary. | |||
| Broken fuser heater wire. |
Check for continuity. If none, replace the fuser heater. | |||
| C6020 |
Abnormally high fuser thermistor temperature |
Fuser thermistor is detected 230°C/ 446°F or more for 40 ms. | Shorted thermistor. |
Measure the resistance. If it is 0 Ω, replace the thermistor. |
| Broken heater control circuit on the power source PWB. |
Replace the power source PWB and check for correct operation. | |||
| C6050 |
Abnormally low fuser thermistor temperature |
Fuser thermistor remains below 90°C/ 194°F for 1 s. | Poor contact in the fuser thermistor connector terminals. |
Reinsert the connector. Also check for continuity within the connector cable. If none, remedy or replace the cable. |
| Broken fuser thermistor wire. |
Measure the resistance. If it is ∞ Ω, replace the fixing thermistor. | |||
| Fuser thermistor installed incorrectly. |
Check and reinstall if necessary. | |||
| Fuser thermostat triggered. |
Check for continuity. If none, replace the fuser thermostat. | |||
| Fuser heater installed incorrectly. |
Check and reinstall if necessary. | |||
| Broken fuser heater wire. |
Check for continuity. If none, replace the fuser heater. | |||
| C6400 |
Zero-cross signal error |
Interrupt of the zero-cross signal does not occur more than 1 s. | Poor contact in the connector terminals. |
Reinsert the connector. Also check for conti- nuity within the connector cable. If none, remedy or replace the cable. |
| Defective power source PWB. |
Check if the zero-crossing signal is output from YC2-2 on the power source PWB. If not, replace the power source PWB. | |||
| Defective main/engine PWB. |
Replace the main/engine PWB if C6400 is detected while YC2-2 on the power source PWB outputs the zero-crossing signal. | |||
| C7800 |
Broken external thermistor wire |
The thermistor output value is 0.5 V or less. | Poor contact in the connector terminals. |
Reinsert the connector. Also check for continuity within the connector cable. If none, remedy or replace the cable. |
| Defective humidity sensor. |
Replace the cassette PWB and check for correct operation. | |||
| C7810 |
Short-circuited external thermistor wire |
The thermistor output value is 4.5 V or more. | Poor contact in the connector terminals. |
Reinsert the connector. Also check for continuity within the connector cable. If none, remedy or replace the cable. |
| Defective humidity sensor. |
Replace the cassette PWB and check for correct operation. | |||
| C8170* |
Built-in finisher front side registration motor problem |
When the front-side registration home- position sensor is turned on during initialization, the sensor did not turn on while it has moved by 106 pulses. When the front-side registration home- position sensor is turned off during initialization, the sensor did not turn on in 3 s. | The front side registration motor connector makes poor contact. |
Reinsert the connector. Also check for continuity within the connector cable. If none, remedy or replace the cable. |
| Defective front side registration motor. |
Replace front side registration motor. | |||
| The front side registration home position sensor connector makes poor contact. |
Reinsert the connector. Also check for continuity within the connector cable. If none, remedy or replace the cable. | |||
| Defective front side registration home position sensor. |
Replace the front side registration home position sensor. | |||
| Defective finisher control PWB. |
Replace the finisher control PWB and check for correct operation. | |||
| C8180* |
Built-in finisher rear side registration motor problem |
When the rear-side registration home- position sensor is turned on during initialization, the sensor did not turn on while it has moved by 106 pulses. When the rear-side registration home- position sensor is turned off during initialization, the sensor did not turn on in 3 s. | The rear side registration motor connector makes poor contact. |
Reinsert the connector. Also check for continuity within the connector cable. If none, remedy or replace the cable. |
| Defective rear side registration motor. |
Replace rear side registration motor. | |||
| The rear side registration home position sensor connector makes poor contact. |
Reinsert the connector. Also check for continuity within the connector cable. If none, remedy or replace the cable. | |||
| Defective rear side registration home position sensor. |
Replace the rear side registration home position sensor. | |||
| Defective finisher control PWB. |
Replace the finisher control PWB and check for correct operation. | |||
| C8190* |
Built-in finisher trailing edge registration motor problem |
When the trailing edge registration home-position sensor is turned on during initialization, the sensor did not turn on while it has moved by 106 pulses. When the trailing edge registration home-position sensor is turned off during initialization, the sensor did not turn on in 3 s. | The trailing edge registration motor connector makes poor contact. |
Reinsert the connector. Also check for continuity within the connector cable. If none, remedy or replace the cable. |
| Defective trailing edge registration motor. |
Replace trailing edge registration motor. | |||
| The trailing edge registration home position sensor connector makes poor contact. |
Reinsert the connector. Also check for continuity within the connector cable. If none, remedy or replace the cable. | |||
| Defective trailing edge registration home position sensor. |
Replace the trailing edge registration home position sensor. | |||
| Defective finisher control PWB. |
Replace the finisher control PWB and check for correct operation. | |||
| C8210* |
Built-in finisher stapler problem |
The stapler home position sensor does not change state from nondetection to detection within 200 ms of the start of stapler motor counterclockwise (forward) rotation. During initialization, the stapler home position sensor does not change state from non-detection to detection within 600 ms of the start of stapler motor clockwise (reverse) rotation. | The stapler connector makes poor contact. |
Reinsert the connector. Also check for continuity within the connector cable. If none, remedy or replace the cable. |
| The stapler is blocked with a staple. |
Remove the stapler cartridge, and check the cartridge and the stapling section of the stapler. | |||
| The stapler is broken. |
Replace the front stapler and check for correct operation. | |||
| Defective finisher control PWB. |
Replace the finisher control PWB and check for correct operation. |
*) Kyocera TASKalfa 181/221