■ DRUM END SOON
The drum unit reached its life and requires replacement.
<User Check>
— Replace the drum unit with a new one.
— Reset the counter.
Dirt on drum unit.
<User Check>
— Clean the corona wire in the drum unit.
— Replace the drum unit with a new one, and reset the drum counter.
Step
Dirt or dust on drum unit
1
electrodes
High-voltage power supply PCB
2
failure
3
Main PCB ASSY failure
Cause
3-15
Remedy
Clean the electrodes on the drum unit and
the machine body (Refer to
Replace the high-voltage power supply
PCB.
Replace the main PCB ASSY failure.
Fig. 3-2, Fig.
3-3).
Confidential
– Compatible Printer model: Konica-Minolta bizhub 20
– Konica-Minolta bizhub 20 Error Codes with quick guides:
- Code: 1E
- Description: The drum unit reached its life and requires replacement.
- Causes:
- Troubleshooting Guides: • Replace the drum unit with a new one.
- Code: 1F
- Description: Two or more optional trays are installed
- Causes: Connector: 54702-1219 failure. Main PCB failure
- Troubleshooting Guides: • Install one optional tray. (Only one optional tray is supported.). Replace the connector: 54702-1219. Replace the main PCB ASSY.
- Code: 24
- Description: Internal temperature sensor failure
- Causes: Harness connection failure of internal temperature sensor. Internal temperature sensor failure. Main PCB failure.
- Troubleshooting Guides: Check the harness connection of the internal temperature sensor and reconnect it. Replace the internal temperature sensor. Replace the main PCB ASSY.
- Code: 35
- Description: EEPROM of main PCB failure
- Causes: Main PCB failure
- Troubleshooting Guides: Replace the main PCB ASSY.
- Code: 36
- Description: HVPS PCB during standby failure
- Causes: HVPS PCB unit failure. Main PCB failure
- Troubleshooting Guides: Replace the HVPS PCB unit. Replace the main PCB ASSY.
- Code: 3B
- Description: Main PCB RAM failure
- Causes: Main PCB failure
- Troubleshooting Guides: Replace the main PCB ASSY.
- Code: 3C
- Description: EEPROM writing error (Not applicable)
- Causes:
- Troubleshooting Guides:
- Code: 3D
- Description: EEPROM reading error (Not applicable)
- Causes:
- Troubleshooting Guides:
- Code: 3E
- Description: EEPROM bus error (Not applicable)
- Causes: Main PCB failure
- Troubleshooting Guides: Replace the main PCB ASSY.
- Code: 44
- Description: No toner cartridge
- Causes: Dirt on electrodes on toner cartridge and machine body. HVPS PCB unit failure. Main PCB failure
- Troubleshooting Guides: Clean both electrodes. Replace the HVPS PCB unit. Replace the main PCB ASSY.
- Code: 50
- Description: The drum unit reached its life and requires replacement.
- Causes:
- Troubleshooting Guides: • Replace the drum unit with a new one.
- Code: 51
- Description: The paper feed kit MP reached its life and requires replacement.
- Causes: Replacement time of the paper feed kit MP.
- Troubleshooting Guides: Replace the paper feed kit MP.
- Code: 52
- Description: The paper feed kit T1 reached its life and requires replacement.
- Causes: Replacement time of the paper feed kit tray 1.
- Troubleshooting Guides: Replace the paper feed kit tray 1.
- Code: 53
- Description: The paper feed kit T2 reached its life and requires replacement.
- Causes: Replacement time of the paper feed kit tray 2
- Troubleshooting Guides: Replace the paper feed kit tray 2.
- Code: 54
- Description: The fuser unit reached its life and requires replacement.
- Causes: Replacement time of the fuser unit
- Troubleshooting Guides: Replace the fuser unit.
- Code: 55
- Description: The laser unit reached its life and requires replacement.
- Causes: Replacement time of the laser unit
- Troubleshooting Guides: Replace the laser unit.
- Code: 56
- Description: Back cover is opened
- Causes: Harness connection failure of relay rear PCB ASSY. Relay rear PCB ASSY failure. Main PCB failure
- Troubleshooting Guides: Check the harness connection of the relay rear PCB ASSY and reconnect it. Replace the relay rear PCB ASSY. Replace the main PCB ASSY.
- Code: 57
- Description: Paper jam (Duplex tray)
- Causes: Duplex feed ASSY failure. Main PCB failure. Plate gear damaged
- Troubleshooting Guides: Replace the Duplex feed ASSY. Replace the main PCB ASSY. Replace the main frame L unit.
- Code: 58
- Description: Fuser unit failure
- Causes:
- Troubleshooting Guides:
- Code: 59
- Description: Fuser unit failure (Detect fuser failure at start-up)
- Causes: Fuser unit failure. Main PCB failure
- Troubleshooting Guides: Replace the fuser unit. Replace the main PCB ASSY.
- Code: 63
- Description: Toner life end
- Causes: Relay front PCB ASSY failure. Main PCB failure
- Troubleshooting Guides: Replace the relay front PCB ASSY. Replace the main PCB ASSY.
- Code: 67
- Description: Toner low
- Causes: Toner sensor PCB ASSY failure. Main PCB failure
- Troubleshooting Guides: Replace the toner sensor PCB ASSY. Replace the main PCB ASSY.
- Code: 68
- Description: Temperature rise when heater is off
- Causes: Fuser unit failure. Main PCB failure
- Troubleshooting Guides: Replace the fuser unit. Replace the main PCB ASSY.
- Code: 69
- Description: Mis-connect center thermistor connector
- Causes: Harness connection failure of fuser unit. Harness connection failure of relay rear PCB ASSY. Fuser unit failure. Main PCB failure
- Troubleshooting Guides: Check the harness connection of fuser unit and reconnect it. Check the harness connection of the relay rear PCB ASSY and reconnect it. Replace the fuser unit. Replace the main PCB ASSY.
- Code: 6A
- Description: Fuser temperature does not reach 60°C within the specified time (center thermistor)
- Causes: Fuser unit failure. Main PCB failure
- Troubleshooting Guides: Replace the fuser unit. Replace the main PCB ASSY.
- Code: 6B
- Description: Fuser temperature does not reach 100°C within the specified time (center thermistor)
- Causes: Fuser unit failure. Main PCB failure
- Troubleshooting Guides: Replace the fuser unit. Replace the main PCB ASSY.
- Code: 6C
- Description: Fuser temperature exceeds its higher limit (center thermistor)
- Causes: Fuser unit failure. Main PCB failure
- Troubleshooting Guides: Replace the fuser unit. Replace the main PCB ASSY.
- Code: 6D
- Description: Fuser temperature exceeds its lower limit (center thermistor)
- Causes: Fuser unit failure. Main PCB failure
- Troubleshooting Guides: Replace the fuser unit. Replace the main PCB ASSY.
- Code: 6E
- Description: Fuser temperature does not rise (center thermistor)
- Causes: Fuser unit failure. Main PCB failure
- Troubleshooting Guides: Replace the fuser unit. Replace the main PCB ASSY.
- Code: 6F
- Description: Hardware detects extremely high temperature of the center or side thermistors
- Causes: Fuser unit failure. Main PCB failure
- Troubleshooting Guides: Replace the fuser unit. Replace the main PCB ASSY.
- Code: 70
- Description: Fuser motor error
- Causes: Motor failure. Main PCB failure
- Troubleshooting Guides: Replace the main motor. Replace the main PCB ASSY.
- Code: 71
- Description: Laser unit polygon motor failure
- Causes: Laser unit failure. Main PCB failure
- Troubleshooting Guides: Replace the laser unit. Replace the main PCB ASSY.
- Code: 72
- Description: Laser beam emission failure
- Causes: Laser unit failure. Main PCB failure
- Troubleshooting Guides: Replace the laser unit. Replace the main PCB ASSY.
- Code: 75
- Description: Sensor of the inside temperature for detection detected higher than normal temperature
- Causes: Thermistor ASSY failure. Main PCB failure
- Troubleshooting Guides: Replace the laser scanner unit. Replace the main PCB ASSY.
- Code: 76
- Description: Rapid temperature rising failure (center thermistor)
- Causes: Fuser unit failure. Main PCB failure
- Troubleshooting Guides: Replace the fuser unit. Replace the main PCB ASSY.
- Code: 78
- Description: Rapid temperature falling failure (center thermistor)
- Causes: Fuser unit failure. Main PCB failure
- Troubleshooting Guides: Replace the fuser unit. Replace the main PCB ASSY.
- Code: 7A
- Description: No detection of main motor synchronous signal
- Causes: Motor failure. Main PCB failure
- Troubleshooting Guides: Replace the main motor. Replace the main PCB ASSY.
- Code: 7D
- Description: Dirt on corona wire (detect discharge error)
- Causes: Dirt or dust on drum unit electrodes. Charge HVPS PCB failure. Main PCB failure
- Troubleshooting Guides: Clean the electrodes of the main body and the drum unit. Replace the charge HVPS PCB ASSY. Replace the main PCB ASSY.
- Code: 7F
- Description: Fax paper setting mismatch (The setting paper becomes besides the A4/Letter/Legal/ Folio) (Not applicable)
- Causes: Registration front actuator 2 catching on some position. Main PCB failure
- Troubleshooting Guides: Correct catching of the registration front actuator 2. Replace the main PCB ASSY.
- Code: 80
- Description: Fax paper size is incorrect (The paper is smaller 10mm than the letter size (11inch) in Fax List/ Report)
- Causes: Registration front actuator 2 catching on some position. Main PCB failure
- Troubleshooting Guides: Correct catching of the registration front actuator 2. Replace the main PCB ASSY.
- Code: 83
- Description: Failure of discharge detection (Printing becomes unable until the drum is replaced with a new one.) (Discharge detection becomes unable until the drum counter reaches the double of the drum life.)
- Causes: Main PCB failure.
- Troubleshooting Guides: Replace the main PCB ASSY.
- Code: 84
- Description: Paper jam
- Causes: Harness connection failure of relay rear PCB ASSY. Eject actuator catching on some position. Paper eject sensor PCB failure. Main PCB failure
- Troubleshooting Guides: Check the harness connection of the relay rear PCB ASSY and reconnect it. Correct catching of the eject actuator. Check the sensor performance following the procedure described in ‘4.10 Sensor Operational Check (Function code 32)’ in Chapter 6. If any problem occurs, replace the relay rear PCB ASSY.

Solve Konica-Minolta bizhub 20 Error codes
- Code: 85
- Description: Tray 1 is not installed into the machine
- Causes: Tray 1 PE/edge sensor PCB/ Tray 2 PE/edge sensor PCB failure. Harness connection failure of Tray 1 PE/edge sensor PCB/ Tray 2 PE/edge sensor PCB. Main PCB failure. Connector 55533-1219 failure (only Tray 2)
- Troubleshooting Guides: Check the sensor performance following the procedure described in ‘4.10 Sensor Operational Check (Function code 32)’ in Chapter 6. If any problem occurs, replace the Tray 1 PE/edge sensor PCB failure/Tray 2 PE/edge sensor PCB. Check the harness connection of the Tray 1 PE/edge sensor PCB/Tray 2 PE/edge sensor PCB. and reconnect it. Replace the main PCB ASSY. Replace the connector 55533-1219.
- Code: 86
- Description: Tray 2 is not installed into the machine
- Causes: Tray 1 PE/edge sensor PCB/ Tray 2 PE/edge sensor PCB failure. Harness connection failure of Tray 1 PE/edge sensor PCB/ Tray 2 PE/edge sensor PCB. Main PCB failure. Connector 55533-1219 failure (only Tray 2)
- Troubleshooting Guides: Check the sensor performance following the procedure described in ‘4.10 Sensor Operational Check (Function code 32)’ in Chapter 6. If any problem occurs, replace the Tray 1 PE/edge sensor PCB failure/Tray 2 PE/edge sensor PCB. Check the harness connection of the Tray 1 PE/edge sensor PCB/Tray 2 PE/edge sensor PCB. and reconnect it. Replace the main PCB ASSY. Replace the connector 55533-1219.
- Code: 88
- Description: Paper jam inside the machine
- Causes: Harness connection failure of high voltage power supply PCB ASSY. Registration rear actuator catching on some position. Registration rear sensor failure. Main PCB failure
- Troubleshooting Guides: Check the harness connection of the high voltage power supply PCB ASSY and reconnect it. Correct catching of the registration rear actuator. Check the sensor performance following the procedure described in ‘4.10 Sensor Operational Check (Function code 32)’ in Chapter 6. If any problem occurs, replace the high voltage power supply PCB ASSY. Replace the main PCB ASSY.
- Code: 89
- Description: Incorrect paper size in duplex printing
- Causes: Registration rear sensor failure. Main PCB failure
- Troubleshooting Guides: Check the sensor performance following the procedure described in ‘4.10 Sensor Operational Check (Function code 32)’ in Chapter 6. If any problem occurs, replace the high voltage power supply PCB ASSY. Replace the main PCB ASSY.
- Code: 8A
- Description: Paper jam in Tray 1
- Causes: Dirt on edge sensor. Harness connection failure of high voltage power supply PCB ASSY. Paper feeding kit worn out (MP/ Tray 1/ Tray 2). Registration front sensor failure. Main PCB failure
- Troubleshooting Guides: Clean the edge sensor. Check the harness connection of the high voltage power supply PCB ASSY in the appropriate tray, and reconnect it. Replace the paper feeding kit of the appropriate tray. Procedure described in ‘4.10 Sensor Operational Check (Function code 32)’ in Chapter 6. If any problem occurs, replace the high voltage power supply PCB ASSY. Replace the main PCB ASSY.
- Code: 8B
- Description: Paper jam in Tray 2
- Causes: Dirt on edge sensor. Harness connection failure of high voltage power supply PCB ASSY. Paper feeding kit worn out (MP/ Tray 1/ Tray 2). Registration front sensor failure. Main PCB failure
- Troubleshooting Guides: Clean the edge sensor. Check the harness connection of the high voltage power supply PCB ASSY in the appropriate tray, and reconnect it. Replace the paper feeding kit of the appropriate tray. Procedure described in ‘4.10 Sensor Operational Check (Function code 32)’ in Chapter 6. If any problem occurs, replace the high voltage power supply PCB ASSY. Replace the main PCB ASSY.
- Code: 8C
- Description: Paper jam in MP Tray
- Causes: Dirt on edge sensor. Harness connection failure of high voltage power supply PCB ASSY. Paper feeding kit worn out (MP/ Tray 1/ Tray 2). Registration front sensor failure. Main PCB failure
- Troubleshooting Guides: Clean the edge sensor. Check the harness connection of the high voltage power supply PCB ASSY in the appropriate tray, and reconnect it. Replace the paper feeding kit of the appropriate tray. Procedure described in ‘4.10 Sensor Operational Check (Function code 32)’ in Chapter 6. If any problem occurs, replace the high voltage power supply PCB ASSY. Replace the main PCB ASSY.
- Code: 8D
- Description: Paper jam near eject tray
- Causes: Duplex sensor failure. Main PCB failure
- Troubleshooting Guides: Check the sensor performance following the procedure described in ‘4.10 Sensor Operational Check (Function code 32)’ in Chapter 6. If any problem occurs, replace the relay rear PCB ASSY. Replace the main PCB ASSY.
- Code: 99
- Description: Specified paper size is not supported for duplex printing (Duplex)
- Causes: Main PCB failure
- Troubleshooting Guides: Replace the main PCB ASSY.
- Code: 9F
- Description: Paper empty
- Causes: Dirt on PE sensor. Harness connection failure of PE EG sensor PCB ASSY. PE actuator catching on some position. PE sensor failure. HVPS PCB unit failure. Main PCB failure
- Troubleshooting Guides: Clean the PE sensor. Check the harness connection of the PE EG sensor PCB ASSY and reconnect it. Correct catching of the PE actuator. Check the sensor performance following the procedure described in ‘4.10 Sensor Operational Check (Function code 32)’ in Chapter 6. If any problem occurs, replace the PE PG sensor PCB ASSY. Replace the HVPS PCB unit. Replace the main PCB ASSY.
- Code: A1
- Description: Front cover opened
- Causes: Harness connection failure of front cover sensor ASSY. Part pressing the front cover sensor ASSY is broken, which is provided at the left side of the front cover inside. Front cover sensor failure. Relay front PCB failure. Main PCB failure
- Troubleshooting Guides: Check the harness connection of the front cover sensor ASSY and reconnect it. Replace the front door main or front door unit ASSY. Check the sensor performance following the procedure described in ‘4.10 Sensor Operational Check (Function code 32)’ in Chapter 6. If any problem occurs, replace the front cover sensor ASSY. Replace the relay front PCB ASSY. Replace the main PCB ASSY.
- Code: A2
- Description: During scanning, 90 cm or longer of a document is detected
- Causes: Document rear actuator catching on some position. Document rear sensor failure. Main PCB failure
- Troubleshooting Guides: Correct catching of the document rear actuator. Replace the document rear sensor. Replace the main PCB ASSY.
- Code: A3
- Description: Document rear sensor is not turned on when feeding the document
- Causes: Document rear actuator catching on some position. Document rear sensor failure. Main PCB failure
- Troubleshooting Guides: Correct catching of the document rear actuator. Replace the document rear sensor. Replace the main PCB ASSY.
- Code: A4
- Description: ADF cover opened
- Causes: ADF cover open sensor arm catching on some position. ADF cover is changed in shape or cracked. ADF cover open sensor failure. ADF relay PCB failure. Main PCB failure
- Troubleshooting Guides: Correct catching of the ADF cover open sensor. Replace the ADF cover. Replace the ADF cover open sensor. Replace the ADF relay PCB ASSY. Replace the main PCB ASSY.
- Code: A5
- Description: Fax scanning error (Warning) (First time)
- Causes: Scanning failure
- Troubleshooting Guides: Turn the power switch off and on. Then, try scanning again.
- Code: A6
- Description: Fax scanning error (Error) (Second time)
- Causes: Document scanner unit failure. Main PCB failure
- Troubleshooting Guides: Replace the CCD module. Replace the main PCB ASSY.
- Code: A7
- Description: Scanning color parameter file failure
- Causes: Scanner module failure. Main PCB failure
- Troubleshooting Guides: Replace the CCD module. Replace the main PCB ASSY.
- Code: A8
- Description: Scanning color parameter matching error
- Causes: Scanner module failure. Main PCB failure
- Troubleshooting Guides: Replace the CCD module. Replace the main PCB ASSY.
- Code: AD
- Description: DMA transfer error
- Causes: Scanner module failure. Main PCB failure
- Troubleshooting Guides: Replace the CCD module. Replace the main PCB ASSY.
- Code: AE
- Description: Document scanner home position sensor is not turned on.
- Causes: Home position sensor harness not connected correctly. Drive PCB failure. Belt broken. Home position sensor failure. Scanner motor failure. Tab of CCD module broken. Main PCB failure
- Troubleshooting Guides: Reconnect the home position sensor harness. Replace the drive PCB. Replace the belt. Replace the home position sensor. Replace the scanner motor. Replace the CCD module. Replace the main PCB ASSY.
- Code: AF
- Description: Document scanner home position sensor is not turned off.
- Causes: Home position sensor harness not connected correctly. Drive PCB failure. Belt broken. Home position sensor failure. Scanner motor failure. Main PCB failure
- Troubleshooting Guides: Reconnect the home position sensor harness. Replace the drive PCB. Replace the belt. Replace the home position sensor. Replace the scanner motor. Replace the main PCB ASSY.
- Code: B0
- Description: Document scanner unit FFC detection error
- Causes: Harness for scanner module not connected correctly. Scanner harness broken. Main PCB failure
- Troubleshooting Guides: Reconnect the harness for the CCD unit correctly. Replace the FFC cable ASSY. Replace the main PCB ASSY.
- Code: B1
- Description: Dark level offset data level error for scanning
- Causes: CCD unit failure. Main PCB failure
- Troubleshooting Guides: Replace the CCD module. Replace the main PCB ASSY.
- Code: B2
- Description: Gain control data level error for scanning
- Causes: CCD unit failure. Main PCB failure
- Troubleshooting Guides: Replace the CCD module. Replace the main PCB ASSY
- Code: B7
- Description: A/D converter standard voltage failure; at High side
- Causes: CCD unit failure. Main PCB failure
- Troubleshooting Guides: Replace the CCD module. Replace the main PCB ASSY
- Code: B8
- Description: A/D converter standard voltage failure; at Low side
- Causes: CCD unit failure. Main PCB failure
- Troubleshooting Guides: .Replace the CCD module. Replace the main PCB ASSY
- Code: B9
- Description: Scanning light adjustment error is detected
- Causes: Scanner module failure. Main PCB failure
- Troubleshooting Guides: Replace the CCD module. Replace the main PCB ASSY.
- Code: BB
- Description: White level data error
- Causes: Scanner module failure. Main PCB failure
- Troubleshooting Guides: Replace the CCD module. Replace the main PCB ASSY.
- Code: BD
- Description: Black level data error
- Causes: Scanner module failure. Main PCB failure
- Troubleshooting Guides: Replace the CCD module. Replace the main PCB ASSY.
- Code: BF
- Description: ADF duplex scanning cannot be implemented due to too long document
- Causes: Document front actuator 2 not operating smoothly or catching in some position. Document front sensor 2 failure
- Troubleshooting Guides: Correct smooth operation and that there is no catching of the document front actuator 2. Replace the document front sensor 2.
- Code: C0
- Description: New toner detection lever failure
- Causes: Power off or front cover opened while detecting a new toner cartridge. New toner sensor failure
- Troubleshooting Guides: Reset the developing bias voltage and develop roller counter. Replace the relay front PCB.
- Code: C7
- Description: Insufficient DIMM Memory
- Causes: Main PCB failure.
- Troubleshooting Guides: Replace the main PCB ASSY.
- Code: C8
- Description: Secure print data full
- Causes: Main PCB failure.
- Troubleshooting Guides: Replace the main PCB ASSY.
- Code: C9
- Description: DIMM error
- Causes: Main PCB failure
- Troubleshooting Guides: Replace the main PCB ASSY.
- Code: CA
- Description: Excess current to USB device
- Causes: Harness connection failure of USB host relay PCB ASSY. USB host relay PCB failure. Main PCB failure
- Troubleshooting Guides: Check the harness connection of the USB host relay PCB ASSY and reconnect it. Replace the USB host relay PCB ASSY. Replace the main PCB ASSY.
- Code: CD
- Description: Drum unit is not installed into the machine
- Causes: Dirt on electrodes on drum unit and machine body. HVPS PCB unit failure. Main PCB failure
- Troubleshooting Guides: Clean both electrodes. Replace the HVPS PCB unit. Replace the main PCB ASSY.
- Code: D1
- Description: Modem initialization failed
- Causes:
- Troubleshooting Guides:
- Code: DD
- Description: Fuser error other than 58, 59, 68, 69, 6A, 6B, 6C, 6D, 6E, 6F, 76, 78, DE and E2 are occurred
- Causes: Fuser unit failure. Main PCB failure. LVPS PCB failure
- Troubleshooting Guides: Replace the fuser unit. Replace the main PCB ASSY. Replace the LVPS PCB ASSY.
- Code: DE
- Description: Central temperature of heat roller detected the temperature that was lower than 60°C)
- Causes: Relay rear PCB ASSY connection failure. Fuser unit failure. Main PCB failure
- Troubleshooting Guides: Reconnect the relay rear PCB ASSY connector correctly. Replace the fuser unit. Replace the main PCB ASSY.
- Code: E0
- Description: Program error
- Causes: Program failure. Main PCB failure
- Troubleshooting Guides: Reinstall the latest firmware. Replace the main PCB ASSY.
- Code: E1
- Description: Main PCB failure
- Causes: Main PCB failure.
- Troubleshooting Guides: Replace the main PCB ASSY.
- Code: E2
- Description: Central temperature of heat roller exceeds 280°C
- Causes: Fuser unit failure. Main PCB failure
- Troubleshooting Guides: Replace the fuser unit. Replace the main PCB ASSY.
- Code: E6
- Description: EEPROM error
- Causes: Main PCB failure
- Troubleshooting Guides: Replace the main PCB ASSY.
- Code: EB
- Description: The data reading error for E2PROM
- Causes: Main PCB failure
- Troubleshooting Guides: Replace the main PCB ASSY.
- Code: EC
- Description: Fuser fan failure
- Causes: Main fan failure. Main PCB failure
- Troubleshooting Guides: Replace the main fan ASSY. Replace the main PCB ASSY.
- Code: EF
- Description: LVPS PCB failure
- Causes: LVPS PCB failure. Main PCB failure
- Troubleshooting Guides: Replace the LVPS PCB ASSY. Replace the main PCB ASSY.
- Code: F8
- Description: Battery connection error
- Causes: Battery harness connection failure. Main PCB failure. Battery failure
- Troubleshooting Guides: Reconnect the battery harness. Replace the main PCB ASSY. Replace the battery.
- Code: F9
- Description: EEPROM customizing code error
- Causes: Turn the power off, when the Maintenance mode 74 “PARAMETER INIT” is in progress. Main PCB failure.
- Troubleshooting Guides: Implement the Maintenance mode 74 again. Replace the main PCB ASSY.
- Code: FF
- Description: Excess current to USB HOST PCB error
- Causes: USB HOST PCB failure. Main PCB failure.
- Troubleshooting Guides: Replace the USB HOST PCB ASSY. Replace the main PCB ASSY.
– Get more error code list with quick guide to fix printer product, click here
– About get help with reseting Epson inkpad or others, click here
– Get more information about Epson XP 15000 troubleshooting, click here
– Buy cheap key of Epson WIC Reset Tool, CLICK HERE
– Key Epson Adjustment Program, CLICK HERE
– Download Epson printer driver, CLICK HERE
– Download Epson XP-6100 Driver, Firmware and Manuals, CLICK HERE
Contact us to get support with Konica-Minolta bizhub 20 Error case
Telegram: https://t.me/hyperaktiv
Facebook: https://www.facebook.com/dngnm/
Or click here to get more ways.
С0000
Main Motor malfunction
Ошибка главного двигателя
162/210/163/211
C0070
Toner Replenishing Motor malfunction
Проблема с вращением банки тонера
162/210/163/211/223/283/363/423/224Е/284Е/364Е/454Е/554Е
Решение
Шаг 1
Откройте переднюю крышку.
Шаг 2
Убедитесь, что туба с тонером установлена корректно.
C0202
C0204
C0206
C0208
Elevator Failure Tray 1/2/3/4
Проблема с подъемом бумаги лоток 1/2/3/4
162/210/163/211
Решение
Шаг 1
Выдвиньте соответствующий ошибке лоток.
Шаг 2
Убедитесь, что в нише за лотком отсутствует препятствующий подъёму лифта лист бумаги, выскочивший из ёмкости лотка.
C0211
C0204
C0206
C0208
Bypass Lifting Motion Failure
Проблема с подъемом бумаги лотка ручной подачи
165/185/195/215/222/282/362/223/283/363/423/224Е/284Е/364Е/454Е/554Е/227/287/367С220/С280/С360/С224/С284/С364/С454/С554/С224Е/С284Е/С364Е/С454Е/С554Е/C227/C287/C367/C258/C308/C368/C458/C558/C658
C0320
LU-202m, LU-202XL fan abnormalitye
Ошибка вентилятора кассеты LU-202m, LU-202XL
AccurioPress C2060/C2070/C2070P
C3070/C3080/C3080P
C05хх
Fusing temperature failure
Проблема с температурой узла закрепления
162/210/163/211
Решение
Шаг 1
Выключите главный выключатель аппарата.
Шаг 2
Нажмите кнопку стоп и, удерживая её, вновь включите главный выключатель аппарата.
C0F32
Faulty ATDC Sensor
Ошибка концентрации тонера
162/210/163/211
Решение
Шаг 1
Войдите в сервисный режим аппарата.
Шаг 2
В меню Adjust установите другое значение TCR Gain.
Шаг 3
Выйдите из сервисного режима.
Шаг 4
Попробуйте провести пробную печать.
C133D
ROM check error
Проблема с платой EEPROM
162/210/163/211
C2152
Transfer belt pressure welding alienation
Проблема с узлом ленты переноса
С220/С280/С360/С224/С284/С364/С454/С554/С224Е/С284Е/С364Е/С454Е/С554Е/C227/C287/C367/C258/C308/C368/C458/C558/C658
C2241
C2242
C2243
C2244
Drum motor abnormality Y/M/C/K
Ошибка мотора барабана Y/M/C/K
PRO/PRESS C6000L/C6000/C7000/C7000P/C70hc/C1060L/C1060/C1070/C1070P
Accurio Press C2060/C2070/C2070P/C3070/C3080/C3080P
Решение
Шаг 1
Войдите в сервисный режим аппарата.
Шаг 2
В режиме State confirmation проведите проверку соответствующего ошибке двигателя фотобарабана.
C2253
C2254
Color PC motor`s failure
Ошибка привода барабанов
227/287/367/С220/С280/С360/С224/С284/С364/С454/С554/С224Е/С284Е/С364Е/С454Е/С554Е/C227/C287/C367/C258/C308/C368/C458/C558/C658
Решение
Шаг 1
Откройте переднюю крышку.
Шаг 2
Извлеките ёмкость для отработанного тонера и цветные фотобарабаны.
Шаг 3
Проверьте целостность и равномерность магнитной кисти блоков проявки.
Шаг 4
Проверьте корректность установки фотобарабанов.
C2351
Fusing cooling fan motor malfunction
Ошибка главного вентилятора охлаждения
164/165/185/195/215/222/282/362
C2411
C2412
C2413
C2414
Developing unit C/M/Y/K new article release
Ошибка определения нового блока проявки
227/287/367/С220/С280/С360/С224/С284/С364/С454/С554/С224Е/С284Е/С364Е/С454Е/С554Е/C227/C287/C367/C258/C308/C368/C458/C558/C658
C2551
C2552
C2553
C2554
C2555
C2556
C2557
C2558
Abnormally low toner density C/M/Y/K
Ошибка концентрации тонера в блоке проявки
165/185/195/215/227/287/367/С220/С280/С360/С224/С284/С364/С454/С554/С224Е/С284Е/С364Е/С454Е/С554Е/C227/C287/C367/C258/C308/C368/C458/C558/C658
C2654
EEPROM Failure
Проблема с платой EEPROM
222/282/362
C2A11
C2A12
C2A13
C2A1
Drum unit C/M/Y/K new release failure
Ошибка определения нового блока барабана
С220/С280/С360/С224/С284/С364/С454/С554/С224Е/С284Е/С364Е/С454Е/С554Е/C227/C287/C367/C258/C308/C368/C458/C558/C658
C3201
C3202
Fusing motor failure
Ошибка мотора привода узла закрепления
224Е/284Е/364Е/454Е/554Е/С220/С280/С360/С224/С284/С364/С454/С554/С224Е/С284Е/С364Е/С454Е/С554Е/C258/C308/C368/C458/C558/C658
C34хх
C37хх
C38хх
C39хх
Fusing temperature failure
Проблема с температурой узла закрепления
164/165/185/195/215/221/282/362/223/283/363/423/224Е/284Е/364Е/454Е/554Е/227/287/367/С220/С280/С360/С224/С284/С364/С454/С554/С224Е/С284Е/С364Е/С454Е/С554Е/C227/C287/C367/C258/C308/C368/C458/C558/C658
Решение
Шаг 1
Выключите главный выключатель.
Шаг 2
В зависимости от модели нажмите кнопку стоп или кнопку reset (желтая кнопка), и, удерживая её, включите главный выключатель аппарата.
Шаг 3
При появлении на экране кнопки trouble reset, нажмите её.
Шаг 4
Выключите и через 10 секунд включите главный выключатель аппарата.
Шаг 5
Если ошибка не сбросилась, требуется диагностика цепи узла фиксации.
C3508
Fusing high temperature abnormality
Повышенная температура узла фиксации
PRO/PRESS C6000L/C6000/C7000/C7000P/C70hc/C1060L/C1060/C1070/C1070P
Accurio Press C2060/C2070/C2070P/C3070/C3080/C3080P
Решение
Шаг 1
Войдите в сервисный режим по процедуре сброса ошибок узла фиксации.
Шаг 2
В режиме System settings переустановите значение программного переключателя 03-1 в состояние выключено (0).
Шаг 3
Выйдите из сервисного режима и перезапустите систему.
Шаг 4
При повторном возникновении ошибки требуется диагностика цепей узла фиксации.
C3924
Fusing sensor wire breaks detection
Проблема с термистором узла фиксации
C452/C552/C652/C451/C550/C650
C4101
Polygon Motor Failure
Проблема с блоком лазера
164/185/195/215/222/282/362/223/283/363/423/224Е/284Е/364Е/454Е/554Е/227/287/367/С220/С280/С360/С224/С284/С364/С454/С554/С224Е/С284Е/С364Е/С454Е/С554Е/C227/C287/C367/C258/C308/C368/C458/C558/C658
C4661
C4662
C4663
Color registration correction abnormality Y/M/C
Ошибка регистрации цветов Y/M/C
PRO C6000L/C6000/C7000/C7000P/C70hc/C1060L/C1060/C1070/C1070P
Решение
Шаг 1
Проверьте ресурсы работы основных расходных материалов (фотобарабан, узел проявки, лента переноса) используя меню «Утилиты» или веб-интерфейс. В случае превышения ресурса замените, ресурс которого превышен.
Шаг 2
Если счетчики расходных материалов не превышены, выполните режим «Стабилизации», используя меню «Утилиты». Настройки администратора — настройки системы — настройки специалиста — регулировка принтера — стабилизация, инициализация + стабилизация.
Шаг 3
Если пункт 2 не дал положительного результата, выполните очистку коротронов заряда. Для этого откройте переднюю крышку аппарата и при помощи шомпола очистите коротрон заряда.
C5102
C5103
Main Motor malfunction
Ошибка главного двигателя
164/165/185/195/2/222/282/362/223/283/363/4/224Е/284Е/364Е/454Е/55/С220/С280/С3/С224/С284/С364/С454/С5/С224Е/С284Е/С364Е/С454Е/С554Е
C5370
MFP control board cooling fan motor`s failure to turn
Ошибка включения вентилятора платы MFP
223/283/363/423/224E/284E/364E/454E/554E/227/287/367/С220/С280/С360/С224/С284/С364/С454/С554/С224Е/С284Е/С364Е/С454Е/С554Е/C258/C308/C368/C458/C558/C658
C6755
CIS Gain adjustment abnormality
Ошибка настройки модуля CIS
AccurioPress C2060/C2070/C3070/C3080
C8001
DF communication error
Ошибка коммуникации с автоподатчиком
AccurioPress C2060/C2070/C3070/C3080
C9401
C9402
IR exposure lump malfunction
Проблема с узлом сканера
164/165/185/195/215/222/282/362/223/283/363/423/224Е/284Е/364Е/454Е/554Е/227/287/367/C227/C287/C367/C258/C308/C368/C458/C558/C658
CC151
Flash ROM error
Проблема с платой EEPROM
164/165/185/195/215/226/287/367/C227/C287/C367/C258/C308/C368/C458/C558/C658
CC163
CC164
CC165
ROM contents error
Ошибка программного обеспечения аппарата
С220/С280/С360/С224/С284/С364/С454/С554/С224Е/С284Е/С364Е/С454Е/С554Е
CD004
HDD error
Ошибка жесткого диска
222/282/362/227/287/367/C227/C287/C367/C258/C308/C368/C458/C558/C658
CD0xx
Hard disk error
Проблема с жестким диском
223/283/363/423/224Е/284Е/364Е/454Е/554Е/227/287/367/С220/С280/С360/С224/С284/С364/С454/С554/С224Е/С284Е/С364Е/С454Е/С554Е/C227/C287/C367/C258/C308/C368/C458/C558/C658
Решение
Шаг 1
Смените текущую версию прошивки.
Шаг 2
Если ошибка повторится, войдите в сервисный режим и проведите процедуру физического форматирования жёсткого диска в меню System2.
CD3xx
NVRAM data error
Проблема с платой NVRAM
165/185/195/215/222/282/362/223/283/363/423/224Е/284Е/364Е/454Е/554Е/С220/С280/С360/С224/С284/С364/С454/С554/С224Е/С284Е/С364Е/С454Е/С554Е/C227/C287/C367/C258/C308/C368/C458/C558/C658
CE020
Browser abnormality detection
Внезапное выключение браузера
AccurioPress C2060/C2070/C2070P/C3070/C3080/C3080P
CE301
Referring incorrect memory
Ошибка обработки данных (ошибка памяти)
224E/284E/364E/454E/554E/227/287/367/С224/С284/С364/С454/С554/С224Е/С284Е/С364Е/С454Е/С554Е/C258/C308/C368/C458/C558/C658
P-5
PRT/IR ERROR
C200/C203/C220/C224/C250/C252/C253/C258/C284/C277/C287/C257i/C300/C308/C352/C350/C353/C360/C364/C368/C450/C451/C452/C454/C458/C550/C552/C554/C558/C650/C652/C654/C658/C659/C754/C759/C224E/C284E/C364E/C454E/C554E/C654E/C754E/C250P/C252P/C352P/C353P/C450P/C250i/C300i/C360i/C450i/C550i/C650i/C3300i/C3320i/C3350i/C4000i/C4050i
Решение
Шаг 1
Проверить поверхность ленты переноса.
Шаг 2
Заменить ленту переноса.
P-6
P-7
P-8
P-9
C/M/Y/K Imaging Unit failure
C200/C203/C220/C224/C250/C252/C253/C258/C284/C277/C287/C257i/C300/C308/C352/C350/C353/C360/C364/C368/C450/C451/C452/C454/C458/C550/C552/C554/C558/C650/C652/C654/C658/C659/C754/C759/C224E/C284E/C364E/C454E/C554E/C654E/C754E/C250P/C252P/C352P/C353P/C450P/C250i/C300i/C360i/C450i/C550i/C650i/C3300i/C3320i/C3350i/C4000i/C4050i
Решение
Шаг 1
Проверить состояние расходных материалов по желтому каналу.
Шаг 2
Заменить расходные материалы по желтому каналу.
P-21
C224e/C224/C220/C652/C200/C203/C227/C250/C250i/C257i/C250P/C252/C252P/C253/C258/C280/C284/C284e/C287/C300/C300i/C308 C352/C350/C352P/C353/C353P/C360/C360i/C364/C364e/C368/C450/C450P/C450i/C451/C452/C454/C454e/C458/C550/C550i/C552 C554/C554e/C558/C650/C650i/C654/C654e/C658/C659/C754 C754e/C759/C3300i/C3320i/C3350i/C4000i/C4050i
Решение
Шаг 1
Проверить состояние расходных материалов по желтому каналу.
Шаг 2
Провести калибровку.
P-28
C224e/C224/C220/C652/C200/C203/C227/C250/C250i/C257i/C250P/C252/C252P/C253/C258/C280/C284/C284e/C287/C300/C300i/C308 C352/C350/C352P/C353/C353P/C360/C360i/C364/C364e/C368/C450/C450P/C450i/C451/C452/C454/C454e/C458/C550/C550i/C552 C554/C554e/C558/C650/C650i/C654/C654e/C658/C659/C754 C754e/C759
Решение
Шаг 1
Проверить состояние расходных материалов по желтому каналу.
Шаг 2
Заменить ленту переноса.
С0000
Main Motor malfunction
Ошибка главного двигателя
162/210/163/211
C0070
Toner Replenishing Motor malfunction
Проблема с вращением банки тонера
162/210/163/211
223/283/363/423
224Е/284Е/364Е/454Е/554Е
Решение
C0202
C0204
C0206
C0208
Elevator Failure Tray 1/2/3/4
Проблема с подъемом бумаги лоток 1/2/3/4
162/210/163/211
Решение
C0211
C0204
C0206
C0208
Bypass Lifting Motion Failure
Проблема с подъемом бумаги лотка ручной подачи
165/185/195/215
222/282/362/223/283/363/423
224Е/284Е/364Е/454Е/554Е
227/287/367
С220/С280/С360
С224/С284/С364/С454/С554
С224Е/С284Е/С364Е/С454Е/С554Е
C227/C287/C367
C258/C308/C368/C458/C558/C658
C0320
LU-202m, LU-202XL fan abnormalitye
Ошибка вентилятора кассеты LU-202m, LU-202XL
AccurioPress C2060/C2070/C2070P
C3070/C3080/C3080P
C05хх
Fusing temperature failure
Проблема с температурой узла закрепления
162/210/163/211
Решение
C0F32
Faulty ATDC Sensor
Ошибка концентрации тонера
162/210/163/211
Решение
C133D
ROM check error
Проблема с платой EEPROM
162/210/163/211
C2152
Transfer belt pressure welding alienation
Проблема с узлом ленты переноса
С220/С280/С360
С224/С284/С364/С454/С554
С224Е/С284Е/С364Е/С454Е/С554Е
C227/C287/C367
C258/C308/C368/C458/C558/C658
C2241
C2242
C2243
C2244
Drum motor abnormality Y/M/C/K
Ошибка мотора барабана Y/M/C/K
PRO/PRESS
C6000L/C6000/C7000/C7000P/C70hc
C1060L/C1060/C1070/C1070P
Accurio Press C2060/C2070/C2070P
C3070/C3080/C3080P
Решение
C2253
C2254
Color PC motor`s failure
Ошибка привода барабанов
227/287/367
С220/С280/С360
С224/С284/С364/С454/С554
С224Е/С284Е/С364Е/С454Е/С554Е
C227/C287/C367
C258/C308/C368/C458/C558/C658
Решение
C2351
Fusing cooling fan motor malfunction
Ошибка главного вентилятора охлаждения
164/165/185/195
215/222/282/362
C2411
C2412
C2413
C2414
Developing unit C/M/Y/K new article release
Ошибка определения нового блока проявки
227/287/367
С220/С280/С360
С224/С284/С364/С454/С554
С224Е/С284Е/С364Е/С454Е/С554Е
C227/C287/C367
C258/C308/C368/C458/C558/C658
C2551
C2552
C2553
C2554
C2555
C2556
C2557
C2558
Abnormally low toner density C/M/Y/K
Ошибка концентрации тонера в блоке проявки
165/185/195/215
227/287/367
С220/С280/С360
С224/С284/С364/С454/С554
С224Е/С284Е/С364Е/С454Е/С554Е
C227/C287/C367
C258/C308/C368/C458/C558/C658
C2654
EEPROM Failure
Проблема с платой EEPROM
222/282/362
C2A11
C2A12
C2A13
C2A1
Drum unit C/M/Y/K new release failure
Ошибка определения нового блока барабана
С220/С280/С360
С224/С284/С364/С454/С554
С224Е/С284Е/С364Е/С454Е/С554Е
C227/C287/C367
C258/C308/C368/C458/C558/C658
C3201
C3202
Fusing motor failure
Ошибка мотора привода узла закрепления
224Е/284Е/364Е/454Е/554Е
С220/С280/С360
С224/С284/С364/С454/С554
С224Е/С284Е/С364Е/С454Е/С554Е
C258/C308/C368/C458/C558/C658
C34хх
C37хх
C38хх
C39хх
Fusing temperature failure
Проблема с температурой узла закрепления
164/165/185/195/215
221/282/362/223/283/363/423
224Е/284Е/364Е/454Е/554Е
227/287/367
С220/С280/С360
С224/С284/С364/С454/С554
С224Е/С284Е/С364Е/С454Е/С554Е
C227/C287/C367
C258/C308/C368/C458/C558/C658
Решение
C3508
Fusing high temperature abnormality
Повышенная температура узла фиксации
PRO/PRESS C6000L/C6000/C7000/C7000P/C70hc
C1060L/C1060/C1070/C1070P
Accurio Press C2060/C2070/C2070P
C3070/C3080/C3080P
Решение
C3924
Fusing sensor wire breaks detection
Проблема с термистором узла фиксации
C452/C552/C652
C451/C550/C650
C4101
Polygon Motor Failure
Проблема с блоком лазера
164/185/195/215
222/282/362/223/283/363/423
224Е/284Е/364Е/454Е/554Е
227/287/367
С220/С280/С360
С224/С284/С364/С454/С554
С224Е/С284Е/С364Е/С454Е/С554Е
C227/C287/C367
C258/C308/C368/C458/C558/C658
C4661
C4662
C4663
Color registration correction abnormality Y/M/C
Ошибка регистрации цветов Y/M/C
PRO C6000L/C6000/C7000/C7000P/C70hc
C1060L/C1060/C1070/C1070P
Решение
C5102
C5103
Main Motor malfunction
Ошибка главного двигателя
164/165/185/195/2
222/282/362/223/283/363/4
224Е/284Е/364Е/454Е/55
С220/С280/С3
С224/С284/С364/С454/С5
С224Е/С284Е/С364Е/С454Е/С554Е
C5370
MFP control board cooling fan motor`s failure to turn
Ошибка включения вентилятора платы MFP
223/283/363/423
224E/284E/364E/454E/554E
227/287/367
С220/С280/С360
С224/С284/С364/С454/С554
С224Е/С284Е/С364Е/С454Е/С554Е
C258/C308/C368/C458/C558/C658
C6755
CIS Gain adjustment abnormality
Ошибка настройки модуля CIS
AccurioPress C2060/C2070
C3070/C3080
C8001
DF communication error
Ошибка коммуникации с автоподатчиком
AccurioPress C2060/C2070
C3070/C3080
C9401
C9402
IR exposure lump malfunction
Проблема с узлом сканера
164/165/185/195/215
222/282/362/223/283/363/423
224Е/284Е/364Е/454Е/554Е
227/287/367
C227/C287/C367
C258/C308/C368/C458/C558/C658
CC151
Flash ROM error
Проблема с платой EEPROM
164/165/185/195/215
226/287/367
C227/C287/C367
C258/C308/C368/C458/C558/C658
CC163
CC164
CC165
ROM contents error
Ошибка программного обеспечения аппарата
С220/С280/С360
С224/С284/С364/С454/С554
С224Е/С284Е/С364Е/С454Е/С554Е
CD004
HDD error
Ошибка жесткого диска
222/282/362
227/287/367
C227/C287/C367
C258/C308/C368/C458/C558/C658
CD0xx
Hard disk error
Проблема с жестким диском
223/283/363/423
224Е/284Е/364Е/454Е/554Е
227/287/367
С220/С280/С360
С224/С284/С364/С454/С554
С224Е/С284Е/С364Е/С454Е/С554Е
C227/C287/C367
C258/C308/C368/C458/C558/C658
Решение
CD3xx
NVRAM data error
Проблема с платой NVRAM
165/185/195/215
222/282/362/223/283/363/423
224Е/284Е/364Е/454Е/554Е
С220/С280/С360
С224/С284/С364/С454/С554
С224Е/С284Е/С364Е/С454Е/С554Е
C227/C287/C367
C258/C308/C368/C458/C558/C658
CE020
Browser abnormality detection
Внезапное выключение браузера
AccurioPress C2060/C2070/C2070P
C3070/C3080/C3080P
CE301
Referring incorrect memory
Ошибка обработки данных (ошибка памяти)
224E/284E/364E/454E/554E
227/287/367
С224/С284/С364/С454/С554
С224Е/С284Е/С364Е/С454Е/С554Е
C258/C308/C368/C458/C558/C658
P-5
PRT/IR ERROR
C200/C203/C220/C224/C250
C252/C253/C258/C284
C277/C287/C257i
C300/C308/C352/C350/C353
C360/C364/C368
C450/C451/C452/C454/C458
C550/C552/C554/C558
C650/C652/C654/C658/C659/C754/C759
C224E/C284E/C364E/C454E
C554E/C654E/C754E
C250P/C252P/C352P
C353P/C450P
C250i/C300i/C360i
C450i/C550i/C650i
C3300i/C3320i/C3350i
C4000i/C4050i
Решение
P-6
P-7
P-8
P-9
C/M/Y/K Imaging Unit failure
C200/C203/C220/C224/C250
C252/C253/C258/C284
C277/C287/C257i
C300/C308/C352/C350/C353
C360/C364/C368
C450/C451/C452/C454/C458
C550/C552/C554/C558
C650/C652/C654/C658/C659
C754/C759
C224E/C284E/C364E/C454E
C554E/C654E/C754E
C250P/C252P/C352P
C353P/C450P
C250i/C300i/C360i
C450i/C550i/C650i
C3300i/C3320i/C3350i
C4000i/C4050i
Решение
P-21
C224e/C224/C220/C652/C200/C203/C227/C250/C250i/C257i/C250P
C252/C252P/C253/C258/C280/C284/C284e/C287/C300/C300i/C308 C352/C350/C352P/C353/C353P/C360/C360i/C364/C364e/C368
C450/C450P/C450i/C451/C452/C454/C454e/C458/C550/C550i/C552 C554/C554e/C558/C650/C650i/C654/C654e/C658/C659/C754 C754e/C759
C3300i/C3320i/C3350i/C4000i/C4050i
Решение
P-28
C224e/C224/C220/C652/C200/C203/C227/C250/C250i/C257i/C250P
C252/C252P/C253/C258/C280/C284/C284e/C287/C300/C300i/C308 C352/C350/C352P/C353/C353P/C360/C360i/C364/C364e/C368
C450/C450P/C450i/C451/C452/C454/C454e/C458/C550/C550i/C552 C554/C554e/C558/C650/C650i/C654/C654e/C658/C659/C754 C754e/C759
Решение
Если вы не нашли на этой странице ваш код ошибки, то нажмите на кнопку «Запросить код ошибки», которая находится под этим текстом, заполните данные, после этого мы отправим информацию на указанную вами электронную почту, а также возможно, что мы добавим вашу ошибку в наш список.
15.4
15.4
Network Error Codes
Functions
IEEE802.1X
bizhub C360/C280/C220
Code
Description
1
Connection has already been established.
2
Parameter error.
3
Unable to find the destination AP (SSID).
4
The authentication mode does not match the AP
(IEEE8021X/WPA-EAP/WPA-PSK/NONE).
5
Negotiation of the EAP method failed.
6
The EAP authentication failed (user ID, password, certificate, etc.)
7
Encryption negotiation with the AP failed (TKIP/CCMP).
8
Failed to retrieve the client certificate.
9
The client certificate has expired.
10
Verification error of the server certificate (EAP-TLS/EAP-
TTLS/PEAP).
11
Although the WPA-PSK mode is selected, the Pre-Shared Key is
not specified.
12
An authentication error occurred in the WPA-PSK mode (un-
matched Pre-Shared Key).
13
The phase 2 method is not specified (PEAP).
14
Negotiation of the phase 2 method failed (PEAP).
15
Response from the server has timed out.
16
Failed to allocate memory.
17
Failed to start the supplicant task.
18
The driver does not work.
19
The server certificate has expired (EAP-TLS/EAP-TTLS/PEAP).
20
CA verification error of the server certificate (EAP-TLS/EAP-
TTLS/PEAP).
21
Server ID verification error of the server certificate (EAP-TLS/EAP-
TTLS/PEAP).
22
The CA certificate is not specified (EAP-TLS/EAP-TTLS/PEAP).
23
The server ID is not specified (EAP-TLS/EAP-TTLS/PEAP).
24
The setting combination is correct.
25
Connection and authentication are complete.
26
The server certificate does not have the expected usage (EAP-
TLS/EAP-TTLS/PEAP).
27
The server certificate has expired (EAP-TLS/EAP-TTLS/PEAP).
28
Access to the server to check for expiration of the server certifi-
cate is rejected (EAP-TLS/EAP-TTLS/PEAP).
29
Access to the server to check for expiration of the server certifi-
cate has timed out (EAP-TLS/EAP-TTLS/PEAP).
30
Unable to check for expiration because the CRL size that has been
retrieved to check for the expiration of the server certificate ex-
ceeds the maximum capacity that can be retained (1MB) (EAP-
TLS/EAP-TTLS/PEAP).
31
Incorrect format of the server certificate (EAP-TLS/EAP-
TTLS/PEAP).
32
Verification of the server certificate is invalid (EAP-TLS/EAP-
TTLS/PEAP).
15
15-19
The trouble code c-2152 means image Transfer belt unit retraction failure or Sensor plate.
Konica Minolta c220 error code c-2152 solutions
Here is an article on how to fix trouble code c-2152 in your Konica Minolta bizhub c220. C280, c360 copier. We are sharing a few methods to fix the error c2152 on bizhub c220. C280, c360 series, so check them one by one until it gets solved.
The maintenance sign means that the copier needs to be well serviced and checked if something is to be replaced. Consumables such as Toner, Drum, Blade, Fuser rollers, Pickup roller, and Developer are changed at such times. And also check the changing consumables are original or not. Always use spares to have good quality. If you are sure that you have replaced the correct part or nothing is to be replaced, after ensuring these things, you can proceed to clear the sign. Always call experienced technicians for service.
Meaning of the trouble code c-2152
The trouble code c-2152 means image Transfer belt unit retraction failure or Sensor plate. Maybe the problem is due to the spilled-out waste toner it may block the transfer belt retraction sensor. Remove the transfer unit, clean the transfer belt retraction sensor, contacts, and the transfer unit contact. You can try resetting the code using the Trouble Reset procedure below
- switch OFF the main power.
- Turn the power switch ON while pressing the Utility/Counter button.
- you can see the ‘Trouble Reset’ option on the display and touch it.
- Make sure «OK» is displayed and it is reset.
- then turn off the main switch and turn it on after 10 seconds and make sure the machine started correctly.
If the error is still showing even after above solutions, then you have no choice other than calling Konica Minolta service technician.
I hope this was helpful, don’t forget to share it via any of the share buttons on this page are highly welcomed as well.
Главная Сброс счетчика и барабана Konica-Minolta C220/C223
Если требуется сбросить счетчик аппарата, пробег, или устранить ошибки — это руководство для вас!
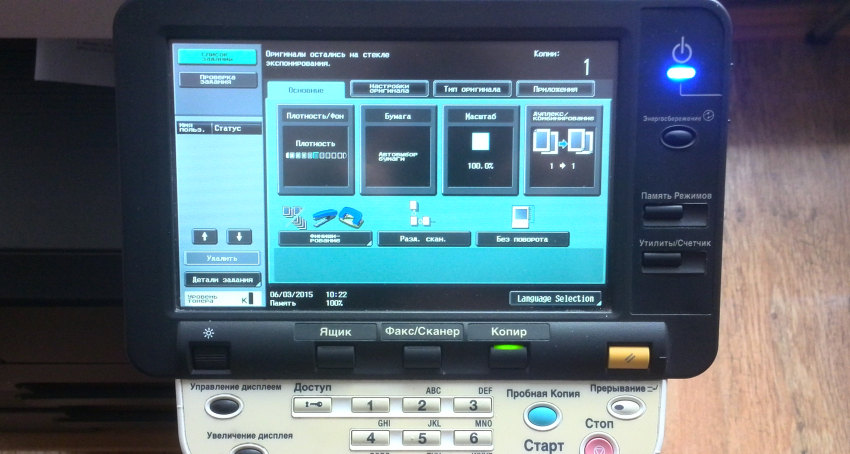
Включаем аппарат.
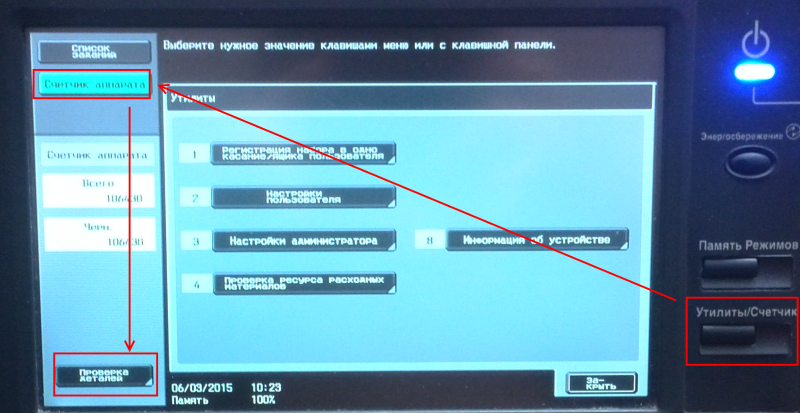
1. Жмем Утилиты/Счётчик —> Счётчик аппарата —> Проверка деталей
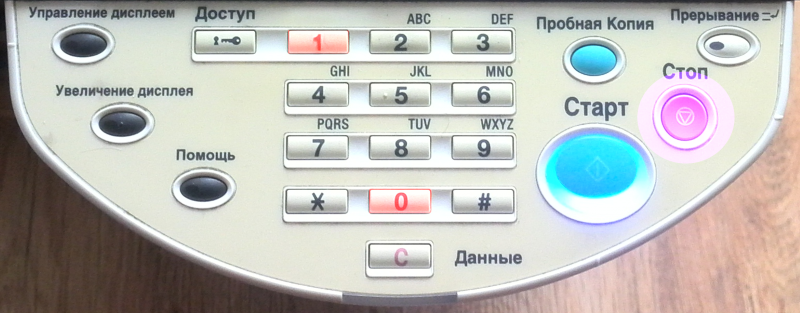
2. Видим «Утилиты». Нажимаем Стоп — Ноль — Ноль — Стоп— Ноль— Один.
Видим вот этот экран:
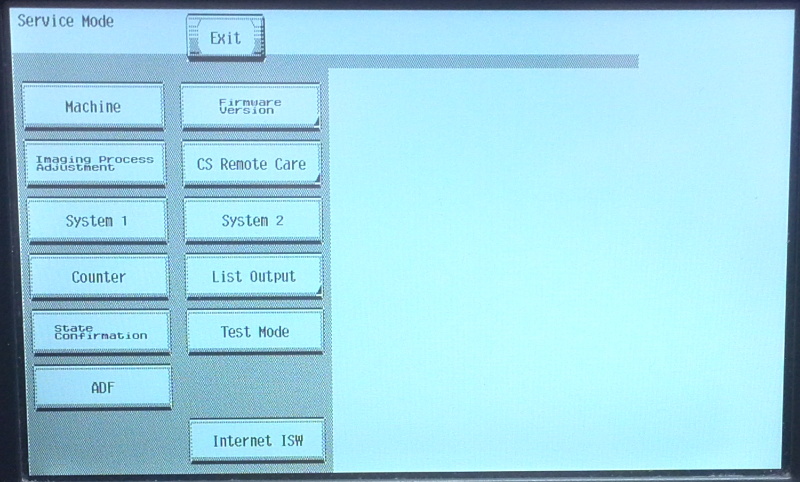
3. Жмем Counter (Счётчик) —— Counter Reset (Сброс счётчика) — выбираем нужное — Counter Of Each Mode (Все счётчики, кроме пробега барабана), Life (пробег фотовала, и т. д.) Warning (Предупреждения — сброс ошибок)
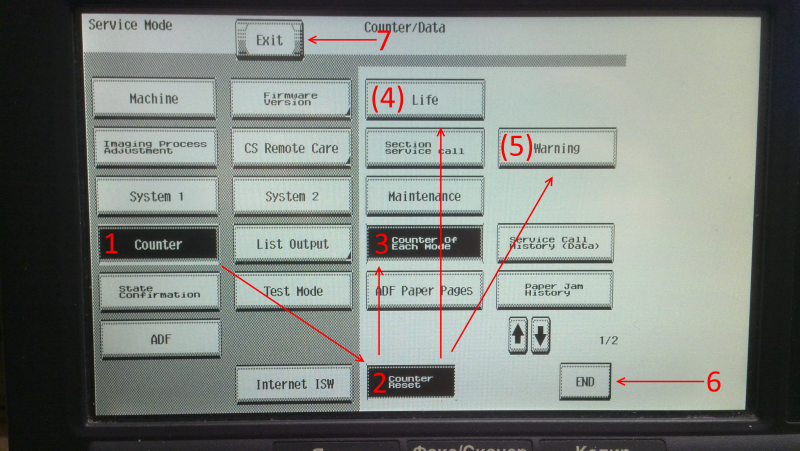
Выбираем нужное, жмем END и Exit. Все, аппаратом можно пользоваться дальше!
-
-
MINOLTA EP1054 «Замятие» и C0F30
Emperor RmPS в форуме Принтеры, МФУ, копиры формата A3
- 4
- 6123
Emperor RmPS

Ср дек 21, 2011 12:42 pm
-
MINOLTA EP1054 «Замятие» и C0F30
-
-
Konica 7013: Ошибка «H-VltFuse Diskonnect»
aav в форуме Принтеры, МФУ, факсы, копиры формата A4
- 1
- 2553
kvg
Пт окт 28, 2011 11:23 pm
-
Konica 7013: Ошибка «H-VltFuse Diskonnect»
-
-
canon bizhub c3110 ошибка «нет тонера»
gruz18 в форуме Принтеры, МФУ, факсы, копиры формата A4
- 12
- 2320
gruz18
Пт дек 24, 2021 2:55 pm
-
canon bizhub c3110 ошибка «нет тонера»
-
-
МФУ Brother 7032R у кого есть такой аппарат помогите провери
kitty в форуме Принтеры, МФУ, факсы, копиры формата A4
- 9
- 19587
kvg
Сб сен 18, 2010 10:56 am
-
МФУ Brother 7032R у кого есть такой аппарат помогите провери
-
-
Epson L3060 adjust есть у кого-нибудь? Помогите пожалуйста
Sveterkom в форуме Принтеры струйные
- 9
- 8972
akobir
Вс июн 20, 2021 3:37 pm
-
Epson L3060 adjust есть у кого-нибудь? Помогите пожалуйста
Вернуться в Принтеры, МФУ, копиры формата A3
Кто сейчас на форуме
Сейчас этот форум просматривают: нет зарегистрированных пользователей и гости: 24