Более или менее продвинутые пользователи нередко пользуются командной строкой, ведь через неё можно влиять на большинство системных процессов. При использовании строки DISM, которая есть в седьмой и следующих версиях Windows, время от времени могут появляться сообщения об ошибке.
Это норма для любой программы, но наша задача — избавиться от неполадки, чтобы выполнить необходимую команду. Ошибка 87 DISM возникает по нескольким причинам, и в каждом случае есть свои пути её устранения.
Иногда пользователи могут столкнуться с ошибкой 87 в строке DISM
Давайте выясним, при каких обстоятельствах обычно появляется такое сообщение и как избавиться от него без посторонней помощи.
С чем связана ошибка 87?
Как правило, она напрямую относится к любым действиям, выполняемым с директорией WinSxS. Если вдруг в Windows пропадёт любой системный файл, он тут же будет восстановлен рабочей копией из этой папки. То есть, WinSxS это очень важная папка с документами.
И вот ошибка 87 возникает в тот момент, когда пользователь пытается проделать какие-то операции с папкой через DISM. А теперь давайте конкретнее рассмотрим ситуации, когда возникает эта неполадка, чтобы в зависимости от них узнать способы избавления от неё.
Ошибка 87 при проверке целостности системных файлов
Время от времени Windows 7, 8, 8.1 и даже последняя версия начинает некорректно работать. Иногда компьютер внезапно перезагружается или попросту часто зависает. В такой ситуации обычно пользователям советуют не только проверить ПК на вирусы, но и выяснить, нет ли каких-либо повреждений в системных файлах.
Чтобы произвести такую проверку, используется командная строка, где вводится sfc /scannow. Если всё хорошо, то пользователь получает соответствующий текст. Однако в некоторых случаях вы получите сообщение о том, что система нашла повреждённые файлы, но ничего не может с ними сделать.
В этот момент в игру вступает DISM — следует открыть его от имени администратора и ввести такие команды:
- DISM /Online /Cleanup-image /ScanHealth — если у вас седьмая версия Windows;
- Та же команда + DISM.exe /Online /Cleanup-image /RestoreHealth — две команды для Windows 8, 10. Первая необходима для поиска повреждений, вторая команда запускает их исправление.
Именно после первой комбинации из списка, которая разработана для седьмой версии системы, всплывает ошибка 87 в командной строке DISM с сопутствующим текстом «Параметр ScanHealth не распознан в этом контексте».
Как её исправить? Первое очень простое решение — проверить правильность ввода комбинации. Поскольку эта командная строка очень требовательна к каждому знаку, убедитесь, что ставите только один пробел перед каждым слешем.
Не помогло? Тогда вам следует скачать обновление под названием KB2966583 на сайте Майкрософт и установить его на своём компьютере.
После успешной установки вы сможете снова запустить командную строку DISM и выполнить восстановление целостности файлов Windows.
Ошибка 87 и попытки почистить директорию WinSxS
Иногда вышеупомянутую директорию, которая работает страховкой для всех самых важных файлов, пытаются уменьшить. Для чего? В большинстве случаев папка WinSxS занимает много места на диске — 5,7 и даже 8 и больше ГБ, что может не нравиться пользователям, особенно если свободной памяти и так не хватает.
Поэтому чтобы немного сэкономить место, можно удалить бэкап папки таким образом:
- Открывается DISM.
- Вводиться текст dism /online /cleanup-image /spsuperseded /hidesp.
Часто именно после этой команды выбивает ошибку 87 с таким текстом: «Параметр spsuperseded не распознан в этом контексте».
Что делать в таком случае? Проверьте работоспособность сервиса «Установщик модулей Windows». Если он нерабочий, установите его, запустите, и затем повторите вышеуказанные действия.
Если же это не помогло, значит, команда для удаления бэкапа уже выполнялась, и больше места вы сэкономить не сможете.
Теперь вы знаете, по каким причинам появляется ошибка 87 в командной строке Windows, и знаете, что делать для её исчезновения. Советуем быть аккуратными при пользовании подобными программами и внимательно следить за тем, в какие процессы вы вмешиваетесь, чтобы не навредить компьютеру.
What is the DISM? Why you receive the DISM error 87 when running DISM tool in Command Line Windows? How to fix the error 87 DISM? This post shows how to fix the DISM error 87 Windows 10/8/7. After solving this CMD error 87, it is recommended to use MiniTool software to keep your data safe.
What Is DISM?
DISM, whose full name is the Deployment Image Service and Management, is a built-in tool of Windows, first introduced in Windows 7 and Windows Server R2. It can perform servicing tasks on a Windows installation image, on an online or offline image within a folder, or on WIM files.
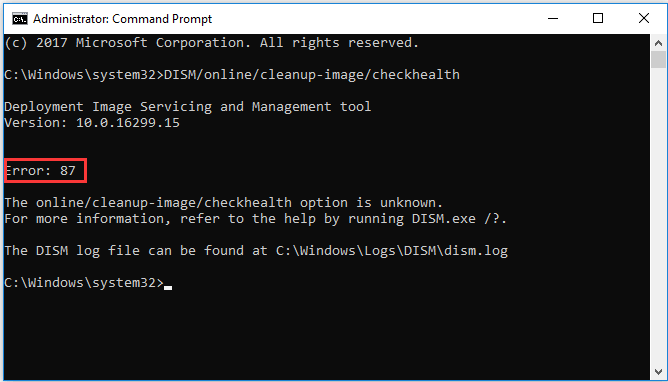
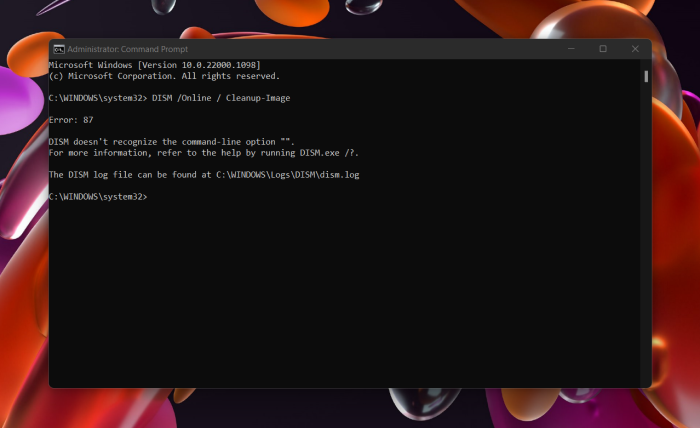
The DISM tool can be available from the Command Line or the Windows PowerShell. DISM tool can be used to update files and fix problems when a Windows image becomes unserviceable. However, when running the DISM tool, you may receive the error code 87 or some other codes like DISM error 50, DISM error 2, DISM error 3, DISM error 1639 and so on, as shown in the following picture:
These DISM error codes mean that you cannot proceed. Therefore, do you know what may cause the DISM error 87 or other DISM error codes?
What Causes DISM Error 87?
As a matter of fact, there are several reasons leading to the DISM error 87 Windows 10/8/7.
1. The command is not correct.
This is the common reason that leads to the DISM error 87 the parameter is incorrect. In most situations, users may forget to type a space before the slash when they type the command.
2. The command does not run into an elevated prompt.
The second cause for the DISM error 87 is that the command does not run into an elevated Command Prompt window. If users run this command in a regular Command Line window, they may receive the error 87 DISM.
3. The machine uses the wrong DISM version.
You may encounter the DISM error 87 if you use the wrong version of DISM when applying a Windows 10 image. Thus, to fix this problem, you need to use the correct DISM version.
Having known what may lead to the DISM restorehealth error 87, how to fix this DISM error?
How to Fix Dism Error 87?
- Use Correct DISM Command.
- Run this command using an elevated command prompt.
- Run Windows update.
- Run System File Checker.
- Use correct DISM version.
- Reinstall Windows.
6 Solutions to DISM Error 87 Windows 7/8/10
In the following section, we will list several solutions to DISM error 87. If you have the same trouble, try these solutions.
Solution 1. Use Correct DISM Command
As we have mentioned in the above section, the DISM error 87 may be caused by the incorrect command. For example, if you input the command without space before the slash like this DISM/online/cleanup-image/checkhealth, you will encounter the DISM/online/cleanup-image/restorehealth error 87.
So, in order to solve this DISM error code, please type the correct command. Please add the space before the slash, like these:
- DISM /Online /Cleanup-image /Scanhealth
- DISM /Online /Cleanup-image /Restorehealth
After that, you can check whether you still encounter the DISM error 87.
See what you can do if DISM /Online /Cleanup-image /Restorehealth is stuck.
Solution 2. Run This Command Using an Elevated Command Prompt
Some people say that they encounter the DISM error 87 when they do not run Command Prompt as administrator.
So in order to solve the error 87 DISM Windows 10, try to run Command Prompt as administrator.
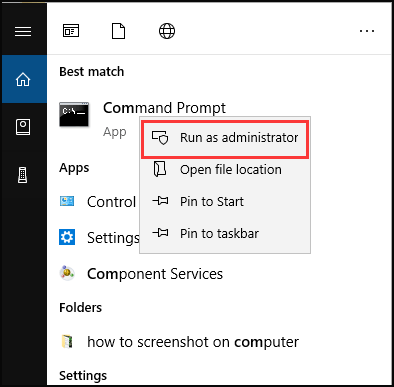
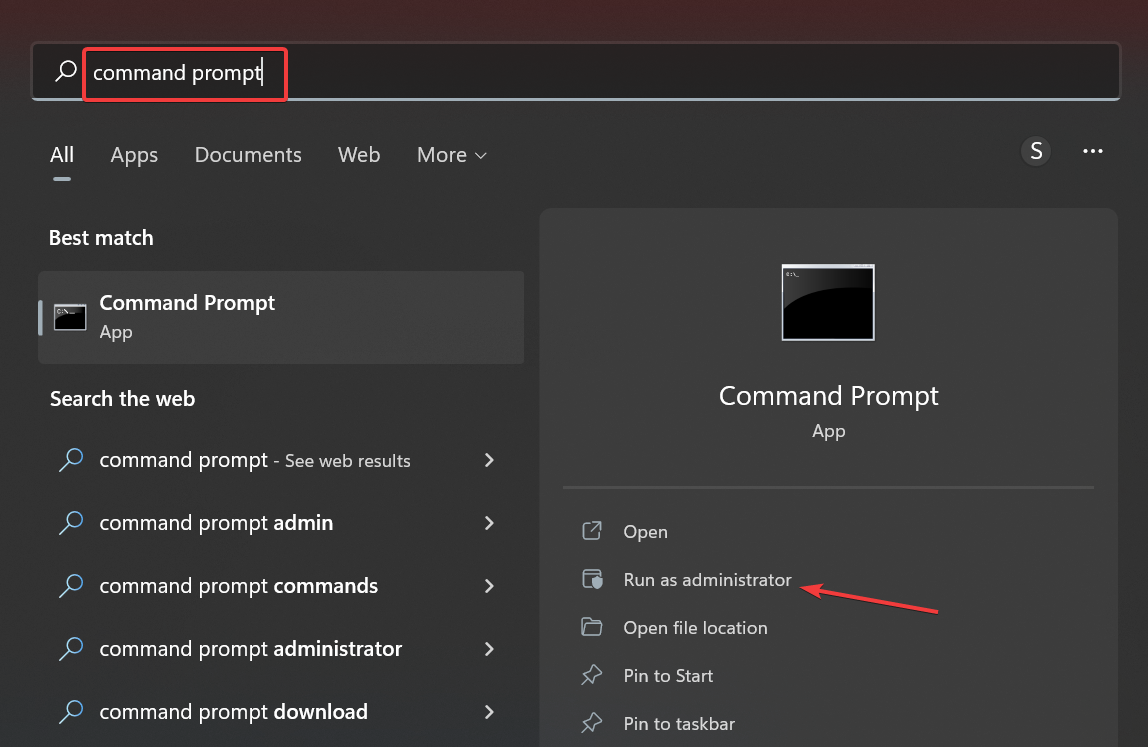
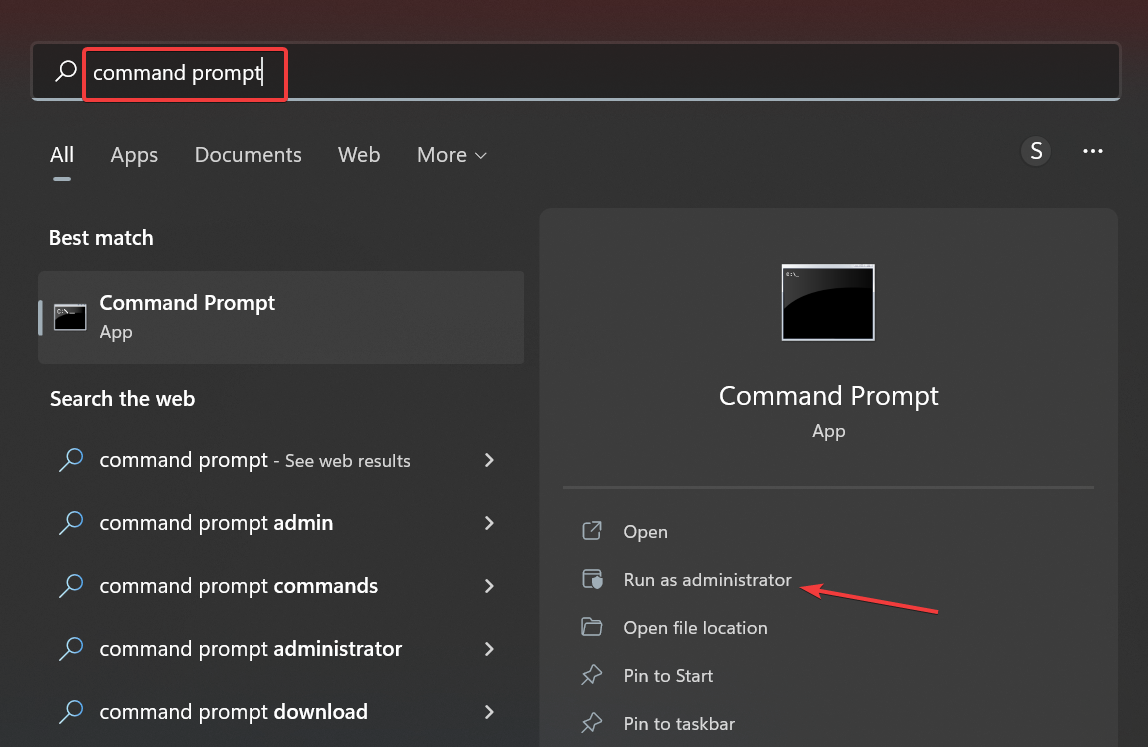
Step 1: Type command prompt in the search box of Windows 10 and choose the best matched one.
Step 2: Right-click it to choose Run as administrator to continue.
You can also refer to the post Command Prompt Windows 10: Tell Your Windows to Take Actions to know more ways to run Command Prompt as administrator.
After running Command Prompt as administrator, type the command to continue and check whether the issue DISM error 87 is solved.
Solution 3. Run Windows Update
The DISM restorehealth error 87 may be caused by the pending Windows update. So in order to solve this error 87 DISM, you need to install all pending updates.
Now, here is the tutorial.
Step 1: Open Windows Update
- Press Windows and I keys together to open Settings.
- In the pop-up window, choose Update & Security to continue.
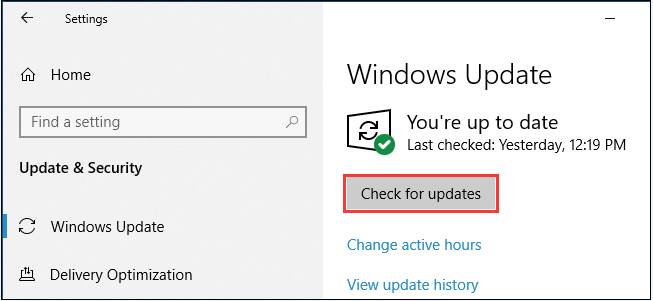
Step 2: Check for updates
- In the pop-up window, go to Windows Update tab.
- Then choose Check for Updates to continue.
Tip: During the Windows Update process, you may need to restart your computer.
When the process is finished, you can run Command Prompt as administrator and input the command again to check whether the error 87 DISM is solved.
Solution 4. Run System File Checker
If there are corrupted system files on your computer, you may also encounter the error 87 DISM Windows 10/8/7. Thus, to fix this problem, you need to check and repair the corrupted system files firstly.
Hence, the Windows built-in tool System File Checker is a good choice to repair the corrupted system files.
Now, here is the tutorial on how to fix the corrupted system files so as to fix the DISM error 87 Windows 7/8/10.
Step 1: Open Command Prompt
- Type command prompt in the search box of Windows 10 and choose the best matched one.
- Right-click it to choose Run as administrator to continue.
Step 2: Type the command to continue
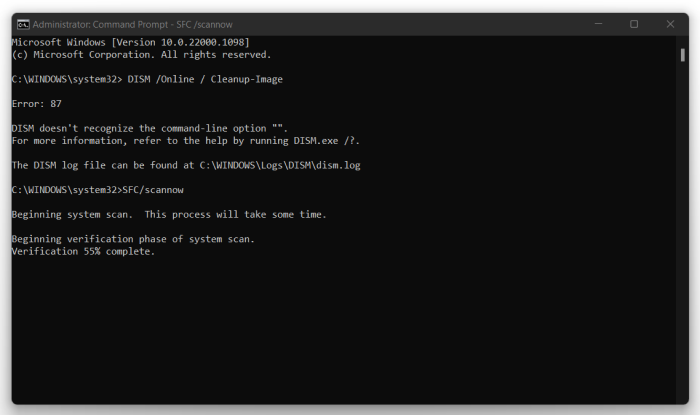
- In the pop-up window, type the command sfc /scannow and hit Enter to continue.
- Please do not close the command line windows until you see the message verification 100% completed.
When the process is finished, you will successfully repair the corrupted system files if there exists. Then open Command Prompt and run as administrator, type the command again, and check whether the DISM error 87 is solved.
If this sfc command does not work, you can refer to the post Quickly Fix – SFC Scannow Not Working (Focus on 2 Cases) to look for solutions.
Note: In addition to checking and repairing corrupted system files, you can also check whether there are bad sectors on hard drive and repair them.
Solution 5. Use the Correct DISM Version
Here, we will walk you through the fifth solution to fix the DISM error 87 Windows 10. If you are a Windows user, you need to run the Windows 10 version of DISM because this version requires the Wofadk.sys filter driver.
Note: The Wofadk.sys filter is contained in the Windows 10 Assessment and Deployment Kit. The driver must be installed and configured with Windows 10 DISM when the command runs on an earlier version of Windows host or Windows Preinstallation Environment.
So, in order to solve DISM error 87 Windows 10, you need to use the Windows 10 Version of DISM with the wofadk.sys filter driver. For more detailed information, you can see the DISM Supported Platforms and Install Windows 10 using a Previous version of Windows PE.
After that, you can reboot your computer and run Command Prompt as administrator again, then type the command to check whether the DISM error 87 Windows 10 is solved.
Solution 6. Reinstall Windows
Now, we will show you the last solution to DISM error 87. If none of the above methods works, there is no other choice for you except reinstalling Windows. Hence, you can reinstall the operating system to fix the DISM error 87and other system problems.
But one important thing is that reinstalling the operating system will lead to data loss. So before continuing, please back up all important files firstly.
After ensuring data safe, you can continue to reinstall the operating system.
I encountered the DISM error 87 when running DISM, but I successfully fixed this DISM error code after I read this post. Click to Tweet
What to Do After Solving DISM Error 87?
After you have fixed the DISM restorehealth error 87, what can you do?
It is strongly recommended to create a system image after fixing this issue. In this way, you can restore your computer to the normal state if you encounter the error 87 DISM again in later.
In addition, if you encounter some other OS problems during the using process, you can also restore your computer to a previous state with the system image created before.
Thus, do you know how to back up computer or create system image easily? To easily keep data safe, MiniTool ShadowMaker would be a good choice.
MiniTool ShadowMaker is a piece of professional Windows backup software which is specializing in backing up disks, partitions, files, folders and the operating system.
Besides backup feature, it is also a clone tool which can clone OS from HDD to SSD without data loss.
So, with so many features, download MiniTool ShadowMaker Trial from the following button immediately or choose to purchase an advanced edition.
MiniTool ShadowMaker TrialClick to Download100%Clean & Safe
Now, we will show you how to back up computer with the step-by-step guide.
Step 1: Launch MiniTool ShadowMaker
- Download MiniTool ShadowMaker and install it on your computer.
- Launch it.
- Click Keep Trial to continue.
Step 2: Select the backup source
- MiniTool ShadowMaker chooses the operating system as the backup source by default. So, there is no need for you to choose it again.
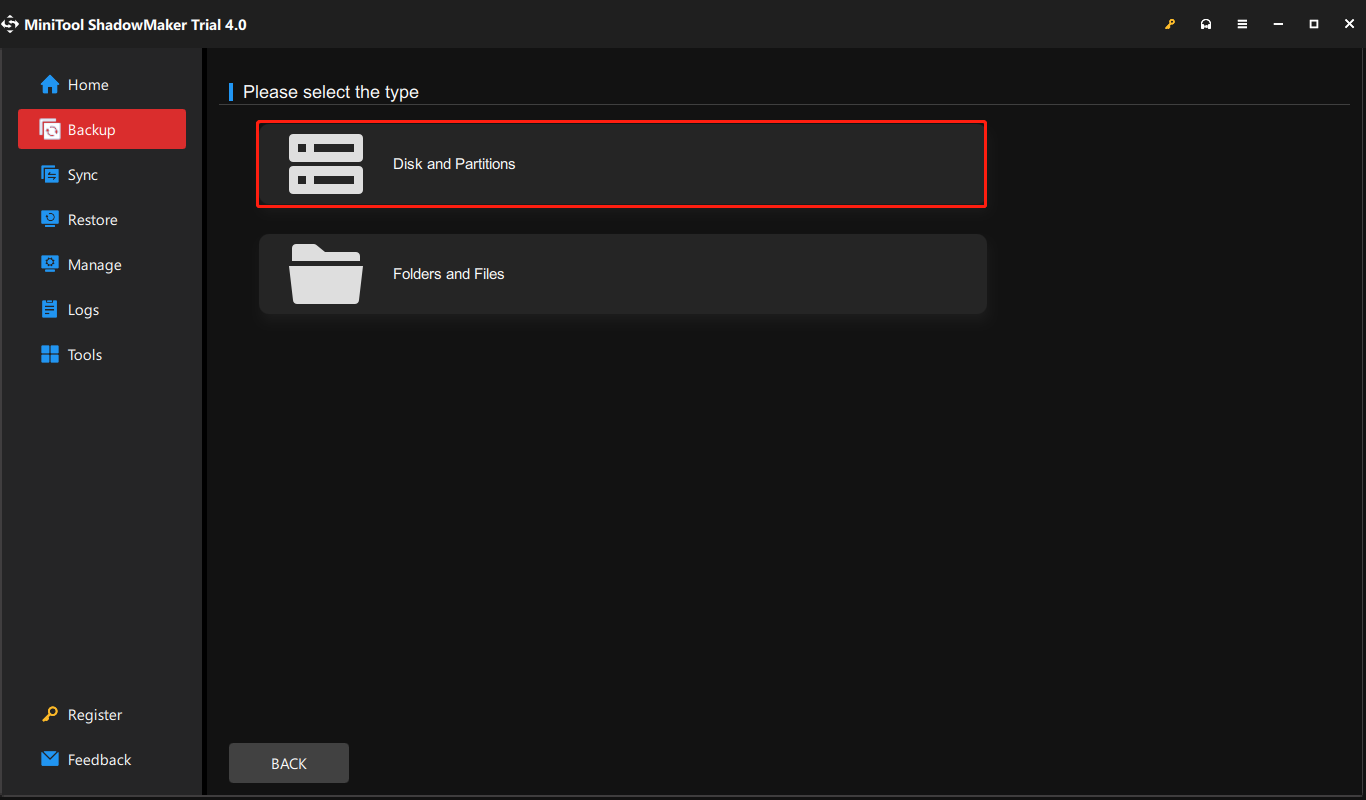
- However, if you want to select a backup source by yourself. Please go to the Backup page, click the Source module, and choose Disk and Partitions to select the system disk to continue. (If you want to back up files, choose Folders and Files.)
Step 3: Select the backup destination
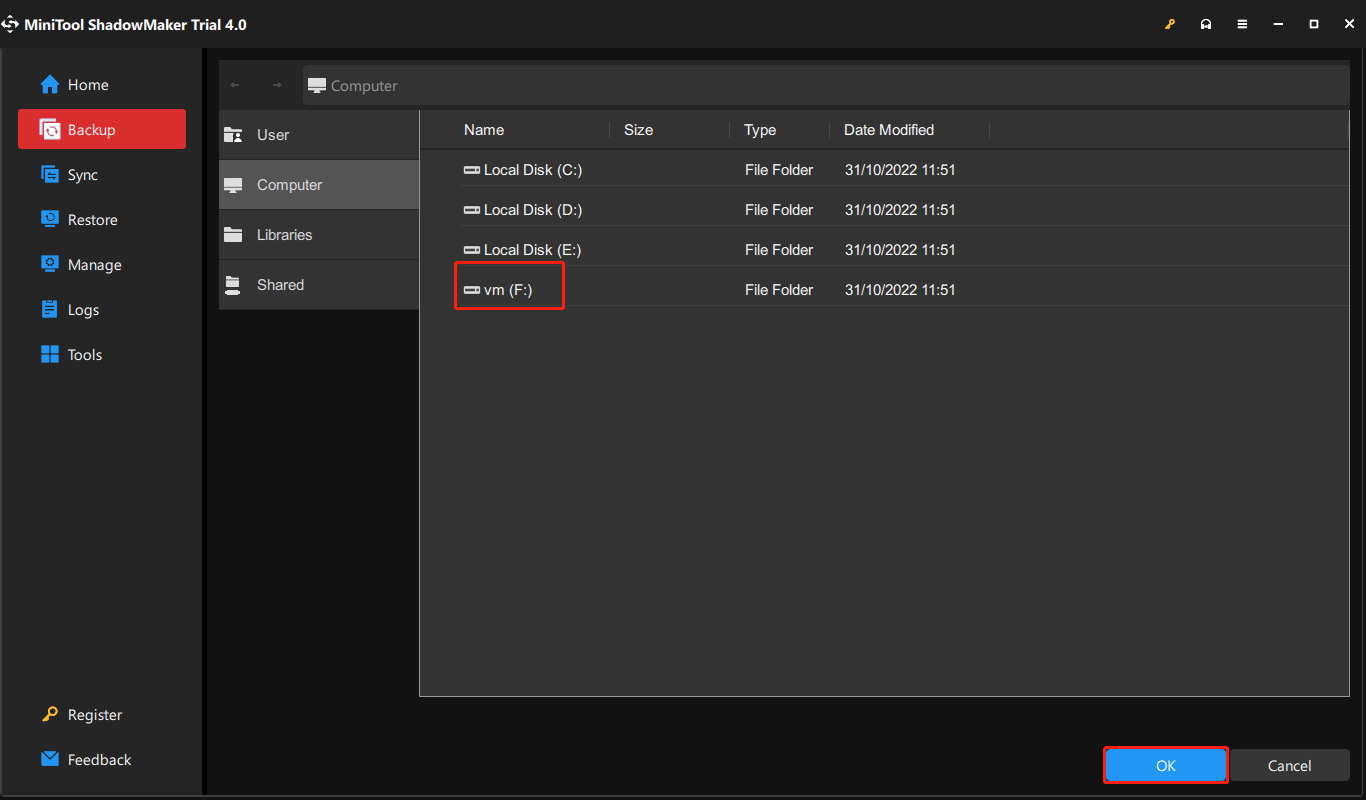
- After returning to the backup page, please click the DESTINATION module to choose a backup destination.
- Here are four available paths which are User, Computer, Libraries, and Shared. It is suggested to save the backup images on an external hard drive. So, click Computer, choose an external hard drive, and click OK to continue.
Here are three points you should pay attention to.
- MiniTool ShadowMaker enables you to create a regular backup. Just go to Options > Schedule Settings.
- MiniTool ShadowMaker provides three different backup schemes. Go to Options > Scheme Settings to change.
- You can also set some advanced backup parameters during the backup process, such as encrypting backup files, etc.
Step 4: Start to backup
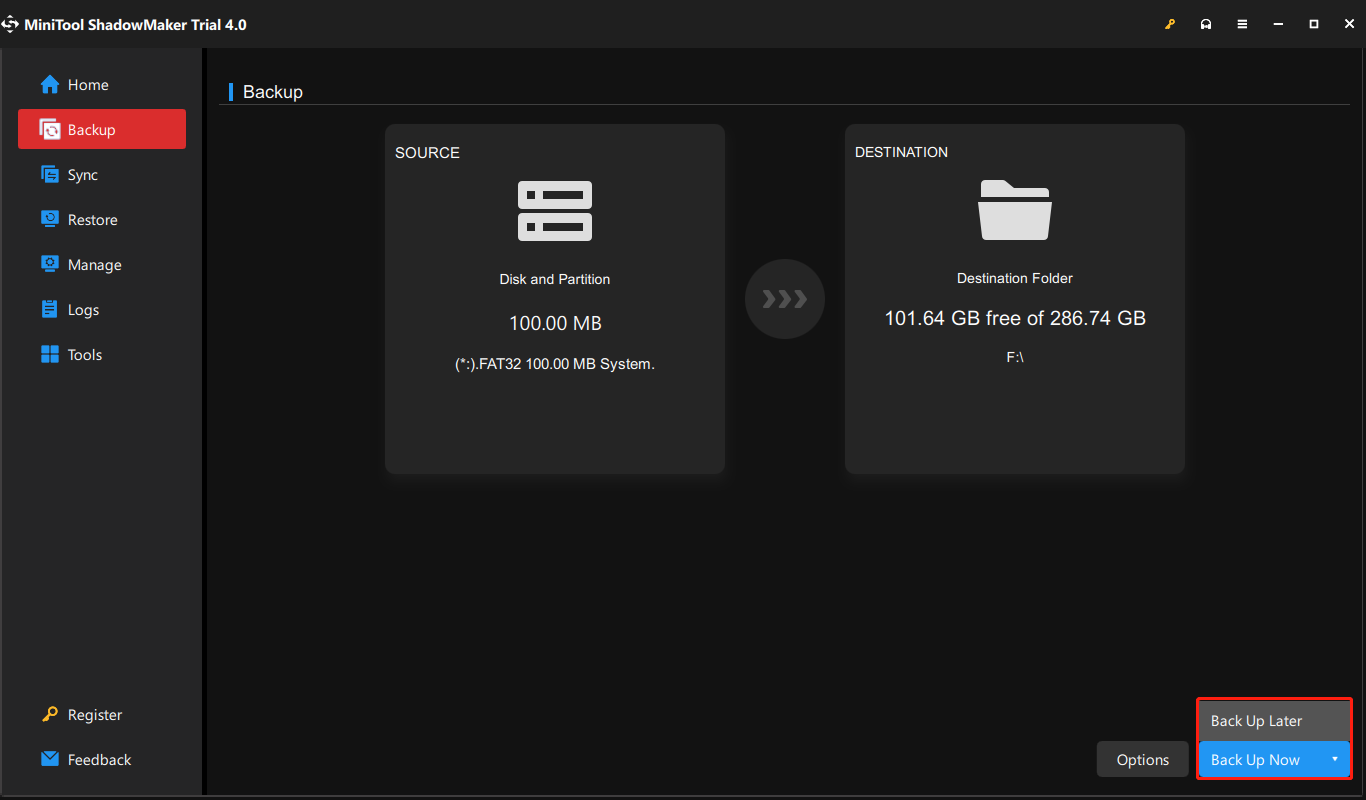
- After selecting the backup source and destination, click Back Up Now to perform the backup task immediately.
- Or click Back Up Later to postpone the backup task and restart it on the Manage page.
When all steps have been finished, you have successfully created a system image. With this system image, you can feel relax even though you encounter the DISM error 87 again or some other system problems because you can restore computer to a previous state.
MiniTool ShadowMaker TrialClick to Download100%Clean & Safe
MiniTool ShadowMaker is a powerful tool. With this software, I am assured as it can keep my computer and data safe.Click to Tweet
Bottom Line
To sum up, this post has introduced what the DISM is and what may cause the DISM error 87. Apart from that, this post has walked through 6 solutions to DISM error 87 Windows 7/8/10.
If you have any better solution to error 87 Windows 10, you can share it on the comment zone. Or if you have any problem with this post or MiniTool ShadowMaker, please contact us via the email [email protected] and we will reply to you as soon as possible.
DISM Error 87 FAQ
How do I fix error 87 DISM?
- Use Correct DISM Command.
- Run this command using an elevated command prompt.
- Run Windows update.
- Run System File Checker.
- Use correct DISM version.
- Reinstall Windows.
What is the DISM?
DISM, also called Deployment Image Service and Management, is a Windows built-in tool that can be used to service and prepare Windows image including the online or offline image within a folder or WIM file. Its features include mounting and unmounting images, querying installed device drivers in an offline image and adding a device driver to an offline image.
What does dism online cleanup image RestoreHealth do?
Dism /Online /Cleanup-Image /RestoreHealth attempts to scan and repair corrupted system files that found on your computer.
How do I fix corrupted files on Windows 10?
- Type Command Prompt in the search box of Windows and choose the best matched one.
- Right-click it to choose Run as administrator.
- Type the command sfc /scannow and hit Enter to continue.
- Wait for the process to be finished.
Learn to fix this error on Windows 10 & Windows 11
by Vladimir Popescu
Being an artist his entire life while also playing handball at a professional level, Vladimir has also developed a passion for all things computer-related. With an innate fascination… read more
Updated on
- Most instances of Error 87 arise due to poor typing and spacing of commands.
- DISM is installed with Windows 11 and is helpful in maintenance and restoration practices.
- Updating the OS and eliminating any corruption with the system files can fix the error.
Windows users have a problem dealing with many error codes caused by different issues. For example, DISM Error 87 is a command-line error that appears on Windows 11 and Windows 10.
This article will look at what causes and several ways of fixing the DISM Error 87.
Why am I getting Error 87 when trying to run DISM?
There are several causes of this error when you input any DISM command in the Command Prompt. These are some of the common ones:
- Mistype when entering the DISM command line, especially spellings and spacing. Most users perform simple mistakes like incorrect spacing between the commands, which raises the error.
- Improper installation of Windows causes this error due to problems with the Command Prompt.
- Users tend to block some essential updates when performing Windows updates, which raises bugs that throw that error.
- When using the wrong versions of DISM, it raises an error since the DISM version is old.
- You get an error if you use the standard Command Prompt (without administrative privileges). This is because it limits the user from accessing the administrative parts of the prompt.
Here are some of the related issues you might come across:
- Error 87 The parameter is incorrect
- DISM Error 87 The restorehealth option is not recognized in this context
- Error 87 the cleanup-image option is unknown
Now that you have a basic understanding of the DISM Error 87 problem in Windows 11 & Windows 10, let’s head to the solutions.
How can I fix the DISM Error 87?
- Why am I getting Error 87 when trying to run DISM?
- How can I fix the DISM Error 87?
- 1. Type the DISM command correctly
- 2. Update your Windows
- 3. Use a third-party tool
- 4. Run the command line as an administrator
- 5. Use the correct DISM version
- 6. Check for corrupt system files
- 7. Perform a disk check
- 8. Clear component store and revert the Windows update
- 9. Reinstall Windows
- How do I use DISM to repair an image in Windows 11?
- What is DISM?
1. Type the DISM command correctly
The first thing you have to verify is whether to commands are correct. For example, if you input the wrong command, make a spelling mistake, or add a space at the wrong point, DISM Error 87 might appear in Windows.
Here are the correct commands for the DISM tool:
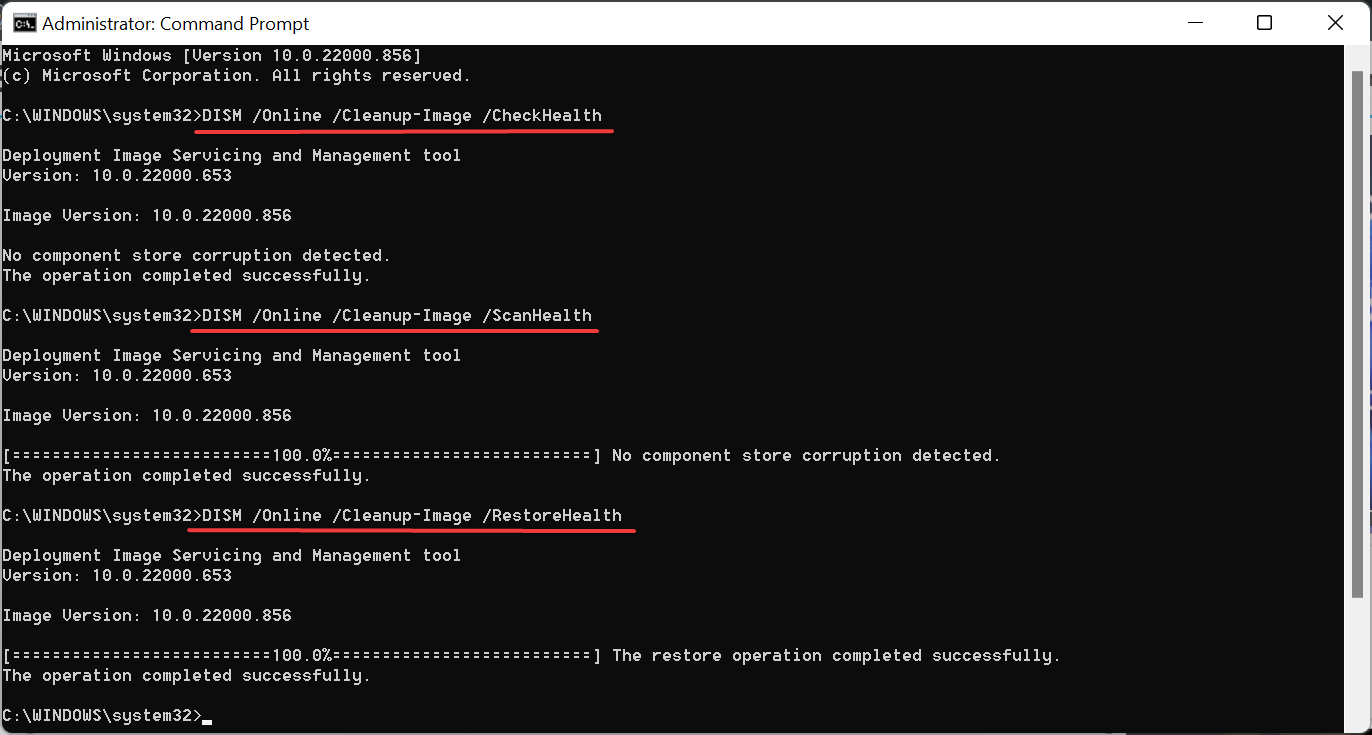
DISM /Online /Cleanup-Image /CheckHealth DISM /Online /Cleanup-Image /ScanHealth DISM /Online /Cleanup-Image /RestoreHealth
There are other DISM commands as well, but these should provide you with a basic understanding of how to use them.
2. Update your Windows
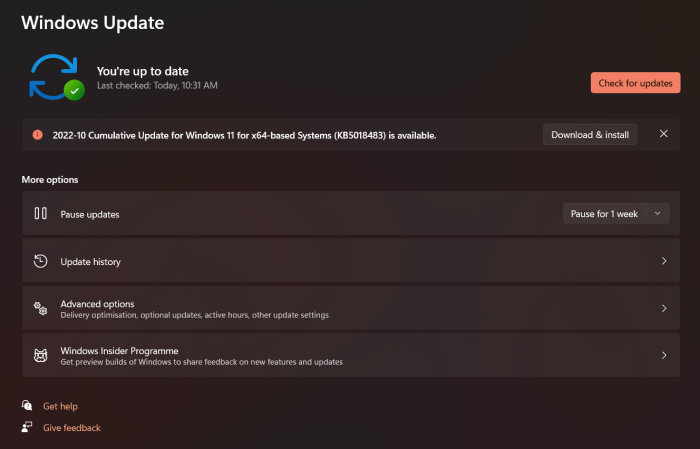
- Press Windows + I to open Settings and select Windows Update from the tabs on the left.
- Now, click on Check for updates.
- If an update is listed after the scan, click on Download & install to get it.
After updating the OS, verify if the DISM Error 87 is fixed in Windows 11. If it still appears while running the tool, head to the following method.
3. Use a third-party tool
Some system problems, such as TLS, can be highly frustrating, and the reason for these errors is often unknown.
The ideal solution is to use a reliable third-party application so the process would run efficiently and error-free.
Fortect, for example, is a great repair tool you can go for because it has advanced technology that detects all corrupt and malfunctioning Windows files and replaces them with new parts from its online database.
⇒ Get Fortect
4. Run the command line as an administrator
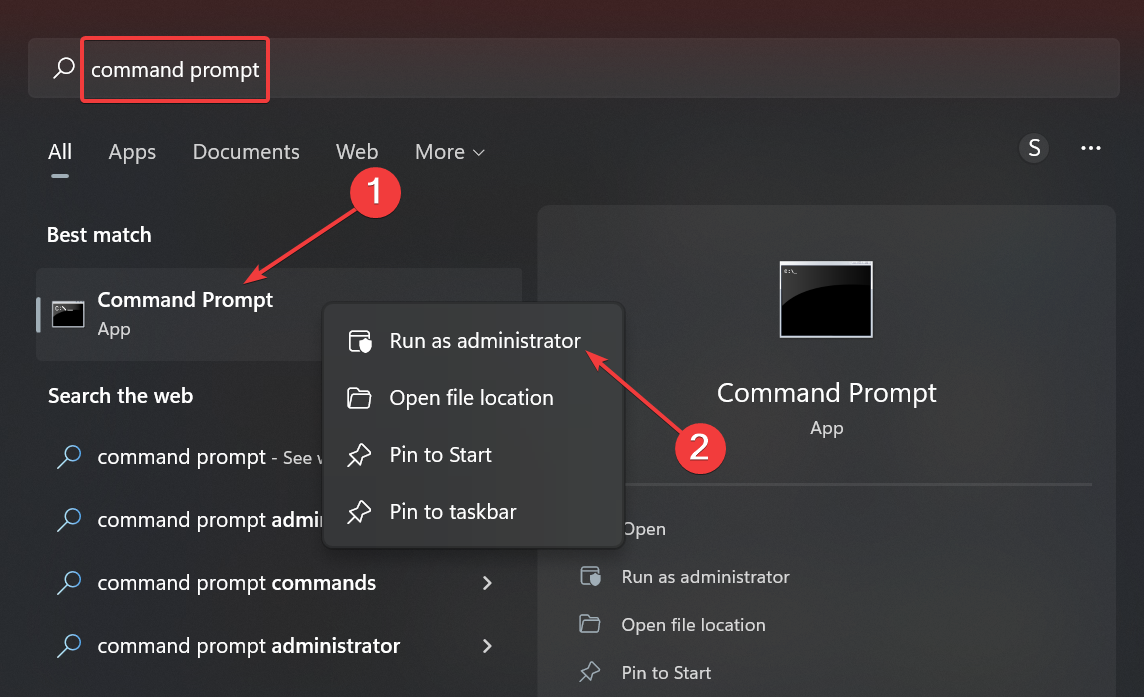
- Press Windows + S to open the Search menu, enter Command Prompt in the text field, and click on Run as administrator on the right.
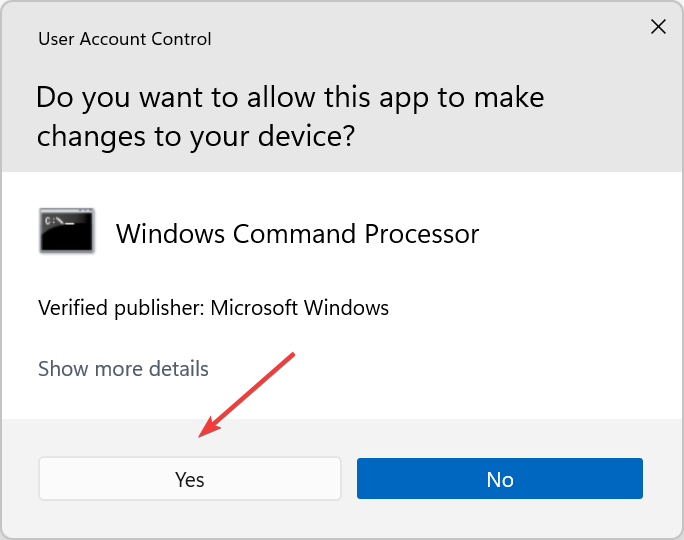
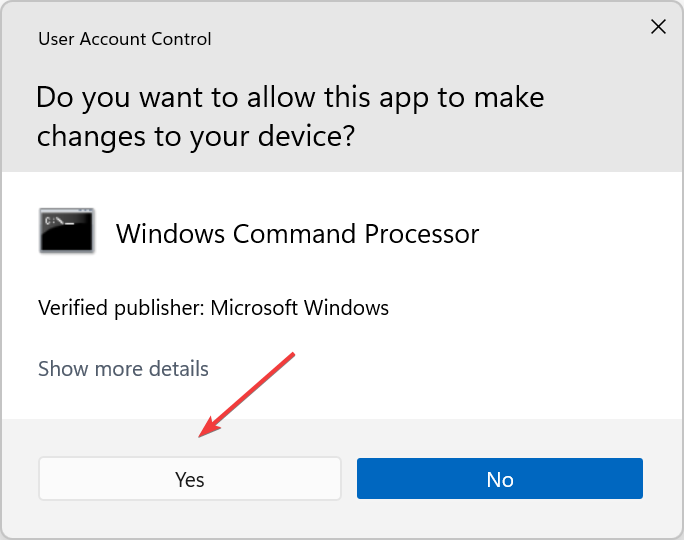
- Click Yes in the UAC prompt that appears.
- Now, try running the DISM tool.
Launching Command Prompt as an administrator will provide all the administrative rights to run the DISM tool and should fix Error 87 in Windows 11.
- How to Change the Hyper-V Display Resolution [Windows 11 Guide]
- Set up Hyper-V USB Passthrough on Windows 11
- Fix: Keyboard Shortcuts are Not Working in Photoshop
5. Use the correct DISM version
- Head to the official Windows Assessment and Deployment Kit(WADK) website and click Download the Windows ADK.
- Click Run to install the downloaded executable file. It has deployment tools that create the Deployment and Imaging Tools environment to make the running of DSIM commands successful.
- Click Next and follow the prompts to finish the installation.
6. Check for corrupt system files
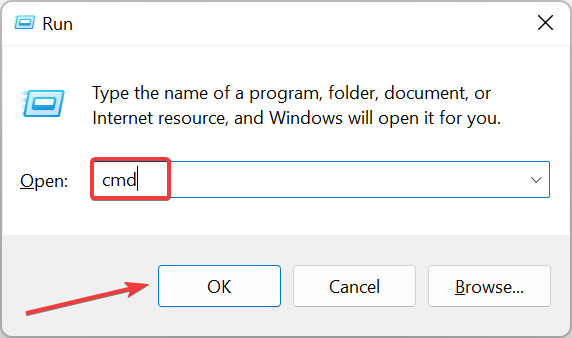
- Press Windows + R to open the Run command, enter cmd in the text field, press the Ctrl + Shift keys, and then click OK.
- Click Yes in the UAC prompt.
- Type this command and hit Enter:
sfc /scannow - Wait for the verification process, and check if any violations were found and resolved.
While it’s recommended that you first run the DISM tool and then SFC (System File Checker) scan, in this case, using just the latter might help. After completing the SFC scan, check if DISM Error 87 is fixed in Windows 11.
- How to Change the Hyper-V Display Resolution [Windows 11 Guide]
- Set up Hyper-V USB Passthrough on Windows 11
- Fix: Keyboard Shortcuts are Not Working in Photoshop
7. Perform a disk check
- Press Windows + S, enter Command Prompt in the text field, right-click on the relevant search result, and select Run as administrator.
- Click Yes in the UAC prompt.
- Type/paste the following command and press Enter:
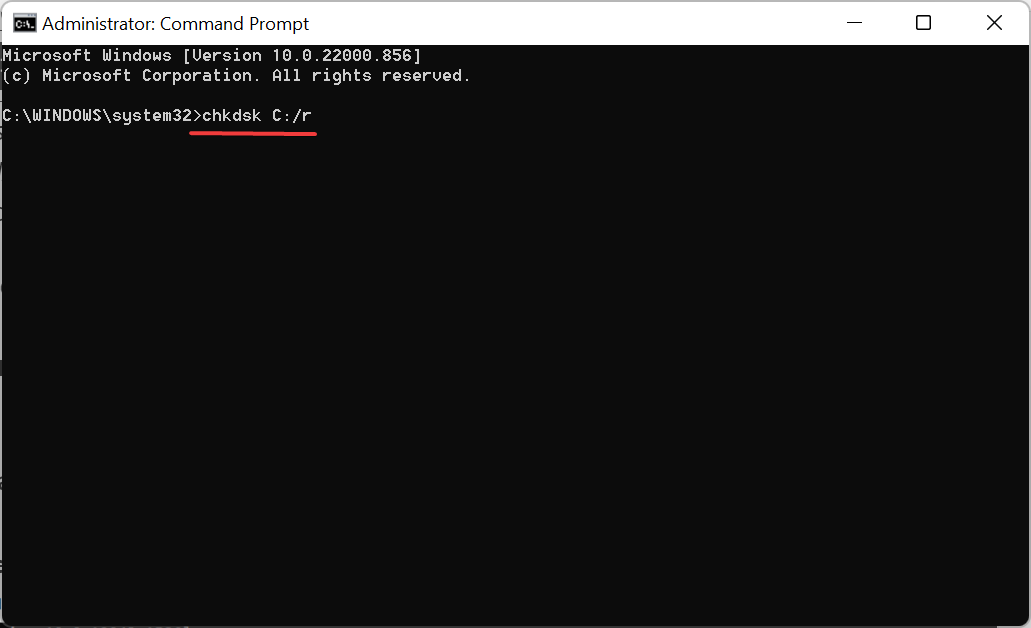
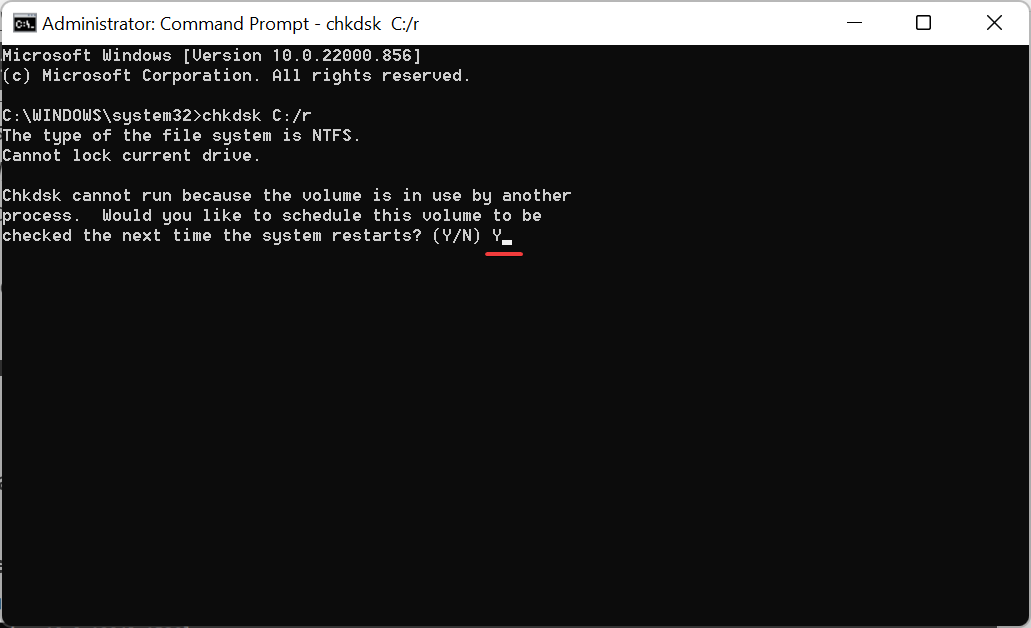
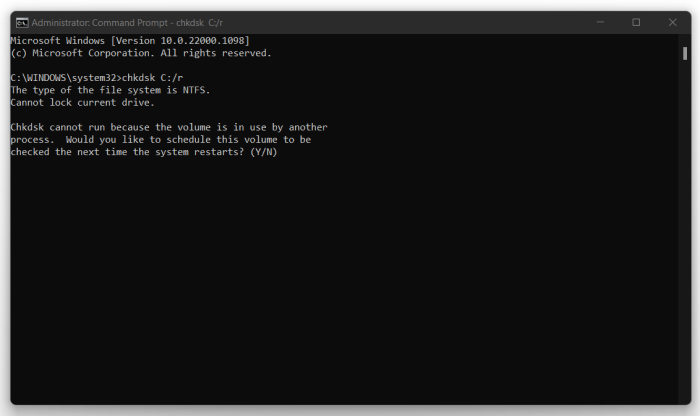
chkdsk C:/r - If you are asked to schedule the scan the next time the computer restarts, press Y, and then hit Enter.
Let the Check Disk process run uninterrupted until it’s completed, and then verify if the DISM Error 87 is fixed in Windows 11.
8. Clear component store and revert the Windows update
- Launch Command Prompt as an administrator.
- Type the following command and hit Enter:
dism.exe /image:C: /cleanup-image /revertpendingactions - Once done, restart the computer.
- Again, launch Command Prompt with administrative privileges, paste the following command, and hit Enter:
dism.exe /online /cleanup-image /startcomponentcleanup - After the two commands are run, restart the computer for the changes to effect.
9. Reinstall Windows
If none of the solutions listed previously fixed DISM Error 87, you are left with no option but to reinstall Windows.
There are two options: reset Windows 11 to factory settings or perform a clean install. Both are equally effective, though the latter requires much more effort, and you would need to create a bootable USB drive.
How do I use DISM to repair an image in Windows 11?
- Press Windows + S to open the Search menu, type Command Prompt, and click on Run as administrator.
- Click Yes in the UAC prompt.
- Now, paste the first of the following three commands, hit Enter, and after one is done running, execute the next until done with all three:
DISM /Online /Cleanup-Image /CheckHealthDISM /Online /Cleanup-Image /ScanHealthDISM /Online /Cleanup-Image /RestoreHealth - Once done, restart the computer for the changes to effect, and the Windows 11 image will be repaired.
What is DISM?
DISM stands for Deployment Image Servicing and Management, and its main work is to help organize virtual disks. It manages split Windows Imaging Format (WIM) files, Full Flash Utility Files, Virtual Hard Disks(VHD), and other vital information.
You can access the tool from the Command Prompt or Windows PowerShell, which is used to fix problems with the Windows image.
Fixing the DISM error 87 in Windows 11 will correct all the system file errors and problems. It also helps in making the modification to the OS more seamless. If you have issues with Windows 11, fixing it addresses all the problems the user faces.
Also, please find out how to make Windows 11 faster and more responsive and boost its performance.
Most DSIM errors are temporary and quick to fix. Try all the methods, and let us know which one worked for you in the comments section.
Некоторые пользователи Windows часто пользуются командной строкой, чтобы вносить изменения во многие системные процессы и контролировать их. Строка DISM может помочь запустить нужный скрытый файл, системный процесс, восстановить хранилище с данными, утерянными из-за программного сбоя и т.д. Но иногда и в работе самой командной строки возникают ошибки, например, DISM /Online/Cleanup-Image /RestoreHealth: ошибка 87. Это нормально для системы Windows, но важно знать, как устранить эту проблему. Далее расскажем, почему возникает ошибка 87, и как исправить её разными способами.
Содержание
- Из-за чего появляется ошибка 87?
- Попытка очистить папку WinSxS
- Попытка проверить целостность файлов системы
- Решение проблемы с ошибкой 87
- Отсутствие обновлений
- Недостаточно привилегий
- Проблема с системными службами
- Ошибка в синтаксисе
Из-за чего появляется ошибка 87?
В любой операционной системе Windows есть особая директория WinSxS. Там хранятся копии всех важных системных файлов. Если, какой-то из оригинальных файлов будет повреждён или утерян, система автоматически восстановит его из этой директории. Таким образом, WinSxS является крайне важной директорией, без которой Windows может в какой-то момент полностью выйти из строя.
Ошибка 87 напрямую связана с директорией WinSxS. Она возникает, когда пользователь пытается внести какие-либо изменения в эту папку. Рассмотрим действия, после которых вы можете увидеть эту ошибку на своём экране.
Попытка очистить папку WinSxS
Директория со всеми важными файлами может занимать около 7-8 Гигабайтов, поэтому некоторые пользователи пытаются удалить все бэкапы с компьютера, чтобы получить больше свободного места.
Для этого нужно:
- Зайти в пуск и ввести в поисковой строке «DISM».
- Запустить DISM.
- Ввести команду dism /online /cleanup-image /spsuperseded /hidesp.
В этом случае ошибка будет сопровождаться объяснением, что «spsuperseded» на компьютере не распознан. Проблема, скорее всего, в «Установщике модулей Windows». О нём расскажем далее.
Попытка проверить целостность файлов системы
Если компьютер начал плохо работать, спонтанно перезагружаться или выключаться, проблема может быть не только в вирусах. Часто причиной становится повреждение файлов системы. В DISM при помощи команды «sfc /scannow» можно выполнить автоматическое сканирование и восстановление. Но, в некоторых случаях, система выявляет повреждение файлов, но сделать с этим ничего не может.
Тогда приходится проводить восстановление вручную:
- Запустить DISM.
- Ввести команду сканирования.
- Ввести команду восстановления.
Для Windows 7 достаточно ввести одну команду: «DISM /Online /Cleanup-image /ScanHealth». Если вы пользуетесь более новыми версиями ОС, к этому коду нужно добавить вторую часть «DISM.exe /Online /Cleanup-image /RestoreHealth».
При попытке проверки файлов и возникает ошибка 87. В этом случае проблема часто заключается в отсутствии обновлений. Как её решить, расскажем далее.
Решение проблемы с ошибкой 87
Существует несколько причин, вызывающих ошибку 87. Во всех случаях исправить проблему достаточно просто, поэтому рассмотрим каждый случай подробнее.
Отсутствие обновлений
Ошибка часто возникает при попытке восстановить системные файлы, если некоторые модули системы не обновлены. В данном случае вам требуется найти на официальном сайте Microsoft обновление KB2966583. Оно распространяется бесплатно и почти ничего не весит. Найдите подходящий под вашу версию ОС файл, выберите язык «русский», скачайте обновление, запустите и следуйте дальнейшим инструкциям в инсталляторе.
Также ошибка 87 возникает из-за отсутствия других обновлений. Обычно, система Windows обновляется автоматически. Но, если вы отключите эту функцию, то со временем некоторые функции и программы начнут работать некорректно. Введите в поисковой строке «Центр обновлений Windows» и проверьте последние обновления.
Недостаточно привилегий
Использовать DISM могут только те пользователи, которые обладают правами администратора. Если вы запустили консоль, как обычный пользователь, то при попытке ввести команду она покажет вам ошибку 87. Чтобы запустить командную строку в режиме администратора, найдите её в перечне программ. После этого нажмите правой кнопкой мыши и в открывшемся списке выберите пункт «Запуск от имени администратора».
Проблема с системными службами
При выполнении некоторых команд в DISM задействуется системная служба «Установщик модулей Windows». Из-за программных сбоев она иногда отключается, что не позволяет выполнять некоторые команды.
Найдите «Службы» через поисковую строку и найдите в списке нужную службу.
Нажмите на неё правой кнопкой мыши и выберите «Свойства». Если «Установщик модулей Windows» остановлен, как на скриншоте снизу, нажмите на «Запустить».
Ошибка в синтаксисе
Распространённая ошибка, допускаемая по невнимательности. Проверьте правильность набранной команды. Обратите внимание, что перед каждым знаком «/» должен стоять пробел. На эту причину указывают следующие описания к ошибке 87:
- Параметр не распознан в контексте;
- Неизвестный параметр.
DISM stands for Deployment Image Service and Management, and you can find DISM in Windows 7/8/10/11 and Windows Server R2 as a preinstalled tool to provide services related to the recovery and repair of Windows images.
You can access the DISM tool from Windows PowerShell or the Command Line of your computer. When a Windows image becomes inoperable, the DISM tool can update files and repair problems.
DISM Error 87 Overview
But unfortunately, when running the DISM tool, sometimes you may receive the DISM error code 87: Option is Unknown. Let us start with the causes of DISM error 87 to find out what is causing this error in our system.
There are several possible causes of the DISM error 87 in Windows 11/10/8/7, here are listed some of them:
- The command or the parameters that you have given is incorrect.
- Unsupported command on Elevated Command Prompt.
- Inappropriate DISM version.
- When a service was required, your system was unable to start it. As an example, consider a network connection failure.
- Failure in Windows Update.
In most cases, the user shall immediately have to repair or update Windows and download the required files. However, it is an open invitation to data loss during the process.
Relax. Don’t panic! We have got your back. All of your questions will be answered in this tutorial. The following section is the perfect solution to save your data. Here’s how to fix the DISM error 87 option is an unknown issue, and recover your lost data.
Recover Lost Data Before Repair Windows 11/10
It is always recommended that you recover your data before beginning the Windows repair. Your system is at high risk of accidental data loss during the repair. So, to be safe, back up all important files before proceeding.
Now comes the question of how to back up your data and which tool to use. EaseUS Data Recovery Wizard is the best tool you might use when looking for a data recovery tool.
Here are a few situations that can require you to use a data recovery app:
- Lost data due to accidental deletion
- Storage drive damaged
- Accidentally formatted a drive or partition
- Data corrupted due to errors
With its three-step process, you can recover your data quickly and efficiently. The best part is that EaseUS Data Recovery Wizard does not need prior technical or computer knowledge.
The app even lets you recover data from deleted, hidden, lost or RAW partitions (fix raw partition without losing data). You can also get your data back from unbootable or crashed systems.
Moreover, the software only takes a few minutes to download and will begin scanning your computer with a single click. It supports almost all document formats and can also be used to store images, videos, audio, and other media. Its compatibility with all versions of the Microsoft Windows operating system sets it apart.
Follow the steps below and recover your data using EaseUS Data Recovery Wizard:
Step 1. Run EaseUS Data Recovery Wizard. Choose the drive where you lost files and start scanning. This software allows you to recover lost data from all devices, including HDD, SSD, USB drive, SD card, pen drive, camera, etc.
Step 2. Browse the full scan results. You can choose the file type you need by clicking on the file type filter. EaseUS data recovery software supports 1000+ file types like photos, videos, documents, emails, audio files, and many more.
Step 3. Select the files you want to preview. Click «Recover» and set a storage location to save the recovered data.
Now that we have completed the most challenging yet crucial part of recovering our data towards fixing the DISM error 87, proceedings further in this tutorial are safe.
Let us look at five effective ways to fix the DISM error 87 — the DISM error 87 option is unknown.
You can also follow the detailed video tutorial to walk you through the process of resolving DISM error 87. Remember to check the key points below:
- 00:14 Use elevated command prompt
- 01:10 Use correct spacing
- 02:38 Reset Windows 10
- 02:49 Using Recovery
Quick Navigation:
- Fix 1. Type in Correct DISM Command-Line
- Fix 2. Run SFC or SCANNOW Tool
- Fix 3. Run CHKDSK Tool
- Fix4. Run Windows Update
- Fix 5. Restore/Re-install Windows
Fix 1. Type in Correct DISM Command-Line
Writing an incorrect DISM command is one of the silliest mistakes. So, whenever you encounter DISM error 87, double-check your command.
Here are a few things to look out for while checking the commands:
- Spelling mistakes.
- There must be a space before every slash in the command.
- Use of correct format and sequence.
Example:
DISM/Online\Clenup-image/Scanhealth (incorrect)
DISM /online /cleanup-image /scanhealth (correct)
After making the required changes, check whether your issue has been resolved. If you still encounter DISM Error 87, try the next solution in the list.
Fix 2. Run SFC or SCANNOW Tool
There is a high chance that you are facing DISM error 87 due to corrupted system files in your computer. The goal is to scan and repair all corrupted system files leading to the error.
Let’s look at how to repair the error caused by corrupted system files using a built-in tool of Windows, System File Checker, or SFC.
Step 1. Search for the command prompt in the search box of Windows 10.
Step 2. Select the Run-as-administer option to proceed.
Step 3. In the command prompt, type SFC/scannow and press the Enter button to continue.
Step 4. Wait for the verification to be completed 100%.
Note: Do not close the command prompt window before the 100% verification completion.
This will repair all the corrupted system files that exist on your computer.
Now, check the command prompt to see if the issue of DISM error 87 has been resolved. Try the next fix if this doesn’t work for you.
Fix 3. Run CHKDSK Tool
If you are reading this fix, we assume your issue has still not been resolved. Hopefully, CHKDSK will do the work for you. You may be encountering DISM error 87 due to some disk-related issues.
The CHKDSK tool checks if the data in the disks are in a safe state or not. Here you will see how to use the CHKDSK tool to resolve your problem. The steps involved in this are as follows:
Step 1. Run the command prompt as administrator.
Step 2. Type the «chkdsk C:/r» command in the command prompt window and press «Enter.»
Step 3. It will ask, «Would you like to schedule the volume to get checked the next time the system restarts?» Type «Y,» and the process begins.
This will help you to check all the issues related to the drive and fix them. Rerun the command prompt and check whether the DISM error 87 has gone.
If the error is still there, the reason behind it must be covered in the upcoming fix provided in this tutorial.
Fix4. Run Windows Update
DISM may also generate error 87 If your Windows is not up to date. In this case, you must check for the latest updates and download and install them. Follow the steps given below to update Windows in your system:
Step 1. Open Settings by pressing Windows, and I key.
Step 2. Click on the Update & Security option to continue.
Step 3. Open the Windows Update tab and click on Check for Updates button.
Step 4. If your Windows is up-to-date, it will show that the latest version of Windows is already installed. If not, click on the download and install button.
Step 5. Your system will demand a Restart after it is updated successfully. Restart your computer.
After the system is updated, run the Command Prompt as administrator and check for the DISM error 87. If the system updates were the reason for the mistake, it would vanish.
However, there are chances that you are still facing the problem of DISM error. Next, we will see one more solution to resolve this issue.
Fix 5. Restore/Re-install Windows
The last solution in this tutorial is to re-install Windows. Since no solution helped resolve the DISM error 87, we have the last option to re-install Windows in our system. Take a look at the steps mentioned below to re-install Windows in your system:
Step 1. Re-installing windows in your system can cause data loss. So, it is advised to back up all the files before proceeding further.
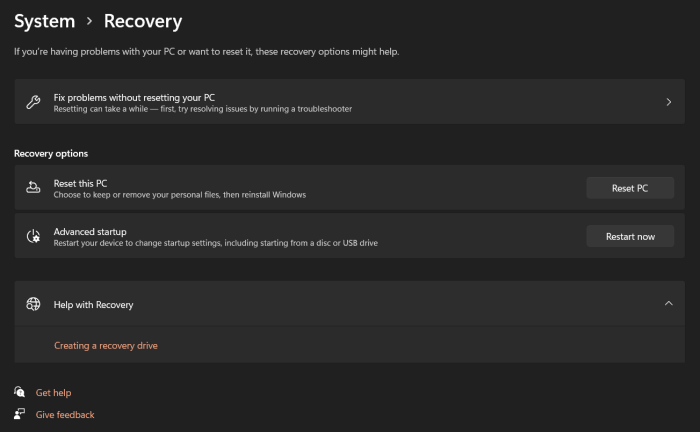
Step 2. After taking data backup, go to the start menu > Settings > Update & Security > Recovery.
Step 3. Under the «Reset this PC» tab, click on Get started.
Step 4. In Choose an option window, choose to Keep my files to ensure no data loss.
Step 5. Click Next.
Step 6. Click the Reset button in Ready to reset this PC window.
Step 7: Now, restart your computer. Your windows have been re-installed.
Now we need to open the command line in administrative mode and check whether the DISM error 87 has gone. We hope this solution was helpful to you.
Summary
In this tutorial, we have discussed DISM and the reasons behind DISM error 87 in Windows 11/10/7. Followed by that, we have also discussed five solutions to the DISM error 87 without losing the computer files and data.
EaseUS Data Recovery Wizard has made the process even more smooth and stress-free by helping us with its powerful and reliable data recovery tools. You can also refer to the video tutorial mentioned in the article for better clarification of each solution.
DISM Error 87 FAQs
The solutions provided in the article are beginner friendly and have all the steps mentioned in detail, along with pictures for your reference. You will surely get your answer in the FAQs section below if you have any questions.
1. What is error 87: The parameter is incorrect?
The parameter is incorrect issue can appear due to corrupted system files or when required services are not running. Try installing the latest drivers manually on your computer to solve this issue. But if you still encounter this error, run the CHKDSK tool to fix the error.
2. How do I fix corrupted DISM?
Corrupted DISM will occur when the system files in the computer system are corrupted. You can fix corrupted DISM by scanning all the files in the computer and repairing the corrupted ones. For a detailed solution, run SFC or SCANNOW tool to fix the corrupted DISM.
3. How do I fix the DISM Online cleanup image RestoreHealth?
Follow the steps to fix the DISM Online cleanup image RestoreHealth:
Step 1. Run Command prompt as administrator.
Step 2. Type «sfc /scannow» and press Enter.
Step 3. Type «Dism.exe /online /cleanup-image /StartComponentcleanup» and press Enter.
Step 4. Type «Dism.exe /online /cleanup-image /CheckHealth» and press Enter.
Step 5. Type «Dism.exe /online /cleanup-image /ScanHealth» and press Enter.
Step 6. Type «Dism.exe /online /cleanup-image /RestoreHealth» and press Enter again.
The DISM online cleanup image issue should be resolved.
4. How do I fix error 87 DISM on Windows 7?
There are many ways you can fix error 87 DISM on Windows 7. Start by checking if the command is spelled correctly and doesn’t include any mistakes. Then you can run the SFC, SCANNOW, and CHKDSK tools to fix the error.
You can also run any available Windows updates and try to restore/re-install Windows to see if this fixes the error.

