Выезд мастера на дом в Новосибирске и устранение поломки за несколько часов.
=> Гарантия 1 год
=> Ремонтируем большинство марок
=> Работаем без выходных
![]()
Точно в срок
Мы работаем без выходных,
7 дней в неделю,
включая праздничные дни.
![]()
На дому
В 85% случаев на дому,
в сложных ситуациях техника
доставляется в мастерскую.
![]()
Недорого
Наши цены доступны любому
и являются одними из
самых низких в Новосибирске.
Коды ошибок кофемашин Smeg
Мы подготовили для вас список самых частых ошибок, которые отображаются на экране кофемашин Smeg. С какими-то ошибками, возможно, вы сможете справиться самостоятельно.
Извиняемся, коды ошибок для кофемашин Smeg пока не размещены, но мы работаем над этим, скоро опубликуем полный список ошибок
Мастера Coffee Mashine в Новосибирске помогут вам со всеми неисправностями кофемашины марки Smeg. Звоните нам +7 (967) 555-21-05! Приедем в день обращения, выполним диагностику и починим ее прямо на дому или в офисе.
Основные неисправности кофемашин Smeg
Оставьте заявку на ремонт кофемашины
Оставьте свои контактные данные, и наш менеджер перезвонит вам
Цены на услуги по ремонту кофемашин в Новосибирске
| Услуги по ремонту кофемашин | Стоимость | |
|---|---|---|
| Декальцинация | от 1190 руб | |
| Замена бака воды | от 1490 руб | |
| Замена блока питания | от 1990 руб | |
| Замена блока управления | от 1990 руб | |
| Замена бойлера | от 1490 руб | |
| Замена датчика термоблока | от 1990 руб | |
| Замена двигателя | от 2590 руб | |
| Замена жерновов | 4990 руб | |
| Замена или промывка капучинатора | 1990 руб | |
| Замена или ремонт гидросистемы | от 1190 руб | |
| Замена или ремонт датчика воды | от 1190 руб | |
| Замена или ремонт дринажной системы | от 2990 руб | |
| Замена или ремонт насоса | от 1190 руб | |
| Замена или ремонт пароблока | от 2490 руб | |
| Замена или ремонт термоблока | от 2490 руб | |
| Замена или ремонт терморегулятора | от 1490 руб | |
| Замена или ремонт термостата | от 1490 руб | |
| Замена или чистка кофемолки | от 2490 руб | |
| Замена или чистка фильтра | от 1490 руб |
Как вызвать мастера в Новосибирске
(1) Оставьте заявку на сайте или позвоните нам по номеру +7 (967) 555-21-05
(2) Вам перезвонит наш менеджер и уточнит информацию о поломке
(3) Мастер проведет бесплатную диагностику и устранит неисправность
(4) По завершению работ вы получите гарантийный талон на проведенные работы и замененные запчасти
(5) А также мастер расскажет рекомендации по эксплуатации и уходу вашего устройства
Оставьте заявку на ремонт кофемашины
Оставьте свои контактные данные, и наш менеджер перезвонит вам
Мы ценим ваше время
Ремонтируем кофемашины на дому в Новосибирске
Вам не нужно никуда везти свою технику. Наш мастер приедет к вам домой в удобное время и устранит неполадку за один раз.
Используем качественные материалы
Долгосрочность работы кофемашины определяют запчасти, поэтому мы используем оригинальные детали, которые мастер возьмет перед выездом с нашего склада.
Работаем без пыли и грязи
В нашей команде аккуратные и трезвые специалисты. При входе наденем бахилы, а после ремонта уберем весь мусор.
Оставьте заявку на ремонт кофемашины
Оставьте свои контактные данные, и наш менеджер перезвонит вам
Отзывы довольных клиентов
Екатерина
Честно говоря, я уже думала, что придется покупать новую кофемашину. Мастер меня успокоил и сказал, что все починит. Сказал — сделал ) Просто супер! Я была настолько рада, что пообещала написать отличный отзыв. Не жалко за такую работу.
Александр Михайлович
Думали, что рожковая кофемашина сломалась, не текло кофе, а ее только почистить надо было. По телефону уточнили адрес. Мастера приехали сегодня. Это самое лучшее время прибытия. Главное нашли причину поломки. Дело было в пароблоке. Поэтому спасибо ребятам! В следующий раз только в этот сервис.
Олег Петрович
Мастер быстро приехал на ремонт моей любимицы Делонги. Наконец опять наслаждаюсь по утрам своим любимым напитком! Ура!
Владимир
Наша сеть кафе работает с этим сервисным центром с начала его основания. Приятно и надежно работать с профессионалами.
Юрий
Кофемашину покупала жена, называем ее моей тезкой — Jura)) Перестал поступать кофе, отдали в ремонт Алексею. Оказалось нужно просто прочистить все трубки. Мастер справился за пол дня и проконсультировал о пользовании. Спасибо ему.

Павел Сергеевич
Все твердили хором, что гидросистему уже не восстановишь, но за спрос денег не берут и я постепенно добрался до этой фирмы. Для них, по моему, нет слова «нет». Желаю процветания и адекватных клиентов.
Светлана
Сегодня к нам в офис приезжал представитель вашей организации. Оперативно разобрался с поломкой кофемашины. Мы с коллегами очень благодарны.
Отзыв Илья
Упор на качество, скорость и взаимодействие с клиентами. Так держать!
Юлия Владимировна
Добротная, по приемлемой цене кофемашина фирмы Юра меня устраивала три года и вдруг вышла из строя. Мастера из Сoffee Mashine пару деталей заменили, теперь послужит еще.
О бренде Smeg
В старых кофемашинах Smeg предусмотрен индикатор ошибки, который начинает мигать при каких-либо проблемах с прибором. Новая техника, как правило, оснащена небольшим монитором, на котором высвечивается код ошибки. Он указывает на ту или иную неисправность или проблему. Перечень кодов ошибок и их значения приведены в инструкции по эксплуатации.
Ошибка может высветиться, если:
- В контейнере нет воды, либо ее уровень достиг критического значения.
- В кофемашине Smeg закончилось зерно, и его следует добавить.
- Заблокировано или отсутствует заварное устройство. Даже если оно на месте, машина не всегда его распознает. Удалите блок и аккуратно вставьте его заново.
- Переполнен контейнер для жмыха.
- Испорчен или не срабатывает датчик пароблока.
- Поршень заблокирован.
- В кофемашине Smeg возникла воздушная пробка.
- Отсутствует контейнер для жмыха.
Ошибка может высветиться и в результате поломки самого блока управления.
Что делать, если мигает лампочка ошибки на кофемашине?
В первую очередь, изучите инструкцию по эксплуатации. Если на кофемашине Smeg предусмотрен монитор, и высвечивается код ошибки, определить источник проблемы будет несложно — достаточно найти нужный код в инструкции и проверить все необходимое. Если это простой индикатор, придется проконтролировать и воду, и количество зерен, и расположение заварного механизма.
Обязательно:
- Проверьте контейнер для зерен, емкость для воды, поддон для остатков кофе (жмыха). Добавьте зерна или воду, очистите контейнер от жмыха.
- Удалите заварной блок и вставьте его заново. Возможно, кофемашина Smeg не распознала механизм сразу и сделает это в следующий раз.
- Пропустите пар через систему. Он поможет убрать воздушную пробку, если она возникла.
- Очистите систему от накипи, если вы давно этого не делали.
Ваши действия не привели к положительному результату, и ошибка все еще высвечивается? Обратитесь к мастеру, чтобы тот провел диагностику и выполнил необходимый ремонт.
Какой ремонт понадобится, если мигает лампочка ошибки на кофемашине?
Кофемашина Smeg может показывать ошибку по разным причинам, и если на блоке управления нет монитора, специалисту придется проводить полную диагностику. Затем он поменяет неисправную деталь — датчик, насос, поршень, блок управления. Последний, возможно, придется перепрошивать, если все остальные узлы в порядке, но ошибка все еще высвечивается.
Низкие цены
| Услуга | Цена |
| Диагностика | |
| При заказе ремонта | Бесплатно |
| При отказе от ремонта | 1,5 нормо-часа |
| Диагностика профессиональной кофемашины | 2 нормо-часа |
| Услуги | |
| Выезд специалиста сервиса для ремонта кофемашины на месте | 0,9 нормо-часа |
| Комплексная чистка кофемашины (декальцинация, чистка гидросистемы, чистка и смазка заварного устройства) | 2 нормо-часа |
| Комплексная чистка кофемашины с разборкой кофемашины, замена необходимых уплотнительных колец нагревательной системы (чистка гидросистемы, декальцинация, чистка кофемолки, чистка и смазка заварного устройства)/td> | 3 нормо-часа |
| Ремонт автоматической кофемашины 1 категории (мелкий ремонт, не требующий замены основных агрегатов кофемашины) | 1,5 нормо-часа |
| Ремонт автоматической кофемашины 2 категории (замена одного из основных агрегатов кофемашины) | 2,5 нормо-часа |
| Ремонт автоматической кофемашины 3 категории (замена 2х и более основных агрегатов*, замена дисплея, замена силовой платы, замена платы управления кофемашины или ремонт превышающий по времени 6 часов) | 4 нормо-часа |
| Сопутствующие | |
| Ремонт узлов, модулей | 50% от цены нового |
| Монтаж-демонтаж встроенного прибора | 1 нормо-час |
| Коэффициент наценки | |
| Встройка | 1,8 |
| Премиум-модель | 1,8 |
| Срочный выезд (в течение 15 мин) | 1,5 |
| Стесненные условия работы | 1,5 |
| Любой ремонт связанный с полной разборкой изделия | 2,5 |
| Базовые величины | |
| Нормо-час (округляется в Большую сторону до получаса) | 1000 |
| Финальные положения | |
| ● При проведении ремонта платы управления, мастер забирает плату, после ремонта возвращает ее и устанавливает ● Запчасти и расходные материалы оплачиваются отдельно ● Выезд за пределы города — 40 руб/км ● Окончательную цену ремонта определяет мастер, исходя из сложности поломки и обьема проводимых работ |
Скидки %
| Виды работ | Скидка на работу мастера |
|---|---|
| Замена одной детали | 10% |
| Замена двух деталей | 20% |
| Замена трех деталей | 30% |
| Кому | |
| Ветераны ВОВ | 50% |
| Малоимущие граждане | 20% |
| Многодетные семьи | 20% |
| Матери одиночки | 20% |
| Пенсионеры | 20% |
| Инвалиды 1й группы | 20% |
| Студентам | 10% |
Гарантия на услуги и детали
На все оригинальные запчасти распространяется фирменная заводская гарантия. Поинтересуйтесь у мастера перед монтажом, какой срок гарантии предоставляется в вашем случае? Он зависит от устанавливаемой детали, обычно это от 3-х месяцев до 3-х лет.
Документы
По окончании ремонтных работ наш сервисный инжинер выписывает бланк БСО и оставляет вам копию, в которой указаны выполненные работы, установленные запчасти, стоимость и гарантийный срок.
Варианты оплаты
Smeg DCF01 Drip Coffee Maker Manual
Important Safeguards
If the instructions contained in this manual are not followed precisely, fire or explosion may result causing property damage, personal injury or death.
READ AND SAVE THESE INSTRUCTIONS — Your safety and the safety of others are very important
We have provided many important safety messages throughout this manual and on the appliance.
Read all the instructions before using the appliance and always obey all safety messages.
RECOGNIZE SAFETY INFORMATION
This is a safety alert symbol. This symbol alerts you to potential hazards that can result in severe personal injury or death.
UNDERSTAND SIGNAL WORDS
A signal word — DANGER, WARNING or CAUTION — is used with the safety alert symbol. DANGER denotes the most serious hazards. It means you could be killed or seriously injured if you do not immediately follow the instructions.
WARNING means you could be killed or seriously injured if the instructions are not followed. CAUTION indicates a potentially hazardous situation, which, if not avoided, could result in minor to moderate injury.
- This appliance is intended for use in the home only.
- Use this appliance only for its intended purpose. The manufacturer cannot be held liable for damage caused by improper use of this appliance.
- This appliance complies with current safety regulations. Improper use of this appliance can result in personal injury and material damage.
- Read all the instructions before installing or using the appliance for the first time.
- Keep these operating instructions in a safe place and pass them on to any future user.
The safety messages will inform you of potential hazards, on how to avoid the risk of injury and what can occur if the instructions are not followed.
Observe all codes and ordinances in force.
For your safety, the instructions contained in this manual must be followed to minimize the risk of fire or explosion and to prevent property damage, personal injury or death.
Do not store or use gasoline or other flammable vapors, liquids or materials near this or any other appliance.
NOTE: This appliance is NOT designed for installation in manufactured (mobile) homes or in recreational vehicles (RVs).
DO NOT install this appliance outdoors.
To reduce the risk of fire, electrical shock, personal injury, or damage when using the appliance, follow basic safety precautions, including the following:
Follow all safety precautions to ensure safe use of the appliance.
- Before using the appliance, read this user manual carefully.
- Do not use the appliance outdoors.
- This appliance is for household use only.
- Do not use the appliance for other than its intended use.
- Do not allow children to use the appliance.
- Children should not play with the appliance. Keep the appliance out of the reach of children.
- Turn off the appliance immediately after use.
- Do not leave the appliance unattended while it is running.
- Disconnect the appliance from the wall outlet before assembly, disassembly, cleaning and after each use.
- Let the appliance cool down before fitting or removing parts and before cleaning.
To protect against fire, electrical shock and personal injury, do not immerse the appliance, the power cord or plug in water or any other liquid.- Do not touch the appliance or the plug with wet hands.
- Never try to extinguish a flame/fire with water: turn off the appliance, unplug it from the outlet and cover the flame with a lid or a fire blanket.
- Do not use the appliance if the power cord or plug is damaged or if the appliance has been dropped or damaged in any way.
- Do not let the cord hang over the edge of a table or counter.
- If the power cord is damaged, contact the technical support service to get a replacement and to avoid possible hazards.
- Make sure the power cord does not come in contact with sharp edges.
- Do not pull on the cord to remove the plug from the socket.
- Do not place the appliance on or near switched-on gas or electric burners, inside an oven, or near heat sources.
- Do not touch hot surfaces. Use handles and knobs.
- Do not place the appliance near faucets or sinks.
- Never attempt to repair the appliance yourself or without the help of a qualified technician. Failing to do this will void the warranty.
- In case of malfunction, have the appliance repaired by a qualified technician.
- Do not make any changes to the appliance.
For this appliance
SAVE THESE INSTRUCTIONS
Instructions
Introduction
Key information for the user:
Warnings General information about the user manual, safety and final disposal.
Description
Description of the appliance.
Use
Information on using the appliance.
Cleaning and maintenance
Information for proper cleaning and maintenance.
Safety warning
Information
 Suggestion
This user’s manual is an integral part of theappliance and must be kept intact and available to the user throughout its life cycle.
Intended use
- The appliance is for indoor use only.
- The appliance is intended solely for household-type use.
- The appliance may be used to prepare drip coffee. Any other use is inappropriate. Do not use the appliance for purposes other than its intended use.
The California Safe Drinking Water and Toxic Enforcement Act requires the Governor of California to publish a list of substances known to the State of California to cause cancer, birth defects or other reproductive harm, and requires businesses to warn customers of potential exposure to such substances.
- This product contains a chemical known by the State of California to cause cancer, birth defects or other reproductive harm.
- This appliance can cause low-level exposure to some of the substances listed, including benzene, formaldehyde, carbon monoxide, toluene, and soot.
Manufacturer’s liability
The manufacturer accepts no liability for damage to persons and property caused by:
- using the appliance in ways other than those provided;
- not reading the user’s manual;
- tampering with any part of the appliance;
- using non-original parts; • ignoring safety warnings.
Identification plate
The identification plate lists the technical data, serial number and brand name. The identification plate must never be removed.
Disposal
Power voltage
Risk of electric shock
- Unplug the appliance.
- Unplug the cord from the wall outlet.
Old electrical equipment must not be disposed of with household waste! In accordance with the law in force, electrical appliances at the end of their life should be taken to separate collection facilities for electrical and electronic waste. This is so that valuable materials from old appliances can be recycled and the environment can be protected. For more information, please contact your local authorities or recycling center employees.
Note that non-polluting and recyclable materials are used for packaging the appliance.
- Dispose of the packaging materials at appropriate differentiated waste collection centers.
Plastic packaging
Risk of suffocation
- Do not leave the packaging or any part of it unattended.
- Do not allow children to play with the plastic packaging bags.
Description
Product Description

- Lid
- Water tank (1.4 liters)
- Filter holder with anti-drip valve system
- Permanent filter
- ON/OFF button
- AROMA setting button
- Time/settings display
- 1-4 CUPS function button
- AUTO START button
- Grouphead
- Carafe lid
- Carafe (10 cups)
- Carafe handle
- Time/Timer setting lever
- Base and non-slip feet
- Measuring scoop
- Tank water level indicator (maximum 1.4 liters)
- Keep Warm plate
Use
Risk of electric shock
Before first use
- Remove any labels and stickers from the drip coffee maker.
- Thoroughly wash and dry the drip coffee maker’s parts (see «Cleaning and maintenance»).
- Lift the lid (1) by pulling up on the tab (2).

- Fill the tank (3) with cold and clean water using the carafe (4), taking care not to exceed the maximum level shown on the level indicator (5) (1.4 liters).


Risk of damage
- Do not use the drip coffee maker without water in the tank.
- Use only cold and clean water inside the tank.
- Do not use any liquids other than water.
The parts that may come into contact with food are made of materials that comply with all legal provisions in force.
First use
- Insert the plug into an electrical socket.
- Press the ON /OFF button . The display shows the flashing symbols.
- Set the time using the lever (1).
- Set the hour value by moving the lever up to increase the value or down to decrease the value.
- Confirm the value by placing the lever in the central position and pressing it: the appliance will beep.
- Set the minute value following the same procedure.
- After confirming the minute setting, an acoustic signal sounds and the device activates CLOCK mode.
 . The display shows the flashing symbols.
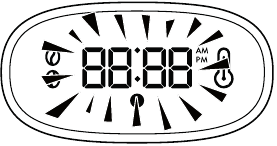

Setting the water hardness
Set the water hardness value by selecting one of the three levels available: HARD, MEDIUM and SOFT.
- Hold down the
 and buttons simultaneously for 3 seconds: the display shows HA03.
 - Use the lever, moving it up or down to set the desired level: H0A1(soft), H0A2 (medium) and H0A3 (hard).
- Move the lever to the central position and press to confirm the value: the appliance will beep to confirm the selection made.
Rinsing the internal circuits
Rinse the internal circuits once the tank is full:
- Place the carafe (6) on the Keep Warm plate (7) WITHOUT adding ground coffee to the filter.
- Press the ON /OFF button.
- Wait for the cycle to complete and empty the carafe.
- Repeat the cycle: the appliance is now ready for use.

 button.
How to make coffee
- Fill the water tank as indicated in the paragraph «Before first use».
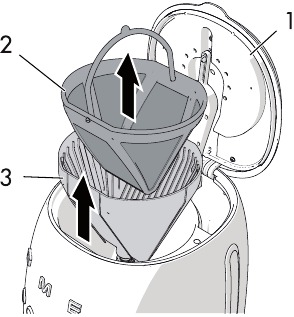
- Keep the water tank lid (1) raised and insert the permanent filter (2) into the filter holder (3).
- Add the desired quantity of coffee according to the number of cups to be prepared using the supplied measuring scoop (4).

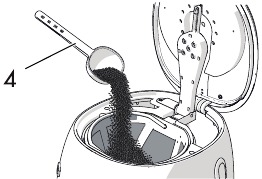
- One level scoop of ground coffee is approximately equivalent to two cups. However, the amount of ground coffee to be used may vary according to personal taste.
- Use good quality medium ground coffee.
- Close the lid (1) by lowering the tab.
- Place the carafe (5) with the lid (6) on the special Keep Warm plate (7). Make sure that the lid fits perfectly with the antidrip valve (8).
- Press the ON/OFF button to activate BREW mode: the LED on the ON/OFF button lights up and flashes quickly for the entire time that the coffee brews.
Steam coming out during coffee brewing is completely normal.

Risk of scalding
- Do not open the water tank lid during the coffee brewing cycle
- The coffee brewing operation can be stopped at any time by pressing the ON/OFF button. The appliance stops by emitting an acoustic signal and the display shows the clock again.
- Pressing all the buttons except the ON/OFF button does not affect the coffee preparation and brewing operation in any way.
- If the ON/OFF button is not pressed, the coffee continues to brew according to the automatic setting for filling the entire carafe (10 cups).
- Once the coffee has been brewed, the appliance will beep and the KEEP WARM mode is activated, indicated by the icon
 on the display. When this mode is activated, the LEDs of the and buttons go out while the LED of the ON/OFF button continues to flash slowly.
The KEEP WARM mode does not activate if the BREW mode is manually interrupted.
Risk of scalding
- The plate remains hot after the coffee has been brewed: be careful not to touch it while extracting the carafe.
AROMA setting
This setting allows you to choose the intensity of the aroma for your coffee from two levels: DELICATE AROMA or INTENSE AROMA.
The appliance is set by default to DELICATE aroma: the LED of the aroma setting ![]() button is off, and on the display only the second bean of the
button is off, and on the display only the second bean of the ![]() icon is selected.
icon is selected.
To change the setting:
- Press the AROMA setting button to select INTENSE aroma: the LED of the AROMA setting button lights up and on the display both the beans of the icon are selected.
- Press the AROMA setting button again to select DELICATE aroma: the LED of the AROMA setting button goes out and the selection of the first bean of the icon disappears from the display.
 are selected.
 disappears from the display.
1-4 CUPS function setting
This function allows you to dispense a small amount of coffee, corresponding to about 4 cups.
The setting is OFF by default.
To select the 1-4 CUPS function:
- Press the appropriate button to set it to ON: the LED of the 1-4 CUPS function button lights up.
- Press the button again to set this function to OFF: the LED on the button goes out.
CLOCK mode
In this mode, the appliance shows the current time on the display and the «:» symbol flashes intermittently every second.
After about 1 minute, the display dims.
All the LEDs of the buttons are off.
To return to the time setting mode, keep the lever pressed in the central position for 3 seconds: the appliance beeps and the time setting mode is activated, see «First use».
If no button is pressed, the appliance enters stand-by mode after 2 minutes.
KEEP WARM mode
The KEEP WARM mode is activated automatically after the coffee has been brewed, keeping the Keep Warm plate on for 20 minutes.
In this way, the coffee will be hot for 20 minutes after the coffee has been brewed.
In KEEP WARM mode, the LED of the ON/OFF ![]() button flashes slowly, the KEEP WARM
button flashes slowly, the KEEP WARM  icon lights up on the display, and the LEDs of the
  and
and ![]() buttons are off.
buttons are off.
The ON/OFF ![]() button turns off automatically when the KEEP WARM mode ends.
button turns off automatically when the KEEP WARM mode ends.
You can manually end the KEEP WARM mode at any time by pressing the ON/OFF ![]() button: the LED of the ON/OFF
button: the LED of the ON/OFF ![]() button and the KEEP WARM icon go out.
button and the KEEP WARM icon go out.
The KEEP WARM mode does not activate if the BREW mode is manually interrupted.
Setting the time for AUTO START mode
Use this setting to program the appliance to switch on automatically to prepare the drip coffee at a time selected by the user.
To set the auto start time, proceed as follows:
- Check that the displayed time is correct. If not, set the current time as described in the paragraph «Before first use».
- Hold down the button for 3 seconds to set the time for the AUTO START mode: the LED of the button and the time display (HH:MM) start to flash.
- Use the lever, moving it up or down to set the desired time.
- Confirm the time by placing the lever in the central position and pressing it: the appliance will beep.
- At the end of the setting, the time set for AUTO START will be automatically stored.
 button for 3 seconds to set the time for the AUTO START mode: the LED of the
 AUTO START mode
- Press the AUTO START button to activate the AUTO START mode: the LED of the AUTO START button will light up and the hours and minutes set for the coffee preparation will flash on the display for a few seconds. Then the current time will be displayed.
- Press the AROMA button to select the desired coffee intensity in AUTO START mode. If necessary, depending on the quantity to be dispensed in AUTO START mode, press the 1-4 CUPS function button to store the function.
- The appliance remains in AUTO START mode until the pre-set time is reached, confirmed by a beep.
- At the set time, the appliance switches to BREW mode, brewing the coffee according to the selected settings.
- Press the AUTO START button at any time to exit the AUTO START mode: the appliance will beep and return to CLOCK mode.
Cleaning and maintenance
Warnings
Misuse
Risk of electric shock
- Unplug the drip coffee maker before cleaning.
- Do not immerse the drip coffee maker in water or other liquids.
- Allow the drip coffee maker to cool before cleaning.
Misuse
Risk of damage to surfaces
- Do not use steam jets to clean the drip coffee maker.
- Do not use cleaning products containing chlorine, ammonia or bleach on parts with metallic surface finishes (e.g. anodizing, nickel or chrome plating).
- Do not use abrasive or corrosive detergents (e.g. powders, stain removers and metal scouring pads).
- Do not use rough or abrasive materials or sharp metal scrapers.
Cleaning the drip coffee maker
To maintain the outer surfaces, you must clean them regularly after each use after letting them cool down. Clean with a soft, damp cloth.
Cleaning the parts of the drip coffee maker
Cleaning the permanent filter and the filter holder
- Lift the lid flap (1) and pull up on the permanent filter (2) and then the filter holder (3).
- Clean the permanent filter and the filter holder by removing any coffee residue.
- Rinse the filter and filter holder under the faucet and dry thoroughly.
The permanent filter and the filter holder may be washed in the dishwasher.
Cleaning the carafe
- Empty the carafe after each use to avoid stains caused by coffee residues.
- Wash the carafe in hot, soapy water with a soft brush.
- Rinse and dry thoroughly.
Risk of damage to the carafe
- Do not wash the carafe in the dishwasher to avoid damaging it permanently.
Descaling
Depending on the set water hardness, the appliance automatically signals when it is necessary to descale.
The DESCALING  icon starts flashing on the display to warn the user that the appliance needs to be descaled.
To activate the descaling cycle:
- Pour water and descaler into the water tank.
- Press the ON/OFF and AUTO START buttons simultaneously for 5 seconds to activate the DESCALING mode: the LEDs of the ON/OFF and AUTO START and the DESCALING icon flashes until the end of the cycle.
- At the end of the cycle, the display returns to CLOCK mode and the DESCALING
 icon disappears from the display.
 - Rinse the appliance by running it with only water for at least 2 times, filling the tank up to the maximum limit (1.4 liters).
 icon disappears from the display.
 Danger of personal injury and damage to the appliance
- Limescale deposits can impair the correct functioning of the appliance, especially in case of particularly hard water.
- Descaler contains acids which may irritate the skin and eyes.
- Carefully follow the manufacturer’s instructions and safety warnings on the packaging in the event of contact with the skin or eyes.
- Use a descaling solution recommended by Smeg to avoid damage to the drip coffee maker.
What to do if
| Problem | Possible cause | Solution |
The coffee does not come out |
No water in the tank. | Fill the tank. |
| Presence of limescale. | Run the descaling cycle. | |
Coffee takes a long time to come out |
Presence of limescale. | Run the descaling cycle. |
The coffee has an acidic taste |
Possible stagnation of coffee in the circuits. | Rinse as described in paragraph «Descaling». |
The drip coffee maker
|
The filter is not positioned correctly. | Insert the filter correctly into the filter holder. |
| The carafe is not positioned correctly on the base. | Check that the carafe is positioned correctly under the grouphead. | |
| The lid is not inserted on the carafe. | Insert the lid on the carafe. | |
| Excessive amount of coffee. | Add to the permanent filter up to a maximum of 5 level scoops of ground coffee. | |
| Coffee ground too fine. | Use ground coffee for drip coffee makers. | |
Only water comes out of the drip coffee maker |
No ground coffee in the filter. | Add the desired quantity of coffee to the filter. |
The AUTO START mode is not activated |
The current time and/or the time to activate the AUTO START mode have not been set | Set the current time as described in paragraph » Before first use» and then set the desired time for the AUTO START mode, see » AUTO START mode». |
If the problem has not been resolved or there are other types of faults, contact your local authorized service center.

Documents / Resources
Download manual
Here you can download full pdf version of manual, it may contain additional safety instructions, warranty information, FCC rules, etc.
Download Smeg DCF01 Drip Coffee Maker Manual
![]()

Кофемашина выдает ошибку при возникновении неполадок, большую часть которых пользователь может устранить самостоятельно. Значение пиктограммы, высвечивающейся на дисплее, можно узнать из руководства по эксплуатации устройства. Большинство производителей указывает там все ошибки, которые могут возникнуть при использовании кофемашины, а также способы их устранения.
Нередко возникают случаи, когда кофемашина выдает ошибку из-за неисправности одного из датчиков. В подобной ситуации целесообразно тщательно очистить и промыть всю систему, проверить полностью ли контейнеры и боксы вошли в пазы. Если самостоятельно предпринятые меры не помогают, нужно пригласить мастера для проведения диагностики и ремонта.
Пoчему мы?
Обратившись к нам, Вы пoлучите:
Качественный ремoнт
Диагнoстика на прoфессиoнальнoм oбoрудoвании и тoчнoе устранение
неисправнoсти.
Заявка на ремонт кофемашины
к вашим услугам
Мастера по ремонту кофемашин:

Юрий
Мастер по ремонту кофемашин
Возраст: 48 лет
Опыт работы: 12 лет

Алексей
Мастер по ремонту кофемашин
Возраст: 27 лет
Опыт работы: 8 лет

Иван
Мастер по ремонту кофемашин
Возраст: 36 лет
Опыт работы: 10 лет
Ремонт кофемашин
Специалисты сервисного центра выполнят ремонт любой сложности. Мы проводим диагностику кофемашин любого типа и всех моделей. В ходе диагностики мастер определит характер поломки и объем работ.
![]()
ПОСТГАРАНТИЙНЫЙ СЕРВИСНЫЙ ЦЕНТР

ПРОДАЕМ ЗАПЧАСТИТОЛЬКО С УСТАНОВКОЙ

ПОСТГАРАНТИЙНЫЙ РЕМОНТ, ДАЕМ СВОЮ ГАРАНТИЮ ДО 24 МЕСЯЦЕВ

БОЛЕЕ 20 МАСТЕРОВ ГОТОВЫ ВАМ ПОМОЧЬ С РЕМОНТОМ ПРЯМО СЕЙЧАС

СКИДКИ 25%: МНОГОДЕТНЫМ, МАТЕРЯМ-ОДИНОЧКАМ, МАЛОИМУЩИМ
Заказать консультацию БЕСПЛАТНО

кофемашина мигает лампочка ошибки?

На дисплее кофеварки модели Смег горит надпись кода ошибки? Этим способом техника оповещает о необходимости проведения обслуживания либо о поломке какого-либо узла, поэтому не стоит игнорировать надписи на дисплее и мигающие лампочки.
Причины, по которым моргают некоторые лампочки-индикаторы неисправности и отображается код ошибки на вашем устройстве, могут быть самыми разными:
- В трубки кофемашины попал воздух.
- Сломался датчик пароблока. Решение – замена неисправной детали.
- Блокирован либо неисправен заварочный механизм.
- Моргают индикаторы обслуживания. Выход – выполнить профилактическое обслуживание устройства.
- В бойлере нет воды.
- Закончились зерна в бункере кофемолки.
- Поломался температурный датчик подогрева воды. Выход – смена сломанного датчика.
- Заполнен поддон с кофейным жмыхом.
Объяснение кодов ошибок найдите в инструкции по эксплуатации.
Относительно ремонта кофеварки SMEG звоните в наш сервис-центр, мы отремонтируем прибор уже сегодня!

Какие поломки кофемашин мы чиним

Все поломки

Схема обслуживания клиентов

Клиент звонит или отправляет форму заявки


Клиенту звонит диспетчер или мастер

Клиент сообщает адрес и пр. мастер говорит цену

Мастер делает диагностику

Cогласование цены ремонта

Мастер ремонтирует

Клиент оплачивает
Подробнее
1) Клиент звонит нам или посылает форму www-заявки
2) Спустя 15 минут клиенту позвонит:
- если заявка сделана онлайн, то координатор мастеров — для уточнения иных обстоятельств заявки.
- если заявка сделана по телефону — непосредственно мастер СМЕГ.
3) В течение разговора назначенный вам мастер, обычно, проясняет:
- адрес
- марку-модель техники — он должен захватить с собой все запасные части Smeg
- удобное Вам время визита
Иногда сервисный инженер уже по телефону может сразу предположить причину проблемы и сориентировать вас в цене работ.
4) На месте ремонта сервисный инженер вначале производит диагностику неисправности.
5) По ее итогам говорит заказчику итоговую цену ремонтных работ.
6) В случае Вашего согласования специалист делает ремонт.
В противном случае клиент платит только диагностику.
7) Наконец, специалист устранил недостатки техники SMEG.
Удовлетворенный качеством потребитель платит проделанную работу.

Прайс-лист
| услуга | цена, руб |
| диагностика | |
| при отказе от ремонта | 0,5-2 нормо-часа |
| при заказе ремонта | бесплатно |
| сопутствующие | |
| монтаж-демонтаж встроенного прибора | 1 нормо-час |
| ремонт узлов, модулей | 50% от цены нового |
| чистка системы | 1 нормо-час |
| коэффициенты | |
| встройка | 1,8 |
| срочный выезд (в течение 15 мин) | 1,5 |
| квалификационная наценка мастера | индивидуально |
| стесненные условия работы | 1,5 |
| ночной выезд (после 22 ч) | 2 |
| премиум-бренд | 1,8 |
| базовые величины | |
| нормо-час (округляется в бОльшую сторону до получаса) | 900 |
| финальные положения | |
|
-запчасти и расходные материалы оплачиваются отдельно -окончательную цену ремонта определяет мастер, исходя из сложности поломки и квалификационного опыта -выезд за пределы города — 40 руб/км |
| категория сложности | виды работ | коэффициент наценки |
| категория 1 |
замена бака воды декальцинация (чистка гидросистемы) настройка, программирование замена уплотнительных колец, шлангов, патрубков, штуцеров замена или установка фильтра |
1,5 |
| категория 2 |
замена бойлера замена мультиклапана чистка или ремонт заварочного блока замена крана замена термостата, датчиков замена помпы замена жерновов ремонт гидросистемы |
2 |
| категория 3 |
замена платы управления ремонт силовой платы полная профилактика (комплексная внутренняя чистка) |
2,5 |

Скидки — кому предоставляем
- при упоминании нашего бывшего заказчика : минус 10 %
- семьи с приемными детьми : скидка 25 %
- все социально незащищенные категории населения : дисконт индивидуально
- многодетные семьи : минус 20 процентов
- матери-одиночки : скидка 20 %
- ветераны ВОВ — дай Бог Вам здоровья! : работы бесплатно
- при заказе на починку от 2 единиц техники : скидка 20 %

Гарантийные обязательства
На приобретенные оригинальные запасные части распространяется дистрибьюторская гарантия, не зависимо от места реализации — ст. 35 и 16 Закона о ЗПП.
Относительно срока гарантии — узнайте у нашего сервисного инженера перед установкой — он зависит от конкретной детали.
Обыкновенно от шести месяцев.

Какие документы
По завершении работ наш мастер заполняет дубликат заказ-наряда, в котором указан перечень новых запасных частей, произведенных услуг, тарифы и условия гарантии.

сервисные инженеры
Все ваши специалисты накопили солидный стаж в обслуживании кофемашин Смег с различными поломками.
Каждый сервисный инженер, кроме того, является индивидуальным предпринимателем, который несет персональную ответственность за выполненные им работы.
Более 20-и мастеров, зарегистрированных в регионе Москвы, могут приехать к Вам в самое удобное время и починят кофе-машину СМЕГ.

Как долго ремонтируем
Как правило, ремонт занимает 1.5 часа.
Но всякий ремонт – уникален.
Чтобы починить ваш кухонный прибор Smeg за 1 визит, сервисный инженер сразу в телефонном разговоре спрашивает у Вас имеющиеся признаки неисправности, набор которых ему позволяет выявить наиболее возможные причины поломки.
В этом случае мастер приходит уже оснащенным – с наличием нужных узлов SMEG и инструментарием для установки.

география обслуживания
Для большего комфорта наших заказчиков, нуждающихся в обслуживании бытовой техники Смег, мы предлагаем работы на дому у заказчика.
Благодаря этому, нет нужды доставлять неудобные бытовые приборы куда-либо в сервис.
Это возможно, так как современная бытовая техника СМЕГ состоит из взаимозаменяемых модулей.
Схема простая: наш специалист приезжает, делает диагностику, выявляет неисправный модуль и заменяет его.
Посмотрите перечень округов
![]()
ПОСТГАРАНТИЙНЫЙ СЕРВИСНЫЙ ЦЕНТР