Автор: Кристин Джеквони (Kristin Jackvony)
Оригинал статьи
Перевод: Ольга Алифанова.
Если вы хоть раз делали REST-запрос или изучали раздел инструментов разработчика в браузере, то наверняка видели код ответа из трех цифр, возвращенный в ответ на HTTP-запрос. Давайте поговорим о различных типах кодов ответа, которые можно получить в процессе тестирования API, и том, что они означают.
Ответы 100
Ответы уровня 100 означают, что запрос должен продолжаться. Наиболее частый тип такого ответа – это просто-напросто 100 Continue. Это может использоваться при объемных запросах, давая серверу возможность остановить большой запрос до того, как будет передан слишком большой объем данных. Возможно, при тестировании вашего API вы с этим не столкнетесь – сервер продолжит отвечать, завершит этот процесс «за кулисами» и выдаст ответ-200.
Ответы 200
Ответы уровня 200 обозначают успех запроса. Наиболее распространенный ответ – это 200 OK, который просто означает, что все прошло как ожидалось. Вот другие примеры запросов этого уровня:
201 Created – такой ответ означает, что в результате запроса создан некий новый ресурс. К примеру, GET-запрос может создать запись в логе, демонстрирующую дату, время и содержание запроса.
202 Accepted – этот ответ значит, что запрос был принят, но еще не завершен. Например, это изменение базы данных, которое нуждается в одобрении перед тем, как повлиять на базу непосредственно.
204 No Content – это значит, что запрос был успешно обработан, и не вернул никаких данных. Этот ответ может прийти на PUT-запрос, когда содержание изменилось, но разработчик не видел необходимости отдавать в ответе какие-то данные. Ответ 200 OK тоже может не возвращать данные, если так решил разработчик, но 204 не возвращает их никогда.
Ответы 300
Ответы уровня 300 говорят о перемещении ресурса. Наиболее частый из таких ответов – это 301 Moved Permanently. Этот ответ должен включать новый URL в заголовке, чтобы клиент понимал, куда в следующий раз обращаться с запросом.
Ответы 400
Ответы уровня 400 обозначают, что с запросом было что-то не так. Наиболее частый из них – 400 Bad Request, обычно применяемый, когда запрос неверно сформулирован или по какой-то причине неправилен. К примеру, в нем отсутствуют необходимые данные, или произошла ошибка валидации этих данных. Другие распространенные варианты ответов-400:
401 Unauthorized – обычно отдается, если у клиента нет соответствующей аутентификации для запроса, к примеру, токена JWT или куки.
403 Forbidden – отдается, если у клиента есть аутентификация, но нет прав на просмотр ресурса. К примеру, пользователь залогинен и может запрашивать свои данные, но не может запрашивать чужие.
404 Not Found – возвращается, если клиент запрашивает специфический ресурс, а сервер не может его найти. Например, запрашивается пользователь с ID 100, отсутствующий в базе данных.
409 Conflict – отдается, если запрос заставляет данные конфликтовать друг с другом. К примеру, клиент пытается осуществить POST-запрос для создания ресурса с ID, который уже используется.
Ответы 500
Ответы уровня 500 значат, что что-то пошло не так на серверной стороне. Чаще всего встречается ответ 500 Internal Server Error, использующийся для обозначения разнообразных проблем. Например, запрос пытался добавить запись в базу данных, которая не может обработать такую запись, потому что в ней слишком много символов, или у записи неверный тип. Другие ответы уровня 500 могут быть такими:
502 Bad Gateway – происходит, если сервер, отвечающий на запрос, должен сделать запрос к другому серверу, а другой сервер возвращает невалидный ответ.
503 Service Unavailable – такой ответ возвращается, если отвечающий сервер по какой-то причине недоступен. Он обычно более полезен, нежели общий ответ 500, потому что сигнализирует, что проблема с доступностью сервера, а не с базой.
Теперь, когда мы знаем, что значат коды ответов, давайте посмотрим на них предметно в нашей коллекции Postman PetStore! Если вы еще не создали, см. предыдущую статью. Кликните на первом запросе в коллекции: Add Pet. Под URL запроса нажмите на «тесты». В правой стороне окна будет список сниппетов кода, которые можно использовать для создания правил. Проскролльте список вниз, пока не найдете сниппет «Status code: Code is 200», и нажмите на него. Это автоматически добавит правило в поле теста, который выглядит вот так:
pm.test("Status code is 200", function () {
    pm.response.to.have.status(200);
});
Секция «Status code is 200» – это название вашего теста. Секция «pm.response.to.have.status(200)» – это ожидаемый результат.
Нажмите кнопку «Save», а затем «Send». В нижней части страницы вы увидите секцию «Test Results» с «1/1» после названия секции. Это значит, что был запущен один тест, и один тест прошел успешно. Если нажать на ссылку «Test Results», вы увидите «PASS» и «Status code is 200» в секции ответа. Вы успешно добавили правило к вашему запросу!
Давайте посмотрим, как выглядит упавшее правило. Чтобы заставить его упасть, просто измените тело правила на:
pm.test("Status code is 202", function () {
    pm.response.to.have.status(202);
});
Теперь мы ожидаем ответа 202, а не 200. Снова запустите запрос, и вы увидите «0/1» рядом со ссылкой «Test Results». Нажмите на ссылку, и в секции ответа вы увидите «FAIL» и «Status code is 202». Это значит, что тест по имени «Status code is 202» упал.
Снова поменяйте тест, чтобы он ожидал ответа 200, и добавьте правило ко всем запросам коллекции, кроме запроса «Verify Delete Pet». Этот запрос ищет запись, которая больше не существует, поэтому там мы не ожидаем ответа 200. Вместо этого мы должны получить 404 Not Found. Давайте добавим это ожидание в секцию тестов:
pm.test("Status code is 404", function () {
    pm.response.to.have.status(404);
});
Нажмите на кнопку «Save» и сохраните тест.
Если вы прогоните этот запрос до запроса Delete Pet, то тест упадет, потому что животное с ID 100 все еще существует. Но если вначале запросить Delete Pet, а затем Verify Delete Pet, то тест будет пройден успешно, потому что животного с ID 100 больше нет в базе данных.
Теперь у нас есть правила для всех наших запросов. Давайте запустим прогон всей коллекции! Наведите курсор на название коллекции Pet Store, и нажмите на шеврон >, который появится справа. Кликните по кнопке «Run», и откроется Collection Runner. Нажмите на имя вашей коллекции, а затем – на кнопку «Run Pet Store». Вы увидите, как запускаются (и успешно выполняются) все ваши тесты, причем очень быстро! Окно результатов будет выглядеть примерно так:

В верхней части окна вы увидите, что шесть ваших тестов прошло успешно, и ни один не упал. Вы увидите названия всех созданных запросов, имена тестов для каждого запроса, и индикатор «PASS».
Обсудить в форуме
For those new to using Postman, the concept of status codes may seem daunting. However, status codes are simply three-digit numbers that provide information on the status of an HTTP request made in Postman.
These codes play a crucial role in understanding whether a request was successful or if any errors occurred. Postman supports all five classes of HTTP status codes.
In this, we will be delving into the standard status code in Postman and what they signify. We will take a closer look at each of these classes and examine the status codes they contain.
By the end of this article, you will have a better understanding of what status codes are and how to interpret them in Postman, including how to view the status code of a request in the response panel.
1xx Status Codes
The 1xx status codes are considered to be informational, indicating that the server has received the request and is still processing it. This class of status codes is relatively limited, and the most commonly encountered code in this category is:
101 Switching Protocols
This status code indicates that the server is transitioning from HTTP to HTTPS.
If you send a request to a website that has just moved from HTTP to HTTPS, you may obtain a 101 status code.
102 Processing
This status code indicates that the server has received the request and is processing it, but has not yet given a final answer.
This status code is typically used when a request takes a long time to process, and the server wants to keep the connection open to send progress updates.
2xx Status Codes
2xx status codes signify that the request was successful.The most common 2xx status codes are:
200 OK
This status code signifies that the request was successful and that the server returned the required data.
For example, if you request to a REST API to retrieve a user’s profile information, and the server returns the data, you’ll receive a 200 status code.
201 Created
This status code signifies that the request was successful and that a new resource on the server was created.
For example, if you request to a REST API to create a new user, and the server successfully creates the user, you’ll receive a 201 status code.
204 No Content
This status code indicates that the server has successfully processed the request, but there is no data to return.
For example, if you request to delete a resource, and the server successfully deletes the resource, you’ll receive a 204 status code.
206 Partial Content
This status code indicates that the server successfully handled a partial GET request. This status code is frequently used when a client requests a huge file, which the server provides in pieces. The client may then put the chunks together to produce the entire file.
3xx Status Codes
3xx status codes indicate redirection. They indicate that the client must take additional action to complete the request. The following are the most frequent 3xx status codes:
301 Moved Permanently
A 301 status code is given when a requested resource has been permanently relocated to a new URL. As an example, suppose a website changes its domain name, and the server responds with a 301 response code with the new URL.
302 Found
This status code signifies that the requested resource has been relocated to a different URL temporarily. This status code is similar to the 301 status code, but the change is temporary.
304 Not Modified
This status code implies that the requested resource has not been updated since its last access. This status code is typically used with caching to reduce server load.
4xx Status Codes
The 4xx status codes denote client-caused problems, suggesting that the request was defective in some manner, such as including improper authentication credentials or arguments. The 4xx status codes are some of the most common error codes.
400 Bad Request
This status code indicates that the client has sent a malformed request, such as missing or invalid parameters.
401 Unauthorized
This status code indicates that the client needs to authenticate to access the requested resource.
403 Forbidden
This status code indicates that the client is authenticated but does not have permission to access the requested resource.
404 Not Found
This status code indicates that the requested resource does not exist on the server.
422 Unprocessable Entity – This status code indicates that the server understands the request but cannot process it due to a client-side error, such as invalid input data.
5xx Status Codes
5xx status codes indicate server errors. They indicate that the server was unable to fulfill the request due to an internal error. The following are the most frequent 5xx status codes:
500 Internal Server Error
This status code signifies that an unexpected problem occurred while the server was processing the request.
502 Bad Gateway
This status code signifies that the gateway or proxy server got an invalid answer from an upstream server.
503 Service Unavailable
The server is presently unable to handle the request due to maintenance or overload, as indicated by this status code.
Takeaway!
In conclusion, understanding status codes is essential for successful API testing, especially in Postman.
By familiarizing yourself with the different status codes and their meanings, you can easily identify errors and know how to respond to them.
This quick brief on handling Status Code in Postman provides a great starting point to expand your knowledge in this area.
To learn more about API Testing with Postman and advance your skills, we recommend joining the Thrive Academy course on API Testing with Postman.
Don’t miss out on this opportunity to master the art of testing and become a proficient tester.
Search code, repositories, users, issues, pull requests…
Provide feedback
Saved searches
Use saved searches to filter your results more quickly
Sign up
API…Application Programming Interface… If you’re a developer then this word is nothing new for you…
Being a developer, you know the importance of API in any kind of application. In simple terms, API is a defined set of rules with some defined methods of communication. With the help of API, software components can interact with each other. You might have implemented some kind of APIs (such as payment gateway APIs) in your application.

Implementing a quality API is really important to ensure fast development without compromising on the code quality. The best and popular tool for API testing among developers is Postman.
In API testing we test the collection of APIs, and we check that whether your application fulfills the expectations of functionality, reliability, performance, and security. Also, we check that whether it returns the correct response or not.
In API testing we check that whether the output is well-structured and useful for some other application or not. Depending on the input parameter we check the response, and we determine the time API is taking to extract the data and authorize the data to it.
How Postman Works?
Postman sends the request to the webserver and then the server sends the response back to it. A user has to set all the headers and cookies API expects to check the response.
You can install the postman from the link Postman. This tool provides a collection of API calls, and you need to follow these API calls for testing APIs of the application. You will find a dropdown list with multiple methods.
You can select one of the methods from the given dropdown list. You will also have to include more information depending on the API call. This information are set as Authorization, Header, or body information. You just need to select one of the methods and send the request and get the response back.

Environment Variables in Postman
Some requests in POSTMAN require some specific information. You can make changes to these variables all at once instead of changing the variables in the endpoint manually.
In the top right corner, you will get the option to set the environment variable. You can follow the steps given below to set the environment variable.
- In the top right corner click on Manage Environment from Settings.
- Click on ADD button.
- Mention the Name of the environment.
- Mention key and value. This will be used as a variable in the collection later.
Add Collection
Collections are a bundle of requests. To create a collection, you can add an API call in the collection. You can reuse it in your application. A lot of organizations offer collections. You can import this in your postman and test it. If you have created a collection, you can export it or if you want the collection of others, you can import it.
Your API call mainly uses two things…
1. HTTP Request
You make HTTP calls sending the HTTP Request. In HTTP request method includes Request Method, Request URL, Request Headers, Request Body, Pre-request Script, and Tests.
Let’s talk about these Request methods one by one…
Request Methods: You will find several types of Request methods in POSTMAN. Depending on your requirements or test you can choose one of them. Mainly you will be using four request methods in your application. These methods are given below…
- GET Request: To retrieve or fetch data
- POST Request: To create and update data
- PUT Request; To update data
- DELETE Request: For deleting data
Request URL: You will find a long-width bar in Postman where you will have to enter the URL to make the HTTP request.
Request Headers: In the request header, you enter the key value of the application. The two main key values are given below.
- Content-Type: The format of data is specified by Content-Type. Mainly developers use JSON format in the content type.
- Authorization: This information is included to identify the requester.
Request Body: In Postman, you will get the tab of Body where you can mention some specific information that needs to be sent with the request. You will get the option to send the data either in raw, binary, or any other form. Most of the time you will select raw form. You will also get the option of Pre-request scripts. This gets executed before a request is sent. In Postman, you are also allowed to write and run the test for each request. You can use JavaScript language for this.
2. HTTP Response
Once you send the request to Postman, you get the response back from the API that contains Body, Cookies, Headers, Tests, Status Code, and API Response time. Body and Header get organized in different tabs. Status code gets displayed in another tab with the time taken to complete the API call. Some important status codes are given below to verify the response.
- 200– For successful request.
- 201– For successful request and data was created
- 204– For Empty Response
- 400– For Bad Request.
- 401– For Unauthorized access. Authentication failed or the user does not have permission for the requested operation.
- 403– For Forbidden, Access Denied
- 404– For data not found.
- 405– For method not allowed or requested method is not supported.
- 500– Internal server error.
- 503– For Service unavailable
From the above explanation, you might have understood many things about Postman. How it works, how it is used for testing, request, response, and all the status code as well. Postman is the most popular tool among developers for API testing. There are many other tools as well, you can check out them as well, but the most popular one is POSTMAN and the reason behind its popularity is a lot of features included in it.
Last Updated :
02 Oct, 2022
Like Article
Save Article
Once you send the request, API sends the response. A response is a message the server receives in return for a Request we send. When we send the request, then server accepts that request in and sends back a packet of the requested information, which is called the response. Each response depends on the sent request.
The server responds differently for every request, and it will be good if we take out some info from all of the server responses. It provides a user-friendly interface to see multiple pieces of information from all of the responses easily.
The postman response interface has multiple options. Let’s see these options one by one:
Response Status and Information
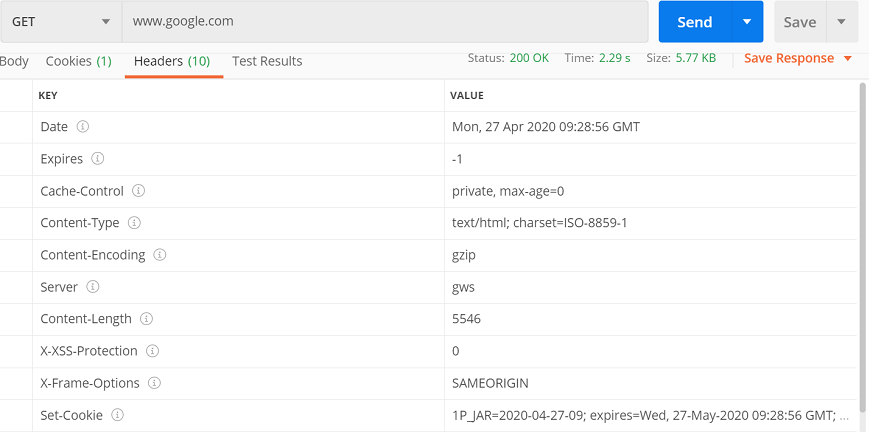
Enter the URL www.javatpoint.com and see the response:
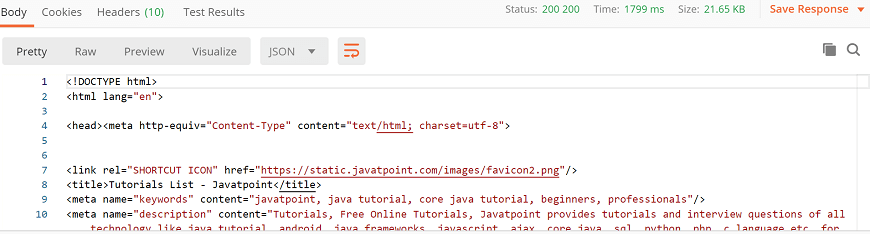
On the top right corner of the response box, we can see the Status, Time, and Size of the code.

Status Code
A status code defines the status of the request. On entering URL, a mistake can be typed in the URL, or there may be a server-side problem. Status code is used to know about what went wrong and where you made a mistake. There are different status codes, and each of the status codes has different meanings.
Let’s see some standard status codes:
200: This code is used for a successful request.
201: For a successful request and data was created.
204: For empty response.
400: This is used for Bad Request. If you enter something wrong or you missed some required parameters, then the request would not be understood by the server, and you will get 400 status code.
401: This is used for Unauthorized Access. If the request authentication failed or the user does not have permissions for the requested operations, then you will get a 401 status code.
403: This is for Forbidden or Access Denied.
404: This will come if the Data Not Found.
405: This will come if the method not allowed or if the requested method is not supported.
500: This code is used for Internal Server Error.
503: And this code is used for Service Unavailable.
Time
Time is the duration between the sent request time and the received response time. Means, this is the duration which the response took after we sent the request and received the response.
This is very useful sometimes because many projects have a Service Level Agreement (SLA). The time shown here is not the actual time that the request will take. It is just approximate time, but you can consider this as an actual time.
Size
Size is the size of the response when it is processed within memory. This response size includes the size of response, cookies, headers, and everything that has been transmitted along with the response.
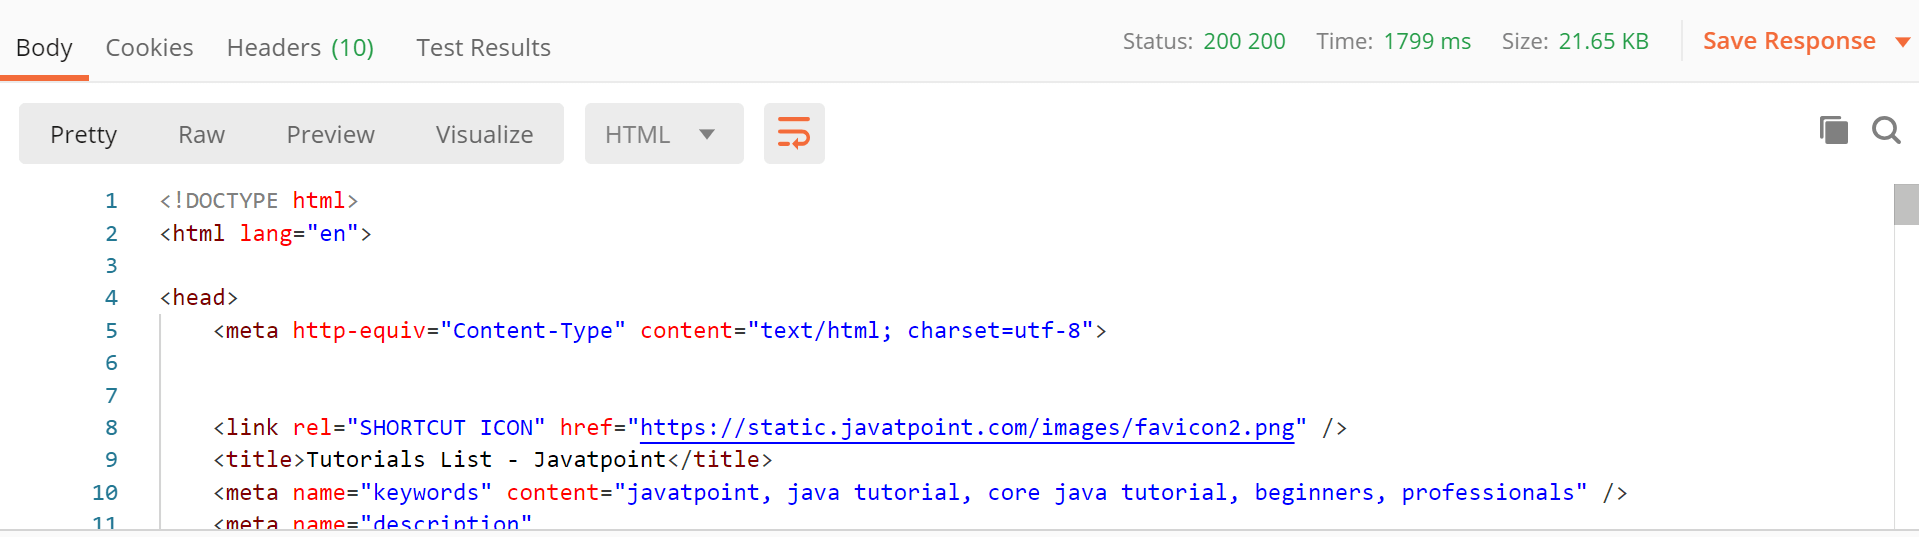
Response Body
A Response body is the body of the response, which actually contains the response content that has been sent from the server. In this section, you can see the web page code is sent to us as a response.
In this box, there are three ways to see the response in the response body:
- Pretty
- Raw
- Preview
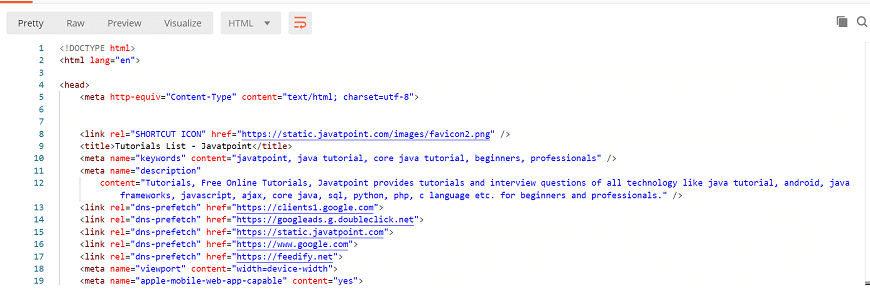
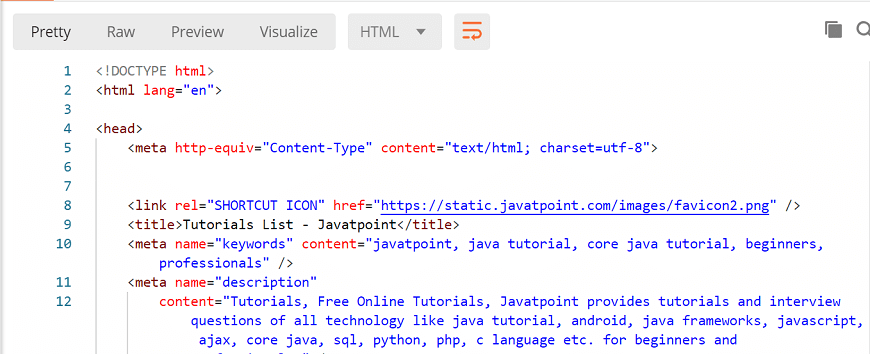
Pretty: As the name specifies, pretty is the prettier way to see the content. In this option, code will colorfully show with different keywords and have indentations in the code, which is useful for reading. Each color has different meanings. This makes the code nicer.
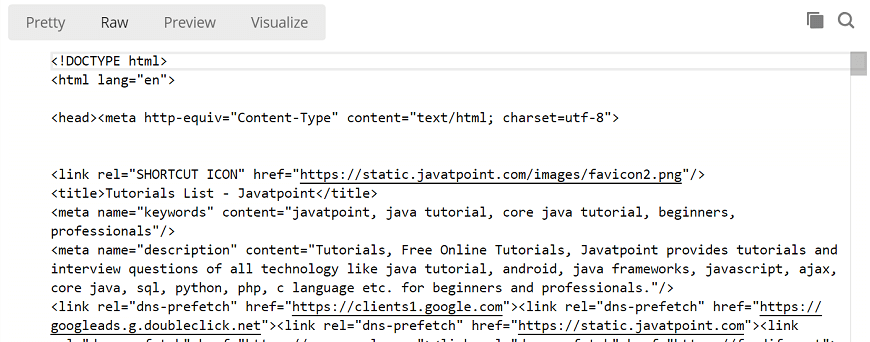
Raw: This is almost similar to pretty but shows the code without colors and in single lines. It is just a raw version of the code without any colorful keywords.
Preview: This will show the preview of the page that has been sent. It has the same page been run inside a browser. You just need to click on the preview, and you will get the exact page as you would have seen inside a browser.
Preview tab renders the response in a sandboxed iframe, and because of iframe sandbox restrictions, JavaScript and images are disabled in the iframe.

Format Type
Each request has a defined response to it as defined by the Content-Type header. That response can be in any format. Such as in the below example we have HTML code file:

You will see that we have multiple format types:
- JSON
- XML
- HTML
- Text
- Auto
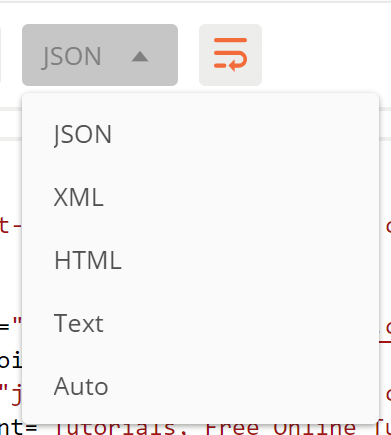
Sometimes, the server sends the response in multiple formats. The type of format of response will be visible to its corresponding format type.
Copy Response
From the right-hand side of the response box, you can see two rectangles; that option is used for copying the complete response to the clipboard, which is very useful to send the response to anyone.
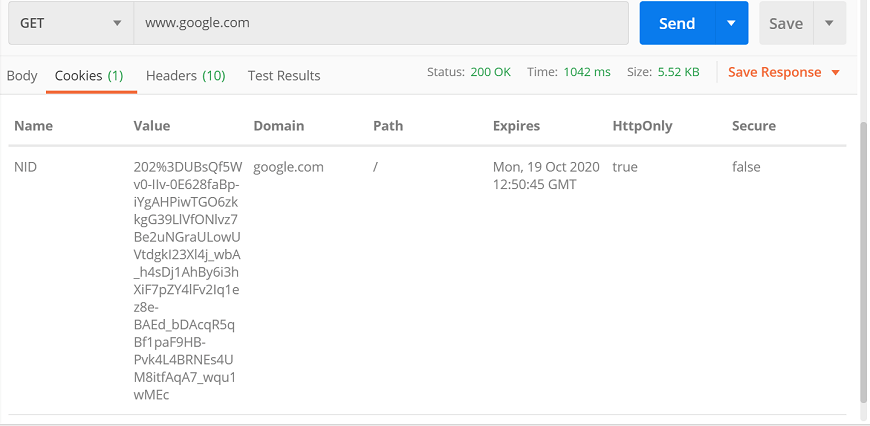
Cookies
Cookies are the small size of files which contain the information related to server files or website pages. Once you open the website for the first time, a cookie file will download on your system. This cookie has some information which will be used by the same site when you visit again. This allows the website to give a specific response and specific information according to your last visit.
Postman offers you to see the cookies that have been sent from the server as a response. We cannot make any changes to the cookies since we got from the server.
Try with the URL www.google.com and go to the Cookies section, you will get the cookie.
Headers
Headers are the extra information that is transferred to the server or the client. In the postman, headers will show like key-value pairs under the headers tab.
Once you select Headers option, you will get the following info: