Ошибка van 81 — это ещё одна распространённая ошибка валорант, которая связана с работой античита. К счастью, подобная ошибка не говорит о том, что вас хочет заблокировать игра, просто служба работает не корректно.
Код ошибки 81 — решение
Решение ошибки кроется всё в той же службе vgc, которая связана с работой античита от Riot. Вам необходимо полностью перезагрузить пк и открыть службы виндовс.
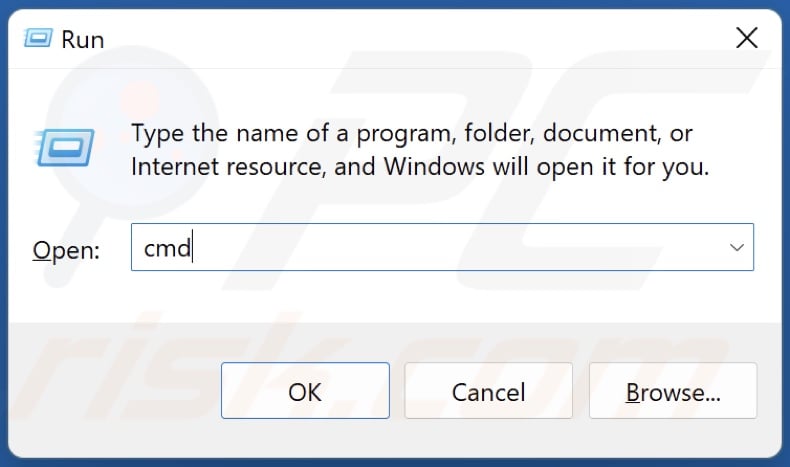
Для этого кликаем правой кнопкой на значок виндовс и нажимаем «выполнить» или же зажимаем комбинацию клавиш WIN + R.
В появившемся окне вводим команду: services.msc и нажимаем ок.

После этого в списке всех служб нам необходимо найти службу vgc и открыть её двойным щелчком мыши. А в открывшемся окне сменить режим запуска службы с «Вручную», на «Автоматически». После этого нажмите запустить и сохраните результат нажатием кнопки «Принять».
 Данная нехитрая манипуляция избавит вас от ошибки van 81, а так же исключит возможность возникновения других проблем в валорант. К примеру ошибка val 51 лечится ровно так же и если вы столкнулись с одной из них и решили, то, скорее всего, другие ошибки вам уже не встретятся.
Что же, теперь перезапускаем компьютер и теперь, с большой вероятностью, вы навсегда избавились от ошибки van 81. Однако, если вы решили данную проблему иным способом — обязательно напишите в комментариях, ваше решение может быть полезно другим игрокам.
How to Fix Valorant Error Code VAN -81
Valorant Error Code VAN -81 is a connection error that often occurs because the VGC service isn’t running or can’t connect to Riot’s servers. This article is dedicated to helping you fix this error.
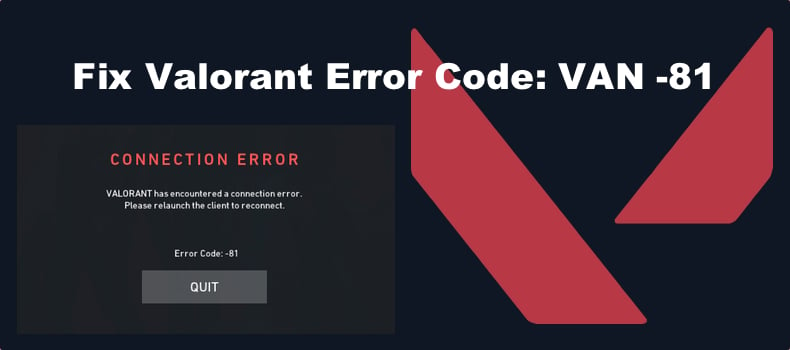
VALORANT has encountered a connection error. Please relaunch the client to reconnect. Error Code: VAN -81
What Causes Error Code VAN -81?
Error VAN -81 appears because Valorant fails to connect to its servers, but the reason it fails to connect relates to the Riot Vanguard (VGC) anti-cheat software. You will get this error if VGC is not running or is blocked from connecting to Riot’s servers.
- The VGC service fails to start. Riot’s VGC service may fail to start when you launch Valorant, resulting in Error VAN -81. You can fix this error by setting the VGC service to start automatically when you boot up Windows.
- The VGC service is blocked by a firewall. Your firewall may block the VGC service from connecting to Riot’s servers. Adding it to your firewall’s exceptions list may fix the error.
- The VGC service is blocked by an anti-virus program. Your anti-virus program may prevent the Riot Vanguard service from running. Adding it to the exclusions list should help you fix the error.
- The Riot Vanguard has been corrupted. If the Riot Vanguard installation has become corrupt, try reinstalling it.
Before trying any of our fixes, here are some tips:
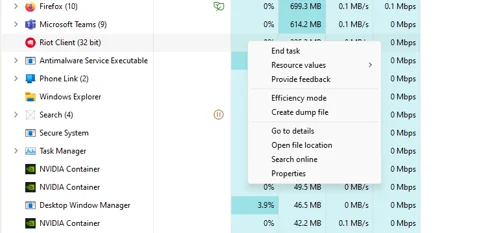
- Restart the Riot client. Open the Task Manager, right-click each Riot and Valorant-related task and click End task. Relaunch Valorant and see if that fixed the issue.
- Run Valorant as an administrator.
- Restart your PC.
- Check your Internet connection. The error may occur if you have an unstable Internet connection. Try restarting/resetting your Internet router.
- Go to the Riot Games Service Status website and check the server status. If there are no recent issue reports, then it’s more than likely that there’s an issue on your side.
Video Guide on How to Fix Valorant Error Code VAN -81
Table of Contents:
- Introduction
- Method 1. Enable the VGC Service
- Method 2. Change the VGC Startup Type to Automatic
- Method 3. Allow VGC through Windows Defender Firewall
- Method 4. Add Riot Vanguard (VGC) to Windows Security Exclusions List
- Video Guide on How to Fix Valorant Error Code VAN -81
Method 1. Enable the VGC Service
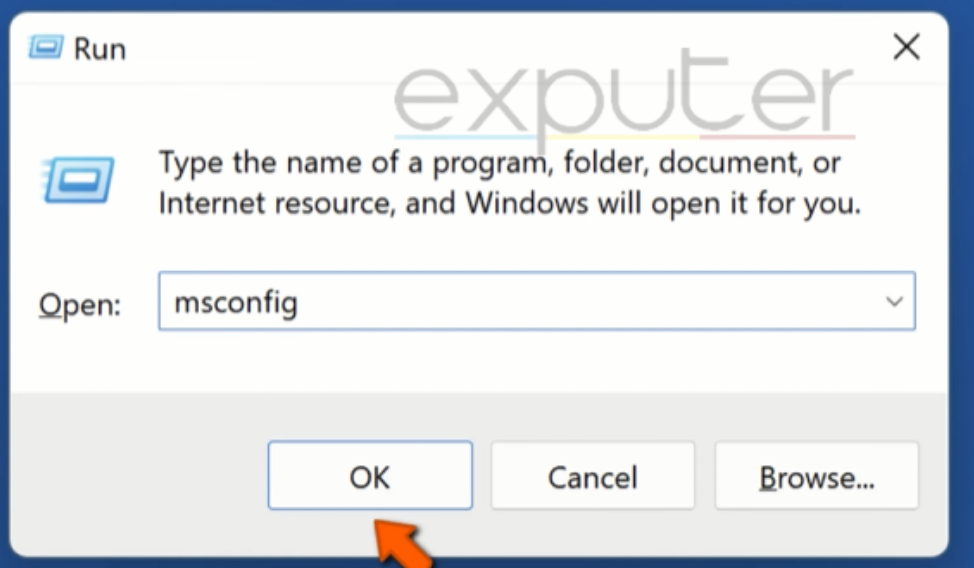
1. Hold down Windows+R keys to open Run.

2. In the Run dialog box, type in msconfig and click OK.
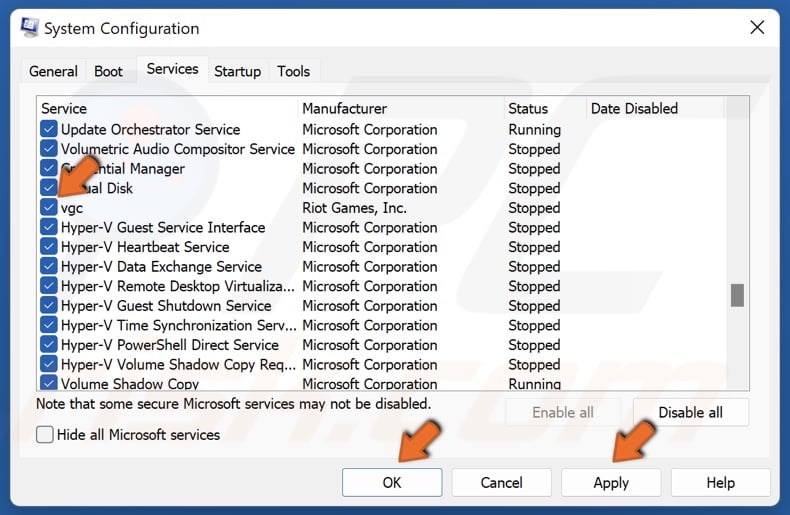
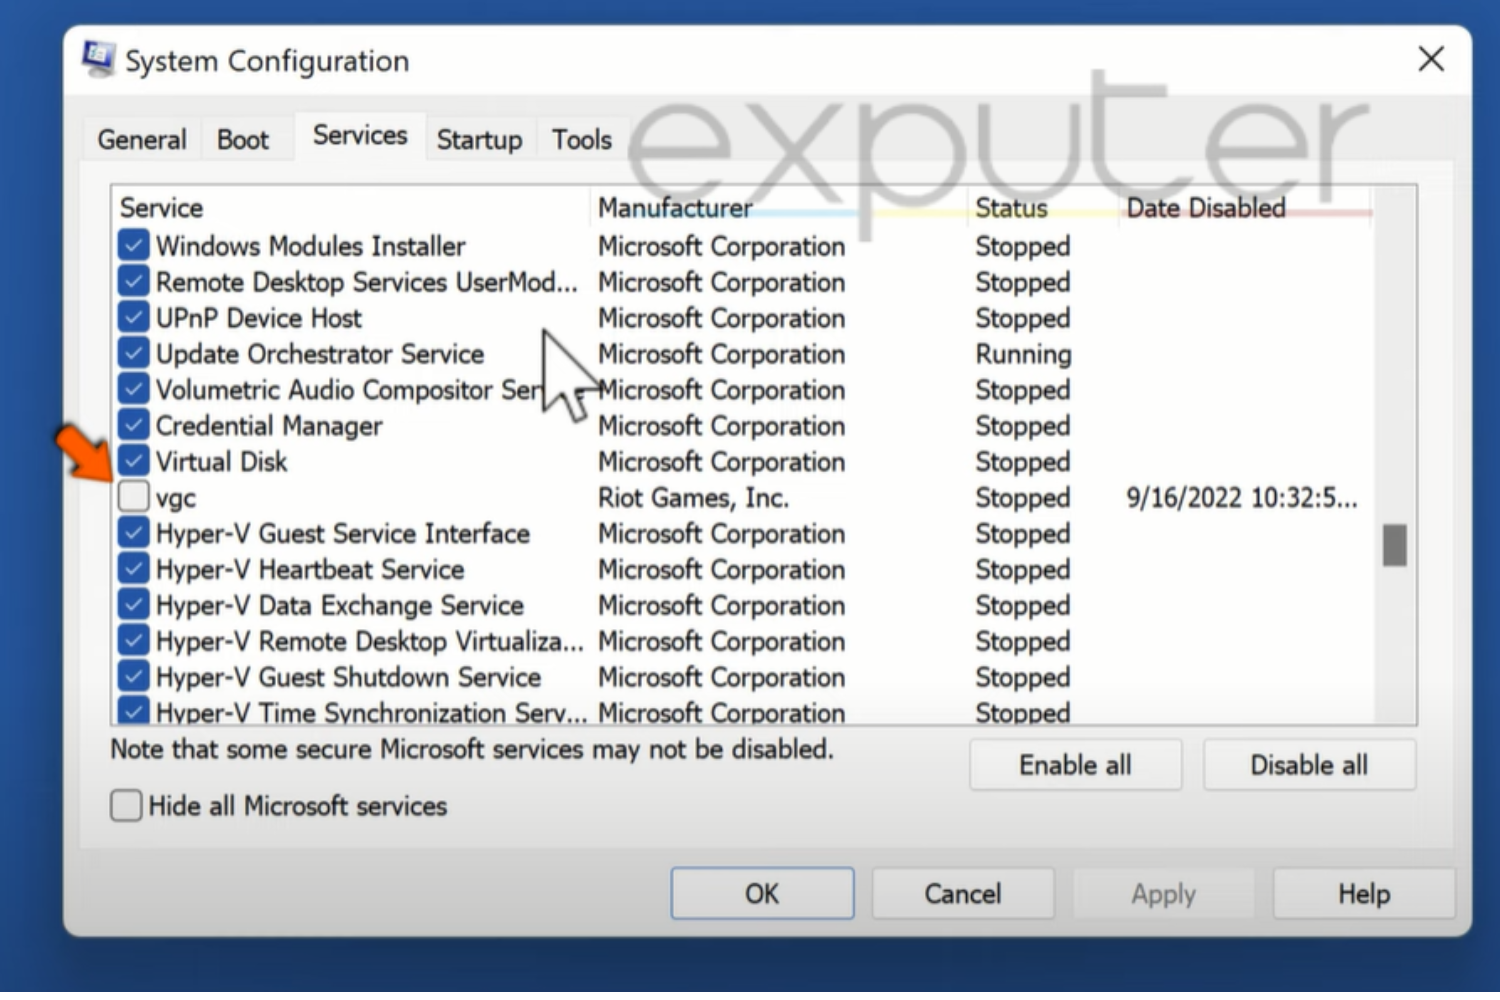
3. In the System Configuration window, select the Services tab.
4. Mark the checkbox next to VGC to enable it.
5. Click Apply and click OK.
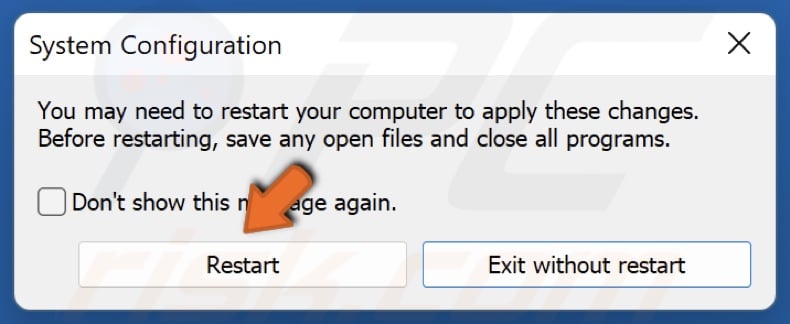
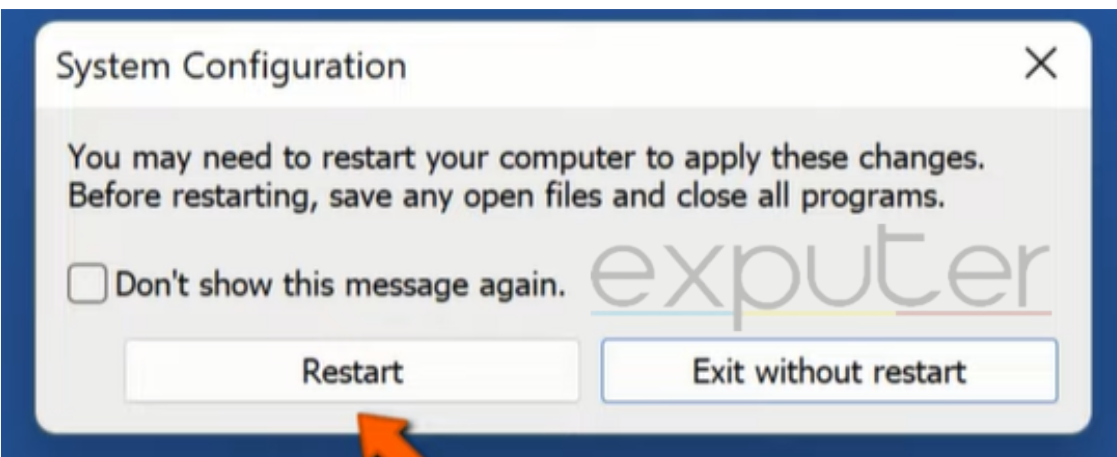
6. Click Restart when prompted.
[Back to Table of Contents]
Method 2. Change the VGC Startup Type to Automatic
The VGC Service is part of the anti-cheat system for Riot games, including Valorant. You may experience Error VAN 81 if the VGC service fails to start. The guide below will show you how to set the service to start automatically, thus preventing the error from occurring.
1. Hold down Windows+R keys to open Run.

2. In the Run dialog box, type in services.msc and click OK.
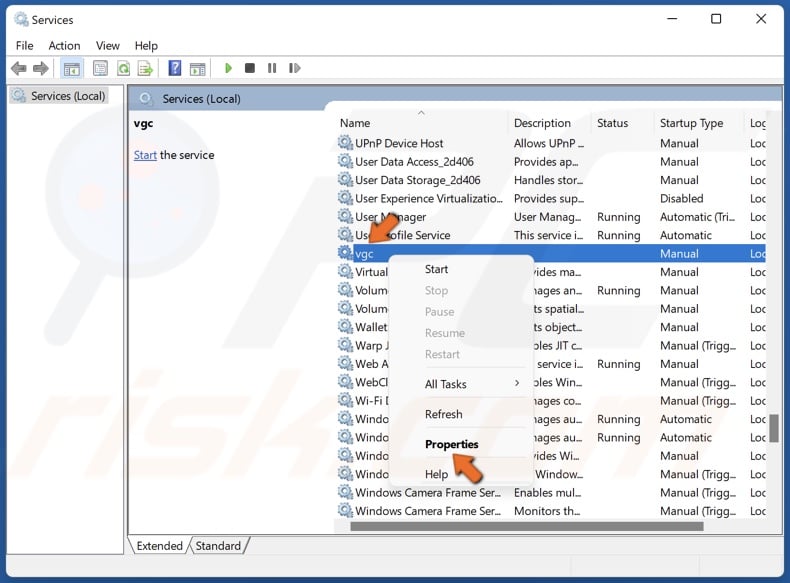
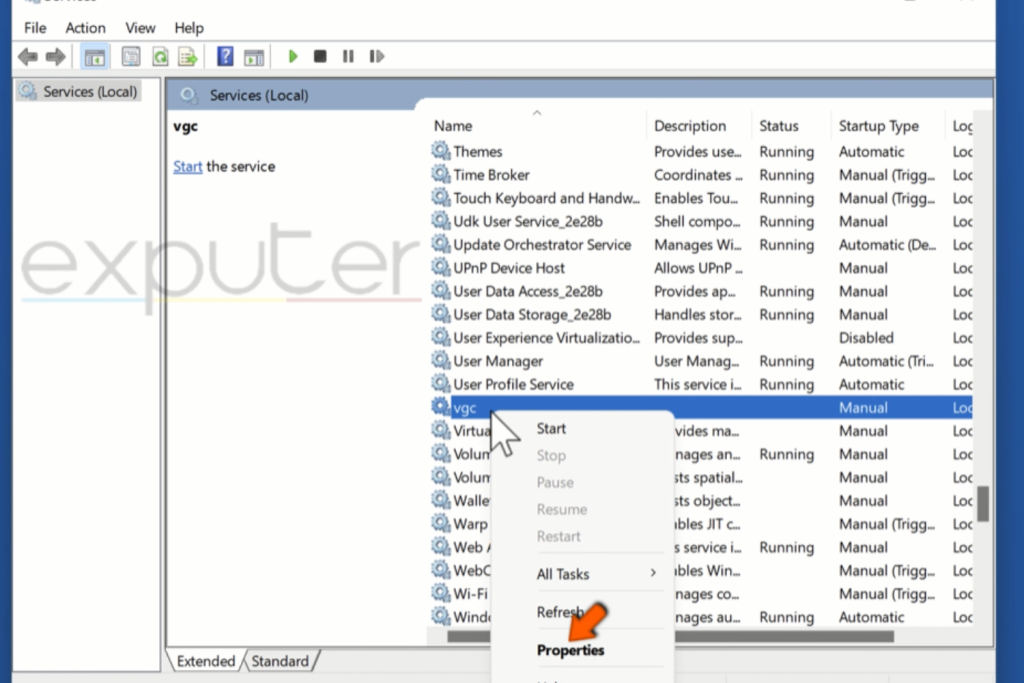
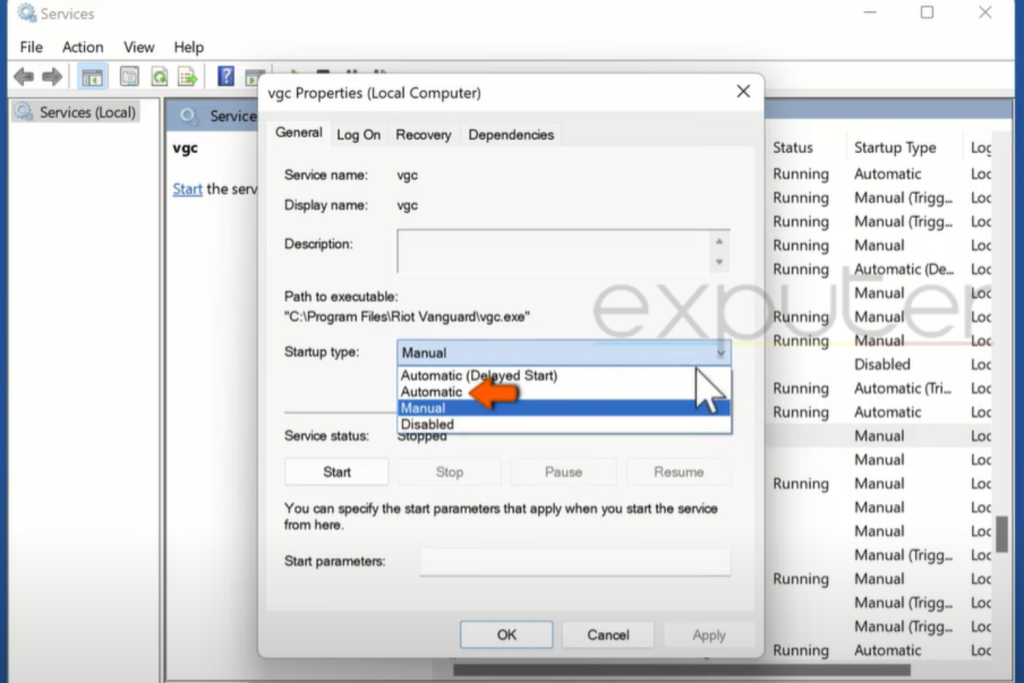
3. In the Services window, locate the VGC service, right-click it and select Properties.
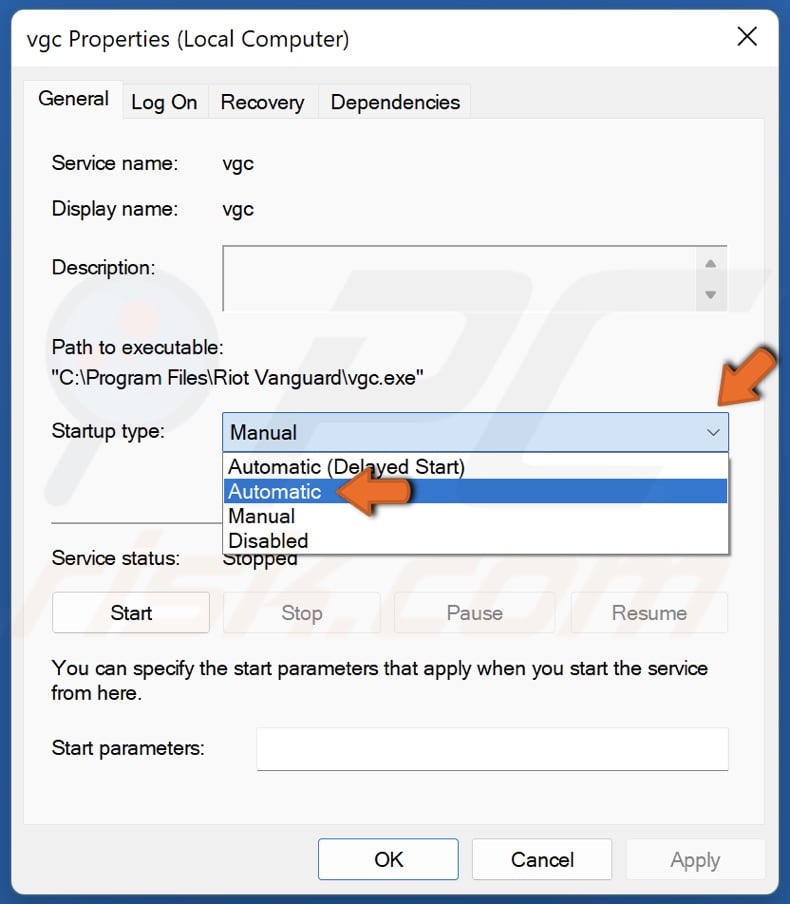
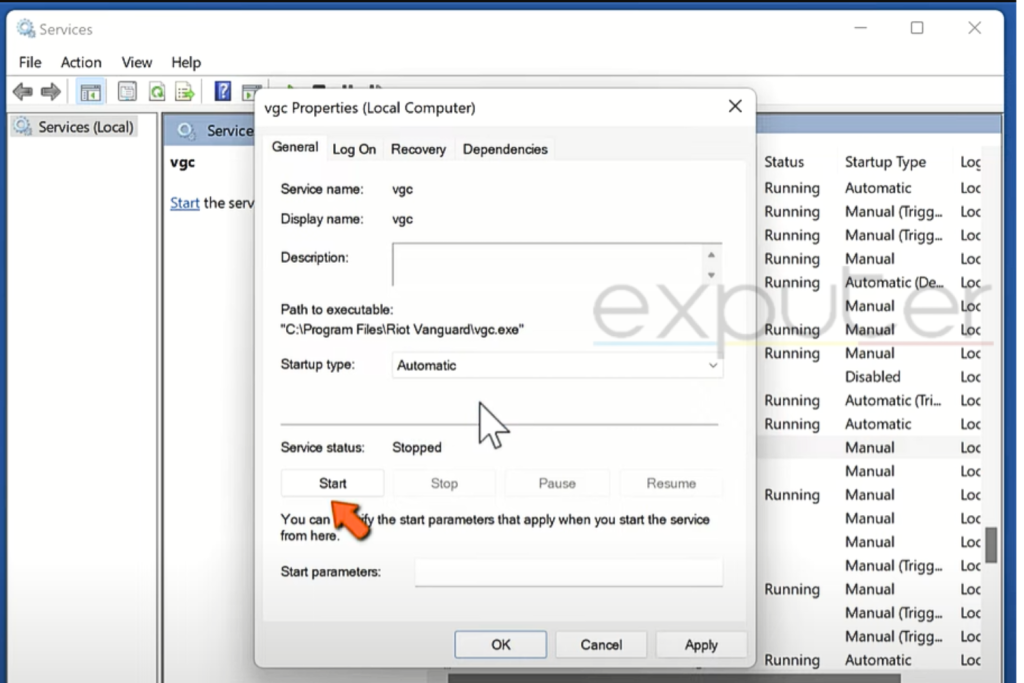
4. Open the Startup type drop-down menu and select Automatic.
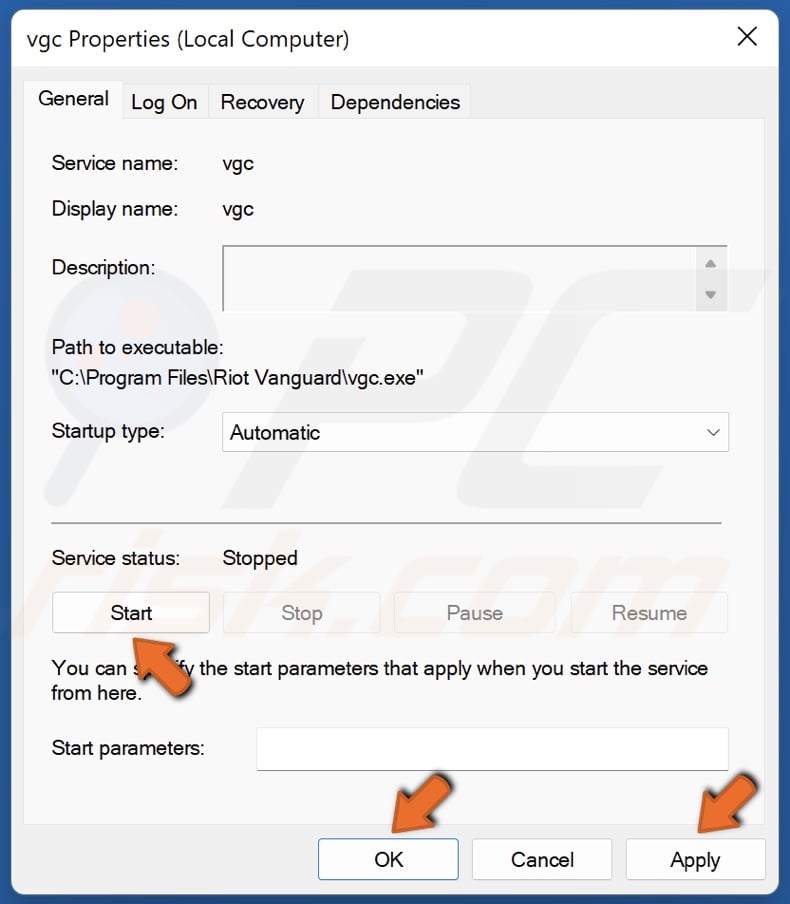
5. In the Services status section, click Start.
6. Click Apply and click OK.
7. Restart your PC and launch Valorant.
8. If you get a “Windows could not start the vgc service on Local Computer. Error 1: Incorrect function” message, perform the following steps.
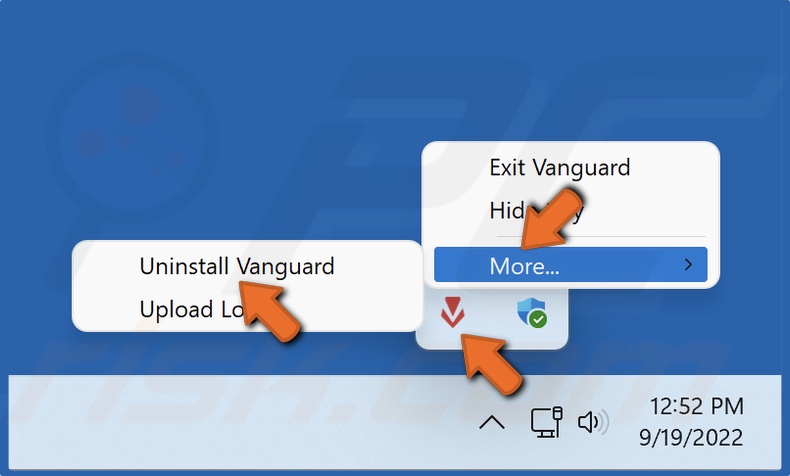
9. Navigate to the icons tray in the taskbar, right-click Riot Vanguard, select More, and click Uninstall Vanguard.
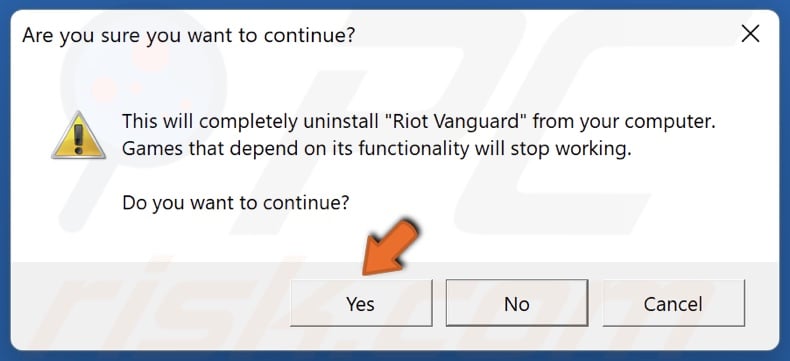
10. Click Yes when prompted to confirm the removal.
11. Hold down Windows+R keys to open Run.
12. In the Run dialog box, type in CMD and hold down Ctrl+Shift+Enter keys to open the elevated Command Prompt.
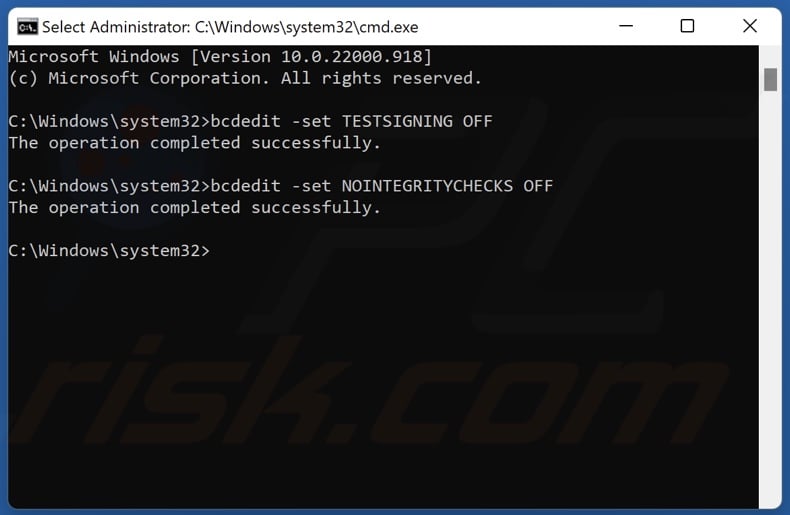
13. In the Command Prompt window, type in bcdedit -set TESTSIGNING OFF and press Enter.
14. Then, type in bcdedit -set NOINTEGRITYCHECKS OFF and press Enter. If you get “The value is protected by Secure Boot policy and cannot be modified or deleted” message, disable Secure Boot in your system’s BIOS.
15. Run the Valorant launcher to install Riot Vanguard.
16. Restart your PC.
17. Hold down Windows+R keys to open Run.
18. In the Run dialog box, type in services.msc and click OK.
19. In the Services window, right-click VGC and select Properties.
20. Open the Startup type drop-down menu and select Automatic.
21. In the Services status section, click Start.
22. Click Apply and click OK.
[Back to Table of Contents]
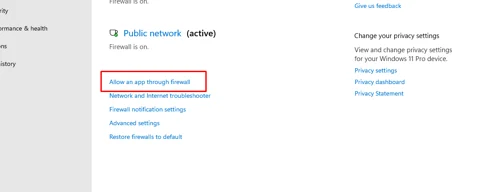
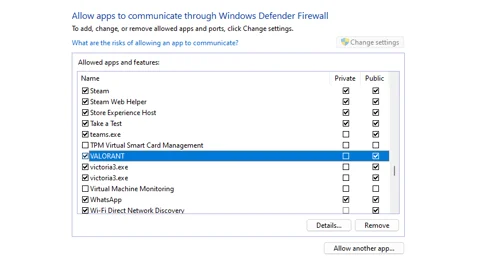
Method 3. Allow VGC through Windows Defender Firewall
Windows Defender Firewall (or your third-party firewall solution) may prevent the VGC service from connecting to Riot’s servers. The instructions below will show you how to add VGC to Windows Defender Firewall’s exceptions list.
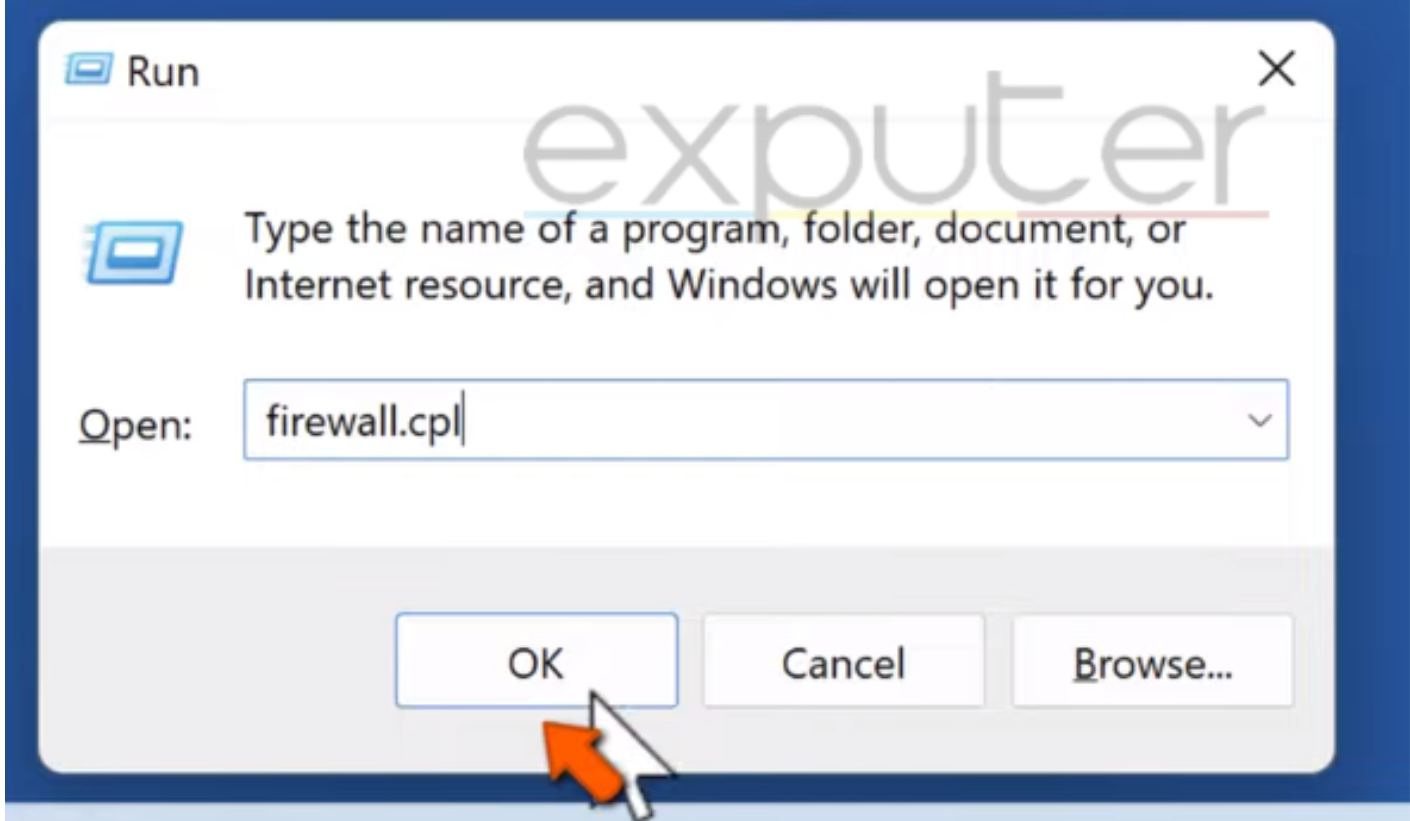
1. Hold down Windows+R keys to open Run.
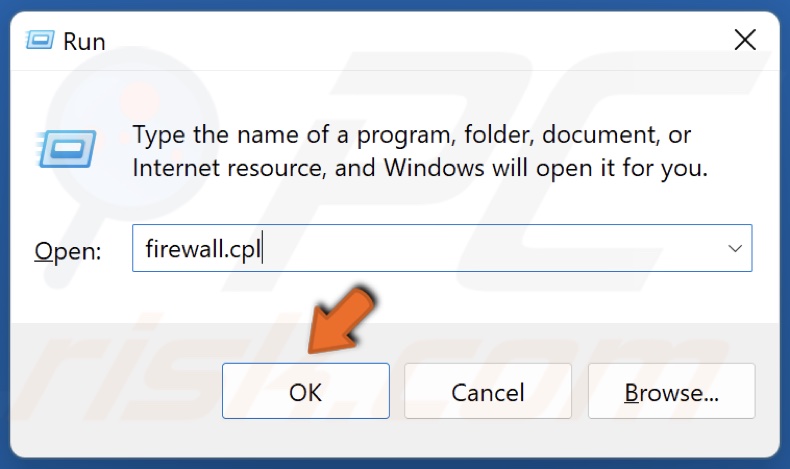
2. In the Run dialog box, type in firewall.cpl and click OK.
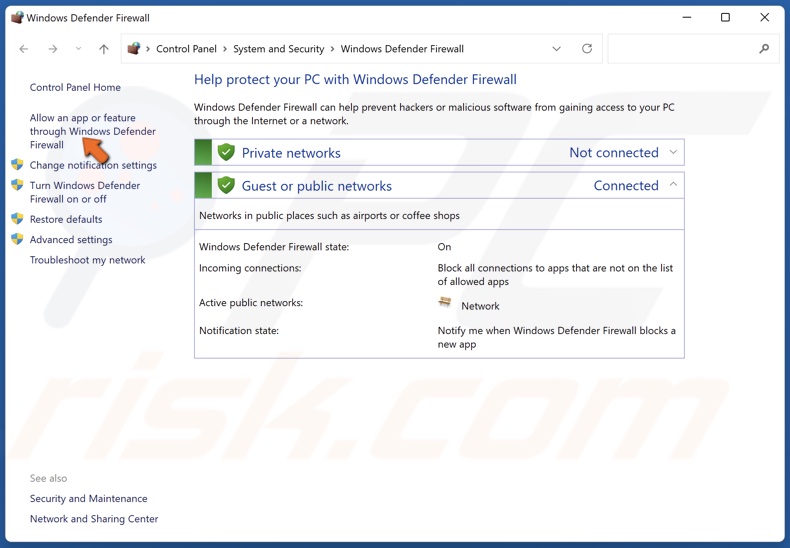
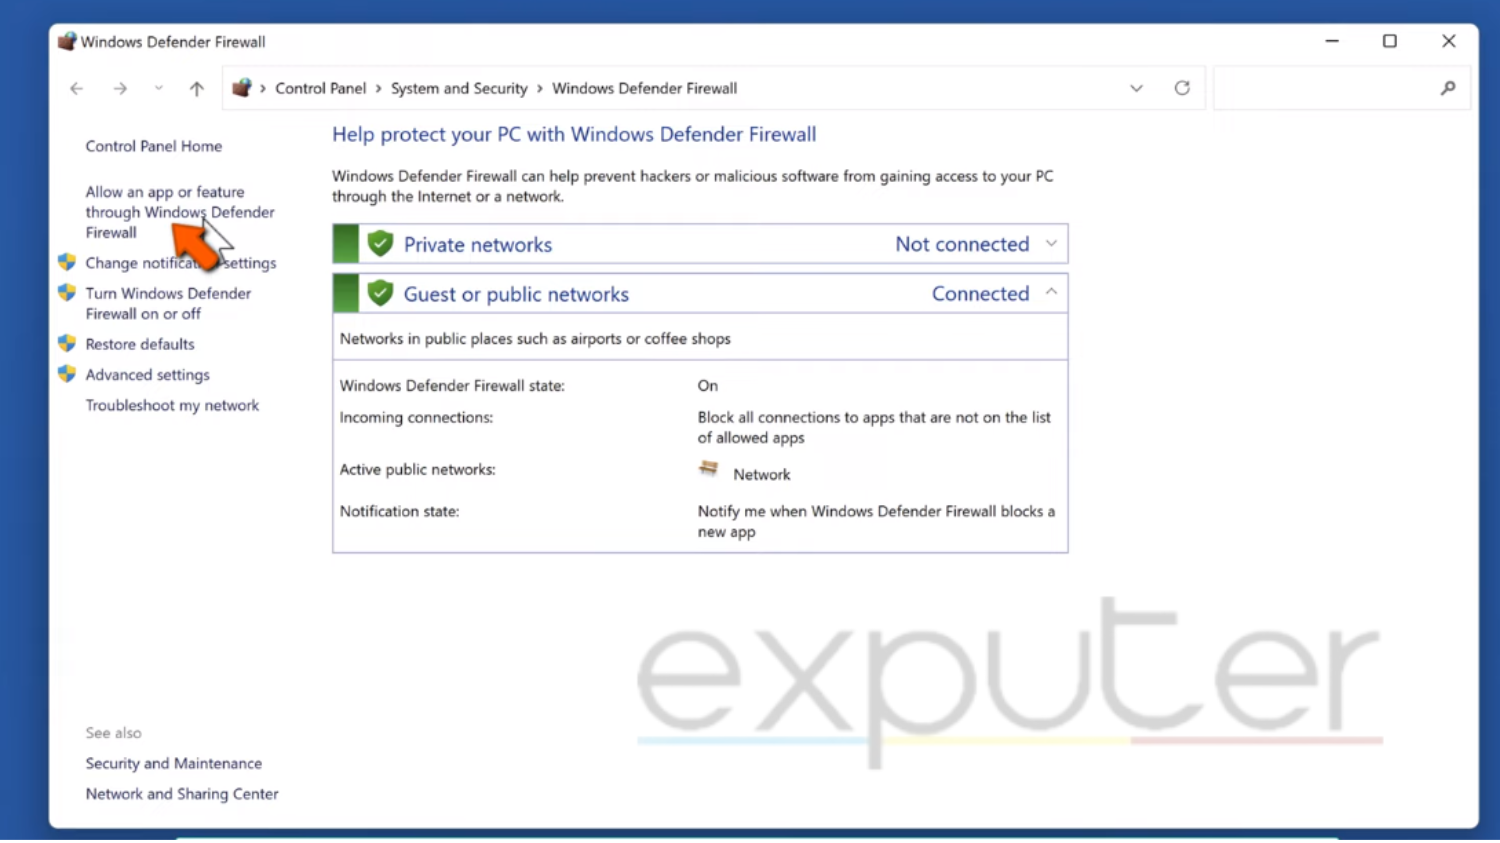
3. Click Allow an app or feature through Windows Defender Firewall.
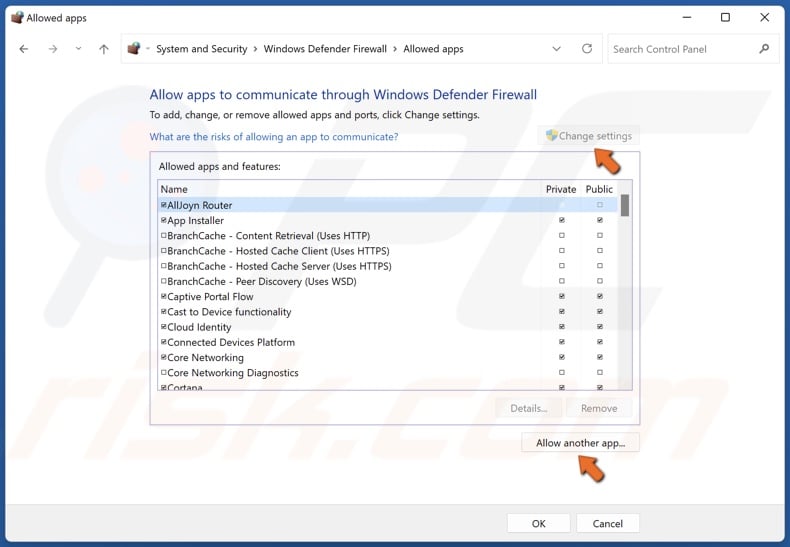
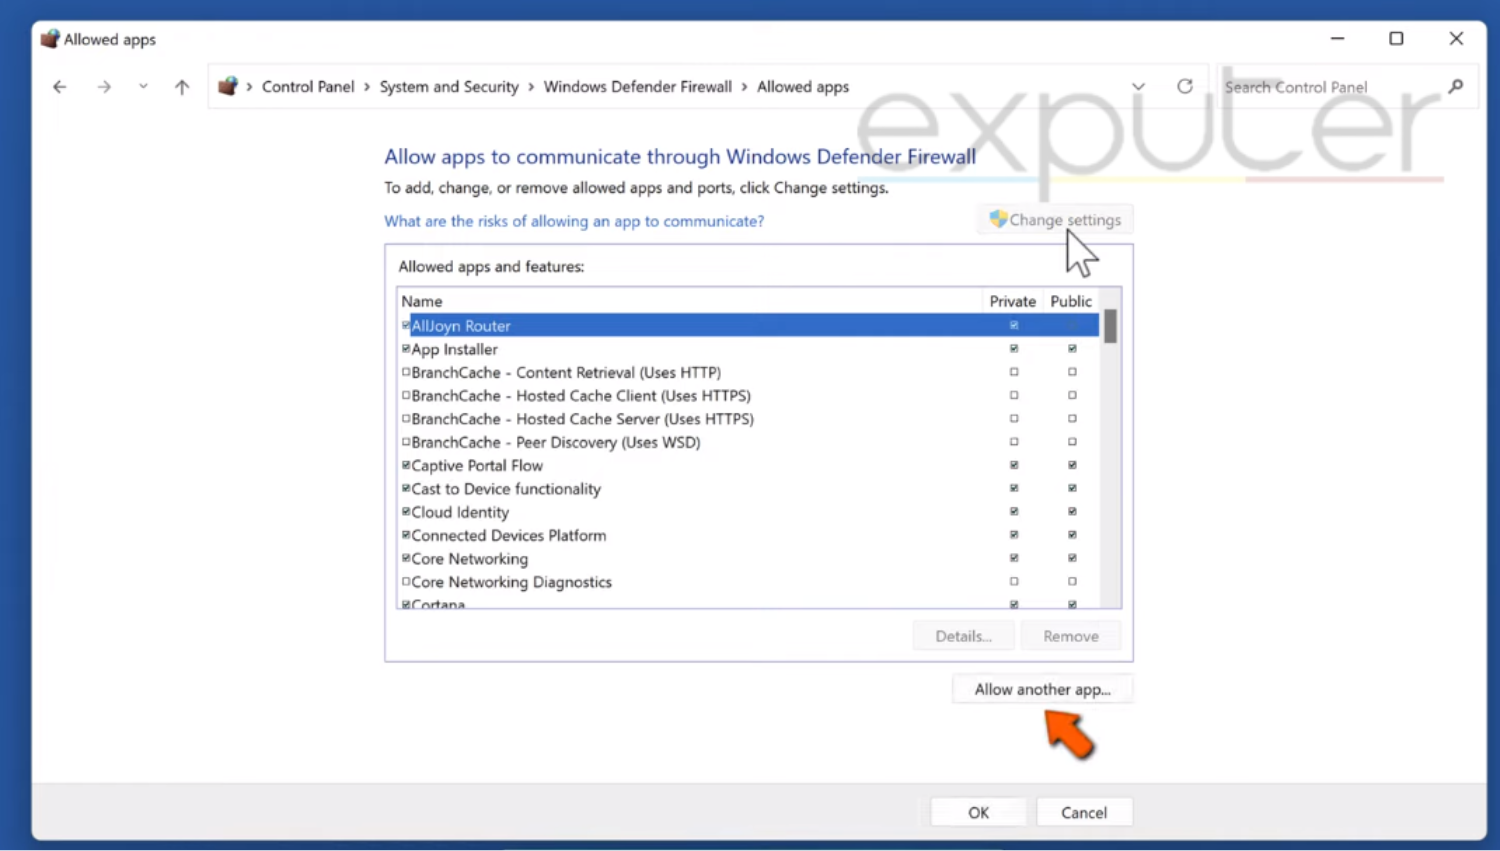
4. Click Change settings.
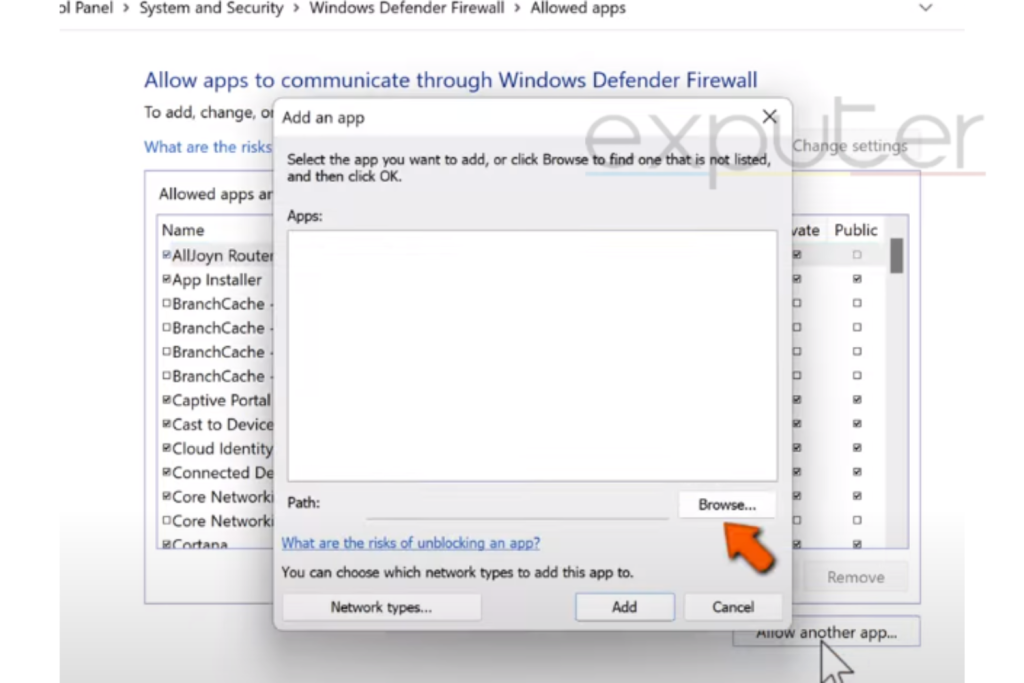
5. Click Allow another app.
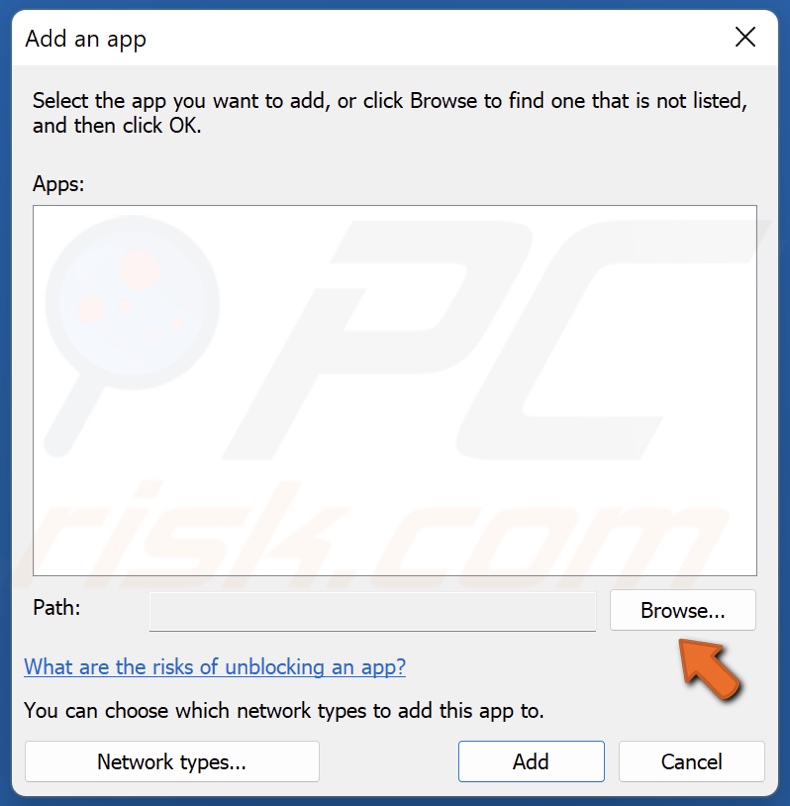
6. Click Browse.
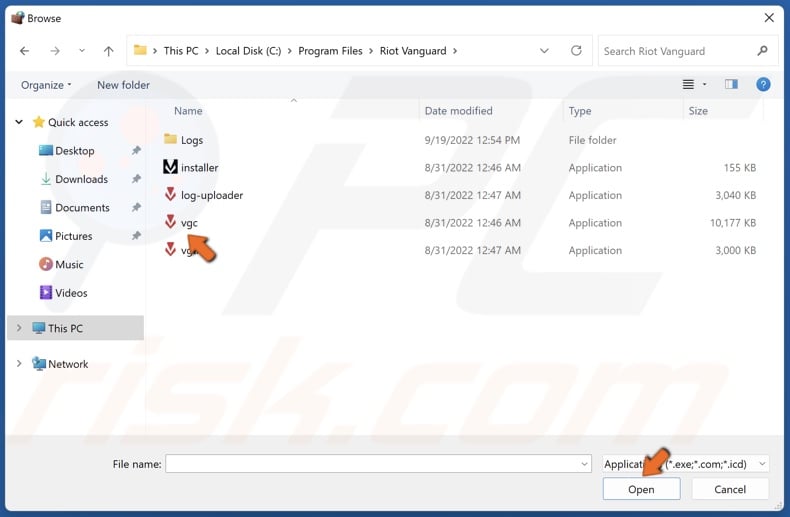
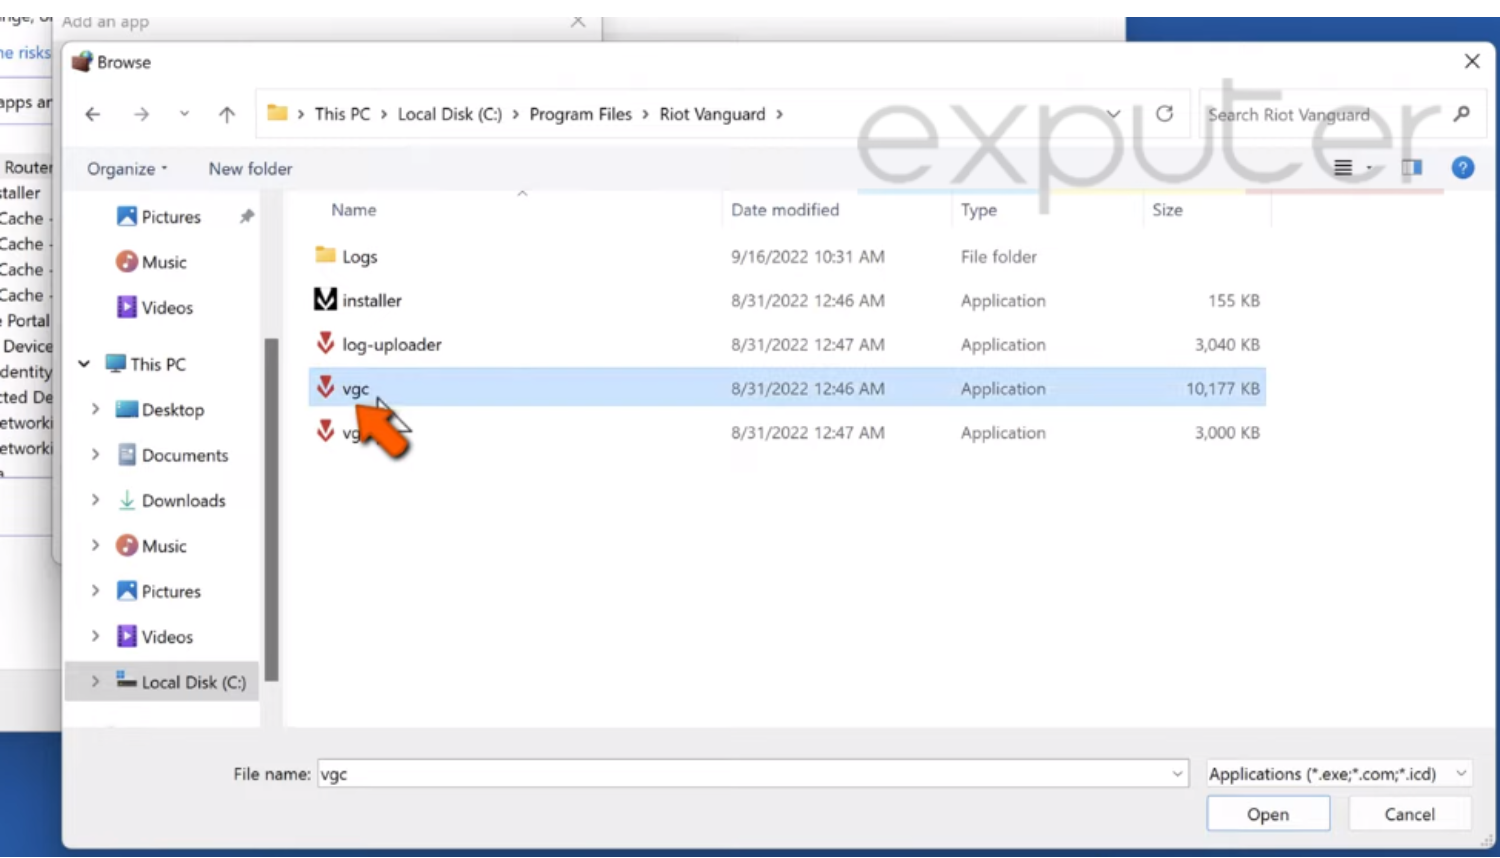
7. Navigate to C:\Program Files\Riot Vanguard
8. Select VGC.exe and click Open.
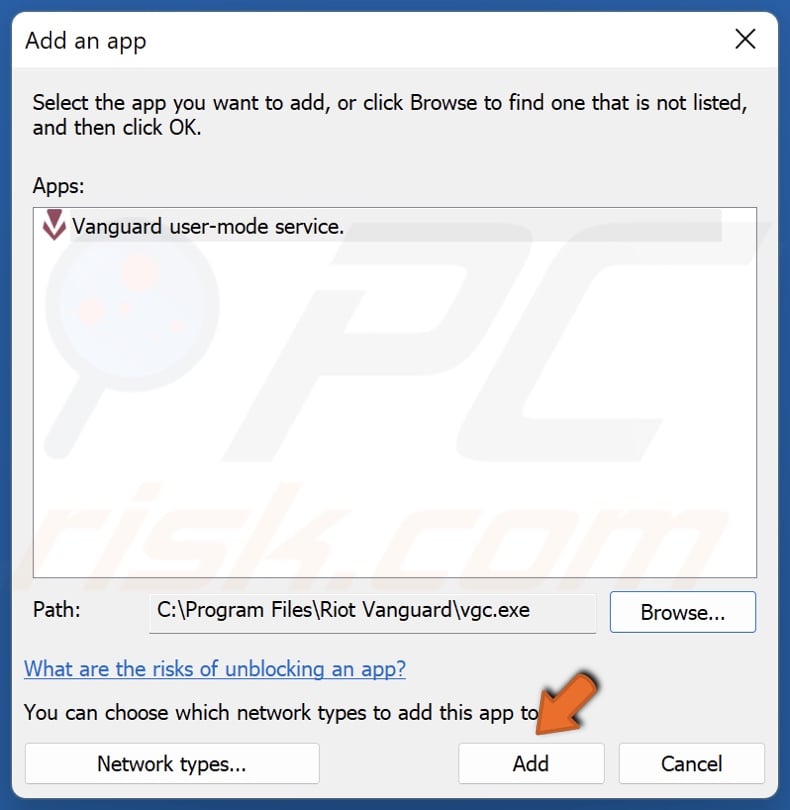
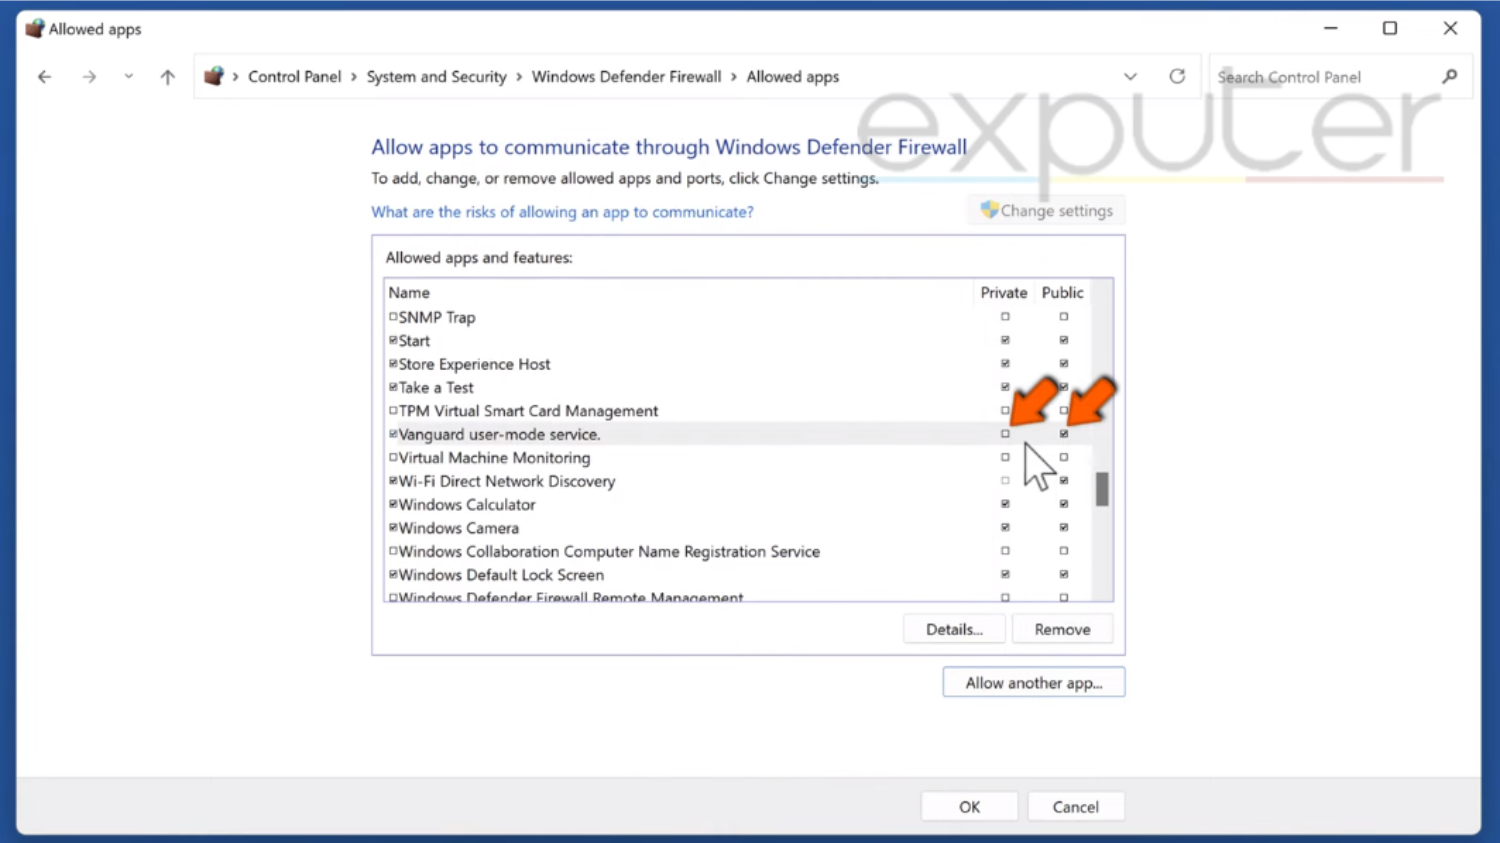
9. Click Add to add Vanguard user-mode service.
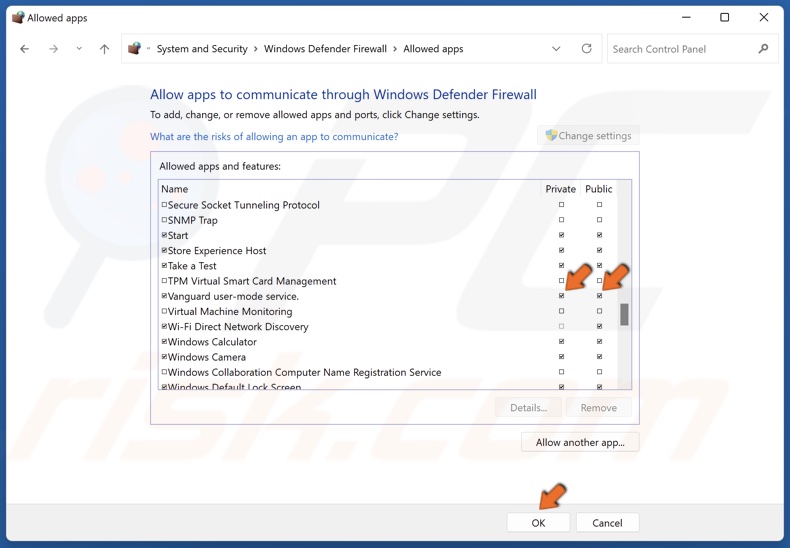
10. Mark the Private and Public checkboxes next to Vanguard user-mode service and click OK.
[Back to Table of Contents]
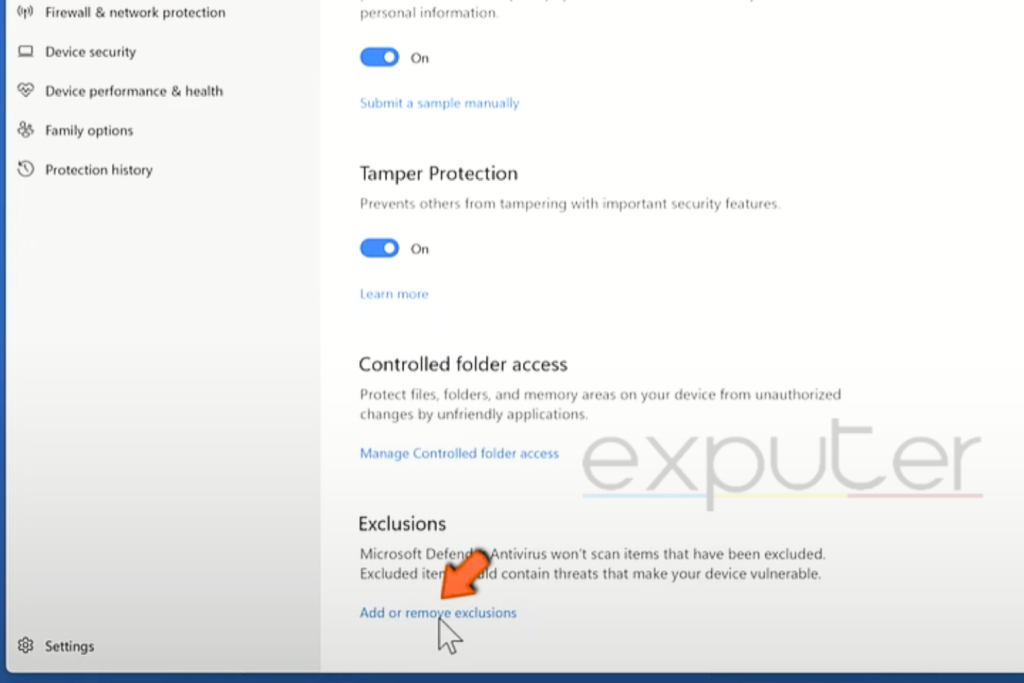
Method 4. Add Riot Vanguard (VGC) to Windows Security Exclusions List
![]()
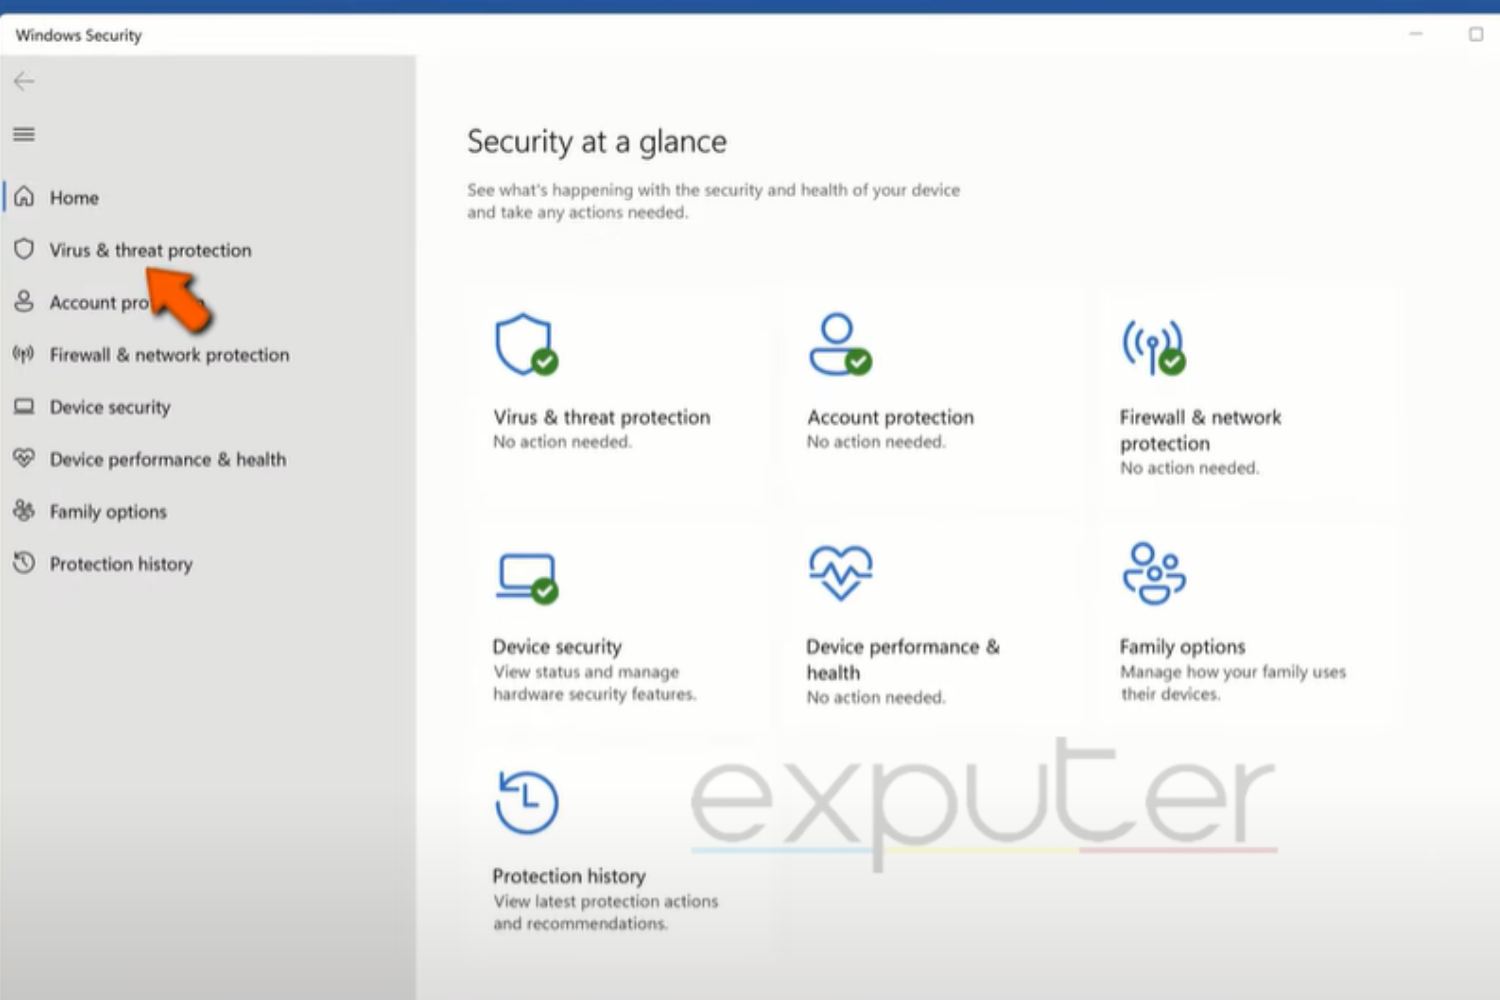
1. Navigate to the icons tray in the taskbar and click the Windows Security icon.
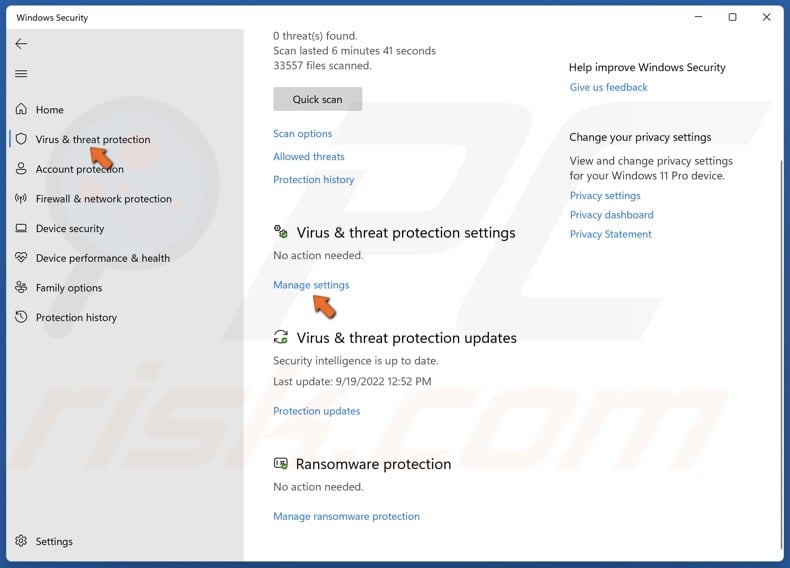
2. In the Windows Security window, select Virus & threat protection from the left pane.
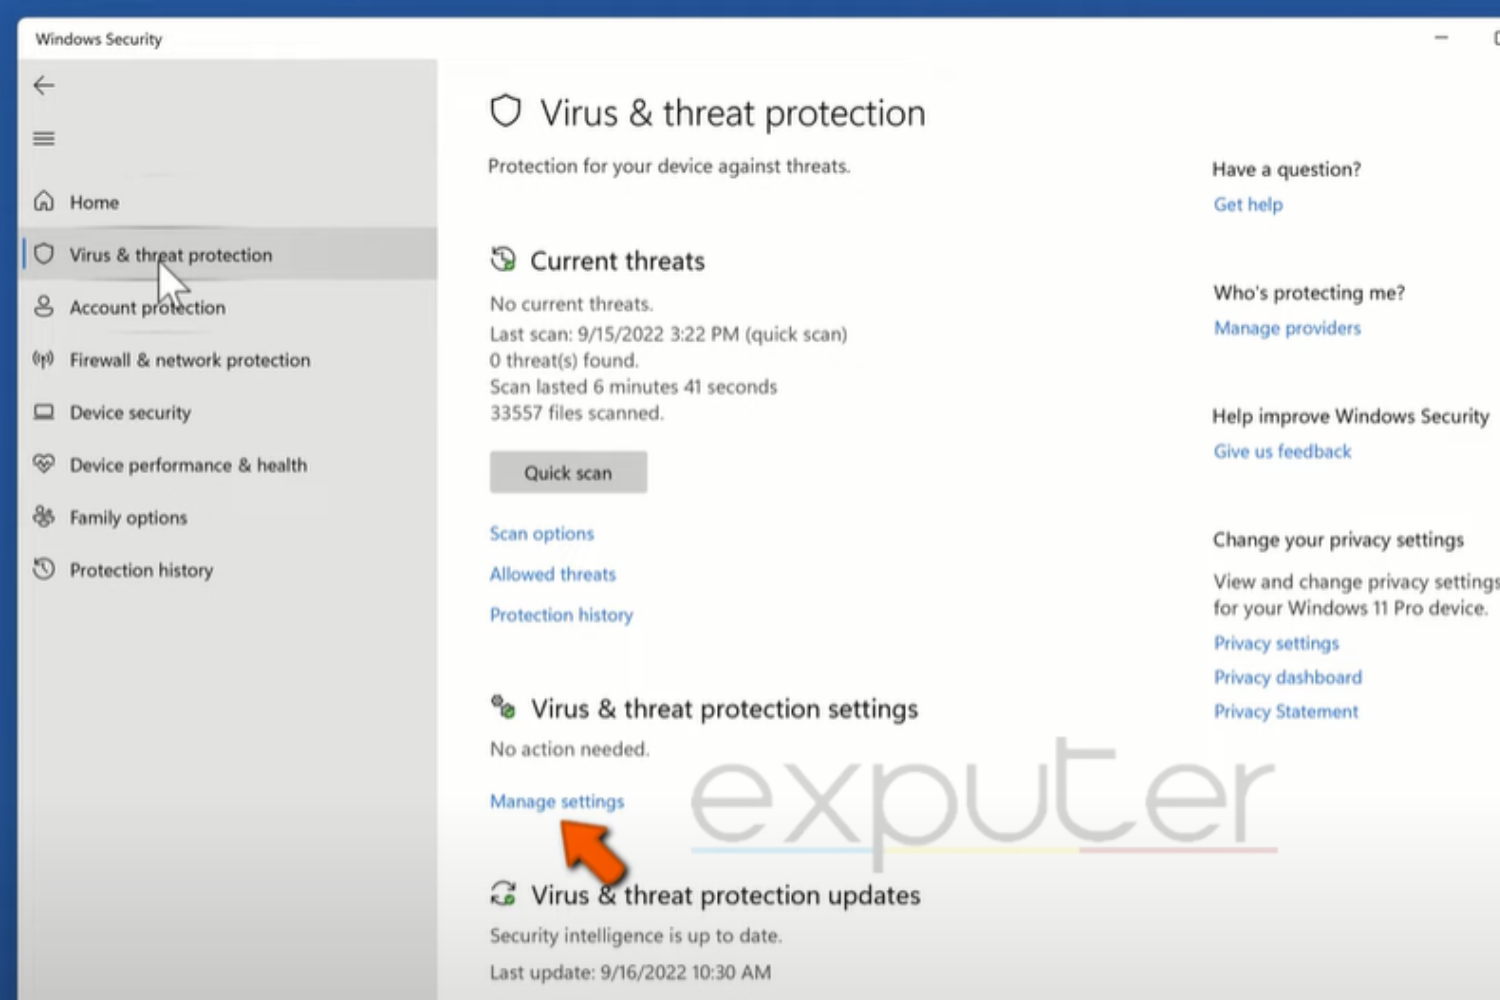
3. In the Virus & threat protection section, click Manage settings.
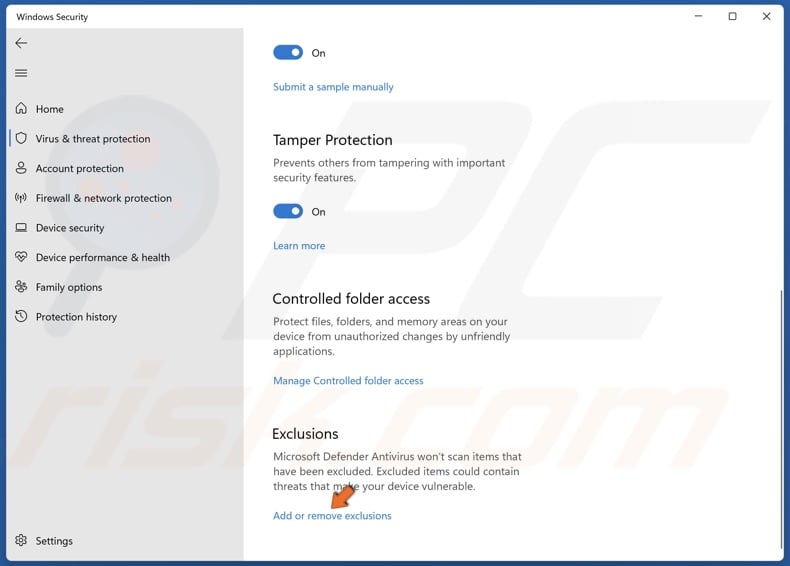
4. Scroll down, and in the Exclusions section, click Add or remove exclusions.

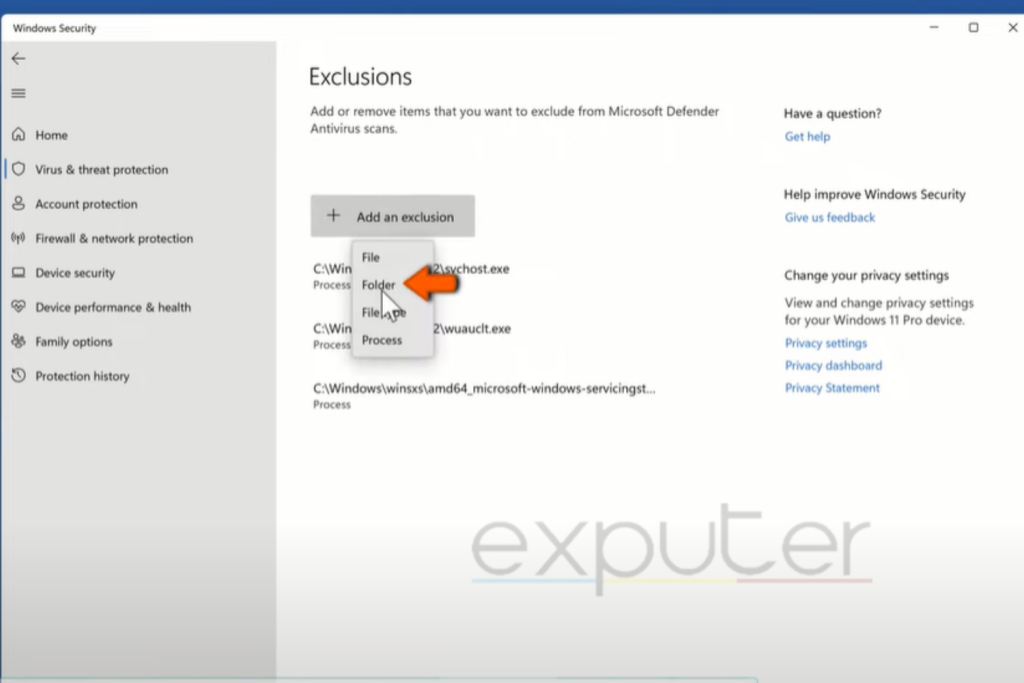
5. Click Add an exclusion and select Folder from the drop-down menu.
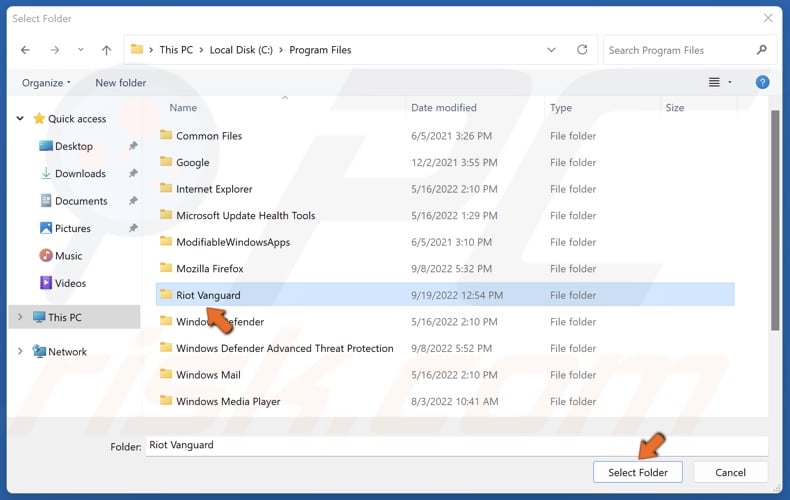
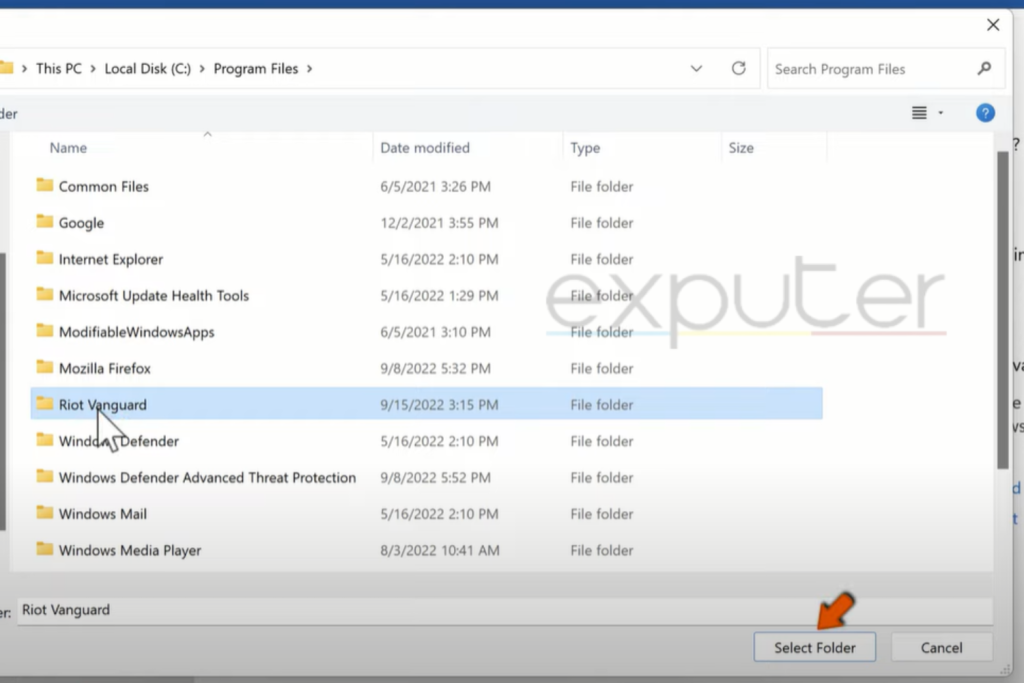
6. Navigate to C:\Program Files and select Riot Vanguard and click Select Folder.
If you have a third-party anti-virus program, you can temporarily disable your anti-virus, launch Valorant, and see if it connects to its servers.
[Back to Top]
Valorant Error code VAN 81 is a connection error that prevents the game from connecting to its servers. There are many underlying reasons behind the frequent occurrence of this error. Some of the most common ones are when the Riot Vanguard (VGC), which is an anti-cheat program, is blocked from connecting to its servers. This error could be very intimidating as it stops you from entering a game. You can follow these simple and easy solutions mentioned below to eliminate this error.
Valorant Error Code Van 81 states:
VALORANT has encountered a connection error. Please relaunch the client to reconnect.”
Key Takeaways
- Van 81 is a connection error that occurs when Valorant is unable to connect to the servers.
- This error is usually caused by VGC Riot Vanguard when it is interrupted from connecting to its servers. You’ll encounter error Van 81 when you enter the matchmaking in Valorant and couldn’t able to join it.
- You can try the following methods in order to fix Valorant Error code VAN 8:
- Check your internet connection
- Enable the VGC in the system configuration
- Change the startup setting of VGC in services
- Make Exceptions For VGC in Windows Defender
- Reinstall the Riot Vanguard
Check Your Internet Connection
Sometimes mundane things such as checking your internet connection can fix the problem, So before doing anything technical first thing you should do is check your internet connection to see if it’s working properly or not. You should also check the speed of your internet as sometimes it seems that the internet is working, but it lacks connection speed.
You can test your internet speed by visiting speed test sites like speedtest-by-okla. If there is a problem with your internet, then restart your router. This will probably restore the connection. If the problem persists, then you should contact your internet service provider. They can indeed resolve the issue.
Restart The Riot Client
The simples fix to this problem is to restart the Riot Client. The problem usually arises when the Riots Client has not launched properly. This causes difficulty in VGC service from connecting to the servers hence preventing the game from working. This can sometimes be fixed by simply restarting the client.
It is worth noticing that simply closing the game will not make any huge as it will still be running in the background, so make sure you close it from the Task Manager. Here’s how to do it:
- Go to Windows Taskbar and Right Click to open the sub-menu.
- Click on the Task Manager button to open it.
- Find Valorant and Riot Vanguard.
- Right-click on the running program and select End Task.
Enable The VGC Service
Most of the Valorant connection errors are due to disruptions in the VGC service, so it is quite important to check if Vanguard VGC is not disabled in the system configuration. Here’s how to do it:
- Firstly, you should open the Windows Run Prompt. It can be opened by using the shortcut Windows + R. Now type msconfig in the dialogue box and press Open. Now wait for it to open the System Configuration Program.

Windows Run Prompt (Image by eXputer) - When System Configuration is opened, click on the services tab, which will show the running programs. Now, all you have to do is to look up VGC in this window.

System Configuration via Windows (Image by eXputer) - Check the VGC box by clicking on it, then click on Apply, and then OK.

Restart warning box (Image by eXputer) - A restart warning window will pop up. Click on the Restart.
If the problem reoccurs, you don’t have to panic. You should try these next solutions which might work for you.
Change the VGC Startup to Automatic
This fix is also related to VGC because it has a lot to do will connection errors, and Error Van 81 is one of them. First, we have enabled the VGC in SYSTEM CONFIGURATION now. We will change its startup type in Services App.
Follow these steps to change the startup type of VGC:
- Open Run Prompt by pressing Windows Key and R, insert services.msc in the box, and then hit OK.
- You will see various different programs. Search for VGC.

Opening Properties of VGC (Image by eXputer) - Then, you find it. Right-click on it to open a sub-menu, and then click on the Properties.
- Now open the droptop of Startup and select Automatic.
Selecting Startup Type (Image by eXputer) - Then, in the Services Status section, Click on Start. After doing that, Click on Apply and Press OK.
Starting the parameters (Image by eXputer) - Restart your PC and Relaunch Valorant.
This will resolve the error. If it didn’t, we got more solutions to fix this.
Make Exceptions For VGC in Windows Defender
If the above solutions didn’t work for you, there are still a bunch of fixes you can try. Windows Defender can sometimes delete or block the activity of the program, which causes Error Code van 81, so excluding the game in the Defender is the thing you should do now.
Although it is advisable that you should remove the game from the Defender right after installing the game.
- First, type Windows Security in the Windows search, which is located on the left of the taskbar.
- Now select Virus & threat protection from the left panel of the Window security window.
windows security (Image by eXputer) - Then open the Virus & threat protection settings by clicking on the manage settings in the window.
opening manage settings (Image by eXputer) - Then, by scrolling a little down in the settings, you will find the Exclusions option. Click on Add or Remove Exclusions. This will open the exclusions windows.
Adding an Exclusion (Image by eXputer) - In the Exclusions window, you will see the Add an Exclusion option. Click on it and select Folder from the drop-down menu. This will let you browse your drive where your game files are.
Adding an exclusion (Image by eXputer) - Now go to Local Drive C, open Program files, look for Riot Vanguard in that folder, and simply click on it. After that, click on the Select Folder button. This will add the folder in the exclusions.
Selecting the app in the program files (Image by eXputer)
Allow VGC Through Window Firewall
If you have done previous methods but are still unsuccessful in removing this error, Windows Firewall might be blocking the VGC from connecting to servers. Allowing VGC through Windows Firewall can potentially resolve this error. However, you should always keep in mind that you always allow only legitimate and safe applications through your firewall. Here’s how to do it:
- You should first open the Windows Run prompt by using the shortcut Windows + R, then type firewall.cpl in the box and hit OK.

Windows Run Prompt (Image by eXputer) - Now, in the left panel of Windows Defender Firewall, click on the “Allow an app or feature through Windows Defender Firewall option. This will take you to the “Allowed Apps” window.

Windows Defender Firewall Settings (Image by eXputer) - Now, first, click on Change Settings and then click on Allow Another App which you will on the bottom of the window.

Windows Defender Firewall Settings (Image by eXputer) - Then Click on the Browse button, which will let you select that app from your PC.
Adding an app in Windows Defender Firewall Settings (Image by eXputer) - Now go to Local disk c in your pc and then go to program files where game files are usually located and look for Riot Vanguard in there.

Selecting the VGC app (Image by eXputer) - Open the Vanguard Folder, select the VGC app, and click Open.
- After selecting the Vanguard user-mode service, this will take you to the previous window. Now in this window, simply click on Add button.
- Now mark both Private and Public checkboxes next to the Vanguard user mode service. Now simply click OK, and your Firewall settings have been changed.
Allow Apps and features in the system and security (Image by eXputer) - After changing the Windows Defender Firewall settings, a reboot is unnecessary because the settings will change immediately. Now launch Valorant client.
- Reinstall Vanguard
Reinstall Vanguard
We have given the most valuable solutions for fixing Valorant Error code 81; now, if you were not successful in removing the error by those methods, then Reinstalling Vanguard can probably work because it will completely remove the files of VGC with corrupted files also, which surely can fix the problem. Here’s how:
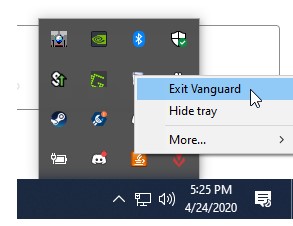
- The first thing you need to do is to disable the Vanguard by using its icon, which is located in the icon tray in the taskbar.
- Then right-click on the icon and press Exit Vanguard. This will close the program. Following this, you might receive a warning popup by clicking on Yes.

Exit Vanguard (Image by eXputer) - Now we can uninstall the Vanguard.
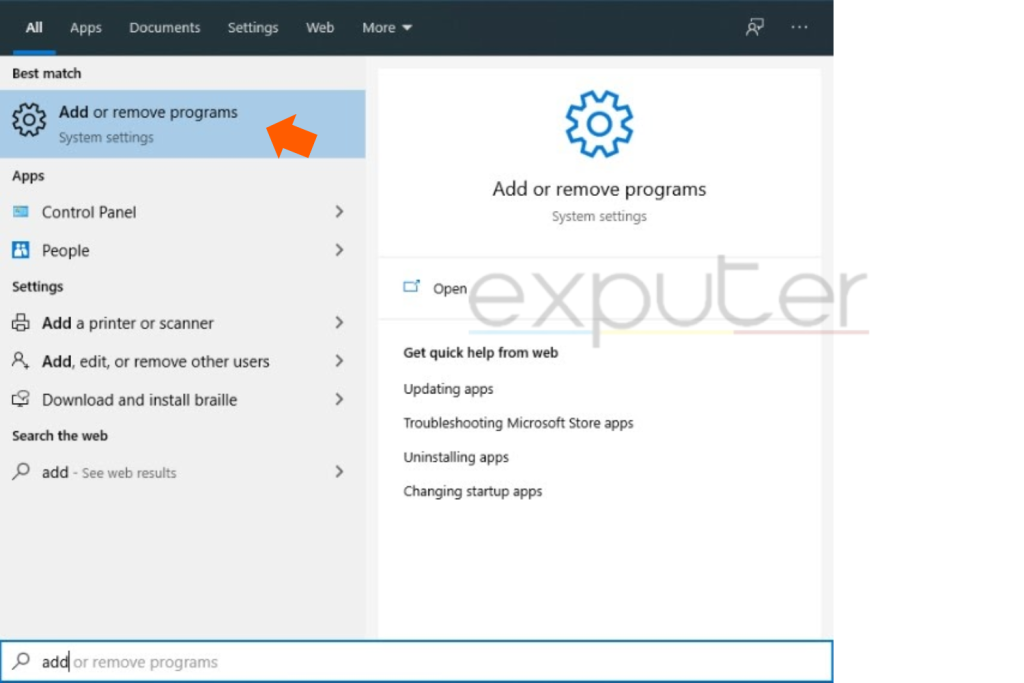
- Now press the Windows Key (or click the Windows icon on your taskbar), type “Add or remove programs” and press Enter.
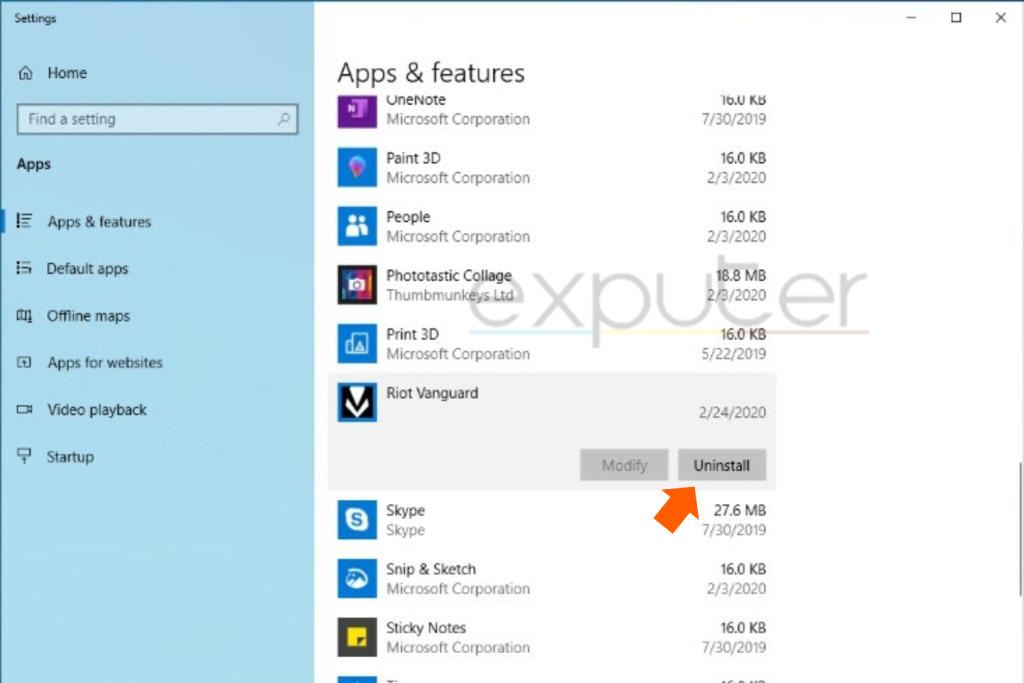
Opening Add or Remove (Image by eXputer) - Then open it, and you will see various programs installed on your PC. Look for Riot Vanguard, and by clicking on it, you will see uninstall option. Click on that.
Uninstalling riot vanguard (Image by eXputer) - After clicking on uninstall button, you will face two popups that allow the application to make changes and confirm that you would like Riot Vanguard to be uninstalled.
- You should restart your computer after uninstalling the riot vanguard and then launch the Valorant client. And you can install the Vanguard again using the Valorant Client.
FAQS
How do I fix Valorant error code VAN 81?
There are various methods by which you can fix this error, for instance, enabling VGC in Windows System Configuration, changing the startup type in Services, etc.
What is Valorant error code VAN 81?
Valorant Error code 81 is a connection error that prevents the game from connecting to its servers.
What are VAN errors?
Van errors appear when Valorant is unable to connect to its servers.
Other Valorant-related error guides covered in eXputer:
- Valorant Error Code 39
- Fixed: Valorant Error Could Not Enter Matchmaking
- Valorant Error Code 57 – Vanguard Not Initialized
- Valorant Error Code 46
- Valorant: A Critical Error Has Occurred
- Valorant Error Code Van 6
Was this article helpful?
Thanks! Do share your feedback with us. ⚡
How could we improve this post? Please Help us. ✍

Haider Khan is our resident error guides writer who loves to tinker around with operating systems and game files to find practical solutions to video game issues. He then crafts easy-to-follow error fix guides based on his findings for his audience on eXputer. With years of experience writing for games, his knowledge about error fixes and research on errors is reflected in his guides. He’s also a Battlefield veteran who likes to rack up some Ws in his spare time. Experience: 3+ Years || Education: Bachelor’s in Journalism || Successfully Troubleshot Over 200 Games || Mainly Covers Error Fix & Game Settings
Fixing error codes has never been easier, a few simple solutions and you’re ready to get back into the game.

Error codes are ways in which Valorant helps us identify the problem our launcher or game has, and find a solution in a matter of minutes. Every error is different and is caused by different problems. This one won’t be a difficult one so let’s get to it.
- Get 30 days of Amazon Prime for free on this link, and get a free sub!
What Is The VAN-81 Error Code
VAN 81 is a connection error. That means that there has been an issue that’s not allowing your launcher to properly start the game. That is most probably due to an issue with the Riot Vanguard system, which is a part of the launching system and is affecting the connection to the game.
These 4 Celebrities Play Valorant
View gallery
These are the pre-requirements for the game to launch properly:
- A valid non-interrupted internet connection
- Both the launcher and Riot Vanguard are not being blocked by the Windows Firewall
- Riot Vanguard working properly and having its launch non-interrupted
My VALORANT has had insane connection issues.
I get VAN-81 Error every time the game launches.
My teammates/enemy names are blank and not loading, and comms don’t work either.
I can’t see my match history without restarting every game with hella lag
Help? @RiotSupport
— NRG willius (@will1us) June 23, 2023
How To Fix VAN 81 Error Code
Since we know what causes it, we can freely focus on the possible solutions and get this error code out of our way.
Properly Restart The Game, Vanguard & It’s Launcher
The first thing you need to try with every error code is a simple restart of the game. in more than 60% of the cases, a restart will do the job. If the manual, normal restart doesn’t work, you might need to close some processes and properly relaunch the game.
You can do this by:
- Opening Task Manager (CTRL+ALT+DELETE), and going to processes
- Scroll the Process tab and search for any Riot-affiliated process
- Right-Click the process and click on End Task
- Do this for every Riot process
- Once done, relaunch the game manually
Relaunch Riot Vanguard
If the Vanguard is faulty, your game won’t launch. For this to be fixed you will have to manually close the Riot Vanguard from the Task Manager, similarly to how we did it above with the processes, and then restart your PC.
After restarting your PC, just relaunch the game and the Riot Vanguard will be successfully «restarted». Take note, once you close Riot Vanguard, the only way to launch it back is with a System Restart.
Whitelist Riot Processes In Your Firewall
This issue occurs rarely, but can still make problems to your launch. On your initial launch of the game, once you install it, Windows will prompt a question about whether you want to Allow Riot Programs through your Firewall. If you didn’t click Allow, Riot Client won’t have access to the internet and thus won’t work properly.
To whitelist Riot Processes do this:
- Click the Windows Key + S
- Input Firewall and then click Enter
- Click on «Allow an app through Firewall»
- While there, the first thing you do is check if Riot Client has a check mark next to it, and if not enable it
- Next up, check for Valorant
- Done
Once done, restart your PC and relaunch the game.
Re-Install Valorant and Vanguard
This is your last solution since it’s going to take the most time. To re-install Valorant you will first need to uninstall it, if you’re having trouble doing that visit How To Uninstall Valorant? After you’re done, relaunch the game and you should be ready to grind the ranks.

For more content:
- Valorant China: Release Date, Replay System, Exclusive Skins
- Valorant This Version of Vanguard Requires Secure Boot — How To Fix
This article contains affiliate links as indicated by the shopping cart icon. Please read the article carefully before clicking any links.
Геймеры, играющие в Valorant могут столкнуться с ошибкой VAN81. При этом рекомендуется перезапустить клиент, но как мы знаем, обычно это не работает. Происходит это достаточно часто, судя по количеству вопросов от них. Это не вызывает удивления, так как игра является очень популярный в нынешнее время. Причин появления данной проблемы не так много. В данном материале рассмотрим их и расскажем о способах решения.
Ошибка VAN 81
В основном при появлении такой ошибки можно сделать предположение, что она вызвана проблемами с интернет подключением. У ПК попросту отсутствует возможность соединиться с серверами. Однако бывает, что причина в другом, например, отключена служба vgc или заблокирована антивирусом.
Перейдем к советам по разрешению такой ситуации.
Начинать будем с самого простого. Первым делом необходимо попробовать перезагрузить компьютер. Достаточно часто это действие решает некоторые проблемы. После перезапуска пробуем запустить игру от имени администратора.
Теперь проверим подключение к интернету, действительно ли оно есть и нормальная ли его скорость.
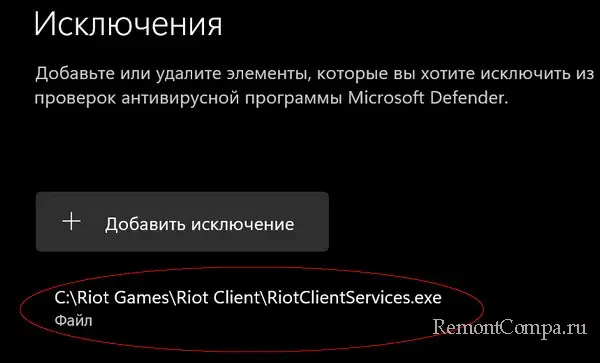
Следующим вариантом будет определение игры в исключения брандмауэра, так как достаточно часто он может блокировать доступ.
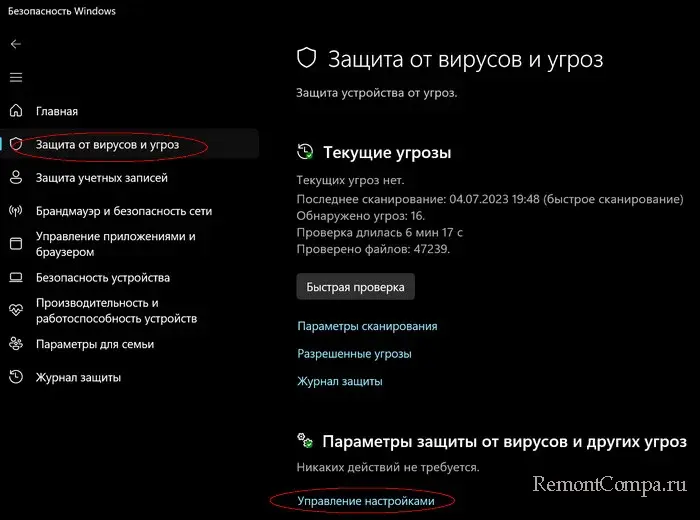
1. В поиске печатаем «Безопасность Windows» и заходим в него.
2. Нажимаем «Защита от вирусов и угроз» — «Управление настройками».
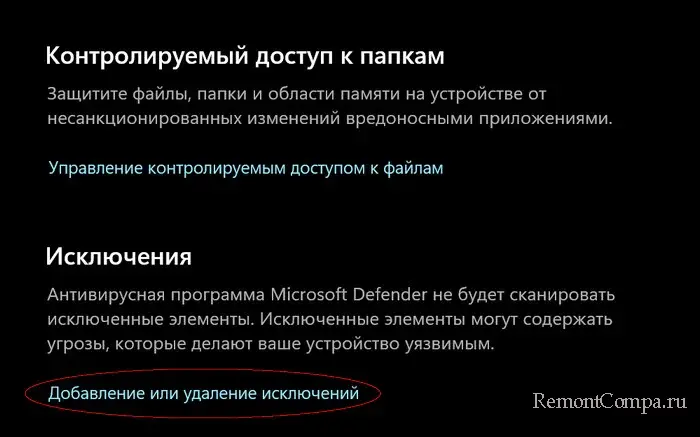
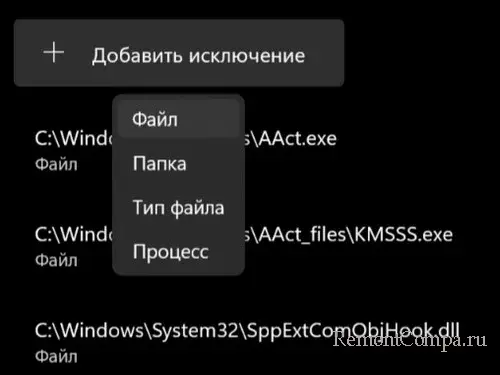
3. Теперь «Добавление и удаление исключений». Жмем «Добавить исключение».
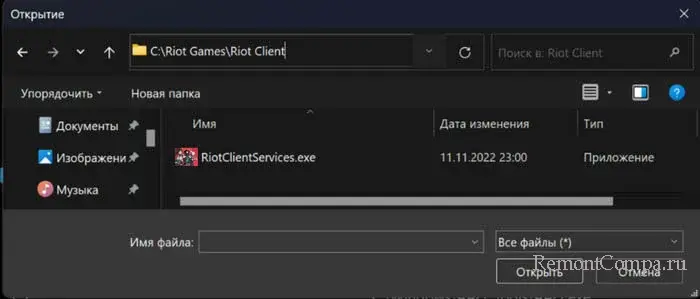
4. Поочередно указываем путь к исполняющему файлу игры, vgc.exe и RiotClientServices.exe.
5. Соглашаемся с изменениями и перезапускаем ПК.
Также с игрой в комплекте идет система античит. Занимается ей служба VGC. Иногда «Защитник» блокирует ее, так как считает опасной. Без нее, конечно, игра работать не будет.
1. Жмем Win+R, пишем «services.msc» и щелкаем «Ввод».
2. В перечне ищем «VGC» и заходим в нее.
3. В пункте «Тип запуска» указываем «Автоматически». В графе «Состояние» жмем «Остановить» и «Запустить».
Также, как и в большинстве случаев появления ошибок, как решение может выступать переустановка самой игры.
1. Жмем Win+I. Выбираем «Приложения» — «Приложения и Возможности».
2. Ищем игру. Щелкаем на точки и выбираем «Удалить».
3. Скачиваем с официального сайта игру и устанавливаем заново.
4. Перезагружаем компьютер.
Если данные советы не решили проблемы VAN81 и вы готовы к радикальным методам, то можно переустановить систему Windows. Некоторые пользователи заявляют что избавились от ошибки только именно таким способом.
Если и крайний метод не позволил вам насладиться геймингом, то помочь вам может только обращение в техподдержку.