Узнайте, как исправить раздражающую ошибку STATUS_BREAKPOINT в Google Chrome и Microsoft Edge. Ошибка возникает, когда браузер не может обрабатывать веб-запросы.
Ошибки в браузерах – обычное дело, если у вас нестабильное интернет-соединение. Тем не менее, есть некоторые сценарии, при которых вы можете получить некоторые ошибки, даже если у вас идеальное интернет-соединение. То же самое произошло со мной, когда я столкнулся с ошибкой STATUS_BREAKPOINT при использовании браузера Chrome. Я запаниковал и переключился на Microsoft Edge, чтобы использовать Интернет, но он представил мне ту же ошибку.
Ошибка STATUS_BREAKPOINT – это случайная ошибка, которая, кажется, возникает, когда пользователь прокручивает веб-страницы. Ошибка связана с дизайном веб-сайта или тем, как браузер обрабатывает запросы веб-страницы. Таким образом, ошибка может быть связана с неправильной установкой веб-браузера или слабым интернет-соединением.
К счастью, некоторые методы устранения неполадок помогли мне исправить ошибку STATUS_BREAKPOINT. Итак, в этой статье я объясню эту ошибку и некоторые способы ее исправления.
Хотя точную причину этой ошибки невозможно отследить, и она возникает из-за множества проблем. Но официальное объяснение кода ошибки для Microsoft – «точка останова, определяемая оборудованием». Хотя это может ничего не значить для обычных конечных пользователей, разработчики что-то находят и могут исправить это. Так что до тех пор мы должны попробовать на нашей стороне все возможные решения, чтобы исправить это.
Обновите браузер Chrome или Edge
Если вы используете старую версию браузера Chrome или Edge, эта ошибка может возникнуть. Поэтому было бы лучше, если бы вы подумали об обновлении браузера, чтобы решить эту проблему.
Вот шаги, чтобы обновить браузер Chrome:
- Запустите браузер Google Chrome на вашем компьютере.
- Попадание
для параметров и выберите Настройки из списка.
- И переключитесь в раздел О Chrome на странице настроек.
- Google Chrome должен автоматически начните искать последние обновления.
- Chrome будет обновлен и запросит перезапуск.
Вышеупомянутый процесс обновления предназначен для Chrome, но шаги аналогичны для Microsoft Edge.
Вот шаги, чтобы обновить браузер Edge:
- Запустите Microsoft Edge в своей компьютерной системе.
- Попадание
для параметров и выберите Настройки из списка.
- Переключиться на
О вкладке Microsoft Edge.
- Edge автоматически начнет проверку обновлений и установку, если таковые имеются.
После обновления браузера просто проверьте, появляется ли ошибка STATUS_BREAKPOINT по-прежнему. Я считаю, что ошибка должна быть устранена после обновления.
Обновите Windows или macOS
Если вы используете старую версию Windows, последняя версия Chrome или Edge вызовет эту ошибку на вашем ПК. Поэтому вам нужно обновить окна, чтобы решить эту проблему.
Вот шаги для обновления ПК с Windows:
- Откройте меню настроек Windows.
- Щелкните Обновления и безопасность.
- На вкладке «Центр обновления Windows» нажмите «Проверить наличие обновлений».
- Если какие-либо обновления доступны, просто загрузите и установите обновления.
Точно так же мы также можем проверить наличие обновлений в macOS. Вот шаги для обновления macOS:
- Нажать на
в строке меню и выберите Системные настройки…
- Выберите в списке настройку «Обновление программного обеспечения».
- Откроется окно, в котором начнется проверка обновлений программного обеспечения.
- Выберите обновления с помощью флажок.
- Нажмите кнопку «Обновить сейчас».
Обновление операционной системы иногда содержит исправления безопасности, которые помогают решить проблему. Следовательно, с точки зрения безопасности важно поддерживать нашу операционную систему в актуальном состоянии.
Удалите ненужные расширения
Некоторые расширения могут вызывать проблему. Поэтому вы можете попробовать удалить их из браузера Chrome или Edge и проверить, решает ли он проблему.
Вот шаги, чтобы удалить расширения Chrome:
- Запустите браузер Chrome на вашем компьютере.
- Нажать на
опции меню.
- Наведите указатель мыши на «Дополнительные инструменты» и выберите в списке «Расширения».
это отобразит список всех расширений, установленных на Chrome. - Теперь нажмите «Удалить» под любым расширением, которое хотите удалить.
Точно так же мы также можем удалить расширения из браузера Edge:
- Запустите на компьютере браузер Microsoft Edge.
- Нажать на
меню из левого верхнего угла.
- Выберите из списка меню «Расширения».
это отобразит список расширений, установленных на краю хрома. - Выберите расширение и нажмите ссылку Удалить команду.
Хотя перед удалением каких-либо расширений лучше выяснить, связана ли проблема только с расширением. Для подтверждения нажмите Ctrl + Shift + N. Откроется вкладка инкогнито. В инкогнито расширения работать не будут. Таким образом, вы можете проверить, не связана ли проблема с самим расширением.
Попробуйте другие веб-браузеры
На самом деле это не решение. Но можно попробовать временно поработать. Итак, сначала я бы предложил установить другой браузер, чтобы проверить проблему. Если этой проблемы нет в другом браузере, это может быть ошибка последней версии, поэтому вам просто нужно подождать, пока разработчики исправят ее.
А пока вы можете попробовать другие браузеры, например Firefox или Chromium. Например, браузер Chromium работает аналогично Chrome, вы можете жить с ним какое-то время.
У нас есть список лучших браузеров на основе операционной системы, с которой вам стоит ознакомиться.
Попробуйте удалить последнее обновление ОС
Если эта проблема начала возникать недавно после обновления, вам следует подумать об удалении установленного обновления.
Вот шаги, чтобы удалить последнее обновление:
- Нажмите «Настройки» и нажмите «Обновления и безопасность».
- Теперь нажмите Просмотр установленных обновлений.
- Наконец, нажмите Удалить обновления вверху, чтобы удалить все установленные обновления.
Это должно решить проблему, если последнее обновление вызвало ошибку STATUS_BREAKPOINT.
Для macOS вы можете рассмотреть возможность восстановления из Time Machine.
Итог: исправить ошибку STATUS_BREAKPOINT
Как видите, проблема в некоторой степени разрешима, но для некоторых людей это не так. Однако вы можете попробовать использовать другой браузер, чтобы временно решить эту проблему. Вернитесь в Chrome или Edge после того, как разработчики исправят его.
Эта проблема чаще всего возникает, если вы используете тестовые версии Chrome (Chrome Canary или Unstable) или предварительные сборки Windows Insider. Если вы используете какой-либо из них, вам следует подумать о переходе на стабильные версии, чтобы избежать этой ошибки.
Сообщите нам, что помогло вам устранить ошибку STATUS_BREAKPOINT в вашем браузере?
Наконец, вот рекомендуемые веб-браузеры для вашего компьютера и мобильного телефона, которые вам стоит попробовать.
The STATUS BREAKPOINT error in Chrome or Edge usually occurs on overclocked computers when the user scrolls through web pages. In other cases, the error is caused by an outdated version of the web browser or a browser extension that prevents the page from loading.

In this guide you’ll find several methods to fix the STATUS_BREAKPOINT error on Chrome and Edge browsers.
How to fix: Aw Snap! STATUS_BREAKPOINT on CHROME/EDGE.*
*Suggestion: Before you continue below check your computer for viruses/malware by using the instructions in this guide: Quick Malware Scan and Removal Guide for PC’s.
- Method 1. Disable Overclocking.
- Method 2. Update Your Browser.
- Method 3. Disable Hardware Acceleration.
- Method 4. Disable Browser Extensions.
- Method 5. Reset Chrome/Edge Flags
- Method 6. Run Compatibility Troubleshooter.
- Method 7. Reset Browser Settings.
- Method 8. Uninstall and re-Install Google Chrome.
- Method 9. Rename the Browser’s .EXE file.
Method 1. Disable Overclocking.
The purpose of overclocking is to boost performance by adjusting some computer components so that it runs faster than the manufacturer specifies.
However, this can sometimes cause your computer to become unstable, causing problems like the one discussed here. So, to solve the STATUS_BREAKPOINT problem, try disabling overclocking on your computer and see if that fixes the problem.
Method 2. Update Your Browser.
The next method to solve the STATUS_BREAKPOINT error is to update your web browser to it’s latest version.
To update Google Chrome:
1. Launch Chrome and click on the More button (three dots) at the top–right corner.
2. Select Settings from the context menu displayed.
![clip_image001_thumb[2]](https://www.wintips.org/wp-content/uploads/2022/01/clip_image001_thumb2_thumb.png "clip_image001_thumb[2]")
3. In the Settings window, select About Chrome from the left panel.
4. The About page should now display if your Chrome is up to date. If not, install the pending updates shown on your screen.

5. Once done, restart Chrome and check if the issue is resolved.
To update Microsoft Edge:
1. Launch Microsoft Edge and click on the More button (three dots) at the top-right corner.
2. Select Settings from the context menu.
![clip_image004_thumb[4]](https://www.wintips.org/wp-content/uploads/2022/01/clip_image004_thumb4_thumb.png "clip_image004_thumb[4]")
3. In the Settings window, select About Microsoft Edge from the left panel.
4. Then check if there are any pending updates that need to be installed. If you find any, install them.

5. Once your browser is up to date, restart it and check if the issue is resolved.
Method 3. Disable Hardware Acceleration.
Th next method to solve the Aw Snap! STATUS BREAKPOINT, is to turn-off the Hardware Acceleration on your Browser.
To disable hardware acceleration in Google Chrome.
1. Open your Google Chrome Browser and from three dots menu go to the Settings.

2. At the left pane, expand Advanced and select System.
3. Next, disable the Hardware Acceleration by clicking on the blue button and then Relaunch the browser to apply the change.

To disable hardware acceleration in Microsoft Edge.
1. Open your Microsoft Edge browser and go to its Settings.

2. Under the Settings menu click on System.

3. Find the Use Hardware Acceleration when available option and turn it Off by clicking on it.

4. Click on the Restart button to apply the new setting.

Method 4. Disable Browser Extensions.
The STATUS_BREAKPOINT error may also occur if one of the browser extensions interferes with its processes and prevents the page from loading. In this case go ahead and disable the extensions and check if this resolves the problem.
How to Disable Chrome Extensions:
1. Launch Chrome and click on the More button (three dots) on the top-right corner of your screen.
2. Select More tools from the context menu and then click on Extensions.
![clip_image009_thumb[5]](https://www.wintips.org/wp-content/uploads/2022/01/clip_image009_thumb5_thumb.png "clip_image009_thumb[5]")
3. Disable all extensions by switching the toggle to OFF and then restart your browser.
![clip_image011_thumb[2]](https://www.wintips.org/wp-content/uploads/2022/01/clip_image011_thumb2_thumb.jpg "clip_image011_thumb[2]")
How to Disable Edge Extensions:
1. Launch Edge and click on the More button (three dots) on the top-right corner of your screen. Then select Extensions from the context menu.
![clip_image012_thumb[2]](https://www.wintips.org/wp-content/uploads/2022/01/clip_image012_thumb2_thumb.png "clip_image012_thumb[2]")
2. If a dialog box pops up, select Manage extensions.
![clip_image013_thumb[1]](https://www.wintips.org/wp-content/uploads/2022/01/clip_image013_thumb1_thumb.png "clip_image013_thumb[1]")
3. In the next screen, turn the toggle off against all the extensions to disable them.
![clip_image015_thumb[2]](https://www.wintips.org/wp-content/uploads/2022/01/clip_image015_thumb2_thumb.jpg "clip_image015_thumb[2]")
4. Restart Microsoft Edge.
Method 5. Reset Chrome/Edge Flags
1. In your browser address bar type chrome://flags/ and hit Enter.*
* Note: In Edge type: edge://flags/
2. Click the Reset all button

3. Click Relaunch.

Method 6. Run Compatibility Troubleshooter.
Some users reported that Aw Snap! STATUS BREAKPOINT error was fixed after running Compatibility Troubleshooter.
1. Right-click on your web browser’s icon and select Properties.

2. At Compatibility tab click Run compatibility troubleshooter.

3. Click Try recommended settings.

4. At the next screen, click Test the program.

5. Now check if the «Aw Snap! STATUS BREAKPOINT» problem is fixed in your browser. If not, return to Compatibility Troubleshooter, click Next and test again with different settings.
Method 7. Reset Browser Settings.
If none of the above methods work for you, then this means that this error cannot be fixed through conventional troubleshooting steps and you will need to reset your browser to factory defaults.
How to Reset Chrome to Default Settings.
1. Launch Chrome and click on the More button (three dots) located on the top-right corner of your window.
2. From the list of options available, select Settings.
![clip_image001[1]_thumb[3]](https://www.wintips.org/wp-content/uploads/2022/01/clip_image0011_thumb3_thumb.png "clip_image001[1]_thumb[3]")
3. In Settings window, scroll down to find the Advanced option and expand it.
4. Now click on Reset and clean up from the left panel and select Restore settings to their original defaults on the right.
![image_thumb[9]](https://www.wintips.org/wp-content/uploads/2022/01/image_thumb9_thumb.png "image_thumb[9]")
5. Finally, click the Reset settings button.
![clip_image022_thumb[1]](https://www.wintips.org/wp-content/uploads/2022/01/clip_image022_thumb1_thumb.png "clip_image022_thumb[1]")
6. Once the process is complete, relaunch Chrome and check if the issue is resolved.
How to Reset Edge to Default Settings.
1. Open Microsoft Edge and click on the More button (three dots) at the top right corner of the window.
2. Select Settings from the context menu.
![clip_image004[1]_thumb[3]](https://www.wintips.org/wp-content/uploads/2022/01/clip_image0041_thumb3_thumb.png "clip_image004[1]_thumb[3]")
3. Then in the Settings window, select Reset settings on the left pane.
4. Finally click Restore settings to their default values and then click OK.
![clip_image024_thumb[2]](https://www.wintips.org/wp-content/uploads/2022/01/clip_image024_thumb2_thumb.jpg "clip_image024_thumb[2]")
5. Once done, relaunch Edge and check if the issue is resolved.
Method 8. Uninstall and re-Install Google Chrome.
There have been several reports of users being able to fix the issue by uninstalling Google Chrome and installing Google Chrome again. So, give a shot and uninstall and reinstall Chrome on your machine, by following the steps below:
1. Simultaneously press the Windows ![]() + R keys to open run command box.
+ R keys to open run command box.
2. In run command box, type: appwiz.cpl and press Enter.

3. Locate and right-click on Google Chrome and click Uninstall
![clip_image008_thumb[1]](https://www.wintips.org/wp-content/uploads/2022/01/clip_image008_thumb1_thumb.png "clip_image008_thumb[1]")
5. Once the uninstallation process is complete, proceed to download and install Google Chrome Stable MSI version on your PC.

Method 9. Rename the Browser’s .EXE file.
Some users reported that the «Aw Snap! STATUS BREAKPOINT» error in Chrome and Edge browsers disappeared after renaming the browser’s execution file. (I know the solution is strange, but try it.)
Chrome
1. Close Chrome.
2. Open File Explorer by pressing the Windows ![]() + E keys simultaneously on your keyboard.
+ E keys simultaneously on your keyboard.
3. Once in File Explorer, navigate to the location mentioned below:
- C:\Program Files (x86)\Google\Chrome\Application
4. Right-click the Chrome file and choose Rename.

4. Rename the file as Chrome1.exe and press Enter.
5. Launch Chrome and see if the problem persists.
Microsoft Edge.
1. Close Edge.
2. Open File Explorer by pressing the Windows ![]() + E keys simultaneously on your keyboard.
+ E keys simultaneously on your keyboard.
3. Once in File Explorer, navigate to the location mentioned below:
- C:\Program Files (x86)\Microsoft\Edge\Application
4. Right-click the msedge (msedge.exe) file and choose Rename.

4. Rename the file as msedge1.exe and press Enter.
5. Launch Edge and see if the problem persists.
That’s it! Which method worked for you?
Let me know if this guide has helped you by leaving your comment about your experience. Please like and share this guide to help others.
Cправка — Google Chrome
Войти
Справка Google
- Справочный центр
- Сообщество
- Google Chrome
- Политика конфиденциальности
- Условия предоставления услуг
- Отправить отзыв
Тема отзыва
Информация в текущем разделе Справочного центра
Общие впечатления о Справочном центре Google
- Справочный центр
- Сообщество
Google Chrome
Error code: STATUS_BREAKPOINT occurs when your browser isn’t able to handle the website’s request for various reasons. It mostly occurs in chromium-based browsers like Chrome. While a reload will remove this error, the issue is sure to persist.
Many users have frequently experienced the error at irregular intervals. If you face this issue once or twice, it may not be much of a problem, but if the error appears too many times, it can start affecting your browsing experience.
Table of Contents
Why Does The STATUS_BREAKPOINT Error Occur?
Here are the possible reasons why your browser may be facing this issue:
- Outdated browser
- Faulty extensions
- Corrupted application data
- Misconfigured settings
- Faulty Chrome flags
There are several ways you can fix this specific error, depending on the cause of the issue. So, go through the list to see which one works for you.
However, before you begin, make sure to check your network connection. A slow internet connection and network issues can also cause this error. If your internet connection works fine, let’s proceed with the fixes.
Update Chrome
Many users have faced this error due to bugs in some specific versions of Chrome. So, you can simply update Chrome to fix this issue. Most updates carry the latest security features and bug fixes, so it is always recommended to update software.
Here’s how you can do it:
- Open the Chrome menu (⋮) from the upper left corner.
- Select Help and About Google Chrome.

- Chrome will automatically search and download the latest updates if there are any.
- After downloading the update, it will prompt you to relaunch the browser.
- Select Relaunch to complete the process.


The method to update Chrome is the same across all desktop versions. For the mobile versions, you can visit the default app store to check and install it from there.
Disable Extensions
Extensions are one of the most popular features in desktop browsers. However, they can also cause this particular error in your browser if they are interfering with your browser’s process or if they are problematic themselves.
Furthermore, this error can also appear if multiple extensions with overlapping functions are interfering with each other, hindering the browser from loading a webpage.
So, here’s how you can disable them.
- Launch Chrome Settings.
- Navigate to Extensions and disable all your installed extensions.
- You can also individually enable the extensions to pinpoint if any of them is causing the issue.
- You can then hit Remove to uninstall the extension.


Reset Chrome Flags
You can enable new features using Chrome flags. However, these new features are experimental, so they may cause various errors in your browser.
In case you have some of them enabled, your browser can run into errors like STATUS_BREAKPOINT, and you will need to reset the flags to fix the issue.
- Open Chrome.
- In the search bar, type in
chrome://flags/and press Enter. - Select the Reset all option in the opened tab.

- Relaunch your browser.

This process is the same for the desktop and mobile versions of Chrome.
Clear Browsing Data
Your Chrome’s browsing data include various browsing histories, cache, cookies, and temporary files. However, sometimes your browser cache gets corrupted, or accumulated cookies may not get refreshed. Such issues can cause various errors in Chrome.
You can clear your browsing data to fix this issue. Here’s how you can do it in mobile and desktop Chrome:
- In Chrome, select the vertical ellipses in the top right.
- Navigate to Settings > Privacy and security.

- Click on Clear browsing data and select Browsing history, Cookies and other site data, and Cached images.
- Choose All time in the Time range menu.
- Tap on Clear data.


Reset Chrome Settings
Another method you can solve this error is by resetting your Chrome settings to its default configuration. If misconfigured browser settings were causing this error, resetting them would fix it.
Here’s how you can do it on desktop and mobile:
On Desktop
- Open Chrome and go to its Settings.
- Navigate to Reset and clean up in the options menu.
- Tap on Restore settings to their original defaults.
- Hit Reset Settings.


On Android
- Launch Settings on your Android Device.
- Navigate to Apps and locate the Chrome app. (The settings may vary on different android devices. So you can simply search Apps in the search bar to get a list of your apps.)
- Click on Chrome and select Storage. (For some devices, you may need to open the Manage Storage option too.)
- Select Clear All Data.


Android has a different way of resetting Chrome settings than the desktop. However, it will also delete all data from Chrome, so you may want to consider it before trying it on your android device.
On the other hand, iOS devices have no option to reset your browser settings.
Reinstall Google Chrome
If the above methods don’t work, you can reinstall Chrome to see if it fixes the issue. This will delete all the errors in your application data, settings, and extensions, along with the Chrome application itself.
Here’s how you can reinstall Chrome in different operating systems:
On Windows
- Access Settings from the start menu.
- Navigate to Apps > Apps & features.
- Locate Chrome and click on the vertical ellipses beside it.

- Select Uninstall and Confirm.
- Download and Install Chrome from the official Website.

On Mac
- Launch the Finder app from the dock.
- Navigate to your Devices and select the Applications folder.
- Locate Chrome and drag and drop it to the Trash icon in the dock.

- Download Chrome from the official website.

On Android
- In your android device’s app menu, locate the Chrome application.
- Hold the selected app till a menu pops up.

- Click on Uninstall and Confirm. (For some devices, holding the application will cause it to appear on the home screen. Drag the selected application to the Uninstall option at the top.)
- Install Chrome from the Playstore.

On iOS
- Locate the Chrome application, tap and hold the application till the option menu appears.
- Select Remove App.

- Confirm Uninstallation.
- Install Chrome from app store.

If you reinstall the latest version of Chrome and this issue persists, you can try downloading a previous version. If this fix solves your issue, it was likely a bug in that specific version.
Note: If the Chrome application comes preinstalled in your android or ios device, you may not be able to uninstall it.
Update Network Driver and Windows OS
For Windows users, you can update your network driver in case network issues were causing this error.
Here’s how you can update driver:
- Access the Run Utility by pressing Windows + R hotkey.
- Enter
devmgmt.mscto open Device Manager. - Go to Network adapters and right-click your network driver.

- Select Update driver and Search automatically for drivers.

You can also update your driver from Windows updates if they are available. Furthermore, Windows updates also carry bug fixes and security patches for your whole Windows OS.
Here’s how you can do it:
- Launch Settings by pressing the Windows key + I key.
- Navigate to Windows Update and select Check for updates.

- Click on the Download and Install option.

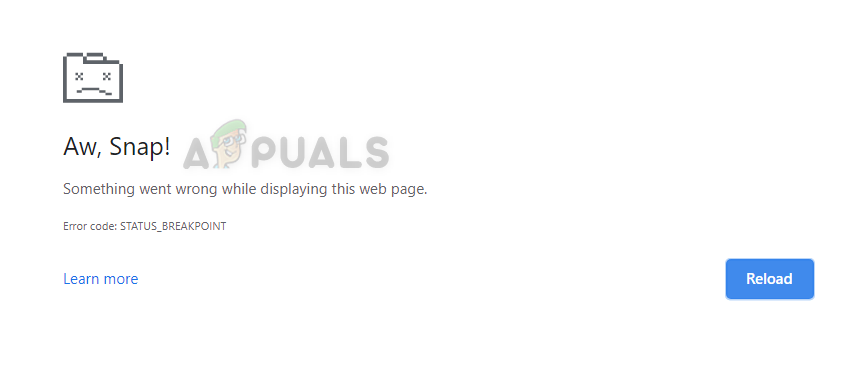
Many Windows users have recently encountered a problem where when they attempted to open any webpage, they saw an Aw, Snap! Something went wrong while displaying this web page with an error code STATUS_BREAKPOINT message on their Chrome browser, as seen below.
Upon further investigation into what may have gone wrong to cause this issue on the Chrome browser, we discovered a few elements that have the potential to cause the difficulties, which we have mentioned below.
- Corrupted System Data files – When files are not saved properly and the system is forced to shut down, the files get corrupted. These sorts of files generate major issues that are difficult to resolve until the corrupted files are replaced or deleted.
- Unstable Internet Connection – The user experience and execution of any work on the system are greatly enhanced by a reliable internet connection. As a result, an inconsistent internet connection will almost certainly result in troubles with the system’s browser.
- Extensions installed from unreliable sources – Extensions make life easier for any windows users while browsing any web page but extensions that were installed from any unreliable third-party sources will cause an error mentioned above.
- Corrupted browser’s cache memory – The cache memory of your browser saves all of your browsing history, cookies, and other site data from the internet. This error will appear if the data in the cache becomes corrupted.
- Windows system is out of date – When any product requires improvement or addresses an issue, Microsoft publishes updates for Windows, whether it is for the operating system, drivers, or other optional settings. These issues are more likely to occur if these updates are not installed and Windows is not maintained up to date.
Let us see how this error can be resolved in this post with a few solutions mentioned below.
Perform SFC Scan and Restore System Health using the DISM tool
To detect the corrupted system data files, we need to run the System File Checker(SFC) scan on the system using the command line tool called command prompt. After we find any system corrupted files, we delete or replace them.
So we recommend our users that they perform these scans and try to restore the system health using the DISM tool mentioned in the steps below.
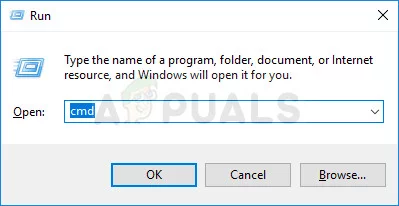
- To open the run command box on the system, press and hold the Windows and R keys simultaneously.
- Later, type cmd in the Run box and hit the Ctrl, Shift and Enter keys together.

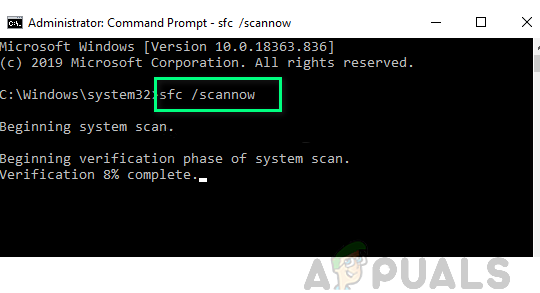
Run Command Prompt as Admin - Type sfc /scannow and press Enter key for executing this command.

Performing the SFC scan - Wait for some time as scanning system files take time depending upon system performance.
- After scanning is done, if you find any system corrupted files please delete or replace them with the fresh file from the internet.
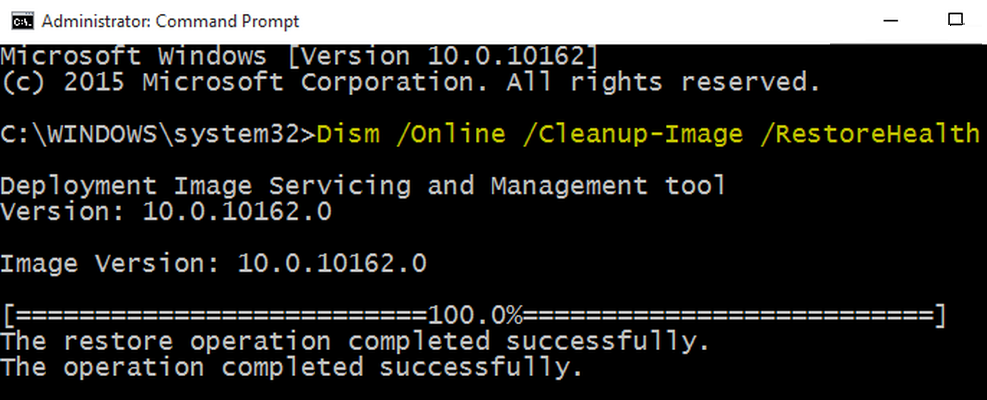
- Once this is over, type the below-given command and execute it by hitting Enter key.
DISM /Online /Cleanup-Image /RestoreHealth

Use the DISM Command to RestoreHealth - This will restore the system’s health.
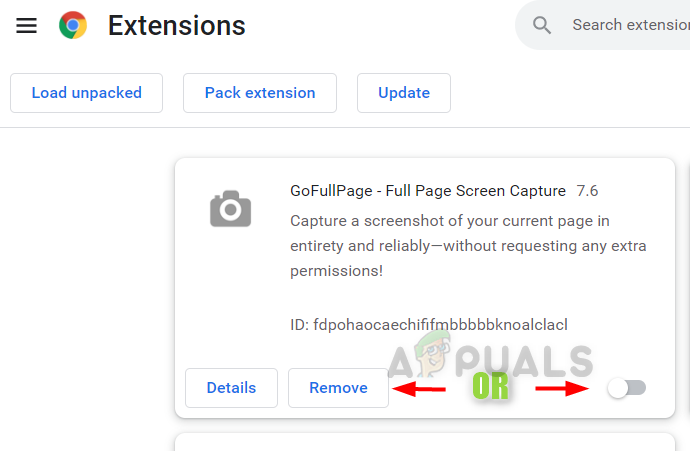
Remove or Disable Extensions on Chrome
Undoubtedly, extensions improve and enhance the user experience and increase productivity in work. Whereas, this is only true if those extensions are downloaded and installed from trustworthy sources.
When they are installed from any third-party unreliable sources, it will cause such errors which can be fixed by disabling or removing those extensions.
Follow the steps below on how it can be removed from chrome.
- Open the google chrome browser.
- Type chrome://extensions/ in a new tab and press Enter.
- This will take you to the extensions page.
- Click on the toggle button to turn it off for disabling the extensions.
- If not disabling, you can also remove it permanently by clicking Remove as shown below.

Remove or Disable Extension in Chrome - Repeat the same for all the extensions which are unreliable.
- Once over, restart the google chrome browser and try accessing web pages and see if the issue is resolved.
Check for a Stable Internet Connection
These sorts of issues might arise as a result of an inconsistent internet connection on your system.
It is preferable to tackle this problem by obtaining a solid internet connection. Refer to this article to see whether there is an issue with your system’s networks.
If the problem persists, contact your internet service provider to obtain a solid internet connection, which should assist address the issue.
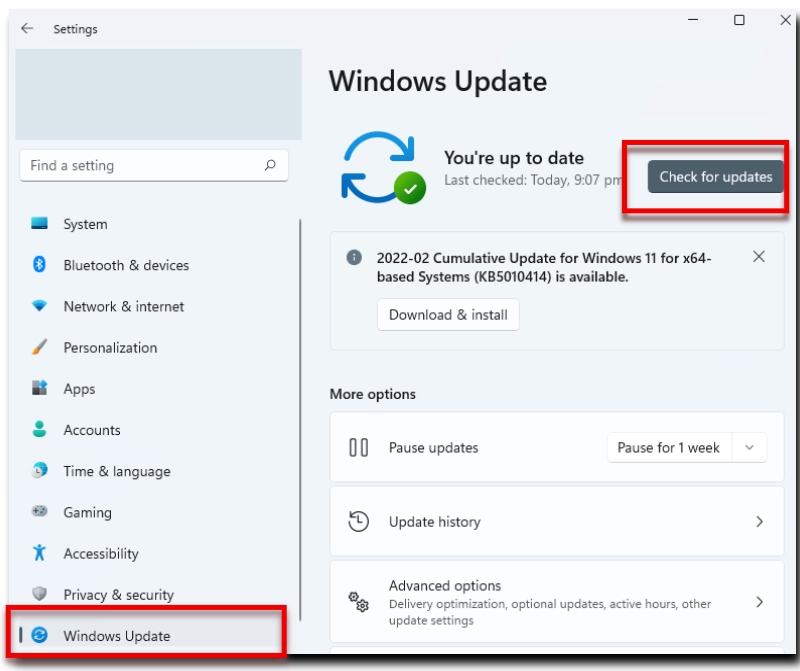
Keep the Windows system updated
We sometimes forget to maintain our Windows system updated since we are too preoccupied with our job, whether it is projects or anything else. Microsoft publishes several updates on a regular basis in order to enhance the system. As a result, it is critical to check for and apply updates on a frequent basis.
Let us see how to check and install the updates on the windows system.
- Press the Win and I keys simultaneously which opens up the Settings app.
- Later click the Windows Update option on the left panel as shown below.
- Select the Check for updates button on the right side of the Windows update page.

Update Windows - Download and install them if there are any updates found after checking.
- Restart your system once it is done installing.
- Now after the system is booted up, check if the issue is solved.
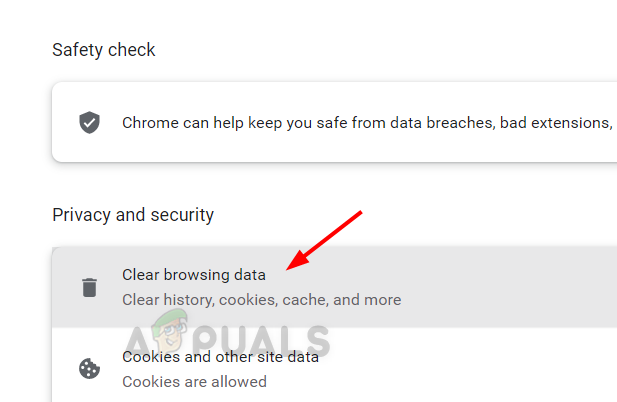
Clear Browser’s Cache Memory and other site data
Cache memory and other site data stores information about the users’ browsing history and cookie data from the websites they visited. When these files are damaged as a result of a forced system shutdown or a virus attack, it causes a slew of issues with the system’s browser.
As a result, we recommend that our customers remove all of their browser’s history and other site data by following the procedures outlined below.
- Open the Google Chrome browser on the system.
- In a new tab, copy and paste the below path and press Enter key.
chrome://settings/privacy
- Click Clear browsing data from the list as shown on the Privacy page.

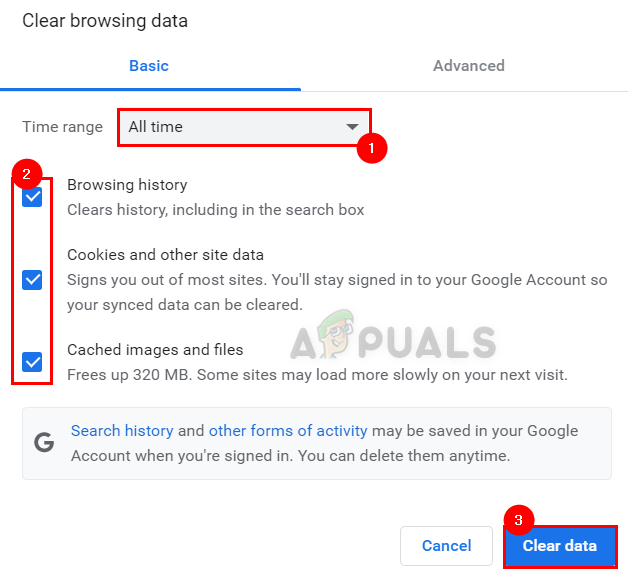
Clear Browsing data - Select All time as the Time range and click all the checkboxes to select it in the Clear browsing data window as shown below.
- After that click Clear data at the bottom to delete all the cache memory data from the browser.

Clear All time data

Muhammad Zubyan
Muhammad Zubyan is a certified Google IT Support Professional with over 7 years of extensive experience. He has worked on more than 1500 computers, gaining valuable insights that enable him to detect and troubleshoot any complicated root cause of Windows-related issues and errors. In addition to managing Appuals as a Senior Editor, he is currently developing his own Game Optimization program that caters to both gamers and casual users alike.