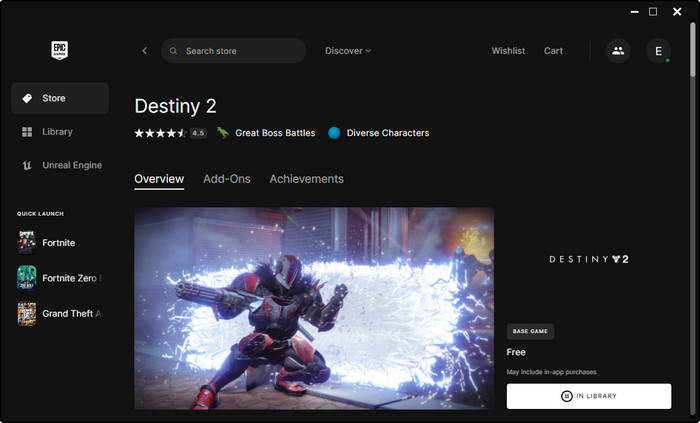
If you’re encountering the Olive error in Destiny 2, there are a lot of methods that can potentially fix this problem. The Olive error usually appears when the developers are testing something on their end, or the servers are under maintenance. At times, this issue can be really annoying and frustrating as it makes the FPS title unplayable. Luckily, we can show you how to fix this problem, so here’s what you need to do if you get the Olive error while playing Destiny 2.
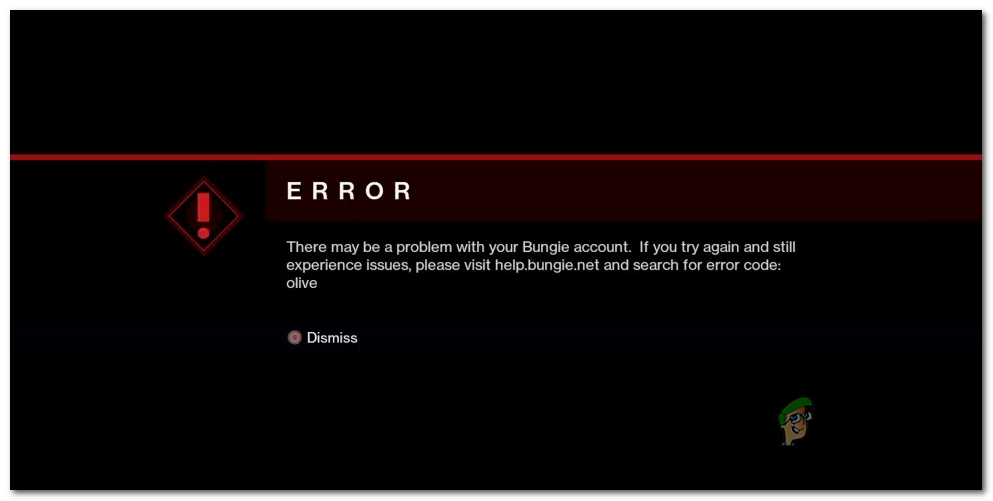
Error Code Olive reads, “Please retry that activity again and resume what you were doing before the error occurred. If you encounter this error again, please exit Destiny and then relaunch” So, one of the most effective ways to fix the Olive error is by closing the Destiny 2 application and the launcher as well. After that, relaunch Destiny 2 and see whether the error code has been fixed or not.
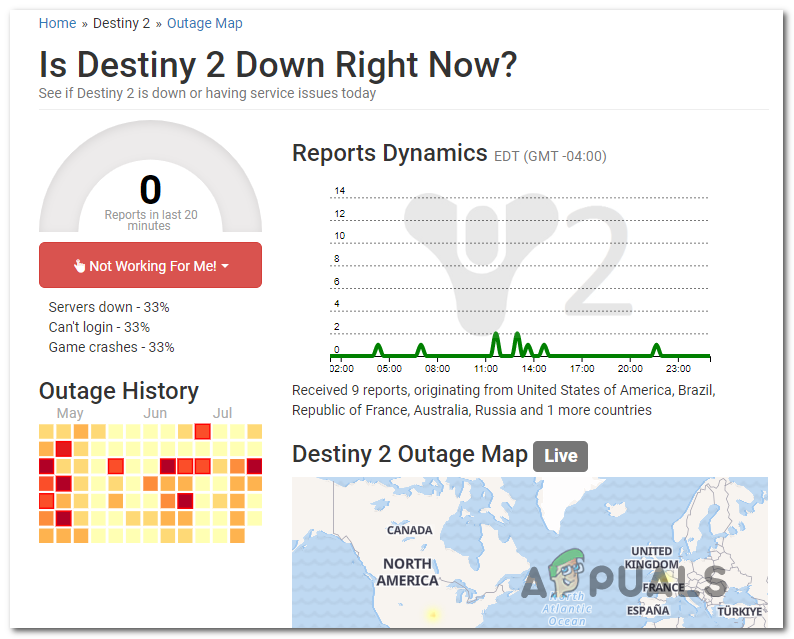
In case this solution doesn’t work for you, we highly recommend checking the Destiny 2 server status to see if all the servers are operational. The best and quickest way to see if Destiny 2 is down is to visit the official Destiny 2 Status page. In case the servers are offline, you need to wait until they are backed up again.
If the servers are operational and you’re encountering Destiny 2 Error Code Olive, then getting in touch with Bungie support is your last hope of getting everything back on track. They can assist you by analyzing log files and giving a permanent solution for the ‘Olive’ error code.
That’s everything you need to know to fix the Olive error in Destiny 2. For more related info and other Destiny 2 news, be sure to check out other guides on how to get the DFA Hand Cannon, as well as how to get the Horror’s Least Pulse Rifle.

Tarun Sayal
Experienced freelance gaming writer with 5 years of experience covering a wide range of gaming topics. From in-depth game reviews to strategy guides, I have a passion for all things gaming. Skilled in crafting engaging and informative content for both casual and hardcore gamers.
More Stories by Tarun Sayal
Некоторые игроки Destiny 2 получают случайное отключение с кодом ошибки «Оливка». Большинство пользователей, затронутых этой проблемой, сообщают, что они видят этот код ошибки после того, как их выгнали из онлайн-игры.
Код ошибки Destiny 2 Olive
После изучения этой конкретной проблемы выясняется, что существует несколько различных экземпляров, которые могут быть ответственны за разделение этой проблемы:
- Проблема с сервером Destiny 2. Прежде чем пытаться исправить какой-либо другой тип исправления, вам следует убедиться, что разработчик игры в настоящее время не имеет дело с какой-либо основной проблемой сервера. Для этого вы можете проверить страницу статуса Destiny 2, проверить официальные объявления и использовать такие сервисы, как Outage. Сообщите, если другие пользователи сообщают о той же проблеме. Если вы действительно имеете дело с проблемой сервера, вы ничего не можете сделать, чтобы решить проблему, кроме как дождаться, пока участвующие разработчики исправят проблему.
- Учетная запись Bungie не подключена. По мнению некоторых затронутых пользователей, эта проблема также может возникать в тех случаях, когда учетная запись Bungie в настоящее время не подключена. Чтобы решить эту проблему, создайте и подтвердите свою учетную запись Bungie перед попыткой присоединиться к онлайн-игре.
- Сбой, вызванный длительным периодом простоя – если вы имеете привычку оставлять игру в режиме ожидания на длительные периоды времени, вы можете ожидать увидеть эту проблему при попытке присоединиться к онлайн-игре после того, как вы потратили более получаса в лобби игры. Чтобы решить эту проблему, все, что вам нужно сделать, это перезапустить игру обычным образом на ПК или выполнить полный сброс консоли.
- Оставшиеся данные Battle.Net. Как вы, наверное, знаете, Bungie переместила игру из Battle.Net в Steam, что привело к множеству ошибок, включая эту. Чтобы решить проблему в этом случае, вам нужно будет удалить игру вместе со старой программой запуска и очистить все папки кеша, в которых могут храниться игровые данные, перед переустановкой игры из Steam.
Метод 1: проверка наличия проблем с сервером
Прежде чем пробовать какое-либо другое исправление, которое, как было подтверждено, работает затронутым пользователем, вам следует начать это руководство по устранению неполадок, выяснив, сталкиваются ли другие пользователи Destiny 2 в вашем регионе с той же проблемой.
Имейте в виду, что этот конкретный код ошибки обычно связан с какой-либо проблемой сервера, поэтому настоятельно рекомендуется начать с исследования, действительно ли вы имеете дело с широко распространенной ошибкой.
Чтобы проверить этот экземпляр, вы можете использовать такие службы, как Отчет о сбое и DownDetector чтобы узнать, сообщают ли другие пользователи в вашем районе о той же проблеме, с которой столкнулись вы.
Проверка статуса сервера в Destiny 2
Даже если вы не обнаружите никаких доказательств проблем, связанных с серверами Destiny 2, вам следует взглянуть на страница статуса Destiny 2 и посетите Bungie’s официальный аккаунт поддержки Twitter Destiny 2 чтобы узнать, являются ли они официальными объявлениями о проблеме с сервером.
Если только что проведенное расследование не выявило никаких доказательств проблемы с сервером, перейдите к следующему потенциальному исправлению ниже.
Метод 2. Подключитесь к учетной записи Bungie
Часто код ошибки «Olive» в Destiny 2 связан с случаем, когда пользователь не подключен к учетной записи Bungie. Несколько затронутых пользователей, которые также столкнулись с этой проблемой, подтвердили, что проблема была решена после того, как они подключились к действующей учетной записи Bungie.
Так что, если вы еще этого не сделали, перезапустите Destiny 2 и выполните ответ, когда вас попросят создать учетную запись Bungie. После того, как вы это сделаете и подтвердите свою учетную запись, присоединитесь к онлайн-игре и посмотрите, решена ли проблема.
Если вы уже настроили свою учетную запись Bungie, перейдите к следующему возможному исправлению ниже.
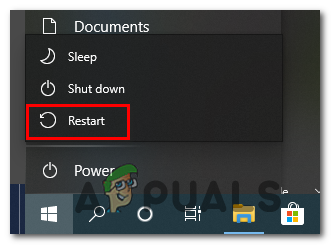
Метод 3: перезапуск ПК / консоли
Если вы еще не пробовали это сделать, вам следует начать это руководство по устранению неполадок с простого перезапуска платформы. Подтверждено, что это эффективно как на Windows, так и на консолях текущего поколения (Xbox One и PlayStation 4).
На ПК просто закройте игру и с помощью кнопки Windows нажмите «Питание»> «Перезагрузить», затем дождитесь завершения следующего запуска перед повторным запуском игры.
Перезагрузка компьютера с Windows
На консолях перезагрузки недостаточно, так как PlayStation 4 и Xbox One сохранят некоторые временные файлы, которые не удаляются при обычном перезапуске. Поэтому, если вы столкнулись с проблемой на консоли, правильная процедура – это выполнить процедуру отключения и включения питания. Следуйте руководству, применимому к выбранной вами консоли:
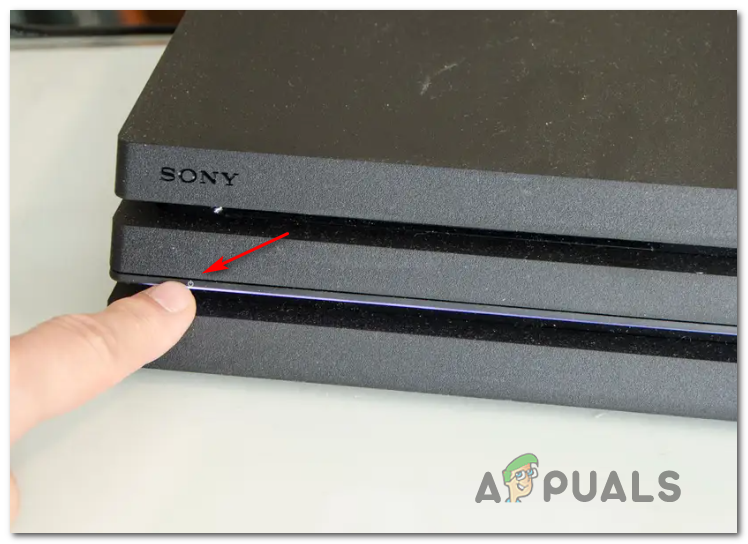
A. Выключение и выключение консоли Playstation 4
- Начните с того, что ваша консоль находится в режиме ожидания (не в режиме гибернации). Затем нажмите и удерживайте кнопку питания (на консоли) и удерживайте I, пока консоль полностью не выключится.
- Когда вы услышите второй звуковой сигнал и выключите вентиляторы, отпустите кнопку питания.
Силовой цикл Ps4
- После того, как ваша консоль перестанет подавать признаки жизни, отсоедините шнур питания от розетки и подождите 30 секунд или более, чтобы убедиться, что силовые конденсаторы полностью разряжены.
- По прошествии этого периода восстановите питание и снова запустите консоль, дождитесь завершения первоначального запуска, затем запустите Destiny 2 и увидите, что проблема решена.
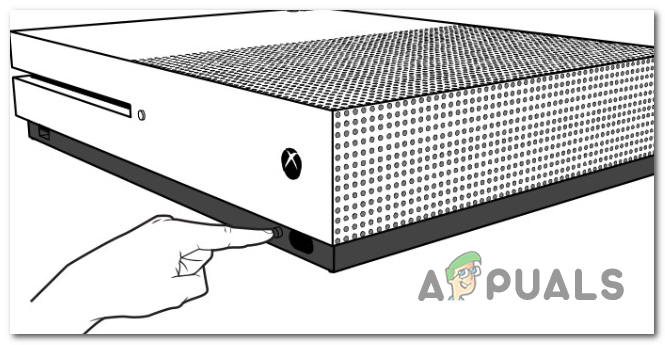
Б. Выключите и снова включите консоль Xbox One.
- Убедитесь, что ваша консоль не находится в режиме ожидания, прежде чем нажать кнопку Xbox (на консоли) и удерживайте ее около 0 секунд или пока не увидите, что передние светодиоды погаснут.
Выполнение аппаратного сброса Xbox One
- Когда консоль полностью выключится, отпустите кнопку питания, затем отсоедините кабель питания от розетки и подождите целую минуту, чтобы убедиться, что силовые конденсаторы полностью разряжены.
Отсоединение шнура питания от розетки
- По истечении этого периода включите питание консоли и запустите ее, чтобы проверить, решена ли проблема.
Если вы по-прежнему видите код ошибки «Олив» после отключения от онлайн-игры Destiny 2, перейдите к следующему потенциальному исправлению ниже.
Если вы столкнулись с этой проблемой на ПК (после того, как Destiny 2 завершила переход с Battle.Net на Steam), возможно, вы видите эту ошибку из-за некоторых файлов, оставшихся после старой установки.
Если этот сценарий применим, вам следует попробовать удалить версию Destiny 2 для Battle.Net и очистить данные кеша Battle.Net перед повторной установкой игры из Steam.
Чтобы упростить вам весь процесс, мы составили пошаговое руководство, которое проведет вас через все. Вот что вам нужно сделать:
- Откройте диалоговое окно «Выполнить», нажав клавиши Windows + R. Затем введите «appwiz.cpl» внутри текстового поля и нажмите клавишу «Ввод», чтобы открыть меню «Программы и компоненты».
Введите appwiz.cpl и нажмите Enter, чтобы открыть список установленных программ.
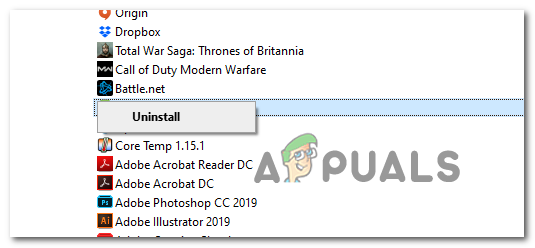
- Зайдя в меню «Программы и функции», прокрутите список установленных приложений и найдите Destiny 2. Когда вы увидите ее, щелкните ее правой кнопкой мыши и выберите «Удалить» из контекстного меню.
Удаление Destiny 2
- Как только вы попадете на экран удаления, следуйте инструкциям на экране, чтобы завершить удаление.
- После завершения операции вернитесь на страницу «Программы и компоненты» и повторите процедуру удаления также с Battle.Net.
- После удаления обоих объектов снова откройте другое окно «Выполнить» (нажмите клавишу Windows + R), введите «% PROGRAMDATA% Battle.net» и нажмите Enter, чтобы мгновенно перейти к месту.
Доступ к папке с кешированными данными Battle.net
- Находясь в папке Cache Battle.net, нажмите кнопку «Назад», затем щелкните правой кнопкой мыши папку Battle.net и выберите «Удалить» в контекстном меню, чтобы избавиться от любых оставшихся файлов, которые могут вызывать проблемы.
- Повторите шаги 5 и 6 с оставшимися кешированными файлами и удалите все папки, пока не останется остаточный файл, который может вызвать эту проблему:% APPDATA% Battle.net% LOCALAPPDATA% Battle.net% APPDATA% Bungie DestinyPC
- После удаления каждой соответствующей папки перезагрузите компьютер, затем загрузите Steam, затем станьте владельцем Destiny 2 и посмотрите, появляется ли код ошибки Olive после правильной установки игры.
As Guardians, you were supposed to rise to defend humanity and unravel the mysteries of the cosmos in Destiny 2. But instead, you are defeated by mere olives!
The Olive error code can strike without warning, disrupting cutscenes, interrupting gameplay, and kicking you back to the character select screen.
But fear not, as in this article, I’ll explain the causes and provide the methods to fix the Olive error in Destiny 2, so you can return to fighting the Darkness ASAP!
Why Do You Keep Getting the Error Code Olive in Destiny 2?
The Olive error in Destiny 2 occurs mainly due to Bungie server problems. It disrupts the connection and leads to this error. Another issue arises when Bungie accounts are not correctly linked. Corrupted game files and outdated drivers also contribute to the Olive error.
Here are the reasons why you keep getting the Olive error in Destiny 2:
- Ongoing server maintenance.
- Outdated graphics drivers.
- Damaged data within the Battle.net folder.
- Game files compromised.
- Your Bungie account connectivity problem.
- Extended periods of game inactivity cause problems.
Bungie’s decision to shift Destiny 2 from Battle.Net to Steam has generated various complications, such as the Olive error.
Getting Olive’d in Destiny 2 can be annoying, as the game becomes completely unplayable. Also, the Bungie support page doesn’t offer proper guidance except suggesting to close the game and relaunch it.
But in the following section, I’ve compiled a set of solutions that will resolve the Olive error for good.
How to Fix Olive Error in Destiny 2
To get rid of the Olive issue in Destiny 2, uninstall the Battle.Net edition of the game, remove the cache file, and install Destiny 2 from Steam. Also, make sure the Bungie servers are up and running, and don’t forget to sign in to the game using a Bungie account.
Additionally, keep the game and the launcher updated.
Here are the methods to fix the Olive error code in Destiny 2:
1. Check Destiny 2 Server Status
Prior to any troubleshooting steps, verify that fellow Guardians near you are encountering similar issues. The Bungie Destiny 2 error code Olive may arise from ongoing server maintenance.
Navigate to the Destiny server status webpage using a web browser and confirm the servers are operational. In the event of a service outage, be patient and try to access the game at a later time.
Services such as DownDetector and Outage.Report provide information on Destiny 2 server status. Also, visit the official Twitter support for Destiny 2. It will let you verify any details concerning ongoing server-related issues.
2. Login with a Valid Bungie Account
Destiny 2 beta error Olive is frequently connected to not being properly linked to a Bungie account. After encountering this issue, I resolved it by establishing a connection to a valid Bungie account.
So, restart Destiny 2 and follow the prompts to create and link a Bungie account.
Once you have completed this process and authenticated your account, launch the game to check the issue’s status.
3. Update Graphics Drivers
Having outdated drivers can significantly impact your gaming experience, causing the Olive error, resulting in sudden crashes, annoying freezing, frustrating lag, or even preventing the game from launching altogether.
To ensure you have a smooth and enjoyable time playing Destiny 2, update your GPU driver.
Here are the steps to update your graphics driver:
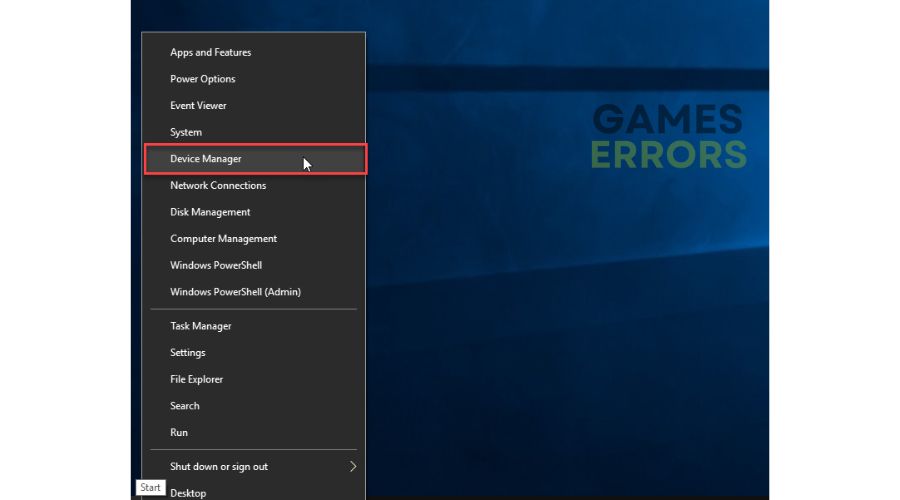
- Right-click the Start icon on the taskbar at the bottom and choose Device Manager.
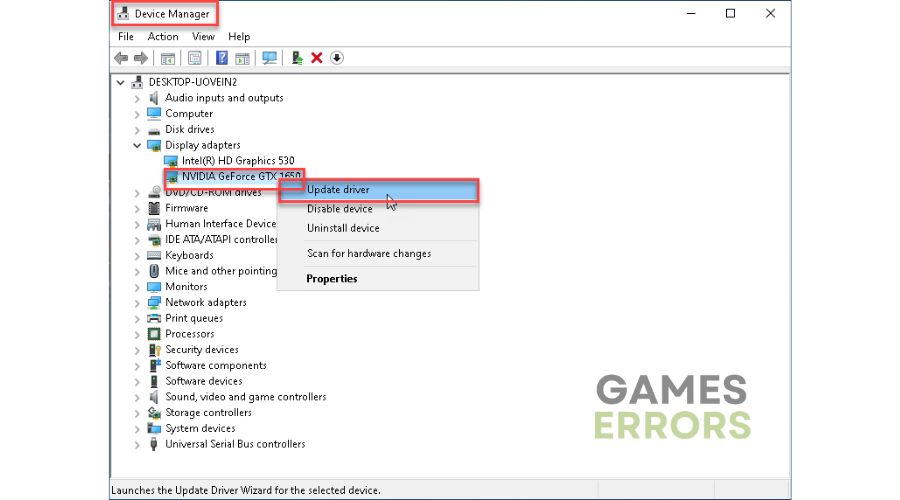
- Extend the Display adapters section.
- Double-click on your graphics card driver.
- Go to the Driver tab and click on the Update Driver button.
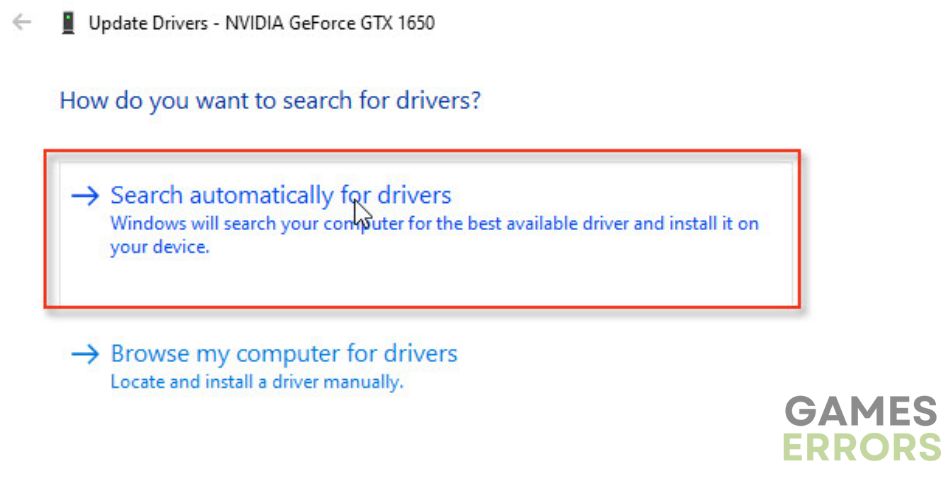
- Select Search automatically for drivers.


If an update is found, let it download and install. Then launch Destiny 2 and see if you still get olive’d.
4. Check the Integrity of the Destiny 2 Files
The smooth operation of the game is compromised due to one or more damaged or missing game files. This issue makes the game unstable and triggers the Olive error code.
Incomplete downloads, system crashes, malware attacks, improper installations, or accidental removal can corrupt these files. To fix this issue, verify the integrity of the game files using the game launcher.
To check the integrity of the Destiny 2 files:
On Steam
On Epic Games Launcher
Be patient while the launcher authenticates your game files. Once the verification process is finished, start the game and check whether the Olive error continues to occur.
Also, update Destiny 2 to the latest version, as updates often include patches that resolve known issues, including file corruption.
5. Use Google’s DNS Servers
Occasionally, you can get issues with your DNS servers, leading to an error code Olive. A process to mitigate DNS-related problems is to use different DNS servers that are reliable and secure.
Among various alternatives, configuring your device or network settings to utilize Google’s DNS servers can improve your internet connectivity while gaming.
Here’s how to use Google’s DNS servers:
6. Power Cycle Your Console
The power cycle refreshes your console’s system and clears any temporary glitches or bugs that might be causing the Olive error.
Follow the steps below to power cycle your console:
- Press the Power button on your PS5 or the Xbox button on the Xbox One console and hold it down for a few seconds until it shuts down. Wait for your console’s lights and fans to turn off completely.
- Unplug the power cable from the back of your console. Additionally, if you’re using an external power brick, unplug it from the power outlet as well.
- Give your console and power adapter some time to discharge any residual electricity. Waiting for a few minutes should be enough.
- Plug the power cable back into your console and connect it to the outlet. Make sure all the connections are secure.
- Press the power button again to turn on your console.
7. Reinstall Destiny 2
Bungie’s transition of Destiny 2 from the Battle.net platform to Steam has produced different problems, including the Olive error.
To fix this problem, firstly, uninstall the existing Battle.net version of Destiny 2 from your system. So, the previous installation doesn’t conflict with the new installation. Then delete the cache data thoroughly and download the latest version of Destiny 2 from Epic Games or Steam.
Here’s how to reinstall Destiny 2:
Uninstall the Game
Delete Cache Data
Install Destiny 2
- Open Steam or the Epic Games Launcher.
- Go to the Store page.
- Search for Destiny 2, download the game, and let it install on your computer.

After installation, launch the game and confirm that the Olive problem has been resolved.
FAQs
What does error code olive mean?
Error code Olive can occur in Destiny 2 due to connectivity issues with a Bungie account. To fix this error, establish a connection with a legitimate Bungie account. Restart Destiny 2 and follow the instructions for configuring your Bungie account.
Why do you keep getting error codes in Destiny 2?
A server problem from Bungie may result in continuous error codes. But in case the issue is originating from your end, restart Destiny 2, clear the cache on your respective platform, power cycle your console, check your connection, and stay informed about any developments from Bungie’s Twitter page.
Why can’t you connect to Destiny 2 servers?
You cannot connect to the Destiny 2 servers due to network problems. Troubleshoot by disconnecting the power cable from your modem and router and waiting a few minutes before reconnecting them. Once your network is restored, launch Destiny 2 to see if you can connect to the game servers.
Final Thoughts
Following the steps in this article, you can resolve the Olive error and enjoy better gameplay in Destiny 2.
Optimizing the network settings, checking for server status, verifying the data, and keeping the game up-to-date will mitigate the problem.
Comment below if you have further questions, and we’ll get back to you.
Some Destiny 2 players are getting random disconnects with the error code ‘Olive‘. The majority of users affected by this problem report that they see this error code after being kicked out of an online game.
After investigating this particular issue, it turns out that there are several different instances that might be responsible for the partition of this issue:
- Destiny 2 server issue – Before you try any other type of fix, you should start by ensuring that the game developer is not currently dealing with some kind of underlying server issue. To do this, you can check the Destiny 2 status page, check for official announcements, and use services like Outage. Report seeing if other users are reporting the same problem. In case you’re indeed dealing with a server issue, there is nothing you can do to fix the issue other than wait for the involved developers to fix the problem.
- Bungie account is not connected – According to some affected users, this problem can also occur in instances where no Bungie account is currently connected. To resolve the issue, create & validate your Bungie account before trying to join an online game.
- Glitch facilitated by long idle period – If you’re in the habit of leaving your game in idle mode for long periods of time, you can expect to see this problem when attempting to join an online game after you spend more than half an hour in the game’s lobby. To resolve this problem, all you have to do is restart the game conventionally on PC or hard reset your console.
- Battle.Net leftover data – As you probably know, Bungie has moved the game from Battle.Net to Steam, and this ended up causing a myriad of errors, including this one. To resolve the problem in this case, you will need to uninstall the game along with the old launcher and clear any cache folder that might hold game data before reinstalling the game from steam.
Method 1: Checking for a Server Issue
Before trying out any other fix that was confirmed to work by an affected user, you should begin this troubleshooting guide by investigating whether other Destiny 2 users in your area are also encountering the same problem.
Keep in mind that this particular error code is typically associated with some kind of server issue, so it’s highly recommended that you start by investigating whether you’re actually dealing with a widespread error.
To check for this instance, you can use services like Outage.Report and DownDetector to see if other users in your area are reporting the same issue as you’re facing it.
Even if you uncover no evidence of issues related to Destiny 2 servers, you should take a look at the status page of Destiny 2 and visit Bungie’s official Twitter Destiny 2 support account to see if they are any official announcements regarding the server issue.
If the investigations you just performed haven’t revealed any evidence of a server issue, move down to the next potential fix below.
Method 2: Connect with a Bungie account
Often times, the ‘Olive’ error code in Destiny 2 is associated with an instance in which the user is not connected with a Bungie account. Several affected users that were also encountering this issue have confirmed that the problem was resolved after they connected with a valid Bungie account.
So if you haven’t done this already, restart Destiny 2 and follow through when asked to set up a Bungie account. After you do this and validate your account, join an online game, and see if the problem is resolved.
If you already set up your Bungie account, move down to the next potential fix below.
Method 3: Restarting the PC / Console
If you didn’t try this already, you should start this troubleshooting guide by going for a simple platform restart. This is confirmed to be effective on both Windows and current-gen consoles (Xbox One and PlayStation 4).
On PC, simply close the game and use the Windows button to click on Power > Restart, then wait for the next startup to complete before launching the game once again.
On consoles, a restart is not sufficient since it both PlayStation 4 and Xbox One will preserve some temp files that aren’t cleared with a regular restart. So if you’re encountering the issue on a console, the proper procedure is to go for a power cycling procedure. Follow the guide applicable to your console of choice:
A. Power cycling your Playstation 4 console
- Start by making your that your console is in idle mode (not in hibernation). Next, press and hold the power button (on your console) and keep I pressed until the console shuts off completely.
- When you hear the second beep and you can hear the fans turning off, let go of the power button.

Power cycling Ps4 - After your console no longer shows signs of life, go ahead and unplug the power cord from the power outlet and wait for 30 seconds or more to ensure that the power capacitors are completely drained.
- Once this period passes, restore power and start your console once again, wait for the initial startup to complete then launch Destiny 2 and see I the problem is now resolved.
B. Power cycle your Xbox One console
- Ensure that your console is not in idle mode before pressing the Xbox button (on your console) and keep it pressed for about 0 seconds or until you see the front LEDs turning off.

Performing a hard reset on Xbox One - Once your console is shut down completely, let go of the power button, then unplug the power cable from the power outlet and wait for a full minute to ensure that the power capacitors are completely drained.

Unplugging the power cord from the socket - Once this time period has passed, restore power to your console and start it back up to see if the problem has been resolved.
In case you’re still seeing the ‘Olive’ error code after being disconnected from a Destiny 2 online game, move down to the next potential fix below.
Method 4: Reinstalling Destiny 2 (PC Only)
If you’re encountering this problem on a PC (after Destiny 2 completed the move from Battle.Net to Steam) it’s possible that you’re seeing this error due to some leftover files left behind by the old installation.
If this scenario is applicable, you should try uninstalling the Battle.Net version of Destiny 2 and clear the cache data of Battle.Net before reinstalling the game from Steam.
To make the whole process easier for you, we’ve put together a step-by-step guide that will walk you through the whole thing. Here’s what you need to do:
- Open up a Run dialog box by pressing Windows key + R. Next, type ‘appwiz.cpl’ inside the text box, then press Enter to open up the Programs & Features menu.

Type appwiz.cpl and Press Enter to Open Installed Programs List - Once you’re inside the Programs & features menu, scroll down through the list of installed applications and locate Destiny 2. When you see it, right-click on it and choose Uninstall from the context menu.

Uninstalling Destiny 2 - Once you’re inside the uninstallation screen, follow the on-screen instructions to complete the uninstallation.
- After the operation is finished, return to the Programs & Features page and repeat the uninstallation procedure with Battle.Net also.
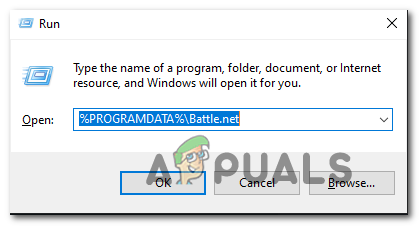
- Once both entities are uninstalled, open another Run box again (press Windows key + R) type ‘ %PROGRAMDATA%\Battle.net’ and press Enter to navigate to the location instantly.

Accessing the cached data folder of Battle.net - When you’re inside the Cache folder of Battle.net, hit the back button, then right-click on the Battle.net folder and choose Delete from the context menu to get rid of any leftover files that might still cause issues.
- Repeat step 5 and 6 with the remaining cached files and delete every folder until there is no remnant file that might cause this problem:
%APPDATA%\Battle.net
%LOCALAPPDATA%\Battle.net
%APPDATA%\Bungie\DestinyPC
- Once every relevant folder is deleted, restart your computer, then download Steam, then take ownership of Destiny 2 and see if the Olive error code is still occurring after the game is installed properly.


Kevin Arrows
Kevin Arrows is a highly experienced and knowledgeable technology specialist with over a decade of industry experience. He holds a Microsoft Certified Technology Specialist (MCTS) certification and has a deep passion for staying up-to-date on the latest tech developments. Kevin has written extensively on a wide range of tech-related topics, showcasing his expertise and knowledge in areas such as software development, cybersecurity, and cloud computing. His contributions to the tech field have been widely recognized and respected by his peers, and he is highly regarded for his ability to explain complex technical concepts in a clear and concise manner.
If you’re struggling with the ‘Olive error code’ in Destiny 2, our guide is the solution you need 🫒 🔥
Destiny 2 can mostly be played as a single-player game, but the most fun missions and best moments will be with other players, often outside of the main campaign. An additional incentive for teaming up is a better loot drop system, as now all players mostly get valuable items.
Unfortunately, you may experience random game crashes in Destiny 2 with the Olive error code. You can usually get this error code after getting kicked out of an online game. This guide will provide you with the best solutions to what to do if you get the Olive error code in Destiny 2.
🫒 Why do I keep getting error code Olive in Destiny 2?
If you’re encountering the Olive error while playing Destiny 2, it’s likely caused by various reasons such as:
- Server maintenance
- Testing by developers
- Outdated drivers
- Connectivity issues with your Bungie account
- Leftover data in the Battle.net launcher
- Corrupted game files
- Problems caused by long periods of inactivity
💁 But, according to most players, the main reasons behind the Olive error in Destiny 2 are:
- Destiny 2 server issue
- Bungie account not connected
- Battle.net leftover data
- Glitch caused by a long idle period
This issue can be frustrating as it renders the game unplayable. The Bungie support page doesn’t provide much assistance, simply suggesting exiting the game and attempting to restart it. But we have some good solutions that are easy to follow and apply.
How do I get rid of the error code Olive in Destiny 2?
To fix the error code Olive in Destiny 2, first, do these more uncomplicated steps:
- Check the Bungie server status first. If the servers are down, have a technical problem, or are scheduled for maintenance, you must wait until the servers are up and running.
- Connect with a Bungie account (Restart Destiny 2 and follow the prompts to create a Bungie account. Once the account is created, validate it and join an online game.)
- Don’t idle for over half an hour in the game’s lobby.
- Relaunch the game or restart your PC.
👉 Now, if the problem persists, do the following:
- Update system drivers
- Verify the integrity of the game files
- Change the DNS server
- Reinstall Destiny 2
1. Update system drivers
Time needed: 5 minutes
We recommend updating your system drivers to resolve the error code Olive in Destiny 2. Outdated drivers can lead to the game crashing, freezing, lagging, or failing to launch. Do the following for updating the GPU driver, for example;
- Open device Manager
Right-click on the Windows Start Menu and choose Device Manager.

- Select Update driver
Double-click to expand Display adapters. Right-click on your GPU and click Update driver
- Search automatically for drivers
Windows will check for an available update; if there is a new version, it will download and install it.

If you’re seeking a simpler way to update your system drivers, we suggest trying Outbyte Driver Updater. This highly efficient tool can effortlessly locate and install all the genuine drivers for your hardware, saving you precious time that would have been wasted on manual updates.
⇒ Get Outbyte Driver Updater
2. Verify the integrity of the game files
One or more game files may be corrupt or missing, affecting the stable operation and possibly leading to the error code Olive. We recommend that you check the integrity of the game files as follows:
1. Launch Steam and go to your games library.
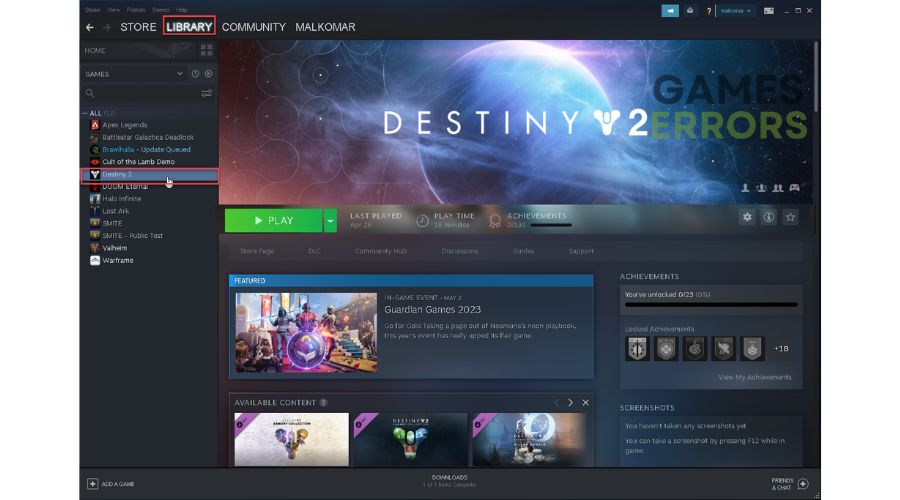
2. Right-click on the Destiny 2 game and select Properties.

3. Go to the LOCAL FILES tab and click on Verify the Integrity of Game Files.
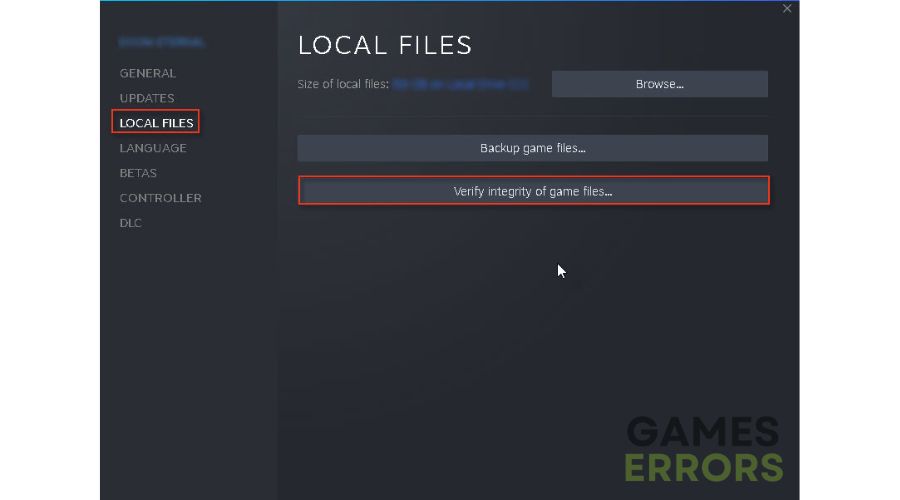
4. After finishing, restart your PC for the changes to take effect.
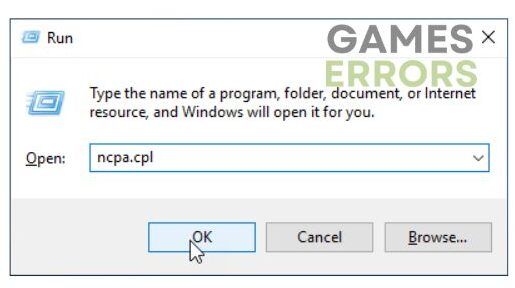
3. Change the DNS server
Sometimes, your DNS servers are not working correctly, so there is a possibility that you will get an error code “Olive.” We advise you to use one of the free and secure DNS servers, such as Google DNS. Do the following:
1. Press Win+R on the keyboard to show the Run dialog.
2. Type: “ncpa.cpl” in the box and press Enter to open Network Connections.
3. Select the network adapter you are connecting to your local network, right-click, and select Properties.
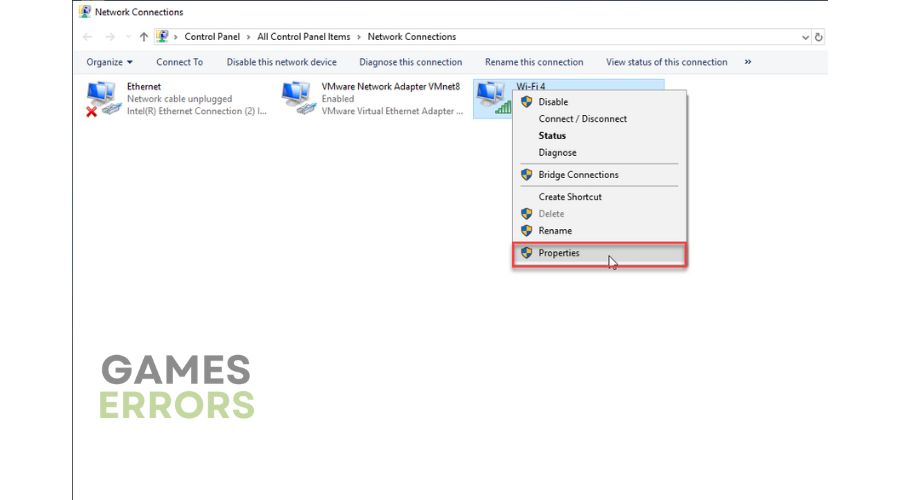
4. Click on the Internet Protocol Version 4 and click on the Properties button.
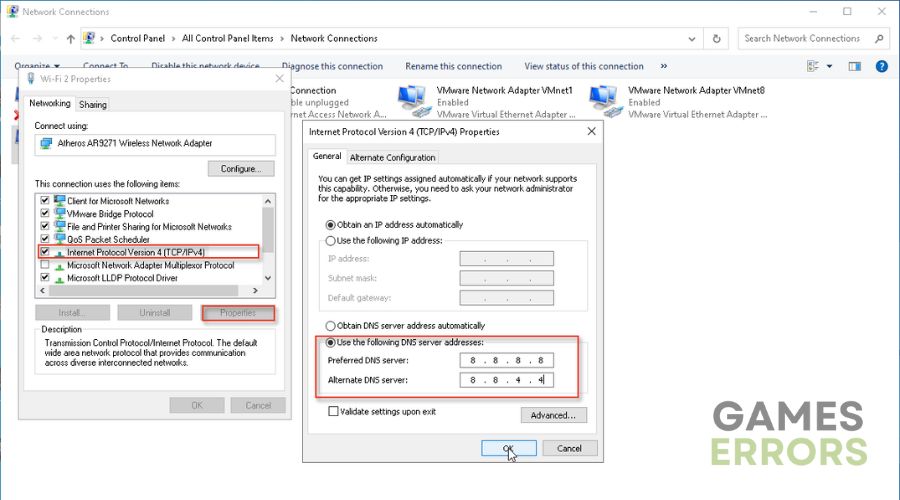
5. Under the General tab, confirm the radio button: Use the following DNS server addresses:
6. Input Preferred DNS server: 8.8.8.8 and Alternate DNS server: 8.8.4.4.
7. Confirm changes, and try to launch Destiny 2 to check if the error code “Olive” is gone.
4. Reinstall Destiny 2
Bungie’s moving of Destiny 2 from Battle.Net to Steam has caused several issues, including the error code “Olive.” To address this problem, we recommend uninstalling the Battle.Net version of Destiny 2 and clearing the cache data before downloading and installing the game from Steam. Here are the steps to follow:
1. Press the Win+R keys to open the Run dialog box.
2. Type; “appwiz.cpl” and press Enter to open the Programs and Features menu.
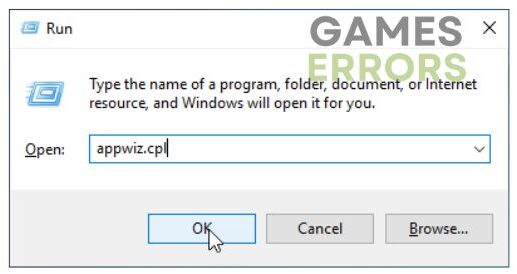
3. Locate and uninstall Destiny 2 and Battle.net launcher.
4. Open the Run dialog box again and type; “%programdata%” to open the Program Data folder.
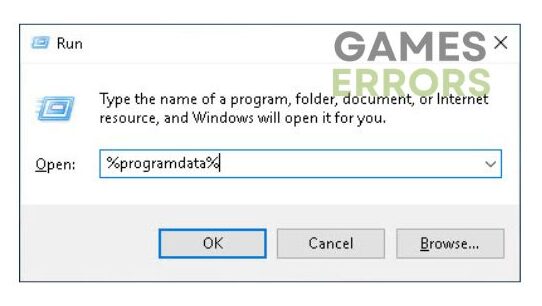
5. Delete the Battle.net folder.

6. Also delete next folders: %APPDATA%\Battle.net, %LOCALAPPDATA%\Battle.net and %APPDATA%\Bungie\DestinyPC
Conclusion
We have provided you with everything you need to know to resolve the “Olive” error code in Destiny 2. However, if you have another solution, share it with us by commenting below.
If you encounter any issues or errors while playing your favorite games and require support, feel free to contact us here. Our team is always ready to assist you and ensure your gaming experience is seamless and enjoyable.