Код ошибки Destiny Beetle, вероятно, является самым печально известным из всех кодов ошибок Destiny из-за того, что в настоящее время в Интернете доступно довольно мало информации. Люди в Bungie еще не опубликовали статью о том, как на самом деле решить проблему, и пользователи часто вынуждены пролистывать огромные сообщения на форуме, пытаясь найти ответ.

Мы собрали несколько рабочих решений от нескольких пользователей, которые утверждали, что решение им помогло, поэтому обязательно попробуйте их все, прежде чем отказываться от этой темы.
Решение 1. Очистите кеш, жестко загрузив Xbox
Это решение помогло довольно немногим людям справиться с кодом ошибки Beetle, и это решение является довольно общим методом устранения почти всех проблем, связанных с Xbox. Естественно, этот метод может быть применен только к пользователям, играющим в Destiny на Xbox.
Однако убедитесь, что все ваши игры синхронизированы онлайн и созданы резервные копии, поскольку в результате этого процесса они могут быть удалены из локальной памяти Xbox One. Есть два способа удалить кеш на Xbox One:
- Нажмите и удерживайте кнопку питания на передней панели консоли Xbox, пока она полностью не выключится.
- Отключите блок питания от задней панели Xbox. Нажмите и удерживайте кнопку питания на Xbox несколько раз, чтобы убедиться, что заряда нет, и это действительно очистит кеш.

- Подключите блок питания и подождите, пока индикатор на блоке питания не изменит свой цвет с белого на оранжевый.
- Снова включите Xbox, как обычно, и проверьте, появляется ли код ошибки Beetle при запуске Destiny или Destiny 2.
Альтернатива:
- Перейдите к настройкам Xbox One и нажмите Сеть >> Расширенные настройки.
- Прокрутите вниз до опции «Альтернативный Mac-адрес» и выберите появившуюся опцию «Очистить».

Вам будет предложено выбрать, действительно ли это сделать, когда ваша консоль будет перезапущена. Ответьте утвердительно, и теперь ваш кеш должен быть очищен
Если вы используете PlayStation 4, убедитесь, что вы следуете приведенным ниже инструкциям:
- Полностью выключите PlayStation 4.
- Когда консоль полностью выключится, отсоедините шнур питания от задней части консоли.
- Оставьте консоль отключенной от сети хотя бы пару минут.
- Подключите шнур питания обратно к PS4 и включите его обычным способом.
Похоже, что проблема была вызвана неисправной системой приглашения клана, и это, по-видимому, является основной проблемой для большинства людей, которые борются с кодом ошибки Beetle. Когда кто-то приглашает вас в клан, это наиболее вероятное время возникновения ошибки. Убедитесь, что у вас нет ожидающих приглашения клана, чтобы не получать это сообщение об ошибке, пока команде Bungie не удастся решить проблему.
Попросите администратора клана выкинуть вас из клана, к которому вы присоединились, чтобы удалить приглашение и избежать сообщения об ошибке

Альтернативный способ избежать этой проблемы — проверить на Bungie.net, есть ли у вас новое приглашение в клан на странице членства. Если вы это сделаете, вступите в клан, а затем немедленно покиньте его, чтобы вообще не получать сообщение об ошибке
Решение 3. Переустановите игру
Большинство пользователей сообщают, что эта ошибка начала появляться после недавнего патча, который, возможно, немного испортил ситуацию, когда дело дошло до подключения игры к Интернету. Однако пользователям, которые стали часто видеть код ошибки после патча, удалось решить проблему, просто переустановив игру. Коды ошибок появлялись один или два раза после переустановки, и после этого их больше не видели.
Переустановка игры на PlayStation 4
- Включите систему PlayStation 4 и войдите в свой профиль PSN.
- Нажмите на крестовине вверх, перейдите в меню «Настройки» и нажмите на меню «Управление системным хранилищем».

- Щелкните меню «Приложения» и нажмите кнопку «Параметры», когда будет выделена «Судьба». Нажмите «Удалить» >> «Выбрать все» и нажмите «Удалить», чтобы удалить игру.
- Нажмите OK, чтобы подтвердить удаление выбранного приложения, и игра будет полностью удалена с жесткого диска.

Очистка кеша консоли после удаления Destiny помогает убедиться, что в кеше консоли не хранятся временные файлы, которые могут повлиять на новую установку Destiny. Вот рекомендуемые шаги по очистке кеша консоли:
- Полностью выключите PlayStation 4.
- Когда консоль полностью выключится, отсоедините шнур питания от задней части консоли.
- Оставьте консоль отключенной от сети хотя бы пару минут.
- Подключите шнур питания обратно к PS4 и включите его обычным способом.
Переустановить игру на PS4 можно с физического диска с игрой:
- Включите систему PlayStation 4 и войдите в свой профиль PSN.
- Вставьте исходный диск с игрой, который вы использовали для установки игры в первую очередь, и установка должна начаться автоматически. Вы можете следить за прогрессом на индикаторе выполнения.
Вы также можете установить игру, загрузив ее с помощью PlayStation и подключения к Интернету. При загрузке игры таким способом рекомендуется использовать проводное соединение.
- Включите систему PlayStation 4 и войдите в свой профиль PSN.
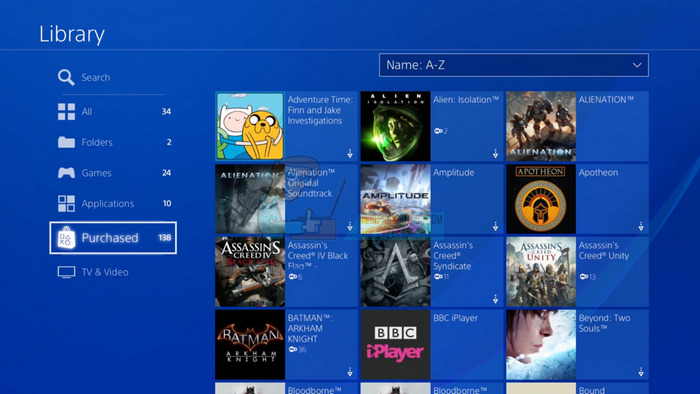
- Откройте элемент «Библиотека» на главном экране, найдите Destiny в списке и нажмите кнопку «Загрузить».
- Индикатор выполнения будет отображаться во время установки игры на жесткий диск консоли.

Переустановка игры на Xbox One
- Включите консоль Xbox One и войдите в нужный профиль Xbox One.
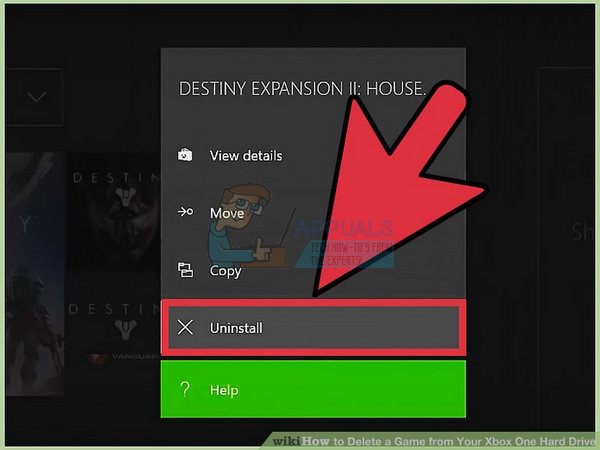
- В окне главного меню Xbox выберите «Мои игры и приложения», нажмите «Игры» и выделите Destiny.

- Нажмите кнопку «Меню» и выберите «Управление игрой» >> «Удалить все». Нажмите «Удалить» еще раз, чтобы подтвердить свой выбор на следующем экране.
- Через мгновение игра будет удалена с жесткого диска.
Очистка кеша консоли после удаления Destiny помогает убедиться, что в кеше нет временных файлов, которые могут повлиять на новую установку Destiny. Вот рекомендуемые шаги по очистке кеша консоли:
Нажмите и удерживайте кнопку питания на передней панели консоли Xbox, пока она полностью не выключится

Отключите блок питания от задней панели Xbox. Нажмите и удерживайте кнопку питания на Xbox несколько раз, чтобы убедиться, что заряда нет, и это действительно очистит кеш
Переустановить игру на Xbox One можно с физического диска с игрой:
- Включите консоль Xbox One и войдите в нужный профиль Xbox One.
- Вставьте диск с игрой в дисковод, и процесс установки начнется автоматически. Вы сможете следить за прогрессом, пока игра не будет установлена.
Вы также можете установить игру, загрузив ее с помощью PlayStation и подключения к Интернету. При загрузке игры таким способом рекомендуется использовать проводное соединение.
- Включите консоль Xbox One и войдите в нужный профиль Xbox One.
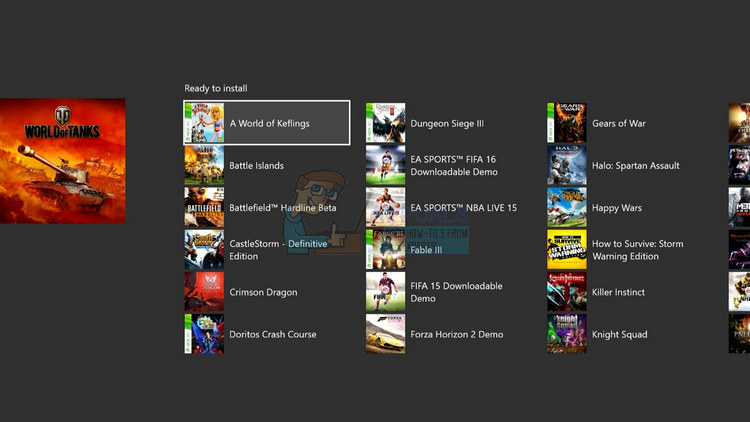
- Перейдите в раздел меню «Все готово к установке», найдите Destiny и выберите опцию «Установить».

- Прогресс загрузки и установки можно увидеть в разделе меню «Очередь».
- Индикатор выполнения будет отображаться во время установки игры на жесткий диск консоли.
Исправление: Цыпленок с кодом ошибки Destiny

С кодами ошибок Destiny и Destiny 2 иногда бывает довольно сложно справиться, поскольку сама игра довольно новая, а команда Bungie все еще
Исправлено: капуста с кодом ошибки Destiny

Код ошибки Cabbage, который был довольно частым явлением среди игроков Destiny и Destiny 2, вызвал такое возмущение, что даже онлайн
Исправлено: Кабан с кодом ошибки Destiny

Если вы в настоящее время получаете код ошибки Boar, возможно, вы теряете соединение с PlayStation Network или Xbox Live, в зависимости от того, на какой консоли
Исправлено: Муравьед с кодом ошибки Destiny

Есть довольно много кодов ошибок, которые могут появиться у вас, если вы играете в Destiny на соответствующей консоли. Однако работа с этими кодами ошибок
Исправлено: гитара с кодом ошибки Destiny

Код ошибки Guitar, вероятно, является одним из менее известных кодов ошибок, с которыми вы можете столкнуться во время игры в Destiny или Destiny 2, а Bungie еще не опубликовал
Image via Bungie
Running into the odd error code in Destiny 2 can be frustrating when you do not know how to fix it. Getting the Beetle error code can be one of the most annoying ones because there are not many dedicated fixes available. Here are our suggestions for getting your Destiny 2 game back in order if you are encountering the Beetle error code.
If you are getting the Beetle error code in Destiny 2, your game is having issues connecting to the servers. This can be related to heavy traffic that the server is experiencing at the moment, so we recommend connecting with a VPN if you have one and connecting via a server in another location. Be aware that the server you connect to could lead to some lag.
If the above didn’t work, we recommend clearing your cache if you are on either PlayStation or Xbox. To do this, fully shut down your console (don’t put it in rest mode). When it is off, unplug the console from the wall for 30 seconds to a minute and then start it up again.
If none of the above worked, we recommend restarting your router and ensuring everything is running well there. If you can, try a wired connection with an ethernet cord. If you still have the Beetle error code after all of this, we recommend contacting Bungie support or deleting Destiny 2 and then reinstalling it.

Код ошибки Destiny Beetle, вероятно, является самым печально известным из всех кодов ошибок Destiny из-за того, что в настоящее время в Интернете доступно довольно мало информации. Люди в Bungie еще не опубликовали статью о том, как на самом деле решить проблему, и пользователи часто вынуждены пролистывать огромные сообщения на форуме, пытаясь найти ответ.

Мы собрали несколько рабочих решений от нескольких пользователей, которые утверждали, что решение им помогло, поэтому обязательно попробуйте их все, прежде чем отказываться от этой темы.
Решение 1. Очистите кеш, жестко загрузив Xbox
Это решение помогло довольно многим людям справиться с кодом ошибки Beetle, и это решение является довольно общим методом устранения почти всех проблем, связанных с Xbox. Естественно, этот метод можно применить только к пользователям, играющим в Destiny на Xbox.
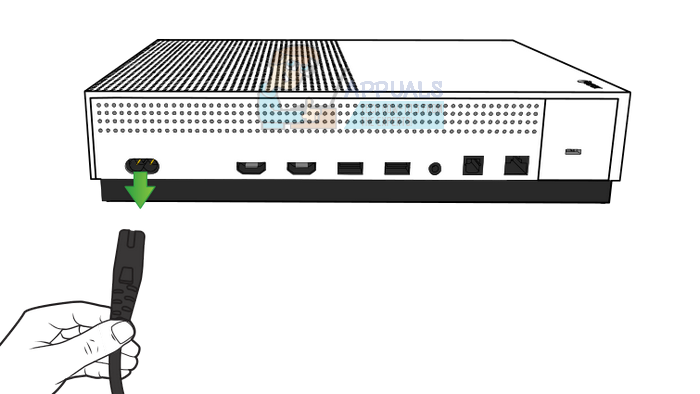
Однако убедитесь, что все ваши игры синхронизированы в сети и созданы резервные копии, поскольку в результате этого процесса они могут быть удалены из локальной памяти Xbox One. Есть два способа удалить кеш на Xbox One:
- Нажмите и удерживайте кнопку питания на передней панели консоли Xbox, пока она полностью не выключится.
- Отключите блок питания от задней панели Xbox. Нажмите и удерживайте кнопку питания на Xbox несколько раз, чтобы убедиться, что заряда нет, и это действительно очистит кеш.

- Подключите блок питания и подождите, пока индикатор на блоке питания не изменит свой цвет с белого на оранжевый.
- Снова включите Xbox, как обычно, и проверьте, появляется ли код ошибки Beetle при запуске Destiny или Destiny 2.
Альтернатива:
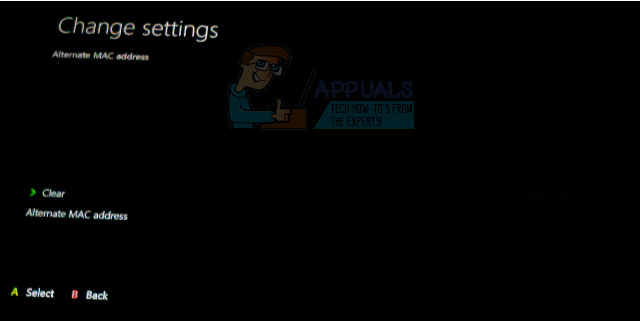
- Перейдите к настройкам Xbox One и нажмите Сеть >> Расширенные настройки.
- Прокрутите вниз до параметра «Альтернативный Mac-адрес» и выберите появившийся параметр «Очистить».

- Вам будет предложено выбрать, действительно ли это сделать, когда ваша консоль будет перезапущена. Ответьте утвердительно, и теперь ваш кеш должен быть очищен.
Если вы используете PlayStation 4, убедитесь, что вы следуете приведенным ниже инструкциям:
- Полностью выключите PlayStation 4.
- Когда консоль полностью выключится, отсоедините шнур питания от задней части консоли.
- Оставьте консоль отключенной от сети хотя бы пару минут.
- Подключите шнур питания к PS4 и включите его обычным способом.
Решение 2. Удалите полученные приглашения в клан и выйдите из текущего клана
Похоже, что проблема была вызвана неисправной системой приглашения клана, и это, по-видимому, является основной проблемой для большинства людей, борющихся с кодом ошибки Beetle. Когда кто-то приглашает вас в клан, это наиболее вероятное время возникновения ошибки. Убедитесь, что у вас нет ожидающих приглашений клана, чтобы избежать получения этого сообщения об ошибке, пока команде Bungie не удастся решить проблему.
- Попросите администратора клана исключить вас из клана, к которому вы присоединились, чтобы удалить приглашение и избежать сообщения об ошибке.

- Альтернативный способ избежать этой проблемы — проверить на Bungie.net, есть ли у вас новое приглашение в клан на странице членства. Если вы это сделаете, вступите в клан, а затем немедленно покиньте его, чтобы вообще не получать сообщение об ошибке.
Решение 3. Переустановите игру
Большинство пользователей сообщают, что эта ошибка начала появляться после недавнего патча, который, возможно, немного испортил ситуацию, когда дело дошло до подключения игры к Интернету. Однако пользователям, которые стали часто видеть код ошибки после патча, удалось решить проблему, просто переустановив игру. Коды ошибок появлялись один или два раза после переустановки, и после этого их больше не видели.
Переустановка игры на PlayStation 4
- Включите систему PlayStation 4 и войдите в свой профиль PSN.
- Нажмите на крестовине вверх, перейдите в меню «Настройки» и нажмите на меню «Управление системным хранилищем».

- Щелкните меню «Приложения» и нажмите кнопку «Параметры», когда выделена Destiny. Щелкните Удалить >> Выбрать все и нажмите Удалить, чтобы удалить игру.
- Нажмите ОК, чтобы подтвердить удаление выбранного приложения, и игра будет полностью удалена с жесткого диска.

Очистка кеша консоли после удаления Destiny помогает убедиться, что в кэше консоли не хранятся временные файлы, которые могут повлиять на новую установку Destiny. Вот рекомендуемые шаги по очистке кеша консоли:
- Полностью выключите PlayStation 4.
- Когда консоль полностью выключится, отсоедините шнур питания от задней части консоли.
- Оставьте консоль отключенной от сети хотя бы пару минут.
- Подключите шнур питания к PS4 и включите его обычным способом.
Переустановить игру на PS4 можно с физического диска с игрой:
- Включите систему PlayStation 4 и войдите в свой профиль PSN.
- Вставьте исходный диск с игрой, который вы использовали для установки игры, и установка должна начаться автоматически. Вы можете следить за прогрессом на индикаторе выполнения.
Вы также можете установить игру, загрузив ее с помощью PlayStation и подключения к Интернету. При загрузке игры таким способом рекомендуется использовать проводное соединение.
- Включите систему PlayStation 4 и войдите в свой профиль PSN.
- Откройте элемент «Библиотека» на главном экране, найдите в списке Destiny и нажмите кнопку «Загрузить».
- Индикатор выполнения будет отображаться во время установки игры на жесткий диск консоли.

Переустановка игры на Xbox One
- Включите консоль Xbox One и войдите в нужный профиль Xbox One.
- В окне главного меню Xbox выберите «Мои игры и приложения», нажмите «Игры» и выделите Destiny.

- Нажмите кнопку «Меню» и выберите «Управление игрой» >> «Удалить все». Нажмите «Удалить» еще раз, чтобы подтвердить свой выбор на следующем экране.
- Через мгновение игра будет удалена с жесткого диска.
Очистка кеша консоли после удаления Destiny помогает убедиться, что в кеше нет временных файлов, которые могут повлиять на новую установку Destiny. Вот рекомендуемые шаги по очистке кеша консоли:
- Нажмите и удерживайте кнопку питания на передней панели консоли Xbox, пока она полностью не выключится.
- Отключите блок питания от задней панели Xbox. Нажмите и удерживайте кнопку питания на Xbox несколько раз, чтобы убедиться, что заряда нет, и это действительно очистит кеш.
Переустановить игру на Xbox One можно с физического диска с игрой:
- Включите консоль Xbox One и войдите в нужный профиль Xbox One.
- Вставьте диск с игрой в дисковод, и процесс установки начнется автоматически. Вы сможете следить за прогрессом, пока игра не будет установлена.
Вы также можете установить игру, загрузив ее с помощью PlayStation и подключения к Интернету. При загрузке игры таким способом рекомендуется использовать проводное соединение.
- Включите консоль Xbox One и войдите в нужный профиль Xbox One.
- Перейдите в раздел меню «Все готово к установке», найдите Destiny и выберите параметр «Установить».
- Прогресс загрузки и установки можно увидеть в разделе меню «Очередь».
- Индикатор выполнения будет отображаться во время установки игры на жесткий диск консоли.
Destiny error code Beetle is probably the most infamous of all Destiny error codes because of the fact that there is quite a small amount of information available online at the moment. Folks at Bungie are yet to post an article regarding how to actually solve the problem and users are often forced to scroll through enormous forum posts trying to find the answer.

We have collected several working solutions from several users who claimed that the solution has worked for them so make sure you try them all out before giving up on this topic.
Solution 1: Clear the Cache By Hard Booting Your Xbox
This solution has helped quite a few people deal with their Beetle error code and this solutions is quite a general method for fixing almost all Xbox-related issue. Naturally, this method can only be applied to users playing Destiny on Xbox.
However, make sure all of your games are synced online and backed up since this process may end up deleting them from your local Xbox One memory. There are two ways to delete the cache on Xbox One:
- Press and hold the power button at the front of the Xbox console until it shuts down completely.
- Unplug the power brick from the back of the Xbox. Press and hold the power button on the Xbox several times to make sure there is no remaining power and this will actually clean the cache.
- Plug in the power brick and wait for the light located on the power brick to change its color from white to orange.
- Turn the Xbox back on as you would do normally and check to see if the Beetle error code still appears when you start Destiny or Destiny 2.
Alternative:
- Navigate to your Xbox One settings and click on Network >> Advanced Settings.
- Scroll down to Alternate Mac Address option and choose the Clear option which appears.
- You will be prompted with a choice to really do this as your console will be restarted. Respond affirmatively and your cache should now be cleared.
If You Are Using PlayStation 4, make sure you follow the instructions below:
- Completely turn off the PlayStation 4.
- Once the console is completely shut down, unplug the power cord from the back of the console.
- Let the console stay unplugged for at least a couple of minutes.
- Plug the power cord back into the PS4 and turn it on the way you normally do.
Solution 2: Delete the Clan Invites You Received and Leave Your Current Clan
It seems that the problem was caused by faulty clan invite system and this appears to be the main concern for most people struggling with the Beetle error code. When someone invites you to a clan, that time is the most likely time that the error occurs. Make sure you have no pending clan invites in order to avoid receiving this error message until the Bungie team manages to deal with the issue.
- Have the clan admin kick you out of the clan which you joined in order delete the invite and avoid the error message.

- An alternative way to avoid the issue is to check on Bungie.net to see if you have a new clan invite under the Memberships page. If you do, join the clan and then immediately leave it in order to avoid receiving the error message at all.
Solution 3: Reinstall the Game
Most users have reported that this error started to appear after the recent patch which may have messed things up a bit when it comes to the game’s connection to the Internet. However, users who started to see the error code often after the patch, managed to solve the problem simply by reinstalling the game. The error codes appeared once or twice after the reinstall and they were never to be seen again after that.
Reinstalling the Game on PlayStation 4
- Turn on the PlayStation 4 system and sign into your PSN profile.
- Press up on the D-pad and navigate to the Settings menu and click on the System Storage Management menu.

- Click on the Applications menu and press the Options button when Destiny is highlighted. Click on Delete >> Select All and press Delete to uninstall the game.
- Select OK to confirm deletion of the selected application and the game will be completely removed from the hard drive.
Clearing the console cache after uninstalling Destiny helps ensure that there are no temporary files stored in the consoles cache that could impact the new installation of Destiny. Here are the recommended steps on clearing the console cache:
- Completely turn off the PlayStation 4.
- Once the console is completely shut down, unplug the power cord from the back of the console.
- Let the console stay unplugged for at least a couple of minutes.
- Plug the power cord back into the PS4 and turn it on the way you normally do.
Reinstalling the game on PS4 can be done using the physical game disc:
- Turn on the PlayStation 4 system and sign into your PSN profile.
- Insert the original game disc you used to install the game in the first place and the installation should begin automatically. You can follow the progress on the progress bar.
You can also install the game by downloading it using your PlayStation and your Internet connection. It’s recommended to use a wired connection while downloading a game this way.
- Turn on the PlayStation 4 system and sign into your PSN profile.
- Open Library item from the home screen, locate Destiny from the list and select the Download button.
- A progress bar will appear while the game is being installed on the console hard drive.
Reinstalling the Game on Xbox One
- Turn on the Xbox One console and sign into the desired Xbox One profile.
- On the Xbox Home menu window, select My Games and Apps, press games and highlight Destiny.
- Tap the Menu button and choose the Manage Game option >> Uninstall All. Click on Uninstall again to confirm your choice on the next screen.
- After a moment, the game will be removed from the hard drive.
Clearing the console cache after deleting Destiny helps ensure that there are no temporary files stored in the cache that could affect the new installation of Destiny. Here are the recommended steps on clearing the console cache:
- Press and hold the power button at the front of the Xbox console until it shuts down completely.
- Unplug the power brick from the back of the Xbox. Press and hold the power button on the Xbox several times to make sure there is no remaining power and this will actually clean the cache.
Reinstalling the game on Xbox One can be done using the physical game disc:
- Turn on the Xbox One console and sign into the desired Xbox One profile.
- Insert the game disc into the disc drive and the installation process should begin automatically. You will be able to follow the progress until the game is installed.
You can also install the game by downloading it using your PlayStation and your Internet connection. It’s recommended to use a wired connection while downloading a game this way.
- Turn on the Xbox One console and sign into the desired Xbox One profile.
- Navigate to the Ready to Install section of the menu, locate Destiny and select the Install option.
- Download and install progress can be viewed in the Queue section of the menu.
- A progress bar will appear while the game is being installed on the console hard drive.

Kevin Arrows
Kevin Arrows is a highly experienced and knowledgeable technology specialist with over a decade of industry experience. He holds a Microsoft Certified Technology Specialist (MCTS) certification and has a deep passion for staying up-to-date on the latest tech developments. Kevin has written extensively on a wide range of tech-related topics, showcasing his expertise and knowledge in areas such as software development, cybersecurity, and cloud computing. His contributions to the tech field have been widely recognized and respected by his peers, and he is highly regarded for his ability to explain complex technical concepts in a clear and concise manner.

Problems with Destiny 2? Here’s all the latest informaiton on error codes, workarounds, solutions and resolutions.
Destiny 2 seems to be pretty stable on consoles, but release has not been entirely smooth. As part of our Destiny 2 guide, we’ll be tracking these errors to keep you across the latest information that’s not so much how to get Exotic weapons or trigger Heroic Public Events but «get online and actually play».
The error codes and reported issues below are arranged in reverse chronological order by update status, so you should always find the latest news on Destiny 2 error codes at the top of the page — and get an idea of how long your particular bugbear has gone unactioned, if you don’t have enough reasons to blow a gasket today.
Check back with this page for regular updates on Destiny 2 error codes, plus solutions and workarounds when we find them. As of the latest update, Cabbage error seems to be the most common and persistent Destiny 2 issue, followed by PS4 crashes, especially on PS4 Pro.

Cabbage error code
Destiny 2 players are enjoying healthy fibre and vitamins as they experience the Cabbage error code. The issue seems to especially affect players using Technicolor or Thompson modems.
The developer suggests the following workarounds, with the caveat «players may need to inspect the manual for their router to proceed through these steps, as some settings pages may have alternate naming conventions per manufacturer».
- Connect your console directly to the router via Wired or Wi-Fi Connection.
Note: attempting to connect to Destiny through a router connected to an alternate router may lead to increased issues. Please attempt to connect to the router connected to your modem for best results. - From the router settings page, proceed from Home > Toolbox > Firewall.
- Create a new Firewall level within your Router settings.
Players may wish to name this «Destiny 2». - From the Router settings page, proceed from Home > Toolbox > Game & Application Sharing and configure the following settings:
- Enable UPnP.
- Disable «Extended Security».
If this doesn’t work for you, please send all the details to Bungie via its Help forum — it specifically wants to know your router hardware — version numbers and manufacturers.
The latest update from Bungie dropped on September 18 and confirmed investigations are ongoing.
Beetle, Buffalo, Newt, Pineapple, Rutabaga and Trumpet error codes
The PC version of Destiny 2 went live on OCtober 24, and along with server queues, and few interesting errors codes (interesting as in what Bungie named them) have surfaced.
Along with the Cabbage error outlined above, Beetle, Newt, Pineapple and Rutabaga codes have been popping up. Bungie noted the issues on Twitter today at launch, and we’ve culled some of the descriptions and workarounds for each to help you out.
The Beetle error code is one we’ve seen before and it occurs on all platforms. It’s a general networking error which is reported to Bungie the moment it occurs. Those who continue to receive the error, should look over the Network Troubleshooting Guide.
If you happen upon a Buffalo error code, Bungie said to make sure you aren’t not logged into Destiny 2 on multiple PCs. This error appears to players who are not signed in with their platform account, or their platform services are undergoing maintenance.
It may also appear to players on console whose PlayStation Plus or Xbox Live subscription has expired.
If Buffalo is repeatedly encountered, players should check the status of their platform’s services (PS4, Xbox One, Battle.net). If no outage or maintenance has been reported, and this error continues to occur, create a new topic in the Help forums.
Newt is also popping up, and those who encounter it should «try that activity again» and resume what they were doing before the error occurred. If it still pops up, exit Destiny 2 then relaunch. If it STILL shows up, it’s likely due to testing on Bungie’s end.
While Pineapple sounds rather delicious at the moment, it isn’t a refreshing snack. It’s another general networking error. Like Beetle, the issue was reported the moment it occurred and folks are urged to look over the Network Troubleshooting guide if the error persists.
Rutabaga on the other hand is a bit different. This is error is encountered by players when Destiny 2 performance drops below sustainable thresholds. Troubleshooting steps are as follows:
- Please ensure that no other applications are running in the background, and relaunch Destiny.
- Verify that the PC operating system and GPU firmware are up to date.
- Inspect the Destiny 2 PC requirements article to ensure requirements have been met.
If the Trumpet error code pops up, Bungie said players can attempt to work around the issue by changing the Blizzard Region in Battle.net application. This issue is currently being investigated. As of October 26, this issue on PC appears to be solved.
For more information on Destiny 2 PC requirements, current Destiny 2 PC known issues and Destiny 2 driver updates, be sure to hit up those links. If you are still facing issues, be sure to visit the Destiny 2 PC support forum.
Baboon, Cacao, Panther and Anteater error codes
What the heck? All of a sudden on the evening of September 14 US time Destiny 2 players reported a whole little menagerie of errors: Baboon, Panther, Anteater and, for some reason, Cocoa. Why are some of these food and other animals…? Anyway, about an hour later Bungie declared all four errors resolved.
PS4 crashes
Some PS4 players are reporting crashes in Destiny 2. We haven’t seen this ourselves despite having the console and game client running for 4 hours or longer at a stretch, but others have been unable to progress through the story as a result. As of September 10, Bungie and Sony are investigating the matter together.
Olive, Chicken, Pony and Sheep error codes
Four new error codes cropped up towards the end of Destiny 2’s first full weekend after launch. Olive and Chicken were reported first, with Pony and sheep joining the fun three hours later.
We’re not sure what the problem actually was, but all four issues were declared resolved seven hours after initial report.
Centipede error code
This error is attributed to a networking. One way to combat the issue is to use a wired connection. If that fails, change your NAT type (from Strict / Type 3 into Open / Type 1) if possible. It is one of a trio of networking error codes (see below) that new players noticed on Destiny 2’s first full weekend after launch.
Although there are several networking troubleshooting steps described in this entry and those that follow, Bungie seems to have changed something on its end, as well. As of September 9, the issue seems to be resolved.
Guitar error code
This is a general Destiny 2 networking error. Player disconnect is reported the moment of occurrence. Those who continue to receive this error should check out Bungie’s Network Troubleshooting Guide.
As of September 9, the issue seemed to be resolved, but then on September 19 the issue resurfaced.
Weasel error code
This error occurs after a Destiny 2 player is returned to orbit during an activity or when inspecting gear. Bungie does not yet have a solution, but redditors discovered a workaround related to clan invites. If that doesn’t help, follow the same steps as you would with a «general» networking error such as Centipede.
As of September 9, the issue seems to be resolved.
Mongoose error code
Xbox One players reported longer than usual matchmaking times in Destiny 2 this week, resulting in Moongoose error notifications.
As of September 8, the issue had been resolved.
PS4 online permissions
Earlier this week, PS4 players encountered the following error message:
«You have lost connection to the Destiny 2 servers. Your permissions to access online content may have changed or your profile may have been signed in elsewhere.»
As of September 8, the issue has been resolved. It’s not clear whether it was related to a problem with the PSN servers.
ce-34878-0 error code (PS4)
Destiny 2 players have reported a ce-34878-0 error code on PlayStation 4 Pro consoles, which is a Sony-specific code. The process for dealing with this code is as follows:
- Close the application, install the latest System Software and game updates and restart the system.
- If you have upgraded the Hard Disk Drive («HDD») in your system, please re-install the original HDD.
- If the error occurs again, back up your saved data, and then go to [Settings] > [Initialization] and choose [Initialize PS4].
- If the error occurs with every application, or as soon as the application starts, please contact PlayStation Support.
Destiny 2 servers at capacity
This may be an issue for some during launch period, as Destiny 2 is going to be popular. Server queues are designed to regulate the Destiny experience and to make sure that stability can be assured. The Bungie Help page notes that:
- If a player loses connection or is removed from the queue, their placement will not be retained
- If a player reaches the front of this queue and is unable to connect to Destiny servers, they will have to re-enter the queue to try again
- Queue times may vary, depending on server traffic and concurrent population
We’ll be updating with workarounds, solutions, and comments from Bungie as they come in, so bookmark this page if you want to stay on top of Destiny’s various error codes post-launch.