«Не удалось создать файл дампа из-за ошибки…»: как исправить
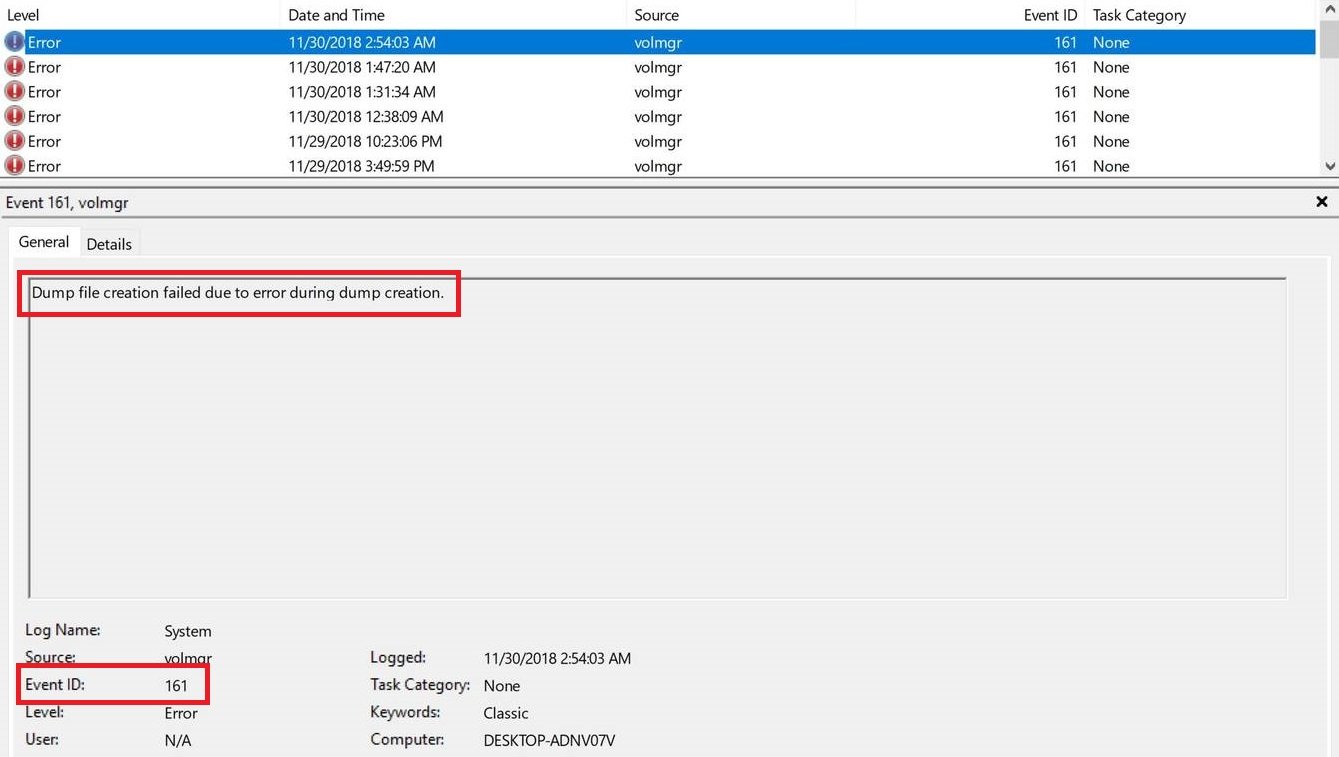
Во время блужданий в компоненте «Просмотр событий» можно наткнуться на ошибку с кодом 161 и сообщением «Не удалось создать файл дампа из-за ошибки при создании дампа». Как правило, пользователи заглядывают в этот компонент системы после постоянных появлений синего экрана смерти и неудачных попыток получить доступ к дампу памяти. Данная проблема может возникать на всех версиях Windows, но чаще всего на нее жалуются именно пользователи Windows 10.
Что вызывает появление этой ошибки?
Как правило, выделяют всего три причины для проявления этой ошибки:
- приложение для очистки диска удаляет создаваемый дамп-файл;
- поврежденные системные файлы Windows;
- устаревшая версия BIOS или проблемы с его настройками.
Ознакомившись с возможными причинами, пора приниматься за устранение ошибки «Не удалось создать файл дампа из-за ошибки…».
Метод №1 Удаление сторонней программы для очистки
Некоторые пользователи предпочитают устанавливать в свои системы сторонние программы, функционал которых заключается в очистке системы от ненужного мусора, временных файлов и тому подобного. Однако они могут и не подозревать, что эти программы частенько удаляют из системы и крайне важные файлы. Разумеется, по ошибке, а не нарочно. Если в вашей Windows установлена подобная программа, то она могла удалить дамп памяти.
Мы рекомендуем вам избавиться от такой программы. Удалить то или иное ПО можно в таких компонентах системы, как «Приложения и возможности» и «Программы и компоненты». Как только избавитесь от программы, дождитесь BSoD и проверьте «Просмотр событий» на наличие «Не удалось создать файл дампа из-за ошибки…».
Метод №2 Использование DISM и SFC
Возможно, ошибка при создании дампа памяти возникла из-за поврежденных системных файлов, функционал которых применяется в данном процессе. Это довольно просто проверить, запустив в работу системные утилиты DISM и SFC. Эти утилиты просканируют систему на наличие поврежденных файлов и попытаются провести восстановление, если это возможно.
Для запуска DISM и SFC вам потребуется сделать следующее:
- нажмите Windows+R;
- пропишите в пустую строчку «cmd» и нажмите комбинацию Ctrl+Shift+Enter;
- напишите команду «sfc /scannow» и нажмите Enter;
- дождитесь окончания работы SFC и перезагрузите компьютер;
- такими же шагами снова откройте Командную строку;
- введите команду «DISM /Online /Cleanup-Image /RestoreHealth» и нажмите Enter;
- подождите окончания процесса и перезагрузите свой ПК.
После очередного появления BSoD откройте компонент «Просмотр событий» и проверьте, исчезло ли сообщение «Не удалось создать файл дампа из-за ошибки при создании дампа».
Метод №3 Обновление BIOS
Некоторые пользователи утверждают, что им удалось избавиться от данной ошибки, просто обновив BIOS своей материнской платы. К сожалению, мы не можем предоставить вам инструкции, так как материнская плата каждого производителя обновляется по разному. Вам нужно зайти на веб-ресурс официального производителя и ознакомиться с предоставленными там инструкциями.
Метод №4 Сброс компьютера к исходному состоянию
Если никакие из вышеуказанных методов не помогли вам в решении ошибки «Не удалось создать файл дампа из-за ошибки при создании дампа», то мы рекомендуем выполнить возврат компьютера к исходному состоянию. Да, метод довольно радикальный, но он наверняка избавит вас как от ошибки при создании дампа, так и от BSoD.
Чтобы вернуть компьютер к исходному состоянию, вам нужно сделать следующее:
- нажмите правой кнопкой мыши на Пуск;
- выберите пункт «Параметры»;
- пройдите в раздел «Обновление и безопасность»;
- перейдите во вкладку «Вернуть компьютер в исходное состояние»;
- выполняйте действия согласно с инструкциями на экране.
Вот и все. Ваша операционная система вернулась в свое изначальное, более стабильное состояние.
Outdated drivers could be the reason
by Srishti Sisodia
Srishti Sisodia is an electronics engineer and writer with a passion for technology. She has extensive experience exploring the latest technological advancements and sharing her insights through informative… read more
Updated on
- Volmgr, also known as Volume Manager Driver file, is a type of Win64 EXE file which manages drive data storage.
- This guide will help you fix the errors related to Volmgr with easy methods.
XINSTALL BY CLICKING THE DOWNLOAD FILE
Fix Windows 11 OS errors with Fortect:
SPONSORED
This tool repairs common computer errors by replacing the problematic system files with the initial working versions. It also keeps you away from system errors, BSoDs, and repairs damages made by malware and viruses. Fix PC issues and remove viruses damage now in 3 easy steps:
- Download and Install Fortect on your PC
- Launch the tool and Start scanning to find broken files that are causing the problems
- Right-click on Start Repair to fix issues affecting your computer’s security and performance
- Fortect has been downloaded by 0 readers this month, rated 4.4 on TrustPilot
If your computer suddenly crashes and you see event ID 161 Volmgr on Windows 11, you are not alone. Unfortunately, it is quite a common occurrence.
In this guide, we will explain what event ID 161 means, how to fix the related error and the causes of the error. Let’s start!
What does Event ID 161 Volmgr mean on Windows 11?
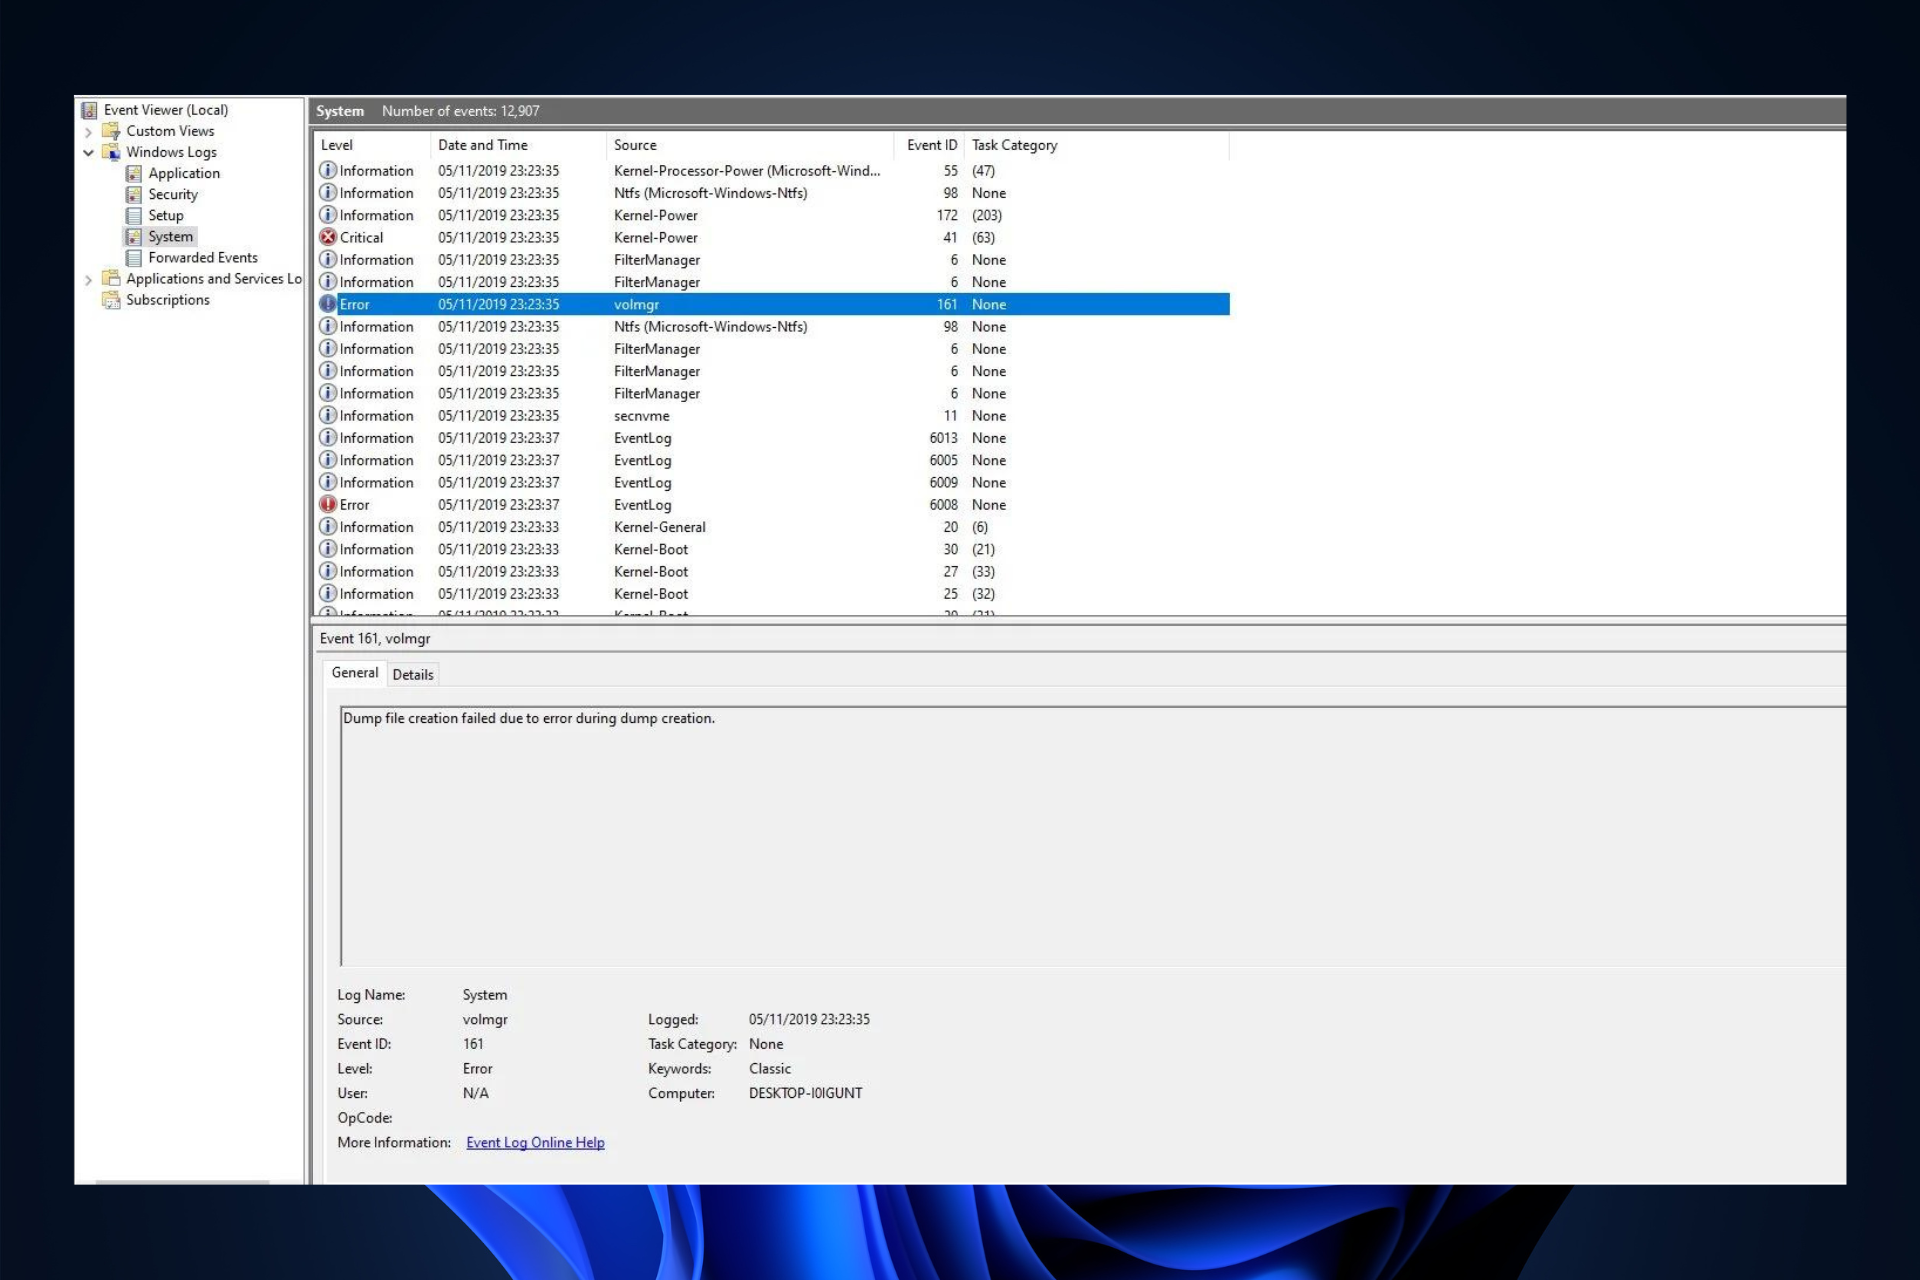
The Event ID 161 Volmgr is an error related to the Volume Manager Driver file. It is logged when Volmgr encounters an error with the disk or the disk volume.
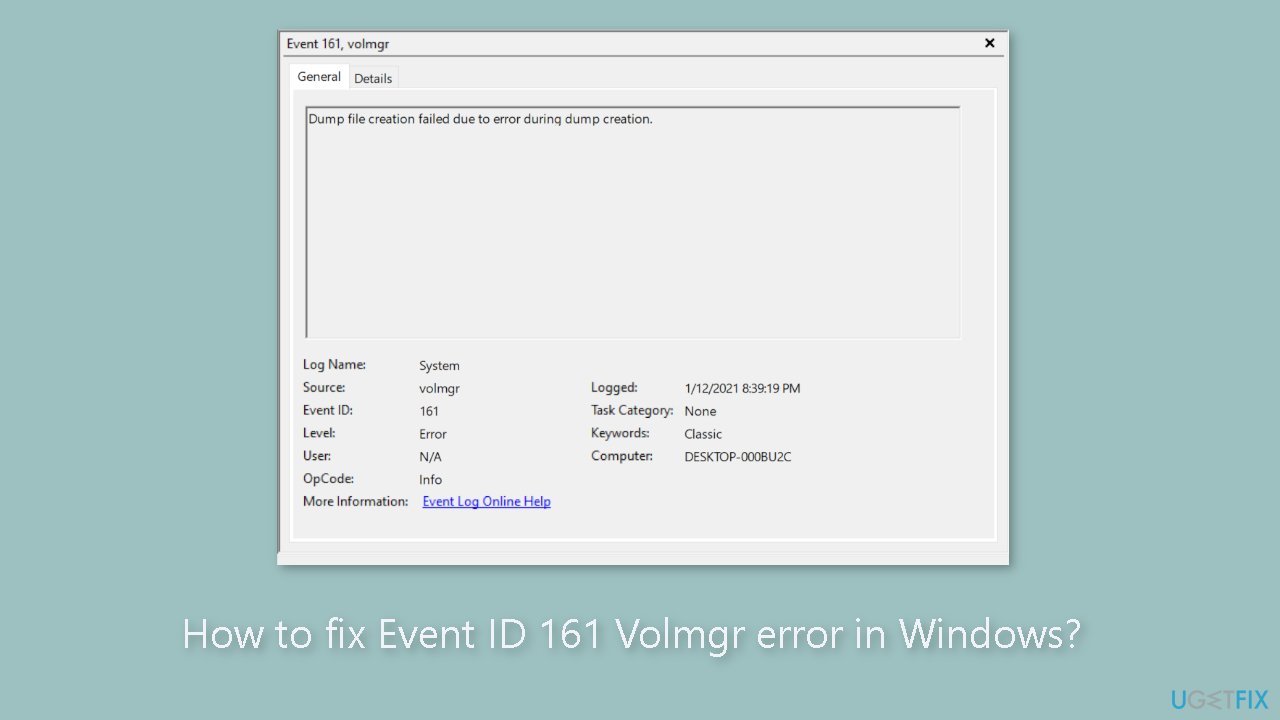
The description of the error says Dump file creation failed due to an error during dump creation, indicating that Windows could not create a dump file.
What causes Event ID 161 Volmgr on Windows 11?
Some PC issues are hard to tackle, especially when it comes to missing or corrupted system files and repositories of your Windows.
Be sure to use a dedicated tool, such as Fortect, which will scan and replace your broken files with their fresh versions from its repository.
There could be several reasons for the event to appear; some of the common ones are mentioned here:
- Wrong write debugging information – If the write debugging information setting is incorrect, you might see the event ID.
- Disk or RAM issues – If the disk is corrupt or your RAM is not configured correctly, your computer might not be able to create dump files, hence the error.
- Damaged system files – If Windows system files are corrupted, dump files will not be created properly. That’s when this Event ID is logged in Event viewer.
- Third-party optimizing apps – The third-party cleaning apps optimize your computer by cleaning temp files and other data. These apps could also delete your dump file storage, hence the error.
- Outdated BIOS – If the BIOS on your computer is outdated, then you may encounter this issue. You need to update the firmware to the latest version.
What can I do to fix Event ID 161 Volmgr on Windows 11?
Before engaging in advanced troubleshooting steps, you should consider performing the following checks:
- If you have a third-party cleaning app installed, uninstall it.
- Remove all the unwanted external peripherals.
- Clean the dirt and debris of the RAM slot.
- Update BIOS firmware.
- Change the Power Supply Unit.
1. Disable automatic restart
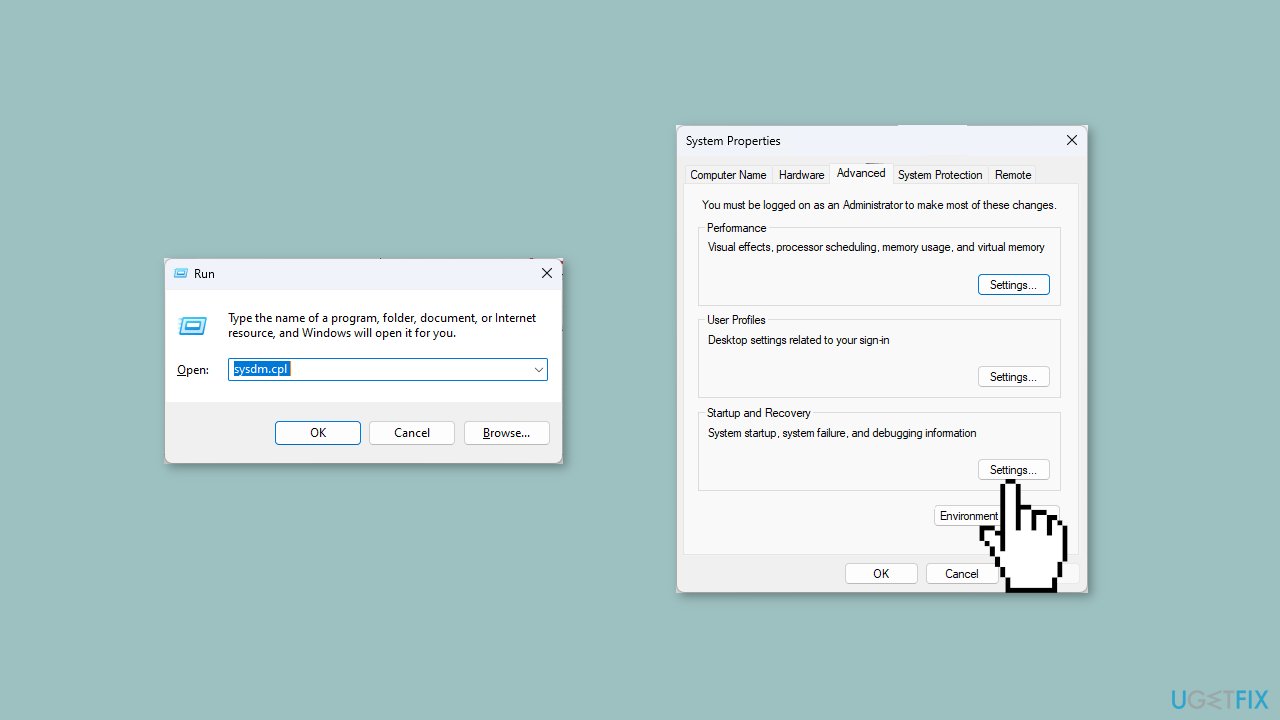
- Press Windows + R to open the Run window.
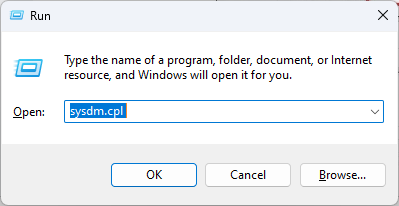
- Type sysdm.cpl and press Enter to open System Properties.
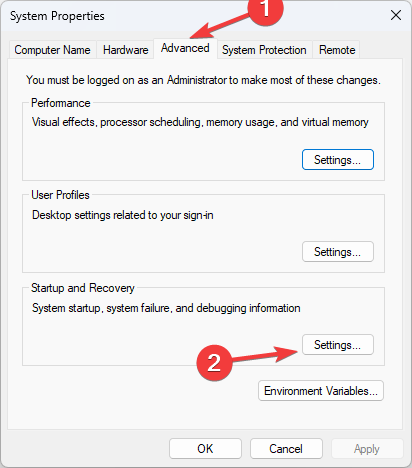
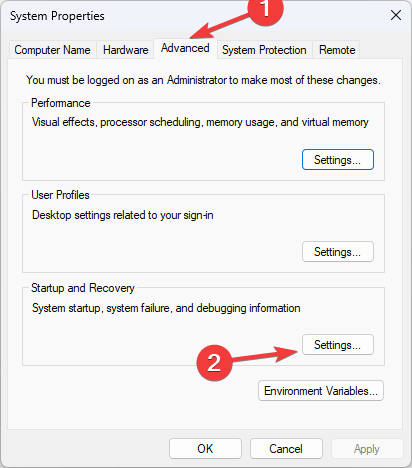
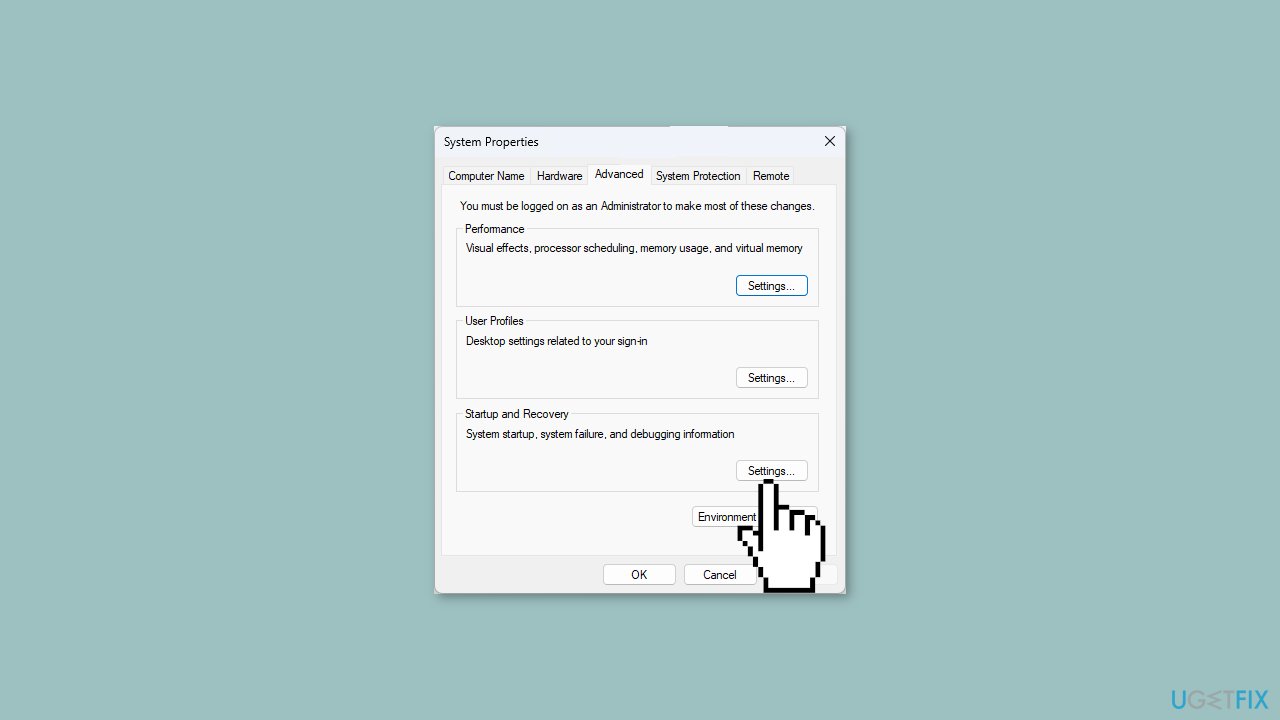
- Go to the Advanced tab, under Startup and Recovery, and click Settings.
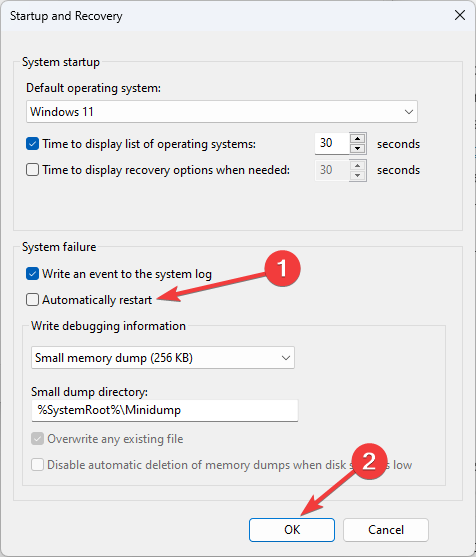
- Under System failure, remove the checkmark next to the Automatically restart option and click OK to confirm.
2. Use the Registry Editor
- Press Windows + R to open the Run console.
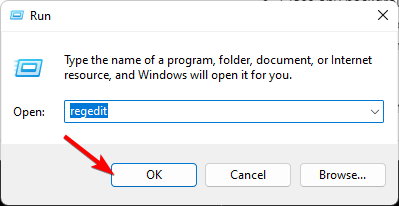
- Type regedit and hit enter to open Registry Editor.
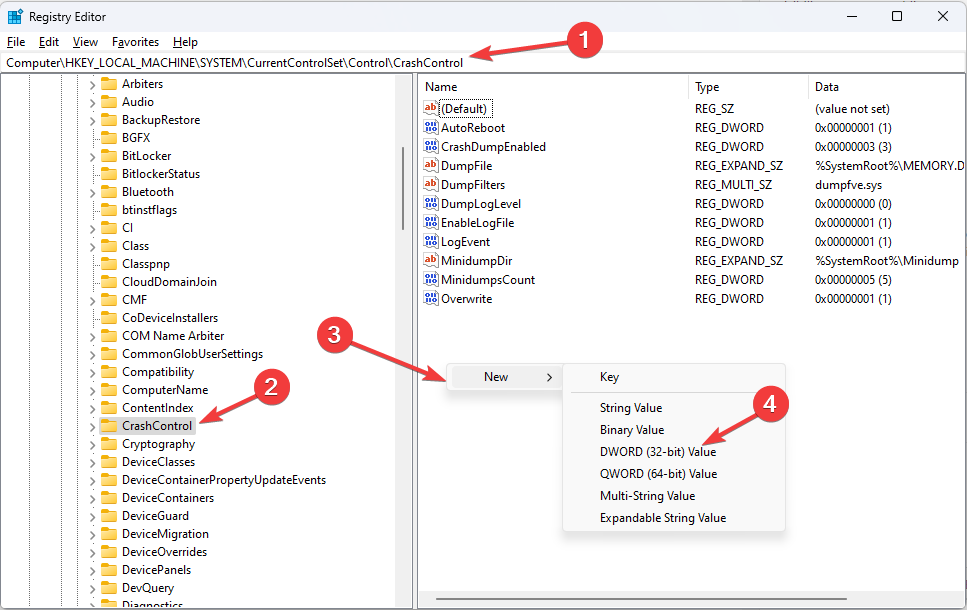
- Navigate to this path:
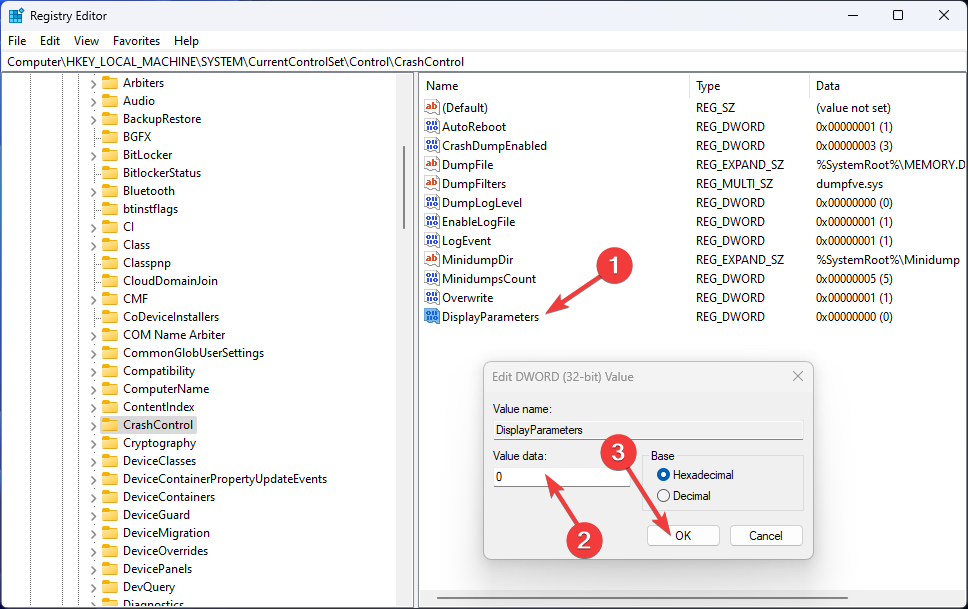
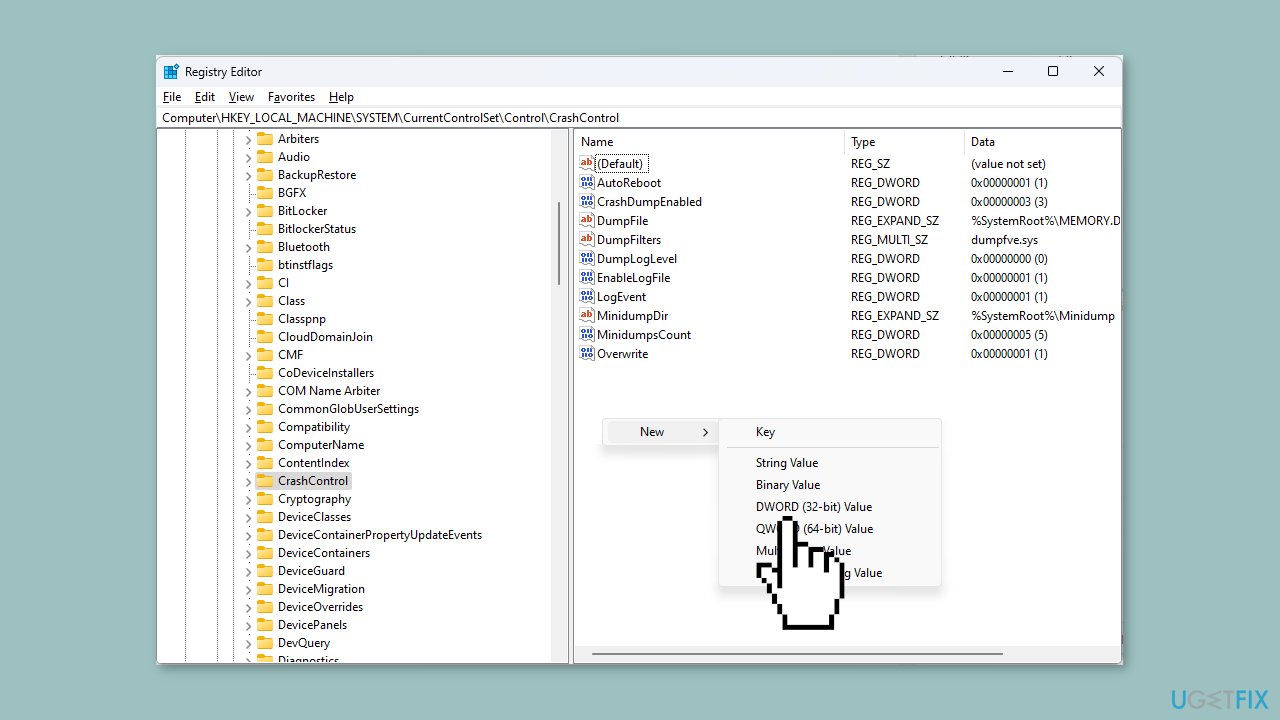
Computer\HKEY_LOCAL_MACHINE\System\CurrentControlSet\Control\CrashControl - Right-click on the empty space on the right pane, select New, then click DWORD (32-bit) Value.
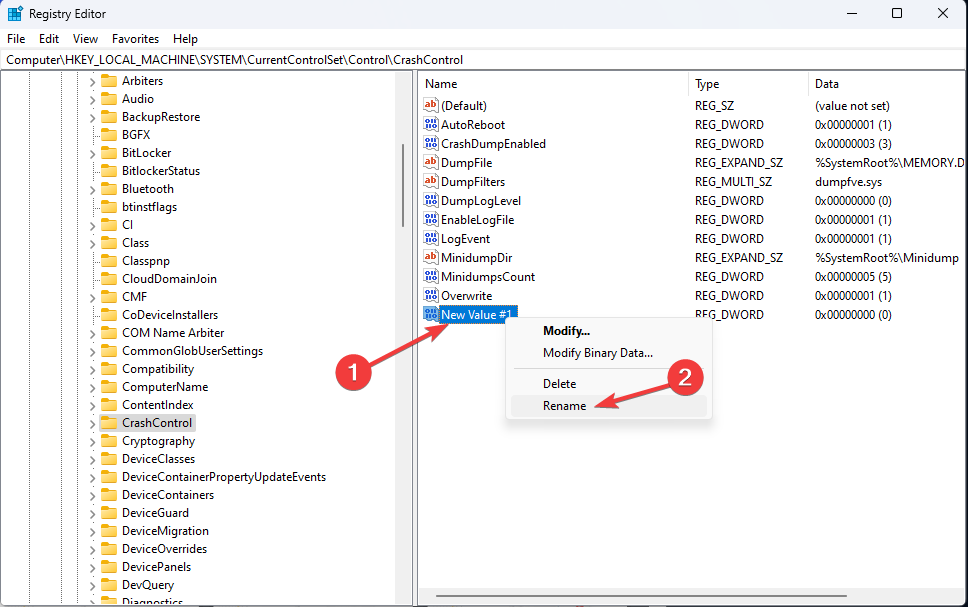
- Right-click on the newly created value, click Rename and name it DisplayParameters.
- Double-click it and change the Value data to 0 and click OK.
- Restart your PC to let the changes take effect.
3. Use the Command Prompt
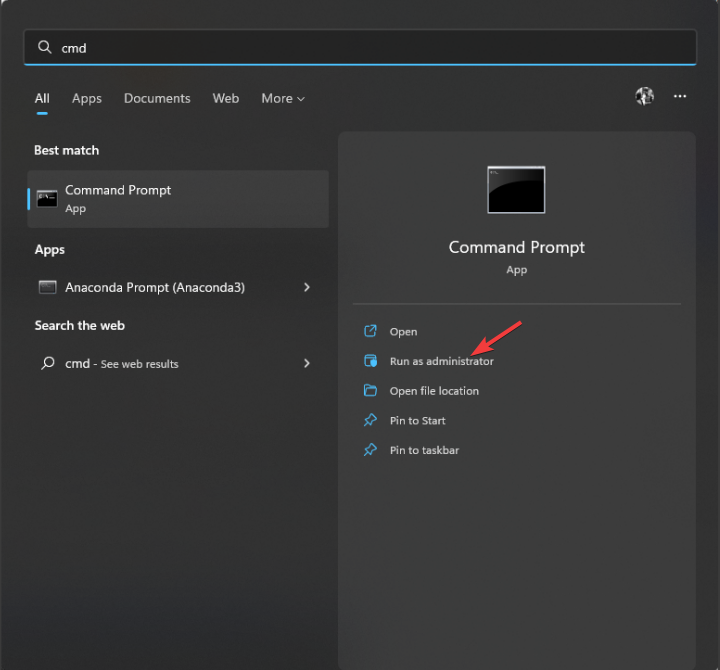
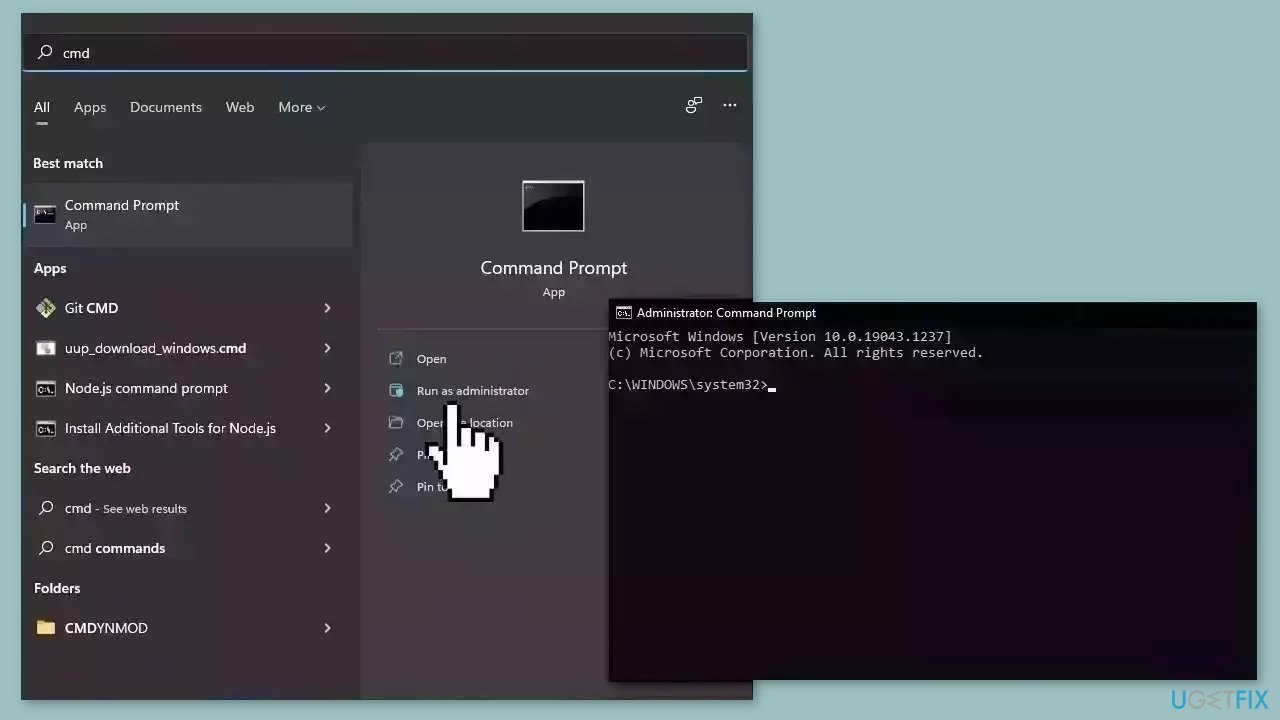
- Press the Windows key, type CMD, and click Run as administrator.
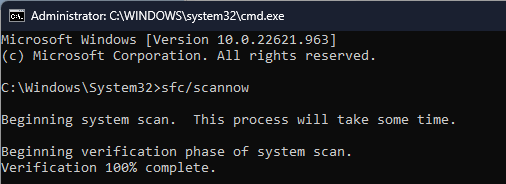
- Type the following command to repair Windows system files and press Enter:
sfc/scannow - Once the scan is complete, copy and paste the following command to restore the Windows image and press Enter:
DISM /Online /Cleanup-Image /RestoreHealth
- Copilot is coming on 9/26 with a new logo and new features
- Windows 11 23H2: Top Features, coming September 26
- How to Find & View Saved Passwords on Windows 11
- How to Permanently Disable Left Swipe on Windows 11
4. Check the Debug settings
- Open the Run console and type sysdm.cpl to open System Properties.
- Go to the Advanced tab, under Startup and Recovery, and click Settings.
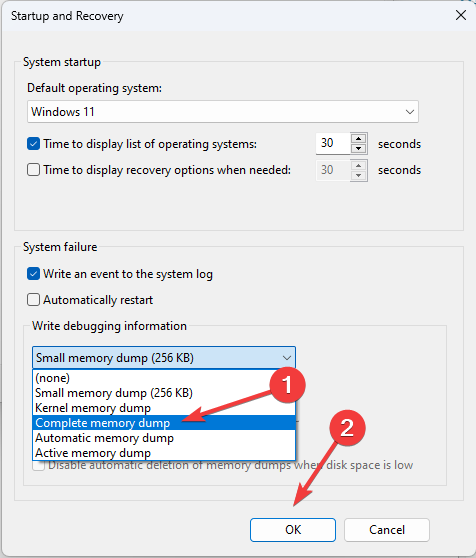
- Under Write debugging information, select Complete memory dump.
- Click OK to confirm your choice and restart your computer.
5. Update the device driver
- Press Windows + R to open the Run window.
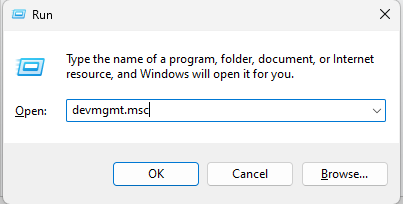
- Type devmgmt.msc and hit Enter to open Device Manager.
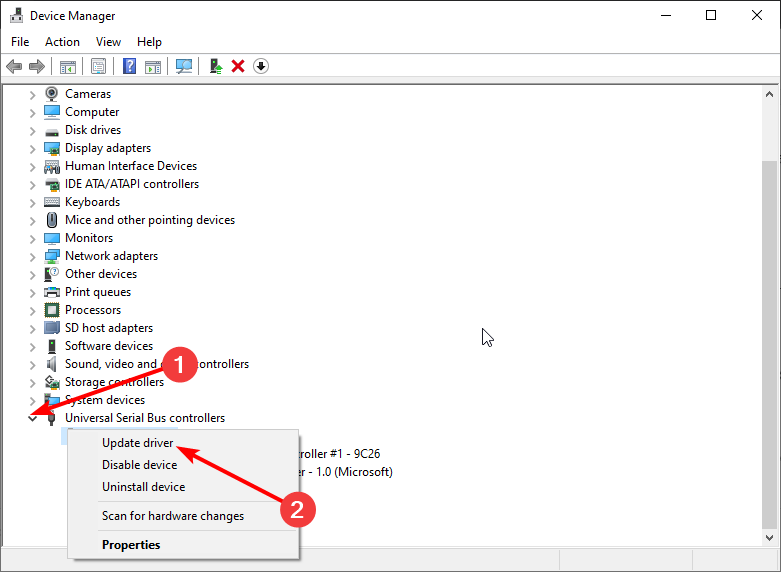
- Look for any driver with a yellow driver on the icon, right-click it, and select Update driver.
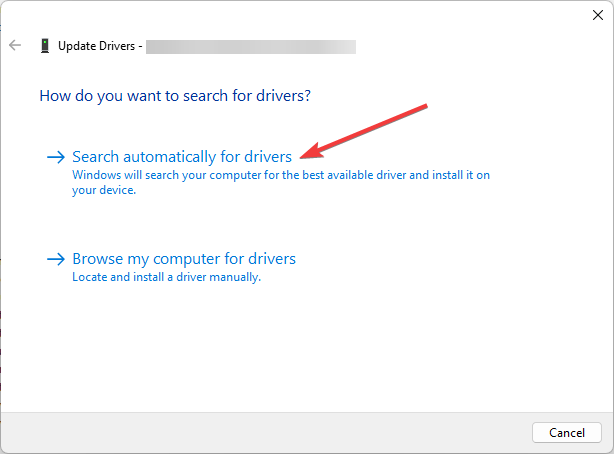
- On the next window, click Search automatically for drivers.
- Follow the on-screen instructions to complete the installation.
Most common Windows errors and bugs can result from faulty or incompatible drivers. An outdated system can lead to lags, system issues, or even BSoDs.
You can prevent these problems by using an automatic tool that will search and install the correct drivers on your computer with just a few clicks. That’s why we recommend you use Outbyte Driver Updater.
Here’s how to do it:
- Download and install the Outbyte Driver Updater app.
- Launch the software.
- Wait for the app to detect all incompatible drivers.
- Afterward, it will show you a list of the drivers found to select the ones to Update or Ignore.
- Click on Update & Apply Selected to download and install the newest versions.
- Restart your PC to ensure the applied changes.

Outbyte Driver Updater
Use this software and solve all driver-related issues from your PC.
Disclaimer: You may need to upgrade the app from the free version to perform specific actions.
6. Scan for viruses or malware
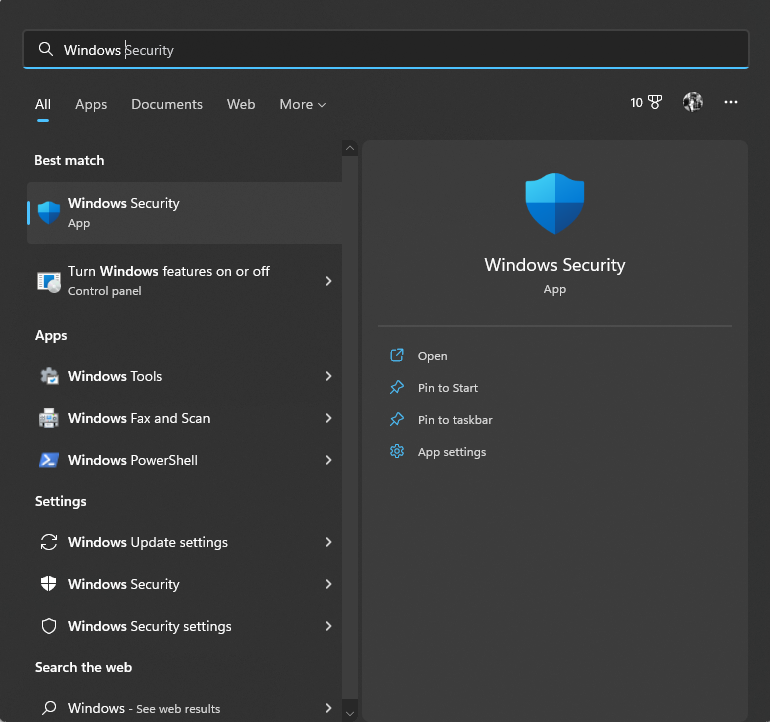
- Press the Windows key, type Windows Security, and click Open.
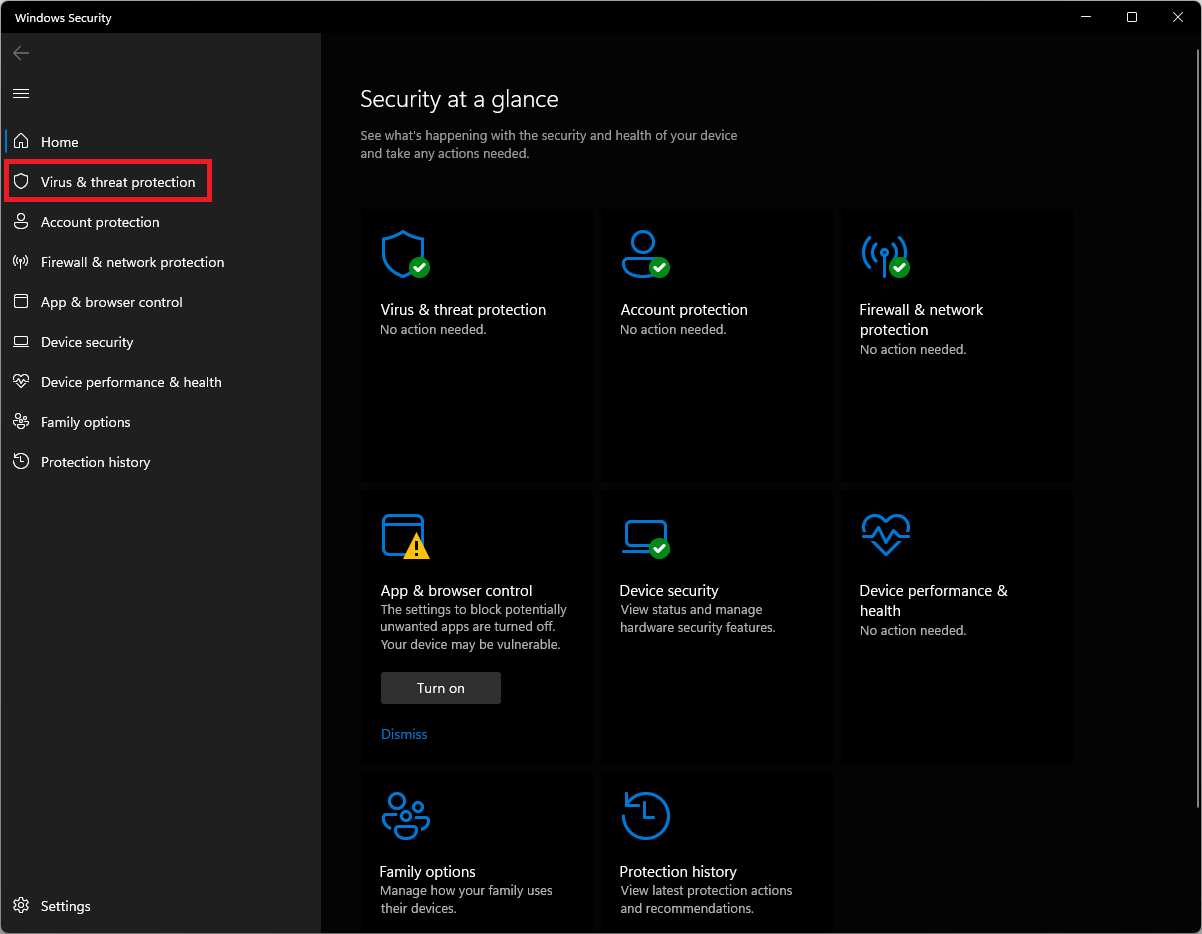
- Go to Virus & threat protection and click Scan options.
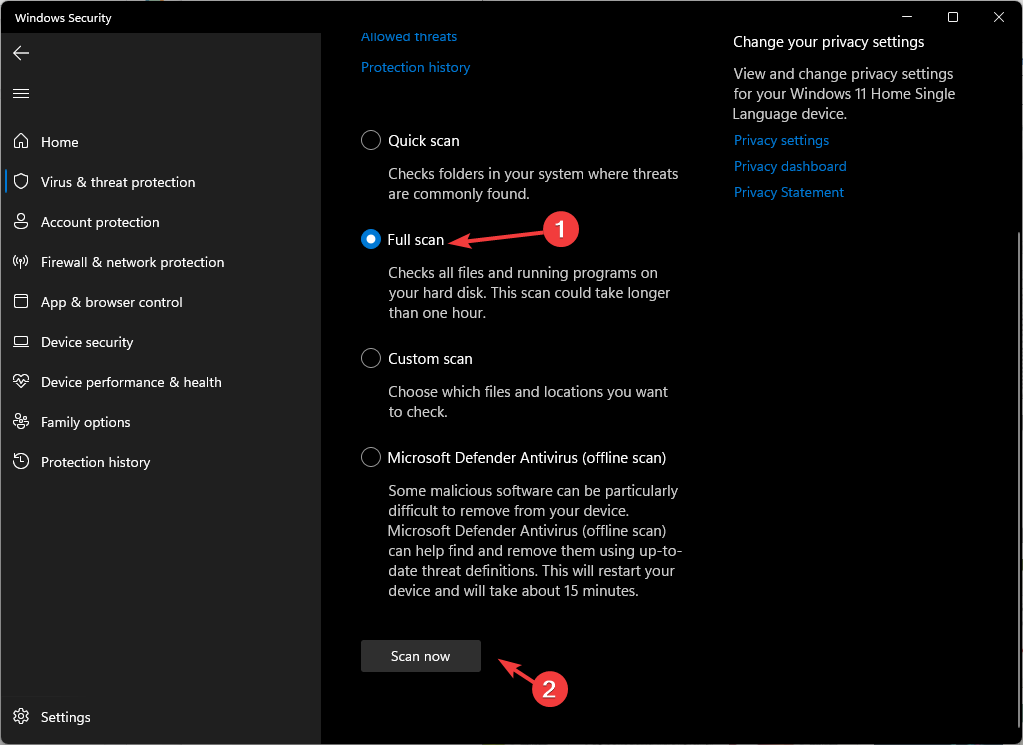
- Choose Full Scan and click Scan now. The scan will take some time, depending on the space occupied on your computer.
So, you can follow these methods to fix Event ID 161, volmgr on Windows 11 computer. If nothing has worked for you so far, it is advised to reset or reinstall Windows to fix it.
If you have any questions or concerns about the event ID, feel free to mention them in the comments below.
Question
Issue: How to fix Event ID 161 Volmgr error in Windows?
Hello. My Windows system keeps crashing because of an Event ID 161 Volmgr error. What is it and how can I fix it?
Solved Answer
The Event ID 161 Volmgr error in Windows can have serious consequences for users in terms of both system performance and data loss. This error occurs when the Volume Manager Driver file, which is in charge of managing drive data storage, fails.
When the Event ID 161 Volmgr error occurs, the system may crash or hang, potentially resulting in data loss and inconvenience. Furthermore, the error may prevent the user from creating a dump file, which is required for diagnosing system errors, complicating the identification and resolution of the underlying problem.
Users should first check their system’s hard drive for errors or malware infections, as these can cause problems with the Volume Manager Driver file. They may also need to update their drivers[1] or ensure that their system meets the hardware requirements for creating dump files, such as sufficient free disk space.
In more severe cases, the user may need to seek professional help, such as hiring a computer technician or contacting Microsoft Support for assistance. In this guide, you will find 6 steps that should help you fix Event ID 161 Volmgr error in Windows. You may also try a system repair tool like FortectMac Washing Machine X9 that can fix most system errors, BSODs,[2] corrupted files, and registry[3] issues. Otherwise, follow the step-by-step instructions below.
Method 1. Fix Corrupted System Files
Fix it now!
Fix it now!
To repair damaged system, you have to purchase the licensed version of Fortect Mac Washing Machine X9.
Use Command Prompt commands to repair system file corruption:
- Open Command Prompt as administrator
- Use the following command and press Enter:
sfc /scannow
- Reboot your system
- If SFC returned an error, then use the following command lines, pressing Enter after each:
DISM /Online /Cleanup-Image /CheckHealth
DISM /Online /Cleanup-Image /ScanHealth
DISM /Online /Cleanup-Image /RestoreHealth
Method 2. Disable Automatic Restart
Fix it now!
Fix it now!
To repair damaged system, you have to purchase the licensed version of Fortect Mac Washing Machine X9.
- Press the Windows key + R to open the Run window.
- Type sysdm.cpl in the Run window.
- Press Enter to open System Properties.
- Go to the Advanced tab.
- Under Startup and Recovery, click Settings.
- Under System failure, remove the checkmark next to the Automatically restart option.
- Click OK to confirm.
Method 3. Update Drivers
Fix it now!
Fix it now!
To repair damaged system, you have to purchase the licensed version of Fortect Mac Washing Machine X9.
Outdated drivers could be the cause of this issue. In this case, you can fix it automatically by using DriverFix, which will scan your PC for missing and out-of-date device drivers. Or you can update them manually:
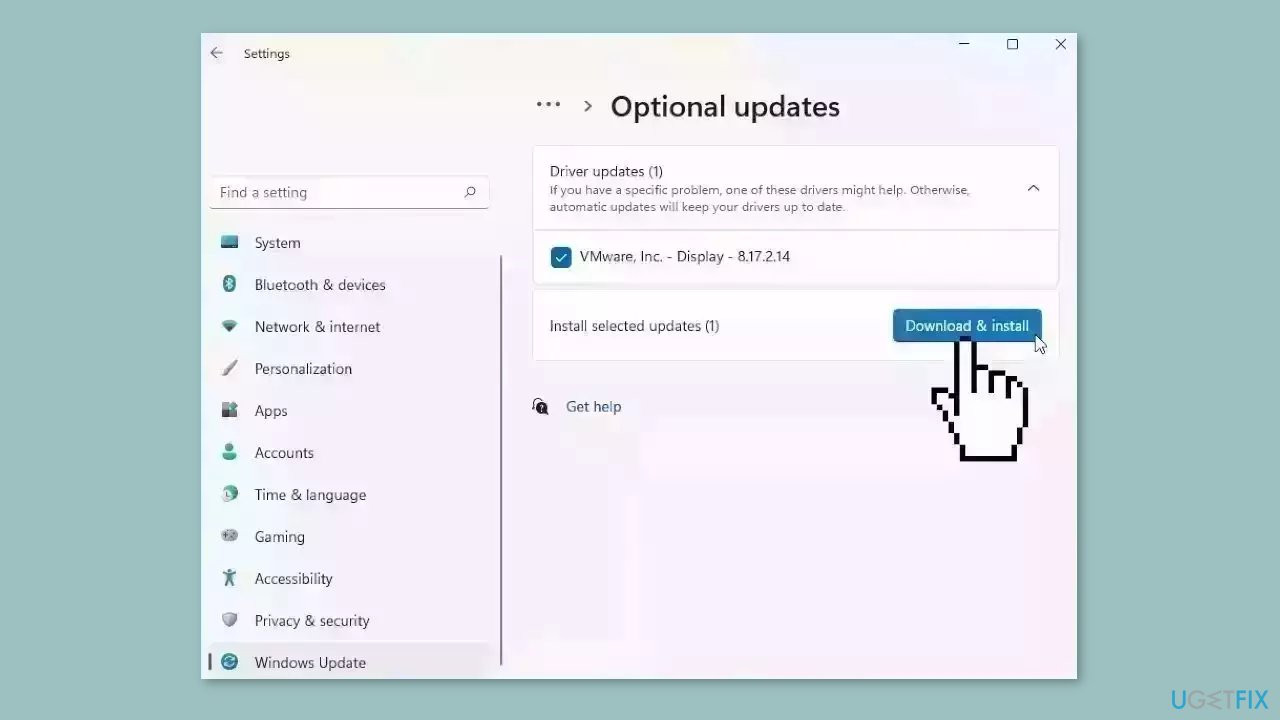
- Open Settings.
- Click on Update & Security.
- Click on Windows Update.
- Click the Check for updates button.
- Click the View optional updates option.
- Click the Driver updates tab.
- Select the driver you want to update.
- Click the Download and install button.
If the View optional updates link is not available after checking for updates, then Windows Update does not have any new drivers or any updates for other products at that particular time.
Method 4. Check Debug Settings
Fix it now!
Fix it now!
To repair damaged system, you have to purchase the licensed version of Fortect Mac Washing Machine X9.
- Open the Run console.
- Type sysdm.cpl and press Enter to open System Properties.
- Go to the Advanced tab.
- Under Startup and Recovery, click Settings.
- Under Write debugging information, select Complete memory dump.
- Click OK to confirm your choice.
- Restart your computer.
Method 5. Modify the Registry
Fix it now!
Fix it now!
To repair damaged system, you have to purchase the licensed version of Fortect Mac Washing Machine X9.
- Press the Windows key + R to open the Run console.
- Type regedit and hit Enter to open Registry Editor.
- Navigate to this path:
Computer\HKEY_LOCAL_MACHINE\System\CurrentControlSet\Control\CrashControl
- Right-click on the empty space on the right pane.
- Select New, then click DWORD (32-bit) Value.
- Right-click on the newly created value, click Rename, and name it DisplayParameters.
- Double-click on the DisplayParameters value.
- Change the Value data to 0.
- Click OK.
- Restart your PC to let the changes take effect.
Method 6. Perform a Malware Scan
Fix it now!
Fix it now!
To repair damaged system, you have to purchase the licensed version of Fortect Mac Washing Machine X9.
It is possible that a malware infection may be the cause of the Event ID 161 Volmgr error in Windows. It is important to run a comprehensive security scan to rule out this possibility and ensure that the computer is not infected. This can help to prevent further issues with the Windows operating system and ensure that it is functioning properly.
If you have access to a security scanner, or if your organization pays for one, you can use it to scan your entire system to check for a virus infection. Otherwise, you can use Windows Defender to scan your system:
- Click on the Windows Start menu or press the Windows key on your keyboard.
- Type Microsoft Defender in the search bar and click on Microsoft Defender Antivirus to open the application.
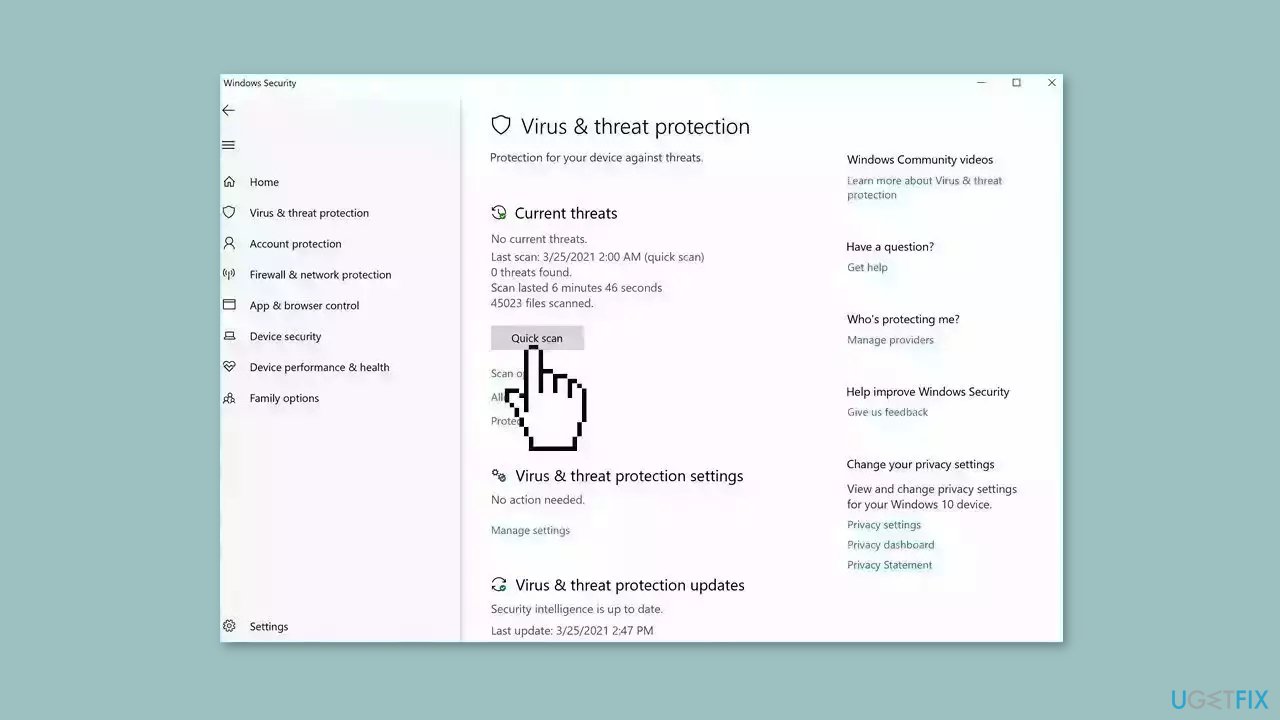
- Click on the Virus & threat protection option in the left-hand menu.
- Click on the Quick scan or Full scan option, depending on your preference.
- If you choose Quick scan, Microsoft Defender Antivirus will scan the most vulnerable and commonly infected areas of your computer.
- If you choose Full scan, Microsoft Defender Antivirus will scan your entire computer, including all files, folders, and programs.
- Click on the Scan now button to start the selected scan type and wait for the scan to complete.
- The time it takes will depend on the size of your hard drive and the number of files being scanned.
- Once the scan is complete, you will be informed of any detected threats, and you can choose to quarantine or remove them.
- If no threats are found, Microsoft Defender Antivirus will inform you that your device is secure.
Repair your Errors automatically
ugetfix.com team is trying to do its best to help users find the best solutions for eliminating their errors. If you don’t want to struggle with manual repair techniques, please use the automatic software. All recommended products have been tested and approved by our professionals. Tools that you can use to fix your error are listed bellow:
do it now!
Download Fix
Happiness
Guarantee
do it now!
Download Fix
Happiness
Guarantee
Compatible with Microsoft Windows
Compatible with OS X
Still having problems?
If you failed to fix your error using FortectMac Washing Machine X9, reach our support team for help. Please, let us know all details that you think we should know about your problem.
Fortect — a patented specialized Windows repair program. It will diagnose your damaged PC. It will scan all System Files, DLLs and Registry Keys that have been damaged by security threats.Mac Washing Machine X9 — a patented specialized Mac OS X repair program. It will diagnose your damaged computer. It will scan all System Files and Registry Keys that have been damaged by security threats.
This patented repair process uses a database of 25 million components that can replace any damaged or missing file on user’s computer.
To repair damaged system, you have to purchase the licensed version of Fortect malware removal tool.To repair damaged system, you have to purchase the licensed version of Mac Washing Machine X9 malware removal tool.
A VPN is crucial when it comes to user privacy. Online trackers such as cookies can not only be used by social media platforms and other websites but also your Internet Service Provider and the government. Even if you apply the most secure settings via your web browser, you can still be tracked via apps that are connected to the internet. Besides, privacy-focused browsers like Tor is are not an optimal choice due to diminished connection speeds. The best solution for your ultimate privacy is Private Internet Access – be anonymous and secure online.
Data recovery software is one of the options that could help you recover your files. Once you delete a file, it does not vanish into thin air – it remains on your system as long as no new data is written on top of it. Data Recovery Pro is recovery software that searchers for working copies of deleted files within your hard drive. By using the tool, you can prevent loss of valuable documents, school work, personal pictures, and other crucial files.
UPD: ВСем спасибо. Помогла замена процессора
Всем привет. Решил себе собрать новый компьютер:
AMD Ryzen 3500
MSI B550 Pro VDH Wifi
Samsung EVO 970
NVIDIA GTX1050 (Осталась со старого компьютера)
Samsung [M378A1K43DB2-CTD] 8 ГБ
Блок питания Chieftec Element 600W
Была версия Windows 10 2015 года, поэтому решил поставить ее и после установки обновиться до актуальной версии. После обновления до актуальной версии стали появляться BSOD c с различными ошибками: apc index mismatch, kernel security check итд. Менял драйвера, менял ОЗУ, ставил изначально WIndows 10 20H2, но ничего не помогает. В безопасном режиме BSod не появляется. Куда копать? Дамп показывает ошибку ntoskrnl.exe.
Bios обновил до последней версии.
Данные с «Просмотр событий»
Уровень Дата и время Источник Код события Категория задачи
Предупреждение 17.01.2021 18:39:28 Microsoft-Windows-DistributedCOM 10016 Отсутствует «Параметры разрешений для конкретного приложения не дают разрешения Локально Активация для приложения COM-сервера с CLSID
{6B3B8D23-FA8D-40B9-8DBD-B950333E2C52}
и APPID
{4839DDB7-58C2-48F5-8283-E1D1807D0D7D}
пользователю NT AUTHORITY\LOCAL SERVICE с ИД безопасности (S-1-5-19) и адресом LocalHost (с использованием LRPC), выполняемого в контейнере приложения Недоступно с ИД безопасности (Недоступно). Это разрешение безопасности можно изменить с помощью средства администрирования служб компонентов.»
Критический 17.01.2021 18:39:24 Microsoft-Windows-Kernel-Power 41 (63) Система перезагрузилась, завершив работу с ошибками. Возможные причины ошибки: система перестала отвечать на запросы, произошел критический сбой или неожиданно отключилось питание.
Ошибка 17.01.2021 18:39:23 volmgr 161 Отсутствует Не удалось создать файл дампа из-за ошибки при создании дампа.
Ошибка 17.01.2021 18:39:26 EventLog 6008 Отсутствует Предыдущее завершение работы системы в 18:37:41 на 17.01.2021 было неожиданным.
Сбои компьютера Windows, идентификатор события 161 (09.22.23)
Когда вы сосредоточились на работе или слушаете музыку, ваш компьютер с Windows 10 внезапно вышел из строя. Вы не знаете, что делать, потому что вы даже не знаете, что вызывает сбой. Вы видите только код события на экране без подсказки о том, как устранить проблему. Это действительно неприятная ситуация.
Почему ваше устройство Windows дает сбой? Что ж, может быть много причин, и исправления зависят от них.
В этой статье мы обсудим одну конкретную ошибку Windows 10, которая вызвала головную боль у многих пользователей: событие с идентификатором 161.
Что такое ошибка? Есть ли событие с кодом 161 в Windows 10?
Несколько месяцев назад у некоторых пользователей Windows 10 возникла странная ошибка на своих компьютерах. Каждые несколько минут их компьютер автоматически перезагружается без ошибки BSOD. Затем они видят на своих экранах событие с идентификатором 161.
Совет для профессионалов: просканируйте свой компьютер на наличие проблем с производительностью, ненужных файлов, вредоносных приложений и угроз безопасности
, которые могут вызвать системные проблемы или замедлить работу. производительность.
Бесплатное сканирование для ПК, ошибки 3.145.873загрузкиСовместимость с: Windows 10, Windows 7, Windows 8
Специальное предложение. Об Outbyte, инструкции по удалению, лицензионное соглашение, политика конфиденциальности.
Согласно отчетам, img этой ошибки является служебной программой Microsoft Windows Backup. Что вызывает событие с кодом 161 в Windows 10, так это удаленный системный каталог. Если вы не знаете, системный каталог состоит из форм, составляющих базу данных вашего компьютера.
Как исправить событие с идентификатором 161 в Windows 10
К счастью, относительно легко исправить событие с идентификатором 161 на Windows 10. Ниже мы изложили несколько решений, которые сработали для многих затронутых пользователей.
Решение № 1. Создайте новый глобальный каталог или резервную копию
Чтобы разрешить событие с идентификатором 161 на вашем устройстве Windows 10, вы можете создайте новый глобальный каталог или резервную копию с помощью мастера восстановления каталога или с помощью команды удаления каталога wbadmin. Вы можете создать новый глобальный каталог, просто создав новую резервную копию.
Для создания резервной копии на вашем устройстве у вас должны быть права администратора или должны быть делегированы соответствующие полномочия. Чтобы получить подробное руководство о том, как создать новую резервную копию с помощью командной строки, выполните следующие действия:
Поздравляем, вы создали резервную копию. На этом этапе вы должны проверить, смогли ли вы успешно создать резервную копию. Вот как:
Наконец, вам необходимо проверить, не поврежден ли локальный каталог, сохраненный в месте назначения резервного копирования. Выполните следующие действия:
Решение №2: замените блок питания
Иногда идентификатор события 161 связан с вашим источником питания. В этом случае вам, возможно, придется заменить блок питания. После этого проверьте, сохраняется ли ошибка.
Решение № 3. Отключите все внешние периферийные устройства.
Если вы подключили внешнее периферийное устройство к своему компьютеру, это может вызвать появление события с кодом 161. Возможно, возникла проблема связи между вашей системой и вашим устройством.
Чтобы исправить это, отключите или отключите все внешние периферийные устройства, включая SSD, Bluetooth и гарнитуру. Затем перезагрузите компьютер и проверьте, решает ли он проблему с идентификатором события 161.
Если ошибка исчезла, значит, проблема успешно решена. В противном случае подключайте внешние периферийные устройства по одному и перезагружайте компьютер каждый раз, пока не обнаружите неисправное устройство.
Решение №4: выключите утилиту управления питанием состояния канала
Если есть проблема со связью Включите служебную программу управления питанием, тогда, вероятно, вы столкнетесь с ошибками, такими как идентификатор события 161. Чтобы исправить это, вы можете временно отключить ее. Вот как:
Решение № 5. Обновите любой устаревший драйвер устройства.
Устаревший или отсутствующий драйвер устройства может привести к сбою компьютера с Windows 10. Поэтому вы всегда должны обновлять драйверы устройств.
Вы можете обновить драйверы устройства двумя способами: вручную или автоматически. Если вы хотите обновить драйвер устройства вручную, перейдите на веб-сайт производителя устройства и найдите самую последнюю версию драйвера, совместимую с вашей системой Windows 10. Как только вы найдете его, загрузите и установите его.
Теперь, если вы предпочитаете делать это автоматически, все, что вам нужно, — это надежный сторонний инструмент для обновления драйверов устройств. Всего за несколько щелчков мышью этот инструмент обновит все устаревшие драйверы устройств, не беспокоясь о проблемах совместимости.
Решение № 6: Используйте утилиту проверки системных файлов
Утилита проверки системных файлов является встроенной инструмент, который определяет и восстанавливает любой поврежденный системный файл на вашем компьютере с Windows 10. Итак, если поврежденный системный файл вызывает сбой Windows или отображается ошибка Event ID 161, выполните сканирование SFC, чтобы исправить это. Вот как:
Решение № 7. Выполните поиск вирусов и вредоносных программ.
Если ваше устройство Windows 10 дает сбой из-за вируса или вредоносный объект, то вам необходимо удалить его, запустив полное сканирование на наличие вредоносных программ. К сожалению, Защитника Windows может быть недостаточно, поэтому используйте его вместе с надежным антивирусным решением. Если вирус был обнаружен, следуйте рекомендациям по избавлению от него. После этого перезагрузите компьютер.
Резюме
Если вы относитесь к числу тех, у кого Windows 10 вылетала из-за события с кодом 161, попробуйте решения по устранению неполадок, которые мы рекомендовали выше. Мы уверены, что одно из них сработает.
Какие еще исправления вы можете порекомендовать для устранения события с кодом 161 на устройствах с Windows 10? Дайте нам знать ниже!
YouTube видео: Сбои компьютера Windows, идентификатор события 161
09, 2023

