| Номер ошибки: | Ошибка 1168 | |
| Название ошибки: | Windows Defender Error Code 1168 | |
| Описание ошибки: | Ошибка 1168: Возникла ошибка в приложении Windows Defender. Приложение будет закрыто. Приносим извинения за неудобства. | |
| Разработчик: | Microsoft Corporation | |
| Программное обеспечение: | Windows Defender | |
| Относится к: | Windows XP, Vista, 7, 8, 10, 11 |
Фон «Windows Defender Error Code 1168»
Эксперты обычно называют «Windows Defender Error Code 1168» «ошибкой времени выполнения». Программисты, такие как Microsoft Corporation, стремятся создавать программное обеспечение, свободное от этих сбоев, пока оно не будет публично выпущено. Как и во всем в жизни, иногда такие проблемы, как ошибка 1168, упускаются из виду.
После первоначального выпуска пользователи Windows Defender могут столкнуться с сообщением «Windows Defender Error Code 1168» во время запуска программы. Когда это происходит, конечные пользователи могут сообщить Microsoft Corporation о наличии ошибок «Windows Defender Error Code 1168». Microsoft Corporation может устранить обнаруженные проблемы, а затем загрузить измененный файл исходного кода, позволяя пользователям обновлять свою версию. Поэтому, когда вы сталкиваетесь с запросом на обновление Windows Defender, это обычно связано с тем, что это решение для исправления ошибки 1168 и других ошибок.
Что генерирует ошибку времени выполнения 1168?
Вполне вероятно, что при загрузке Windows Defender вы столкнетесь с «Windows Defender Error Code 1168». Проанализируем некоторые из наиболее распространенных причин ошибок ошибки 1168 во время выполнения:
Ошибка 1168 Crash — это распространенная ошибка 1168 во время выполнения ошибки, которая приводит к полному завершению работы программы. Обычно это происходит, когда Windows Defender не может обработать данные в удовлетворительной форме и поэтому не может получить ожидаемый результат.
Утечка памяти «Windows Defender Error Code 1168» — ошибка 1168 утечка памяти приводит к тому, что Windows Defender постоянно использует все больше и больше памяти, увяская систему. Возможные причины включают сбой Microsoft Corporation для девыделения памяти в программе или когда плохой код выполняет «бесконечный цикл».
Error 1168 Logic Error — Ошибка программной логики возникает, когда, несмотря на точный ввод от пользователя, производится неверный вывод. Это связано с ошибками в исходном коде Microsoft Corporation, обрабатывающих ввод неправильно.
Повреждение, отсутствие или удаление файлов Windows Defender Error Code 1168 может привести к ошибкам Windows Defender. Как правило, решить проблему можно заменой файла Microsoft Corporation. В некоторых случаях реестр Windows пытается загрузить файл Windows Defender Error Code 1168, который больше не существует; в таких ситуациях рекомендуется запустить сканирование реестра, чтобы исправить любые недопустимые ссылки на пути к файлам.
Распространенные проблемы Windows Defender Error Code 1168
Усложнения Windows Defender с Windows Defender Error Code 1168 состоят из:
- «Ошибка программного обеспечения Windows Defender Error Code 1168. «
- «Недопустимая программа Win32: Windows Defender Error Code 1168»
- «Windows Defender Error Code 1168 должен быть закрыт. «
- «Файл Windows Defender Error Code 1168 не найден.»
- «Windows Defender Error Code 1168 не может быть найден. «
- «Проблема при запуске приложения: Windows Defender Error Code 1168. «
- «Windows Defender Error Code 1168 не выполняется. «
- «Windows Defender Error Code 1168 выйти. «
- «Windows Defender Error Code 1168: путь приложения является ошибкой. «
Проблемы Windows Defender Error Code 1168 с участием Windows Defenders возникают во время установки, при запуске или завершении работы программного обеспечения, связанного с Windows Defender Error Code 1168, или во время процесса установки Windows. При появлении ошибки Windows Defender Error Code 1168 запишите вхождения для устранения неполадок Windows Defender и чтобы HelpMicrosoft Corporation найти причину.
Причины проблем Windows Defender Error Code 1168
Проблемы Windows Defender Error Code 1168 могут быть отнесены к поврежденным или отсутствующим файлам, содержащим ошибки записям реестра, связанным с Windows Defender Error Code 1168, или к вирусам / вредоносному ПО.
В первую очередь, проблемы Windows Defender Error Code 1168 создаются:
- Недопустимая или поврежденная запись Windows Defender Error Code 1168.
- Вирус или вредоносное ПО, которые повредили файл Windows Defender Error Code 1168 или связанные с Windows Defender программные файлы.
- Windows Defender Error Code 1168 злонамеренно удален (или ошибочно) другим изгоем или действительной программой.
- Другая программа, конфликтующая с Windows Defender Error Code 1168 или другой общей ссылкой Windows Defender.
- Windows Defender (Windows Defender Error Code 1168) поврежден во время загрузки или установки.
Продукт Solvusoft
Загрузка
WinThruster 2023 — Проверьте свой компьютер на наличие ошибок.
Совместима с Windows 2000, XP, Vista, 7, 8, 10 и 11
Установить необязательные продукты — WinThruster (Solvusoft) | Лицензия | Политика защиты личных сведений | Условия | Удаление
Have you ever tried to use your VPN app only to be slapped by an error message saying error 1168 element not found? It is not only annoying but frustrating.
As an avid VPN user, it is normal to encounter one of these errors because VPNs are not as fail-proof as one might think.
But you are in the right place if you have experienced this error, so read till the end to know how to clear VPN error 1168 element not found for good.
What is the element not found error?
The element not found error is usually a network connection problem that appears on Windows versions 7 and 8.
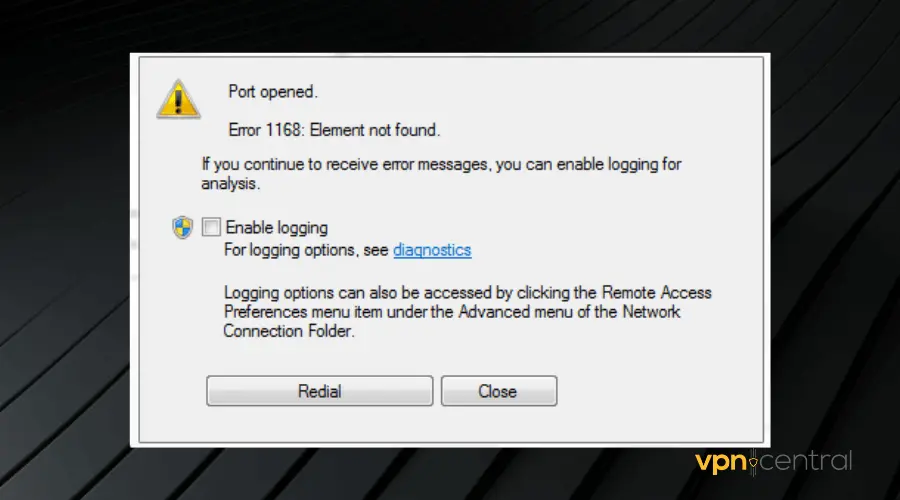
Oftentimes, this error message pops up when launching your VPN app.
However, it can also happen with apps like File Explorer, Microsoft Edge, Command Prompt, or even the Settings app in Windows.
It usually appears either as a result of a bad Windows update, corrupt drivers, or interference from third-party applications.
Below are some fixes you can try:
- Install pending Windows updates
- Reload Explorer.exe
- Uninstall any recently installed apps
- Run the DSM tool
- Reset your PC
- Use a modern VPN
1. Install pending updates
This error may occur if one of your computer’s software components is outdated.
Therefore, ensure that you update your software to the latest version. Follow the steps below to achieve this:
- Open Windows settings.
- Click Update and Security.
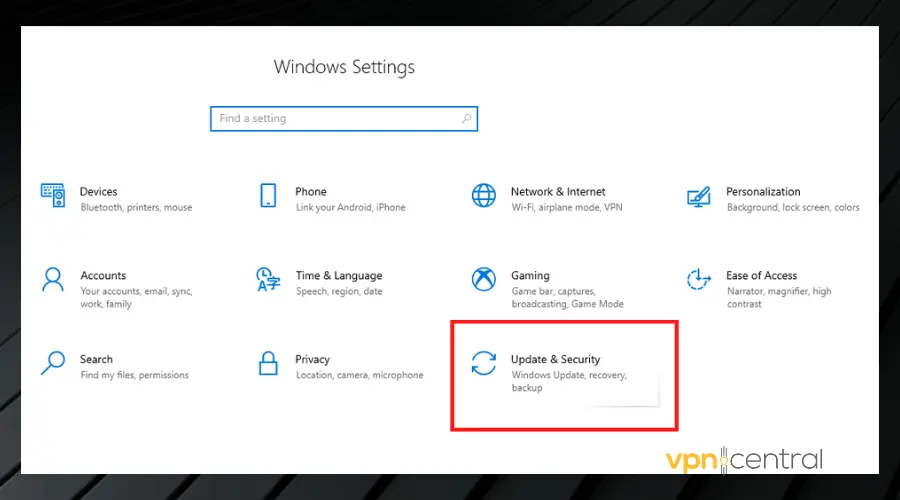
- Click Check for updates.
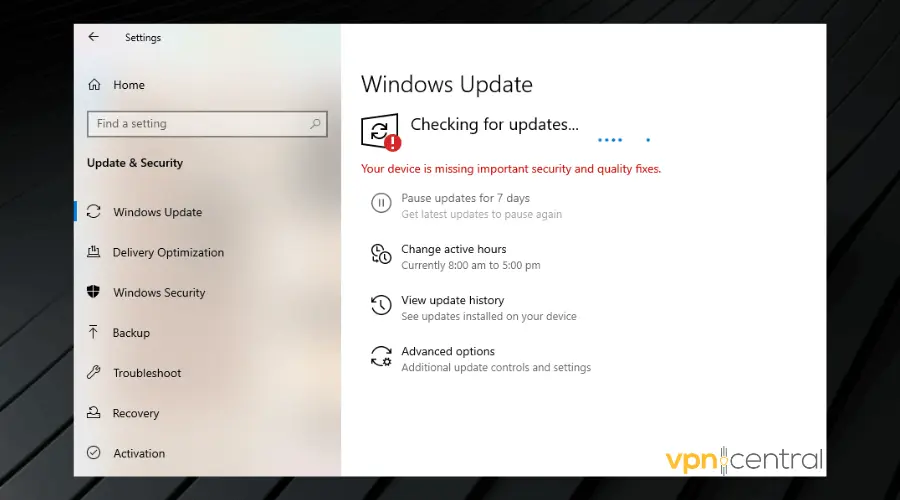
Your PC will search the internet for any relevant updates. Click the Update button to download and install any available updates.
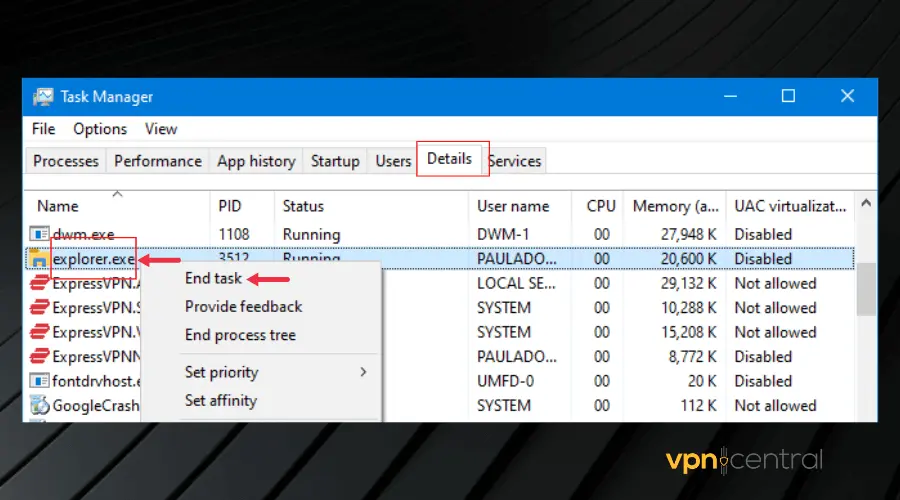
2. Reload Explorer.exe
If you get the element not found error whenever you start up your VPN, you may need to reload your File Explorer. Here is how to do that:
- Press the Ctrl + Shift + Esc keys on your keyboard to launch the Task Manager.
- Click on the Details tab.
- Right-click Explorer.exe and select End Task. This will close all Windows Explorer processes so you can reload it.
- Click on File and select Create new task.
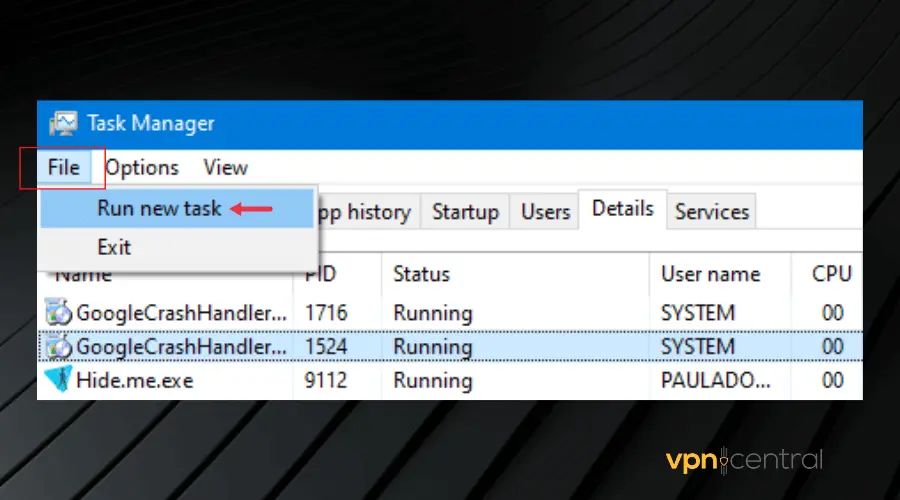
- Type explorer.exe into the text box.
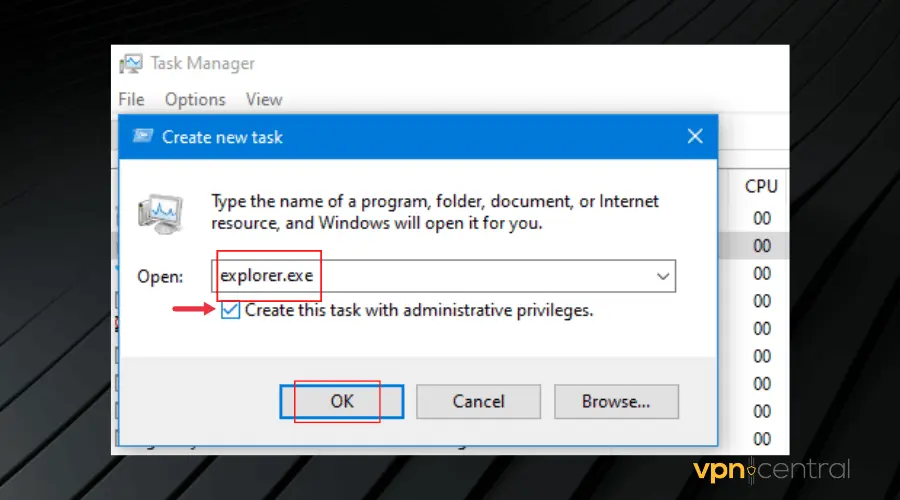
- Tick the Create this task with administrative privileges box and click OK.
Doing this refreshes your computer so that the Windows Explorer process can start afresh.
3. Uninstall any recently installed apps
If you started getting the error message after installing an app, then it’s only logical to uninstall it and check if it fixes the issue.
This is because the new app may have installed a driver that doesn’t support the VPN application. This has worked in many cases, so you should try it if you have any recently installed apps.
To uninstall apps on your computer, follow these steps:
- Press the Windows + R keys on your keyboard.
- Type Control Panel and press Enter to launch the Control Panel.

- Click on Programs.
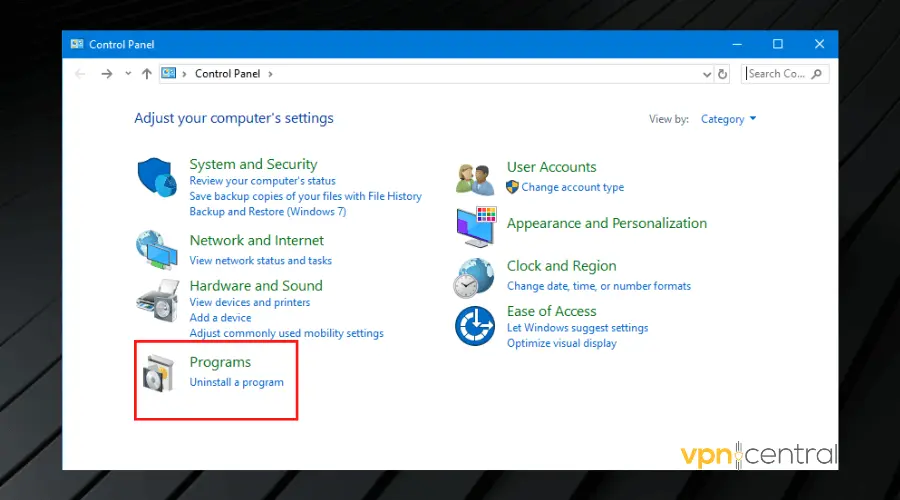
- Click on Uninstall a program.
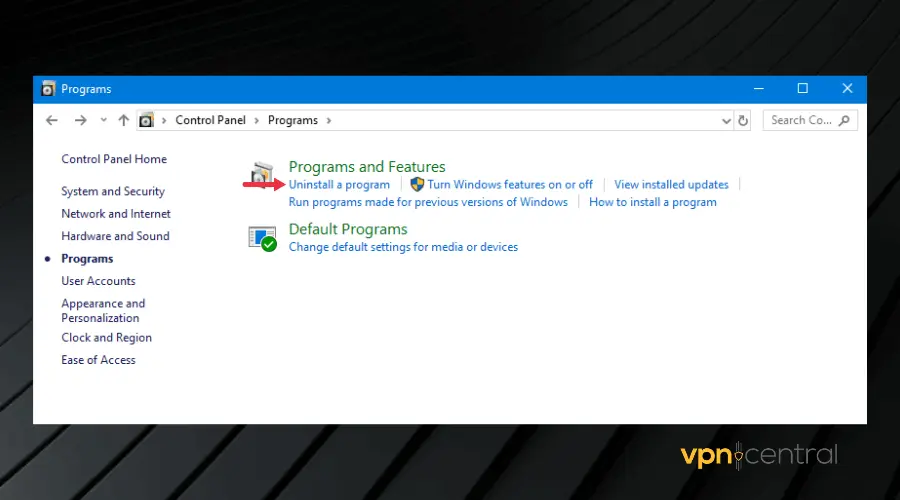
- Search for the recently installed app, right-click on it, and click Uninstall.
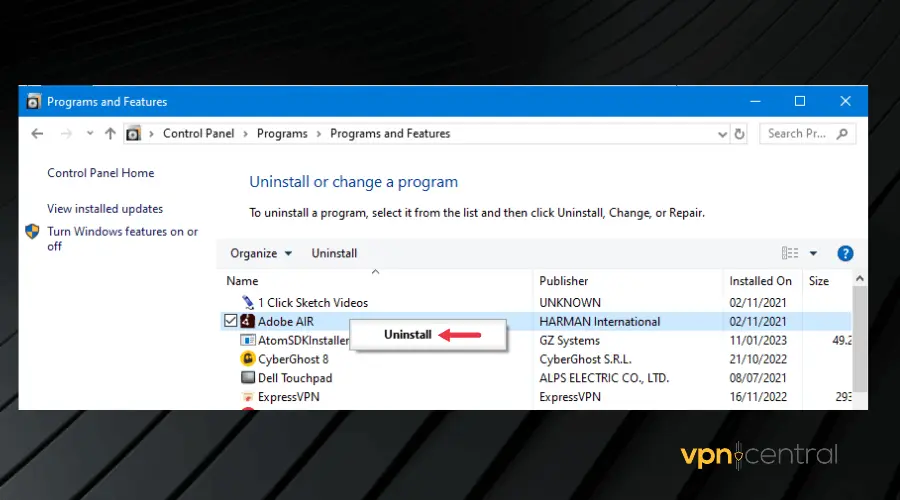
Now check to see if your VPN works properly.
Alternatively, some windows updates can cause this error to happen. Therefore, you may need to uninstall recent updates. The process is similar to the one above. However, instead of clicking on Uninstall a program,
- Click on View installed updates.
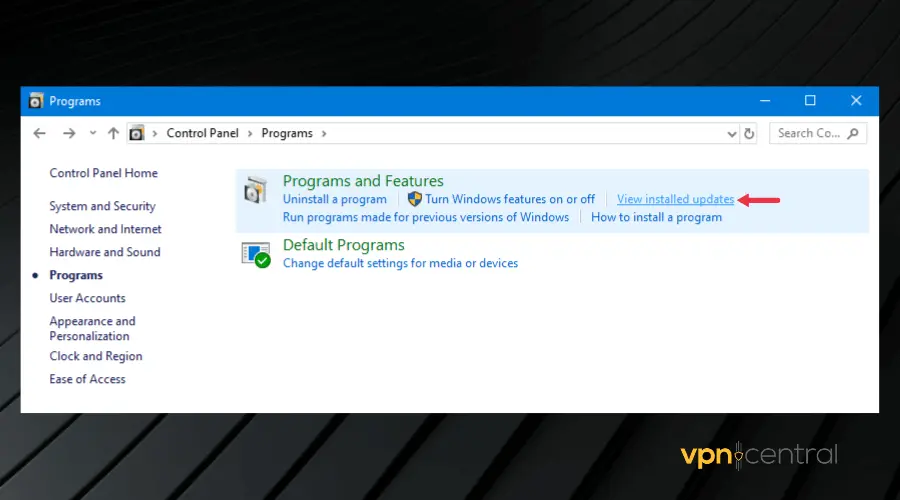
- Then right-click on the affected updates and click Uninstall.
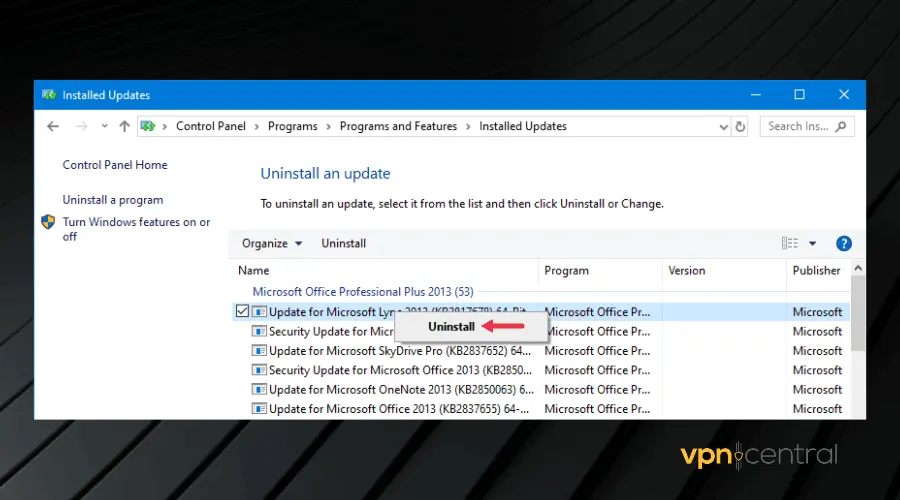
Check back to see if the error message is now clear.
4. Run the DISM tool
Running the Deployment Image Servicing and Management tool is another fix for the element not found error.
The purpose of the tool is to scan your PC for problems that can lead to errors and repair them for you.
To run this tool:
- Search for Command Prompt from your Start Menu.
- Right-click on its icon and select Run as administrator. After this, a black rectangular window will pop up, asking for a command.

- Type in the following command: DISM.exe /Online /Cleanup-image /Scanhealth and press the Enter key.
- After the scan is complete, type this second command: DISM.exe /Online /Cleanup-image /Restorehealth and press Enter to run it.
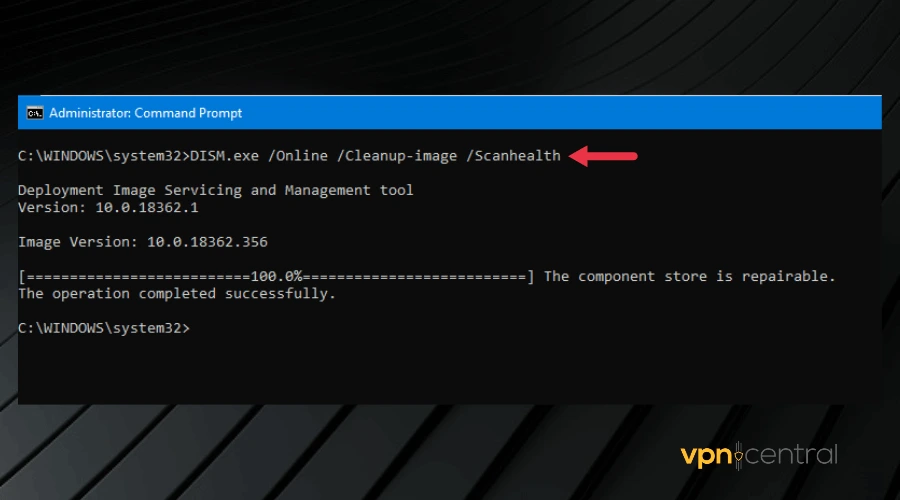
This fix requires a little bit of patience if there are serious or multiple issues with your configuration.
The good news is that it can get rid of a lot of errors and there’s not a lot of work on your end, you just have to make sure you enter the correct commands.
5. Reset Your PC
Resetting your PC should be the last fix to try if you have tried fixes 1- 4 and none worked. Although intense, performing a full reset on your PC is definitely going to clear this error from your computer.
Follow these steps to reset your PC:
- Open Computer Settings and click Update and Security.
- Click Recovery.
- Then click on Get Started below the Reset PC menu.
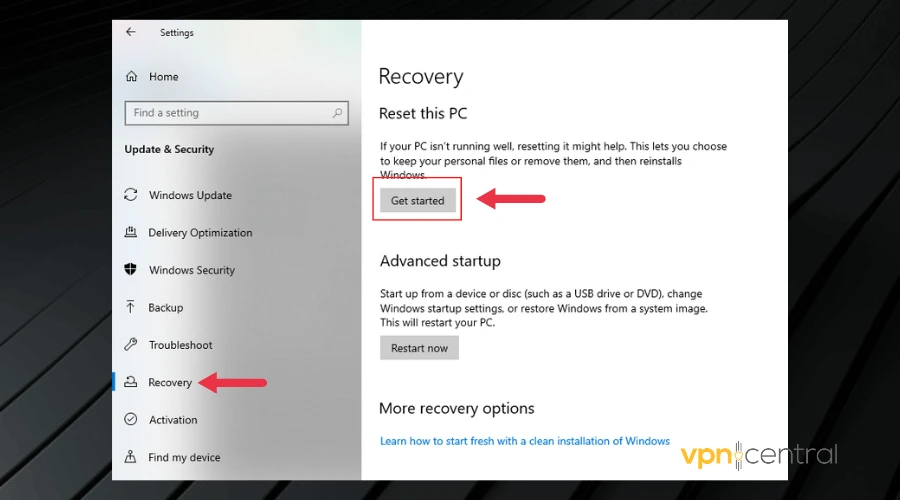
- Select an option from the menu that appears and follow the instructions to reset your PC.
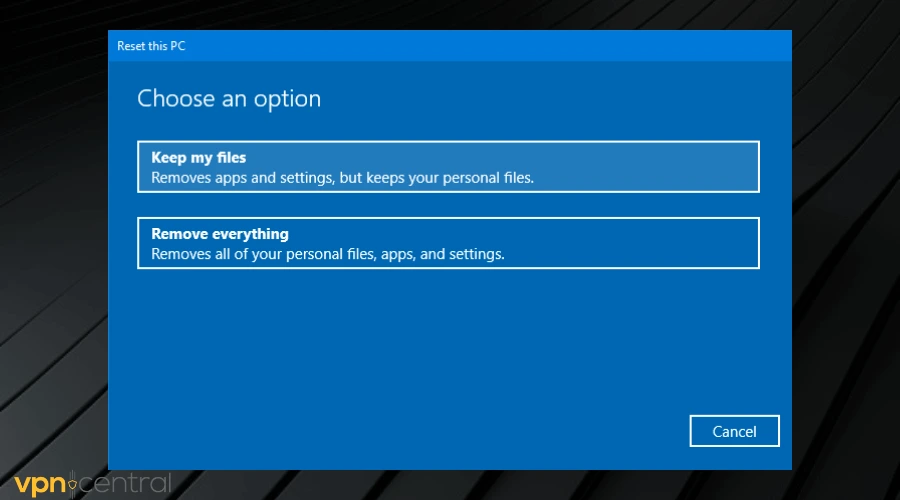
Resetting your PC returns the Windows OS to its original condition – as it was when you first installed it without all the installed programs so it is important to back up your personal files.
6. Use a modern VPN
This element not found error is most pronounced on VPNs with old tunneling protocols, especially L2TP and PPTP.
Therefore, switching to a provider with modern protocols such as OpenVPN and Wireguard is a sure way to fix the issue permanently.
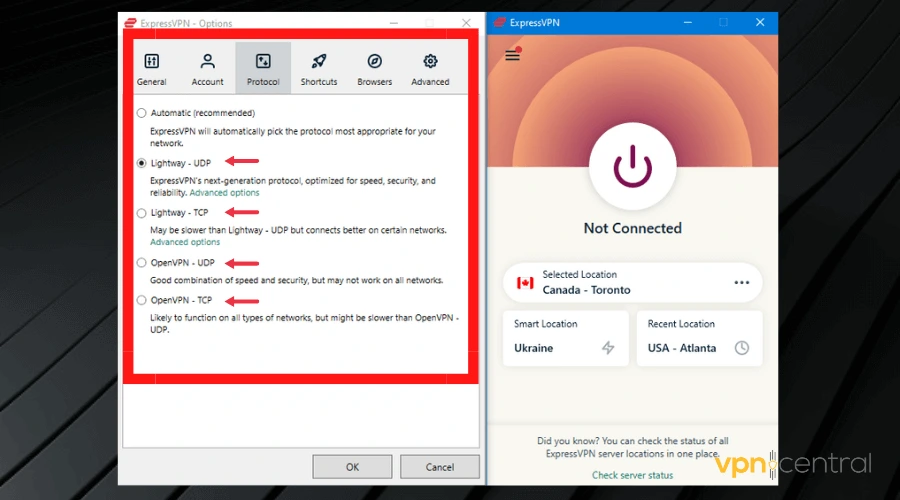
If you want an error-free experience and very fast connections, consider ExpressVPN.
The tool is frequently updated to avoid errors. On top of that, as you can see in the screenshot, it gives you the possibility to pick from multiple VPN protocols.
We must also mention that the VPN has a large network of 3000+ servers located in 94 countries. This is great for anyone who uses VPNs for a better connection or to bypass geo-blocking.

ExpressVPN
Use this up-to-date VPN to prevent any errors and enjoy all the benefits of private browsing!
Conclusion
We tested all the fixes in this article. Therefore, we hope that one of them works for you and helps you get rid of the VPN error 1168 element not found on your PC.
by Teodor Nechita
Eager to help those in need, Teodor writes articles daily on subjects regarding Windows, Xbox, and all things tech-related. When not working, you may usually find him either… read more
Updated on December 14, 2021
XINSTALL BY CLICKING THE DOWNLOAD FILE
This software will keep your drivers up and running, thus keeping you safe from common computer errors and hardware failure. Check all your drivers now in 3 easy steps:
- Download DriverFix (verified download file).
- Click Start Scan to find all problematic drivers.
- Click Update Drivers to get new versions and avoid system malfunctionings.
- DriverFix has been downloaded by 0 readers this month.
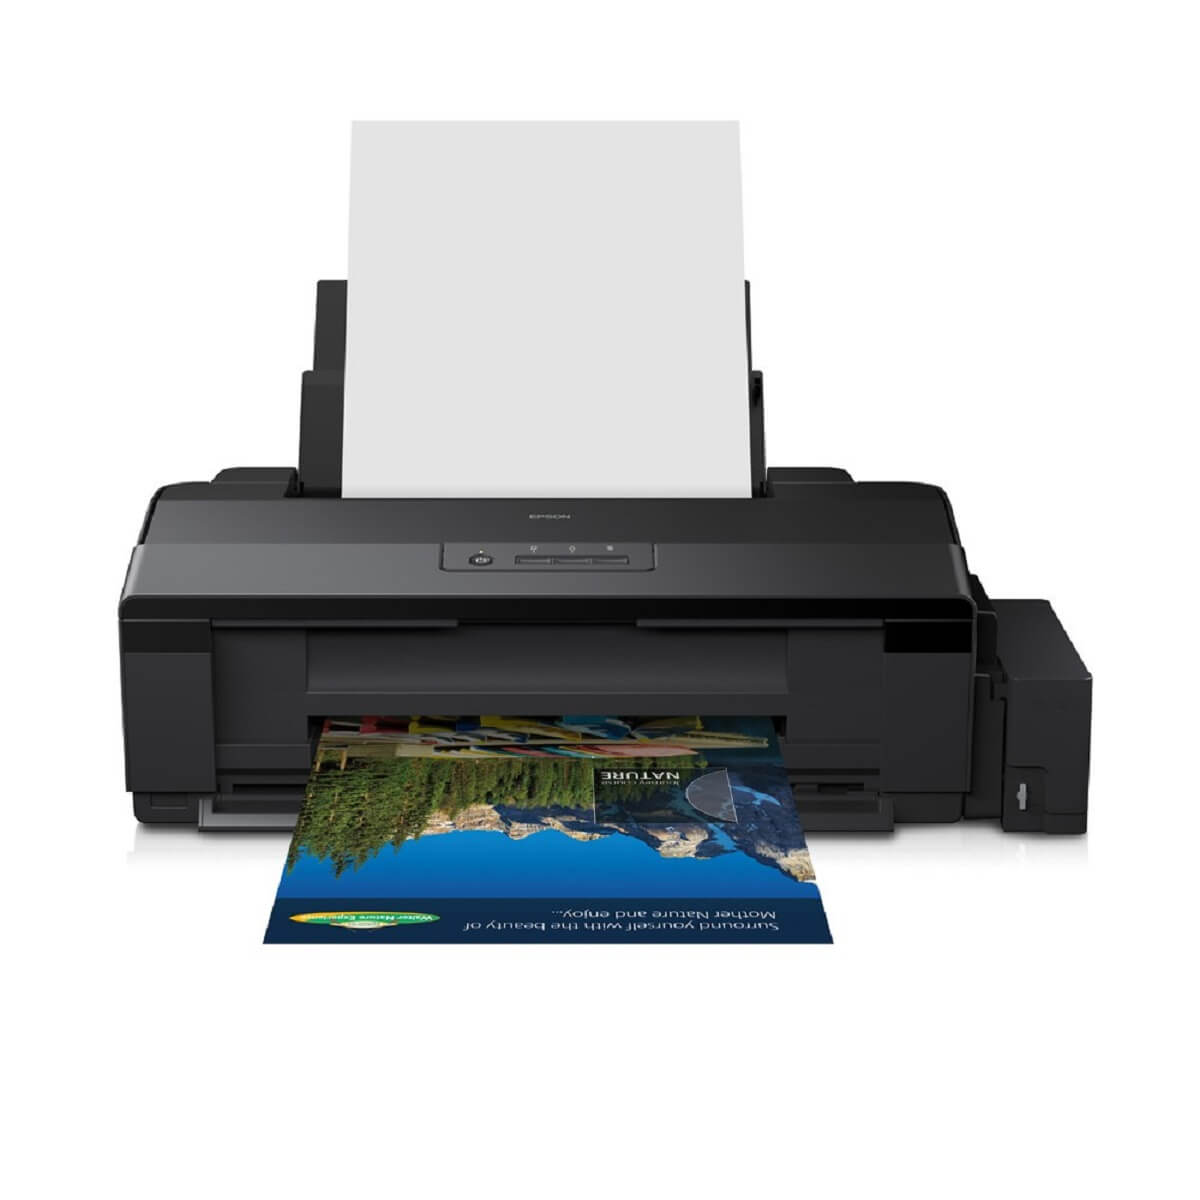
Several users have been reporting on the official Microsoft forums that they are having issues with the XPS printer:
I was unable to print from software using the XPS writer. I attempted to reinstall the printer but the installation fails reporting “printer driver not installed. Element not found”
Apparently, they are getting an error 1168: Element not found can have a wide variety of causes.
This article will guide you step-by-step on how to fix this error with the XPS printer.
How do you fix a generic error 1168?
1. Update your drivers
- Click on the Start button, then go to Settings
- Select Update & Security
- Click on Check for updates
- Allow Windows Update to download and install the updated driver
Follow these steps to install the latest printer drivers using Windows Update.
Alternatively, you can use a professional third-party tool that performs this process automatically and aims to keep your printer drivers updated and healthy.
More so, by choosing this automated method of managing drivers you also stay secure from potential damages caused by devices incompatibility.
Thus if you need reliable support to install or update any driver, the following software will accomplish this mission with no exception.
⇒ Get DriverFix
2. Try reinstalling the Windows XPS feature
- Press Windows
- Click on Settings (the cogwheel-shaped button)
- Select Apps
- Go to Apps & features
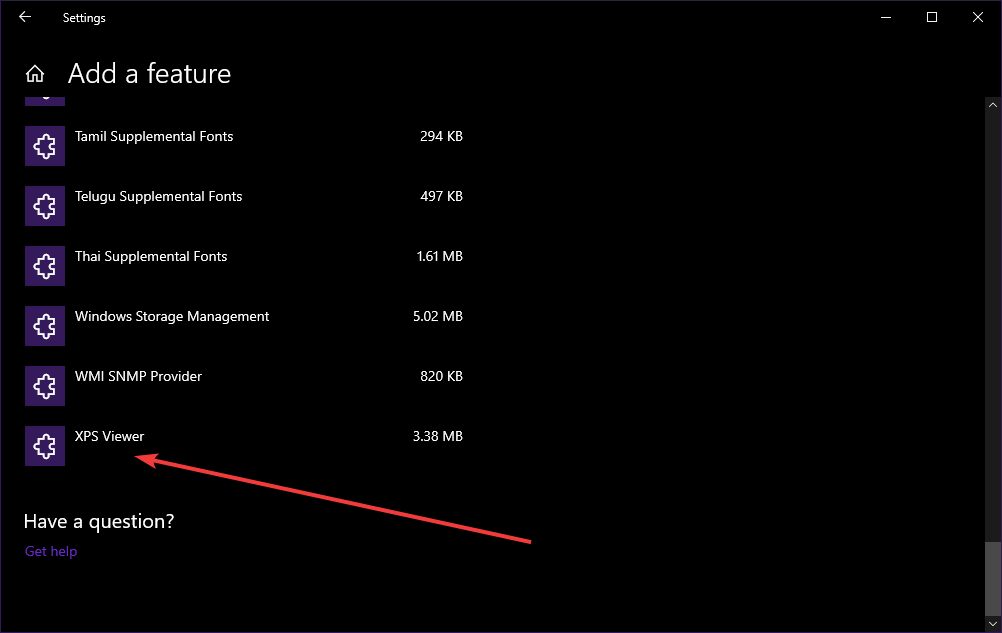
- Click Optional features
- Look for XPS feature if it is present
- If it is, right-click it and select uninstall
- Restart your PC
- After the restart or if your PC didn’t have the feature, go to the Manage optional features screen, and select Add a new feature
- When on the Add a new feature screen, select the XPS Viewer
- Restart your PC
3. Manually search for the location of your XPS Writer
Depending on which version of Windows 10 you have installed, the location of the XPS Writer may vary.
As such, if the solution listed above didn’t work, try this:
- Press Windows + R
- Type in control.exe
- Click Programs
- Select Programs and Features
- Click Turn Windows features on or off
- See if XPS Services and XPS Viewer are listed
- If the services are marked in their checkbox, unmark them and restart the PC
- If the services are unmarked in their checkbox, mark them and restart the PC
- Press Windows + R
- Type in control.exe
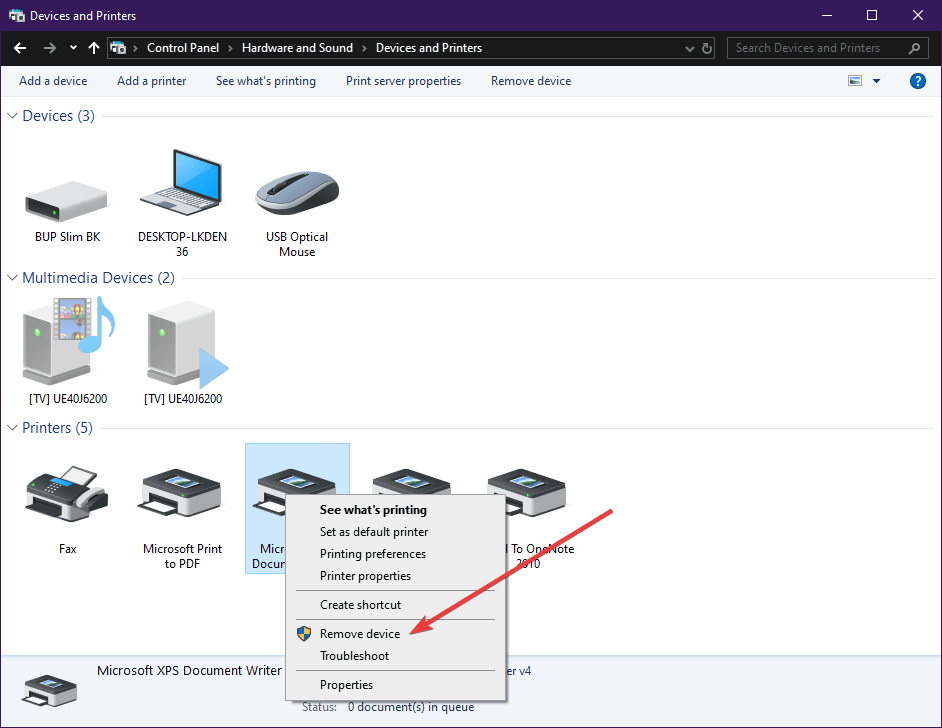
- Go to Hardware and Sound
- Click Devices and Printers
- See if Microsoft XPS Document Writer is installed as a printer.
- If it is, right-click it and choose Remove device
- Restart your PC
- Go back to Devices and Printers and select Add a printer
- Select The printer that I want isn’t listed
- Click Add a local printer or network printer with manual setting
- In the Choose a printer port screen, select Use an existing port and PORTPROMPT: (Local Port)
- In the Install a printer driver screen, select Microsoft on the left pane and Microsoft XPS Document Writer on the right
- When asked Which version of the driver do you want to use? select Use the driver that is currently installed (recommended)
If these particular steps didn’t help, you could also try to:
- Uninstall Recent Windows Updates
- Reset Your PC
![]()
Newsletter
by Teodor Nechita
Eager to help those in need, Teodor writes articles daily on subjects regarding Windows, Xbox, and all things tech-related. When not working, you may usually find him either… read more
Updated on December 14, 2021
XINSTALL BY CLICKING THE DOWNLOAD FILE
This software will keep your drivers up and running, thus keeping you safe from common computer errors and hardware failure. Check all your drivers now in 3 easy steps:
- Download DriverFix (verified download file).
- Click Start Scan to find all problematic drivers.
- Click Update Drivers to get new versions and avoid system malfunctionings.
- DriverFix has been downloaded by 0 readers this month.
Several users have been reporting on the official Microsoft forums that they are having issues with the XPS printer:
I was unable to print from software using the XPS writer. I attempted to reinstall the printer but the installation fails reporting “printer driver not installed. Element not found”
Apparently, they are getting an error 1168: Element not found can have a wide variety of causes.
This article will guide you step-by-step on how to fix this error with the XPS printer.
How do you fix a generic error 1168?
1. Update your drivers
- Click on the Start button, then go to Settings
- Select Update & Security
- Click on Check for updates
- Allow Windows Update to download and install the updated driver
Follow these steps to install the latest printer drivers using Windows Update.
Alternatively, you can use a professional third-party tool that performs this process automatically and aims to keep your printer drivers updated and healthy.
More so, by choosing this automated method of managing drivers you also stay secure from potential damages caused by devices incompatibility.
Thus if you need reliable support to install or update any driver, the following software will accomplish this mission with no exception.
⇒ Get DriverFix
2. Try reinstalling the Windows XPS feature
- Press Windows
- Click on Settings (the cogwheel-shaped button)
- Select Apps
- Go to Apps & features
- Click Optional features
- Look for XPS feature if it is present
- If it is, right-click it and select uninstall
- Restart your PC
- After the restart or if your PC didn’t have the feature, go to the Manage optional features screen, and select Add a new feature
- When on the Add a new feature screen, select the XPS Viewer
- Restart your PC
3. Manually search for the location of your XPS Writer
Depending on which version of Windows 10 you have installed, the location of the XPS Writer may vary.
As such, if the solution listed above didn’t work, try this:
- Press Windows + R
- Type in control.exe
- Click Programs
- Select Programs and Features
- Click Turn Windows features on or off
- See if XPS Services and XPS Viewer are listed
- If the services are marked in their checkbox, unmark them and restart the PC
- If the services are unmarked in their checkbox, mark them and restart the PC
- Press Windows + R
- Type in control.exe
- Go to Hardware and Sound
- Click Devices and Printers
- See if Microsoft XPS Document Writer is installed as a printer.
- If it is, right-click it and choose Remove device
- Restart your PC
- Go back to Devices and Printers and select Add a printer
- Select The printer that I want isn’t listed
- Click Add a local printer or network printer with manual setting
- In the Choose a printer port screen, select Use an existing port and PORTPROMPT: (Local Port)
- In the Install a printer driver screen, select Microsoft on the left pane and Microsoft XPS Document Writer on the right
- When asked Which version of the driver do you want to use? select Use the driver that is currently installed (recommended)
If these particular steps didn’t help, you could also try to:
- Uninstall Recent Windows Updates
- Reset Your PC
![]()
Newsletter
C++, windows-application, wlanapi, qt
Здравствуйте!
Я хочу подключатся к сетям WiFi Enterprise через свою программу. Настроил Radius Server, поключение к сети через Windows работает. Но при подключении через программу пишет: ошибка 1168 (ERROR_NOT_FOUND). Если быть точнее, то такую ошибку возращает функция: WlanSetProfileEapXmlUserData.
Разрабатываю эту программу на Qt 5.9.8 (Windows 10).
Пример кода:
QString xmlProfile = "<?xml version="1.0"?><WLANProfile xmlns="http://www.microsoft.com/networking/WLAN/profile/v1"><name>" + profileName + "</name><SSIDConfig><SSID>" "<name>" + apName + "</name></SSID><nonBroadcast>" + checkHiddenAP(hiddenAP) + "</nonBroadcast></SSIDConfig><connectionType>ESS</connectionType><connectionMode>" + checkAutoConnection(isAutoConnection) + "</connectionMode><MSM><security><authEncryption><authentication>" + checkAuthentication(authAlgorithm) + "</authentication><encryption>" + checkEncryption(encryption) + "</encryption><useOneX>true</useOneX></authEncryption><PMKCacheMode>enabled</PMKCacheMode><PMKCacheTTL>720</PMKCacheTTL><PMKCacheSize>128</PMKCacheSize>" "<preAuthMode>disabled</preAuthMode><OneX xmlns="http://www.microsoft.com/networking/OneX/v1"><authMode>user</authMode><EAPConfig><EapHostConfig " "xmlns="http://www.microsoft.com/provisioning/EapHostConfig"><EapMethod><Type xmlns="http://www.microsoft.com/provisioning/EapCommon">25</Type><VendorId " "xmlns="http://www.microsoft.com/provisioning/EapCommon">0</VendorId><VendorType xmlns="http://www.microsoft.com/provisioning/EapCommon">0</VendorType>" "<AuthorId xmlns="http://www.microsoft.com/provisioning/EapCommon">0</AuthorId></EapMethod>" "<Config xmlns="http://www.microsoft.com/provisioning/EapHostConfig"><Eap xmlns="http://www.microsoft.com/provisioning/BaseEapConnectionPropertiesV1"><Type>25</Type>" "<EapType xmlns="http://www.microsoft.com/provisioning/MsPeapConnectionPropertiesV1"><ServerValidation>" "<DisableUserPromptForServerValidation>false</DisableUserPromptForServerValidation><ServerNames></ServerNames></ServerValidation>" "<FastReconnect>true</FastReconnect><InnerEapOptional>false</InnerEapOptional><Eap xmlns="http://www.microsoft.com/provisioning/BaseEapConnectionPropertiesV1"><Type>26</Type>" "<EapType xmlns="http://www.microsoft.com/provisioning/MsChapV2ConnectionPropertiesV1"><UseWinLogonCredentials>false</UseWinLogonCredentials></EapType></Eap>" "<EnableQuarantineChecks>false</EnableQuarantineChecks><RequireCryptoBinding>false</RequireCryptoBinding><PeapExtensions><PerformServerValidation " "xmlns="http://www.microsoft.com/provisioning/MsPeapConnectionPropertiesV2">true</PerformServerValidation><AcceptServerName " "xmlns="http://www.microsoft.com/provisioning/MsPeapConnectionPropertiesV2">true</AcceptServerName><PeapExtensionsV2 " "xmlns="http://www.microsoft.com/provisioning/MsPeapConnectionPropertiesV2"><AllowPromptingWhenServerCANotFound " "xmlns="http://www.microsoft.com/provisioning/MsPeapConnectionPropertiesV3">true</AllowPromptingWhenServerCANotFound></PeapExtensionsV2></PeapExtensions></EapType></Eap></Config>" "</EapHostConfig></EAPConfig></OneX><EapHostUserCredentials xmlns="http://www.microsoft.com/provisioning/EapHostUserCredentials" " "xmlns:eapCommon="http://www.microsoft.com/provisioning/EapCommon" xmlns:baseEap="http://www.microsoft.com/provisioning/BaseEapMethodUserCredentials"><EapMethod>" "<eapCommon:Type>25</eapCommon:Type><eapCommon:AuthorId>0</eapCommon:AuthorId></EapMethod><Credentials xmlns:eapUser="http://www.microsoft.com/provisioning/EapUserPropertiesV1" " "xmlns:xsi="http://www.w3.org/2001/XMLSchema-instance" xmlns:baseEap="http://www.microsoft.com/provisioning/BaseEapUserPropertiesV1" " "xmlns:MsPeap="http://www.microsoft.com/provisioning/MsPeapUserPropertiesV1" xmlns:MsChapV2="http://www.microsoft.com/provisioning/MsChapV2UserPropertiesV1"><baseEap:Eap>" "<baseEap:Type>25</baseEap:Type><MsPeap:EapType><MsPeap:RoutingIdentity>" + apName + "</MsPeap:RoutingIdentity><baseEap:Eap><baseEap:Type>26</baseEap:Type><MsChapV2:EapType>" "<MsChapV2:Username>" + username + "</MsChapV2:Username><MsChapV2:Password>" + password + "</MsChapV2:Password></MsChapV2:EapType></baseEap:Eap></MsPeap:EapType></baseEap:Eap>" "</Credentials></EapHostUserCredentials></security></MSM></WLANProfile>"; LPCWSTR wlanProfile = reinterpret_cast<LPCWSTR>(profileName.utf16()); // profileName - это название Точки Доступа которую получаю через параметр функции. DWORD dwResult = WlanSetProfileEapXmlUserData(hClient, &adapterGUID, wlanProfile, WLAN_SET_EAPHOST_DATA_ALL_USERS, reinterpret_cast<LPCWSTR(xmlProfile).utf16()), nullptr); qDebug() << dwResult;Подключения к персональной сети работают, там использую WlanSetProfile функцию. Проблема только если подключатся к корпоративной сети. Я думаю что проблема с неверным XML профилем. На сайте Microsoft, есть много примеров профилей, к примеру:
https://docs.microsoft.com/en-us/windows/win32/nativewifi/wpa2-enterprise-with-peap-mschapv2-profile-sample
и
https://docs.microsoft.com/en-us/windows/win32/eaphost/peap-ms-chapv2-user-properties
Как думаете в чем может быть проблема? Или где можно узнать какой профиль нужен? Спасибо за помощь.
| Номер ошибки: | Ошибка 1168 | |
| Название ошибки: | Windows Defender Error Code 1168 | |
| Описание ошибки: | Ошибка 1168: Возникла ошибка в приложении Windows Defender. Приложение будет закрыто. Приносим извинения за неудобства. | |
| Разработчик: | Microsoft Corporation | |
| Программное обеспечение: | Windows Defender | |
| Относится к: | Windows XP, Vista, 7, 8, 10, 11 |
Фон «Windows Defender Error Code 1168»
Эксперты обычно называют «Windows Defender Error Code 1168» «ошибкой времени выполнения». Программисты, такие как Microsoft Corporation, стремятся создавать программное обеспечение, свободное от этих сбоев, пока оно не будет публично выпущено. Как и во всем в жизни, иногда такие проблемы, как ошибка 1168, упускаются из виду.
После первоначального выпуска пользователи Windows Defender могут столкнуться с сообщением «Windows Defender Error Code 1168» во время запуска программы. Когда это происходит, конечные пользователи могут сообщить Microsoft Corporation о наличии ошибок «Windows Defender Error Code 1168». Microsoft Corporation может устранить обнаруженные проблемы, а затем загрузить измененный файл исходного кода, позволяя пользователям обновлять свою версию. Поэтому, когда вы сталкиваетесь с запросом на обновление Windows Defender, это обычно связано с тем, что это решение для исправления ошибки 1168 и других ошибок.
Вполне вероятно, что при загрузке Windows Defender вы столкнетесь с «Windows Defender Error Code 1168». Проанализируем некоторые из наиболее распространенных причин ошибок ошибки 1168 во время выполнения:
Ошибка 1168 Crash — это распространенная ошибка 1168 во время выполнения ошибки, которая приводит к полному завершению работы программы. Обычно это происходит, когда Windows Defender не может обработать данные в удовлетворительной форме и поэтому не может получить ожидаемый результат.
Утечка памяти «Windows Defender Error Code 1168» — ошибка 1168 утечка памяти приводит к тому, что Windows Defender постоянно использует все больше и больше памяти, увяская систему. Возможные причины включают сбой Microsoft Corporation для девыделения памяти в программе или когда плохой код выполняет «бесконечный цикл».
Error 1168 Logic Error — Ошибка программной логики возникает, когда, несмотря на точный ввод от пользователя, производится неверный вывод. Это связано с ошибками в исходном коде Microsoft Corporation, обрабатывающих ввод неправильно.
Повреждение, отсутствие или удаление файлов Windows Defender Error Code 1168 может привести к ошибкам Windows Defender. Как правило, решить проблему можно заменой файла Microsoft Corporation. В некоторых случаях реестр Windows пытается загрузить файл Windows Defender Error Code 1168, который больше не существует; в таких ситуациях рекомендуется запустить сканирование реестра, чтобы исправить любые недопустимые ссылки на пути к файлам.
Распространенные проблемы Windows Defender Error Code 1168
Усложнения Windows Defender с Windows Defender Error Code 1168 состоят из:
- «Ошибка программного обеспечения Windows Defender Error Code 1168. «
- «Недопустимая программа Win32: Windows Defender Error Code 1168»
- «Windows Defender Error Code 1168 должен быть закрыт. «
- «Файл Windows Defender Error Code 1168 не найден.»
- «Windows Defender Error Code 1168 не может быть найден. «
- «Проблема при запуске приложения: Windows Defender Error Code 1168. «
- «Windows Defender Error Code 1168 не выполняется. «
- «Windows Defender Error Code 1168 выйти. «
- «Windows Defender Error Code 1168: путь приложения является ошибкой. «
Проблемы Windows Defender Error Code 1168 с участием Windows Defenders возникают во время установки, при запуске или завершении работы программного обеспечения, связанного с Windows Defender Error Code 1168, или во время процесса установки Windows. При появлении ошибки Windows Defender Error Code 1168 запишите вхождения для устранения неполадок Windows Defender и чтобы HelpMicrosoft Corporation найти причину.
Причины проблем Windows Defender Error Code 1168
Проблемы Windows Defender Error Code 1168 могут быть отнесены к поврежденным или отсутствующим файлам, содержащим ошибки записям реестра, связанным с Windows Defender Error Code 1168, или к вирусам / вредоносному ПО.
В первую очередь, проблемы Windows Defender Error Code 1168 создаются:
- Недопустимая или поврежденная запись Windows Defender Error Code 1168.
- Вирус или вредоносное ПО, которые повредили файл Windows Defender Error Code 1168 или связанные с Windows Defender программные файлы.
- Windows Defender Error Code 1168 злонамеренно удален (или ошибочно) другим изгоем или действительной программой.
- Другая программа, конфликтующая с Windows Defender Error Code 1168 или другой общей ссылкой Windows Defender.
- Windows Defender (Windows Defender Error Code 1168) поврежден во время загрузки или установки.
Продукт Solvusoft
Загрузка
WinThruster 2022 — Проверьте свой компьютер на наличие ошибок.
Совместима с Windows 2000, XP, Vista, 7, 8, 10 и 11
Установить необязательные продукты — WinThruster (Solvusoft) | Лицензия | Политика защиты личных сведений | Условия | Удаление
by Teodor Nechita
Eager to help those in need, Teodor writes articles daily on subjects regarding Windows, Xbox, and all things tech-related. When not working, you may usually find him either… read more
Updated on December 14, 2021
XINSTALL BY CLICKING THE DOWNLOAD FILE
This software will keep your drivers up and running, thus keeping you safe from common computer errors and hardware failure. Check all your drivers now in 3 easy steps:
- Download DriverFix (verified download file).
- Click Start Scan to find all problematic drivers.
- Click Update Drivers to get new versions and avoid system malfunctionings.
- DriverFix has been downloaded by 0 readers this month.
Several users have been reporting on the official Microsoft forums that they are having issues with the XPS printer:
I was unable to print from software using the XPS writer. I attempted to reinstall the printer but the installation fails reporting “printer driver not installed. Element not found”
Apparently, they are getting an error 1168: Element not found can have a wide variety of causes.
This article will guide you step-by-step on how to fix this error with the XPS printer.
How do you fix a generic error 1168?
1. Update your drivers
- Click on the Start button, then go to Settings
- Select Update & Security
- Click on Check for updates
- Allow Windows Update to download and install the updated driver
Follow these steps to install the latest printer drivers using Windows Update.
Alternatively, you can use a professional third-party tool that performs this process automatically and aims to keep your printer drivers updated and healthy.
More so, by choosing this automated method of managing drivers you also stay secure from potential damages caused by devices incompatibility.
Thus if you need reliable support to install or update any driver, the following software will accomplish this mission with no exception.
⇒ Get DriverFix
2. Try reinstalling the Windows XPS feature
- Press Windows
- Click on Settings (the cogwheel-shaped button)
- Select Apps
- Go to Apps & features
- Click Optional features
- Look for XPS feature if it is present
- If it is, right-click it and select uninstall
- Restart your PC
- After the restart or if your PC didn’t have the feature, go to the Manage optional features screen, and select Add a new feature
- When on the Add a new feature screen, select the XPS Viewer
- Restart your PC
3. Manually search for the location of your XPS Writer
Depending on which version of Windows 10 you have installed, the location of the XPS Writer may vary.
As such, if the solution listed above didn’t work, try this:
- Press Windows + R
- Type in control.exe
- Click Programs
- Select Programs and Features
- Click Turn Windows features on or off
- See if XPS Services and XPS Viewer are listed
- If the services are marked in their checkbox, unmark them and restart the PC
- If the services are unmarked in their checkbox, mark them and restart the PC
- Press Windows + R
- Type in control.exe
- Go to Hardware and Sound
- Click Devices and Printers
- See if Microsoft XPS Document Writer is installed as a printer.
- If it is, right-click it and choose Remove device
- Restart your PC
- Go back to Devices and Printers and select Add a printer
- Select The printer that I want isn’t listed
- Click Add a local printer or network printer with manual setting
- In the Choose a printer port screen, select Use an existing port and PORTPROMPT: (Local Port)
- In the Install a printer driver screen, select Microsoft on the left pane and Microsoft XPS Document Writer on the right
- When asked Which version of the driver do you want to use? select Use the driver that is currently installed (recommended)
If these particular steps didn’t help, you could also try to:
- Uninstall Recent Windows Updates
- Reset Your PC
![]()
Newsletter
- Remove From My Forums
-
Вопрос
-
Нужно раздать интернет с ноутбука. Настроил раздачу через консоль, создал точку доступа. Телефон точку нашёл, но интернет всё-равно не работал. Полез я в ноутбуке в «Центр
управления сетями и общим доступом«, далее залез в настройки беспроводной сети и попытался включить «Общий доступ к подключению к интернету«, но вылезла такая ошибка:
«Что общий доступ уже используется для подключения «iftype0_0». Вместо этого будет разрешен доступ для «Телефонное подключение (модем через который я подкл. к интернету) «.
Я нажимаю «ОК» потом ещё раз чтобы открыть общий доступ для своей сети Wi-Fi и вылетает ошибка «Не удаётся разрешить общий доступ. Ошибка 1168: Элемент
не найден.» Google не нашёл ничего такого, что разрешило бы мою проблему, поэтому обратился сюда в надежде, что мне помогут.
Ответы
-
Проверьте, что у вас есть поддержка Hosted Network и попробуйте сделать через NETSH WLAN
-
Помечено в качестве ответа
27 апреля 2020 г. 20:53
-
Помечено в качестве ответа
|
Проблемы с сетью |
||||||
|
||||||
|
||||||
|
||||||
|
||||||
|
||||||
|
||||||
|
||||||
|
||||||
|
||||||
|
||||||
|
||||||
|


Have you ever tried to use your VPN app only to be slapped by an error message saying error 1168 element not found? It is not only annoying but frustrating.
As an avid VPN user, it is normal to encounter one of these errors because VPNs are not as fail-proof as one might think.
But you are in the right place if you have experienced this error, so read till the end to know how to clear VPN error 1168 element not found for good.
What is the element not found error?
The element not found error is usually a network connection problem that appears on Windows versions 7 and 8.
Oftentimes, this error message pops up when launching your VPN app.
However, it can also happen with apps like File Explorer, Microsoft Edge, Command Prompt, or even the Settings app in Windows.
It usually appears either as a result of a bad Windows update, corrupt drivers, or interference from third-party applications.
Below are some fixes you can try:
- Install pending Windows updates
- Reload Explorer.exe
- Uninstall any recently installed apps
- Run the DSM tool
- Reset your PC
- Use a modern VPN
1. Install pending updates
This error may occur if one of your computer’s software components is outdated.
Therefore, ensure that you update your software to the latest version. Follow the steps below to achieve this:
- Open Windows settings.
- Click Update and Security.
- Click Check for updates.
Your PC will search the internet for any relevant updates. Click the Update button to download and install any available updates.
2. Reload Explorer.exe
If you get the element not found error whenever you start up your VPN, you may need to reload your File Explorer. Here is how to do that:
- Press the Ctrl + Shift + Esc keys on your keyboard to launch the Task Manager.
- Click on the Details tab.
- Right-click Explorer.exe and select End Task. This will close all Windows Explorer processes so you can reload it.
- Click on File and select Create new task.
- Type explorer.exe into the text box.
- Tick the Create this task with administrative privileges box and click OK.
Doing this refreshes your computer so that the Windows Explorer process can start afresh.
3. Uninstall any recently installed apps
If you started getting the error message after installing an app, then it’s only logical to uninstall it and check if it fixes the issue.
This is because the new app may have installed a driver that doesn’t support the VPN application. This has worked in many cases, so you should try it if you have any recently installed apps.
To uninstall apps on your computer, follow these steps:
- Press the Windows + R keys on your keyboard.
- Type Control Panel and press Enter to launch the Control Panel.
- Click on Programs.
- Click on Uninstall a program.
- Search for the recently installed app, right-click on it, and click Uninstall.
Now check to see if your VPN works properly.
Alternatively, some windows updates can cause this error to happen. Therefore, you may need to uninstall recent updates. The process is similar to the one above. However, instead of clicking on Uninstall a program,
- Click on View installed updates.
- Then right-click on the affected updates and click Uninstall.
Check back to see if the error message is now clear.
4. Run the DISM tool
Running the Deployment Image Servicing and Management tool is another fix for the element not found error.
The purpose of the tool is to scan your PC for problems that can lead to errors and repair them for you.
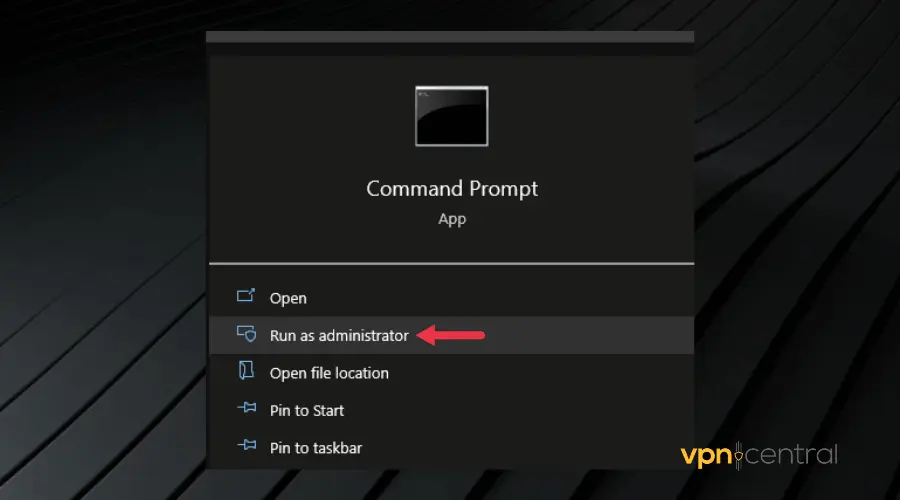
To run this tool:
- Search for Command Prompt from your Start Menu.
- Right-click on its icon and select Run as administrator. After this, a black rectangular window will pop up, asking for a command.
- Type in the following command: DISM.exe /Online /Cleanup-image /Scanhealth and press the Enter key.
- After the scan is complete, type this second command: DISM.exe /Online /Cleanup-image /Restorehealth and press Enter to run it.
This fix requires a little bit of patience if there are serious or multiple issues with your configuration.
The good news is that it can get rid of a lot of errors and there’s not a lot of work on your end, you just have to make sure you enter the correct commands.
5. Reset Your PC
Resetting your PC should be the last fix to try if you have tried fixes 1- 4 and none worked. Although intense, performing a full reset on your PC is definitely going to clear this error from your computer.
Follow these steps to reset your PC:
- Open Computer Settings and click Update and Security.
- Click Recovery.
- Then click on Get Started below the Reset PC menu.
- Select an option from the menu that appears and follow the instructions to reset your PC.
Resetting your PC returns the Windows OS to its original condition – as it was when you first installed it without all the installed programs so it is important to back up your personal files.
6. Use a modern VPN
This element not found error is most pronounced on VPNs with old tunneling protocols, especially L2TP and PPTP.
Therefore, switching to a provider with modern protocols such as OpenVPN and Wireguard is a sure way to fix the issue permanently.
If you want an error-free experience and very fast connections, consider ExpressVPN.
The tool is frequently updated to avoid errors. On top of that, as you can see in the screenshot, it gives you the possibility to pick from multiple VPN protocols.
We must also mention that the VPN has a large network of 3000+ servers located in 94 countries. This is great for anyone who uses VPNs for a better connection or to bypass geo-blocking.
ExpressVPN
Use this up-to-date VPN to prevent any errors and enjoy all the benefits of private browsing!
Conclusion
We tested all the fixes in this article. Therefore, we hope that one of them works for you and helps you get rid of the VPN error 1168 element not found on your PC.
THE PROBLEM
I build the following code, copied from the visual studio tutorial online.
#include "stdafx.h"
#include <iostream>
using namespace std;

int main()
{
	cout << "Hello, world!\n";
	return 0;
}
It works. I remove the «;» from the line which begins «cout», attempt to build, it fails, giving error code 2: fine. I add the «;» back in to the proper place, to correct the error, attempt to build, but it fails again, giving
code 1168 «LINK : fatal error LNK1168: cannot open C:\Users\…\source\repos\HelloWorld\Debug\HelloWorld.exe for writing».
To work around, I can close Visual Studio and reopen, but this is a pain.
To add a bit more: the console window is definitely closed, but if i look in task manager, «HelloWorld.exe» is still running under «background processes», and sometimes multiple times if i have attempted to build multiple times.
Am I making a simple error, or is something else wrong? I’d be grateful for any advice.
Not sure if this info requested for bug reports is useful or necessary, but here it is.
TOOLSET VERSION
C:\Users\…\source>cl /Bv /CLR
Microsoft (R) C/C++ Optimizing Compiler Version 19.11.25508.2
for Microsoft (R) .NET Framework version 4.07.2110.0
Copyright (C) Microsoft Corporation. All rights reserved.
Compiler Passes:
C:\Program Files (x86)\Microsoft Visual Studio\2017\Community\VC\Tools\MSVC\14.11.25503\bin\HostX86\x86\cl.exe: Version 19.11.25508.2
C:\Program Files (x86)\Microsoft Visual Studio\2017\Community\VC\Tools\MSVC\14.11.25503\bin\HostX86\x86\c1.dll: Version 19.11.25508.2
C:\Program Files (x86)\Microsoft Visual Studio\2017\Community\VC\Tools\MSVC\14.11.25503\bin\HostX86\x86\c1xx.dll: Version 19.11.25508.2
C:\Program Files (x86)\Microsoft Visual Studio\2017\Community\VC\Tools\MSVC\14.11.25503\bin\HostX86\x86\c2.dll: Version 19.11.25508.2
C:\Program Files (x86)\Microsoft Visual Studio\2017\Community\VC\Tools\MSVC\14.11.25503\bin\HostX86\x86\link.exe: Version 14.11.25508.2
C:\Program Files (x86)\Microsoft Visual Studio\2017\Community\VC\Tools\MSVC\14.11.25503\bin\HostX86\x86\mspdb140.dll: Version 14.11.25508.2
C:\Program Files (x86)\Microsoft Visual Studio\2017\Community\VC\Tools\MSVC\14.11.25503\bin\HostX86\x86\1033\clui.dll: Version 19.11.25508.2
Common Language Runtime:
Version 4.07.2110.0
cl : Command line error D8003 : missing source filename
COMMAND LINE
^C:\USERS\…\SOURCE\REPOS\HELLOWORLD\HELLOWORLD\HELLOWORLD.CPP
/c /ZI /nologo /W3 /WX- /diagnostics:classic /sdl /Od /Oy- /D WIN32 /D _DEBUG /D _CONSOLE /D _UNICODE /D UNICODE /Gm /EHsc /RTC1 /MDd /GS /fp:precise /Zc:wchar_t /Zc:forScope /Zc:inline /Yu»stdafx.h» /Fp»DEBUG\HELLOWORLD.PCH» /Fo»DEBUG\\»
/Fd»DEBUG\VC141.PDB» /Gd /TP /analyze- C:\USERS\…\SOURCE\REPOS\HELLOWORLD\HELLOWORLD\HELLOWORLD.CPP
-
Edited by
Thursday, September 28, 2017 4:27 PM
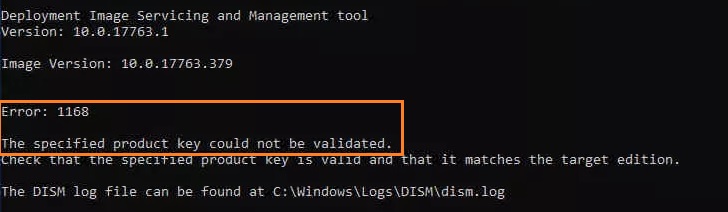
When you try to upgrade Windows Server 2019 Evaluation version to a licensed full version using a MAK volume license key you may receive below error message.
Error 1168
The specified product key could not be validated.
Check that the specified product key is valid and that it matches the target edition.
To fix this first you have to install a KMS client key using DISM command line tool. Keys are available on https://docs.microsoft.com/en-us/windows-server/get-started/kmsclientkeys (Get your respective key from “Windows Server LTSC/LTSB versions” section)
Now open CMD or PowerShell with administrative privileges and execute below command.
DISM /Online /Set-Edition:ServerStandard /ProductKey:N69G4-B89J2-4G8F4-WWYCC-J464C /AcceptEula
For more details on “Set-Edition” option follow the article in here.
Once the above command is successfully executed you will prompt for restart the server. Restart the server and execute the below command to install the new MAK key which is available on Volume Licensing Service Center.
slmgr /ipk <product key>
slmgr /ato
Now the Windows Activation should have completed successfully.
Reader Interactions
Trackbacks