-
Home
-
News
- How to Fix VAN 1067 Valorant Error Code? Try Solutions Here!
By Vera | Follow |
Last Updated
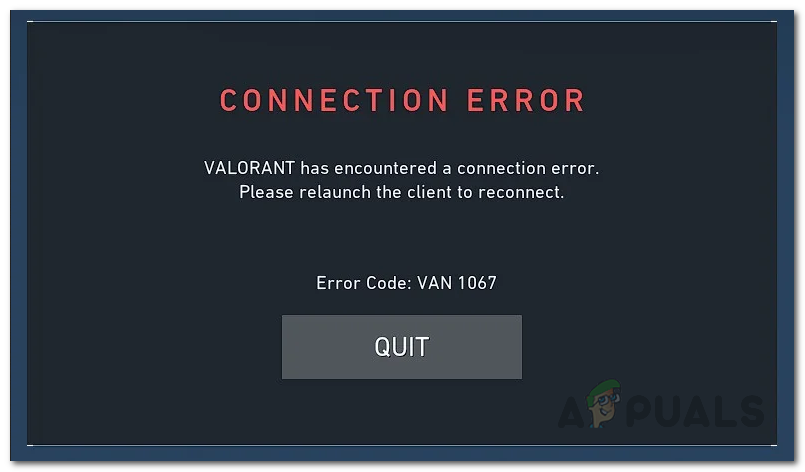
If you are Valorant gamers, upgrading to Windows 11 is a bit troublesome since you may run into the infamous error code VAN 1067 when you try to launch this game. How to fix VAN 1067 Valorant? Read this post and you can find some useful methods given by MiniTool Solution to easily get rid of the Valorant issue.
VAN 1067 Windows 11
Windows 11 is a good choice for game players since it brings two powerful features including Auto HDR and DirectStorage. Besides, due to its brand new user interface and improved features, many users want to install Windows 11 to have an experience.
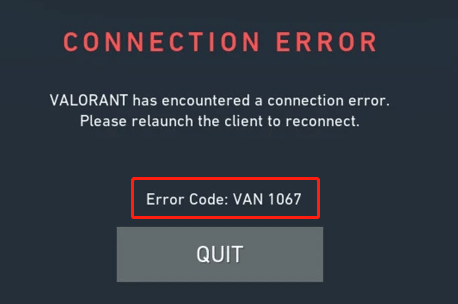
However, upgrading to this new operating system is trouble for Valorant users. If you also install this game and when you play this game, error code VAN 1067 appears with a dialogue, saying a connection error. You need to relaunch the client to reconnect.
Actually, a simple restart cannot fix Windows 11 Valorant error 1067. The main reasons for this are TPM 2.0 and Secure Boot. As you know, these two requirements are required by Windows 11, and the same is true for Valorant when launching this game.
Besides, Stopped VGC service, third-party software, outdated Windows, and more can also lead to VAN 1067 along with a message (depending on different situations, the error message varies).
Fortunately, you can fix VAN 1067 error. Move to the next part to get solutions.
VAN 1067 Error Fixes
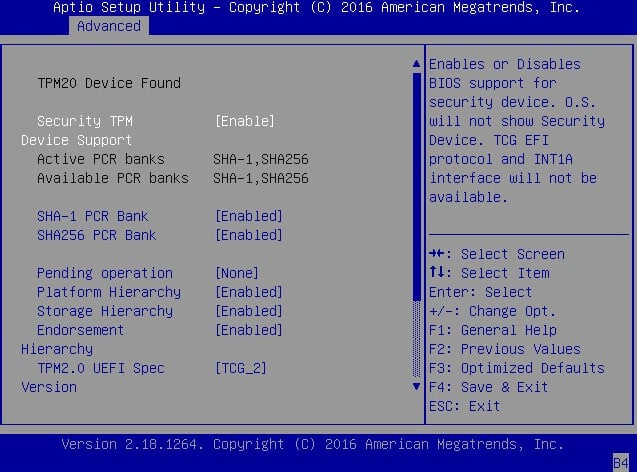
Enable TPM 2.0 and Secure Boot
The first fix you can try is to make sure TPM 2.0 and Secure Boot are enabled.
Step 1: Press Shift + Restart to reboot your PC to Windows Recovery Environment (WinRE).
Step 2: Navigate to Troubleshoot > Advanced options > UEFI Firmware Settings.
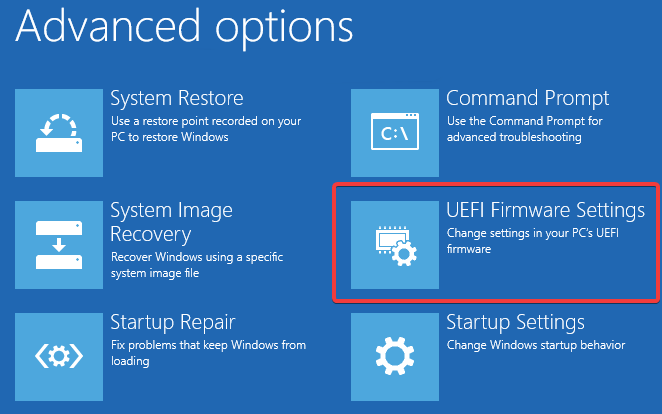
Step 3: Under the Security tab, find Trusted Platform Module (TPM) and enable it. Also, find Secure Boot and enable it. Based on different PCs, the UEFI settings are usually different.
Related article:
- Windows 11 UEFI: Everything You Should Know Is Here!
- How to Check if Your PC Has TPM for Windows 11? How to Enable It?
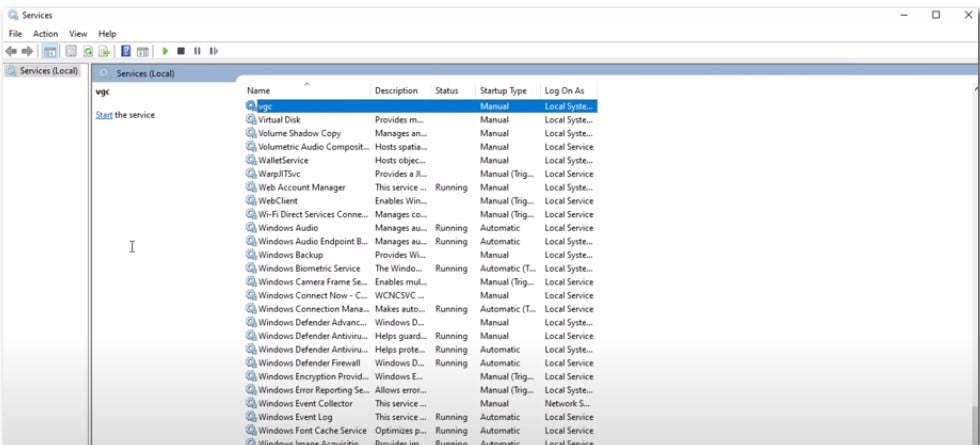
Restart VGC Service
If VGC service is stopped due to some reason, a connected error VAN 1067 will appear when opening Valorant. So, have a check and make sure it is running.
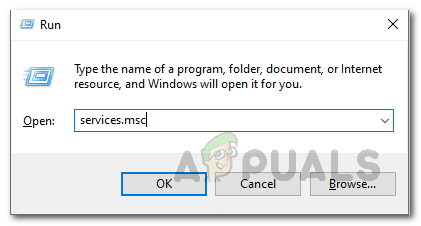
Step 1: Press Win + R to open the Run dialog, type services.msc and click OK to open the Services window.
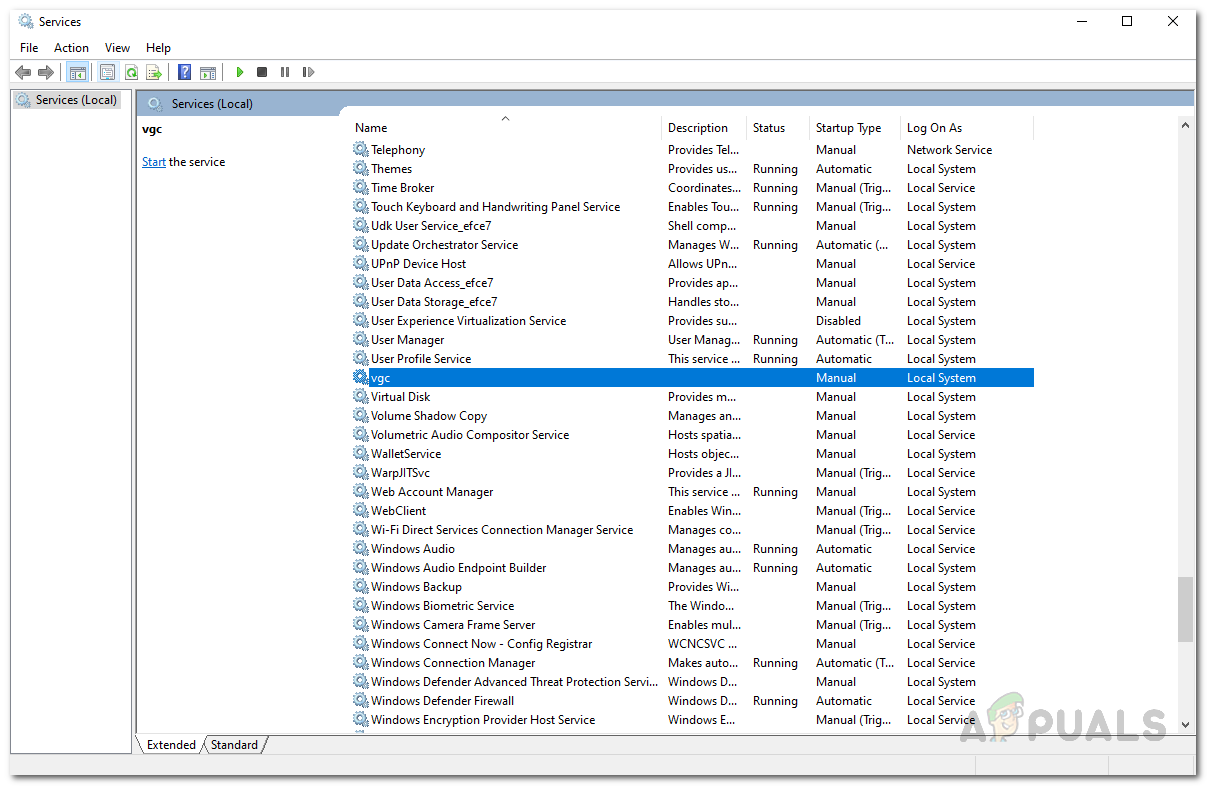
Step 2: Go to find vgc service, double-click on it, and choose Start.
Step 3: Save the change by clicking Apply and OK.
Now, Valorant should run without VAN 1067 in Windows 11.
Close Discord
Although Discord can be used for communication when you play a game, it can lead to a problem with the game in some situations. If you run into the error code VAN 1067, you need to close Discord. To disable Discord completely, right-click on the Discord’s icon and choose Quit Discord.
Update Windows 11
According to users, installing the latest version of Windows 11 is helpful to fix VAN 1067. If you are also having this issue, update Windows 11 to resolve Valorant error 1067 Windows 11.
Step 1: Press Win + I to open Settings.
Step 2: Under the Windows Update tab, check for updates. If some updates are available, download and install them on your Windows 11 PC.
Other Troubleshooting Tips to Fix Error Code VAN 1067 Windows 11
In addition, there are some VAN 1067 error fixes you can try.
- Choose a language for non-Unicode programs if your language is English. Go to Settings > Time and language > Language & region > Administrative language settings > Change system locale, choose English, tick the checkbox of Beta: Use Unicode UTF-8 for worldwide language support and restart the PC.
- Perform a clean boot. (Related article: How to Clean Boot Windows 10/11 and Why You Need to Do So)
- Go back to Windows 10 from Windows 11. (Related article: [3 Ways] How to Uninstall Windows 11 and Go Back to Windows 10?)
Final Words
That’s all the information about how to fix VAN 1067 Valorant. If you are having this Valorant issue, follow these methods above to easily get rid of it from your Windows 11 computer.
About The Author

Position: Columnist
Vera is an editor of the MiniTool Team since 2016 who has more than 7 years’ writing experiences in the field of technical articles. Her articles mainly focus on disk & partition management, PC data recovery, video conversion, as well as PC backup & restore, helping users to solve some errors and issues when using their computers. In her spare times, she likes shopping, playing games and reading some articles.
Ошибка Valorant 1067 сравнительно сложная в исправлении ошибка, которую обещали исправить разработчики из Riot еще полгода назад. Однако она до сих пор появляется, а игроки всячески изощряются, чтобы ее устранить. Она очень часто появляется в Windows 10 и в Windows 11. Сегодня собралось уже много способов, которые кому-то помогли и другие тоже подтвердили, что смогли исправить свою проблему. Мы не знаем, что именно должно помочь, но что-то из перечисленного скорее всего сработает. По крайней мере, мы на это рассчитываем.
Изменить язык
Часть пользователей смогли решить проблему переключением языка.
Вот, что нужно сделать:
- Переходим в «Панель управления» и выбираем пункт «Язык».
- Жмем на кнопку «Параметры» рядом с тем языком, который вы знаете, но обязательно он должен отличаться от текущего.
- Нажимаем на кнопку «Сделать основным языком».
- Выходим из системы и входим повторно.
- Пробуем запустить Valorant, возможно, без ошибки.
В некоторых случаях понадобится дополнительная процедура. Она потребуется в ситуациях, когда не выбран системный язык для программ без поддержки Unicode.
Инструкция:
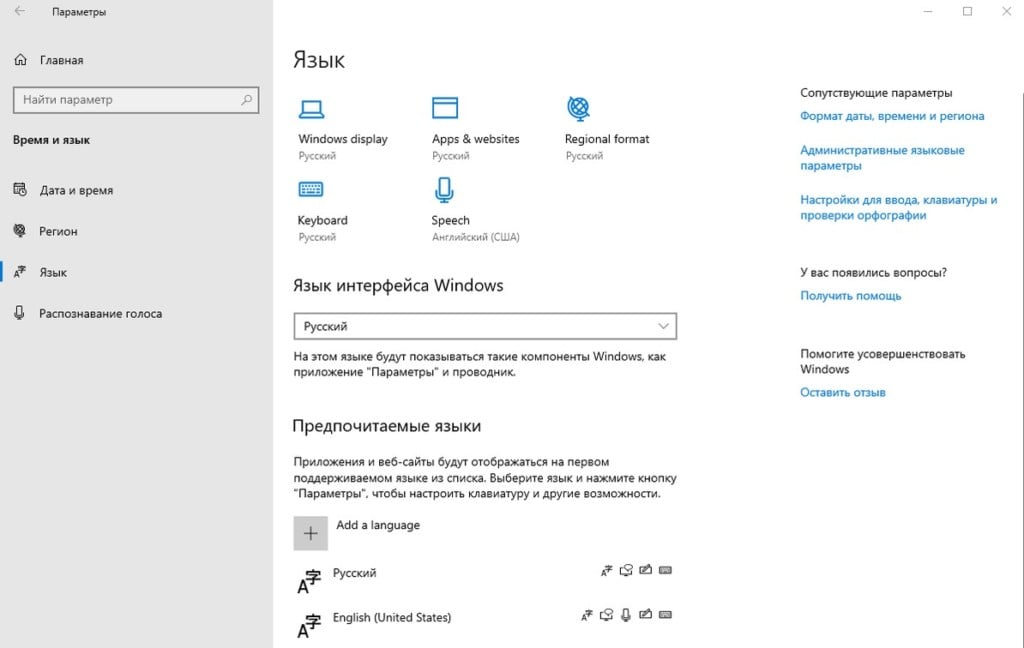
- Переходим в «Параметры» (Win + I), а затем – «Время и язык».
- На вкладке «Язык» нажимаем на связанную ссылку «Административные языковые параметры» справа сверху.
- Выбираем опцию «Изменить язык системы» и обязательно активируем значок «Использовать Unicode UTF-8 для поддержки языков по всему миру».
Официальное решение от разработчиков
Выполнить данную процедуру порекомендовали сами разработчики:
- Запускаем Windows в режиме чистой загрузки (выключаем все службы через msconfig и все программы из автозапуска через Диспетчер задач). Единственное исключение – служба vgc, она необходима для загрузки игры.
- Загружаем файл Autoruns и устанавливаем его.
- Включаем данную программу и выключаем записи, принадлежащие Windows.
- Начинаем поиск конфликта драйверов.
- Перезагружаем компьютер и пробуем снова начать установку Valorant.
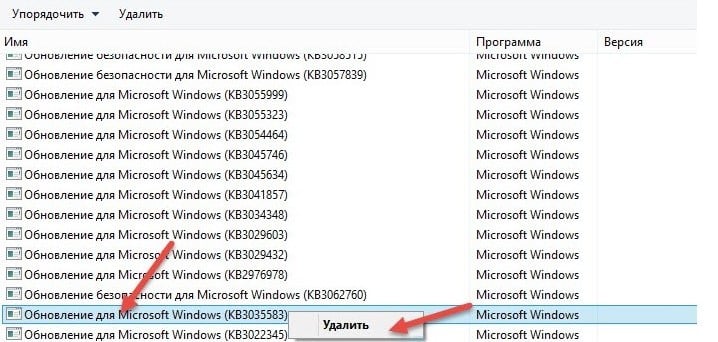
Удалить обновление KB4589212
Несколько пользователей отметили, что смогли исправить ошибку с кодом 1067 в Valorant после удаления одного обновления – его код KB4589212. Правда, им это помогло только на несколько дней. Похоже дело в том, что оно загрузилось и установилось заново. Если нет желания полностью отключать обновления Windows, возможно, придется повторять процедуру с определенной периодичностью.
Как это сделать:
- Переходим в «Панель управления», здесь выбираем «Программы и компоненты».
- Слева сверху нажимаем на «Просмотр установленных обновлений».
- Ищем то, что имеет код KB4589212, жмем по нему правой кнопкой мыши и «Удалить».
- Перезагружаем компьютер и проверяем результат.
Перезагрузить службу VGC
Текущая задача – отключить и запустить заново службу VGC, она необходима для запуска Valorant. Если сервис столкнулся с какой-то непреодолимой трудностью, завис или остановлен, это может быть причиной ошибки 1067.
Что нужно сделать:
- Открываем «Панель управления» и в разделе «Администрирование» переходим в «Службы».
- Находим ту, что называется VGC и делаем по ней двойной клик.
- Нажимаем на кнопку «Остановить» и сохраняем изменение.
- Повторно включаем службу клавишей «Запустить».
Удалить VoiceMeeter, отключить Discord
VoiceMeeter – программа для обработки звука, весьма популярная сегодня. С ней Valorant может работать неправильно, но после удаления восстанавливается. По крайней мере несколько пользователей сообщили, что им помогло удаление этого софта.
Еще одна проблемная связь у Valorant наблюдается с Discord, только в этом случае не обязательно удалять программу. Достаточно отключить приложение во время работы игры. Хоть это и самая популярная голосовая связь в мире, есть куча достойных альтернатив, которые позволят без дискомфорта и ошибок общаться с друзьями.
Включить TPM 2.0
TPM 2.0 нужна как для перехода на Windows 11, так и для нормальной работы Valorant. Она активируется в BIOS (UEFI) и на некоторых устройствах отключена по умолчанию.
Как включить TPM 2.0:
- Перезагружаем компьютер и в момент запуска нажимаем кнопку для перехода в BIOS. Обычно снизу показывается подсказка, какую именно клавишу следует жать. По умолчанию на многих устройствах это F2 и Del.
- Переходим в раздел «Advanced» и раскрываем список «Security», иногда он называется Trusted Computing.
- Ищем опцию, где есть слово TPM или Platform Trust Technology или «Поддержка устройств безопасности» — «Устройства беозопасности». Кстати, Intel называет ее PTT.
- Активируем параметр.
Нам этом список известных нам решений Valorant 1067 не заканчивается, но обычно их достаточно. В более сложных ситуациях дополнительно придется активировать Control Flow Guard, отключить виртуализацию ЦП в BIOS и просто обновить Windows. Примечательно, что ошибка чаще появляется в Windows 11, поэтому откат к Windows 10 тоже может быть своего рода исправлением.
Players have been facing the Valorant error 1067 or more specifically, VAN 1067 error code while trying to play Valorant on their system. As it turns out, this issue can be caused by a number of factors including third-party software running on your system, virtualization enabled from the BIOS or Hyper-V feature enabled from Windows features and much more. The error code suggests that Valorant has encountered a connection error and you are asked to relaunch your game. However, simply relaunching may not fix your problem. The error code can be really frustrating as it disconnects you from the game despite the game mode that you start to play and usually within the first 5 minutes or so. In this article, we will be showing you how you can tackle this problem with ease, so just follow through.
As we have mentioned earlier, there are quite a few reasons due to which you may be encountering the problem in question. While third-party software and the virtualization feature are in there, they are in no way the only reasons out there that can cause the problem. In addition to that, if you are running the game on Windows 11 by bypassing Windows 11 installation requirements, you will also encounter the mentioned error code. The only difference is that you might be prompted with a different error message depending on your scenario. In some cases, you will be notified that you need TPM 2.0 and secure boot to run the game while in other scenarios, you are asked to enable Control Flow Guard or CFG in your operating system. We will be covering all of this in more detail, however, before that, let us first look at the potential causes of the problem so that we can establish an understanding of why the issue is being caused and as a result, isolate the source of the problem. With that said, let us get started.
- Stopped VGC Service — As it turns out, one of the reasons that you might be encountering the mentioned problem could be due to the VGC service. The said service needs to be running when you start Valorant and in case it does not start automatically, you will have to do so manually to avoid facing the error message.
- Third-Party Software — Another reason due to which you can face the error message in question can be due to the third-party software that you have installed on your system. This can happen when the third-party software is interfering with the Valorant application due to which you encounter the error message. According to user reports, Discord and MSI Afterburner have been some of the culprit applications that cause the issue. In such a scenario, you will have to either disable them and then run the game to avoid any interruption.
- CPU Virtualization — CPU virtualization allows your processor to act like multiple individual processors. This can help the operating system to efficiently utilize the CPUs. However, in some cases, this can cause the error message in question here especially if you have virtual machines on your system. In such a scenario, you will have to disable virtualization from your BIOS to fix the problem.
- Secure Boot — As it turns out, if you are using Windows 11 when trying to play Valorant, one of the reasons that you may encounter the issue could be due to secure boot. Valorant has been enforcing the Windows 11 requirements on the users who have upgraded or clean installed Windows 11 on their machine. Therefore, if Secure Boot is disabled in the BIOS on your system, you will most likely encounter the said problem.
- Control Flow Guard — In addition to Secure Boot, Control Flow Guard can also cause the problem especially on Windows 11 machines. The game requires CFG to be enabled and in case the feature is disabled on your system, you won’t be able to start the game even in some cases. Therefore, an easy fix here would be to simply enable Control Flow Guard via Windows Settings.
- Outdated Windows — Another reason that you might encounter the error message in question can be due to outdated Windows. Valorant often requires your system to be up to date especially because of its anti-cheat system, Vanguard. Therefore, running the game on an outdated Windows version can run into issues which is why you will have to make sure that the operating system is up to date in your case.
- DNS Configuration — Finally, your internet settings can also be a factor in raising the problem in question. This can sometimes happen when you have specified custom DNS settings on your system. In such a scenario, you will have to flush your DNS to get the game back up and running without any issues.
Now that we have gone through a whole list of possible reasons that can actually contribute to causing the error message in question, we can now get into showing you how to resolve it via the different methods that are available. If you are running Windows 11, we recommend trying the Secure Boot and Control Flow Guard workarounds first to see if they resolve the issue. With that said, let us get started without any further ado.
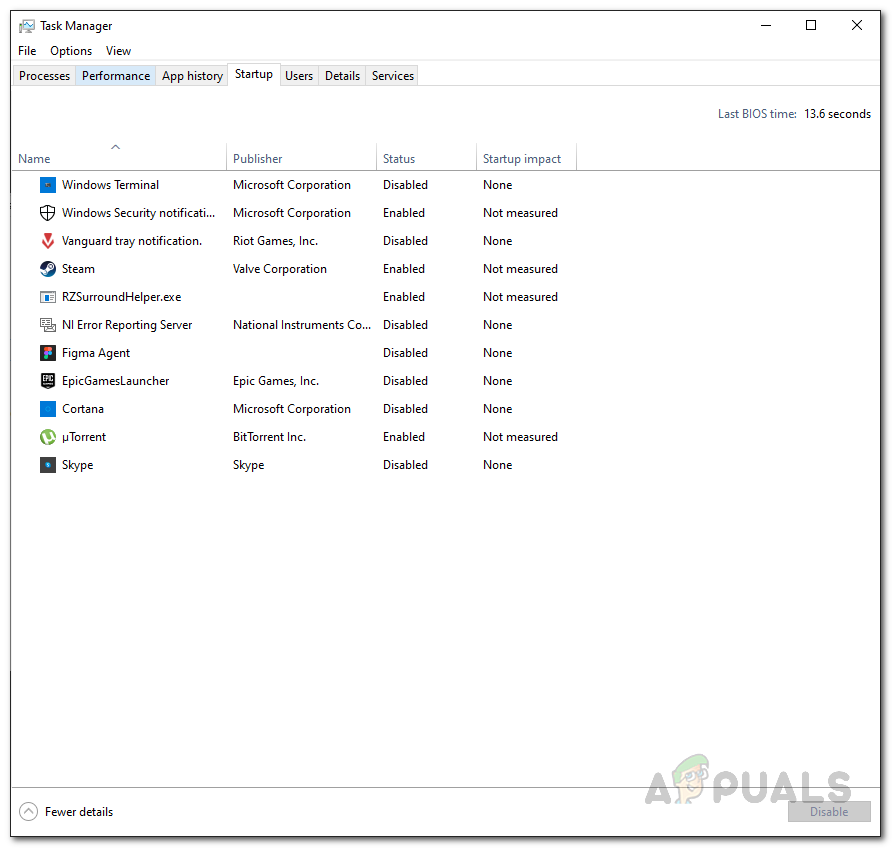
Check VGC Service
As it turns out, the first thing that you should do when you encounter the issue mentioned here is to make sure that the VGC service is running on your system. This system is required to make sure that your Valorant game runs smoothly and without any issues. If the service is stopped for whatever reason, you will be disconnected from the game and shown an error message. Therefore, the first step in solving the problem should be to make sure the vgc service is perfectly fine. To do that, follow the instructions given down below:
- First of all, open up the Run dialog box by pressing Windows key + R.
- Then, in the Run dialog box, type in services.msc and then hit the Enter key.

Opening Services - This will open up the Services window that lists all the services on your system.
- From the list of services, locate the vgc service. To make it easier, press the V key on your keyboard to jump to the services starting with the alphabet V.

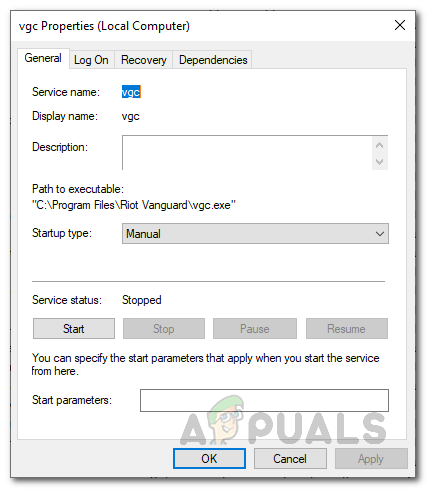
Locating VGC Service - Once you have found the service, double-click on it to open up the Properties window.
- If the service is running, click the Stop button and then start it up again by clicking Start.
- In case the service is not running by default, go ahead and start it up by clicking the Start button.

VGC Service Properties - Once you have done that, you can close the Services window. After that, open up the game to see if the problem is there.
Close Discord and MSI Afterburner
Even though Discord is widely used for communication while playing a game, it can, in some cases, cause a problem with the game that will prevent you from playing the game at all. In some cases, even the MSI Afterburner can interfere with the game and because of the Vanguard anticheat, you won’t be able to play properly and thus disconnected with the error message shown. This happens because MSI Afterburner tries to show you your hardware statistics while you are playing which the Vanguard anticheat may not permit.
Therefore, if you have any of the applications installed, make sure to close them completely via the Task Manager. Once you have done that, you can go ahead and open up the game to see if the problem still persists.
Flush DNS Settings
As we have mentioned above, the problem can also be due to your network configuration in some cases. More often than not, the DNS settings can be held responsible for problems like these and are usually due to the custom DNS servers that you have provided to your network adapter. If this case is applicable, you will have to flush your DNS settings which will restore your DNS configuration to its default. In addition, you can also choose to provide a more stable DNS server. To do all of this, follow the instructions given down below:
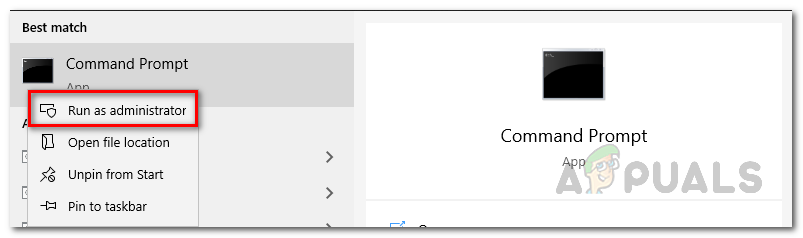
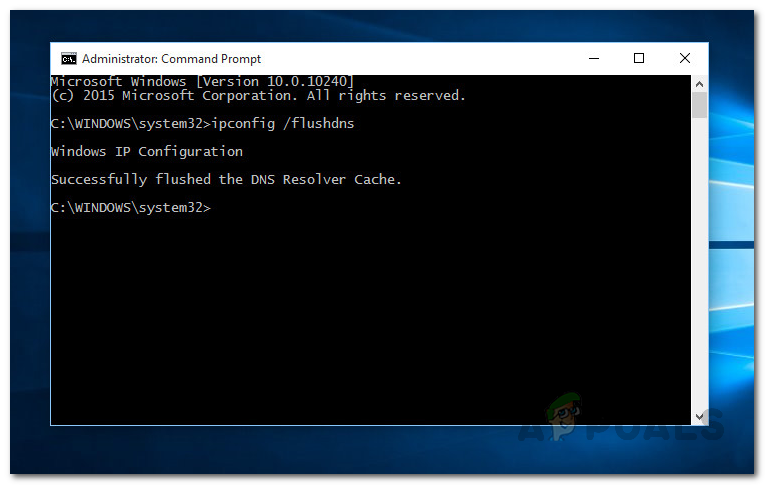
- First of all, you will have to open up an elevated command prompt window. To do this, open up the Start Menu by pressing the Windows key and then search for cmd. Right-click on the result shown and choose Run as administrator from the drop-down menu.

Opening Command Prompt as an Admin - Once the command prompt window is open, type in “ipconfig /flushdns” without the quotes and then hit the Enter key.

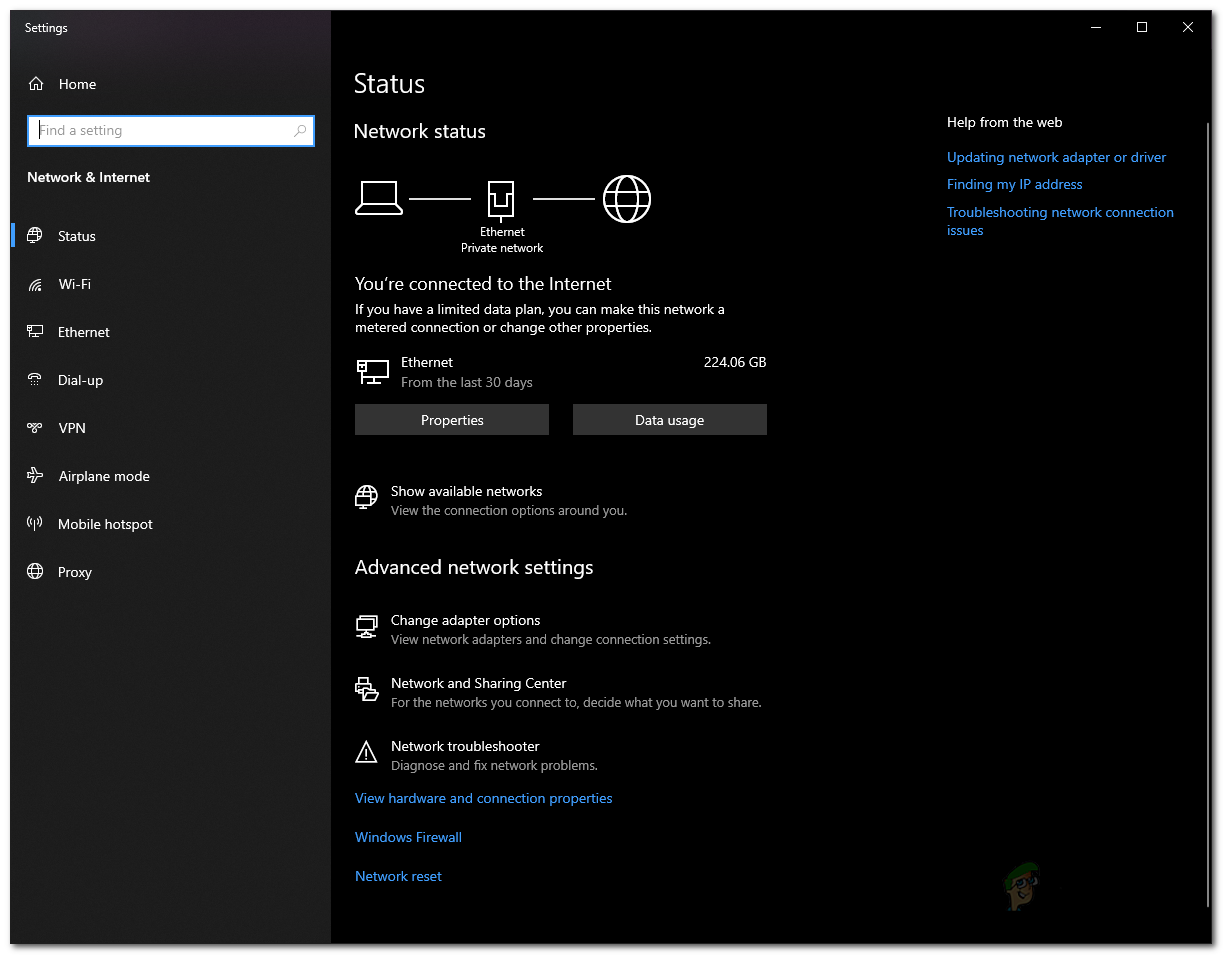
Flushing DNS - After that, right-click on the network icon on your taskbar and choose Open Network and Internet Settings from the menu.

Opening Network and Internet Settings - On the settings window, click the Change adapter options option.

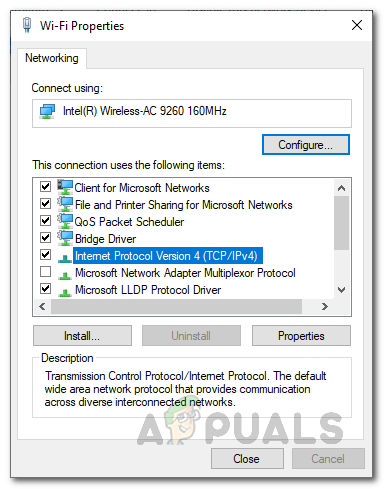
Network and Internet Settings - Here, you will see your network adapters. Right-click on your network adapter and choose Properties from the drop-down menu.
- There, from the list, click on Internet Protocol Version 4 (TCP/IPv4) and then click the Properties window.

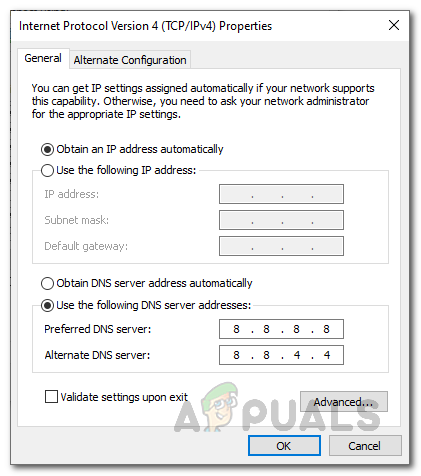
Changing IPv4 Properties - At the bottom, choose the Use the following DNS server addresses option and then in the two fields down below, provide the following IPs respectively.
8.8.8.8
8.8.4.4

Changing DNS Server - Click OK.
- Finally, close the windows and then try opening up the game to check if the problem is still persistent.

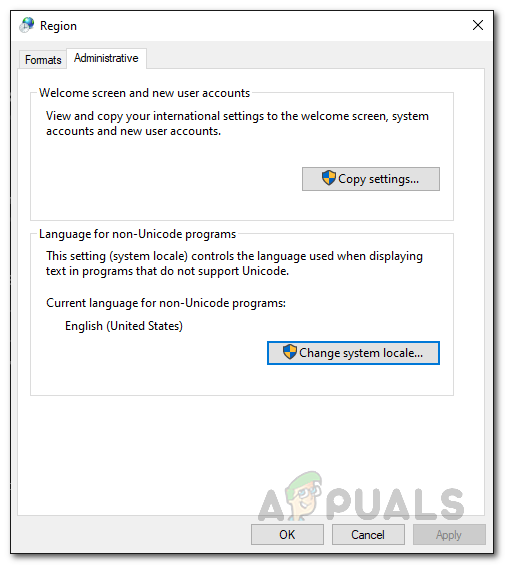
Choose Language for Non-Unicode Programs
As it turns out, in some cases, if you don’t have a system language selected for programs that do not support Unicode, you can encounter the problem in question. This has been reported by a user who was directed to this fix by the Riot support team. To do this, follow the instructions given down below:
- First of all, open up the Windows Settings window by pressing Windows key + I.

Windows Settings - Once the Settings window is open, go to Time and Language.
- There, switch to the Language tab on the left-hand side.
- On the Language tab, on the right-hand side under Related settings, click on the Administrative language settings option.
Opening Administrator Language Settings - This will bring up a new window. There, click on the Change system locale button.

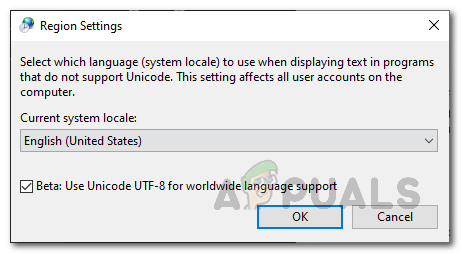
Administrator Language Settings Window - Choose English (US) from the drop-down menu and also make sure to tick the Use Unicode UTF-8 for worldwide language support option.

Changing System Locale - Then, click OK. Follow it up by clicking Apply and then OK.
- After doing that, go ahead and open up your game and check if the problem still appears.
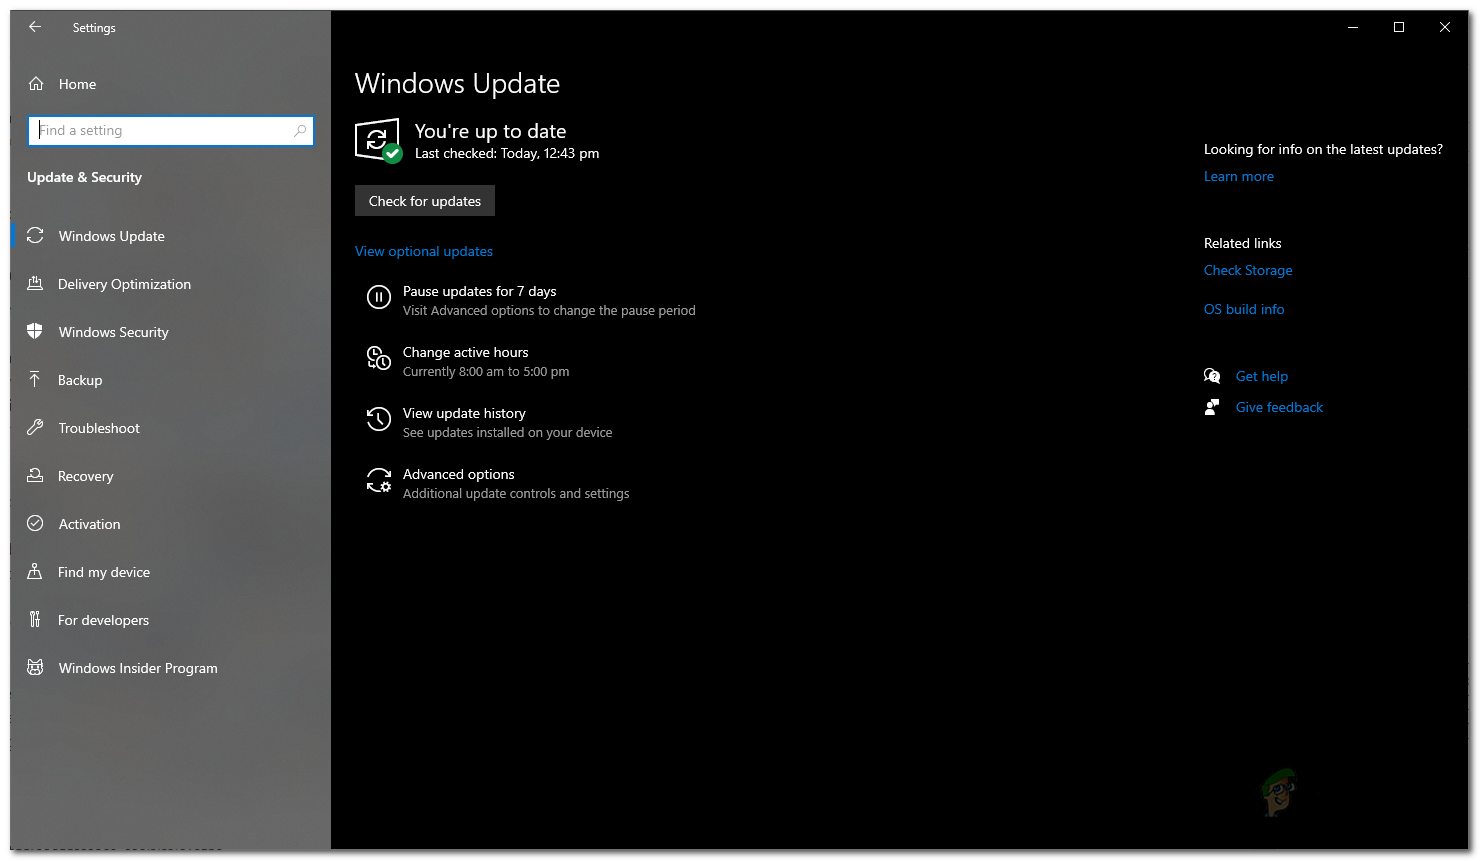
Update Outdated Windows
Running a really old, outdated version of Windows is never really a good idea. This is because Windows updates often contain fixes to several issues as well as security patches. If you try to run Valorant on an old version of Windows, it will very likely cause compatibility issues due to which you will have to make sure your Windows is up to date. This is rather simple and easy to do. Follow the instructions given down below to do this:
- First of all, open up the Windows Settings app by pressing Windows key + I.
Windows Settings - There, navigate to Update and Security.
- On the Windows Update tab, click the Check for updates button to search for any available updates.
Windows Update - Download and install the updates and then try playing your game. See if the problem still occurs.
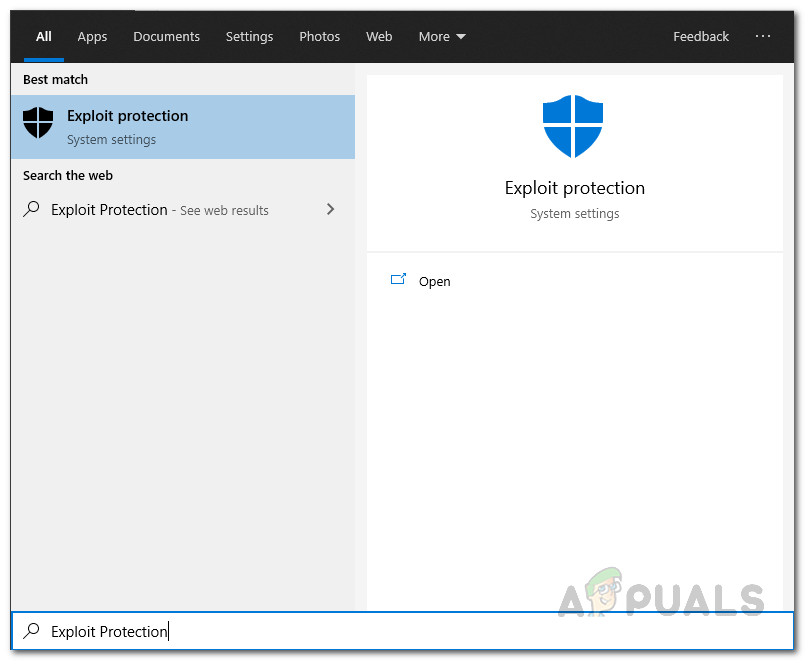
Enable Control Flow Guard
If you are running Windows 11 while encountering the error message in question, you may be prompted to enable Control Flow Guard or CFG on your system. Control Flow Guard is basically a feature that makes the job of exploits harder on your system by stopping them from running arbitrary code through the vulnerabilities in your system. If you are asked to enable CFG, there are actually two methods that you can follow down below to do so. Follow whichever looks easier to you to enable CFG on your system.
Enable Control Flow Guard through Windows Settings
The first way of enabling it would be to do so via Windows Settings. Follow the instructions down below:
- First of all, open up the Start Menu and then search for Exploit Protection. Open it up.

Opening Exploit Protection Settings - This will open up a Windows Settings window that takes you to the Exploit Protection screen.
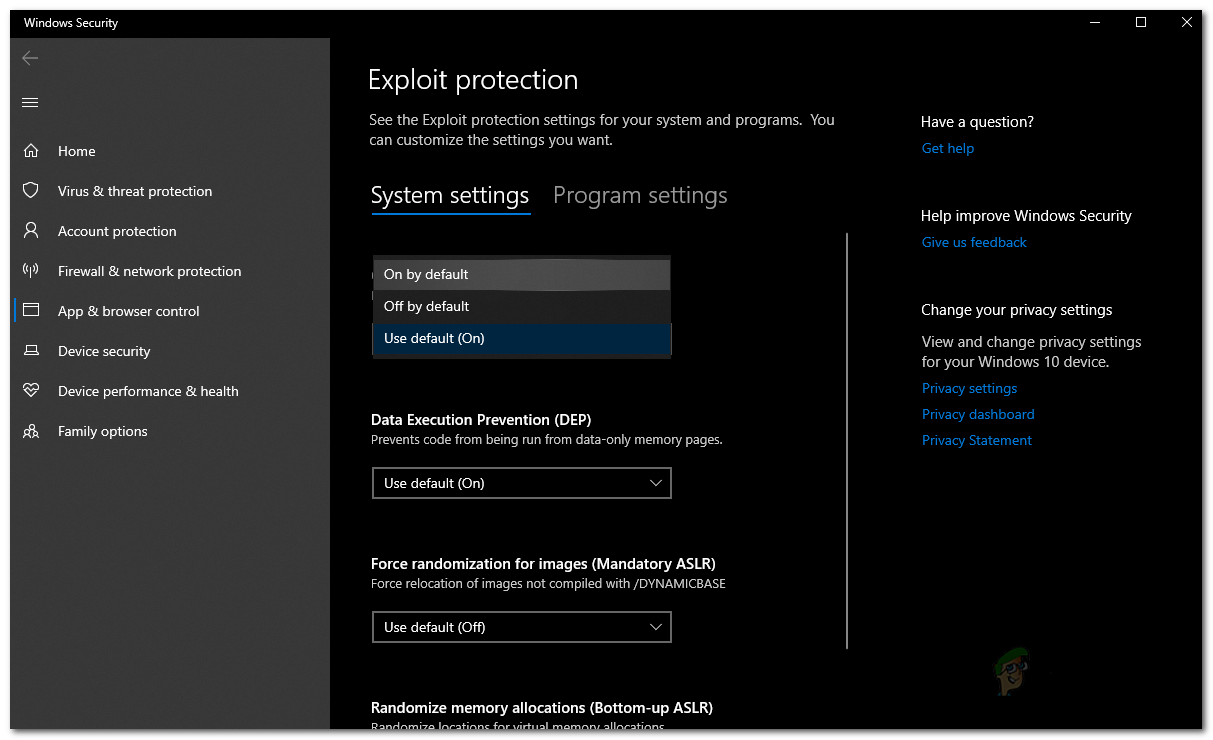
- Under System Settings, make sure the Control flow guard (CFG) is set to On by default from the drop-down menu.

Enabling Control Flow Guard via Windows Settings - And you are done. You shouldn’t get a CFG error message after this.
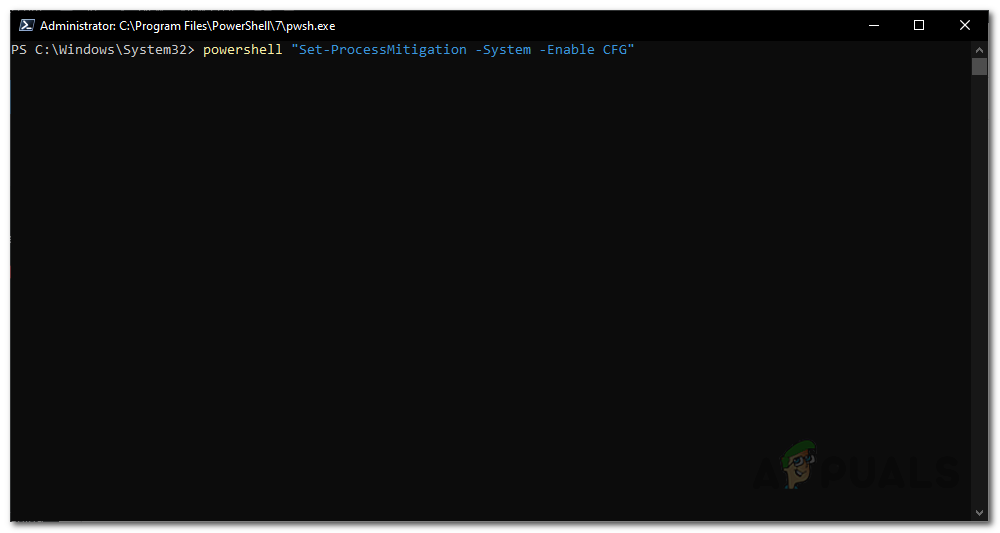
Enable Control Flow Guard through Powershell
Control Flow Guard can also be enabled through Powershell with the help of a single command. Follow the instructions given down below:
- First of all, in the Start Menu, search for Powershell. Right-click on the app and choose Run as administrator from the drop-down menu.

Opening Powershell as an Admin - Once the Powershell window is up, copy and paste the following command to enable CFG:
powershell "Set-ProcessMitigation -System -Enable CFG"

Enabling Control Flow Guard via Powershell - After doing that, CFG should be enabled.

Enable Secure Boot
In addition to the CFG requirement while using Windows 11, in some cases, you may also be required to enable Secure Boot in case it is disabled. Secure Boot is essentially a feature that allows your device to boot up using only the software or operating systems that are approved by the OEM or Original Equipment Manufacturer (OEM). Secure Boot is a requirement for Windows 11 as well so you should have it enabled if you are using the mentioned version of Windows.
This feature exists in the BIOS and that’s where you will have to enable it from. Therefore, go ahead and restart your system so that you can make your way to the BIOS. There, locate Secure Boot and enable it. Save the changes and then see if the error message still persists.
Disable Virtualization from BIOS
Virtualization is basically a hardware feature that allows your CPU to act as multiple individual CPUs as we have mentioned above. What this, as a result, does is it allows your operating system to more efficiently use the CPUs on your system. In addition to that, almost all the virtual machines software require you to enable the Virtualization feature on your BIOS. However, this is prohibited by Vanguard like most other anticheats such as FACEIT AC.
Therefore, in order to play the game, you will have to disable the virtualization feature from your BIOS. Once you have done that, you should be good to go without any issues.
Perform a Clean Boot
Finally, if none of the solutions above have resolved your problem, then it is probably because your issue is being caused by a third-party software on your system. If you have multiple applications installed, locating the culprit can be really hard. That is where clean boot comes in. This is basically a feature that allows you to start Windows with only the required services running. This means that all the third-party applications and services will be stopped from running on startup. Performing a clean boot is pretty simple. If you are able to play the game without any issues in a clean boot, you should try to enable each service one by one to see which application is actually causing the problem. Follow the instructions down below to perform a clean boot:
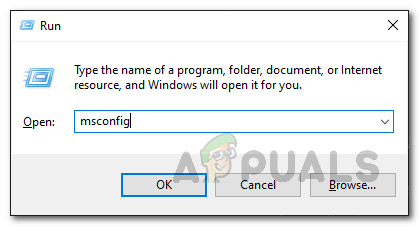
- First of all, open up the Run dialog box by pressing Windows key + R.
- Then, in the Run dialog box, type in msconfig and then hit the Enter key.

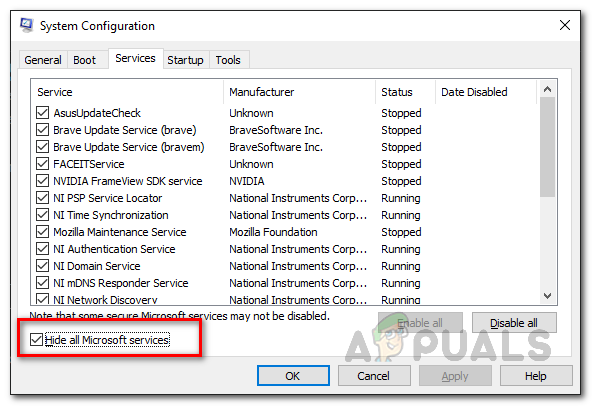
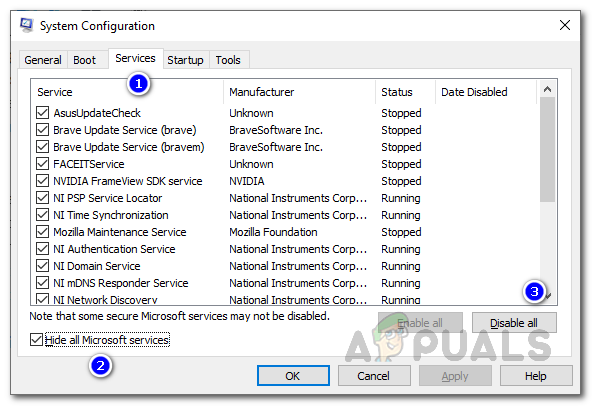
Opening System Configuration - This will open up the System Configuration window. There, switch to the Services tab.
- On the Services tab, first of all, go ahead and click the Hide all Microsoft services tickbox.

Hiding all Microsoft Services - Then, follow it up by clicking the Disable all button which will disable all of the rest services. After doing that, click Apply.
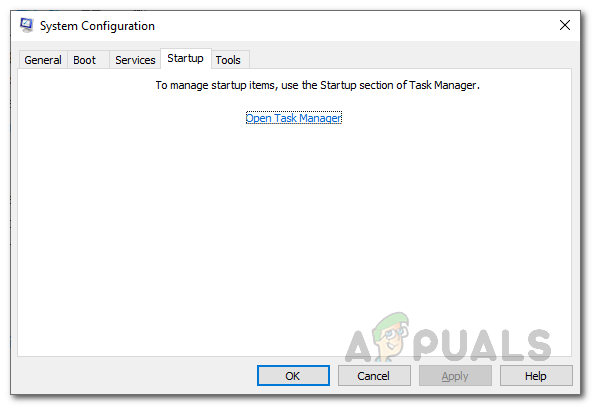
Disabling all Third-Party Services - Then, switch to the Startup tab and click on the Open Task Manager option.
System Configuration Startup Tab - On the Startup tab of the Task Manager, choose each application and click the Disable button.

Task Manager Startup Tab - After doing that, go ahead and restart your system.
- Once your PC boots up, open up the game and see if the problem persists.
Note: After locating the culprit application, do not forget to enable all of the services that we disabled earlier.
Обновление до Windows 11 доставляет проблемы игрокам Valorant. Часто появляется код ошибки VAN 1067 с диалогом, говорящим об ошибке подключения. Вам необходимо перезапустить клиент, чтобы восстановить соединение.
На самом деле, простой перезапуск не может исправить ошибку 1067 Windows 11 Valorant. Основными причинами этого являются TPM 2.0 и Secure Boot. Как вы знаете, эти два требования необходимы Windows 11, и то же самое верно для Valorant при запуске этой игры.
Кроме того, служба VGC, стороннее программное обеспечение, устаревшая Windows и многое другое также может привести к появлению VAN 1067.
К счастью, вы можете исправить ошибку VAN 1067. Перейдите к следующей части, чтобы решить проблему.
Включаем TPM 2.0 и Secure Boot
Первое решение, которое вы можете попробовать — это убедиться, что TPM 2.0 и Secure Boot включены.
- Шаг 1: Нажмите Shift + Restart, чтобы перезагрузить компьютер в среду восстановления Windows (WinRE).
- Шаг 2: Перейдите в раздел Устранение неполадок > Дополнительные параметры > Настройки микропрограммы UEFI.
- Настройки встроенного ПО UEFI
- Шаг 3: На вкладке Безопасность найдите Trusted Platform Module (TPM) и включите его. Также найдите Secure Boot и включите его. На разных ПК настройки UEFI обычно отличаются.
Перезапускаем службу VGC
Если служба VGC по какой-то причине остановлена, при открытии Valorant появится связанная ошибка VAN 1067. Поэтому проверьте и убедитесь, что она запущена.
- Шаг 1: Нажмите Win + R, чтобы открыть диалог «Выполнить», введите services.msc и нажмите OK, чтобы открыть окно «Службы».
- Шаг 2: Найдите службу vgc, дважды щелкните по ней и выберите Пуск.
- Шаг 3: Сохраните изменения, нажав Применить и ОК.
Теперь Valorant должен работать без VAN 1067 в Windows 11.
Закрыть Discord
Хотя Discord можно использовать для общения во время игры, в некоторых ситуациях он может привести к проблемам с игрой. Если вы столкнулись с кодом ошибки VAN 1067, вам необходимо закрыть Discord.
Чтобы полностью отключить Discord, щелкните правой кнопкой мыши на значке Discord и выберите Выйти из Discord
Обновление Windows 11
По словам пользователей, установка последней версии Windows 11 помогает устранить ошибку VAN 1067. Если у вас также возникла эта проблема, обновите Windows 11, чтобы устранить ошибку Valorant 1067 Windows 11.
- Шаг 1: Нажмите Win + I, чтобы открыть Настройки.
- Шаг 2: На вкладке Обновление Windows проверьте наличие обновлений. Если некоторые обновления доступны, загрузите и установите их на свой компьютер с Windows 11.
Другие советы
Кроме того, есть некоторые способы устранения ошибки VAN 1067, которые вы можете попробовать.
Выберите язык для программ не-Unicode, если ваш язык — английский. Перейдите в Настройки > Время и язык > Язык и регион > Административные языковые настройки > Изменить системную локаль, выберите английский язык, установите флажок Beta: Use Unicode UTF-8 for worldwide language support и перезагрузите компьютер.
Выполните чистую загрузку.
Если ничего не получилось, то вернитесь к Windows 10
Ошибки в играх почти никогда не являются чем-то приятным, и ошибка Van 1067, возникающая при входе в Валорант — не исключение. Ошибка просто не даёт зайти в игру, но несколько решений у неё всё же есть. На них я и предлагаю взглянуть ниже.

Первый способ
Первый способ — одна незаметная галочка в настройках языка в Windows.
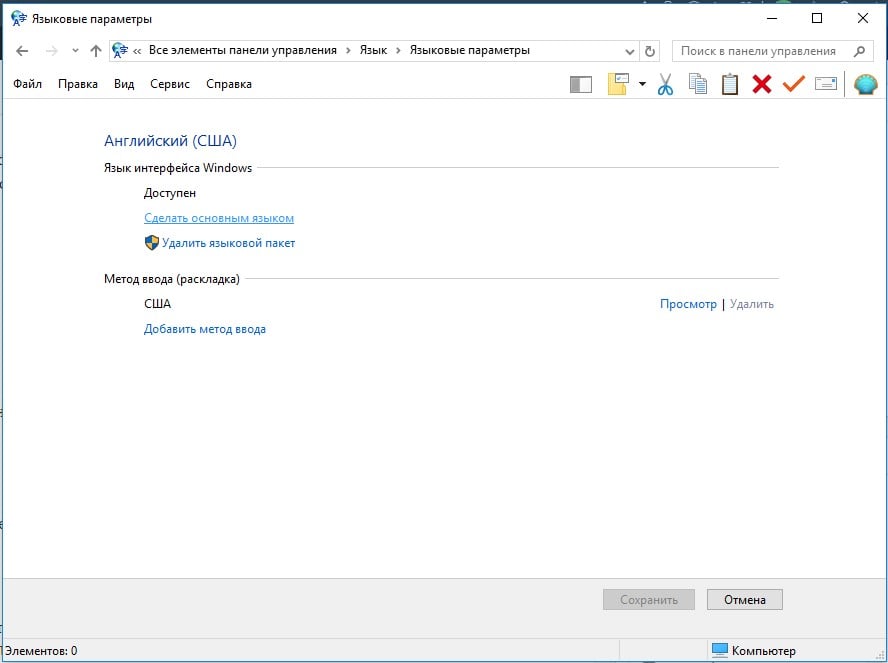
- Открываем языковые параметры Windows (Поиск -> Язык/Language -> Языковые параметры/Language settings)

- Переходим в Административные настройки языка/Administrative language settings (верхний правый угол)
- Жмём кнопку Изменить язык системы/Change system locale внизу окна

- Выбираем язык Английский (США)/English (United States) и ставим галочку «Бета-версия: Использовать Юникод (UTF-8) для поддержки языка во всём мире» («Beta: Use Unicode UTF-8 for worldwide language support»)

- Жмём «Применить«/»Apply» внизу экрана
- Перезагружаем компьютер
После этого можно пробовать заходить в игру. Если этот способ не помог, переходим ко второму.
Второй способ
Второй способ уже заметно сложнее и заставит вас неплохо побегать по настройкам системы. Но, думаю, шанс починить игру стоит того, так что продолжаем пытаться.
- Переходим в конфигурацию системы (Поиск -> Конфигурация системы/System Configuration)

- Открываем окно из поиска, открываем там вкладку Сервисы/Services и ставим галочку внизу, чтобы спрятать мешающие сервисы и быстрее найти нужный

- Проматываем список вниз и находим сервис «vgc«. Ставим галочку, если она ещё не поставлена.

- Применяем настройки
Вот вроде бы и всё, но это ещё только пол дела.
- Открываем окно Службы/Services (Поиск -> Службы)

- Кликаем курсором на пустую область справа от служб и начинаем печатать «vgc», чтобы найти нужный сервис быстрее. Не забудьте поменять раскладку на английскую (Alt + Shift)!

- Жмём правой кнопкой мыши по службе vgc и выбираем пункт «Свойства«/»Properties«
- Жмём на выпадающий список в середине (Startup Type/Тип запуска) и выбираем пункт «Automatic»/»Автоматический»

- Применяем изменения кнопкой внизу окна
- Перезагружаем компьютер и пробуем запустить игру
Способ этот более сложный, чем прошлый, но его тоже стоит попробовать, если первый не исправил ошибку Van 1067 и Валорант всё ещё не запускается. А если не помог и этот, то идём дальше.
Третий способ
Раз прошлые способы не помогли, попробуем удалить античит Riot Vanguard:
- Открываем Панель управления/Control Panel (Поиск -> Панель Управления)

- Жмём кнопку «Удалить программу»/»Uninstall a program» внизу открывшегося окна

- Проматываем список вниз до пункта Riot Vanguard
- Жмём по Riot Vanguard правой кнопкой мыши и выбираем «Удалить«/»Uninstall»

- Если появилось окно с предупреждением, жмём «Да«/»Yes»
- Запускаем Valorant, ждём скачивания античита и перезагружаем компьютер
Этот способ тоже не из лёгких. Если он тоже не помог, можно попробовать сначала перезагрузить ПК, и только потом скачивать античит, либо удалить его через командную строку, предварительно запустив её от имени администратора. Понадобятся следующие команды:
- sc delete vgc
- sc delete vgk
Четвёртый способ
Прошлые способы не помогли и ошибка Van 1067 всё ещё не даёт поиграть в Valorant? Попробуйте отключить виртуализацию в настройках BIOS.
Этот способ сложнее объяснить. На разных компьютерах интерфейс BIOS выглядит по-разному, так что и найти соответствующую настройку придётся самостоятельно, либо попробовав найти в поисковике гайд для конкретной версии.
Способы попадания в BIOS так же отличаются. Чаще всего кнопки, нужные для попадания туда — Delete или одна из F-кнопок в верхней части клавиатуры. Достаточно часто подсказки по кнопкам написаны на загрузочном экране системы, так что можно попробовать выключить компьютер и прочитать соответствующую подсказку.
- Выключаем компьютер
- Включаем и во время запуска запоминаем нужную для входа в BIOS клавишу
- Снова выключаем
- Снова включаем и нажимаем нужную кнопку во время запуска. Можно нажать несколько раз, чтобы точно успеть попасть в BIOS до загрузки компьютера
После того как вы успешно попали в BIOS, нужно найти и отключить настройки Intel VTX и Intel VTD. Называться они могут по-разному, так что стоит обращать внимания на названия вроде «Intel Virtualization Technology», «Intel VT-x»или «AMD-V».
- Находим настройку виртуализации в BIOS
- Отключаем настройку
- Выходим из BIOS, сохранив изменения
- Включаем компьютер и пробуем запустить игру
Пятый и шестой способы
Пятый способ — переустановка уже не античита, а самой игры. Наравне с перезапуском программы, её переустановка — один из самых частых способов устранения самых разных проблем.
Шестой способ — заявка в техническую поддержку игры. Если даже все приведённые выше способы не помогают решить проблему, значит, что-то явно не так. В таком случае стоит написать в техническую поддержку Валорант, при этом подробно описав свои действия и проблему. О том, как написать в техподдержку Валорант, есть отдельная статья. Советую её прочитать, если возникнут вопросы или проблемы по поводу отправки заявки.