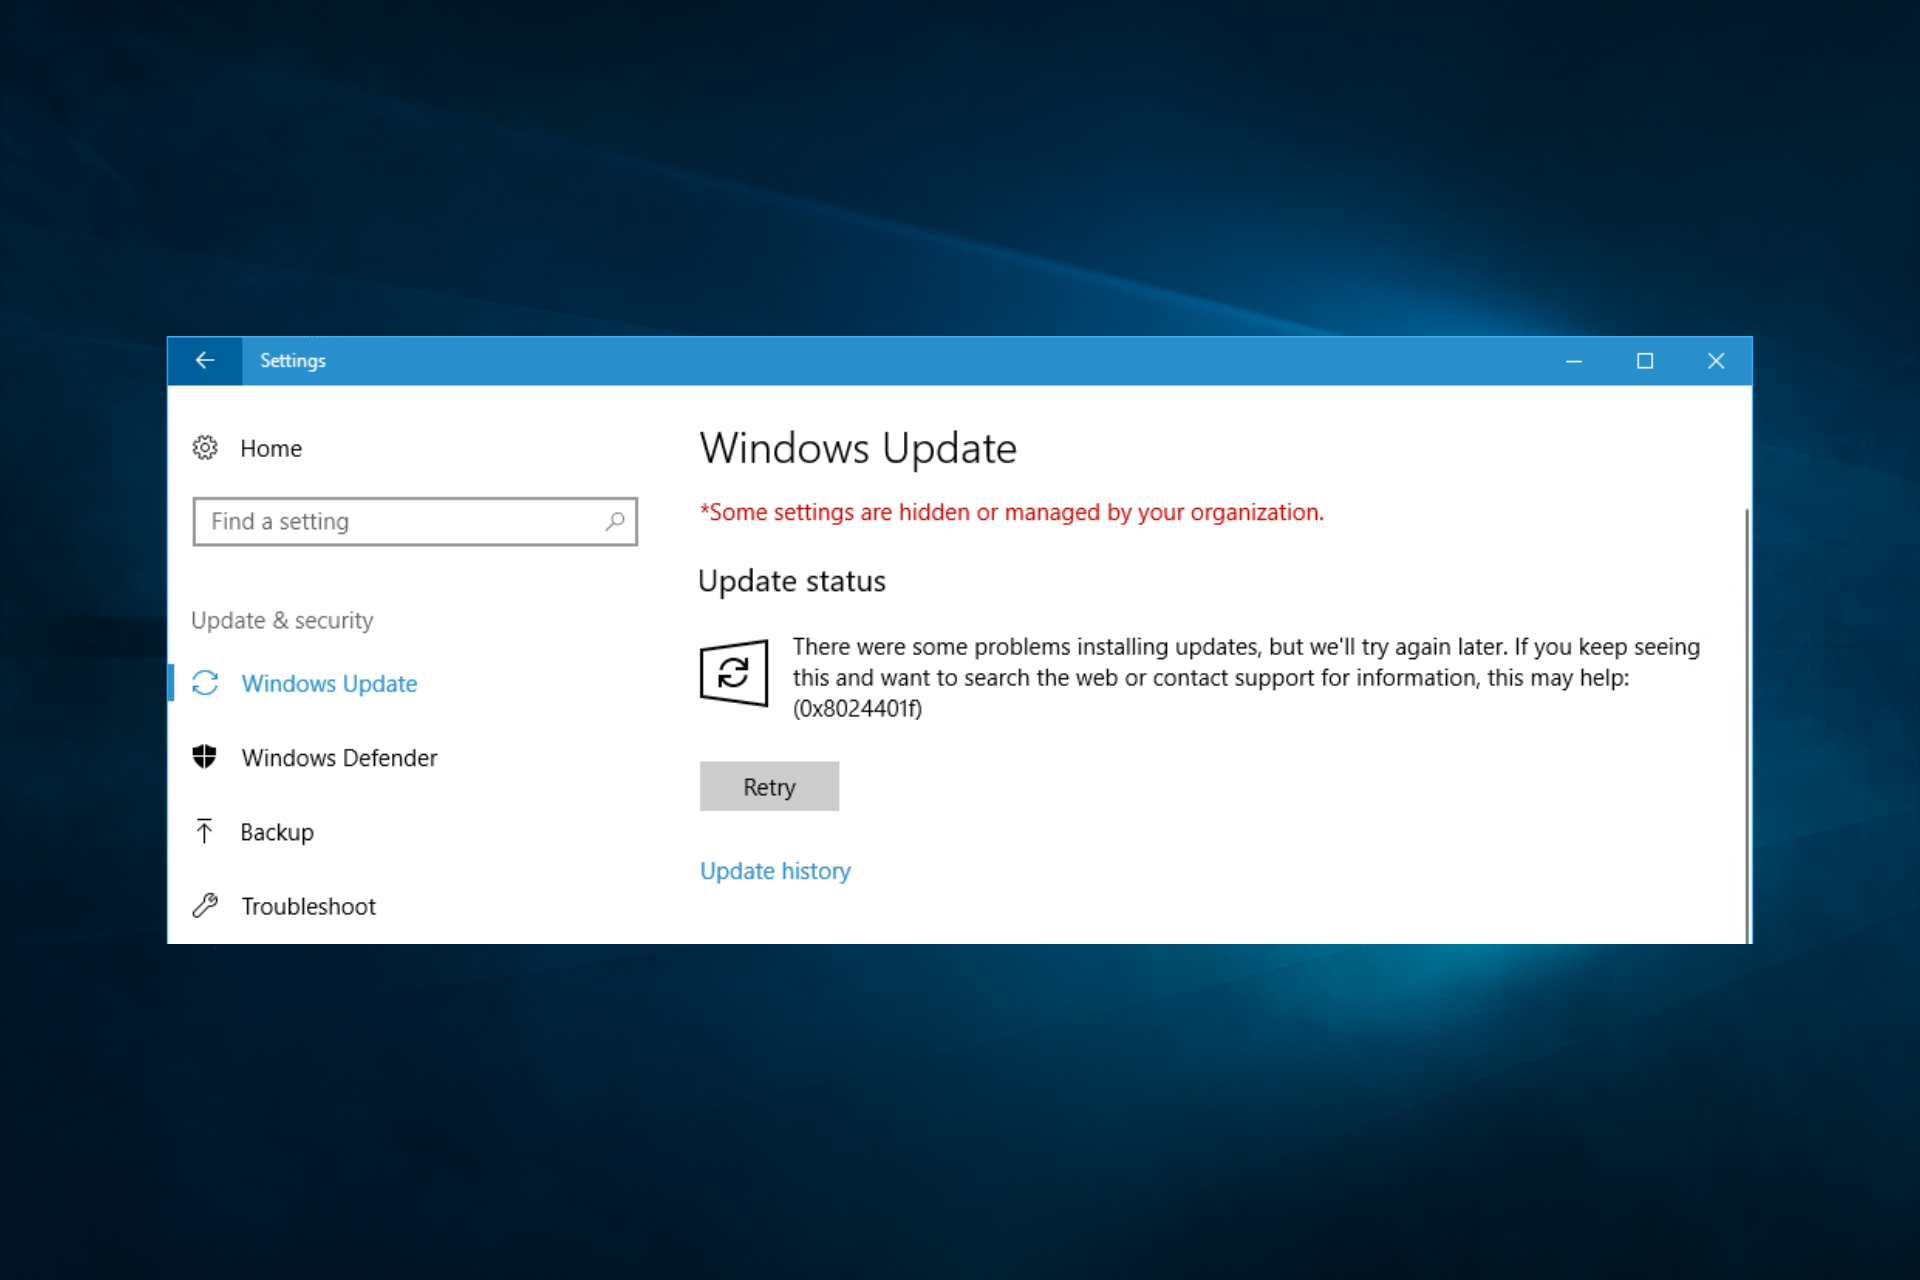
The 0x8024401f error code is usually due to connectivity issues
by Matthew Adams
Matthew is a freelancer who has produced a variety of articles on various topics related to technology. His main focus is the Windows OS and all the things… read more
Updated on
- The Windows Update error 0x8024401f is usually caused by network connectivity problems.
- Resetting the Windows Update service may fix the problem quickly.
XINSTALL BY CLICKING THE DOWNLOAD FILE
Repair all Windows Updates Errors with Fortect:
SPONSORED
Windows update failures can be annoying! With Fortect, you will get rid of errors caused by missing or corrupted files after an update. The utility maintains a repository of the original Windows system file versions, and it uses a reverse algorithm to swap out the damaged ones for good ones.
- Download Fortect and install it on your PC
- Start the tool’s scanning process to look for corrupt files that are the source of the issues
- Right-click on Start Repair to resolve security and performance issues with your computer
- Fortect has been downloaded by 0 readers this month, rated 4.4 on TrustPilot
The Windows Update error 0x8024401f has been discussed in numerous Microsoft forum threads. That issue arises when users check for Windows updates via Settings. Error 0x8024401f can also arise when users try to update apps via Microsoft Store.
As a result, Windows and app updates aren’t installed. The resolutions below are primarily for fixing error 0x8024401f in Windows 10, they might also resolve the issue in 8.1 and 11 using this guide.
What causes the Windows Update Error 0x8024401f?
Several potential causes for a Windows update error with the code 0x8024401f. Here are some common ones:
- Network connectivity issues – If your computer cannot connect to the internet or the update servers, it can cause the update to fail with this error.
- Firewall or antivirus software – If your firewall or antivirus software is blocking the update, it can cause this error. You may need to temporarily disable these programs to see if they are causing the issue.
- Insufficient hard drive space – If your hard drive is full or almost full, it can cause the update to fail. Make sure you have enough free space on your hard drive before installing the update again.
- Corrupted update files – Sometimes, the update files can become corrupted during the download process. You may need to delete the temporary update files and try downloading the update again.
- Corrupted system files – If your system files are corrupt, it can cause the update to fail. You may be able to fix this by running the System File Checker tool.
- Pending updates – If other updates are waiting to be installed, it can cause this error. Make sure to install any pending updates before installing the update causing the issue.
These are some of the most common causes of this error. I hope this helps!
How do I fix the Windows Update error 0x8024401f?
- What causes the Windows Update Error 0x8024401f?
- How do I fix the Windows Update error 0x8024401f?
- 1. Run the Windows Update troubleshooter
- 2. Turn off third-party antivirus software
- 3. Don’t utilize a proxy server
- 4. Reset Windows Update
- 5. Reset the Microsoft Store cache
- 6. Reset your Windows OS
1. Run the Windows Update troubleshooter
Windows Update troubleshooter doesn’t always fix update errors, but it’s still worth a shot nonetheless.
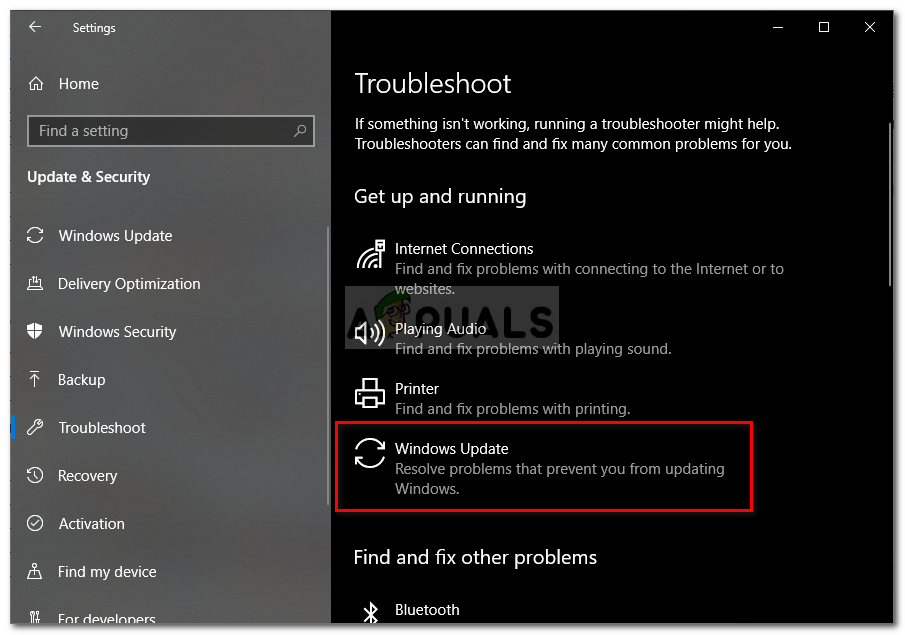
- Press the Windows key + S keyboard shortcut to open the Type here to search box.
- Input troubleshoot in the search box, and click Troubleshoot settings.

- Next, click Windows Update and select its Run the troubleshooter option.

- Click the Apply this fix option if the troubleshooter presents a resolution to you.


2. Turn off third-party antivirus software
Some users have said they fixed error 0x8024401f by disabling their third-party antivirus software, such as Comodo, McAfee, and Sophos. To do so, right-click the system tray icon for your antivirus software to open a context menu.
You can usually select a disable or turn off option on an antivirus utility’s context menu. In addition, select an option to disable the utility’s firewall if its context menu includes one.

If you discover that the antivirus is causing the problem, then you should consider getting a better antivirus.
- Windows 11 23H2: Top Features, coming September 26
- Adding layers in Windows 11’s Paint greatly increases RAM usage
- How to copy texts from images with Snipping Tool’s Text Action
3. Don’t utilize a proxy server
- Click the Type here to search button (with the magnify glass icon) on the taskbar and type proxy.
- Click Proxy settings to open the window in the shot directly below.
- Toggle the Use a proxy server option off.

4. Reset Windows Update
- To do that, enter Command Prompt in the Type here to search box.
- Right-click Command Prompt and choose the Run as administrator option.
- Input these separate commands:
net stop wuauserv net stop cryptSvc net stop bits net stop msiserver
- Open the C: > Windows folder within File Explorer.
- Right-click the SoftwareDistribution subfolder there to select Rename.

- Input SoftwareDistribution.old as the new folder title, and press the Return key.
- Open the System32 folder, which is in the Windows folder.

- Then rename the catroot2 subfolder to Catroot2.old.
- Open an elevated Command Prompt window again.
- Enter these commands to restart the services:
net start wuauserv net start cryptSvc net start bits net start msiserver
- Close the Command Prompt, and restart Windows.


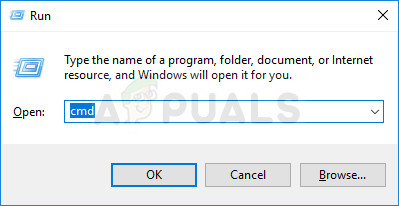
5. Reset the Microsoft Store cache
If you need to fix error 0x8024401f for MS Store app updates, open the Command Prompt as administrator. Then enter this command: wsreset.exe. Press the Return key after entering that command.

6. Reset your Windows OS
- Type the keyword reset in Windows 10’s search box.
- Click Reset this PC to open the Recovery tab in Settings.
- Click Get started to open Reset this PC.

- Click the Keep my files option.
- Click Next to continue, and press the Reset button.


A few users have also confirmed that resetting Windows 10 can fix error 0x8024401f.
Those are some of the most likely fixes for error 0x8024401f. We would like to know which solutions worked best for you, so leave us your feedback in the form of a message in the comments section below.
![]()

Содержание
- Что вызывает ошибку Центра обновления Windows 0x8024401f?
Некоторые пользователи Windows обращаются к нам с вопросами после того, как не смогли обновить свою сборку ОС до последней доступной версии. Большинство пользователей сообщают, что они видят сообщение об ошибке 0x8024401f после нажатия кнопки Проверить наличие обновлений кнопка. Другие пользователи сталкиваются с этой проблемой при попытке обновить приложение UWP через Магазин Windows. Как оказалось, проблема не только в определенной версии Windows, поскольку подтверждено, что она появляется в Windows 7, Windows 8.1 и Windows 10.

Мы исследовали эту особенность, проанализировав различные отчеты пользователей и попробовав различные исправления, которые другие пользователи в аналогичной ситуации успешно развернули для решения этой конкретной проблемы. Как оказалось, этот код ошибки может быть вызван целым рядом различных виновников. Вот краткий список сценариев, в которых может возникнуть код ошибки 0x8024401f:
- Стороннее вмешательство в систему безопасности — За этот конкретный код ошибки также может быть ответственен чрезмерно защищенный пакет. Sophos, McAfee и еще несколько потенциальных подозреваемых, которых обычно называют виновными в таком поведении. Если этот сценарий применим, вы можете полностью решить проблему, отключив защиту в реальном времени при установке обновления или полностью удалив пакет безопасности.
- Плохое обновление Windows — Есть несколько плохих обновлений Windows, которые могут вызвать именно эту ошибку. К счастью, Microsoft выпустила исправление для этой проблемы через несколько недель после того, как проблема была впервые обнаружена. Чтобы воспользоваться этим, просто запустите средство устранения неполадок Центра обновления Windows и примените рекомендованное исправление.
- Поврежден кеш Магазина Windows — Если вы видите этот конкретный код ошибки при попытке обновить приложение UWP, скорее всего, вы имеете дело с поврежденным кешем Магазина Windows. Если этот сценарий применим, вы сможете решить проблему, сбросив кеш Магазина Windows. Вы можете сделать это либо через графический интерфейс Windows, либо через терминал CMD.
- Мешает прокси или VPN-соединение — Частное соединение, поддерживаемое через прокси-сервер или решение VPN, может побудить агент установки Windows определить, что ваше соединение небезопасно, и отказаться от обновления через официальные каналы. В этом случае вы можете устранить препятствия на пути к безопасности и разрешить установку, отключив / удалив прокси-сервер или VPN-клиент.
Если вы в настоящее время пытаетесь решить ту же самую 0x8024401f ошибка кода, эта статья предоставит вам несколько различных стратегий восстановления, которые вы можете использовать для устранения проблемы. Внизу. вы найдете несколько различных методов, эффективность которых подтверждена другими затронутыми пользователями.
Чтобы оставаться максимально эффективными, мы советуем вам следовать приведенным ниже потенциальным исправлениям в том же порядке, в котором они расположены. Чтобы сделать весь процесс максимально эффективным, мы упорядочили методы на основе сложности и эффективности. В конце концов, вы должны наткнуться на исправление, которое устранит проблему независимо от виновника ошибки.
Метод 1: отключение / удаление стороннего AV
Одна из наиболее вероятных причин, которая вызовет 0x8024401f ошибка код при попытке установить ожидающее обновление Windows является чрезмерно защищающим антивирусным пакетом. Sophos, McAfee, AVAST, Comodo и несколько других сторонних программ безопасности, которые, по мнению затронутых нами пользователей, несут ответственность за эту проблему.
Если этот сценарий применим, вы сможете решить проблему, отключив защиту антивируса в реальном времени или удалив все вместе и вернувшись к программе безопасности по умолчанию (Защитник Windows).
Если вы в настоящее время используете сторонний пакет и подозреваете, что он может быть ответственным за появление 0x8024401f ошибка кода, вам следует начать с отключения защиты в реальном времени. Конечно, шаги этой процедуры будут отличаться в зависимости от того, какой антивирусный пакет вы используете, но обычно вы можете сделать это прямо из контекстного меню панели задач.

Если отключение защиты в режиме реального времени не помогло вам решить проблему, это не означает, что проблема не вызвана чрезмерной защитой антивирусного пакета. Некоторые решения безопасности (особенно те, которые включают межсетевой экран) будут поддерживать некоторые комплекты безопасности даже в тех случаях, когда пользователь отключает защиту в реальном времени.
Имея это в виду, единственный способ убедиться, что проблема не вызвана сторонним пакетом, — это полностью удалить программу и выполнить действия, необходимые для того, чтобы убедиться, что вы не оставляете никаких остатков файлов. Если вы решили пойти радикальным путем, то можете прочитать эту статью (Вот), чтобы полностью удалить ваш AV-пакет, не оставляя после себя каких-либо оставшихся файлов.
После удаления стороннего AV перезагрузите компьютер и посмотрите, будет ли проблема решена при следующем запуске системы. Если 0x8024401f ошибка код все еще возникает, когда вы пытаетесь установить ожидающее обновление, перейдите к следующему способу ниже.
Метод 2: запуск средства устранения неполадок Центра обновления Windows
Как выясняется, если проблема была вызвана другим плохим обновлением Windows, скорее всего, ваша ОС способна решить проблему автоматически. В Windows 10 Microsoft выпустила исправление для этой конкретной проблемы с помощью стратегии автоматического восстановления, включенной в средство устранения неполадок Центра обновления Windows.
Несколько пользователей, которые также пытались решить проблему 0x8024401f ошибка code сообщили, что проблема была полностью решена после запуска средства устранения неполадок Центра обновления Windows. Для некоторых из них эта процедура закончилась автоматическим устранением проблемы.
Средство устранения неполадок Центра обновления Windows — это встроенная утилита, которая содержит широкий выбор стратегий восстановления, которые будут применяться автоматически при обнаружении покрываемой проблемы. Вот краткое руководство по запуску средства устранения неполадок Центра обновления Windows:
- Нажмите Клавиша Windows + R открыть Бегать диалоговое окно. Затем введите «Ms-settings: устранение неполадок» и нажмите Войти открыть Исправление проблем вкладка Настройки приложение.

- Перейдя на вкладку «Устранение неполадок», переместите курсор мыши в правую часть экрана и перейдите к Вставай и работай раздел. Когда вы приедете, нажмите на Центр обновления Windows, затем нажмите Запустите средство устранения неполадок.
- После запуска утилиты терпеливо дождитесь завершения первоначального сканирования. Этот процесс определит, применима ли какая-либо из стратегий ремонта, включенных в программу, к проблеме, с которой вы имеете дело.
- Если подходящее исправление найдено, вам будет представлено окно, в котором вы можете нажать на Применить это исправление для обеспечения соблюдения стратегии ремонта. В зависимости от типа исправления вам может потребоваться выполнить некоторые дополнительные действия, чтобы применить стратегию исправления.
- Как только исправление вступит в силу, перезагрузите компьютер еще раз и посмотрите, будет ли проблема решена при следующем запуске системы.


Если то же самое 0x8024401f ошибка код все еще возникает, перейдите к следующему методу ниже.
Метод 3: сброс кеша Магазина Windows
Если вы столкнулись с 0x8024401f ошибка кода при попытке обновить приложение UWP (универсальная платформа Windows) через Магазин Windows, скорее всего, процесс обновления остановлен из-за некоторой степени поврежденных системных файлов.
После изучения различных случаев такого рода кажется, что в большинстве случаев проблема возникает после того, как сканер безопасности завершает карантин некоторых элементов, необходимых для процесса обновления. Другой возможный сценарий — неудачное обновление, которое привело к неудачной установке новой версии Microsoft Store.
Несколько пользователей, которые также сталкивались с этой проблемой, сообщили, что им удалось исправить 0x8024401f ошибка путем сброса Магазина Windows и всех связанных компонентов.
Есть два способа сброса кеша Магазина Windows в Windows 10. Хотя первый вариант более быстрый, он предполагает выполнение действий с терминала CMD. Если вы не уверены в терминале CMD или в использовании команд для выполнения работы, второй вариант может быть более привлекательным, поскольку он позволяет выполнять всю операцию из графического интерфейса Windows.
Не стесняйтесь следовать тому методу, который вам удобнее:
Сброс кеша Магазина Windows через CMD
- Нажмите Клавиша Windows + R , чтобы открыть диалоговое окно «Выполнить». Затем введите ‘Cmd’ внутри текстового поля и нажмите Ctrl + Shift + Enter , чтобы открыть командную строку с правами администратора. В ответ на запрос UAC (Контроль учетных записей пользователей) нажмите Да, чтобы предоставить доступ администратора.
- Как только вы окажетесь в командной строке с повышенными привилегиями, введите следующую команду и нажмите Войти для сброса Магазина Windows вместе со всеми зависимостями:
wsreset.exe
- После успешной обработки команды перезагрузите компьютер и посмотрите, решается ли проблема при следующем запуске системы.


Сброс кеша Магазина Windows через приложение Настройки
- Откройте Бегать диалоговое окно, нажав Клавиша Windows + R. Затем введите «‘ms-settings: appsfeatures » и нажмите Войти открыть Приложения и функции меню Настройки приложение.
- Как только вы окажетесь внутри Приложение и функции прокрутите список установленных приложений UWP вниз и найдите запись в Microsoft Store.
- После того, как вам удастся найти правильное приложение, нажмите на Расширенные опции связанная с ним гиперссылка (в Microsoft Corporation).
- Когда вы окажетесь в меню дополнительных параметров в Microsoft Store, прокрутите вниз до Сброс вкладку и нажмите на Сброс кнопку, чтобы начать процесс очистки кеша.
- Дождитесь завершения процесса, затем перезагрузите компьютер и посмотрите, будет ли проблема решена при следующем запуске системы.

Если вы все еще сталкиваетесь с 0x8024401f ошибка кода даже после сброса кеша Магазина Windows, перейдите к следующему способу ниже.
Метод 4: отключение VPN-клиента прокси-сервера (если применимо)
Если вы зашли так далеко безрезультатно и используете прокси-сервер или решение VPN для сохранения анонимности при серфинге, скорее всего, ваш прокси / VPN конфликтует с клиентом Центра обновления Windows. Вы можете столкнуться с 0x8024401f ошибка код, потому что агент установки Windows не доверяет вашему частному соединению, поэтому установка обновления никогда не будет разрешена.
Если этот сценарий применим к вашему текущему сценарию, вы сможете решить проблему, отключив / удалив прокси-сервер или VPN-клиент. После этого и перезагрузки компьютера у агента установки не будет причин не доверять вашему подключению, и он позволит установить обновление Windows / app.
В зависимости от того, используете ли вы прокси-сервер или VPN-клиент, следуйте инструкциям по остановке частного подключения:
Отключение прокси-сервера
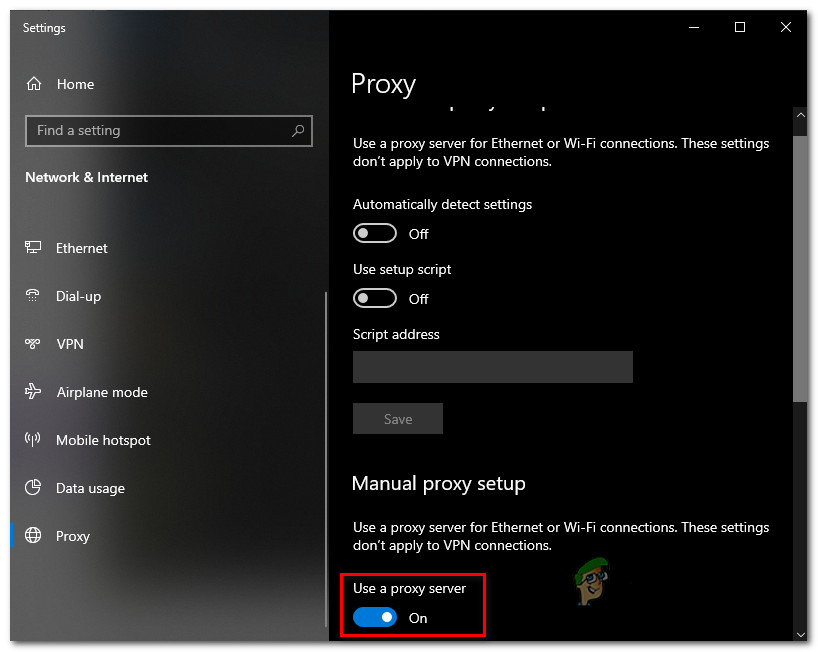
- Нажмите Клавиша Windows + R , чтобы открыть диалоговое окно «Выполнить». Затем введите «ms-настройки: сетевой проксиВнутри текстового поля и нажмите Войти открыть Прокси вкладка Настройки сети и Интернета меню.
- Войдя в меню прокси, перейдите в правую часть экрана, затем прокрутите вниз до Ручная настройка прокси.
- Когда вы приедете в Ручная настройка прокси раздел, просто отключите переключатель, связанный с Используйте прокси-сервер.
- Перезагрузите компьютер и посмотрите, исчезнет ли ошибка при следующем запуске системы.

Удаление VPN-клиента
- Откройте Бегать диалоговое окно, нажав Клавиша Windows + R. Затем введите «Appwiz.cpl» и нажмите Войти открыть Программы и особенности окно.
- Как только вы окажетесь внутри Программы и особенности прокрутите список установленных приложений и найдите стороннее клиентское решение VPN, которое вы используете в настоящее время. Когда вы его увидите, щелкните его правой кнопкой мыши и выберите Удалить из контекстного меню.
- На экране удаления следуйте инструкциям на экране, чтобы завершить удаление, затем перезагрузите компьютер и посмотрите, будет ли проблема решена при следующем запуске системы.

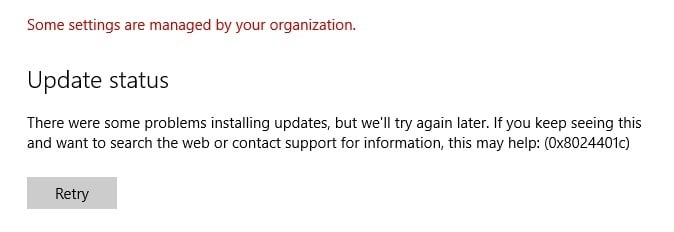
Ошибка 0x8024401c не дает Windows 10 установить обновления. Это случается как для ПК, которые качают апдейты с серверов Microsoft, так и клиентских машин, обновляющихся по закрытой сети организации. Такая неполадка означает, что превышен лимит ожидания ответа сервера.
Методы решения ошибки 0x8024401c
Первоочередно убедитесь, что соединение с сервером не блокируется чем-либо. Это может быть файрвол или вредоносное ПО. Далее переходите к следующим способам.
№1: копаемся в реестре
Запускаем Редактор реестра, переходим в ветку HKEY_LOCAL_MACHINE\Software\Policies\Microsoft\Windows\WindowsUpdate. В правом окне отыскиваем в этой ветке строку UseWUServer. Убедитесь, что в ней установлено значение 0. Перегружаем ПК, повторяем попытку обновления.
№2: применяем другое сетевое устройство
Иногда помогает использование иного роутера, сетевой платы или модема.
№3: играемся с обновлениями (при обновлении внутри рабочей сети)
В некоторых случаях отмечалось — если вручную обновить клиентские ПК на Windows 10 build 1703 и запустить предварительно установленное Средство устранения неполадок Центра обновления Windows, то проблема исчезала.
№4: изменяем настройки сервера обновления (при обновлении внутри рабочей сети)
Увеличьте таймауты и свободные ресурсы сервера, с которого устанавливают обновления клиентские компьютеры. Зачастую ошибка 0x8024401c возникает из-за того, что клиент и сервер на некотором этапе застопориваются и процедура автоматически прекращается.
Some Windows users have been reaching us with questions after being unable to update their OS build to the latest version available. Most users are reporting that they see the error message 0x8024401f after they click the Check for Updates button. Other users are encountering this issue while trying to update a UWP app via the Windows Store. As it turns out, the issue is not exclusive to a certain Windows version as it’s confirmed to appear on Windows 7, Windows 8.1 and Windows 10.
What is causing the Windows Update error 0x8024401f?
We investigated this particular by analyzing various user reports and by trying out different fixes that other users in a similar situation have successfully deployed to fix this particular problem. As it turns out, this error code can be caused by a collection of different culprits. Here’s a shortlist of scenario in which the 0x8024401f error code might occur:
- 3rd party security interference – An overprotective suite can also be responsible for this particular error code. Sophos, McAfee and a couple of others are potential suspects that are commonly pointed out as culprits that will trigger this behavior. If this scenario is applicable, you can fix the issue entirely bu disabling the real-time protection while installing the update or by uninstalling the security suite altogether.
- Bad Windows update – There are a couple of bad Windows updates with the potential of introducing this particular error. Fortunately, Microsoft has released a hotfix for this issue several weeks after the problem was first introduced. To take advantage of it, simply run the Windows Update troubleshooter and apply the recommended hotfix.
- Corrupted Windows Store cache – If you’re seeing this particular error code while trying to update a UWP application, chances are you’re dealing with a corrupted Windows Store cache. If this scenario is applicable, you will be able to resolve the issue by resetting the Windows Store cache. You can do this either via the Windows GUI or via a CMD terminal.
- Interfering Proxy or VPN connection – A private connection maintained via a proxy server or a VPN solution might prompt the Windows installation agent to determined that your connection is unsafe and refuse to update through the official channels. In this case, you can eliminate the security roadblocks and allow the installation to take place by disabling/ uninstalling the Proxy server or VPN client.
If you’re currently struggling to resolve the very same 0x8024401f error code, this article will provide you with a couple of different repair strategies that you can use to troubleshoot the issue away. Down below. you’ll find several different methods that have been confirmed to be effective by other affected users.
To remain as efficient as possible, we advise you to follow the potential fixes below in the same order that they are arranged in. To make the whole process as efficient as possible, we arranged the methods based on difficulty and efficiency. Eventually, you should stumble upon a fix that will fix the problem regardless of the culprit responsible for the error.
Method 1: Disabling / Uninstalling 3rd party AV
One of the most probable causes that will trigger the 0x8024401f error code when trying to install a pending Windows update is an overprotective AV suite. Sophos, McAfee, AVAST, Comodo and a couple of other 3rd party security suite we’re singled out by affected users as being responsible for this issue.
If this scenario is applicable, you will be able to resolve the issue by either disabling the real-time protection of the AV or by uninstalling it all together and revert to the default security program (Windows Defender).
If you’re currently using a 3rd party suite and you’re suspecting that it might be responsible for the apparition of the 0x8024401f error code, you should start by disabling the real-time protection. Of course, the steps of this procedure will be different depending on which AV suite you’re using, but you can typically do it directly from the taskbar context menu.

If disabling the real-time protection didn’t resolve the issue for you, it doesn’t mean that the issue is not being caused by an overprotective AV suite. Certain security solutions (particularly ones that include a Firewall) will maintain some security suites even in those instances where the user disables the real-time protection.
With this in mind, the only way to ensure that the issue is not being caused by a 3rd party suite is to uninstall the program altogether and follow the steps necessary to ensure that you’re not leaving behind any leftover files. If you decide to go the radical route, you can follow this article (here) to completely uninstall your AV suite without leaving behind any leftover files.
Once you remove the 3rd party AV, restart your computer and see if the issue is resolved at the next system startup. If the 0x8024401f error code is still occurring when you try to install a pending update, move down to the next method below.
Method 2: Running the Windows Update troubleshooter
As it turns out, if the issue was introduced by another bad Windows Update, chances are your OS is capable of resolving the issue automatically. On Windows 10, Microsoft has released a hotfix for this particular issue via an automated repair strategy included inside the Windows Update troubleshooter.
Several users that were also struggling to resolve the 0x8024401f error code have reported that the issue was resolved entirely after they ran the Windows Update troubleshooter. For some of them, this procedure ended up fixing the problem automatically.
The Windows Update troubleshooter is a built-in utility that contains a wide selection of repair strategies that will be enforced automatically if a covered problem is identified. Here’s a short guide on running the Windows Update troubleshooter:
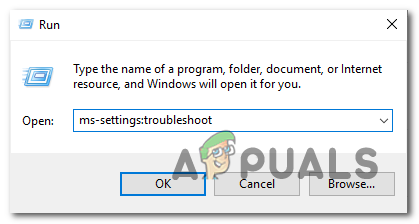
- Press Windows key + R to open up a Run dialog box. Next, type “ms-settings:troubleshoot” and press Enter to open up the Troubleshooting tab of the Settings app.

Opening the Troubleshooting tab of the Settings app via a Run box - Once you’re inside the Troubleshooting tab, move your mouse cursor to the right-hand section of the screen and navigate to the Get up and running section. When you get there, click on Windows Update, then click on Run the troubleshooter.

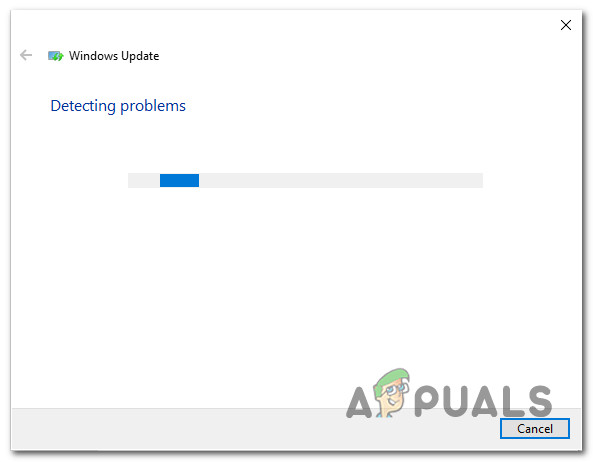
Running Windows Update Troubleshooter - Once the utility is started, wait patiently until the initial scan is complete. This process will determine whether any of the repair strategies included with the utility apply to the problem that you’re dealing with.

Detecting problem with Windows Update - If a suitable fix is identified, you will be presented with a window in which you can click on Apply this Fix to enforce the repair strategy. Depending on the type of fix, you might need to follow some additional steps to enforce the repair strategy.

Apply this fix - Once the fix is enforced, restart your computer once again and see if the issue is resolved at the next system startup.

If the same 0x8024401f error code is still occurring, move down to the next method below.
Method 3: Resetting the Windows Store cache
If you’re encountering the 0x8024401f error code while trying to update a UWP (Universal Windows Platform) app via Windows Store, chances are the updating process is being stopped by some degree of corrupted system files.
After looking at various occurrences of this kind, it seems like in most cases, the issue appears after a security scanner ends up quarantining some items essential to the updating process. Another possible scenario is a botched update that ended up botching the installation of the new Microsoft Store version.
Several users that were also encountering this issue have reported that they managed to fix the 0x8024401f error by resetting Windows Store and all associated components.
There are two ways of resetting the Windows Store cache on Windows 10. Even though the first option is quicker, it involves doing things from a CMD terminal. If you’re not confident with the CMD terminal or using commands to get the job done, then the second option might be more appealing since it allows you to perform the whole operation from the Windows GUI.
Feel free to follow whichever method you feel more comfortable with:
Resetting Windows Store cache via CMD
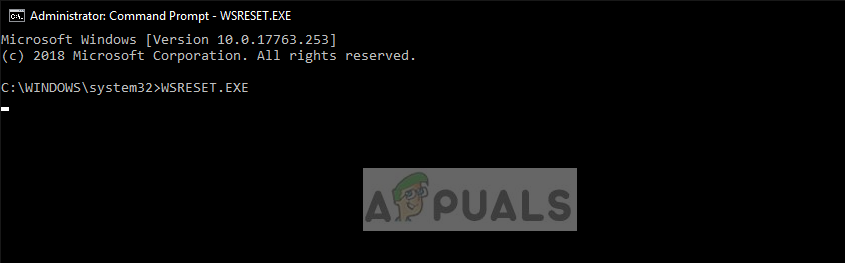
- Press Windows key + R to open up a Run dialog box. Next, type ‘cmd’ inside the text box and press Ctrl + Shift + Enter to open up a Command Prompt with administrative privileges. When prompted by the UAC (User Account Control), click Yes to grant admin access.

Running Command Prompt as an administrator - Once you’re inside the elevated Command Prompt, type the following command and hit Enter to reset Windows Store along with all dependencies:
wsreset.exe

Resetting Windows Store - After the command is processed successfully, restart your computer and see if the issue is being resolved at the next system startup.
Resetting the Windows Store cache via the Settings app
- Open a Run dialog box by pressing Windows key + R. Then, type “‘ms-settings:appsfeatures” and press Enter to open up the Apps & Features menu of the Settings app.
- Once you’re inside the App & Features screen, scroll down through the list of installed UWP applications and locate the Microsoft Store entry.
- After you manage to find the correct application, click on the Advanced options hyperlink associated with it (under Microsoft Corporation).
- Once you’re inside the Advanced options menu of the Microsoft Store, scroll down to the Reset tab and click on the Reset button to initiate the process of clearing the cache.
- Wait until the process is complete, then reboot your machine and see if the issue is resolved at the next system startup.

If you’re still encountering the 0x8024401f error code even after resetting the cache of Windows Store, move down to the next method below.
Method 4: Disabling Proxy server VPN client (if applicable)
If you’ve come this far without a result and you’re using a proxy server or a VPN solution to maintain your surfing anonymity, chances are your proxy/VPN is conflicting with the Windows Update client. You may be encountering the 0x8024401f error code because the Windows installation agent does not trust your private connection, so the update is never allowed to be installed.
If this scenario applies to your current scenario, you will be able to resolve the issue by disabling/ uninstalling the Proxy server or VPN client. After doing this and restarting your computer, the installation agent will have no reason not to trust your connection and will allow the Windows/ app update to be installed.
Depending on if you’re using a Proxy server or a VPN client, follow the guide applicable towards stopping the private connection:
Disabling the Proxy Server
- Press Windows key + R to open up a Run dialog box. Next, type “ms-settings:network-proxy” inside the text box and press Enter to open up the Proxy tab of the Network & Internet settings menu.

Opening the Proxy menu via a Run command - Once you’re inside the proxy menu, move to the right section of the screen, then scroll down to Manual Proxy Setup.
- When you arrive at the Manual proxy setup section, simply disable the toggle associated with Use a proxy server.

Disabling the use of a proxy server - Restart your computer and see if the error is resolved at the next system startup.

Uninstalling the VPN client
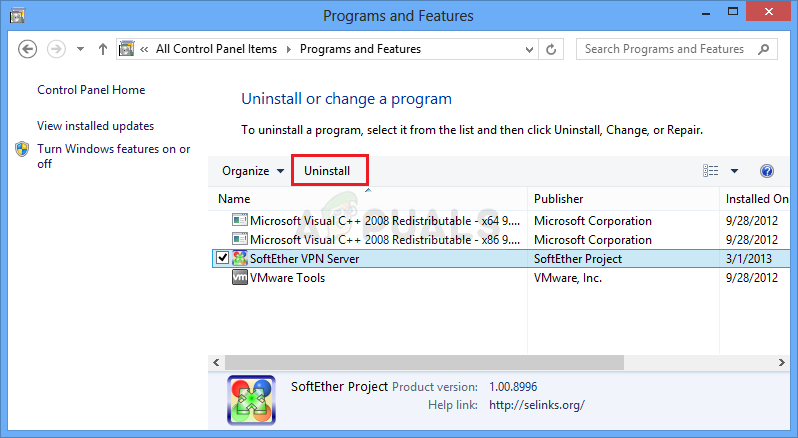
- Open a Run dialog box by pressing Windows key + R. Then, type “appwiz.cpl’ and press Enter to open up the Programs and Features window.
Type appwiz.cpl and Press Enter to Open Installed Programs List - Once you’re inside the Programs and Features screen, scroll down through the list of installed applications and locate the 3rd party VPN client solution that you’re currently using. When you see it, right-click on it and choose Uninstall from the context menu.

Uninstalling a VPN tool - From the uninstallation screen, follow the on-screen prompt to complete the uninstallation, then restart your computer and see if the issue has been resolved at the next system startup.

У одного из заказчиков столкнулись с проблемой обновлений новых ПК с Windows 10 1607 и Windows Server 2016 с внутреннего WSUS сервера (на Windows Server 2012 R2). Компьютеры Windows 10 появляются в консоли WSUS, но при запуске поиска обновлений, клиент очень долго пытается их найти и возвращает ошибку 0x8024401c.
There were some problems installing updates, but we’ll try again later. If you keep seeing this and want to search the web or contact support for information, this may help: (0x8024401c)
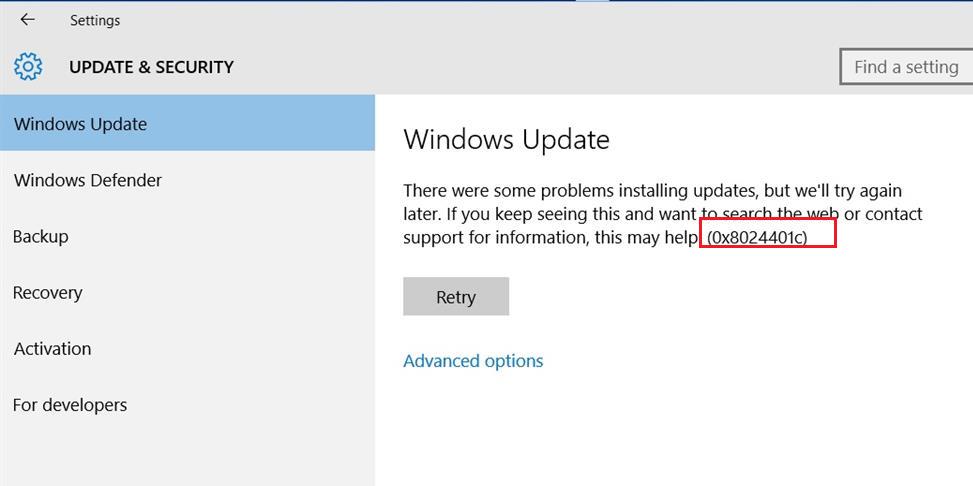
Согласно списка кодов ошибок центра обновления Windows ошибка 0x8024401C означает превышение таймаута ответа от клиента: WU_E_PT_HTTP_STATUS_REQUEST_TIMEOUT — HTTP status 408 — the server timed out waiting for the request.
В новом журнале логов службы Windows Update Windows 10 при этом также периодически фиксируется ошибка, связанная с таймаутом ответа WSUS.
2017-05-30 14:11:24:870  816 1244 WS WARNING: There was an error communicating with the endpoint at 'http://msk-wsus:8530/ClientWebService/client.asmx'.
2017-05-30 14:11:24:870  816 1244 WS WARNING: There was an error receiving the HTTP reply.
2017-05-30 14:11:24:870  816 1244 WS WARNING: The operation did not complete within the time allotted.
2017-05-30 14:11:24:870  816 1244 WS WARNING: The operation timed out
Сама страница ‘
http://msk-wsus:8530/ClientWebService/client.asmx
‘ при этом с клиента доступна и открывается, т.е. возникает такое ощущение, что сервер WSUS или клиент просто не успевают выполнить некую операцию и клиент отваливается по таймауту. Возможно при инициирующем сканировании, новому клиенту WSUS прилетает слишком большой список обновлений, в результате чего достигаются некие лимиты рабочего процесса IIS.
Чтобы решить проблему с клиентами, мне пришлось сначала установить на сервере WSUS обновление KB3159706 (на сервере должен быть установлен Wndows Server 2012 R2 Update 1).
В статье KB3159706 (Update enables ESD decryption provision in WSUS in Windows Server 2012 and Windows Server 2012 R2) обратите внимание на ручные действия, которые нужно выполнить после установки обновления (иначе может перестать открываться консоль WSUS).
- Выполнить команду
"C:\Program Files\Update Services\Tools\wsusutil.exe" postinstall /servicing

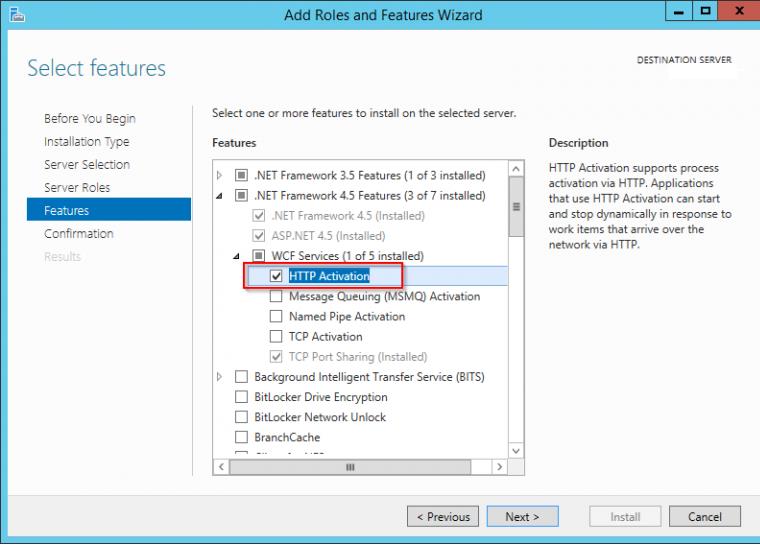
- Проверить, установлен ли компонент.NET Framework 4.5 -> HTTP Activation (
Get-WindowsFeature -Name NET-WCF-HTTP-Activation45
), и если он отсутствует, установить:
- Если на WSUS используется SSL, нужно выполнить редактирование файла C:\Program Files\Update Services\WebServices\ClientWebService\Web.config в соответствии с рекомендациями в статье (в нашем случае этот пункт выполнять не пришлось).
- Отредактируйте файл config ( C:\Program Files\Update Services\WebServices\ClientWebService\web.config ), заменив строку
<httpRuntime maxRequestLength="4096" />
на
<httpRuntime maxRequestLength="204800" executionTimeout="7200"/> - Осталось перезапустить службу WSUS с помощь PoSh:
Get-Service -Name WsusService | Restart-Service -Verbose

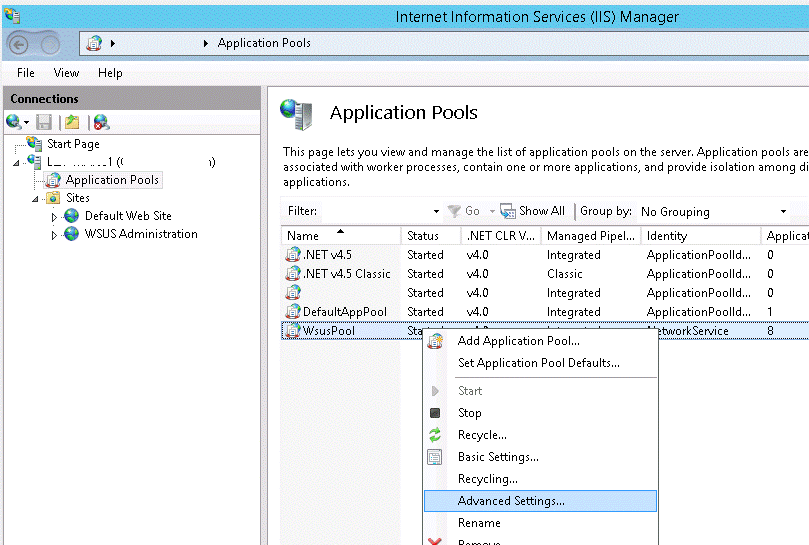
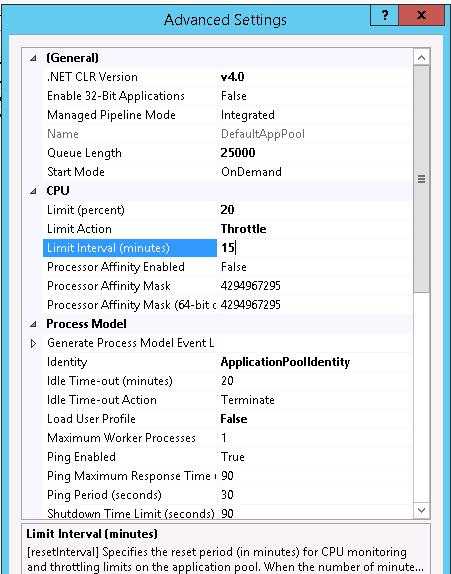
Далее с помощью консоли IIS Manager нужно внести следующие изменения в настройки пула WsusPool (Application Pools -> WsusPool -> Advanced settings)
- Private Memory Limit (KB) – 0 (было 1258015, убирается лимит на использование памяти рабочим процессов WSUS, в результате служба может использовать более 1,2 Гб памяти)
- Queue Length — 25000 (увеличиваем длину очереди к пулу приложения с 10000)
- Limit Interval (minutes) — 15 (увеличиваем с 5 минут до 15 минут время для сброса счетчиков и выполнения CPU Throttling)
- Service Unavailable Response — TcpLevel (при старом значение HttpLevel клиенту возвращается ошибка HTTP 503, теперь соединение просто сбрасывается)
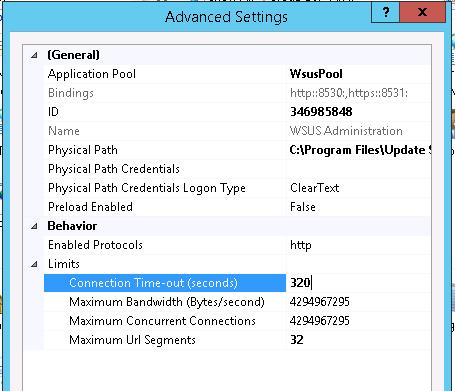
Затем в настройках сайта WSUS Administration -> Advanced settings нужно изменить значение Connection Time-out со 180 до 320.
 Осталось перезапустить IIS:
IISReset
Теперь мы увеличили таймауты и ресурсы сервера, требуемые клиентам Windows 10 для поиска и проверки обновлений на сервере обновлений WSUS. На следующий день – все клиенты смогли обнаружить и установить все требуемые обновления.