System Center 2012 Endpoint Protection Forefront Endpoint Protection 2010 Еще…Меньше
Симптомы
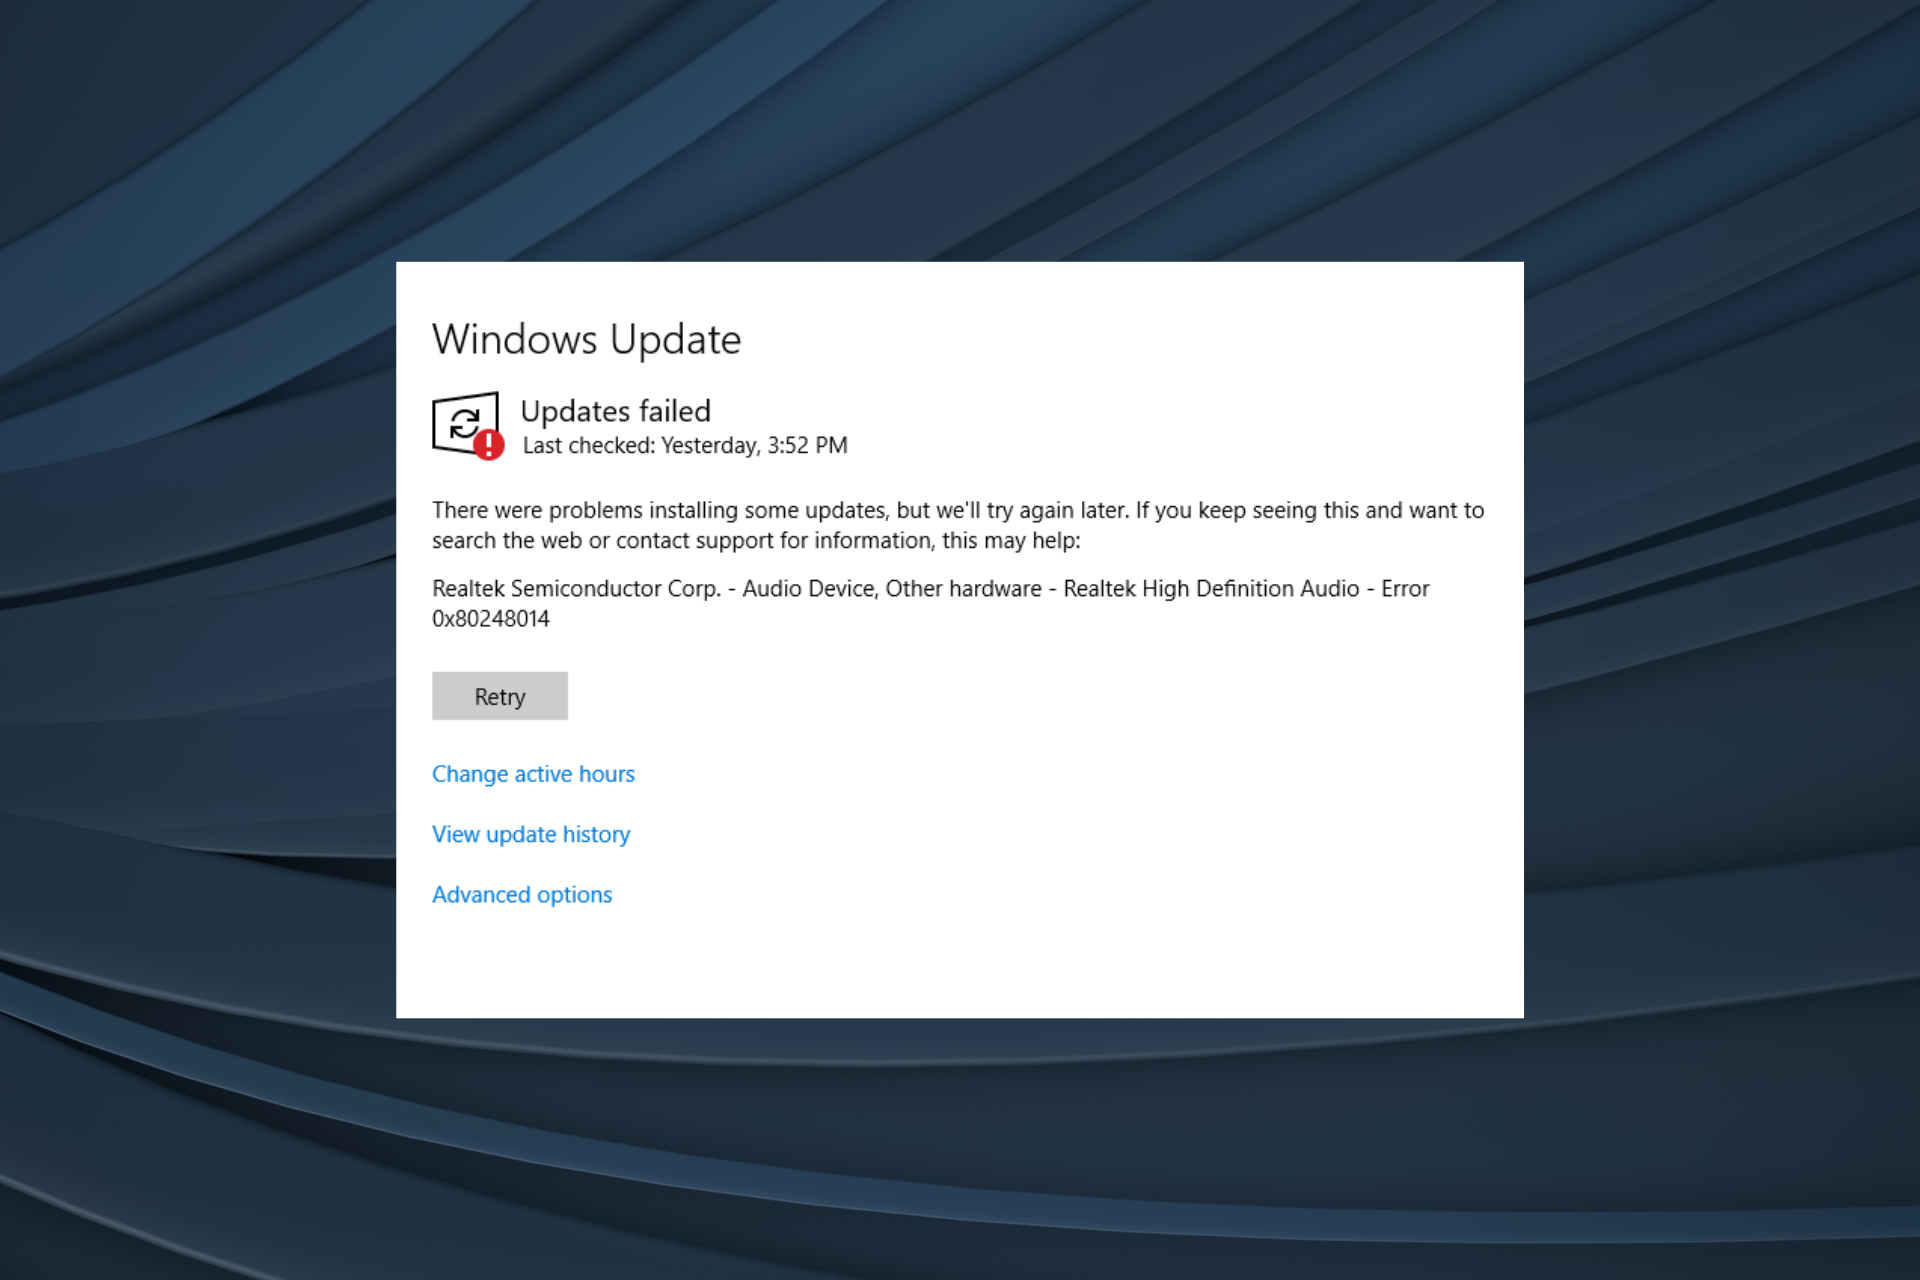
Появляется сообщение об ошибке 0x80248014 при попытке обновления определений защиты от вредоносных программ на компьютере с Forefront Endpoint Protection 2010 (FEP 2010) вручную или установки System Center 2012 защиты конечной точки (SCEP 2012).
Причина
Обновления определений для FEP 2010 и SCEP 2012 будут распространяться через несколько источников. Эта проблема возникает, если источник, используемый обновления Майкрософт (MU) и согласие на использование Центра обновления Майкрософт не установлен компьютер.
Решение
Чтобы устранить эту проблему, установите клиентский компьютер для применения обновлений корпорации Майкрософт.
Как вручную согласие на использование Центра обновления Майкрософт:
-
Откройте панель управления.
-
Выберите пункт Система и безопасность.
-
Щелкните Центр обновления Windows.
-
Нажмите кнопку Изменить параметры.
-
Установите флажок предоставить обновления для других продуктов Майкрософт, при обновлении Windows .
-
Нажмите кнопку ОК.
Как программно согласие на использование Центра обновления Майкрософт
-
Сохраните следующий текст в файл, имя которого имеет расширение «.vbs» (например, OptinMU.vbs):
Set ServiceManager = CreateObject("Microsoft.Update.ServiceManager")ServiceManager.ClientApplicationID = "My App"
'add the Microsoft Update Service, GUID
Set NewUpdateService = ServiceManager.AddService2("7971f918-a847-4430-9279-4a52d1efe18d",7,"") -
В командной строке с повышенными привилегиями выполните следующую команду:
cscript optinMU.vbs
Для получения дополнительных сведений обратитесь к следующей статье:
Согласиться на Центр обновления Майкрософт
Дополнительные сведения
Настройка обновления определений для защиты от конечной точки в ConfigurationManager (SCEP)
Настройка обновления определений (FEP2010)
Нужна дополнительная помощь?
Нужны дополнительные параметры?
Изучите преимущества подписки, просмотрите учебные курсы, узнайте, как защитить свое устройство и т. д.
В сообществах можно задавать вопросы и отвечать на них, отправлять отзывы и консультироваться с экспертами разных профилей.
Содержание
- Способ 1: Диагностика подключения к сети
- Способ 2: Оценка дискового пространства
- Способ 3: Проверка служб
- Способ 4: Включение магазина
- Другие решения
- Вопросы и ответы

Способ 1: Диагностика подключения к сети
Ошибка 0x80248014 обычно возникает в «Центре обновления Windows», когда там не удается загрузить какой-то апдейт. Конкретную причину сбоя, как правило, не указывают, а значит, нужно учитывать разные варианты, например проблемы с интернетом. Проверьте, подключен ли компьютер к глобальной сети, и если да, то насколько стабильно это соединение.
Подробнее:
Проверка стабильности интернет-соединения
Решение проблемы с неработающим интернетом на ПК

Если доступ к интернету есть, но скорость передачи данных значительно ниже той, что предусматривает ваш тариф, ознакомьтесь со специальной статьей на нашем сайте, которая может помочь поднять пропускную способность до исходных значений.
Подробнее: Способы увеличения скорости интернета на ПК с Windows 11
Способ 2: Оценка дискового пространства
Сколько конкретно требует тот или иной апдейт выяснить сложно, но если в системном разделе накопителя меньше 8-10 ГБ свободного пространства, сначала освободите больше места, а затем снова попробуйте обновиться.
Существует сразу несколько способов освобождения памяти. Можно почистить компьютер от лишнего мусора и временных файлов, удалить ненужный сторонний софт или, в крайнем случае, некоторые стандартные приложения операционной системы Виндовс.
Подробнее: Освобождение места на диске C в Windows 11
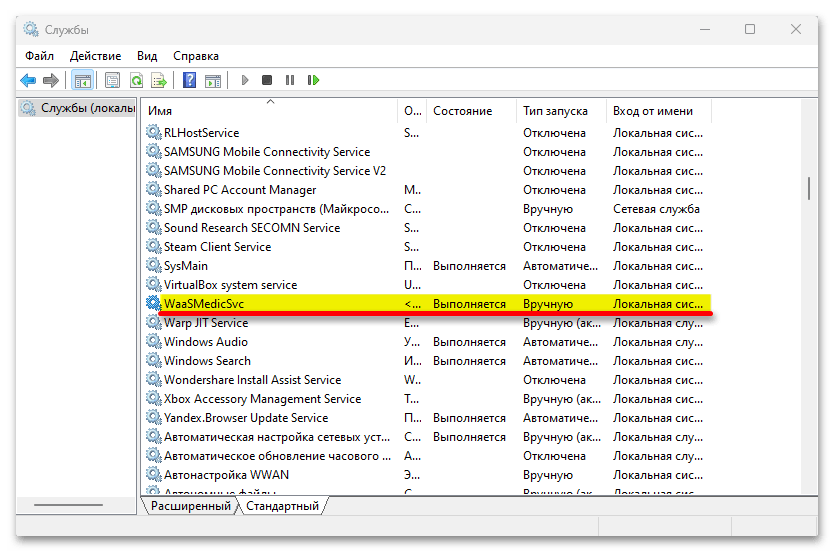
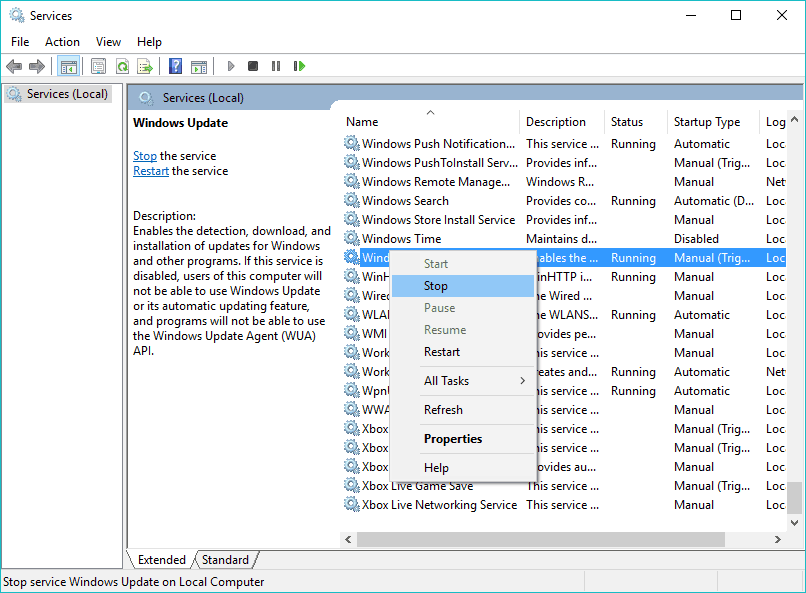
Способ 3: Проверка служб
Следует убедиться, что включены все необходимые службы.
- В поиске Виндовс 11 вводим
Службыи запускаем их.

Читайте также: Как открыть «Службы» в Windows 11
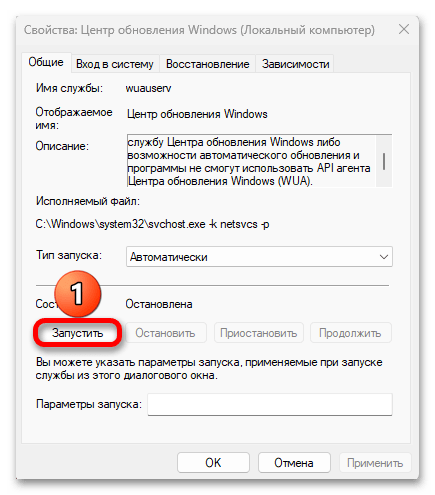
- В первую очередь ищем «Центр обновления Windows» и открываем ее двойным кликом.

Как правило, она запускается во время поиска обновлений. Возможно, в вашем случае этого не произошло, поэтому скачивание и завершается ошибкой. Если служба остановлена, кликаем «Запустить»,

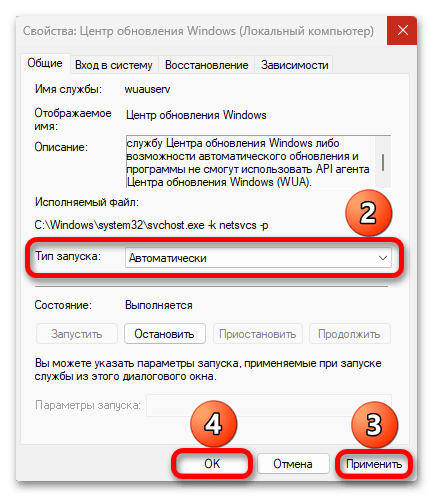
проверяем, что выбран автоматический тип запуска, применяем изменения и закрываем окно.
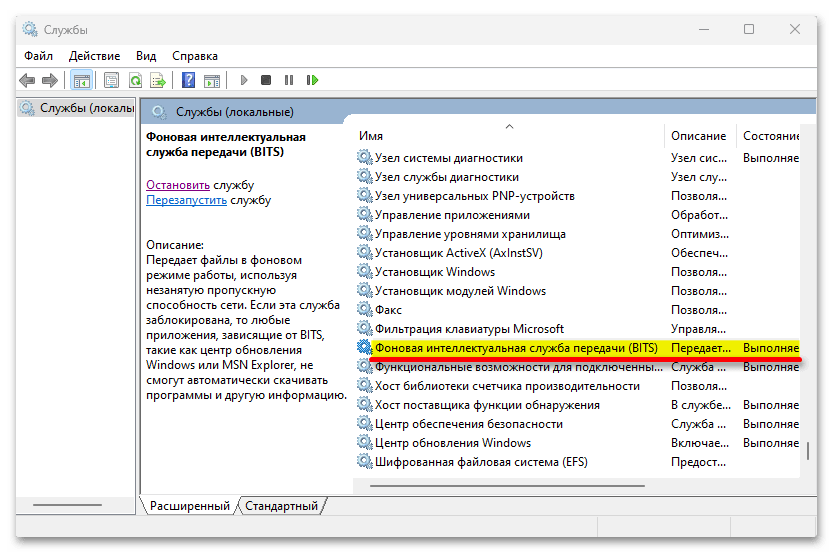
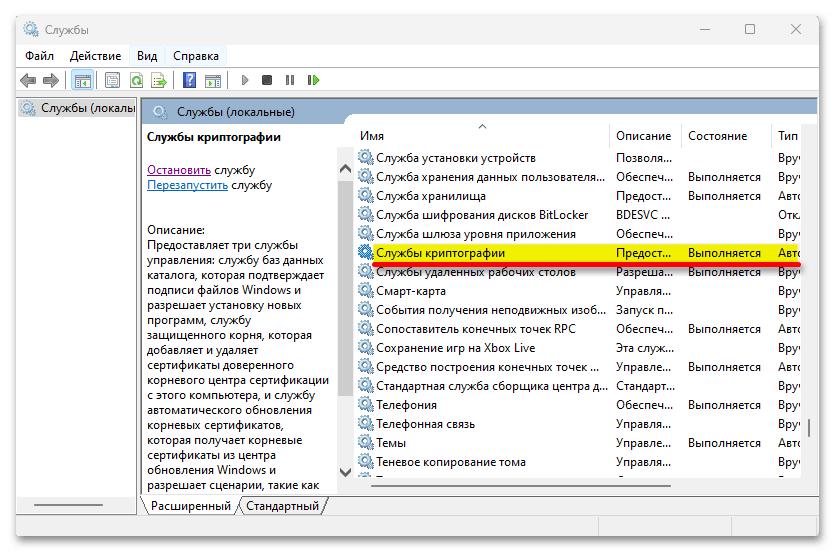
- Теперь запускаем, если они отключены, «Фоновую интеллектуальную службу BITS»,

«Службы криптографии»,

и «WaaSMedic».
Способ 4: Включение магазина
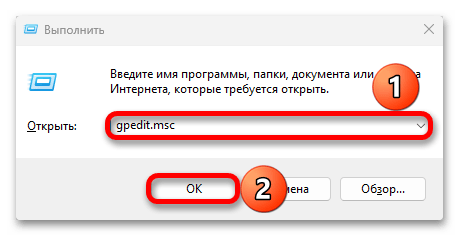
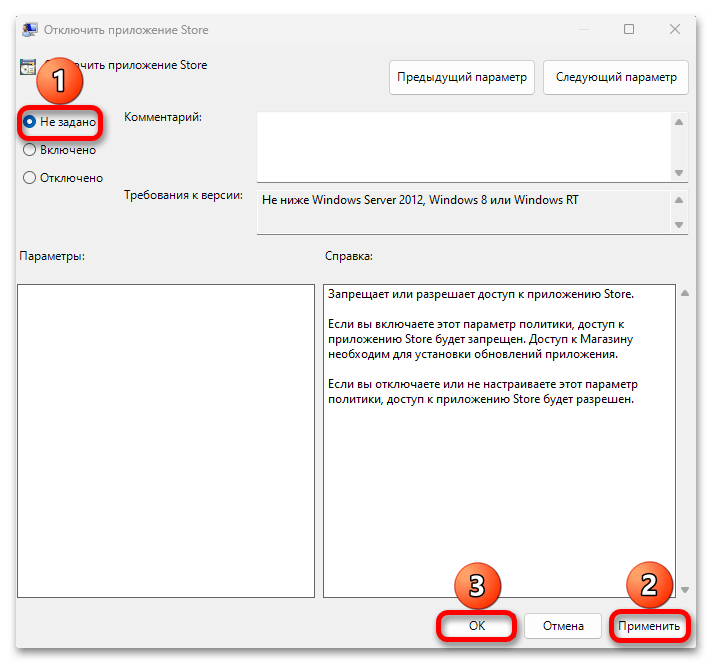
Проверьте, не включен ли в «Редакторе локальной групповой политики» параметр, ограничивающий работу Microsoft Store. Просто уже бывали случаи, когда именно по этой причине не загружались обновления для операционной системы. Правда, этот способ выполним только на компьютерах с Windows 11 «Pro» и выше, так как домашняя версия такой редактор не поддерживает.
- Сочетанием клавиш «Windows+R» вызываем окно «Выполнить», вводим команду
gpedit.mscи нажимаем «OK».

Читайте также: Запуск «Редактора локальной групповой политики» в Windows 11
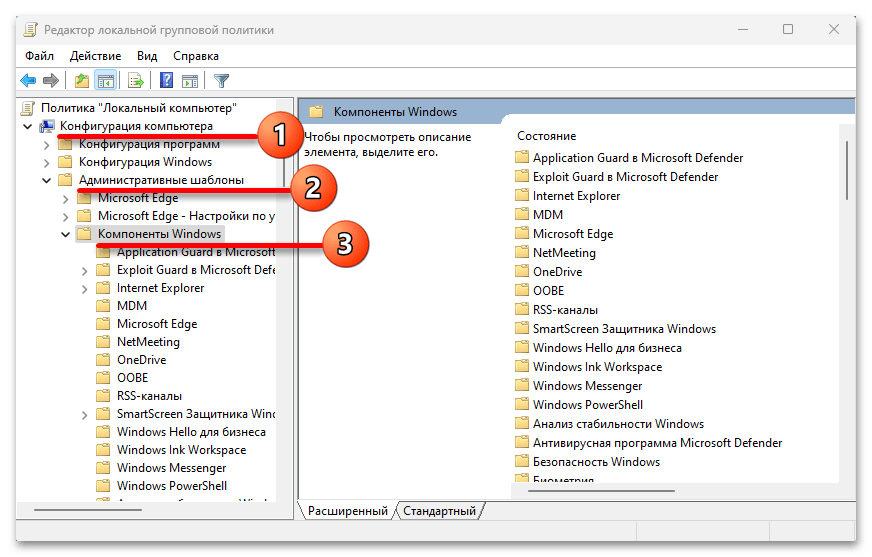
- Переходим в каталог с компонентами Windows так, как показано на скриншоте ниже:
Конфигурация компьютера/Административные шаблоны/Компоненты Windows
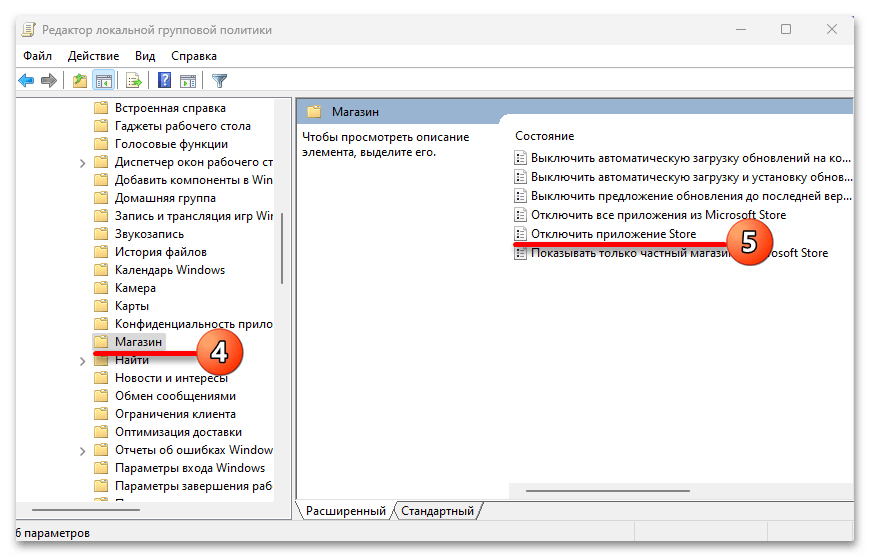
жмем на папку «Магазин» и двойным кликом открываем параметр, отключающий приложение Store.
- Если он включен, значит, выбираем значение «Отключено» или «Не задано», применяем изменения, закрываем «Редактор» и перезагружаем компьютер.
Другие решения
Если ошибку выдает какой-то один апдейт, а все остальные скачиваются без проблем, можно попробовать загрузить его отдельно из каталога Microsoft и установить вручную.
Для устранения неполадок в работе «Центра обновления» операционная система поддерживает специальное средство, которое, если повезет, сделает все за вас.
Не исключено, что сначала нужно восстановить поврежденные системные файлы или обновить/установить отсутствующие драйверы устройств. В общем, если выше описанные действия не помогли, то есть и другие способы устранения ошибки, о которых подробно написано в отдельной статье на нашем сайте.
Подробнее: Восстановление работы Центра обновления в Windows 11
Еще статьи по данной теме:
Помогла ли Вам статья?
Find out what worked for other users
by Ivan Jenic
Passionate about all elements related to Windows and combined with his innate curiosity, Ivan has delved deep into understanding this operating system, with a specialization in drivers and… read more
Updated on
- Windows Updates automatically installs fresh updates as they become available. However, Windows 10 lets you decide when and how to get the latest updates.
- Users often describe getting the 0x80248014 error when they’re unable to check for updates.
- Fixing this problem is simple, and in most cases, resetting Network components will do the trick.
- However, this issue is also related to Microsoft Store purchases.
Users have reported that the download error 0x80248014 errors appear in two cases – when they’re unable to check for updates and when they cannot complete a purchase in Microsoft Store.
We have solutions for both problems, so just follow the instructions from this article.
How can I fix the download error 0x80248014?
- How can I fix the download error 0x80248014?
- 1. Reset Network components
- 2. Delete the Software Distribution folder
- 3. Run the Troubleshooter
- 4. Run the SFC scan
- 5. Run the DISM
- 6. Flush DNS
- How can I fix error code 0x80248014 in Microsoft Store?
- 1. Run the Troubleshooter
- 2. Disable UAC
1. Reset Network components
There’s a simple solution for error code 0x80248014 which prevents you from checking for updates.
Just follow these steps to solve error code 0x80248014, so you can check for updates normally again:
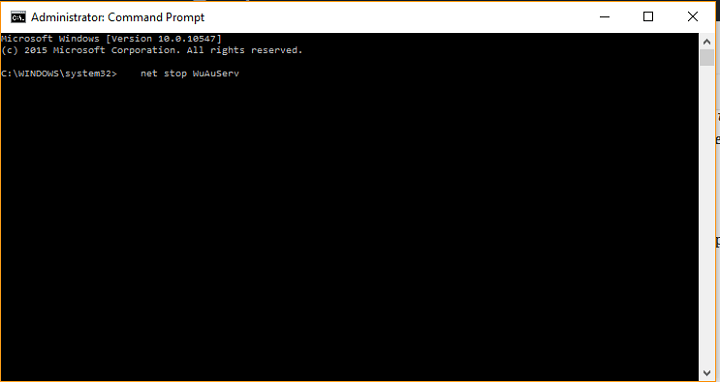
- Right-click on the Start Menu button, and choose Command Prompt (Admin).
- Enter the following command and press Enter: net stop WuAuServ

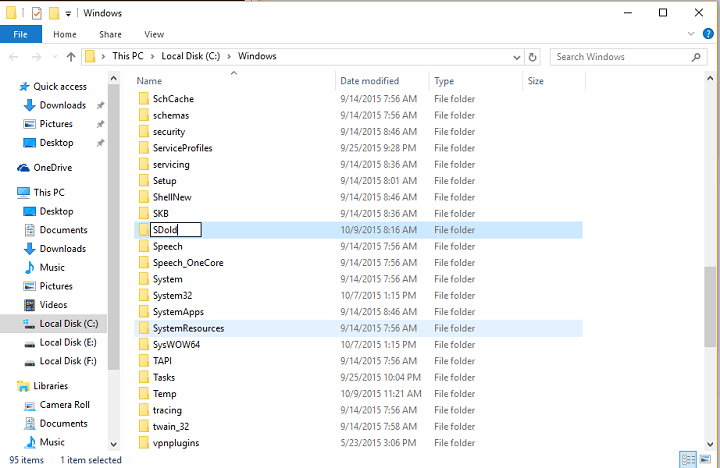
- Now, past the following into Search and press Enter: %windir%
- In Windows folder, find SoftwareDistribution folder, and rename it to SDold.

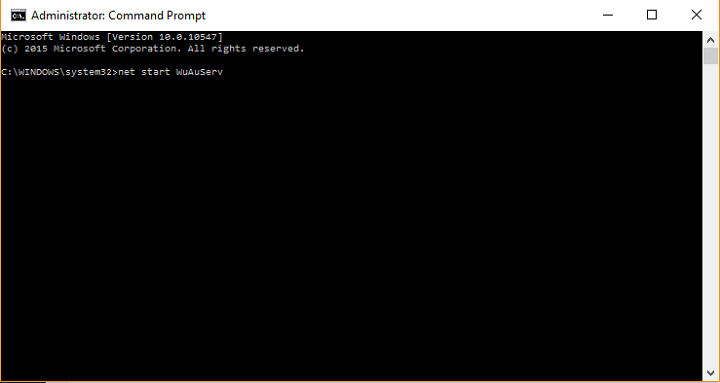
- Open Command Prompt (Admin) again, and enter the following command: net start WuAuServ

- Try to check for updates again
This error probably occurred because of the corrupted update file, which we removed by renaming the SoftwareDistribution folder.
Most users have reported that removing the Software Distribution folder helped them to solve error code 0x80248014, and I hope it will help you, as well.
2. Delete the Software Distribution folder
Software Distribution folder is the most important Windows folder for updates. Namely, all updates files and data are stored in this folder.
So, if there’s some corruption inside it, you’ll likely have problems installing updates. So, we’re going to reset this folder, in order to resolve the problem.
But before we reset the Software Distribution folder, we need to stop the Windows Update service:
- Go to Search, type services.msc, and go to Services.
- In the Services list, search for Windows Update.
- Right-click and go to Properties, then choose Disable.

- Restart your computer.
Now that the Windows Update service is disabled, let’s go and delete (rename) the SoftwareDistribution folder:
- Navigate to C:Windows and find the SoftwareDistribution folder.
- Rename folder to SoftwareDistribution.OLD (you can delete it, but it’s safer if we just leave it there).
- Restart your computer.
Once you do that, go and re-enable the Windows Update service:
- Once again navigate to Services and find Windows Update and, in Properties, change from Disabled to Manual.
- Restart your computer once again.
- Check for updates.
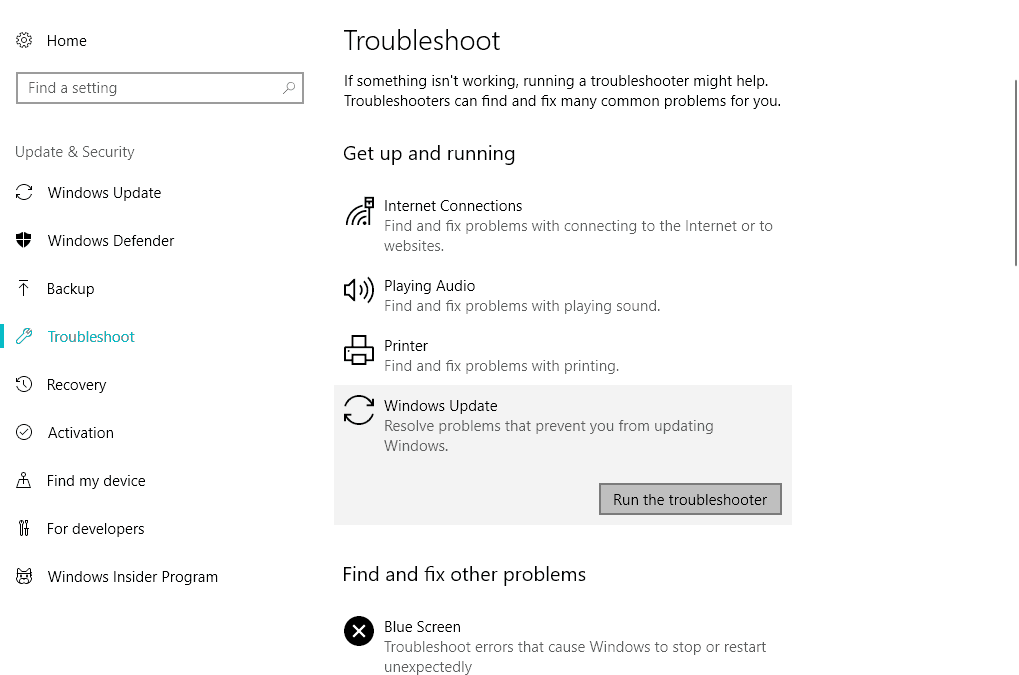
3. Run the Troubleshooter
If you’re still experiencing this update error, you can also try the new Troubleshooter in Windows 10.
This troubleshooter deals with a wide range of system issues, including update errors. But it’s only available in Windows 10 Creators Update or later.
Here’s how to use the Windows 10 Troubleshooter:
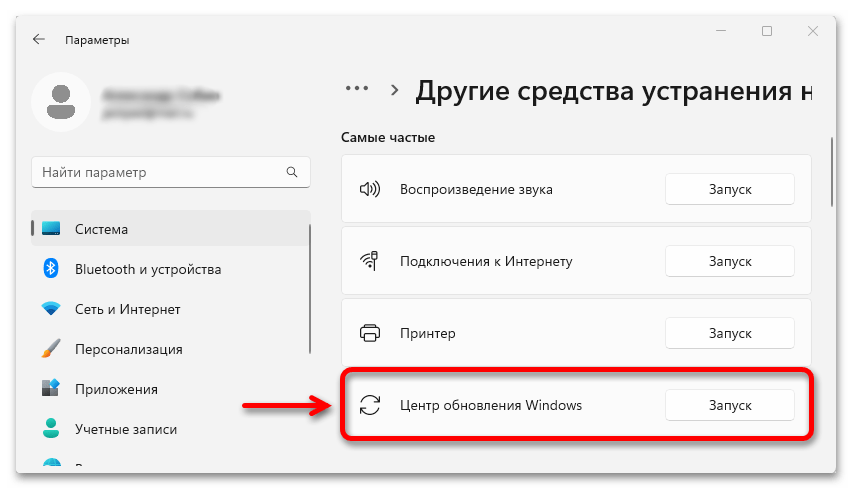
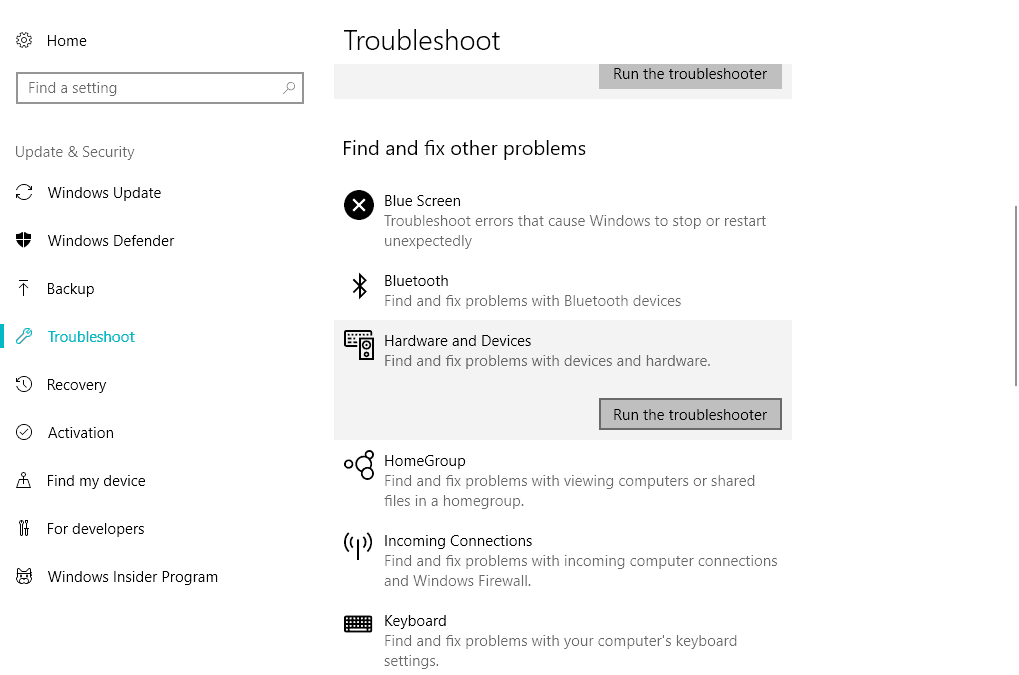
- Go to Settings.
- Head over to Updates & Security > Troubleshoot.

- Now, click Windows Update, and choose Run the troubleshooter.
- Follow further on-screen instructions.
Alternatively, you can use a third-party troubleshooting tool. Choose one from our great list.
- Adding layers in Windows 11’s Paint greatly increases RAM usage
- How to copy texts from images with Snipping Tool’s Text Action
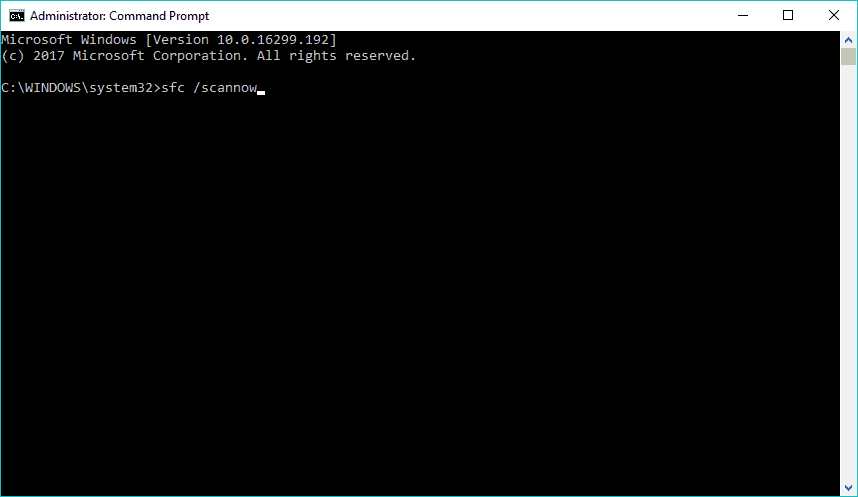
4. Run the SFC scan
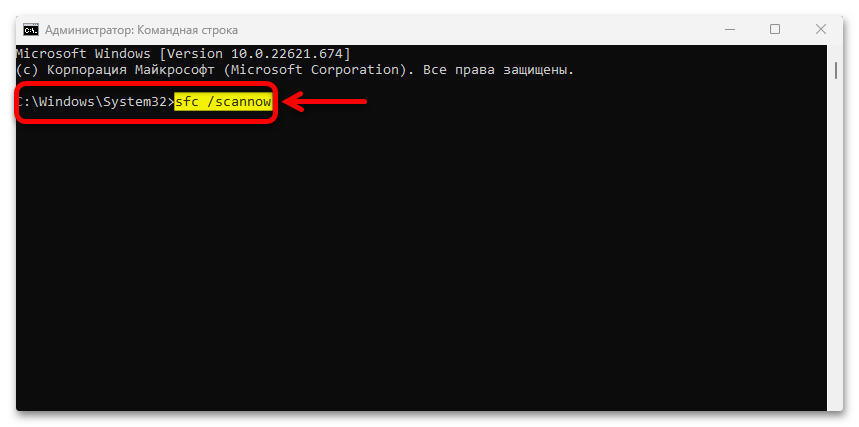
Another troubleshooter you can try is the SFC scan. This is a universal tool that also deals with various system errors. Here’s how to run the SFC scan in Windows 10:
- Go to Search, type cmd in the Search box, and then right-click on Command Prompt.
- Click on Run as administrator. (If you are prompted for an administrator password or for a confirmation, type the password, or click Allow).
- At the Command Prompt, type the following command, and then press ENTER: sfc /scannow

5. Run the DISM
And finally, the last troubleshooter I’m going to mention in this article is also the most powerful one – Deployment Image Servicing and Management (DISM).
So, if the previous two troubleshooters failed to resolve the problem, you can as well try with this one.
Here’s how to run DISM in Windows 10:
- Open the Command Prompt as shown above.
- Enter the following command and press Enter: DISM.exe /Online /Cleanup-image /Restorehealth

- Wait for the process to finish.
- Restart your computer.
- In case the DISM can’t obtain files online, try using your installation USB or DVD. Insert media and type following command: DISM.exe /Online /Cleanup-Image /RestoreHealth /Source:C:RepairSourceWindows /LimitAccess
- Make sure to replace the C:RepairSourceWindows path of your DVD or USB.
- Follow further on-screen instructions.
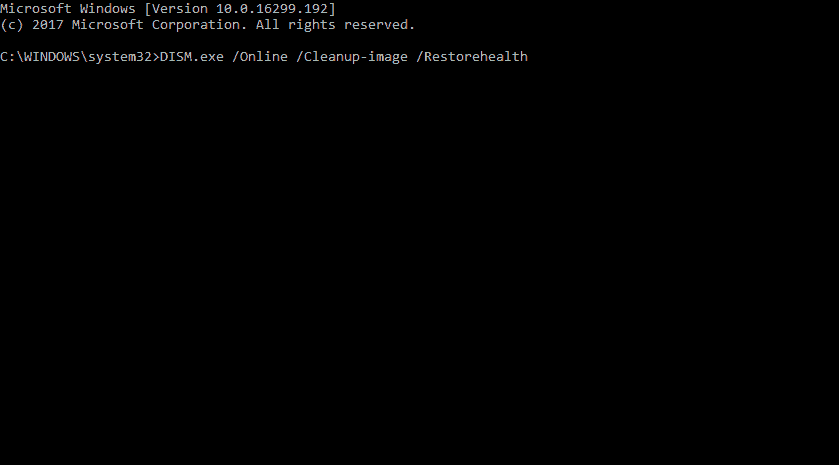
Learn everything there is to know about DISM from our comprehensive guide!
6. Flush DNS
And finally, if none of the previous solutions worked the last thing we’re going to try is flushing the DNS. Here’s how to do that:
- Start Command Prompt as administrator. To do that press Windows Key + X and choose Command Prompt (Admin) from the menu.
- When Command Prompt opens, enter the following lines before closing Command Prompt and restarting your PC:
- ipconfig /release
- ipconfig /flushdns
- and ipconfig /renew
How can I fix error code 0x80248014 in Microsoft Store?
1. Run the Troubleshooter
We’re going to run the Troubleshooter once again, but this time, we’ll be checking the hardware:
- Go to Settings.
- Head over to Updates & Security > Troubleshoot.
- Now, click Hardware & devices, and choose Run the troubleshooter.
- Follow further on-screen instructions.
An error occurred while loading the troubleshooter? Don’t panic! Check out our guide to solve the problem!
2. Disable UAC
And finally, let’s try with disabling the User Account Control, as well:
- Go to Search and type user account. Choose User Account Control from the menu.
- User Account Control Settings window will appear. Move the slider all the way down to Never notify and click OK to save changes.
We hope you managed to fix the Windows Update error 0x80248014, as well as the error with the same name that appears on Microsoft Store.
Let us know how it went in the comments section below.
![]()
The problem we are going to discuss here can occur when upgrading by any method whether through Update assistant, automatic mode, or Media creation tool. Moreover, sometimes this will trouble when you try to install or update applications from Microsoft Store by causing the process to fail and showing a message. However, we have covered this issue earlier in – How to Fix 0x80248014 Windows 10 Update error WU_E_DS_UNKNOWNSERVICE but it needs more attention.
Error 0x80248014 generally shows up because of malfunctions in components or missing the associated files. The message that will come across during this occurrence in Windows 11 or 10 is “Error 0x8024801, There were some problems installing updates, but we”ll try again later.” Windows Update failures occur due to a variety of factors, including insufficient disk space, problems with internet connectivity, damaged Windows Update Components, etc.
Here is how to fix error 0x80248014 in Windows 11 or 10 –
Way-1: Launch the Windows Update Troubleshooter
Windows Update Troubleshooter is a built-in program that detects problems and restores the related settings to default. Running this tool will likely solve 0x80248014 error automatically.
- Click on Start.
- Type – Control Panel.
- Press – “Enter”.
- Change the “View By” setting to “Large icons“. See – How to Make Windows 10 Control Panel Icon Size Bigger.
- Click – Troubleshooting.
- Choose the option Fix problems with Windows Update from the right pane.
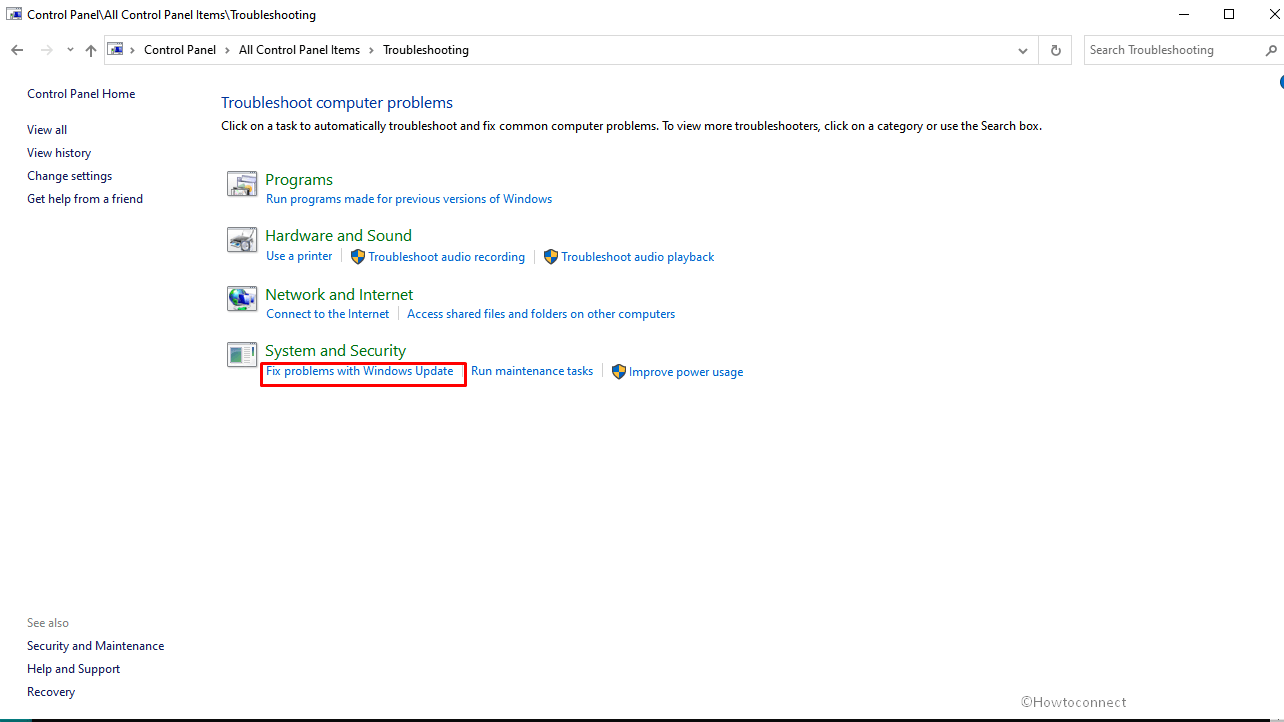
- Troubleshooter window will appear; select – Next.
- Close the ‘Troubleshooter’ then restart your system.
Way-2: Reset the Windows Update Component
Windows Update Component is a crucial element of the process that includes the associated services and SoftwareDistribution having deciding folders. A faulty component may be a culprit for any errors you see while updating Windows. Luckily, you can reset the Windows Update Component using manual method or PowerShell script without any risks and hazards. This post elaborates the same – How to Reset Windows Update to Default in Windows 10. Let’s see an easier way aka using PowerShell script –
- Press Window and R.
- Type – cmd.
- Hit – Ctrl + Shift + Enter.
- Select Yes on the confirmation prompt.
- On the command prompt copy-paste below lines one by one, and press Enter each time –
net stop wuauserv
net stop cryptSvc
net stop bits
net stop msiserver
ren C:\Windows\SoftwareDistribution SoftwareDistribution.old
net start wuauserv
net start cryptSvc
net start bits
net start msiserver
ren C:\Windows\System32\catroot2 Catroot2.old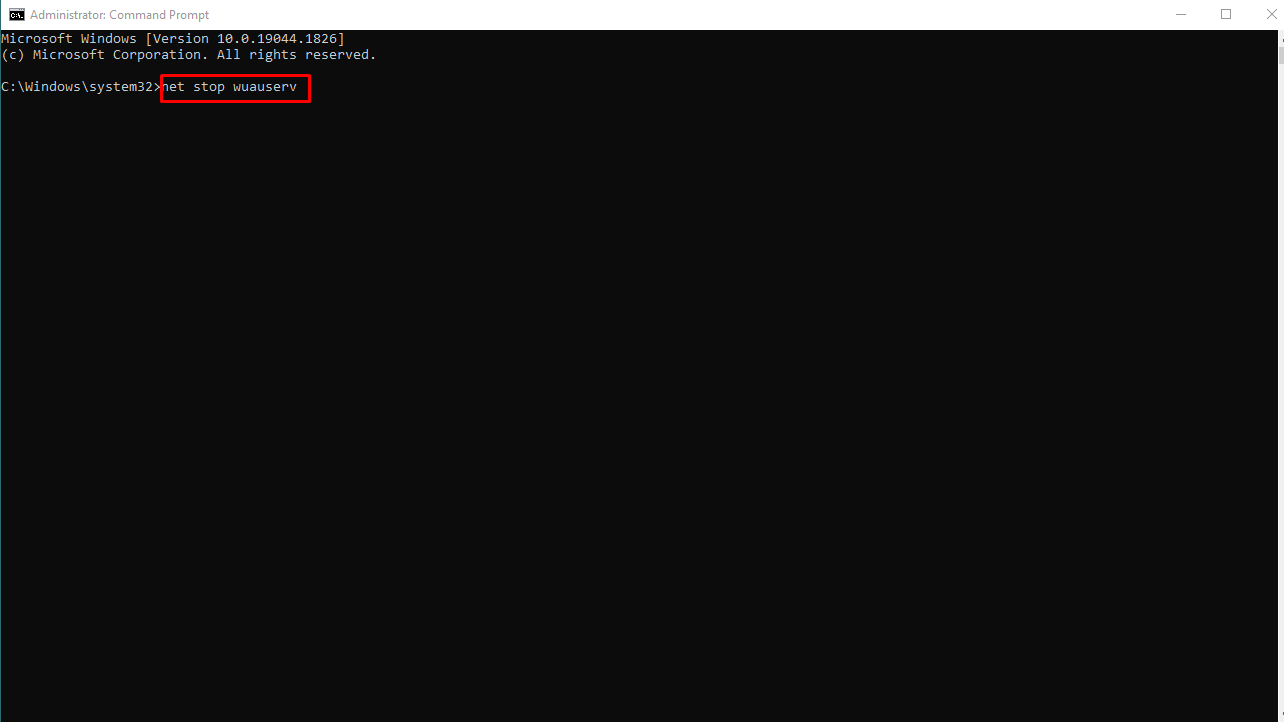
- Restart the system and check if the error 0x80248014 is solved.
Way-3: Reset Windows Store Cache
Store error 0x80248014 is also prevalent in addition to the same code with Windows update so it also needs remediation. Because Reset store cache is all-in-one solution to problems with the application this single method has the ability to fix this message appearing when installing or updating apps. Follow the steps –
- Click on Search from the Taskbar.
- Type – WSReset.exe.
- Select the same command from result.
- Allow the syntax to complete its task through Command prompt and Windows Store open.
See – 5 Ways to Reset Microsoft Store in Windows 10.
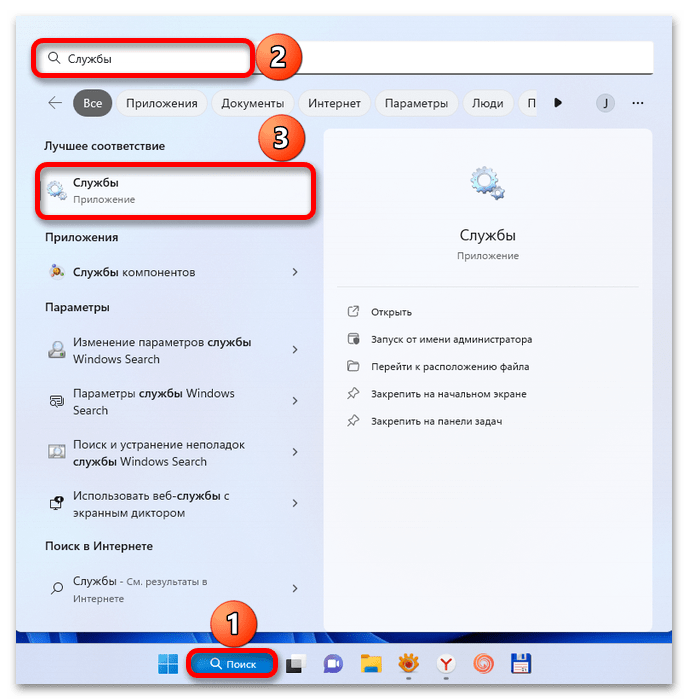
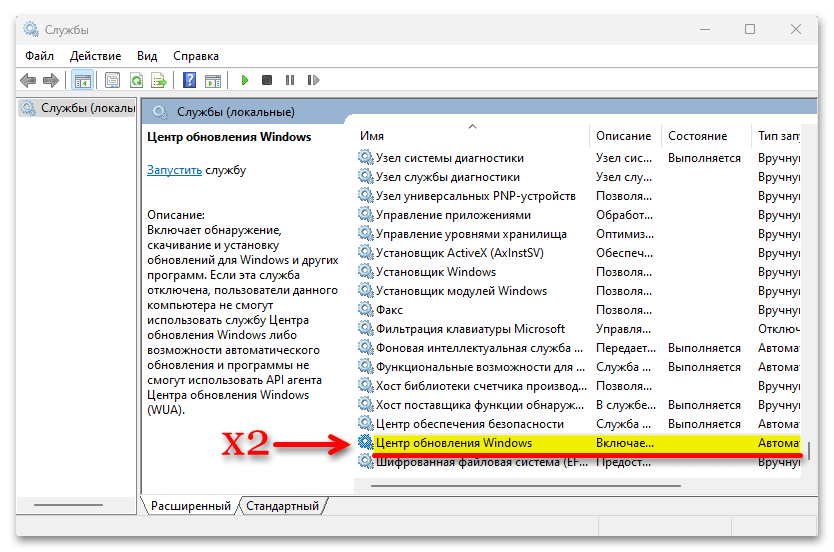
Way-4: Verify the status of Windows Update Services
Access the Services tool and verify that the services associated with Windows Update, for example, “Windows Update Medic”, “Windows Update”, “Update Orchestrator Service”, etc., are not disabled:
- Right click on Taskbar.
- Select Run.
- Type – services.msc.
- Hit Enter to launch the Services tool.
- Set the services Startup types as given below –
1] Manual – Windows Update Service or wuauserv (Triggered).
2] Services for Windows Update Medic or WaaSMedicSvc – Manual.
3] Automatic Cryptographic Service or CryptSvc.
4] Manual – Background Intelligent Transfer Service or BITS.
5] Automatic – DCOM Server Process Launcher or DcomLaunch.
6] Automatic – RPC Endpoint Mapper or RpcEptMapper.
7] Manual – Windows Installer or msiserver.
Way-5: Manually Install the Windows Update
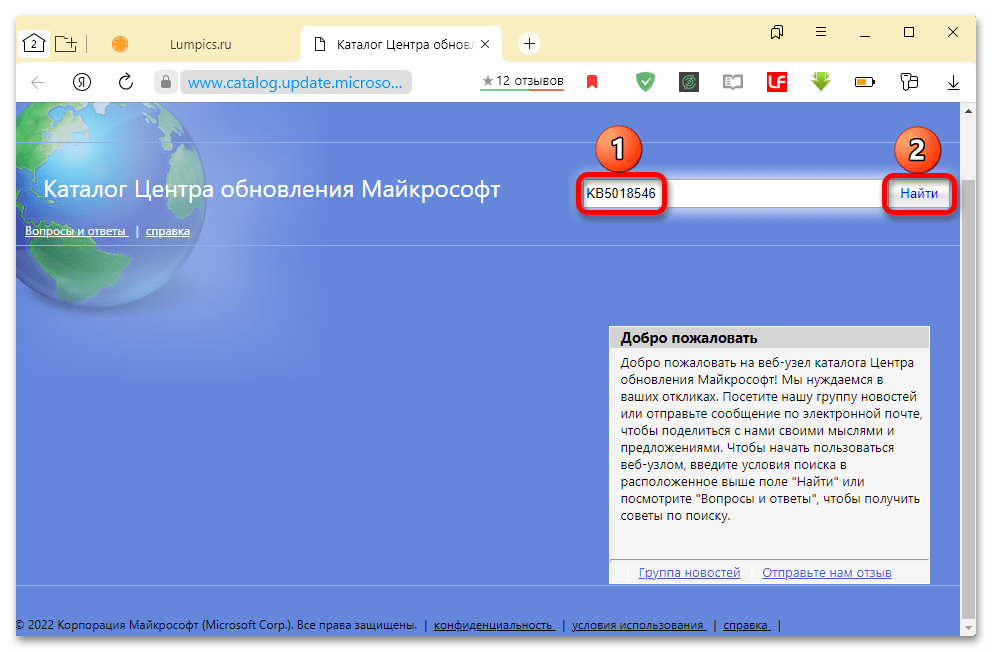
This is one of the best methods to fix Error 0x80248014 in Windows 11 or 10. Using KB number, conduct a search for the patch on Update Catalog website and grab the standalone copy of installer. Now manually apply the patch by following the instructions –
- Start with knowing the patch number of the updates from Settings > “Update & Security > View update history”.
- Now navigate to Microsoft update catalog.
- Type the KB number in the search box.
- Hit Enter to have the results in front.
- Locate the file having architecture identical to the architecture of your CPU.
- Click on Download.
- Go to the location where the standalone file is kept and double-click on it.
- Click on Yes if prompted.
Way-6: Run a Virus Check
Use a Full scan to look for and eliminate any viruses or dangerous programs that could be running on your system. Several malicious codes can not only interfere with Windows update installing process but also steal your data. Move with the steps under and remove them –
- Click on Start.
- Type “Security”.
- Hit Enter to launch Windows Security app.
- Choose the option ‘Virus & threat protection.
- Select the link Scan options.
- Check the – ‘Full scan’.
- Finally, click on – Scan now.
- In case, you have already third-party anti-malware run a thorough scan using that.
- When finished reboot the device and check if the error is resolved.
Way-7: Rebuild or Recreate the Software Distribution Folder
Windows 11 or 10 stores its Updates in the SoftwareDistribution folder (aka “C:\Windows\SoftwareDistribution\Download“). In order to download and install updates from scratch, this folder may occasionally become corrupted, and you will need to recreate it. Follow these steps to recreate or rebuild the “SoftwareDistribution”:
- Press – Win+R.
- Type – services.msc.
- Click – OK
- Right click on – Windows Update service.
- Select – Stop from the Context menu.
- Then, open Windows Explorer (Win+E) and go to: C:/Windows/.
- Locate the SoftwareDistribution folder and remove it.
- Restart your computer.
- Go to “Windows Update Settings” and click on Check for updates.
Way-8: Clear the Catroots2 folders’ Contents
You might want to try emptying the catroot and catroot2 contents to see if it helps. These folders contain files and ‘folders’ having signature of Windows Update package.
- Go to “C:\Windows\System32\catroot2” and ‘delete’ all items there.
- Similarly access “C:\Windows\System32\catroot2”. Select all the files and folders in the directory and press Delete.
- Restart your computer and recheck for updates.
Way-9: Restart Windows PC
To ensure maximum performance, you should reboot the Windows 10/11 device once a week at least. Some users inform that only restarting the system has solved error 0x80248014 in Windows 11 or 10 for them so you can give an attempt to it
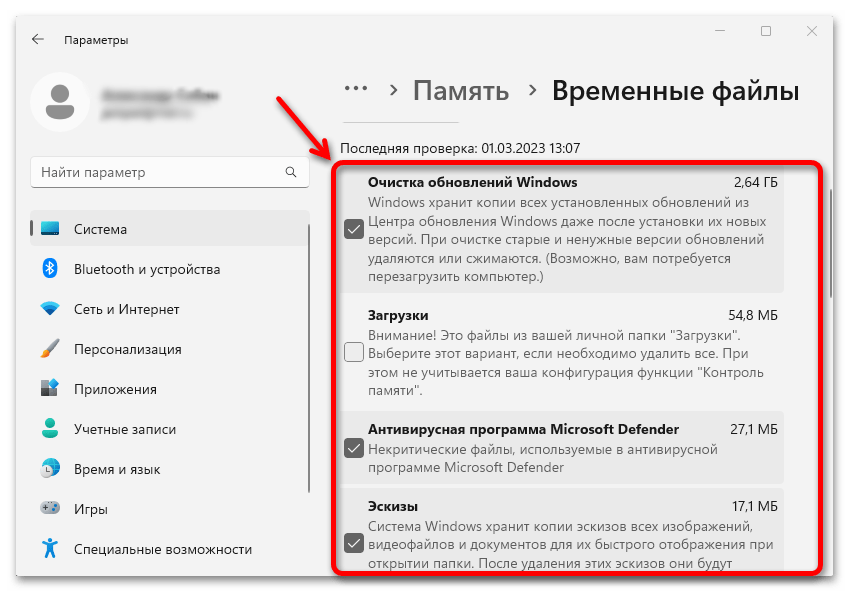
Way-10: Remove Unnecessary Temp Files
A built-in function in Windows 10 and Windows 11 following their predecessors allows users to delete temporary files. To remove any superfluous transient files go with the instructions below.
- Click on – Search.
- Type – cleanmgr.
- Press – Enter.
- On Disk cleanup small pop-up, click on OK.
- Select Clean up system files on the next window.
- Again choose OK
- Check all the boxes under “Files to delete” section.
- Click on OK and then on Delete Files.
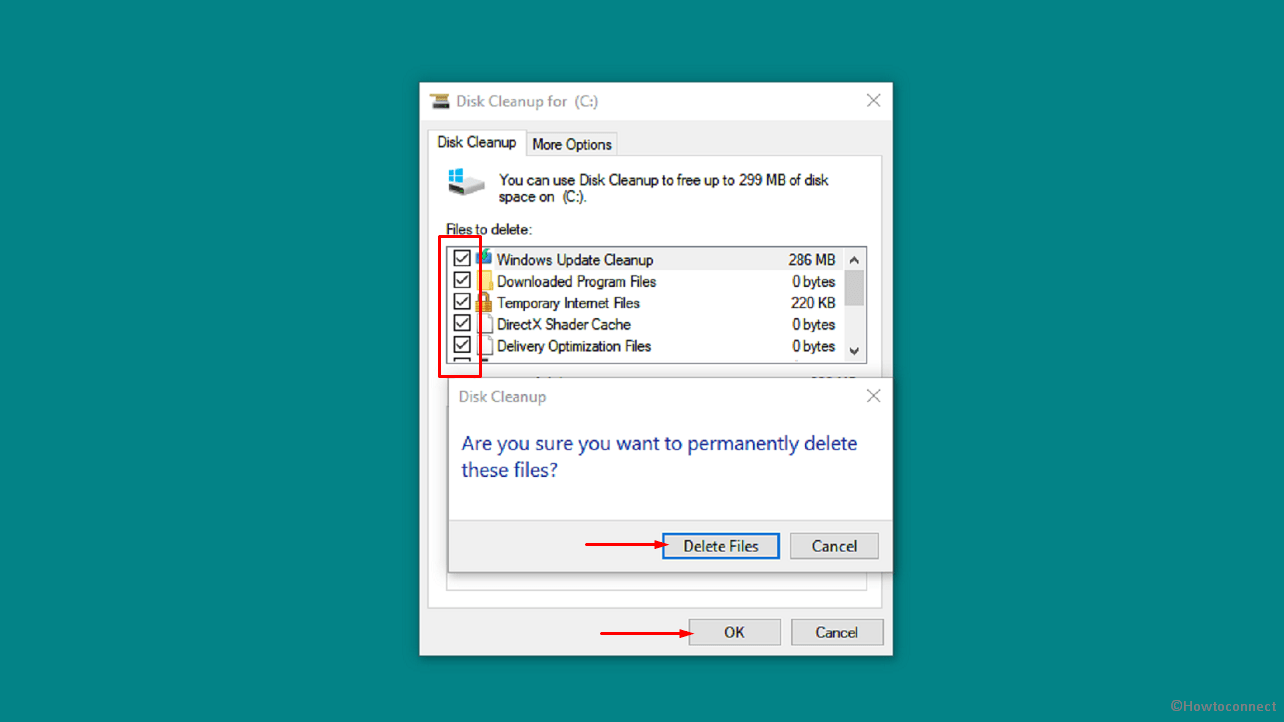
- Restart the PC and check if Error 0x80248014 no longer occurs.
Methods:
Way-1: Launch the Windows Update Troubleshooter
Way-2: Reset the Windows Update Component
Way-3: Reset Windows Store Cache
Way-4: Verify the status of Windows Update Services
Way-5: Manually Install the Windows Update
Way-6: Run a Virus Check
Way-7: Rebuild or Recreate the Software Distribution Folder
Way-8: Clear the Catroots2 folders’ Contents
Way-9: Restart Windows PC
Way-10: Remove Unnecessary Temp Files
That’s all!!
Repair any Windows problems such as Blue/Black Screen, DLL, Exe, application, Regisrty error and quickly recover system from issues using Reimage.
Question
Issue: How to fix Microsoft Store error 0x80248014?
Hello. When I try to download any app from the Microsoft Store, I receive the 0x80248014 error. Is there a way to fix this?
Solved Answer
The Microsoft Store is an official digital marketplace for various Microsoft Windows-compatible applications, games, software, and media content. It offers users a convenient platform for discovering, purchasing, and downloading a wide variety of apps for their devices. Additionally, the Microsoft Store provides features such as automatic updates, a user-friendly interface, and integration with Microsoft accounts for seamless synchronization across multiple devices.
Users have reported encountering the error code 0x80248014, which prevents them from downloading apps from the Microsoft Store. This error usually indicates a problem with the Store’s update process or a temporary system glitch. It can be aggravating for users because they are unable to access or install desired applications, limiting their ability to improve their Windows experience with new software or entertain themselves with games and media content.
This problem may have a significant impact on users who rely on the Microsoft Store for essential apps, productivity tools, or entertainment options. It limits their ability to access and use the most recent software offerings, preventing them from taking advantage of new features, bug fixes, security patches, and performance enhancements. Furthermore, because the error disrupts the Microsoft Store’s synchronization capabilities, users may have difficulty maintaining a consistent app ecosystem across their devices.
While specific troubleshooting steps may differ depending on the underlying cause of the error, users can investigate a number of potential solutions. Checking for and installing Windows updates, resetting the Microsoft Store cache, verifying network connectivity, or running the Windows Store Apps troubleshooter are all possible solutions.
This guide will walk you through six steps that should help you resolve Microsoft Store error 0x80248014. Remember that you can use a maintenance tool like FortectMac Washing Machine X9 to repair most system errors, BSODs,[1] corrupted files, registry[2] issues, or clear cookies and cache.[3] Otherwise, proceed with the instructions below.

Solution 1. Run Microsoft Store Apps Troubleshooter
Fix it now!
Fix it now!
To repair damaged system, you have to purchase the licensed version of Fortect Mac Washing Machine X9.
- Open the Start menu.
- Click the gear-shaped icon to launch the Settings app.
- In the Settings app, click on the System tab.
- Click on Troubleshoot.
- Select Other troubleshooters.

- Look for Windows Store Apps and click the Run button next to it.
- Follow the on-screen prompts to run the troubleshooter.
Solution 2. Fix Corrupted System Files
Fix it now!
Fix it now!
To repair damaged system, you have to purchase the licensed version of Fortect Mac Washing Machine X9.
Use Command Prompt commands to repair system file corruption:
- Open Command Prompt as administrator
- Use the following command and press Enter:
sfc /scannow

- Reboot your system
- If SFC returned an error, then use the following command lines, pressing Enter after each:
DISM /Online /Cleanup-Image /CheckHealth
DISM /Online /Cleanup-Image /ScanHealth
DISM /Online /Cleanup-Image /RestoreHealth
Solution 3. Reset Network
Fix it now!
Fix it now!
To repair damaged system, you have to purchase the licensed version of Fortect Mac Washing Machine X9.
- Press the Windows key + I to launch the Settings window.
- Click on the Network & internet option from the left sidebar.
- From the right section, click on Advanced network settings.
- Under the More settings section, click on the Network reset option.

- Click the Reset now button to reset the network settings.
- Confirm the action by selecting Yes on the confirmation pop-up window.
- Restart your Windows PC to complete the network reset process.
Solution 4. Clear Microsoft Store Cache
Fix it now!
Fix it now!
To repair damaged system, you have to purchase the licensed version of Fortect Mac Washing Machine X9.
Like most applications, Microsoft Store creates and stores cache data to enhance performance. However, if this cache becomes corrupt, you may experience various issues.
- Open the Run dialog box by pressing the Windows key + R.
- If the hotkeys don’t work, you can use any other method to open the Run dialog box.
- In the search bar of the Run dialog box, type wsreset.exe.

- Click OK.
- A blank Command Prompt window will appear for a few seconds.
- Once the cache is cleared, Windows will close the Command Prompt window and automatically launch the Microsoft Store app.
Solution 5. Re-register the App Packages
Fix it now!
Fix it now!
To repair damaged system, you have to purchase the licensed version of Fortect Mac Washing Machine X9.
- Press the Windows key to open the Start Menu.
- Type Windows PowerShell in the search bar.
- Choose Run as administrator from the right pane.
- In the elevated PowerShell window, type the following command:
Get-AppXPackage -AllUsers | Foreach {Add-AppxPackage -DisableDevelopmentMode -Register “$($_.InstallLocation)\AppXManifest.xml”}

- Press Enter to run the command.
- Wait for the process to complete.
- Close the PowerShell window.
- Check if the Microsoft Store app is working properly now.
Solution 6. Repair or Reset the Microsoft Store
Fix it now!
Fix it now!
To repair damaged system, you have to purchase the licensed version of Fortect Mac Washing Machine X9.
- Right-click on Start and pick Apps & Features.
- Scroll down to locate Microsoft Store and click Advanced options.
- Click Terminate and Repair.
- If that does not help, try the Reset option instead.

Repair your Errors automatically
ugetfix.com team is trying to do its best to help users find the best solutions for eliminating their errors. If you don’t want to struggle with manual repair techniques, please use the automatic software. All recommended products have been tested and approved by our professionals. Tools that you can use to fix your error are listed bellow:
do it now!
Download Fix
Happiness
Guarantee
do it now!
Download Fix
Happiness
Guarantee
Compatible with Microsoft Windows
Compatible with OS X
Still having problems?
If you failed to fix your error using FortectMac Washing Machine X9, reach our support team for help. Please, let us know all details that you think we should know about your problem.
Fortect — a patented specialized Windows repair program. It will diagnose your damaged PC. It will scan all System Files, DLLs and Registry Keys that have been damaged by security threats.Mac Washing Machine X9 — a patented specialized Mac OS X repair program. It will diagnose your damaged computer. It will scan all System Files and Registry Keys that have been damaged by security threats.
This patented repair process uses a database of 25 million components that can replace any damaged or missing file on user’s computer.
To repair damaged system, you have to purchase the licensed version of Fortect malware removal tool.To repair damaged system, you have to purchase the licensed version of Mac Washing Machine X9 malware removal tool.
To stay completely anonymous and prevent the ISP and the government from spying on you, you should employ Private Internet Access VPN. It will allow you to connect to the internet while being completely anonymous by encrypting all information, prevent trackers, ads, as well as malicious content. Most importantly, you will stop the illegal surveillance activities that NSA and other governmental institutions are performing behind your back.
Unforeseen circumstances can happen at any time while using the computer: it can turn off due to a power cut, a Blue Screen of Death (BSoD) can occur, or random Windows updates can the machine when you went away for a few minutes. As a result, your schoolwork, important documents, and other data might be lost. To recover lost files, you can use Data Recovery Pro – it searches through copies of files that are still available on your hard drive and retrieves them quickly.