Try manually updating the .NET Framework to fix the problem
by Sagar Naresh
Sagar is a web developer and technology journalist. Currently associated with WindowsReport and SamMobile. When not writing, he is either at the gym sweating it out or playing… read more
Updated on
- The 0x800f0907 error arises when upgrading the .NET Framework on a PC.
- This issue has been reported by both Windows 10 as well as Windows 11 users.
- You can try to resolve the issue by tweaking the Group Policy Editor as instructed in this guide.
Many of our readers have reported coming across the 0x800f0907 error code on their Windows 10 and 11 PCs. This error basically pops up when there is some issue with the .NET Framework component.
In this guide, we will share with you a list of solutions that have helped our readers resolve the 0x800f0907 error code on Windows 10 and 11. Let us get right into it.
What is the 0x800f0907 error on my PC?
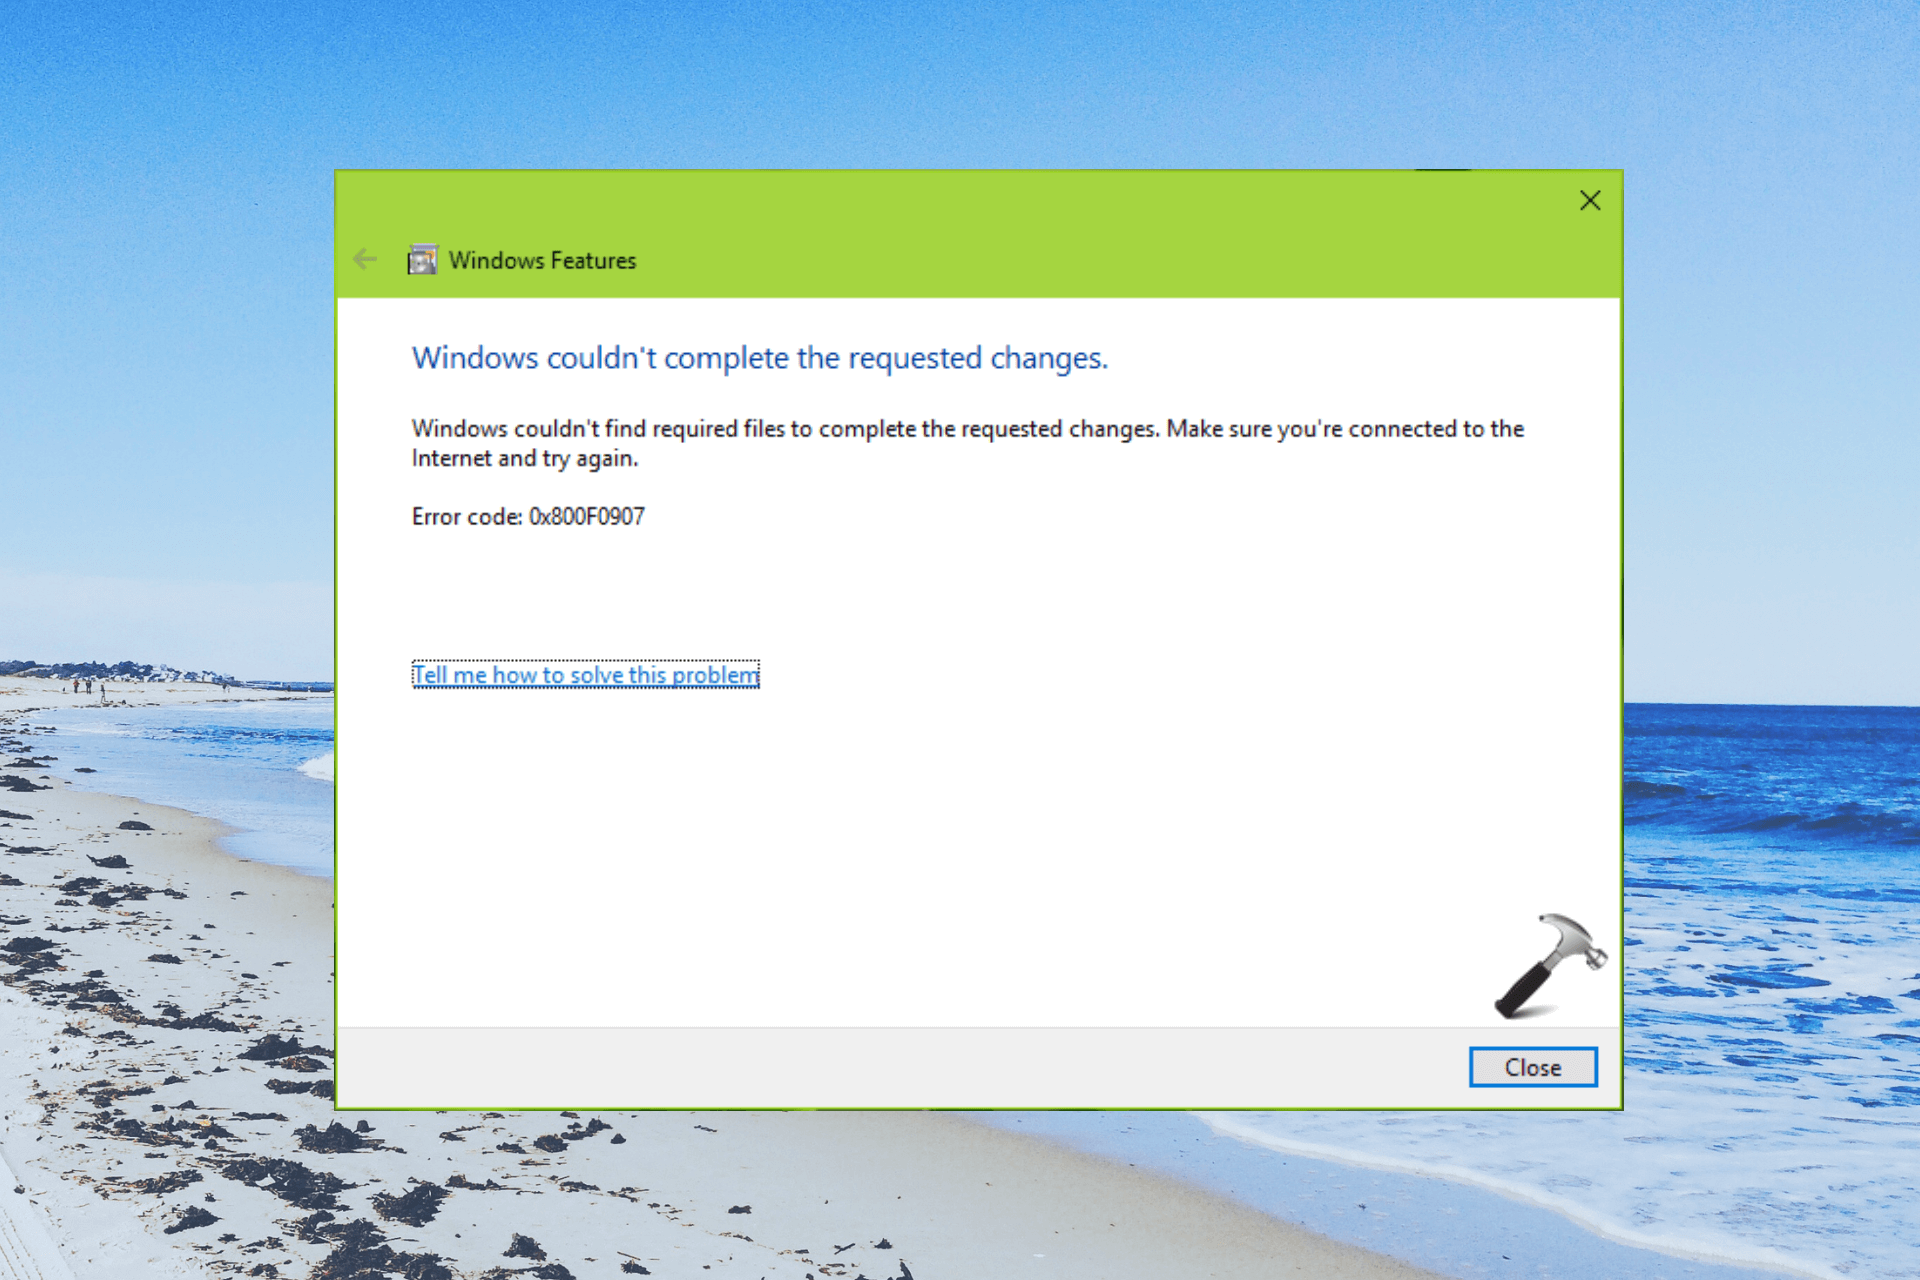
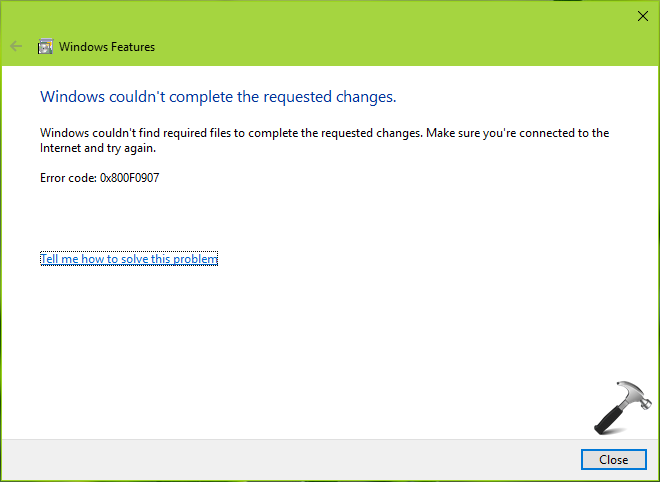
When you will come across the 0x800f0907 error, you will see the below error message displayed on your desktop.
Windows couldn’t complete the requested changes.
Windows couldn’t find the required files to complete the requested changes. Make sure you’re connected to the Internet and try again.
Error: 0x800F0907
Here are some of the common reasons why you would come across the 0x800f0907 error:
- The internet connection is faulty: The network to which your PC is connected might be problematic and cause this problem.
- Incorrectly configured Group Policy: There are some Group Policy settings that need to be selected to avoid coming across the 0x800f0907 error.
- Repair Windows: Chances are some important system files related to the Net Framework are corrupt and it needs repairing.
- Install the latest Net Framework: You might be running an old version of the Net Framework which is why you are getting the 0x800f0907 error.
Let us check the solutions to resolve the 0x800f0907 error quickly on your PC.
How do I fix the 0x800f0907 error on Windows 10 & 11?
- What is the 0x800f0907 error on my PC?
- How do I fix the 0x800f0907 error on Windows 10 & 11?
- 1. Use the .NET Framework repair tool
- 2. Tweak the Group Policy
- 3. Manually update the .NET Framework
- 4. Run the SFC scan
- 5. Repair Windows using the installation media

NOTE
The below solutions can be applied on both Windows 10 and Windows 11 PCs to resolve the 0x800f0907 error.
1. Use the .NET Framework repair tool
- Download the .NET Framework repair tool.
- Launch the program on your PC.
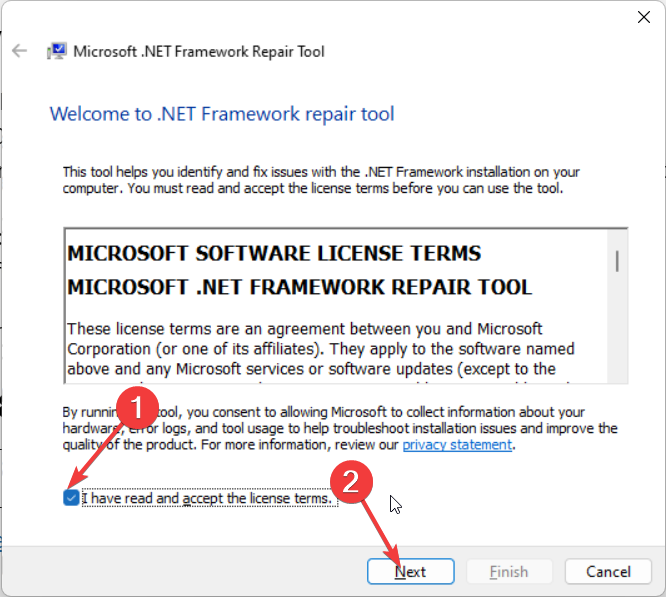
- Accept the terms and agreement and click Next to begin the diagnosing process.

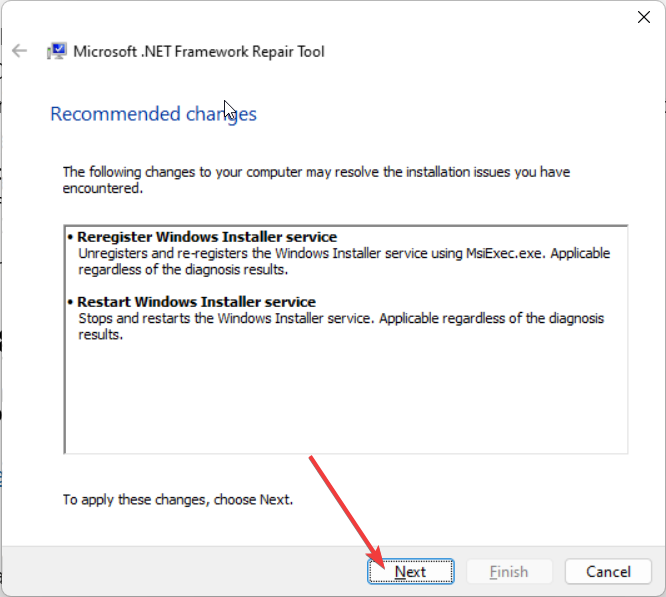
- It will give you the changes that are required for the .NET Framework to run properly.
- Click Next to apply the changes.
The .NET Framework repair tool is one of the best tools that is provided by Microsoft to fix any issues related to the .NET Framework.
However, we have a guide that lists some other solutions that will help you resolve any issues related to the .NET Framework quickly.
2. Tweak the Group Policy
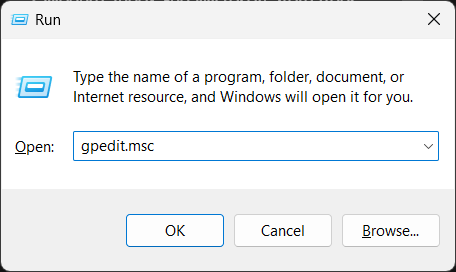
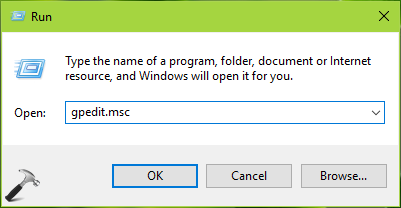
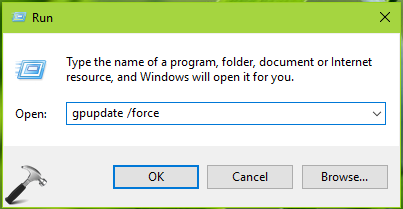
- Press the Win + R keys to open the Run dialogue.
- Type gpedit.msc and press Enter.

- Navigate to the below path:
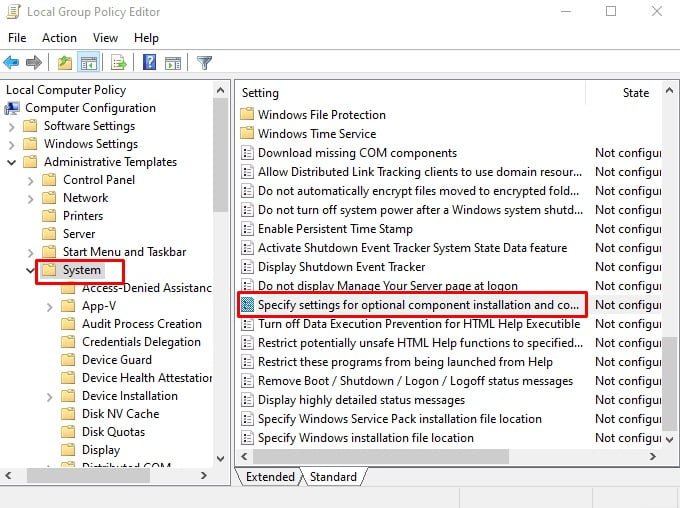
Computer Configuration\ Administrative Templates\ System - Locate Specify settings for optional component installation and component repair and open it.

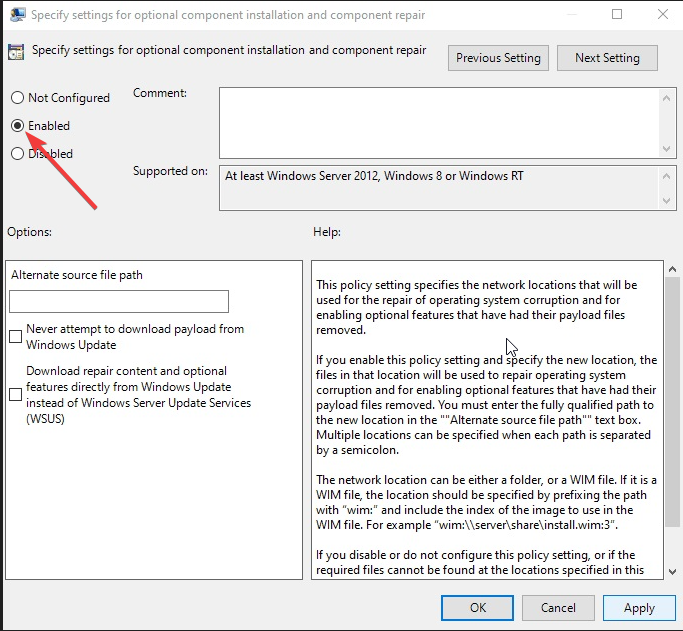
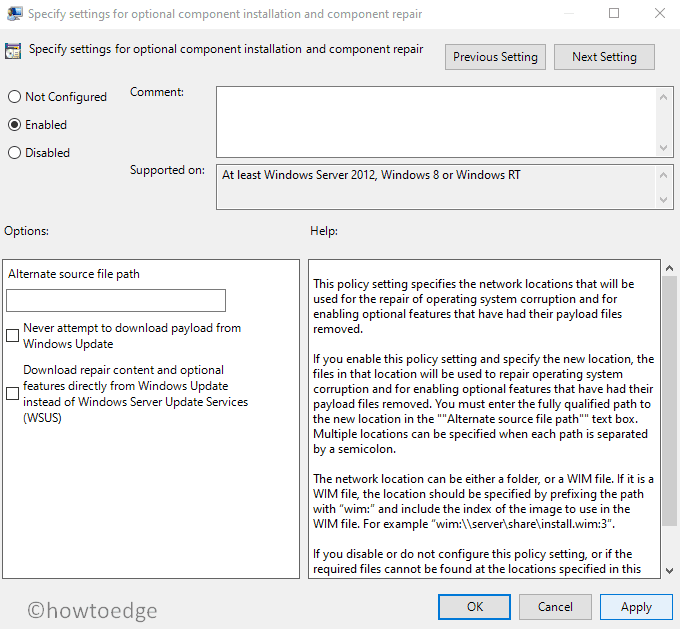
- Select the Enable radio button.

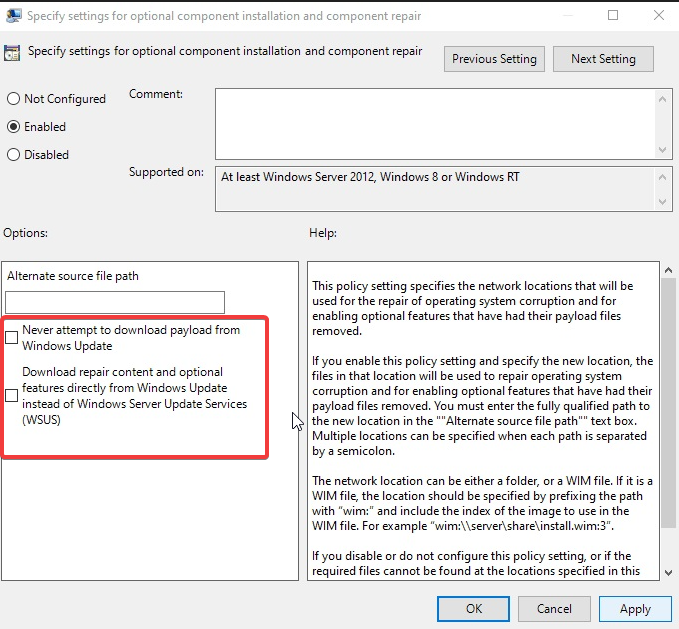
- Check the boxes for Never attempt to download payload from Windows Update and Download repair content optional features directly from Windows Update instead of Windows Server Update Services (WSUS).

- Click Apply and OK to save the changes.
- Press Win + R keys to open the Run dialogue.
- Type gpupdate /force and click OK to update the Group Policy Editor.
- Restart your PC.
Many of our readers have reported that tweaking the Group Policy as shown above has helped them resolve the 0x800f0907 error.
- Error Authenticating With Venmo: 6 Ways to Fix it
- Fix: Internet Speed is Fast, but Video Calls are Slow
- Fix: MSI Afterburner Failed to Start Scanning
- Windows 11 Keeps Chiming? Stop it in 8 Steps
3. Manually update the .NET Framework
- Note down the KB number of the failing .NET Framework.
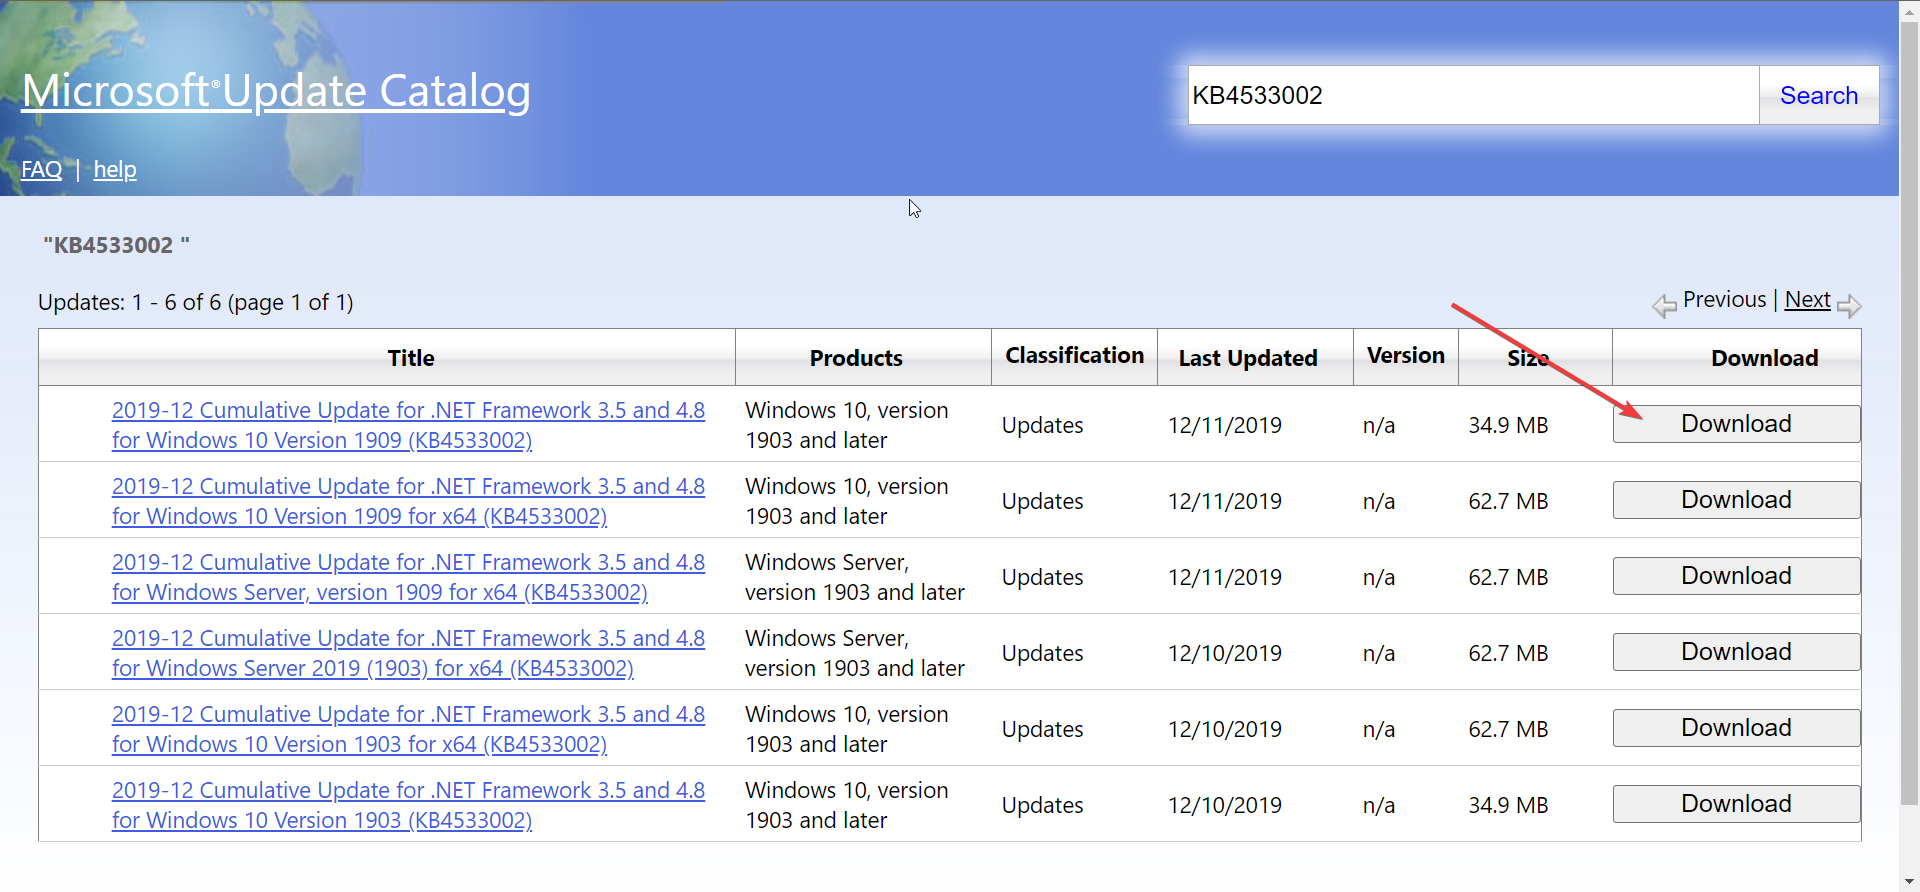
- Visit Microsoft’s Update Catalog website.
- Search for the KB number of the .NET Framework and download it.

- Open the setup file and run the installation.
- Restart your PC.
This way you will be able to install the failing .NET Framework update on your PC. Microsoft Update Catalog is a safe and official website and it fetches the download files right from the official source.
4. Run the SFC scan
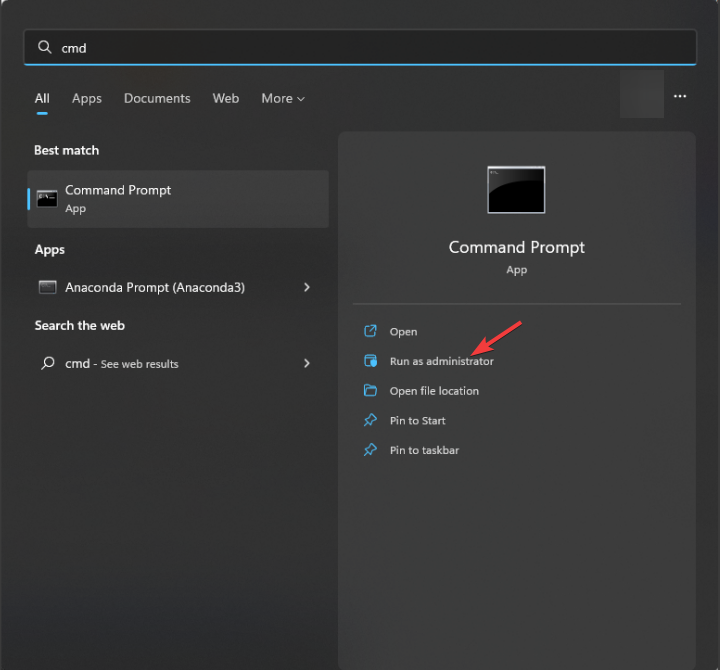
- Press the Win key to open the Start menu.
- Type Command Prompt and run it as an administrator.

- Type the below command and press Enter.
sfc /scannow
- Wait for the process to complete and restart your computer.
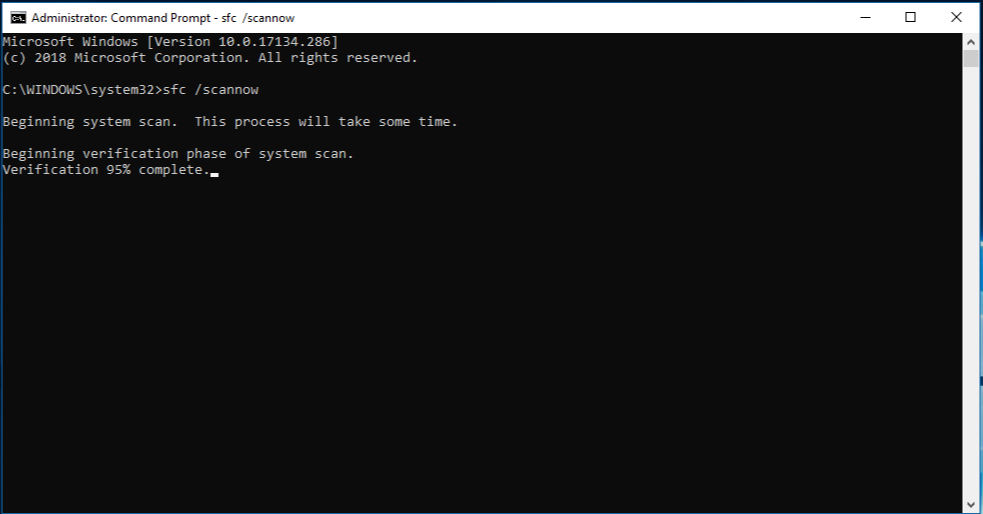
Some system files associated with the .NET Framework might be causing the 0x800f0907 error on your Windows 10 and Windows 11 PC. You can always try to run the SFC Scan to resolve the corrupt or missing system files.
5. Repair Windows using the installation media
- Download the Media Creation Tool.
- Windows 10
- Windows 11
- Insert a USB Drive to create a bootable media.
- Restart your Windows PC and press the Boot menu key (usually the Del key) to enter Windows Setup.
- Click the Repair your computer option.

- Wait for the process to complete.
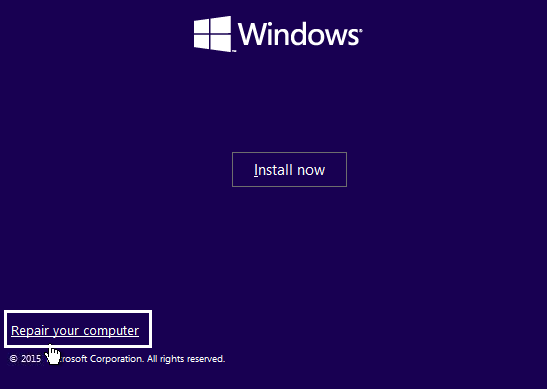
If nothing works then as a last resort, we recommend using the installation media and repairing your computer. This will definitely resolve the 0x800f0907 error on your PC.
That is it from us in this guide. Let us know in the comments below, which one of the above solutions fixed the 0x800f0907 error on your Windows 10 and Windows 11 PC.
![]()
Earlier, we have seen how to enable .NET Framework in Windows 10, in following article:
How to enable .NET Framework 3.5 on Windows 10
However the PowerShell method discussed in above mentioned article requires you to specify the source files using Windows 10 ISO file. But if you’ve upgraded your earlier version of Windows to Windows 10, you may not have the source files with you. In that case, you can try enabling .NET Framework via Turn Windows Features On or Off page in Control Panel. However, when we tried to enable .NET 3.5 from there, we got this message:
Page Contents
Windows couldn’t complete the requested changes.
Windows couldn’t find required files to complete the requested changes. Make sure you’re connected to the Internet and try again.
Error: 0x800F0907
Closing the message ends operation with this message:
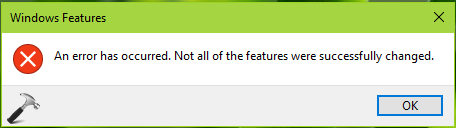
An error has occurred. Not all of the features were successfully changed.
When you try to enable the .NET 3.5 from Control Panel, Windows 10 try to activate the feature by installing some required Windows Updates. This issue can be easily solved by configuring the alternative source path which can help Windows to enable the feature without much relying on Windows Update. If you’ve source path located on some network share, you can use it here. This issue can also occur if your system is configured to get upgrades via Windows Server Update Services (WSUS) instead Windows Updates. Whatever is the case, the steps mentioned below will help you to fix this error.
FIX : Error 0x800F0907 While Installing .NET Framework 3.5 In Windows 10
FYI: Local Group Policy Editor is not available in Windows 10 Home editions. If you’re on Windows 10 Home and want to use Group Policy, go here and upgrade to Pro edition.
1. Press  + R and put gpedit.msc in Run dialog box to open Local Group Policy Editor. Click OK.
2. Next, in the Local Group Policy Editor window, navigate here:
Computer Configuration > Administrative Templates > System
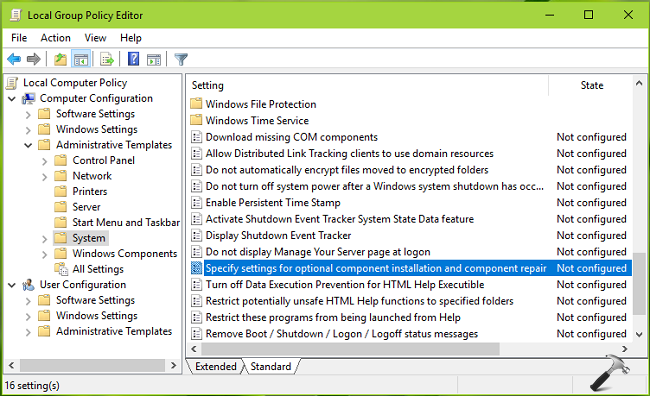
3. In the right pane of System, look for Setting named Specify settings for optional component installation and component repair. Double click on this setting to modify it:
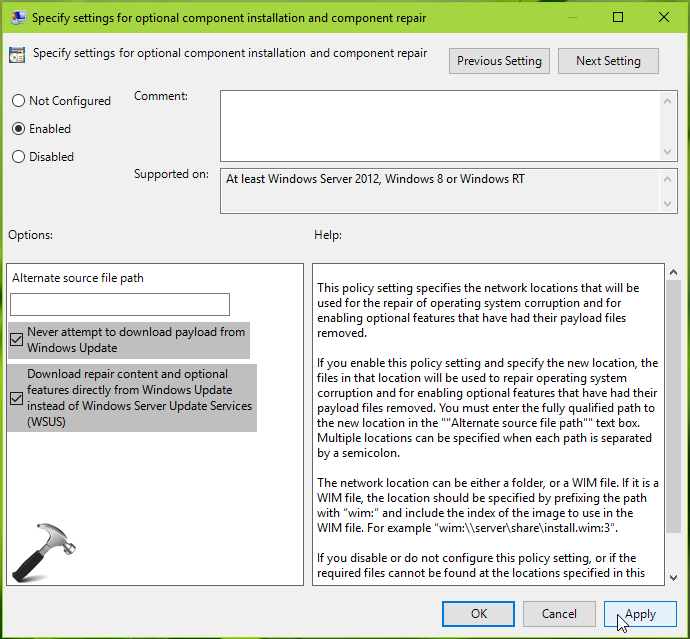
4. In the policy configuration window shown above, click on Enabled to activate the policy. Then in Options, you can specify valid alternate source file path which could have .NET Framework feature files which we’re required to enable it. You can refer policy explanation for detailed info about adding alternative source here. Also make sure Never attempt to download payload from Windows Update and Download repair content optional features directly from Windows Update instead of Windows Server Update Services (WSUS) options are checked here. Click Apply followed by OK. Close Local Group Policy Editor.
5. Press + R and put gpupdate /force in Run dialog box to update Group Policy engine. Click OK.
After updating policies, re-try to enable .NET Framework and this time it should get activated without pushing any error code.
Hope this helps!
READ THESE ARTICLES NEXT
- How to enable .NET Framework 3.5 in Windows 11
- Fix: .NET Framework 3.5 installation error 0x800F0922
- Install .NET Framework 4.8 offline in Windows 10
- Fix: The .NET Framework 4.7 is not supported on this operating system
- [FIX] .NET Framework 3.5/DISM Error 0x800F0954 In Windows 10
- [FIX] The Referenced Assembly Is Not Installed On Your System
- Download Microsoft .NET Framework Repair Tool For Windows 10
- Enable .NET Framework 3.5 On Windows 10
Several users reported receiving an error 0x800F0907 or 0x800F0906 when they were attempting to install the latest version of the .NET Framework on their PCs. If you are one such user and are wondering what to do next, this blog post is certainly for users like you.
In this guide, we have enlisted the reasons why this error occurs, and four solutions that should address this problem on Windows 11/10 PC. Let’s first learn what this error code is.

An error 0x800F0907 occurs when there isn’t any alternate installation source specified under the “Specify settings for optional component installation and component repair” inside Local Group Policy. Moreover, this may also occur when you have configured the local group policy to “Never attempt to download payload from Windows Update”.
When this error appears, you may see one or a combination of the following error messages on your computer –
DISM failed. No operation was performed.
For more information, review the log file.
The DISM log file can be found at C:\Windows\Logs\DISM\dism.log
Because of network policy settings, Windows couldn't connect to the Internet to download files that are required to complete the requested changes. Contact your network administrator for more information.
0x800F0907 - CBS_E_GROUPPOLICY_DISALLOWED
Error code: 0x800F0907
Error: 0x800F0907
What causes this .NET Framework Installation failure?
It is quite evident from the error messages that the following issues must have occurred on your PC –
- You are not connected to a stable internet connection.
- Local Group Policy is configured incorrectly.
Fix .NET Framework Installation Error 0x800F0907
If you are encountering an error 0x800F0907, 0x800F0906, or 0x800f081f while installing the latest .NET Framework on your PC, try the below fixes one after another. You may apply these fixes in any order, however, we suggest, following the same order as they were put in.
- Try .NET Framework Repair Tool: This tool is developed by Microsoft and is solely for resolving .NET Framework-related issues.
- Modify the Group Policy: Windows Home users may skip this solution as there is no such tool on their Windows edition.
- Use the Installation Media to repair .NET Framework: Use the Installation media to repair the .NET Framework by running the DISM codes over the console.
- Repair your Windows using the Installation Media: Go for this solution only when the above two solutions fail to address the error code 0x800F0907.
Note: Before you apply any fixes, make sure to check if the network to which you are connected is stable and working properly or not. This is important because it requires a stable internet connection to download and install any update in Windows.
1] Try .NET Framework Repair Tool
The .NET Framework Repair tool has been developed by Microsoft developers and is available on its support website. Its sole purpose is to find and resolve issues preventing .NET Framework installation on your PC.
When you are struggling with some .NET framework issues, this is the most effective tool to go for. Download and Install this tool on your computer. And, when the installation completes, run this tool and have the error 0x800F0907 resolved.
2] Modify the Group Policy
Systems that are configured to use WSUS, Windows Server Update Services, and not Windows Update Server are most likely to get into error codes 0x800F0907, 0x800F0906, and 0x800f081f. One may confirm the same by opening the Group Policy Editor (GPE), making necessary edits there, and force updating the GPE.
Follow the below instructions on how to re-configure the group policy in Windows –
- Press Windows + R to invoke the Run dialog.
- Type “
gpedit.msc” on it and hit OK to launch the Group Policy. - Next, navigate to the below path on the local policy editor –
Computer Configuration > Administrative Templates > System
- Head over to the right pane and search for a policy named “Specify settings for optional component installation and component repair”.

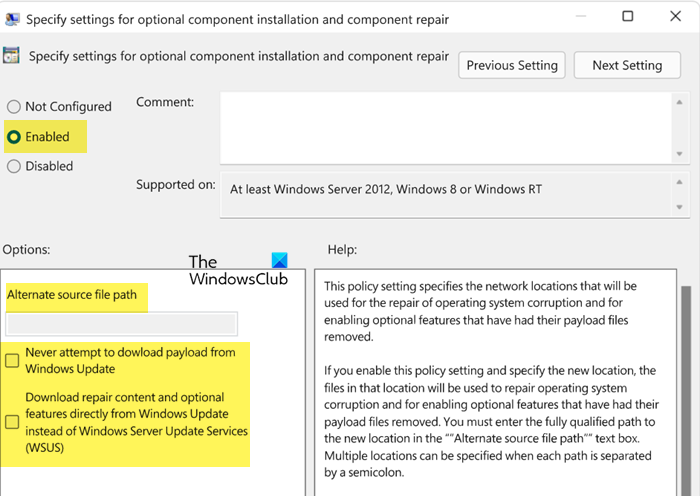
- When you find this policy, double-click on it, and select the Enabled radio button.
- If you do have an alternate source file path, provide the same under the Options. Here’s how to enter an alternate path in the text field.
- While you are at it, tick the checkboxes – “Never attempt to download payload from Windows Update” and “Download repair content optional features directly from Windows Update instead of Windows Server Update Services (WSUS).”
- In the end, hit Apply followed by OK to confirm the recent changes.
Note: In case, the recent changes are not being saved, open the Run dialog (Win + R), type “gpupdate /force” without quotes on it and hit OK. This way, you can force update any policy inside the Group Policy Editor.
Close all running windows and restart your computer. Sign back into your device and check if you can download .NET Framework without getting into some random error codes again.
How to enter an alternate path under Options in GPE?
One should specify an alternate source file only when s/he has a fully qualified path of a shared folder that contains the contents of the \sources\sxs folder from the installation media. Do note that this requires you to have a Windows Installation Media and the same is inserted in one of your device’s ports. If you don’t have one, download Windows ISO from the official website of Microsoft and then make it bootable using Rufus.
Alternatively, you may also specify a WIM file here in the alternate source file path box. To do so, add the prefix WIM: to the path, and then add the index of the image that you want to use in the WIM file as a suffix. We have also included a few examples for your better understanding –
- Path of a shared folder:
\\server_name\share\Win8sxs - Path of a WIM file, in which 3 represents the index of the image in which the feature files are found:
WIM:\\server_name\share\install.wim:3
3] Use the Installation Media to repair .NET Framework
In case you are still struggling with the .NET Framework error 0x800F0907 on your computer, consider repairing your Windows OS. This won’t take much time if you already have a bootable Windows Installation Media on your PC.
Follow the below instructions on how to proceed with this task –
- Insert the Windows Installation media into one of your device’s ports.
- Launch Command Prompt as administrator next and execute the following command over it –
Dism /online /enable-feature /featurename:NetFx3 /All /Source:<drive>:\sources\sxs /LimitAccess
Note: Make sure to replace <drive> in the above code with the disk letter to which Windows Installation Media is attached. Here’s an example of this –
Dism /online /enable-feature /featurename:NetFx3 /All /Source:D:\sources\sxs /LimitAccess
Restart your PC next and check if the .NET Framework Error 0x800F0907 resolves on your Windows PC.
4] Repair your Windows using the Installation Media
If none of the above solutions help to resolve the error 0x800F0907 on your computer, repair your Windows OS using the installation media. Here’s what you need to do next –
Insert the same into one of your device’s ports, and restart your computer. While Windows 11/10 is loading, press the Boot menu key to enter the Windows Setup Screen. Click Repair your computer available at the bottom-left corner and wait while the repair process is going on.

This might take 10-15 minutes, so wait patiently. Once your operating system is repaired for possible issues, check if you can now install the latest version of .NET Framework on your Windows PC.
What to do if the .NET framework is still failing to install?
Many a time, .NET Framework fails to install despite trying several times. This happens mostly when there are missing or corrupt system files inside your computer. To overcome this issue, repair all your system files using the SFC Scan. Here’s how to perform this task –
- Press Windows + X, and select Terminal (Admin).
- The UAC window will prompt next, hit Yes to authorize the access.
- On the elevated console, type the following, and press Enter –
sfc /scannow

- Wait for this tool to find and repair all your system files and folders.
- After this scan completes, close all opened windows, and restart your computer.
From the next login, you must be able to update the .NET Framework Build version on your Windows PC.
How do I manually update .NET Framework on my PC?
In case you are still not able to upgrade the .NET Framework version on your PC, you may manually download and install the same by following these easy steps –
- First of all, note down the KB number of the failing .NET Framework.
- Go to Microsoft’s Update Catalog, and search for the copied KB number.
- Pick the update that best matches your system architecture, and hit the Download button.
- Click on the top link to begin downloading the .NET Framework.
- After the download completes, double-click on the setup file to begin its installation.
That’s it, you have successfully upgraded the .NET Framework version on your Windows PC.
Download Windows Speedup Tool to fix errors and make PC run faster
The .NET Framework is a core component of Windows and many applications rely on the feature to create an environment for them to run on. If the .NET Framework is not installed on your system, you won’t be able to run a wide range of apps. Now if try to install the feature from Control Panel on a Windows device and get the 0x800F0907 .NET Framework installation error. then here’s what you need to do.

When we go to enable the .NET Framework from the Control Panel, it tries to activate the existing files on your system or download and install the required files if need be. But if this process fails you will see the following message.
Windows couldn’t complete the requested changes.
Windows couldn’t find required files to complete the requested changes. Make sure you’re connected to the Internet and try again.
Error: 0x800F0907
When we click on the Close button on the error message, you may see the following error.
An error has occurred. Not all of the features were successfully changed.
Because of this, the box associated with the .NET Framework remains unchecked.
If you get 0x800F0907 .NET Framework installation error, follow the solutions mentioned below to resolve the issue.
- Check your Internet Connection
- Configure Group Policy Editor
- Repair Windows using Installation Media
Let us talk about them in detail.
1] Check your Internet Connection
You need to make sure that your computer is getting a good connection. To know the bandwidth, use any of the mentioned Internet Speed testers. In case, the Internet is slow or even if it is not slow, restart your router. After restarting the router, reboot the computer and connect to the network and check if the issue is resolved.
2] Configure Group Policy Editor
Our system will fail to install the .NET Framework if configured to use WSUS, Windows Server Update Services, and not Windows Update Server. In such a scenario, you need to ask the admin to turn on Specify settings for optional component installation and component repair from Group Policy Editor and edit the Alternate source file path field or select the Contact Windows Update directly to download repair content instead of Windows Server Update Services (WSUS) option.
This can be done by following the steps mentioned below.
- Open Group Policy Editor on your computer by searching “Gpedit” from the Start Menu.
- Go to the following location:Computer Configuration > Administrative Templates > System
- Look for Specify settings for optional component installation and component repair, and double-click on it to configure the policy.
- Select Enabled.
- Specify the Alternate source file path if you have one.
- Check Never attempt to download payload from Windows Update and Download repair content optional features directly from Windows Update instead of Windows Server Update Services (WSUS).
Finally, open Run, paste gpupdate /force and click on OK to update the Group Policy engine.
Once the policy is updated, enable .NET Framework and see.
Related: Fix 0x800F0922 .NET Framework installation error
3] Repair Windows using Installation Media
If nothing worked, your last resort is to repair the copy of Windows using Installation Media. This should be the last solution as it took a lot of your time and required you to download the Windows ISO.
Installation Media uses the ISO file of Windows to repair the corrupted system files and install missing services. Since we cannot install the .NET Framework, repair the operating system using the Installation Media. This will do the trick for you.
We hope that you can resolve the issue using the solutions mentioned in this article.
Read: Fix .NET Framework 3.5 Installation Error 0x800F0950
How do I repair .NET Framework installation?
The .NET Framework installation can be repaired using Microsoft .NET Framework Repair Tool. It is a utility developed by Microsoft and is hosted on the support website of Microsoft. It looks for the factors causing the issue and then asks the user to allow it to apply the required fixes. If you want to repair the .NET Framework installation, make use of this tool.
Read: Fix .NET Framework Error 0x800c0006 on Windows
How do I fix failed to install the .NET framework?
If the .NET Framework is not installed, there are various solutions you can implement. But first of all, we recommend you try to repair the system files. You can do the same using the Installation Media. And if that doesn’t work, check our guide on how to troubleshoot .NET Framework Installation issues. Hopefully, you will be able to resolve the issue.
Also Read: Fix Error 0x800F080C when installing .NET Framework.
Anand Khanse is the Admin of TheWindowsClub.com, a 10-year Microsoft MVP (2006-16) & a Windows Insider MVP (2016-2022). Please read the entire post & the comments first, create a System Restore Point before making any changes to your system & be careful about any 3rd-party offers while installing freeware.
Earlier, we have seen how to enable .NET Framework in Windows 10, in following article:
How to enable .NET Framework 3.5 on Windows 10
However the PowerShell method discussed in above mentioned article requires you to specify the source files using Windows 10 ISO file. But if you’ve upgraded your earlier version of Windows to Windows 10, you may not have the source files with you. In that case, you can try enabling .NET Framework via Turn Windows Features On or Off page in Control Panel. However, when we tried to enable .NET 3.5 from there, we got this message:
Windows couldn’t complete the requested changes.
Windows couldn’t find required files to complete the requested changes. Make sure you’re connected to the Internet and try again.
Error: 0x800F0907
Closing the message ends operation with this message:
An error has occurred. Not all of the features were successfully changed.
When you try to enable the .NET 3.5 from Control Panel, Windows 10 try to activate the feature by installing some required Windows Updates. This issue can be easily solved by configuring the alternative source path which can help Windows to enable the feature without much relying on Windows Update. If you’ve source path located on some network share, you can use it here. This issue can also occur if your system is configured to get upgrades via Windows Server Update Services (WSUS) instead Windows Updates. Whatever is the case, the steps mentioned below will help you to fix this error.
FIX : Error 0x800F0907 While Installing .NET Framework 3.5 In Windows 10
FYI: Local Group Policy Editor is not available in Windows 10 Home editions. If you’re on Windows 10 Home and want to use Group Policy, go here and upgrade to Pro edition.
1. Press + R and put gpedit.msc in Run dialog box to open Local Group Policy Editor. Click OK.
2. Next, in the Local Group Policy Editor window, navigate here:
Computer Configuration > Administrative Templates > System
3. In the right pane of System, look for Setting named Specify settings for optional component installation and component repair. Double click on this setting to modify it:
4. In the policy configuration window shown above, click on Enabled to activate the policy. Then in Options, you can specify valid alternate source file path which could have .NET Framework feature files which we’re required to enable it. You can refer policy explanation for detailed info about adding alternative source here. Also make sure Never attempt to download payload from Windows Update and Download repair content optional features directly from Windows Update instead of Windows Server Update Services (WSUS) options are checked here. Click Apply followed by OK. Close Local Group Policy Editor.
5. Press + R and put gpupdate /force in Run dialog box to update Group Policy engine. Click OK.
After updating policies, re-try to enable .NET Framework and this time it should get activated without pushing any error code.
Hope this helps!
READ THESE ARTICLES NEXT
- Install .NET Framework 4.8 offline in Windows 10
- Fix: The .NET Framework 4.7 is not supported on this operating system
- [FIX] .NET Framework 3.5/DISM Error 0x800F0954 In Windows 10
- [FIX] The Referenced Assembly Is Not Installed On Your System
- Download Microsoft .NET Framework Repair Tool For Windows 10
- Enable .NET Framework 3.5 On Windows 10
| title | description | ms.date | author | ms.author | manager | audience | ms.topic | ms.prod | localization_priority | ms.reviewer | ms.custom | ms.technology | adobe-target |
|---|---|---|---|---|---|---|---|---|---|---|---|---|---|
|
.NET Framework 3.5 installation errors |
This article describes a problem where you receive an 0x800F0906, 0x800F081F, or 0x800F0907 error code when you try to install the .NET Framework 3.5 in Windows. |
12/16/2021 |
Deland-Han |
delhan |
dcscontentpm |
itpro |
troubleshooting |
windows-client |
medium |
kaushika |
sap:.net-framework-installation, csstroubleshoot |
windows-client-application-compatibility |
true |
.NET Framework 3.5 installation errors: 0x800F0906, 0x800F081F, 0x800F0907, 0x800F0922
This article helps fix Microsoft .NET Framework 3.5 installation errors.
Applies to: Windows 10 — all editions, Windows Server 2019, Windows Server 2012 R2
Original KB number: 2734782
[!NOTE]
Installation of the .NET Framework may throw errors that are not listed in this article, but you might be able to try the following steps to fix those errors as well.
Microsoft is releasing Out-of-band (OOB) updates for .NET Framework. .NET Framework Out-of-band update to address issues after installing the January 11, 2022 Windows update
Resolutions for Windows Server
You may receive the following errors when you install the .NET Framework 3.5 in Windows Server:
- Error code 0x800F0906
- Error code 0x800F081F
- Error code 0x800F0907
Error code 0x800F0906
This error code occurs because the computer cannot download the required files from Windows Update.
To resolve this issue, use one of the following methods:
Method 1: Check your internet connection
This behavior can be caused by network, proxy, or firewall configurations or by network, proxy, or firewall failures. To fix this problem, try to connect to the Microsoft Update website.
If you cannot access this website, check your Internet connection, or contact the network administrator to determine whether there is a configuration that blocks access to the website.
Method 2: Configure the Group Policy setting
This behavior can also be caused by a system administrator who configures the computer to use Windows Server Update Services (WSUS) instead of the Windows Update server for servicing. In this case, contact your system administrator and request that they enable the Specify settings for optional component installation and component repair Group Policy setting and configure the Alternate source file path value or select the Contact Windows Update directly to download repair content instead of Windows Server Update Services (WSUS) option.
To configure the Group Policy setting, follow these steps:
-
Start the Local Group Policy Editor or Group Policy Management Console.
Point to the upper-right corner of the screen, click Search, type group policy, and then click Edit group policy.
-
Expand Computer Configuration, expand Administrative Templates, and then select System. The screenshot for this step is listed below.
:::image type=»content» source=»media/dotnet-framework-35-installation-error/system-option.svg» alt-text=»Screenshot of the System group policy setting window.» border=»false»:::
-
Open the Specify settings for optional component installation and component repair Group Policy setting, and then select Enabled. The screenshot for this step is listed below.
:::image type=»content» source=»media/dotnet-framework-35-installation-error/enabled-option.svg» alt-text=»Screenshot of the Enabled option of the Specify settings for optional component installation and component repair item.» border=»false»:::
-
If you want to specify an alternative source file, in the Alternate source file path box, specify a fully qualified path of a shared folder that contains the contents of the
sourcessxsfolder from the installation media.Example of a shared folder path:
\server_nameshareWin8sxsOr, specify a WIM file. To specify a WIM file as an alternative source file location, add the prefix WIM: to the path, and then add the index of the image that you want to use in the WIM file as a suffix.
Example of a WIM file path:
WIM:\server_nameshareinstall.wim:3[!NOTE]
In this example,3represents the index of the image in which the feature files are found. -
If it is applicable to do this, select the Contact Windows Update directly to download repair content instead of Windows Server Update Services (WSUS) check box.
-
Tap or click OK.
-
At an elevated command prompt, type
gpupdate /force, and then press Enter to apply the policy immediately.
Method 3: Use Windows installation media
You can use the Windows installation media as the file source when you enable the .NET Framework 3.5 feature. To do this, follow these steps:
-
Insert the Windows installation media.
-
At an elevated command prompt, run the following command:
Dism /online /enable-feature /featurename:NetFx3 /All /Source:<drive>:sourcessxs /LimitAccessIn this command, <drive> is a placeholder for the drive letter for the DVD drive. For example, you run the following command:
Dism /online /enable-feature /featurename:NetFx3 /All /Source:D:sourcessxs /LimitAccess
Method 4: Alternative steps for Windows Server
In Windows Server 2012 R2, you can also specify an alternative source by using Windows PowerShell cmdlets or by using the Add Roles and Features Wizard.
To use Windows PowerShell, follow these steps:
-
Insert the Windows installation media.
-
In an elevated Windows PowerShell command window, run the following command:
Install-WindowsFeature name NET-Framework-Core source <drive>:sourcessxs
In this command, <drive> is a placeholder for the drive letter for the DVD drive or for the Windows installation media. For example, you run the following command:
Install-WindowsFeature name NET-Framework-Core source D:sourcessxs
To use the Add Roles and Features Wizard, follow these steps:
-
Insert the Windows installation media.
-
Start the Add Roles and Features Wizard.
-
On the Select features page, select the .NET Framework 3.5 Features check box, and then click Next.
-
On the Confirm installation selections page, click the Specify an alternate source path link. The screenshot for this step is listed below.
:::image type=»content» source=»media/dotnet-framework-35-installation-error/specify-alternate-source-path.svg» alt-text=»Screenshot of the Specify an alternate source path link on the Conform installation selections page.» border=»false»:::
-
On the Specify Alternate Source Path page, type the path of the SxS folder as a local path or as a network share path. The screenshot for this step is listed below.
:::image type=»content» source=»media/dotnet-framework-35-installation-error/path-of-sxs-folder.svg» alt-text=»Screenshot of the Specify Alternate Source Path page.» border=»false»:::
-
Click OK.
-
Click Install to finish the wizard.
Error code 0x800F081F
This error code can occur when an alternative installation source is specified and one of the following conditions is true:
- The location that is specified by the path does not contain the files that are required to install the feature.
- The user who tries to install the feature does not have at least READ access to the location and to the files.
- The set of installation files is corrupted, incomplete, or invalid for the version of Windows that you are running.
To fix this problem, make sure that the full path of the source is correct (x:sourcessxs) and that you have at least Read access to the location. To do this, try to access the source directly from the affected computer. Verify that the installation source contains a valid and complete set of files. If the problem persists, try to use a different installation source.
Error code 0x800F0907
This error code occurs if an alternative installation source is not specified or is invalid and if the Specify settings for optional component installation and component repair Group Policy setting is configured to Never attempt to download payload from Windows Update.
To fix this problem, review the policy setting to determine whether it is appropriate for your environment. If you do not want to download feature payloads from Windows Update, consider configuring the Alternate source file path value in the Group policy setting.
[!NOTE]
You must be a member of the Administrators group to change Group Policy settings on the local computer. If the Group Policy settings for the computer that you want to manage are controlled at the domain level, contact your system administrator.
To do this, follow these steps:
-
Start Local Group Policy Editor or Group Policy Management Console as applicable in your environment.
-
Expand Computer Configuration, expand Administrative Templates, and then select System.
-
Open the Specify settings for optional component installation and component repair Group Policy setting, and then select Enabled.
-
Determine whether the Never attempt to download payload from Windows Update Group Policy setting is enabled, and then determine the desired setting for your environment.
-
If you want to specify an alternate source file, in the Alternate source file path box, specify a fully qualified path of a shared folder that contains the contents of the
sourcessxsfolder from the installation media. Or, specify a WIM file. To specify a WIM file as an alternative source file location, add the prefix WIM: to the path, and then add the index of the image that you want to use in the WIM file as a suffix. The following are examples of values that you can specify:- Path of a shared folder:
\server_nameshareWin8sxs - Path of a WIM file, in which
3represents the index of the image in which the feature files are found:
WIM:\server_nameshareinstall.wim:3
- Path of a shared folder:
-
If you want, select the Contact Windows Update directly to download repair content instead of Windows Server Update Services (WSUS) check box.
-
Tap or click OK.
-
At an elevated command prompt, type the
gpupdate /force, and then press Enter to apply the policy immediately.
Resolution for Windows 10
-
Error code 0x800F0906, 0x800F081F, or 0x800F0907
To fix the error codes for Windows 10, follow these steps:
-
Download the Windows Media Creation tool, and create an ISO image locally, or create an image for the version of Windows that you have installed.
-
Configure the Group Policy as in Method 2, but also follow these steps:
- Mount the ISO image that’s created in step 1.
- Point the Alternate source file path to the ISO
sourcessxsfolder from the ISO. - Run the
gpupdate /forcecommand. - Add the .NET Framework feature.
-
-
Error code 0x800F0922
The following error message occurs when you do Windows 10 upgrade:
0x800F0922 CBS_E_INSTALLERS_FAILED: Processing advanced installers and generic commands failed.
[!NOTE]
This error code is not specific to .NET Framework.To fix this issue, follow these steps:
-
Open the .NET Framework installation files folder.
-
Open Sources folder.
-
Right-click the SXS folder, and then click Properties.
-
Click Security and make sure that there is a check mark next to Read & Execute. If the check mark isn’t there, click the Edit button and turn it on.
-
Press Windows Key + X keyboard shortcut.
-
Click Command Prompt (Admin).
-
In the Command Prompt window, type the following command and press Enter:
dism /online /enable-feature /featurename:netfx3 /all /source:c:sxs /limitaccess -
In the Command Prompt window, type the following command and press Enter:
dism /online /Cleanup-Image /RestoreHealth
-
More information
These errors may occur when you use an installation wizard, the Deployment Image Servicing and Management (DISM) tool, or Windows PowerShell commands to enable the .NET Framework 3.5.
In Windows 10 and Windows Server 2012 R2, the .NET Framework 3.5 is a Feature on Demand. The metadata for Features on Demand is included. However, the binaries and other files associated with the feature are not included. When you enable a feature, Windows tries to contact Windows Update to download the missing information to install the feature. The network configuration and how computers are configured to install updates in the environment can affect this process. Therefore, you may encounter errors when you first install these features.
Error messages that are associated with these error codes
| Error code | Error messages |
|---|---|
| 0x800F0906 | The source files could not be downloaded. Use the source option to specify the location of the files that are required to restore the feature. For more information on specifying a source location, see http://go.microsoft.com/fwlink/?LinkId=243077. The DISM log file can be found at C:WindowsLogsDISMdism.log. Windows couldn’t complete the requested changes. Installation of one or more roles, role services, or features failed. 0x800F0906 — CBS_E_DOWNLOAD_FAILURE Error code: 0x800F0906 Error: 0x800f0906 |
| 0x800F081F | The source files could not be found. Use the Source option to specify the location of the files that are required to restore the feature. For more information on specifying a source location, see http://go.microsoft.com/fwlink/?LinkId=243077. The DISM log file can be found at C:WindowsLogsDISMdism.log 0x800F081F — CBS_E_SOURCE_MISSING Error code: 0x800F081F Error: 0x800F081F |
| 0x800F0907 | DISM failed. No operation was performed. For more information, review the log file. The DISM log file can be found at C:WindowsLogsDISMdism.log Because of network policy settings, Windows couldn’t connect to the Internet to download files that are required to complete the requested changes. Contact your network administrator for more information. 0x800F0907 — CBS_E_GROUPPOLICY_DISALLOWED Error code: 0x800F0907 Error: 0x800F0907 |
Download the .NET Framework 3.5 outside of the Windows Update requirement
The .NET Framework 3.5 is available for customers with Volume Licensing or MSDN Subscription, as Feature on-Demand Media is available.
Error codes are not listed when you install .NET Framework 3.5
When you install .NET Framework 3.5, you may encounter other error codes that are not listed in this article, for more information, go to the following articles:
-
Windows help
-
Net Framework 3.5 and 4.5 error 0x80070002
-
Install the .NET Framework 3.5 in Windows 10
-
Microsoft .NET Framework 3.5 Deployment Considerations
Пользователи операционной системы Windows вынуждены периодически вступать в борьбу с всевозможными ошибками и системными сбоями, возникающими по различным причинам. С выходом 10 версии, несмотря на её регулярные кумулятивные обновления, призванные устранить имеющиеся ошибки и баги, в том числе залатать дыры в системе безопасности, проблем меньше не стало. Среди множества неприятностей, с которыми пришлось столкнуться пользователям, нередким явлением стала ошибка 0x800f081f, возникающая в процессе установки патчей для Десятки. Сбой, сопровождающийся соответствующим сообщением с указанием кода и некоторых деталей, прерывает процедуру, при этом повторное обновление ситуацию не исправляет. Присутствие ошибки с тем же кодом характерно и при установке .NET Framework 3.5, хотя природа сбоев, соответственно и способ устранения будут отличаться.

Методы устранения ошибки 0x800f081f при обновлении Windows.
Код ошибки 0x800F081F является одним из четырех возможных кодов ошибок, которые указывают на одну и ту же проблему. Остальные три — это код ошибки 0x800F0906, код ошибки 0x800F0907 и код ошибки 0x800F0922. Несовместимость Microsoft .NET Framework 3.5 вызывает все эти коды ошибок. Как правило, они будут возникать при включении .NET Framework, используя либо мастер установки, инструмент обслуживания изображений и управления развертыванием (DISM), либо команды Windows PowerShell.
Вы будете видеть эти коды только на Windows 10, Windows Server 2016, Windows Server версии 1709, Windows 8.1, Windows Server 2012 R2, Windows 8 и Windows Server 2012. В этих операционных системах Microsoft .NET Framework 3.5 не включен по умолчанию. Когда вы включаете эту функцию, Windows Update пытается захватить .NET-файлы вместе с другими необходимыми файлами. Если ваш компьютер настроен неправильно, то вы можете увидеть коды:
- 0x800F081F: Windows не смогла найти исходные файлы .NET для продолжения установки.
- 0x800F0906: Windows не смогла загрузить исходные файлы .NET и подключиться к Интернету, или установить роль службы или функцию.
- 0x800F0907: Сбой программы DISM, либо параметры сетевой политики не позволяют Windows подключаться к сети.
- 0x800F0922: Обработка .NET-инсталляторов или общих команд завершилась неудачно.
Решение проблем с установкой
Мы постарались собрать все самые верные решения, отмеченные пользователями популярных форумов и ресурсов. Итак, приступим.
Как показали многие отзывы – повторное скачивание нового пакета фреймворка с официального сайта не помогает. Также, решение которое описывается на официальном форуме мало кому помогает и является достаточно запутанным.
Проверка подключенных компонентов
Для начала проверьте, присутствует ли по умолчанию в системе фреймворк версии 3.5. Возможно его потребуется просто активировать.
- Кливаем по значку “Меню Пуск” правой кнопкой и сверху жмем на “Программы и компоненты”.
- В данной директории просматриваем боковое меню, там кликаем на “Включение или отключение компонентов”. Опция должна запускаться из-под админа.
- В приведенном окошке ставим галочку напротив .NET Framefork 3.5 и двух его подпунктов.

Проверка компонентов Windows 10
Далее запустится процесс активации. После активируем повторную установку и смотрим – исчезла ли проблема.
Проверяем службы обновления Windows 10
Частенько код ошибки появляется при попытке запустить игру, либо другое приложение. В таком случае причиной могут быть неактивные службы апдейтов. Проверьте следующее:
- Через пуск заходим в “Выполнить”, прописываем команду services.msc. Тем самым вы попадете в список всех служб.
- Внизу будет Центр обновлений Windows, через правую кнопку проходим в свойства. Во вкладке “Тип запуска” клацаем Автоматически. Чуть ниже в Состоянии кликаем “Запустить”.

Активируем службу обновления
Офлайн инсталлер
Как вариант можно опробовать применение оффлайн инсталлера .NET Framefork 3.5. Он в принудительном порядке загрузит компоненты в системе. Вот ссылка на скачивание его файлов – загрузить инсталлер. Далее делаем по-пунктам:
- Распаковываем на Рабочем столе загруженный архив.
- Там будут три файла – папку Sources просто перенесите на диск C. Возможно выйдет уведомление о замене – подтверждаем.
- Далее активируйте инсталятор: выберите диск системы C: и кликайте Install.

Применение оффлайн инсталлера
Сторонние образы
Если проблема выглядит как DISM ошибка 0x800F081F (или 0x800F0906) “Не удалось найти исходные файлы”, то действенным вариантом будет применение внешнего носителя с образом системы Windows 10 (диск, флешка).
- Монтируем образ. Запоминаем букву присвоенного раздела.
- Выполняем Командную строку и записываем туда следующую активацию: и клацаем Enter.

Выполняем DISM команду со встроенного образа
Как исправить коды ошибок 0x800F081F, 0x800F0906, 0x800F0907 или 0x800F0922 на Windows 10
К счастью, способы для исправления первых трех кодов ошибок одинаковы. Для кода ошибки 0x800F0922 вам нужно перейти прямо к способу 2.
Способ 1. Настройка групповой политики
Примечание. Редактор групповой политики доступен только в Windows 10 Pro, Enterprise и Education. К счастью, есть обходной путь. Вы можете ознакомиться с руководством по доступу к редактору групповой политики в Windows 10 Home.
1. Нажмите Windows + R, затем введите gpedit.msc и нажмите Enter. Команда откроет окно редактора групповой политики.

2. Далее перейдите Конфигурация компьютера > Административные шаблоны > Система. С правой стороны прокрутите немного вниз и найдите «Укажите параметры для установки необязательных компонентов и восстановления компонентов.»

3. Теперь нажмите по этому слову два раза мышкой, чтобы открыть «настройки». Далее в новом окне Вам нужно поставить точку на «Включено«. Если ошибка не устранена

Способ 2. Включение .NET Framework с помощью команды DISM
Примечание. Это единственный метод, который исправит код ошибки 0x800F0922, и требует для этого использование команды DISM для включения .NET Framework.
1. Прежде чем начать основной процесс, вам сначала нужно убедиться, что у вас есть образ ISO Windows 10. Версия ISO должна точно соответствовать вашей текущей операционной системе. Вы можете официально специальным средством. Скачали ISO образ? Тогда приступим.
2. Для начала вам нужно смонтировать недавно загруженный образ ISO. Откройте проводник (этот компьютер), найдите свой скачанный ISO образ и нажмите на нем правой кнопкой мыши, и выберите в меню «Подключить«. Таким образом мы создадим виртуальный диск с Windows 10.

3. Если процесс был успешным, вы увидите ISO Windopws 10 на виртуальном диске, открыв «Этот компьютер». Запомните имя диска, в моем случае это G.

4. Теперь откройте «меню пуск» и введите в поиск cmd. Когда вы увидите список результатов, щелкните правой кнопкой мыши Командная строка и выберите Запуск от имени администратора.
5. В окне командной строки задайте следующую команду dism /online /enable-feature /featurename:NetFx3 /All /Source:G:sourcessxs /LimitAccess и нажмите Enter.

6. После окончания процесса с командной строкой, откройте «Этот компьютер» и нажмите правой кнопкой мыши на виртуальном созданном диске, и в меню выберите «Извлечь«. Таким образом мы удалим созданный ранее наш виртуальный диск с Windows 10, чтобы не мешал. Он нам больше не нужен. Перезагрузите ПК и проверьте, устранена ли ошибка.

Воспользуйтесь средством DISM
DISM – это инструмент Windows, который подготавливает пакеты к установке и предоставляет им поддержку во время установки. Он является чем-то вроде менеджера обновлений в операционной системе.
Далее выполните следующие указания:
- Откройте меню « Пуск » ПКМ и выберите командную строку.
- В ней запишите без ошибок строку « DISM /Online/Cleanup-Image /RestoreHealth /source:WIM:G:SourcesInstall.wim:1 /LimitAccess ».
- После чего необходимо ввести следующую команду здесь же « DISM /Online /cleanup-image /restorehealth ».
- Далее закройте открытые окна и программы и перезагрузите ваш ПК .
- Повторите попытку запуска необходимой вам программы.
Если проблема не исчезла, и ошибка 0x800f081f продолжает появляться, в этом случае мы воспользуемся еще одним способом восстановить работоспособность вашей операционной системы.
Для этого метода вам понадобиться флешка с Windows или установочный диск.
Выполните пошаговую инструкцию.
| Перезапустите ваш компьютер и выполните загрузку со съемного диска | Для этого зайдите в BIOS и во вкладке BOOT , в приоритетах загрузки укажите ваш съемный носитель |
| После того, как ОС загрузится, перейдите в командную строку | Для этого кликните ПКМ по меню « Пуск » и выберите нужный пункт |
| Далее введите следующую команду в пустой строке « dism.exe /online /enable-feature /reaturename:NetFX3 /Source:C:sourcessxs /LimitAccess » | Как можно догадаться, диск необходимо указывать тот, на котором установлена ваша операционная система |
| После этой команды проверьте ваши файлы на поврежденные , запустив специальную утилиту « sfc /scannow » | Она проверит все ваши файлы, хранящиеся на жестком диске на ошибки и целостность |
| Далее выйдите из системы, установив загрузку с вашего жесткого диска | Переустановите проблемную программу и повторите запуск. В этот раз проблем быть не должно |
Если ошибка с системным кодом 0x800f081f, связанная с Net Framework 3.5 снова появляется в вашей новенькой Windows 10 – попробуйте применить кардинальный метод – вернуть компьютер в исходное состояние. Если вы не знаете, как это сделать – можно прочитать инструкцию на официальном сайте Microsoft.
Переустановить Microsoft .NET Framework 3.5
После того, как вы успешно выполнили инструкции, пришло время установить .NET Framework 3.5, чтобы исправить ошибки 0x800F081F и связанных с ним кодов.
1. Нажмите Win + R и введите appwiz.cpl.

2. Нажмите слева «Включение и отключение компонентов«. В новом окне найдите в списке NET Framework 3.5 (включая .NET 2.0 и 3.0) и установите рядом с ним флажок, после чего нажмите OK. Процесс установки займет несколько минут, в зависимости от скорости вашего соединения. Проверьте устранена ли ошибка 0x800F081F.

Смотрите еще:
- Как исправить ошибку 0x80070017 в Windows 10
- Windows Media Creation Tool: Код ошибки 0x80072F76-0x20017
- Как исправить ошибку 0xc000014c в Windows 10
- 0x80070422 Проблемы с установкой обновлений Windows 10
- Ошибка 0x80070643: Не удалось установить обновления Windows 10
comments powered by HyperComments
Совсем никак не хочет ставиться.
что я пробовал:
1) Стандартный подход, через добавление ролей. указывал альтернативный путь к файлам дистрибутивов. Файлы на установочном диске windows server 2012 r2 standart.
2) Через PowerShell командой Install-WindowsFeature Net-Framework-Core -source D:sourcessxs (D это диск с дистрибутивом)
Получил ошибку
Install-WindowsFeature : The request to add or remove features on the specified server failed.
Installation of one or more roles, role services, or features failed. Error: 0x800f0907
At line:1 char:1
+ Install-WindowsFeature Net-Framework-Core -source D:sourcessxs
+ ~~~~~~~~~~~~~~~~~~~~~~~~~~~~~~~~~~~~~~~~~~~~~~~~~~~~~~~~~~~~~~~~
    + CategoryInfo          : InvalidOperation: (@{Vhd=; Credent...Name=localhost}:PSObject) [Install-WindowsFeature],
    Exception
    + FullyQualifiedErrorId : DISMAPI_Error__Failed_To_Enable_Updates,Microsoft.Windows.ServerManager.Commands.AddWind
   owsFeatureCommand
3) Через PowerShell командой Add-WindowsFeature NET-Framework-Core -Source d:sourcessxs
Получил ошибку но несколько иную:
Add-WindowsFeature : The request to add or remove features on the specified server failed.
Installation of one or more roles, role services, or features failed.
The source files could not be downloaded.
Use the "source" option to specify the location of the files that are required to restore the feature. For more
information on specifying a source location, see http://go.microsoft.com/fwlink/?LinkId=243077. Error: 0x800f0906
At line:1 char:1
+ Add-WindowsFeature NET-Framework-Core -Source d:sourcessxs
+ ~~~~~~~~~~~~~~~~~~~~~~~~~~~~~~~~~~~~~~~~~~~~~~~~~~~~~~~~~~~~
    + CategoryInfo          : InvalidOperation: (@{Vhd=; Credent...Name=localhost}:PSObject) [Install-WindowsFeature],
    Exception
    + FullyQualifiedErrorId : DISMAPI_Error__Cbs_Download_Failure,Microsoft.Windows.ServerManager.Commands.AddWindowsF
   eatureCommand
4) через командную строку командой
C:Windowssystem32>dism /online /enable-feature /featurename:NetFX3 /all /Source:D:sourcessxs /LimitAccess
тоже закончилось ничем
Deployment Image Servicing and Management tool
Version: 6.3.9600.17031

Image Version: 6.3.9600.17031

Enabling feature(s)
[===========================66.2%======                    ]

Error: 0x800f081f

The source files could not be found.
Use the "Source" option to specify the location of the files that are required t
o restore the feature. For more information on specifying a source location, see
 http://go.microsoft.com/fwlink/?LinkId=243077.

The DISM log file can be found at C:WindowsLogsDISMdism.log
5) так же прописывал в локальной групповой политике значение параметра «Specify settings for optional component installation and component repair» с указанием пути к файлам дистрибутивов и запретом качать что либо из интернета.
пробовал два разных дистрибутива windows, английскую и русскую версии.
в общем на текущий момент я в тупике…
-
Изменен тип
8 февраля 2018 г. 11:09