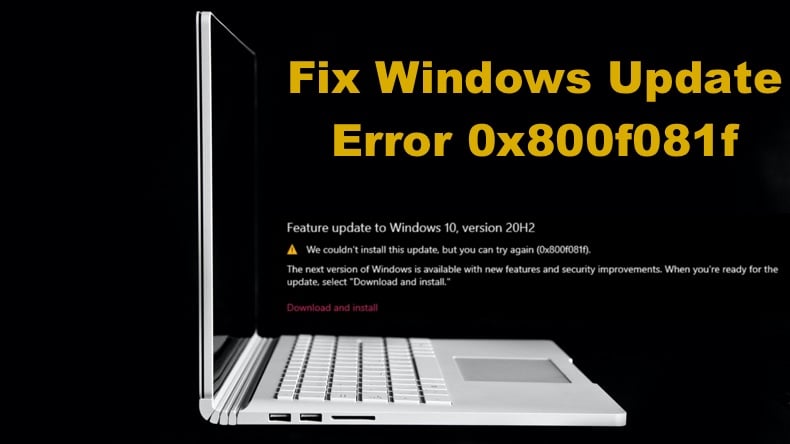
How to Fix Update Error 0x800f081f in Windows 10
If you’re getting error 0x800f081f when trying to update your operating system, you won’t get important system updates. This article will show you several methods to fix this error.
What Causes Error 0x800f081f
You may experience error 0x800f081f due to incompatibility issues caused by Microsoft .NET Framework 3.5. It has been determined that such incompatibilities occur when users enable NET Framework.
In Windows 10, NET Framework works as an on-demand feature, meaning that when the user turns it on, the Windows Update service tries to acquire the binaries of .NET and other files. If your computer has been incorrectly configured, you will get the 0x800f081f error because Windows Update cannot find the necessary files for NET.
If Microsoft NET Framework is the cause of error 0x800f081f, then you may be able to resolve the issue by using an offline NET Framework installer or enabling the currently installed NET Framework version manually. NET Framework can be enabled using a PowerShell Command, the Deployment Image Servicing, and Management tool, or the installation wizard.
Video Guide on How to Fix Windows Update Error 0x800f081f
Table of Contents:
- Introduction
- Solution 1. Run the Windows Update Troubleshooter
- Solution 2. Enable Microsoft .NET Framework using Command Prompt
- Solution 3. Run the System File Checker (SFC) Scan
- Solution 4. Run the Deployment Image & Servicing Management (DISM) Scan
- Solution 5. Configure the Group Policy Setting
- Solution 6. Upgrade Windows 10 Using the Media Creation Tool
- Video Guide on How to Fix Windows Update Error 0x800f081f
Solution 1. Run the Windows Update Troubleshooter
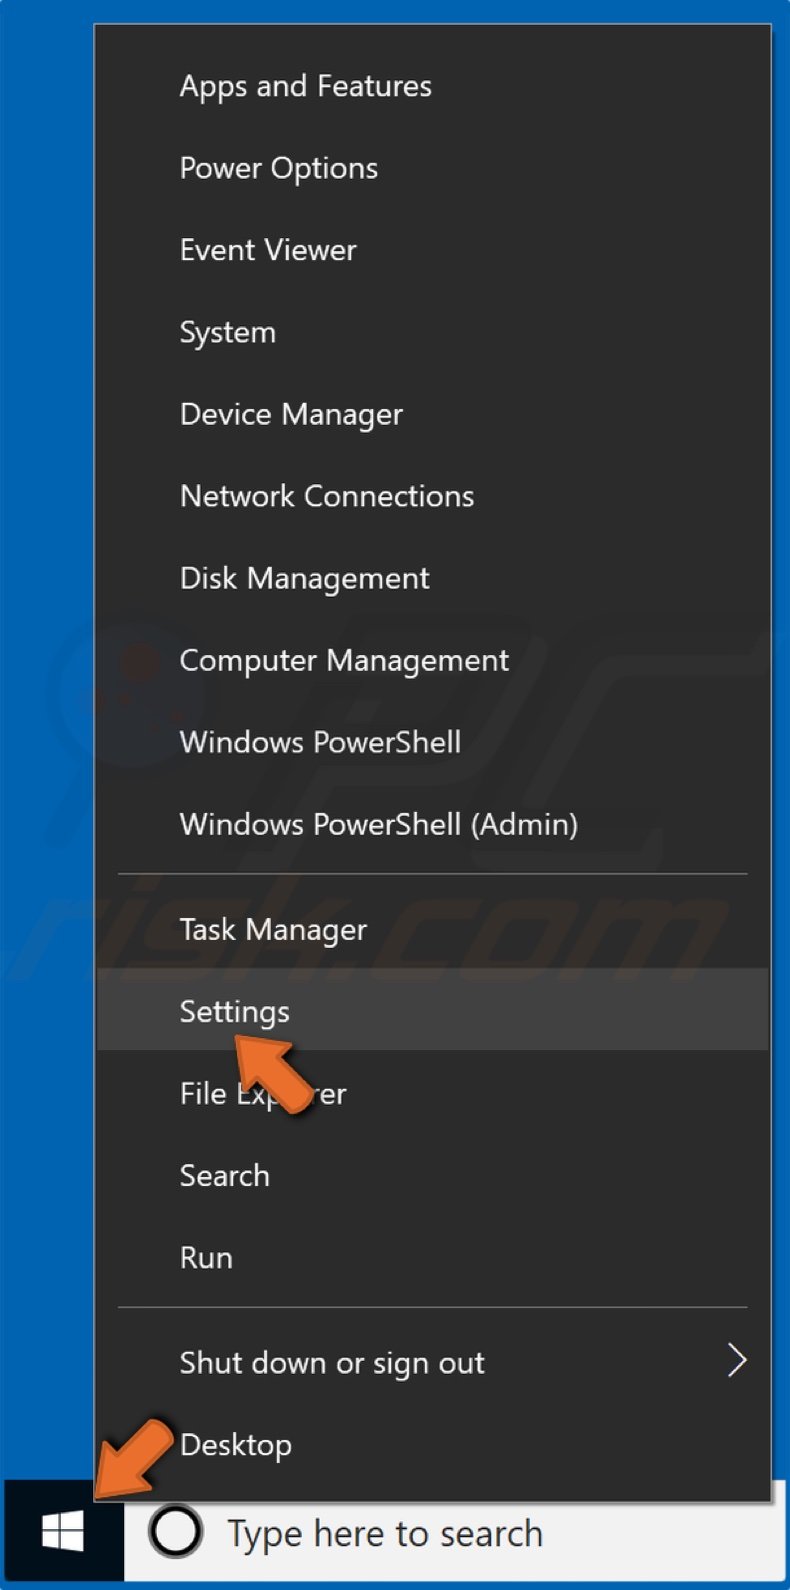
1. Right-click the Start Menu and click Settings.
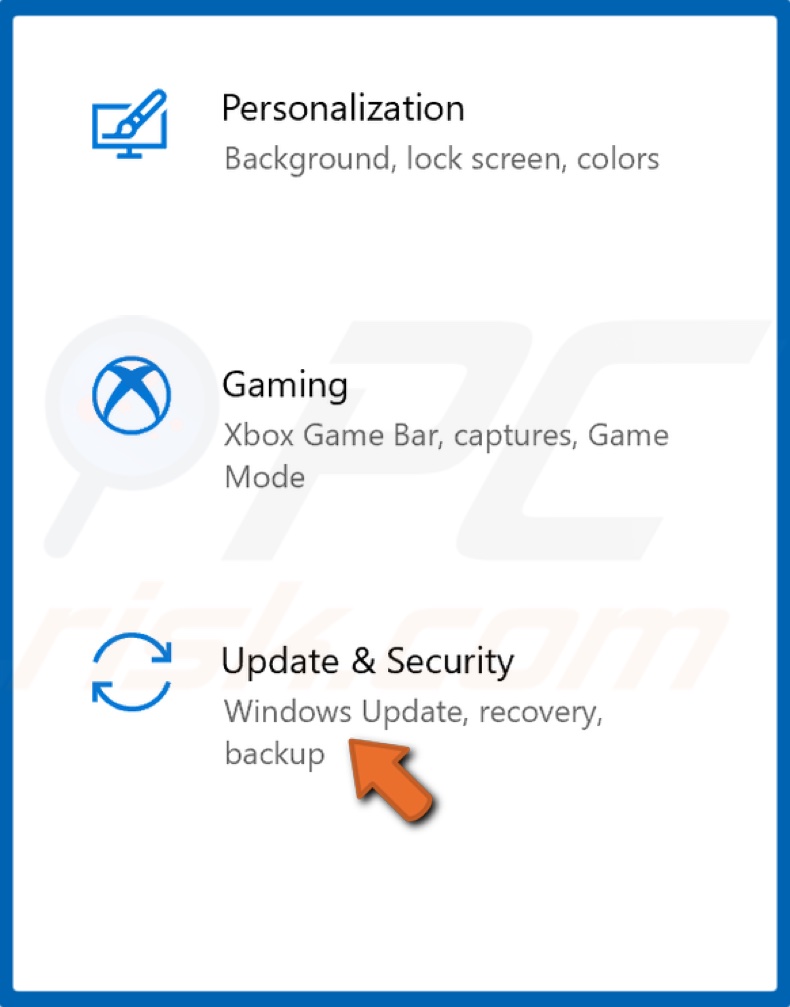
2. Select Update & Security.
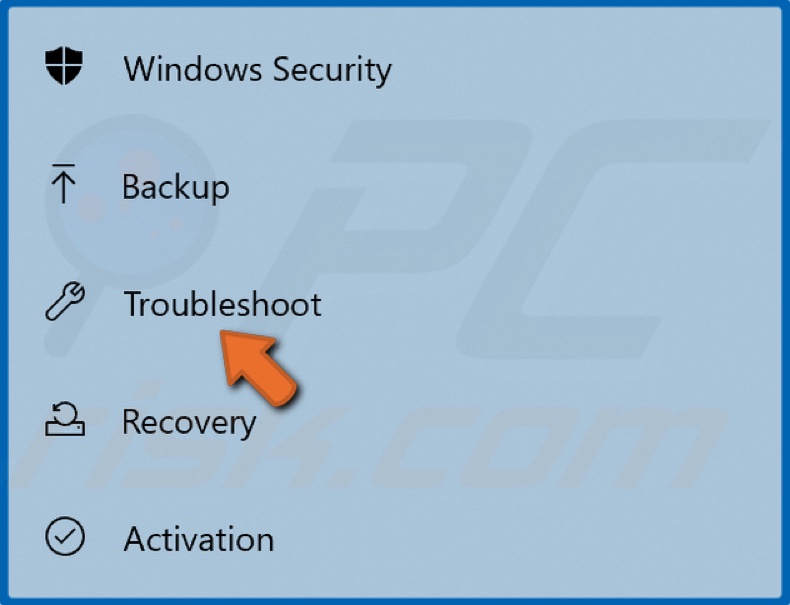
3. Click Troubleshoot.
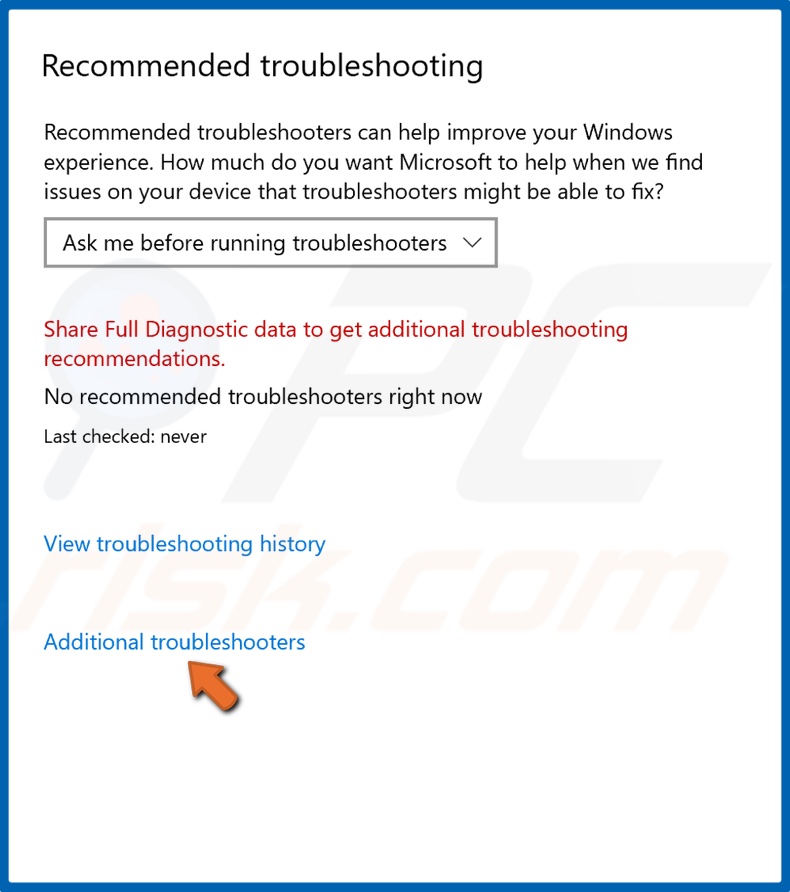
4. Click Additional troubleshooters.
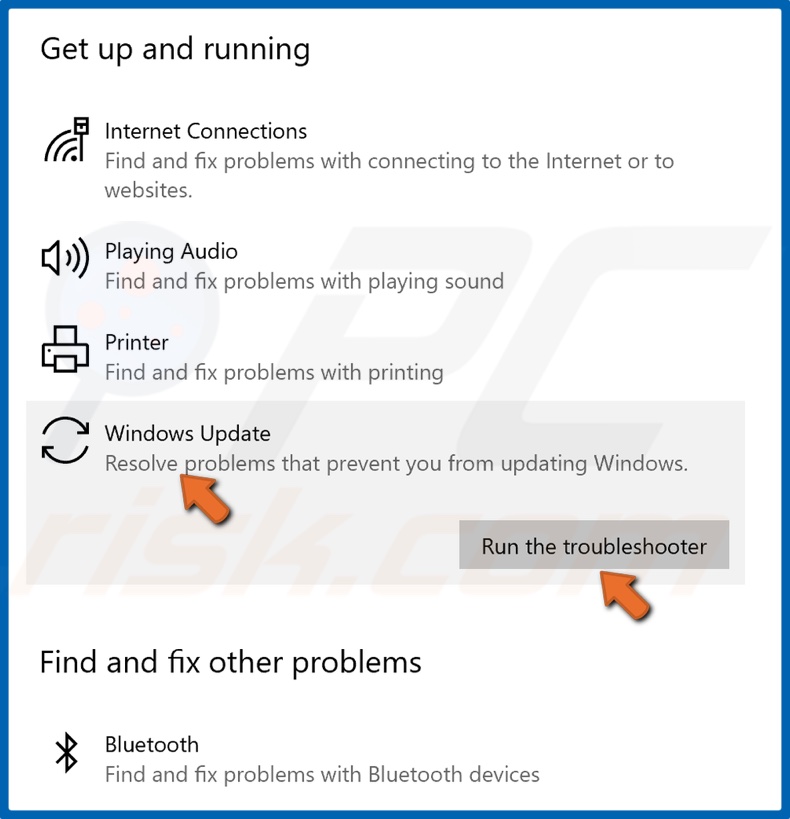
5. Select Windows Update and click Run the troubleshooter.
6. If the troubleshooter detects an issue, it will select and apply a fix automatically.
[Back to Table of Contents]
Solution 2. Enable Microsoft .NET Framework using Command Prompt
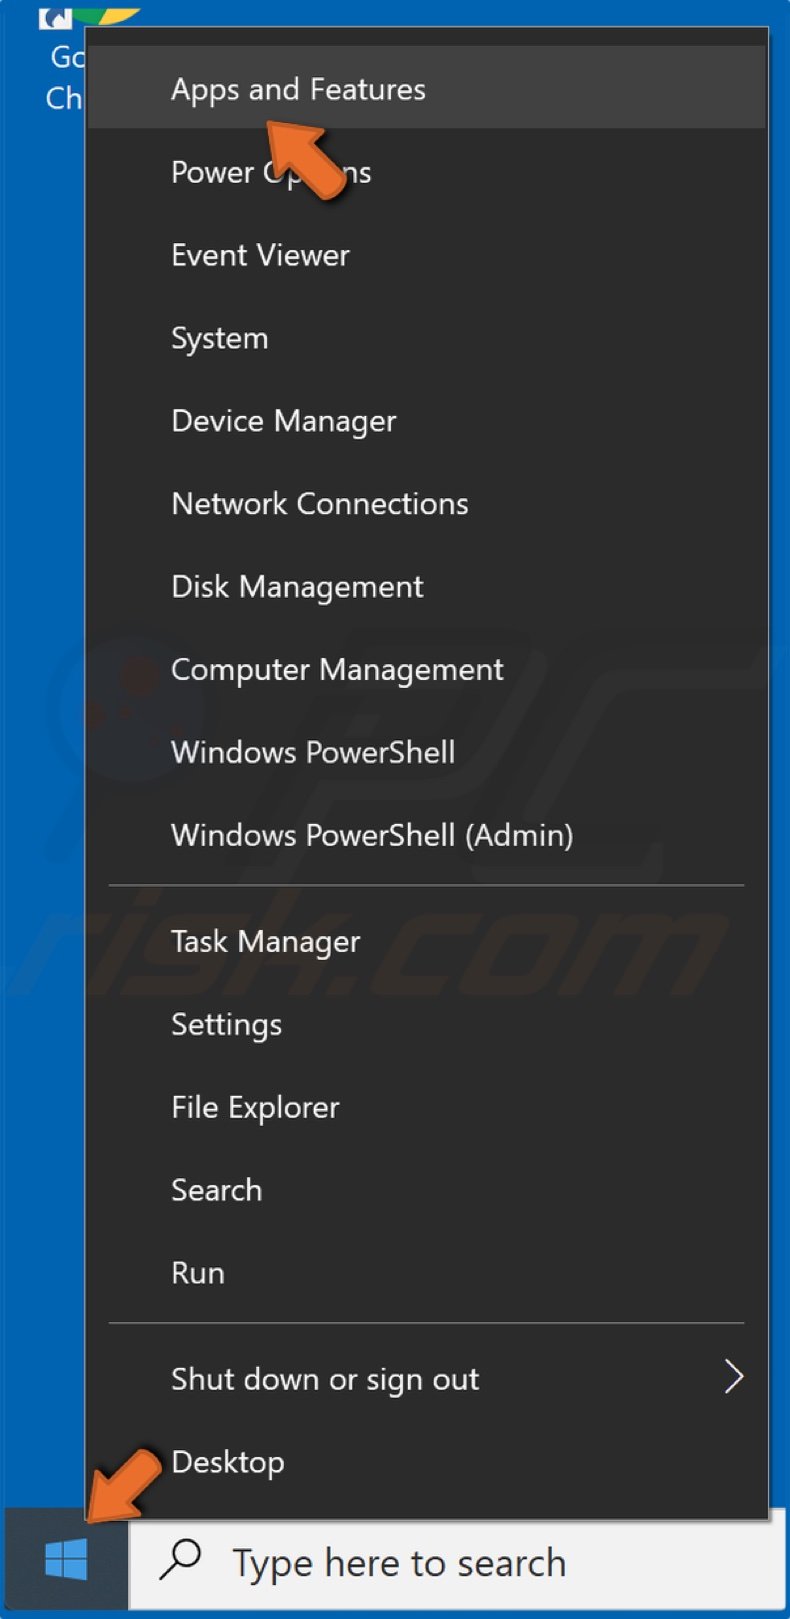
1. Right-click the Start Menu and select Apps and Features.
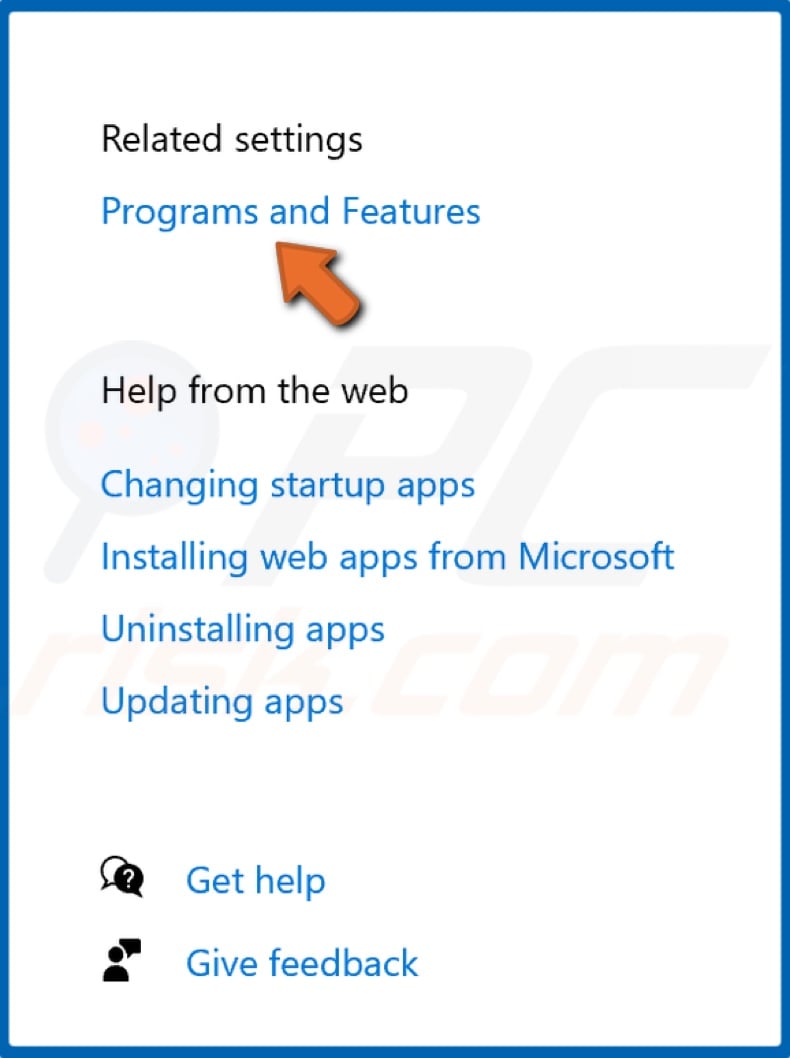
2. At the top-right of the window, select Programs and Features.
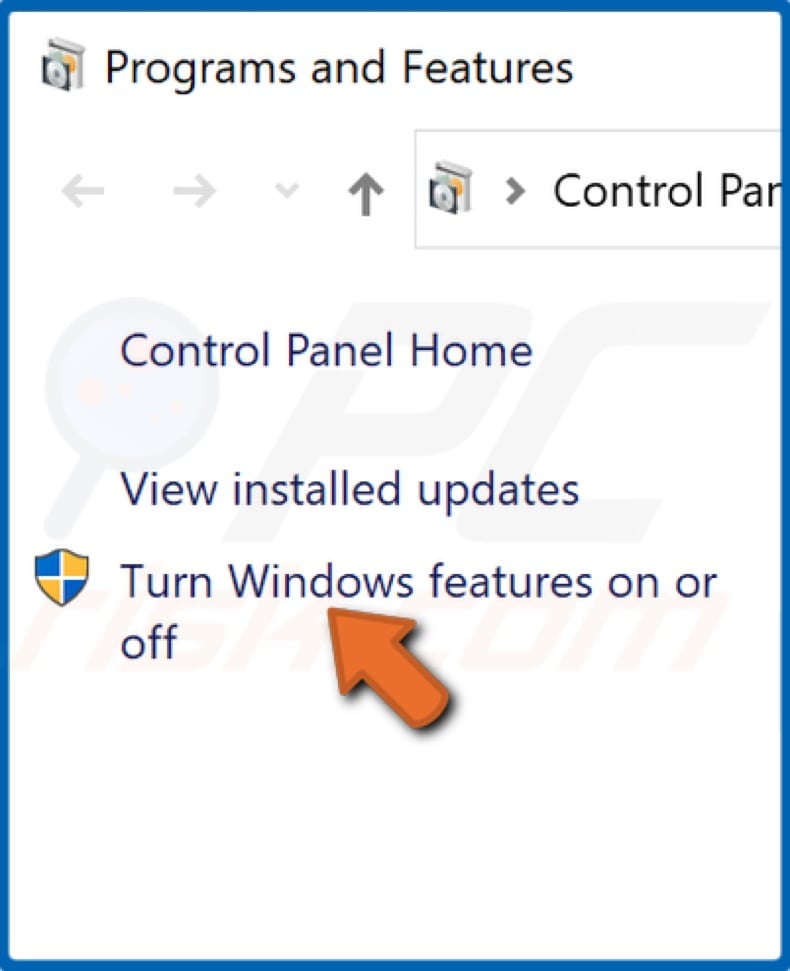
3. In the resulting Programs and Features window, click Turn Windows features on or off.
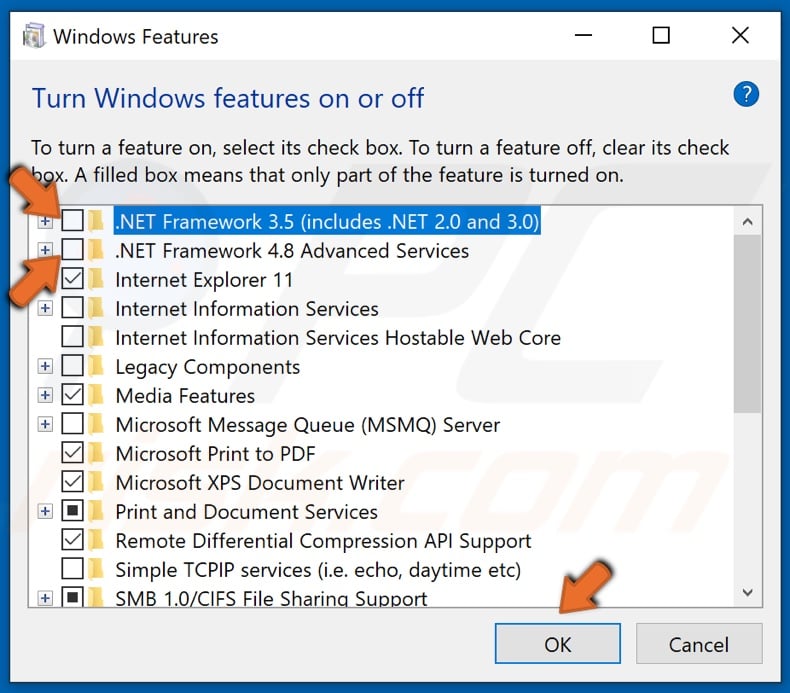
4. Find .NET Framework 3.5 and .NET Framework 4.8.
5. Uncheck the boxes next to .NET Framework 3.5 and .NET Framework 4.8 and click OK to disable them.
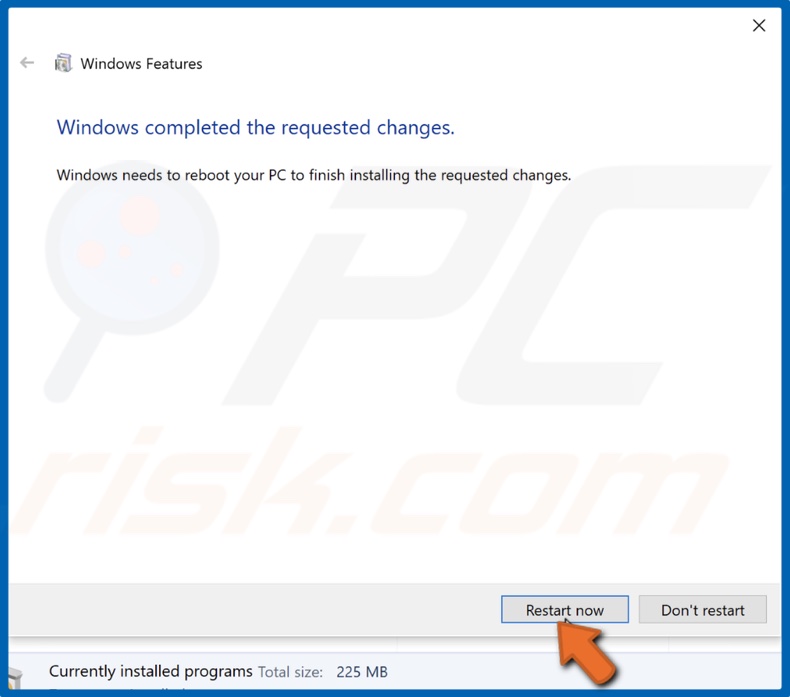
6. Click Restart Now.
7. Return to the Turn Windows features on or off window.
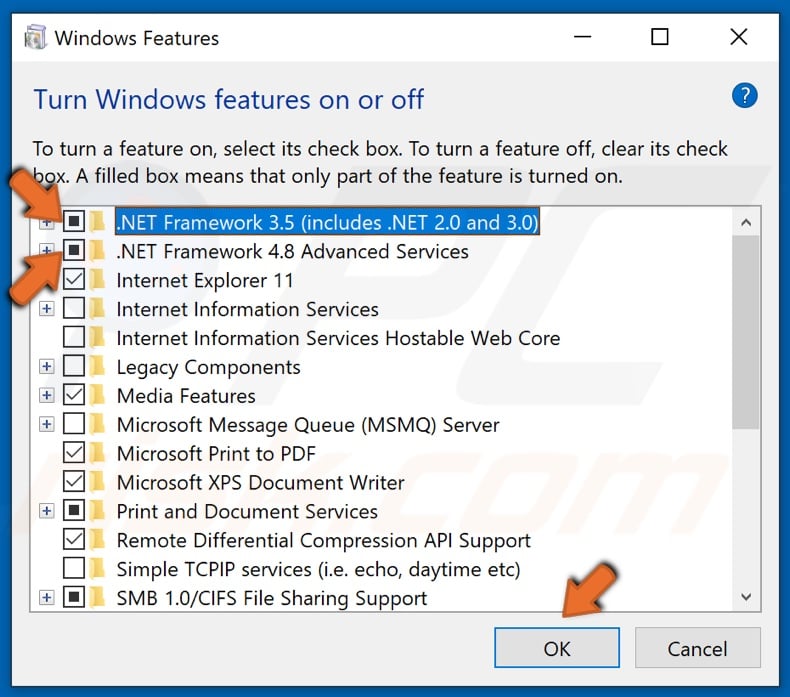
8. Check the boxes next to .NET Framework 3.5 and .NET Framework 4.8 and click OK.
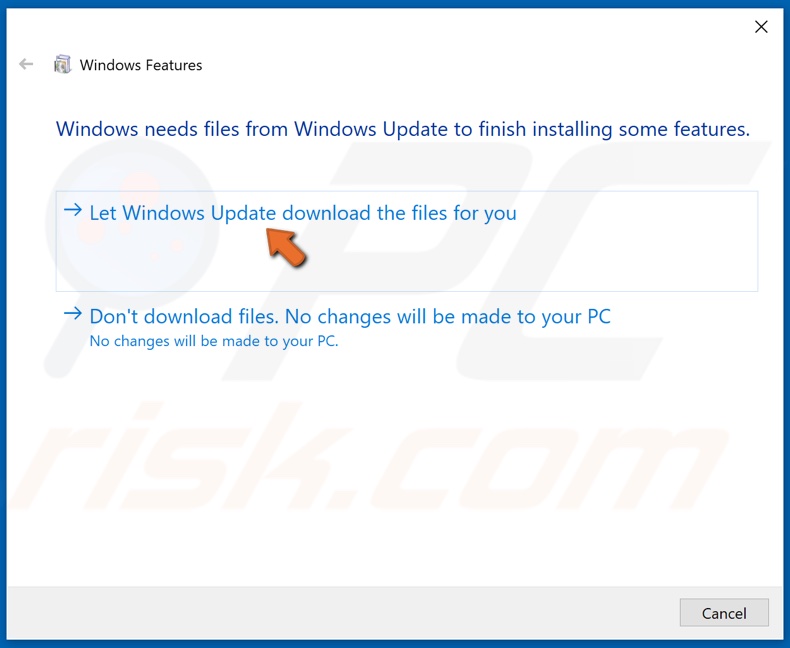
9. Then, click the Let Windows Update download the files for you option.
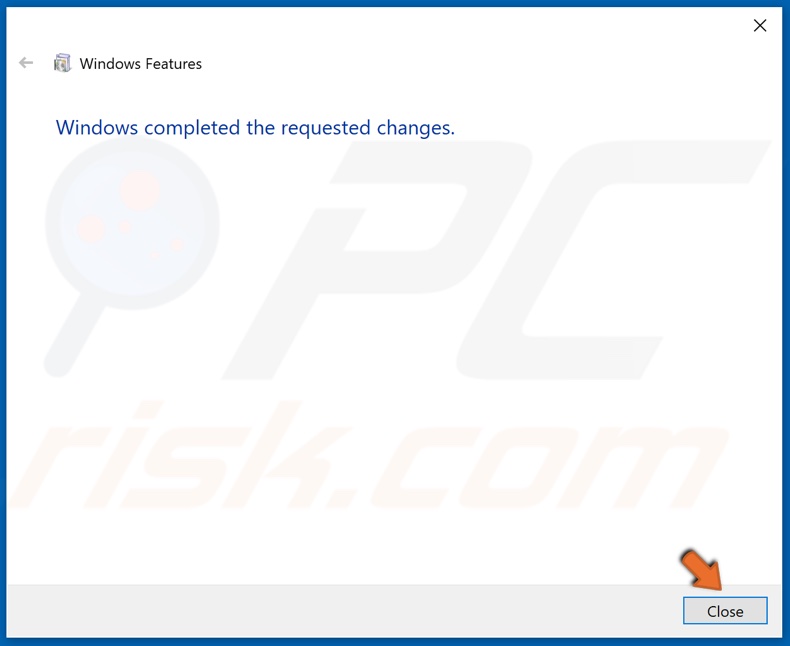
10. Click Close once the requested changes have been completed.

11. Then, Hold down Windows+R keys to open the Run dialog box.
12. Type in CMD in the dialog box, and hold down Ctrl+Shift+Enter to open elevated Command Prompt.
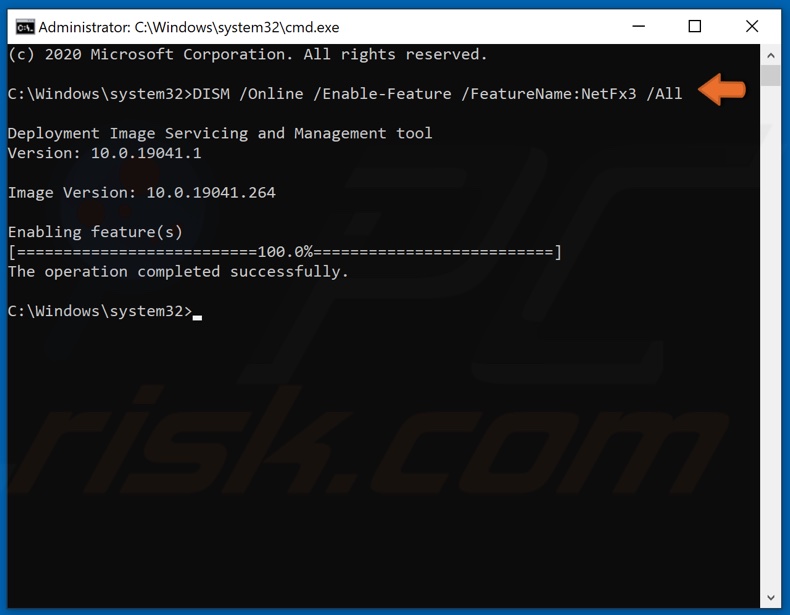
13. In the Command Prompt window, type in DISM /Online /Enable-Feature /FeatureName:NetFx3 /All and hit the Enter key.
14. Close the Command Prompt and try updating Windows.
[Back to Table of Contents]
Solution 3. Run the System File Checker (SFC) Scan
1. Hold down Windows+R keys to open the Run dialog box.
2. Type in CMD in the Run text box and hold down Ctrl+Shift+Enter keys to open the elevated Command Prompt.
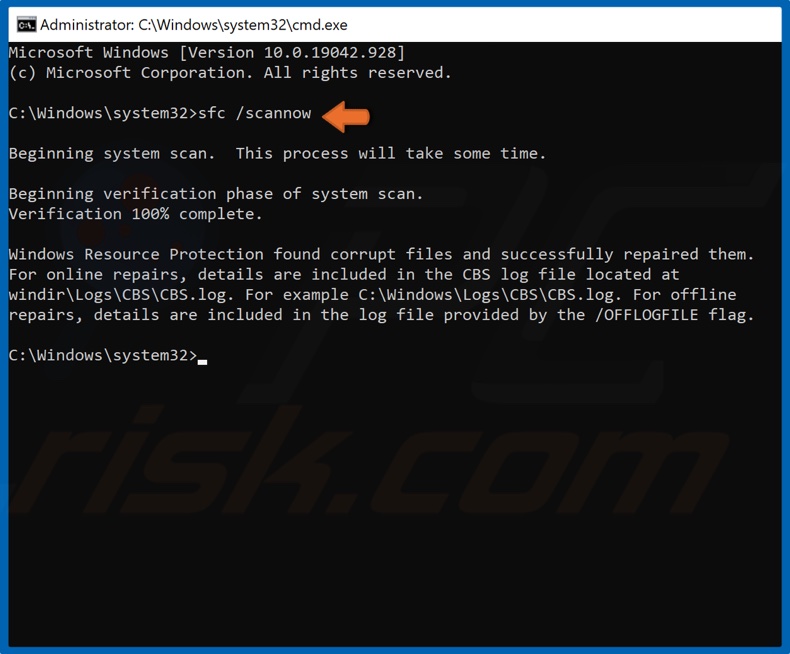
3. In the Command Prompt window, type in SFC /Scannow and hit the Enter key to start the scan.
4. Once the scan has been completed, restart your PC.
[Back to Table of Contents]
Solution 4. Run the Deployment Image & Servicing Management (DISM) Scan
1. Hold down Windows+R keys to open the Run dialog box.
2. Type in CMD in the Run text box and hold down Ctrl+Shift+Enter keys to open the elevated Command Prompt.
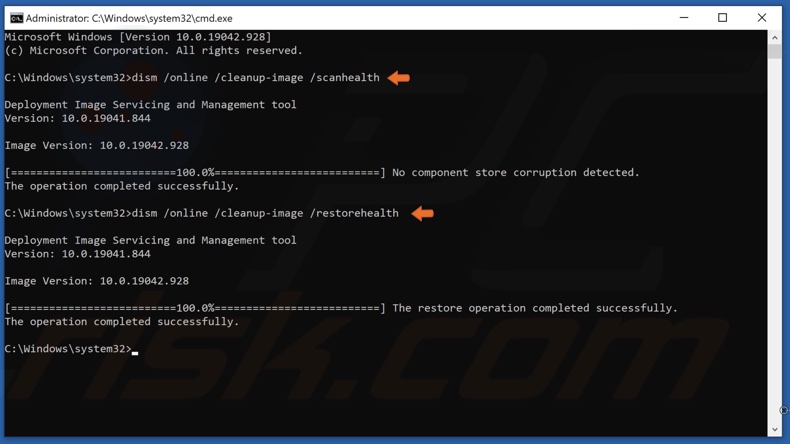
3. In the Command Prompt window, type in DISM /Online /Cleanup-Image /ScanHealth and hit the Enter key. This parameter will scan the component store for corruption.
4. Type in DISM /Online /Cleanup-Image /RestoreHealth and hit the Enter key.
5. Once the process has been completed, try updating Windows 10.
[Back to Table of Contents]
Solution 5. Configure the Group Policy Setting
This solution is not possible on Windows 10 Home Edition since the Home Edition does not have the Group Policy Editor.
1. Hold down Windows+R keys to open the Run dialog box.
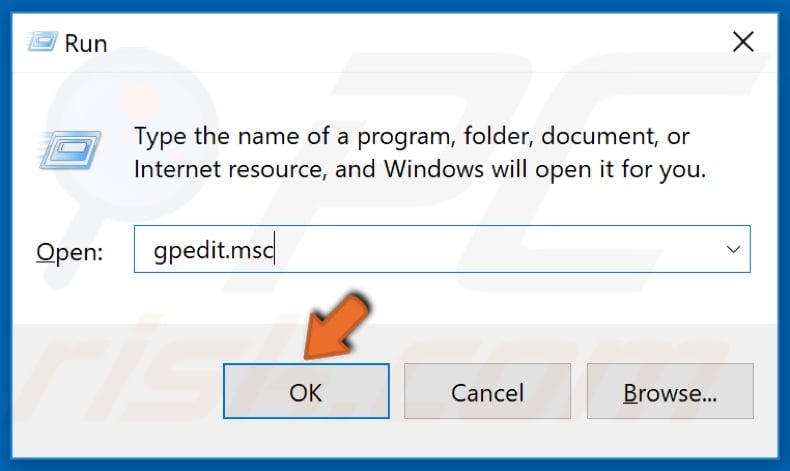
2. In the Run dialog box, type in gpedit.msc and click OK.
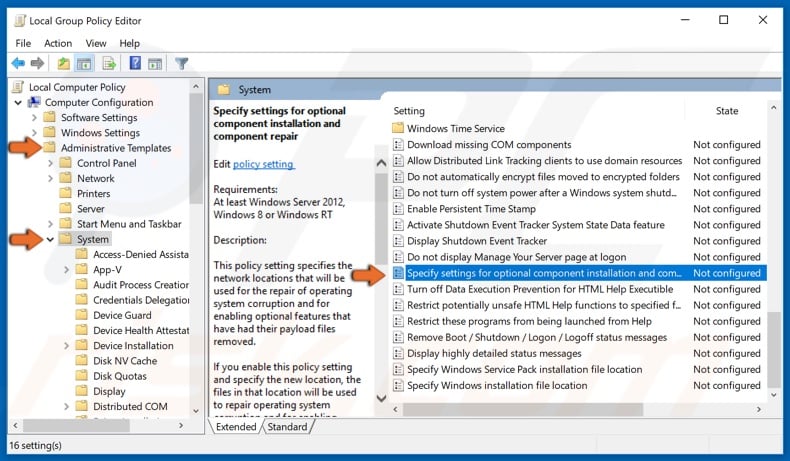
3. In the left pane, expand Administrative Templates.
4. Then, select System.
5. In the right pane, open the Specify Settings for Optional Content Installation.
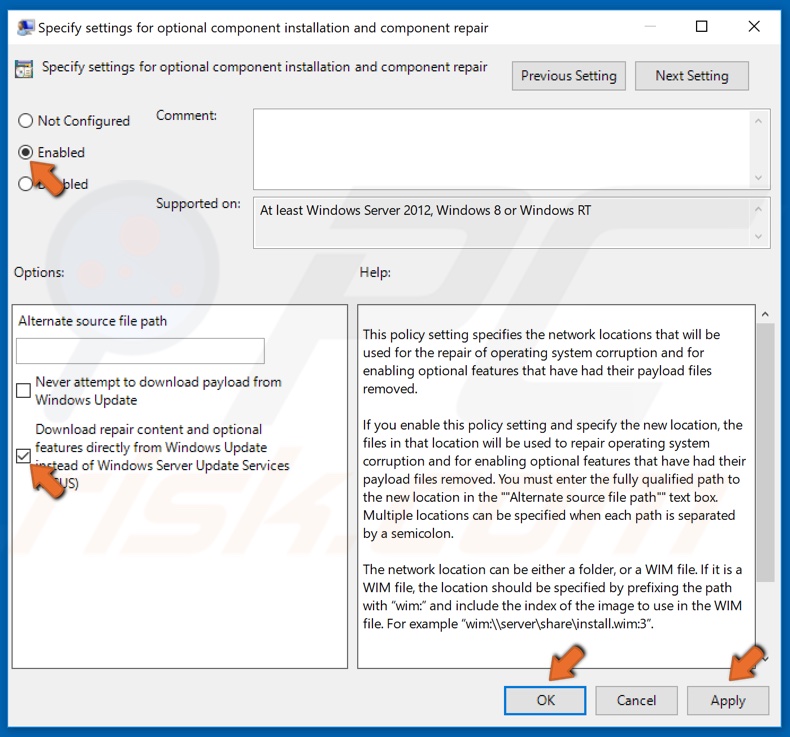
6. At the top-right of the window, select the Enabled option.
7. Then, mark the Download Repair Content and options features directly from Windows Update instead of Windows Server Update Services (WSUS) checkbox.
8. Click Apply and click OK to save the changes.
[Back to Table of Contents]
Solution 6. Upgrade Windows 10 Using the Media Creation Tool
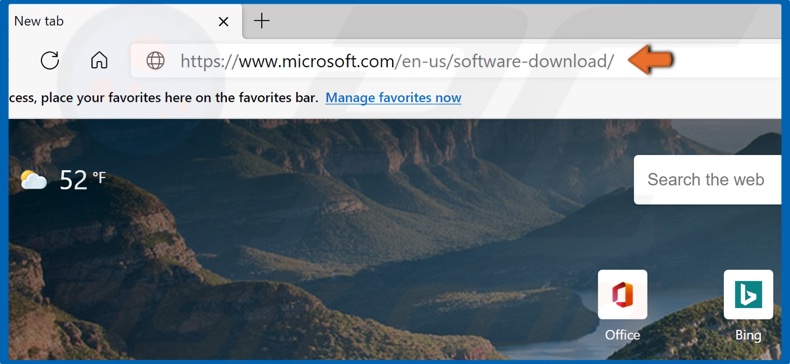
1. Open your web browser, and go to Microsoft’s Download Windows 10 web page.
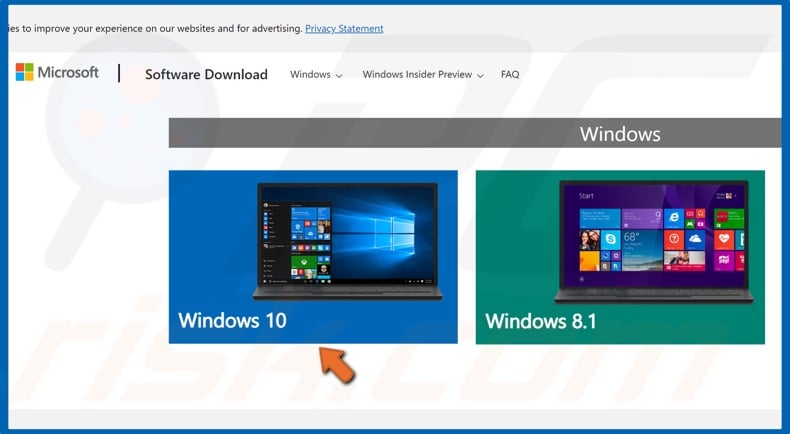
2. Once on the website, select Windows 10.

3. Click Download tool now to get the Media Creation Tool.
4. Run the Media Creation Tool once it’s been downloaded.
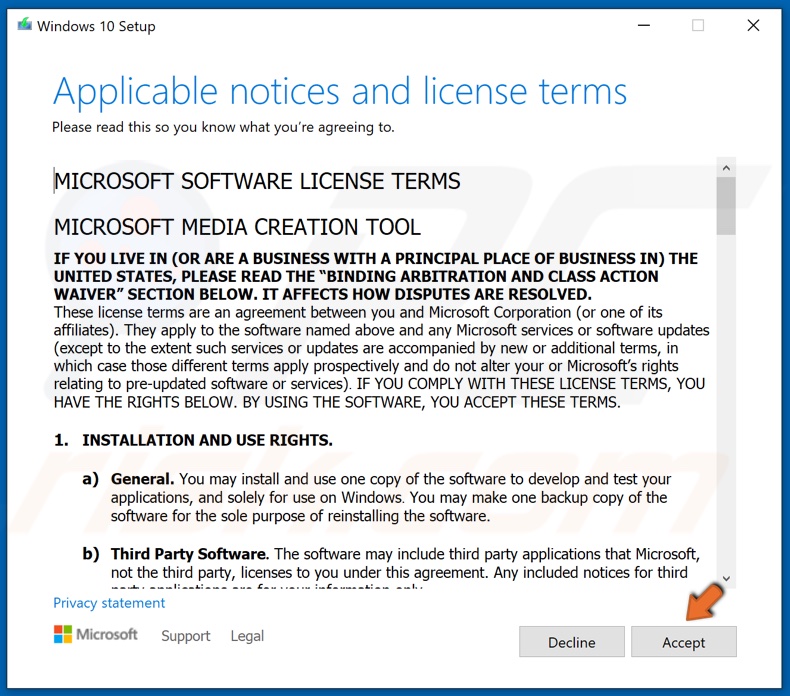
5. Then, Accept the license agreement.
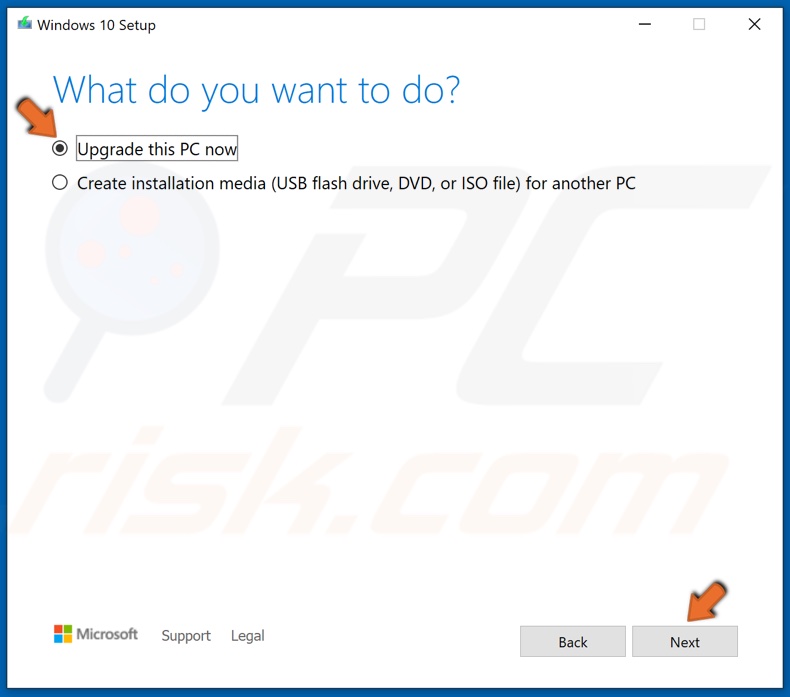
6. Make sure that the Upgrade this PC now is ticked, and click Next.
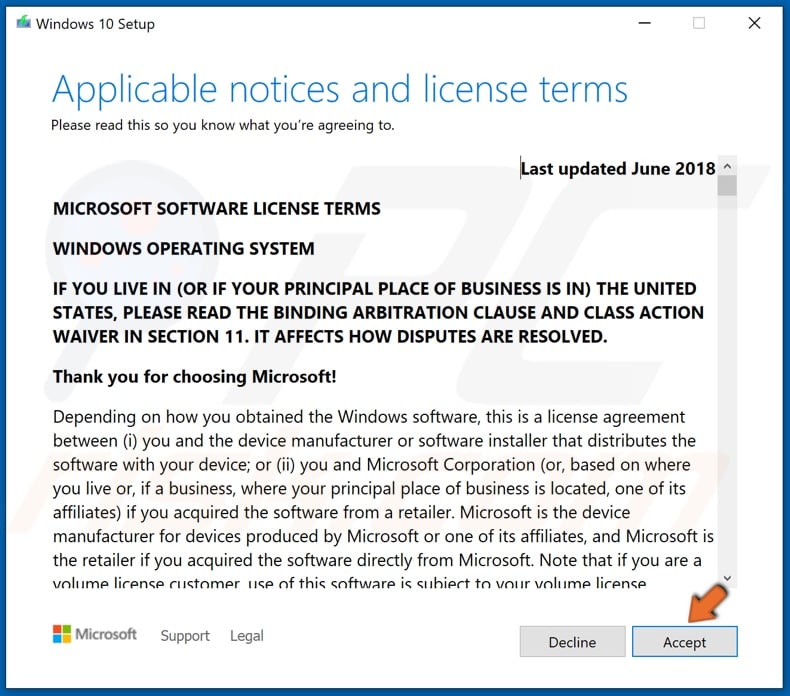
7. Then, Accept the Windows 10 license agreement.
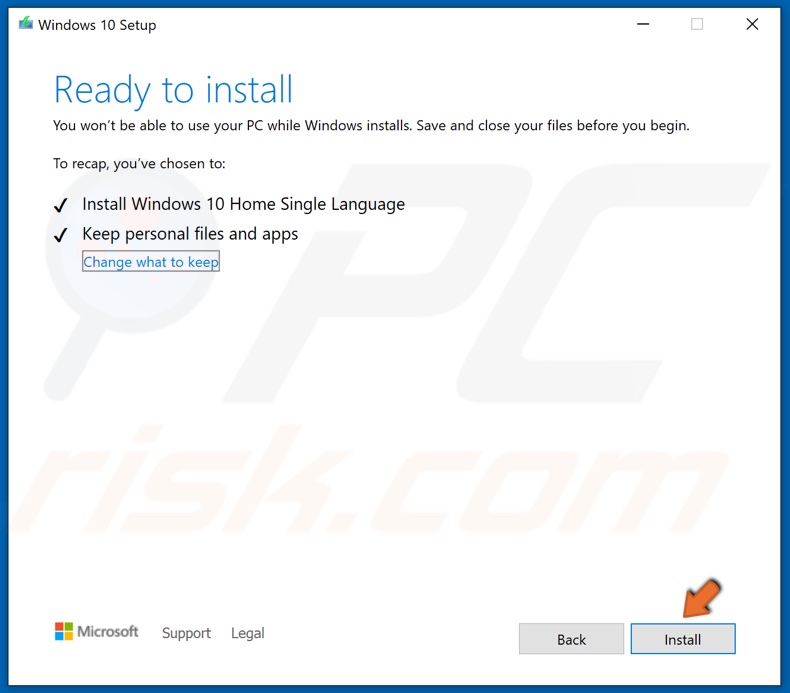
8. You can opt to keep your personal files and apps, but if you want a clean installation of Windows 10, click the Change what to keep button to customize the installation settings.
9. Then, click Install, and the setup will begin installing Windows 10.
Take note that the installation will take some time, and your computer will restart several times throughout the installation.
[Back to Top]
0x800f081f — это ошибка обновления, связанная с патчами KB5000842 или KB5001391, которые были выпущены для исправления предыдущих проблем с печатью. Данное обновление позволяет пользователям обновить систему до новой сборки Windows 21H1, которая устраняет ранее существовавшие ошибки. К сожалению, несмотря на его важность, многим пользователям не удается загрузить его из-за появляющейся ошибки. Ждать, пока Windows решит эту проблему, совершенно бессмысленно, поскольку данная ошибка требует действий вручную. Как показало исследование, ошибка 0x800f081f обычно вызвана отключенным или же неисправной конфигурацией .NET Framework, что предотвращает обеспечение надлежащей связи с обновлениями Windows. Обычно это основная причина появления ошибки 0x800f081f, однако есть и другие, которые следует обсудить в инструкциях, приведенных ниже.

Скачать средство восстановления Windows
Скачать средство восстановления Windows

Существуют специальные утилиты для восстановления Windows, которые могут решить проблемы, связанные с повреждением реестра, неисправностью файловой системы, нестабильностью драйверов Windows. Мы рекомендуем вам использовать Advanced System Repair Pro, чтобы исправить «Ошибка Центра обновления Windows 0x800f081f» в Windows 10.
1. Воспользуйтесь средством устранения неполадок Центра обновления Windows
Прежде чем приступить к решению проблем с .NET Framework, важно попробовать более простой шаг, а именно средство устранения неполадок Windows. Это встроенная утилита, способная решать временные проблемы, возникающие на ПК. Хотя для полного решения проблемы этого способа обычно недостаточно, все же следует попробовать, выполнив следующие действия.
- Открытые Настройки через Меню Пуск или нажмите Windows key + I кнопки одновременно. Перейдите в Обновление и безопасность > Устранение неполадок.
- На правой панели найдите Центр обновления Windows и нажмите Запустить средство устранения неполадок.
- Завершите процесс, следуя инструкциям на экране, и перезагрузите компьютер.
2. Перезапустите .NET Framework 3.5 и 4.8.
Иногда Windows не может установить необходимое обновление из-за плохой конфигурации .NET Framework. Данная проблема часто переплетается с ошибкой 0x800f081f, поскольку Windows часто зависит от данного компонента. Чтобы исправить это, выполните следующие действия.
- Тип Панель управления в строку поиска рядом с Меню Пуск.
- Откройте ее и выберите Программы и компоненты.
- Затем выберите Включение или отключение компонентов Windows.
- Вы сразу увидите список функций Windows.
- Нужно найти .NET Framework 3.5 и .NET Framework 4.8.
- Снимите с них флажки и нажмите OK чтобы временно отключить их.
- Затем нажмите Перезапустить сейчас чтобы перезагрузить компьютер.
- Как только вы загрузитесь обратно, откройте то же окно, повторив предыдущие шаги.
- Теперь вы должны установить флажки для обоих . NET Framework , которые были отключены, и нажмите «ОК».
- Затем Windows попросит вас выбрать один из двух вариантов. Выбирайте Скачать файлы из Центра обновления Windows.
- После применения всех изменений закройте окно.
Теперь, в качестве следующего этапа этого решения, нам следует включить .NET Framework с помощью DISM (средство обслуживания и управления образами развертывания).
- Открытые Командная строка , введя CMD в поле поиска рядом с Меню Пуск кнопку.
- Щелкните правой кнопкой мыши по Командная строка , а затем выбрать Запуск от имени администратора.
- После открытия консоли скопируйте и вставьте эту команду
DISM /Online /Enable-Feature /FeatureName:NetFx3 /Allи нажмите Enter. - Как только Windows напишет, что операция успешно завершена, вы можете закрыть консоль и снова попытаться установить проблемное обновление.
3. Проверьте целостность системных файлов.
Поврежденные или отсутствующие системные компоненты могут быть причиной таких ошибок, как 0x800f081f. Именно поэтому важно проверить их целостность, прежде чем переходить к другим методам решения. Ниже мы будем использовать как SFC (средство проверки системных файлов), так и DISM (обслуживание образов развертывания и управление ими), которые помогут обнаружить и восстановить отсутствующие и поврежденные компоненты. Вот как:
С помощью SFC
- Открытые Командная строка , введя
cmdв поле поиска рядом с Меню Пуск кнопку. - Щелкните правой кнопкой мыши по Командная строка , а затем выбрать Запуск от имени администратора.
- После открытия консоли введите
sfc /scannowкоманду и нажмите Enter. - Когда процесс восстановления будет завершен, перезагрузите компьютер.
С помощью DISM
- Открытые Командная строка как мы это делали на предыдущем шаге.
- Скопируйте и вставьте эту команду
DISM.exe /Online /Cleanup-image /Restorehealth. - Нажмите Enter и подождите, пока Windows закончит сканирование и исправление.
- После этого перезагрузите компьютер и снова установите обновление.
4. Укажите параметры для установки необязательных компонентов и восстановления компонентов.
Использование этого метода поможет нам перенастроить параметры локальной групповой политики, чтобы Windows загружал содержимое для восстановления и дополнительные компоненты непосредственно из Центра обновления Windows. Вот как можно выполнить это простое, но очень эффективное решение:
- Нажмите Windows key + R комбинацию клавиш и напишите
gpedit.msc. - Редактор локальной групповой политики откроется. На левой панели перейдите в Административные шаблоны > Система.
- На правой панели прокрутите список вниз, пока не найдете Укажите параметры для установки необязательных компонентов и восстановления компонентов.
- Дважды щелкните по этому тексту, и выберете Включено , потом поставьте галочку напротив Скачайте содержимое для восстановления и дополнительные компоненты непосредственно из Центра обновления Windows вместо использования служб Windows Server Update Services (WSUS). опцию.
- После выполнения этих шагов нажмите Применить и OK для сохранения изменений.
Теперь вы можете попробовать установить обновление еще раз. Если и это не помогло решить проблему, перейдите к дальнейшим инструкциям ниже.
5. Перезапустите компоненты и Службу обновления Windows.
Этот метод поможет вам сбросить настройки Центра обновления Windows. Этот способ часто помогает, поскольку перезапускает важные службы с нуля. Вся процедура включает перезапуск служб BITS, Cryptographic, MSI Installer и Windows Update, а также переименование некоторых папок обновлений (SoftwareDistribution и Catroot2). Эти папки содержат специальные подписи для обновлений Windows. Исходя из этого, мы заставим Windows удалить поврежденные элементы и пересоздать компоненты обновления с нуля. Мы будем использовать консоль для выполнения необходимых команд. Это более сложный вариант, но для его выполнения не потребуется много времени и знаний. Просто следуйте инструкциям ниже. Просто следуйте инструкциям ниже:
- Открытые Командная строка , введя
cmdв поле поиска рядом с Меню Пуск кнопку. - Щелкните правой кнопкой мыши по Командная строка , а затем выбрать Запуск от имени администратора.
- Скопируйте и вставьте этот список команд одну за другой, нажимая Enter после каждой из них. (Это действие отключит службы, отвечающие за обновления Windows)
- Затем мы должны переименовать вышеупомянутые папки. Просто вставьте эти команды, нажимая Enter после каждой.
- Наконец, все, что осталось сделать, это вернуть отключенные службы. Введите эти команды так же, как мы делали ранее.
- На этом все. Перейдите в Центр обновления Windows и попробуйте установить обновление снова.
net stop wuauserv

net stop cryptSvc

net stop bits

net stop msiserver
ren C:\Windows\SoftwareDistribution SoftwareDistribution.old

ren C:\Windows\System32\catroot2 Catroot2.old
net start wuauserv

net start cryptSvc

net start bits

net start msiserver
6. Попробуйте загрузить конфликтующее обновление из каталога Microsoft.
Случаи, когда Windows не может получить накопительные обновления с сервера, случаются довольно часто. Хотя предыдущие шаги уже должны были устранить проблемы с сервером при получении обновлений, Windows, все равно, может иметь проблемы с получением обновлений по другим причинам. Если у вас та же ситуация, можно попробовать установить необходимое обновление прямо из каталога Microsoft. Перед тем как это сделать, нам нужно будет записать, какое обновление необходимо установить. Для этого:
- Нажмите Windows key + I одновременно.
- Затем перейдите в Обновление и безопасность.
- В правой части окна выберите Просмотр журнала обновлений.
- После этого найдите и запишите самое последнее обновление, которое вызывает ошибку (вверху списка).
- Затем загрузите записанное обновление из Microsoft Update Catalog.
7. Используйте Media Creation Tool.
В качестве последней рекомендации среди всех упомянутых решений мы советуем установить обновления через Media Creation Tool. Это официальная утилита Microsoft, специально созданная для пользователей, которым не удается обновить свою систему. Эта процедура никак не повлияет на ваши личные данные, а просто обновит ваш компьютер. Для этого выполните следующие действия:
- Для начала, вам нужно скачать утилиту с веб-сайта Microsoft.
- Затем запустите загруженный файл.
- После того, как вы согласитесь с Условиями использования, вам будет предложено два варианта на выбор. Выберите Обновить этот компьютер сейчас.
- Выберите Сохранить личные файлы чтобы они не пострадали.
- Наконец, запустите процесс и дождитесь его завершения.
- Надеемся, этот метод помог вам избавиться от ошибки 0x8009001d.
Итоги
Самостоятельное решение 0x800f081f или подобных проблем может затратить уйму времени и усилий, однако так и не увенчаться успехом. К счастью, есть люди, которые уже протестировали и собрали наиболее эффективные решения в одно руководство, чтобы помочь пользователям избежать ненужной потери времени и энергии. Надеемся, что ошибка 0x800f081f вас больше не докучает. Если на вашем ПК есть еще какие-то проблемы, вы можете найти множество других статей для Windows и Mac на нашем веб-сайте.
Перейти к контенту
При установке различных программ на компьютер возможно возникновение различных ошибок, проблем или сбоев. Так, при установке на виндоус 10 специализированной платформы Framework 3.5 появляется неприятная ошибка, которая мешает использовать указанную программу свободно и по назначению. Каждая ошибка имеет свой определенный код или номер, указывающий программисту на конкретный сбой в функционировании программы, что бы его можно было легко решить. В данной статье будет рассмотрена ошибка 0x800f081f NET Framework, причины ее возникновения и способы устранения.
Причины возникновения
Современный компьютер неразрывно связан с интернетом и без подключения к последнему некоторые компоненты могут работать не правильно или вовсе не работать. Так, ошибка 0x800f081f NET Framework возникает в случаях когда компьютер не может подключиться к Центру обновления Виндоус через интернет. Таким образом наиболее частой причиной является отсутствие или нарушение в интернет-соединении.
Способы устранения
- Проверьте соединение с сетью, перейдите на сайт Центра обновления Windows. В случае если он не доступен — еще раз все тщательно перепроверьте в соединении.
- Проверьте антивирус или брандмауэр (любую аналогичную программу способную блокировать соединение).
- Если с вышеуказанными программами все в порядке и они не блокируют доступ, следует обратиться к администратору, возможно блокировка исходит из настроек сети. Администратор мог настроить обновление и поддержку компьютера путем Windows Server Update. В некоторых случаях такая установка ставится в замену Центр обновления.В данном случае следует проделать следующие действия:
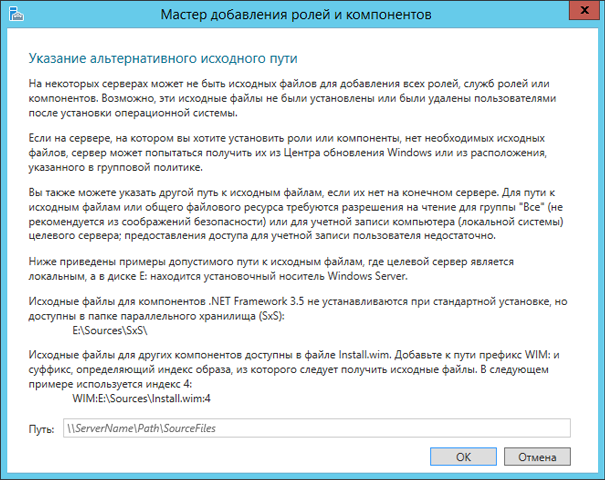
- Необходимо сменить настройки указания компонентов виндоус (обязательных и необязательных), указать верный путь в значении «альтернативный путь к исходным файлам». Совершите следующие действия:
NET Framework код ошибки 0x800f081f
Решение ошибки через установочный носитель
Для решения указанной ошибки возможно использование установочного носителя Windows. Для этого следует совершить следующее:
- Устанавливаем носитель на компьютер (диск или флеш-карта);
- Открываем командную строку (как это сделать указано здесь);
- В открывшейся командной строке запускаем следующую команду:

- Буквы хххх следует заменить на директорию установочного носителя виндоус. К примеру вместе хххх будет идти С:\sources\sxs…

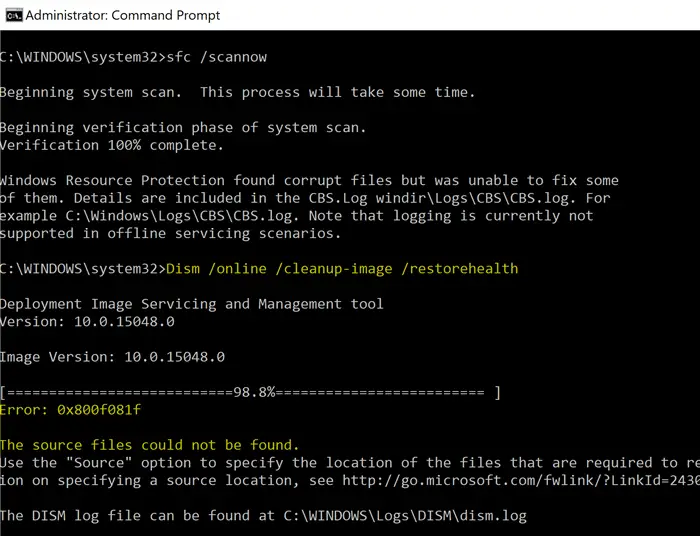
When running the following DISM command, the error 0x800F081F may appear in some systems. The same error occurs when installing the .NET Framework in Windows 10.
Dism /Online /Cleanup-Image /RestoreHealth
Error: 0x800f081f
The source files could not be found.
Use the "Source" option to specify the location of the files that are required to restore the feature. For more information on specifying a source location, see http://go.microsoft.com/fwlink/?LinkId=243077.
DISM.log
Error DISM DISM Package Manager: PID=13368 TID=5124 Failed finalizing changes. - CDISMPackageManager::Internal_Finalize(hr:0x800f081f)
Error DISM DISM Package Manager: PID=13368 TID=5124 The source files could not be found; their location must be specified using the /source option to restore the feature. - GetCbsErrorMsg
Error DISM DISM Package Manager: PID=13368 TID=5124 Failed processing package changes with session option CbsSessionOptionRepairStoreCorruption - CDISMPackageManager::RestoreHealth(hr:0x800f081f)
Error DISM DISM Package Manager: PID=13368 TID=5124 The source files could not be found; their location must be specified using the /source option to restore the feature. - GetCbsErrorMsg
Error DISM DISM Package Manager: PID=13368 TID=5124 Failed to restore the image health. - CPackageManagerCLIHandler::ProcessCmdLine_CleanupImage(hr:0x800f081f)
Error DISM DISM Package Manager: PID=13368 TID=5124 Failed while processing command cleanup-image. - CPackageManagerCLIHandler::ExecuteCmdLine(hr:0x800f081f)
CBS.log
CBS    Exec: Processing complete, session(Corruption Repairing): 30459372_734419507 [HRESULT = 0x800f081f - CBS_E_SOURCE_MISSING]
CBS    Session: 30459372_734419507 failed to perform store corruption detect and repair operation. [HRESULT = 0x800f081f - CBS_E_SOURCE_MISSING]
CBS    Session: 30459372_734419507 finalized. Download error: 0x80240022 [Unknown Error], Reboot required: no [HRESULT = 0x800f081f - CBS_E_SOURCE_MISSING]
CBS    Failed to FinalizeEx using worker session [HRESULT = 0x800f081f]
The same error (0x800F081F – CBS_E_SOURCE_MISSING) may occur when you attempt to install .NET Framework 3.5 via Optional Features.
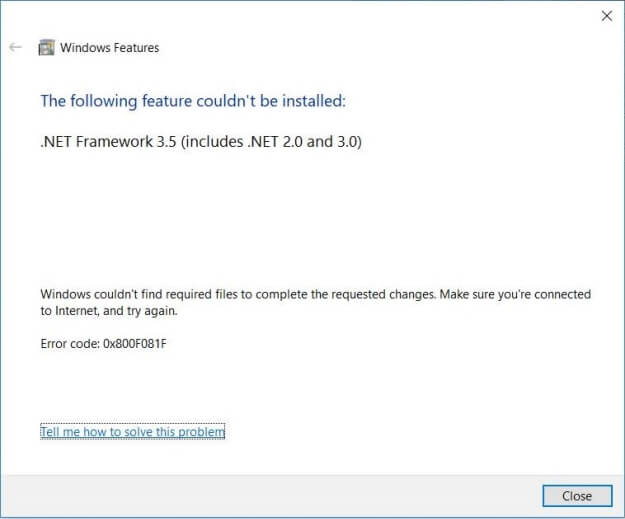
Windows couldn't find required files to complete the requested changes. Make sure you're connected to Internet, and try again:

Error code: 0x800F081F
DISM.log
The source files could not be found.
Use the "Source" option to specify the location of the files that are required to restore the feature. For more information on specifying a source location, see http://go.microsoft.com/fwlink/?LinkId=243077.
The DISM log file can be found at C:\Windows\Logs\DISM\dism.log
0x800F081F - CBS_E_SOURCE_MISSING
This post tells you how to fix the .NET Framework installation and the DISM error 0x800f081f in Windows 10.
Cause
The error 0x800F081F when running DISM or .NET Framework installation can occur due to one of the following reasons:
- The component store is corrupted, or several files are missing in the store.
- The system is unable to access the Microsoft Update servers to restore the missing files.
- The location specified by the path does not contain the files required to install the feature.
- The user who tries installing the feature does not have at least READ access to the location and files.
- The set of installation files is corrupted, incomplete, or invalid for the version of Windows that you are running.
Contents
- Solution 1: Bypass WSUS before installing .NET Framework or running DISM
- Solution 2: Run DISM or Install .NET Framework from a local source (offline)
- Install .NET Framework error from a local source
- Run DISM from a local source
Option 1: Bypass WSUS
If your computer is configured to use your company’s WSUS server or SCCM, temporarily bypass WSUS/SCCM using the following registry edit (requires administrator privileges).
- Right-click Start, and click Run
- Type
regedit.exeand click OK - Go to the following registry key if it exists:
HKEY_LOCAL_MACHINE\SOFTWARE\Policies\Microsoft\Windows\WindowsUpdate\AU
(If the above registry branch or the value
UseWUServerdoesn’t exist, then it means that the WU server policy is not set. In that case, skip to Step 5.) - In the right pane, if the value named
UseWUServerexists, set its data to0 - Go to the following key:
HKEY_LOCAL_MACHINE\SOFTWARE\Policies\Microsoft\Windows\WindowsUpdate
- Delete the value named
DisableWindowsUpdateAccessif it exists. - Exit the Registry Editor
- Restart Windows.
Now, your computer is configured to fetch files or packages from Microsoft’s Windows Update servers rather than your office network’s WSUS/SCCM server.
After restarting Windows, you should be able to run the DISM command or install .NET Framework successfully. Run the DISM command (or install .NET Framework) after connecting your computer to the internet. DISM fetches the missing files from Microsoft’s servers automatically.
Install .NET Framework
Now, run this command if you want to install .NET Framework:
dism /online /enable-feature /featurename:NetFX3 /All
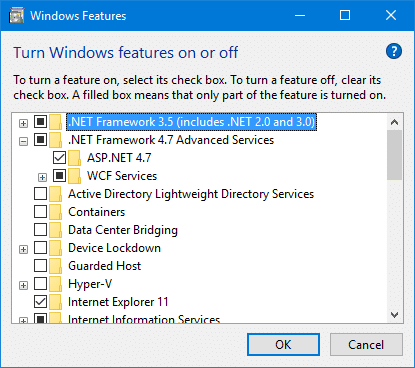
Alternatively, you can install it via Windows Features (optionalfeatures.exe)
If that doesn’t work, follow the instructions in Option 2 below.
Option 2: Run DISM or Install .NET Framework from local installation source (offline)
Fix for .NET Framework error 0x800f081f
To fix the error 0x800F081F when installing .NET Framework, mention the local source path (i.e., mounted ISO or USB setup disk).
- Download a fresh copy of Windows 10 or 11 ISO from Microsoft.
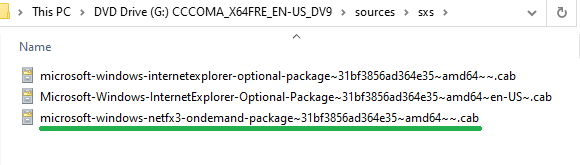
- Mount the ISO to a drive letter — e.g.,
G:\.The “Sources\Sxs” folder in the ISO contains the CAB file (“microsoft-windows-netfx3-ondemand-package~31bf3856ad364e35~amd64~~.cab”) needed to install .NET Framework 3.5.

(If you have a multi-architecture Windows 10 setup disk, be sure to use the correct “Sources” folder. For x64 version, the path could be
G:\x64\sources\sxsand for x86, the pathG:\x86\sources\sxs.) - To install .NET Framework using the local install source (e.g.,
G:\Sourcesfrom the USB Setup disk or mounted ISO), run the appropriate command:dism /online /enable-feature /featurename:NetFX3 /All /Source:G:\sources\sxs /LimitAccess
(or)
dism /online /enable-feature /featurename:NetFX3 /All /Source:G:\x86\sources\sxs /LimitAccess
(or)
dism /online /enable-feature /featurename:NetFX3 /All /Source:G:\x64\sources\sxs /LimitAccess
You should see the following output:
Enabling feature(s)
[==========================100.0%==========================]
The operation completed successfully.
Alternatively, if you prefer PowerShell instead of DISM, then use this command to install .NET Framework using a local installation source:
Enable-WindowsOptionalFeature –Online –FeatureName "NetFx3" –Source G:\sources\sxs -LimitAccess

(or)

Enable-WindowsOptionalFeature –Online –FeatureName "NetFx3" –Source G:\x86\sources\sxs -LimitAccess

(or)

Enable-WindowsOptionalFeature –Online –FeatureName "NetFx3" –Source G:\x64\sources\sxs -LimitAccess
Fix for DISM error 0x800f081f
The solution for DISM Error 0x800f081f would be to download a fresh ISO from Microsoft, slipstream the Windows 10 setup disk, and mention it as the repair source when running the DISM command. Slipstreaming is a process of integrating updates (and drivers, optionally) and making an updated Windows 10 or 11 Setup disk or ISO.
- Follow the steps in the article Slipstream Windows 10/11 to create a slipstreamed Windows 10 setup disk.

- Then, open an elevated or admin Command Prompt.
- The ISO files downloaded from Microsoft have multiple Windows 10 Editions in them. You need to find the index that corresponds to the edition of Windows you’re going to repair. You can find it using DISM’s
Get-Wiminfocommand-line. - Find the list of indexes and the corresponding editions found in the
install.wim, by running the following command:dism /get-wiminfo /wimfile:"D:\sources\install.wim"
… where
D:\is the drive letter of the mounted ISO or Windows Setup DVD.In the case of ISOs downloaded from Microsoft, you’ll see more indexes (Meaning: Multiple windows images or different editions combined into the install.wim). For example, here’s the list of indexes found inside the Windows 10 ISO (may vary from ISO build to ISO build) from Microsoft:
Index : 1
Name : Windows 10 Home
Description : Windows 10 Home
Size : 14,168,728,218 bytes

Index : 2
Name : Windows 10 Home N
Description : Windows 10 Home N
Size : 13,409,860,497 bytes

Index : 3
Name : Windows 10 Home Single Language
Description : Windows 10 Home Single Language
Size : 14,168,323,899 bytes

Index : 4
Name : Windows 10 Education
Description : Windows 10 Education
Size : 14,413,769,870 bytes

Index : 5
Name : Windows 10 Education N
Description : Windows 10 Education N
Size : 13,651,680,505 bytes

Index : 6
Name : Windows 10 Pro
Description : Windows 10 Pro
Size : 14,413,947,833 bytes

Index : 7
Name : Windows 10 Pro N
Description : Windows 10 Pro N
Size : 13,649,482,925 bytes

Index : 8
Name : Windows 10 Pro Education
Description : Windows 10 Pro Education
Size : 14,413,708,288 bytes

Index : 9
Name : Windows 10 Pro Education N
Description : Windows 10 Pro Education N
Size : 13,651,618,023 bytes

Index : 10
Name : Windows 10 Pro for Workstations
Description : Windows 10 Pro for Workstations
Size : 14,413,739,079 bytes

Index : 11
Name : Windows 10 Pro N for Workstations
Description : Windows 10 Pro N for Workstations
Size : 13,651,649,264 bytes
- Let’s say you have Windows 10 Home Edition. The index is
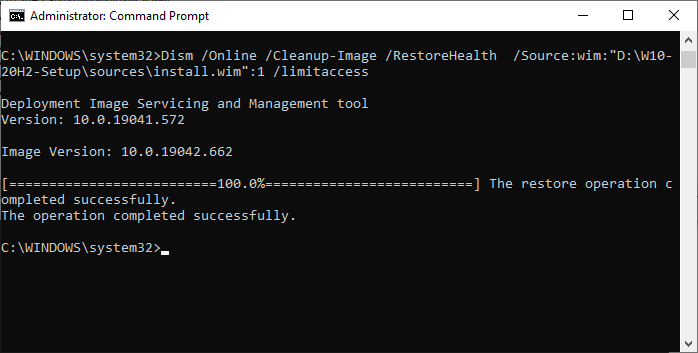
1as per the above output. Therefore, run the following command:Dism /Online /Cleanup-Image /RestoreHealth /Source:wim:"D:\Sources\Install.wim":1 /limitaccess
That’s it! the DISM operation has now been completed successfully!

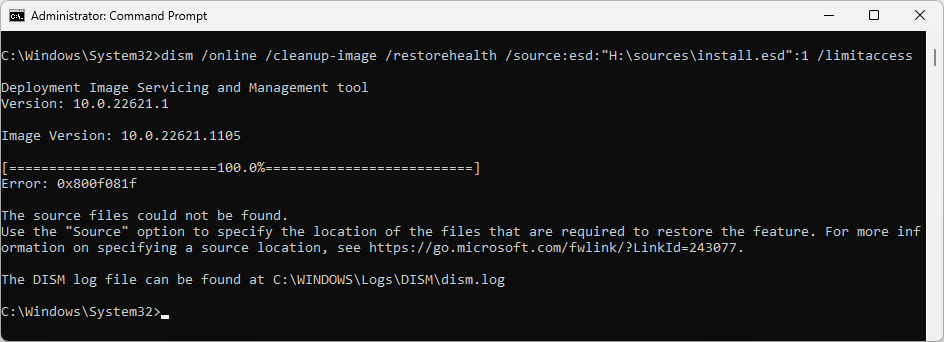
*Important*: Don’t use ESD!
If you have
install.esd(instead ofinstall.wim) in the Windows 10/11 setup disk, you must convert the ESD file into WIM for the above DISM command to work. In our tests, DISM was unable to useInstall.esdas the source and the command ended up with the0x800f081ferror every time, regardless of the syntax (/source:wim:g:\sources\install.esdor/source:esd:g:\sources\install.esd) used.
The following command is absolutely useless. Don’t use it. It does nothing.
Dism /Online /Cleanup-Image /RestoreHealth /Source:esd:"D:\Sources\Install.esd":1 /limitaccess
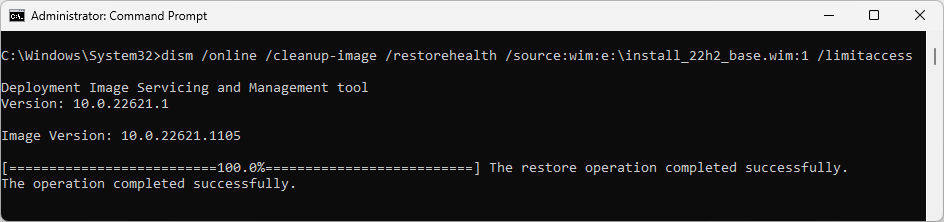
After converting the ESD file to WIM, I ran DISM mentioning the
Install.wimfile as the source. It ran perfectly fine, and it restored the missing manifest files indeed!
Please keep this important point in mind when running DISM.
If you don’t use a slipstreamed Windows 10/11 disk (integrated with the latest updates), the error
0x800f081fmay still appear. The ISO/repair source must be the same build your system is running. For instance, you can’t repair a Windows 10 build16299.98using the Windows 10 Build16299.15ISO.
This fixes the DISM error 0x800f081f, and you should now see the message “The restore operation completed successfully.”
Once the DISM command completes successfully, follow up with the sfc /scannow command (from elevated Command Prompt) if necessary. For more information, check out the article Repair Windows 10 Using DISM and SFC.
One small request: If you liked this post, please share this?
One «tiny» share from you would seriously help a lot with the growth of this blog.
Some great suggestions:
- Pin it!
- Share it to your favorite blog + Facebook, Reddit
- Tweet it!
So thank you so much for your support. It won’t take more than 10 seconds of your time. The share buttons are right below. 
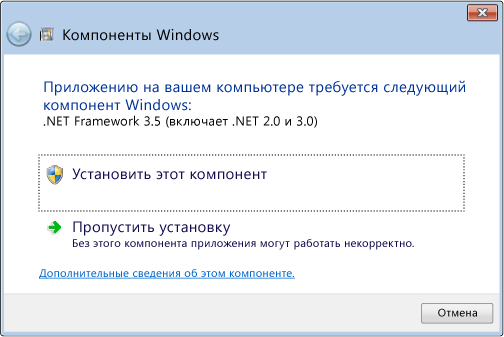
 Одной из программных платформ Microsoft, к которой обращаются приложения при работе в экосистеме операционной системы Windows, является NET Framework 3.5. Зачастую при установке приложений можно встретить ошибку “Приложению на вашем компьютере требуется следующий компонент Windows — NET Framework 3.5 (включает .NET 2.0 и 3.0)”. Обычно операционная система сразу предлагает способ решить возникшую проблему — скачать указанный компонент и установить его.
Оглавление:
1. Почему возникает ошибка 0x800F081F при установке NET Framework
2. Где скачать NET Framework 3.5 для Windows 10
3. Как установить NET Framework и избавиться от ошибки 0x800F081F
Но далеко не всегда это проходит удачно и возникает ошибка 0x800F081F. В рамках данной статьи рассмотрим, что делать, если столкнулись с указанными проблемами.
Почему возникает ошибка 0x800F081F при установке NET Framework
В операционной системе Windows 10 и более ранних версиях по умолчанию установлена программная платформа NET Framework, поэтому возникать ошибок при обращении к ней со стороны приложений не должно. Однако если ошибка возникает, далеко не всегда требуется именно установка платформы. Зачастую проблема связана с тем, что NET Framework в системе установлен, но не подключен.

Где скачать NET Framework 3.5 для Windows 10
Вопреки советам операционной системы, устранить ошибку 0x800F081F можно, если выполнить интеграцию пакета NET Framework в операционную систему, а не если скачать и установить NET Framework 3.5, как это рекомендует система.
Зачастую, все необходимые компоненты уже загружены в систему, но не установлены.
Как установить NET Framework и избавиться от ошибки 0x800F081F
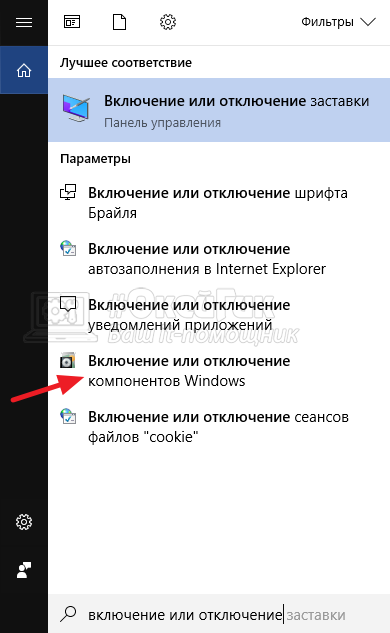
В Windows имеется утилита, которая отвечает за подключением и отключение всевозможных системных утилит, а также программных платформ. При ошибке 0x800F081F первым делом нужно убедиться, что в ней активирован необходимый для работы приложения Framework. Для этого запустите утилиту “Включение или отключение компонентов Windows”. Проще всего найти это приложение через поиск в Windows 10, введя его название.
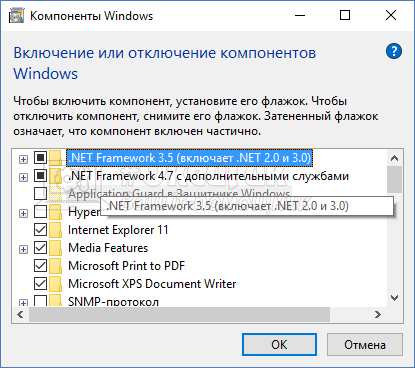
Открыв приложение, убедитесь, что .NET Framework 3.5 подключен. Если это не так, то поставьте галочку около него и нажмите “ОК”, чтобы сохранить результат.
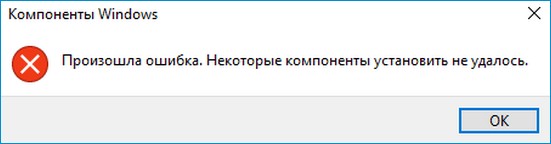
Данного способа подключить NET Framework не всегда достаточно. Может возникнуть ошибка, которая сообщит, что некоторые компоненты установить не получилось.
В такой ситуации можно интегрировать NET Framework 3.5 в Windows 10 через DISM.
С использованием утилиты PowerShell через DISM в операционную систему Windows 10 можно интегрировать файлы с расширением .cab. Это пакетные файлы, которые присутствуют в дистрибутиве операционной системы, то есть в образе Windows 10. Соответственно, чтобы устранить ошибку 0x800F081F и интегрировать в систему NET Framework, можно воспользоваться .cab файлом, отвечающим за данную программную платформу из установочного образа Windows 10.
Выполните следующие действия:
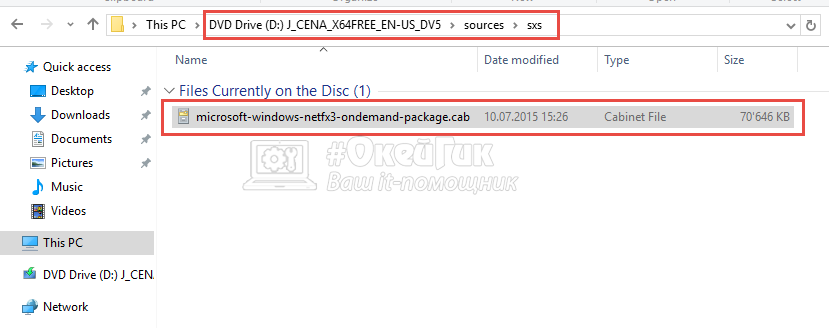
- Скачайте на компьютер ISO-образ операционной системы Windows 10. Это можно сделать бесплатно с официального сайта компании Microsoft;
- Далее смонтируйте его на виртуальном дисководе. Соответственно, он будет отображаться после этого среди “Устройств и дисков” в проводнике в разделе “Этот компьютер”;
- Зайдите на этот смонтированный дистрибутив и найдите в нем файл microsoft-windows-netfx3-ondemand-package.cab. Именно этот файл и содержит в себе данные о программной платформе NET Framework. Этот файл должен располагаться на дистрибутиве по пути \sources\sxs;

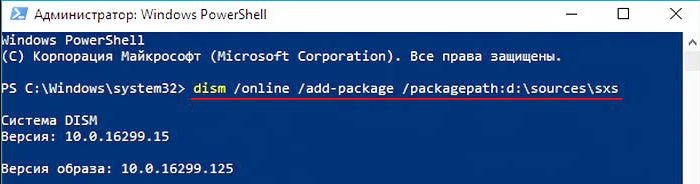
- Запустите системную утилиту Windows PowerShell от имени администратора и пропишите и используйте в ней команду:
dism /online /add-package /packagepath:d:\sources\sxs
Важно: В указанной выше команде d:\sources\sxs — это путь до .cab файла. Если у вас образ Windows смонтирован на другой “букве”, нужно ввести ее, вместо d.
Указанная выше команда приведет к добавлению пакета NET Framework. После этого можно снова открыть утилиту “Включение или отключение компонентов Windows” и убедиться, что .NET Framework 3.5 активирован.
![]()
![]()
![]()
![]()
![]() (156 голос., средний: 4,36 из 5)
(156 голос., средний: 4,36 из 5)
![]() Загрузка…
Загрузка…