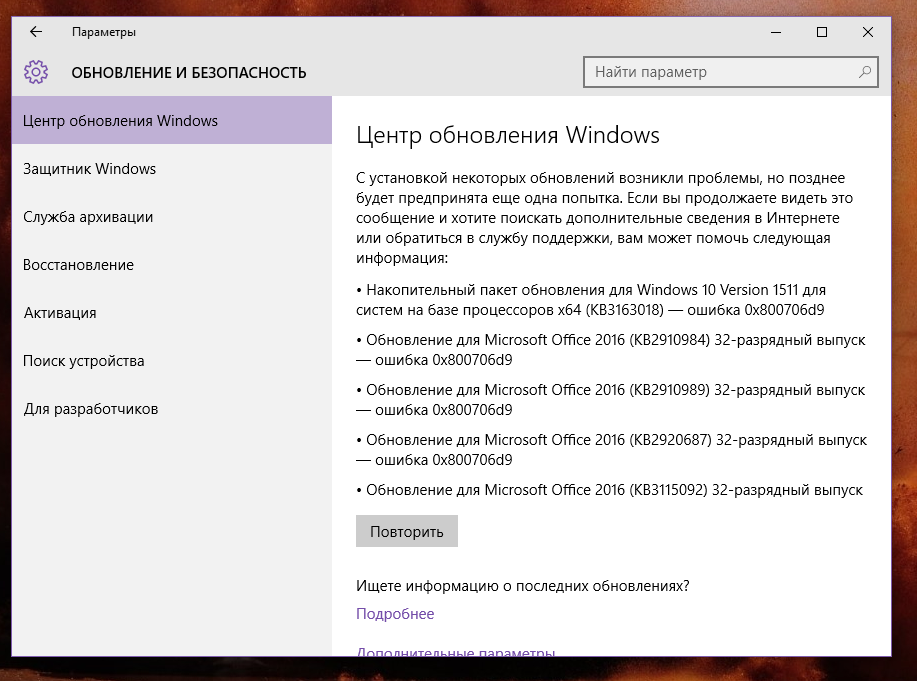
Во время обновления ПК на базе Windows 10 некоторые пользователи могут сталкиваться с ошибкой 0x800706d9. Самая частая причина за этой неполадок — деактивированный брандмауэр Windows. Впрочем, иногда она может возникать из-за проблем с компонентами Центра обновления.
Как исправить ошибку 0x800706d9?
Прежде всего, создайте точку восстановления на вашем компьютере. Она поможет вам в случае того, если что-то пойдет не так. Нажмите Win+S и пропишите в поисковую строку запрос «Создание точки восстановления». В появившемся окошке выполните все необходимые действия и создайте точку на одном из разделов диска. Как только закончите, переходите к методам ниже.
Метод №1 Включение брандмауэра Windows
Ошибка 0x800706d9 может возникать в процессе обновления Windows, если в вашей системе отключен брандмауэр. Чтобы включить его, сделайте следующее:
- нажмите Win+S для вызова поисковой строки;
- пропишите запрос «Брандмауэр Защитника Windows»;
- кликните на ссылку «Включение и выключение брандмауэра Защитника Windows» в левой части окошка;
- выберите опции по включению брандмауэра и сохраните внесенные изменения;
- перезагрузите компьютер и попробуйте запустить апдейт ОС Windows еще раз.
Метод №2 Проверка параметров служб брандмауэра и Центра обновления
Возможно, параметры служб брандмауэра и Центра обновления были изменены, вследствие чего те перестали нормально функционировать. Вот что вам нужно сделать:
- нажмите комбинацию Win+R;
- пропишите в пустой строчке services.msc и нажмите Enter;
- найдите в списке службу «Центр обновления Windows» и дважды кликните на нее ЛКМ;
- выставьте в типе запуске значение «Автоматически»;
- сохраните выставленные настройки и закройте окно свойств службы;
- сделайте все вышеописанное для службы «Брандмауэр Защитника Windows»;
- перезагрузите компьютер и проверьте наличие ошибки 0x800706d9.
Метод №3 Запуск средства устранения неполадок Центра обновления
В некоторых случаях приходится положиться на системное средство устранения неполадок. Оно не всегда помогает, но попробовать все же стоит. Сделать это можно вот так:
- нажмите Win+S;
- пропишите «Устранение общих проблем» и выберите результат;
- выберите пункт «Центр обновления Windows» и нажмите на кнопку «Запустить средство устранения неполадок»;
- следуйте инструкциям, которые предлагает вам средство;
- перезагрузите компьютер, если в этом будет необходимость.
Как только зайдете в Windows, запустите процесс обновления и проверьте, была ли решена ошибка 0x800706d9.
Метод №4 Сброс компонентов Центра обновления
Если ничего из вышеуказанного не помогло, предлагаем вам заняться сбросом компонентом Центра обновления. Да, звучит сложно, но на деле процедура крайне простая. Вот что вам нужно сделать:
- нажмите Win+R;
- напишите notepad.exe и нажмите Enter;
- вставьте в окно Блокнота следующие команды:
:: Run the reset Windows Update components.
:: void components();
:: /*************************************************************************************/
:components
:: —— Stopping the Windows Update services ——
call :print Stopping the Windows Update services.
net stop bitscall :print Stopping the Windows Update services.
net stop wuauservcall :print Stopping the Windows Update services.
net stop appidsvccall :print Stopping the Windows Update services.
net stop cryptsvccall :print Canceling the Windows Update process.
taskkill /im wuauclt.exe /f
:: —— Checking the services status ——
call :print Checking the services status.sc query bits | findstr /I /C:»STOPPED»
if %errorlevel% NEQ 0 (
echo. Failed to stop the BITS service.
echo.
echo.Press any key to continue . . .
pause>nul
goto :eof
)call :print Checking the services status.sc query wuauserv | findstr /I /C:»STOPPED»
if %errorlevel% NEQ 0 (
echo. Failed to stop the Windows Update service.
echo.
echo.Press any key to continue . . .
pause>nul
goto :eof
)call :print Checking the services status.
sc query appidsvc | findstr /I /C:»STOPPED»
if %errorlevel% NEQ 0 (
sc query appidsvc | findstr /I /C:»OpenService FAILED 1060″
if %errorlevel% NEQ 0 (
echo. Failed to stop the Application Identity service.
echo.
echo.Press any key to continue . . .
pause>nul
if %family% NEQ 6 goto :eof
)
)call :print Checking the services status.
sc query cryptsvc | findstr /I /C:»STOPPED»
if %errorlevel% NEQ 0 (
echo. Failed to stop the Cryptographic Services service.
echo.
echo.Press any key to continue . . .
pause>nul
goto :eof
):: —— Delete the qmgr*.dat files ——
call :print Deleting the qmgr*.dat files.del /s /q /f «%ALLUSERSPROFILE%\Application Data\Microsoft\Network\Downloader\qmgr*.dat»
del /s /q /f «%ALLUSERSPROFILE%\Microsoft\Network\Downloader\qmgr*.dat»:: —— Renaming the softare distribution folders backup copies ——
call :print Deleting the old software distribution backup copies.cd /d %SYSTEMROOT%
if exist «%SYSTEMROOT%\winsxs\pending.xml.bak» (
del /s /q /f «%SYSTEMROOT%\winsxs\pending.xml.bak»
)
if exist «%SYSTEMROOT%\SoftwareDistribution.bak» (
rmdir /s /q «%SYSTEMROOT%\SoftwareDistribution.bak»
)
if exist «%SYSTEMROOT%\system32\Catroot2.bak» (
rmdir /s /q «%SYSTEMROOT%\system32\Catroot2.bak»
)
if exist «%SYSTEMROOT%\WindowsUpdate.log.bak» (
del /s /q /f «%SYSTEMROOT%\WindowsUpdate.log.bak»
)call :print Renaming the software distribution folders.
if exist «%SYSTEMROOT%\winsxs\pending.xml» (
takeown /f «%SYSTEMROOT%\winsxs\pending.xml»
attrib -r -s -h /s /d «%SYSTEMROOT%\winsxs\pending.xml»
ren «%SYSTEMROOT%\winsxs\pending.xml» pending.xml.bak
)
if exist «%SYSTEMROOT%\SoftwareDistribution» (
attrib -r -s -h /s /d «%SYSTEMROOT%\SoftwareDistribution»
ren «%SYSTEMROOT%\SoftwareDistribution» SoftwareDistribution.bak
if exist «%SYSTEMROOT%\SoftwareDistribution» (
echo.
echo. Failed to rename the SoftwareDistribution folder.
echo.
echo.Press any key to continue . . .
pause>nul
goto :eof
)
)
if exist «%SYSTEMROOT%\system32\Catroot2» (
attrib -r -s -h /s /d «%SYSTEMROOT%\system32\Catroot2»
ren «%SYSTEMROOT%\system32\Catroot2» Catroot2.bak
)
if exist «%SYSTEMROOT%\WindowsUpdate.log» (
attrib -r -s -h /s /d «%SYSTEMROOT%\WindowsUpdate.log»
ren «%SYSTEMROOT%\WindowsUpdate.log» WindowsUpdate.log.bak
):: —— Reset the BITS service and the Windows Update service to the default security descriptor ——
call :print Reset the BITS service and the Windows Update service to the default security descriptor.sc.exe sdset wuauserv D:(A;;CCLCSWLOCRRC;;;AU)(A;;CCDCLCSWRPWPDTLOCRSDRCWDWO;;;BA)(A;;CCDCLCSWRPWPDTLCRSDRCWDWO;;;SO)(A;;CCLCSWRPWPDTLOCRRC;;;SY)S:(AU;FA;CCDCLCSWRPWPDTLOCRSDRCWDWO;;WD)
sc.exe sdset bits D:(A;;CCLCSWLOCRRC;;;AU)(A;;CCDCLCSWRPWPDTLOCRSDRCWDWO;;;BA)(A;;CCDCLCSWRPWPDTLCRSDRCWDWO;;;SO)(A;;CCLCSWRPWPDTLOCRRC;;;SY)S:(AU;FA;CCDCLCSWRPWPDTLOCRSDRCWDWO;;WD)
sc.exe sdset cryptsvc D:(A;;CCLCSWLOCRRC;;;AU)(A;;CCDCLCSWRPWPDTLOCRSDRCWDWO;;;BA)(A;;CCDCLCSWRPWPDTLCRSDRCWDWO;;;SO)(A;;CCLCSWRPWPDTLOCRRC;;;SY)S:(AU;FA;CCDCLCSWRPWPDTLOCRSDRCWDWO;;WD)
sc.exe sdset trustedinstaller D:(A;;CCLCSWLOCRRC;;;AU)(A;;CCDCLCSWRPWPDTLOCRSDRCWDWO;;;BA)(A;;CCDCLCSWRPWPDTLCRSDRCWDWO;;;SO)(A;;CCLCSWRPWPDTLOCRRC;;;SY)S:(AU;FA;CCDCLCSWRPWPDTLOCRSDRCWDWO;;WD):: —— Reregister the BITS files and the Windows Update files ——
call :print Reregister the BITS files and the Windows Update files.cd /d %SYSTEMROOT%\system32
regsvr32.exe /s atl.dll
regsvr32.exe /s urlmon.dll
regsvr32.exe /s mshtml.dll
regsvr32.exe /s shdocvw.dll
regsvr32.exe /s browseui.dll
regsvr32.exe /s jscript.dll
regsvr32.exe /s vbscript.dll
regsvr32.exe /s scrrun.dll
regsvr32.exe /s msxml.dll
regsvr32.exe /s msxml3.dll
regsvr32.exe /s msxml6.dll
regsvr32.exe /s actxprxy.dll
regsvr32.exe /s softpub.dll
regsvr32.exe /s wintrust.dll
regsvr32.exe /s dssenh.dll
regsvr32.exe /s rsaenh.dll
regsvr32.exe /s gpkcsp.dll
regsvr32.exe /s sccbase.dll
regsvr32.exe /s slbcsp.dll
regsvr32.exe /s cryptdlg.dll
regsvr32.exe /s oleaut32.dll
regsvr32.exe /s ole32.dll
regsvr32.exe /s shell32.dll
regsvr32.exe /s initpki.dll
regsvr32.exe /s wuapi.dll
regsvr32.exe /s wuaueng.dll
regsvr32.exe /s wuaueng1.dll
regsvr32.exe /s wucltui.dll
regsvr32.exe /s wups.dll
regsvr32.exe /s wups2.dll
regsvr32.exe /s wuweb.dll
regsvr32.exe /s qmgr.dll
regsvr32.exe /s qmgrprxy.dll
regsvr32.exe /s wucltux.dll
regsvr32.exe /s muweb.dll
regsvr32.exe /s wuwebv.dll:: —— Resetting Winsock ——
call :print Resetting Winsock.
netsh winsock reset:: —— Resetting WinHTTP Proxy ——
call :print Resetting WinHTTP Proxy.if %family% EQU 5 (
proxycfg.exe -d
) else (
netsh winhttp reset proxy
):: —— Set the startup type as automatic ——
call :print Resetting the services as automatics.
sc.exe config wuauserv start= auto
sc.exe config bits start= delayed-auto
sc.exe config cryptsvc start= auto
sc.exe config TrustedInstaller start= demand
sc.exe config DcomLaunch start= auto:: —— Starting the Windows Update services ——
call :print Starting the Windows Update services.
net start bitscall :print Starting the Windows Update services.
net start wuauservcall :print Starting the Windows Update services.
net start appidsvccall :print Starting the Windows Update services.
net start cryptsvccall :print Starting the Windows Update services.
net start DcomLaunch:: —— End process ——
call :print The operation completed successfully.echo.Press any key to continue . . .
pause>nul
goto :eof
:: /*************************************************************************************/
- нажмите на пункт «Файл» в строке меню и выберите «Сохранить как…»;
- задайте файлу имя «WinUpdReset.cmd» (обязательно укажите расширение CMD в конце!) и сохраните его в удобное для вас место;
- дважды кликните ЛКМ на созданный WinUpdReset.cmd и следуйте инструкциям в окошке Командной строки;
- перезагрузите компьютер по окончанию сброса компонентов Центра обновления.
После выполнения этого процесса ошибка 0x800706d9 не должна вас больше донимать.
The error code 0x800706D9 might appear when you are trying to update your Windows. How to get rid of the issue and perform Windows update properly? In this guide from MiniTool Partition Wizard, you will learn about several methods to fix the problem.
Many problems have been reported with Windows Update and the error code 0x800706D9 is one of them. According to the reports from the affected users, the Windows update error 0x800706D9 could happen when they are trying to download or install certain updates for the system.
In most cases, the error 0x800706D9 is related to the Windows Firewall. Some other potential factors could also cause this problem and prevent you from updating your Windows. If you are facing the problem, the following fixes may help you get out of trouble. Just try the following solutions one by one until you fix the issue effectively.
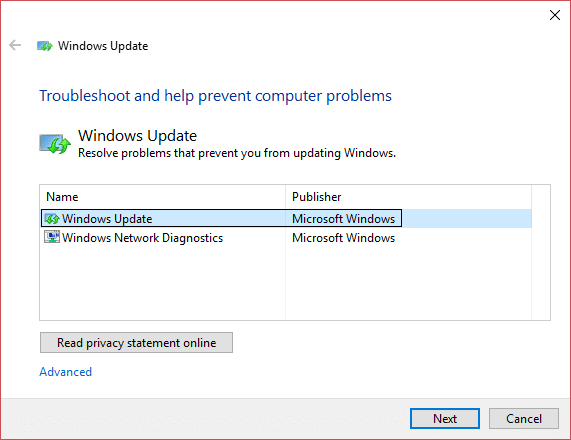
Fix 1: Run Windows Update Troubleshooter
As for any problems related to Windows Update, you can use the built-in troubleshooter tool to detect and resolve potential problems. To run Windows Update troubleshooter, you need to:
Step 1: Press Windows + I to open Settings.
Step 2: Navigate to Update & Security > Troubleshoot.
Step 3: In the right pane, select Windows Update and click the Run the troubleshooter button.
Then, this tool will start detecting problems. If there are any fix strategies available, choose the Apply the fix option. After the troubleshooting process is completed, restart your computer and check if you can update your Windows without the error code 0x800706D9.
Fix 2: Turn on Windows Firewall
In Windows 10, if the Windows Firewall is turned off, most programs including Windows updates cannot install at all. But sometimes, certain third-party security programs may disable Windows Firewall automatically, or some users disable Windows Firewall for specific reasons.
Therefore, if you come across the Windows update error 0x800706D9, you need to make sure Windows Firewall is enabled. If not, turn it on. Just follow the following instructions.
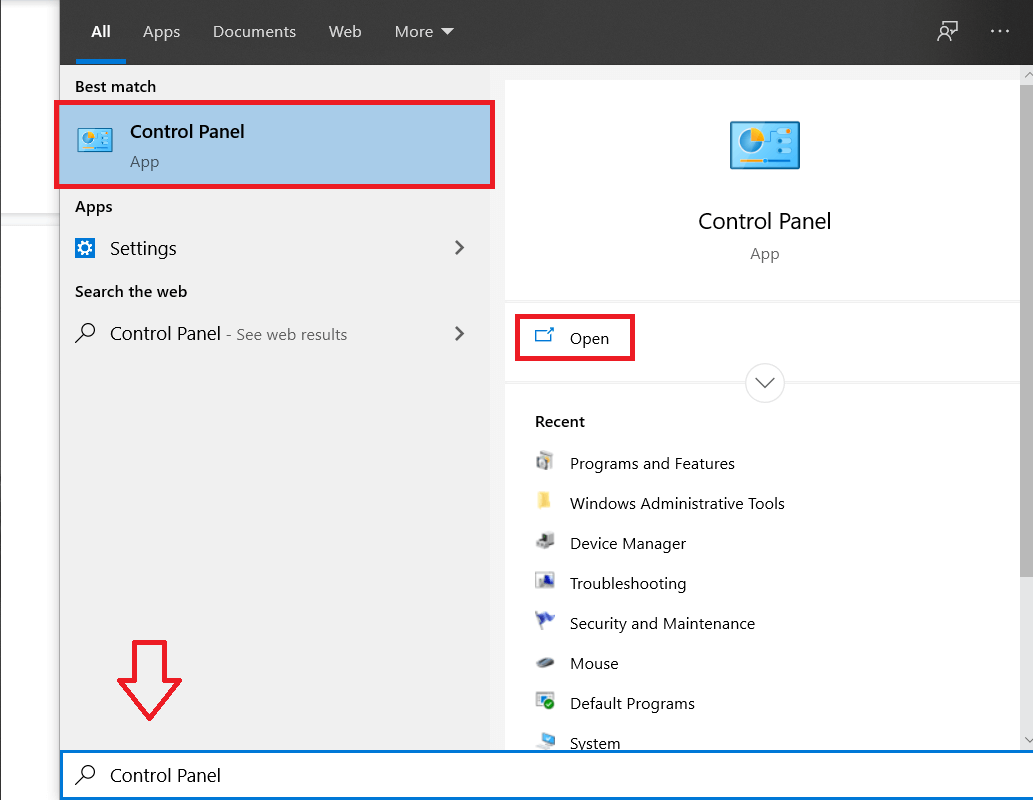
Step 1: Press Windows + S, input control panel, and click the search result to open it.
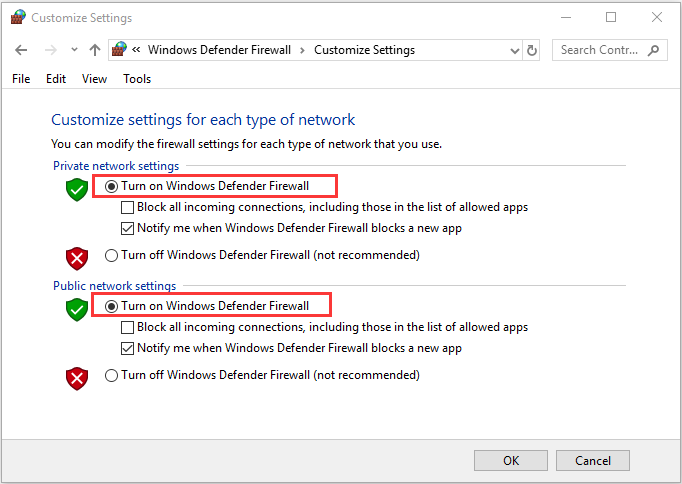
Step 2: Choose the System and Security category and click Windows Defender Firewall in the right pane. Then, click the Turn Windows Defender Firewall on or off option.
Step 3: In the pop-up window, make sure the Turn on Windows Defender Firewall option has been checked for both Private and Public network settings.
Now, you can try installing the specific Windows update again to check if the error 0x800706D9 has been resolved.
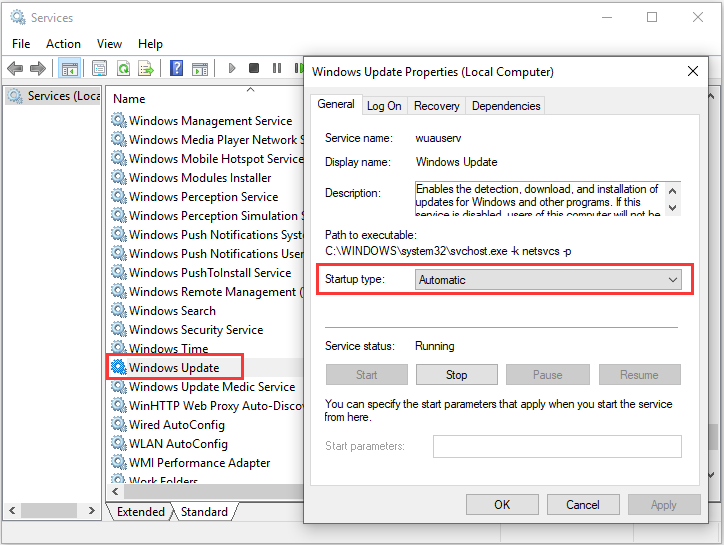
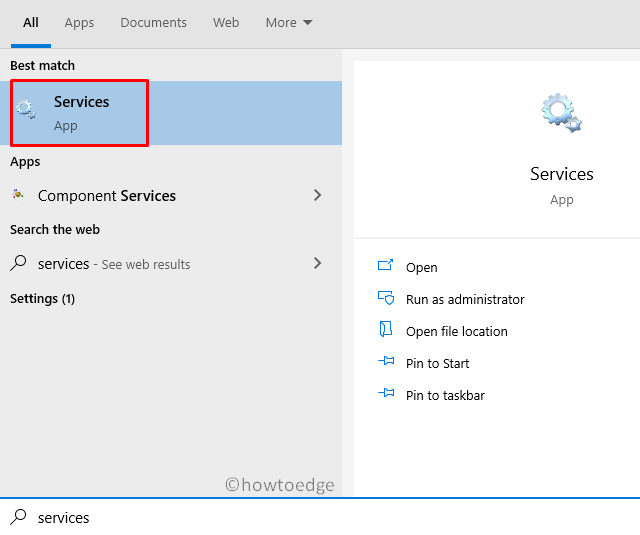
Fix 3: Make Sure the Windows Update Service Is Running
If you fail to update your Windows due to the error 0x800706D9, perhaps the problem lies in the Windows Update service. To perform the Windows update successfully, you have to make sure the service is running.
Note: You should also make sure the Windows Defender Firewall service is enabled.
Here’s what you need to do.
Step 1: Press Windows + R to invoke the Run window.
Step 2: Input services.msc in the empty box and click the OK button to open the Services app.
Step 3: Double-click the Windows Update service to open its properties and set its Startup type to Automatic. Make sure its status is Running. If not, click the Start button to enable it.
Step 4: Click Apply and OK to save changes.
Fix 4: Rename Windows Update Folders
Besides, you may be able to fix the problem by renaming Windows Update folders. If you don’t know how to rename the involved folder, you can follow the steps below.
Step 1: Input cmd in the Run dialog and press Ctrl + Shift + Enter to launch Command Prompt as administrator.
Step 2: Type the following commands and press Enter after each to stop services related to Windows Update including Windows Update, Cryptographic Services, Background Intelligent Transfer Service, and Windows Installer.
- net stop wuauserv
- net stop cryptSvc
- net stop bits
- net stop msiserver
Step 3: Execute the following commands to rename Windows Update folders:
- ren C:WindowsSoftwareDistribution SoftwareDistribution.old
- ren C:WindowsSystem32catroot2 Catroot2.old
Step 4: Finally, restart the previously disabled services by running the commands below:
- net start wuauserv
- net start cryptSvc
- net start bits
- net start msiserver
Fix 5: Disable Your Third-party Antivirus Temporarily
It turns out that certain antivirus problems may interfere with Windows update and trigger the error code 0x800706D9. If you are using any third-party antivirus applications and the above methods fail to work for you, then you can try disabling you’re your antivirus temporarily. Then, check if you can update your Windows properly with the antivirus disabled.
If your antivirus is the culprit of the Windows update error 0x800706D9, you can choose to uninstall the program and turn to another reliable one.
Введение
Брандмауэр в операционной системе Windows играет важную роль в обеспечении безопасности компьютера и сети. Он контролирует входящий и исходящий сетевой трафик, блокируя подозрительные или нежелательные соединения.
Ошибки, возникающие в брандмауэре, могут привести к серьезным проблемам, включая уязвимости в безопасности и неработоспособность сети. Одной из таких ошибок является ошибка 0x800706d9.
Ошибка 0x800706d9
Ошибка 0x800706d9 часто возникает во время попытки изменить настройки брандмауэра или запустить службу брандмауэра Windows. Возможны различные причины, вызывающие эту ошибку, включая неправильные настройки брандмауэра, проблемы с файлами системы или внешними программами, конфликты сетевых соединений и другие факторы.
Решение проблемы
Для решения ошибки 0x800706d9 с брандмауэром в Windows можно применить следующие шаги:
1. Проверить статус службы брандмауэра
Проверьте, включена ли служба брандмауэра Windows. Для этого выполните следующие действия:
- Нажмите
Win + R, чтобы открыть окно «Выполнить». - Введите «services.msc» и нажмите Enter.
- Найдите службу «Брандмауэр Windows» в списке служб.
- Проверьте статус службы. Если она отключена, щелкните правой кнопкой мыши и выберите «Свойства».
- В разделе «Состояние службы» выберите «Автоматически» и нажмите «Применить» и «ОК».
- Запустите службу, щелкнув правой кнопкой мыши на службе и выбрав «Запустить».
2. Проверить настройки брандмауэра
Проверьте настройки брандмауэра Windows, чтобы убедиться, что они не вызывают конфликты или проблемы. Для этого выполните следующие действия:
- Откройте «Панель управления» и перейдите в «Система и безопасность» > «Брандмауэр Windows».
- Нажмите на «Настроить уведомления» и убедитесь, что уведомления включены.
- Проверьте вкладку «Исключения» и убедитесь, что необходимые приложения и службы добавлены в список исключений.
- Проверьте вкладку «Расширенные настройки» и убедитесь, что правила брандмауэра не блокируют нужный трафик.
3. Запустить инструменты проверки системных файлов
Инструменты проверки системных файлов могут помочь исправить проблемы, связанные с файлами операционной системы, которые могут вызывать ошибку 0x800706d9. Для этого выполните следующие действия:
- Откройте командную строку от имени администратора.
- Введите команду «sfc /scannow» и нажмите Enter.
- Дождитесь завершения проверки и исправления ошибок файлов системы.
4. Использовать инструменты автоматического исправления ошибок
Microsoft предоставляет набор инструментов автоматического исправления ошибок, которые могут помочь в решении проблем с брандмауэром. Вы можете загрузить и выполнить соответствующую утилиту с официального сайта Microsoft.
Заключение
Ошибка 0x800706d9 с брандмауэром Windows может возникнуть по различным причинам, но с помощью описанных выше шагов ее можно успешно решить. Если проблема сохраняется, рекомендуется обратиться к специалисту по поддержке или сообществу пользователей Windows для получения дополнительной помощи. Важно помнить, что надлежащая работа брандмауэра является важным аспектом обеспечения безопасности вашего компьютера и сети.
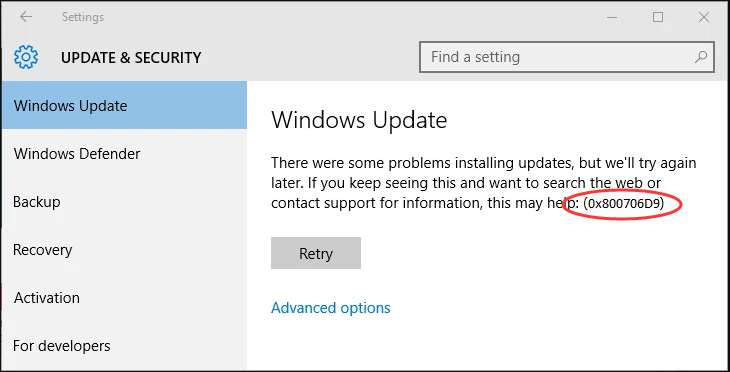
Windows Update seems to have many problems later in Windows 10, many users are reporting various error codes while trying to update windows, and one such error code is 0x800706d9. Users are reporting that while trying to update Windows, they face the error 0x800706d9 and cannot update Windows. The error means that you need to start Windows firewall services, then only you will able to download & install the required update. Anyway, without wasting any time let’s see how to actually Fix Windows Update Error 0x800706d9 with the help of the below-listed guide.

Table of Contents
Make sure to create a restore point just in case something goes wrong.
Method 1: Turn Windows Firewall On
1. Search for the control panel from the Start Menu search bar and click on it to open the Control Panel.
2. Next, click on System and Security.

3. Then click on Windows Firewall.

4. Now from the left window pane click on Turn Windows Firewall on or off.

5. Select Turn On Windows Firewall then click OK and restart your PC.

Method 2: Make sure Windows Firewall Service is running
1. Press Windows Key + R then type services.msc and hit Enter.

2. Now find the following services in the list:
Windows Update
Windows Firewall
3. Now double click on each of them and make sure their Startup type is set to Automatic and if the services are not running click on Start.

4. Click Apply, followed by OK.
5. Reboot your PC to save changes and again check if you can fix Windows Update Error 0x800706d9.
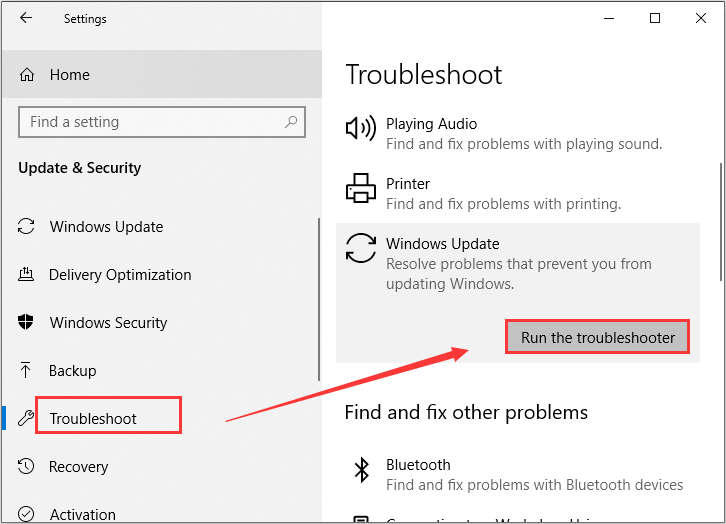
Method 3: Run Windows Update Troubleshooter
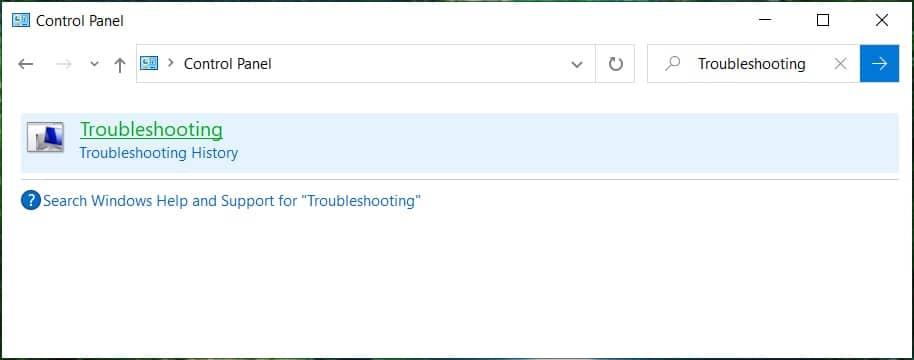
1. In the control panel search Troubleshooting in the Search Bar on the top right side and click on Troubleshooting.
2. Next, from the left window, pane select View all.
3. Then from the Troubleshoot computer problems list select Windows Update.
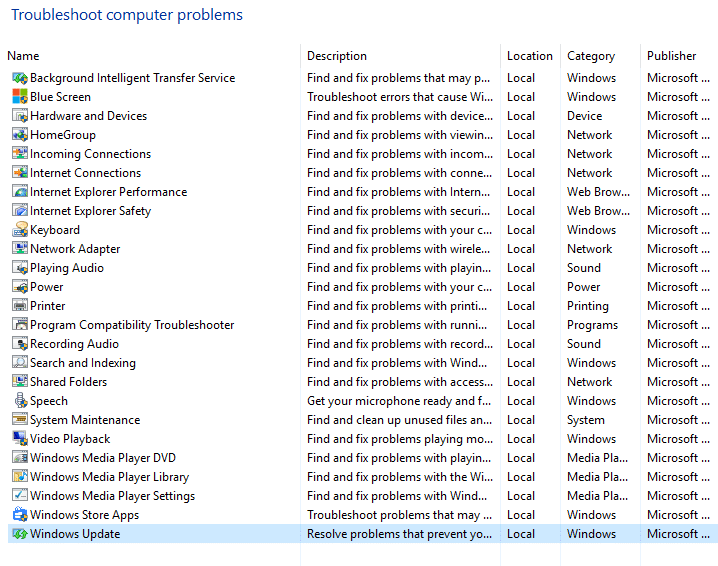
4. Follow on-screen instructions and let the Windows Update Troubleshoot run.
5. Restart your PC and see if you can fix Windows Update Error 0x800706d9.
Method 4: Rename software distribution Folder
1. Open Command Prompt. The user can perform this step by searching for ‘cmd’ and then press Enter.

2. Now type the following commands to stop Windows Update Services and then hit Enter after each one:
net stop wuauserv
net stop cryptSvc
net stop bits
net stop msiserver

3. Next, type the following command to rename SoftwareDistribution Folder and then hit Enter:
ren C:\Windows\SoftwareDistribution SoftwareDistribution.old
ren C:\Windows\System32\catroot2 catroot2.old
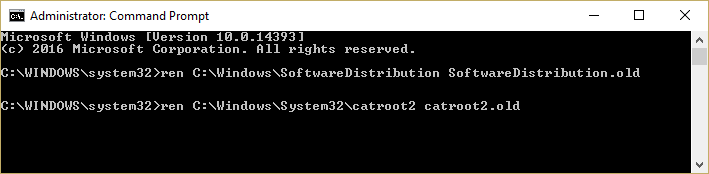
4. Finally, type the following command to start Windows Update Services and hit Enter after each one:
net start wuauserv
net start cryptSvc
net start bits
net start msiserver

5. Reboot your PC to save changes.
Recommended:
- Fix Windows 10 Update Error 0x8007042c
- Fix Windows Update Error 0x80010108
- How To Fix Error 0X80010108 In Windows 10
- Fix The file or directory is corrupted and unreadable
That’s it you have successfully Fix Windows Update Error 0x800706d9 but if you still have any questions regarding this article then feel free to ask them in comment’s section.
Did you recently encounter Error Code 0x800706d9 while opening a Store app, launching Sandbox, or updating Windows 10? Well, in this guide, we explore the reasons that lead to this bug in the first place along with some working ways to resolve the issue.
The error 0x800706d9 may occur due to corrupt system files, missing Windows components, fail to start certain services, storage-related issues, etc. In general, we can categorize them into four different types and each one has its own set of solutions. If you do know why you are receiving this error, reach out to the specific section below –
- Update Error 0x800706D9
- Sandbox Error 0x800706D9
- Microsoft Store Error 0x800706D9
- Windows Defender Error 0x800706D9
To solve the Update error 0x800706D9, try the below workarounds –
1] Run System File Checker
The update error 0x800706D9 occurs mainly due to corrupt or missing system files. SFC is a great utility program designed to scan and repair damaged system files. Here’s how to use this tool –
- First of all, open Command Prompt with Admin rights.
- Copy/paste
sfc/ scannowon the elevated console and press the Enter key.
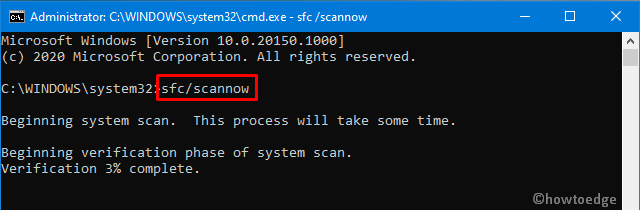
- This usually takes 15-20 minutes to locate and repair corrupt system files. In certain cases, this might even take more time, so wait accordingly.
- Once over, Restart Windows so that changes made come into effect.
2] Manually Install Cumulative Update
If the error persists, one should manually download and install the recent standalone package on the computer. Here’s how to perform this task –
- First of all, visit the Windows 10 Update History page.
- On the left column, select the Windows 10 version that you are having on the computer.
- Scroll down to “In this release“.
- Note down the KB number and reach out to the Microsoft Update Catalog site.
- Paste the KB number noted down earlier and hit Enter. A list of matching results will pop-up.
- Look for the system architecture
- Here, hit the Download button next to the system architecture that you are currently having
- On the subsequent screen, click the top link to download the .msu file.
After the file gets downloaded, browse to the Download folder and double-click the setup to install this.
3] Purge Windows Update Folder
Usually, manually installing the recent cumulative update will resolve any update-related issues on Windows 10. If the 0x800706D9 bug persists even after this, purge the update folder and reinstall the setup file (downloaded above). Here’s how to purge Windows update folder –
- Type “regedit” on the search bar and click the top result.
- When the UAC window prompts, hit Yes.
- On the registry window, navigate to –
HKEY_LOCAL_MACHINE\SOFTWARE\Policies\Microsoft\Windows\WindowsUpdate
Note: If you don’t find the WindowsUpdate folder at the above location, use either system backup or clean install Windows 10, May 2020 Update.
- Head over to the right pane and search for
WUServerandWIStatusServerfolders. - Right-click on each one of them and select “delete“.
- Restart Windows to save the recent changes.
Sign back into Windows 10 and re-follow the method-2.
Fix: Windows Sandbox Error 0x800706d9
The Sandbox error 0x800706D9 may occur due to some corruption inside the system files, certain services not working properly, or installing an incorrect feature update. To correct this, attempt to disable then re-enable Hyper-V services.
Note: Make sure to enable the virtualization settings inside the computer BIOS or Firmware menu before proceeding to the solutions.
Here’s how to fix disable then re-enable Hyper-V related services –
1] Check the status of Hyper-V Related Services
- Press Win+S to invoke the Search UI.
- Type “services” in the text field and click the top result.
- Now, check each one of the services below.
- If you find any one of them as “stopped”, hit “Start” to restart them.
Network Virtualization Service
Virtual Disk
Hyper-V Virtual Machine Manager
Hyper-V Host Compute Service
Container Manager Services
Application Guard Container Service
Remote Procedure Call (RDC)
2] Disable and Enable Hyper-V
First of all, disable the following services –
- Windows Defender Random Folder Protection
- Tamper Protection Service
- Container Manager service
- Windows Sandbox
Next, browse to the below paths –
C:\ProgramData\Microsoft\Windows\Containters\Sandboxes
C:\ProgramData\Microsoft\Windows\Containters\Zygotes
Here, search for VHDX files and delete them. However, make sure not to delete these files from the recycle bin. Now, re-enable the services that you have stopped earlier following the exact reverse order i.e. –
- Windows Sandbox
- Container Manager service
- Tamper Protection Service
- Windows Defender Random Folder Protection
Do Restart Windows to incorporate the above changes. From the next logon, Windows Sandbox will start normally.
Fix: Microsoft Store Error 0x800706D9
This error may also occur while opening Microsoft Store or any of its applications. To solve this, try the following suggestions –
1] Run Store App Troubleshooter
Windows 10 includes a troubleshooter for each one of its services and components. Store App Troubleshooter is one such tool that can locate and repair any bugs related to Windows Store. In case this doesn’t solve the issue, it suggests mending ways to address the issue at hand. Here’s how to use this tool –
- Press Win+I shortcut to start Windows Settings UI.
- Click Update & Security thereafter Troubleshoot on the left overlay.
- Move to the right side and click the “Additional troubleshooter” link.
- Scroll down to Windows Store apps and click to extend its pane.
- Hit Run the troubleshooter.
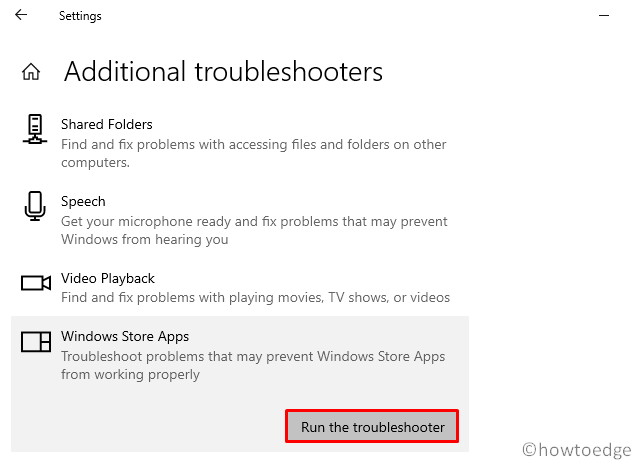
- The tool immediately starts detecting and fixing any errors (if it finds any).
2] Enable Storage Services
At times, the 0x800706D9 error occurs due to Storage services becoming troublesome. Users often disable storage services so as to avoid Windows writing hidden files on USB devices. The 0x6D9 error might occur due to such restrictions on Windows 10. To get rid of this bug, you need to re-enable the services manually following these easy steps –
- Right-click on the Windows icon and choose Run.
- Type “services.msc” without quotes and hit the OK button.
- Locate Storage Service on the succeeding window.
- Double-click the same to launch its Properties window.
- If the Service status displays “stopped”, click the start button.

- Click Apply then OK to confirm these changes.
- Restart Windows so that changes made come into effect from the next logon.
3] Re-register All Store apps
If you are still getting the 0x800706D9 bug, you must re-register each one of the Store apps using PowerShell command. Here are the essential steps to work upon –
- Right-click on the Start button and choose “Windows PowerShell (Admin)“.
- When the UAC window comes into view, tap Yes.
- On the elevated console, copy/paste the below code and hit Enter –
Get-AppXPackage -AllUsers | Foreach {Add-AppxPackage -DisableDevelopmentMode -Register "$($_.InstallLocation)\AppXManifest.xml"}
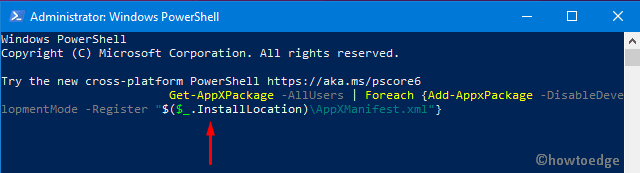
- After this code runs successfully, reboot PC to implement the recent changes.
Fix: Windows Defender Firewall Error 0x800706d9
If you are getting the error code 0x800706d9 while opening Windows Defender, try these solutions –
Tip: Make sure to uninstall or remove any third-party antivirus program as well to avoid this error.
1] Disable Microsoft Defender
- Go and click the “up arrow” available near the notification area and hit the “Shield” icon.
- Doing so will launch the Microsoft Defender application.
- Head over to the right pane and click Virus & threat protection.
- On the succeeding page, tap Manage settings link.
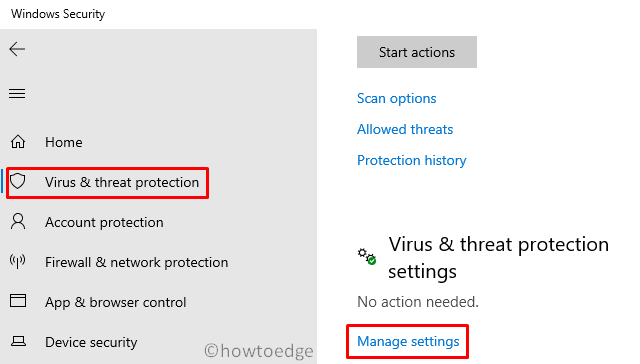
- Next, turn off the Real-time protection toggle switch.
- When a confirmation window appears, hit the Yes button.
You may now check whether the error 0x800706d9 is still appearing or has disappeared.
2] Set Windows Firewall to Automatic
As per certain user’s POV, disabling the Firewall/ICS service directly may fix this issue on Windows 10. However, doing so you might not even launch the Windows Firewall wizard. Here’s how to fix this –
- Make a right-click on the Windows icon and select Run.
- Type “devmgmt.msc” and press Enter to launch the Device Manager.
- This time, right-click on the Windows firewall and set it to Automatic.
That’s it, I hope the above tutorial does help to address the error code 0x800706d9 on Windows 10.