Содержание
- Способ 1: Перерегистрация DLL-файла
- Способ 2: Встроенная служба устранения неполадок
- Способ 3: Включение соответствующий служб
- Способ 4: Сброс настроек Microsoft Store
- Способ 5: Проверка на вирусы
- Способ 6: «Редактор реестра»
- Дополнительные рекомендации
- Вопросы и ответы
Способ 1: Перерегистрация DLL-файла
Если при попытке обновить Windows 10 появляется ошибка с кодом 0x80070424, попробуйте сначала перерегистрировать DLL-файл фоновой интеллектуальной службы, используя встроенное средство «Командная строка»:
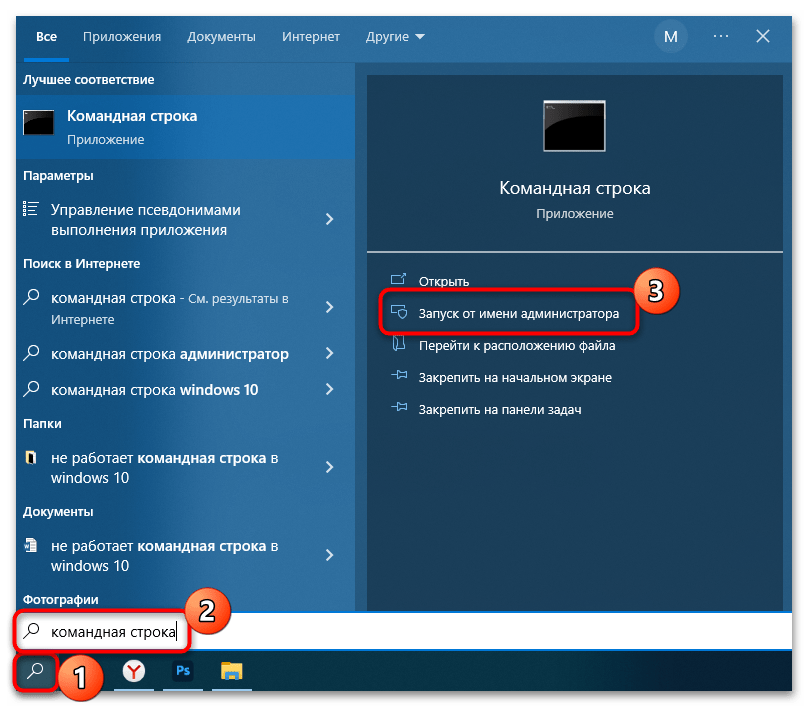
- Откройте консоль от имени администратора, найдя сам инструмент в «Пуске» и выбрав для него соответствующий тип запуска.
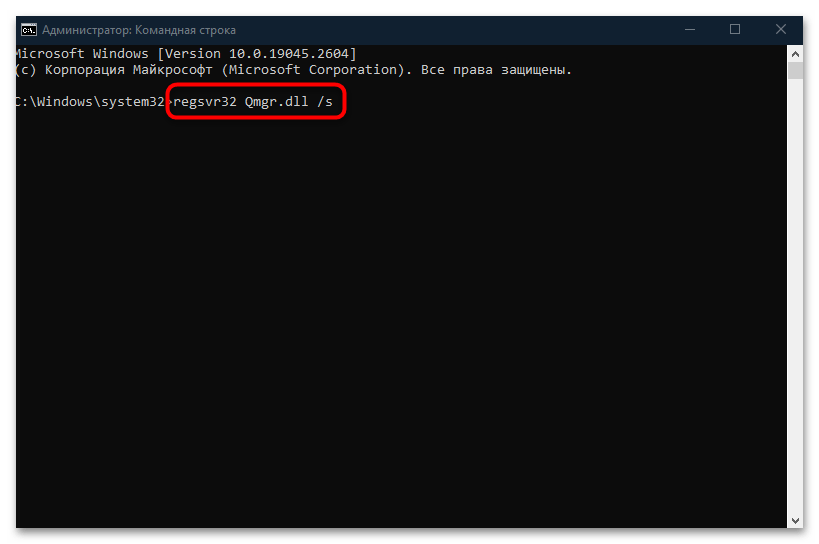
- Введите команду
regsvr32 Qmgr.dll /s, затем нажмите на клавишу «Enter», чтобы выполнить ее. - После выполните еще одну команду —
regsvr32 Qmgrprxy.dll /s.

О том, что процедура прошла успешно, уведомит соответствующее сообщение в окне «Командной строки». Перезагрузите компьютер и проверьте, решена ли проблема.
Способ 2: Встроенная служба устранения неполадок
Также можете применить встроенную утилиту, с помощью которой система сканируется на наличие ошибок, после чего они по возможности исправляются.
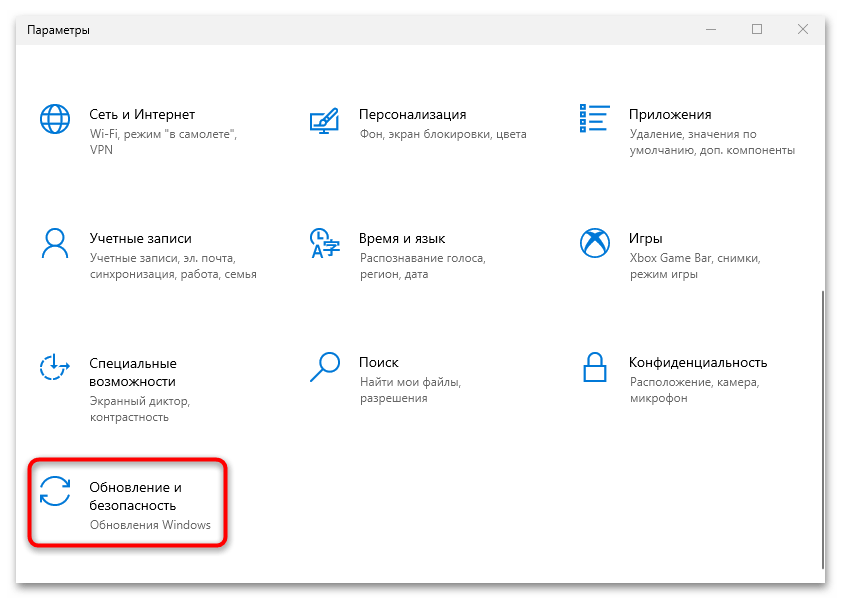
- Нажмите на иконку «Пуск» и перейдите в «Параметры» Windows 10.
- Выберите раздел «Обновление и безопасность».
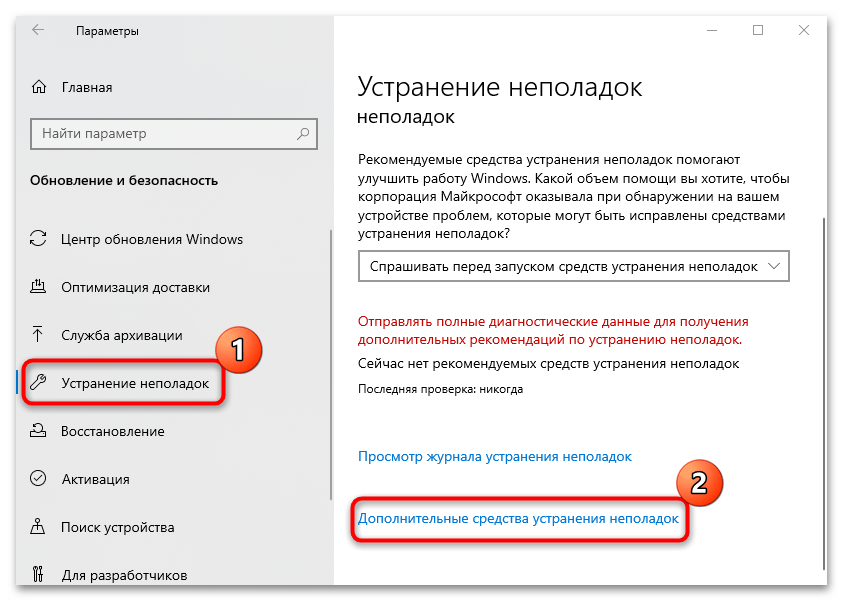
- В новом окне на вкладке слева нажмите на строку «Устранение неполадок», а в центральной части окна кликните по строке «Дополнительные средства устранения неполадок».
- Для выполнения диагностики нажмите на строку «Центр обновления Windows», затем на появившуюся кнопку «Запустить средство устранения неполадок».


Останется дождаться завершения диагностики. Если ошибка под кодом 0x80070424 связана с «Центром обновления», то будут предложены пути ее решения, в том числе автоматические исправления, не требующие действий пользователя.
Способ 3: Включение соответствующий служб
Еще один вариант, который может помочь исправить ситуацию, предполагает проверку, работают ли службы, которые связаны с обновлением операционной системы. Если они выключены, то их нужно активировать вручную, причем делается это все с помощью предустановленных в Windows 10 средств:
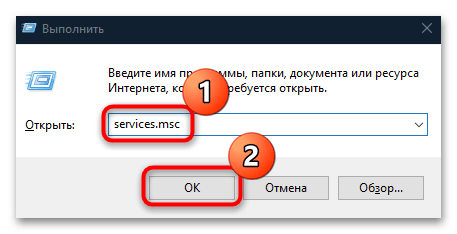
- Одновременно нажмите на клавиши «Win + R» — запустится диалоговое окно «Выполнить». Введите команду
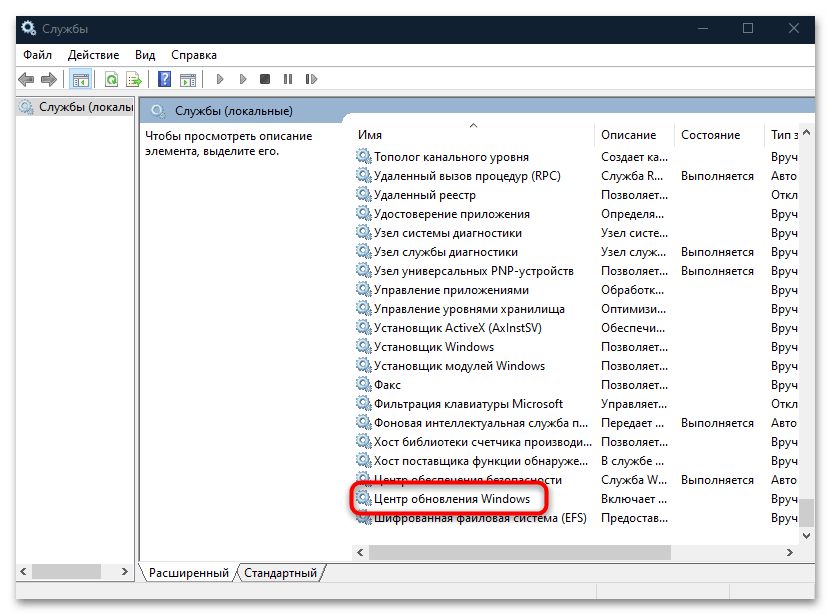
services.mscи нажмите на «Enter». - Произойдет запуск инструмента «Службы». Вам необходимо отыскать несколько служб и запустить их. Первая – «Центр обновления Windows». Дважды щелкните по названию левой кнопкой мыши.
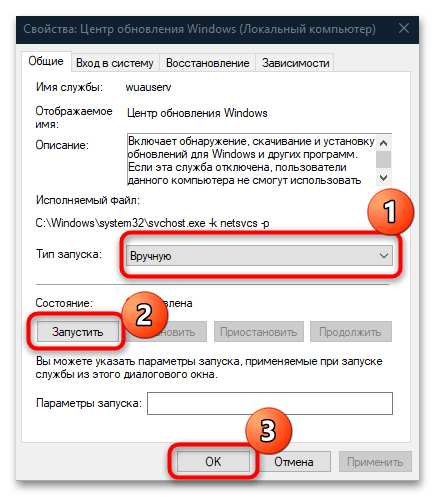
- В появившемся окне «Свойств» для параметра «Тип запуска» задайте значение «Вручную», затем нажмите по кнопке «Запустить» и по «ОК».
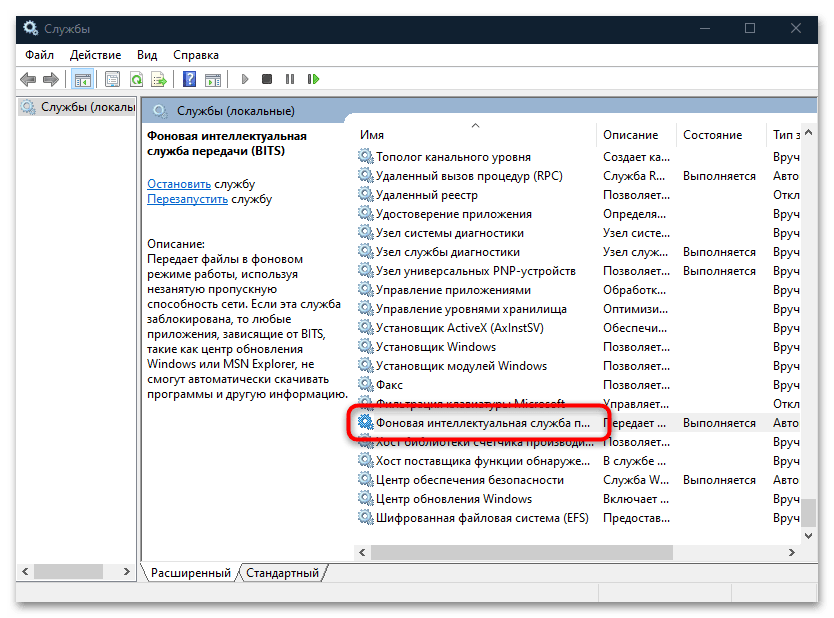
- Далее вернитесь к списку служб Windows и найдите «Фоновая интеллектуальная служба передачи».
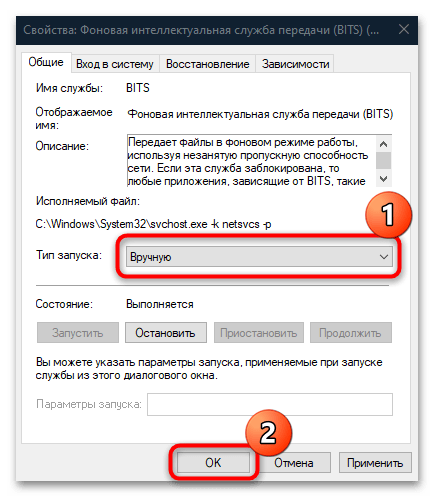
- В окне «Свойств» службы в качестве типа запуска выставьте «Вручную», затем также запустите ее.
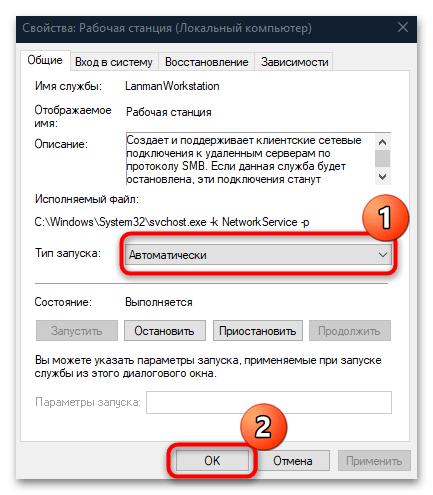
- Откройте «Свойства» службы «Рабочая станция» и в поле «Тип запуска» выберите «Автоматически», после чего сохраните изменения.
После этого все необходимые для корректного обновления операционной системы службы будут работать правильно. Попробуйте снова установить апдейты для Windows 10.
Способ 4: Сброс настроек Microsoft Store
Также ошибка 0x80070424 может быть связана с неправильной работой официального магазина Microsoft Store. В таком случае исправить проблему может помочь сброс настроек этого приложения через «Командную строку».
Достаточно запустить консоль с правами администратора (так же, как в Способе 1), затем ввести команду wsreset и выполнить ее, нажав на клавишу ввода.

Когда все настройки магазина от Microsoft окажутся сброшены, перезагрузите систему и проверьте, получается ли установить обновления.
Способ 5: Проверка на вирусы
Как ни банально, но еще одной частой проблемой появления рассматриваемой ошибки являются вирусы, блокирующие работу «Центра обновления» и, соответственно, установку необходимых апдейтов для системы, в особенности связанных с улучшением безопасности ОС.
Проверьте систему на наличие вредоносного ПО встроенными средствами обеспечения безопасности или же специализированным софтом, который нужно скачивать отдельно. Для достижения максимального эффекта можете воспользоваться сразу несколькими вариантами, а большинство способов мы разбирали в нашем отдельном материале.
Подробнее: Методы удаления вируса с компьютера под управлением Windows 10

Способ 6: «Редактор реестра»
Нередки и проблемы с файлами реестра: чаще всего у них выставлены неверные значения или они по каким-то причинам отсутствуют. Проверьте, все ли в порядке с файлами, связанными с «Центром обновления Windows», с помощью «Редактора реестра»:
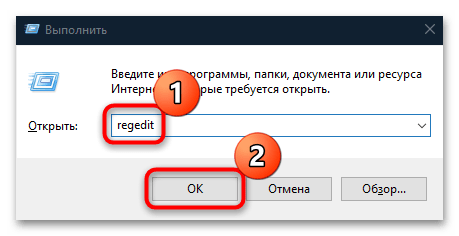
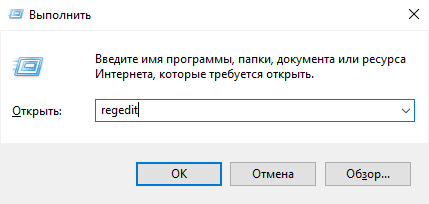
- Через диалоговое окно «Выполнить» запустите упомянутое средство, выполнив команду
regedit. - Перейдите по пути
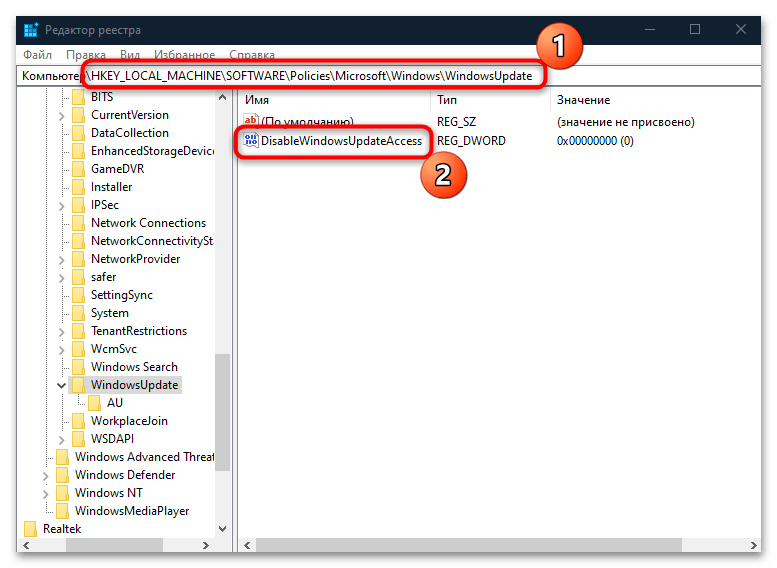
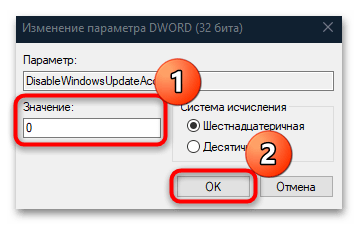
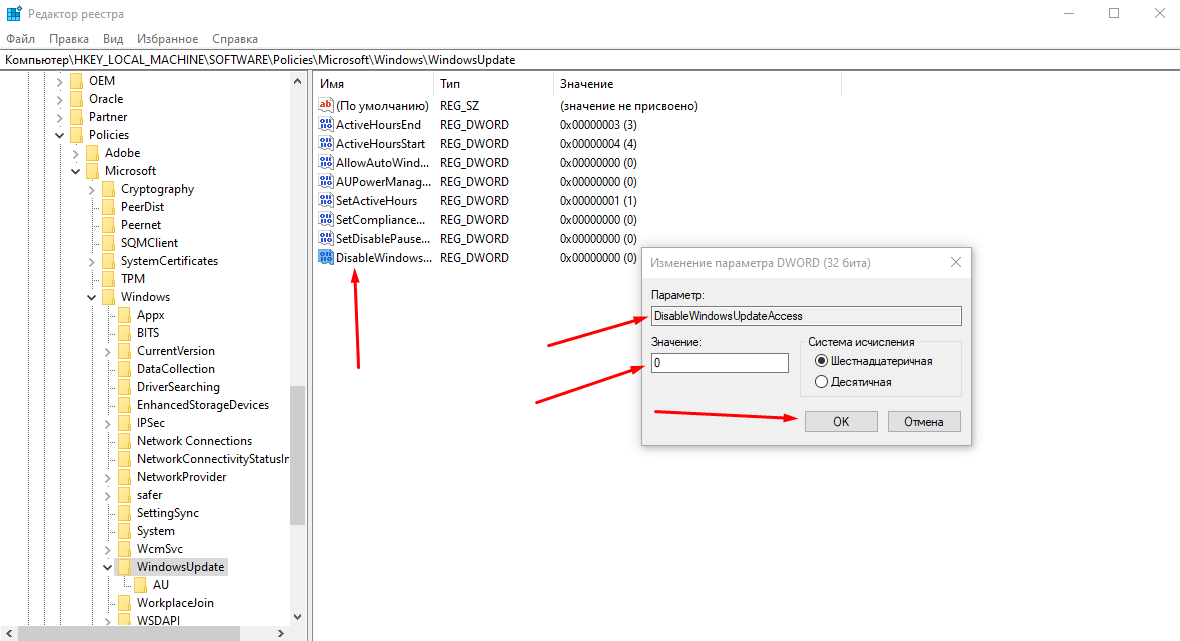
HKEY_LOCAL_MACHINE\SOFTWARE\Policies\Microsoft\Windows\WindowsUpdate, разворачивая ветки слева, или вставьте его в адресную строку. В центральной части окна дважды кликните ЛКМ по параметру под названием «DisableWindowsUpdateAccess». - В поле «Значение» напишите «0», затем нажмите на кнопку «ОК».
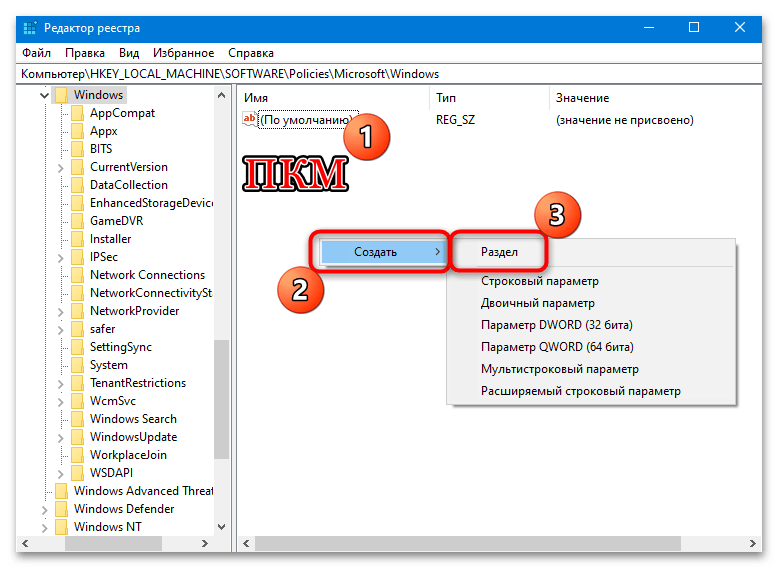
Если папка «WindowsUpdate» отсутствует, то потребуется создать и ее, и необходимый параметр. Для этого, находясь в разделе «Windows», кликните правой кнопкой мыши по свободному месту, из контекстного меню выберите «Создать» — «Раздел». Он появится в панели слева – задайте ему соответствующее имя (WindowsUpdate).
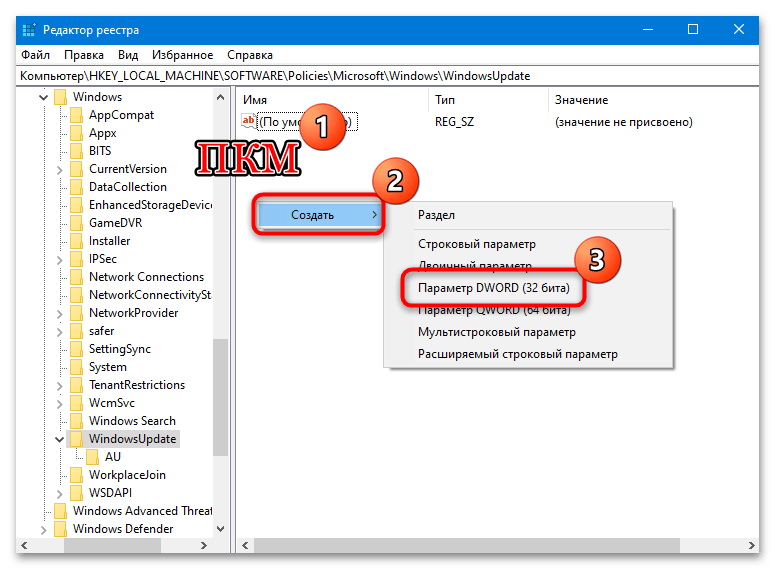
Нажмите на созданную папку и в основной части окна вызовите контекстное меню, из которого выберите «Создать» > «Параметр DWORD (32 бита)». Задайте ему имя DisableWindowsUpdateAccess, затем останется указать в качестве значения «0».
Как только файл реестра исправлен или создан с корректными значениями, перезагрузите Windows и проверьте, была ли исправлена ошибка 0x80070424.
Дополнительные рекомендации
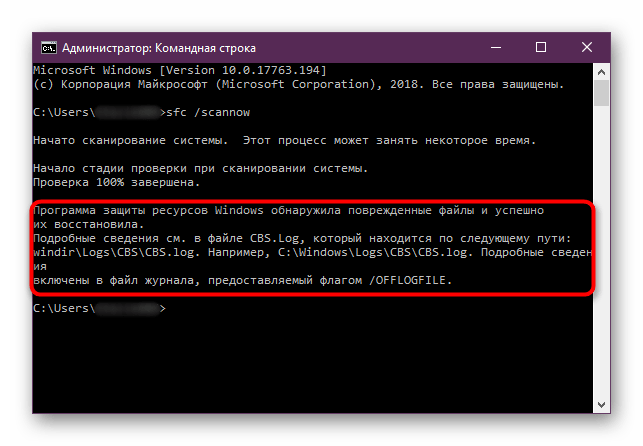
В некоторых случаях, особенно когда повреждаются системные файлы, могут помочь некоторые универсальные решения. Если ни один из способов из статьи не помог, попытайтесь восстановить их с помощью предустановленных утилит – SFC и DISM. Работать с ними можно через «Командую строку», достаточно знать соответствующие запросы. О том, как проверить целостность системных файлов и восстановить их, используя названные инструменты, читайте в нашем отдельном руководстве.
Подробнее: Использование и восстановление проверки целостности системных файлов в Windows 10
Также можете попытаться сбросить компоненты «Центра обновлений Windows», чтобы выполнить перезапуск некоторых служб, связанных с процедурой установки апдейтов. Для этого используйте «Командную строку», запущенную с расширенными правами, вводя следующие команды и выполняя их поочередно (нажимая после каждой из них «Enter»).
net stop bits

net stop wuauserv

net stop appidsvc

net stop cryptsvc

ren %systemroot%\SoftwareDistribution SoftwareDistribution.old

ren %systemroot%\system32\catroot2 catroot2.old

net start bits

net start wuauserv

net start appidsvc

net start cryptsvc
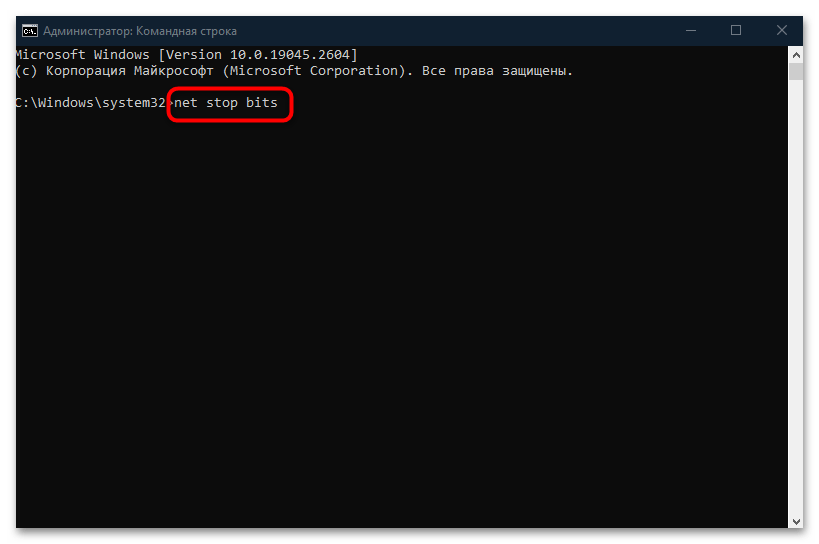
Вдаваться в подробности, что это за команды и какие действия они выполняют, нет смысла, но общий смысл таков: происходит остановка служб (BITS, Windows Update, Cryptographic и других), затем на локальном диске автоматически создаются папки с резервными копиями файлов обновления, а после – запуск остановленных служб.
В некоторых случаях может помочь установка проблемного обновления вручную, скачав нужный апдейт с официального сайта компании Microsoft. Переходите по ссылке ниже, чтобы узнать, как это правильно сделать.
Подробнее: Устанавливаем обновления для Windows 10 вручную

Ошибка 0x80070424 появляется при попытке системы автоматически загрузить обновление. А если брать конкретнее, данный код касается именно Центра обновления, Защитника Windows или пакета Microsoft Virtual C++. Я расскажу о причинах появления ошибки 0x80070424, а также способах ее устранения.
В основном, код ошибки 0x80070424 появляется по нескольким причинам:
- отключение службы, отвечающей за загрузку обновлений;
- поражение системных файлов вирусами;
- блокировка сторонним антивирусом;
- наличие ошибок в магазине Microsoft Store.
Способы устранения неполадки
Ошибка с кодом 0x80070424 устраняется несколькими методами, и прибегать к ним можно как поочередно, так и в любом другом порядке, по желанию пользователя. Самое главное – точно следовать инструкции.
Повторная регистрация dll в командной строке
Для начала я открываю командную строку. Сделать это можно несколькими способами – ввести в поисковой строке на панели «Пуск» соответствующий запрос или же открыть окно «Выполнить» нажатием на комбинацию Win + R, затем в поле «Открыть» ввести cmd и нажать на кнопку ОК.
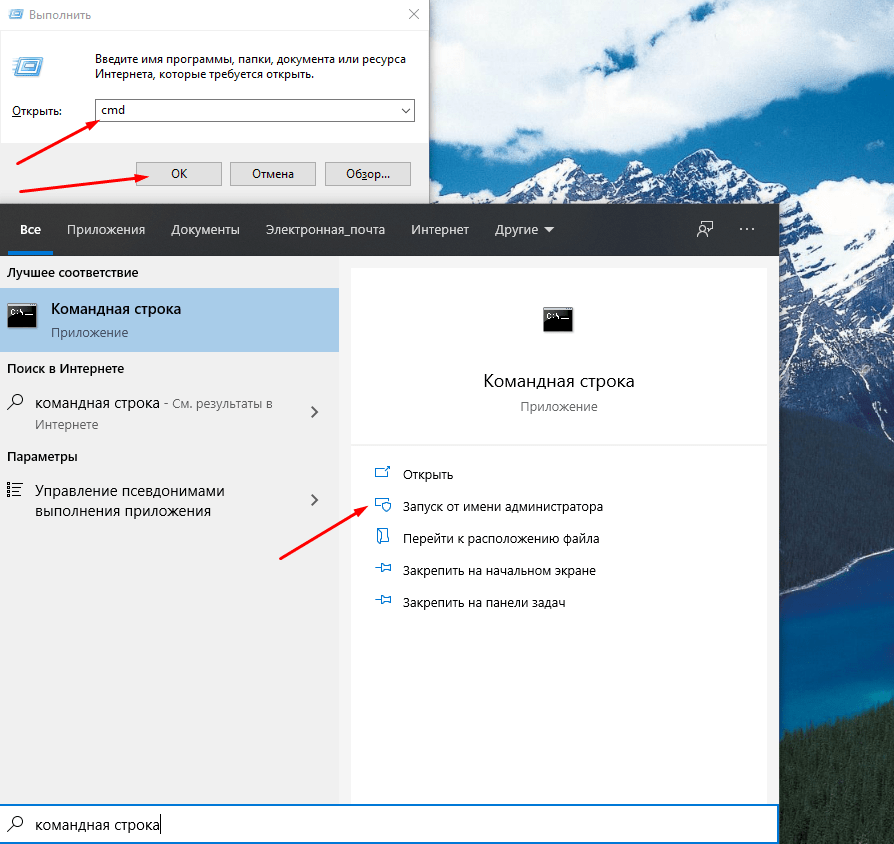
Показываю два способа открытия командной строки – через поисковик в строке «Пуск» и окно «Выполнить»
В новом открывшемся окне даю команду на регистрацию нужного dll-файла, и выглядеть он будет таким образом:
regsvr32 Qmgr.dll /s, или
regsvr32 Qmgrprxy.dll /s
Запускаю одну из них нажатием на кнопку Enter. После завершения процедуры перезагружаю компьютер и проверяю, появляется ли ошибка вновь.
Запуск службы устранения неполадок
В Windows 10 есть специальная служба для устранения неполадок. Обычно в окне с ошибкой есть кнопка со ссылкой на нее. В других случаях ее можно открыть через раздел «Параметры», категорию «Обновление и безопасность». Во вкладке «Устранение неполадок» ищу пункт «Центр обновления Windows», жму по нему, затем по кнопке «Запустить средство устранения неполадок».
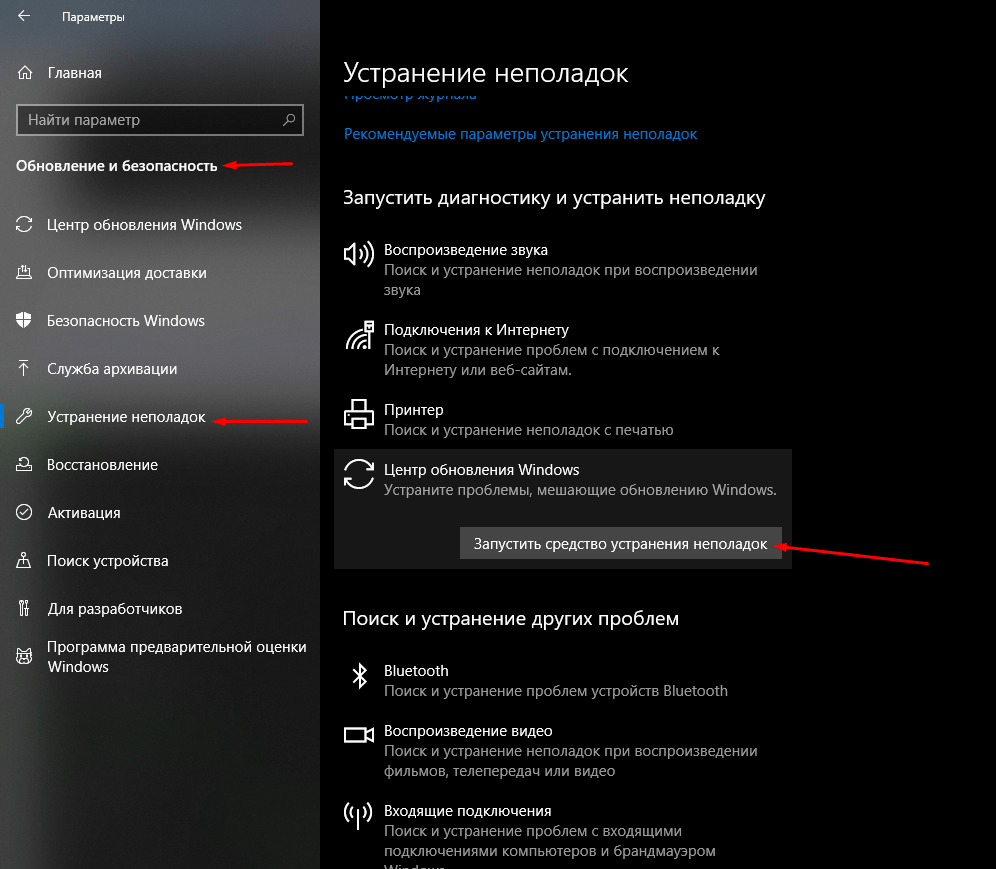
Во вкладке «Устранение неполадок» запускаю соответствующее средство для поиска ошибок в работе «Центра обновлений Windows»
Следую пошаговой инструкции. Программа просканирует службу, и если какая-то неполадка обнаружится, то устранит ее. Если же наоборот, в результатах сканирования не было ничего выявлено, перехожу к следующему способу.
Включение службы «Центр обновления Windows»
Также нужно проверить, включена ли в компьютере служба «Центр обновления Windows». Сначала для этого надо открыть раздел «Службы». Вызываю окно «Выполнить», ввожу в поле запрос «services.msc» и жму на кнопку ОК. В результате откроется окно диспетчера служб. В списке я нахожу элемент «Центр обновления Windows». Открываю его двойным кликом по пункту и проверяю, запущена ли служба. Если нет, тогда жму на кнопку «Запустить» и во вкладке «Общие» указываю тип запуска «Вручную» или «Автоматически», по усмотрению пользователя.
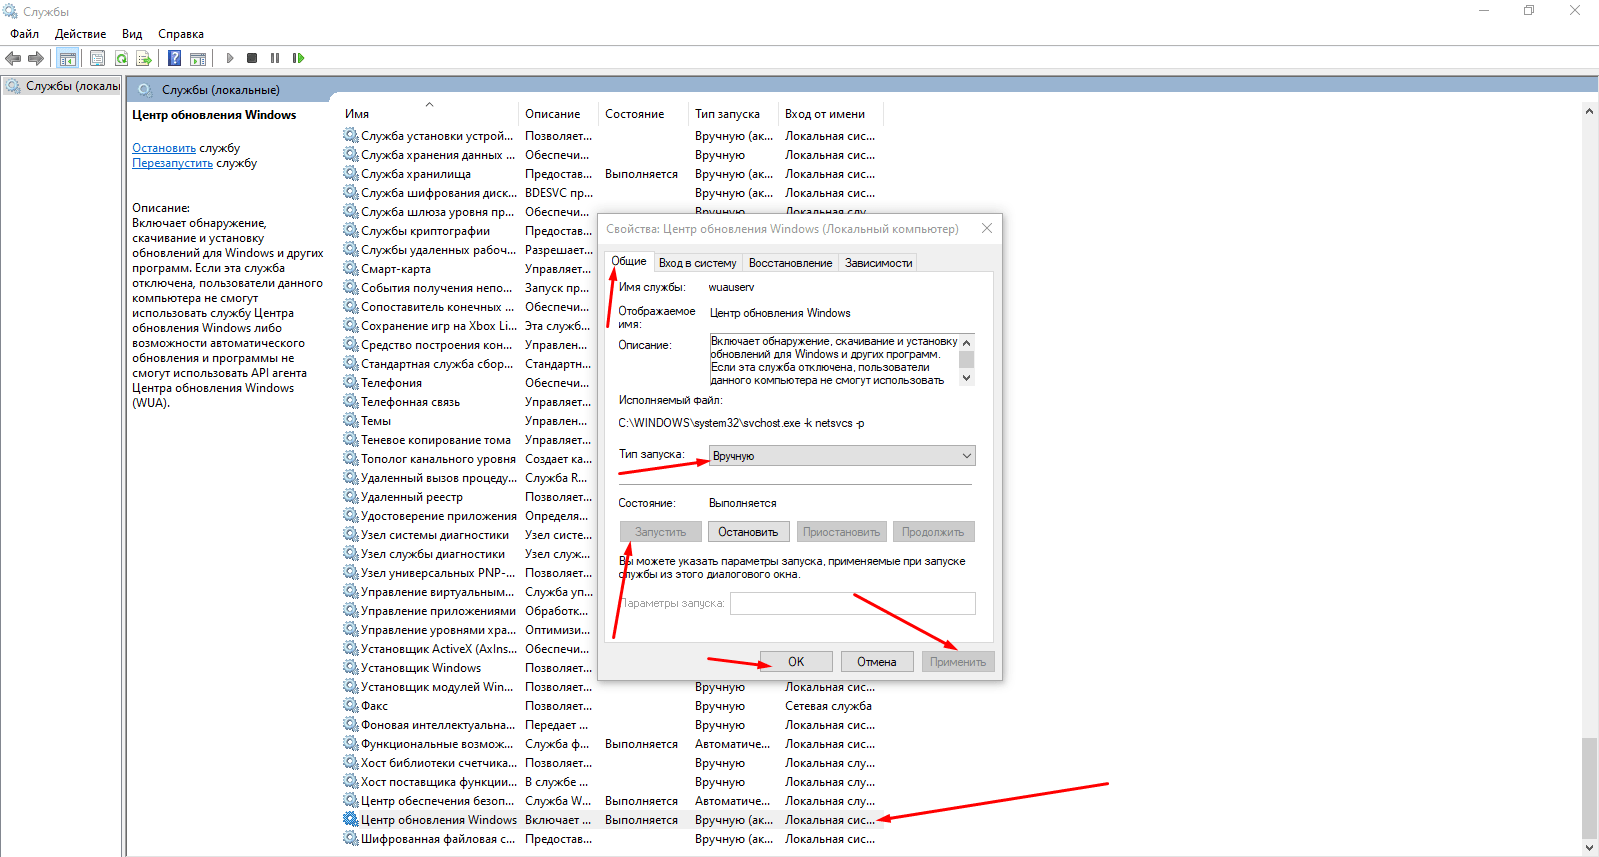
Если служба не активирована, запускаю ее нажатием на соответствующую кнопку, применяю изменения и проверяю, появляется ли теперь ошибка 0x80070424
Сбросить настройки магазина Microsoft
Также допустимо, что дело кроется в работе официального магазина приложений Microsoft. Исправить ошибки можно посредством сброса его настроек через командную строку. Для начала ее необходимо открыть, способ я указывала выше – через окно «Выполнить» или поисковик в панели «Пуск». Далее даю команду wsreset и жму на кнопку Enter для ее запуска. Жду окончания процедуры, перезагружаю компьютер. После этого проверяю, появляется ли опять та же ошибка.
Изменение настроек в реестре
Сначала надо открыть редактор реестра – жму на комбинацию Win + R и ввожу в поле запрос regedit.
Открываю «Редактор реестра» для исправления ошибки 0x80070424
Далее в новом открывшемся окне следую такому пути, ну или просто ввожу его в верхней строке: HKEY_LOCAL_MACHINE\SOFTWARE\Policies\Microsoft\Windows\WindowsUpdate. Далее создаю параметр DWORD (32 бита), даю ему наименование DisableWindowsUpdateAccess и значение 0. Сохраняю изменения нажатием на кнопку ОК и перезагружаю компьютер.
Создаю вот такой параметр, перезагружаю компьютер и проверяю, не исчезла ли ошибка
Сканирование системы антивирусом
Не помешало бы и просканировать систему антивирусом — вполне вероятно, что именно вредоносное ПО блокирует работу Центра обновлений. Запускаю ту антивирусную программу, что установлена у меня в системе, провожу сканирование системы, и если в ней есть какие-то вирусы, удаляю их, лечу или перемещаю в карантин. Далее перезагружаю компьютер и проверяю работу службы.
Заключение
Если ни один из вышеперечисленных способов не помог устранить проблему, можно попробовать провести восстановление с установленной точки или же полностью переустановить систему. Есть и вариант возврата к предыдущей версии через настройки – так хотя бы данные пользователя и важные файлы сохранятся, а обновление можно провести и потом.
![]() Загрузка …
Загрузка …
Post Views: 3 638
The error code “0x80070424” usually occurs when one or more Windows services are missing or stopped and encounter it when installing a Windows update or Visual C++, or using Microsoft…
Whenever Microsoft rolls out a Windows update, many users face the error code “0x80070424.” This error code is often reported to be seen when trying to install any version of Visual C++ or an app from the Microsoft Store.
This error code can be encountered when installing an update through Windows Update, or even when trying to install an update using Windows Update Standalone Installer (WUSA.exe).
Today, we will show you multiple tried-and-tested methods to mitigate and fix the error code “0x80070424” without reinstalling the Windows operating system.
Table of contents
- Windows Update Error 0x80070424: Causes and Symptoms
-
Fix the 0x80070424 Error on Windows
- Run Windows Update Troubleshooter
- Enable/Restart Windows Services
- Restore Windows Modules Installer
- Restore Windows Update Components
- Register System Files
- Remove Restriction from Windows Registry
- Fix Corrupted Files with DISM and SFC
- Clear SoftwareDistribution and Catroot2 Folder
- Closing Thoughts
Windows Update Error 0x80070424: Causes and Symptoms
The error code “0x80070424” has existed for a long time. It can come up on Windows 11, Windows 10, Windows 8, 7, XP, and even Windows Vista. This error code occurs when the responsible Windows services are not running, have been corrupted, or malfunctioned.
The Windows Update error code “0x80070424” is mostly associated with the Background Intelligent Transfer Service (BITS), which is responsible for transferring the update files from servers to clients. However, this is not the only issue that can cause this error message.
This error can also occur due to unregistered multiple Windows services. If you encounter the error code “0x80070424” while trying to install a Windows update through Windows Update, you will see the following error message:
Error encountered

There were some problems installing updates, but we'll try again later. If you keep seeing this and want to search the web or contact support for information, this may help (0x80070424)
If you are installing the update using Windows Update Standalone Installer, then you will see this message:
Windows Update Standalone Installer

Installer encountered an error: 0x80070424
The specified service does not exist as an installed service.
If the error occurs whilst installing/updating an app through Microsoft Store, then you may see this error message:
Something unexpected happened
Reporting this problem will help us understand it better. You can
wait a bit and try again or restart your device. That may help.Code:
0x80070424
For either one of these error messages, you can apply all of the following possible solutions and fix it.
Fix the 0x80070424 Error on Windows
To fix the error code “0x80070424,” apply the following solutions one by one in the given chronological order.
Run Windows Update Troubleshooter
This method can be applied if you are encountering the error code “0x80070424” while trying to install a Windows update through Windows Update.
Both Windows 11 and 10 come with pre-installed troubleshooters for several different services and features of the OS. This troubleshooter can be executed automatically to check for Windows Update issues and then suggest the necessary action(s) to be taken.
Follow these steps to run the Windows Update troubleshooter:
-
Navigate to:
Settings app >> System >> Troubleshoot >> Other troubleshooters
-
Click Run in front of Windows Update.
 1")
Run Windows Update troubleshooter -
Close the troubleshooter once the fixes have been applied.
 2")
Close Windows Update troubleshooter
 1")
 2")
The Windows Update troubleshooter tries to resolve any issues it can. If it cannot apply the fixes itself, such as physically reconnecting the LAN wire, we suggest you perform the action. In that case, apply the fixes and then check if the issue is resolved.
If you still see the error code, continue to perform the solutions shared below.
Enable/Restart Windows Services
Ensure responsible Windows services are up and running to install the update(s). If those are turned off or unable to start, Windows will go through the error code “0x80070424.”
The following Windows services need to be running:
- Background Intelligent Transfer Service (BITS)
- DCOM Server Process Launcher
- Remote Procedure Call (RPC)
- Windows Defender Firewall
- Windows Modules Installer
- Windows Update
Note: If Windows Modules Installer or some other services are missing from the Windows Services console, follow the steps below, and then proceed to the next section(s) to restore them.
To check whether these services are running, open the Services console by typing in services.msc in the Run Command box, and very their status.
 3")
If you find that one or more services are not running, follow these steps to start them and set them to run automatically:
-
Open service properties.
 4")
Open service properties Right-click on the service and then click Properties from the context menu.
-
Set the service to start automatically.
Set startup to Automatic From the Properties window, select Automatic from the drop-down menu in front of “Startup type.”
-
Start the service.
Start service -
Apply the changes.
Apply the changes -
Repeat steps 1 through 4 to enable all services:
- BITS
- DCOM Server Process Launcher
- Remote Procedure Call (RPC)
- Windows Defender Firewall
- Windows Modules Installer
- Windows Update
-
Restart the PC.
 4")
 5")
 6")
 7")
Once the computer reboots, try updating/installing the Windows update/app/Visual C++ which initially caused the error.
That being said, if all of the services are already running, then simply restart them using these steps:
-
Stop the service.
Stop Windows service Right-click on the service and then click Stop from the context menu.
-
Now start the service again.
Restart the service Right-click on the service again and then click Start from the context menu.
-
Repeat steps 1 & 2 for all services that were already started.
 8")
 9")
Once all the services have been started/restarted, check to see if the issue has been resolved.
You can also use the command line to restart the services.
Open Windows Terminal and run the following commands:
net stop wuauserv
net stop cryptSvc
net stop bits
net stop msiserver
This will stop the required services. To start the services again, run the following commands:
net start wuauserv
net start cryptSvc
net start bits
net start msiserver
Restore Windows Modules Installer
The Windows Modules Installer is responsible for detecting and installing Windows updates and other Microsoft product updates, like OneDrive, Office, etc. If it is missing from your PC, then you can restore it. However, the process requires that you import functioning Windows Registries from another computer.
If you have one available, please follow the steps below to restore the Windows Modules Installer service and other missing Registry Keys:
Note: Misconfiguration of critical values in the system’s registry could be fatal for your operating system. Therefore, we insist that you create a system restore point before proceeding with the process on both computers.
You can also use our top selection of disk imaging and backup software so you never lose your data or operating system again.
-
Open the Registry Editor on a non-problematic PC.
 10")
Open the Registry Editor Type in regedit in the Run Command box on the PC that is functioning normally.
-
Navigate to:
Computer\HKEY_LOCAL_MACHINE\System\CurrentControlSet\Services\TrustedInstaller
-
Export the TrustedInstaller Key as a .REG file.
 11")
Export TrustedInstaller Key Right-click on the TrustedInstaller Key and then click Export from the context menu.
-
Save the .REG file.
Save the Registry file -
Move the .REG file to the problematic computer.
Copy the exported .REG file onto a USB/external hard drive and then paste it on the problematic computer.
-
Run the .REG file.
After running the file, you may be prompted with a UAC. Click Yes.
 13")
Run the Registry file -
Click Yes on the dialog box for confirmation.
 14")
Confirm action Once the file is executed, click Ok on the dialog box.
-
Restart the computer.
 10")
 11")
 12")
 13")
 14")
When the computer restarts, check to see inside the Services console if the Windows Modules Installer service has been restored, and then apply the steps in the method given in the section above to start the service.
Restore Windows Update Components
Like Windows Modules Installer, if you find either the “Windows Update” service or the BITS service missing, you can restore those too. Here is how:
-
Download the zipped Registry files. (wuauserv.zip)
Windows Update Service Restore Tool (unknown, 114 hits)
-
Extract the archive.
 16")
Extract zipped file -
Run the following file to restore the respective Windows service:
- WindowsUpdate.reg
- BITS.reg
 17")
Run the respective Registry file -
Click Yes on UAC prompt.
Run the Registry file -
Click Yes on the confirmation dialog box.
 19")
Confirm action -
Restart the PC.
 16")
 17")
 19")
Basically these files will restore the following registry keys:
HKEY_LOCAL_MACHINE\SYSTEM\CurrentControlSet\Services\wuauservOnce rebooted, the respective Windows services will be restored. Now check if it is running using the guide shared above (start the service if it is stopped) and then check if the problem has gone away.
Register System Files
Unregistered system files can cause the respective services to not be able to run. You can register Dynamic Link Libraries (DLLs) using the “regsvr32” command line tool.
That being said, since there are many .DLL files that can be the cause of the “0x80070424” error code, we will create a batch file to register all of them.
Follow these steps to register the system files:
-
Copy and paste the following cmdlets in Notepad.
regsvr32 comcat.dll /s
regsvr32 shdoc401.dll /s
regsvr32 shdoc401.dll /i /s
regsvr32 asctrls.ocx /s
regsvr32 oleaut32.dll /s
regsvr32 shdocvw.dll /I /s
regsvr32 shdocvw.dll /s
regsvr32 browseui.dll /s
regsvr32 browseui.dll /I /s
regsvr32 msrating.dll /s
regsvr32 mlang.dll /s
regsvr32 hlink.dll /s
regsvr32 mshtmled.dll /s
regsvr32 urlmon.dll /s
regsvr32 plugin.ocx /s
regsvr32 sendmail.dll /s
regsvr32 scrobj.dll /s
regsvr32 mmefxe.ocx /s
regsvr32 corpol.dll /s
regsvr32 jscript.dll /s
regsvr32 msxml.dll /s
regsvr32 imgutil.dll /s
regsvr32 thumbvw.dll /s
regsvr32 cryptext .dll /s
regsvr32 rsabase.dll /s
regsvr32 inseng.dll /s
regsvr32 iesetup.dll /i /s
regsvr32 cryptdlg.dll /s
regsvr32 actxprxy.dll /s
regsvr32 dispex.dll /s
regsvr32 occache.dll /s
regsvr32 occache.dll /i /s
regsvr32 iepeers.dll /s
regsvr32 urlmon.dll /i /s
regsvr32 cdfview.dll /s
regsvr32 webcheck.dll /s
regsvr32 mobsync.dll /s
regsvr32 pngfilt.dll /s
regsvr32 licmgr10.dll /s
regsvr32 icmfilter.dll /s
regsvr32 hhctrl.ocx /s
regsvr32 inetcfg.dll /s
regsvr32 tdc.ocx /s
regsvr32 MSR2C.DLL /s
regsvr32 msident.dll /s
regsvr32 msieftp.dll /s
regsvr32 xmsconf.ocx /s
regsvr32 il.dll /s
regsvr32 msoeacct.dll /s
regsvr32 inetcomm.dll /s
regsvr32 msdxm.ocx /s
regsvr32 dxmasf.dll /s
regsvr32 l3codecx.ax /s
regsvr32 acelpdec.ax /s
regsvr32 mpg4ds32.ax /s
regsvr32 voxmsdec.ax /s
regsvr32 danim.dll /s
regsvr32 Daxctle.ocx /s
regsvr32 lmrt.dll /s
regsvr32 datime.dll /s
regsvr32 dxtrans.dll /s
regsvr32 dxtms3ft .dll /s
regsvr32 WEBPOST.DLL /s
regsvr32 WPWIZDLL.DLL /s
regsvr32 POSTWPP.DLL /s
regsvr32 CRSWPP.DLL /s
regsvr32 FTPWPP.DLL /s
regsvr32 FPWPP.DLL /s
regsvr32 WUAPI.DLL /s
regsvr32 WUAUENG.DLL /s
regsvr32 ATL.DLL /s
regsvr32 WUCLTUI.DLL /s
regsvr32 WUPS.DLL /s
regsvr32 WUWEB.DLL /s
regsvr32 wshom.ocx /s
regsvr32 wshext.dll /s
regsvr32 vbscript.dll /s
regsvr32 scrrun.dll mstinit.exe /setup /s
regsvr32 msnsspc.dll /SspcCreateSspiReg /s
regsvr32 msapsspc.dll /SspcCreateSspiReg /s
exit
-
Save the file.
Save the file -
Save it as a batch file.
Save the batch file Change the file type to “All files” and concatenate a “.bat” at the end of the file name to save it as a batch file.
-
Run the batch file with administrative privileges.
 22")
Run the batch file with elevated privileges Right-click on the batch file and click Run as administrator from the context menu. You will then see a Command Prompt instance run and close by itself.
-
Restart the computer.
 20")
 21")
 22")
Once the computer restarts, check to see if your issue has been resolved.
Remove Restriction from Windows Registry
The “0x80070424” error code can also pop up when attempting to install a Windows update because of a restriction imposed by the Windows Registry. If so, the issue can be fixed by removing the restriction. Here is how:
-
Open Registry editor.
Open Registry editor -
Navigate to:
Computer\HKEY_LOCAL_MACHINE\SOFTWARE\Policies\Microsoft\Windows\WindowsUpdate
Note: If you do not see the WindowsUpdate Key, it is likely that your Registry is not blocking an update from being installed, as the Registry value does not exist. Hence, you can skip this step.
-
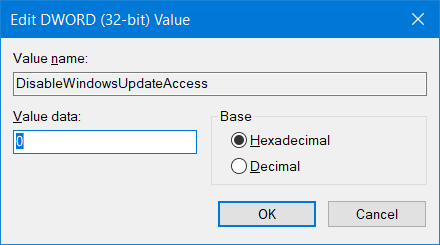
Double-click on the DisableWindowsUpdateAccess value.
DisableWindowsUpdateAccess value in Windows Registry -
Set the Value Data to 1.
Change Value Data for DisableWindowsUpdateAccess -
Restart the computer.
 24")
 25")
If you find the DisableWindowsUpdateAccess value inside the Registry, this is likely the culprit, as this value does not exist by default.
However, if you did not find this value or the WindowsUpdate key, then the “0x80070424” error code was not caused by a restriction in the Windows Registry.
Fix Corrupted Files with DISM and SFC
Deployment Image Servicing and Management (DISM) and System File Checker (SFC) are built-in tools in Windows that can scan and repair system files. Use the following steps to run the DISM and SFC scans in an attempt to repair the critical system files:
-
Launch an elevated Command Prompt.
-
Now execute the following commands one after the other:
DISM.exe /Online /Cleanup-image /Checkhealth DISM.exe /Online /Cleanup-image /Scanhealth DISM.exe /Online /Cleanup-image /Restorehealth -
Then run the SFC scan:
SFC /ScanNow 26")
Execute DISM and SFC cmdlets to repair system files
 26")
Once the scans have been run successfully and all files have been repaired, check to see if the error code is gone.
Clear SoftwareDistribution and Catroot2 Folder
If the “0x80070424” error code is occurring during a Windows update installation, then you can apply this fix.
The SoftwareDistribution folder can be found in C:\Windows, while the Catroot2 folder can be found at C:\Windows\System32\.
The SoftwareDistribution folder contains temporary files within a subfolder (download) that are required to install a Windows update, while the Catroot2 folder contains Windows update-related files and folders, including signature files from Microsoft.
Quite often, a Windows update fails to install and experiences an error code because of the corrupted files inside these 2 folders.
In this case, these temporary files need to be removed and the update process needs to be started from the top.
Here is how to clear the SoftwareDistribution and the CarRoot2 folder:
-
Navigate to the following location using File Explorer:
C:\Windows\SoftwareDistribution\Download
-
Select all the items using CTRL + A hotkeys.
-
Delete all items.
 27")
Clear SoftwareDistribution directory -
Now navigate to the Catroot folder at the following location and repeat steps 2 & 3:
C:\Windows\System32\Catroot2
-
Restart the computer when done.
 27")
Once the computer reboots, try downloading the updates again and check if the error code has been mitigated.
Closing Thoughts
Any error code on a Windows PC has a meaning that you can use to identify its root cause. However, in the case of 0x80070424, the issues lead to multiple possible causes. That is why we have created this detailed guide so you can find all of the possible solutions under one title.
If the methods discussed in this post worked for you, let us know which one in the comments section below so our readers can benefit from it.
Windows Update and Windows Store are inter-dependable services on Windows 11/10. So, many times when an error like 0x80070424, ERROR SERVICE DOES NOT EXIST occurs for one, the other service is prone or affected by it too. However, this error can occur to both Windows Update Standalone Installer as well as to the Windows Update section in the Windows Settings App too.

The Windows Update Standalone Installer states:
Installer encountered an error: 0x80070424, The specified service does not exist as an installed service.
The Windows Store error states:
The were some problems installing updates, but we’ll try again later. If you keep seeing this and want to search the web or contact support for information, this may help: (0x80070424).
This error code has been known to appear while updating Windows Defender too.
We will be discussing how to fix this error for Windows Update and Microsoft Store on Windows 11 or Windows 10:
- Re-register Background Intelligent Transfer Service DLL file
- Run Windows Update & Store apps Troubleshooters.
- Reset Windows Update related folders.
- Use the Registry Editor.
- Check Windows Services.
- Reset the Microsoft Store.
- Fix Windows Update files using DISM
- Restore via Registry.
See which of these suggestions apply in your case.
1] Re-register Background Intelligent Transfer Service DLL file
Open Command Prompt with Administrator level privileges.
Type in the following commands and hit the Enter key to re-register the dll files–
regsvr32 Qmgr.dll /s
regsvr32 Qmgrprxy.dll /s
Reboot and check if your issues are fixed.
2] Run Windows Update & Windows Store Apps Troubleshooters
You can run the Windows Update Troubleshooter and also Microsoft’s Online Windows Update Troubleshooter and check if that is any help in fixing any of your issues. You may want to also run the Windows Store Apps Troubleshooter.
3] Reset Windows Update related folders
You need to delete the contents of the SoftwareDistribution folder & reset the Catroot2 folder.
4] Check the WU setting in Registry
Type regedit in Windows Search box and hit Enter to open the Registry Editor. Locate the registry key:
Computer\HKEY_LOCAL_MACHINE\SOFTWARE\Policies\Microsoft\Windows\WindowsUpdate
Select and Double-click on the DWORD named as DisableWindowsUpdateAccess set its Value Data as 0.
Restart your computer and check if this has fixed your issues.
5] Check on some Windows Services
Open the Windows Services Manager and locate the following services:
- Windows Update Service – Manual (Triggered)
- Background Intelligent Transfer Service – Manual.
- Workstation Service – Automatic.
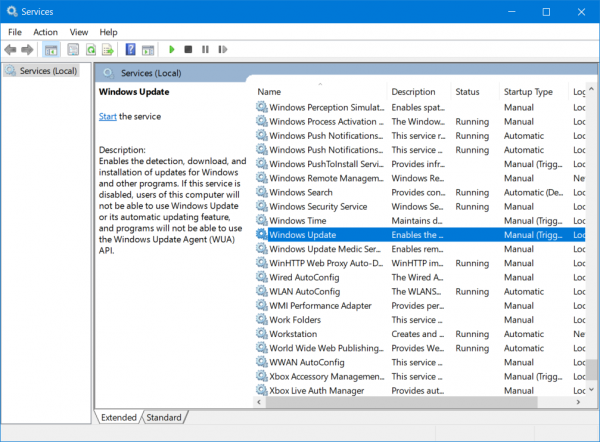
Open their Properties and ensure that their Startup type is as mentioned above against their name and that the Services are running. If not click on the Start button.
6] Reset the Microsoft Store
To Reset the Microsoft Store Run CMD as Administrator and execute the following command:
wsreset
Wait for the process to complete and then try to install your App or Windows Update again.
7] Fix Windows Update files using DISM
You may need to fix Windows Update files using DISM.
8] Restore via Registry
If you have managed to delete Windows Update Service (sc delete wuauserv), then it must have also removed registry entries under HKLM\SYSTEM\CurrentControlSet\Services\wuauserv. Some Windows Home users have reportedly deleted the service to stop Windows Update from downloading any future updates.
So you need to follow two steps here to fix the error:
Restore Windows Update Service
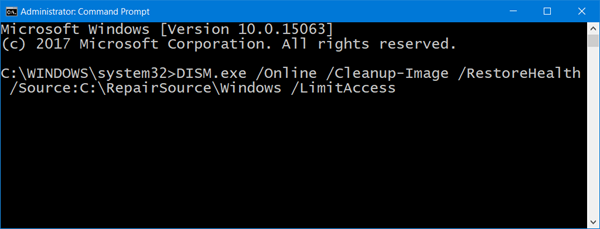
Sadly, there is no simple way to do this. While you can use the DISM and SFC command, but they cannot fix which is not there. Especially DISM, which uses Windows Update to provide the files that are required to fix corruption.
The alternate way is to use DISM with Windows installation as the repair source. It can be Windows side-by-side folder from a network share or a removable media. To do this, run the following command:
DISM.exe /Online /Cleanup-Image /RestoreHealth /Source:C:\RepairSource\Windows /LimitAccess
In the command, replace the C:\RepairSource\Windows placeholder with the location of your repair source. Read more about Repair Source here. If you cannot get this done, you need to Refresh your Windows 10 PC, but you will need Windows 10 Bootable media as it will copy the service file from the image, and reregister it.
Once you fix the Windows Update Service issue, make sure to run it. If there is no error, and you can download the update, then you are done. If not, follow the next step.
Import Registry Entries from a different computer
Since Windows Update service will need its registry entries to work as expected, you need to place them manually. The best way is to find a laptop which is running the same version as yours, and then export all entries related to the Windows Update service.
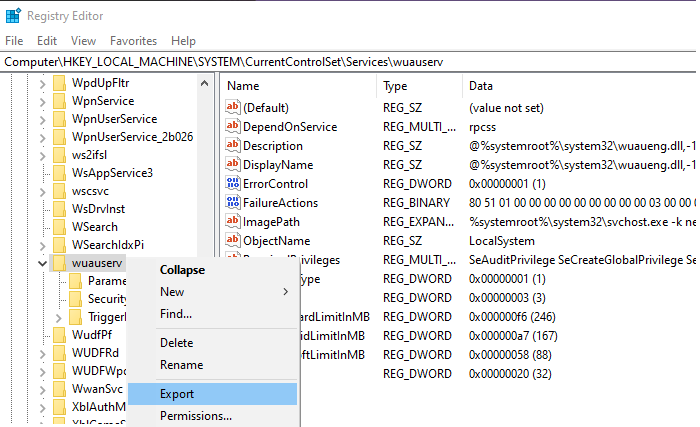
Open Registry Editor and navigate to:
Computer\HKEY_LOCAL_MACHINE\SYSTEM\CurrentControlSet\Services\wuauserv
- Right-click on wuauserv key, and select export
- Save as a REG file on the computer.
- Copy the file to the computer where you need to fix the issue.
- Double click on the file, and agree to import.
We have also linked to the exported version of the file in this post. Download the 0x80070424 Fix, extract the contents and double-click on the reg file. Now when you run the Windows Update service, you will not receive error 0x80070424.
I hope something helps!
Microsoft releases a wide range of cumulative updates, preview builds now and then such as Tuesday patches, and more to keep the operating system away from bugs and issues. But sometimes users find with 0x80070424 Update Error in Windows 10 or 11 that blocks the update process halfway. It is so annoying that this error message appears in both the cases – Windows Update page in the Settings app and also in the Windows Standalone Installer. This leaves the user with no choice of upgrading their systems neither automatically nor manually.
In addition to these aspects, when trying to download or update apps from Microsoft Store, users experience the same issue. Hence, it is pretty clear that the problem is within the system files and as everything is inter-connected, the trouble occurs across all platforms. So, in this article, we will discuss all the applicable solutions to mitigate this issue and have an error-free update process.
Here is how to fix 0x80070424 Update Error in Windows 11 or 10 –
1] Re-register Background Intelligent Transfer Service (BITS) DLL Files
Certain Windows system files are always required to download and install the Windows update flawlessly. These files are in the .dll file formats and when they go missing from the system, you tend to meet 0x80070424 Update Error in Windows 11 or 10. So, as a first solution, just register the missing system files by the following steps –
- Press ‘Win+R’ keys together to open Run dialog box.
- Insert the below-given commands one by one and hit Enter.
regsvr32 Qmgr.dll /s
regsvr32 Qmgrprxy.dll /s
- After running the commands successfully, reboot the device.
2] Modify Registry Entries to Fix 0x80070424 Update Error in Windows 11 and 10
Sometimes, Windows Registry accidentally imposes certain restrictions on the Windows Update service. Hence, a simple modification in the Registry Editor would help you to mitigate 0x80070424 Update Error in Windows 10 and 11. Let us see how to deploy this workaround –
- Insert the command regedit in the taskbar search box and hit Enter. To give consent, click Yes on the prompt of the User Account Control.
- Once you access Registry Editor, navigate to the below-given path on its left sidebar.
HKEY_LOCAL_MACHINE\SOFTWARE\Policies\Microsoft\Windows\WindowsUpdate
- Switch to the right pane and locate the DWORD namely DisableWindowsUpdateAccess.
- Do a right-click on it and choose Modify. Set its Value data as 0 and click OK to implement the changes.
- This small tweak would let you enable Windows Update from Registry after you reboot the device. Upon startup, all the updates would take place without any further error codes.
3] Use Windows Update and Microsoft Store Troubleshooter
Microsoft provides multiple troubleshooters to every aspect of the operating system. Hence, it also includes the troubleshooting tools for both Windows Update and Windows Store Apps. Running this built-in utility would scan, detect, and attempts to fix all the possible causes. This is how you will execute the troubleshooter –
For Windows 10 –
- Open Windows Settings and to do so hit on Win+I keys.
- Click Update & security.
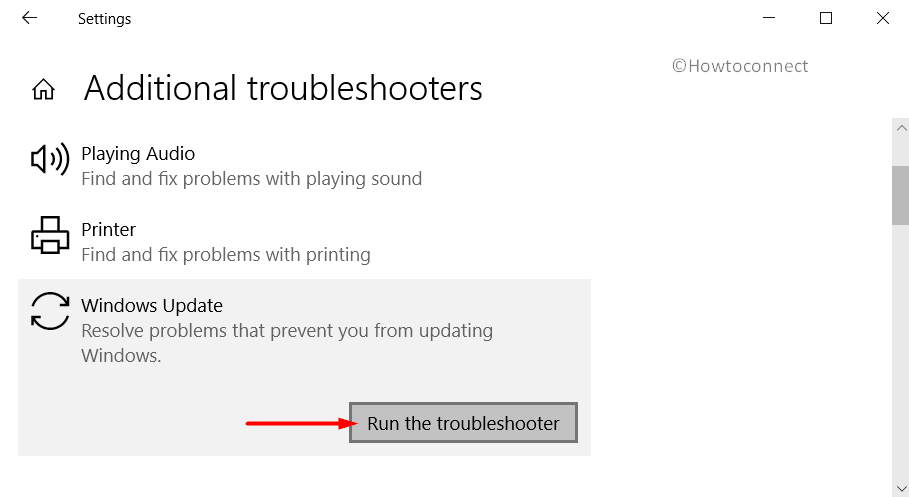
- Go to the Troubleshoot subsection that appears on the left pane.
- In the right, locate and select Windows Update and Windows Store Apps one after another.
- Hit Run the troubleshooter for both. Wait for the scan to complete and display the result.
For Windows 11 –
- Hit – Winkey + I.
- Select – Windows update.
- Click on – ‘Check for updates.’
4] Check Services related to Windows Update
The entire procedure of Windows Update depends on certain services. Those services have to be running in order to update the patches or applications in Microsoft Store. This is how you will make it sure that the concerned services are in the working state –
- Right-click on Start and choose Run. Type services.msc in the text space and click OK.
- In the Services console, find and double-click on the services Windows Update, Background Intelligent Transfer Service and Workstation respectively.
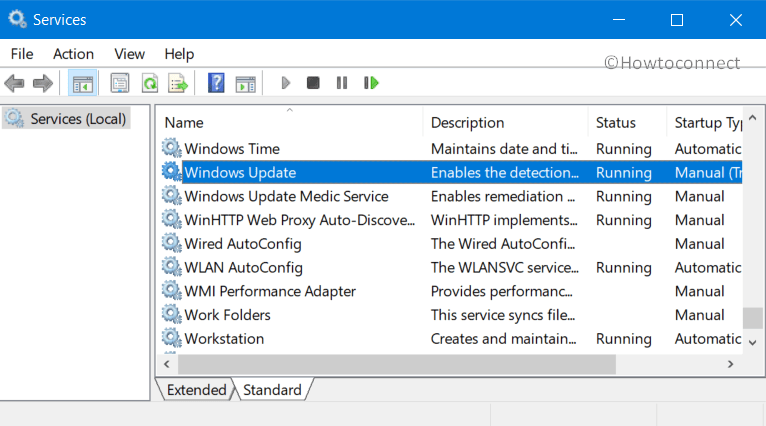
- Make sure that all three of them are set to Automatic and are in Running status.
- If not, then set them to Automatic and click the Start button. Restart the PC and then continue with the updates.
5] Reset Windows Update Components
Another relevant workaround to bypass 0x80070424 Update Error in Windows 11 or 10 is to reset all the components of Windows Update.
- Type the command cmd.exe on the taskbar search box. Right-click on Command Prompt and choose ‘Run as administrator’.
- Hit Yes on the prompt of UAC.
- Once the black window appears, insert the below-mentioned commands and hit Enter after each.
net stop wuauserv
net stop cryptSvc
net stop bits
net stop msiserver
Ren C:\Windows\SoftwareDistribution SoftwareDistribution.old
Ren C:\Windows\System32\catroot2 Catroot2.old
net start wuauserv
net start cryptSvc
net start bits
net start msiserver
- After successfully running the commands, check for the error code.
6] Fix 0x80070424 Update Error by using DISM tool
For several reasons, the Windows Update files may get corrupt or broken and in such cases, it is very common to receive issues with the update procedure. Therefore, one more applicable solution to resolve this error is to run the DISM tool. Specially designed to repair system images on your device, this tool is very handy to use and does not need any further installation.
- Get access to Run and type cmd into it. Press Ctrl + Shift + Enter keys in one go in order to Open Command Prompt as Admin from Run.
- On the UAC prompt, click Yes.
- Type or copy-paste the below command and hit Enter to execute the tool.
DISM /Online /Cleanup-Image /RestoreHealth
- After the scan, restart Windows 10 or 11 PC and check for the 0x80070424 Update Error.
7] Reset Microsoft Store to Fix 0x80070424 Update Error in Windows 11 or 10
The 0x80070424 Update Error in Windows 10 or 11 also occurs while downloading or updating the Store apps. In such conditions, the most applicable workaround would be to reset Microsoft Store.
- Open Command Prompt as administrator and insert
wsreset. Hit Enter. - Wait for the procedure to finish and then attempt to install the app or Windows Update again.
Hopefully, with the above-mentioned workarounds, you would be able to resolve the 0x80070424 Update Error in Windows 11 or 10 pretty effortlessly.
Methods:
1] Re-register Background Intelligent Transfer Service (BITS)
2] Modify Registry Entries
3] Use Windows Update and Microsoft Store Troubleshooter
4] Check Services related to Windows Update
5] Reset Windows Update Components
6] Fix 0x80070424 Update Error by using DISM tool
7] Reset Microsoft Store
That’s all!!
Repair any Windows problems such as Blue/Black Screen, DLL, Exe, application, Regisrty error and quickly recover system from issues using Reimage.