by Tashreef Shareef
Tashreef Shareef is a software developer turned tech writer. He discovered his interest in technology after reading a tech magazine accidentally. Now he writes about everything tech from… read more
Updated on
- Encountering error code 0x8007000d can mean that your Windows installation process will grind to a complete stop.
- Besides the obvious problem with this error, seeing this error can stop you from accessing important files.
- Uninstalling some specific apps and using a flash memory drive to complete the setup might prove useful.
- If all else fails, updating some important elements on your system has resolved the issue for some users.

The error code 0x8007000d is usually triggered when the user tries to install Windows 10 update. Several users have reported the error has occurred when installing Windows 10 from a bootable USB drive.
The error code 0x8007000d means Windows is unable to find an essential file in the installation package. Corrupted system files and broken Windows update components are a few reasons why you may see this error.
That said, Microsoft does offer a built-in troubleshooter to fix issues with Windows update and system files. We have included a few additional troubleshooting tips in this article to help you resolve this error.
How do I fix the error code 0x8007000d on Windows 10?
1. Uninstall Mixed Reality Portal app
- Press the Windows key + I to open Settings.
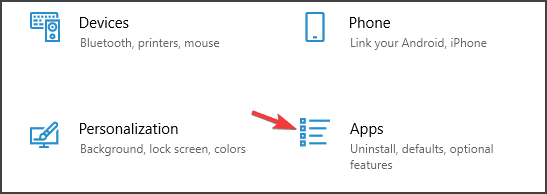
- Go to Apps.

- In the Apps & features tab, search Mixed Reality Portal.
- Choose the app and click on the Uninstall button.

- Click Uninstall once more to confirm the action.
- Once uninstalled, reboot the computer and try updating your OS.
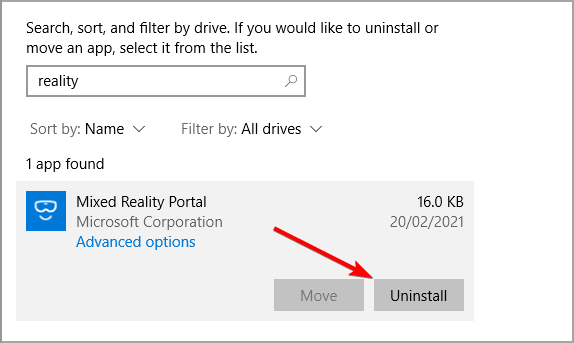
The Mixed Reality Portal app, for some reason, seems to be preventing other Windows updates from installing. Uninstall the app and then attempt to install a pending update to fix the error code 0x8007000d.
2. Create a new bootable USB flash drive

If you have encountered an error similar to G:/Sources/install.wim (error code : 0x8007000d, it could be due to corrupt installation media. In this case, you would have to create a new Windows 10 bootable flash drive.
Make sure to reformat your USB drive before creating a bootable flash drive. Also, download the fresh Windows 10 ISO file from the Microsoft website or using the Media Creation Tool to eliminate any chances of corruption during Windows installation.
Irrespective of whether you are using a bootable DVD or USB drive, a corrupted ISO file can result in an error during a clean install. Make sure to check your storage drive for issues before mounting the ISO file.
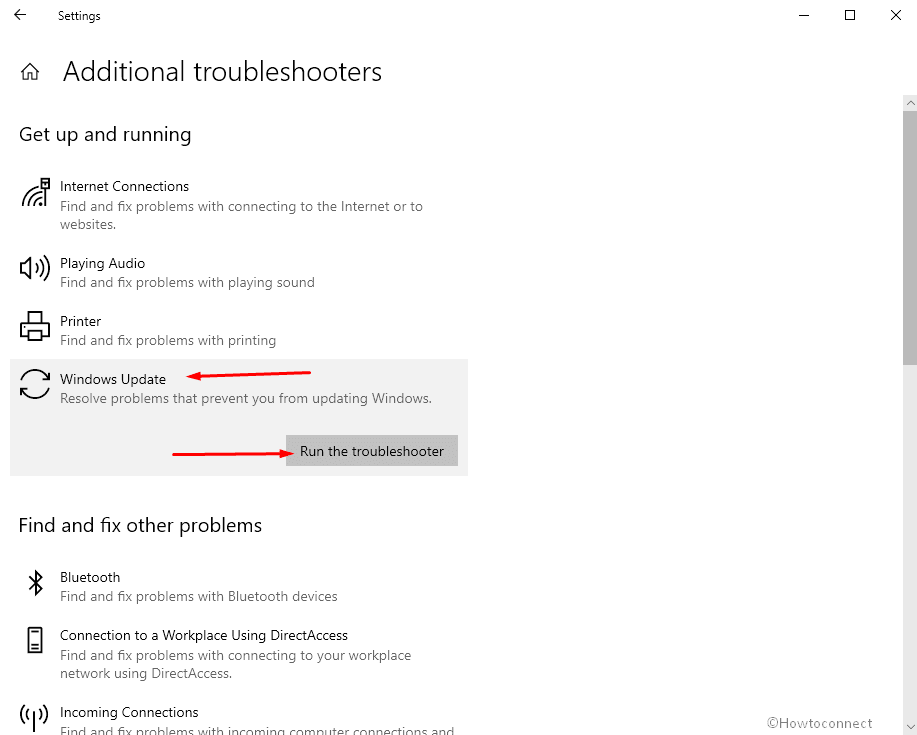
3. Run Windows update troubleshooter
- Press the Windows key + I to open Settings.
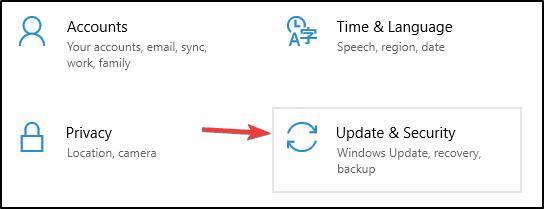
- Go to Update & Security.

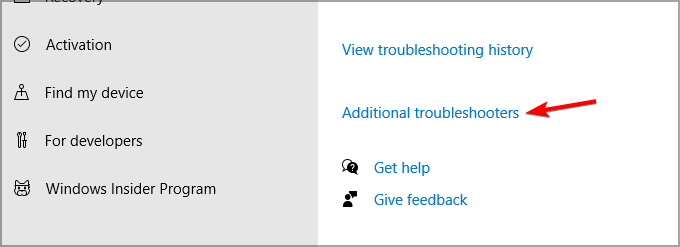
- Open the Troubleshoot tab from the left pane.
- Select Additional troubleshooters.

- Select Windows Update and click on Run the Troubleshooter button. This will scan the system for issues that may be preventing Windows updates from installing.

- Follow on-screen instructions and apply any or all the recommended fixes.
- Once the fixes are applied, reboot the computer and try to upgrade Windows 10 gain. Check if the error code 0x8007000d is resolved.
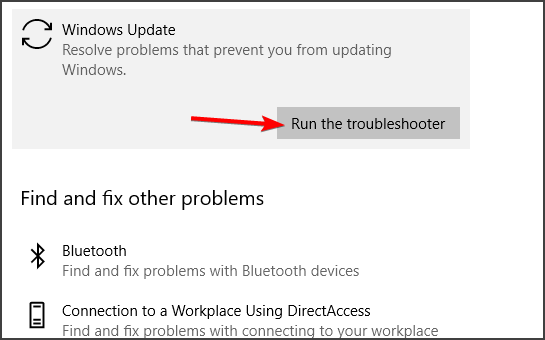
Windows Update Troubleshooter is a built-in utility that scans your system for issues that may cause error code 0x8007000d.
4. Reset Windows Update components
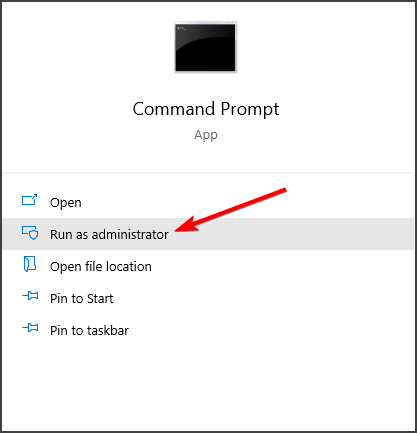
- Press the Windows key, and type cmd.
- Click on Run as Administrator for Command Prompt.

- In the Command Prompt windows, copy/paste the following command and hit enter to execute.

net stop bits
net stop wuauserv
net stop appidsvc
net stop cryptsvc - Next, delete the qmgr*.dat file. Enter the following command to delete the file.
Del “%ALLUSERSPROFILE%Application DataMicrosoftNetworkDownloaderqmgr*.dat - Next, enter the following command to navigate to the System32 folder.
cd /d %windir%system32 - Once you are in the System32 folder, enter the following command to register the BITS files and Windows update files. Make sure to enter all the command one by one followed by an enter to execute:
regsvr32.exe atl.dll
regsvr32.exe urlmon.dll
regsvr32.exe mshtml.dll
regsvr32.exe shdocvw.dll
regsvr32.exe browseui.dll
regsvr32.exe jscript.dll
regsvr32.exe vbscript.dll
regsvr32.exe scrrun.dll
regsvr32.exe msxml.dll
regsvr32.exe qmgrprxy.dll
regsvr32.exe wucltux.dll
regsvr32.exe muweb.dll
regsvr32.exe wuwebv.dll
regsvr32.exe msxml3.dll
regsvr32.exe msxml6.dll
regsvr32.exe actxprxy.dll
regsvr32.exe softpub.dll
regsvr32.exe wintrust.dll
regsvr32.exe dssenh.dll
regsvr32.exe rsaenh.dll
regsvr32.exe gpkcsp.dll
regsvr32.exe sccbase.dll
regsvr32.exe slbcsp.dll
regsvr32.exe cryptdlg.dll
regsvr32.exe oleaut32.dll
regsvr32.exe ole32.dll
regsvr32.exe shell32.dll
regsvr32.exe initpki.dll
regsvr32.exe wuapi.dll
regsvr32.exe wuaueng.dll|
regsvr32.exe wuaueng1.dll
regsvr32.exe wucltui.dll
regsvr32.exe wups.dl
regsvr32.exe wups2.dll
regsvr32.exe wuweb.dll
regsvr32.exe qmgr.dll - Next, type the following command one by one and hit enter:
netsh Winsock reset
Netsh winhttp reset proxy - The two commands above will reset Winsock and reset proxy, respectively.
- Next, you need to restart the Windows update component services. Enter the following command one by one and hit Enter to execute:
net start bits
net start wuauserv
net start appidsvc
net start cryptsvc - Close Command Prompt and reboot your computer. After the restart, try installing the update and check if the error code 0x8007000d is resolved.
If you’re looking for a faster method, consider using Windows Update reset script.
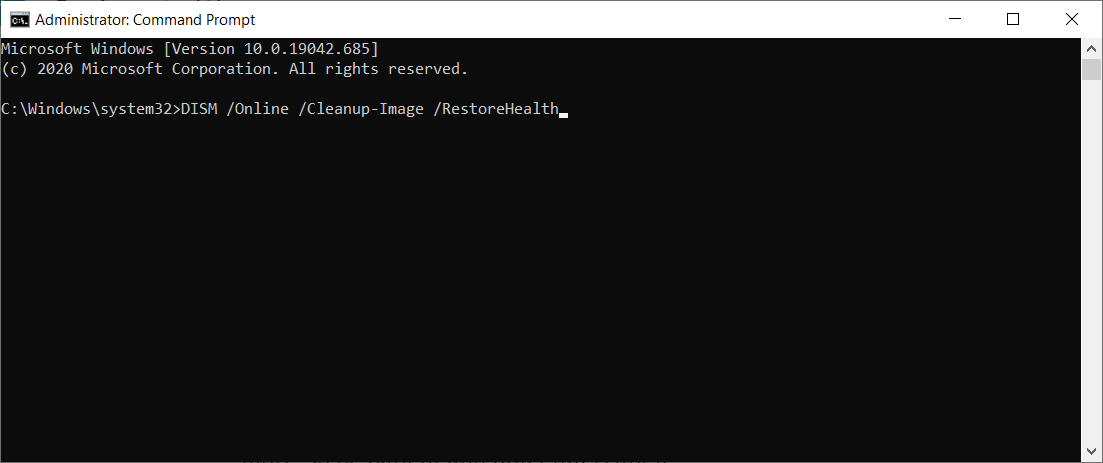
5. Run Deployment Image Servicing and Management (DISM)
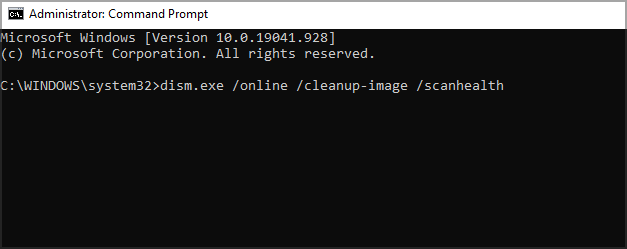
- Press the Windows key, type cmd, and click on Run as Administrator for Command Prompt.
- In the Command Prompt window, type the following command and hit enter:

dism.exe /online /cleanup-image /scanhealth - It may take a few minutes to scan the system for potential issues that are preventing your computer from installing Windows updates.
- Once the scan is complete, enter the following command and hit Enter:

dism.exe /online /cleanup-image /restorehealth - This command will clean up the system files and fix any issues with them to resolve system problems.
- Once the command is finished, close the Command Prompt and reboot your computer.
Try performing a system upgrade and check if the error code 0x8007000d is resolved. If the error code still persists, try performing a system upgrade using the Media creation tool.
6. Upgrade using Media Creation tool
- Download the Media Creation Tool from the Microsoft Download Centar.
- Run the setup file and click the Agree button. Wait for the tool to scan your system.
- Choose Upgrade this PC now option under What do you want to do.

- Click Next. Windows will start downloading the latest version of OS available for your PC.
- Once downloaded, proceed to upgrade your OS. You may have to restart your PC a few times during the upgrade.
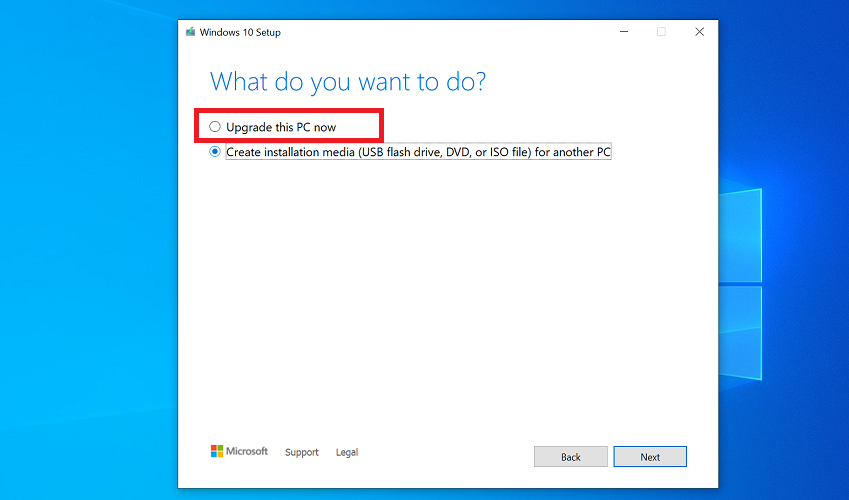
Media Creation Tool upgrade option allows you to install the latest Windows OS version without removing your personal files and apps. Make sure to create a backup, to be on the safer side.
The error code 0x8007000d usually occurs when the user tries to upgrade or clean install Windows 10 using a USB device. Follow the steps in the article to troubleshoot and fix this error.
As a last resort, try upgrading using the Media Creation Tool to update Windows without error. Do let us know what method worked for you in the comments.
![]()
Windows 11, as well as 10, is no doubt a feature-rich version of the OS but issues and bugs have close kinships with it at the same time. 0x8007000d is such an error code that appears when trying to download a cumulative update or build. When the problem occurs Windows update stuck and ails you with the error message.
Although 0x8007000d error could arise due to a number of reasons often the primary cause of this nagging issue is Windows update Component. This puts a sort of restriction over your system and prevents it from downloading or installing any new patch on your PC. However, it may be hard to resolve these errors here are some methods that will certainly help you.
Here is how to fix Windows 11/10 Update Error 0x8007000d –
1] Purge the Windows update components
In order to resolve this issue, the first thing that you can try is purging your windows update components. Resetting will recalibrate the entire update installation module which churns out the faulty bug that may be causing the error.
- Press Windows+S keys and type in – cmd.
- Hit the – Ctrl+Shift+Enter.
- Select – Yes to approve the User account control.
- On the Command Prompt screen type in the below lines and hit enter after each and don’t forget to enter –
net stop wuauserv
net stop cryptSvc
net stop bits
net stop msiserver

- Now enter the following command to rename the SoftwareDistribution folder –
ren C:\Windows\SoftwareDistribution SoftwareDistribution.old
ren C:\Windows\System32\Catroot2 Catroot2.old
- Now run the following commands to re-enable the windows update related services –
net start wauserv
net start cryptSvc
net start bits
net start msiserver
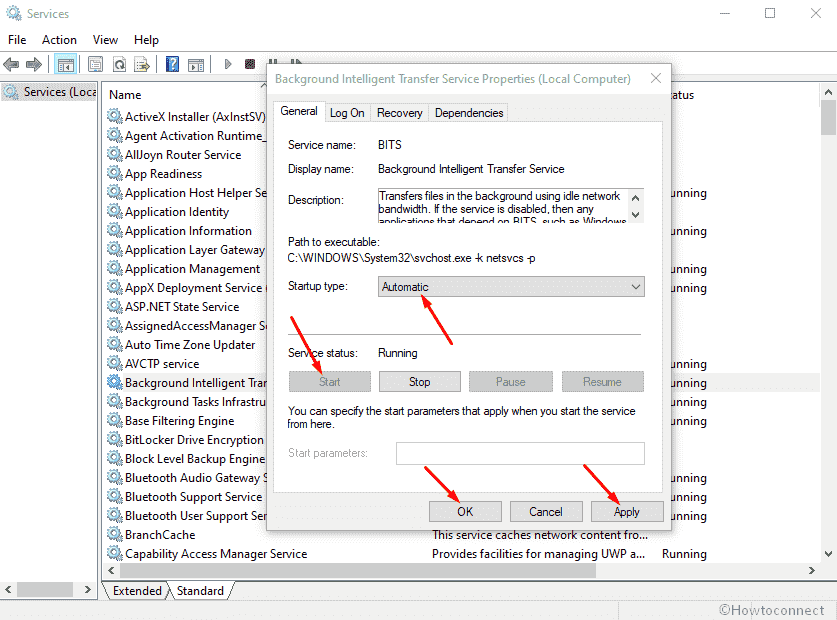
2] Make sure that BITS is running
BITS is an essential service of Windows that helps the system to download files from the Microsoft server. Furthermore, it also assists the OS and application during foreground or background downloads or uploads. BITS also allows the system to exchange files between the device and the remote server that too without impacting the network experience.
If for some reason this service stops, windows update would mostly fail and reflect the error 0x8007000d. Hence it is quite important that BITS is always in automatic startup type and running status. You can do that by following these few simple steps:
- Press Windows+S and type in the – service.msc.
- Hit Enter to open the services console.
- Find “Background Intelligence Transfer Service” in the Name column.
- Now Right-click on this one and select the – Properties.
- Here, set the startup type to – Automatic.
- Click the Start under service status and wait for a while.
- Make sure to click Apply and then OK to save the changes.
3] Rename the CBS log files to fix 0x8007000d Error code
CBS log sometimes might be the reason for the error 0x8007000d appear during updates. This Component-based servicing keeps a detailed record and information regarding all the updates that have been installed in a component over a period of time. These logs could get corrupted and cause trouble in the process of updating your system.
Sometimes deleting these logs easily resolves the issue but if you don’t feel it’s safe renaming the file could also do the trick. Follow the guidelines –
- Hit the – Windows+Q.
- Now type in the following and hit Enter –
%systemroot%\Logs\CBS
- Now change the CBS.log file name to anything else such as error.log.
- If the system doesn’t allow you to alter the name, do the following
- Open Services console as you did in the above mentioned process.
- Next, scroll down and look for the – Windows modules installer.
- Double click on it to open.
- Set the startup type to manual and click on Apply then OK to save the changes.
- Reboot your system and go to the logs directory – C:\Windows\Logs\ and rename cbs.log.
- Restart your pc again and open the services console
- Set the startup type of windows modules installer back to automatic again.
4] Use Windows Updates troubleshooter
Windows built-in troubleshooter has proven it’s worth many times. The utility is quite handy and user friendly and you don’t need to go through any of those lengthy time-consuming processes to resolve simple and basic errors. Just a few clicks on the utility and the troubleshooter would scan your device to ascertain the cause of error 0x8007000d to come up and would render you some easy one-step solution to get rid of it.
Let’s see how you can do that –
- Press Win+S and then type – troubleshoot.
- Hit the – Enter.
- Once on the Troubleshoot Settings page, click the – Additional troubleshooters.
- Click the – Windows update.
- Select the – Run the Troubleshooter.
- The troubleshooter might prompt you to apply some fixes, follow them accordingly.
If you are using Windows 11, open Settings => Select Troubleshoot from right pane => click Other troubleshooters. Finally, hit Run button located alongside Windows update.
5] Try going for Manual Update
Windows update has been designed in a way that it would run discretely in your background without even giving you a hint, provided that you are on an unlimited data usage network. But sometimes these autonomous and discreet procedures may fail to run due to extremely low internet speed or interference in the network. In such cases, you may need to ensure that your Windows updates are accomplished without any glitches.
So try to receive the update manually as of now using the following instructions –
- Click taskbar search, type update, and press – Enter.
- From right pane, click – Check for Updates.
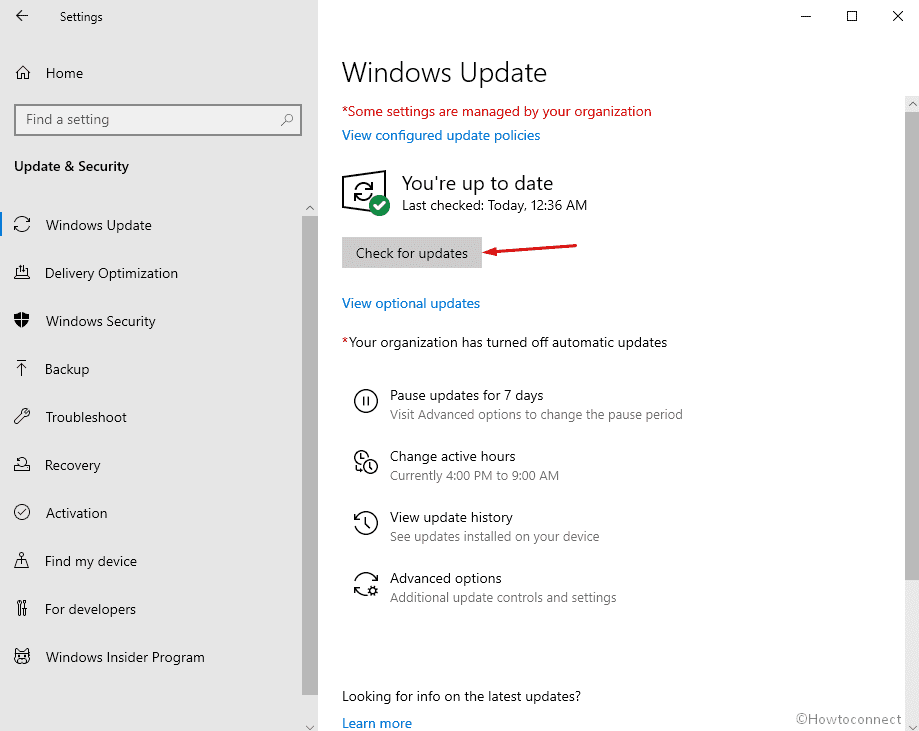
- Wait until the completion of downloading and lastly, click the – Install now.
6] Remove Windows Update download path to solve Error 0x8007000d
In order to make sure all your windows components are running smoothly you must ensure that all the Registry keys are intact. A single letter error with any of its strings may result in an unexpected error. It could be in the case of windows update as well, if any associated string value gets corrupted it could reflect error 0x8007000d. In such an eventuality what you must do is modify or remove that key what is necessary in order to get rid of the disturbing issue.
Note – Be very careful while changing the registry, as an invalid registry could adversely affect your PC and OS, you end up losing data as well.
- Press Windows & S keys together and type in – “regedit”
- Hit the – Enter
- Click the – Yes when a User account control box appears.
- In the Registry Editor console, type in the following string
HKEY_LOCAL_MACHINE\SOFTWARE\Policies\Microsoft\Windows\WindowsUpdate
- Right-click on WUserver and choose Delete.
- Then right-click on the – WIStatusServer and delete it as well.
- Now close the Registry Editor console and Reboot your system
7] Uninstall or put your Antivirus software on Stand-by status
We have often seen people buying an antivirus kit along with their first laptop and we can’t blame them for it. Everyone is apprehensive of data loss and won’t bother spending a bit extra for it. But these third-party applications sometimes can’t differentiate between a virus and a Microsoft update. Hence in order to deal with it what you must do is disable your antivirus for a period of time and manually start the update and check if the error still comes up.
- Click the up arrow present on the right-hand side of the taskbar to open the hidden icons on the system tray.
- Right click on the Antivirus icon and choose – Disable.
- The Antivirus program would ask you for the period of time after which the program is re-enabled automatically. Select as per your choice.
- Now go to the – Settings
- Click the – Update and Security.
- Here, select the – Check for Updates.
Suppose the update isn’t installed then you must uninstall your antivirus program immediately.
Here’s is how you can do that
- Press the Windows logo key, type in appwiz.cpl, and hit enter
- Here, from the list of programs on your system, select the antivirus and click Uninstall from the top bar.
8] Clean boot to fix Windows Update Error 0x8007000d
Often the reason for update failed error 0x8007000d is the malicious third party applications that change the windows update components. So you must perform a clean boot of the windows which would start up our system with the least of the drivers, programs, or services.
- Hit the Win+S, type in msconfig, and press – Enter.
- Click on radio button alongside the – Selective Startup.
- Uncheck the box set for – Load Startup items.
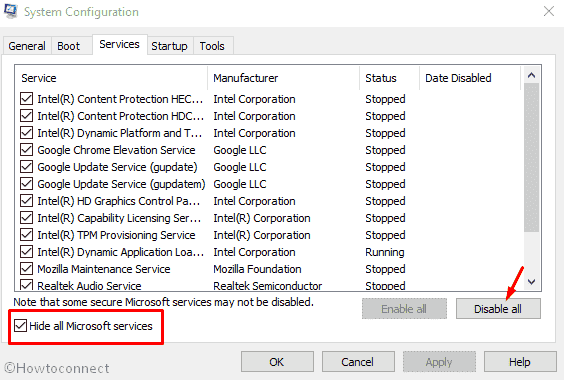
- Click the – Services tab.
- Click and select the box for the – Hide all Microsoft services
- Next, click the – Disable all.
- Switch to the – Startup tab.
- Select the – Open Task Manager.
- Right-click on the enabled program and choose the Disable one by one.
- Repeat the same for all enabled programs.
- Now close the –Task Manager.
- Go back to the – system configuration.
- Click on Apply and then Ok.
9] Wipe out the Temporary Files
Temporary files are created to facilitate a smooth and seamless transition while working on Windows. These are records of your activities and provide an easy and quick recovery of data in case of an unintentional shutdown or power outage. Unfortunately, these are redundant data keep sitting on your system, making it slower and slower by each day. Furthermore, disk space might runs short leading to error: 0x8007000d. So, delete all the files of these kinds using the following guidelines –
- Press the – Windows+R.
- Type in Temp and hit the – Enter.
- Once you are inside the temp folder, press Ctrl+A to select all items.
- Hit the – Delete.
- Once again open the run box and type in %temp%.
- Select all items similarly and wipe out them.
10] Set Microsoft Edge as your Default Browser
Sometimes 0x8007000d might occur due to the add-ons that you install on your browser. Setting Microsoft Edge as your Default Browser could resolve the issue and do the trick. Also, reset the Internet Explorer Settings using the following instructions –
- Open Control panel.
- Put the View by status either of Large or Small icons.
- Click the – Internet options.
- Select the – Advanced tab.
- Next, click the – Reset.
- A dialogue box will appear, select the – Delete personal settings.
- And finally, click the – Reset.
11] Uninstall any previously existing updates
More often, it has been noticed that the existing update would raise a conflict with the new patch and cause an obstruction in downloading and installing the latest one on the system. It could even be the case of a bug being carried on the latest installed update patch. You can easily resolve this issue by removing all of the previously existing updates.
- Press Windows + I keys together to open “Settings”
- Go to the – “Update and Security”
Windows 11 users, open Settings app => choose Windows update from left pane to get same settings page.
- From right hand side, click – “View Update history” or Update history.
- Move down and Choose – “Uninstall updates”
- Scroll down to reach Microsoft Windows section.
- Select the recent update you received and click Uninstall.
- Comply with all the prompts in order to complete the uninstallation process.
- When the process ends, kindly reboot your system
12] Get rid of any kind of existing corruption on your PC
System elements could go missing or in worse case scenarios, go corrupt, if our PC suffers any kind of malware attack, software collisions, or anything similar to that sort. This could be a prominent reason for error 0x8007000d to come up. In order to recover the missing system elements or resolve this corruption, we must execute these few simple steps –
- Press Windows+S key together and type in – “cmd”
- Now press the – ‘Ctrl+Shift+Enter’.
- When the User Account Control box appears, click the – Yes.
- In the elevated Command Prompt window, type in the following syntax exactly it is and hit enter.
DISM.exe /Online /Cleanup-image /Restorehealth
- Once you have executed the command Reboot your system.
- This should have fixed 0x8007000d error when you sign back in.
- However, if the issue still persists, open command prompt again as administrator.
- Type in the following command and hit enter –
Sfc /scannow
- Wait patiently till the procedure completes without any kind of interruption.
- When the process ends, reboot your windows PC.
13] Ensure that the Windows defender is working effectively
Windows Defender Firewall protects your system from any kind of potentially harmful and malicious programs that your system may encounter. Error 0x8007000d may come up if this system is turned off. The reason why it happens is not clear yet but turning it back on has often resolved the issue. So let’s see how you can do that in a few simple steps –
- Click the Taskbar Search and type in – control.
- Hit Enter and open the Control panel.
- Set the View by option to Large icons.
- Click the – Windows Defender Firewall
- On the next page, check carefully and make sure that each option is green, and in case if you find any option red, turn it manually.
- To do that, click the – Turn Windows Firewall On or Off.
- Click on the radio button alongside – Turn on Windows Firewall
- Make sure you choose the same option for both Private Network Settings and Public Network Settings
- Finally, click on OK to save the settings.
14] Free up essential Disk Space
Sometimes windows update packs require a significant amount of space In order to download and install them in a smooth and consolidated process.
If your system is running out of storage and you don’t have enough space for the updates, this could interfere the update process and result in error 0x8007000d. Hence you must clean up the junk files and allocate more space in order to resolve the issue by following the instructions –
- Press Windows+Q keys and type in – cleanmgr.
- Hit Enter to open Disk Cleanup console
- After assessing how much space the system utility can evacuate, Disk Cleanup for ( C: ) will open.
- Click the – Clean up system files.
- Simply click Ok on the next prompt.
- On the next screen, Disk Cleanup for ( C: ) will appear.
- Click the checkboxes available under Files to delete
- Then hit the – OK
- Finally, select the – Delete files.
15] Restore your PC
Error 0x8007000d might appear after you made some modifications in Registry or Settings, or installed a third-party shady program. Then it’s highly probable that your recent ministrations have adversely affected the system and you might need to restore your PC.
- Press the Windows logo and type in – rstrui
- Hit enter to open System Restore.
- When “system restore” opens click on Next.
- Click and Check the checkbox alongside – Show more restore points
- Choose the most recent date and time of restore available here and click – Next
- On the next step click – Finish.
- Click Yes on the final confirmation prompt.
- The system will reboot itself once the restoration process completes.
- Once the system restarts, the new update patch would most certainly be installed without any kind of error 0x8007000d appearing.
16] Do clean install of Windows
Suppose everything fails to fix 0x8007000d error then the clean install is the last solution. This allows you to start afresh without any shred of previous install residues, no cache data, or any damaged files residues whatsoever.
Follow the instructions in this post – How to Install Windows 10 2009 October 2020 update.
Methods list
1] Purge the Windows update components
2] Make sure that BITS is running
3] Rename the CBS log files
4] Use Windows Updates troubleshooter
5] Try going for Manual Update
6] Remove Windows Update download path
7] Uninstall or put your Antivirus software on Stand-by status
8] Clean boot Windows
9] Wipe out the Temporary Files
10] Set Microsoft Edge as your Default Browser
11] Uninstall any previously existing updates
12] Get rid of any kind of existing corruption on your PC
13] Ensure that the windows defender is working effectively
14] Free up essential Disk Space
15] Restore your PC
16] Do a clean install of Windows
That’s all!!
Repair any Windows problems such as Blue/Black Screen, DLL, Exe, application, Regisrty error and quickly recover system from issues using Reimage.
С сообщениями об ошибках, препятствующими выполнению какого-либо действия, пользователи устройств с Windows сталкиваются достаточно часто. Среди распространённых сбоев, возникающих в различных условиях (в процессе инсталляции, обновления или активации Windows), может повстречаться и код 0x8007000d. В зависимости от сценария и источника появления неисправности, решить её можно разными способами.

Причины ошибки
Наличие ошибки 0x8007000d обычно обусловлено такими факторами:
- нарушение целостности, отсутствие установочных файлов, невозможность корректного прочтения (сбой при инсталляции ОС), что провоцирует ряд разнообразных причин;
- повреждение жёсткого диска, наличие сбойных секторов (при обновлении ОС);
- сбой вызван отсутствием доступа к разделу реестра (при активации ОС);
- несовместимость драйвера (при загрузке драйверов, обновлении).

Ошибка 0x8007000d при установке Windows 10
Если выполнялась установка операционной системы и в определённый момент процесс был прерван сообщением с таким кодом, это значит, что повреждён или загрузочный накопитель, с которого осуществлялась инсталляция, или же находящиеся на нём данные. Тогда сбой устранить несложно, но от юзера потребуются определённые навыки.
Чтобы убрать сбой 0x8007000d, возникающий при установке Windows 10, применяют такие меры:
- Создание нового загрузочного накопителя – флешки или оптического носителя (предпочтительнее применить другой накопитель, чтобы избежать повторения сбоя). Процесс установки должен завершиться корректно.

- Перезапись данных на тот же носитель. Если образ был повреждён изначально, потребуется найти новый, исправный дистрибутив и, записав его на флешку, снова попробовать установить систему.

СОВЕТ. Лучше скачать образ ОС с подходящей разрядностью с официального ресурса Microsoft, чтобы дистрибутив был гарантированно без изъянов, чего не скажешь о многочисленных сборках с просторов сети.
Ошибка 0x8007000d при обновлении Windows 10
Чаще всего сбой появляется в ходе инсталляции апдейтов Windows и является следствием воздействия различных факторов. Ошибка обновления встречается при нарушении целостности компонентов оснастки «Центр обновления» или повреждении системных данных. Причин её появления немало, а потому применимы различные решения, эффективные при определённых условиях. Разберём подробно, как можно убрать ошибку, возникшую на этапе обновления Windows 10 и препятствующую процедуре.
Запуск инструмента устранения неполадок
Нечасто, но всё же в отдельных обстоятельствах на помощь придёт штатная утилита. Решение заключается в проверке и исправлении выявленных неисправностей. Запустить средство можно следующим образом:
Запуск SFC и DISM
Нередко сбой вызван повреждением файлов системы, поэтому целесообразно проверить их штатной утилитой SFC (System File Checker). Ещё одно встроенное средство, которое будет полезно в исправлении повреждённых данных, – DISM (Deployment Image Servicing and Management). В ходе процесса сканирования ошибочный элемент будет выявлен и исправлен.
Для выполнения задачи поиска и исправления следует проделать следующие шаги:
- запустим Командную строку (администратор), выбрав соответствующий пункт из контекстного меню «Пуск»;

- вводим sfc/scannow и жмём клавишу ввода. Действие запустит процесс сканирования, что займёт некоторое время;

- по завершении сканирования в терминале задаём поочерёдно команды (жмём Enter вслед за каждым запросом):
dism.exe /online /cleanup-image ScanHealth
dism.exe /online /cleanup-image /CheckHealth
dism.exe /online /cleanup-image /RestoreHealth
- закрываем терминал, перезагружаем устройство, после чего пробуем обновить систему.


Применение редактора групповой политики
Если метод выше не помог и система продолжает выдавать ошибку, для её исправления можно применить оснастку «Редактор групповой политики»:
Очищение папки обновлений
Иногда убрать сбой можно, очистив каталог, включающий накопившиеся данные:
Сброс компонентов WU
Этот метод во многих случаях эффективен в устранении 0x8007000d и некоторых прочих проблем обновления.
Сброс компонентов Windows к изначальному состоянию выполняется путём ввода команд в терминале. Помимо Центра обновления, потребуется деактивировать и прочие связанные службы – BITS и службы криптографии. Выполняем следующие шаги:
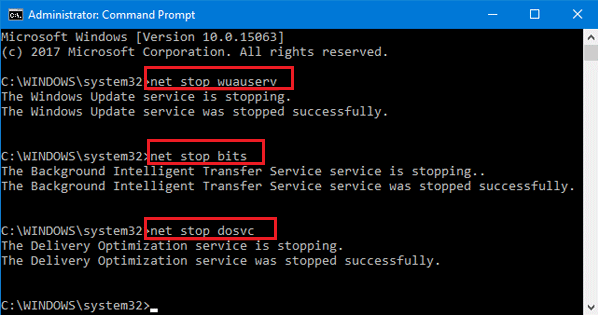
- открываем Командную строку от имени администратора (например, из меню «Пуск»);
- поочерёдно задаём команды (каждый запрос отправляем клавишей Enter):
net stop bits
 net stop wuauserv
 net stop appidsvc
 net stop cryptsvc
- требуется также удалить qmgr*.dat, введя запрос Del «%ALLUSERSPROFILE%Application DataMicrosoftNetworkDownloaderqmgr*.dat»;
- меняем имена каталогам, куда сохраняются данные обновлений, запуская поочерёдно команды:
Ren %systemroot%SoftwareDistribution SoftwareDistribution.bak
Ren %systemroot%system32catroot2 catroot2.bak
- сбрасываем Winsock, прописав запрос netsh winsock reset;

- запускаем ранее остановленные службы:
net start bits
 net start wuauserv
 net start appidsvc
 net start cryptsvc
- перезагрузим устройство и попробуем обновить ОС. Смотрим, принесли манипуляции результат или нет.


Вручную установить KB
Если неисправность возникла при инсталляции через «Центр обновления Windows» накопительного патча, решить вопрос можно путём его загрузки с ресурса Microsoft и последующей инсталляции.
Чтобы скачивать пакеты, потребуется проделать шаги:
Если название патча неизвестно, в поиске можно ввести версию ОС, например Windows 10, чтобы затем из результатов выдачи выбрать нужный вариант.
Обновить при помощи Media Creation Tool
К обновлениям компонентов применим способ использования свежего образа ISO Windows 10 напрямую или с использованием Media Creation Tool, для чего потребуется его загрузка с ресурса Microsoft, а после старта утилиты следует применить вариант «Обновить этот компьютер сейчас». Дальше остаётся действовать согласно подсказкам на экране.

Альтернативный способ – использование Помощника по обновлению Windows 10.
Чистая загрузка Windows
Код 0x8007000d нередко бывает следствием конфликта компонентов Windows с загружённым пользователем защитным софтом или прочим ПО. Чтобы выяснить это, можно использовать возможность чистой загрузки Windows (только с интегрированными приложениями и оснастками):
Чтобы вернуть Windows в режим обычной загрузки, выполняем обратные действия.
СОВЕТ. Если источник проблемы выявлен, например, в случае блокировки установки новых обновлений антивирусом (или удаления файлов в ходе процедуры), можно отключить его на время или добавить службу в исключение.
Ошибка 0x8007000d при активации Windows 10
Не всегда проходит гладко и активация системы. Сбой 0x8007000d, прерывающий процесс обновления, может появиться также при попытке активировать ОС (в том числе посредством SLMGR – команды slmgr /dlv) либо приложение пакета MS Office. Ошибка появляется, когда не удалось найти файлы активации.
Как исправить ошибку с кодом 0x8007000d, которая не даёт активировать Windows 10:
- первым делом стоит применить штатное средство устранения неисправностей;
- актуален также способ чистой загрузки системы (описан выше);
- вручную назначить разрешения к разделу системной учётной записи.
Так как ошибка 0x8007000d при процедуре активации Windows 10 нередко вызвана неправильно заданными в реестре правами доступа, для её исправления следует исправить настройку.
ВНИМАНИЕ. Работа с системным реестром требует от пользователя определённых навыков, поскольку неправильные правки могут привести к неприятным последствиям. Рекомендуем предварительно сделать копию реестра на случай форс-мажора.
Для исправления ошибки выполняем следующие действия:
- открываем реестр посредством консоли «Выполнить» (Win+R) и запроса regedit;
- идёмпо ветке HKEY_LOCAL_MACHINE\SYSTEM\CurrentControlSet\Enum\ROOT;
- жмём ПКМ по ROOT и выберем «Разрешения…»;
- отмечаем в группах «СИСТЕМА» и в блоке разрешений даём полный доступ, отметив соответствующий пункт;
- применяем правки, перезагружаемся и пробуем снова активировать Windows.

Продукты Microsoft, в частности Windows и программы Office, могут быть также активированы по телефону, чем и можно воспользоваться, если вышеописанные действия не дали результата.
Представленные способы решения ошибки 0x8007000d, возникающей при различных условиях, обычно срабатывают в том или ином случае. Независимо от того, известен ли источник проблемы, пробуйте разные пути решения в соответствии со сценарием появления сбоя.
Several users complain that they are unable to update their system to the latest version of Windows 11, version 22H2, because the update fails to install with error 0x8007000d. The error code «0x8007000d» in the Windows 11 v122H2 update is usually caused because of corrupted downloaded files or because of a non-compliant device driver or software.
This guide, contains step by step instructions to resolve the error 0x8007000d in Windows 11 22H2 update installation: «We couldn’t install this update, but you can try again. Error Code (0x8007000d).
How to fix error 0x8007000d on Windows 11 22H2 Update.
Important Prerequisites before installing the Windows 11 22H2 Update.
1. Disable or (better), temporarily uninstall your Security/Antivirus software and reinstall it after the update installation has completed.
2. Make sure that you have at least 32GB free disk space. To free up disk space use Disk Cleanup.
3. Disconnect all USB devices & SD Cards (e.g. USB Flash Disks, the USB Wireless receiver for you mouse or keyboard, etc.).
4. Disable Device/Hard Drive Encryption (If enabled).
Method 1. FIX Windows 11 22H2 Update Error 0x8007000d by Removing NVIDIA Graphics Drivers.
Some users reported that after uninstalling the NVIDIA Control Panel and the GeForce Experience drivers, the Windows 11 22h2 update installed without any issue. To try that: *
* Note: This method only applies to NVIDIA graphics owners.
1. Press Windows ![]() + R keys to open the Run command box.
+ R keys to open the Run command box.
2. Type control appwiz.cpl and press OK (or Enter) to launch Programs and Features.

3. Now proceed and uninstall all NVIDIA’s software. (e.g. NVIDIA Graphics Driver, NVIDIA Control Panel, GeForce Experience, etc.)

4. Restart the PC and try to install the update. If the installation is successful, proceed to reinstall the latest NVIDIA drivers and software for your graphics card.
* Note: if the update 22H2 fail to install again, then proceed to next method, before installing the latest NVIDIA drivers.
Method 2. Delete the ‘SoftwareDistribution’ Folder.
The “C:\Windows\SoftwareDistribution“ folder, is the location where Windows store the Windows Updates. Many times, this folder becomes corrupted and you must re-create it in order to download the updates from scratch. To rebuild (re-create) the “SoftwareDistribution” folder follow the steps below:
Step 1: Stop Windows Update Service.
1. Open Windows Services control panel: To do that:
- Press Windows
 + R keys to open the run command box.
 - In the Search box, type: services.msc & click OK.
- (Accept the UAC warning if appears).

2. In Services control panel locate the «Windows Update» service.
3. Right-click on Windows Update service and select “Stop”.

Step 2: Delete the SoftwareDistribution folder.
1. Open Windows Explorer and navigate to: C:\Windows folder.
2. Find and Delete the “SoftwareDistribution” folder (or rename it. e.g. to “SoftwareDistributionOLD”) .

Step 3: Start the Windows Update Service.
1. Open Windows Services control panel.
2. Right-click on Windows Update service and select “Start”.

Step 4: Check and Install Windows 11 Update.
1. Navigate to Start -> Settings -> Windows Update and click Check for Updates.
Method 3. Update to Windows 11 22H2 by using the Update Assistant.
1. Navigate to Windows 11 download site and click download the Windows 11 Installation Assistant.

2. Double click at the downloaded file and click the Accept and install button to begin the installation.
3. Finally, click Update Now to install the latest version of Windows 11 on your computer.
That’s all folks! Did it work for you?
Please leave a comment in the comment section below or even better: like and share this blog post in the social networks to help spread the word about this solution.
If this article was useful for you, please consider supporting us by making a donation. Even $1 can a make a huge difference for us.

Ошибки вроде 0x8007000d связаны с обновлениями и могут встречаться пользователями довольно часто. К сожалению, эта и многие другие проблемы сохраняются с момента появления Windows 7 до последних существующих версий. На данный момент диапазон зарегистрированных случаев включает количество накопительных обновлений, которые пользователи не могут установить — KB3124200, KB4586853, KB4592438 для Windows 10 версии 1511 и 20H2. Сообщение об ошибке, отображаемое после сбоя, не дает ценных рекомендаций по восстановлению обновлений. Он предоставляет только соответствующий код ошибки (0x8007000d), помогающий пользователям повышать осведомленность и вместе предлагать решения на форумах и в ресурсах по устранению неполадок. Если вам интересно, каковы причины возникновения таких проблем, то вот пара из них. Обычно проблемы с обновлением могут быть вызваны повреждением или отсутствием файловой системы. В других случаях успешному обновлению может помешать неправильная конфигурация или стороннее программное обеспечение, вызывающее конфликт. Как бы то ни было, трудно решить, какой из них на самом деле ваш. Таким образом, стоит попробовать все методы, пока не найдете тот, который решает проблему. Поэтому обязательно следуйте приведенному ниже списку пошаговых инструкций, которые помогут вам избавиться от ошибки 0x8007000d.

Ошибка Центра обновления Windows 0x8007000d

Ошибка автономного установщика Центра обновления Windows 0x8007000d
Скачать средство восстановления Windows
Скачать средство восстановления Windows

Существуют специальные утилиты для восстановления Windows, которые могут решить проблемы, связанные с повреждением реестра, неисправностью файловой системы, нестабильностью драйверов Windows. Мы рекомендуем вам использовать Advanced System Repair Pro, чтобы исправить «Ошибка Центра обновления Windows 0x8007000d» в Windows 10.
1. Воспользуйтесь средством устранения неполадок Центра обновления Windows
Хотя этот метод редко помогает, все же стоит попробовать уже установленное средство устранения неполадок Центра обновления Windows. Он предназначен для решения наиболее распространенных проблем, связанных с обновлениями на базовом уровне. Он просканирует вашу систему на предмет потенциальных проблем и попытается в конечном итоге их исправить. Узнайте, как это сделать, следуя приведенным ниже инструкциям:
- Открытые Настройки , а затем перейдите в Обновление и безопасность > Устранение неполадок.
- На правой панели найдите Центр обновления Windows и нажмите Запустить средство устранения неполадок.
- Завершите процесс, следуя инструкциям на экране, и перезагрузите компьютер.
2. Проверьте целостность системных файлов.
Чаще всего отсутствующие или поврежденные файлы становятся основными виновниками ошибок обновления. Даже второстепенные файлы иногда могут быть жизненно важными для правильного взаимодействия служб Windows. Если какие-то из этих файлов выпадают из головоломки, скорее всего, это будет причиной проблем с обновлением. Ниже мы собираемся использовать как SFC (средство проверки системных файлов), так и DISM (обслуживание и управление образами развертывания), которые будут обнаруживать и восстанавливать отсутствующие компоненты, если таковые имеются. Обязательно используйте оба сканирования, поскольку они могут по-разному повлиять на решение ошибки. Вот как:
С помощью SFC
- Открытые Командная строка , введя
cmdв поле поиска рядом с Меню Пуск кнопку. - Щелкните правой кнопкой мыши по Командная строка , а затем выбрать Запуск от имени администратора.
- После открытия консоли введите
sfc /scannowкоманду и нажмите Enter. - Когда процесс восстановления будет завершен, перезагрузите компьютер.
С помощью DISM
- Открытые Командная строка как мы это делали на предыдущем шаге.
- Скопируйте и вставьте эту команду
DISM.exe /Online /Cleanup-image /Restorehealth. - Нажмите Enter и подождите, пока Windows закончит сканирование и исправление.
- После этого перезагрузите компьютер и снова установите обновление.
После завершения обоих этих сканирований попробуйте снова запустить установку обновлений. Если это не помогает решить проблему, перейдите к альтернативным методам ниже.
3. Укажите параметры для установки необязательных компонентов и восстановления компонентов.
В этом методе мы собираемся повлиять на некоторые изменения в настройках групповой политики. В частности, чтобы Windows загружала материалы для восстановления и дополнительные функции непосредственно из Центра обновления Windows. Вот как можно выполнить это простое, но очень эффективное решение:
- Нажмите Windows key + R комбинацию клавиш и напишите
gpedit.msc. - Редактор локальной групповой политики откроется. На левой панели перейдите в Административные шаблоны > Система.
- На правой панели прокрутите список вниз, пока не найдете Укажите параметры для установки необязательных компонентов и восстановления компонентов.
- Дважды щелкните по этому тексту, и выберете Включено , потом поставьте галочку напротив Скачайте содержимое для восстановления и дополнительные компоненты непосредственно из Центра обновления Windows вместо использования служб Windows Server Update Services (WSUS). опцию.
- После выполнения этих шагов нажмите Применить и OK для сохранения изменений.
Наконец, попробуйте установить обновления еще раз. Еще нет эффекта? — перейдите к остальным решениям ниже.
4. Очистите ненужные системные файлы.
Может помочь удаление избыточных системных файлов. Другими словами, некоторые пользователи извлекли выгоду из очистки своего диска от копий для восстановления и кешированных файлов, хранящихся на ПК. Обратите внимание, что удаление копий для восстановления означает, что вы не сможете использовать точки восстановления предыдущих версий для отката, если они вам вдруг понадобятся. Несмотря на это, использование такого метода помогло некоторым пользователям избавиться от проблемы.
- Открытые Этот компьютер.
- Щелкните правой кнопкой мыши на основной диск и выберите Объекты.
- Найдите и нажмите на Очистка диска.
- Затем выберите Очистить системные файлы, установите все флажки и нажмите OK.
- После этого перезагрузите компьютер и попробуйте установить обновление снова.
5. Включите Чистый запуск Windows.
Ошибка 0x8007000d также может возникнуть из-за проблем несовместимости. Антивредоносное ПО или любое другое стороннее программное обеспечение может конфликтовать со службами Windows, вызывая ошибку. Вот почему в Windows есть функция чистой загрузки, помогающая пользователям загружать свой компьютер только со встроенными приложениями и службами, чтобы узнать, является ли какое-то дополнительное приложение частью проблемы. Чтобы запустить систему в режиме чистой загрузки, выполните следующие действия:
- Нажмите Windows Key + R кнопки одновременно и вставьте
msconfig. - Затем в открывшемся окне перейдите в Услуги сверху.
- Установите флажок рядом с Не отображать службы Майкрософт и нажмите на Отключить все кнопку.
- Теперь перейдите в Общие и выберите Выборочный запуск опцию. Убедитесь, что флажок установлен только рядом с Загружать системные службы.
- Нажмите Применить и OK. Затем перезагрузите компьютер.
Теперь вы можете попробовать обновить свою систему, находясь в режиме чистой загрузки. Независимо от того, удалось ли вам установить проблемные обновления или нет, вам следует вернуть Windows к параметрам обычного запуска. Для этого просто повторите все шаги, описанные выше, включив отключенные службы и изменив параметр запуска с Выборочный запуск в нормальная.
6. Сбросьте компоненты Центра обновления Windows.
Предпоследняя мера в нашем списке — сброс настроек Центра обновления Windows. Статистически этот метод зарекомендовал себя как очень эффективный при решении многих проблем с обновлением. Вся процедура включает перезапуск служб BITS, Cryptographic, MSI Installer и Windows Update, а также переименование некоторых папок обновлений (SoftwareDistribution и Catroot2). Эти папки содержат временные файлы, необходимые для установки обновлений Windows. Исходя из этого, мы заставим Windows удалять поврежденные элементы и создавать компоненты, связанные с обновлением, с нуля. Ниже мы покажем вам два способа выполнения этого метода. Первый требует ввода и выполнения каждой консольной команды в ручной последовательности. Другой выполняется с помощью так называемого пакетного сценария, написанного в Блокноте и сохраненного как WUReset.bat. Нет никакой реальной разницы в том, какой из них вы выберете. Хотя вся процедура может показаться сложной и сложной, она не займет много времени и знаний. Просто следуйте последовательности, указанной ниже:
Вручную
- Открытые Командная строка , введя
cmdв поле поиска рядом с Меню Пуск кнопку. - Щелкните правой кнопкой мыши по Командная строка , а затем выбрать Запуск от имени администратора.
- Скопируйте и вставьте этот список команд одну за другой, нажимая Enter после каждой. (Это действие отключит службы, ответственные за Обновления Windows)
- Затем мы должны переименовать вышеупомянутые папки. Просто вставьте эти команды, нажимая Enter после каждой.
- Наконец, все, что осталось сделать, это вернуть отключенные службы. Введите эти команды так же, как мы делали ранее.
- На этом все. Перейдите в центр обновления Windows и попробуйте выполнить установку снова.
net stop wuauserv

net stop cryptSvc

net stop bits

net stop msiserver
ren C:\Windows\SoftwareDistribution SoftwareDistribution.old

ren C:\Windows\System32\catroot2 Catroot2.old
net start wuauserv

net start cryptSvc

net start bits

net start msiserver
С помощью Пакетного файла
Это альтернативный метод описанному выше. Пакетный сценарий используется для выполнения тех же команд для сброса всех компонентов Центра обновления Windows, криптографических служб и папок, таких как SoftwareDistribution. В какой-то степени, этот способ даже проще, чем предыдущий. Все, что вам нужно, — это обычный блокнот Windows и немного копирования и вставки. Пакетные сценарии лучше ручного набора текста, поскольку они позволяют выполнять все необходимые команды сразу в один клик. Если вы когда-нибудь столкнетесь с подобными проблемами в будущем, просто запустите уже созданный .bat файл и для сброса компонентов обновления:
- Откройте новый Блокнот . Для этого щелкните правой кнопкой мыши на любую свободную область на рабочем столе, выберите Новая и Текстовый документ.
- Затем вставьте этот список команд в блокнот:
- После вставки всех команд, нажмите Файл > Сохранить как и назовите файл WUReset.bat, Обязательно установите Кодирование в ANSI и сохраните файл в любом месте.
- Наконец, нажмите на файл правой кнопкой мыши и выберите Запуск от имени администратора и наслаждайтесь автоматическим сбросом компонентов обновлений Windows.
@ECHO OFF

echo Simple Script to Reset / Clear Windows Update

echo.

PAUSE

echo.

attrib -h -r -s %windir%system32catroot2

attrib -h -r -s %windir%system32catroot2*.*

net stop wuauserv

net stop CryptSvc

net stop BITS

ren %windir%system32catroot2 catroot2.old

ren %windir%SoftwareDistribution sold.old

ren "%ALLUSERSPROFILE%\Application Data\Microsoft\Network\Downloader" downloader.old

net Start BITS

net start CryptSvc

net start wuauserv

echo.

echo Task completed successfully...

echo.

PAUSE
7. Используйте Помощник по обновлению для загрузки проблемных обновлений.
Помощник по обновлению Windows 10, как он официально называется, — это специальная утилита, предназначенная для помощи людям в получении последних обновлений, доступных для их системы. Он отлично работает как обходной путь для многих проблем, с которыми пользователи сталкиваются при обновлении. Это совершенно бесплатно и не требует много времени для загрузки. Просто выполните следующие действия:
- Сначала посетите официальный сайт Помощник по обновлению и нажмите на Обновить сейчас кнопку.
- Затем откройте загруженный файл и нажмите Обновить сейчас снова.
- Windows выполнить проверку вашего ПК на совместимость в течение нескольких секунд. После этого нажмите Следующая и подождите, пока Windows обновит ваш компьютер.
- В конце нажмите Перезапустить сейчас чтобы Windows завершила установку обновлений.
Вот и все. После выполнения этих шагов ваш компьютер должен быть обновлен и не сталкиваться с проблемами, как это было раньше.
Итоги
Несмотря на то, что вышеупомянутые решения очень эффективны, они не исключают возможности повторения подобных проблем в будущем. Если что-то подобное, связанное с обновлениями, повторится снова, сохраните этот список решений, чтобы выполнить их снова. Они должны уметь обрабатывать и другие ошибки.