The Error 0x8007000d is quite an unusual error, in the sense that it appears in different scenarios. You may encounter the error when installing, upgrading, updating or activating Windows 11/10. It can also occur during a System Restore operation. In this post, we will attempt to provide the most suitable solutions that you can try to successfully resolve the issue in relation to the respective error scenarios.
See the sections below for the resolution to the error depending on how you encounter it.

This error indicates the bootable installation media you are using is corrupt – that’s why the Windows installation failed. In this case, you will need to re-create that Installation media and try the Installation process again – it should complete successfully without any errors.
Fix Windows Update or Upgrade Error 0x8007000d

The Windows Update error 0x8007000d occurs mainly due to two reasons – corrupt system files or the Windows update components have become obsolete. This won’t let you install any updates for Windows and it also won’t let you upgrade Windows in case a newer version is available.
When you encounter this error, you won’t be able to apply the monthly security patches on the existing operating system. You may sometimes succeed to initiate the upgrade via Windows Update. However, this will either fail or get stuck at a certain percentage.
So, if you’re faced with this issue, you can try our recommended solutions below in no particular order and see if that helps to resolve the issue.
- Run Windows Update Troubleshooter
- Rename SoftwareDistribution folder
- Run SFC scan
- Run DISM scan
- Reset Windows Update components to the default
- Manually download the update from Microsoft Update Catalog (applies to Cumulative Updates)
- Directly download the Windows ISO or use Media Creation Tool (applies to Feature Updates)
Let’s take a look at the description of the process involved concerning each of the listed solutions.
1] Run Windows Update Troubleshooter
More often than not, running the inbuilt Windows Update Troubleshooter fixes update errors on Windows 10. After you run the troubleshooter and rerun Windows update but still receive the error, you can try the next solution.
2] Rename SoftwareDistribution folder
- Create a system restore point first.
- Stop Windows Update Service using Services.msc
- Rename the C:\Windows\SoftwareDistribution folder to C:\Windows\SoftwareDistributionOld
- Restart the Windows Update Service
- Reboot computer.
3] Run SFC scan
The presence of corrupt/damaged system files can potentially trigger this error on Windows 11/10. In which case, you can run SFC scan. Running this inbuilt command-line utility program scans the entire PC for obsolete or corrupt/damaged files and replaces or repairs such files (if any) as the case maybe.
4] Run DISM scan
Sometimes the SFC scan will fail to fix the underlying causes. In such cases, you should run Deployment Image Servicing and Management (DISM) scan – another in-built tool to repair the corrupt files as well as the Windows system image.
5] Reset Windows Update components to the default
In this solution, you can use the Reset Windows Update Agent Tool and see if it helps you. This PowerShell script will help you Reset Windows Update Client. Also, you may want to manually reset each Windows Update components to default.
6] Manually download the update from Microsoft Update Catalog (applies to Cumulative Updates)
If you’re having this issue installing the cumulative update via Windows Update, you can manually download from the Microsoft Update Catalog, the update that is failing to install and consequently triggering the update error, and then install the update on your Windows PC.
See this post if after you download the update and run the installer, you receive the error message Windows Update Standalone Installer encountered an error 0x8007000d, The data is invalid.
7] Directly download the Windows ISO or use Media Creation Tool (applies to Feature Updates)
If you’re having this issue installing feature updates via Windows Update, you can directly download the latest Windows ISO image file from the Microsoft website. Once you have downloaded the ISO to a location (preferably the desktop) on your device, double-click the ISO image to mount it as a virtual drive then double-click the setup.exe file to start the in-place upgrade process.
Alternatively, you may use the Windows Update Assistant to install the Feature Update.
Fix Windows Activation Error 0x8007000d
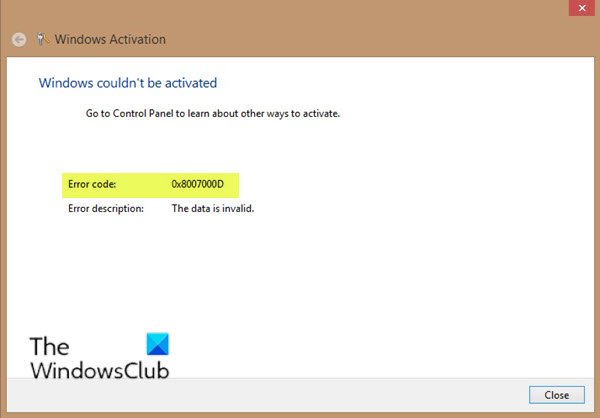
You may encounter this activation error when you try run the slmgr -dlv or slmgr -ato command. This error can be caused because of insufficient permission to the ‘root’ directory. The System account by default has Full Control permissions to the registry path:
HKEY_LOCAL_MACHINE\SYSTEM\CurrentControlSet\Enum\ROOT
and any subkeys. If those permissions have been altered for the ‘Root’ key or any subkey(s), you would see the error code 0x8007000D.
To resolve this issue, you need to assign the minimum permission of “Enumerate Subkeys” to the System account for the registry path HKEY_LOCAL_MACHINE\SYSTEM\CurrentControlSet\Enum\Root and any of its subkeys, says KB2230957.
You can try our recommended solutions below in no particular order and see if that helps to resolve the issue.
- Run Windows Activation Troubleshooter
- Perform a Clean Boot and retry activation
- Assign the minimum permission of “Enumerate Subkeys” to the System account
- Activate by Phone
Let’s take a look at the description of the process involved concerning each of the listed solutions.
Before you try any of the solutions below, you can quickly run an SFC scan, followed by a DISM scan (if necessary) then retry the activation. If that doesn’t resolve your issue, you can then proceed.
1] Run Windows Activation Troubleshooter
The Windows Activation Troubleshooter will help you address the most commonly encountered activation issues on Genuine Windows devices including those caused by hardware changes. This solution requires you to run the inbuilt Windows Activation Troubleshooter and see if that would be of any help. Else, you can try the next solution.
2] Perform a Clean Boot and retry activation
There have been instances where some programs interfered with the activation process. This solution requires you to perform a Clean Boot – this will disable any active security programs or third-party programs running in the background. Once your Windows 11/10 device is running in the clean boot state, you can try to activate Windows 11/10 again.
3] Assign the minimum permission of “Enumerate Subkeys” to the System account
Since this is a registry operation, it is recommended that you back up the registry or create a system restore point as necessary precautionary measures. Once done, you can proceed as follows:
- Press Windows key + R to invoke the Run dialog.
- In the Run dialog box, type
regeditand hit Enter to open Registry Editor. - Navigate or jump to the registry key path below:
HKEY_LOCAL_MACHINE\SYSTEM\CurrentControlSet\Enum\ROOT
- At the location, on the left pane, right-click on the ROOT folder and select Permission.
- Select System under Groups or Usernames and check the permission status. If its changed to only Read then continue to the next step.
- Click on Advanced button.
- Under Permissions tab, select System and click on Edit.
- Select Full Control.
- Click OK to save permission changes. If you’re somehow prevented from saving this change, you may have to take ownership and retry again.
You can now retry activating. If you’re still unable to activate, try the next solution.
4] Activate by Phone
Microsoft phone activation is one of the ways to activate Microsoft Windows or Microsoft Office products. Generally, it requires calling the Microsoft Activation Center and to verbally exchanging activation information.
Fix System Restore error 0x8007000D
If you receive An unspecified error occurred during System Restore, 0x8007000D then you have to try using another restore point. If it does not help, this post will help you Troubleshoot System Restore problems.
I hope you find this post useful!
С сообщениями об ошибках, препятствующими выполнению какого-либо действия, пользователи устройств с Windows сталкиваются достаточно часто. Среди распространённых сбоев, возникающих в различных условиях (в процессе инсталляции, обновления или активации Windows), может повстречаться и код 0x8007000d. В зависимости от сценария и источника появления неисправности, решить её можно разными способами.

Причины ошибки
Наличие ошибки 0x8007000d обычно обусловлено такими факторами:
- нарушение целостности, отсутствие установочных файлов, невозможность корректного прочтения (сбой при инсталляции ОС), что провоцирует ряд разнообразных причин;
- повреждение жёсткого диска, наличие сбойных секторов (при обновлении ОС);
- сбой вызван отсутствием доступа к разделу реестра (при активации ОС);
- несовместимость драйвера (при загрузке драйверов, обновлении).

Ошибка 0x8007000d при установке Windows 10
Если выполнялась установка операционной системы и в определённый момент процесс был прерван сообщением с таким кодом, это значит, что повреждён или загрузочный накопитель, с которого осуществлялась инсталляция, или же находящиеся на нём данные. Тогда сбой устранить несложно, но от юзера потребуются определённые навыки.
Чтобы убрать сбой 0x8007000d, возникающий при установке Windows 10, применяют такие меры:
- Создание нового загрузочного накопителя – флешки или оптического носителя (предпочтительнее применить другой накопитель, чтобы избежать повторения сбоя). Процесс установки должен завершиться корректно.

- Перезапись данных на тот же носитель. Если образ был повреждён изначально, потребуется найти новый, исправный дистрибутив и, записав его на флешку, снова попробовать установить систему.

СОВЕТ. Лучше скачать образ ОС с подходящей разрядностью с официального ресурса Microsoft, чтобы дистрибутив был гарантированно без изъянов, чего не скажешь о многочисленных сборках с просторов сети.
Ошибка 0x8007000d при обновлении Windows 10
Чаще всего сбой появляется в ходе инсталляции апдейтов Windows и является следствием воздействия различных факторов. Ошибка обновления встречается при нарушении целостности компонентов оснастки «Центр обновления» или повреждении системных данных. Причин её появления немало, а потому применимы различные решения, эффективные при определённых условиях. Разберём подробно, как можно убрать ошибку, возникшую на этапе обновления Windows 10 и препятствующую процедуре.
Запуск инструмента устранения неполадок
Нечасто, но всё же в отдельных обстоятельствах на помощь придёт штатная утилита. Решение заключается в проверке и исправлении выявленных неисправностей. Запустить средство можно следующим образом:
Запуск SFC и DISM
Нередко сбой вызван повреждением файлов системы, поэтому целесообразно проверить их штатной утилитой SFC (System File Checker). Ещё одно встроенное средство, которое будет полезно в исправлении повреждённых данных, – DISM (Deployment Image Servicing and Management). В ходе процесса сканирования ошибочный элемент будет выявлен и исправлен.
Для выполнения задачи поиска и исправления следует проделать следующие шаги:
- запустим Командную строку (администратор), выбрав соответствующий пункт из контекстного меню «Пуск»;

- вводим sfc/scannow и жмём клавишу ввода. Действие запустит процесс сканирования, что займёт некоторое время;

- по завершении сканирования в терминале задаём поочерёдно команды (жмём Enter вслед за каждым запросом):
dism.exe /online /cleanup-image ScanHealth
dism.exe /online /cleanup-image /CheckHealth
dism.exe /online /cleanup-image /RestoreHealth
- закрываем терминал, перезагружаем устройство, после чего пробуем обновить систему.


Применение редактора групповой политики
Если метод выше не помог и система продолжает выдавать ошибку, для её исправления можно применить оснастку «Редактор групповой политики»:
Очищение папки обновлений
Иногда убрать сбой можно, очистив каталог, включающий накопившиеся данные:
Сброс компонентов WU
Этот метод во многих случаях эффективен в устранении 0x8007000d и некоторых прочих проблем обновления.
Сброс компонентов Windows к изначальному состоянию выполняется путём ввода команд в терминале. Помимо Центра обновления, потребуется деактивировать и прочие связанные службы – BITS и службы криптографии. Выполняем следующие шаги:
- открываем Командную строку от имени администратора (например, из меню «Пуск»);
- поочерёдно задаём команды (каждый запрос отправляем клавишей Enter):
net stop bits
 net stop wuauserv
 net stop appidsvc
 net stop cryptsvc
- требуется также удалить qmgr*.dat, введя запрос Del «%ALLUSERSPROFILE%Application DataMicrosoftNetworkDownloaderqmgr*.dat»;
- меняем имена каталогам, куда сохраняются данные обновлений, запуская поочерёдно команды:
Ren %systemroot%SoftwareDistribution SoftwareDistribution.bak
Ren %systemroot%system32catroot2 catroot2.bak
- сбрасываем Winsock, прописав запрос netsh winsock reset;

- запускаем ранее остановленные службы:
net start bits
 net start wuauserv
 net start appidsvc
 net start cryptsvc
- перезагрузим устройство и попробуем обновить ОС. Смотрим, принесли манипуляции результат или нет.


Вручную установить KB
Если неисправность возникла при инсталляции через «Центр обновления Windows» накопительного патча, решить вопрос можно путём его загрузки с ресурса Microsoft и последующей инсталляции.
Чтобы скачивать пакеты, потребуется проделать шаги:
Если название патча неизвестно, в поиске можно ввести версию ОС, например Windows 10, чтобы затем из результатов выдачи выбрать нужный вариант.
Обновить при помощи Media Creation Tool
К обновлениям компонентов применим способ использования свежего образа ISO Windows 10 напрямую или с использованием Media Creation Tool, для чего потребуется его загрузка с ресурса Microsoft, а после старта утилиты следует применить вариант «Обновить этот компьютер сейчас». Дальше остаётся действовать согласно подсказкам на экране.

Альтернативный способ – использование Помощника по обновлению Windows 10.
Чистая загрузка Windows
Код 0x8007000d нередко бывает следствием конфликта компонентов Windows с загружённым пользователем защитным софтом или прочим ПО. Чтобы выяснить это, можно использовать возможность чистой загрузки Windows (только с интегрированными приложениями и оснастками):
Чтобы вернуть Windows в режим обычной загрузки, выполняем обратные действия.
СОВЕТ. Если источник проблемы выявлен, например, в случае блокировки установки новых обновлений антивирусом (или удаления файлов в ходе процедуры), можно отключить его на время или добавить службу в исключение.
Ошибка 0x8007000d при активации Windows 10
Не всегда проходит гладко и активация системы. Сбой 0x8007000d, прерывающий процесс обновления, может появиться также при попытке активировать ОС (в том числе посредством SLMGR – команды slmgr /dlv) либо приложение пакета MS Office. Ошибка появляется, когда не удалось найти файлы активации.
Как исправить ошибку с кодом 0x8007000d, которая не даёт активировать Windows 10:
- первым делом стоит применить штатное средство устранения неисправностей;
- актуален также способ чистой загрузки системы (описан выше);
- вручную назначить разрешения к разделу системной учётной записи.
Так как ошибка 0x8007000d при процедуре активации Windows 10 нередко вызвана неправильно заданными в реестре правами доступа, для её исправления следует исправить настройку.
ВНИМАНИЕ. Работа с системным реестром требует от пользователя определённых навыков, поскольку неправильные правки могут привести к неприятным последствиям. Рекомендуем предварительно сделать копию реестра на случай форс-мажора.
Для исправления ошибки выполняем следующие действия:
- открываем реестр посредством консоли «Выполнить» (Win+R) и запроса regedit;
- идёмпо ветке HKEY_LOCAL_MACHINE\SYSTEM\CurrentControlSet\Enum\ROOT;
- жмём ПКМ по ROOT и выберем «Разрешения…»;
- отмечаем в группах «СИСТЕМА» и в блоке разрешений даём полный доступ, отметив соответствующий пункт;
- применяем правки, перезагружаемся и пробуем снова активировать Windows.

Продукты Microsoft, в частности Windows и программы Office, могут быть также активированы по телефону, чем и можно воспользоваться, если вышеописанные действия не дали результата.
Представленные способы решения ошибки 0x8007000d, возникающей при различных условиях, обычно срабатывают в том или ином случае. Независимо от того, известен ли источник проблемы, пробуйте разные пути решения в соответствии со сценарием появления сбоя.
Windows 11, as well as 10, is no doubt a feature-rich version of the OS but issues and bugs have close kinships with it at the same time. 0x8007000d is such an error code that appears when trying to download a cumulative update or build. When the problem occurs Windows update stuck and ails you with the error message.
Although 0x8007000d error could arise due to a number of reasons often the primary cause of this nagging issue is Windows update Component. This puts a sort of restriction over your system and prevents it from downloading or installing any new patch on your PC. However, it may be hard to resolve these errors here are some methods that will certainly help you.
Here is how to fix Windows 11/10 Update Error 0x8007000d –
1] Purge the Windows update components
In order to resolve this issue, the first thing that you can try is purging your windows update components. Resetting will recalibrate the entire update installation module which churns out the faulty bug that may be causing the error.
- Press Windows+S keys and type in – cmd.
- Hit the – Ctrl+Shift+Enter.
- Select – Yes to approve the User account control.
- On the Command Prompt screen type in the below lines and hit enter after each and don’t forget to enter –
net stop wuauserv
net stop cryptSvc
net stop bits
net stop msiserver

- Now enter the following command to rename the SoftwareDistribution folder –
ren C:\Windows\SoftwareDistribution SoftwareDistribution.old
ren C:\Windows\System32\Catroot2 Catroot2.old
- Now run the following commands to re-enable the windows update related services –
net start wauserv
net start cryptSvc
net start bits
net start msiserver
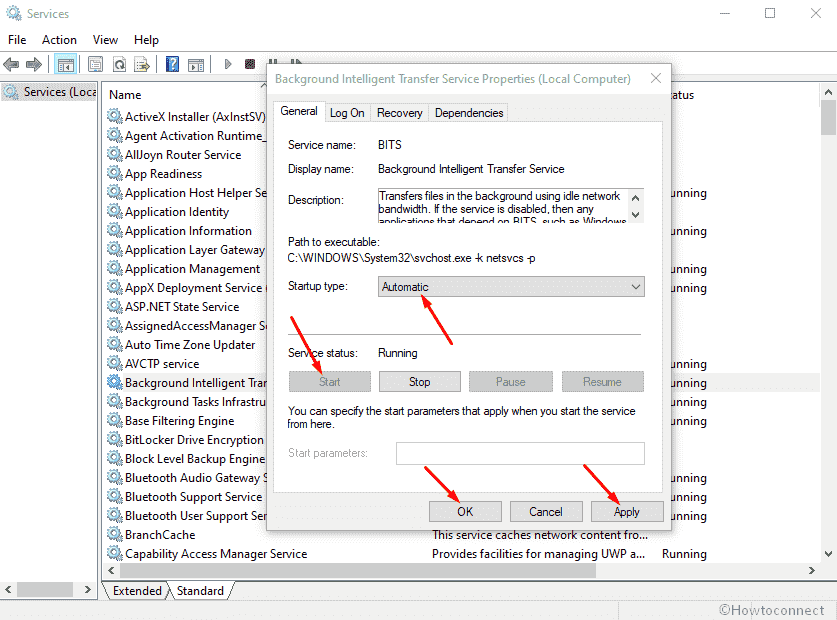
2] Make sure that BITS is running
BITS is an essential service of Windows that helps the system to download files from the Microsoft server. Furthermore, it also assists the OS and application during foreground or background downloads or uploads. BITS also allows the system to exchange files between the device and the remote server that too without impacting the network experience.
If for some reason this service stops, windows update would mostly fail and reflect the error 0x8007000d. Hence it is quite important that BITS is always in automatic startup type and running status. You can do that by following these few simple steps:
- Press Windows+S and type in the – service.msc.
- Hit Enter to open the services console.
- Find “Background Intelligence Transfer Service” in the Name column.
- Now Right-click on this one and select the – Properties.
- Here, set the startup type to – Automatic.
- Click the Start under service status and wait for a while.
- Make sure to click Apply and then OK to save the changes.
3] Rename the CBS log files to fix 0x8007000d Error code
CBS log sometimes might be the reason for the error 0x8007000d appear during updates. This Component-based servicing keeps a detailed record and information regarding all the updates that have been installed in a component over a period of time. These logs could get corrupted and cause trouble in the process of updating your system.
Sometimes deleting these logs easily resolves the issue but if you don’t feel it’s safe renaming the file could also do the trick. Follow the guidelines –
- Hit the – Windows+Q.
- Now type in the following and hit Enter –
%systemroot%\Logs\CBS
- Now change the CBS.log file name to anything else such as error.log.
- If the system doesn’t allow you to alter the name, do the following
- Open Services console as you did in the above mentioned process.
- Next, scroll down and look for the – Windows modules installer.
- Double click on it to open.
- Set the startup type to manual and click on Apply then OK to save the changes.
- Reboot your system and go to the logs directory – C:\Windows\Logs\ and rename cbs.log.
- Restart your pc again and open the services console
- Set the startup type of windows modules installer back to automatic again.
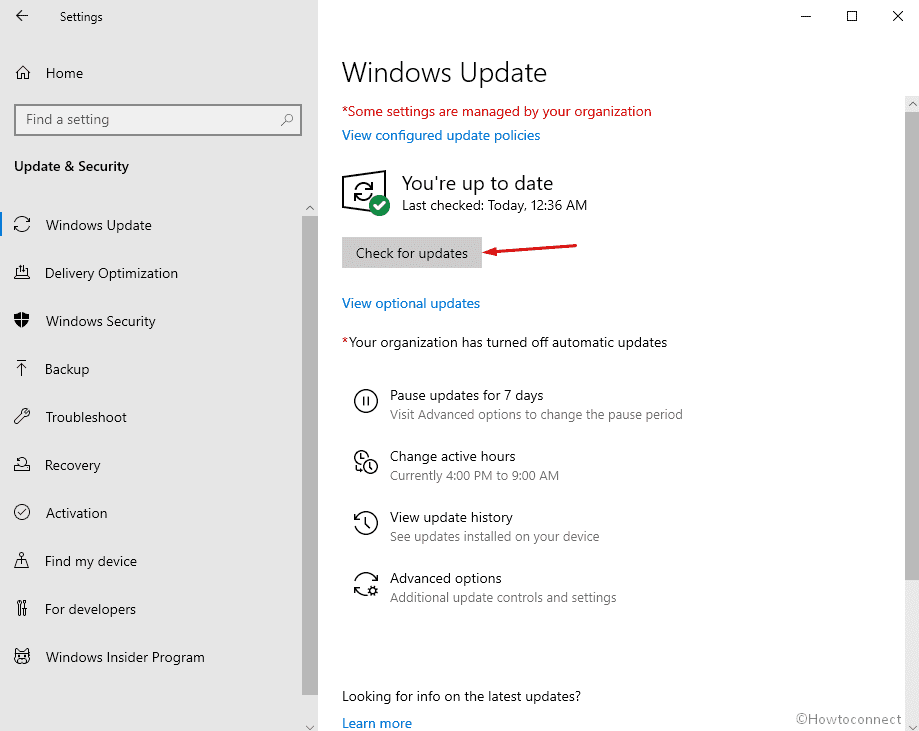
4] Use Windows Updates troubleshooter
Windows built-in troubleshooter has proven it’s worth many times. The utility is quite handy and user friendly and you don’t need to go through any of those lengthy time-consuming processes to resolve simple and basic errors. Just a few clicks on the utility and the troubleshooter would scan your device to ascertain the cause of error 0x8007000d to come up and would render you some easy one-step solution to get rid of it.
Let’s see how you can do that –
- Press Win+S and then type – troubleshoot.
- Hit the – Enter.
- Once on the Troubleshoot Settings page, click the – Additional troubleshooters.
- Click the – Windows update.
- Select the – Run the Troubleshooter.
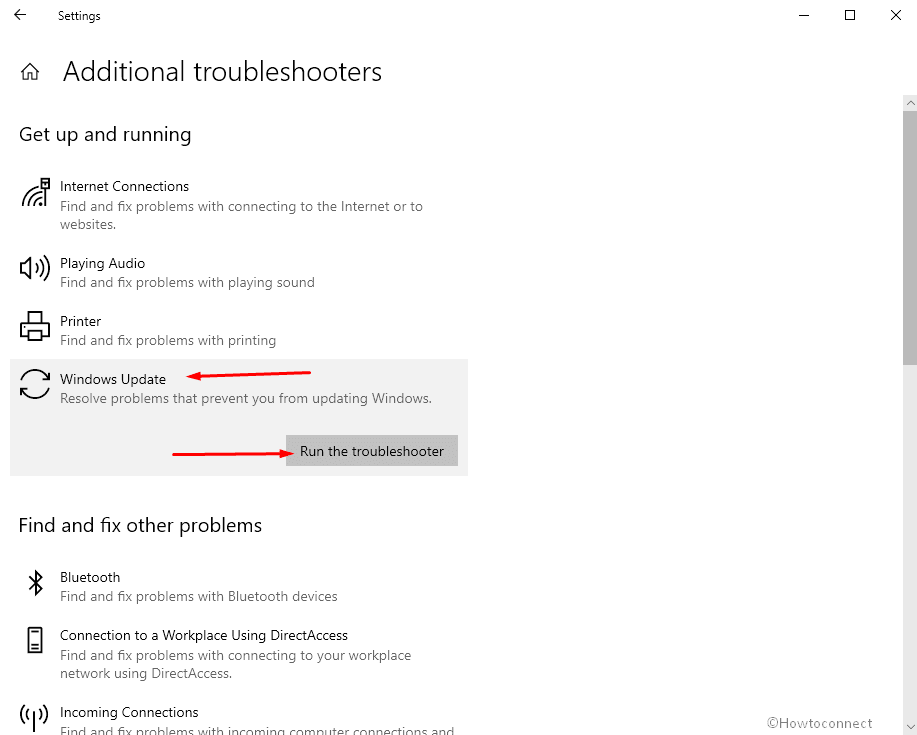
- The troubleshooter might prompt you to apply some fixes, follow them accordingly.
If you are using Windows 11, open Settings => Select Troubleshoot from right pane => click Other troubleshooters. Finally, hit Run button located alongside Windows update.
5] Try going for Manual Update
Windows update has been designed in a way that it would run discretely in your background without even giving you a hint, provided that you are on an unlimited data usage network. But sometimes these autonomous and discreet procedures may fail to run due to extremely low internet speed or interference in the network. In such cases, you may need to ensure that your Windows updates are accomplished without any glitches.
So try to receive the update manually as of now using the following instructions –
- Click taskbar search, type update, and press – Enter.
- From right pane, click – Check for Updates.
- Wait until the completion of downloading and lastly, click the – Install now.
6] Remove Windows Update download path to solve Error 0x8007000d
In order to make sure all your windows components are running smoothly you must ensure that all the Registry keys are intact. A single letter error with any of its strings may result in an unexpected error. It could be in the case of windows update as well, if any associated string value gets corrupted it could reflect error 0x8007000d. In such an eventuality what you must do is modify or remove that key what is necessary in order to get rid of the disturbing issue.
Note – Be very careful while changing the registry, as an invalid registry could adversely affect your PC and OS, you end up losing data as well.
- Press Windows & S keys together and type in – “regedit”
- Hit the – Enter
- Click the – Yes when a User account control box appears.
- In the Registry Editor console, type in the following string
HKEY_LOCAL_MACHINE\SOFTWARE\Policies\Microsoft\Windows\WindowsUpdate
- Right-click on WUserver and choose Delete.
- Then right-click on the – WIStatusServer and delete it as well.
- Now close the Registry Editor console and Reboot your system
7] Uninstall or put your Antivirus software on Stand-by status
We have often seen people buying an antivirus kit along with their first laptop and we can’t blame them for it. Everyone is apprehensive of data loss and won’t bother spending a bit extra for it. But these third-party applications sometimes can’t differentiate between a virus and a Microsoft update. Hence in order to deal with it what you must do is disable your antivirus for a period of time and manually start the update and check if the error still comes up.
- Click the up arrow present on the right-hand side of the taskbar to open the hidden icons on the system tray.
- Right click on the Antivirus icon and choose – Disable.
- The Antivirus program would ask you for the period of time after which the program is re-enabled automatically. Select as per your choice.
- Now go to the – Settings
- Click the – Update and Security.
- Here, select the – Check for Updates.
Suppose the update isn’t installed then you must uninstall your antivirus program immediately.
Here’s is how you can do that
- Press the Windows logo key, type in appwiz.cpl, and hit enter
- Here, from the list of programs on your system, select the antivirus and click Uninstall from the top bar.
8] Clean boot to fix Windows Update Error 0x8007000d
Often the reason for update failed error 0x8007000d is the malicious third party applications that change the windows update components. So you must perform a clean boot of the windows which would start up our system with the least of the drivers, programs, or services.
- Hit the Win+S, type in msconfig, and press – Enter.
- Click on radio button alongside the – Selective Startup.
- Uncheck the box set for – Load Startup items.
- Click the – Services tab.
- Click and select the box for the – Hide all Microsoft services
- Next, click the – Disable all.
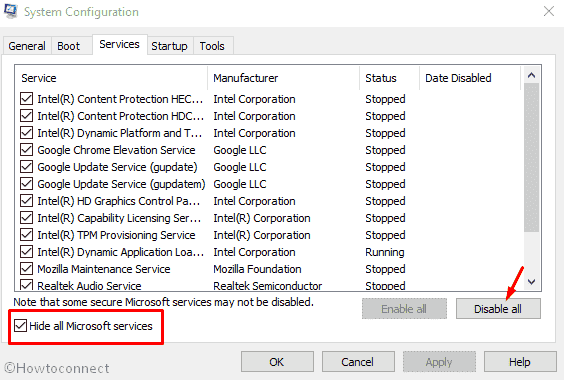
- Switch to the – Startup tab.
- Select the – Open Task Manager.
- Right-click on the enabled program and choose the Disable one by one.
- Repeat the same for all enabled programs.
- Now close the –Task Manager.
- Go back to the – system configuration.
- Click on Apply and then Ok.
9] Wipe out the Temporary Files
Temporary files are created to facilitate a smooth and seamless transition while working on Windows. These are records of your activities and provide an easy and quick recovery of data in case of an unintentional shutdown or power outage. Unfortunately, these are redundant data keep sitting on your system, making it slower and slower by each day. Furthermore, disk space might runs short leading to error: 0x8007000d. So, delete all the files of these kinds using the following guidelines –
- Press the – Windows+R.
- Type in Temp and hit the – Enter.
- Once you are inside the temp folder, press Ctrl+A to select all items.
- Hit the – Delete.
- Once again open the run box and type in %temp%.
- Select all items similarly and wipe out them.
10] Set Microsoft Edge as your Default Browser
Sometimes 0x8007000d might occur due to the add-ons that you install on your browser. Setting Microsoft Edge as your Default Browser could resolve the issue and do the trick. Also, reset the Internet Explorer Settings using the following instructions –
- Open Control panel.
- Put the View by status either of Large or Small icons.
- Click the – Internet options.
- Select the – Advanced tab.
- Next, click the – Reset.
- A dialogue box will appear, select the – Delete personal settings.
- And finally, click the – Reset.
11] Uninstall any previously existing updates
More often, it has been noticed that the existing update would raise a conflict with the new patch and cause an obstruction in downloading and installing the latest one on the system. It could even be the case of a bug being carried on the latest installed update patch. You can easily resolve this issue by removing all of the previously existing updates.
- Press Windows + I keys together to open “Settings”
- Go to the – “Update and Security”
Windows 11 users, open Settings app => choose Windows update from left pane to get same settings page.
- From right hand side, click – “View Update history” or Update history.
- Move down and Choose – “Uninstall updates”
- Scroll down to reach Microsoft Windows section.
- Select the recent update you received and click Uninstall.
- Comply with all the prompts in order to complete the uninstallation process.
- When the process ends, kindly reboot your system
12] Get rid of any kind of existing corruption on your PC
System elements could go missing or in worse case scenarios, go corrupt, if our PC suffers any kind of malware attack, software collisions, or anything similar to that sort. This could be a prominent reason for error 0x8007000d to come up. In order to recover the missing system elements or resolve this corruption, we must execute these few simple steps –
- Press Windows+S key together and type in – “cmd”
- Now press the – ‘Ctrl+Shift+Enter’.
- When the User Account Control box appears, click the – Yes.
- In the elevated Command Prompt window, type in the following syntax exactly it is and hit enter.
DISM.exe /Online /Cleanup-image /Restorehealth
- Once you have executed the command Reboot your system.
- This should have fixed 0x8007000d error when you sign back in.
- However, if the issue still persists, open command prompt again as administrator.
- Type in the following command and hit enter –
Sfc /scannow
- Wait patiently till the procedure completes without any kind of interruption.
- When the process ends, reboot your windows PC.
13] Ensure that the Windows defender is working effectively
Windows Defender Firewall protects your system from any kind of potentially harmful and malicious programs that your system may encounter. Error 0x8007000d may come up if this system is turned off. The reason why it happens is not clear yet but turning it back on has often resolved the issue. So let’s see how you can do that in a few simple steps –
- Click the Taskbar Search and type in – control.
- Hit Enter and open the Control panel.
- Set the View by option to Large icons.
- Click the – Windows Defender Firewall
- On the next page, check carefully and make sure that each option is green, and in case if you find any option red, turn it manually.
- To do that, click the – Turn Windows Firewall On or Off.
- Click on the radio button alongside – Turn on Windows Firewall
- Make sure you choose the same option for both Private Network Settings and Public Network Settings
- Finally, click on OK to save the settings.
14] Free up essential Disk Space
Sometimes windows update packs require a significant amount of space In order to download and install them in a smooth and consolidated process.
If your system is running out of storage and you don’t have enough space for the updates, this could interfere the update process and result in error 0x8007000d. Hence you must clean up the junk files and allocate more space in order to resolve the issue by following the instructions –
- Press Windows+Q keys and type in – cleanmgr.
- Hit Enter to open Disk Cleanup console
- After assessing how much space the system utility can evacuate, Disk Cleanup for ( C: ) will open.
- Click the – Clean up system files.
- Simply click Ok on the next prompt.
- On the next screen, Disk Cleanup for ( C: ) will appear.
- Click the checkboxes available under Files to delete
- Then hit the – OK
- Finally, select the – Delete files.
15] Restore your PC
Error 0x8007000d might appear after you made some modifications in Registry or Settings, or installed a third-party shady program. Then it’s highly probable that your recent ministrations have adversely affected the system and you might need to restore your PC.
- Press the Windows logo and type in – rstrui
- Hit enter to open System Restore.
- When “system restore” opens click on Next.
- Click and Check the checkbox alongside – Show more restore points
- Choose the most recent date and time of restore available here and click – Next
- On the next step click – Finish.
- Click Yes on the final confirmation prompt.
- The system will reboot itself once the restoration process completes.
- Once the system restarts, the new update patch would most certainly be installed without any kind of error 0x8007000d appearing.
16] Do clean install of Windows
Suppose everything fails to fix 0x8007000d error then the clean install is the last solution. This allows you to start afresh without any shred of previous install residues, no cache data, or any damaged files residues whatsoever.
Follow the instructions in this post – How to Install Windows 10 2009 October 2020 update.
Methods list
1] Purge the Windows update components
2] Make sure that BITS is running
3] Rename the CBS log files
4] Use Windows Updates troubleshooter
5] Try going for Manual Update
6] Remove Windows Update download path
7] Uninstall or put your Antivirus software on Stand-by status
8] Clean boot Windows
9] Wipe out the Temporary Files
10] Set Microsoft Edge as your Default Browser
11] Uninstall any previously existing updates
12] Get rid of any kind of existing corruption on your PC
13] Ensure that the windows defender is working effectively
14] Free up essential Disk Space
15] Restore your PC
16] Do a clean install of Windows
That’s all!!
Repair any Windows problems such as Blue/Black Screen, DLL, Exe, application, Regisrty error and quickly recover system from issues using Reimage.
Рассказываем, как исправить ошибку 0x8007000d в ОС Windows.
Обычно этот сбой происходит при попытке обновить операционную систему. Код ошибки указывает на неисправность в центре обновлений. Поэтому именно там надо искать проблему.
Используем средство автоматического поиска и устранения неполадок
В Windows 10 есть специальная программа, которая в автоматическом режиме разыскивает неисправности и пытается их устранить. Говорят, что она неплохо справляется со своей задачей. Сейчас в ее работе задействован искусственный интеллект, который помогает находить наиболее оптимальные пути решения проблем.
Чтобы воспользоваться этой функцией:
- Открываем меню «Пуск», кликнув по логотипу системы.

Это же меню можно открыть, нажав Win
- Потом переходим к настройкам.

Сюда можно попасть, одновременно нажав Win + I
- Ищем в списке настроек подменю «Обновление и безопасность». Заходим туда.

Вот нужный пункт настроек
- Ищем в боковой панели вкладку «Устранение неполадок». Переходим на нее.

Раздел с инструментами для поиска и исправления ошибок
- Откроется окно с большим списком разных служб и устройств Windows. Мы ищем строчку «Центр обновления Windows» и жмем на нее.

Кликаем вот сюда
- Затем нажимаем на кнопку «Запустить средство устранения неполадок».
В течение нескольких минут система будет пытаться исправить все найденные ошибки. Если повезет, то это сработает.
Проверяем целостность системных компонентов
Если не удалось автоматически исправить ошибки с помощью графического интерфейса, можно прибегнуть к использованию текстовых утилит. Иногда простейшие консольные команды приносят больше пользы, чем современные технологии с ИИ и прочими прелестями. Попробуем утилиты System File Checker и DISM.
- Сначала одновременно нажимаем клавиши Win + R.
- В появившемся окошке вводим cmd.exe и нажимаем на клавишу Enter.

Можно найти эту же утилиту в локальном поисковике
-
Затем проверяем систему на наличие поврежденных файлов с помощью команды sfc /scannow. Вводим ее в терминал, а затем нажимаем Enter, чтобы активировать.
-
После этого в командную строку по очереди вводим команды: Dism /Online /Cleanup-Image /CheckHealth для проверки состояния системы. А затем Dism /Online /Cleanup-Image /RestoreHealth для ее восстановления. После каждой команды так же надо нажимать клавишу Enter, чтобы они сработали.

Вводим команды по очереди и каждую запускаем, нажав на «Ввод»
Как только все команды завершат свою работу, надо будет перезагрузить систему. Ну а после этого снова попытаться обновить Windows. Проблем возникнуть не должно.
Перезапускаем службы обновления и заново регистрируем необходимые DLL
Иногда, чтобы заставить нормально работать центр обновления, приходится сбрасывать его параметры, а иногда и вовсе сбрасывать настройки всей операционной системы. Вплоть до полной переустановки.
Но мы все-таки сперва попробуем сбросить настройки центра обновлений. Для этого:
- Запускаем командную строку (выше я уже писал, как это можно сделать).
- Поочередно вводим туда все описанные ниже команды. После каждой нажимаем на Enter, чтобы они заработали.
Останавливаем действующие службы
net stop bits
net stop wuauserv
net stop appidsvc
net stop cryptsvc
Удаляем настройки системы обновлений
    Del «%ALLUSERSPROFILE%\Application Data\Microsoft\Network\Downloader\qmgr*.dat» *

    sc.exe sdset bits D:(A;;CCLCSWRPWPDTLOCRRC;;;SY)(A;;CCDCLCSWRPWPDTLOCRSDRCWDWO;;;BA)(A;;CCLCSWLOCRRC;;;AU)(A;;CCLCSWRPWPDTLOCRRC;;;PU)

    sc.exe sdset wuauserv D:(A;;CCLCSWRPWPDTLOCRRC;;;SY)(A;;CCDCLCSWRPWPDTLOCRSDRCWDWO;;;BA)(A;;CCLCSWLOCRRC;;;AU)(A;;CCLCSWRPWPDTLOCRRC;;;PU)
Переходим в системную папку Windows
cd /d %windir%\system32
Поочередно регистрируем все необходимые библиотеки DLL
regsvr32.exe atl.dll regsvr32.exe urlmon.dll regsvr32.exe mshtml.dll regsvr32.exe shdocvw.dll regsvr32.exe browseui.dll regsvr32.exe jscript.dll regsvr32.exe vbscript.dll regsvr32.exe scrrun.dll regsvr32.exe msxml.dll regsvr32.exe msxml3.dll regsvr32.exe msxml6.dll regsvr32.exe actxprxy.dll regsvr32.exe softpub.dll regsvr32.exe wintrust.dll regsvr32.exe dssenh.dll regsvr32.exe rsaenh.dll regsvr32.exe gpkcsp.dll regsvr32.exe sccbase.dll regsvr32.exe slbcsp.dll regsvr32.exe cryptdlg.dll regsvr32.exe oleaut32.dll regsvr32.exe ole32.dll regsvr32.exe shell32.dll regsvr32.exe initpki.dll regsvr32.exe wuapi.dll regsvr32.exe wuaueng.dll regsvr32.exe wuaueng1.dll regsvr32.exe wucltui.dll regsvr32.exe wups.dll regsvr32.exe wups2.dll regsvr32.exe wuweb.dll regsvr32.exe qmgr.dll regsvr32.exe qmgrprxy.dll regsvr32.exe wucltux.dll regsvr32.exe muweb.dll regsvr32.exe wuwebv.dll
Заново запускаем выключенные службы обновления
netsh winsock reset
netsh winhttp reset proxy
net start bits
netstart wuauserv
net start appidsvc
net start cryptsvc
После этого перезагружаем компьютер и снова пытается обновить ОС.
Ну и на случай, если ничего не помогает, придется сделать полный сброс параметров Windows 10. Правда, это чревато потерей важных данных. Придется заранее сохранить их в облаке или на отдельном носителе.
![]() Загрузка …
Загрузка …
Post Views: 12 173
Ошибка 0x8007000d – технический сбой, возникающий на операционных системах семейства Windows. Проблема распространенная и встречается как при обновлении драйверов, так и при вводе ключа активации ОС, а потому и однозначного решения возникающих неполадок не бывает – придется перепробовать разные варианты действий.


Установщик обнаружил ошибку: 0x8007000d. Недопустимые данные.
Причинно-следственная связь
Разработчики из Microsoft выделяют четыре сценария, которые приводят к появлению уведомления «error code: 0x8007000d»:
- При установке Windows. Причина – установочные файлы записаны с ошибками, повреждены или же недоступны. Решение – сменить загрузочный носитель (желательно с DVD-диска на внешний накопитель, вроде USB-флешки), отказаться от сборок в пользу классического образа операционной системы, который легко загрузить с официального сайта Microsoft. Альтернативный вариант действий – пересоздать загрузочный носитель с помощью утилиты Rufus, следуя инструкциям от разработчиков.
При активации ОС. Причина – активационный ключ не может быть добавлен в Windows из-за недостаточного уровня доступа к ветке реестра HKEY_LOCAL_MACHINE. Решение – открыть «Пуск», в нижней части интерфейса обратиться к поиску и набрать команду «Выполнить».

 После – вписать в появившееся текстовое поле regedit и нажать Enter.

 В отобразившемся реестре нажать правой кнопкой мыши на пункт HKEY_LOCAL_MACHINE и выбрать пункт меню «Разрешения».


- Проставить галочки полного доступа и нажать «Ок». Перезагрузить компьютер и попробовать провести активацию заново.
При обновлении драйверов. Причина – несовместимость программного обеспечения с текущей версией операционной системы. Как исправить – загрузить новую версию драйвера или воспользоваться функцией «Устранение несовместимости». Порядок действий следующий: нажать правой кнопкой на исполняемый файл с расширением *exe и, вызвав выпадающее меню выбрать пункт «Свойства». В открывшейся панели перейти в раздел «Совместимость», а после – выбрать вариант с запуском средства устранения неполадок. 

- Если не помогло – придется попробовать убрать неполадку вручную – выставив специальный режим совместимости в одноименном разделе. На Windows 10, к примеру, стоит работать в режиме совместимости с Windows
- При обновлении Windows. Причина – техническая неполадка, связанная или с нарушением работы жесткого диска (а иногда и интерфейса SATA), не работающей в BIOS опции Secure Boot (стоит сразу же проверить подобный нюанс, в особенности на ноутбуках), или же неисправностью операционной системы, которая не может определить версию недавних обновлений и загрузить новые.
Способы избавления
Если описанные выше сценарии исправить предлагаемыми способами не получилось, то придется воспользоваться следующими рекомендациями:
Использование инструментария Windows. Сервис «Устранение неполадок» уже давно стал частью семейства операционных систем Microsoft – и на «Семерке», и на «Десятке» лучшего способа исправить незначительные технические ошибки и не найти. 

Вызывается сервис через панель «Пуск» и раздел поиск, куда придется ввести комбинацию «Устранение неполадок», а после того, как подходящий вариант появится на экране – нажать Enter. 

Половина работы уже сделана – осталось найти пункт «Центр обновления Windows» и подождать, пока не закончится проверка

После проведенного анализа сервис выдаст инструкцию, связанную с дальнейшими действиями (перезагрузка компьютера, поиск обновлений, загрузка программного 

Обновление драйверов в автоматическом режиме. Ошибка 0x8007000d частенько возникает в тех случаях, когда драйвера на некоторые компоненты персонального компьютера давно устарели. В первую очередь речь об интерфейсе SATA, контроллерах центрального процессора и некоторых системных компонентах. 

Решить проблему поможет мультифункциональный инструмент Driver Booster, способный в два счета отыскать свежие драйвера и вернуть работоспособность нерабочим элементам компьютера.

- Работать с Driver Booster легко – поиск запускается автоматически, заканчивается уже через 5 минут, а для установки всего необходимого придется только нажать на кнопку Update Now. Перезагрузка компьютера – обязательна.
Очистка каталога %systemroot%SoftwareDistributionDownload. Если обновление Windows не работает из-за проблем с проверкой версий, значит, пора перезапустить процесс вручную.

Сначала важно вызвать проводник комбинацией клавиш WIN + E. А после – ввести комбинацию %systemroot%SoftwareDistributionDownload в строку состояния и нажать Enter.

- После перехода в каталог рекомендуется выделить все файлы через CTRL + A и нажать Shift + Delete. Проделанные действия стоит подкрепить перезагрузкой компьютера. А после останется снова зайти в раздел «Центр обновлений Windows» и проверить появившиеся предложения.
Запуск DISM. «Система обслуживания образов развертывания» (DISM) встроена в Windows и предназначена для молниеносного поиска поврежденных файлов, которые мешают процессу обновления.
Использовать DISM придется через командную строку, запущенную с правами администратора через меню «Пуск». 

Далее – ввод команды dism.exe /online /cleanup-image /scanhealth и недолгое ожидание завершения процедуры. 

- А после, независимо от результата, нужно добавить команду exe /online /cleanup-image /restorehealth. Перезагрузка системы обязательна.
Отдельного упоминания заслуживают инструменты, способные отыскать вредоносное программное обеспечение на жестких дисках или в остальных компонентах Windows. Хотя бы для поверхностного, но анализа системы стоит воспользоваться сервисом Dr.Web CureIT!
Источник