Fix Windows Update errors with our tested solutions
by Ivan Jenic
Passionate about all elements related to Windows and combined with his innate curiosity, Ivan has delved deep into understanding this operating system, with a specialization in drivers and… read more
Updated on
- The 0x80070003 update error usually arises due to issues with OS itself and can be fixed in no time.
- Restarting associated services, for instance, Windows Update, can help here.
- Other fixes include modifying the Registry and manually downloading the update, as described below.
XINSTALL BY CLICKING THE DOWNLOAD FILE
Repair all Windows Updates Errors with Fortect:
SPONSORED
Windows update failures can be annoying! With Fortect, you will get rid of errors caused by missing or corrupted files after an update. The utility maintains a repository of the original Windows system file versions, and it uses a reverse algorithm to swap out the damaged ones for good ones.
- Download Fortect and install it on your PC
- Start the tool’s scanning process to look for corrupt files that are the source of the issues
- Right-click on Start Repair to resolve security and performance issues with your computer
- Fortect has been downloaded by 0 readers this month, rated 4.4 on TrustPilot
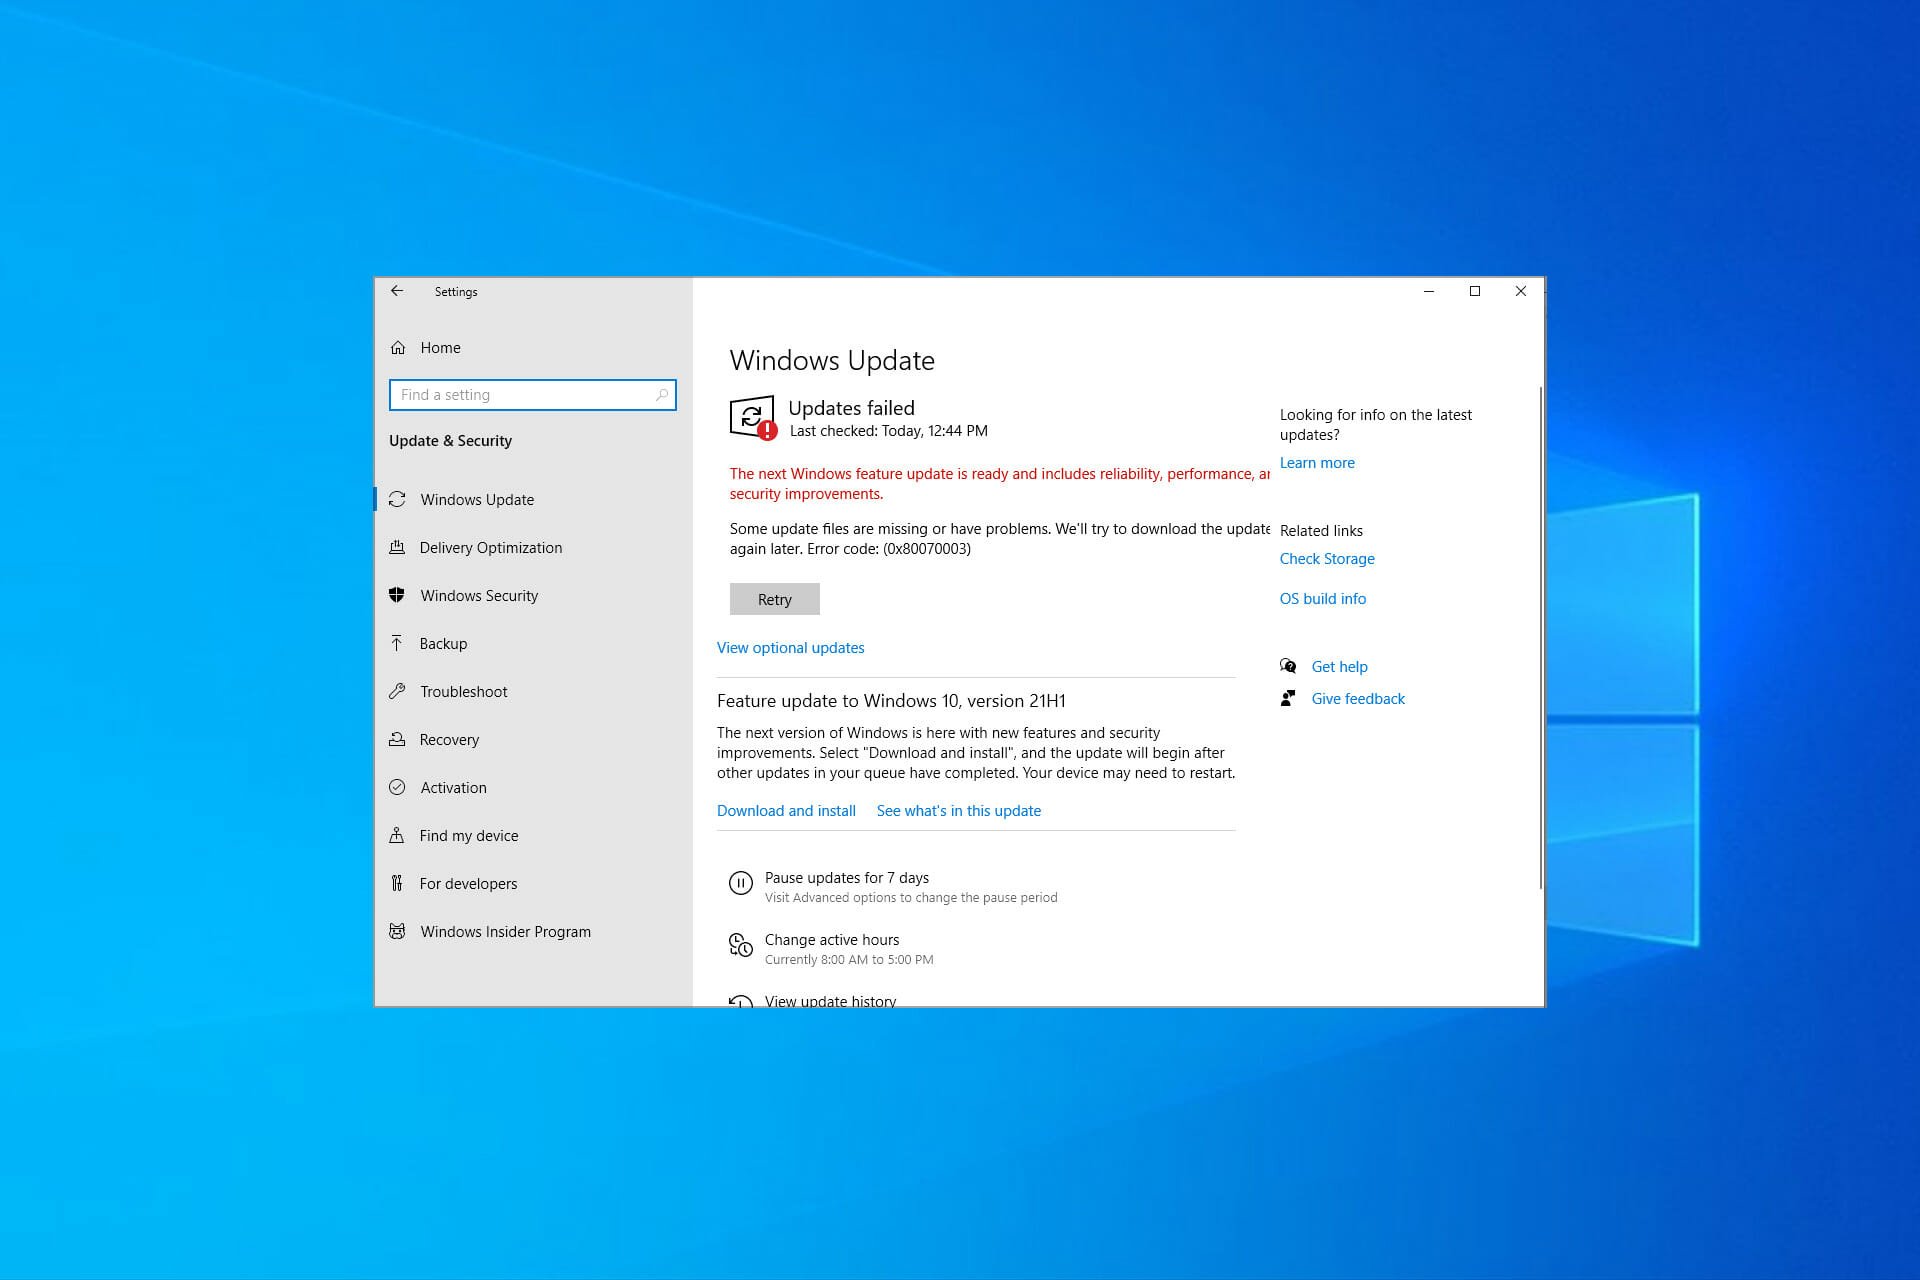
Have you tried updating your device only to get an error message on each attempt? You might have noticed that in some cases, the Windows Update process stops at around 50% and gives you the error code 0x80070003.
You are not the only one. The complete error message reads Some update files are missing or have problems. We’ll try to download the update again later. Error code: (0x80070003) with a Retry button underneath, which, too, doesn’t work in most cases.
What is error code 0x8007003?
Like any other Windows Update error, 0x80070003 prevents you from downloading the latest version of the OS. Here are some of the reasons why you might encounter the error:
- Issues with the related services – There are several critical services that need to be running for the update process to go through, in the absence of which, you are likely to get the error.
- Corrupt system files – In some cases, the error arises due to corrupt system files, which can easily be fixed by running the DISM tool and SFC scan.
- Misconfigured Registry – Oftentimes, all it takes is making some minor changes to the Registry to get the update process up and running.
- Problems with the Windows Update components – WU components play a critical role in the update process, and any issues here can trigger errors.
Here are other variations of the error:
- We couldn’t install this update but you can try again (0x80070003) – Here, you can try restarting the computer and verifying that the critical services are all up and running.
- Windows failed to install the following update with error 0x80070003 – A variation of the update error, and the solutions here should help fix things.
- Error code 0x80070003 Visual Studio / IIS (Cannot read configuration file) – Check whether the folder name matches the path for the virtual directory.
- Error 0x80070003 the system cannot find the path specified – In this case, users get the 0x80070003 Backup error.
- 0x80070003 error code Windows install in Windows 7/10/11 – Error encountered while installing Windows.
- 0x80070003 SCCM – Seen in Configuration Manager during the SCCM content transfer.
- Failure error code 0x80070003 – Modify the registry as we have shown below in order to fix this failure error.
- Status_wait_3 0x8007003 – Manually download each Windows update that you want to install in order to avoid this issue.
Without further ado, let’s just jump right in!
How do I fix error code 0x80070003?
- What is error code 0x8007003?
- How do I fix error code 0x80070003?
- 1. Modify the Registry
- 2. Run the Windows Update troubleshooter
- 3. Run the DISM and SFC scan
- 4. Restart or stop the Windows Update Service
- 5. Reset the Windows Update Components
- 6. Manually download each update
- 7. Perform an in-place upgrade
- How to fix update error 0x80070003 on Windows 11?
- 1. Run a quick SFC scan
Before we head to the full-fledged solutions, here are a few things you can try:
- Restart the computer.
- Disable any third-party antivirus or firewall installed on the computer since these could be blocking the update.
In case the two don’t work, try the solutions listed next.
1. Modify the Registry
Windows updates can run into trouble due to corrupted registry files, so you may need to change your Registry settings. Apply the provided steps below without changing other files.
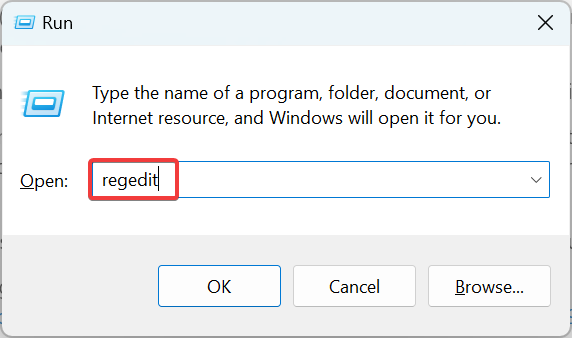
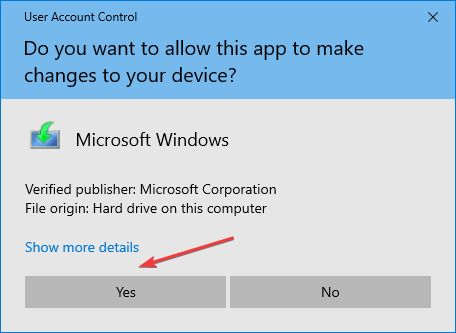
1. Press Windows + R to open Run, type regedit in the text field, and hit Enter.
2. Click Yes in the UAC prompt.
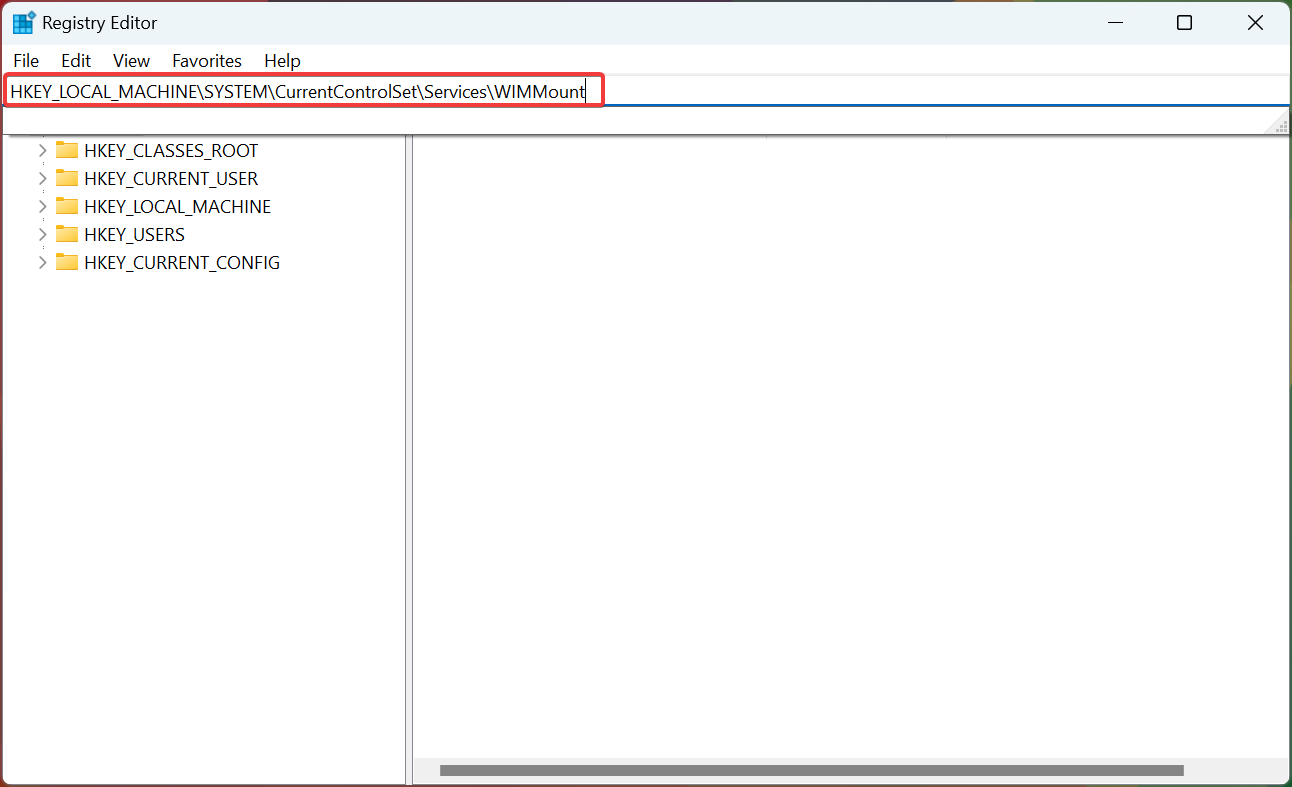
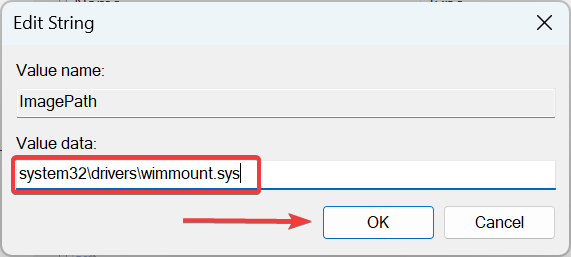
3. Paste the following path in the address bar and hit Enter:HKEY_LOCAL_MACHINE\SYSTEM\CurrentControlSet\Services\WIMMount
4. Now, double-click on the ImagePath entry on the right.
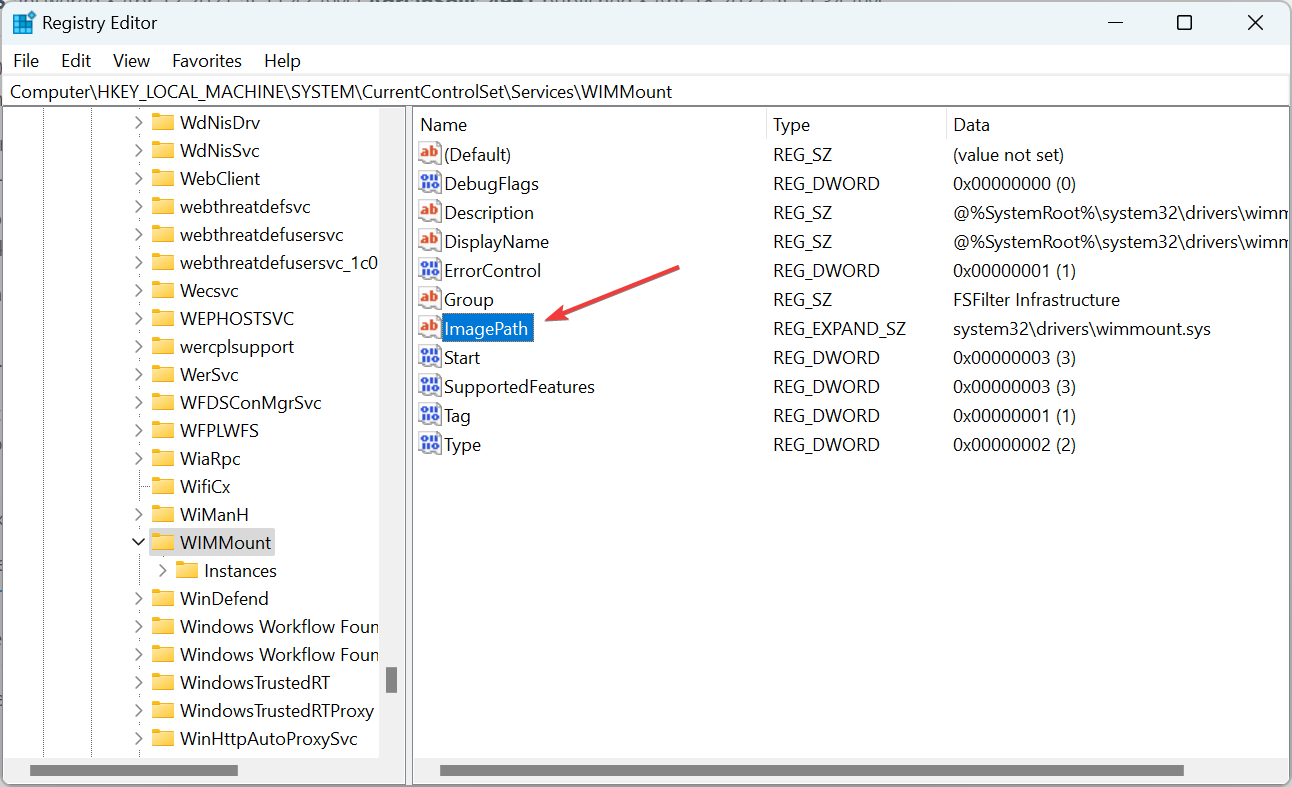
5. Make sure the Value data here has system32\drivers\wimmount.sys listed under it. If it doesn’t, make the changes and click on OK.
6. Now, press Windows + E to open File Explorer, paste the following path in the address bar, and hit Enter:C:\Windows\System32\drivers\
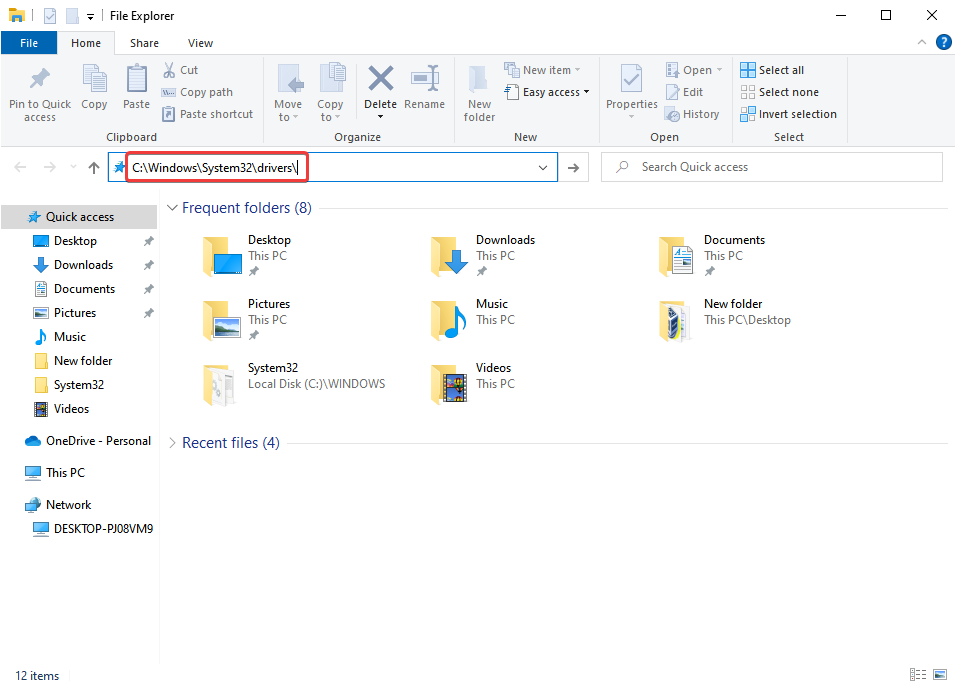
7. Verify you have the wimmount.sys file here.
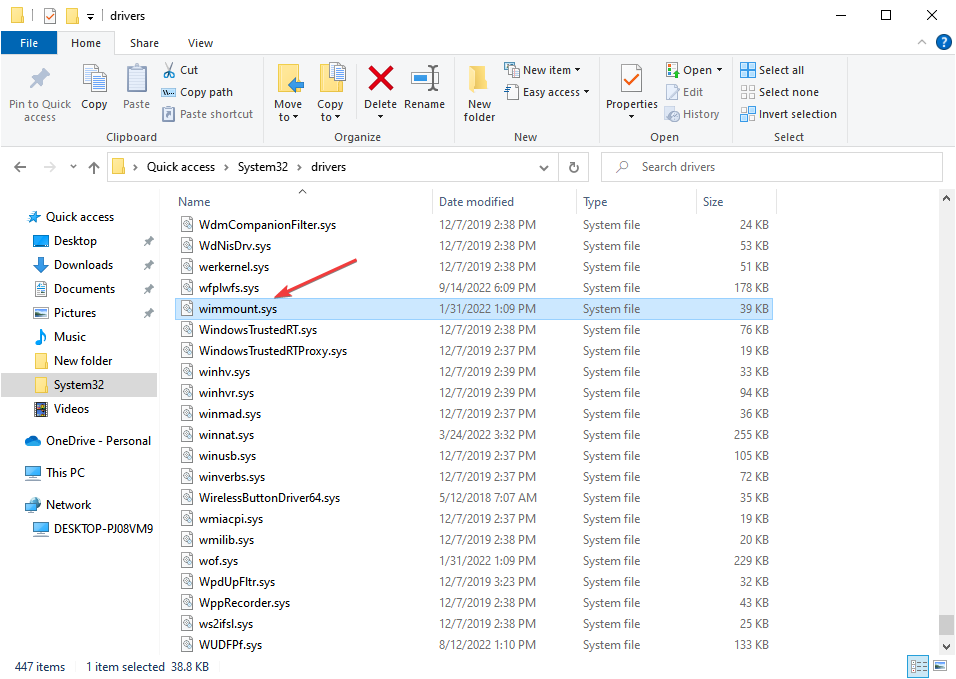
8. Finally, restart the computer.
Once done, check if you can now download Windows Updates without encountering the 0x80070003 error.
2. Run the Windows Update troubleshooter
- Download Windows Update Troubleshooter.
- Once the file is downloaded, run it.
- Select one of the available options and click on Next.

- Wait for the process to finish.
- If the issue is still there, repeat the process, but select a different troubleshooter.

If you want to fix update errors and other issues with ease, Fortect is a great tool that you might want to consider.
⇒ Get Fortect
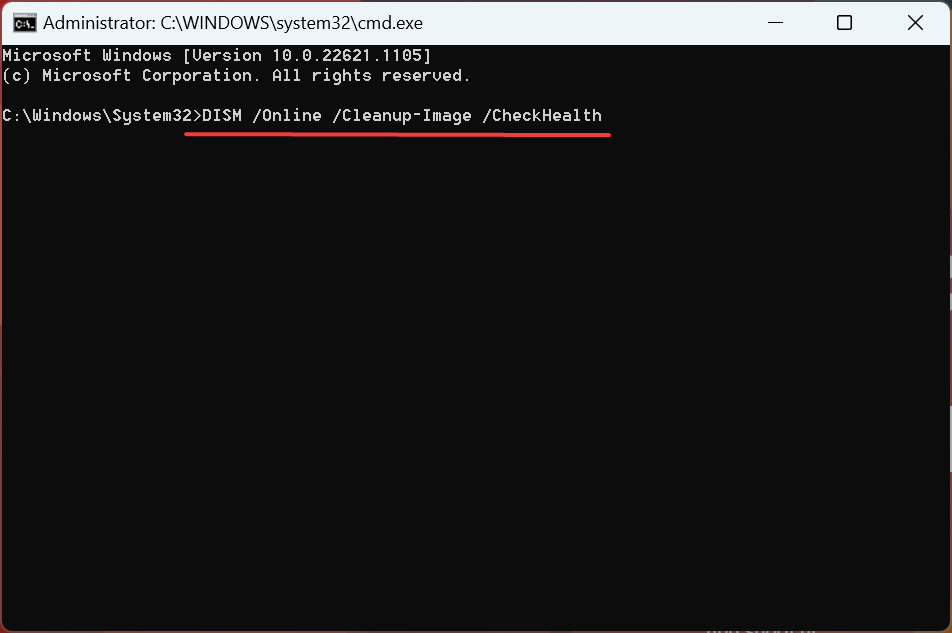
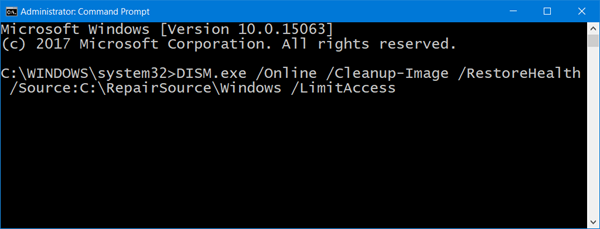
3. Run the DISM and SFC scan
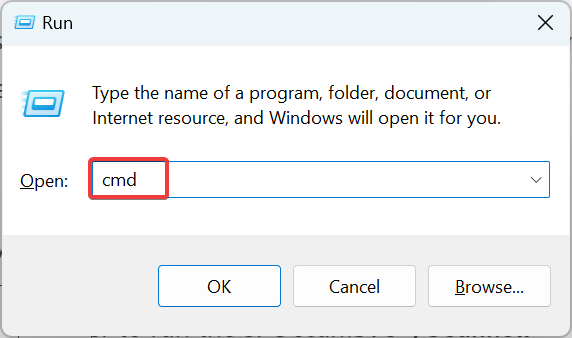
- Press Windows + R to open Run, type cmd, and hit Ctrl + Shift + Enter.

- Click Yes in the UAC prompt.
- Now, paste the following three commands one at a time and hit Enter after each:
DISM /Online /Cleanup-Image /CheckHealthDISM /Online /Cleanup-Image /ScanHealthDISM /Online /Cleanup-Image /RestoreHealth
- Next, execute the following command to run the SFC scan:
sfc /scannow - Once done, check if you are now able to install the updates.
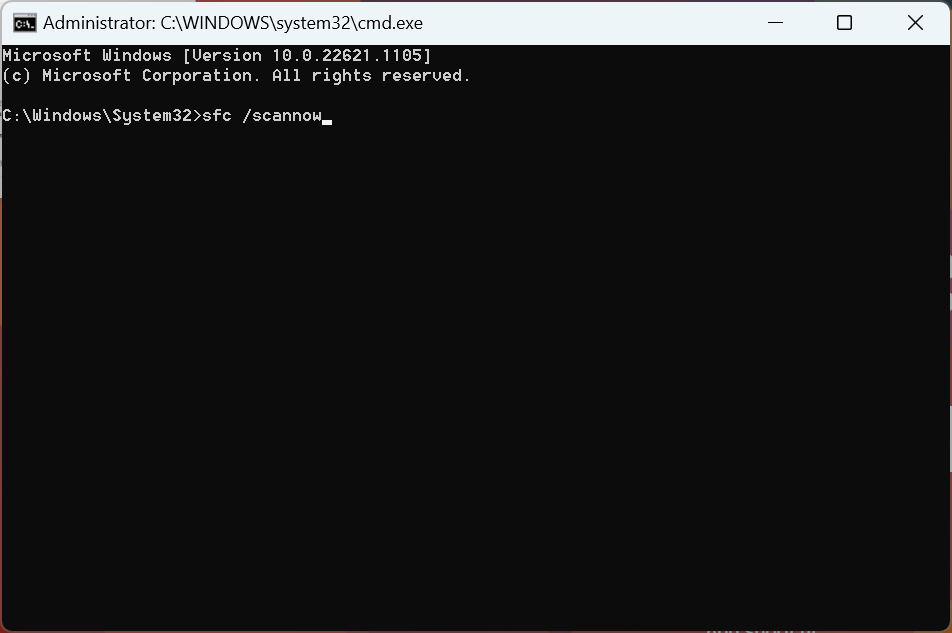
Corrupt system files are a likely reason you are getting the 0x80070003 update error in Windows, and the SFC (System File Checker) scan and DISM (Deployment Image Servicing and Management) tool should do the trick in this case.
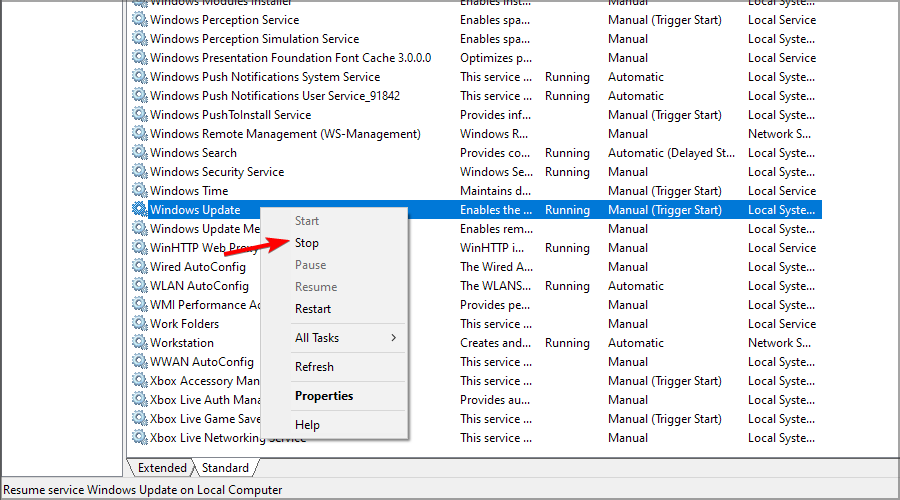
4. Restart or stop the Windows Update Service
- Press Windows + R to open Run, type services.msc, and then hit Enter.
- Now, right-click on the Windows Update service, and select the Stop button.
- Reboot your PC.
- Return to the Windows Update service, right-click on it, and select Start.
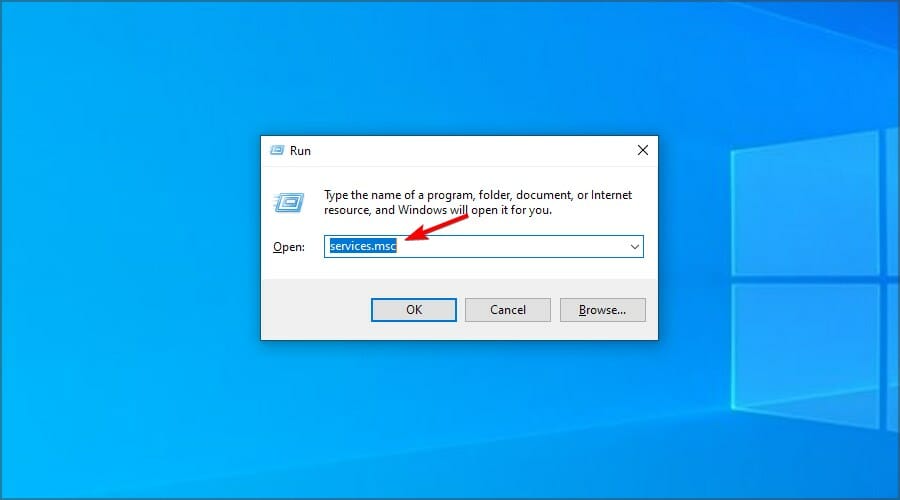

This solution usually works, but if you’re having issues with services, check out what to do when the Windows Update service isn’t running.
- Windows Update is not working in Windows 10/11
- We couldn’t complete the Updates/Undoing changes
- 5+ best Windows update repair tools for Windows 10/11
- How to use the Windows Update troubleshooter in Windows 10 & 11
- Update error 0x800f0922 on Windows 10/11 [Install Failed]
5. Reset the Windows Update Components
In case the previous methods didn’t work, it could be corrupt Windows Update components to blame. Here, the simplest solution is to reset the Windows Update Components.
You can do that by running a batch file or manually executing the commands. The process is usually quick and highly effective at eliminating the 0x80070003 error with the KB5007186 update.
6. Manually download each update
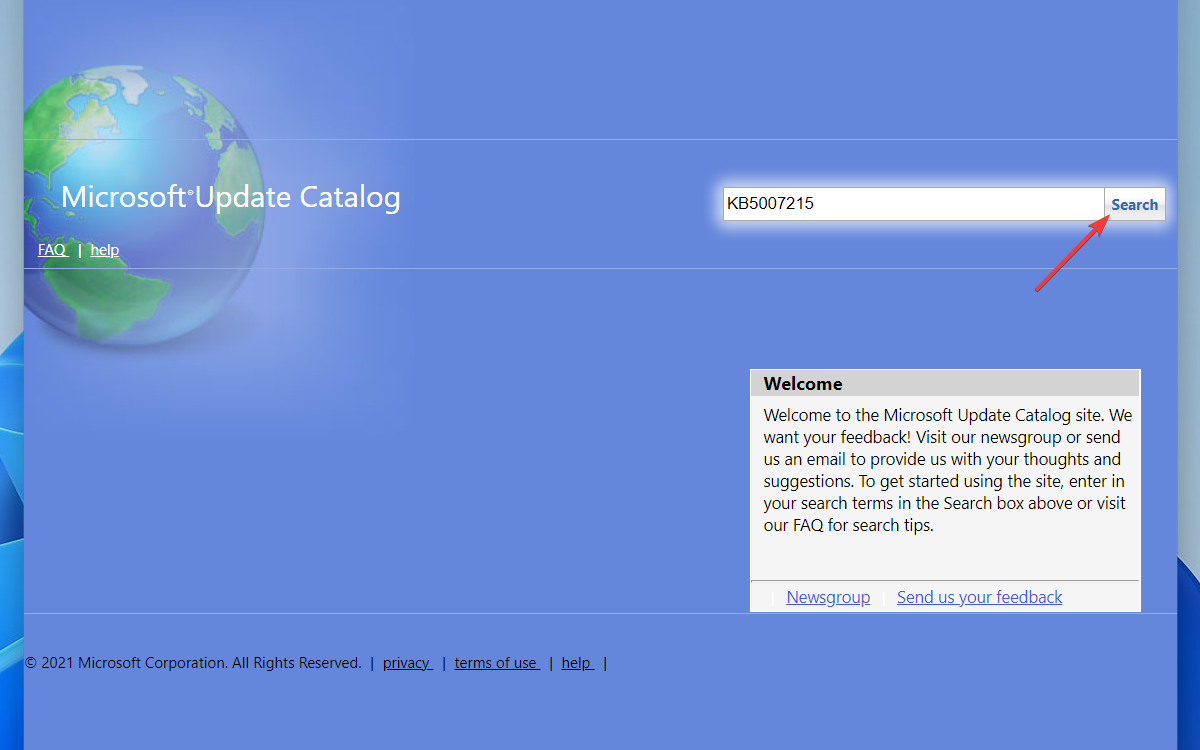
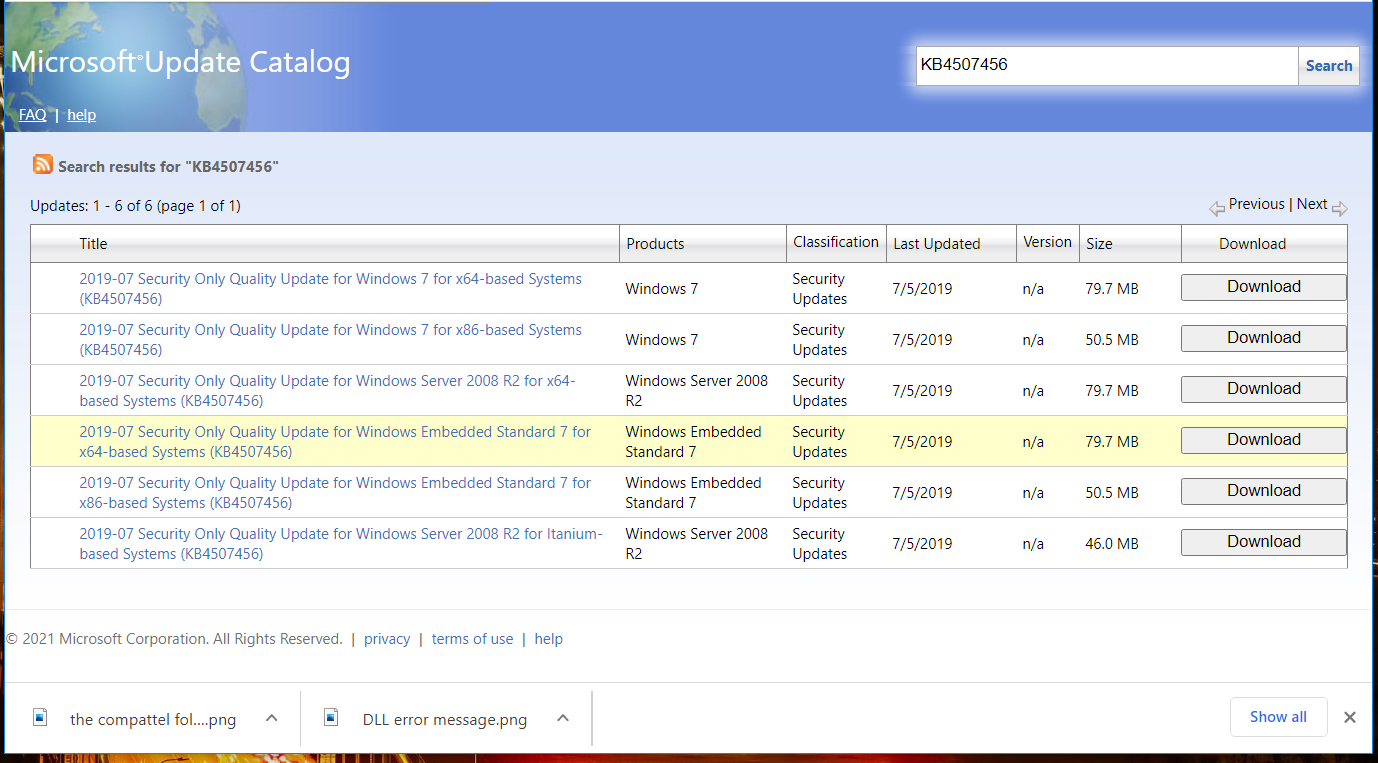
- Visit the Microsoft Update Catalog website.
- Enter the KB number of the update you want to download.

- Now locate the update that matches your PC architecture and download it.

- Once the update is downloaded, run it and follow the instructions on the screen to install it.
7. Perform an in-place upgrade
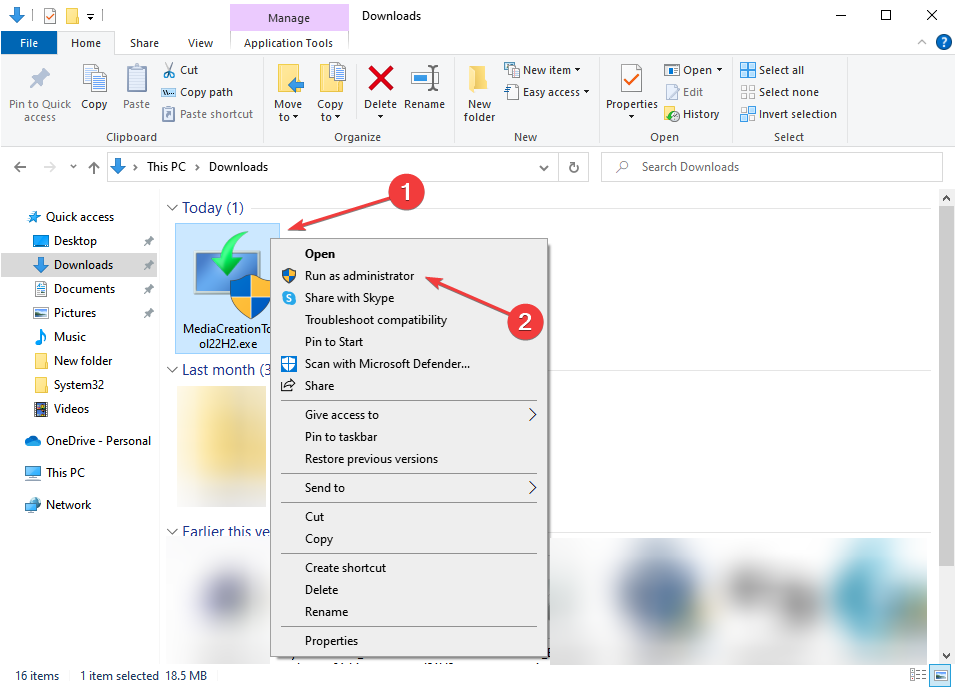
- Visit the official Windows 10 download page and click on the Download Now button.

- After the tool is downloaded, right-click on it and select Run as administrator.

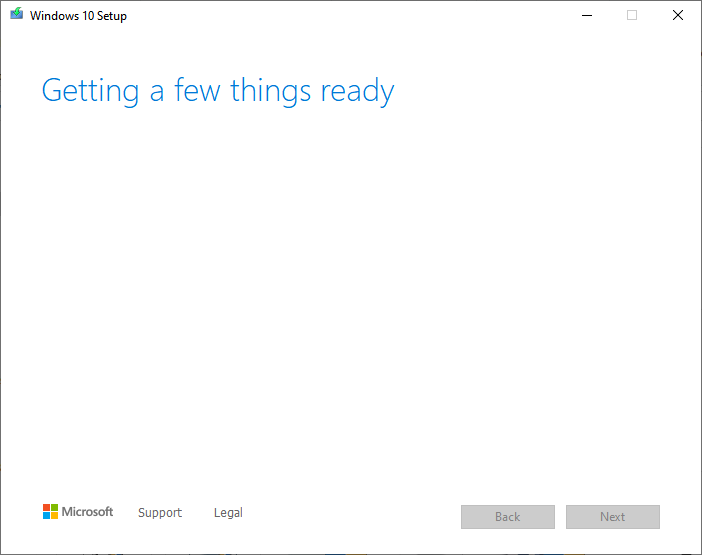
- Click Yes in the UAC prompt.

- Wait for the tool to get things ready.

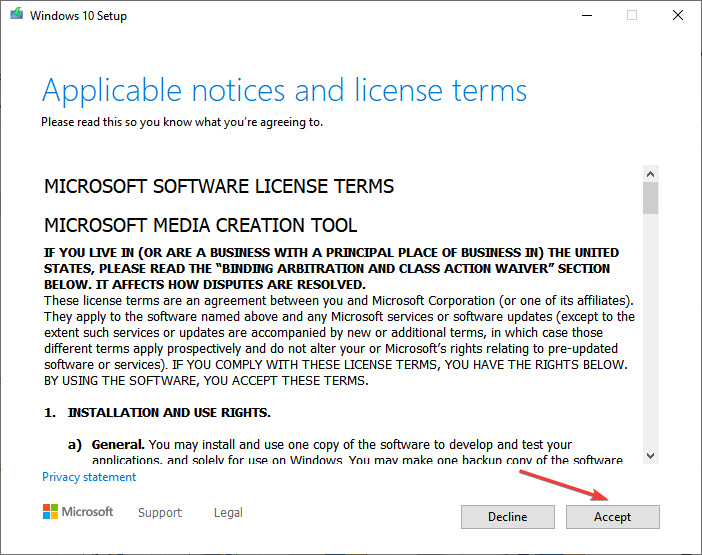
- Click on Accept to agree to the Microsoft Software License Terms.
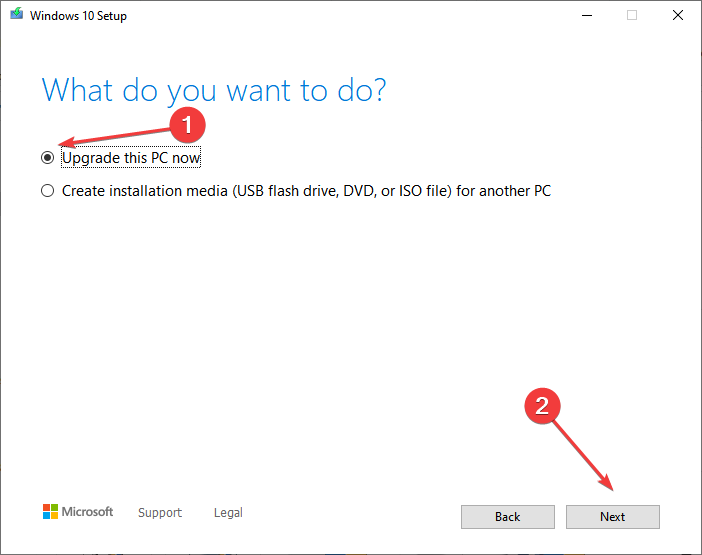
- Choose Upgrade this PC now and click Next.
- Wait for the update to download. This can take a while.
- When you reach the Choose what to keep screen, select Keep everything and then proceed with the in-place upgrade.
- Now follow the instructions to complete the process.
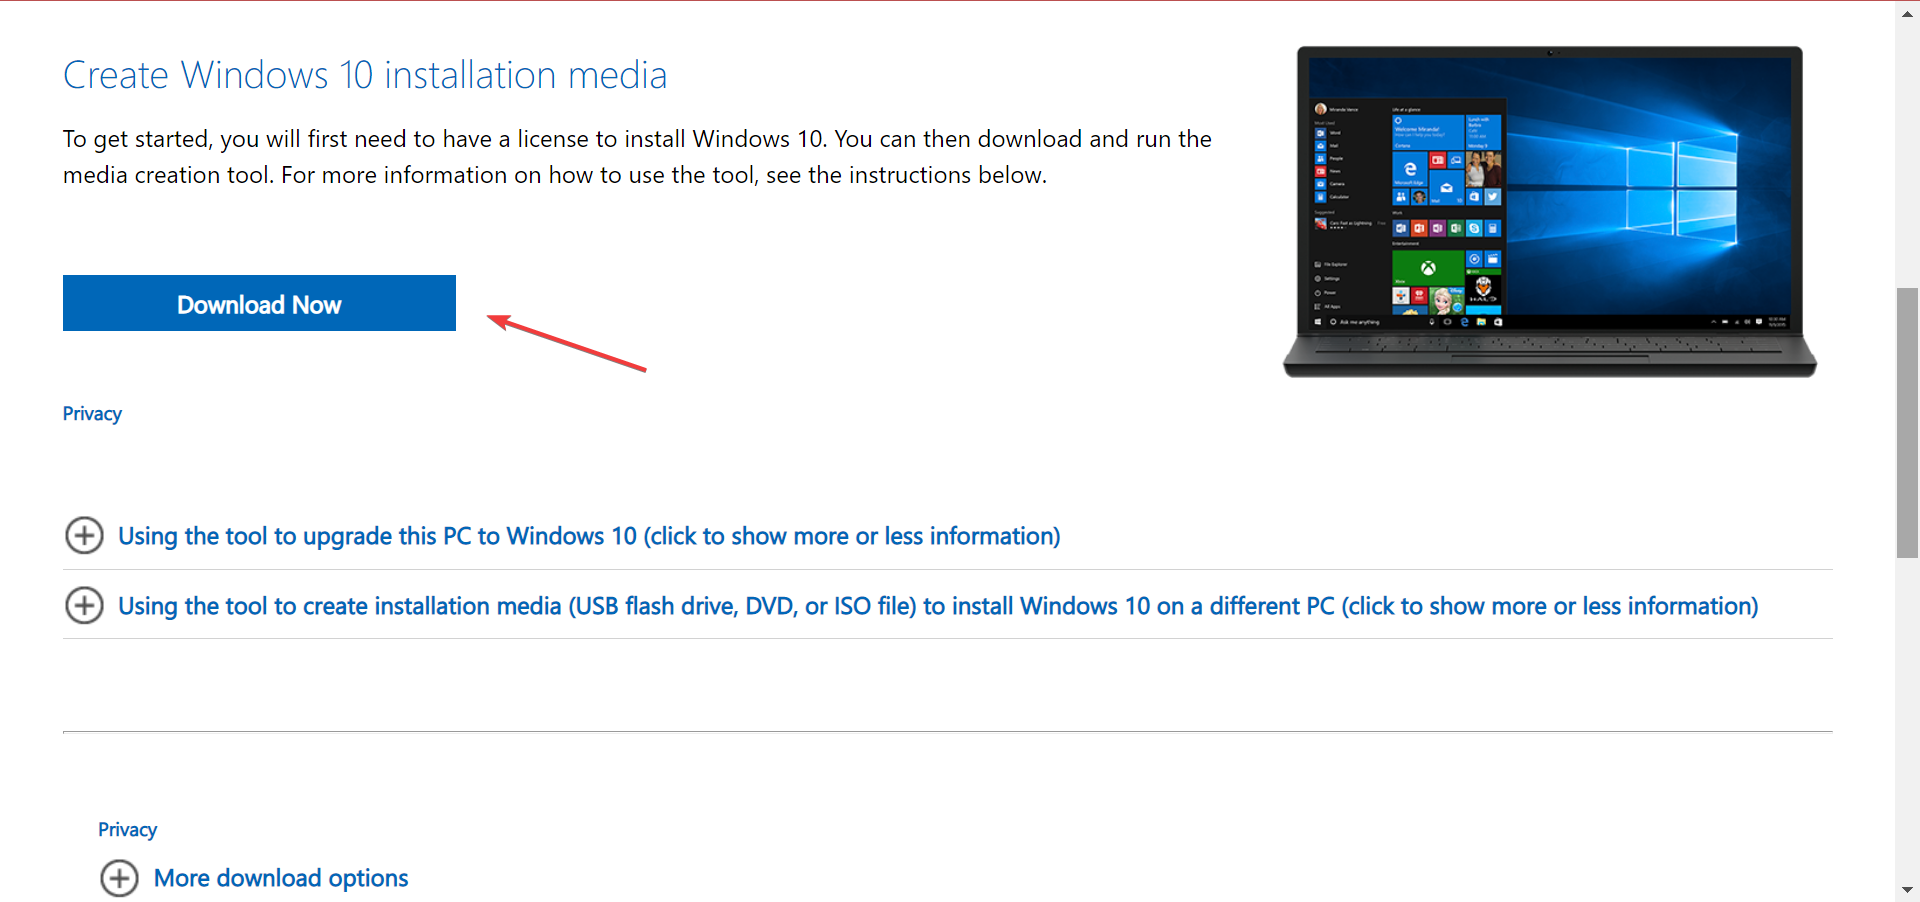

This is by far the most effective method to fix the 0x80070003 error. And remember, the installed applications and stored files won’t be affected during the process.
How to fix update error 0x80070003 on Windows 11?
1. Run a quick SFC scan
- Right-click the Start button and select Windows Terminal (Admin).

- Now run the following command:
sfc /scannow - Wait for it to finish. The process can take 10 minutes or more.
- After it’s finished, check if the problem is still there.


If you have followed the steps above carefully, the error code 0x80070003 should be fixed by the time you reach this part.
In case the problem persists, you have no option but to reinstall Windows 10, and remember, you will lose the applications and files stored on the computer.
Also, you may use a reliable Windows Update repair tool and fix all such errors automatically and in no time.
Should you run into any issues along the way, let us know in the comments below.
![]()
Windows update is pretty significant for the OS as it comes with security patches that keep you safe online and offline as well. Such updates not only ensure safety but also let you experience additional feature enhancements moreover improve PC performance. The process of getting an update in Windows 11 and 10 is independent if you haven’t changed the related default settings earlier. But oftentimes, the procedure gets stuck in the middle due to some error codes.
Error 0x80070003 generally occurs when the Windows update fails to install. Though the exact reason behind this Windows issue is yet to be known, there are some potential causes that are often found to be culprit. In most cases, the incorrect status of update related services causes such an error. Additionally, missing update files, malware infection, corrupted system components, old Spupdsvc.exe file, and incorrect time zone can prompt the same issue.
Here is how to fix Windows 11 or 10 update Error 0x80070003 –
1] Download Servicing Stack Update manually
For any update to install successfully Windows 10 and 11 requires having SSU already installed. So before proceeding ahead to the next methods install the Servicing stack update and check if the error is fixed.
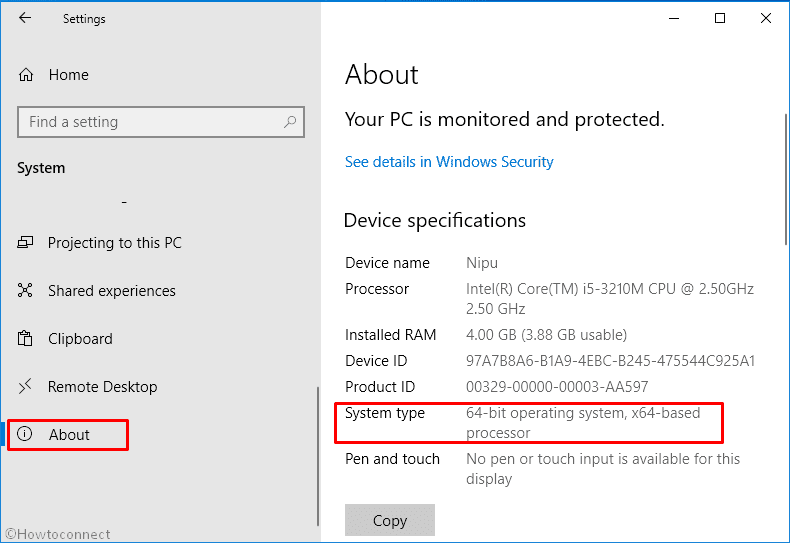
- Press – Windows + I.
- Click – System.
- From the left, select – About.
- Note down the System type present on the right-hand side.
Windows 11 users, open Settings=> Choose About from left to check System type.
- After that, visit the official webpage of update catalog.
- Click the search bar and type in the KB number of the Servicing Stack update.
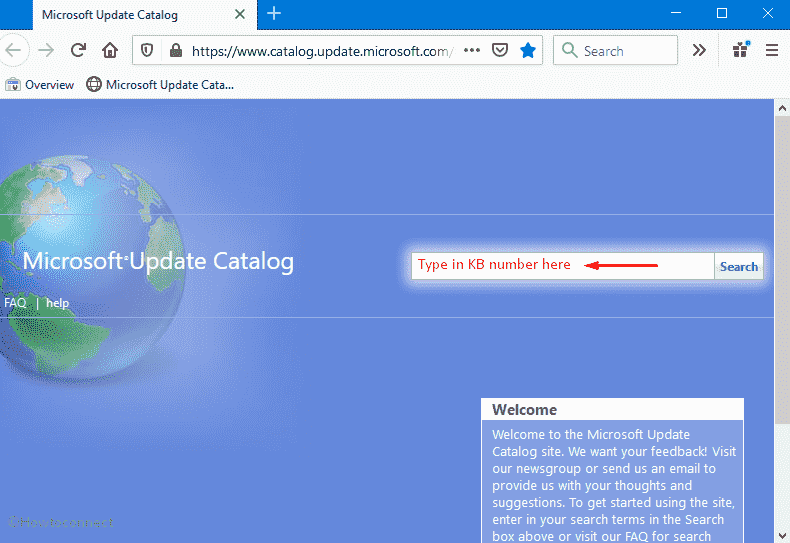
- Hit – Enter.
- Look for the Servicing Stack Update that matches the system type you noted.
- Click Download present next to the desired KB number.
- Double-click the downloaded item and install it following on-screen instructions.
- Restart Windows and check if the error still exists.
2] Run Windows Update troubleshooter to fix 0x80070003
To fix any kind of update error, Microsoft offers a troubleshooter that scans the full system to diagnose the real cause. Furthermore, it put forward automatic fix to resolve the error that you are getting while downloading or installing the new patch. Before running the troubleshooter, make sure you are connected with an active internet connection and then go through the below steps –
For Windows 10
- Press – Windows + S.
- Type in – troubleshoot.
- Hit – Enter.
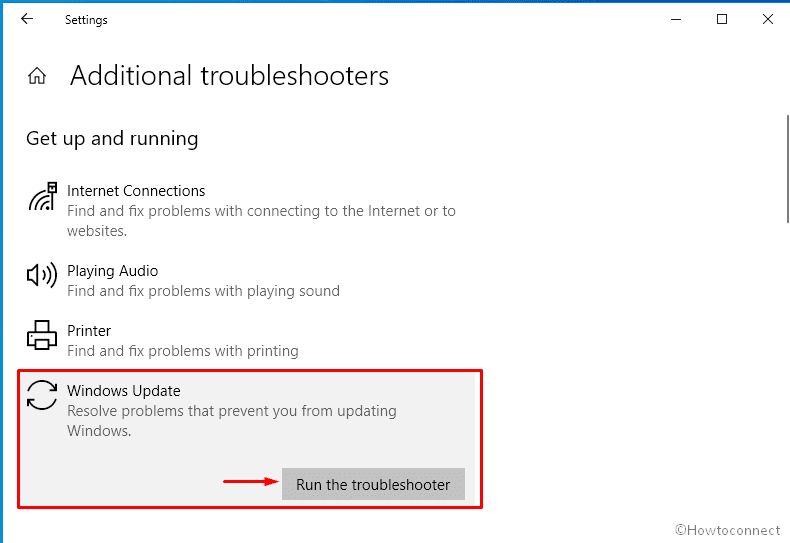
- From the right-pane, click – Additional troubleshooters.
- Select – Windows update.
- Click – Run the troubleshooter.
- Follow on-screen guidelines if any.
- When the utility suggests a resolution, click – Apply this fix.
- Close the troubleshooter and check for update error 0x80070003.
For Windows 11
- Press – Windows + I.
- Move to the right of appearing Settings page.
- Scroll down to find – Troubleshoot.
- Once you get it, select the same.
- From next page, click – Other troubleshooters.
- Hit – Run set beside Windows update.
3] Check the Windows update related services
Windows update service runs in the background and allows the system to download and install new patches automatically. Some other services like BITS, RPC helps in this procedure too. To get any update error-free, these services must run properly. Here are the steps to check the same –
- Press – Windows key.
- Type – services.
- Hit – Enter.
- From Services window, double-click – Windows Update.
- Set the Startup type to Automatic.
- If the service is not running, click – Start.
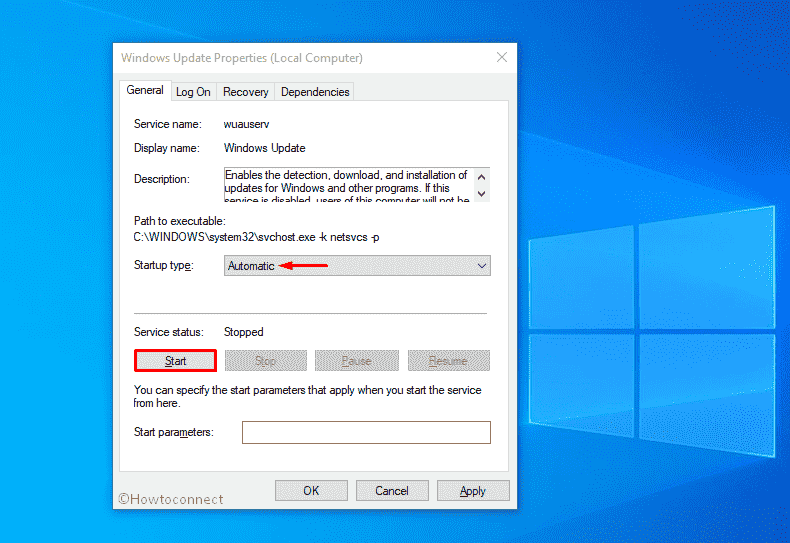
- Shift to – Log on tab.
- Click the radio button set before Local System account.
- Make sure the checkbox of Allow service to interact with desktop is unchecked.

- Click Apply and then OK.
- Do the exact same for Background Intelligent Transfer Service, Event Log, and Remote Procedure Call (RPC) services too.
4] Reset Spupdsvc.exe folder
Spupdsvc.exe is a genuine executable file from Microsoft and a part of RunOnce service. When a new patch becomes available, another process gets a notification and the system adds a RunOnce entry to the registry for spupdsvc.exe. This happens to perform necessary updates to Windows PC. The process is executed when the device restarts and the user logs on. If the system finds anything unusual with Spupdsvc.exe folder, update error 0x80070003 may appear. To fix it out –
- Click – Start icon.
- Type – cmd.
- Press – Ctrl + Shift + Enter.
- When a User Account Control shows up, click – Yes.
- In the elevated Command Prompt, insert the following –
cmd /c ren %systemroot%\System32\Spupdsvc.exe Spupdsvc.old
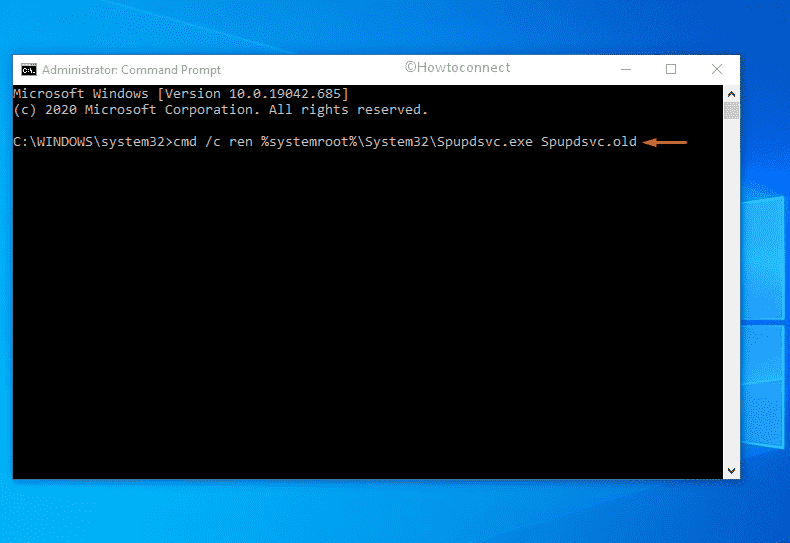
- Hit – Enter.
- Restart the device.
5] Restart Windows update services to fix error 0x80070003
As we said earlier, Windows update service is pretty crucial as it ensures the smooth functioning of the update process. After downloading an update, those files are being saved in the Software distribution folder for the time being. Sometimes if something wrong happens during the installation of update files, many of us try to download the same file again and again. As a result, they conflict with the existing one and end up causing update error 0x80070003. In order to fix the issue, you will have to restart Windows update service moreover replace the current Software Distribution folder with a fresh one. Here is how to proceed –
- Open Command Prompt as admin.
- In the prompt, insert the bellow command one after another and hit Enter after each one –
net stop wuauserv
ren c:\windows\SoftwareDistribution softwaredistribution.old
net start wuauserv
exit
- Reboot the system and check for update error 0x80070003.
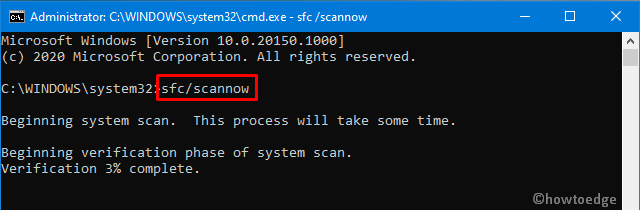
6] Resolve existing system corruption
System File checker resolves the existing corruption as well as recover missing components. On the other hand, DISM is used to repair and make Windows image including Windows RE, Windows Setup, and Windows PE ready. Many people reported that, after running this utility, error 0x80070003 didn’t occur anymore and they were able to install the update without a hitch.
- Press – Windows + S.
- Type in – cmd.exe.
- Opt for – Run as administrator.
- To grant access, click – Yes.
- Type in – sfc /scannow.
- Hit – Enter.
- Once the procedure hits 100%, check the report thoroughly.
- If the corruption is fixed, restart the PC.
- Else, run DISM /Online /Cleanup-Image /RestoreHealth command in the same console.
- After completion of the scanning process, close Command Prompt.
- Reboot Windows PC.
7] Ensure correct Time and Date settings to resolve 0x80070003
Incorrect time zone many times gives rise to error 0x80070003 while installing a new patch. Therefore, it’s necessary to check if your current settings reflect the correct time zone. For that –
- Open Control Panel.
- Set the View by option to Category.
- Click – Clock and Region.
- From the right pane, hit – Date and Time.
- Shift to Internet Time tab.
- Click – Change settings.
- Check the box present before Synchronize with an Internet time server.
- Click – Update now.
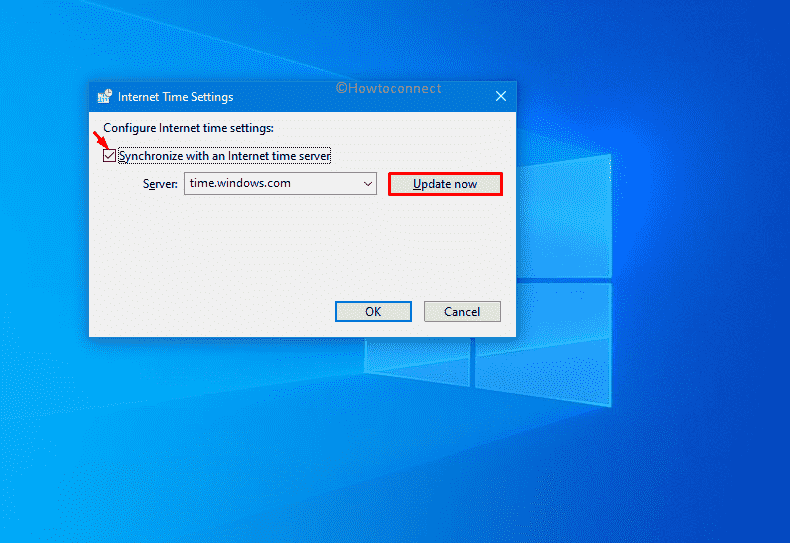
- Hit – OK to save the changes.
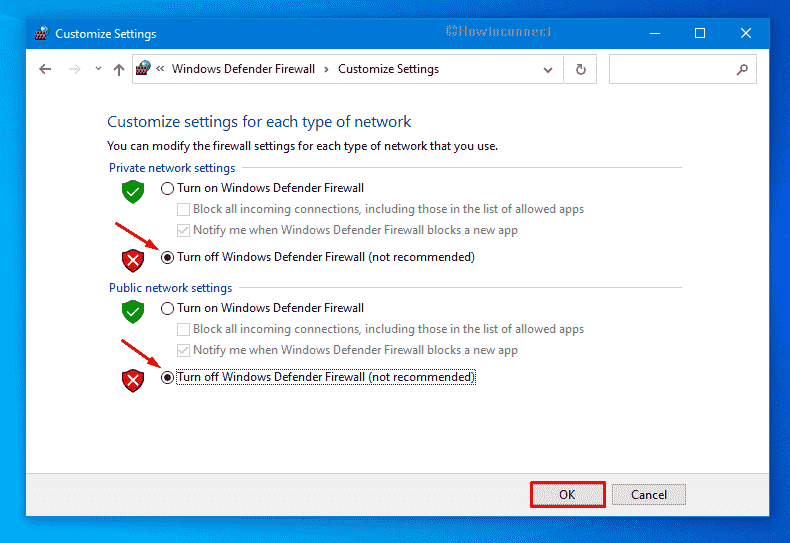
8] Disable the running antivirus program
On many occasions, the antimalware program you are using get a wrong idea about the update files and consider them as a threat. For that reason, the utility blocks the updates from being downloaded. To settle down the issue, you can put the antivirus program out of action. However, don’t forget to turn it on after installing the updates successfully.
Turn Windows Defender Firewall off
- Press – Windows + S.
- Type in – firewall.cpl.
- Hit – Enter.
- From the left column, click – Turn Windows Defender Firewall on or off.
- Select – Turn off Windows Defender Firewall (not recommended) for both Private network settings and Public network settings.
- Click – OK.
Disable third-party antimalware program
- Click the up arrow icon from the notification bar.
- Right-click on the icon of your antivirus software.
- Choose – Disable.
- Set a period of time that decides how long the tool will remain disabled.
9] Clean boot Windows to install updates without 0x80070003
All third-party software and services are not trustworthy and often create problems on Windows 11 and 10. When we end up installing too many similar programs, they conflict with each other which gives rise to several fatal codes. Update error 0x80070003 can be a result of the same. Clean boot lets the system start with basic programs and services, as a result, you will get to know if any third-party component really causing the issue. To clean boot –
- Click – Start icon.
- Type in – MSConfig.
- Hit – Enter.
- Select the radio button set for Selective startup.
- Uncheck – Load startup items.
- Shift to – Services tab
- Check the box present next to Hide all Microsoft services.
- Select – Disable all.
- Go to the Startup tab.
- Click – Open Task Manager.
- Right-click on each program that exists there and choose – Disable.
- Close Task Manager and go back to the System Configuration window.
- Click Apply first and then OK.
- Restart the PC.
Methods list
1] Download Servicing Stack Update manually
2] Run Windows Update troubleshooter
3] Check the Windows update related services
4] Reset Spupdsvc.exe folder
5] Restart Windows update services
6] Resolve existing system corruption
7] Ensure correct Time and Date settings
8] Disable the running antivirus program
9] Clean boot Windows
That’s all!!
Repair any Windows problems such as Blue/Black Screen, DLL, Exe, application, Regisrty error and quickly recover system from issues using Reimage.
The error code 0x80070003/0x80070002 is an update-related issue that may occur while installing pending Windows 10 updates or upgrading to Windows 11. This problem occurred indicates that there are some corrupted system files on your PC or there has been some issue with the Spupdsvc.exe application.
Apart from these two, the unnecessarily piled-up Cache or a recent patch update may also trigger this bug. To solve this error code i.e. error 0x80070002 or 0x80070003, we suggest running the Update Troubleshooter and repairing corrupted/missing files using SFC.
If the error persists even after this, try deleting the stored Cache and Resetting Windows Update Services. As per some users, replacing the old Configuration file Spupdsvc.exe also proves to be useful. If you are stuck with this bug, you may use the previously created restore points or Reset this PC.

What does Error 0x80070003 mean?
The error 0x80070003 simply implies that the Windows update is not working and it could be because of varied reasons. A few of them include –
- Disabled Update Services – BITS, WUAUSERV, etc.
- Missing/Damaged System Files
- Corrupted Update components
To solve the Update Error Code 0x80070003 or 0x80070002 on Windows 10 PC, try the following suggestions –
1] Run Windows Update troubleshooter
Running the default troubleshooter for Windows updates may address any update-related issues on the computer. All you need is to have proper net connectivity and follow the below steps –
Windows 11
- Navigate to the path below, and hit the Run button –
Settings (Win + I) > System > Troubleshoot > Other Troubleshooters > Windows Update

Windows 10
- Jointly press WinKey + I to start the Settings App.
- Select Update & Security thereafter Troubleshoot on the succeeding screen.
- Head over to the right pane and hit “Additional troubleshooters”.
- Next, click to expand the Windows Update section and tap “Run the troubleshooter“.

- This will automatically check for any possible errors and repair them (if found).
2] Repair Corrupt System Files using SFC
The presence of corrupt or missing system files may also cause the 0x80070003 error. To get rid of this error, you must use the System File Checker Utility program and repair damaged files and folders. Here are the essential steps to work upon –
- First of all, launch Command Prompt as an Admin.
- On the elevated console, type “
sfc/ scannow” and press the Enter Key.
- This usually takes 15-20 minutes to scan and repair corrupt files, so wait accordingly.
- After this is over, Restart Windows to incorporate the recent changes.
Sign back into your PC and check whether you still encounter the 0x80070003 error while upgrading Windows. If yes, try the next set of solutions.
3] Reset Windows Services using a batch file
The above two solutions are in general enough to resolve any update-related troubles. They only fail when there is some unnecessary stored cache or service-related corruption on the computer. In this method, you need to stop some of the basic Windows services, clear the cache, and restart the stopped services.
To keep things simple, we suggest creating a batch file of necessary command lines and then running it using Administrative privileges. Let’s explore how to carry out this solution –
- First, minimize all the running windows and right-click anywhere on the Desktop.
- Choose
New > Text Document. - Now, copy all the greyed codes below and paste them on the notepad.
@ECHO OFF
echo Simple Script to Reset / Clear Windows Update
echo.
PAUSE
echo.
attrib -h -r -s %windir%\system32\catroot2
attrib -h -r -s %windir%\system32\catroot2\*.*
net stop wuauserv
net stop CryptSvc
net stop BITS
ren %windir%\system32\catroot2 catroot2.old
ren %windir%\SoftwareDistribution sold.old
ren "%ALLUSERSPROFILE%\application data\Microsoft\Network\downloader" downloader.old
net Start BITS
net start CryptSvc
net start wuauserv
echo.
echo Task completed successfully...
echo.
PAUSE
- Go to the File Menu and select “Save As”.
- Subsequently, type “WSReset.bat” under the “File Name” and select “All Files” under the “Save As Type“.

- Next, put right-click on the newly created batch file and hit “Run as Administrator”.
- If there appears any confirmation window, tap Yes to proceed further.
- The Console will then prompt to “press any key”, and hit any key to run the script.
- Once over, Reboot the PC to make the changes effective from the next login.
4] Replace old Configuration file Spupdsvc.exe
Sometimes, the mere presence of an old configuration file titled “Spupdsvc.exe” under Microsoft Update RunOnce Service may cause the error 0x80070003. Each time users update their existing Build OS, a RunOnce entry is added to the registry for spupdsvc.exe. In case, this doesn’t get renewed after performing an upgrade, it may result in update-related issues. To fix this, all you need is to run a single code on the Command Prompt. Here’s how to proceed –
- Open Command prompt as an Administrator: Press Win+R to start Run, type “cmd“, and press Ctrl + Shift + Enter keys together.
- On the elevated prompt, copy/paste the below command line and hit Enter –
cmd /c ren %systemroot%\System32\Spupdsvc.exe Spupdsvc.old
Note: Executing the above code will replace the old configuration of Spupdsvc.exe with a new one.
- Restart Windows to implement the above changes.
5] Manually Install Windows 10 Updates
If you start receiving the 0x80070003 error after installing a recent security patch, there might be some issue with the cumulative update itself. In such scenarios, we suggest rolling back the OS to its previous state.
Or, you may manually download and install the latest Standalone package on the computer. To do so, you need to first know the recent CU number matching your system architecture. You may visit the Cumulative Update Catalog to know whether there lies any new patch or not. Once you have the required “KB” number, follow the below steps to download and install the .msu file.
Manually Install the Available Updates
- Visit the Microsoft Update Catalog website and type the “KB” number noted above.
- This will present a list of well-matching results, choose one as per the system architecture.
- Click Download next to the update link and thereafter the top link on the upcoming window.
- When the download completes, click twice on the setup file to upgrade the operating system.
6] Use a System Restore Point or Fresh Start PC
If the error persists even after this, we recommend using the restore points to revert back OS to an earlier state where everything was running OK. If you haven’t created any system backups in the past, you are left with either “Reset this PC” or “Clean Installation of Windows“.
Download Windows Speedup Tool to fix errors and make PC run faster
Some update files are missing, Error 0x80070003 can occur on a Windows computer when running Windows Update, activating Windows Firewall or downloading from the Windows Store. In this article, we will talk about Windows Update error 0x80070003. When this occurs, it usually means that the Windows Update (WUAUSERV) is not started or Background Intelligent Transfer Service (BITS) cannot be started. The issue could also be with other supporting components for the Windows Update mechanism.

Some effective fixes to get rid of error code 0x80070003 for Windows Updates on Windows 11/10 would be:
- Run Windows Update Troubleshooter.
- Replace old Configuration file Spupdsvc.exe
- Reset Windows Update related folders
- Check the status of Windows Update-related Windows Services
- Use System File Checker
- Reset Windows Update component to default
- Use DISM Tool to fix corrupted Windows Update files.
1] Use Windows Update Troubleshooter

The Windows Update Troubleshooter or Microsoft’s Online Windows Update Troubleshooter can be used to detect and fix any conflicts for Windows Updates automatically.
2] Replace old Configuration file Spupdsvc.exe
Spupdsvc.exe is a process file that comes under Microsoft Update RunOnce Service. When an update becomes available for the computer, the process responsible for performing the upgrade is notified. Also, a RunOnce entry is added to the registry for spupdsvc.exe. The process is executed when the computer restarts, and the user logs on.
Open Command Prompt as an administrator to execute the following command:
cmd /c ren %systemroot%\System32\Spupdsvc.exe Spupdsvc.old
It will replace the old configuration of Spupdsvc.exe with a fresh one. Try to rerun Windows Updates and check if your issue t is fixed now.
3] Manually reset Windows Update related folders
This method is all about deleting the contents of the SoftwareDistribution folder & reset the Catroot2 folder.
The SoftwareDistribution folder and the Catroot2 folder contain some temporary system files that are responsible for applying updates to a computer. They include data that support Windows Updates as well as installers for new components.
4] Check the status of Windows Update-related Windows Services

There are various Windows Services that help the functioning of different elements inside of the Windows 10 operating system. Therefore, you might need to check on the services that support Windows Updates.
Open the Windows Services Manager and locate the following services:
- Windows Update Service – Manual (Triggered)
- Background Intelligent Transfer Service – Manual.
- Cryptographic Services – Automatic
- Workstation Service – Automatic.
Open their Properties and ensure that their Startup type is as mentioned above against their name and that the Services are running. If not click on the Start button.
5] Use System File Checker
Open Command Prompt as an administrator and execute the following command:
sfc /scannow
It will run the System File Checker.
Reboot your computer after the scan has completed and run Windows Update.
6] Reset Windows Update components
Reset Windows Update component to default and see if that helps.
7] Use DISM Tool to fix corrupted Windows Update files
Run the DISM Tool to fix corrupted Windows Update files. If your Windows Update client is already broken, you will be required to use a running Windows installation as the repair source or use a Windows side-by-side folder from a network share, as the source of the files.
The update should be getting downloaded now!
Related: Fix Windows Backup or Restore failed error 0x80070003.
Ayush has been a Windows enthusiast since the day he got his first PC with Windows 98SE. He is an active Windows Insider since Day 1 and has been a Windows Insider MVP.
На чтение 6 мин. Просмотров 6.1k. Опубликовано
Содержание
- Как исправить ошибку 0x80070003?
- Исправить ошибку 0x80070003 в Windows 10, 8.1
- 1. Запустите средство устранения неполадок Центра обновления Windows.
- 2. Перезапустите или остановите службу Центра обновления Windows.
- 3. Удалите папку DataStore
- 4. Перезапустите Центр обновления Windows в командной строке.
- 5. Запустите DISM
Как исправить ошибку 0x80070003?
- Запустите средство устранения неполадок Центра обновления Windows .
- Перезапустите или остановите службу Центра обновления Windows .
- Удалить папку хранилища данных
- Перезапустите Центр обновления Windows в командной строке .
- Запустите DISM
Вы пытались обновить устройство с Windows 8 до новой Windows 10? Или обновить его с более старой версии Windows 10 до более новой?
Возможно, вы заметили, что в некоторых случаях процесс обновления Windows останавливается примерно на 50% и выдает код ошибки код ошибки 0x80070003 .
Вам не нужно беспокоиться, потому что после прочтения этой статьи вы узнаете, как успешно исправить ошибку 0x80070003 в Windows 8, 8.1 и Windows 10.
Полное сообщение об ошибке, которое вы получаете при попытке обновления до Windows 8.1, должно быть «ЧТО-ТО ПРОИЗОШЛО, И WINDOWS 8.1 НЕ МОЖЕТ БЫТЬ УСТАНОВЛЕНО». ПОЖАЛУЙСТА, ПОПРОБУЙТЕ СНОВА. КОД ОШИБКИ: 0X80070003. »
И это можно исправить, запустив средство устранения неполадок Центра обновления Windows или просто перезапустите Центр обновления Windows.
Какая последняя версия Windows 10? Узнайте из нашей постоянно обновляемой статьи!
Исправить ошибку 0x80070003 в Windows 10, 8.1
1. Запустите средство устранения неполадок Центра обновления Windows.
-
Щелкните левой кнопкой мыши или нажмите на ссылку, размещенную ниже
- Скачать здесь Обновление Windows Устранение неполадок для Windows 8 и Windows 8.1
- Щелкните левой кнопкой мыши или нажмите «Сохранить файл».
- Затем щелкните левой кнопкой мыши или нажмите кнопку «ОК».
- Пусть загрузка закончится.
- Перейдите в каталог, в который вы загрузили средство устранения неполадок, и щелкните его правой кнопкой мыши или удерживайте нажатой.
- В появившемся меню щелкните левой кнопкой мыши или нажмите «Запуск от имени администратора».
- Щелкните левой кнопкой мыши или нажмите на кнопку «Да», если вам будет предложено сообщение управления учетной записью пользователя.
- Следуйте инструкциям на экране, чтобы завершить процесс установки средства устранения неполадок Центра обновления Windows.
- Перезагрузите операционную систему после устранения неполадок.
- Проверьте еще раз, если вы можете обновить с Windows 8 до Windows 8.1 или Windows 10 без получения кода ошибки 0x80070003.
Если вы столкнулись с ошибкой 0x80070003 при попытке установить более новую версию Windows 10, вы также можете запустить встроенное средство устранения неполадок Центра обновления Windows.
Все, что вам нужно сделать, это перейти в Настройки> Обновление и безопасность> Устранение неполадок> найти и запустить средство устранения неполадок, как показано на снимке экрана ниже.

Ошибка устранения неполадок 0x803c0103? Не паникуйте! Решите эту проблему быстро!
2. Перезапустите или остановите службу Центра обновления Windows.
- Переместите курсор мыши в верхнюю правую часть экрана.
- Щелкните левой кнопкой мыши или нажмите на функцию «Поиск», представленную там.
- В диалоговом окне поиска напишите следующее: «Панель управления».
- После завершения поиска щелкните левой кнопкой мыши или коснитесь значка «Панель управления».
- Щелкните левой кнопкой мыши или нажмите в окне поиска, представленном в окне панели управления.
- Напишите в поле поиска следующее: «Администрирование» без кавычек.
- Щелкните левой кнопкой мыши или коснитесь функции «Администрирование».
-
Теперь дважды нажмите на «Службы».
Примечание. Вас могут попросить ввести учетную запись администратора и пароль, и в этом случае вам потребуется ввести их. - В списке, который показывает, вам нужно будет искать «Центр обновления Windows».
-
Теперь щелкните правой кнопкой мыши или удерживайте нажатой кнопку «Центр обновления Windows».

- В появившемся меню щелкните левой кнопкой мыши или нажмите кнопку «Стоп». Вы также можете выбрать опцию Перезагрузка.
- Перезагрузите операционную систему Windows 8, 8.1 или Windows 10.
- Вернитесь в службу обновления Windows, щелкните ее левой кнопкой мыши и выберите «Пуск».

3. Удалите папку DataStore
- Откройте проводник.
- Дважды щелкните, чтобы открыть диск «C:» или на какой Windows 8 установлена система Windows 10.
- Дважды щелкните папку «Windows», чтобы открыть ее.
- Найдите папку «SoftwareDistribution» и дважды щелкните ее, чтобы открыть.
- Найдите папку «DataStore» внутри папки «SoftwareDistribution» и откройте ее.
-
Удалите файлы и папки, имеющиеся в папке «DataStore».
Примечание. Вас могут попросить указать учетную запись администратора и пароль. - Теперь вернитесь в папку «SoftwareDistribution».
- Найдите папку «Скачать» и дважды щелкните по ней, чтобы открыть.
- Теперь удалите все файлы в папке «Скачать».
- Перезагрузите операционную систему Windows 8, 10 и снова запустите процесс обновления до Windows 8.1, Windows 10.
- Наведите курсор на верхнюю правую часть экрана.
- В появившемся меню снова щелкните левой кнопкой мыши на функции поиска.
- В поле поиска напишите «Панель управления» без кавычек.
- Щелкните левой кнопкой мыши или нажмите значок панели управления.
- В окне поиска панели управления вдова напишите: «административные инструменты».
- После завершения поиска щелкните левой кнопкой мыши или коснитесь значка «Администрирование».
- Дважды щелкните, чтобы открыть функцию «Услуги».
- Найдите сервис «Центр обновления Windows» в представленном списке.
- Щелкните правой кнопкой мыши или удерживайте нажатой на него.
- В появившемся меню щелкните левой кнопкой мыши или нажмите кнопку «Пуск».
- Проверьте еще раз, можете ли вы обновить операционную систему до новой Windows 8.1 или Windows 10.
4. Перезапустите Центр обновления Windows в командной строке.

- Щелкните левой кнопкой мыши или коснитесь функции «Командная строка (администратор)», которая имеется в операционной системе Windows 8.1, Windows 10.
- Если вас попросят ввести учетную запись администратора и пароль, введите его.
- Напишите в окне командной строки следующее: «net stop wuauserv» без кавычек.
- Нажмите кнопку ввода на клавиатуре.
- Затем напишите в командной строке следующее: «стоповые биты сети» без кавычек.
- Нажмите кнопку ввода на клавиатуре.
- Перезагрузите операционную систему Windows 8, 10.
- После повторного запуска устройства снова откройте окно командной строки.
- Напишите в окне командной строки следующее: «net start wuauserv» без кавычек
- Нажмите кнопку ввода на клавиатуре.
- Напишите в окне командной строки следующее: «net start bits» без кавычек.
- Нажмите кнопку ввода на клавиатуре.
- Теперь попробуйте снова запустить функцию Windows Update и посмотреть, работает ли она у вас в этот раз.
Epic Guide alert! Все, что вам нужно знать о командной строке!
5. Запустите DISM
- Нажмите и удерживайте кнопку «Windows» и кнопку «X».
- В появившемся меню слева снова щелкните значок «Командная строка (Администратор)».
- В командной строке напишите следующее: «Dism/Online/Cleanup-Image/ScanHealth» без кавычек.
- Нажмите кнопку ввода на клавиатуре.
-
Напишите в окне командной строки следующее: «Dism/Online/Cleanup-Image/RestoreHealth» без кавычек.
- Нажмите кнопку ввода на клавиатуре.
- Процесс займет около 10 минут.
- После завершения процесса перезагрузите операционную систему Windows 8, 10 еще раз.
- После запуска устройства проверьте еще раз, нормально ли работает ваша функция Windows Update.

Ознакомьтесь с нашим удобным руководством и научитесь использовать DISM like pro!
Если код ошибки сохраняется, попробуйте отключить антивирусное программное обеспечение. Иногда ваши антивирусные инструменты могут неправильно помечать обновления Windows как вредоносные программы, блокируя их.
Вы можете отключить антивирус, проверить наличие обновлений и посмотреть, удастся ли вашему компьютеру установить доступные обновления.
Если вы тщательно выполнили все вышеперечисленные шаги, то к концу этой записи вы исправите свой код ошибки 0x80070003.
Если по пути вы столкнулись с какими-либо проблемами, сообщите нам об этом в комментариях ниже. Мы поможем вам дальше, как только сможем.